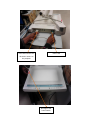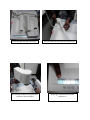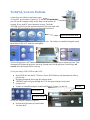
1
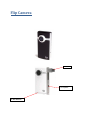
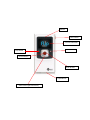
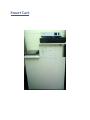
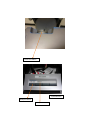
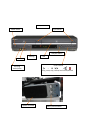
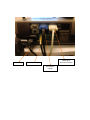
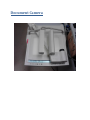
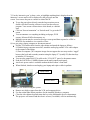
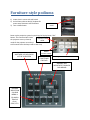
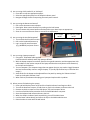
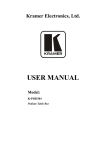
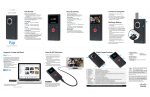
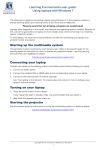
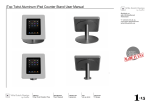
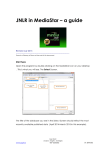
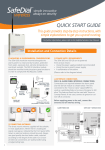
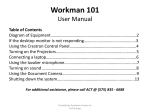
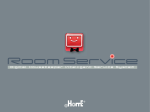
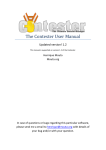
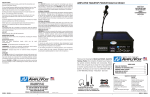
Multimedia Services Users‟ Guide Manual Welcome to the Multimedia Service (MMS) Mission Statement The mission of Multimedia Services is to support the College’s mission by providing professional, up-to-date multimedia technology services and support the internal College community and its external constituents. MMS staff provides this support within an excellent customer service environment and strives to find creative, innovative, cost-effective solutions. MMS seeks out new technologies and adapts them to our current delivery systems so as to enhance the learning experience for the students. The major activities of Multimedia Services center on the distribution of equipment to faculty and classrooms as well as support for special events. The staff also provides support for equipment set up and are available to trouble shoot any problems that may occur. The Staff provide support for editing and producing shows for CCPTV Channel 53. TABLE OF CONTENTS Flip Camera ....................................................... 4 Flip Camera .......................................................................................... 6 Smart Cart ......................................................... 8 Mobile SMART CART............................................................................. 9 Detailed pictures ................................................................................ 10 Document Camera .......................................... 14 Tecom/Lectern Podium .................................. 17 TechPod/Lectern Podium ................................................................... 18 Furniture-style podiums ................................. 20 Auditorium ...................................................... 22 Auditorium Rules and Regulations ..................................................... 23 Auditorium Safety Procedure ............................................................. 25 Flip Camera USB Arm TV Playback 2 “AA” Batteries Speaker Power Switch 1.5 inch LCD Screen Play Button Delete Button Record Button Scroll Arrows Tripod Mount Zoom button (plus and minus) Flip Camera Directions How to Get Started Press power button to turn on. Camcorder setup appears automatically when you first power on. Record and Play Recording Videos Press record button to start/stop Touch plus and minus buttons to zoom in/out Playing Videos Touch play button to start/pause Touch left/right scroll buttons to view previous/next Deleting Videos You first must select specific video Left/Right scroll button video X of Y appears an screen Touch delete button (trash can) Select “Yes” to confirm. Tip: Delete button is locked when you first power on. To unlock, press and hold delete button. Connect to Computer Slide USB latch down and the USB arm flips up automatically. Plug arm into USB port on computer Your camcorder will begin recharging and you can install FlipShare® software on your computer Save, Edit and Share FlipShare® is built in software that makes organizing, editing, and sharing video incredibly simple. When you plug in your camcorder, open FLIPVIDEO and launch Setup FlipShare® (PC) or Start FlipShare® (Mac) FlipShare® Features Browse, play, and delete your videos Save your videos to your computer Make custom movies with music Snap photos from your videos Upload to Facebook, Myspace Click “Help” inside FlipShare® for detailed instruction on all features. Recharge Battery Connect USB arm to computer‟s USB port Blinking light indicates charging The light stops blinking when charge. Recharging a discharged battery takes about 3 hours The camcorder may remain connected to your computer after it is fully charged, but disconnecting it will help preserve the battery‟s lifespan and performance. The optional Flip Video Power Adapter can charge the battery in about 2 hours. Battery If you do not have rechargeable batteries, the camera takes 2 AA Batteries. Smart Cart Mobile SMART CART 1. 2. 3. 4. 5. 6. 7. 8. 1. 2. 3. Plug in the electrical cord and blue data cable Press POWER on the projector Press POWER on the Laptop Username in AVCART with no password and check “workstation only” box (only if no internet access is desired.) Otherwise if internet access is desired, leave “workstation only” box unchecked. After desktop appears on the screen, click on the NOVELL icon and when the login box appears sign in under “Username” with your personal login name and password Hold down the Fn Key and touch F8 on the computer once to enable the PC video through the projector Press SOURCE SELECT on the projector if no image appears (possibly 3 times) Select the COMPUTER audio (SELECTOR near the speakers) to hear sounds from the PC ( If still no sound click on speaker icon on the computer and push up fader or unmute by clicking the mute box) Insert a VHS tape or DVD Press SOURCE SELECT on the projector to switch to the VCR/DVD player image Select VCR/DVD audio (SELECTOR near the speakers) to hear the audio 1. Pull up and secure the side shelf to use the DOCUMENT CAMERA 2. Place the DOCUMENT Camera on the shelf – sockets facing the student 3. Connect the power card to the 3-prong (GREEN) and video card to RGB out (GREEN or YELLOW) gray cable 4. Press the button to release the camera head – unfold the lights 5. Power switch for the DOCUMENT CAMERA is on the side (BLUE or RED LABEL) 9. Press SOURCE SELECT on the projector to switch to the DOCUMENT CAMERA ========================================================== 1. Press SOURCE SELECT on the projector to switch to each device in turn 2. Select the correct AUDIO for the device with the SWITCH When finished, power down all component, replace the DOCUMENT CAMERA into the lower storage area with the underside of DOCUMENT CAMERA leaning on the side wall. Smart Cart Detailed pictures White Epson Projector Power Button Source Button Gray Epson Projector Power Button Source Button Focus Lens Switch Input Selection DVD/VCR switch Computer switch DVD/VCR Unit Power Switch Eject button DVD/VHS Switch Tracking VHS DVD Control switch Aux Plug Audio/Video = Play, pause, stop, rewind, fast forward, Record Speaker for Audio Power /volume Switch Power Plug VGA Plug for Document Camera Video Connection VGA Plug for Laptop Document Camera VGA Cable connects the document camera to the projector Power cord Red tag on Side Power Switch Unfold the light arm and Camera arm Still pushing the button pull gently until you hear it click into place Press the switch on the side of the camera arm Green light indicate that the power switch is on Tecom/Lectern Podium TechPod/Lectern Podium 1) Insert key into side door and turn to open. 2) Check PC power button: if green, PC is already powered on and you will see the computer image on the front screen in about 20 seconds. If not, push PC power button to boot up. Touch the <ENTER> key to log in (no password required).You may login with your CCP ID if you need access to your networked resources. Multi-control touch panel 3) The microphone may be used to amplify your voice. The volume is controlled using the round knob labeled “Mic Vol” under the microphone. 4) Press the projector “ON” button to lower an electronic screen and power up the projector. This command will initiate the projector warm-up. Startup mode for the projector can take up to 60 seconds since the lamp needs to warm up. 5) Are you using a VHS, DVD or audio CD? Insert DVD disc into the PC CD-drive. Power DVD Software will automatically offer to play the disc. Navigate through the disc using the software menu. VHS/DVD tapes will play through the VCR. Navigate using the touch panel next/preview. Volume is controlled using the round knob labeled “Volume” on the left. VCR slot PC CD -Drive PC Power on/off 6) Are you using the installed computer? Pull out the keyboard tray located under the front shelf 7) Use the „interactive pen‟ to draw, write, or highlight anything that is displayed on the instructor‟s screen and it will be displayed by the projector onto the screen. You can use the pen as a mouse to control the PC To use the pen to draw directly onto the large monitor screen, double-click the Floworks software icon to start the software program. Your screen will turn into a white board, as a default start. Click on “Screen Annotation” or “Switch mode” to get to the PC screen You can annotate over anything including web pages, DVD screens, Microsoft Office documents, etc. Multiple screens may be created to develop a concept and then exported to a PDF or HTM file for students to view outside of class. 8) Are you using a laptop computer or document camera? Pull the VGA/audio cable from the side cabinet and attach the laptop as follows: i) With the laptop computer turned off, attach the audio plug and the VGA cable adapter to the outputs of the laptop. ii) Turn on computer. (If a computer image does not appear the user may need to “toggle” between the local and secondary monitor using the laptop “F” (usually F8) function keys to initialize VGA output.) You can also connect this VGA cable to the “VGA OUT” port of a document camera. Push the LAPTOP or CAMERA button on the multi-control touch panel. An electric power outlet is available underneath the Podium‟s front shelf. When finished, shut down and unplug your laptop and replace cable in podium. Laptop cables Electric outlet 9) When you are finished using the system: Remove any disks or tapes from the VCR, and computer drives Use the normal Shut Down procedure for the installed Windows® computer Close the side cabinet door and return the key to the Multimedia Services department. The projector will turn off and the electric screen (if available) will rise automatically. Furniture-style podiums 1) Lower electric screen with wall switch 2) Unlock lower cabinet door(s)/ keyboard & mouse area/ document camera drawer 3) Turn on Main Power Main Power on/off Power up the projection system by touching the Display Power “ON” button. This command will initiate Display Power the projector warm-up. Startup on/off mode for the projector can take up to 45 seconds since the lamp needs to warm up. GREEN LIGHT INDICATES WHETHER VCR OR DVD IS ACTIVE IN SYSTEM Master Volume control MAIN MENU FUNCTIONS FOR DVD Graphic Indicator Panel ARROWS WILL NEGOTIATE THROUGH DVD MENUS CHOOSE SELECTION S IN DVD MENU or CD AUDIO TRACKS. PLAY, STOP, ETC. 4) Are you using a DVD, audio CD, or VHS tape? Insert disc or tape into appropriate player Select the appropriate player on the Graphic Indicator panel Navigate through the disc or tape using the touch panel controls 5) Are you using the Document Camera? Pull out the document camera drawer Raise lights. Raise camera head by first pushing on the lock button Turn on camera with power button and select either top or base lamps as appropriate Zoom in or out and use auto-focus or manual focus adjustments 6) Are you using the installed computer? Turn on both the PC and PC monitor Pull out the keyboard/mouse tray Log in using the room username (e.g.,W248w2k) and press <Enter> PC Power on/off PC monitor Power on/off 7) Are you using a laptop computer? Using the 3’ VGA/audio cable supplied (stored inside the cabinet) attach the laptop as follows: With the laptop computer turned off, attach the long audio extension and the appropriate VGA cable adapter to the monitor output of the laptop and the other end (shorter audio extension) to the input at the Podium. Turn on computer. (If a computer image does not appear the user may need to ‘toggle’ between the local and secondary monitor using the laptop “F” (usually F8) function keys to initialize VGA output.) Audio levels for the laptop can be adjusted from the panel by rotating the “Master Volume” knob on the Graphic Indicator Panel When finished, shut down and unplug your laptop and replace cable in podium. 8) When you are finished using the system: Press and hold Display Power on/off until the Graphic Indicator Panel begins to blink. Turn off the document camera, re-fold the arms, push in the drawer, and secure the lock Remove any disks or tapes from the DVD player, VCR, and computer drives Use the normal Shut Down procedure for the installed Windows® computer Store the keyboard and mouse and secure the lock When the Graphic Indicator Panel stops blinking, turn off the Main Power Lock the lower cabinet door(s) and return the keys to the Multimedia Services Raise the electric screen with the wall switch Auditorium Rules and Regulation & Safety Procedures Auditorium Rules and Regulations Guidelines and Procedures for Use of Large Auditorium – BG 10 The following guidelines and procedures are in place to maintain the security and safety of the environment of the auditorium and to comply with all College and public fire and safety codes. Scheduling All events to take place in the auditorium must be scheduled in advance through the Office of Marketing and Government Relations. No event will be allowed to take place in the auditorium unless it has been scheduled in advance. Multimedia Services staff will be assigned for all scheduled events in the auditorium. The necessary technical qualifications and number of technicians will be determined by Multimedia Services (MMS). MMS equipment and technical needs must be reserved at least 1 week prior to the use of the auditorium. It is not possible to honor last minute requests. No classes are to be scheduled for regular class meeting times in the auditorium. The Communication Arts curriculum‟s theater production will have access to the auditorium two weeks prior to and the week during the performance of the play, barring any unforeseen circumstances. This will normally occur from the 9th through the 11th week of any given semester. Set assembly and other dedicated work on the stage will only occur during the 2 week period before the production. The Music Department may schedule use of the auditorium for one rehearsal before any performance/festival barring any unforeseen circumstance. Usage Food or beverage consumption is not permitted in the Auditorium. Only Multimedia Services staff is authorized to operate College equipment in the auditorium including but not limited to the audio, lighting, projector and projection screen controls. Internal and external stage and production crew members including students are expected to comply with appropriate safety standards including wearing safety glasses for construction and harnesses for lighting and rigging. No modifications to lights or other technical or mechanical devices are permitted without approval and supervision from Multimedia Services staff. There will be no construction or set building on the stage. All sets must be created off the stage for assembly on stage. Assembly of sets on the stage cannot include cutting and sawing materials on stage. Users are expected to return the Auditorium to the condition prior to their use, removing materials and sets immediately after they have completed the use of the area. Any issues or concerns noted about the facility must be reported to the MMS staff immediately. Users are responsible for all damage to property or equipment that occurs during their use of the Auditorium. Auditorium Safety Procedure Auditorium is cleaned by campus housekeeper daily Monday through Friday. If client is in need of a Housekeeper please contact the office manager. Stage Area The stage must be clear of all trash, debris, furniture, equipment, and set pieces not being used in the current production. No Children allowed on stage unless apart of production and supervised by adult. Do not let anyone on the Grand piano use being using during production Stage lighting work must be supervised by an approved theatre professional. All personal property should be removed from Auditorium after the conclusion of productions. Dressing Rooms All costumes, makeup, and other personal items and equipment must be removed from the dressing rooms. Hair dryers, curling irons, irons, and other equipment must be unplugged except while in use. The dressing rooms must be kept clean during performances and returned to a clean condition at the conclusion of performances. It should be understood that the dressing rooms are also used as Theatre classrooms, so they are not safe places to leave personal items. Auditorium Seating Area The piano, speakers, and other equipment must be kept out of the aisles on the front and sides of the auditorium when the auditorium is occupied by patrons. All aisles and doorways must remain clear at all times. These areas must not be blocked in any manner. Don‟t block the Emergency exit. All unused programs and other handouts should be removed from the theatre or placed in the trash at the conclusion of events. Don‟t let anyone stand in the sits. No eating or drinking at any time. Don‟t let anyone on the cat walk. Don‟t let anyone in the booth. Don‟t let anyone touch the sound system. Don‟t let anyone bring balloon in the auditorium.