1
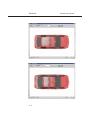
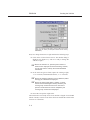
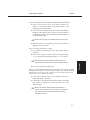
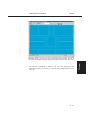
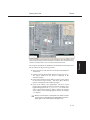
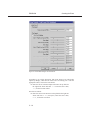
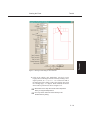
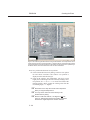
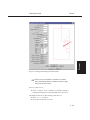
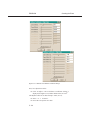
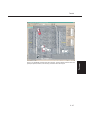
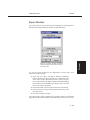
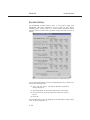
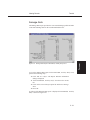
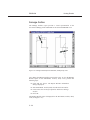
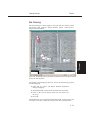
Creating the Event
Tutorial
The Nissan’s positions are now established. Let’s enter the driver controls. In
this case, there are no driver inputs, per se. However, after impact the vehicle
coasts to rest, so we need to enter rolling resistances:
â Choose Set-up from the menu bar and select Driver Controls.
The Wheel Data dialog is displayed.
According to our vehicle inspection, all the wheels were free turning (i.e., not
locked by damage). Let’s enter the appropriate values, first for the front
wheels:
â Accept the default values for Percent Lock-up for Axle 1,
Right Side and Left Side, 0.20 (0.15/mslide).
Now the rear wheels:
â In the Percent Lock-up field for Axle 2, Right Side, enter
0.01 (0.01/mslide). Enter the same value, 0.01, for the left
rear wheel.
The Nissan is a front wheel drive vehicle, hence
+ NOTE:
the larger wheel lock-up values; see Table 5-1.
â Click on the Rot/Lat Skid check box.
â Press OK to accept the wheel data for the Nissan Sentra.
The wheel data have now been assigned for the Nissan Sentra.
Let’s conclude event set-up for the Nissan Sentra by supplying a damage
profile:
â Choose Set-up from the menu bar, select Damage Profiles.
The Damage Profile dialog is displayed for the Nissan Sentra.
The Damage Profile dialog initially contains None, waiting for us to assign a
CDC (Collision Deformation Classification):
â Replace None in the CDC field with 02RPEW3 and click
Apply. The default damage profile is displayed according to
the CDC.
Because we actually measured the damage profile during our vehicle
inspection, let’s enter the measured width, depth and offset:
â Enter the right side damage width, 220 cm, and offset, -40 cm.
We measured five crush depths along the right side of the Nissan, so we have
four crush zones:
â Click on the Damage Profile Zones option list and change the
default value from 3 to 4.
5 - 21
TUTORIAL
Finally, noting the vehicle rotated and skidded after impact, let’s select that
EDCRASH option: