1
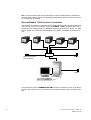
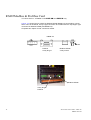
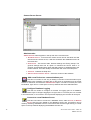
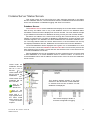
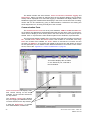
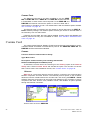
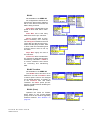
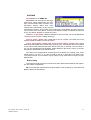
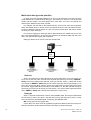
Realtime Comms logging
Left click on the Realtime icon from the tool bar down the left side of
the main screen. This will produce the Recorders pane displaying the
recorders that are available on the comms server. From here the user
can also see which server the comms server is using, which pens are
available on each recorder and the comms server status.
The instructions listed here include selecting a destination server and database.
•
Right click on the recorder and select Log to produce the Logging Configuration window. The same window is in the Comms Server.
•
Designate a destination server i.e. Local Server being your own PC, and a destination database to store the logged data.
•
Select a pen from the ‘Pens available to be logged’ window and the Add Pen to
Selection button will be enabled, OR
•
Select All Pens and the Logging Pens Configuration box will appear.
•
Select Log Rate from 20milliseconds up to 24 hours and the Type of logged
data, choose from Sample or MaxMin . Sample will log the actual data value of
the last sampled reading. MaxMin will log the maximum and minimum values
since the last log.
•
Click on the Send Event Data if you require the event data to be logged.
Click on the Start Logging button when complete. This will enable the logging to
the designated database.
The window will now display the name of the database, which pens are being logged,
the log interval and the type of logging.
To view the database go to the Recorder icon down the left side of the main screen,
and select the database designated for that recorder.
•
Add pens for logging
As each pen is selected, or all pens depending on the button selected, the Logging
Pen Configuration box appears so the Log Rate and Type of logging can be set for each
pen individually or all pens.
When the pens have been selected they will appear in the bottom window, click on
Apply to enable the pens to log. Once the pens are in the ‘Pens logging to selected
database’ window they can be selected and the Edit and Delete button become active.
The Edit button allows the logging rate or type of logging to be changed.
Summary of Logging Changes - If any changes are made using the Edit button, the
Summary of Changes button becomes active, this will show the last changes made to
any of the pens for this configuration only.
The Delete button will take the pen out of this window and put it into the window
showing available pens for logging. Logging will stop for this pen.
36
43-TV-25-24 GLO Issue 3 01/02 UK
A5E00117347-03