1
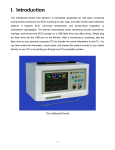
VETSPECS® VET PC ECG SERIES
USER’S MANUAL
PLEASE READ THIS MANUAL
BEFORE USING THE PRODUCT
VETSPECS, INC.
1
www.vetspecs.com
CONTENTS
I.
INTRODUCTION -------------------------------------------------------------------------- 1
II.
INSTALL THE SOFTWARE
----------------------------------------------------------- 1
2.1 Install the ECG program -------------------------------------------------------------------------- 2
2.2 Install the USB driver program ----------------------------------------------------------------- 6
2.3 Get the Comm Port number for the UBS port ------------------------------------------- 13
III. CLINICAL INSTRUCTIONS ---------------------------------------------------------- 16
3.1 ECG leads with limb plates --------------------------------------------------------------------- 16
3.2 ECG leads with flat clips ------------------------------------------------------------------------ 17
3.3 ECG leads with limb caps ----------------------------------------------------------------------- 18
3.4 Lead placements ----------------------------------------------------------------------------------- 19
3.5 ECG scopes ----------------------------------------------------------------------------------------- 20
3.6 ECG chestrode (optional) ----------------------------------------------------------------------- 22
3.7 ECG esophageal probes (optional) ---------------------------------------------------------- 23
IV. OPERATIONAL INSTRUCTIONS ---------------------------------------------------- 25
4.1 Open the ECG program -------------------------------------------------------------------------- 25
4.2 Toolbar and menus ------------------------------------------------------------------------------- 29
4.3 Record ECG ----------------------------------------------------------------------------------------- 32
4.4 Operate the ECG program ---------------------------------------------------------------------- 39
4.5 Retrieve a saved ECG file ----------------------------------------------------------------------- 48
4.6 Capture an ECG screen as a picture -------------------------------------------------------- 50
V. ACCESSORIES ------------------------------------------------------------------------- 52
VI. TECHNICAL SUPPORT -------------------------------------------------------------- 52
LIMITED WARRANTY ------------------------------------------------------------------------ 53
2
I. INTRODUCTION
The VetSpecs® VET PC ECG Series is state-of-the-art, PC-based veterinary ECG systems,
available in four models:
VET PC ECG
– single-lead system
VET PC ECG-6
– six-lead system
VET PC ECG-T
– single-lead telemetric system (wireless)
VET PC ECG-6T
– six-lead telemetric system (wireless)
The VET PC ECG Series is compatible with all off-the-shelf PCs (desktops, notebooks, and
tablets) which use Microsoft® Windows® 2000 or XP operating system and have at least one
USB port. You are allowed to install the software on as many PCs as you have in your practice
so that you can record ECG, as well as review saved ECG files, on all your PCs.
VetSpecs, Inc. offers cutting-edge, veterinary-specific technologies in vital signs monitoring,
patient warming, ECG, noninvasive blood pressure, and ultrasound. In addition to the VET PC
ECG Series, VetSpecs offers a full-line of multi-parameter diagnostic and monitoring systems,
a patient warming system, two stand-alone blood pressure monitors, multiple-patient telemetric
ECG monitoring systems, and a digital ultrasound notebook. For information on VetSpecs®
products, please visit www.vetspecs.com or call 1-800-599-2566.
The VetSpecs® VET PC ECG Series is for veterinary use only.
II. INSTALL THE SOFTWARE
Note:
If the PC being used was provided by VetSpecs, Inc., all software had already been
installed by a VetSpecs engineer. All you need to do is to connect the ECG receiver to
the USB port labeled “ECG RECEIVER” on the PC.
The CD labeled “VETSPECS® VET PC ECG (-6, -T, or -6T) Version 1.0” contains the ECG
program “VET PC ECG (-6, -T, or -6T) setup.exe” and the USB driver program “Win2K”.
3
The following pages provide detailed instructions on how to install the ECG program and the
USB driver program on PCs using Window® XP operating system. For PCs using Window®
2000 operating system, the required steps are similar.
2.1 Install the ECG program
Insert the CD into a CD drive. Click start button located at the lower left corner of the screen.
Click My Computer in Start Menu.
Double click the CD drive.
Double click the file VET PC ECG setup.exe.
The window below pops up. Click Next> box to continue.
4
The window below pops up. Select “I agree to the terms of this license agreement”, and then
click Next> box to continue.
The window below pops up. Type in a user name, for example the owner of the hospital, and
the hospital name, and then click Next> box to continue.
5
The window below pops up. Click Next> box to continue. A file folder “VET PC ECG” will be
created in the “Program Files” folder on the hard drive. The ECG program “VET PC ECG (-6, T, or -6T).exe” will be in the “VET PC ECG” folder.
The window below pops up. Click Next> box to continue. A shortcut folder “VET PC ECG (-6, T, or -6T).exe” will be created on the desktop.
6
The window below pops up. Click Next> to continue.
The window below pops up. Click Finish box to complete the installation.
7
2.2 Install the USB driver program
1. Install USB driver program with Found New Hardware Wizard
A USB port
There are usually multiple USB ports on a PC. The ECG receiver can work with any one of
them. However, in order to reduce the chance of having user’s errors, it is strongly
suggested that you designate only one USB port for use with the ECG receiver and label
the Port, for example label it “ECG RECEIVER” or “ECG PORT”.
In order for the ECG receiver to communicate with the PC through the USB port, the USB
driver program needs to be installed. To install the USB driver program, first connect the
ECG receiver to the USB port.
8
For the VET PC ECG-T and VET PC ECG-6T, connect the ECG receiver to the USB port
with the transmitter turned off. Do not connect the ECG receiver to the USB port while
the transmitter is turned on.
After connecting the ECG receiver, in a few seconds you will see Found New Hardware
Wizard window pops up automatically, as shown above. Click Next> box to continue.
The window below pops up. Ignore the warnings displayed in the window below, and click
Continue Anyway box.
9
The window below pops up. Make sure the CD is in a CD drive, and click OK button. The CD is
labeled “VET PC ECG (-6, -T, or -6T) Version 1.0”, not “USB-Serial Cable Diskette” as
indicated in the Insert Disk window.
If the CD is in D drive, type d:\Win2K in “Copy files from:” box, and then click OK button, as
shown in the window below. If the CD is in E drive, type e:\Win2K in “Copy files from:” box.
10
After the USB driver program has been installed, the window below will pop up.
Click Finish button, and a few seconds later, the window below will pop up, indicating the USB
port is ready to work with the ECG receiver.
11
It is highly recommended that you only install the USB driver program for the USB port
designated (labeled) for the ECG receiver.
2. Install the USB driver program with Add Hardware Wizard
If Found New Hardware Wizard window (see page 6) does not pop up after connecting the
ECG receiver to the USB port, you will need to install the USB driver program with Add
Hardware Wizard. Go through the following steps to install the USB driver program with Add
Hardware Wizard.
Click start button located at the lower left corner of the screen, and then click Control Panel.
In Control Panel window, double click Add Hardware icon as shown below.
Add Hardware Wizard window pops up. Click Next> box to continue.
12
The window below pops up. Select “Yes, I have already connected the hardware”, and then
click Next> box to continue.
13
In the window below, select “Add a new hardware device” located at the bottom of the list, and
then click Next> box to continue.
In the window below, select “Install the hardware that I manually select from a list”, and then
click Next> box to continue.
14
In the window below, select Ports (COM & LPT), and then click Next> box to continue.
The window below pops up. Select Prolific, and then click Next> box to continue.
15
The window below pops up. Click Next> box to continue.
Continue on to steps listed on pages 7 and 8.
16
2.3 Get the Comm Port number for the UBS port
After installing the USB driver program, the Windows® operating system in the PC will
automatically assign a Comm Port number to the USB port. In order for the ECG receiver to
communicate with the PC, the Comm Port number needs to be input in the ECG program (see
page 32). To get the Comm Port number, follow these steps:
1.
Connect the ECG receiver to the USB port, and then click start button located at the lower
left corner of the screen.
2.
Click Control Panel as shown below.
3.
In Control Panel window, double click System icon as shown below.
4.
In System Properties window, click Hardware box as shown below.
5.
In the window below, click Device Manager box as shown below.
17
6.
Double click Ports (COM & LPT) in the window below.
18
7.
The number in the line Prolific USB-to-Serial Comm Port (COM ) is the Comm Port
number for the USB port. In this case, it is 5, as pointed by the cursor below.
To find out whether the USB port is ready to work with the ECG receiver, plug the ECG
receiver into the USB port, go through the above steps to open the Device Manager window,
and then double click Ports (COM & LPT). If the Prolific USB-to-Serial Comm Port (COM ) line
is displayed, as shown above, the USB port is ready to work with the ECG receiver. If the line
is not displayed, as shown below, the USB port is not ready. The USB driver program needs to
be installed or re-installed.
III. CLINICAL INSTRUCTIONS
Six types of ECG leads/electrodes, intended for use in different clinical patients and settings,
are available. To get the best performance, you must use the lead/electrode most suitable for
the procedure and the patient involved. Using the right lead/electrode and applying it correctly
can make a huge difference.
3.1 ECG leads with limb plates (all models)
19
For the VET PC ECG and VET PC ECG-T, the ECG leads with limb plates consist of three
wires (green, red, and white) and three metal plates, each with a Velcro strip, as shown above.
For the VET PC ECG-6 and VET PC ECG-6T, the ECG leads with limb plates consist of four
wires (green, red, white, and black) and four metal plates, each with a Velcro strip.
The limb plates are easy to apply, stay on the patient once placed, and induce no discomfort,
ideal for ECG work-up/screening, especially in sensitive patients, such as kittens, cats,
puppies, and small dogs.
Place the limb plate between the carpal pad and the metacarpal pad, on either the dorsal
side or the palmer side. Do not place the limb plate on or above the hock or elbow. First,
soak the site with conductive agent, wrap the limb plate firmly on the leg with the Velcro
strip, and then apply more conductive agent at the site. It is not necessary to clip the
hair. However, you must wet all contact sites thoroughly with conductive agent.
Establishing a good electrode-skin contact with conductive agent is crucial for
registering interference-free ECG. It is recommended to use saline as conductive agent.
Although alcohol can also be used as conductive agent, the saline works better.
For monitoring in surgeries or dental procedures, wet the contact site with conductive agent as
described above, and then apply ECG gel on the contact site. The ECG gel provides a
conductive contact for an extended period of time.
For the VET PC ECG-T and VET PC ECG-6T, after applying all leads, plug the connector on
the leads into the port on the transmitter.
For the VET PC ECG and VET PC ECG-6, after applying all leads, plug the connector on the
leads into the ECG receiver. An arm wrap (a black Velcro belt) comes with each VET PC ECG
and VET PC ECG-6. When recording ECG in conscious patients, you can wrap the arm wrap
20
on your forearm, and then attach the ECG receiver to the arm wrap (through the attached
Velcro strip). By this way, when you hold the patient, the ECG receiver will stay close to the
patient, preventing the leads from being pulled.
3.2 ECG leads with flat clips (all models)
For the VET PC ECG and VET PC ECG-T, the ECG leads with flat clips consist of three wires
(green, red, and white) and three metal clips, as shown above.
For the VET PC ECG-6 and VET PC ECG-6T, the ECG leads with flat clips consist of four
wires (green, red, white, and black) and four metal clips.
The flat clips are easy to apply, ideal for ECG work-up/screening, especially in medium or
large dogs.
The foreleg lead(s) are attached to the appropriate foreleg just above the elbow. The rear leg
lead(s) are attached to the appropriate rear leg immediately proximal to the stifle. There is no
need to clip hair. Wet all contact sites thoroughly with conductive agent. To register
interference-free ECG, adequate amount of conductive agent must be applied to each contact
site. It is recommended to use saline or alcohol as conductive agent.
3.3 ECG leads with limb caps (VET PC ECG-T and -6T)
21
The ECG leads with limb caps are developed specifically for long-term (multiple-hour)
continuous monitoring in intensive care, critical care, and emergency patients.
The limb caps can be used on almost all patients in a variety of clinical settings. Compared
with the ECG scope (see pages 20 and 21), the limb caps are more suitable for long-term
monitoring in the following clinical situations:
A.
The patient is already inside the cage, and is too heavy to be lifted easily, making it
difficult to place the ECG scope.
B.
The patient is trembling continuously. Due to the significant motions on the chest, the
ECG scope will not work as well as the limb caps placed on the distal legs.
C.
The patient’s chest is not available for placing the ECG scope.
Follow these steps when applying the limb caps on the patient.
A.
Soak all limb caps (sponges) thoroughly with saline by dipping them into a tray containing
saline of half of an inch deep.
B.
It is recommended to place the limb caps on the distal legs between the carpal pad
and the metacarpal pad on either the dorsal side or the palmer side. Clip the hair
and apply ECG gel on each contact site. It is not recommended to place the limb
caps on or above the hock or elbow.
C.
Wrap the limb cap firmly on the distal leg with the attached Velcro strip. Each limb cap is
labeled to indicate which leg it should be placed on. RL means the right rear leg; LL
means the left rear leg; RA means the right front leg; and LA means the left front leg.
22
Use only saline as conductive agent for the limb caps. Do not use alcohol as it can
damage the sponges, and vaporizes quickly, not suitable for long-term monitoring.
When the limb caps are not in use, place them in a tray with saline to keep the sponges wet. In
this way, the limb caps will not get dried, and are ready for use. Do not wash, steam, or
autoclave the limb caps. To disinfect the sponges, place the limb caps in a tray containing half
of an inch of hydrogen peroxide solution.
3.4 Lead placements
The patient should be laid on the side and relaxed. Trembling can induce motion artifact on
ECG. Panting can make the baseline undulate at the frequency of the respiratory rate. Use the
ECG leads with limb plates if the patient is trembling severely or panting heavily.
1. VET PC ECG and VET PC ECG-T
The ECG leads (with limb plates, flat clips, or limb caps) can register Lead-I, Lead-II, or LeadIII, one Lead at a time. Lead-II is the Lead of choice for both monitoring and screening. To
register different Leads of ECG, place the three leads/electrodes on the patient as below:
LEAD-II ECG
GREEN lead to RIGHT REAR LEG
RED lead to LEFT REAR LEG
WHITE lead to RIGHT FORELEG
LEAD-I ECG
GREEN lead to RIGHT REAR LEG
RED lead to LEFT FORELEG
WHITE lead to RIGHT FORELEG
LEAD-III ECG
GREEN lead to RIGHT REAR LEG
RED lead to LEFT REAR LEG
WHITE lead to LEFT FORELEG
2. VET PC ECG-6 and VET PC ECG-6T
23
The ECG leads (with limb plates, flat clips, or limb caps) can simultaneously register six Leads
of ECG. Place the four leads/electrodes on the patient as below.
GREEN lead to RIGHT REAR LEG
RED lead to LEFT REAR LEG
WHITE lead to RIGHT FORELEG
BLACK lead to LEFT FORELEG
3.5 ECG scopes (VET PC ECG-T and -6T)
The ECG scopes are developed specifically for long-term (multiple-hour) continuous
monitoring in intensive care and critical care patients.
The ECG scopes are available in three sizes. The size-1 is for cats, puppies, and other
animals of similar size. The size-2 is for dogs and other animals of similar size. The size-3 is
for horses and other large animals.
For the VET PC ECG-T, the ECG scope registers one Lead of ECG, close to the Lead-II,
directly on the chest.
For the VET PC ECG-6T, although the ECG scope can simultaneously register six Leads of
ECG directly on the chest, the waveforms registered with the ECG scope are different from
those registered with limb leads/electrodes, due to different electrode positions. The ECG
scope is only intended for monitoring. When using the ECG scope, it is recommended to use
the single-lead ECG program (Single-lead ECG.exe) to display only Lead-II ECG.
24
The ECG scope, along with the transmitter, can easily be applied onto the chest with the
attached harness. Once secured, the ECG scope will stay in position for as long as necessary.
Like the limb caps, the electrodes on the ECG scope can hold conductive agent for many
hours, making it suitable for long-term monitoring.
Follow these steps to apply the ECG scope on the patient.
A.
Soak all four electrodes (sponges) thoroughly with saline by dipping into a tray containing
saline of half of an inch deep.
B.
It is preferred to place the ECG scope on the front or left side of the chest. The closer is
the ECG scope to the heart, the stronger is the ECG. However, if has to, the ECG scope
can also be placed on the right side of the chest. Clip the hair at and around the site. It is
recommended to clip an area 1.5 times bigger than the size of the ECG scope. Use a
piece of paper towel wet with saline to damp the clipped area.
C. Put the transmitter in the rubber case on the harness. Wrap the harness around the chest.
Before tightening up, apply ECG gel on the four electrodes (sponges), and position the
ECG scope at the clipped area and the transmitter on the back of the patient. Tighten up
the harness to secure both the ECG scope and the transmitter in position. The two belts
of the harness can be adjusted separately to make it fit the contour of the chest. Attach
the string on the ECG scope to the neck to prevent the ECG scope from slipping down
the body. Connect the ECG scope to the transmitter (make sure to plug the connector all
the way into the port), and then push down the red power button on the transmitter.
D.
Make sure that both the ECG scope and the transmitter are not underneath the body. If
the sponges are getting dry, loose the belts, turn over the ECG scope, and apply saline
directly on the sponges. Place the ECG scope back in position, and then tighten the belts.
Use only saline as conductive agent for the ECG scopes. Do not use alcohol as it can
damage to the sponges, and vaporizes quickly, not suitable for long-term monitoring.
The ECG scope is intended for repeated use. If used and maintained with care, it will last for
months. When the ECG scope is not in use, place the ECG scope in a tray with saline to keep
the sponges wet. In this way, the ECG scope will not get dried, and is ready for use.
The ECG scope can be cleaned with a piece of paper towel wet with liquid cleaner. Do not
wash, steam, or autoclave it. To disinfect the sponges, place the ECG scope in a tray
containing half of an inch of hydrogen peroxide solution.
3.6 ECG chestrode (optional)
25
The ECG chestrode is designed for ECG screening in dogs, horses, and other animals
of similar sizes.
The ECG chestrode consists of four metal electrodes (each with four legs) mounted on a
rubber pad with attached a harness.
For the VET PC ECG-T, the ECG chestrode registers one Lead of ECG, close to the Lead-II,
directly on the chest.
For the VET PC ECG-6T, although the ECG chestrode can simultaneously register six Leads
of ECG, the waveforms registered with the ECG chestrode are different from those registered
with the limb leads/electrodes. The ECG chestrode is only intended for ECG screening (rhythm
screening). When using the ECG chestrode, it is recommended to use the single-lead ECG
program (Single-lead ECG.exe) to display only Lead-II ECG.
The ECG chestrode can easily be applied onto the patient with the attached harness. Once
secured, it will stay in position. Follow these steps to apply the ECG chestrode.
A.
Dipping the ECG chestrode into a tray containing salty water of half of an inch deep for
several minutes to prepare the four metal electrodes. Do not use alcohol as it may cause
damage to the ECG chestrode.
B.
Wrap the harness around the chest. Before tightening up, position the ECG chestrode
above or close to the heart. Tighten up the harness to secure it in position. The two belts
of the harness can be adjusted separately to make it fit the contour of the chest.
C.
It is not necessary to clip the hair. Wet all four contact points thoroughly with
saline. Apply saline directly onto the four contact points, rather than apply an
excessive amount of saline to wet the whole area underneath the ECG chestrode.
26
D.
The patient should be laid down on the right side to prevent the body weight from being
applied to the ECG chestrode. If the ECG chestrode is underneath the body, the ECG can
be affected by respiration movement.
It is not recommended to hold the ECG chestrode to the chest with your hand. Instead, secure
it to the chest with the attached harness. The ECG chestrode is not intended for ECG
screening in cats. Use the ECG leads with limb plates for ECG screening in cats.
3.7 ECG esophageal probes (optional)
The ECG esophageal probes are developed for monitoring in anesthetized patients.
For the VET PC ECG and VET PC ECG-T, the esophageal probe registers one Lead of ECG,
close to the Lead-II.
For the VET PC ECG-6 and VET PC ECG-6T, although the esophageal probe can
simultaneously register six Leads of ECG, the waveforms registered with the esophageal
probe are different from those registered with limb leads/electrodes, due to different electrode
positions. The esophageal probe is only intended for monitoring. When using the esophageal
probe, it is recommended to use the single-lead ECG program (Single-lead ECG.exe) to
display only Lead-II ECG.
1. Choosing an appropriate-sized probe
The ECG esophageal probes are available in three sizes. The size-1 is for lizards. The size-2
is for kittens, cats, and small dogs. The size-3 is for medium and large dogs.
27
In order to register ECG, all metal rings (electrodes) must establish a good contact with the
esophagus. If the metal rings are too small in diameter, or the interval between the metal rings
is too long, after inserted, not all metal rings can establish a stable contact with the esophagus,
producing erratic ECG and inaccurate heart rate. Therefore, it is critically important to apply a
probe of correct size. Do not use a size-1 or size-2 probe in medium or large dogs. Do not
use a size-3 probe in small dogs or cats. Applying a probe of incorrect size may
produce inaccurate heart rate and erratic ECG.
2. Applying the probe
Generally speaking, for optimal performance, the middle and distal electrode rings should be
positioned across the heart. After the patient has been anesthetized and intubated, lay the
probe on the patient to determine roughly how deep it needs to be inserted. Position the
proximal electrode ring at the shoulder level, and then mark the probe at the mouth level.
Insert it into the esophagus to the depth as determined above. After inserting the probe,
observe ECG on the screen. If ECG baseline is jumping up and down, adjust the depth of the
probe to make ECG baseline stable. Tie the probe in place as the endotracheal tube.
The esophageal probe is intended for repeated use with proper cleaning prior to reuse. It is
contraindicated for patients with known esophageal disease or trauma. Before applying the
esophageal probe, inspect it for any damage or defect. If any mechanical defect or damage
exists, do not use it. Never insert the esophageal probe into a patient who has not been
anesthetized and intubated.
Never use the esophageal probe in electrosurgical procedures.
Clean the esophageal probe with a paper towel wet with alcohol. Only the distal and middle
portions of the probes can be washed. Do not immerse it in liquid. Do not steam or autoclave it.
28
IV. OPERATIONAL INSTRUCTIONS
4.1 Open the ECG program
For the VET PC ECG or VET PC ECG-T, double click the shortcut folder “Vet PC ECG.exe” on
the desktop to open the ECG program as shown below.
For the VET PC ECG-6 or VET PC ECG-6T, double click the shortcut folder “Six-lead
ECG.exe” or “Single-lead ECG.exe” on the desktop to open the ECG program as shown below.
The ECG program (window) opens up, as shown below.
29
The single-lead program
The six-lead program
Note: For the VET PC ECG-6 and VET PC ECG-6T, the six-lead program and the single-lead
program can not be used at the same time when registering ECG from the patient.
1. Display formats
The ECG program (single lead) offers two display formats: full-screen or partial-screen. Click
the Maximize box located at the upper right corner of the window to switch between the two
formats.
30
Full-screen display - cascaded four lines of ECG
31
Partial-screen display - cascaded two lines of ECG
2. Adjust screen resolution
Full-screen display with incorrect screen resolution
If the ECG display is a full screen, but there are only two lines, not four lines, as shown in the
window above, the screen resolution setting on the computer needs to be adjusted.
To adjust the screen resolution setting so that the ECG can be displayed correctly on the
screen, go to Control Panel window and double click Display icon.
32
In Display Properties window, click Settings, set Screen resolution to 1024 by 768 pixels or
higher, and then click Apply button and OK button.
4.2 Toolbar and menus
1. Toolbar
The ECG program features a toolbar. The user can operate the ECG program by clicking the
keys in the toolbar. To display the function(s) of a key in the toolbar, place the cursor on the
key. The function(s) of the key will be indicated in a drop-down box, as shown below.
33
The function(s) of the keys in the toolbar are listed as below.
- Start a new recording or Reset
- Stop the current recording
- Replay saved ECG
- Display real-time ECG
- Display heart rate trend
- Review recorded ECG
- Review selected ECG
- Input or edit patient information and diagnostic comments
- Change settings
- Heartbeat beep ON/OFF
- Audible alarm ON/OFF
- Change ECG gains
- Adjust ECG baseline
34
- Change waveform speeds
- Freeze or release ECG on the screen
- Measure the amplitude (mV) and width (ms) between two points
- Open
- Save
- Print
- Capture an active window as a picture
- Invert ECG on the screen
To close the toolbar, pull down View menu, and click Toolbar, as shown below. To open the
toolbar, repeat the above operation.
2. Actions menu and Tools menu
The ECG program also features an Actions menu and a Tools menu. You can operate the
ECG program through the Actions menu and the Tools menu.
35
4.3 Record ECG
1. Enter the Comm Port number
In order for the ECG receiver to communicate with the PC through the USB port, the ECG
program needs to have the Comm Port number for the USB port. If you do not know the Comm
Port number for the USB port, refer to pages 13 - 15 for instructions.
Click
key, or select Settings in Actions menu, to display Settings window. Type in the
correct Comm Port number in the CommPort box, and then click OK button.
After the Comm Port number has been entered, it will be saved as the default by the ECG
program. If using the same USB port, it will not be necessary to re-enter the Comm Port
number each time you use the ECG program. Therefore, it is highly recommended to
designate one USB port on the PC for the ECG receiver.
36
The window below pops up. Click Continue button.
If an incorrect Comm Port number is entered, or the ECG receiver is not connected to the PC,
the window below will pop up.
2. Type in patient information
Click
, or select Information in Actions menu, to display Information Page window.
37
Type in patient information and then click OK button. At any time, you can open this window to
type in or edit patient information and/or diagnostic comments, which will be saved as part of
the patient’s ECG record.
3. Name the file, and save it on the hard drive
You need to create at least one folder (the master folder) on the hard drive to store ECG files.
You may name the folder “ECG Files”. It is recommended to create the ECG Files folder
before you use the ECG program for the very first time.
It is suggested that before recording ECG on a new patient, create a new folder inside the
ECG Files folder to store the ECG data of the new patient. You may name the new folder with
the patient’s ID number, for example 10001.
To permanently save recorded ECG, click Save in File menu or click
key. Go to the folder
for the patient 10001, as shown below. You need to name the file to be saved. For example,
you can use the date of the recording as the file name, for instance 11-01-2003. Type in the
file name in the “File name:” box, and then click Save button.
38
For the VET PC ECG-6 and VET PC ECG-6T, you need to indicate that the saved ECG file is
in a single-lead format or six-lead format. For example, you may name the file 11-01-2003-lead
II if it is in the single-lead format or 11-01-2003-six leads if it is in the six-lead format.
Anytime during or after an ECG recording, you can select Save in File menu, or click
key,
to save or re-save the recorded ECG. The new data will automatically replace the existing data
in the file. Or, you can select Save As … in File menu to save the ECG data in a different file.
4. Start a new recording
Click
key, or select Start/Reset in Actions menu, to start a new recording. Each time you
start a new recording, the Note window (see page 32) will pop up. If you do not want to save
the ECG data already recorded, click Continue button.
A. ADJUST THE ECG BASELINE
The ECG baseline is too low if the ECG is being cut off at the bottom, as shown below. The
ECG baseline is too high if the ECG is being cut off at the top, as shown below. Click
key,
or select Adjust in Tools menu, to move the ECG baseline to the correct position.
If the ECG is being cut off at both the top and the bottom, the gain of the ECG amplifier is too
big, click
key to decrease the gain. Changing the gain may affect the ECG baseline. You
39
may need to click
key to bring the ECG baseline back to the proper position after
changing the gain.
ECG baseline is too low
40
ECG baseline is too high
B. MOTIONS OR ELECTRODES OFF
When there are strong motions on the patient, or one or more electrodes lost contact with the
patient, two red question marks (?) will appear on the screen, as shown below, to indicate that
no ECG is being registered and the displayed heart rate is not accurate. Verify the patient
status and check the electrodes. If the patient is moving or trembling continuously, wait for the
patient to stop the motions.
If electrode(s) lost contact with the patient, re-apply the electrode(s) to the patient. After reapplying the electrode(s), you may see ECG being displayed in seconds or first some artifacts
and then ECG being displayed. If you see nothing but a flat line running across at the very top
or bottom of the display range after the electrode(s) have been re-applied to the patient for
41
more than one minute, the ECG receiver needs to be reset. To reset the ECG receiver, simply
start a new recording by clicking
key. You may want to save recorded ECG on the hard
drive before starting a new recording.
C. STOP THE RECORDING
Click
key, or select Stop in Actions menu, to stop a recording.
After a recording is stopped, you can click
to start a new recording.
key to replay recorded ECG, or click
key
D. CLOSE THE ECG PROGRAM
For the VET PC ECG-T and VET PC ECG-6T, before closing the ECG window (exiting the
ECG program), you need to turn off the transmitter. Otherwise, the PC could crash, and will
need to be rebooted. All unsaved data will be lost. Upon selecting Exit in File menu or clicking
the close box at the upper right corner of the ECG window, the window below will pop up. Turn
off the transmitter, and then click on OK box in the window below.
E. RECONNECT THE RECEIVER
If the receiver is disconnected from the USB port during a recording, the ECG program will
have to be closed before reconnecting the receiver. The window below pops up. Click OK
button.
42
If the ECG receiver is reconnected without closing the ECG program first, the ECG receiver
will not be able to communicate with the PC. The window below will pop up, indicating a
communication problem at the USB port. Close the ECG program, and then re-open it.
5. Print ECG
To print ECG, click
key, or select Print … in File menu. The Print window pops up, as
shown below. Select the printer through which you want to print. Make sure that the printer is
ready, and then click Print box.
To print real-time ECG, first push F key on the keyboard or click
freeze the ECG on the screen, and then click
key.
43
key in the toolbar to
Before printing, you can preview the page to be printed on the screen by selecting Print
Preview in File menu. For waveform speed of 12.5, 25, 50, or 100 mm/s, 48, 24, 12, or 6
seconds of ECG recorded immediately before freezing will be printed on one 8.5”X11” page.
4.4 Operate the ECG program
1. Adjust gains
To adjust the gains (sensitivities) of the ECG amplifier, click
key in the toolbar, strike the
G key on the keyboard, or select Gain in Actions menu. Increase the gain to enlarge the ECG,
and decrease the gain to reduce the size of the ECG.
The gains can be adjusted on both real-time ECG and recorded ECG. If the ECG is being cut
off at both the top and the bottom, reduce the gain to make the ECG smaller.
If the ECG is being cut off only at the top or at the bottom, it may be necessary to adjust the
ECG baseline. Click
key to move the ECG baseline to a proper position.
2. Change waveform speeds
Click
key, strike S key on the keyboard, or select Speed in Actions menu, to change the
waveform speeds (12.5, 25, 50, and 100 mm/s). At 50 mm/s, each grid on the screen is equal
to 125 ms, as shown below, while each big grid on the ECG printout, which consists of five
small grids of 1 mm, is equal to 100 ms.
The waveform speed can be changed on both real-time ECG and recorded ECG.
3. Freeze or release waveform on the screen
Click
key, strike F key on the keyboard, or select Freeze/Release in Tools menu, to
freeze or release waveform on the screen.
4. Turn on or off heartbeat beeps
44
Click
key, or select Heartbeat Beep in Actions menu, to turn on (the heart symbol turns
red) or off (the heart symbol turns purple) the heartbeat beeps.
The speakers for the PC need to be turned on. To change speaker volume, go to the Control
Panel, and double click Sounds and Audio Devices icon, as shown below.
In Sounds and Audio Devices Properties window, adjust the setting under Device volume, and
then click Apply button and OK button, as shown below.
5. Set alarm limits and turn on/off audible alarm
45
Click
key, or select Alarm in Actions menu, to turn the audible alarm setting on (a bell
symbol displayed near the heart rate) or off (the bell symbol not displayed).
The audible alarm setting is ON as default. When the heart rate is out of the range set in the
Setting window (see page 32), the audible alarm will be sounded, and the heart rate display
will be flashing in red (visual alarm). The visual alarm cannot be turned off.
The default settings for heart rate alarm are 300 bpm for the high limit and 30 for the low limit.
To change alarm limits, display Settings window (see page 32), type in new numbers (between
1 and 500 bpm), and click OK button.
6. Invert the ECG on the screen
When using the ECG scope, esophageal probe or ECG chestrode, in some occasions, you
may see the displayed ECG seem upside down. Click
menu, to invert the ECG on the screen.
key, or select Invert in Tools
7. Display and print heart rate trend
To display heart rate trend, click
key, or select Trend in Actions menu.
The ECG program can provide a heart rate trend of up to 24 hours for each patient. One
screen can only display up to 12 hours of trend data, for example, from hour 0 to hour 12, as
shown in Picture 19. Click at the lower right corner of the window (see the cursor in the window
below) to display the second page (from hour 12 to hour 24). Click at the upper left corner of
the window to go back to the first page.
key, or select Print … in File menu, the heart rate trend (up to 24 hours) will be
Click
printed on one 8.5”X11” page.
46
Trend display
Click
key, or click Print … in File menu, the heart rate trend (up to 24 hours) will be
printed on one 8.5”X11” page.
8. Review recorded ECG
A. REVIEW PAGE BY PAGE
During or after a recording, you can review recorded ECG page by page. To review recorded
key, or select Recorded ECG in Actions menu. Cascaded four
ECG page by page, click
lines of ECG in blue will be displayed on one screen, as shown below.
During an ECG recording, you can review recorded ECG, while the real-time ECG is being
recorded continuously.
47
The initial page of recorded ECG will be displayed first. To display the next page, move the
cursor to the lower right corner of the window (outside the waveform area) and click (push the
left button of the mouse). To display the previous page, move the cursor to the upper left
corner of the window (outside the waveform area) and click. Move the cursor to a point inside
the waveform area (see the cursor in the picture above) and click, that point will become the
starting point of the next page. If you want to move a particular QRS complex to the beginning
of the page, place the cursor in front of the QRS complex and click.
During the page by page review, if you see some QRS complexes are cut off at the bottom or
at the top, move these QRS complexes to the beginning of the page by clicking in front of them,
key to move their baseline to the proper position, allowing these QRS
and then click
complexes to be displayed inside the range.
Click
key to change the gain of the ECG on the screen.
48
Click
key to change the waveform speed of the ECG.
Click
key to print the ECG on the screen. The ECG on the screen will be printed on one
8.5”X11” page.
Click
key to return to the real-time ECG.
B. REPLAY RECORDED ECG
To replay recorded ECG, first click
key to stop the current recording, and then click
key to replay recorded ECG. To stop a replay, click
choose to save them permanently by clicking
key again. After replaying, you may
key.
C. REVIEW ECG RECORDED AT A PARTICULAR TIME POINT
You can review the ECG recorded around any particular time points. Simply go to the trend
display, and then double click on the trend graphic at a time point of interest, for example, at
the line of hour one (see the cursor in the picture below).
The ECG recorded around this time point will be displayed, as shown below. This feature
makes review of ECG data recorded in a long monitoring much easier.
49
9. Measure amplitude and width
The ECG program can measure the amplitude and width between two points on ECG. To
measure on real-time ECG, freeze the ECG on the screen first.
To activate the measurement function, click
key, or select Measure in Actions menu. Click
the start point of the measurement, and then click the end point of the measurement. A dotted
red line will connect the two points, with the measurement result displayed nearby (AMP –
key again to deactivate the measurement function and
amplitude, WTH - width). Click
erase the measurement result on the screen.
50
The displayed measurement result can not be printed or saved directly. If you want to save
and/or print the displayed measurement result, you need to capture the ECG screen and save
it as a picture file, and then print the picture file. See pages 50 and 51.
10. Select ECG of interest to review on one screen
The ECG program allows you to select up to six lines of ECG from recorded ECG for reviewing
on one screen. To select a line of ECG from recorded ECG, hold down the Ctrl key on the
keyboard, and at the same time, click on the line of ECG you want to select. A sequence
number (in red) will appear at the lower right corner of the line, indicating this line of ECG has
been selected, as shown below.
key, or select Selected ECG in Actions menu,
After selecting up to six lines of ECG, click
up to six lines of selected ECG will be displayed (in red) on one screen, as shown below.
51
“Memory Full!” will be displayed on the screen if selecting more than six lines of ECG. To
delete an ECG line in the selected ECG window, place the cursor on the ECG line, and then
double click. Then, you can go back to recorded ECG to select another line, which will be put
at the same place of the line just deleted in the selected ECG window.
Click
key to print the selected ECG. All six lines will be printed on one 8.5”X11” page.
Click
key to display recorded ECG.
Click
key to display real-time ECG.
52
4.5 Retrieve a saved ECG file
To retrieve (open) an ECG file saved on the hard drive, a CD, or other external storage device,
click
key, or select Open … in File menu. Go to the folder containing the file you want to
open, select the file, for example 11-01-2003-lead II, and then click Open box, as shown below.
The saved ECG will be displayed on the screen, as shown below.
53
1. Review page by page
Click
key to review the saved ECG page by page. See pages 42 and 43 under the
section “Review page by page” for more instructions.
Click
key to change the gain of the ECG.
54
Click
key to change the waveform speed.
Click
key to print the ECG on the screen. The ECG will be printed on one 8.5”X11” page.
Click
key to view the selected ECG.
Click
key to view the heart rate trend.
2. Replay the ECG
Click
key to replay the saved ECG. See page 44 under the section “Replay recorded
ECG” for more instructions.
3. Send ECG cases via email for consultation
You can send ECG cases via email for consultation in two different ways:
A. Capture the ECG on screen as pictures, and then email the pictures. The recipient will be
able to open the pictures without having the ECG program on his or her PC.
B. Email saved ECG files to a consultation service which has the VetSpecs® ECG program,
for example, Idexx Telemedicine (Cardiopet).
4.6 Capture an ECG screen as a picture
The ECG program can capture an ECG screen (an active window) and save it as a picture file.
If you want to send ECG cases via email to someone who does not have the ECG program
installed on his or her computer, you need to capture and save the ECG cases as picture files,
and then email them. The recipient can open and save them, just like any other picture files.
55
To capture an ECG screen and save it as a picture, click
menu. The window below pops up.
key, or select Capture in Tools
The default file folder for storing the picture files is My ECG Pictures, which was automatically
created on the hard drive when installing the ECG program.
The ECG program automatically assigns a name to a picture file, which will be Patient ID _
Patient Name _ Sequence Number.bmp, as shown above. Click OK button to save the picture
file to My ECG Pictures folder.
To store ECG picture files in a different file folder, click
key to display Settings window.
Click Browse…box to select a folder in which ECG picture files will be stored, as shown below.
To open a picture file, double click My ECG Pictures folder, and then double click the file you
want to open. An ECG picture is shown below.
56
To print, click the printer icon as shown above.
To email a picture file, open My ECG Pictures folder, select the file(s) you want to send, and
then click “E-mail this file” in File and Folder Tasks menu, as shown below.
57
V. MAJOR ACCESSORIES
Standard
VET PC ECG
Single-lead ECG receiver, ECG leads with limb plates, and ECG leads with flat clips
VET PC ECG-6
Six-lead ECG receiver, ECG leads with limb plates, and ECG leads with flat clips
VET PC ECG-6
Single-lead ECG receiver, transmitter, one set of ECG leads with flat clips, one set of ECG
leads with limb plates, one set of ECG leads with limb caps, one small ECG scope, and
one large ECG scope.
VET PC ECG-6T
Six-lead ECG receiver, transmitter, one set of ECG leads with flat clips, one set of ECG
leads with limb plates, one set of ECG leads with limb caps, one small ECG scope, and
one large ECG scope.
Optional
ECG esophageal probes, ECG chestrode, and ECG leads with snaps (compatible with all
standard disposable sticky patch electrodes)
Ordering accessories
Please call VetSpecs, Inc. at 1-800-599-2566 to order accessories.
VI. TECHNICAL SUPPORT
Please call toll-free 1-800-599-2566 for technical support. Regular business hours are from
8:30 AM to 6:30 PM EST Monday to Friday.
If any accessories need to be repaired, please return them to VetSpecs Service Center at the
address below. To check the status of returned item(s), call 1-800-599-5910.
VETSPECS, INC.
58
224 BROWN INDUSTRIAL PARKWAY, CANTON, GA 30114
LIMITED WARRANTY
VetSpecs® VET PC ECG Series
VetSpecs, Inc. (“VetSpecs”) warrants the above product (the Product) to be free from defects
in materials and workmanship, when stored under appropriate conditions and given normal,
proper and intended usage, for ONE year (see the details listed below) from the date of
delivery of the Product to the original end user purchaser (“the Buyer”). VetSpecs agrees
during the applicable warranty period to repair or replace all defective products by VetSpecs
and without cost to the Buyer. VetSpecs shall not have any obligation under this Limited
Warranty to make replacements which result, in whole or in part, from catastrophe, fault or
negligence of the Buyer, or anyone claiming through or on behalf of the Buyer, or from
improper use of the Product, or use of the Product in a manner for which it was not designed,
or by cause external to the Product.
The software is covered by a life-long replacement warranty. The ECG receiver and transmitter
are covered by a one-year labor and parts limited warranty. There is no warranty for the ECG
leads with limb plates, ECG leads with flat clips, ECG chestrode, ECG leads with limb caps,
ECG scopes, and ECG leads with snaps. The ECG esophageal probes are covered by a sixmonth labor and parts limited warranty.
The warranty for the optional computer and its AC adapter is provided directly by the
manufacturer of the computer. It is the buyer’s responsibility to register the computer with its
manufacturer upon purchasing.
The Buyer shall notify VetSpecs of any product which it believes to be defective during the
warranty period. Such product shall be returned by the Buyer at the Buyer’s cost to VetSpecs
for examination and testing. VetSpecs shall repair or replace any such product found to be so
defective and return such product to the Buyer, transportation and insurance prepaid by
VetSpecs.
The provisions of the foregoing Limited Warranty are exclusive and are expressly in lieu of any
other warranty, whether express or implied, written or oral. VetSpecs neither assumes nor
authorizes any employee, agent, distributor or other person or entity to assume for it any other
liability in connection with the manufacture, sale, supplying or use of the Product. VetSpecs’
liability arising out of the manufacture, sale or supplying of the Product or its use or disposition,
whether based upon warranty, contract, tort or otherwise, shall not exceed the actual purchase
price paid by Buyer for the Product. In no event shall VetSpecs be liable to the Buyer or any
other person or entity for special, incidental or consequential damages (including, but not
limited to, loss of profits, damages to properties, and injuries to the patient and/or the user)
arising out of the manufacture, sale, supplying or use of the Product. The foregoing Limited
Warranty extends to the Buyer only and shall not be applicable to any other person or entity
including, without limitation, customers of the Buyer.
59