1
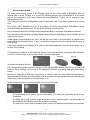
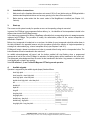
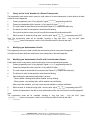
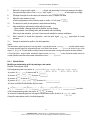
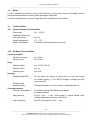
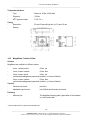
ES-Mega
MegaBeans
Access Control System
User Manual
_________ / ____
Order No.
Device
People
in Motion
User Manual ES-Mega / MegaBeans
______________________________________________________________________________________________________
Contents
1.
General description …………………………………………………………………………..3
2.
Installation Instructions ……………………………………………………………………..4
3.
Start-up …………………….…………………………………………………………………….4
4.
Audible signals ………………………………………………………………………………..4
5.
Operating the Access Control System Using Key Transponders ………………….5
5.1
Permanent Enabling Using Key Transponders ………………………………………5
6.
Code Number …………………………………………………………………………………..6
6.1
Code Number Structure ………………………………………………………………..6
7.
Query for the Code Number of a Stored Transponder ……………………………….…7
8.
Modifying an Authorization Profile ………………………………………………………..7
8.1
Modifying an Authorization Profile with Code Number Output …………………….7
8.2
Modifying an Authorization Profile without Code Number Output …………………8
8.3
Modifying an Authorization Profile by Entering a Code Number ………………….8
8.3.1 Quick Guide ……………………………………………………………………..9
9.
Storing a New Transponder ………………………………………………………………10
9.1
ES-Mega Capacity ……………………………………………………………………10
9.2
Storing a New Transponder with Code Number Output
(Standard, Recommended) ………………………………………………………….10
9.3
Storing a New Transponder without Code Number Output (Turbo Storage) …...11
9.4
Storing a New Transponder without Code Number Output and without
Modifying
the Authorization Profiles (Turbo Storage) ………………………...11
10.
Deleting Single Transponder Identifiers ………………………………………………..12
10.1 Deleting an Existing Transponder ………………………………………………….12
10.2 Deleting Unavailable Transponders using the Code number ……………………12
10.2.1 Quick Guide ……………………………………………….…………………..13
11.
Deleting the Entire Memory (RESET) ……………………………………………………14
12.
Programming Special Function Cards …………………………………………………14
13.
Relay ...………..……………………………………………………………………………….15
14.
Technical Data ………………………………………………………………………………15
14.1 General System Technical Data …………………………………………………….15
14.2 ES-Mega Technical Data …………………………………………………………….15
14.3 MegaBean Technical Data …………………………………………………………..16
15.
Connecting the Components ……………………………………………………………..17
15.1 Connecting ES-Mega ………………………………………………………………..17
15.2 Connecting MegaBeans ……………………………………………………………..18
16.
Transponder Output Table ………………………………………………………………..18
2
______________________________________________________________________________________________________
SCHAEFER GmbH | Winterlinger Str. 4 | 72488 Sigmaringen | Germany
Phone +49 7571 722-0 | Fax +49 7571 722-98 | [email protected] | www.ws-schaefer.de
User Manual ES-Mega / MegaBeans
______________________________________________________________________________________________________
1.
General description
The access control system consists of the ES-Mega central unit and of any number of MegaBeans which are
installed within a board. ES-Mega is to be used for detecting electronic keys (transponders) in a non-contact
process. Any combination of the control stations connected (MegaBean + button) can be enabled for every
authorized transponder.
The ES-Mega is connected to the MegaBeans using a six-pole ribbon cable. The direction of insertion is not relevant
here.
Every button needs a MegaBean of its own to be included in the access control system. A MegaBean is simply
connected between button and control. This also allows retrofitting to existing boards.
Every transponder stored in the ES-Mega can be mapped individually to any number of MegaBeans connected.
The authorization profile (enabling or disabling different buttons through the MegaBeans) can be modified easily and
quickly at every location.
Audible signals will acknowledge every action, and will also sound when a connected button is pressed without
having detected a transponder before. A relay (1 potential-free changeover contact) is also switched whenever an
action is made.
A light ring is available for the ES-Mega as an option for optical acknowledgement, and it can be connected, e.g., to
the relay of the ES-Mega.
Transponders are available in an ISO card format (cheque card format) identified by a KeyCard product designation
as shown in the below figure, or as key tags as shown in the below right figures.
BlueTag
KeyTag
All variants have identical functions.
Every transponder is a unique specimen, and has a unique and unalterable identifier which can only be read by an
electronic device. ES-Mega can store up to 255 transponder identifiers on a lasting basis and without battery
backup.
Before a key transponder is handed out to an end user, it is useful to write down every holder of a transponder in a
table (see appendix) because only this procedure will allow the deletion of single transponders by entering their code
numbers (e.g., when a transponder is lost) (see Chapter 10.2).
Special function cards can be used to reconfigure the access control system:
-
The programming card is used to add new transponders, or to modify the authorization profile of every
transponder.
-
The delete card is used to remove single transponders from the complete system. Lost transponders can
also be deleted with little effort and without any additional hardware.
-
The reset card is used to reset the complete system, removing all stored key transponders from the system.
3
______________________________________________________________________________________________________
SCHAEFER GmbH | Winterlinger Str. 4 | 72488 Sigmaringen | Germany
Phone +49 7571 722-0 | Fax +49 7571 722-98 | [email protected] | www.ws-schaefer.de
User Manual ES-Mega / MegaBeans
______________________________________________________________________________________________________
2.
Installation Instructions
1.
Make sure that the faceplate thickness does not exceed 0.08 in (2 mm) before using an ES-Mega behind a
stainless steel faceplate which does not have any opening in the area of the read-out unit.
2.
Before start-up, make certain that the correct variant of the MegaBeans is installed (see Chapter 14.3,
Variants).
3.
Start-up
The access control system is ready for operation as soon as the operating voltage is connected.
In general, the ES-Mega is pre-programmed before delivery, i.e., the identifiers of the transponders included in the
shipment are stored in the ES-Mega memory.
In the status as programmed for delivery, MegaBeans will enable their corresponding buttons for every transponder
registered with ES-Mega. The procedure to modify the authorization profiles for the various transponders is
described in Chapter 8.
Before a key transponder is handed out to an end user, the holder of every transponder should be written down in
the table included in the appendix because only this procedure will allow the deletion of single transponders by
entering their code numbers (e.g., when a transponder is lost) (see Chapters 6 and 10.2).
ES-Mega will output a buzzer tone whenever a button is pressed without having read-in a transponder before. The
button actuation will not be transferred to the control unit.
An audible acknowledgement will sound, and the buttons enabled will start flashing when a programmed
transponder is held in front of the ES-Mega. An actuation of a flashing button will be transferred to the control unit.
The subsequent acknowledgement from the control is also transferred to the button. Any pressure on a button which
is not flashing will not lead to any reaction.
Note: DIP switches 1, 2, and 3 of the ES-Mega are OFF during normal operation.
4.
Audible signals
Operation is supported by the audible signals (beeps) listed as follows:
short high pitch ...........................................................................
short low pitch - short high pitch .................................................
short high pitch - short low pitch .................................................
double short high pitch - short low pitch .....................................
trill ...............................................................................................
double trill ...................................................................................
triple trill ......................................................................................
long trill .......................................................................................
long low pitch ..............................................................................
long high pitch ............................................................................
double long - low pitch ................................................................
double long - high pitch ...............................................................
long high pitch - long low pitch.....................................................
4
______________________________________________________________________________________________________
SCHAEFER GmbH | Winterlinger Str. 4 | 72488 Sigmaringen | Germany
Phone +49 7571 722-0 | Fax +49 7571 722-98 | [email protected] | www.ws-schaefer.de
User Manual ES-Mega / MegaBeans
______________________________________________________________________________________________________
5.
Operating the Access Control System Using Key Transponders
1.
Hold transponder in front of ES-Mega Æ “short low pitch - short high pitch” signal
The buttons enabled for this transponder start flashing.
2.
Press a flashing button within 10 seconds Æ “trill” signal
Button actuation is transferred to the control unit. The system returns to idle, and the ES-Mega waits for the
next input.
ES-Mega will output a buzzer tone whenever a button is pressed without having read-in a transponder before. The
button actuation will not be transferred to the control unit.
In the idle state, an acknowledgement will be transferred to the buttons.
Notes:
A transponder not stored in the ES-Mega so far will be rejected immediately, sounding a “long high pitch - long low
pitch” signal
.
If no button is pressed within 10 seconds after step 1, the system will sound a “long high pitch - long low pitch” signal
and return to the idle status.
The system will not react when a non-flashing button is pressed in step 2, while the enabled buttons keep on
flashing.
5.1
Permanent Enabling Using Key Transponders
Permanent enabling can be used to “unlock” any number of floors for an indefinite period of time, allowing visitors to
use the lift without a transponder.
DIP switch 4 of ES-Mega must be ON to enable this function.
Identical procedures are applied for enabling or disabling a button:
1.
Hold transponder in front of ES-Mega Æ “short low pitch - short high pitch” signal
The buttons enabled for this transponder start flashing.
2.
Keep holding transponder in front of ES-Mega and press a flashing button within 10 seconds
Æ “trill” signal
; keep the button pressed, keep holding transponder in front of ES-Mega.
3.
A “double long low pitch” signal sounds after pressing for 3 seconds
remove transponder.
; release the button,
- A button disabled so far, is enabled now.
- A button enabled so far, is disabled now.
An actuation of an enabled button will be transferred directly to the control unit. ES-Mega will not sound any audible
acknowledgement.
Notes:
The button will flash as before after detecting a transponder assigned to a floor which is enabled permanently.
The floors not enabled so far remain blocked.
A user can only enable or disable a floor when his or her transponder has been authorized for that floor.
A floor cannot be blocked any longer when DIP switch 4 is set to OFF while permanent enabling is active for that
floor.
5
______________________________________________________________________________________________________
SCHAEFER GmbH | Winterlinger Str. 4 | 72488 Sigmaringen | Germany
Phone +49 7571 722-0 | Fax +49 7571 722-98 | [email protected] | www.ws-schaefer.de
User Manual ES-Mega / MegaBeans
______________________________________________________________________________________________________
6.
Code Number
ES-Mega assigns a 4 digit code number to every transponder which is stored in its memory. This code number is
used for the transponder’s internal administration.
This code number is also necessary whenever a transponder is lost, and needs to be deleted from the system as a
single transponder (see Chapter 10.2).
The code number also allows the modification of the authorization profile for a transponder which is not available at
that time (see Chapter 8.3).
The appendix to this User Manual includes a table which lists the factory-programmed transponders, and the code
numbers assigned to them for this system.
Before the transponders are handed out to the end users, it is useful to write down every holder of a transponder in
this table because only this procedure will allow the deletion of single transponders by entering their code numbers
(e.g., when a transponder is lost) (see Chapter 10.2).
A code number is assigned to the transponder, and emitted as beep sequences when the transponder is
programmed for the first time. This number is not related to the transponder’s real identifier but only to the sequence
in which the transponders are programmed in the ES-Mega.
Accordingly, a transponder can have different code numbers when it is used in more than one system (e.g., in
several lift cars). It is absolutely necessary to archive all user manuals, and keep good record of their mapping to
every system in order to be able to delete any lost single transponders later on.
When programming more transponders to expand the number of users, the code numbers indicated by beep
sequences should also be written down in that table.
6.1
Code Number Structure
A 4-digit code number is composed of 4 beep sequences. Every beep sequence consists of 1...4 short high pitch
beeps
, and a long low-pitch beep
to mark the difference to the next beep sequence. The last (fourth)
beep sequence is completed by 2 long low-pitch beeps
.
Example:
Beep sequences
1st beep seq.: 4
2nd beep seq.: 2
3rd beep seq.: 1 4th beep seq.: 3
Æ Code number 4 2 1 3
6
______________________________________________________________________________________________________
SCHAEFER GmbH | Winterlinger Str. 4 | 72488 Sigmaringen | Germany
Phone +49 7571 722-0 | Fax +49 7571 722-98 | [email protected] | www.ws-schaefer.de
User Manual ES-Mega / MegaBeans
______________________________________________________________________________________________________
7.
Query for the Code Number of a Stored Transponder
The programming card can be used to query the code number of a stored transponder to check whether the table
entries are correct (appendix).
1.
Present programming card Æ “long high pitch” signal
; programming mode ON;
2.
Present key transponder within 6 seconds Æ “long low pitch” signal
3.
The code number is heard after a few seconds (see Chapter 6.1); compare with table entry;
4.
The buttons for which the transponder is authorized start flashing.
;
Do not push any button unless you wish to modify this transponder’s authorization profile.
6.
Wait 6 seconds Æ “double short high pitch - short low pitch” signal
; programming mode OFF.
Note: The programming mode will be cancelled, sounding a “long high pitch – long low pitch” signal
unless a transponder is held in front of the device within 6 seconds after step 1.
8.
Modifying an Authorization Profile
The programming card can be used to modify the authorization profile for every stored transponder.
It is useful to write down the floors authorized for every transponder in the table (appendix).
8.1
Modifying an Authorization Profile with Code Number Output
Code number output is only used to check the table entry for the corresponding transponder.
1.
Present programming card Æ “long high pitch” signal
; programming mode ON;
2.
Present key transponder within 6 seconds Æ “long low pitch” signal
3.
The code number is emitted after a few seconds (see Chapter 6.1); compare with table entry;
4.
The buttons for which the transponder is authorized start flashing.
5.
Start modifying the authorization profile within 6 seconds:
;
- When pressed, a flashing button will be disabled, and stop flashing.
- When pressed, a non flashing button will be enabled, and start flashing.
After every button actuation, you have 6 more seconds available to continue modification.
6.
Wait 6 seconds Æ “double short high pitch - short low pitch“ signal
; programming mode OFF;
7.
Present the transponder to the device, check authorization profile, and write it down in the table (appendix).
Note:
The programming mode will be cancelled, sounding a “long high pitch – long low pitch” signal
unless a transponder is held in front of the device within 6 seconds after step 1.
7
______________________________________________________________________________________________________
SCHAEFER GmbH | Winterlinger Str. 4 | 72488 Sigmaringen | Germany
Phone +49 7571 722-0 | Fax +49 7571 722-98 | [email protected] | www.ws-schaefer.de
User Manual ES-Mega / MegaBeans
______________________________________________________________________________________________________
8.2
Modifying an Authorization Profile without Code Number Output
The output of the code number is skipped in this procedure, allowing a very swift modification of authorization
profiles for a large number of transponders.
1.
Hold programming card to the device Æ “long high pitch” signal
; programming mode ON;
2.
Keep the programming card in front of the device Æ “double trill” signal
mode ON;
3.
Remove programming card Æ “tacking” sound to indicate the turbo storage mode;
4.
Present key transponder within 6 seconds Æ “long low pitch” signal
5.
The buttons for which the transponder is authorized start flashing.
6.
Start modifying the authorization profiles within 6 seconds:
; turbo storage
;
- When pressed, a flashing button will be disabled, and stop flashing.
- When pressed, a non flashing button will be enabled, and start flashing.
After every button actuation, you have 6 more seconds available to continue modification.
7.
Wait 6 seconds Æ “double short high pitch - short low pitch” signal
again.
; the “tacking” sound is heard
Continue with step 4 if you wish to modify the authorization profile of another transponder .
8.
After completing the modification of all desired authorization profiles:
Wait 6 seconds Æ “long high pitch - long low pitch” signal
9.
Check the authorization profiles of all transponders, and write them down in the table (appendix).
8.3
Modifying an Authorization Profile by Entering a Code Number
; programming mode OFF;
This procedure is only needed to modify the authorization profile of a transponder which is not available at that time.
All steps are performed using the programming card only.
For this procedure, you need the transponder’s code number as recorded in the table (appendix).
1.
Hold the programming card to the device Æ “long high pitch” signal
; programming mode ON;
2.
Keep the programming card in front of the device Æ “double trill” signal
mode ON;
3.
Keep the programming card in front of the device Æ “triple trill” signal
storage mode OFF, code number input ON;
4.
Keep the programming card in front of the device Æ You hear the first beep
, indicating the first digit of
the code number.
When the code number’s first digit is 1, remove the card from the field right away.
When the code number’s first digit is 3 (e.g.), keep the card in the field until you have heard a total of 3
beeps
. Then, remove the card from the field.
5.
Wait until a “long low pitch” signal
6.
Hold the programming card to the device again Æ You will hear the first beep
of the next digit.
When the code number’s next digit is 1, remove the card from the field right away.
When the code number’s first digit is 2 (e.g.), keep the card in the field until you have heard a total of 2
beeps
. Then, remove the card from the field.
; turbo storage
; turbo
is heard.
8
______________________________________________________________________________________________________
SCHAEFER GmbH | Winterlinger Str. 4 | 72488 Sigmaringen | Germany
Phone +49 7571 722-0 | Fax +49 7571 722-98 | [email protected] | www.ws-schaefer.de
User Manual ES-Mega / MegaBeans
______________________________________________________________________________________________________
7.
Wait until a “long low pitch” signal
is heard, and repeat step 6 for the code number’s next digits.
Continue with step 8 when a “double long low pitch” signal
is heard (after the 4th digit).
8.
ES-Mega will output the code number just entered for safety. Compare with table.
9.
When the code number is correct,
hold the programming card to the device again to confirm Æ “trill” signal
10.
The buttons for which the transponder is authorized start flashing.
11.
Start modifying the authorization profiles within 6 seconds:
- When pressed, a flashing button will be disabled, and stop flashing.
- When pressed, a non flashing button will be enabled, and start flashing.
After every button actuation, you have 6 more seconds available to continue modification.
12.
Wait 6 seconds Æ “double short high pitch - short low pitch” signal
operation.
13.
Change the authorization profile in the table (appendix).
; system back to normal
Notes:
The termination signal is given by a long high pitch - long low pitch sound
, and the system returns
to normal operation when the programming card is not held to the device for a longer period of time in any of the
steps 2, 3, 4, 6, or 9. This also allows to simply cancel the process when a wrong code number has been entered.
A “long high pitch – long low pitch” termination signal sounds
in step 8, and the system returns to
normal operation when the code number entered does not exist in the system.
8.3.1 Quick Guide
Modifying an authorization profile by entering a code number
Example: Code number 2 3 1 4
Hold programming card to the device Æ
Æ
Æ present Æ
....
Æ remove card Æ
Æ present Æ
....
....
Æ present Æ
Æ remove Æ
Æ present Æ
...
Æ
Æ remove Æ
....
....
Æ remove Æ
Æ Pause, then wait for code number output to check:
2
3
1
4
see table;
Æ
if OK, hold programming card to the device Æ
Æ remove
Æ press the corresponding buttons to change the authorization profile Æ wait 6s Æ
ready.
Change the authorization profile in the table (appendix).
9
______________________________________________________________________________________________________
SCHAEFER GmbH | Winterlinger Str. 4 | 72488 Sigmaringen | Germany
Phone +49 7571 722-0 | Fax +49 7571 722-98 | [email protected] | www.ws-schaefer.de
User Manual ES-Mega / MegaBeans
______________________________________________________________________________________________________
9.
Storing a New Transponder
The procedure used to store new transponders in the ES-Mega is the same as for modifying an authorization profile
(Chapter 8).
The only difference is that the code number (Chapter 6) has not been assigned before, and is not included in the
table (appendix). So, the transponder’s serial number must be written down next to the corresponding code number
(output by beep code) in the table.
Every new transponder will be assigned the first free code number available.
This is the next free line in the table unless another transponder has been deleted from the ES-Mega before.
If another transponder has been deleted from the ES-Mega before, the code number of that transponder is free
again, and will be assigned to the next new transponder.
9.1
ES-Mega Capacity
The entire storage process can be repeated as often as necessary until the memory area for 255 transponder
identifiers is fully occupied. A transponder with a stored identifier is recognized as authorized immediately after
completing the storage procedure.
Any attempt to store an identifier of another transponder will be rejected when the memory is full. The device will
terminate the programming mode, and sound a long high-pitch long low-pitch tone
as a termination
signal.
9.2
Storing a New Transponder with Code Number Output
(Standard, Recommended)
During this procedure, a new transponder is stored in the memory of the ES-Mega. After this, the code number is
output for this transponder (Chapter 6.1). The authorization profile for this transponder can be defined immediately
after this.
1.
Write the transponder’s serial number to the first free line in the table;
2.
Hold the programming card to the device Æ “long high pitch” signal
3.
Hold new key transponder to the device within 6 seconds Æ “trill” signal
4.
The code number is output after a few seconds (see Chapter 6.1), compare with table;
5.
Buttons flash.
6.
Start modifying the authorization profiles within 6 seconds:
; programming mode ON;
;
- When pressed, a flashing button will be disabled, and stop flashing.
- When pressed, a non flashing button will be enabled, and start flashing.
After every button actuation, you have 6 more seconds available to continue modification.
7.
Wait 6 seconds Æ “double short high pitch - short low pitch” signal
; programming mode OFF;
8.
Hold the transponder to the device, check the authorization profile, and write it down in the table
Note:
The programming mode will be cancelled, sounding a “long high pitch – long low pitch” signal
unless a transponder is held in front of the device within 6 seconds after step 2.
10
______________________________________________________________________________________________________
SCHAEFER GmbH | Winterlinger Str. 4 | 72488 Sigmaringen | Germany
Phone +49 7571 722-0 | Fax +49 7571 722-98 | [email protected] | www.ws-schaefer.de
User Manual ES-Mega / MegaBeans
______________________________________________________________________________________________________
9.3
Storing a New Transponder without Code Number Output (Turbo Storage)
This procedure is used to store a transponder in the memory of the ES-Mega, while skipping the code number
output. The authorization profile for this transponder can be defined immediately, and the next key transponder can
be programmed after this, without presenting the programming card again.
It is absolutely necessary in this process to make certain that the transponders are programmed in the same order
as they are written down in the table (appendix. Also, no transponders should have been deleted from the system
before.
1.
Write the new transponder to the first free line in the table;
2.
Hold the programming card to the device Æ “long high pitch” signal
3.
Keep the programming card in front of the device Æ “double trill” signal
mode ON;
4.
Remove programming card Æ “tacking” sound indicating the turbo storage mode;
5.
Hold a new key transponder to the device within 6 seconds Æ “trill” signal
; programming mode ON;
; turbo storage
;
When programming more than one transponder, make certain to follow the sequence (table)!
6.
Buttons flash.
7.
Start modifying the authorization profiles within 6 seconds:
- When pressed, a flashing button will be disabled, and stop flashing.
- When pressed, a non flashing button will be enabled, and start flashing.
After every button actuation, you have 6 more seconds available to continue modification.
8.
Wait 6 seconds Æ “double short high pitch - short low pitch” signal
To program another transponder, continue with step 5.
9.
When all new transponders are programmed:
Wait 6 seconds Æ “long high pitch - long low pitch” signal
10.
; new “tacking” sound.
; programming mode OFF.
Check the authorization profiles of the new transponders, and write them down in the table (appendix).
Note: The code numbers of one or more transponders can be checked quickly as described in Chapter 7.
9.4
Storing a New Transponder without Code Number Output and without Modifying
the Authorization Profiles (Turbo Storage)
This procedure is used to store a transponder in the memory of the ES-Mega, while skipping both the code number
output, and the assignment of an authorization profile.
The transponders to be programmed can be held to the ES-Mega device directly and one after the other as long as
the device is in the turbo storage mode.
It is absolutely necessary in this process to make certain that the transponders are programmed in the same order
as they are written down in the table (appendix. Also, no transponders should have been deleted from the system
before.
1.
Write the new transponders to the first free lines in the table;
2.
Set DIP switch 3 of ES-Mega to ON;
3.
Hold the programming card to the device Æ “long high pitch” signal
; programming mode ON;
11
______________________________________________________________________________________________________
SCHAEFER GmbH | Winterlinger Str. 4 | 72488 Sigmaringen | Germany
Phone +49 7571 722-0 | Fax +49 7571 722-98 | [email protected] | www.ws-schaefer.de
User Manual ES-Mega / MegaBeans
______________________________________________________________________________________________________
4.
Keep the programming card in front of the device Æ “double trill” signal
mode ON;
5.
Remove programming card Æ “tacking” sound indicating the turbo storage mode;
6.
Hold a new key transponder to the device within 6 seconds Æ “Trill” signal
When programming more than one transponder, make certain to follow the sequence (table)!
7.
New “tacking” sound; to program another transponder, continue with step 6
8.
When all new transponders are programmed:
Wait 6 seconds Æ “long high pitch - long low pitch” signal
9.
; turbo storage
; programming mode OFF;
Set DIP switch 3 of ES-Mega back to OFF.
Note: The code numbers of one or more transponders can be checked quickly as described in Chapter 7.
10.
Deleting Single Transponder Identifiers
The delete card is used to delete a single transponder from the memory of ES-Mega. This will also delete the
corresponding code number from the memory.
10.1
Deleting an Existing Transponder
Both the delete card and the key transponder to be deleted are needed for this procedure.
1.
Hold the delete card to the device Æ “long high pitch” signal
; delete mode ON;
2.
Present the key transponder to be deleted within 6 seconds;
Æ “long trill” signal
; delete process started;
3.
Remove transponder, “double short high pitch - short low pitch” signal
4.
Remove the deleted transponder from the table (appendix).
; delete process completed;
Notes:
The delete mode will be terminated, and a “long high pitch - long low pitch” signal will sound
no transponder is presented within 6 seconds after step 2.
when
Transponders not stored in ES-Mega cannot be deleted either. If an attempt is made to do so, the delete process will
be cancelled, and a “long high pitch - long low pitch” signal is heard
.
A special function card (programming, reset, or delete card) cannot be deleted using this procedure.
10.2
Deleting Unavailable Transponders using the Code number
The ES-Mega allows the deletion of identifiers belonging to transponders which are not available any longer. This
may be required, e.g., when the holder of a transponder has lost his or her transponder, or fails to return the
transponder although there is a return obligation.
For unavailable transponders, the full delete process is carried out using the delete card.
To delete such a transponder, you need its code number as written down in the table (appendix).
12
______________________________________________________________________________________________________
SCHAEFER GmbH | Winterlinger Str. 4 | 72488 Sigmaringen | Germany
Phone +49 7571 722-0 | Fax +49 7571 722-98 | [email protected] | www.ws-schaefer.de
User Manual ES-Mega / MegaBeans
______________________________________________________________________________________________________
1.
Present the delete card Æ “long high pitch” signal
; delete mode ON;
2.
Keep delete card presented Æ “triple trill” signal
3.
Keep delete card presented Æ You hear the first beep
, indicating the first digit of the code number.
When the code number’s first digit is 1, remove the card from the field right away.
When the code number’s first digit is 3 (e.g.), keep the card in the field until you have heard a total of 3
beeps
. Then, remove the card from the field.
4.
Wait until a “long low pitch” signal
5.
Present the delete card again Æ You hear the first beep
of the next digit.
When the code number’s first digit is 1, remove the card from the field right away.
When the code number’s first digit is 2 (e.g.), keep the card in the field until you have heard a total of 2
beeps
. Then, remove the card from the field.
6.
Wait. If you hear a “long low pitch” signal
If you hear a “double long low pitch” signal
7.
ES-Mega will output the code number just entered for safety. Compare with table.
8.
When the code number is correct, hold the delete card to the device again to confirm
Æ “long trill” signal
; delete process started;
9.
Remove the delete card, wait for “double short high pitch - short low pitch” signal
complete;
10.
Remove the deleted transponder from the table (appendix).
; code number input ON;
is heard.
, repeat step 5 for next digits of the code number.
(after the 4th digit), continue with step 7.
; delete process
Notes: The termination signal is given by a long high pitch - long low pitch sound
, and the system
returns to normal operation when the delete card is not held to the device for a longer period of time in any of the
steps 2, 3, 5, or 8. This also allows to simply cancel the process when a wrong code number has been entered.
A “long high pitch – long low pitch” termination signal sounds
normal operation when the code number entered does not exist in the system.
10.2.1
in step 7, and the system returns to
Quick Guide
Deleting Unavailable Transponders using the Code number
Example: Code number 2 3 1 4
Present delete card Æ
Æ
Æ present Æ
....
Æ remove card Æ
Æ present Æ
....
....
Æ present Æ
Æ remove Æ
Æ present Æ
...
Æ remove Æ
....
....
Æ remove Æ
Æ Pause, then wait for code number check output:
2
3
1
4
see table.
Æ
if OK, present delete card Æ
Æ remove Æ
ready
Remove the deleted transponder from the table (appendix).
13
______________________________________________________________________________________________________
SCHAEFER GmbH | Winterlinger Str. 4 | 72488 Sigmaringen | Germany
Phone +49 7571 722-0 | Fax +49 7571 722-98 | [email protected] | www.ws-schaefer.de
User Manual ES-Mega / MegaBeans
______________________________________________________________________________________________________
11.
Deleting the Entire Memory (RESET)
The reset card is used to delete all key transponders from the memory of ES-Mega at a time. After the reset, all 255
memory locations can be assigned again.
1.
Present reset card Æ “double long high pitch” signal
;
2.
Remove reset card Æ wait for “long high pitch” signal
3.
Present reset card again Æ “long trill” signal
4.
Remove reset card Æ wait for “double short high pitch - short low pitch” signal
;
; reset started;
; reset complete;
Notes: The memory will remain unchanged, and the process will be cancelled, sounding a “long high pitch – longlow pitch”
signal unless the precise sequence of steps 1 to 3 is complied with (present – remove –
present the reset card).
Special function cards (programming card, delete card, reset card) are not deleted and remain valid.
12.
Programming Special Function Cards
Upon request, the ES-Mega will be delivered with pre-programmed special function cards (programming card, delete
card, reset card). But users can also program the ES-Mega for any other (existing) special function card by
themselves.
Thus, a single set of special function cards can be used to support any number of systems.
ES-Mega can also be programmed for a new special function card without any problem even when a special
function card is lost.
DIP switches 1 and/or 2 can be set to assign the "Programming", "Delete", or "Reset" functions to every transponder
marked by a corresponding label. This will delete the transponder used for the corresponding function previously.
The table below shows the DIP switch positions assigned to the storage of special function cards:
DIP switch
1 ON
Special function card
2 OFF
Programming card
1 OFF
2 ON
Delete card
1 ON
2 ON
Reset card
1.
Set DIP switches 1 and 2 to the desired position;
2.
Present the corresponding special function card Æ “double long high pitch” signal
The card is now assigned to the corresponding special function.
3.
Set DIP switches 1 and 2 to OFF again (or to the next position to program another special function card);
;
To return to normal operation, both DIP switches 1 and 2 must be set to OFF again.
Notes: All DIP switches also allow hot switching to either ON or OFF unless the tool used is liable to cause shortcircuits.
When you attempt to assign a special function to a transponder which is already used for another function, the
process will be cancelled, and a long high-pitch long low-pitch signal
will sound as a cancellation
signal.
If the same transponder was already defined for the special function to be assigned, this transponder's identifier will
remain in the memory, and the same acknowledgement as for a new allocation will be given:
14
______________________________________________________________________________________________________
SCHAEFER GmbH | Winterlinger Str. 4 | 72488 Sigmaringen | Germany
Phone +49 7571 722-0 | Fax +49 7571 722-98 | [email protected] | www.ws-schaefer.de
User Manual ES-Mega / MegaBeans
______________________________________________________________________________________________________
13.
Relay
A relay (1 potential-free changeover contact) switches during any action which concerns the ES-Mega, and also
during an unauthorized button operation (without presenting a transponder).
The relay is provided mainly to connect the light ring which is available on an optional basis.
14.
Technical Data
14.1
General System Technical Data
-
Power supply:
20V ... 30V DC
-
Admissible output current
of the entire system:
max. 2A
-
Operating temperature:
0°C ... 55°C
-
Number of participants:
A maximum of 255 transponders can be stored.
14.2
ES-Mega Technical Data
Current consumption:
-
Closed-circuit current:
max. 60mA
-
Working current:
max. 70mA
-
Switching voltage:
max. 50V DC / 75V AC
-
Switching current:
max. 1A
-
Switching power:
max. 33W
Relay:
Fastening:
-
ES-Mega Design MT42:
-
ES-Mega without
faceplate opening:
The key switch top element is inserted from the front side through
the faceplate opening ( □ 32.5 R4.25). ES-Mega is snapped into place
from the rear side.
(Faceplate thickness up to 2 mm st. steel) 2 x welding bolts M3 x 20
Connecting hardware:
-
Connection to MegaBeans:
6-pole ribbon cable with MicroMatch plug-in contacts,
any insertion direction.
-
Supply and relay:
5-pole 0.1 mm2 ... 1 mm2 screw terminal, or optional modular 5-pole
insulation displacement connector to AWG 26-28
-
Light rim (optional):
Red LED, 2-pole light rim 0.1mm2 ... 1mm2
15
______________________________________________________________________________________________________
SCHAEFER GmbH | Winterlinger Str. 4 | 72488 Sigmaringen | Germany
Phone +49 7571 722-0 | Fax +49 7571 722-98 | [email protected] | www.ws-schaefer.de
User Manual ES-Mega / MegaBeans
______________________________________________________________________________________________________
Transponder hardware:
-
Type:
Read only, 64 bits, 40 bits data
-
Frequency:
125 kHz
-
BZT1 approval number :
G 750 741 J
Casing:
-
Dimensions:
52 mm (59 mm with light rim) x 41.5 mm x 20 mm
-
Drawing:
14.3
MegaBean Technical Data
Variants:
MegaBeans are available in 4 different variants:
-
3-wire , common anode
Colour: red
-
3-wire, common cathode
Colour: blue
-
4-wire, common anode
Colour: red
(call and acknowledgement jumpered at the button, or 3-wire call button)
-
4-wire, common cathode
Colour: blue
(call and acknowledgement jumpered at the button, or 3-wire call button)
Currents:
-
Closed-circuit current:
max. 8mA
-
Admissible output current:
max. 200mA each for button and control
Fastening:
-
1
Adhesive joint:
The MegaBean fastening plate is glued either to the faceplate,
or to the back box wall.
German Federal Office for Telecommunication Approvals
16
______________________________________________________________________________________________________
SCHAEFER GmbH | Winterlinger Str. 4 | 72488 Sigmaringen | Germany
Phone +49 7571 722-0 | Fax +49 7571 722-98 | [email protected] | www.ws-schaefer.de
User Manual ES-Mega / MegaBeans
______________________________________________________________________________________________________
Connecting hardware:
-
Connection to ES-Mega
and other MegaBeans:
6-pole ribbon cable with MicroMatch plug-in contacts,
any insertion direction
-
Connection of button
and control:
0.1mm2 ... 1mm2 screw clamps
Casing:
-
Dimensions:
-
Drawing:
28mm x 19mm x 18mm
MegaBean
fastening plate
15.
Connecting the Components
15.1
Connecting ES-Mega
ES-Mega is connected to the power supply via the “+ 24V” and “- 0V“ terminals.
The ES-Mega light ring, which is available on an optional basis, can be connected to the power supply, e.g., via the
ES-Mega’s relay (1 potential-free changeover contact).
The ES-Mega is connected to the MegaBeans using a 6-pole ribbon cable. The direction of insertion is irrelevant for
the MicroMatch plugs. The plugs’ polarization keys can be broken off if necessary.
Relay
Light ring
(optional)
Ribbon cable with MicroMatch to the MegaBeans
Power supply
Relay
Any insertion direction
17
______________________________________________________________________________________________________
SCHAEFER GmbH | Winterlinger Str. 4 | 72488 Sigmaringen | Germany
Phone +49 7571 722-0 | Fax +49 7571 722-98 | [email protected] | www.ws-schaefer.de
User Manual ES-Mega / MegaBeans
______________________________________________________________________________________________________
15.2
Connecting MegaBeans
One MegaBean is needed for every button to be included in the access control system. The MegaBean is connected
simply between button and control (or converter).
15.2.a 3-wire hardware
15.2.b 4- wire hardware
- Couple call and acknowledgement at the button
(or use 3-wire buttons) and connect to terminal T
- Connect call control to terminal R
- Connect acknowledgement (ACK) control to terminal Q
- Connect button to terminal T
- Connect control to terminal R
3-wire, common cathode
(3-wire, common anode)
+ 24V
(GND-)
GND(+ 24V)
4-wire, common cathode
(4-wire, common anode)
+ 24V
(GND-)
Control
Call 2
GND(+ 24V)
Control
Jumper
Call 1
ACK 2
Button
Button
Call 2
Jumper
ACK 1
Call 1
Ribbon
cable
16.
Ribbon
cable
Transponder Output Table
The following table should be used to write down and assign serial number, holder, and the code number (beep
sequence) output during programming for every transponder.
The name of every transponder holder, and the laser-engraved numbers on every transponder should be written
down clearly in the columns under "Transponder Holder / Number". The next columns are designated as 1. 2. 3. 4,
and should be used to record the 4 digits of very code number (beep sequences).
We should like to point out once again that it is absolutely necessary to write down the laser-engraved number of
every transponder next to the name of the corresponding transponder holder (especially when a large number of
transponders is issued). Otherwise, it may be impossible to ensure a proper and logical administration of the
transponders.
18
______________________________________________________________________________________________________
SCHAEFER GmbH | Winterlinger Str. 4 | 72488 Sigmaringen | Germany
Phone +49 7571 722-0 | Fax +49 7571 722-98 | [email protected] | www.ws-schaefer.de
User Manual ES-Mega / MegaBeans
______________________________________________________________________________________________________
Transponder Output Table
for:
__________________ / ______
Order No.
on _________
Device
Date
Example:
Transponder
Holder name
Number
Code
Number
1. 2. 3. 4.
Floor
Ms.. Mustermann 1012345 1 1 1 1 U, E, 2
Mr. Oberstock
1001223 1 1 1 2 U, E, 15
Mr. Boss
2110123 1 1 1 3
all
Code
Number
Transponder
Holder name
Number
1.
2.
3.
Floor
4.
1 1 1 1
1 1 1 2
1 1 1 3
1 1 1 4
1 1 2 1
1 1 2 2
1 1 2 3
1 1 2 4
1 1 3 1
1 1 3 2
1 1 3 3
1 1 3 4
1 1 4 1
1 1 4 2
1 1 4 3
1 1 4 4
1 2 1 1
1 2 1 2
1 2 1 3
1 2 1 4
19
______________________________________________________________________________________________________
SCHAEFER GmbH | Winterlinger Str. 4 | 72488 Sigmaringen | Germany
Phone +49 7571 722-0 | Fax +49 7571 722-98 | [email protected] | www.ws-schaefer.de
User Manual ES-Mega / MegaBeans
______________________________________________________________________________________________________
Code
Number
Transponder
Holder name
Number
1.
2.
3.
Floor
4.
1 2 2 1
1 2 2 2
1 2 2 3
1 2 2 4
1 2 3 1
1 2 3 2
1 2 3 3
1 2 3 4
1 2 4 1
1 2 4 2
1 2 4 3
1 2 4 4
1 3 1 1
1 3 1 2
1 3 1 3
1 3 1 4
1 3 2 1
1 3 2 2
1 3 2 3
1 3 2 4
1 3 3 1
1 3 3 2
1 3 3 3
1 3 3 4
1 3 4 1
1 3 4 2
1 3 4 3
1 3 4 4
20
______________________________________________________________________________________________________
SCHAEFER GmbH | Winterlinger Str. 4 | 72488 Sigmaringen | Germany
Phone +49 7571 722-0 | Fax +49 7571 722-98 | [email protected] | www.ws-schaefer.de
User Manual ES-Mega / MegaBeans
______________________________________________________________________________________________________
Code
Number
Transponder
Holder name
Number
1.
2.
3.
Floor
4.
1 4 1 1
1 4 1 2
1 4 1 3
1 4 1 4
1 4 2 1
1 4 2 2
1 4 2 3
1 4 2 4
1 4 3 1
1 4 3 2
1 4 3 3
1 4 3 4
1 4 4 1
1 4 4 2
1 4 4 3
1 4 4 4
2 1 1 1
2 1 1 2
2 1 1 3
2 1 1 4
2 1 2 1
2 1 2 2
2 1 2 3
2 1 2 4
2 1 3 1
2 1 3 2
2 1 3 3
2 1 3 4
21
______________________________________________________________________________________________________
SCHAEFER GmbH | Winterlinger Str. 4 | 72488 Sigmaringen | Germany
Phone +49 7571 722-0 | Fax +49 7571 722-98 | [email protected] | www.ws-schaefer.de
User Manual ES-Mega / MegaBeans
______________________________________________________________________________________________________
Code
Number
Transponder
Holder name
Number
1.
2.
3.
Floor
4.
2 1 4 1
2 1 4 2
2 1 4 3
2 1 4 4
2 2 1 1
2 2 1 2
2 2 1 3
2 2 1 4
2 2 2 1
2 2 2 2
2 2 2 3
2 2 2 4
2 2 3 1
2 2 3 2
2 2 3 3
2 2 3 4
2 2 4 1
2 2 4 2
2 2 4 3
2 2 4 4
2 3 1 1
2 3 1 2
2 3 1 3
2 3 1 4
2 3 2 1
2 3 2 2
2 3 2 3
2 3 2 4
22
______________________________________________________________________________________________________
SCHAEFER GmbH | Winterlinger Str. 4 | 72488 Sigmaringen | Germany
Phone +49 7571 722-0 | Fax +49 7571 722-98 | [email protected] | www.ws-schaefer.de
User Manual ES-Mega / MegaBeans
______________________________________________________________________________________________________
Code
Number
Transponder
Holder name
Number
1.
2.
3.
Floor
4.
2 3 3 1
2 3 3 2
2 3 3 3
2 3 3 4
2 3 4 1
2 3 4 2
2 3 4 3
2 3 4 4
2 4 1 1
2 4 1 2
2 4 1 3
2 4 1 4
2 4 2 1
2 4 2 2
2 4 2 3
2 4 2 4
2 4 3 1
2 4 3 2
2 4 3 3
2 4 3 4
2 4 4 1
2 4 4 2
2 4 4 3
2 4 4 4
3 1 1 1
3 1 1 2
3 1 1 3
3 1 1 4
23
______________________________________________________________________________________________________
SCHAEFER GmbH | Winterlinger Str. 4 | 72488 Sigmaringen | Germany
Phone +49 7571 722-0 | Fax +49 7571 722-98 | [email protected] | www.ws-schaefer.de
User Manual ES-Mega / MegaBeans
______________________________________________________________________________________________________
Code
Number
Transponder
Holder name
Number
1.
2.
3.
Floor
4.
3 1 2 1
3 1 2 2
3 1 2 3
3 1 2 4
3 1 3 1
3 1 3 2
3 1 3 3
3 1 3 4
3 1 4 1
3 1 4 2
3 1 4 3
3 1 4 4
3 2 1 1
3 2 1 2
3 2 1 3
3 2 1 4
3 2 2 1
3 2 2 2
3 2 2 3
3 2 2 4
3 2 3 1
3 2 3 2
3 2 3 3
3 2 3 4
3 2 4 1
3 2 4 2
3 2 4 3
3 2 4 4
24
______________________________________________________________________________________________________
SCHAEFER GmbH | Winterlinger Str. 4 | 72488 Sigmaringen | Germany
Phone +49 7571 722-0 | Fax +49 7571 722-98 | [email protected] | www.ws-schaefer.de
User Manual ES-Mega / MegaBeans
______________________________________________________________________________________________________
Code
Number
Transponder
Holder name
Number
1.
2.
3.
Floor
4.
3 3 1 1
3 3 1 2
3 3 1 3
3 3 1 4
3 3 2 1
3 3 2 2
3 3 2 3
3 3 2 4
3 3 3 1
3 3 3 2
3 3 3 3
3 3 3 4
3 3 4 1
3 3 4 2
3 3 4 3
3 3 4 4
3 4 1 1
3 4 1 2
3 4 1 3
3 4 1 4
3 4 2 1
3 4 2 2
3 4 2 3
3 4 2 4
3 4 3 1
3 4 3 2
3 4 3 3
3 4 3 4
25
______________________________________________________________________________________________________
SCHAEFER GmbH | Winterlinger Str. 4 | 72488 Sigmaringen | Germany
Phone +49 7571 722-0 | Fax +49 7571 722-98 | [email protected] | www.ws-schaefer.de
User Manual ES-Mega / MegaBeans
______________________________________________________________________________________________________
Code
Number
Transponder
Holder name
Number
1.
2.
3.
Floor
4.
3 4 4 1
3 4 4 2
3 4 4 3
3 4 4 4
4 1 1 1
4 1 1 2
4 1 1 3
4 1 1 4
4 1 2 1
4 1 2 2
4 1 2 3
4 1 2 4
4 1 3 1
4 1 3 2
4 1 3 3
4 1 3 4
4 1 4 1
4 1 4 2
4 1 4 3
4 1 4 4
4 2 1 1
4 2 1 2
4 2 1 3
4 2 1 4
4 2 2 1
4 2 2 2
4 2 2 3
4 2 2 4
26
______________________________________________________________________________________________________
SCHAEFER GmbH | Winterlinger Str. 4 | 72488 Sigmaringen | Germany
Phone +49 7571 722-0 | Fax +49 7571 722-98 | [email protected] | www.ws-schaefer.de
User Manual ES-Mega / MegaBeans
______________________________________________________________________________________________________
Code
Number
Transponder
Holder Name
Number
1.
2.
3.
Floor
4.
4 2 3 1
4 2 3 2
4 2 3 3
4 2 3 4
4 2 4 1
4 2 4 2
4 2 4 3
4 2 4 4
4 3 1 1
4 3 1 2
4 3 1 3
4 3 1 4
4 3 2 1
4 3 2 2
4 3 2 3
4 3 2 4
4 3 3 1
4 3 3 2
4 3 3 3
4 3 3 4
4 3 4 1
4 3 4 2
4 3 4 3
4 3 4 4
4 4 1 1
4 4 1 2
4 4 1 3
4 4 1 4
27
______________________________________________________________________________________________________
SCHAEFER GmbH | Winterlinger Str. 4 | 72488 Sigmaringen | Germany
Phone +49 7571 722-0 | Fax +49 7571 722-98 | [email protected] | www.ws-schaefer.de
User Manual ES-Mega / MegaBeans
______________________________________________________________________________________________________
Code
Number
Transponder
Holder Name
Number
1.
2.
3.
Floor
4.
4 4 2 1
4 4 2 2
4 4 2 3
4 4 2 4
4 4 3 1
4 4 3 2
4 4 3 3
4 4 3 4
4 4 4 1
4 4 4 2
SCHAEFER GmbH
Winterlinger Str. 4
72488 Sigmaringen
Germany
Phone +49 (0) 7571 722-0
Fax +49 (0) 7571 722-98
[email protected]
www.ws-schaefer.de
Support
If you have any questions regarding this product, do not hesitate to contact us.
Copyright
Duplication (copy, print, microfilm or any other form) as well as electronic spreading of this document is only
permitted after formal written consent of SCHAEFER. SCHAEFER reserves the right for alterations of technical
details without prior notice. For all transactions our General Conditions of Sale and Delivery are applied.
All rights reserved.
28
______________________________________________________________________________________________________
SCHAEFER GmbH | Winterlinger Str. 4 | 72488 Sigmaringen | Germany
Phone +49 7571 722-0 | Fax +49 7571 722-98 | [email protected] | www.ws-schaefer.de
Ress.-Nr. 010335 I Schaefer GmbH
03/2006 I Printed in Germany
4 4 4 3