1
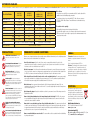
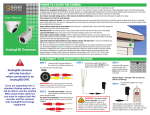
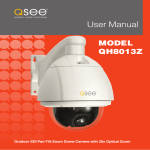
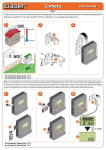
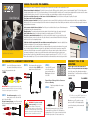
WHERE TO LOCATE THE CAMERA:
User Manual
For use with Weatherproof Indoor/Outdoor
and Indoor-Only Cameras
When installing your camera, it is important to select a proper site not only for field of view, but for other considerations as well:
Distance from viewing/recording device. The further the camera is from the DVR or monitor, the higher the chances of signal degradation. Typical 75Ω Video Cable provides
acceptable signal at distances up to 200’ (60m). At greater distances, UL-Listed shielded RG59 should be used. The camera’s power supply should be located as near to the camera
as possible when the distance exceeds 200’ as the power level will drop over extended distances resulting in a decrease in video quality.
Do not place near high voltage wires or other sources of electrical interference. Electrical interference will degrade the quality of the signal.
Place camera out of reach to avoid damage.
Avoid direct exposure to weather. Do not place the camera where rain or snow will hit the lens directly nor should the camera be placed so that the sun or bright light shines
directly into the lens. Your camera is weatherproof, but it will not work when submerged in water. Ensure that all power and video connections are not directly exposed to water and
are protected from the elements.
Indoor cameras should not be used outdoors. Even if they are in a sheltered location, they can still suffer damage due
to humidity, dust and other environmental factors.
Mounting surface The mounting surface must be sturdy and able to hold at least five times the camera’s total weight.
Legal Considerations Always check state and local laws before installing cameras. (2011 NEC 820.44)
Do not place camera behind a window. If there is a light source behind the camera, it can cause a reflection in the
window that will obscure events on the other side of the glass. Likewise, the camera’s infrared LEDs will reflect off the glass
and shine into the lens, thus degrading the image.
Light levels should be approximately the same between camera and target area. A camera in a brightly-lit area
looking into a shaded area, or vice versa, may produce inadequate results.
The above are guidelines and the optimal location for your camera will depend on your unique circumstances. As a general
rule, the locations highlighted in Green in the picture to the right indicate the best locations to mount your camera. Both
locations are sheltered from rain or snow and offer good sight lines to allow your camera to monitor a wide area. Because
your camera is weatherproof, it requires less protection than weather-resistant cameras and it can be placed in more
exposed locations if needed. Keep in mind that this camera is designed to operate between 14°F to 122°F (-10°C to 50°)
with a relative humidity of up to 95%) and consider wind chill and other environmental factors when selecting your location.
CONNECT TO A TV OR
MONITOR:
TO CONNECT TO A SECURITY DVR SYSTEM:
STEP 1
Connect the BNC and power leads from
the camera to the matching connectors on
one end of the power and video cable.
STEP 3
Plug the power splitter cable into the
camera power adapter. DO NOT plug the
adapter into an outlet at this time.
CAMERA
STEP 4
AUDIO IN
Connect the BNC connector
on the other end of the
power and video cable to a
Video In port on the back
of the DVR.
VIDEO IN
1
3
1
3
2
4
2
4
A single camera can be connected directly to a
monitor or TV using the included cable and adapter.
Connect the camera to the cable and power supply as
described in Steps 1, 2 and 5 above before connecting it
to your video display.
CAMERA
TV or MONITOR
Repeat Steps 1 through 4 for all cameras
before continuing.
STEP 5
IMPORTANT! When connecting the power and video cable
between the camera and the DVR, the “male” power end (red plug)
connects to the matching power lead on the camera.
Plug the power adapter into a surge
protector *
STEP 2
For multi-camera packs, connect the
power connector on the other end of the
cable to the power splitter.
For single camera packages, connect the power lead
into the power adapter itself. In this case, you can skip
to Step 4.
For TV: Tune to correct INPUT (ie; A/V, L1, L2,
Source) Consult TV manual for details.
WARNING! If you have a multicamera package, the included
power adapter is designed to
provide enough voltage to operate multiple
cameras. Connecting a single camera to the
adapter can cause the optical chipset of that
camera to burn out and become useless.
*When selecting a surge protector, it is STRONGLY
recommended to use one that is UL-1449 rated, for a
clamping voltage of 330 or lower, a Joule rating of at least
400 and a response time of 10 nanoseconds or less.
Depending on your TV or monitor, you may
need to use a BNC-to-RCA adapter (right) to
connect the yellow plug on the camera cable
to your screen.
EXTENSION CABLES:
For more information on which cable to use for your application, please see the extended chart at www.q-see.com/cableselection To purchase, order online at www.Q-SeeStore.com
Q-See Model Number
Maximum Run Length
QS60F (60’)
QS120F (120’)
QS50B (50’)
QS100B (100’)
QSVRG60 (60’)
QSVRG100 (100’)
QSVRG200 (200’)
QS59500 (500’)
QS591000 (1000’)
180’
180’
800’
800’
Standard
Standard
High
High
75Ω Video Cable
75Ω Video Cable
RG-59
RG-59
Shielded
No
No
Yes - UL Rated
Yes - UL Rated
Plenum Rated
No
No
No
No
Video
RCA
BNC
BNC
BNC
Audio
RCA
N/A
N/A
N/A
Power
2.1mm
2.1mm
2.1mm
2.1mm
Quality Output
Type
Pre-Attached Connector
Usage
Indoor/Outdoor · Do not run inside walls or underground
Camera Compatibility
PRECAUTIONS:
CAUTION! Risk of electrical shock. To prevent
electric shock, do not remove screws or cover.
Do not attempt to disassemble camera. There are
no user serviceable parts inside. Service should be
performed by a qualified Q-See technician only.
Handle camera with care. Do not hit, shake,
puncture or drop the camera as this could cause
damage and prevent proper operation.
Avoid strong light. Do not aim camera at sun or
aim strong light directly into the lens as it will degrade
image quality and could cause damage. Camera should
ideally be placed out of direct sunlight for improved
performance.
Protect from elements. Indoor/outdoor cameras are
weatherproof but direct exposure to excessive rain, sun
or marine environmental conditions will degrade their
performance and shorten the life of the product.
Indoor-only cameras should NEVER be used outdoors.
Even if sheltered from direct exposure, they will still be
damaged by dust and moisture in the air.
Avoid excessive moisture within camera or
adapters. Do not use strong or abrasive detergents
when cleaning camera body. Clean with dry cloth or
mild detergent, wiping gently.
Do not use camera beyond prescribed voltage range.
Only use included power supply. Ensure power input
source conforms to local voltage. Voltage outside of
range could cause damage or abnormal performance.
Other Notes:
· If a cable run exceeds 800ft, we recommend using RG-6 coaxial cable which is
available at most retail building supply companies.
·If your home or business is pre-wired with CAT-5 cable, then you can run up
to 1000ft. (QSBAL2 Video Balun or Powered Balun are recommended for easy
installation.
To maintain video quality:
· Video quality is always enhanced by using shielded cables.
· To prevent video signal loss, run one continuous cable between the camera and
DVR for best results. If more length is required, use the minimum number of interconnection points possible.
Indoor/Outdoor · In-wall or along wall
CMOS/CCD, RCA/BNC Connection
FREQUENTLY ASKED QUESTIONS:
Below are some frequently asked questions regarding cameras. Additional information, plus live chat (during regular
business hours) can be found at www.Q-See.com/Support
Lines in the video images. Check the cable. If you connect a camera that is working to the cable of the
camera that has the lines and it too shows lines, replace the cable. If you are in an area with a lot of electrical
interference, switch to a shielded cable such as RG-59.
No video from camera. Check all connections and make sure that camera is connected to proper power supply.
Check to see that the camera is receiving power by cupping hand over lens. You should see a faint red glow from
the LEDs. Check camera on known functioning cable to determine if issue lies with camera or cable.
Cable extended to more than 60 feet and no video or video only during the day. The camera power supply/
power splitter combination is only designed to power cameras up to 60 feet. Any cameras beyond that distance
will need their own power supply which is available at www.Q-SeeStore.com
Dark video image. Some cameras feature an infrared cut filter to improve daytime video images. This can
sometimes become stuck. Place a hand over the lens for 10 seconds to trigger night vision mode. You may hear a
soft click as the filter resets.
Upside down video image. Change the orientation or position of your camera to correct. Video images cannot be
flipped within the DVR.
Camera looking through window has video image during day, but not at night. The LEDs on the camera
act as a flashlight and, at night, this light is being reflected by the window back at the camera. You will need to
reposition the camera outside the window.
Camera video is very dark during one time of day, but lighter during others. The camera may be positioned
so that the sun shines directly into it. This will backlight the subjects in the camera’s field of view and cause them
to appear dark and washed out. Reposition the camera to avoid this, keeping in mind that the sun will change
positions over the course of a year as well as during the day.
Camera on metal building has excessive static. The camera will need to be seperated from the metal building
by using a rubber gasket.
LEGAL:
Trademarks: All brand names and products are
trademarks or registered trademarks of their respective
owners.
Q-See is a registered trademark of DPS, Inc.
Disclaimer: The information in this document is subject
to change without notice. The manufacturer makes no
representations or warranties, either express or implied, of
any kind with respect to completeness of its contents.
Manufacture shall not be liable for any damages whatsoever
from misuse of this product.
DISPOSAL:
If the camera no longer functions or can no
longer be repaired, it must be disposed of
according to regulations regarding electronic
waste. By not disposing of electronic items in
household waste you will not only be following
the law, but contributing to the protection of the
environment.
Digital Peripheral Solutions, Inc.
8015 E. Crystal Dr., Anaheim, CA 92807
www.q-see.com
Q-See Customer Support (USA)
FAQ, videos, guides 24/7 & live chat (M-F 9-5pm
PST) at www.Q-See.com/Support