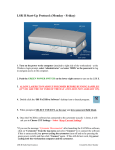
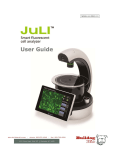
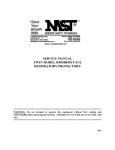
1
User Manual Non-Magnetic Beads PN: UM-P20121001 For research use only. Not for use in diagnostic procedures. 1 Rev 1.3.4 AimPlex® assay kits and any related reagents and documentation are provided “as is” without warranty of any kind. Although we have tried our best to ensure accuracy of this user manual and any related documentation, YSL Bioprocess Development Co. does not warrant, guarantee, or make any representations regarding the use or the results of the use of AimPlex assay kits and related documentation in terms of correctness, accuracy, reliability, or omissions. The entire risk as to the use, results, and performance of AimPlex assay kits and related documentation is assumed by the user. YSL Bioprocess Development Co. assumes no liability of any kind, whether oral or written, expressed or implied, for any direct, indirect, special, incidental, or consequential damages resulting from any defects in its documentation. This user manual and related documentation are subject to change without notice. AimPlex is a trademark licensed to YSL Bioprocess Development Co. All other trademarks appearing in this user manual are owned by their respective owners. Please contact Customer Service at [email protected] with any questions or comments. © Copyright 2012 YSL Bioprocess Development Co. All rights reserved. 2 Rev 1.3.4 Contents 1 How It Works ...................................................................................................................................... 5 2 Available AimPlex Immunoassay Kit format ........................................................................................ 6 3 2.1 Single Plex Kits ............................................................................................................................ 6 2.2 Premixed Multiplex Kits .............................................................................................................. 6 2.3 Custom panels and assay development and custom bulk packaging .......................................... 6 Supplied reagents and materials ......................................................................................................... 6 3.1 Single Plex Kits ............................................................................................................................ 6 3.1.1 Analyte Kit ........................................................................................................................... 6 3.1.2 Basic Kit ............................................................................................................................... 7 3.2 Premixed Multiplex Kits .............................................................................................................. 8 3.2.1 Premixed Analyte Kit ........................................................................................................... 8 3.2.2 Basic Kit for Premixed Panels .............................................................................................. 8 3.3 Diluent Kits .................................................................................................................................. 8 3.3.1 CCS (Cell culture supernatant) Diluent kit ........................................................................... 8 3.3.2 NR (Non-Rodent) SPB (Serum/Plasma/Bodily Fluid) Diluent kit .......................................... 9 3.3.3 Mouse/Rat SPB (Serum/Plasma/Bodily Fluid) Diluent kit .................................................... 9 3.3.4 TL (Tissue/cell lysate) Diluent kit ......................................................................................... 9 4 Required Equipment Not Supplied...................................................................................................... 9 5 Preparing 1x Reading Buffer and 1x Wash Buffer ............................................................................. 10 6 7 8 5.1 1x Reading Buffer ...................................................................................................................... 10 5.2 1x Wash Buffer .......................................................................................................................... 10 Preparing Antibody-Coupled Bead Working Suspension .................................................................. 10 6.1 Single Plex Kits .......................................................................................................................... 10 6.2 Premixed Multiplex Kits ............................................................................................................ 11 Preparing Biotinylated Detection (dAb) Antibody Working Solution ................................................ 11 7.1 Single Plex Kits .......................................................................................................................... 11 7.2 Premixed Multiplex Kits ............................................................................................................ 12 Preparing Antigen Standards ............................................................................................................ 12 8.1 Reconstitution of the lyophilized standards .............................................................................. 12 3 Rev 1.3.4 8.1.1 If there is only one standard vial in the kit ........................................................................ 12 8.1.2 If there are multiple standard vials in the kit .................................................................... 12 8.2 9 Serial dilution preparation ........................................................................................................ 13 Performing the assay ........................................................................................................................ 14 10 Setting Up Flow cytometers .......................................................................................................... 15 10.1 Fluorescence channels .............................................................................................................. 15 10.2 Preparing instrument setup beads ............................................................................................ 15 10.3 Setting up a display layout/template ........................................................................................ 16 10.4 Running the setup beads........................................................................................................... 16 11 Analyzing the samples ................................................................................................................... 19 12 Technical hints .............................................................................................................................. 19 13 Troubleshooting ............................................................................................................................ 21 14 Blank Plate Layout ......................................................................................................................... 22 4 Rev 1.3.4 1 How It Works AimPlex multiplex assay technology utilizes multiple bead populations differentiated by size and different levels of fluorescence intensity. With multiple sizes of beads and multiple levels of fluorescence intensity in each bead size, the AimPlex technology can measure up to 24 analytes simultaneously in a single reaction. The bead populations in the reaction are determined by a flow cytometer equipped with a 488nm laser. The maximum emission of the bead classification dye is at 700 nm. Similar to the principle of a sandwich ELISA, each bead population conjugated with a specific capture antibody to trap the protein of interest, such as a cytokine, in the sample. The amount of the analyte captured is detected via a biotinylated antibody against a secondary epitope of the protein, followed by a streptavidin-R-phycoerythrin treatment. The fluorescent intensity of R-phycoerythrin on the beads is quantified on a flow cytometer. Concentrations of a protein of interest in the samples can be obtained by comparing the fluorescent signals to those of a standard curve generated from a serial dilution of a known concentration of the analyte. The assay procedure consists of a 60 min antigen and capture antibody conjugated bead incubation step, a 30 min biotinylated detection incubation step and a 20 min streptavidin-PE incubation step. Assay Protocol Overview: 5 Rev 1.3.4 2 Available AimPlex Immunoassay Kit format 2.1 Single Plex Kits All available AimPlex immunoassays are grouped as 12-24 analytes per group. Each analyte in a Group has a unique bead region and can be multiplexed together in any combination. Analytes in different groups may be multiplexed together if there is no conflicted on the bead regions but may have some cross-reactivity because we did not validate cross-reactivity of all the assays across different groups. Each Single Plex Kit consists of 1 or more user selectable Analyte Kits, a Basic Kit and a sample matrix specific Diluent Kit. Each Analyte Kit contains analyte specific Ab conjugated beads, detection antibody(ies) and corresponding antigen standard(s). The Basic Kit has species-specific detection antibody diluent, reading buffer, wash buffer, Streptavidin-PE (SAPE), filter plate and plate seals. The Diluent Kit contains sample-type specific Standard Diluent and sample Assay Buffer. 2.2 Premixed Multiplex Kits Each Premixed Multiplex Kit has a pre-defined multiplex panel with premixed antibody-conjugated beads, antigens and detection antibodies. Except the Reading Buffer (10x) and Wash Buffer (10x), all the reagents are supplied as ready-to-use. 2.3 Custom panels and assay development and custom bulk packaging We offer custom premixed multiplex panels as well as custom assay development for analytes not currently available. We will work with you to design the panels and assays. Please contact us for pricing, lead time and details of those offerings. We also offer custom bulk packaging, usually in 5 plate size. Please contact us for details. 3 Supplied reagents and materials 3.1 Single Plex Kits Each Single Plex Kit consists of 1 or more user selectable Analyte Kits, a Basic Kit and a sample matrix specific Diluent Kit (refer to section 3.3 for available Diluent kits). 3.1.1 Analyte Kit Each Analyte Kit consists of the following components. If multiple analyte kits are ordered, all the components are shipped in a single Analyte Kit box. Component Vol 6 Rev 1.3.4 45x Analyte-Specific Ab conjugated beads, e.g. 45x S4P7-human IL-2 0.1 mL (S4 = Size 4µm beads, P7 = Peak 7 of the 4µm beads) 25x Analyte-Specific biotinylated detection Ab, e.g. 25x Biotin-human IL-2 0.1 mL dAb Lyophilized Antigen Standard* 1 vial* * Each vial may contain one or multiple antigens, refer to lot-specific Standard Info Sheet for details. 3.1.2 Basic Kit There are 2 species-specific, non rodent (NR) and mouse/rat, Basic Kits. 3.1.2.1 NR (Non Rodent) Basic Kit This Basic Kit is for human, non-human primate and other non-rodent species asssays. Component Vol 3x NR Detection Ab Diluent 1x Streptavidin-PE (SAPE) 10x Reading Buffer 10x Wash Buffer PCR 8-tube Strip Filter Plate and Lid Plate Seals User Manual Packaging insert 0.85 mL 3 mL 5 mL 15 mL 2 each 1 each 6 sheets 1 each 1 each 3.1.2.2 Mouse/Rat Basic Kit This Basic Kit is for mouse and rat assays. Component Vol 3x Mouse/Rat Detection Ab Diluent 1x Streptavidin-PE (SAPE) 10x Reading Buffer 10x Wash Buffer PCR 8-tube Strip Filter Plate and Lid Plate Seals User Manual Packaging insert 0.85 mL 3 mL 5 mL 15 mL 2 each 1 each 6 sheets 1 each 1 each 7 Rev 1.3.4 3.2 Premixed Multiplex Kits Each Premixed Muliplex Kit consists of a Premixed Analyte Kit, a Basic Kit for premixed panels and a sample type-specific Diluent Kit (refer to section 3.3 for available Diluent kits). 3.2.1 Premixed Analyte Kit Component Vol 1x Premixed Ab-conjugated beads 5 mL 2x Premixed Biotin-dAbs 1.5 mL 2x NR or Mouse/Rat dAb Diluent (depending on the assay panel) 1.5 mL Lyophilized Antigen Standards* 1 or multiple vials * Antigen standards are supplied as premixed but can be in a single vial or multiple vials depending on the panels. Refer to Standard Info Sheet for details. 3.2.2 Basic Kit for Premixed Panels Component Vol 1x Streptavidin-PE (SAPE) 10x Reading Buffer 10x Wash Buffer PCR 8-tube Strip Filter Plate and Lid Plate Seals User Manual Packaging insert 3 mL 5 mL 15 mL 2 each 1 each 6 sheets 1 each 1 each 3.3 Diluent Kits The Diluent Kits are sample type-specific. Please indicate the sample type of your assay panel when place an order. 3.3.1 CCS (Cell culture supernatant) Diluent kit This kit is for cell culture supernatant samples. It is universal for all species. Component CCS Standard Diluent CCS Assay Buffer Vol 2.5 mL 8 mL 8 Rev 1.3.4 3.3.2 NR (Non-Rodent) SPB (Serum/Plasma/Bodily Fluid) Diluent kit This kit is for serum, plasma and bodily fluid (SPB) samples from human, non-human primate and other non-rodent (NR) species. Component NR SPB Standard Diluent NR SPB Assay Buffer 3.3.3 Vol 2.5 mL 8 mL Mouse/Rat SPB (Serum/Plasma/Bodily Fluid) Diluent kit This kit is for mouse and rat serum, plasma and bodily fluid samples. Component Mouse/Rat SPB Standard Diluent Mouse/Rat SPB Assay Buffer 3.3.4 Vol 2.5 mL 8 mL TL (Tissue/cell lysate) Diluent kit This kit is for tissue and cell lysate samples. It is universal for all species. Component TL Standard Diluent TL Assay Buffer 4 Vol 2.5 mL 8 mL Required Equipment Not Supplied Barnstead/Lab-Line Titer Plate Shaker (Thermo Scientific, Waltham, MA) or equivalent. The shaker should have 3 mm orbit with ability to maintain 600-800 rpm. AimPlex™ EZPrep Filter Plate Washer (PN: VM1001). Vacuum source for the filter plate washer. An economy vacuum pump (e.g. Barnant Model 400-1901 or equivalent) is recommended. A flow cytometer equipped with a 488nm laser and capable of detecting FS, SS, PE and PECy5 (and/or PECy7). 9 Rev 1.3.4 5 Preparing 1x Reading Buffer and 1x Wash Buffer 5.1 1x Reading Buffer Bring the 10x Reading Buffer to room temperature and vortex for 15 seconds. Mix 5 mL of the 10x Reading Buffer with 45 mL ddH20. The 1x Reading Buffer can be stored at 2-8 °C for up to 3 months. 5.2 1x Wash Buffer Bring the 10x Wash Buffer to room temperature and vortex for 15 seconds. Mix 15 mL of the 10x Wash Buffer with 135 mL ddH20. The 1x Wash Buffer can be stored at room temperature for up to 3 months. 6 Preparing Antibody-Coupled Bead Working Suspension 6.1 Single Plex Kits The capture bead stock provided with each kit is a 45x concentrated stock (1 µL per test). Dilution of the stock beads to working suspension with 1x Reading Buffer is needed. 6.1.1. Determine the number of analytes in the panel (e.g. a 7-plex panel) 6.1.2. Determine the number of wells in the experiment. We recommend adding an additional at least 2 wells to account for pipetting recovery. For example, if a total of 48 wells is needed in the experiment, prepare enough for 50 wells. 6.1.3. Determine the total volume of working bead suspension needed for the experiment. Each tube/well needs 45 µL of the working bead suspension. The total volume is calculated by multiplying the number of wells (calculated in Step 6.1.2.) by 45 µL. For example, 50 wells × 45 µL = 2,250 µL total working bead suspension. 6.1.4. Determine the volume needed for each 45x Analyte-Specific Ab Conjugated Beads (i.e. 1.0 µL needed for each well). Therefore, for example, a total of 50 wells needs 50 µL of each 45x capture bead stock. 6.1.5. Determine the volume of 1x Reading Buffer needed to prepare the working bead suspension. Calculate the 1x Reading Buffer volume by subtracting the volume for each capture bead stock: ____ µL from Step 6.1.3 – ___ µL from Step 6.1.4 x ___ number of Plex (Step 6.1.1) = ____ µL of 1x Reading Buffer For example, a 7-plex panel for 50 wells: 2,250 - 50 x 7 = 1900 µL of 1x Reading Buffer 10 Rev 1.3.4 6.1.6. Add the appropriate volume (determined in Step 6.1.5) of 1x Reading Buffer to a test tube labeled with "Working Bead Suspension". 6.1.7. Centrifuge each capture bead vial at 20,00 x g for 10 sec. 6.1.8. Vortex each capture bead vial for 15 second. 6.1.9. Add the appropriate volume (determined in Step 6.1.4.) of each capture bead stock into the "Working Bead Suspension" tube. 6.1.10. Mix by gentle vortexing. If not use immediately, store the working bead suspension at 28oC with light protection. It can be stored at 2-8 °C for up to 1 week. 6.2 Premixed Multiplex Kits The antibody-coupled beads are provided as premixed ready-to-use 1x suspension. No preparation is needed. 7 Preparing Biotinylated Detection (dAb) Antibody Working Solution 7.1 Single Plex Kits The Biotinylated Detection (dAb) Antibody stock provided with each kit is a 25x concentrated stock (1 µL per test). Dilution of the stock biotinylated dAb stocks to working solution with NR or Mouse/Rat dAb Diluent is needed. 7.1.1. Determine the number of analytes in the panel (e.g. a 7-plex panel) 7.1.2. Determine the number of wells in the experiment. We recommend adding an additional 2 wells to account for pipetting recovery. For example, if a total of 48 wells is needed in the experiment, prepare enough for 50 wells. 7.1.3. Determine the total volume of working dAb solution needed for the experiment. Each tube/well needs 25 µL of the working detection antibody solution. The total volume is calculated by multiplying the number of wells (calculated in Step 7.1.2.) by 25 µL. For example, 50 wells × 25 µL = 1,250 µL total working detection antibody solution. 7.1.4. Determine the volume needed for each 25x Biotinylated Detection Antibody stock (i.e. 1.0 µL needed for each well). Therefore, for example, a total of 50 wells needs 50 µL of each 25x detection antibody stock. 7.1.5. Determine the volume of 3x NR or Mouse/Rat dAb Diluent needed to prepare the working dAb solution. ____ µL from Step 7.1.3 ÷ 3 = ____ µL of 3x NR or Mouse/Rat dAb Diluent For example, a total of for 50 wells: 1,250 ÷ 3 = 417 µL of 3x NR or Mouse/Rat dAb Diluent 11 Rev 1.3.4 7.1.6. Calculate the ddH2O volume by subtracting the volume for each capture bead stock and 3x 3x NR or Mouse/Rat dAb Diluent: ____ µL from Step 7.1.3 – ___ µL from Step 7.1.4 x ___ number of Plex (Step 7.1.1) ____ µL from Step 7.1.5 = ____ µL of ddH2O For example, a 7-plex panel for 50 wells: 1,250 - 25 x 7 - 417 = 658 µL of ddH2O 7.1.7. Add the appropriate volume (determined in Step 7.1.6) of ddH2O to a test tube labeled with "Working dAb Solution ". 7.1.8. Add the appropriate volume (determined in Step 7.1.5) of 3x NR or Mouse/Rat dAb Diluent 7.1.9. Add the appropriate volume (determined in Step 7.1.4.) of each dAb stock into the "Working dAb Solution " tube. 7.1.10. Mix by gentle vortexing. The working dAb solution can be stored at 2-8 °C for up to 24 hrs. 7.2 Premixed Multiplex Kits Transfer the entire content of 2x NR or Mouse/Rat dAb diluent to the 2x Premixed Biotin-dAb vial. Mix by gentle vortexing. The working solution can be stored at 2-8 oC for up to 24 hrs. 8 Preparing Antigen Standards 8.1 Reconstitution of the lyophilized standards 8.1.1 If there is only one standard vial in the kit 8.1.1.1. Centrifuge the antigen standard vial at 2000 x g for 10 sec. 8.1.1.2. Add 250 μL of CCS (cell culture supernatant), SPB (serum/plasma/bodily fluid) or TL (Tissue/cell lysate) standard diluent into the vial. Note: Reconstitute volume may be different for custom assay panels. Refer to the "Standard Info Sheet" enclosed in the kit for details. 8.1.1.3. 8.1.1.4. 8.1.1.5. Vortex gently for 15 sec. Incubate on ice for 5-10 min. Vortex gently for 15 sec before Serial Dilution Preparation (Step 8.2) 8.1.2 If there are multiple standard vials in the kit 8.1.2.1. Centrifuge the antigen standard vials at 2000 x g for 10 sec. 12 Rev 1.3.4 8.1.2.2. Add 250 μL of CCS (cell culture supernatant), SPB (serum/plasma/bodily fluid) or TL (Tissue/cell lysate) standard diluent into the first vial. Note: Reconstitute volume may be different for custom assay panels. Refer to the "Standard Info Sheet" enclosed in the kit for details. 8.1.2.3. 8.1.2.4. 8.1.2.5. 8.1.2.6. 8.1.2.7. 8.1.2.8. 8.1.2.9. 8.1.2.10. 8.2 Vortex gently for 15 sec. Incubate on ice for 5 min Vortex gently for 15 sec Transfer the entire content to the next vial Vortex gently for 15 sec. Incubate on ice for 5 min Vortex gently for 15 sec If more than 2 standard vials in the kit, repeat Steps 8.1.2.6 to 8.1.2.9 for the rest of the vials. Serial dilution preparation Prepare 3x serial dilutions (160 µL in total, enough for duplicated wells) according to Table 1. Mix each addition by pipetting up and down 6–8 times. Change pipette tips after each addition to avoid contamination from one concentration to the other. Keep the standards on ice until use. Table 1: Preparation of antigen Standard Curve Standard Standard 1 (Undiluted) Standard 2 (1/3) Standard 3 (1/9) Standard 4 (1/27) Standard 5 (1/81) Standard 6 (1/243) Standard 7 (1/729) Blank Amount from Previous Standard (µL) 80 80 80 80 80 80 0 Standard Diluent (µL) Prepared in Section 8.1 160 160 160 160 160 160 160 Note: If very low levels (less than 10 pg/mL) of cytokines are expected in the samples, we recommend adding 1 or even 2 more standard points, Standard 8 (1/2187) and Standard 9 (1/6561) in the assay for better quantitation at low concentrations. Standard 1 may be omitted when assaying those samples. Note: Serial dilution factor may be different for custom assay panels. Refer to the "Standard Info Sheet" enclosed in the kit for details. 13 Rev 1.3.4 9 Performing the assay 9.1. Prepare the plate template. Mark the standard, sample and blank wells. Standards and samples should be run in duplicates or triplicates. If the whole plate will not be used, seal the unused well with a plate seal. Important: Place the filter plate on top of the inverted filter plate lid during the entire assay process to prevent touching the plate bottom on any surface. 9.2. 9.3. 9.4. 9.5. 9.6. Add 45 µL/well of 1x Reading Buffer to each well. Incubate for 5 min at room temperature. Remove buffer by using the EZPrep Filter Plate Washer. Vortex working bead suspension for 15 second. Add 45 µL of capture bead working suspension to each well. Note: Save the remaining capture bead working suspension and store at 2-8oC with light protection. It can be used for setting up the flow cytometer. 9.7. 9.8. 9.9. 9.10. Remove solution by using the EZPrep Filter Plate Washer. Wash the wells once by adding 100 µL 1x Wash Buffer to each well and removing buffer using the Filter Plate Washer. Gently tap the plate bottom onto several layers of paper towels to remove residual buffer on the plate bottom after the wash. Add 30 µL of CCS Assay Buffer, SPB or TL Assay Buffer to each sample well. Note: Cell culture supernatant samples can be run without diluting in Assay Buffer if very low levels (less than 20 pg/mL) of cytokines are expected. If it is the case, skip this step and add 45 µL of cell culture supernatant samples to each sample well in Step 9.11. 9.11. 9.12. 9.13. 9.14. 9.15. 9.16. 9.17. 9.18. 9.19. 9.20. 9.21. 9.22. Add 15 µL of samples to each sample well. Add 45 µL of standards to each standard well. Cover the plate with a plate seal. Incubate on the shaker (set at 700 rpm) for 60 min at room temperature. Protect from light. Remove the plate seal. Wash the wells three times with 100 µL 1x Wash Buffer. Gently tap the plate bottom onto several layers of paper towels to remove residual buffer on the plate bottom after the last wash. Add 25 µL of biotinylated antibody working solution to each well. Cover the plate with a plate seal. Incubate on the shaker (set at 700 rpm) for 30 min at room temperature. Protect from light. Remove the plate seal. Wash the wells three times with 100 µL 1x Wash Buffer. 14 Rev 1.3.4 9.23. Gently tap the plate bottom onto several layers of paper towels to remove residual buffer on the plate bottom after the last wash. Add 25 µL of streptavidin-PE working solution to each well. Cover the plate with a plate seal. Incubate on the shaker (set at 700 rpm) for 20 min at room temperature. Protect from light. Remove the plate seal. Remove solution by using the EZPrep Filter Plate Washer. 9.24. 9.25. 9.26. 9.27. 9.28. Note: If your flow cytometer does not use sheath fluid, wash the wells three times with 100 µL 1x Wash Buffer 9.29. Gently tap the plate bottom onto several layers of paper towels to remove residual solution. Add 150 µL of 1x Reading Buffer to each well to resuspend the beads. Cover the plate with a plate seal. Place the plate on the microtiter shaker and shake for 30 seconds at 700 rpm. Remove the plate seal. Read on a flow cytometer. 9.30. 9.31. 9.32. 9.33. 9.34. Note: If the assayed plate is not read immediately, it can be stored at 2-8oC for up to 16 hr. The plate should be sealed with a plate seal and protected from light. 10 Setting Up Flow cytometers 10.1 Fluorescence channels The maximum emission of the bead classification dye is at 700 nm. It can be detected on "PE-Cy5" channels of most of the flow cytometers with blue (488 nm) excitation. It can also be detected on PECy7 channels with blue (488 nm) excitation or APC channel with red (635 or 640nm) excitation if such a florescence channel is available. The reporter dye of the AimPlex assays is PE and can be detected on the PE channel with blue (488 nm) excitation. 10.2 Preparing instrument setup beads 10.2.1. Blank beads: Aliquot 75 µL bead suspension from one of Blank wells from Step 9.32 into a sample tube or a well of a 96-well plate depending on the sample loading mechanism of a flow cytomter. Add 100 to 300 µL of Reading Buffer to the tube/well. Remaining capture bead working suspension from Step 9.6 can also be used for this purpose. 15 Rev 1.3.4 10.2.2. Standard 1 beads: Aliquot 75 µL bead suspension from one of the Standard 1 wells from Step 9.32 into a sample tube or a well of a 96-well plate depending on the sample loading mechanism of a flow cytomter. Add 100 to 300 µL of Reading Buffer to the tube/well. Note: Add 75 µL of Reading Buffer to both Blank and Standard 1 wells. Acquisition for both wells will be slower (less bead concentrations) during the sample acquisition step. When running a panel the first time, we recommend running one extra well of Standard 1 for instrument setup purpose. 10.3 Setting up a display layout/template 1. Perform start up and verification of fluidic stability and optical alignment by following cytometer manufacturer's recommendations. 2. Open a new protocol. 3. Create the following plots and histograms: 1) A dot plot with FS (X-axis) and SS (Y-axis) in linear display mode. 2) 2 histograms of "PE-Cy5" in Log display mode. 3) 2 dot plots with PE (X-axis) and "PE-Cy5" (Y-axis) in Log display mode. 4) If PE-Cy7 or APC channel is available, create 2 histograms of "PE-Cy5" in Log display mode and 2 dot plots with PE (X-axis) and PE-Cy7 or APC (Y-axis) in Log display mode. 4. Set all compensation to zero. 5. Save the protocol. 10.4 Running the setup beads 10.4.1. Run the Blank beads prepared in Step 10.2.1. 1) Adjust FS and SS gains so that the bead populations are on scale (Figure 1). 2) Create Gate 1 for the smaller (4 micron size, S4) beads and Gate 2 for the larger (5 micron size, S5) beads (Figure 1). 16 Rev 1.3.4 Figure 1 3) Apply Gate 1 to one of the "PE-Cy5" histograms and one of the PE/"PE-Cy5" dot plots. 4) Apply Gate 2 to the other "PE-Cy5" histogram and the other PE/"PE-Cy5" dot plot 5) Adjust "PE-Cy5" PMT voltage so that all bead populations are clearly separated on the histograms and dot plots (Figure 2). In this example, S4 has 4 bead populations, S4P3, S4P7, S4P9 and S4P11. S4P3 (Size 4 micron, Peak #3) is the dimmest and S4P11 (Size 4 micron, Peak #11) is the brightest. 6) Adjust PE PMT voltage so that the dimmest bead population is positioned within the first decade on the PE-axis of the plot (Figure 2). S4P11 S4P3 Figure 2 7) Save the protocol. 10.4.2. Run the Standard 1 beads prepared in Step 10.2.2. 1) Verify all the bead populations on the PE-axis are on scale (Figure 3). 17 Rev 1.3.4 2) Adjust PE PMT voltage if needed. If adjustment is needed, make sure rerun the Standard 8 and make sure the dimmest bead population is still visible on the PE/"PE-Cy5" dot plots. Figure 3 3) Apply proper "PE-Cy5" - %PE color compensation so that the bead populations are in a horizontal position (see Figure 4 as an example of proper color compensation setting). Figure 4 Over compensation should be avoided (see Figure 5 as an example of over compensation). 18 Rev 1.3.4 Figure 5 4) Save the protocol . Note: If PE-Cy7 or APC fluorescence channel is available, carry out Steps 10.4.1 and 10.4.2 for the PE-Cy7 channel for the proper PMT voltage and color compensation (usually zero) settings. 11 Analyzing the samples If the flow cytometer does not equipped with a 96-well plate loader, transfer the samples from the wells to sample tubes. Acquire 100 events each bead population of the larger beads (Gate 2). For example, if there are 3 bead populations in Gate 2 (larger beads), acquire 3 x 100 = 300 events per sample. We have found that as few as 50 events for a bead population is sufficient. Save the FCS files and analyze the data using FCAP Array 3.0. 12 Technical hints 1. Set up the EZPrep Filter Plate Washer according to the instruction in the Product Insert. Adjust the vacuum pressure so that 100 µL of 1x Wash Fuffer in the wells can be clear in 3-5 second. 2. When working with samples and standards, change the pipette tips after every transfer and avoid creating bubbles when pipetting. 3. We recommend, whenever possible, using a multi-channel pipette for reagent additions to achieve optimal assay precision. 4. When apply plate seal to the filter plate, do not use a rubber roller. Use finger to gently press over the plate seal to seal the plate. 5. Sample handling: 19 Rev 1.3.4 a. Cell Culture Supernatant: Remove particulates by centrifugation and assay immediately or aliquot and store samples at ≤ -80℃. Avoid repeated freeze-thaw cycles. b. Serum: If using serum separator tubes, allow samples to clot for 30 minutes at room temperature. Centrifuge for 10 minutes at 1000×g. Collect the serum fraction and assay promptly or aliquot and store the samples at -80℃. Avoid multiple freeze-thaw cycles. If serum separator tubes are not being used, allow samples to clot overnight at 2-8℃. Centrifuge for 10 minutes at 1000×g. Remove serum and assay promptly or aliquot and store the samples at -80℃. Avoid multiple freeze-thaw cycles. c. Plasma: Centrifuge samples at 1,000 x g at 4 °C for 10 min within 30 min of blood collection. Collect the plasma fraction and assay promptly or aliquot and store the samples at -80℃. Avoid multiple freeze-thaw cycles. d. Thaw frozen samples on ice and mix well prior to adding to the assay wells. e. If there is a high lipid content in serum, plasma or bodily fluid samples, centrifuge at 10,000 x g for 10 min at 2-8 °C. Collect the serum, plasma or bodily fluid fraction for the assays. f. If samples contain high analyte concentrations and need dilution for the assays, use Sample Dilution Buffer (Part# P830100) for sample dilution. The exact dilution must be determined empirically. 20 Rev 1.3.4 13 Troubleshooting Issue Low event count Low assay signal or sensitivity High Background Low Precision Clogged filter plate Possible cause Bead aggregate Bead settle on the well bottom Vacuum too strong Standard not reconstituted well Incubation time too short Excess exposure to light Well-to-well contamination Poor pipetting precision Contamination from adjacent wells High lipid content in the serum, plasma or bodily fluid samples Recommended actions Vortex stock and working bead suspensions well before pipetting. Shake plates at 1000 rpm for 30 seconds prior to acquisition or transferring to sample tubes. Adjust the vacuum pressure so that 100 µL of 1x Wash Buffer in the wells can be clear in 3-5 second. Standard should be incubated on ice for 5min after the addition of standard diluent Follow recommended incubation time in each step During incubation, cover the plate with aluminum foil to minimize exposure of the beads to light Change pipette tips after every transfer. Remove plate seal carefully and avoid contents from one well to mix with another. Use calibrated pipettes. Avoid well-to-well contamination during pipetting and removal of plate seal Centrifuge the samples at 10,000 x g for 10 min at 28 °C. Collect the serum, plasma or bodily fluid fraction. 21 Rev 1.3.4 14 Blank Plate Layout 22 Rev 1.3.4