1
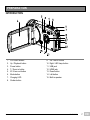
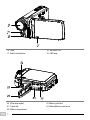
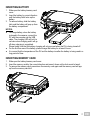
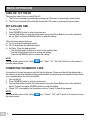
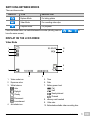
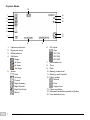
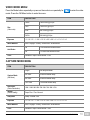
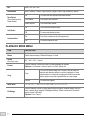
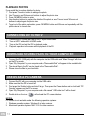
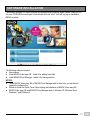
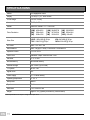
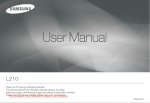
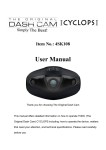
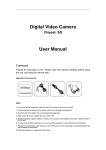
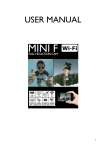
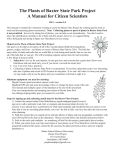
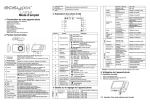
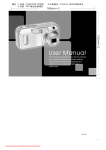
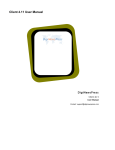
CONTENTS PRECAUTIONS ....................................................................................................................................... 1 DISCLAIMER ........................................................................................................................................... 1 FACTORY DEFAULT SETTINGS ........................................................................................................... 1 PREPARATION ........................................................................................................................................ 2 INTRODUCTION .................................................................................................................................. 2 INSERTING BATTERY ......................................................................................................................... 4 INSERTING MEMORY CARD ............................................................................................................. 4 BASIC OPERATION ................................................................................................................................ 5 TURN ON / OFF THE DV ..................................................................................................................... 5 SET DATE AND TIME .......................................................................................................................... 5 FORMATTING THE MEMORY CARD ................................................................................................. 5 SWITCHING BETWEEN MODES ....................................................................................................... 6 DISPLAY ON THE LCD SCREEN ....................................................................................................... 6 Video Mode........................................................................................................................................ 6 Capture Mode .................................................................................................................................... 7 Playback Mode .................................................................................................................................. 8 MENU ....................................................................................................................................................... 9 SETUP MENU ...................................................................................................................................... 9 VIDEO MODE MENU ......................................................................................................................... 10 CAPTURE MODE MENU ................................................................................................................... 10 PLAYBACK MODE MENU ................................................................................................................. 11 VIDEO RECORDING ............................................................................................................................. 12 TAKING PHOTO .................................................................................................................................... 12 PLAYBACK ............................................................................................................................................ 12 PLAYBACK VIDEO CLIPS ................................................................................................................. 12 PLAYBACK PHOTOS......................................................................................................................... 13 CONNECTING DV TO HDTV ................................................................................................................ 13 DOWNLOAD STORED FILES TO YOUR COMPUTER ...................................................................... 13 USE DV AS A PC CAMERA ................................................................................................................. 13 SOFTWARE INSTALLATION................................................................................................................ 14 SPECIFICATIONS ................................................................................................................................. 15 Thank you for purchasing this camera. Please read these operating instructions carefully in order to use the camera correctly. Keep the instructions in a safe place after reading so that you can refer to them later. PRECAUTIONS Before using the camera, please ensure that you read and understand the safety precautions described below. Always ensure that the camera is operated correctly. Do not point the camera directly into the sun or other intense light sources which could damage your eyesight. Do not try to open the case of the camera or attempt to modify this camera in any way. Maintenance and repairs should be carried out only by authorized service providers. Keep the camera and its accessories out of the reach of children and animals to prevent accidents or damage to the camera. If you notice smoke or a strange odor coming from the camera, turn the power off immediately. Take the camera to the nearest authorized service center for repair. Never attempt to repair the camera by your own. Use only the recommended power accessories. Use of power sources not expressly recommended for this equipment may lead to overheating, distortion of the equipment, fire, electrical shock or other hazards. DISCLAIMER We assume no responsibility for damages suffered by the user or third parties as a result of inappropriate handling of the product or its accessories, or by their operational failure and by their use. We reserve the right to make changes to this product and its accessories without prior notice. FACTORY DEFAULT SETTINGS To return to the factory default settings: Press the OK/MENU button to enter the menu. Use the Right button to enter the Setup menu. Use the Down button to choose “Default Setting” and press the OK/MENU button. Choose “Cancel” to cancel the request or choose “OK” to return to the factory settings. EN 1 VS-FHD39N EN/1501.V01 PREPARATION INTRODUCTION 1. 2. 3. 4. 5. 6. 7. 8. LCD touch screen Up / Playback button Power button T / Zoom in button W / Zoom out button Mode button Charging LED Shutter button EN/1501.V01 9. 10. 11. 12. 13. 14. 15. OK / MENU button Right / LED lamp button USB jack HDMI jack Down button Left button Built-in speaker VS-FHD39N 2 EN 16. Lens 17. Built-in microphone 18. Self-timer LED 19. LED lamp 20. Wrist strap eyelet 21. Tripod slot 22. Battery compartment 23. Memory card slot 24. Battery/Memory card cover EN 3 VS-FHD39N EN/1501.V01 INSERTING BATTERY 1. Slide-open the battery/memory card cover. 2. Insert the battery by correct direction until the battery latch locks up the battery. 3. To remove battery, slide the battery latch and the battery will pop up from the battery compartment. NOTES: To charge battery, when the battery is placed in the camera, connect the DV with the computer via the USB cable. The charging LED will be lit in red color when charging and it will go off when charging is completed. Please kindly note that the battery charging will only proceed when the DV is being turned off. For the first time use of the battery, please charge the battery for at least 6 hours. It is normal that the temperature of the DV and the battery rise after the battery is being used in a long period of time. INSERTING MEMORY CARD 1. Slide-open the battery/memory card cover. 2. Insert the memory card by the correct direction and press it down until a click sound is heard. 3. To remove the memory card, press down the memory card again and the memory card will pop up from the memory card slot. EN/1501.V01 VS-FHD39N 4 EN BASIC OPERATION TURN ON / OFF THE DV There are two ways to turn on and off the DV. 1. The DV can be turned on by either flip-opening the LCD screen or pressing the power button. 2. The DV can be turned off by either flip-closing the LCD screen or pressing the power button. SET DATE AND TIME 1. Turn on the DV. 2. Press OK/MENU button to enter the main menu. 3. Use the Right button to enter the Setup menu and use the Down Button to move the indication bar on “Date” and press OK/MENU button to enter the setting. There are three options which are: a) On: To activate the date/time imprint. b) Off: To de-activate the date/time imprint. c) Set Date: To set the date and time. - Use the Right and Left buttons to move to the preferred item. - Use the Up and Down buttons to change the setting. - Press the OK/MENU button to confirm the setting. NOTE: You can directly press on the “Setup have the same access. ” icon, “Date”, “On”, “No” and “Set time” on the screen to FORMATTING THE MEMORY CARD It's important to format the memory card for the first time use. Please note that all the data stored in the memory card will be deleted including protected files, so please be sure to download those files to your computer before the card is formatted. 1. Turn on the DV. 2. Press OK/MENU button to enter the main menu. 3. Use the Right button to enter the Setup menu and use the Down Button to move the indication bar on “Format” and press OK/MENU button to enter the setting 4. Chose “OK” to proceed for the formatting or chose “Cancel” to cancel the request. NOTE: You can directly press on the “Setup the same access. EN 5 VS-FHD39N ” icon, “Format”, “OK”, and “Cancel” on the screen to have EN/1501.V01 SWITCHING BETWEEN MODES There are three modes: DISPLAY TITLE DESCRIPTION Capture Mode For taking photos Video Mode For recording video clips Playback Mode For playback Press the Mode button can switch between the modes (directly press on have the same access). to DISPLAY ON THE LCD SCREEN Video Mode 1 10 2 9 3 8 7 4 5 1. Video mode icon 2. Exposure value 3. White balance Auto Daylight Cloudy Fluorescent Incandescent 4. Anti-shake icon EN/1501.V01 6 5. Time 6. Date 7. Battery power level Full Half Nearly drained Drained 8. Memory card inserted 9. Video size 10. Estimated available video recording time VS-FHD39N 6 EN Capture Mode 15 1 2 14 3 12 13 4 5 6 11 10 7 8 1. 2. 3. 4. Capture mode icon Exposure value White balance Self-timer Single 2s timer 5s timer 10s timer 5. Scene Auto Scenery Portrait Night Scenery Night Portrait High Sensitivity Beach EN 7 VS-FHD39N 9 6. ISO value Auto ISO 100 ISO 200 7. 8. 9. 10. 11. 12. ISO 400 Anti-shake icon Time Date Battery power level Memory card inserted Photo quality Normal Fine Supper fine 13. Photo resolution 14. Estimated available quantity of photos 15. Face detection icon EN/1501.V01 Playback Mode For Photo 1. Playback mode icon 2. Date 3. Time 4. Battery power level 5. File sequence number/total file number 6. Photo resolution 6 5 1 4 2 For Video Clip 1. Playback mode icon 2. Video clip symbol 3. Battery power level 4. File sequence number/total file number 5. Time 6. Video size EN/1501.V01 6 3 5 1 4 2 3 VS-FHD39N 8 EN MENU SETUP MENU 1. Press the OK/MENU button to enter the Setup menu. 2. Use Up and Down buttons to select the preferred item and press the OK/MENU button again to enter the setting and exit the setting. ITEM DESCRIPTION Date (Date and time imprint) On To have date/time imprint Off To cancel the date/time import Set Date To set date/time 1 Minute Auto power off in 1 minute 3 Minutes Auto power off in 3 minutes 5 Minutes Auto power off in 5 minutes Off No auto power off time On To have beep sound Off To cancel beep sound Auto Power Off Beep Sound Language German / English / French / Spanish / Portuguese / Dutch / Italian Frequency 50Hz / 60Hz Cancel Cancel the request to format the memory card OK Format the memory card Cancel Cancel the request to return to factory default settings OK Return to factory default settings Format Default Setting EN 9 VS-FHD39N EN/1501.V01 VIDEO MODE MENU Press the Mode button repeatedly or press on the mode icon repeatedly for mode. Press the OK/Menu button to enter the menu. ITEM Size (Video size) to enter the video DESCRIPTION 1080P 1920X1080 @ 25 fps 720P 1280X720 @ 30 fps VGA 640 x 480 @ 30 fps QVGA 320x240 @ 30 fps Exposure -2 / 1.6 / 1.3 / -1 / 0.6 / -0.3 / 0 / +0.3 / +0.6 / +1 / +1.3 / 1.6 / +2 White Balance Auto / Daylight / Cloudy / Fluorescent / Incandescent On To activate anti-shake function Off To cancel anti-shake function Anti-Shake Color Standard / Sepia / Monochrome / Vivid CAPTURE MODE MENU ITEM Capture Mode (Self-timer) DESCRIPTION Single No delayed shutter 2S Timer 2-second shutter delay 5S Timer 5-second shutter delay 10S Timer 10-second shutter delay Resolution (Photo Resolution) 12M / 10M / 9M / 8M / 7M / 5M / 3M / 2M / VGA Quality (Photo Quality) Super Fine / Fine / Normal Sharpness Sharp / Normal / Soft Exposure -2 / 1.6 / 1.3 / -1 / 0.6 / -0.3 / 0 / +0.3 / +0.6 / +1 / +1.3 / 1.6 / +2 White Balance Auto / Daylight / Cloudy / Fluorescent / Incandescent Color Standard / Sepia / Monochrome / Vivid EN/1501.V01 VS-FHD39N 10 EN ISO Auto / 100 / 200 / 400 Scene Mode Auto / Scenery / Portrait / Night Scenery / Night Portrait / High Sensitivity / Beach Face Detect (Face Detection and Smile Shutter) Off To cancel the face detection and smile shutter Face Detect To activate Face detection Smile Capture To activate smile shutter On To activate anti-shake function Off To cancel anti-shake function On To activate continuous shot (6 images/sec) Off To cancel continuous shot Anti-Shake Continue Shot PLAYBACK MODE MENU ITEM DESCRIPTION Delete Delete Current Image / Delete All Images / Cancel Rotate (For photo only) 90° / 180° / 270° / Cancel Protect Use this function to protect the files from being deleted by accident. Options: Lock Current / Unlock Current / Lock All / Unlock All Crop To crop the chosen image, use T/zoom in and W/zoom out buttons and direction buttons to set the cropping are. Press shutter button to confirm the cropping area and press shutter button again to save the cropped image as a new image. Cancel To cancel the request Crop Slide Show -2 / 1.6 / 1.3 / -1 / 0.6 / -0.3 / 0 / +0.3 / +0.6 / +1 / +1.3 / 1.6 / +2 PictBridge Use this function to print a picture without going through a computer (Make sure you have a printer which supports PictBridge function). Please connect the DV and the printer via the USB cable. Options: Print / Cancel EN 11 VS-FHD39N EN/1501.V01 VIDEO RECORDING 1. Insert the memory card into the DV. 2. Turn on the DV and set it at video mode by pressing the Mode button or pressing directly on the model icon on the screen. 3. Press the shutter button to start or stop recording. NOTES: Use the zoom in and zoom out buttons for zooming. Press the Right button to activate or deactivate the LED flash. Press the left button repeatedly to show the OSD information or turn off the screen to save power. TAKING PHOTO 1. Insert the memory card into the DV. 2. Turn on the DV and set it at capture mode directly on the model icon on the screen. 3. Press the shutter button to take photo. by pressing the Mode button or pressing NOTES: Use the zoom in and zoom out buttons for zooming. Press the Right button to activate or deactivate the LED flash. Press the left button repeatedly to show the OSD information or turn off the screen to save power. PLAYBACK Turn on the DV and set it at capture mode by pressing the Mode button or pressing directly on the model icon on the screen. Or press the Up button under video mode or capture mode will also switch to the playback mode. Press W/Zoom in button can enter thumbnails. Use direction buttons and press OK/MENU button to select the preferred file. PLAYBACK VIDEO CLIPS 1. Press the Shutter button or touch on the screen to start or pause the playback. Touch on the screen or press OK/MENU button to stop the playback. 2. Use zoom in and zoom out buttons to adjust the sound volume. EN/1501.V01 VS-FHD39N 12 EN PLAYBACK PHOTOS If you would like to explore details of a photo: 1. First press T/zoom in button to enlarge the photo. 2. Use T/zoom in and W/zoom out buttons to adjust the photo size. 3. Press OK/MENU button to enter. 4. Use direction buttons to explore the details of the photo or use T/zoom in and W/zoom out buttons to adjust again the photo size. 5. To get out of the photo exploration, press OK/MENU button and W/zoom out repeatedly until the photo returns to normal size. CONNECTING DV TO HDTV 1. Connect the DV (HDMI jack) with a HDTV by an HDMI cable. 2. Turn on HDTV and switch to HDMI mode. 3. Turn on the DV and set the DV in playback mode. 4. Playback operation is the same as the playback of the DV. DOWNLOAD STORED FILES TO YOUR COMPUTER 1. Connect the DV (USB jack) with the computer via the USB cable and “Mass Storage” will show on the DV’s screen. 2. Open “My Computer” in your computer and a “Removable Disk” will appear in the available list. 3. The stored files in the DV can be found in the “Removable Disk”. 4. Please store the files in your hard disk. USE DV AS A PC CAMERA 1. Connect the DV with your computer via the USB cable. 2. Make sure that the DV is turned off. 3. First press the Shutter button and don’t let go. Then press the Power button and on hold until “PC Camera” appears on the DV’s screen. 4. Open “My Computer” in your computer and a file named “USB video tool” will be found. 5. Double click on the icon will activate the PC camera feature. NOTES: PC camera is not workable under the following operation systems: 1. Windows operation system: Windows 8 or later versions. 2. Macintosh operation system: MAC 10.5.8 or later versions. EN 13 VS-FHD39N EN/1501.V01 SOFTWARE INSTALLATION The bundled software CD has the drivers and software that come with video camera. Insert the CD into your CD-ROM drive and open it, then double click the “start”, so it will pop up an installation MENU as below: The following software is listed: User manual Install MAGIX Video easy SE - Install it for editing video files. Install MAGIX Photo Manager - Install it for manage photos. NOTES: To use MAGIX Video easy SE or MAGIX Photo Manager with no time limit, you will have to register the software first. Please do install the Quick Timer Player during the installation of MAGIX Video easy SE. MAGIX Video easy SE and MAGIX Photo Manager work in Windows XP, Windows Vista, Windows 7 and Windows 8. EN/1501.V01 VS-FHD39N 14 EN SPECIFICATIONS Sensor 5.0 Megapixels CMOS Display 7.6 cm (3.0") TFT touch screen Focus Range 150 cm ~ infinity Lens F / 2.8, f = 5.3 mm Shutter Electronic Shutter: 1/2 ~ 1/2000 sec. Photo Resolution [12M]: 4000x3000 [8M]: 3264x2448 [3M]: 2048x1536 Video Size 1080P: 1920x1080 @ 25 fps 720P: 1280x720 @ 30 fps ISO Value Auto / 100 / 200 / 400 White Balance Auto / Daylight / Cloudy / Fluorescent / Incandescent Exposure Control -2 EV to +2 EV Photo Color Standard / Sepia / Monochrome / Vivid Self-timer 2 / 5 / 10 sec. Internal Memory No internal memory External Storage SD / SHDC (Up to 32GB) TV System NTSC / PAL Digital Zoom 8X Power Supply 3.7 V Lithium battery Operating temperature 0 - 40 °C Microphone Built-in Speaker Built-in Dimension 114.5 x 68 x 42 mm Weight Approx. 150 g (Battery and memory card excluded) [10M]: 3648X2736 [7M]: 3072X2304 [2M]: 1600x1200 [9M]: 3456X2592 [5M]: 2592x1944 [VGA]: 640x480 VGA: 640X480 @ 30 fps QVGA: 320x240 @ 30 fps *Above specifications are subject to change without prior notice. EN 15 VS-FHD39N EN/1501.V01 SERVICE PROCEDURE If you have reason for complaint, or your device is defective, please contact your dealer or the service division of JAY-tech GmbH to make arrangements for service procedures. Service Hours: Phone No.: Email: Monday - Thursday from 8:00 am to 5:00 pm Friday from 8:00 am to 2:00 pm. 02161 / 575 8950 [email protected] Please do not send your product to our address unless requested to do so by our service team. All costs and the risk of loss are the responsibility of the sender. We reserve the right to reject unrequested deliveries, or return the package at the sender’s expense. EC Declaration of Conformity The product complies with the protective requirements of European Directives 2004/108/EC. The conformity declaration for this product is available under www.jay-tech.de. Directive 2002/96/EC on Waste Electrical and Electronic Equipment (WEEE) This symbol on the product or in the instructions means that your electrical and electronic equipment should be disposed at the end of its life separately from your household waste. There are separate collection systems for recycling in the EU. For more information, please contact the local authority or your retailer where you purchased the product. EN/1501.V01 VS-FHD39N 16 EN