1
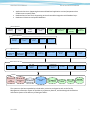
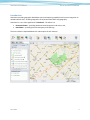
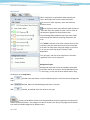
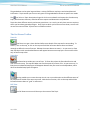
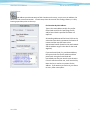
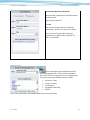
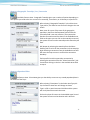
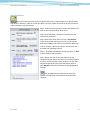
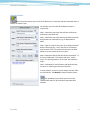
GeoViewer
User Manual
Part of the Ontario GeoPortal
Developed by Infrastructure Ontario
in partnership with SKE Inc.
Date: June 2011
GeoViewer User Manual
Part of the Ontario GeoPortal
GeoViewer User Manual
Contents
GeoViewer User Manual.......................................................................................................................... 2
About the Ontario GeoPortal ........................................................................................................... 2
Introduction ........................................................................................................................................ 4
Identify ................................................................................................................................................ 5
GeoViewer Tabs .................................................................................................................................. 6
Find Feature .................................................................................................................................... 6
Map Layers ...................................................................................................................................... 7
Topics .............................................................................................................................................. 7
The GeoViewer Toolbar ....................................................................................................................... 8
Zoom In ........................................................................................................................................... 8
Zoom Out ........................................................................................................................................ 8
Pan .................................................................................................................................................. 8
Full View .......................................................................................................................................... 8
Find Address .................................................................................................................................... 9
Zoom to Area ................................................................................................................................. 10
Advanced Tools ................................................................................................................................. 12
Measure Distance .......................................................................................................................... 12
Measure Area ................................................................................................................................ 12
PowerPoint .................................................................................................................................... 12
Select By Distance .......................................................................................................................... 13
Select by Feature ........................................................................................................................... 14
Clear Map ...................................................................................................................................... 15
Print Map ...................................................................................................................................... 15
Map Frame Functions ........................................................................................................................ 15
The Key Map .................................................................................................................................. 15
Move Back or Forward - History ..................................................................................................... 15
Tooltips ......................................................................................................................................... 15
Selecting Map Layer Visibility......................................................................................................... 15
About the Ontario GeoPortal
The Ontario GeoPortal is an award-winning GIS based information publishing and management solution
developed by the Infrastructure Ontario (IO) in partnership with SKE Inc. Its main purpose is to provide
a single view of all IO asset information. The solution does this by integrating business systems and
datasets through geography. The map is the integration point.
The solution is made up of four technology layers and a data layer, as shown in the following diagram:
• Business Applications: Custom applications developed for IO and their clients to support specific
business needs.
• GeoPortal Applications: Core end-user and administrative applications that deliver capabilities
to users.
June 2011
2
GeoViewer User Manual
•
•
•
Part of the Ontario GeoPortal
Application Services: Supporting business and GeoPortal application services/components that
enable access to specific data.
Database Services and Tools: Supporting services that enable integration with Database layer.
Databases: IO business and spatial databases.
Business Applications
ORC Data
Dictionary
Survey Records
Index
Geomatics Project
Tracking
Manager
Activity Tracking
System
Customer
Portal
FMIS Maintenance
& Reporting
ACIS
Maintenance &
Reporting
PRPS
Maintenance
GeoPortal Applications
GeoPortal
Manager
Dynamic Access
System
Document
Viewer
DataViewer
GeoViewer
Application Services
Teranet
GeoWarehouse
Service
Teranet
Instrument and
Plan Service
Teranet Parcel
Registry Service
iLookAbout
StreetScape
Address Locator
MRImagery
Service
PPT Map
Service
GeoDocs Service
Database Services and Tools
LiveLink
Services
SharePoint
Services
ORC Data
Replication
Service
Teranet GeoServer
Replicaiton Service
Asset Mapping
Synchronization
Service
GeoEditor
Web Map
Services
Dynamic
Knowledge Base
FMIS dB
ACIS dB
Customer
Portal (CP) dB
Databases
ORC
LiveLink dB
ORC Business
dBs
ORC Geomatics
Business dBs
GeoDB
ORC SharePoint
dBS – ACIS/CP
The system use has been expanded to include other ministries and agencies such as the Facility
Management Information System of the Ministry of Attorney General, and the Aboriginal Consultation
Information System of the Ministry of Aboriginal Affairs.
June 2011
3
GeoViewer User Manual
Part of the Ontario GeoPortal
Introduction
GeoViewer provides geographic-based data search and reporting capabilities with secure integration to
related business data – enabling integration of corporate information with geography.
GeoViewer is a core client application of GeoPortal. The others are:
• DocumentViewer – providing document based integration and access; and,
• DataViewer – providing business data query and reporting.
The user interface is depicted below with a description of each function.
June 2011
4
GeoViewer User Manual
Part of the Ontario GeoPortal
Identify
The Identify feature is central to GeoViewer
and the GeoPortal concept. By clicking on the map,
you are immediately presented with information about
that the feature(s) in that location from all visible map
layers. For example, depending of course on the map
layers present in the topic, if you click on a building,
you will see the information sources available for that
building, for the property that the building is on, for
the neighbourhood the building is in, for the postal
area, for the planning zone, and for the municipality.
The Identify function enables you to use the map as an
integrator of information from databases and systems
throughout an organization and beyond.
To identify a feature and access its related data,
reports, and documents, enable the Identify button in
the toolbar and then click on the map feature of
interest. You will see a form like the one shown. The
Identify function drills down through all the layers and
lists the feature from each map layer. With the "Show
Source Map Layer" checked on, every item in the list
will show the source map layer when you mouse over
it.
Documents & Reports Tab: This tab lists the names of
any related business data associated with the map
feature(s) you identified on various map layers; as well as any related information (documents, pictures,
reports, or other information sources) that have been registered and are available for the identified map
layer. To view the related information; click on its name.
Note: Document sources and reports are registered against a whole map layer, so there may not be a
specific document / report for the selected feature. In other words, one feature might have a document
while another might not. The document source, however, will be shown in the list for all features on
that map layer.
Map Data Tab: This tab lists the map layers that have been selected, and shows the specific attributes
from each map layer for the selected feature. This contains mapping information specific to the feature
– such as its unique ID and feature name.
June 2011
5
GeoViewer User Manual
Part of the Ontario GeoPortal
GeoViewer Tabs
GeoViewer has three tabs which enable you to set up the map for use in finding and accessing
information. These are:
• Find Feature
• Map Layers, and,
• Topics
Find Feature
The Find Feature tab enables you to quickly find any
feature on any map layer.
To find a feature, select the map layer from the Select Map
Layer pick list that contains the feature you want to find.
icon to get a description of the map layer
Hint: Use the
and access to all its attributes.
Input a search keyword(s) and then tell the system to
search only the Primary Fields (i.e. the feature name and
business ID number) or All Fields (i.e. all attribute fields for
the map layer).
Click Go.
The features matching that keyword (or any keyword) will
be listed. Choose the one you want and the system will
zoom to it. If you have “Identify Feature” checked (at the
bottom of the form), the system will also automatically
open the Identify form with the features related
information.
•
•
•
Notes:
• If there are any asset layers they will appear first in the
pick list, and will be separated from other layers by a
blank space. An “asset layer” is one that has been
designated as being of direct interest or importance for
that topic. For example, if an organization has a topic
dealing with real estate, then the mapped real estate
assets (buildings and properties) would be designated
as asset layers. By designating a map layer as an asset
map layer it will always appear first in any map layer list.
Don't use a comma to separate keywords.
Search is not case sensitive.
If the map layer is huge, searching all attributes can cause the system to time-out. If so, limit your
search to one keyword.
June 2011
6
GeoViewer User Manual
Part of the Ontario GeoPortal
Map Layers
Which map layers are published is determined by the
topic. Most topics will contain several map layers.
To turn on or off a map layer, select the check box
beside its name.
Some map layers have many different types of features
- each with their own symbol or colour. You can show or
collapse their legend with the plus/minus icon.
The coloured graphic beside the map layer name shows
how the map layer features are being rendered on the
map.
The "Visible" indicator at top of form means that only the
map layers that are visible at the scale of your map view
are listed. The map layers listing will change as you zoom
in or out since most map layers' visibility is scaledependant.
The "All Layers" tab lists all the map layers in the topic regardless of the current map scale.
Background Layers
the buttons on the map frame.
Background Layers don't have any attributes associated
with them and can be turned on and off individually here
in this listing - or they can all be turned off and on using
With
layers.
selected in the map frame, only the checked map layers are shown and no background
With
selected, ONLY the checked background layers are shown.
With
selected, all checked layers are shown on the map.
Topics
Topics provide different views onto the geodatabase and are organized so that they each
contain related information. Like chapters in a book or sections of a library, they organize information
into useful and usable categories for different users.
June 2011
7
GeoViewer User Manual
Part of the Ontario GeoPortal
The geodatabase can be quite large and have a variety of different map layers and related data and
information. Topics enable you to access only parts of the geodatabase relevant to specific user needs.
The
icon links to a Topic description along with a link to more details and reports that list what map
layers, what business data sets, and what business reports and documents are published.
Topics also have different security and access permissions. As a result, you only have access to topics to
which you have been granted privileges. Only Topics to which you have access are shown, so users will
not even be aware of other Topics that are available to others.
The GeoViewer Toolbar
Zoom In
Use Zoom In to get a closer look and often more details of the map and its surrounding. To
zoom in, click on the map, or click on the map and hold the left mouse button down and draw a
rectangle to define the area of interest. Release the mouse button to zoom in. As you zoom in, often
new map layers with more detailed features will appear because some map layers are set to be visible
only at certain map scales.
Zoom Out
Use Zoom Out to widen your area of view. To Zoom Out, select the Zoom Out function and
click once on the map. The map will widen out from that point by a factor of 2x. As you zoom out, it’s
likely that more detailed map layers will disappear because they are set to be scale dependent, while
other less detailed map layers will appear.
Pan
Panning enables you to move the map view in one or more directions so that different areas of
the map become visible at the same map scale. With the Pan function, click on the map and hold the
left mouse button down to "grab" it and move it.
Full View
Use Full View to zoom out all the way to the extent of the Topic.
June 2011
8
GeoViewer User Manual
Part of the Ontario GeoPortal
Find Address
Find Address provides two ways to find a location on the map – one is to use an address; the
other is to find a street intersection. In both cases, these do not work like finding a feature; it is only
locating a particular point on the map.
Find Location By Civic Address:
Type in the street address and/or City and/or
Postal Code and click Go. Specifying the City
and/or Postal Code is optional and often not
required.
All matching addresses will be listed. Click on the
value that most closely represents the location of
interest and the map will zoom to that
approximate location (based on the road network
and the address ranges in the data for that road
segment).
If you use Postal Code, City, and Street Address,
the system looks first for the address and then
postal code. Using the Postal Code will
immediately narrow your search to one location.
If it can’t match on either one, it will use the City.
Note: the City is used as a constraint for the
address. If you want to just find a city, use Zoom
to Area - place name option.
June 2011
9
GeoViewer User Manual
Part of the Ontario GeoPortal
Find Location By Street Intersection:
An intersection, by definition, requires that both
streets be input.
The City field is optional.
Click Go.
The system will locate and list all matching
intersections. Click the one you want to map it.
Hint: If you are having trouble finding the
intersection, try again without using the "St.",
"Rd", etc. extension.
Zoom to Area
Zoom to Area gives you immediate access to a
particular geographic area. This function is available in
every topic even if the map layers are not. Example types
of area you may have available to zoom to include:
•
•
•
•
•
a province / state;
a region / county;
a municipality;
a geographic township;
a place.
Then, click on the name in the Available Areas list to zoom to that area.
June 2011
10
GeoViewer User Manual
Part of the Ontario GeoPortal
Zoom to a Geographic Township / Lot / Concession
If available, Zoom to Area - Geographic Township gives you a number of options depending on
how specific you need to be. You can zoom to a township, a concession, or all the way to a specific lot.
After selecting "Geographic Township" in the Select Area
Type pick list, the Zoom to Area form will change to the one
shown.
Next, enter all or part of the name of the geographic
township in the Enter GeoTwp Name field and click Go.
(The name field is not case sensitive.) The system then
searches for matches and lists them in the Available Areas
field. At this point you can click on the township name and
the system will zoom to that township and its boundary will
flash.
Drill deeper by selecting the township from the Select
GeoTwp pick list to list all the concessions in that township.
Again selecting a concession from the Available Areas field
will cause the map to zoom in and flash the concession
boundary.
Find a specific lot within a particular concession by
selecting the concession from the "Select Concession" pick
list and then clicking on the lot in the Available Areas field
to map it.
Zoom to a Populated Place
The Zoom to Area - Place Name gives you that ability to zoom to any named populated place in
the extents of the Topic.
After selecting "Place Name" in the Select Area Type pick
list, the Zoom to Area form will change as shown.
Type in a full or partial name and click Go and the system
will list all places that match the name.
Click on the place of interest in the Available Areas list and
the system will zoom to that location and it will flash.
June 2011
11
GeoViewer User Manual
Part of the Ontario GeoPortal
Advanced Tools
Measure Distance
Measure Distance enables you to measure the distance along a line that you draw. Click on the
start point of the line and continue to click at each vertex until the end. Double-click to complete the
line. The distance will be displayed in the units you choose.
Measure Area
Measure Area enables you to measure the area of a polygon that you define with your mouse
on the map. Click on the map at a corner of the polygon. Click at each corner to define the full extent
and shape of the polygon, then double-click when complete. The area bounded by the polygon will be
calculated and shown in the units you choose.
PowerPoint
The link to PowerPoint enables you to place the contents of the map view along with the map
legend and other information directly into a PowerPoint slide - which you can then tailor to meet your
publishing needs. This is handy because in PowerPoint you can edit the components, animate them for a
presentation, and add graphics and comments to the map composition.
The system shows you the map in a browser and generates a PowerPoint file with the slide. In order to
use the slide, click on the instructions to save it locally on your machine and then open it in PowerPoint.
You can't edit the slide in the browser.
Note, all the textual surround components - such as the legend, can be edited to suit your needs. The
slide will automatically include items like: the date, the Topic name, the map view, the legend, a scale
bar, a north arrow, a logo, and a textual disclaimer "For discussion purposes only".
June 2011
12
GeoViewer User Manual
Part of the Ontario GeoPortal
Select By Distance
Select by Distance means that you are able to select one or more features on a specified map
layer within a distance / radius of a point you define. The form shown on the left illustrates the various
steps involved in using this function.
Step 1. Select the map layer that contains the features you
want to select from the drop down menu.
Step 2. State the radius / distance (in meters) from the
center point of interest.
Step 3. Define the center point. Click on "Set Location".
This tells the system that your next click on the map will
define the middle of the circle for the selection. When you
click on the map, a blue circle is drawn at that point with
the radius you specified in Step 2.
Step 4. - Click Go if this selection is what you want, or Clear
to clear the form and start again.
Step 5. When you click Go, any map features on the
selected map layer within the search circle will be listed on
the form. Click on a feature name to select it on the map
and launch the Identify form with information about it.
Click Map All to have all the features listed highlighted on
the map.
The spreadsheet icon allows you to access any
related information for all the features that have been
selected.
June 2011
13
GeoViewer User Manual
Part of the Ontario GeoPortal
Select by Feature
Select by Feature means you can list all the features on a map layer that are contained within a
feature on another layer.
For example, you can select all AIS Reserves within a
municipality.
Step 1. Choose the map layer that will have its features
selected (e.g. AIS Reserves).
Step 2. Choose the map layer that has the feature that will
be used to do the intersection (e.g. UT Municipalities
2007).
Step 3. Type all or part of the name of the feature that will
do the intersecting (e.g. "Hal") and click Go. All features
with the word "Hal" in its name will be listed in the field
below for you to choose the one you want.
Step 4. Choose the feature that will do the intersection – in
this case “Haldimand”. This feature acts like a "cookie
cutter" for selecting features on the layer you selected in
Step 1.
Step 5. Click Go to list all the features (AIS Reserves) that
are within or touching the intersection feature.
To map a feature, click on its name and the map will zoom
to it and select it. Use Map All to map all features listed.
The spreadsheet icon allows you to access any
related information for all the features that have been
selected.
June 2011
14
GeoViewer User Manual
Part of the Ontario GeoPortal
Clear Map
Clear Map un-selects any selected features and clears any drawn features.
Print Map
Use the Print Map function to quickly print a map based on the view shown. The system
generates the print product for a standard 8.5x11 inch page with landscape orientation. Use the printer
dialogue to specify which printer to use, the paper size and the orientation.
Map Frame Functions
The Key Map
Use the Key Map function on the map frame to help you keep track of your map view in relation to
the full extents of the topic. The Key Map shows the full extents with a red box to indicate your current
map view.
Move Back or Forward - History
GeoViewer remembers the last five steps you have taken. Use Back or Forward to refresh the
map view at a previous location. Note: the function does not remember what layers are turned on-off in
each view.
Tooltips
Turning on Tooltips will enable you to see the name or a key attribute of each feature as you “mouseover” them. Note, this is only available for specific map layers.
Selecting Map Layer Visibility
With
selected in the map frame, only the selected map layers in the Map Layers tab are
shown and no background layers.
With
shown.
selected, ONLY the checked background layers (e.g. Google Maps, Google imagery) are
With
selected, all selected map layers in the Map Layers tab are shown on the map.
June 2011
15


![ArcMap [v10.0- v.10.2] User manual](http://vs1.manualzilla.com/store/data/005724954_1-1f5d2da94c774511c91b8b97dbbbcd93-150x150.png)