1
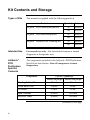
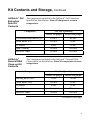
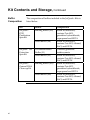
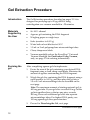
Genomed
JetQuick™ DNA Purification Kits
Gel Extraction, PCR Purification, and General
DNA Clean-up
Cat. nos. 410050, 410250, 420050, 420250, 430050, and 430250
Rev. Date: 21 April 2010
Manual Part no.: 70-15013
MAN0001740
Corporate Headquarters
Genomed GmbH
Poststr. 22
D-32584 Löhne, Germany
Tel:+49-(0)5732-904700
Fax:+49-(0)5732-9047010
[email protected]
www.genomed-dna.com
User Manual
ii
Table of Contents
Kit Contents and Storage ....................................................................................... iv
Kit Specifications ....................................................................................................vii
PCR Purification .......................................................................... 1
System Overview...................................................................................................... 1
Experimental Overview .......................................................................................... 3
PCR Purification Procedure.................................................................................... 4
Troubleshooting........................................................................................................ 8
Gel Extraction .............................................................................. 9
System Overview...................................................................................................... 9
Experimental Overview ........................................................................................ 11
Gel Extraction Procedure ...................................................................................... 12
Troubleshooting...................................................................................................... 17
General DNA Clean-Up.............................................................. 18
System Overview.................................................................................................... 18
Experimental Overview ........................................................................................ 19
General DNA Clean-Up Procedure..................................................................... 20
Troubleshooting...................................................................................................... 24
Appendix .................................................................................... 25
Estimating DNA Yield and Quality .................................................................... 25
Accessory Products ................................................................................................ 27
Technical Support................................................................................................... 28
Purchaser Notification........................................................................................... 29
iii
Kit Contents and Storage
Types of Kits
This manual is supplied with the following products.
Product
Quantity Cat. no.
JetQuick™ PCR Purification Spin Kit
™
JetQuick Gel Extraction Spin Kit
™
JetQuick General DNA Clean-up Kit
50
410050
250
410250
50
420050
250
420250
50
430050
250
430250
Intended Use
For research use only. Not intended for human or animal
diagnostic or therapeutic uses.
JetQuick™
PCR
Purification
Spin Kit
Contents
The components included in the JetQuick™ PCR Purification
Spin Kit are listed below. Store all components at room
temperature.
Component
Binding Buffer (H1)
Wash Buffer (H2)
TE Buffer
Cat. No. (Quantity)
410050 (50 preps)
410250 (250 preps)
22 mL
110 mL
12.8 mL
60 mL
10 mL
22 mL
Spin Columns
50 each
250 each
Receiver Tubes
50 each
250 each
Continued on next page
iv
Kit Contents and Storage, Continued
JetQuick™ Gel
Extraction
Spin Kit
Contents
The components included in the JetQuick™ Gel Extraction
Spin Kit are listed below. Store all components at room
temperature.
Component
Cat. No. (Quantity)
420050 (50 preps)
420250 (250 preps)
Gel Solubilization Buffer (L1)
100 mL
500 mL
Wash Buffer (L2)
12.8 mL
60 mL
TE Buffer
10 mL
22 mL
Spin Columns
50 each
250 each
Receiver Tubes
50 each
250 each
JetQuick™
General DNA
Clean-up Kit
Contents
The components included in the JetQuick™ General DNA
Clean-up Kit are listed below. Store all components at room
temperature.
Component
Cat. No. (Quantity)
430050 (50 preps)
430250 (250 preps)
22 mL
110 mL
12.8 mL
60 mL
TE Buffer
10 mL
22 mL
Spin Columns
50 each
250 each
Receiver Tubes
50 each
250 each
Binding Buffer (M1)
Wash Buffer (M2)
Continued on next page
v
Kit Contents and Storage, Continued
Buffer
Composition
The composition of buffers included in the JetQuick™ Kits is
listed below.
Kit
Buffer
Composition
Binding Buffer (H1)
When reconstituted,
contains Tris-HCl,
guanidine hydrochloride,
isopropanol and EDTA
Wash Buffer (H2)
When reconstituted,
contains Tris-HCl, ethanol,
NaCl, and EDTA
JetQuick™ Gel
Extraction
Spin Kit
Gel Solubilization
Buffer (L1)
Contains guanidine
isothiocyanate
Wash Buffer (L2)
When reconstituted,
contains Tris-HCl, ethanol,
NaCl, and EDTA
JetQuick™
General DNA
Clean-up Kit
Binding Buffer (M1)
When reconstituted,
contains Tris-HCl,
guanidine hydrochloride,
isopropanol and EDTA
Wash Buffer (M2)
When reconstituted,
contains Tris-HCl, ethanol,
NaCl, and EDTA
™
JetQuick
PCR
Purification
Spin Kit
vi
Kit Specifications
JetQuick™
PCR
Purification
Spin Kit
JetQuick™ Gel
Extraction
Spin Kit
The specifications for the JetQuick™ PCR Purification Spin Kit
are listed below.
Time required
5 minutes
Column Reservoir Capacity
600 μL
Centrifuge Compatibility
>12,000 × g
Elution Volume
50 μL
DNA Yield
Up to 20 μg
DNA Recovery
Up to 95% (depending on
DNA fragment size)
DNA Fragment Size
80 bp to 20 kb
Primer Removal
>99.8%
The specifications for the JetQuick™ Gel Extraction Spin Kit
are listed below.
Time required
25 minutes
Starting Material
≤400 mg agarose gel slice
Binding Capacity
~20 μg DNA per column
Column Reservoir Capacity
600 μL
Centrifuge Compatibility
>12,000 × g
Elution Volume
50 μL
DNA Recovery
Up to 95% (depending on
DNA fragment size)
DNA Fragment Size
40 bp to 10 kb
Continued on next page
vii
Kit Specifications, Continued
JetQuick™
General DNA
Clean-up Kit
viii
The specifications for the JetQuick™ General DNA Clean-up
Kit are listed below.
Time required
5 minutes
Column Reservoir Capacity
600 μL
Centrifuge Compatibility
>12,000 × g
Elution Volume
50 μL
DNA Yield
Up to 20 μg
DNA Recovery
Up to 95% (depending on
DNA fragment size)
DNA Fragment Size
80 bp to 20 kb
Enzyme removal
(e.g., T4 DNA ligase,
Taq DNA polymerase,
restriction enzymes)
no detectable activity
PCR Purification
System Overview
About the Kit
The JetQuick™ PCR Purification Spin Kit provides a simple
and reliable method to isolate highly pure DNA on the basis
of spin columns. It is designed for the rapid and efficient
removal of primers, dNTPs, enzymes, and salts from PCR
products. The JetQuick™ PCR Purification Spin Kit is based
on the selective binding of dsDNA to a silica-based
membrane in the presence of chaotropic salts.
The PCR product is mixed with Binding Buffer (H1) to
adjust conditions for subsequent dsDNA binding to the
JetQuick™ Spin Column. The dsDNA binds to the silicabased membrane in the column and impurities are removed
by thorough washing with Wash Buffer (H2). The dsDNA is
then eluted in low salt Elution Buffer (Tris-HCl or TE) or
water.
Downstream
Applications
DNA purified using the JetQuick™ PCR Purification Spin Kit
is as pure as CsCl purified DNA and is suitable for a number
of downstream applications including:
•
Ligation
•
Restriction Analysis
•
Automated and manual DNA sequencing
•
PCR amplification
•
Cloning
Continued on next page
1
System Overview, Continued
Advantages
2
The advantages of using the JetQuick™ PCR Purification
Spin Kit are:
•
Efficient removal of primers, dNTPs, salts, and
enzymes without the need to perform ethanol
precipitation or use solvents such as phenol or
chloroform
•
Reliable performance of the purified PCR products in
downstream applications
•
Not sensitive to gelatin or detergents such as NP-40 or
Triton X-100 (at concentrations <0.1%)
•
May be used to isolate dsDNA fragments >100 bp
Experimental Overview
Introduction
The flow chart below provides an overview for purifying
DNA from Polymerase Chain Reactions using the JetQuick™
PCR Purification Spin Kit.
Vacuum
Centrifugation
Add appropriate Binding
Buffer with isopropanol
to the PCR products
Add appropriate Binding
Buffer with isopropanol
to the PCR products
Apply sample to JetQuickTM
PCR Spin Column in a
Receiver Tube
Apply sample to JetquickTM
Spin Column attached to
vacuum manifold
Wash column with
Wash Buffer
Wash column with
Wash Buffer
SPIN
SPIN
Elute DNA into a new
microcentrifuge tube
SPIN
Elute DNA into a new
microcentrifuge tube
3
PCR Purification Procedure
Introduction
The PCR purification procedure is designed for purifying up to
20 μg dsDNA using a centrifuge (see page 5) or vacuum
manifold (see page 6) in ~5 minutes.
Materials
Supplied by
the User
•
Isopropanol
•
96–100% ethanol
Before
Starting
Method for
Purifying DNA
•
Microcentrifuge capable of centrifuging at >12,000 × g
•
Vacuum manifold such as the EveryPrep™ Universal
Vacuum Manifold (for Purification Procedure Using
Vacuum only, see page 27 for ordering information)
•
DNase-free pipettes and tips
•
Reconstitute Binding Buffer (H1) with isopropanol
according to the instructions on the label of the bottle.
Store reconstituted Binding Buffer (H1) at room
temperature.
•
Reconstitute Wash Buffer (H2) with absolute ethanol
(96–100%) according to the instructions on the label of
the bottle. Store reconstituted Wash Buffer (H2) at room
temperature.
•
To purify DNA using centrifugation, proceed to page 5.
•
To purify DNA using vacuum, proceed to page 6.
Continued on next page
4
PCR Purification Procedure, Continued
Purification
Procedure
Using
Centrifugation
1.
Add 4 volumes of Binding Buffer (H1) to 1 volume of PCR
sample. Mix well.
Note: When PCR assays >100 μL are used, scale up Buffer
H1 proportionally and maintain the 4:1 ratio of Buffer
H1:PCR Sample. In this case, multiple loadings of the
JetQuick™ Spin Column (Step 3, below) are required.
2.
Place a JetQuick™ Spin Column into a 2 mL Receiver Tube.
3.
Load the mixture from Step 1 into the prepared column.
4.
Centrifuge at >12,000 × g for 1 minute.
5.
Re-insert the column into the empty receiver tube and add
500 μL of reconstituted Wash Buffer (H2).
6.
Centrifuge the column at >12,000 × g for 1 minute.
7.
Discard the flow-through and place the JetQuick™ Spin
Column back in the same 2 mL Receiver Tube.
8.
Centrifuge again at >12,000 × g for 1 minute.
Note: The additional centrifugation ensures that no
residual ethanol, which may interfere with downstream
applications, is carried over into the next step of the
protocol. Buffer H2 is not completely removed unless the
flow-through is discarded before centrifugation.
9.
Place the JetQuick™ Spin Column into a new
1.5 mL microcentrifuge tube (not supplied in the kit).
10. Add 50 μL of sterile water, TE Buffer, or 10 mM Tris-HCl,
pH 8.0 to the center of the column.
11. Centrifuge at >12,000 × g for 2 minutes.
The elution tube contains your purified PCR product. Remove
and discard the column.
Note: To obtain higher DNA concentrations, elute with
30 μL preheated (65°C to 70°C) elution buffer. Add the
buffer directly onto the center of the silica membrane of
the JetQuick™ Spin Column and let stand for 1 minute
before centrifugation. Preheated elution buffer is
recommended to elute PCR fragments >5kb.
Continued on next page
5
PCR Purification Procedure, Continued
Purification
Procedure
Using Vacuum
Perform all vacuum operations at room temperature.
1.
Add 4 volumes of Binding Buffer (H1) to 1 volume of
amplification reaction and mix thoroughly.
Note: When PCR assays >100 μL are used, scale up
Buffer H1 proportionally, maintaining the 4:1 ratio of
Binding Buffer:PCR Sample. In this case, multiple
successive loadings of the column (Step 3, below) are
required.
2.
Assemble the vacuum manifold according to the
manufacturer’s instructions and attach a JetQuick™ Spin
Column to the vacuum manifold.
3.
Pipette the DNA sample (Step 1, above) onto the center of
the silica membrane of the JetQuick™ Spin Column.
4.
Apply vacuum (−200 to −650 mbar) until all liquid passes
through the column and then turn off the vacuum source.
5.
Add 500 μL Wash Buffer (H2) containing ethanol (page 4).
6.
Apply vacuum as described in Step 4. Remove the column
from the vacuum and place it into a 2 mL Receiver Tube.
7.
Centrifuge the column with the Receiver Tube at
maximum speed for 1 minute to remove any residual
Wash Buffer (H2) and ethanol. Discard the flow-through
and the Receiver Tube.
8.
Place the JetQuick™ Spin Column into a new
1.5 mL microcentrifuge tube (not supplied in the kit) and
add 50 μL of sterile water, TE Buffer, or 10 mM Tris-HCl,
pH 8.0 to the center of the column.
9.
Centrifuge at >12,000 × g for 2 minutes. The elution tube
contains your purified PCR product. Discard the column.
Note: A higher DNA concentration is obtained if the
elution is performed with only 30 μL of elution buffer. In
this case, preheat the elution buffer to 65°C–70°C, add the
buffer directly onto the center of the spin column and let
stand for 1 minute before centrifugation.
Continued on next page
6
PCR Purification Procedure, Continued
Storing DNA
•
Store purified DNA at 4°C for immediate use.
•
Aliquot DNA and store at –20°C for long-term storage.
•
Store DNA eluted in water at –20°C.
•
Avoid repeated freezing and thawing of DNA.
7
Troubleshooting
Introduction
Problem
Low DNA
yield
Review the information below to troubleshoot your
experiments with the JetQuick™ PCR Purification Spin Kit.
Cause
Insufficient
amplification
Incorrect binding
conditions
Incomplete DNA
elution
Inhibition of
enzymatic
reaction
DNA fragment is
too large
Residual ethanol
in the purified
DNA
Residual salt in
the purified DNA
8
Solution
Check amplicon on gel to verify the PCR
product prior to purification.
For efficient DNA binding, always mix
1 volume of PCR assay with 4 volumes of
Binding Buffer (H1).
Add preheated Elution Buffer (65°C to
70°C) directly onto the center of the silica
matrix of the spin column and let it stand
for 1 minute. Centrifuge at >12,000 × g for
1 minute.
Use preheated Elution Buffer (as described
above).
Traces of ethanol from the Wash Buffer
(H2) can inhibit downstream enzymatic
reactions.
To remove Wash Buffer (H2), discard the
Wash Buffer flow-through from the
Receiver Tube. Place the column into the
Receiver Tube and centrifuge the column
at >12,000 × g for 2–3 minutes to
completely dry the column.
Use water or 10 mM Tris-HCl, pH 8.0 (no
EDTA) for elution.
Gel Extraction
System Overview
About the Kit
The JetQuick™ Gel Extraction Spin Kit is used for the rapid and
efficient purification of DNA fragments from TAE or TBE
agarose gels. DNA fragments up to 10 kb are optimally
purified, although DNA fragments >10 kb may be purified with
lower DNA recovery. Extract DNA by first excising and
dissolving the gel (pages 12–13) and then purify the DNA by
centrifugation (pages 14–15) or vacuum (see pages 15–16) using
JetQuick™ silica membrane-based columns.
Note: The JetQuick™ Gel Extraction Spin Kit is not designed to
purify supercoiled plasmid DNA or genomic DNA from
agarose gels. Only linear DNA fragments are purified from
gels using this kit.
Advantages
Advantages of using the JetQuick™ Gel Extraction Spin Kit are:
•
Purification of DNA fragments from TAE and TBE agarose
gels of various percentages and melting points
•
Procedure is complete in less than 25 minutes
•
Efficient purification of DNA fragments from 40 bp to
10 kb from gels
•
High recovery (85–95%) of DNA fragments
•
High binding column capacity of up to 20 μg DNA
•
Ensure that the DNA fragment of interest is completely
separated from other DNA fragments on the agarose gel.
•
Each JetQuick™ Spin Column can purify up to 20 μg of
DNA. If you wish to purify a larger amount of DNA, use
several JetQuick™ Spin Columns. For best results, use one
JetQuick™ Spin Column per 10 μg of DNA fragment loaded
onto the gel.
Continued on next page
9
MEND
ION
AT
RECOM
System Overview, Continued
Experimental
Summary
10
Follow the recommendations below to obtain the best results:
•
To minimize DNA degradation, always wear gloves and
use a clean razor blade to cut the gel slice.
•
Maintain a sterile working environment when handling
DNA to avoid any contamination from DNases.
•
Ensure that no DNase is introduced into the sterile buffers
supplied with the kit.
•
Make sure all equipment that comes in contact with DNA
is sterile, including pipette tips and tubes.
To purify DNA fragments from agarose gels using the
JetQuick™ Gel Extraction Spin Kit:
1.
Dissolve an excised gel piece using Gel Solubilization
Buffer (L1).
2.
Purify and elute the DNA fragment using centrifugation or
vacuum.
3.
Place the dissolved gel piece into a JetQuick™ Spin Column
containing a silica membrane and allow the DNA to bind
the membrane.
4.
Wash the membrane with Wash Buffer (L2) containing
ethanol to remove impurities.
5.
Elute the purified DNA using Elution Buffer (TE Buffer).
The purified DNA is suitable for use in a wide variety of
downstream applications.
Experimental Overview
Introduction
The flow chart below provides an overview for purifying
DNA fragments from agarose gels using the JetQuick™ Gel
Extraction Kit. First, excise and dissolve the gel (pages 12–13).
To purify DNA using centrifugation, see page 14. To purify
DNA using vacuum, see page 15.
15 MIN
15 MIN
L
L
L
2 MIN
L
2 MIN
11
Gel Extraction Procedure
Introduction
The Gel Extraction procedure described on pages 12–16 is
designed for purifying up to 20 μg dsDNA using
centrifugation or a vacuum manifold in ~25 minutes.
Materials
Supplied by
the User
•
96–100% ethanol
•
Agarose gel containing the DNA fragment
•
Weighing paper or weigh trays
•
Scale (sensitive to 0.001 g)
•
Water bath or heat block set at 50°C
•
1.5 mL or 5 mL polypropylene microcentrifuge tubes
•
Clean, sharp razor blade
•
Vacuum manifold such as the EveryPrep™ Universal
Vacuum Manifold (for Purification Using Vacuum,
only, see page 27 for ordering information)
Excising the
gel
After completing agarose gel electrophoresis:
1.
Excise the area of the gel containing your desired DNA
fragment using a clean, sharp razor blade. Minimize the
amount of agarose surrounding the DNA fragment.
2.
Weigh the gel slice containing the DNA fragment using a
scale sensitive to 0.001 g, and then place the gel into a
1.5 or 5.0 mL microcentrifuge tube as described on the
next page.
Note: The maximum amount of starting material (gel) is
400 mg per tube. If your gel slice exceeds 400 mg, cut the
gel into smaller slices so that no one piece exceeds
400 mg. Place each additional gel slice into separate
microcentrifuge tubes. For highest DNA purity, use
100 mg agarose gel slices per extraction.
3.
Proceed to Dissolving the Gel, next page.
Continued on next page
12
Gel Extraction Procedure, Continued
Gel Solubilization Buffer (L1) contains guanidine
isothiocyanate. Use proper precautions when handling.
Dissolving the
Gel
1.
For ≤2% agarose gels:
•
Place up to 400 mg of the excised gel containing the
DNA fragment (above) into a 1.5 mL polypropylene
microcentrifuge tube.
•
Add 3 volumes Gel Solubilization Buffer (L1) for
every 1 volume of gel (e.g., add 1.2 mL Buffer L1 for
a 400 mg gel piece).
For >2% agarose gels:
•
Place up to 400 mg of the excised gel containing the
DNA fragment (see above) into a 5 mL
polypropylene microcentrifuge tube.
•
Add 6 volumes Gel Solubilization Buffer (L1) for
every 1 volume of gel (e.g., add 2.4 mL Buffer L1
for a 400 mg gel piece).
2.
Place the tube(s) containing your gel slice and Buffer L1
(Step 1) into a 50°C water bath or heat block.
3.
Incubate at 50°C for 15 minutes. Invert the tube by hand
every 3 minutes to mix and ensure gel dissolution.
Note: Complete dissolution of the agarose gel slice is
critical. Once the gel slice appears dissolved, incubate
the gel slice for an additional 5 minutes at 50°C. High
concentration gels (>2% agarose) or large gel slices may
take 20–30 minutes to dissolve. Cutting larger gel slices
into smaller pieces will enhance solubilization.
4.
Proceed to Purification Using Centrifugation, next
page or Purification Using Vacuum, page 15.
Continued on next page
13
Gel Extraction Procedure, Continued
Purification
Using
Centrifugation
The bottle of Buffer L2 contains concentrated buffer solution.
Before beginning, add absolute ethanol (96–100%) as
directed on the label of the bottle. Store reconstituted Wash
Buffer (L2) at room temperature.
1.
Place a JetQuick™ Spin Column into a 2 mL Receiver
Tube. Pipette the dissolved gel piece containing the DNA
fragment of interest (Step 3, previous page) onto the
JetQuick™ Spin Column.
Note: Do not load >400 mg agarose per JetQuick™ Spin
Column. The maximum column capacity is 600 μL; for
larger sample volumes, multiple loadings are necessary.
2.
Centrifuge at >12,000 × g for 1 minute. Discard the flowthrough and replace the JetQuick™ Spin Column into the
2 mL Receiver Tube.
Note: For downstream applications including
sequencing, in vitro transcription, or microinjection, or if
the weight of the initial agarose gel slice is >250 mg,
wash the DNA with 500 μL Buffer L1. Incubate for
1 minute at room temperature before centrifuging again
at >12,000 × g for 1 minute.
3.
Add 500 μL Wash Buffer (L2), containing ethanol to the
JetQuick™ Spin Column.
4.
Centrifuge at >12,000 × g for 1 minute. Discard the flowthrough and replace the column into the Receiver Tube.
5.
Centrifuge again at maximum speed for 1 minute to
remove any residual Wash Buffer (L2) and ethanol.
Note: Discard the flow-through before centrifugation to
remove residual Wash Buffer (L2). The additional
centrifugation step assures that no residual ethanol is
carried over into the next step.
6.
Discard the Receiver Tube and place the JetQuick™ Spin
Column into a clean 1.5 mL microcentrifuge tube.
Continued on next page
14
Gel Extraction Procedure, Continued
Purification
Using
Centrifugation
Continued
7.
Add 50 μL of sterile water, 10 mM Tris-HCl, pH 8.0, or
TE Buffer to the center of the JetQuick™ Spin Column.
8.
Centrifuge at >12,000 × g for 2 minutes. The tube
contains the purified DNA. Discard the column.
Note: To obtain higher DNA concentrations, elute with
only 30 μL of preheated (65°C to 70°C ) elution buffer,
dispensed directly onto the center of the membrane. In
this case, let stand for 1 minute before centrifugation.
9.
Purification
Using Vacuum
Store DNA as indicated on page 16.
Before beginning, add ethanol to the Wash Buffer (L2).
Perform all vacuum operations at room temperature.
1.
Assemble the vacuum manifold according to the
manufacturer’s instructions.
2.
Attach a JetQuick™ Spin Column to the vacuum manifold.
3.
Pipette the dissolved gel piece containing the DNA
fragment of interest (Step 3, page 13) onto the center of
the silica membrane of the JetQuick™ Spin Column.
4.
Apply vacuum (−200 to −650 mbar) until all liquid passes
through the column, and then switch off the vacuum
source.
Note: Do not load more than 400 mg agarose per column.
5.
Optional Column Wash: Add 500 μL Gel Solubilization
Buffer (L1) to the center of the JetQuick™ Spin Column.
Let stand for 1 minute. Apply vacuum (−200 to −650
mbar) until all liquid passes through the column, and
then switch off the vacuum source.
Continued on next page
15
Gel Extraction Procedure, Continued
Purification
Using
Vacuum,
Continued
6.
Add 500 μL Wash Buffer (L2) containing ethanol to the
center of the JetQuick™ Spin Column.
7.
Apply vacuum (−200 to −650 mbar) until all liquid passes
through the column, and then switch off the vacuum
source.
8.
Remove the JetQuick™ Spin Column from the vacuum
and place it into a 2 mL Receiver Tube.
9.
Centrifuge the column with the Receiver Tube at
maximum speed for 1 minute to remove any residual
Wash Buffer and ethanol. Discard the Receiver Tube with
the flow-through.
10. Place the JetQuick™ Spin Column into a clean 1.5 mL
recovery tube.
11. Add 50 μL of sterile water (or TE Buffer or 10 mM
Tris-HCl, pH 8.0) to the center of the JetQuick™ Spin
Column.
Note: Higher DNA concentrations are obtained if the
elution is performed with only 30 μL of elution buffer
preheated to 65°C –70°C. Add the buffer onto the center
of the silica matrix of the spin column.
12. Incubate for 1 minute at room temperature.
13. Centrifuge at >12,000 × g for 2 minutes to elute the
purified DNA into the recovery tube. Discard the JetQuick™
Spin Column.
Storing DNA
16
•
Store the purified DNA at 4°C for immediate use.
•
Aliquot the DNA and store at –20°C for long-term
storage.
•
Store DNA eluted in water at –20°C.
•
Avoid repeated freezing and thawing of DNA.
Troubleshooting
Introduction
Problem
Low DNA
yield
Inhibition of
enzymatic
reaction
Review the information below to troubleshoot your
experiments with the JetQuick™ Gel Extraction Spin Kit.
Cause
Incorrect ratio of
gel to Gel
Solubilization
Buffer (L1)
Incomplete
solubilization of
gel piece
Solution
Ensure that the correct volume of Gel
Solubilization Buffer (L1) is added for
every 1 volume of gel used, based on the
agarose gel percentage (see page 13).
Verify that the temperature of water bath
or heat block is at 50°C.
Cut large gel slices into several pieces to
accelerate gel dissolution.
Mix gel slice in Buffer L1 every 3 minutes
during the dissolution step.
Incomplete DNA
elution
Preheat Elution Buffer to 65°C to 70°C, add
the buffer directly onto the center of the
silica matrix of the JetQuick™ Spin Column,
let stand for 1 minute. Centrifuge at
>12,000 × g for 1 minute.
DNA fragment is
too large
Use preheated elution buffer (as described
above). Increase the incubation time for
elution to >10 minutes.
This kit is not designed to purify
supercoiled plasmid DNA.
Traces of ethanol from the Wash Buffer
(L2) can inhibit downstream enzymatic
reactions.
To remove Wash Buffer (L2), discard
Buffer L2 flow-through from the Receiver
Tube. Place the column into the Receiver
Tube and centrifuge at >12,000 × g for
3 minutes to completely dry the column.
Use water or 10 mM Tris-HCl, pH 8.0 (no
EDTA) for elution.
DNA is
supercoiled
Residual ethanol
in the purified
DNA
Residual salt in
the purified DNA
17
General DNA Clean-Up
System Overview
About the Kit
The JetQuick™ General DNA Clean-up Kit is used to purify
DNA in less than 5 minutes. The DNA sample (e.g., crude
plasmid preps, restriction, ligation or other enzymatic assay)
is first adjusted to defined salt conditions. The DNA
selectively binds to the silica membrane of a JetQuick™ Spin
Column during centrifugation. After centrifugation, one
wash is sufficient to remove nucleotides, enzymes, salts,
dyes, residual RNA’s and other impurities. The purified
DNA is eluted in TE Buffer or water and ready for
downstream use.
DNA can be purified by centrifugation (page 21) or vacuum
(see page 22) using JetQuick™ silica membrane-based
columns.
Advantages
18
Advantages of using JetQuick™ General DNA Clean-up Kits
are:
•
No phenol
•
No chloroform
•
Total salt, dye, and protein removal
•
Not sensitive to gelatin or detergents such as
Triton X-100 (at concentrations <0.1%) or NP-40
Experimental Overview
Introduction
The flow chart below provides an overview for purifying
DNA using the JetQuick™ General DNA Clean-up Kit.
Purification may be performed using centrifugation or
vacuum.
Vacuum Method
Centrifugation Method
Add appropriate Binding
Buffer to the DNA sample
Add appropriate Binding
Buffer to the DNA sample
Apply sample to JetquickTM
Spin Column in a Collection
Tube
Apply sample to JetquickTM
Spin Column attached to
vacuum manifold
Wash column with
Wash Buffer
Wash column with
Wash Buffer
SPIN
SPIN
Elute DNA
SPIN
Elute DNA
19
General DNA Clean-Up Procedure
Introduction
The General DNA Clean-Up procedure described on pages
21–23 is designed for purifying up to 20 μg dsDNA using a
centrifuge or vacuum manifold in ~5 minutes.
Materials
Supplied by
the User
•
Isopropanol
•
96–100% ethanol
•
Microcentrifuge capable of centrifuging at >12,000 × g
•
DNase-free pipettes and tips
•
DNA sample from enzymatic and or other in vitro assays
(e.g., restriction enzyme digestion, ligation reaction) or
plasmid DNA from crude minipreps
•
Vacuum manifold such as the EveryPrep™ Universal
Vacuum Manifold, for Purification Procedure Using
Vacuum only (see page 27 for ordering information)
Before
Starting
Reconstitute Binding Buffer (M1) with isopropanol and Wash
Buffer (M2) with absolute ethanol (96–100%) according to the
instructions on the labels of the bottles. Store reconstituted
Binding Buffer (M1) and Wash Buffer (M2) at room temperature.
Reconstituted Binding Buffer (M1) contains guanidine
hydrochloride and isopropanol. Always wear a lab coat,
disposable gloves, and protective eyewear during handling.
Do not add bleach or acidic solutions directly to solutions
containing guanidine hydrochloride or sample preparation
waste as it forms reactive compounds and toxic gases when
mixed with bleach or acids.
Continued on next page
20
General DNA Clean-Up Procedure, Continued
Purification
Procedure
Using
Centrifugation
1.
Add 4 volumes of Binding Buffer (M1) to 1 volume of
DNA sample. Mix well.
Note: When samples >100 μL are used, scale up the
volume of Buffer M1 proportionally, maintaining the ratio
of Buffer M1:DNA sample (4:1). In this case, multiple
loadings of the column (Step 3, below), are required.
2.
Place a JetQuick™ Spin Column into a 2 mL Receiver Tube.
3.
Load the mixture from Step 1 into the prepared column.
4.
Centrifuge at >12,000 × g for 1 minute.
5.
Discard the flow-through.
6.
Re-insert the column into the empty Receiver Tube and
add 500 μL of reconstituted Wash Buffer (M2).
7.
Centrifuge the column at >12,000 × g for 1 minute.
8.
Discard the flow-through and place the JetQuick™ Spin
Column back in the same Receiver Tube.
9.
Centrifuge again at >12,000 × g for 1 minute.
Note: Residual buffer (M2) will not be completely removed
unless the flow-through is discarded before this additional
centrifugation. Buffer M2 contains ethanol, and residual
ethanol may interfere with subsequent reactions. The
additional centrifugation assures that no residual ethanol
is carried over into the next step of the protocol.
10. Place the JetQuick™ Spin Column into a new 1.5 mL
microcentrifuge tube.
11. Add 50 μL of sterile water, TE Buffer, or 10 mM Tris-HCl,
pH 8.0, to the center of the column.
12. Centrifuge at >12,000 × g for 2 minutes.
Note: A higher DNA concentration is obtained if the
elution is performed with only 30 μL of elution buffer. In
this case, preheat the elution buffer to 65°C–70°C, add the
buffer directly onto the center of the spin column and let
stand for 1 minute before centrifugation.
Continued on next page
21
General DNA Clean-Up Procedure, Continued
Purification
Procedure
Using Vacuum
1.
Add 4 volumes of Binding Buffer (M1) to 1 volume of
DNA sample. Mix well.
Note: When samples >100 μL are used, scale up the
volume of Buffer M1 proportionally, maintaining the ratio
of Buffer M1:DNA sample (4:1). In this case, multiple
loadings of the column (Step 4, below), are required.
2.
Assemble the vacuum manifold according to the
manufacturer’s instructions.
3.
Attach a column to the vacuum manifold.
4.
Pipette the sample onto the membrane of the column.
Apply vacuum (−200 to −650 mbar) until all liquid passes
through the column, and then switch off the vacuum
source.
5.
Add 500 μL Wash Buffer (M2) containing ethanol (see
page 20) to the center of the JetQuick™ Spin Column.
6.
Apply vacuum (−200 to −650 mbar) until all liquid passes
through the column, and then switch off the vacuum.
Remove the JetQuick™ Spin Column from the vacuum and
place it into a 2 mL Receiver Tube.
7.
Centrifuge the column with the Receiver Tube at
maximum speed for 1 minute to remove any residual
Wash Buffer (M2) and ethanol. Discard the flow-through
and the Receiver Tube.
8.
Place the JetQuick™ Spin Column into a new 1.5 mL
microcentrifuge tube. Add 50 μL of sterile water, TE
Buffer, or 10 mM Tris-HCl, pH 8.0, to the center of the
column.
9.
Centrifuge at >12,000 × g for 2 minutes.
Note: A higher DNA concentration is obtained if the
elution is performed with only 30 μL of elution buffer. In
this case, preheat the elution buffer to 65°C–70°C, add the
buffer directly onto the center of the spin column and let
stand for 1 minute before centrifugation.
Continued on next page
22
General DNA Clean-Up Procedure, Continued
Storing DNA
•
Store the purified DNA at 4°C for immediate use.
•
Aliquot the DNA and store at –20°C for long-term storage.
•
Store DNA eluted in water at –20°C.
•
Avoid repeated freezing and thawing of DNA.
23
Troubleshooting
Introduction
Review the information below to troubleshoot your
experiments with the JetQuick™ General DNA Clean-up Kit.
Problem
Cause
Solution
Low DNA
yield
Insufficient
starting material
Verify the quantity of DNA in your sample
prior to purification.
Incorrect binding
conditions
For efficient DNA binding, always mix
1 volume of DNA sample with 4 volumes
of Binding Buffer (M1).
Incomplete DNA
elution
Add preheated Elution Buffer (65°C to
70°C) directly onto the center of the silica
matrix of the spin column and let stand for
1 minute. Centrifuge at >12,000 × g for
1 minute.
DNA fragment is
too large
Use preheated Elution Buffer for all
fragments >7.5kb and add the buffer
directly onto the center of the silica matrix
of the spin column. Let stand for 1 minute
before centrifuging at >12,000 × g for
1 minute.
Residual ethanol
in the purified
DNA
Traces of ethanol from the Wash Buffer
(M2) can inhibit downstream enzymatic
reactions.
Inhibition of
enzymatic
reaction
To remove Buffer M2, discard Wash Buffer
flow-through from the Receiver Tube.
Place the column into the Receiver Tube
and centrifuge the column at >12,000 × g
for 2–3 minutes to completely dry the
column.
Residual salt in
the purified DNA
24
Use water or 10 mM Tris-HCl, pH 8.0 (no
EDTA) for elution.
Appendix
Estimating DNA Yield and Quality
DNA Yield
Perform DNA quantitation using Quant-iT™ DNA Assay
Kits, agarose gel electrophoresis, or spectrophotometer.
Quant-iT™ DNA Assay Kits
The Quant-iT™ DNA Assay Kits (see page 27 for ordering
information) provide a rapid, sensitive, and specific method
for dsDNA quantitation with minimal interference from
RNA, protein, ssDNA (primers), and other common
contaminants that affect UV absorbance.
The kit contains a state-of-the-art quantitation reagent, prediluted standards for standard curve, and a pre-made
buffer. For optimal results, perform the quantitation using
Invitrogen’s Qubit® Fluorometer (page 27). Quant-iT™ DNA
Assay Kits also work with standard fluorescent microplate
readers. Follow the manufacturer’s recommendations to
perform the assay.
Agarose Gel Electrophoresis
To estimate the yield using agarose gel electrophoresis,
compare the purified PCR product to known quantities of a
DNA fragment with the same size. Compare the band
intensity of the purified PCR product to the DNA fragment
used as a standard.
Continued on next page
25
Estimating DNA Yield and Quality, Continued
DNA Yield,
Continued
UV Spectrophotometer
To estimate DNA yield by spectrophotometer, measure the
UV absorbance of the sample at 260 nm. Dilute the sample in
Tris-HCl pH 7.5–8.5. Calculate quantity with the following
formula:
A260 × dilution factor × ε
Where A260 is the absorbance at 260 nm, and ε is the molar
extinction coefficient (for dsDNA, ε = 50; for, ssDNA ε = 33).
Estimating
DNA Quality
DNA purified using JetQuick™ DNA Purification Kits has an
OD A260/A280 value of >1.8 when samples are diluted in TrisHCl pH 7.5–8.5 indicating that the DNA is substantially free
of contaminants that would otherwise affect UV absorbance.
To confirm the integrity and the size of the purified DNA
fragments, perform agarose gel electrophoresis.
26
Accessory Products
Additional
Products
The table below lists additional products available from
Invitrogen that may be used with JetQuick™ DNA
Purification Kits.
For more information about these products, visit
www.invitrogen.com or contact Technical Support (page 28).
Amount
Cat. no.
™
Product
1,000 assays
Q33120
™
1,000 assays
Q33130
Qubit® Fluorometer
1 each
Q32857
1 unit
K211101
Quant-iT DNA Assay Kit, High Sensitivity
Quant-iT DNA Assay Kit, Broad–Range
™
EveryPrep Universal Vacuum Manifold
27
Technical Support
World Wide
Web
Contact Us
Visit the website at www.genomed-dna.com for:
•
Technical resources, including manuals, MSDSs, FAQs
•
Complete technical support contact information
•
Access to the Online Catalog
•
Additional product information and special offers
For more information or technical assistance, call, write, fax,
or email. Additional international offices are listed on
www.genomed-dna.com.
GENOMED GmbH
Poststr. 22
D-32584 Löhne
Germany
Tel: +49-(0)5732-904700
Fax: +49-(0)5732-9047010
E-mail: [email protected]
28
Purchaser Notification
Limited
Warranty
GENOMED (a part of Life Technologies Corporation) is committed to
providing our customers with high-quality goods and services. Our
goal is to ensure that every customer is 100% satisfied with our
products and our service. If you should have any questions or
concerns about an Invitrogen product or service, contact our
Technical Support Representatives.
All GENOMED products are warranted to perform according to
specifications stated on the certificate of analysis. The Company will
replace, free of charge, any product that does not meet those
specifications. This warranty limits the Company’s liability to only
the price of the product. No warranty is granted for products beyond
their listed expiration date. No warranty is applicable unless all
product components are stored in accordance with instructions. The
Company reserves the right to select the method(s) used to analyze a
product unless the Company agrees to a specified method in writing
prior to acceptance of the order.
GENOMED makes every effort to ensure the accuracy of its
publications, but realizes that the occasional typographical or other
error is inevitable. Therefore the Company makes no warranty of any
kind regarding the contents of any publications or documentation. If
you discover an error in any of our publications, report it to our
Technical Support Representatives.
Life Technologies Corporation shall have no responsibility or
liability for any special, incidental, indirect or consequential loss or
damage whatsoever. The above limited warranty is sole and
exclusive. No other warranty is made, whether expressed or
implied, including any warranty of merchantability or fitness for a
particular purpose.
Continued on next page
29
Purchaser Notification, Continued
Limited Use
Label License
No. 5:
Invitrogen
Technology
The purchase of this product conveys to the buyer the nontransferable right to use the purchased amount of the product and
components of the product in research conducted by the buyer
(whether the buyer is an academic or for-profit entity). The buyer
cannot sell or otherwise transfer (a) this product (b) its components or
(c) materials made using this product or its components to a third
party or otherwise use this product or its components or materials
made using this product or its components for Commercial Purposes.
The buyer may transfer information or materials made through the
use of this product to a scientific collaborator, provided that such
transfer is not for any Commercial Purpose, and that such
collaborator agrees in writing (a) not to transfer such materials to any
third party, and (b) to use such transferred materials and/or
information solely for research and not for Commercial Purposes.
Commercial Purposes means any activity by a party for consideration
and may include, but is not limited to: (1) use of the product or its
components in manufacturing; (2) use of the product or its
components to provide a service, information, or data; (3) use of the
product or its components for therapeutic, diagnostic or prophylactic
purposes; or (4) resale of the product or its components, whether or
not such product or its components are resold for use in research. For
products that are subject to multiple limited use label licenses, the
terms of the most restrictive limited use label license shall control. Life
Technologies Corporation will not assert a claim against the buyer of
infringement of patents owned or controlled by Life Technologies
Corporation which cover this product based upon the manufacture,
use or sale of a therapeutic, clinical diagnostic, vaccine or prophylactic
product developed in research by the buyer in which this product or
its components was employed, provided that neither this product nor
any of its components was used in the manufacture of such product.
If the purchaser is not willing to accept the limitations of this
limited use statement, Life Technologies is willing to accept return
of the product with a full refund. For information about purchasing
a license to use this product or the technology embedded in it for
any use other than for research use please contact Out Licensing,
Life Technologies, 5791 Van Allen Way, Carlsbad, California 92008
or [email protected]
©2010 Life Technologies Corporation. All rights reserved.
30
Genomed
Corporate Headquarters
Genomed GmbH
Poststr. 22
D-32584 Löhne, Germany
Tel:+49-(0)5732-904700
Fax:+49-(0)5732-9047010
[email protected]
www.genomed-dna.com
User Manual