1
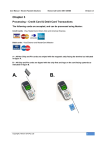
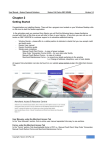
Installation Guide-Nexion Payement Solution
Nexion Call Centre 0861 639 466
Payment Solutions for Service Providers
Nexion Application Installation Guide
Version 2.1.0.23
Copyright Nexion SA (Pty) Ltd
-1-
Version 2.0.0.3
Installation Guide-Nexion Payement Solution
Nexion Call Centre 0861 639 466
INDEX
Version 2.0.0.3
Page
Nexion Installation Requirements
3
Firewall and Anti-virus Exceptions
3
Contents of installation Pack
3
Contents of installation Disk
3
System Requirements
4
Pre-Installation Inspection
4
Installation Types
4
Nexion Installation Requirements
5
Installing the Card Swipe Terminal
5
Serial Com Port Installation
5
USB to Com Port Adaptor Installation
5
Get Settings
10
Setting the default number of receipts
11
The Test Transaction
12
Post Installation Checks
14
Copyright Nexion SA (Pty) Ltd
-2-
Installation Guide-Nexion Payement Solution
Nexion Call Centre 0861 639 466
Version 2.0.0.3
Nexion Installation Requirements
Firewall and Antivirus Exceptions:
We highly recommend that virus protection be installed on the relevant computer.
It is possible that you will need to grant permission for the antivirus or firewall software to allow
the Nexion Application to access the internet.
Please allow the following ports ands I.P address:
IP:
196.23.49.206
TCP PORTS: 6221, 5432, 6210, 6211, 6201, 6220
Equipment and documentation:
All required equipment and documentation will be supplied by Nexion in the Installation Pack. This
will be sent to you or the Merchant concerned according to arrangement between us, Nexion and
you the installer. Please confirm installation date and time before arriving on site. In the
Installation pack there is a detailed contents list should any documentation or equipment be
missing please contact the Nexion Technical Department on 0861 639 466.
Contents of Installation Pack:
□
□
□
□
□
□
□
□
□
□
□
□
□
□
Nexion User Manual
Quick Links Booklet
Direct Debit Transaction Form
Member Maintenance Form
Manual Credit Card Transaction Form
Manual Credit or Refund Application Form
Request for Cash or Cheque Functionality Form
Installation Form
Obtaining a Manual Authorization Bulletin
Report Functionality Bulletin
User Training Syllabus & Contact Details
Nexion Installation Disc
Card Swipe Terminal “Magic 1800”
Visa/ Master Card Decals & Tents
Contents of Installation Disc:
A.)
Nexion Installation Folder.
-
B.)
Nexion Install.exe
Updates Folder.
C.)
Any Updates available at the time will be put in this folder please copy all files and overwrite
existing files. Path: C:/Program Files/Nexion
Forms Folder.
-
Direct Debit Transaction Form
Manual Credit Card Form
Member Maintenance Form
Credit or Refund Application Form
Merchant Maintenance Form
Copyright Nexion SA (Pty) Ltd
-3-
Installation Guide-Nexion Payement Solution
Nexion Call Centre 0861 639 466
Version 2.0.0.3
Minimum Hardware and Operating System Requirements:
*Mandatory Requirement
-
*Processor
-
*RAM
Hard Drive
Access
*Motherboard
*OS
*Internet
1.66 GHz or higher (Intel preferred)
512 MB or higher
80 GB capacity or higher
A Dialup, 3G or ADSL (Recommended) internet connection
1 free serial com port or 1 free USB port
Windows XP Service Pack 2 (Recommended)
Pre Installation inspection
Please go through the following checklist and follow the actions if necessary.
A.)
Is there a Serial Com Port available?
-
B.)
Is the internet up and running?
-
C.)
If there is no Serial Com port available, A Serial Com Port to USB adaptor is required.
Please refer to steps, 1.1-1.7 of this installation manual.
If a dialup is used please connect.
Open Internet Explorer and type in www.nexion.co.za, to check the connection.
Should the page load please continue, if not begin trouble shooting
(See appendix A of this Installation Manual)
Is the Merchant running Windows XP Home/Pro? (Recommended)
- The Nexion Application requires a minimum O.S of Windows 2000
- If not, please contact the Nexion Technical Centre.
Installation Types:
Standard Nexion Installation
Other Practice management Integrations
-
Please use this installation manual
Please refer to enclosed documentation
Should there be any queries please contact the
Nexion Technical Help Desk
0861 NEXION (639 466)
Copyright Nexion SA (Pty) Ltd
-4-
Installation Guide-Nexion Payement Solution
Nexion Call Centre 0861 639 466
Version 2.0.0.3
Nexion Installation Procedure
Installing the Card Swipe terminal:
Please find in the installation pack provided by Nexion the “Magic 1800” Card Swipe terminal and
proceed as follows:
Please note, for USB installations only.
Once the adaptor has been installed on a specific USB port it may not be moved or
unplugged. If moved the terminal must be re initialised.
Serial Com Port Installation:
1.)
2.)
3.)
Insert the Nexion Installation CD into the CD/DVD drive.
Connect the Magic 1800 Card Swipe terminal to an available Serial Com port.
Should there be no Serial Com Port available please use the USB to COM Port (RS-232)
adaptor and complete the following USB installation:
USB Installation:
1.1) Connect the USB to Com Port (RS-232) adaptor to the serial port connector of the
terminal.
1.2) Plug the USB connector into an available USB port.
1.3) Supplied on the Nexion installation CD under the USB Driver folder is the relevant
driver installation.(Please refer to make and model)
1.4) Run the USB driver Install.exe.
1.5) Once complete restart the Computer.
1.6) Windows will automatically pick up and finish the adaptors driver installation.
1.7) Once installation is complete please continue from point 4.
4.)
Plug in the Power supply provided with the terminal and switch on the power.
5.)
Double click the CD/DVD Drive in “My Computer”
6.)
Open the Folder labelled Nexion Installation.
Copyright Nexion SA (Pty) Ltd
-5-
Installation Guide-Nexion Payement Solution
Nexion Call Centre 0861 639 466
7.)
Double click the Nexion Install.exe icon to begin the Nexion Installation.
8.)
Click Next.
Copyright Nexion SA (Pty) Ltd
-6-
Version 2.0.0.3
Installation Guide-Nexion Payement Solution
9.)
Nexion Call Centre 0861 639 466
Version 2.0.0.3
Choose “I accept the terms of the license agreement” and click Next.
10.)
Type in the client’s information in the User Name: filed provided.
11.)
Type in the client’s organization in the Organization: field provided then Click Next.
Copyright Nexion SA (Pty) Ltd
-7-
Installation Guide-Nexion Payement Solution
Nexion Call Centre 0861 639 466
Version 2.0.0.3
12.) Choose directory you wish to install Nexion into – It is recommended that you use default
destination folder. Click Next.
13.) Choose the Com port where the terminal is installed – default is COM1 for a Serial port
installation. If a USB installation, please select the relevant com port.
The USB Installation Com port can be attained via the Computer management console in the
Device manager section under Ports.
Please contact Nexion should you experience any difficulty.
Copyright Nexion SA (Pty) Ltd
-8-
Installation Guide-Nexion Payement Solution
Nexion Call Centre 0861 639 466
Version 2.0.0.3
14.) Key in Terminal ID and Unique ID
(This information will be provided on the Nexion Activation form)
15.) If host machine is using dial up, click, “Prompt for Dialup” and choose which dial up
connection to use.
16.) Click the ‘Initialize’ button to initialize the card swipe terminal to Nexion.
17.) Click “OK” once the Successful Dialog box opens. Check the screen of the Card Swipe
Terminal screen “INITIALISED” must be displayed and then disappear. This signifies a
successful initialization.
18.) Once complete, close all open windows.
19.) On the desktop there will be an “nxStandalone” icon.
20.) Double click the icon and the following screen will appear.
Copyright Nexion SA (Pty) Ltd
-9-
Installation Guide-Nexion Payement Solution
Nexion Call Centre 0861 639 466
Version 2.0.0.3
Get Settings:
Now that the installation is complete. A Get Settings must be done to attain the necessary
Merchant information from the Nexion Servers.
21.) Click the “Get settings” button on the User Login screen and wait until confirmation dialog
box appears.
22.) When the confirmation dialog box appears, Click NO.
23.) Select the “Username:” from the username drop-down box and enter the ‘Password’. The
default password is ‘nexion’ in lower case.
24.) Click the ‘Login’ button to begin. The main Menu Screen is now displayed.
Copyright Nexion SA (Pty) Ltd
- 10 -
Installation Guide-Nexion Payement Solution
Nexion Call Centre 0861 639 466
Version 2.0.0.3
Setting the Default Number of Receipts:
Please note:
The Merchant must retain a signed copy of the Credit Card receipt. This copy must be filed
as it may be required as proof of purchase, in the case of a charge back by the bank.
Before processing any payments, always ensure that your printer is switched on, and has
enough paper
25.) From the Main Menu, select the Settings option and then select Slips.
26.) The Slip Settings screen is now displayed with all the various options.
27.)
Select the appropriate receipt printing options for each tender type and click “save.”
Copyright Nexion SA (Pty) Ltd
- 11 -
Installation Guide-Nexion Payement Solution
Nexion Call Centre 0861 639 466
Version 2.0.0.3
The Test Transaction:
In Order to check if the installation was successful a test Transaction must be completed and
verified with the Nexion Technical Centre. Please call 0861 NEXION (639 466).
1.)
Click the “Payments” Button on the Main Menu.
A
B
C
2.)
Ensure that the Correct Merchant Name is displayed in the Merchant Drop Drown list.
If the Incorrect name is displayed the Terminal ID and Unique ID are incorrect please contact
the Nexion Technical Centre to verify the relevant Merchant details.
3.)
Enter R20.00 into the “Amount:” field (A)
4.)
Enter Test 1 into Field B and C.
Copyright Nexion SA (Pty) Ltd
- 12 -
Installation Guide-Nexion Payement Solution
Nexion Call Centre 0861 639 466
Version 2.0.0.3
5.)
Click “Process Card Trxn” to continue.
6.)
Press cancel on the Card Swipe terminal keypad in order to do a manual Transaction.
7.)
A dialog box will be displayed on your screen confirming that a manual transaction will be
done.
8.)
Click on the “Yes” button to confirm that you wish continue with the manual transaction.
9.)
On the “Manual payment” screen, choose “Master Card” from the “Type” drop down list
and click OK to continue.
10.) Enter the following fictitious information as displayed in the fields below and press OK.
Copyright Nexion SA (Pty) Ltd
- 13 -
Installation Guide-Nexion Payement Solution
Nexion Call Centre 0861 639 466
Version 2.0.0.3
11.) At this point the transaction will be processed and the result displayed on your screen by
means of a declined message on a receipt displayed by the default “Foxit” viewer.
12.) The Declined Reason you are looking for is “T8” this signifies that the Transaction has hit the
switch into the bank and returned with a legitimate declined code thus ensuring that the
connection is active.
13.) Regardless of the outcome of the transaction, the preset number of receipts will automatically
be printed to your default printer.
14.) Contact the Nexion Technical Help Desk to confirm that the transaction was successfully
processed.
Nexion Technical Help Desk: 0861 639 466
Other Post Installation Checks:
Please perform the following checks to ensure that the setup is correct.
1.)
Check the Receipt header; make sure that all the Merchants details are displayed.
2.)
Ensure that the Default number of receipts is to the merchant specifications and that the
correct format of receipt is selected.
Copyright Nexion SA (Pty) Ltd
- 14 -