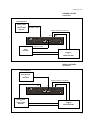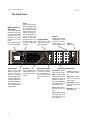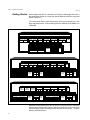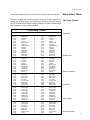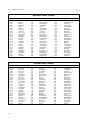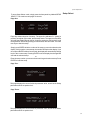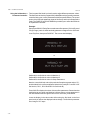
1
300 Digital Effects System V 3.0 Owner's Manual Unpacking and Inspection After unpacking the 300, save all packing materials in case you ever need to ship the unit. Thoroughly inspect the 300 and packing materials for signs of damage. Report any shipment damage to the carrier at once; report equipment malfunction to your dealer. Precautions The Lexicon 300 is a rugged device with extensive electronic protection. However, you should observe the same reasonable precautions that apply to any piece of audio equipment. • Always use the correct line voltage. Refer to Chapter 1 of this manual for power requirements. • Don't install the 300 in an unventilated rack, or directly above heat-producing equipment such as power amplifiers. Maximum ambient operating temperature is 35°C (95°F). • Never attach audio power amplifier outputs directly to any of the 300's connectors. • Before turning the 300 on or off, mute your monitor speakers to avoid possible damage from transients. • To prevent fire or shock hazard, do not expose the 300 to rain or moisture. Notice This equipment generates and uses radio frequency energy and if not installed and used properly, that is, in strict accordance with the manufacturer's instructions, may cause interference to radio and television reception. It has been type tested and found to comply with the limits for a Class A computing device in accordance with the specifications in Subpart J of Part 15 of FCC Rules, which are designated to provide reasonable protection against such interference in a residential installation. However, there is no guarantee that interference will not occur in a particular installation. If this equipment does cause interference to radio or television reception, which can be determined by turning the equipment OFF and ON, the user is encouraged to try to correct the interference by one or more of the following measures: Reorient the receiving antenna Relocate the computer with respect to the receiver Move the computer away from the receiver Plug the computer into a different outlet so that the computer and receiver are on different branch circuits. If necessary, the user should consult the dealer or an experienced radio/television technician for additional suggestions. The user may find the following booklet prepared by the Federal Communications Commission helpful: "How to identify and Resolve Radio/TV Interference Problems." This booklet is available from the U.S. Government Printing Office, Washington, DC 20402, Stock No. 004-000-00345-4. Le présent appareil numérique n'émet pas de bruits radioélectriques dépassant les limites applicables aux appareils numériques de la class A prescrites dans le Règlement sur le brouillage radioélectrique édicté par le ministère des Communications du Canada. This triangle, which appears on your component, alerts you to the presence of uninsulated, dangerous voltage inside the enclosure... voltage that may be sufficient to constitute a risk of shock. Copyright 1997 All Rights Reserved. Lexicon Part #070-09678 Rev. 2 CAUTION RISK OF ELECTRIC SHOCK DO NOT OPEN This triangle, which appears on your component, alerts you to important operating and maintenance instructions in this accompanying literature. Lexicon Inc. 3 Oak Park Bedford MA 01730-1441 Telephone 617-280-0300 Fax 617-280-0490 Contents Introduction 1. Installing the 300 Mounting ............................................................................................. Power Requirements .......................................................................... The Rear Panel .................................................................................. Connectors, Cables and Configurations ............................................. Connectors ................................................................................... Cables .......................................................................................... Setting Analog Audio Levels ........................................................ Configurations .............................................................................. 1-2 1-2 1-3 1-4 1-4 1-5 1-6 1-7 2. System Overview Terms used in this manual ................................................................. The Front Panel .................................................................................. Overview of Front Panel Controls ................................................ Overview of the 300 Display ........................................................ System Overview ................................................................................ 2-2 2-4 2-5 2-6 2-7 3. System Operation Getting Started ................................................................................... 3-2 Selecting digital input and/or changing analog sampling rate ...... 3-3 Single Setups ..................................................................................... 3-4 Dual Mono Setups .............................................................................. 3-5 Cascade Setups ................................................................................. 3-7 Setup Select Mode ............................................................................. 3-9 The Setup Presets ....................................................................... 3-9 Using the Soft Knob as a Parameter Controller ......................... 3-12 Setup Edit Mode ............................................................................... 3-13 Single Setups ............................................................................. 3-13 Dual Mono and Cascade Setups ............................................... 3-15 Naming the Setup ............................................................................. 3-17 Storing the Setup .............................................................................. 3-17 Effect Edit Mode ............................................................................... 3-18 Parameter Selection ................................................................... 3-18 Naming and Storing Effects ....................................................... 3-19 Mod Edit Mode ................................................................................. 3-20 Soft Knob Patches ..................................................................... 3-21 Control Mode .................................................................................... 3-22 Time Code Event List ................................................................. 3-22 MIDI Mode and Map Table ......................................................... 3-23 Machine Configuration ............................................................... 3-24 Digital Interface and Sampling Rates ......................................... 3-24 SCMS Mode ............................................................................... 3-25 Emphasis ................................................................................... 3-25 Bypass/Effect Load Mode .......................................................... 3-26 Copy Tools ................................................................................. 3-26 Purge Tools ................................................................................ 3-27 Contents, cont'd. 4. The Algorithms and their Parameters Single Setup Algorithms ..................................................................... 4-2 Random Hall ................................................................................ 4-2 Random Ambience ....................................................................... 4-8 Rich Plate ................................................................................... 4-11 Stereo Pitch Shift ....................................................................... 4-15 Stereo Adjust .............................................................................. 4-18 "Split" Setup Algorithms .................................................................... 4-23 Dual Delays ................................................................................ 4-23 Split Chamber ............................................................................ 4-26 Mono Pitch Shift ......................................................................... 4-29 Compressor ................................................................................ 4-31 PONS (Psychoacoustically Optimized Noise Shaping) .............. 4-33 Small Stereo Adjust .................................................................... 4-34 5. The Presets Single Setup (and Effect) Presets ...................................................... 5-2 Split Setup Presets and Their Effects ................................................. 5-6 Split Setup Effect Descriptions ......................................................... 5-20 Effect Preset Parameters ................................................................. 5-25 Effect Presets Using the Random Hall Algorithm ....................... 5-25 Effect Presets Using the Random Ambience Algorithm ............. 5-27 Effect Presets Using the Rich Plate Algorithm ........................... 5-28 Effect Presets Using the Stereo Adjust Algorithm ...................... 5-29 Effect Presets Using the Stereo Pitch Shift Algorithm ................ 5-30 Effect Presets Using the Dual Delays Algorithm ........................ 5-31 Effect Presets Using the Split Chamber Algorithm ..................... 5-34 Effect Presets Using the Mono Pitch Shift Algorithm ................. 5-36 Effect Presets Using the Compressor Algorithm ........................ 5-36 Effect Presets Using the PONS Algorithm ................................. 5-36 Effect Presets Using the Small Stereo Adjust Algorithm ............ 5-36 6. Time Code Operation Using Time Code ................................................................................ 6-2 The Event List ..................................................................................... 6-3 Using time code to initiate program changes ............................... 6-3 Snapping events .......................................................................... 6-4 Editing the List .............................................................................. 6-4 Trimming Time Codes in the Event List ....................................... 6-5 Programming Parameter Glides ................................................... 6-6 Things to Consider about Glides .................................................. 6-8 Adding an event ........................................................................... 6-9 Deleting an event ......................................................................... 6-9 Dumping the List to MIDI storage devices .......................................... 6-9 Event List Log Sheet ........................................................................ 6-10 7. MIDI Operation MIDI Connections ............................................................................... Setting MIDI Channels ........................................................................ Dynamic MIDI ..................................................................................... Using MIDI Program Change Messages with the 300 ........................ MIDI Table mode .......................................................................... Editing the MIDI Table .................................................................. Real-time MIDI Effects Automation .................................................... Using Real-time SysEx and Non-registered Parameters ............. Using Dynamic MIDI® to transmit and receive MIDI Controller Information ............................................................ Using SysEx and Dynamic MIDI® Patches ................................... Controlling Multiple 300s .................................................................... MIDI Dumps of Current Setup, Event List, MIDI Table, and All Registers ................................................................................. 8. Troubleshooting Low Voltage ........................................................................................ Overheating ........................................................................................ Common MIDI Problems .................................................................... Common Time Code Problems .......................................................... Common Digital Interfacing Problems ................................................ 9. MIDI Implementation Chart 10. Specifications 7-2 7-3 7-4 7-5 7-5 7-5 7-6 7-6 7-7 7-7 7-7 7-8 8-2 8-2 8-2 8-3 8-3 Congratulations on your purchase of the 300 Digital Effects System! The 300 not only contains the finest sounds, as you've come to expect from Lexicon, it incorporates new functions that satisfy the needs of today's audio production. Analog and Digital Audio Interfacing For both analog and digital use the 300 takes full advantage of recent advances in converter technology and combines them with flexible digital interfacing. The A/D and D/A converters use oversampling techniques to minimize low-level distortion and provide linear phase characteristics. 64x oversampling Delta/ Sigma conversion is used in the A/Ds; 8x oversampling is used in the D/As. The result is sonic transparency without the artifacts normally encountered in conversion. The digital I/O simplifies interfacing with both the AES/EBU professional and the EIAJ consumer format. XLR, RCA and Optical connectors are provided for both input and output. The digital inputs of the 300 will automatically accept and lock to any AES/EBU/SPDIF format; the 300's digital output format is user-selectable for feeding either professional or consumer equipment. This allows for format conversion as well as using the high quality A/D converters to feed digital recorders. Control of additional Channel Status information is provided as well. Dual DSP Architechture The 300 utilizes two proprietary high performance DSP engines. The configuration of these engines can be determined by the end-user to suit a particular audio application. The Single Setup configuration unites both DSP engines. Two “split” configurations: Dual Mono and Cascade, allow each DSP engine to run a special program especially designed for “Split “ applications. The Single algorithms include: Random Hall, Random Ambience, Rich Plate, Stereo Pitch Shift, and Stereo Adjust. The “split" algorithms include: Dual Delays, Chamber, Mono Pitch Shift, Compressor, a special mastering dither program called PONS (Psychoacoustically Optimized Noise Shaping), and a small version of Stereo Adjust. Comprehensive Effects Automation The 300 makes effects automation available in three different ways. If you use time code, the 300's Event List and Time Code Reader add a new twist to effects processing. Each entry in the 50-item list contains a time code value and a 300 effect preset/register number, allowing incoming time code to trigger setup and effect changes, as well as setup and effect parameter glides. For changing effects in music or changing rooms and environments for film and video, the 300's time code capability opens new avenues to all time code users. Dynamic MIDI® is included for real-time performance control and effects automation. All parameters in the 300 can be patched to most MIDI controllers, allowing full control from remote devices. For full MIDI automation all parameter changes can be recorded on any sequencer. For additional control, complete System Exclusive information is available. Introduction Lexicon Sound Even with the best functions and features, the heart of any signal processor is its sound. The 300 contains the very best of the Lexicon Sound — with new refinements such as dynamic size parameters in the Reverb and Ambience algorithms. We have also included stereo and mono pitch shifting, delay effects, a mastering algorithm with precision level/balance controls and equalization. These sounds, combined with analog and digital audio I/O, time code based effect change, an internal LFO, and full MIDI automation result in a system that provides new creative options each time you use it. We’re confident you’ll find that the 300’s combination of state-of-the-art sound and extraordinary versatility is exactly what you’re looking for — to make sure you don’t miss out on anything, we’d like you to read this manual. It provides a thorough explanation of both front panel and MIDI operation, digital and analog interfacing, descriptions of the effects and presets, and complete MIDI Implementation data — all the information you need to access the full power of the 300. Installing the 300 1 Installing the 300 1-1 300 V 3.0 Owner's Manual Lexicon Mounting Before rack-mounting the 300, you may want to remove the four rubber feet attached to the bottom of the 300 chassis. Gently pry off the black plastic buttons in the center of each foot, then remove the foot itself. The 300 measures 19"W x 3.50"H x 13.9"D (483 x 90 x 353 mm). It uses two EIA-standard rack spaces and can be mounted on any level surface or in a standard 19 inch (483 mm) rack. Whatever mounting method you use, make sure that the 300 is securely screwed into the rack adapter If the 300 is mounted in a rack or road case, support the rear of the chassis to prevent possible damage from mechanical shock and vibration. Power Requirements The 300 is equipped with a 3-pin IEC power connector and detachable cord, providing chassis grounding to the AC mains line. Plug the female end of the power cord into the 300, and the male end into a wall outlet. The 300 is internally wired to operate at 100, 120, 220 or 240 VAC. The operating voltage set at the factory is marked on a label attached to the rear panel. Check the label before applying power to the unit. If the voltage must be changed, refer a qualified technician to the Voltage Changeover procedure in the 300 Service Manual. 1-2 Installing the 300 The Rear Panel Digital Inputs and Outputs Inputs Three connectors are provided for digital input: AES/EBU professional format (1): 3-pin female XLR S/PDIF EIAJ CP-340 consumer format (2): unbalanced coaxial RCA optical (fiber-optic) One of these connectors may be selected for digital input. Time Code In Outputs 3-pin female XLR connector for input of SMPTE (Drop or Nondrop), EBU, or FILM time code formats. (Electronically balanced, 100mV p-p minimum) Output format can be AES/EBU or S/PDIF. Output always goes to all three digital outputs. Digital interfaces conform to AES 3-1992 (ANSI S4.40-1992). Input/output impedance levels of the AES/EBU connectors comply with the CCITT V.11 EIA RS-422A. TIME CODE IN PUSH DO AES/EBU Analog Inputs and Outputs 3-pin XLR connectors, electronically balanced. Either pin 2 or pin 3 can be used as high but, to maintain polarity when transferring data to the digital domain, pin 2 high convention is used by Lexicon. Pin 1 and either pin 2 or pin 3 of each output must be grounded for unbalanced operation. Input impedance is 50kΩ unbalanced, and 100kΩ balanced. Inputs accept input levels from -14dBu to +20dBu. Output impedance is 75Ω, and levels up to +18dBu are possible. EIAJ CP340 DI R OUT L OUT PUSH DO DI R IN L IN PUSH PUSH DI DO INPUT GAIN MIDI COMM PORT OUT AC Power Standard 3-pin IEC power connector. Communications Port DE9 connector, reserved for future enhancements. THRU IN MIDI Connectors Out: Transmits MIDI data to other equipment. Thru: Passes any MIDI data received without change. In: Receives MIDI information from other MIDI equipment such as master keyboard controllers, MIDI foot controllers, sequencers and synthesizers. Input Gain 2-position (In/Out) switch for matching input gain to the source being used. In = +16dB; Out = 0dB. 1-3 300 V 3.0 Owner's Manual Lexicon Connectors, Cables and Configurations Connectors Signal Mating Connector Description L and R Analog Audio Input XLR A3M Active balanced, pin 2 high +2dBu min; +20dBu max at 0dB setting L and R Analog Audio Output XLR A3F Active balanced; pin 2 high -2dBu to +18dBu at full scale output AES/EBU Digital Input XLR A3M Balanced RS-422 pin 2 high AES/EBU Digital Output XLR A3F Balanced RS-422 pin 2 high RCA Unbalanced 75Ω S/PDIF EIAJ CP340 Consumer Digital Input and Output S/PDIF EIAJ CP340 Consumer Digital Audio Optical Input and Output Time Code EIAJ Consumer Digital Audio format XLR A3M Active balanced RS-422; pin 2 high, 100mV p-p minimum 5-pin DIN Standard MIDI Interface Input MIDI In MIDI Out MIDI Thru Male 2 = high 3 = low 1 = ground Female 1 = ground 3 = low Pin 2 high by convention. 1-4 2 = high Installing the 300 Cables For best performance, maintain balanced connections, and use high-quality, Analog Audio I/O and Time Code low-capacitance, twisted-shielded pair cable. When connecting to single-ended, unbalanced devices, connect the low side to signal ground at the unbalanced piece of equipment. For mono connection, connect the left and right input channels in parallel. Be careful to keep input and output to all channels wired consistently. Out-ofphase wiring can produce audible effects. This interface requires balanced connections using high-quality, low-capacitance, controlled-impedance, data communication, twisted-shielded pair cable. It will not work reliably if microphone cable is used. AES/EBU Digital Audio I/O This interface is unbalanced but, because it carries digital signals, it requires the use of 75Ω RG-59 coaxial cable. SPDIF (EIAJ CP340) Consumer Digital Audio I/O Use commercially-available, consumer audio optical cable assemblies. SPDIF (EIAJ CP340) Consumer Digital Audio Optical I/O Use standard 5-pin DIN MIDI cable asemblies, available from your local dealer. MIDI IN, OUT and THRU Below are recommended manufacturer's part numbers for cable and cable assemblies. In some cases, two types are specified: one with an overall braid shield for heavy use, and one with a foil shield for permanent installation. Analog Audio and Time Code Belden 8412 (microphone cable with braided shield) Belden 9461 (foil shield) AES/EBU Belden 9271 (foil shield) Gotham GAC-2 AES-FRU Maximum recommended length: 100 ft (30M) S/PDIF (EIAJ CP340) Consumer Digital Audio Belden 9259 (22 AWG conductor, .242 O.D.) Belden 8218 (27 AWG conductor, .150 O.D.) Maximum recommended length: 32 ft (10M) S/PDIF (EIAJ CP340) Consumer Digital Audio Optical Toshiba TOCP174y Sony POC-15 Maximum recommended length: 16 ft (5M) 1-5 300 V 3.0 Owner's Manual Setting Analog Audio Levels Lexicon When shipped, the 300 is set for the Analog I/O configuration. Once you have connected the analog inputs and outputs, you can set up the analog input and output levels. To do this, press the 300 front panel key marked LEVEL. The display will show: Press this button to toggle selection of INL on and off. This line is selected, and will change as you turn the Soft knob to give a visual indication of the level settings Level Indicators Red Amber Green DSP Overload -3 -6 -12 -18 -24 -30 -36 -42 ❚ ❚ ❚ ❚ ❚ ❚ ❚ ❚ INR ❚ ❚ ❚ ❚ ❚ ❚ ❚ ❚ INL (-10.0dB to +10.0dB) (-10.0dB to +10.0dB) LEVEL LEVEL values are dB approximate Press this button to toggle selection of INR on and off. Actual level settings (in dB) are shown here. The front panel PAGE UP and PAGE DOWN keys allow you to switch the display from input levels (IN L and R) to output levels (OUT L and R). When a line is selected, the boxes on the display will be lengthened. (The illustration above shows the upper line selected.) If both lines on the display are selected, turning the Soft knob will alter both settings simultaneously. The buttons directly above and below the display act as toggle switches to individually select and un-select these lines. If additional gain is needed, the rear panel INPUT GAIN switch allows you to set unity gain of the 300 to 0dB (switch OUT), or to +16dB (switch IN). Feed a 1kHz tone (or a musical signal at the maximum peak level used in your system) to the 300. Use the front panel Soft knob to adjust the level so that the peak input level falls just short of lighting the red overload LED. To set the output level, press the front panel PAGE UP or PAGE DOWN key and use the Soft knob to set the output to provide appropriate levels for your console or system. 1-6 Installing the 300 Configurations Connection to a mixing console's effects sends Effects Send (L) Effects Send (R) Channel Input or Effects Return (L) Channel Input or Effects Return (R) TIME CODE IN PUSH DO AES/EBU EIAJ CP340 DI R OUT PUSH DO DI L OUT R IN L IN PUSH PUSH DI DO INPUT GAIN MIDI COMM PORT OUT THRU IN If you will be using a 300 as your primary effects unit, and your system includes a console with one or more auxiliary (effects) sends, connect the 300 as shown above. In most applications, it is preferable to connect the 300 outputs to two of the console's input channel strips, panned full left and right, rather than the effects returns. This allows the greatest flexibility in routing and equalization. In this configuration the console controls are used to set the amount of effect heard—the 300's MIX control should be set for 100% wet. If you are using only one effects send, connect the left and right inputs of the 300 in parallel. The following diagrams give a few examples of various possible configurations for interfacing to digital equipment. 1-7 300 V 3.0 Owner's Manual Lexicon AES/EBU to AES/EBU DIGITAL AUDIO or DIGITAL VIDEO MACHINE AES/EBU Format Analog outputs for monitoring Source Machine AES/EBU Format Out TIME CODE IN In DO AES/EBU PUSH Out EIAJ CP340 DI Out R OUT L OUT PUSH DO DI R IN L IN PUSH PUSH DI DO INPUT GAIN MIDI COMM PORT THRU OUT DIGITAL AUDIO or DIGITAL VIDEO MACHINE IN CONSOLE or HEADPHONE AMP Analog outputs for monitoring Destination Machine S/PDIF to S/PDIF RDAT MACHINE or CD PLAYER S/PDIF Format Analog outputs for monitoring Source Machine In TIME CODE IN PUSH DO AES/EBU Out Out EIAJ CP340 DI R OUT PUSH DO DI L OUT R IN L IN PUSH PUSH DI DO INPUT GAIN MIDI COMM PORT OUT S/PDIF Format RDAT MACHINE THRU IN Out Analog outputs for monitoring Destination Machine Note: These digital connections can be made with fiber optic, or XLR cables instead of 75Ω coaxial RCA cables. 1-8 CONSOLE or HEADPHONE AMP Installing the 300 AES/EBU to S/PDIF Conversion Source Machine DIGITAL AUDIO or DIGITAL VIDEO MACHINE AES/EBU Format Analog outputs for monitoring In TIME CODE IN DO AES/EBU PUSH Out Out EIAJ CP340 DI R OUT L OUT PUSH DO DI R IN L IN PUSH PUSH DI DO INPUT GAIN MIDI COMM PORT THRU OUT IN Out S/PDIF Format RDAT MACHINE CONSOLE or HEADPHONE AMP Analog outputs for monitoring Destination Machine S/PDIF to AES/EBU Conversion Source Machine RDAT MACHINE or CD PLAYER S/PDIF Format Analog outputs for monitoring AES/EBU Format PUSH DO AES/EBU Out Out In Out TIME CODE IN EIAJ CP340 DI R OUT PUSH DO DI L OUT R IN L IN PUSH PUSH DI DO INPUT GAIN MIDI COMM PORT OUT DIGITAL AUDIO or DIGITAL VIDEO MACHINE THRU IN Analog outputs for monitoring CONSOLE or HEADPHONE AMP Destination Machine 1-9 300 V 3.0 Owner's Manual Lexicon ANALOG I/O and AES/EBU to AES/EBU Analog Source Digital Source DIGITAL AUDIO or DIGITAL VIDEO MACHINE ANALOG MACHINE or CONSOLE AES/EBU Format Analog audio AES/EBU Format Out TIME CODE IN In In DO AES/EBU PUSH EIAJ CP340 DI R OUT L OUT PUSH DI DO In R IN L IN PUSH PUSH DI DO INPUT GAIN MIDI COMM PORT THRU OUT IN Out Out Analog audio DIGITAL AUDIO or DIGITAL VIDEO MACHINE CONSOLE, HEADPHONE AMP or ANALOG MACHINE Analog outputs for monitoring Digital Destination Analog Destination ANALOG I/O and AES/EBU Digital Output Source Machine CONSOLE or MIKE PREAMP Analog audio AES/EBU Format Out TIME CODE IN PUSH In DO AES/EBU EIAJ CP340 DI R OUT PUSH DO DI L OUT In R IN L IN PUSH PUSH DI DO INPUT GAIN MIDI COMM PORT OUT THRU IN Out Out Analog audio DIGITAL AUDIO or DIGITAL VIDEO MACHINE Destination Machine 1-10 Analog outputs for monitoring CONSOLE, HEADPHONE AMP or ANALOG MACHINE Installing the 300 ANALOG In with Digital Patch Point to ANALOG Out ANALOG MACHINE or CONSOLE AES/EBU Format DIGITAL PROCESSOR Out In In Out TIME CODE IN PUSH In DO AES/EBU In Out Out Out Out EIAJ CP340 DI R OUT PUSH DO DI L OUT In In R IN L IN PUSH PUSH DI DO INPUT GAIN MIDI COMM PORT OUT THRU IN 1-11 System Overview 2 System Overview 2-1 300 V 3.0 Owner's Manual Lexicon Terms used in this manual In discussing 300 operation, the following terms are used. Algorithm The 300 contains eleven algorithms. An algorithm is a set of instructions that tells the 300's audio processors how to process the input signal. One algorithm produces pitch shift effects, another produces reverberation, etc. Algorithms are stored inside the 300 on ROM (Read-only memory) chips. Configuration The 300 can deliver two effects (one from each machine) simultaneously. The manner in which the two machines relate to each other is called the configuration. The machines can be used with independent inputs and outputs (Dual Mono configuration), they can share the same stereo input signal (Single configuration), or the outputs of one machine can be fed into the input of another (Cascade configuration). Effect An effect consists of an algorithm, the parameter values which create a specific sound, four associated patches, and an identifying name. Machine The 300 contains two processing modules, called Machine A and Machine B. Although both machines can run simultaneously, only one can be accessed from the front panel at any given time. A dedicated function key labeled MACH allows front panel selection of either Machine A or Machine B. Pages Because effects (and other modes of operation) have more parameters than can be displayed at one time, parameters are grouped into several pages. You move between pages by pressing the dedicated function keys labeled PAGE UP and PAGE DOWN. Parameter Each algorithm has a set of parameters (controls) that uniquely characterize it. The settings of the parameters can be changed to create radically different sounds from a single algorithm. Patch A patch is a routing assignment that allows one of the 300's parameters to be driven by a source controller (LFO, footswitch, mod wheel, etc.) Register/Preset Registers are simply memory locations where you can store your own setups and effects. Presets are factory-installed setups and effects. The presets cannot be overwritten, but they can be modified and stored as custom setups in the registers. Registers and presets are differentiated on the 300 display by the initial R (Register) or P (Preset) before their number. 2-2 System Overview Effect presets: 100 effect presets are installed in the 300 to give you a wide variety of sounds to use as is, or to use as a starting point when creating your own sounds. (50 effect registers are provided for storage.) Setup presets: 100 setup presets provide a convenient starting point for selection of effect combinations. (50 setup registers are provided for storage.) Setup A setup consists of a single effect or a pair of effects, the configuration associated with them, and an identifying name.The three basic setup configurations: Single, Dual Mono and Cascade, are shown below. SINGLE SETUP INPUT LEVEL ANALOG DIGITAL INPUT BALANCE ANALOG DIGITAL MACHINE LFO OUT MIX RATE METERS SHAPE LEFT MOD EDIT RIGHT PATCH PATCH SETUP NAME EFFECT MOD EDIT ALGORITHM RANDOM HALL STEREO ADJUST RANDOM AMBIENCE STEREO PITCH SHIFT PARAMETER VALUES RICH PLATE PATCH PATCH PATCH PATCH EFFECT NAME DUAL MONO SETUP INPUT LEVEL A LVL INPUT BALANCE B LVL A BAL MIX B BAL A LFO B RATE METERS SHAPE LEFT MOD EDIT RIGHT EFFECT A MONO PITCH SHIFT DUAL DELAY COMPRESSOR PONS PATCH SETUP NAME EFFECT B MOD EDIT ALGORITHM SPLIT CHAMBER PATCH PARAMETER VALUES SMALL STEREO ADJ PATCH PATCH PATCH PATCH MOD EDIT ALGORITHM EFFECT NAME SPLIT CHAMBER MONO PITCH SHIFT DUAL DELAY COMPRESSOR PONS PARAMETER VALUES SMALL STEREO ADJ PATCH PATCH PATCH PATCH EFFECT NAME CASCADE SETUP INPUT BALANCE INPUT BALANCE CASCADE FEEDBACK MIX A B LFO O RATE METERS SHAPE LEFT EFFECT A SPLIT CHAMBER MONO PITCH SHIFT DUAL DELAY COMPRESSOR PONS SMALL STEREO ADJ PARAMETER VALUES PATCH PATCH SETUP NAME EFFECT B MOD EDIT ALGORITHM MOD EDIT RIGHT PATCH PATCH PATCH PATCH MOD EDIT ALGORITHM EFFECT NAME SPLIT CHAMBER MONO PITCH SHIFT DUAL DELAY COMPRESSOR PONS SMALL STEREO ADJ PARAMETER VALUES PATCH PATCH PATCH PATCH EFFECT NAME 2-3 300 V 3.0 Owner's Manual Lexicon The Front Panel Level MIDI and Sample Rate LEDs The amber MIDI LED indicates activity over the designated MIDI channels. The sampling rate of the 300 is shown by the green LEDs. Note: 32kHz sampling rate is not supported. Used to adjust Analog input and output levels (in conjunction with the Soft knob and the Page Up/Down keys). Levels are shown on the LED bar graphs directly above the LEVEL key. The lower 6 LEDs are green, followed by 2 amber, and one red - indicating overload. MIDI 48 kHz 44.1 kHz 32 kHz Bypass Page Up/Down Allow access to display pages of adjustable parameters. PAGE UP PAGE DOWN LEVEL 300 Enable digital bypass of Machine A or B to provide an unprocessed signal, or to mute the effect input. 7 8 9 4 5 6 1 2 3 — 0 ENTER SETUP Power on/off. CONTROL SELECT MACH SETUP STORE EFFECT VALUE MOD EDIT BYPASS A BYPASS B EDIT DIGITAL EFFECTS SYSTEM EDIT POWER Soft buttons Soft knob Numerical Keypad Each of these eight buttons is used to select the parameter displayed directly above or below. Once selected, parameters can be changed incrementally by additional button pushes, or they can be adjusted by the Soft knob. Used to adjust parameters displayed and selected with the Soft buttons. Used for numeric entry of program numbers (as an alternative to Soft Knob selection) and for time code entries. Dedicated-function keys Setup Select: Used to select and run setups. Mach: In appropriate configurations, allows selection of either of the 300's two processing modules (Machine A and Machine B) for front panel control. Store: Used to memorize effects and setups. Value: Used to display parameter values for Soft button or Soft knob adjustment. 2-4 Power Control: Used to access system parameters. Setup Edit: Used to create or modify the current setup. Effect Edit: Used to adjust the parameters of effects. Mod Edit: Used create patches. to System Overview The 300 front panel has been designed for ease-of-use and intuitive access to all of the 300's functions. In general the user will be operating in one of the following modes of operation, each of which is accessed from the dedicated keypad on the front panel. Each mode key has an LED which lights when the key is activated. The functions of the VALUE and STORE keys are discussed later in this section. Overview of Front Panel Controls SETUP CONTROL SELECT MACH SETUP STORE EFFECT VALUE MOD EDIT SETUP SELECT It is from Setup Select mode that setups are selected and loaded. Setups can be selected with the Soft knob, or by entering a setup number on the numeric keypad and then pressing ENTER. EDIT EDIT CONTROL Control mode provides access to global system functions which include: Digital I/O Configuration, MIDI Channels, Modes, and Effect Change tables. Selecting Control mode does not interrupt the audio operation of the 300. MACH This button allows you to toggle between the 300's two DSP engines. Each machine can process audio continuously and simultaneously. However, the front panel can only actively control one effect at a time.Each time you press MACH, the 300 switches control; the display indicates whether Machine A or B is being controlled. SETUP EDIT This mode is used to modify the current setup. In this mode you can select the effect for the setup, and the name assigned to the setup EFFECT EDIT In this mode you can modify the effect used in the current setup, and change the name of the effect. The available parameters for each effect are organized onto display pages. The algorithms and their parameters are discussed in detail in Chapter 4. MOD EDIT In Modulation Edit you can assign MIDI and Soft knob patches. Switching between these various modes is as simple as pressing a button. The operation of the 300 in each of these modes is discussed in the following sections. 2-5 300 V 3.0 Owner's Manual Lexicon Overview of the 300 Display Generally, the display will indicate a page of parameters, any of which can be selected by pressing the button directly above or below it. In the example below, the "RTIM" parameter has been selected and is highlighted by an underscore cursor on the display. RTIM SIZE ROLL PDLY RLVL TDCY BASS XOVR LEVEL Once selected, parameters can be adjusted over their entire range with the Soft knob. The parameter and its current value will appear on the display as long as the Soft knob is being adjusted. SETUP CONTROL SELECT MACH SETUP STORE EFFECT VALUE MOD Pressing the front panel VALUE key will display all of the current parameter values for the selected page. in this example, pressing VALUE will cause the following display to appear: EDIT EDIT 2.0s 37.1M 2.9k 22m FULL 3.6k 2X 0.5k EDIT Here again, turning the Soft knob will adjust the selected parameter over its entire range; the buttons will select other parameters for adjustment. PAGE UP PAGE DOWN 2-6 The PAGE UP and PAGE DOWN keys are used to access various pages of additional parameters (or parameter values) which can then be edited via the Soft knob. System Overview The 300 presents you with an incredible number of choices — all of which can be made through the front and rear panel. Although you could certainly operate the 300 by setting each I/O configuration and effect parameter by hand each time you use it, you probably wouldn't enjoy it — so we've tried to organize the 300 so that its considerable flexibility doesn't become an obstacle. Before digging into the details of operation presented in this manual, you may find this brief overview useful. System Overview The block diagram shown below illustrates the basic flow of audio through the 300. Analog and/or digital audio enters on the left. Each is conditioned and translated as required and, in the case of digital audio, a sample clock is extracted. The resultant digital audio streams are sent to effect processing, then converted to appropriate analog and digital outputs (on the right). 48 kHz 44.1 kHz PLL Digital In XLR Sample Rate (SR) Digital Out SR XLR Effect Digital In RCA Digital Out RCA OPT OPT SR Analog In Emph 0.0 or +16dB Rear Panel Gain Switch -10 to +10dB Input Level Control SR DSP D/A A/D DSP Emph Analog Out -10 to +10dB Output Level Control Panel, MIDI and Time Code Program Change As you can see from the figure, the 300 has a rich set of I/O capabilities, with many choices available to the user, including: Sample Rate Analog or Digital Input connector Digital and Analog Emphasis/De-emphasis Digital Output format (AES or SPDIF) Digital Copy (SCMS) and Emphasis bit manipulation Processor Configuration The I/O organization is part of the 300's Control Mode. Other items which form part of the global operaton of the box are: Time Code event list viewing and editing, MIDI Mapping Tables, Purge functions for User Registers,Copy Tools, and Bypass button functions. 2-7 300 V 3.0 Owner's Manual SETUP Lexicon CONTROL SELECT MACH SETUP STORE EFFECT VALUE MOD EDIT EDIT EDIT By far the most important aspect of the 300 is the Setup and its association to the digital effect(s) that you want to use. The 300 has three types of Setups: Single, Dual Mono, and Cascade. Each is strikingly different and together they provide incredible audio possibilities. Each Setup includes one or more effects along with other items such as machine input(s) and source balance(s), the relationship between wet (effect) and dry (input) mixing for each machine, meter functions, LFO rates and shapes, and a naming function. In addition, there are two(2) modulation patches which can link source controllers to two Setup parameters. To simplify the choice among the many possible effect and system routings, the 300 is shipped with 100 Setup Presets. (The organization of the Setup Presets is shown to the left.) These factory presets cannot be overwritten, but can be modified and stored as User Setups in any of 50 Setup Registers. Setup Presets The Setup Presets are organized as follows: 101-150 = Single Setups 201-225 = Dual Mono Setups 301-325 = Cascade Setups Single Set-Ups contain one effect running in a single unified machine (both DSP engines working as one). Dual Mono and Cascade can be thought of as “split” configurations, and are capable of simultaneously running two different (or identical) effects. Effect Presets Effect Presets are organized as follows: 101-115 = Random Hall Presets 201-210 = Random Ambience 301-308 = Rich Plates 401-409 = Stereo Adjust 501-508 = Stereo Pitch Shift These can only be loaded into Single Setups (101-150). 601-616 = Dual Delays 701-720 = Split Chambers 801-810 = Mono Pitch Shift 901-902 = Compressor 001 = the PONS Program for Mastering Applications 010 = Small Stereo Adjust These can only be loaded into “Split” Setups (201-325). 2-8 Audio effects, of course, are what the 300 is all about, and a total of 100 Effect Presets are provided for loading into the three Setup types. Five algorithms can be loaded into Single Setups: Random Hall, Random Ambience, Rich Plate, Stereo Pitch Shift, and Stereo Adjust. Six different algorithms can be loaded into the "split" Setups (Dual Mono and Cascade): Dual Delays, Split Chamber, Mono Pitch Shift, Compressor, PONS, and Small Stereo Adjust. (The organization of the Effect Setups is also shown to the left.) Each algorithm has its own control parameters. Random Hall, for example, has 28. The front panel EFFECT EDIT key and the Soft knob, allow effect parameters to be adjusted along a range of values, dramatically altering the audible effect of the algorithm. An effect can also activate as many as 4 patches, each linking a source controller to a parameter. This MOD EDIT function is intrinsically mapped as an extension of the EFFECT EDIT function. Saving either saves the other. (The Effect Presets cannot be overwritten, but can be modified and stored as custom Effects in any of 50 Effect Registers.) In summary, the 300 is organized into setups and effects. Setups are collections of many decisions, including DSP routing, Input levels, Source, Balances, LFO Rate and Shape, and an Effect or Effects. These selections are grouped together, named and stored so they can be called up with a single user action. Each Effect included in a Setup contains an algorithm, a complete set of parameters, and 4 patches. As with Setups, Effects can be loaded, copied, edited, named, and stored, as well as dumped and recalled via MIDI. System Overview The 300's Control Mode provides access to general global parameters and miscellaneous functions. Selecting Control mode does not interrupt the audio operation of the 300. There are 9 Control mode pages: 1. Set-up Configuration and Input type select (Analog and/or Digital), 2. Analog sample rate select, Digital locked, Digital input connector type, Digital Input format display and Digital Output format selection. 3. SCMS Detect and select 4. Digital emphasis detect and select 5. Effect Load select(Bypass, Mute) and Bypass function (Input mute, Bypass 6. Copy Protect/Copy Tools for Setups, Effects, and MIDI Mod Edits 7. Purge (Delete) Tools for Time Code Event List,All Registers, All Effects, MIDI Map Table, and return to Factory Initialization. 8. Time Code Event List Management 9. MIDI Mode and MIDI Map Table Note: The 300 Digital Effects System is shipped from the factory running in an Analog Input, 48kHz mode with Setup Preset S:P101 SINGLE running Effect Preset EA: P101 Large Hall. If you are already familiar with the operation of the 300 and wish to change the Input to a Digital Type, simply enter Control mode and make your selections. If you have no previous experience with the 300, we suggest you remain in the analog mode and read on... 2-9 System Operation 3 System Operation 3-1 300 V 3.0 Owner's Manual Lexicon Getting Started When shipped, the 300 V3.0 defaults to an Analog In, 48K sample rate state. It also loads Setup Preset 101 Large Hall, with the Random Hall Effect Large Hall (Effect Preset 101). The various audio DSP routing configurations which can be utilized by the 300 are grouped into Setups. The three Setup types are: SINGLE, DUAL MONO, and CASCADE. SINGLE SETUP INPUT LEVEL ANALOG INPUT BALANCE DIGITAL ANALOG MACHINE DIGITAL OUT MIX LFO RATE METERS SHAPE LEFT MOD EDIT RIGHT PATCH PATCH SETUP NAME EFFECT MOD EDIT ALGORITHM RANDOM HALL STEREO ADJUST RANDOM AMBIENCE STEREO PITCH SHIFT PARAMETER VALUES RICH PLATE PATCH PATCH PATCH PATCH EFFECT NAME DUAL MONO SETUP INPUT LEVEL A LVL INPUT BALANCE B LVL A BAL MIX B BAL A LFO B RATE METERS SHAPE LEFT RIGHT EFFECT A MONO PITCH SHIFT DUAL DELAY COMPRESSOR PONS PATCH SETUP NAME EFFECT B MOD EDIT ALGORITHM SPLIT CHAMBER MOD EDIT PATCH PARAMETER VALUES SMALL STEREO ADJ MOD EDIT ALGORITHM PATCH PATCH PATCH PATCH EFFECT NAME SPLIT CHAMBER MONO PITCH SHIFT DUAL DELAY COMPRESSOR PONS PARAMETER VALUES SMALL STEREO ADJ PATCH PATCH PATCH PATCH EFFECT NAME CASCADE SETUP INPUT BALANCE INPUT BALANCE CASCADE FEEDBACK MIX A B LFO O RATE METERS SHAPE LEFT EFFECT A MONO PITCH SHIFT DUAL DELAY COMPRESSOR PONS 3-2 SMALL STEREO ADJ PATCH PATCH SETUP NAME EFFECT B MOD EDIT ALGORITHM SPLIT CHAMBER MOD EDIT RIGHT PARAMETER VALUES PATCH PATCH PATCH PATCH MOD EDIT ALGORITHM EFFECT NAME SPLIT CHAMBER MONO PITCH SHIFT DUAL DELAY COMPRESSOR PONS SMALL STEREO ADJ PARAMETER VALUES PATCH PATCH PATCH PATCH EFFECT NAME When the 300 is powered up, the SETUP SELECT button should be lit, indicating that the unit is in Setup Select mode. Turning the Soft knob will cue a new setup into the display window. Pressing ENTER will load the new Setup — and the Effect(s) associated with it. . System Operation If you wish to change the Analog Sampling rate or to slave-lock the 300 to an external digital device or to external system word clock, you must go into the 300’s Control mode. To do this, simply press the CONTROL button. Press PAGE DOWN twice to view Page Three, the Machine Configuration page. Selecting digital Input, and/or changing analog sampling rate This page allows you to define Input type, with the currently selected type underscored. (When shipped, this will be the factory default Input type, ANALOG.) Mach Conf : Single I : ANALOG 0 : ana+dig Before turning the Soft knob to change the Input type, press PAGE DOWN to display the Digital Input and Sampling Rate page. This page allows you to select different types of Analog and Digital I/O parameters. Inp : ***** Clk : 48kHz Out : AES Din : XLR Inp: Indicates the Digital Format if properly locked. If ***** appears, the 300 is not locked to an external digital sync. Clk: Allows the engineer to select the Analog Sampling rate. Pushing either of the 2 buttons above this label first selects the parameter. You can then push the button again to toggle to 44kHz, or you can use the Soft knob. Out: Allows you to select AES Professional or SPDIF(Sony/Phillips Digital InterFace) Consumer as output formats. Din: Allows selection from among the three(3) different Digital Input Connectors: XLR, RCA, and OPTical. If you wish to operate the 300 in the digital domain, push either of the 2 buttons under the Din label to select that parameter. (The selected parameter will be underscored.) Use the Soft knob or multiple button pushes to select the Digital Input connector which suits your studio rig. Press PAGE UP to display the Input I/O selection screen. In the SINGLE mode there are three choices: ANALOG, DIGITAL, or ANAlog + DIGital. Use the Soft knob to select DIGITAL, then press PAGE DOWN to display the next screen. 3-3 300 V 3.0 Owner's Manual Lexicon If the system is properly locked, the Inp field should now be displaying either “AES” or “SPDIF”. If the system is not properly locked to the incoming word clock, the following error message will be displayed: BAD/NO DIGITAL INPUT Check Din connector! Go back and check all your cables. Once you’ve configured the Analog or Digital audio type, return to the Setup Select mode by pressing SETUP SELECT. Single Setups SINGLE Setups (101-150) configure both DSP engines with microcode which enables them to function as a unified engine. Both analog and digital inputs can be utilized simultaneously. Each type of input (A or D) has a source Level and Balance control. The Level control varies the input level to the DSP engine for each type of input; Analog or Digital. The Balance controls determine what ratio Dry Analog and Digital Out Analog L R Analog Level Analog Balance Σ EFFECT EDIT Σ Overall Mix L R Digital L R Digital Level Digital Balance Dry of Left/Right balance feeds the DSP engine. (Analog and digital input levels and balances are located on Page 2 of the SETUP EDIT mode. Press SETUP EDIT, then press PAGE DOWN once.) Example All SINGLE Setups have Balance set to 50%. This means an equal proportion of Left and Right input signal is passed into the (Single) Effect. 1. Press the ABAL (Analog Balance). 2. Turn the Soft knob counterclockwise to let more of the Left input pass through. 3. Turn the knob clockwise to allow more of the Right channel to pass through. 4. Return the parameter to 50%, allowing proper stereo to pass to the DSP effect. Before the signal passes into the loaded effect, a post input level and post balance is picked off and bypasses the effect. Lexicon calls this the Dry signal path. The Dry signal and the Wet DSP effect signal are summed and proportionally mixed by the control labeled OMIX (Overall Mix). This control is found on the next Page. (Press PAGE DOWN once.) The resulting mix is passed out both analog and digital. 3-4 System Operation NOTE: Most studio applications assume a100% Wet mix. Most SINGLE Setups are set with OMIX at 100% Wet. However, it is possible that some prefade sends to the 300 will require the mix to be set to another value. Dual Mono Setups (Setup Presets 201-225) are “Split” configurations. Turn the Soft knob to cue up different Dual Mono Setups. The top line of the display indicates the Setup Preset number and the two types of effects loaded in the Setup. The bottom display line shows which “Split” Effect is loaded into which machine. In the Dual Mono”Split” configuration each DSP engine, Mach A and Mach B, can run special Split Effect Algorithms and Presets . Dual Mono Setups Analog and/or Digital formats can be input into the 300. When only one input type (analog or digital) is specified, we refer to the format as "Fixed." When Analog is selected as the main Input source, the Digital I/O port can be placed in a pre or post effect patch point. Conversely, if the Digital input is selected as the main input source, Analog I/O connections can be used as a patch point. Fixed Format Dry Patch Points L A Level A Balance EFFECT EDIT A A Mix L Out B Level B Balance EFFECT EDIT B B Mix R Out Analog or Digital R Patch Points Dry 3-5 300 V 3.0 Owner's Manual Lexicon When both Analog and Digital are specified to operate as MAIN Inputs, we refer to it as "Mixed Format." The Mixed format gives you the option of using the left, right, or summed mono input signals of each type of input(Analog or Digital). In this format, patch points are given up. The parameters for determining what blend of Left/Right is passed to each Machine (A and B), are “A BAL" and “B BAL", located on Page Two of the Setup Edit mode. Mixed Format L Analog R L Digital R Dry A Level A Balance EFFECT EDIT A A Mix L Out B Level B Balance EFFECT EDIT B B Mix R Out Dry The determination of Fixed vs. Mixed formats is set in Control mode on Page Three: the Machine Configuration page. Selecting ANALOG or DIGITAL on this page specifies the Fixed format. If you want to input both analog and digital audio (Mixed format), press CTRL to get to Control mode. Press PAGE UP or PAGE DOWN to view the Machine Configuration page. The leftmost button on the bottom row selects I: ANALOG or DIGITAL. In Dual Mono Setups, the selections also include: A>L D>R, and D>L A>R. Turn the Soft knob so that the display reads: Mach Conf: Dual-Mono I : A>L D>R O : a>l d>r In this format, analog audio feeds the Input to the Left Processor (Machine A); digital audio feeds the Input to the Right Processor (Machine B). Machine A audio comes out Analog left (and digital left) Machine B audio comes out Digital right (and analog right) All Dual Mono setups have the ABAL and BBAL set to Left-CHannel and Right CHannel respectively. This assumes a fixed format type of audio configuration. If you elect to work in a Fixed format, all Dual Mono setups will require individual adjustment of ABAL and BBAL to 50%. 3-6 System Operation When working in a fixed format (with only analog or digital Dual Mono inputs), each machine has its own level control. The output of each level adjustment is split to each source balance control. Each Dual Mono Setup Preset defaults to ABAL panned to LEFT ONLY, and BBAL panned to RIGHT ONLY. (AIN, ABAL, BIN, and BBAL are located on Page Two of the Setup Edit mode.) *If you had, for example, a piano in the left input and a voice in the right input and both Balances were set to 50%, a summed input with equal amounts of piano and voice would be passed to each DSP engine. A dry signal is picked off before the signal passes into each Split DSP Effect. The mono wet output of each DSP effect sums with the dry signal and is proportionally mixed under the MIX controls: AMIX and BMIX. The third SETUP EDIT page contains AMIX and BMIX.) Continuing with the above example, if both AMIX and BMIX were set to 0%WET (or 100% DRY), you could use AIN and BIN as level controls, mixing two independent signals to mono as part of an analog or digital process. Cascade Setups are another type of “Split” configuration. They are numbered 301-325 in Setup Select mode. While in Setup Select mode, you can use the Soft knob to locate the Cascade Setups. Pressing ENTER will load two split type programs: one in Machine A, the other in Machine B. Cascade Setups Dry Feedback Patch Points Analog or Digital L R Input Level L Out Input Balance Σ Σ EFFECT EDIT A A Mix B Mix EFFECT EDIT B Overall Mix R Out Patch Points Feedback Dry 3-7 300 V 3.0 Owner's Manual Lexicon From the 300's Control mode, there are two input format selections available when running Cascade programs: Analog or Digital. If Analog is selected as the main input type, then the Digital Input can be used as a patch point — either PreMachine A, Mid A - B, or Post Machine B. As in the other setups, there are Input level and source Balance Controls. Cascade setups, however, have three mix controls. AMIX proportions the dry signal to A's wet signal. BMIX proportions the resulting A output with Machine B's output. OMIX takes the resulting A+B mix and blends(mixes) it with the dry signal which is picked off before EFFECTA. Cascade setups also include an overall feedback control which routes the B output back to Machine A's input. Be careful!! This parameter can wipe out tweeters, woofers and ears if used too liberally. Note: If the sum of the feedback parameters in EFFECT A , EFFECT B and the above-mentioned overall Feedback parameter is greater than 100%, runaway feedback will occur. For example, assume Machine A is running a Dual delay effect with Delay1 Feedback set to 40% and Delay3 Feedback set to 40%. Machine B is running a Mono Shift program with the feedback parameter set to 40%. The total amount of feedback in the system is 80%. So far, so good.... that is until you add more than 20% Cascade Feedback. BE CAREFUL!!!! CASCADE Setups offer an amazing number of effect combinations: Chambers into Delays, Pitch Shifts into Chambers, Flanges into Delays, Reverbs into Compressor, etc. You experiment, name, and store new combinations into User Setup Registers. Remember, Input levels, Source Balances, Mix Balances, Feedback amounts, LFO type, and, of course, the two effects are part of the storable Setup. 3-8 System Operation Setup Select mode allows you to select and run setup presets and registers. Setup Select Mode The 300 is shipped with 100 setup presets, as well as 50 setup registers for storing your modified setups. The setup presets provide a convenient starting point for selecting the audio DSP routing you want to use. Note: Presets marked with an asterisk (*) have a Soft knob patch. The Setup Presets Single Setup Presets Setup # Setup Name Mach Effect # Effect Name Algorithms: P101 P102 P103 P104 P105 P106 P107 P108 P109 P110 P111 P112 P113 P114 P115 Large Hall Medium Hall Small Hall *Church *Rooms RehursalRoom *Chamber LiveDrumRoom *Studio A *Studio B *Brick Wall *Deep End Oil Tanker *Synth Hall Dance Hall A A A A A A A A A A A A A A A P101 P102 P103 P104 P105 P106 P106 P108 P109 P110 P111 P112 P113 P114 P115 Large Hall Medium Hall Small Hall *Church *Rooms Rehursal Hall *Chamber LiveDrumRoom *Studio A *Studio B *Brick Wall *Deep End Oil Tanker *Synth Hall Dance Hall Random Hall P116 P117 P118 P119 P120 P121 P122 P123 P124 P125 *Ambience In A Room Stairwell *Hangar MarbleFoyer EarlyReflect Lecture Hall *CarInterior Score Stage Gate It!! A A A A A A A A A A P201 P202 P203 P204 P205 P206 P207 P208 P209 P210 *Ambience In A Room Stairwell *Hangar Marble Foyer EarlyReflect Lecture Hall *CarInterior Score Stage Gate It!! Random Ambience P126 P127 P128 P129 P130 P131 P132 P133 *Rich Plate Glossy Plate Warm Plate Perc Plate Contem-Plate *EKO Plate Bright Plate *Round Plate A A A A A A A A P301 P302 P303 P304 P305 P306 P307 P308 *Rich Plate Glossy Plate Warm Plate Perc Plate Contem-Plate *EKO Plate Bright Plate *Round Plate Rich Plate P134 P135 P136 P137 P138 P139 P140 P141 P142 StereoAdjust Phase Invert 2 Frame Dly 3 Frame Dly 4 Frame Dly MS Decode *MultiEchoes LFO Panner Telephone A A A A A A A A A P401 P402 P403 P404 P405 P406 P407 P408 P409 Stereo Adjust Phase Invert 2 Frame Dly 3 Frame Dly 4 Frame Dly MS Decode *MultiEchoes LFO Panner Telephone P143 P144 P145 P146 P147 P148 P149 P150 *Stereo Shift Octave Down Vox Chorus Pole Flange Bulkie Roll Heavy Roll *Going, Going Zorch! A A A A A A A A P501 P502 P503 P504 P505 P506 P507 P508 *Stereo Shift Octave Down Vox Chorus Pole Flange Bulkie Roll Heavy Roll *Going, Going Zorch! Stereo Adjust Stereo Pitch Shift 3-9 300 V 3.0 Owner's Manual Lexicon Dual Mono Setup Presets Setup # P201 P202 P203 P204 P205 P206 P207 P208 P209 P210 P211 P212 P213 P214 P215 P216 P217 P218 P219 P220 P221 P222 P223 P224 P225 Setup Name Rev/Rev Rev/Dly Rev/Pch Rev/Comp Dly/Dly *Dly/Pch Dly/Comp *Pch/Pch Pch / Comp Comp/Comp Slow Spin WideFlang X-Traffic *GearUp TwoRooms TwoHalls *Verbs *RevPan Up&Down MyGuitar EnvSpooge Flng&Dlys *Dly Daze Clusters 2 Flanges Mach A Effect # 701 703 705 707 609 601 602 803 810 901 607 605 612 803 715 720 717 707 807 802 614 616 604 612 606 Name Mach B Effect # Chamber Drum Chamber Guitar Room “U”Chamber Chorus *Dual Delays Space Delays *Up Shift Vocal Shift EZ Comp LFO:FazeDlys OverTheTop1 Chorus+EKOz *Up Shift Joe's Garage Recital Hall *Drum Rooms “U”Chamber HalfStepsUp Guit Shift Env:Peak Negative Flang *3VoiceDlys Chorus+EKOz OverTheTop2 702 607 802 901 612 804 902 806 902 902 609 606 610 805 709 710 711 708 808 614 608 602 603 604 804 Name Key Chamber LFO:Faze Delays Guit Shift EZ Comp2:1 Chorus+EKOz Sky Down DrumComp3:1 Echo down DrumComp3:1 DrumComp 3:1 Chorus OverTheTop2 *Sky Delays Env*EKOShift Basement Big Hall *Great Room *’L’Chamber HalfStepsDn Env:Peak Env:Phazer Space Dlys *PingoPongo *3Voice Dlys Sky Down Cascade Setup Presets Setup # P301 P302 P303 P304 P305 P306 P307 P308 P309 P310 P311 P312 P313 P314 P315 P316 P317 P318 P319 P320 P321 P322 P323 P324 P325 3-10 Setup Name Rev->*Dly *Dly->*Rev Rev->Pch Pch->Rev Rev->Comp Comp->Rev Dly->Pch Pch->*Dly *Dly->Comp Comp->*Dly Pch->Comp *SurrVerb *V3Comp V3Chamber *SpaceOut *JetVerb BigBricks Rev->EKOz Rev->Korus Over!Top GuitarXP *EKO->Faze Verb->Down *The Sky Spinola Mach A Effect # Name 701 601 707 804 705 902 609 810 604 901 802 720 010 701 711 712 713 710 706 605 611 805 720 804 609 Chamber *Dual Delays “U”Chamber Sky Down Guitar Room Drum Comp 3:1 Chorus Vocal Shift *3Voice Dly EZ Comp 2:1 Guit Shift Recital Hall *Small St Adj Chamber *Great Room *Great Hall Big Bricks Big Hall Big & Short OverTheTop1 LFO:Pan&Faze Env*EKOShift Recital Hall Sky Down Chorus Mach B Effect # 601 714 802 703 901 709 801 603 901 613 901 010 901 001 604 616 902 612 609 606 607 608 806 610 011 Name *Dual Delays *Joe's B&G Guit Shift Drum Chamber EZ Comp 2:1 Basement Mono Shift *PingoPongo EZ Comp 2:1 *Wall Slaps EZ Comp 2:1 *Small St Adj EZ Comp 2:1 PONS+Dither *3Voice Dlys NegativeFlng Drum Comp 3:1 Chorus+EKOz Chorus OverTheTop2 LFO:FazeDlys Env:Phazer Echo Down *Sky Delays Panola System Operation To enter Setup Select mode, simply press the front-panel key labeled SETUP SELECT. This mode has two pages of controls: Setup Select Page One: S : P101 Large Hall EA :P101 Large Hall Page One allows selection of a setup. The upper line indicates "S:" (setup), a preset (P)or register (R) number, and the setup name. The upper row of buttons will step sequentially through the list of setups; turning the soft knob will scroll through the list. After finding a setup you want to load, note its number. There are two ways to load this setup: Simply press ENTER while the number of the setup you want is selected on the display. If this is not the current setup, the number will flash on the display. If you do not press ENTER within a few seconds, the display will automatically change back to the current setup. Pressing ENTER once the display has changed will still load the selected setup. or Enter the setup number you want on the numeric keypad to select a setup. Press ENTER to load the setup. Page Two: KnobPatchS: _ _ 0 Dst1 : Dst2 : This page displays the current Soft knob parameter value, as well as the Setup parameters which are patched to it. Page Three: KnobPatchA/B: _ _ 0 Dst1 :Dst2 Dst 3 Dst 4 : This page displays the current Soft knob parameter value, as well as the Effect parameters which are patched to it. 3-11 300 V 3.0 Owner's Manual Using the Softknob as a Parameter Controller Lexicon The front panel Soft knob is primarily used to adjust different parameter values. This Soft knob can also be programmed (in Mod Edit mode) as a multi-parameter controller linking one or more parameters within Setups and Effects. The control portion of the Soft knob parameter is part of the Setup, and is set in Setup Select mode. The PAGE UP and PAGE DOWN keys enable you to utilize the Soft knob as a parameter controller. Example: Setup Preset DM 223 *Delay Daze contains two effect presets (*3Voice Dlys and *Pingo Pongo), each of which has delay parameters mapped to the Soft knob. Load *Dly Daze, then press PAGE UP. The screen should display: SoftknobA: 17 DLY3 DLY4 Dst3 Dst4 or SoftknobB: 17 DLY1 DLY2 RDLY Dst4 SoftknobA is the Soft knob value for Machine A SoftknobB is the Soft knob value for Machine B SoftknobS is the Soft knob value for Setup Parameters Note the current Soft knob value (this particular Setup has a preset value of 17), and the labels for the effect parameters linked to the knob (DLY3 and DLY4 for Soft knob A; DLY1, DLY2 and RDLY for Soft knob B). Press VALUE to display the values of these effect parameters. Remember that the display can only show one Machine’s effect at a time, to view parameters in the other Machine which might be linked to the Soft knob, press MACH. Leave the display in the value mode while turning the Soft knob on the front panel, and you will see the displayed values change. The Soft knob parameter has a range of 127 steps. 3-12 System Operation Setup Edit mode is used to select the effect to be used in the setup. To enter Setup Edit mode, first go to Setup Select mode and select and load the setup you want to modify. With the setup selected, press SETUP EDIT. Setup Edit Mode The specific items available on the various Setup Edit pages are determined by the type of Setup (Single, Dual Mono or Cascade) which is loaded. Page 1 shows the Effect which is loaded in the currently running Setup and identifies the setup as SINGLE, DUAL MONO or CASCADE. The Effect ID number is underscored, indicating that you can load new Effect Presets or Registers. To select another Effect, simply turn the softknob to cue up a new Effect, then press ENTER. SIngle Setups Page One EA : P209 Podium [SINGLE MACH CONFIG] Page 2 provides adjustment for analog and digital level and source balance into the unified DSP engine. Simply press the key under the label of the control you want to adjust and turn the softknob. As you turn the softknob, a long text message will be displayed in the display. After a brief timeout, the display will return to its orginal state. Page Two Mach A + B Inputs : ALVL ABAL DLVL DBAL Note: Press VALUE to display parameter values rather than their labels. Once you become familiar with the page layouts in the 300, you may find this mode useful. Single Setups have only one adjustable parameter on Page 3: OMIX. This control adjusts the proportion of “wet” signal to “dry” signal. Most SINGLE Setup Presets have OMIX set to “WET” (100% wet effects). 3-13 300 V 3.0 Owner's Manual Lexicon The LFO (Low Frequency Oscillator) is a control generator which is designed to modulate Effect or Setup parameters in the 300 when parameters are patched to it. The LFO has a shape and a rate (speed) function, available on Page Four. The shape can be SINEusoidal, TRIANGLE, SQUARE, or RANDOM. Rate is adjustable from Off to 9.0Hz. The action of the meters is determined on Page Five. The choices are: ANA IN (Analog In) for either Left or Right channel DIG IN (Digital In) for either Left or Right channel FX-OUT for either Left or Right channel ( commonly referred to as the WET BUS) Note: If you choose Left Meter or Right Meter as Patch sources when making MOD Edits, you are essentially linking the ballistics of the meter to the assigned destination. Pages Six and Seven allow you to make as many as two MOD patches in the Setup domain. As an example, try patching the LFO to a Balance parameter as follows: 1. The display should read: Patch #1S DEST SOURCE THRS VALUE SCALE 2. If DEST is not underscored, press the button directly beneath it to select it. Once it is underscored, turn the softknob to select ANALOG BALANCE. The display will revert to its state in Step 1 after approximately 20 seconds. To return immediately to this display, press SETUP EDIT. 3. Select SOURCE by pressing the button directly beneath it. Turn the softknob fully clockwise until the display reads LFO_1. 4. Before doing anything else, press PAGE UP twice to the LFO control page. Select RATE and adjust it to .07Hz. (Leave Shape at SINE.) The display should start to flicker. 5. Press PAGE UP twice to the Level and Balance Page. Press the VALUE key. The value of ABAL (balance) should be modulating from left to right. Although very simplified, this is the basic model for making MOD patches in the 300. To disable the patch, press SETUP SELECT and reselect the Setup, thereby restoring the original settings. Alternatively, you can return to the LFO Rate page, and set the rate to OFF. On Page Eight you can name your Setup prior to storing it into a register. The arrow (cursor) keys allow you to select a letter to change; the softknob actually changes the character. The maximum length of a name is 12 characters. 3-14 System Operation When you have made all the necessary changes to a setup and want to save it in a register, press STORE. The display will show: Src: Dst: Storing the Setup SET Large Hall R # __ Available The top line of the display shows the source (Src) — the currently selected setup name. The bottom line shows the destination (Dst) — the register number into which the the setup will be copied. Use the Soft knob to select the register number you want, then press STORE again. The display will return to the last Setup Edit page. Note: The 300 has a memory protection feature which enables or disables copying into the registers. When Copy Tools are disabled, all storing functions are inhibited. The Control mode Copy Tools page allows this feature to beenabled or disabled. For more details, see the section describing Control mode at the end of this chapter. In both Dual Mono and Cascade Setups, Page One shows the Preset or Register location and the full name of each Effect (A and B). Whichever Preset or Register number is underscored is available for loading a new program. To select the other machine, press any of the keys beneath the display. The alternate machine’s Effect should be underscored. Turn the softknob to locate a new program; press ENTER to load the program. Dual Mono and Cascade Setups Note: The 300 automatically knows what Presets or Registers are loadable in the current Setup. Split algorithms, such as Mono Shift or Dual Delay will never be displayed if a Single Setup is running. In Dual Mono Setups, Page Two provides adjustment for Level and Balance in both Machine A and Machine B. Ordinarily Machine A and B are loaded Full Level in the factory presets. Most of the presets default to Machine A receiving audio from the Left Input and Machine B from the Right Input. Cascade Setups have three controls on Page Two: INP, BAL and FDBK. INP (Input) sets the gain going into Machine A (which feeds Machine B). BAL (Balance)adjusts the blend of Left/Right information into Machine A. FDBK (Feedback) adjusts the output of Machine B back into the input of Machine A. This is a very dangerous control. Be careful! 3-15 300 V 3.0 Owner's Manual Lexicon Dual Mono Setups provide two Mix controls on Page Three: AMIX and BMIX. These are independent mix controls for each machine. Cascade Setups provide three Mix controls on Page Three: AMIX, BMIX and OMIX. AMIX varies the amount of “dry” input in Machine A’s wet output. This Mixture of wet and dry (if any) is passed along to the input of Machine B. BMIX adjusts the proportion of Machine A’s wet output to the “wet” output of Machine B. OMIX takes that mix result and mixes it with the “Dry” input signal. The LFO (Low Frequency Oscillator) is a control generator which is designed to modulate Effect or Setup parameters in the 300 when parameters are patched to it. The LFO has a shape and a rate (speed) function, available on Page Four. The shape can be SINEusoidal, TRIANGLE, SQUARE, or RANDOM. Rate is adjustable from Off to 9.0Hz. The action of the meters (FX-OUT for either Left or Right channel) is determined on Page Five. Note: If you choose Left Meter or Right Meter as Patch sources when making MOD Edits, you are essentially linking the ballistics of the meter to the destination parameter. Pages Six and Seven allow you to make as many as two MOD patches in the Setup domain. Storing the Setup On Page Eight you can name your Setup prior to storing it into a register. The arrow (cursor) keys allow you to select a letter to change; the softknob actually changes the character. The maximum length of a name is 12 characters. When you have made all the necessary changes to a setup and want to save it in a register, press STORE. The display will show: Src: Dst: SET DM: Rev/Rev R# _ _ Available The top line of the display shows the source (Src) — the currently selected setup name. The bottom line shows the destination (Dst) — the register number into which the the setup will be copied. Use the Soft knob to select the register number you want, then press STORE again. The display will return to the last Setup Edit page. Note: The 300 has a memory protection feature which enables or disables copying into the registers. When Copy Tools are disabled, all storing functions are inhibited. The Control mode Copy Tools page allows this feature to beenabled or disabled. For more details, see the section describing Control mode at the end of this chapter. 3-16 System Operation Naming the Setup Page Five INS ←← DEL →→ Current Setup Name The bottom line of the display shows the name of the current setup, with a cursor positioned under the first character. The two keys directly above the left and right arrows cause the cursor to move left and right to select other characters. Pressing the key directly above "INS" adds a blank space wherever the cursor is currently positioned in the display. Pressing the key directly above "DEL" removes the underscored character. Turning the soft knob alters the underscored character. (Available characters include: 0-9, a-z, A-Z, and an assortment of symbols.) To rename the setup, simply position the cursor under the first character of the current name, turn the softknob to replace this character with the first character of the name you want, select the next character and change it, etc. When you have made all the necessary changes to a setup and want to save it in a register, press STORE. The display will show: Src: Dst: Storing the Setup SET Large Hall R# Available The top line of the display shows the source (Src) — the currently selected setup name. The bottom line shows the destination (Dst) — the register number into which the the setup will be copied. Use the Soft knob to select the register number you want, then press STORE again. The display will return to the last Setup Edit page. Note: The 300 has a memory protection feature which enables or disables copying into the registers. When Copy Tools are disabled, all storing functions are inhibited. The Control mode Copy Tools page allows this feature to beenabled or disabled. For more details, see the section describing Control mode at the end of this chapter. 3-17 300 V 3.0 Owner's Manual Lexicon Effect Edit Mode The 300 is shipped with 100 effect presets. Sooner or later you will want to alter the sounds of these effects to more perfectly fit your requirements. To do this,go to Run mode and load a preset setup that uses the effect you want to edit — or select and load the effect you want to edit from Page One in Setup Edit mode. Once the setup is loaded, pressing EFFECT EDIT will put you in Effect Edit mode with the display showing one page of the parameters available for the algorithm driving that effect. Parameter Selection The algorithms and their parameters are described in detail in Chapter 4. We've chosen the first page of Random Hall parameters to show here as an example: RTIM SIZE ROLL PDLY RLVL TDCY BASS XOVR The buttons directly above and below each display entry will select that parameter. Once selected, parameters can be adjusted over their entire range with the Soft knob. The parameter and its current value will appear on the display as long as the Sof tknob is being adjusted. In the example above, "RTIM" has been selected — turning the Soft knob will alter the parameter value, and cause the display to show: Mid Reverb Time SETUP XX.XX seconds CONTROL SELECT MACH SETUP STORE EFFECT VALUE MOD EDIT EDIT Pressing the front panel VALUE key will display all of the current parameter values for the selected page. in this example, pressing VALUE will cause the following display to appear: EDIT 3-18 XX.Xs 37.1M 2.9k 22m FULL 3.6k 1.2X 0.5k System Operation Here again, turning the Soft knob will adjust the selected parameter over its entire range; the soft buttons will select other parameters for adjustment. The PAGE UP and PAGE DOWN keys are used to access various pages of additional parameters which can then be edited via the Soft knob. When changes have been made on a page, and you move to a new page, the previous edits remain intact. However, when a new effect is loaded, edits will be lost unless you have stored the edited effect in a register. In Split Setups, effects are loaded into both Machine A and Machine B. Use the MACH button to toggle between Machine Effects. The 300 has 50 registers available to store edited versions of the preset effects. After you have made the changes you want to an effect's parameters, you can store the changed version into an effect register simply by pressing STORE.The following display will appear: Src: EFFA *3VoiceDly Dst R1 Available Naming and Storing Effects The display will show the name of the current effect (in this example, *#VoiceDly, running in Machine A), and a register location. Press the button directly beneath "R#" to select a different register with the Soft knob. Press STORE again to complete the operation. Once registers are filled, they can be selected and loaded exactly like presets. You can edit parameters in a register, and store the results in the same register or another register.) When you store a register, the edited effect still has the same name as the original effect. To avoid confusion, you can assign names to registers. For convenience, a naming page is included in Effect Edit mode. To rename a register, follow the same procedure described for naming a Setup. 3-19 300 V 3.0 Owner's Manual Mod Edit Mode Lexicon Mod Edit mode is used to create or modify Dynamic MIDI® patches. To use Dynamic MIDI®, you assign a MIDI controller or an event to a setup parameter or an effect parameter, using the patch parameters found on the pages in Mod Edit. (Two pages for Setup patches are available in Setup Edit mode.) Four parameter patch pages are available at any one time in Mod Edit mode. The pages will be for Machine A or Machine B, depending on the type of setup currently running, and on the machine currently selected. Each of the four available patch pages shows the following parameters: Off Cntlr- 0 ModWheel Breath Cntlr-3 FootPedal PortaTime Volume Cntlr-9 Pan Expression Cntlr-12-15 GP Cntlr-1-4 Cntlr-20-31 Sustain PortaSw SostenSw SoftPedal Switch-68-79 GP Cntlr-5-8 Sitch-84-95 PitchWheel AfterTouch LastNote LastVel MidiClock Knob-> L-Meter R-Meter LFO-1 Available "Source" selections Patch # 1A DEST VALUE SOURCE THRS SCALE Destination: This is used to select the effect parameter that the MIDI controller is patched to. The available parameters are based on the algorithm that you are currently running. Value: This is used to set the initial value of the parameter that you are controlling. This is provided as a convenience so that you do not have to go into Effect Edit mode to view the available parameters of the running algorithm. Source: This is used to select the MIDI controller, or event, that will control an effect parameter in the 300. The list contains the selections shown to the left. Threshold: This is used to set thecontroller value below which the controller will not have an effect on the parameter. Scale: This is used to set the effective control range of the MIDI controller. Scaling can be set from -200% to +200%. When Scale is set to 100%, the full range of the MIDI controller will cover the full range of the selected parameter. Setting a negative value will cause the 300 to reduce the setting of the parameter as the controller increases. You can store any patches you create with the Effect simply by pressing STORE, selecting a register number with the Soft knob, and then pressing STORE again. Note: Be extremely careful when creating patches while a MIDI device is connected. If you accidentally send a MIDI Program Change before saving the patches in a register, they will be lost. To avoid this possibility, you may want to set the MIDI Master Channel (in Control Mode) to OFF, or unplug the MIDI cable from the 300's rear-panel MIDI IN connector. 3-20 System Operation Soft knob patches are made in MOD Edit mode. Press MOD EDIT to display one of the four possible patches in each Machine. Press PAGE UP or PAGE DOWN to view other patches in the same effect. Press MACH to display patches in the other Machine. Soft knob Patches Example: Setup Preset DM 223 *Delay Daze contains two effect presets (*3Voice Dlys and *Pingo Pongo), each of which has delay parameters mapped to the Soft knob. The *3Voice Dlys effect preset loaded into Machine A, has 2 patches (DLY3 and DLY4); the *Pingo Pongo effect preset loaded into Machine B, has 3 patches (DLY1, DLY2 and RDLY). Press VALUE to display the actual values of each patch. Selecting any of these parameters (or any field labeled Dst#) allows you to select a different parameter to be patched to the Soft knob. Patched parameters become part of the Setup, and control of their values is accessed in Setup Select mode. A Patch page viewed in "Label" mode: Patch # 1A DEST VALUE SOURCE THRESH SCALE Patch # 1A Dly3 120m Knob-> 17 65% A Patch page viewed in "View" mode: Soft knob patches are made just like other MIDI patches; Choose the Destination first (the parameter you wish to control), then the source controller (the MIDI controller;Softknob, LFO, Mod Wheel, Pitch bender,etc.), then a scaling amount (+% to increment or -% to decrement the parameter). In the value mode, if you select “knob->” as a source controller, the actual Soft knob value can be adjusted. Press the button directly under the Soft knob value. In this example this would be the button under “17”. Now, as you turn the Soft knob, the MOD EDIT display will show the interaction between the Soft knob contoller and the patched effect parameter. Remember! All MOD Edits are an extension of the individual effect. There are four patches in each effect (machine). Therefore, all MOD patches are stored with the effect. However, it is important to realize that the Soft knob parameter controller is much like any other external MIDI controller, in that it is actually part of the Setup . 3-21 300 V 3.0 Owner's Manual Lexicon If the Soft knob value is set to 37, and then stored into a Setup Register, when you recall that Setup, the knob will automatically set the effect parameter value which it controls. It is also important to understand that, if you load a Setup which has a Soft knob value of say, 66, and then load any other effect(s) into that setup, any Soft knob patches which exist in the newly loaded effect(s) will cause the linked parameters to jump to some new value. The Soft knob value controls the linked parameter(s) at all times. Control Mode Control mode provides access to general global parameters and miscellaneous functions including audio configuration. Selecting Control mode does not interrupt the audio operation of the 300. There are nine Control mode pages: Event List MIDI Mode and Map Table Machine Configuration Digital Interface and Sampling Rates SCMS Mode Emphasis Bypass/Effect Load Mode Copy Tools Purge Tools Each of these pages is described below. Page One Time Code Event List Event List: OFF VIEW ADD EDIT SNAP DEL This page allows creation and modification of a list of up to 50 events triggered standard timecode or MIDI timecode. Four main functions are provided: Add, Delete, Edit and Snap. (For more information, see Chapter 6: Time Code Operation. 3-22 System Operation The MIDI Control page allows you to specify mapping of MIDI Non-registered parameters, System Exclusive messages or Program Change messages to the 300 registers. The button directly above "AUTO" allows you to set this MIDI Mode. MIDI Mode: AUTO CHNL P Chg Map: EDIT DUMP Page Two MIDI Mode and Map Table On the upper line, selecting "AUTO" activates output automation on the 300. The choices are OFF, SysEx, Non-registered parameters, and Program Change Only. When the AUTO Mode is set to "OFF", the 300 will not output MIDI data. Note: In "Program Change Only" automation mode, effect registers R29-50 are not transmitted as their sequence numbers fall outside of the range of what can be legally represented by a MIDI data byte (0x00-0x7F). Therefore: program change # 0x00-0x63 = E: P1-100 program change # 0x64-0x7F = E: R1-28 (For more information on Automation, see MIDI Operation.) Selecting "CHNL" allows you to set the system and machine channels on which the 300 can send and receive messages. Possible setttings are: 1-16, OMNI. All bulk dump and SysEx messages, except Program Change, follow the system channel, while all generic MIDI and Non-registered parameter messages follow the machine channel assignment. Selecting "EDIT" allows you to speciy the MIDI mapping mode. The three choices available are: OFF, FIX or MAP. For complete information on the MIDI Table, see Chapter 7: MIDI Operation. Selecting "DUMP" allows you to dump all registers, the current setup, the MIDI Map Table, or a MIDI Timecode Event List. 3-23 300 V 3.0 Owner's Manual Lexicon Page Three Machine Configuration Mach Conf: Dual-Mono I : ANALOG O : ANA+DIG The upper line of this page describes the current machine configuration (Single, Dual Mono or Cascade). The information that appears here is determined by the type of Setup currently running. Either of the two left buttons on the botton allow selection of Input: ANALOG and DIGITAL are available as choices with all types of setups. A>L D>R (Analog/ Left, Digital/Right), or D>L A>R (Digital/Left, Analog/Right) is available for selection in Dual Mono setups.. The two right buttons on the bottom row allow selection of Output: ANA+DIG is available in all setup types. A(D Pre), or A(D Pst) and D(A Pre), or D(A Pst) are available in Dual Mono setups. Cascade setups display choice between A(D Pre, Mid or Pst) and D(A Pre, Mid or Pst) for patch point selection. Page Four Digital Interface and Sampling Rates Inp: * * * * * Clk : 48kHz Out: AES Din : XLR This upper line of this page describes the current format being input to the 300. When no digital signal is present, the display will show "* * * * *" as above. If the incoming audio signal is analog, selecting "Clk" allows Soft knob selection of the system sample rate for analog operation: 48kHz or 44.1kHz. (The appropriate sample rate LEDs on the left side of the display will illuminate to indicate the sample rate selected.) If the input is digital, the system will automatically lock to the sample rate of the incoming data and display "Lock." Otherwise, "***" will be displayed to indicate that the incoming digital signal has not yet been detected. Either of the two left buttons on the botton allow selection of AES or SPDIF as output format. The two right buttons on the bottom row allow you to specify the connector used for audio input: XLR, RCA, or OPT. 3-24 System Operation Page Five SCMS Mode SCMS Inp: XX SCMS Out: MULT-COPY This page provides control over the SCMS (Serial Copy Management System) bits embedded in certain digital audio formats. The upper line of this page describes the SCMS status of your input source. Either of the two right buttons on the botton allow Soft knob selection of the SCMS setting which will be output by the 300. The choices are: NO COPY, ONE COPY and MULT-COPY. Page Six Emphasis Emph Inp: D>N A>N Emph Out: D>N A>N The top line (I) displays the input status of the incoming digital audio signal. (***** if none detected). The bottom line (O) shows your selections for the output data stream. The soft buttons act as toggle switches for the selections on this page. The Soft knob can also be used to alter selected items. "D>N" on the top line shows the Incoming pre-emphasis bit status (in this example "N"). Pressing the key directly below "D>N" sets the bit's outgoing status, Y(on) or N(off). The rightmost buttons on both the top and bottom row select analog pre- and deemphasis. The choices are: Y (on) or N (off). Control of emphasis/de-emphasis links the input and output, i.e. you can select both or neither. 3-25 300 V 3.0 Owner's Manual Lexicon Page Seven Bypass/Effect Load Mode Effect Load: MUTE Bypass Btns: INMUTE If you change between setups which use different algorithms, the system will either mute or bypass while the parameter changes are being made, depending on the selection you make here under "Effect Load". Selecting "MUTE" will mute the analog and digital outputs during these transitions; selecting "BYPASS" allows you to hear the unprocessed audio signal. This page also allows you to select whether the front panel BYPASS buttons mute the incoming signal (INMUTE) or bypass processing (BYPASS). Page Eight Copy Tools The Copy Tools page allows you to copy setups, effects, or the mod portion of effects into the registers. This page also allows you to enable and disable the 300's memory protection function. When you call up the Copy Tools page, the display will show: Copy Tools: ENABLE SETUP MIDI EFX The upper line on this page allows you to enable, or prohibit, the 300's copy functions. Pressing either of the two righthand buttons above the display will toggle the memory protect function between "ENABLE" and "DISABLE". Disabling the memory function will prevent: Event List and MIDI Map editing, Setup and Effect storing, Setup and Effect copying, as well as incoming MIDI loads of any of the above. The lower line allows selection of: "SETUP", "EFX", or "MIDI". Selecting "SETUP" will cause the display to show: 3-26 System Operation Src : SET Large Hall Dst: R # _ _ Available Select "Src" and use the Soft knob to designate a setup number (or the current setup) to be copied; select "Dst" and use the Soft knob to specify the register number where you want this copy stored. When you have made these selections, press STORE. Selecting "EFX" will cause a similar page to appear which allows you to copy the effect and the patches used in any effect to any other register. Selecting "MIDI" allows you to copy patches from one effect to another. The Purge page allows you to delete all setup or effect registers, the MIDI Program Change Map Table, or the Time Code Event List. It also allows reinitialization of a Lexicon demonstration (erasing all user effects and Time Code Event List data), and a complete reinitialization of the system to its factory configuration. Page Nine Purge Tools Selecting "FACTORY" restores the 300 to its factory memory configuration. This selection will destroy all user modifications of the original factory configurations. Purge Tools: FACTORY SETUP MIDI EFX Select "SETUP" to clear all setup registers. Select "EFX" to clear all ef- TCODE Select "TCODE" to clear the Time Code Event List. fect registers. Select "MIDI" to clear the MIDI Program Change Map Table. Pressing any of the active buttons to select one of these options will cause the display of a warning prompt. When this prompt appears, press STORE to execute the function. Be careful! These functions permanently erase user information. 3-27 The Algorithms and their Parameters 4 The Algorithms and their Parameters 4-1 300 V 3.0 Owner's Manual Lexicon Single Setup Algorithms Random Hall General Description The 300 incorporates the results of a great deal of research into acoustics and reverberation. Reverberation, or reflected sound energy, gives recorded music a sense of being performed in a real acoustic location. In the 300, the SIZE, SPREAD and SHAPE controls allow adjustment of the buildup and decay of the initial part of the reverberation envelope. SHAPE controls the shape of the envelope, while SPREAD and SIZE set the time over which this shape is active. In the Random Hall program, SIZE acts as a master control for the apparent size of the space being created by the 300. Both SPREAD and RTIM vary linearly with the setting of SIZE. Thus maximum reverb time and spread require high settings of SIZE. To find an appropriate reverb sound, start with a preset with a similar sound to what you want to end up with. Simply varying SIZE is often sufficient to arrive at the exact sound you are seeking. Once a size has been selected, SPREAD and SHAPE are used to adjust the shape and duration of the initial reverb envelope, which together provide the major sonic impression of room size. When SHAPE is at minimum, the reverberation envelope builds up very quickly to a maximum amplitude, and then dies away quickly at a smooth rate. This envelope is characteristic of small reverberation chambers and reverberation plates. There are few (if any) size cues in this envelope, so it is ineffective in creating ambience. With this SHAPE setting, SPREAD has no effect. The density is set by the size control, and the rate of decay is set by RTIM. This reverberation envelope is typical of many of the popular digital reverberators of the last few years. As SHAPE is raised to about 1/8 of its range, the initial sharp attack of the reverberation is reduced, and reverberation builds more slowly. The envelope then sustains briefly before it begins to die away at the rate set by RTIM. SPREAD has little or no effect on this shape. When SHAPE is at 1/4 of its range, buildup is even slower and the sustain is longer. Now SPREAD affects the length of both the buildup and the sustain. As a rough estimate, the sustain will be approximately the time value indicated by the SPREAD display (in milliseconds). As SHAPE is raised further, the buildup and sustain remain similar, but now a secondary sustain appears in the envelope, at a lower level than the first. This secondary plateau simulates a very diffused reflection off the back wall of a hall, and is effective in creating a sense of size and space. This reflection becomes stronger and stronger, reaching an optimal loudness when SHAPE is at about 1/2 of its range. The highest SHAPE settings are typically used for effects. Near the top of the scale the back wall reflection becomes stronger than the earlier part of the envelope, resulting in an inverse sound. 4-2 The Algorithms and their Parameters Note that none of these shape effects are audible unless RTIM is set short enough. Generally, RTIM should be set to a value of about 1.2 seconds for small rooms, and up to 2.4 seconds or so for halls. SIZE should also be set to a value appropriate to the desired hall size (note, however, that small sizes color the reverberation).15 meters makes a very small room, and 38 meters is useful for a large hall. Used with care SHAPE and SPREAD allow the 300 to produce superior ambience—a sound which is spacious and has great depth—without the long reverberation of a church. The Random Hall algorithm in the 300 incorporates random delay elements. These elements have several effects. First, there is a reduction of long-lived modes in the reverberant decay, which makes the decay less metallic and reduces the apparent reverb time. The random elements also improve the steady-state timbre of the program. Random Delays The speed at which the delay elements move is controlled by SPIN. Values of SPIN which are higher than about 38 can cause audible pitch wobble in very critical material (such as classical guitar or piano and can also cause noise on pure tones. This noise is not audible in speech, however, and, for mixed music or speech, values up to 48 will give an improved sound. WANDER is typically set to about 10ms at larger settings of SIZE. The effect of WANDER is reduced for small SIZEs. When you set out to create a sound, the first and most important decision is how big a space you want. The best way to start is to listen to several presets and choose the one which sounds closest to what you have in mind. If necessary, use SIZE to make a slightly larger or smaller sound, as needed. Creating a Realistic Sound Next use RTIM to fine-tune the amount of time the reverberation takes to die away at the end of musical phrases. Actual halls vary a great deal in their actual RTIM values. The setting of the BASS is also critical in matching the sound of an existing hall. An ideal concert hall would have a BASS setting of 1.2. It is rare when actual physical spaces exceed 1.5. Many (if not most) good recording environments have values of BASS of 1.0 or less, so a value of 0.8 could be tried when attempting to match an existing hall. There are two additional controls to deal with. SHAPE and SPREAD adjust the effective reverb time when the music is running. Higher values of SHAPE and SPREAD produce a longer effective reverb time. Longer effective reverb times give greater spaciousness to the sound. The 300 reverberation algorithm offers the option of adding early reflections (preechoes) which have been made into diffused clusters of pre-echoes. The density of the cluster is set by the DIFFUSION control. We recommend that these preechoes be used with caution, unless you are trying to match the sound of the reverberation to a particular location where such reflections are strong. 4-3 300 V 3.0 Owner's Manual Lexicon Random Hall Parameters Random Hall Basic Sounds RTIM .02-60.49s RLVL Off-48dB-Up Full SIZE 4-39.4M TDCY 0.5-21.2kHz ROLL 0.1-26.5kHz, Flat BASS 0.2x-4.0x PDLY 0-1000ms XOVR 0.1-26.5kHz Random Hall Tweaks SPIN 0-48 DIFF 0-99 WAND 0µs-37.1ms LINK Link/Unlink SHAP 0-255 SHLF Off-24dB-Up Full SPRD 0-250 SIZE 4-39.4M Random Hall Pre-Echoes DLY1 0-1000ms LVL1 Off-24dB-Up Full DLY2 0-1000ms LVL2 Off-24dB-Up Full RTIM .24-65.39s RLVL Off-24dB-Up Full - Feedback Pre-Echoes DLY3 0-2800ms LVL3 Off-24dB-Up Full FBK3 -93 to +93% DLY4 0-2800ms LVL4 Off-24dB-Up Full FBK4 -93 to +93% Effect Naming Page Fbk 3 Σ Delay 3 Level 3 Delay 1 Σ Level 1 Reverberator Diffusion Predelay RTIME SIZE SHAPE SPREAD XOVR BASS TDCY LINK SPIN WANDER SHLF Delay 2 Σ Σ Level 2 Delay 4 Rolloff R Level Level 4 Fbk 4 Random Hall Basic Sounds Page 4-4 RTIM (Mid-Frequency Reverb Time) RTIM sets the reverb time for mid-frequency signals. Because low-frequency reverb time (BASS) is a multiplier of RTIM, RTIM acts as a master control for the reverb time. SIZE SIZE sets the rate of buildup of diffusion after the initial period (which is controlled by DIFF). It also acts as a master control for RTIM and SPRD. The SIZE control changes a reverb sound from very large to very small. Generally, The Algorithms and their Parameters you should set the SIZE control to approximate the size of the acoustic space you are trying to create, before adjusting anything else. The size in meters is roughly equal to the longest dimension of the space. Moving SIZE while a signal is present may cause audible transients on critical material. The apparent size of the space created is actually a combination of the settings of the SIZE, SHAP, and SPRD controls. Small acoustic spaces are characterized by a rapid buildup of diffusion. However, both small and large spaces frequently have an uneven buildup of initial reverberation. This uneven buildup is controlled by the SPRD and SHAP controls. ROLL sets the frequency above which a 6 dB/octave low-pass filter attenuates the processed signal. It attenuates both pre-echoes and reverberant sound. High frequencies are often rolled off with this parameter, resulting in more natural sounding reverberation. The low-pass characteristic can be modified to a shelving charactistic with the SHLF control. When SHLF is off, ROLL is typically set betwen 2kHz and 4kHz. ROLL (Hi Freq Rolloff) PDLY adjusts an additional time delay between the input of signal and the onset of reverberation. The control is not intended to mimic the time delays in natural spaces. In real rooms the build-up of reverberation is gradual, and the initial time gap is usually relatively short. Natural spaces are best emulated by setting SHAP at a middle value and adjusting SPRD for the desired effective pre-delay. PDLY (Pre-Delay) Additional delay added with the PDLY control can increase the initial time gap slightly, emulating a situation where reverberant pick-up microphones are located much further from the source than the main microphones. If less than about 30ms of pre-delay is added, this additional delay can add clarity with some music, but it can also sound unnatural. Large pre-delays can be useful for slapecho effects. RLVL sets the amount of reverberation in the processed signal. It is normally FULL, but may be reduced for effects where the pre-echoes should dominate. RLVL (Reverb Level) TDCY sets the frequency above which sounds decay at a progressively faster rate. It filters all the sound except the pre-echoes. When set relatively low, it gives a darker tone to the reverberation, simulating the effect of air absorption in a real hall. TDCY also helps keep the ambience generated by the program from muddying the direct sound. TDCY (Treble Decay) BASS sets the reverb time for low-frequency signals, as a multiplier of the RTIM parameter. For example, if BASS is set to 2X, and RTIM is set to two seconds, the low frequency reverb time will be four seconds. For a natural-sounding hall ambience, we recommend values of 1.5X or less. BASS (Bass Multiply) XOVR sets the frequency at which the transition from RTIM to BASS takes place. XOVR should be set at least two octaves higher than the low frequency you want to boost. For example, to boost a signal at 100 Hz, set XOVR to 400 Hz (This setting works well for classical music). XOVR works best around 400 for boosting low frequencies, and around 1.5 kHz for cutting low frequencies. XOVR (Bass Crossover) 4-5 300 V 3.0 Owner's Manual Lexicon Random Hall Tweaks Page SPIN (Randomization) SPIN affects the movement of the reverberation tail. The object of SPIN (and WAND) is to continuously alter the timbre of the reverberant sound. This makes the result more natural, without making the position of instruments unstable. SPIN should typically be 20 or higher. High values may make the pitch of piano or guitar unstable. WAND (Wander) WAND sets the distance in time that the early reflections will move. For best results WAND should be about 10ms at larger sizes. SHAP (Shape) SHAP and SPRD work together to control the overall ambience of the reverberation created by the 300. SHAP determines the contour of the reverberation envelope. With SHAP all the way down, reverberation builds explosively, and decays quickly. As SHAP is advanced, reverberation builds up more slowly and sustains for the time set by SPRD. With SHAP in the middle, the buildup and sustain of the reverberation envelope emulates a large concert hall (assuming that SPRD is at least halfway up, and that SIZE is suitably large—30 meters or larger.) SPRD (Spread) SPRD works together with SHAP to control the duration of the initial ambience created by the 300. Low SPRD settings result in a rapid onset of reverberation at the beginning of the envelope, with little or no sustain. Higher settings spread out both the buildup and sustain. DIFF (Diffusion) DIFF controls the degree to which initial echo density increases over time. High settings of DIFF result in high initial buildup of echo density, and low settings cause low initial buildup. Echo density is also affected by SIZE; smaller spaces will sound denser. To enhance percussion, use high settings of diffusion. For clearer and more natural vocals, mixes, and piano music, use low or moderate settings of diffusion. LINK When LINK is set, the reverb time and spread values scale linearly as the SIZE control is varied. For some special effects, RTIM and SPRD can be unlinked. SHLF SHLF modifies the low-pass characteristic of the rolloff control, turning it into a shelving filter. SHLF sets the gain of an output path which is mixed with the output of ROLL to form the main reverberant output. Both the pre-echoes and the reverberation are affected. For example, if SHLF is set to -6dB, frequencies below approximately ROLL/2 will be boosted by 3.5dB; above approximately ROLL x 2, the response will be flat. SHLF provides a method for making the spectral content of the reverberation match the ideal spectrum for musical acoustics in rooms. For this application, ROLL should be set between 700 and 1.5kHz, with SHLF set between 12 and -6dB. 4-6 The Algorithms and their Parameters SIZE sets the rate of buildup of diffusion after the initial period (which is controlled by DIFF). It also acts as a master control for RTIM and SPRD. The SIZE control changes a reverb sound from very large to very small. Generally, you should set the SIZE control to approximate the size of the acoustic space you are trying to create, before adjusting anything else. The size in meters is roughly equal to the longest dimension of the space. Moving SIZE while a signal is present may cause audible transients on critical material. SIZE The apparent size of the space created is actually a combination of the settings of the SIZE, SHAP, and SPRD controls. Small acoustic spaces are characterized by a rapid buildup of diffusion. However, both small and large spaces frequently have an uneven buildup of initial reverberation. This uneven buildup is controlled by the SPRD and SHAP controls. Random Hall and Feedback Pre-Echoes Pages The Random Hall Pre-Echoes page and the Feedback Pre-Echoes page contain four pre-echo taps with delay and level controls. The taps are fed directly to the output wet signal rather than into the reverberator. Pre-echoes can best be understood by visualizing a stage where the early reflections are the sounds emanating from the rear and side stage walls directly after the sound from the stage. Usually the rear stage wall reflection is earlier and louder than those from the two side walls. The pre-echoes are actually clusters of echoes, with the density of the cluster set by DIFF. The pre-echo delay parameters change the perceived locations of reflecting surfaces surrounding the source. Level adjusts the loudness of the reflection. For each of the Lvl (Pre-echo level) parameters, there is a corresponding Dly parameter. Each of these sets the delay time in ms for one of the pre-echoes. These are not affected by PDLY, so pre-echoes can be placed to occur before the reverberation starts. The Dly pre-echo delay parameters have a resolution of 2 milliseconds. The Lvl pre-echo level parameters have sixteen steps, calibrated in decibels. The Fbk feedback parameters (for Delays 3 and 4 only) are adjustable in 6% increments from -93% to +93%. Pre-Echo 1, one second maximum to left channel. DLY1, LVL1 Pre-Echo 2, one second maximum to right channel. DLY2, LVL2 Pre-Echo 3, 2.8 seconds maximum to left channel, with feedback. DLY3, LVL3, FBKk3 Pre-Echo 4, 2.8 seconds maximum to right channel, with feedback. DLY4, LVL4, FBK4 4-7 300 V 3.0 Owner's Manual Lexicon Random Ambience General Description The 300's Random Hall effects are designed to add a cushion of reverberance to recorded music, while leaving the clarity of the direct sound unaffected. Random Ambience is different. It is intended to become a part of the direct sound — to give it both better blend and a definite position in space. Random Ambience gives warmth, spaciousness and depth to a performance without coloring the direct sound at all. Random Ambience generates primarily the strong reflections which appear in the first few hundred milliseconds of the reverberation process. These early reflections constitute the primary audible effect, giving you the impression of a hall surrounding you while the music is playing. To avoid any coloration from these strong reflections, the time delays and amplitudes are random functions. Random Ambience is very useful for adding a room sound to recorded music or speech. It is particularly easy to match a studio recording of dialog to a typical room environment. In music recording, using Random Ambience is an effective way of realistically adding distance to a close-miked signal. If an ensemble has been recorded with close-mikes and pan pots, Ambience can provide the missing blend and depth. The apparent position of the instruments is preserved in the reverb while the apparent distance is increased. Random Ambience is also useful in matching a closely miked accent microphone to the overall ambience of a recording. This allows a soloist to be increased in level without changing the apparent distance. Random Ambience can be used in a recording situation any time a close-miked sound is undesireable. Set the SIZE to the desired room size. RLVL adjusts the amplitude of reverberation defined by RTIM, and can be trimmed to get exactly the effect you need. To use the algorithm with a console, it is best to use a stereo send to the 300, carefully matching the panning of the various close-miked sources to their positions in the mix. Leave the MIX control at 100%. The apparent distance of each source can be controlled by the level of its feed. 4-8 The Algorithms and their Parameters Random Ambience Basic Sounds RTIM 0.18-47.82s RLVL Off, -48to-1dB, Up Full SIZE 4.0-39.4M DDLY 0-99.9ms DIFF 0-99 PDLY 0-99.9ms ROLL 0.5kHz-21.2kHz - Random Ambience Parameters Random Ambience Tweaks SPIN 0-48 - WAND 0-37.1ms - - - Effect Naming Page D Delay Ambience Generator L R Diffusion Predelay SIZE SPIN RTIME RLVL Rolloff WANDER Σ Σ D Delay Random Ambience Basic Sounds Page This control adjusts the reverberation time of the independent reverberator. The range of action is limited. Be careful — both long and short reverb times may sound unnatural. If a much longer or shorter reverb time than the preset provides is desired, SIZE should be changed first. RTIM (Reverb Time) SIZE allows you to vary the apparent size of the space over a wide range. SIZE is the most dramatic control, and must be selected to match the music or program material. It should be the first control that you adjust to tailor the desired space. SIZE also affects the reverb time, in a similar way to the standard reverb programs. SIZE DIFF controls the degree to which initial echo density increases over time. High settings of DIFF result in high initial buildup of echo density; low settings cause low initial buildup. Echo density is also affected by SIZE; smaller spaces will sound denser. To enhance percussion, use high settings of DIFF. For clearer, more natural vocals, mixes, and music, use low or moderate settings. DIFF ROLL sets the frequency above which a 6 dB/octave low-pass filter attenuates the processed signal. It attenuates both pre-echoes and reverberant sound. High frequencies are often rolled off with this parameter, resulting in more natural sounding reverberation. ROLL (Hi Freq Rolloff) 4-9 300 V 3.0 Owner's Manual RLVL (Reverb Level) Lexicon RLVL sets the amount of reverberation in the processed signal. It is normally FULL, but may be reduced for effects where the pre-echoes should dominate. DDLY ( Dry Delay) DDLY provides a delay for the "dry" audio path. PDLY (Pre-Delay) PDLY adds an additional delay to the reflections and to the reverberation. This control may be useful in a sound reinforcement situation, or for ambience effects. Both DDLY and PDLY have 4-sample (approximately 0.1msec) resolution. Random Ambience Tweaks Page 4-10 SPIN (Randomization) SPIN affects the movement of many of the delay taps. The object of SPIN (and WAND) is to continuously alter the timbre of the reverberant sound. This makes the result more natural, without making the position of instruments unstable. SPIN should typically be 20 or higher. High values may make the pitch of piano or guitar unstable. WAND (Wander) WAND sets the distance in time that the early reflections will move. For best results WAND should be about 10ms at larger sizes. The Algorithms and their Parameters Rich Plate The Rich Plate program is denser, smoother, and less colored than other reverb programs. When used with the SIZE control at around 16 meters, the sound is dense and tight — ideal for percussion. Larger sizes and longer reverb times are suitable for vocals and brass. General Description The Rich Plate program has five control pages with 28 adjustable parameters, shown below. Rich Plate Parameters Rich Plate Basic Sounds RTIM 0.15-40.46s RLVL Off, -48dB-Up Full SIZE 4.0-39.4M TDCY 0.5-21.2kHz RAND Off, 1-98%, Up Full DIFF 0-99 LINK Link/Unlink ROLL 0.1-26.5kHz, Flat BASS 0.2x-4.0x PDLY 0-1000ms XOVR 0.1-26.5kHz Rich Plate Tweaks SHAP 0-255 - SPRD 0-250 SIZE 4.0-39.4M Delay and Feedback 1 DLY1 0-2000ms FBK1 0-93% DLY2 0-2000ms FBK2 0-93% DLY3 0-1000ms LVL3 Off-24dB, Up Full DLY4 0-1000ms LVL4 Off-24dB, Up Full Delay and Feedback 2 DLY5 0-2800ms LVL5 Off,-48dB-Up Full FBK5 0-93% - DLY6 0-2800ms LVL6 Off,-48dB-Up Full FBK6 0-93% - Effect Naming Page Fbk 1 Fbk 5 Σ Delay 1 Σ Σ Delay 5 Level 5 Delay 3 Σ Level 3 Reverberator Diffusion Predelay RTIME SIZE SHAPE SPREAD XOVR BASS TDCY LINK R Level Rolloff RAND Delay 4 Delay 2 Σ Fbk 2 Σ Level 4 Delay 6 Level 6 Fbk 6 4-11 300 V 3.0 Owner's Manual Lexicon Rich Plate Basic Sounds Page 4-12 RTIM (Reverb Time) This control adjusts the reverberation time of the independent reverberator. The range of action is limited. Be careful — both long and short reverb times may sound unnatural. If a much longer or shorter reverb time than the preset provides is desired, SIZE should be changed first. SIZE SIZE allows you to vary the apparent size of the space over a wide range. SIZE is the most dramatic control, and must be selected to match the music or program material. It should be the first control that you adjust to tailor the desired space. SIZE also affects the reverb time, in a similar way to the standard reverb programs. ROLL (Hi Freq Rolloff) ROLL sets the frequency above which a 6 dB/octave low-pass filter attenuates the processed signal. It attenuates both pre-echoes and reverberant sound. High frequencies are often rolled off with this parameter, resulting in more natural sounding reverberation. PDLY (Pre-Delay) PDLY adds an additional delay to the reflections and to the reverberation. This control may be useful in a sound reinforcement situation, or for ambience effects. Both DDLY and PDLY have 4-sample (approximately 0.1msec) resolution. RLVL (Reverb Level) RLVL sets the amount of reverberation in the processed signal. It is normally FULL, but may be reduced for effects where the pre-echoes should dominate. TDCY (Treble Decay) TDCY sets the frequency above which sounds decay at a progressively faster rate. It filters all the sound except the pre-echoes. When set relatively low, it gives a darker tone to the reverberation, simulating the effect of air absorption in a real hall. TDCY also helps keep the ambience generated by the program from muddying the direct sound. BASS (Bass Multiply) BASS sets the reverb time for low-frequency signals, as a multiplier of the RTIM parameter. For example, if BASS is set to 2X, and RTIM is set to two seconds, the low frequency reverb time will be four seconds. For a natural-sounding hall ambience, we recommend values of 1.5X or less. XOVR (Bass Crossover) XOVR sets the frequency at which the transition from RTIM to BASS takes place. XOVR should be set at least two octaves higher than the low frequency you want to boost. For example, to boost a signal at 100 Hz, set XOVR to 400 Hz (This setting works well for classical music). XOVR works best around 400 for boosting low frequencies, and around 1.5 kHz for cutting low frequencies. The Algorithms and their Parameters Rich Plate Tweaks Page RAND sets the rate of the randomization process. Plates should generally use low amounts of randomization. RAND (Randomization) SHAP and SPRD work together to control the overall ambience of the reverberation created by the 300. SHAP determines the contour of the reverberation envelope. With SHAP all the way down, reverberation builds explosively, and decays quickly. SHAP (Shape) As SHAP is advanced, reverberation builds up more slowly and sustains for the time set by SPRD. With SHAP in the middle, the buildup and sustain of the reverberation envelope emulates a large concert hall (assuming that SPRD is at least halfway up, and that SIZE is suitably large—30 meters or larger.) SPRD works together with SHAP to control the duration of the initial ambience created by the 300. Low SPRD settings result in a rapid onset of reverberation at the beginning of the envelope, with little or no sustain. Higher settings spread out both the buildup and sustain. SPRD (Spread) DIFF controls the degree to which initial echo density increases over time. High settings of DIFF result in high initial buildup of echo density; low settings cause low initial buildup. Echo density is also affected by SIZE; smaller spaces will sound denser. To enhance percussion, use high settings of DIFF. For clearer, more natural vocals, mixes, and music, use low or moderate settings. DIFF (Diffusion) When LINK is set, the reverb time and spread values scale linearly as the SIZE control is varied. For some special effects, RTIM and SPRD can be unlinked. LINK SIZE allows you to vary the apparent size of the space over a wide range. SIZE is the most dramatic control, and must be selected to match the music or program material. It should be the first control that you adjust to tailor the desired space. SIZE also affects the reverb time, in a similar way to the standard reverb programs. SIZE Rich Plate Delay and Feedback Pre-Echoes Page These pages provide control over three stereo delay pairs. All three are summed with the output of the reverberator. Many, many different echo combinations are possible. DLY1 and DLY2 (0ms-2000ms) are recirculating delay lines to the left and right channel inputs. The path of either is picked off after the diffusor with the amount of recirculation defined by the adjustment of FBK1 (for DLY1) and FBK2 (for DLY2). DLY1 and DLY2 are the only delays which effectively feed back (recirculate) into the reverberator. DLY1 , DLY2 4-13 300 V 3.0 Owner's Manual FBK1 , FBK2 FBK1 and FBK2 determine the amount of recirculation passed back through to the left and right inputs. DLY3 , DLY4 DLY3 (0ms-1000ms) and DLY4 (0ms-1000ms) are also picked off after the diffusor. The level of each is controlled by LVL3 and LVL4, respectively. LVL3,LVL4 LVL3 and LVL4 determine the loudness of DLY3 and DLY4. DLY5 , DLY6 DLY5 (0ms-2800ms) and DLY6 (0ms-2800ms) allow you to build non-diffused recirculating echoes independent of the reverberator. Each has a feedback control (FBK5 and FBK6). FBK5, FBK6 FBK5 and FBK6 provide feedback control for DLY5 and DLY6. LVL5,LVL6 4-14 Lexicon LVL5 and LVL6 determine the loudness of DLY5 and DLY6. Remember, these are undiffused pre-echoes. The Algorithms and their Parameters Stereo Pitch Shift Stereo Pitch Shift is a stereo or two-channel mono pitch shifter with several useful effects, including predelay, feedback, and glide. These are independently adjustable for each channel. The pitch shifter in the 300 includes a pitch detection feature which automatically adjusts the period of the splices to match the pitch of incoming signals. This feature greatly reduces the artifacts associated with pitch shift. In stereo mode both channels are linked, and the sum of the two channels (L & R) is used in the pitch detector. In mono mode each channel splices independently. In either case it takes about 40 ms for the pitch detector to obtain an optimal pitch value. Setting the LDLY and RDLY controls to this value will give the smoothest pitch shift. Shorter values can be used for special effects, or when extra delay cannot be tolerated. General Description There are three interacting controls for pitch described below: Glide, Pitch Interval, and Fine Pitch. Adjusting any pitch control activates a long display that shows the pitch percentage, the musical interval, and any fine adjustment in cents. Always use this long display when matching Glide to Pitch Interval and Fine Pitch. Stereo Pitch Shift Mode, Pitch and Effects MODE GLDL GLDR Mono/Stereo -2 Oct to +M7+48¢ -2 Oct to +M7+48¢ PCHL FINL PCHR FINR + 100 cents -2 Oct to +M7+48¢ + 100 cents -2 Oct to +M7+48¢ Stereo Pitch Shift Parameters Stereo Pitch Shift Delay and Feedback LDLY 0-510ms BNPS On/Off LFBK 0-98%, Max SYNC On/Off RDLY 0-510ms - RFBK 0-98%, Max - Effect Naming Page Feedback Bandpass Sync Mode Mono or Stereo Σ Σ Shifter PITCH FINE GLIDE L Delay GLIDE R Delay Shifter PITCH FINE Feedback 4-15 300 V 3.0 Owner's Manual Lexicon Stereo Pitch Shift Mode, Pitch and Effects Page MODE MODE selects stereo or mono mode. In stereo the two channels are linked, pitch shifting by the same amount and splicing at the same time. GLDL and GLDR (Glide Stereo Left and Right) GLDL affects both channels in stereo mode, and the left channel in mono mode. GLDR affects the right channel in mono mode. These controls change the pitch continuously over a range of -2octaves to +1 octave. This allows a glissando to be performed, either manually or via MIDI. PCHL (Pitch Interval Stereo Left) and PCHR (Pitch Interval R) PCHL adjusts the pitch interval of both channels in stereo mode, and the left channel in mono mode. The exact tuning can be altered by the fine pitch control, and the exact pitch shift in intervals and cents is displayed. The fine control must be set to the exact middle of its range if perfect pitch intervals are to be obtained. In the long display, the Fine Pitch is shown by the number of cents added to, or subtracted from, the semitone intervals. Remember that Pitch Interval will produce exact intervals only if Fine Pitch is centered. The rightmost character in the long display is an asterisk (*) if Fine Pitch is centered, and a '+' or '-' otherwise. When the VALUE key turns on the short value display, Fine Pitch is not shown in cents, but as a number ranging from -32 to +32 in order to give a clear indication of how much Pitch Interval has been changed. When '**' is shown, Fine Pitch is centered and inactive. As a rule, 1 count of Fine Pitch is worth 2 cents near 200%, 3 cents near 100%, 6 cents near 50%, and 12 cents near 25%. PCHR performs the same functions as the PCHL control, except that it is only active in Mono mode, in which it adjusts the right channel. FINL (Fine Pitch Stereo Left) and FINR (Fine Pitch R) FINL acts on both channels together in stereo mode, and the left channel in mono mode. It adjusts pitch continuously over a range of a few hundred cents, and is additive to the PCHL control. If PCHL is set to the middle of its range the FINL control can be used to set very small values of pitch shift, producing a chorusing effect. FINR performs the same functions as the FINL control, except that it is only active in Mono mode, in which it adjusts the right channel. 4-16 The Algorithms and their Parameters Stereo Pitch Shift Delay and Feedback Page LDLY adjusts the length of a delay line in series with the left input. The range is zero to 510ms in 2ms steps.Pre-delay also affects the delay of any feedback which is applied. In stereo mode the two pre-delays must be set to the same value, or the signals will not be in phase. Optimal pitch shift occurs when LDLY is about 40ms. LDLY and RDLY RDLY is the same as the LDLY, except that it acts upon the right channel. L FBK and R FBK control the amount of positive feedback from the output of the pitch shift to the input of the pre-delay line. The control is adjustable from 0 to +99%. Some very useful efects can be obtained by combining pitch shift, delay, and feedback. LFBK and R FBK BNPS is a band-pass filter which rolls off the frequency responce of the audio before the splicing algorithm. The -3dB point is 100 Hz. The purpose of the bandpass filter is to give the pitch shifter less information than it actually needs to decide when to make the splice. Typically, this will inprove the performance of the pitch shifter. BNPS SYNC is only active in STEREO mode. This control forces an exact sync of the two channels when the control is turned from 0 to 1. When SYNC is 1, there is an automatic re-syncing any time the two channels differ in phase by about 10 samples. This can occur if PCHL or LDLY is changed. Re-syncing can cause a small click in the output. If the pitch shifter is being used to manually pitch-correct classical music using the GLDL control, it may be better to set SYNC to 0, or Off. There is an automatic sync tracking feature which will keep the two channels locked to within 2 samples. If precise synchronization is desired, the GLDL or PCHL controls should be set, SYNC should be set from 0 to 1, and then the pitch should not be changed. The two channels will remain precisely synchronized, even though both are continually changing the splice length in response to the incoming pitches. SYNC 4-17 300 V 3.0 Owner's Manual Lexicon Stereo Adjust General Description The Stereo Adjust algorithm offers fine adjustments of level and equalization during digital mastering. Its stereo digital fader permits 0.25dB trimming and provides full fades to digital zero at the end of a track. Its two sets of shelving treble EQ can be set for different 3dB points and gains. BASS and SPEQ permit adjustment of stereo width, enhancing the spaciousness and depth of the recording. Stereo Adjust Parameters Stereo Adjustments MSTR BAL ROT Off, -72dB to +12dB L+2.9 to R+2.9dB L+2.9 to R+2.9dB D-EM 11µs RFnS On, Off On, Off +L+R,+L-R,+R+L,-R+L DLAY 0-5000ms Stereo Adjust EQ and Spatial BASS TREB Cut, -18dB - +6dB Cut, -18dB - +6dB BXOV TXOV 0.1-26.5kHz 0.1-26.5kHz LTRB Cut, -18dB - +6dB TXLR 0.1-26.5kHz RTRB Cut, -18dB - +6dB SPEQ Cut, -6 to +6dB Stereo Adjust Delay and Feedback LDLY 0-5000ms LFBK -99 to +99% LFIN 0-500 samples Lfbk -99 to +99% DCSW Reset, Manual, Auto L-DC -99 to +99% RDLY 0-5000ms RFBK -99 to +99% RFIN 0-500 samples Rfbk -99 to +99% DC Offsets R-DC -99 to +99% SHUF 0-10 Effect Naming Page LFB Lfb 11 µs Equalizer Σ Σ Σ Σ Level R F'n'S Balance Rotate SPATIAL L Delay B XVR BASS+ TR XVR TREB+ D-EM L/R Dly L/R XVR L TRB+ R TRB+ R Delay L Fine R Fine Rfb RFB Stereo Adjustments Page MSTR (Master Fader) 4-18 MSTR is a stereo level control, with both channels equally attenuated or boosted. From -12 to +12 the fader moves in .25 dB increments. Below -12 it moves in .50 dB increments. Below -60 dB the calibration comes in larger steps, finally dropping to zero output at -72 dB. The Algorithms and their Parameters BAL implements a sine/cosine balance adjustment. Balance is smoothly adjusted over a wide range, with excellent resolution in the critical area around zero. The display indicates the actual channel gains as the control is varied. BAL (Balance) ROT is similar to BAL, but it treats stereo information somewhat differently. Any signal panned to the center (mono) will be treated by ROT exactly as it would be treated by BAL. However, if a signal is panned full right and the control is moved toward the right, instead of simply being attenuated (as BAL would do) the right channel is inverted in phase and added to the left channel. A stereo image appears to rotate when this control is used. Ambient information is preserved, and both channels appear to retain equal loudness. ROT (Rotate) If stereo material is recorded with a coincident pair of figure-of-eight microphones, moving the ROT slider is exactly equivalent to rotating the microphone pair. Other microphone arrays and multimicrophone setups do not rotate perfectly, but using this control is frequently preferable to simply adjusting balance. The display shows the actual channel gains for a continually panned source. DLAY controls a 5-second stereo delay line, with a resolution of 10 milliseconds. Separate mono and fine controls are on the Delay page below. This is a postprocessing full-level delay, and is always in the circuit. DLAY When D-Em is On, the incoming signal is digitally de-emphasized. This should not be used unless the material has been emphasized in the record process— such as a PCM-F1 tape. Note that the emphasis bit in the incoming signal can be turned off from the 300 front panel. See Chapter 2: System Operation: Setup Edit. D-EM (De-emphasis On/Off) When digital de-emphasis is applied, the CD mastering lab must be informed that the tape is not emphasized, and the CD emphasis bit should be manually set to Off. Mastering labs are happy to do this, but they must be informed! When this control is on, the left channel is delayed relative to the right by 11µsec (1/2 sample). This control specifically corrects for the timing error between channels caused by consumer digital systems (e.g. the Sony PCM-F1 and its progeny) that time-share single analog converters. Turning on this delay time aligns the left channel audio data for compatibility with professional systems. 11 µsec (1/2 sample) RFnS is used for digitally correcting probelms you used to be able to fix (or create) by switching analog cables around. The normal setting is +L to the left output and +R to the right output. Other settings should only be used when correcting some problem created previously in the recording process. RFnS (Right Channel Flip 'n' Swap) +L+R = Normal Routing +L-R = Right Channel polarity inverted (flipped) +R+L = Left and Right Channels swapped -R+L = Right flipped and swapped with Left 4-19 300 V 3.0 Owner's Manual Lexicon Stereo Adjust EQ and Spatial Page BASS (Bass EQ) BASS is a 6dB/octave shelving EQ control with a range of +6 dB boost and -18dB cut. It moves in .50 dB steps from +6 to -6 dB. The crossover point is adjusted with BXOV. BASS acts on both stereo channels equally. TREB (Treble EQ) TREB is a 6 dB/octave shelving EQ controls with a range of +6 dB boost and -18dB cut. It moves in .50 dB steps from +6 to -6 dB. The crossover point is adjusted with TXOV. TREB acts on both stereo channels equally. LTRB and RTRB These controls allow independent adjustment of left and right treble. They may be used together with the stereo adjustments to create a 12 dB/octave cut or boost. Note that the 3 dB frequencies can be different from the stereo set. BXOV (Bass Crossover) BXOV sets the crossover point for BASS. When BASS is set to full cut, the level is -3 dB at the frequency set with BXOV. TXOV (Stereo Treble Crossover) TXOV sets the crossover point for TREB. When TREB is set to full cut, the level is -3 dB at the frequency set with TXOV. TXLR (Independent Treble Crossover) TXLR sets the crossover point for LTRB and RTRB. When either is set to full cut, the level is -3 dB at the frequency set with TXLR. SPEQ (Spatial EQ) SPEQ sets the amount of a crossfeed between channels. The signal first goes through a 6 dB/octave low-pass filter whose frequency is set with BXOV. When SPEQ is set positive (above 0) the crossfeed has a negative sign. When SPEQ is set negative (below 0), the crossfeed has a positive sign. When the control is set to either maximum or minimum, the gain in the crossfeed circuit is unity. The result of this control is to change the separation of low frequency stereo signals. When the control is raised, low frequencies in the sum (mono) channel are reduced, and low frequencies in the difference (stereo) channel are raised. With the control at maximum, low frequency mono signals are completely removed. This represents an extreme setting which should seldom be needed in practice. With material which has stereo bass information, or which contains some reverberation, the effect of raising SPEQ is to increase the sense of spaciousness and depth of the sound. It is particularly useful on material recorded with panpots, or coincident and semi-coincident microphone technique. When most of the bass in a recording is in the sum (mono) channel, raising SPEQ may reduce the bass level. This effect can be compensated for by raising the overall bass level with BASS. Since both controls use the same BXOV setting, this compensation will be quite accurate as long as SPEQ is set to less than 3 dB boost. 4-20 The Algorithms and their Parameters Stereo Adjust Delay and Feedback Page These controls give individual channel control over the 5-second post-equalization delay line. 5-second, 10 milliseconds per step, mono control for the left channel. LDLY (Left Channel Coarse) DLAY + LDLY must not total more than 5,000 milliseconds. 5-second, 10 milliseconds per step, mono control for the right channel. RDLY (Right Channel Coarse) DLAY + RDLY must not total more than 5,000 milliseconds. Fine Sample Accurate Delays These can be used for subtle time alignment adjustments. The 300 will correctly display the resulting time shift as a function of the sampling rate. As many as 500 samples can be added to any stereo/coarse delay setting for a maximum possible delay per channel of 5 seconds + 500 samples. 48 kHz = 20.833 microseconds per sample 44.1 kHz = 22.676 microseconds per sample 32 kHz = 31.25 microseconds per sample 500-sample, 1 sample per step, mono fine adjust for the left channel. LFIN (Left Channel Fine) 500-sample, 1 sample per step, mono fine adjust for the right channel. RFIN (Right Channel Fine) Two feedback paths are available per channel: overall and fine. Overall feedback is the total delay of DLAY + L(R)DLY + L(R)FIN, and is useful for long echo effects. Fine Feedback is only around the Fine Delay and can be used for very short delay effects and coloration. All feedback gains are adjustable in 1% increments from -99% to +99%. If the magnitudes of both feedback gains for a channel sum to more than 100%, that channel will take off and overload. On the 300 Effects Feedback page, overall and fine are distinguished by upper and lower case lettering: LFBK = Overall Left Channel Feedback Lfbk = Fine Left Channel Feedback RFBK = Overall Right Channel Feedback Rfbk = Fine Right Channel Feedback 4-21 300 V 3.0 Owner's Manual Lexicon Stereo Adjust DC Offsets Page DCSW (DC Offset Nulling) This control provides three choices: RESET, MANUAL ADJUST and AUTO ADJUST. RESET disables all DC adjustment. AUTO ADJUST enables routines for correcting DC offset from material recorded through analog-to-digital converters that are not properly trimmed for DC. MANUAL ADJUST allows Softknob selection of offset values. L-DC and R-DC (Lch and Rch DC Offset) Replaces any previously obtained value with the value set here via the soft knob. The display indicates the percent of the correction. SHUF (Binaural Shuffler) SHUF controls a spatial equalizer designed to make recordings from a dummy head, or closely-spaced omni microphones, more suitable for loudspeaker reproduction. Due to the close spacing of the microphones, there is very little difference between the two stereo channels below about 300Hz. The shuffler restores the low frequency separation by first matrixing the L and R signals into L+R and L-R, bass-boosting the L-R channel, then rematrixing back to L and R. The effect is to convert small time differences (which are not audible in loudspeaker reproduction) between the two microphones into level differences, which are audible. The effect can be dramatic. The frequency below which the boost acts is set by the SHUF control. A setting of 5 will give a 3dB L-R boost at about 150Hz; a setting of 10 will be 3dB up at 250Hz. Response rises at 6dB/octave below this frequency. More than 18dB of gain can be obtained at 20Hz when SHUF is set to 10. This control has been optimized for true binaural recordings, where the difference signal at low frequencies is minimal. If it is used on ordinary stereo material, or with binaural material to which reverberation has been added, excessive low frequency difference signals can result. On such material, it is better to use the SPEQ control which will achieve a similar result. The SHUF control varies from 0 (shuffler off) to a maximum of 10. While theory would suggest a setting of 10 for a dummy head, a setting of 5 appears to be more useful in practice. The setting is very much a matter of taste. If closely spaced microphones are used, the setting will scale inversely with the microphone distance in centimeters. For a spacing of 15cm, try a shuffler setting of 5. For a spacing of 30cm, try a setting of 3. For a spacing of 7cm, try a setting of 10. 4-22 The Algorithms and their Parameters "Split" Setup Algorithms Dual Delays The Dual Delay algorithm consists of 2 types of delay lines: Gliding Flange delays and Fixed delays. This is a true stereo algorithm. (If run in a Dual Mono setup, however, it will be mono.) General Description Two independet gliding flange predelays are available, each with a 20ms range in single sample steps. There is also a ganged stereo gliding flange delay. There are two flange gain controls which vary the overall amount of flange effect. The flange glides are typically modulated by the internal LFO. Setting the flange gains very high will cause an “over the top” type of flange to occur as the flange glide delays cross over the predelay pointers. The outputs of the flange delays are fed to the delay left and delay right lines which are 2.5 seconds long. Once into these delay lines, you can create many different delay effects. There are two programmable taps on each delay line. DLY1 (left) and DLY2 (right) can be programmed anywhere along this 2.5 second path. There will, however, be no apparant delay unless a feedback value is assigned to the delay values via FBK1 and FBK2. All Pass filters, or diffusors, in line with the feedback paths are labeled APD (All Pass Delay) and APG (All Pass Gain). The actual “tuning” of the All pass delay is accomplished with the APD control. The amount of diffusion is set by APG. When APG is turned high and FBK1 is adjusted away from the 0% value, each feedback loop will be rediffused. DLY3 and DLY4 are cross feedback delay lines. They are also adjustable anywhere along the 2.5 second delay line. DLY3 feeds from the left delay position to the input of the right delay line. The same is true with DLY4 feeding into the left delay line. The feedback parameters adjust the amount (level) passed into the destination delay lines. The last pair of delay pointers (LDLY and RDLY) can be thought of as independently adjustable post delays. These can be adjusted anywhere along the 2.5 second delay line. The output of each delay line can be positioned anywhere in the stereo pan field. LPAN adjusts the position of the left delay loop; RPAN positions the output of the right delay loop. 4-23 300 V 3.0 Owner's Manual Lexicon Dual Delays Parameters Dual Delay Adjustments DM: FDLY LFBD RFBD 0-479smp=0-10ms 0-479smp=0-10ms 0-479smp=0-10ms LFLG RFLG 0-99% 0-99% MchB Delay and Feedback Page 1 DM: MchB DLY1 0-119996smp= 0-2498.9ms DLY2 0-19996smp= 0-2498.9ms@48kHz FBK1 0-99% - FBK2 0-99% - Diffusor Controls DM: APD1 0-19996smp= 0-2498.9ms APD2 0-19996smp= 0-2498.9ms MchB APG1 0-191 - APG2 0-191 - Delay and Feedback Page 2 DM: DLY3 0-19996smp= 0-2498.9ms DLY4 0-19996smp= 0-2498.9ms MchB FBK3 0-99% - FBK4 0-99% - Diffusor Controls DM: LDLY 0-19996smp= 0-2498.9ms RDLY 0-19996smp= 0-2498.9ms MchB LPAN L, 0-98%R/L, R - RPAN L, 0-98%R/L, R - Effect Naming Page APG 1 APD 1 FBK 1 Flanger L PDLY L GAIN Σ Σ Delay 1 Σ Σ Delay 2 APG 2 4-24 L Pan Delay 4 R Delay R Pan Σ Fbk 4 FLNGDLY R GAIN L Delay Fbk 3 FLNGDLY R PDLY Delay 3 APD 2 FBK 2 Σ The Algorithms and their Parameters Dual Delays Adjustments Page FDLY is a separate 20 ms ganged stereo delay line which is controllable in single sample steps. FDLY (Flange Delay) LFBD and RFBD are base delays which get summed with the stereo ganged flange delay.These base delays are adjustable in single sample steps throughout a 20 millisecond range. LFBD and RFBD (Left and Right Flange Base Delays) LFLG and RFLG are flange gains which are adjustabe as a feed forward amplifier loop (+99% positive value) or feedback amplifier loop (-99% negative value). LFLG and RFLG (Left and Right Flange Gain) Dual Delays Diffusors, Feedback and Delays DLY1 and DLY2 set the delay values for the respective left to left and right to right feedback loops DLY1 and DLY2 FBK1 and FBK2 set the gain of feedback for each of the delay lines. Available values range from -99% to +99% gain. FBK1 and FBK2 APD1 and APD2 are diffusors (All Pass Delays) in series with the feedback loops associated with DLY1 and DLY2. Their controls range from 0 to 10 ms. These controls essentially “tune” the diffuor delay line. APD1 and APD 2 (All Pass Left and Right Delays) APG1 and APG2 are gains associated with the diffusors. You can think of them as controlling the amount of diffusion. APG1 and APG 2 (All Pass Left and Right Gain) DLY3 controls the delay time which cross-feedbacks to the input of DLY2. DLY4 controls the delay time which cross-feedbacks to the input of DLY1. DLY3 and DLY 4 FBK3 and FBK4 control the gain of the feedbacks going with each of their respective delay lines. FBK3 and FBK4 LDLY sets the left channel delay line's time. RDLY sets the right channel delay line's time. LDLY and RDLY LPAN adjusts the left delay channel pan placement. RPAN adjusts the right delay channel pan placement LPAN and RPAN 4-25 300 V 3.0 Owner's Manual Lexicon Split Chamber General Description The Split Chamber program provides several presets which can be loaded into any Dual Mono or Cascade setup. In the Dual Mono setups it passes audio Mono In-Mono Out. In the Cascade setups, audio is routed Mono In-Stereo Out. The Split Chamber program can simulate many different types of acoustic spaces or mechanical devices. Th Split Chamber algorithm is great on anything. SIZEs of 25 and larger set a lower acoustic density. SHAP and SPRD help create the illusion of larger spaces whicle using short reverb times. As in the Random Hall algorithm, the LINK parameter couples SIZE to the RTIM and SPRD. Unlink provides a method of setting stable RTIM and SPRD values, then adjusting SIZE to set the right density and “tuning”. Split Chamber is bright by design, so you may want to use lower values of TDCY — maybe even as low as 1.0kHz or 500Hz. The randomization circuit in Split Chamber is designed to reduce coloration and/ or frequency nodes caused by low frequency input. If you want to create your own special Chambers or Halls, you should keep RAND set to 90 or 95. Typically, SIZEs of 14-24 meters with TDCYs higher than3.4kHz will emulate bright sounding metal plates. Remember to set SHAP and SPRD to extremely low values to maintain the explosiveness of the reverb decay. Because plates are very diffuse, any preset mimicking a plate should have DIFF set relatively high (70-80), while BASS is kept to some value less than 1.2kHz. DIFF and PDLY precede the reverberator. When Chamber programs are loaded into Dual Mono setups, the audio will be Mono In-Mono Out. When loaded into Cascade setups, audio is routed summed Mono In-Stereo Out. Split Chamber Parameters Split Chamber Adjustments Page 1 DM: MchA RTIM .09-24.11s TDCY 0.5-21.2kHz SIZE 4.0-66.4M SHAP 0-255 PDLY 0-1000ms SPRD 0-202 Split Chamber Adjustments Page 2 DM: MchA BASS 0.2-4.0x XOVR 0.1-26.5kHz DIFF 0-99 LINK Link/Unlink RAND Off,0-98%,Up Full - Effect Naming Page Split Chamber Σ Diffusion Predelay RTIME SIZE SHAPE SPREAD XOVR BASS TDCY LINK RAND 4-26 The Algorithms and their Parameters Split Chamber Adjustments Page 1 RTIM sets the reverb time for mid-frequency signals. Because low-frequency reverb time (BASS) is a multiplier of RTIM, RTIM acts as a master control for the reverb time. RTIM (Mid-Frequency Reverb Time) SIZE sets the rate of buildup of diffusion after the initial period (which is controlled by DIFF). It also acts as a master control for RTIM and SPRD. The SIZE control changes a reverb sound from very large to very small. Generally, you should set the SIZE control to approximate the size of the acoustic space you are trying to create, before adjusting anything else. The size in meters is roughly equal to the longest dimension of the space. Moving SIZE while a signal is present may cause audible transients on critical material. SIZE The apparent size of the space created is actually a combination of the settings of the SIZE, SHAP, and SPRD controls. Small acoustic spaces are characterized by a rapid buildup of diffusion. However, both small and large spaces frequently have an uneven buildup of initial reverberation. This uneven buildup is controlled by the SPRD and SHAP controls. PDLY adjusts an additional time delay between the input of signal and the onset of reverberation. The control is not intended to mimic the time delays in natural spaces. In real rooms the build-up of reverberation is gradual, and the initial time gap is usually relatively short. Natural spaces are best emulated by setting SHAP at a middle value and adjusting SPRD for the desired effective pre-delay. PDLY (Pre-Delay) Additional delay added with the PDLY control can increase the initial time gap slightly, emulating a situation where reverberant pick-up microphones are located much further from the source than the main microphones. If less than about 30ms of pre-delay is added, this additional delay can add clarity with some music, but it can also sound unnatural. Large pre-delays can be useful for slapecho effects. TDCY sets the frequency above which sounds decay at a progressively faster rate. It filters all the sound except the pre-echoes. When set relatively low, it gives a darker tone to the reverberation, simulating the effect of air absorption in a real hall. TDCY also helps keep the ambience generated by the program from muddying the direct sound. TDCY (Treble Decay) SHAP and SPRD work together to control the overall ambience of the reverberation created by the 300. SHAP determines the contour of the reverberation envelope. With SHAP all the way down, reverberation builds explosively, and decays quickly. SHAP (Shape) As SHAP is advanced, reverberation builds up more slowly and sustains for the time set by SPRD. With SHAP in the middle, the buildup and sustain of the reverberation envelope emulates a large concert hall (assuming that SPRD is at least halfway up, and that SIZE is suitably large—30 meters or larger.) 4-27 300 V 3.0 Owner's Manual Lexicon SPRD (Spread) SPRD works together with SHAP to control the duration of the initial ambience created by the 300. Low SPRD settings result in a rapid onset of reverberation at the beginning of the envelope, with little or no sustain. Higher settings spread out both the buildup and sustain. Split Chamber Adjustments Page 2 BASS (Bass Multiply) BASS sets the reverb time for low-frequency signals, as a multiplier of the RTIM parameter. For example, if BASS is set to 2X, and RTIM is set to two seconds, the low frequency reverb time will be four seconds. For a natural-sounding hall ambience, we recommend values of 1.5X or less. DIFF (Diffusion) DIFF controls the degree to which initial echo density increases over time. High settings of DIFF result in high initial buildup of echo density; low settings cause low initial buildup. Echo density is also affected by SIZE; smaller spaces will sound denser. To enhance percussion, use high settings of DIFF. For clearer, more natural vocals, mixes, and music, use low or moderate settings. RAND (Randomization) 4-28 RAND sets the distance in time that the early reflections will move. XOVR (Bass Crossover) XOVR sets the frequency at which the transition from RTIM to BASS takes place. XOVR should be set at least two octaves higher than the low frequency you want to boost. For example, to boost a signal at 100 Hz, set XOVR to 400 Hz (This setting works well for classical music). XOVR works best around 400 for boosting low frequencies, and around 1.5 kHz for cutting low frequencies. LINK When LINK is set, the reverb time and spread values scale linearly as the SIZE control is varied. For some special effects, RTIM and SPRD can be unlinked. The Algorithms and their Parameters Mono Pitch Shift The Mono Pitch Shift Algorithm has several useful effects, including predelay, feedback, and glide. The pitch shifter in the 300 includes a pitch detection feature which automatically adjusts the period of the splices to match the pitch of incoming signals. This feature makes the splicing intelligent, and greatly reduces the artifacts associated with pitch shift. the Mono Pitch Shift program, each channel splices independently. It takes about 40 ms for the pitch detector to obtain an optimal pitch value. Setting the DLY control to this value will give the smoothest pitch shift. Shorter values can be used for special effects, or when extra delay cannot be tolerated. General Description There are three interacting controls for pitch described below: Glide, Pitch Interval, and Fine Pitch. Adjusting any pitch control activates a long display that shows the pitch percentage, the musical interval, and any fine adjustment in cents. Always use this long display when matching Glide to Pitch Interval and Fine Pitch. Mono Pitch Shift Parameters Mono Pitch Shift Adjustments DM: MchB PCH -2Oct to M7+48¢ GLD -2Oct to M7+48¢ DLY 0-510ms FIN +96 cents FBK 0-98%, Max BNPS On/Off Effect Naming Page Feedback Shifter Bandpass Σ PITCH FINE GLIDE Delay Mono Pitch Shift Adjustments Page PCH adjusts pitch interval. The exact tuning can be altered by FIN, and the exact pitch shift in intervals and cents is displayed. FIN must be set to the exact middle of its range if perfect pitch intervals are to be obtained. PCH In the long display, fine pitch is shown by the number of cents added to, or subtracted from, the semitone intervals. Remember that PITCH will produce exact intervals only if FIN is centered. The rightmost character in the long display is an asterisk (*) if FIN is centered, and a '+' or '-' otherwise. When the VALUE key turns on the short value display, FIN is not shown in cents, but as a number ranging from -32 to +32 in order to give a clear indication of how much the pitch shift has been changed. When '**' is shown, FIN is centered and inactive. As a rule, 1 count of FIN is worth 2 cents near 200%, 3 cents near 100%, 6 cents near 50%, and 12 cents near 25%. 4-29 300 V 3.0 Owner's Manual Lexicon DLY DLY adjusts the length of a delay line from zero to 510ms in 2ms steps.Optimal pitch shift occurs when DLY is about 40ms. FBK FBK controls the amount of positive feedback from the output of the pitch shift to the input of the pre-delay line. The control is adjustable from 0 to +99%. Some very useful efects can be obtained by combining pitch shift, delay, and feedback. GLD GLD changes the pitch continuously over a range of -2 octaves (25%) to +1 octave (199%). This allows a glissando to be performed, either manually or via MIDI. FIN FIN adjusts pitch continuously over a range of -2 octaves to +1 octave. This allows a glissando to be performed, either manually or via MIDI. BNPS BNPS is a band-pass filter which rolls off the frequency responce of the audio before the splicing algorithm. The -3dB point is 100 Hz. The purpose of the bandpass filter is to give the pitch shifter less information than it actually needs to decide when to make the splice. Typically, this will further improve the performance of the pitch shifter. 4-30 The Algorithms and their Parameters Compressor The Compressor algorithm is a true digital compressor which will run in either Dual Mono or Cascade Setups. In Dual Mono Setups, it configures to mono in mono out; in Cascade Setups it configures as a true stereo effect. The compressor can be described as an upwards averaging compressor. Digital compressors, like analog compressors, decrease audio above a given threshold. Unlike analog compressors, they increase gain below the threshold. The result from either analog or digital compression is exactly the same — less dynamic range. General Description As shown in the diagram below, the audio path takes two routes. One path goes through a predelay mechanism which delays the audio a maximum of 48 ms. The other path sends control information (dependent on the settings of slope, threshold, attack and release) to “digital VCA’s” labeled MAX COMP GAIN and EXP GAIN. As the signal crosses the threshold point, both Compressor Gain and Expansion Gain vary constantly. Compressor Gain determines the maximum amount of gain increase below the threshold; Expansion Gain determines the maximum amount of gain attenuation below the threshold. Generally, digital compression requires lower threshold settings than analog compression. The reason for this is that there is no such thing as headroom in a digital system — dBfs (Digital Full scale [0VU]) is the maximum level audio. Audio dynamics below full scale, however, can be manipulated and modified. Example 1. Press SETUP SELECT and turn the Softknob to select Cascade Setup: 313 STEREO COMP. This preset loads the stereo compressor into both machines but mixes Machine B to full dry. (no point in compressing twice!) 2. Press ENTER to load the preset. 3. Press EFFECT EDIT. Note the front panel level meters and try to establish the average input level. A simple approach might be to look at the peaks and valleys in signal amplitude and estimate the middle ground. If this all seams too complicated, just select THRS and set it to -17dB. 4. Select GAIN and set it to Max (9 dB). At this point there should be no effect on the dynamics because you’ve not yet adjusted the slope parameter. 5. Select SLP and increase it to 2.0 : 1 (a 2 to 1 Compression Slope). Now you should hear a change. If you still do not hear a net effect, readjust THRS until something becomes audible. Remember, as you adjust the threshold clockwise (closer to digital full scale) more and more audio will be gain increased — overload can occur!! The whole purpose of a digital compressor is to maintain peaks while compressing lower level audio signals upwards. If you think about it in terms of the most significant and least significant bits, you would never want to reduce the most significant bits — you want to increase the least sigificant bits. Adding some pre-delay gives the control mechanism time to react before the audio reaches the digital VCA. Of course, the more predelay you add, the more “out of sync” the audio will become. Attack constants should be kept to short values (7,15, or 30ms). A good starting point for release time is 91 or 114 ms. 4-31 300 V 3.0 Owner's Manual Lexicon Compressor Parameters Compressor Adjustments DM: MchB PDLY 0-48ms THRS 0 to -40dB ATC 0-960ms GAIN 0-24dB RTC 0-4000ms SLP 1.0-99.99:1 Expander Adjustments DM: MchB EXTH 0 to -70dB - EXG 0-24dB - EXSL 1.0-8.93:1 - Effect Naming Page L R CmpGain Predelay ExpGain Compressor SLOPE THRS ATTACK RELEASE Expander X SLOPE X THRS Compressor Adjustments Page PDLY ATC (Attack) RTC (Release Time Constant) THRS (Threshold) 4-32 PDLY sets the predelay of the audio before the digital VCA. ATC adjusts the attack time constant. RTC allows adjustment of the release time constant. THRS sets the level at which compression starts. GAIN GAIN adjusts the gain of low level signals (below the compression threshold). SLP (Slope) SLP controls the slope of the gain reduction curve or the ratio of input level versus output level. The Algorithms and their Parameters Expander Adjustments Page EXTH sets the threshold at which the expander starts to work. EXSL EXG sets the amount of negative gain. EXTH EXSL controls the slope of the expander circuit. EXG PONS Dither is a low-level pseudo-random signal which is added to digital audio to reduce quantization noise, in effect, by replacing it with a "nicer sounding" noise. It is possible to filter the quantization noise in such a way that almost all of the noise within the frequency range where human hearing is most acute is shifted to higher frequencies. This is called psychoacoustically optimized noise shaping (PONS) because it takes advantage of the variations in the ear's sensitivity to noise within the 20 Hz - 20 kHz range. PONS Parameters PONS Adjustments CC: MchA DITH 0-254 - PONS On/Off - General Description - Effect Naming Page PONS Adjustments Page DITH allows you to vary the amount of dither gain added to the signal. DITH (Dither Gain) This control allows you to turn the dither function on or off. PONS 4-33 300 V 3.0 Owner's Manual Lexicon Small Stereo Adjust General Description The Small Stereo Adjust algorithm is a version of Stereo Adjust with some of the specialized features omitted. It is designed to be put in a Cascade Setup ahead of PONS. Small Stereo Adjust Parameters Stereo Adjustments CC: MchA MSTR BAL ROT Off, -72dB to +12dB L+2.9 to R+2.9dB L+2.9 to R+2.9dB SPEQ RFnS Cut, -6 to +6dB +L+R,+L-R,+R+L,-R+L Equalization CC: MchA BASL Cut, -18dB - +6dB BASR Cut, -18dB - +6dB LTRB Cut, -18dB - +6dB RTRB Cut, -18dB - +6dB BXOV 0.1-26.5kHz TXLR 0.1-26.5kHz Effect Naming Page Equalizer MSTR R F'n'S Balance Rotate BASL BASR BXOV LTRB RTRB TXLR SPEQ MSTR (Master Fader) Stereo Adjustments Page MSTR is a stereo level control, with both channels equally attenuated or boosted. From -12 to +12 the fader moves in .25 dB increments. Below -12 it moves in .50 dB increments. Below -60 dB the calibration comes in larger steps, finally dropping to zero output at -72 dB. BAL (Balance) BAL implements a sine/cosine balance adjustment. Balance is smoothly adjusted over a wide range, with excellent resolution in the critical area around zero. The display indicates the actual channel gains as the control is varied. ROT (Rotate) ROT is similar to BAL, but it treats stereo information somewhat differently. Any signal panned to the center (mono) will be treated by ROT exactly as it would be treated by BAL. However, if a signal is panned full right and the control is moved toward the right, instead of simply being attenuated (as BAL would do) the right channel is inverted in phase and added to the left channel. A stereo image appears to rotate when this control is used. Ambient information is preserved, 4-34 The Algorithms and their Parameters and both channels appear to retain equal loudness. If stereo material is recorded with a coincident pair of figure-of-eight microphones, moving the ROT slider is exactly equivalent to rotating the microphone pair. Other microphone arrays and multimicrophone setups do not rotate perfectly, but using this control is frequently preferable to simply adjusting balance. The display shows the actual channel gains for a continually panned source. RFnS (Right Channel Flip 'n' Swap) RFnS is used for digitally correcting probelms you used to be able to fix (or create) by switching analog cables around. The normal setting is +L to the left output and +R to the right output. Other settings should only be used when correcting some problem created previously in the recording process. +L+R = Normal Routing +L-R = Right Channel polarity inverted (flipped) +R+L = Left and Right Channels swapped -R+L = Right flipped and swapped with Left Equalization Page BASL and BASR BASL and BASR are 6dB/octave shelving EQ controls with a range of +6 dB boost and -18dB cut. They move in .50 dB steps from +6 to -6 dB. The crossover point is adjusted with BXOV. LTRB and RTRB These controls allow independent adjustment of left and right treble. They may be used together with the stereo adjustments to create a 12 dB/octave cut or boost. Note that the 3 dB frequencies can be different from the stereo set. BXOV (Bass Crossover) BXOV sets the crossover point for BASL and BASR. When BASL and BASR are set to full cut, the level is -3 dB at the frequency set with BXOV. TXLR (Independent Treble Crossover) TXLR sets the crossover point for LTRB and RTRB. When either is set to full cut, the level is -3 dB at the frequency set with TXLR. SPEQ (Spatial EQ) SPEQ sets the amount of a crossfeed between channels. The signal first goes through a 6 dB/octave low-pass filter whose frequency is set with BXOV. When SPEQ is set positive (above 0) the crossfeed has a negative sign. When SPEQ is set negative (below 0), the crossfeed has a positive sign. When the control is set to either maximum or minimum, the gain in the crossfeed circuit is unity. The result of this control is to change the separation of low frequency stereo signals. When the control is raised, low frequencies in the sum (mono) channel are reduced, and low frequencies in the difference (stereo) channel are raised. With the control at maximum, low frequency mono signals are completely removed. This represents an extreme setting which should seldom be needed 4-35 300 V 3.0 Owner's Manual Lexicon in practice. With material which has stereo bass information, or which contains some reverberation, the effect of raising SPEQ is to increase the sense of spaciousness and depth of the sound. It is particularly useful on material recorded with panpots, or coincident and semi-coincident microphone technique. When most of the bass in a recording is in the sum (mono) channel, raising SPEQ may reduce the bass level. This effect can be compensated for by raising the overall bass level with BASL and BASR. Since both controls use the same BXOV setting, this compensation will be quite accurate as long as SPEQ is set to less than 3 dB boost. 4-36 The Presets 5 The Presets 5-1 300 V 3.0 Owner's Manual Lexicon The Setup Presets The 300 is shipped with 100 setup presets (50 Single Setups, and 25 each of the two split setup types), as well as 50 setup registers for storing your modified setups. Single Setup (and Effect) Presets # Name Single Effects are only available in Single-type Setups. Therefore, the descriptions (and the names) of the setup and effect presets are identical. An asterisk (*) indicates there is a Soft knob patch which controls various parameters with one controller. Algorithm Description P101 Large Hall Random Hall Used as a great standard reference point. The hall size is big, with a gentle bloom in the reverberation envelope. The first set of pre-echoes is set to 14 and 20 ms, but the levels are set to OFF. Set levels to taste if you want to add some initial reflections. P102 Medium Hall Random Hall Similar to Large Hall, but the size is not as big (29.3) and the reverb time is proportionately shorter. The same arrangement exists for the pre-echoes. P103 Small Hall Random Hall An even smaller version, a bit denser — good for general reverb fill. P104 * Church Random Hall This preset is big and spread out. There are 2 close in pre-echoes and 2 longer and softer delays which have low recirculation added. The Soft knob controls the Size parameter(Spread and Shape are intrinsically linked), and Treble Decay. As the Soft knob value is increased, Room Size is decreased and Treble Decay is brightened. P105 * Rooms Random Hall This preset links Room Size to the Soft knob. As you turn the Soft knob, Room Size will go from its initial value of 19.1Meters down to 9.6Meters. These Rooms are diffuse and very articulate sounding. Lower values of Room Size tend to be more resonant sounding. Good for dialog reads. P106 RehursalRoom Random Hall This is a dense, brashy-sounding space with the listener in the back of the room. Rolling off the high-cut filter will put the carpeting on the walls. Room size is set to 15.2M, so the sound is very tight. Good on vocals and fill. P107 * Chamber Random Hall Like the Room Preset, the Soft knob is patched to the Size parameter. Advancing the softknob reduces the Size value from a maximum of 25.3 Meters to 14.1 Meters. Imagine a chamber with a reflective plaster finish. P108 LiveDrumRoom Random Hall Bright and tight. The Soft knob is patched to the Size and Rolloff parameters so that advancing the knob value makes the room a little bigger and brighter. P109 * Studio A Random Hall This preset sounds like the “big” rooms ($125/hour). The Softknob is patched to Delay Levels 3 and 4, as well as to the Rolloff and Treble Decay parameters. Advancing the Soft knob increases all of these parameters, making the studio brighter and more reflective. P110 * Studio B Random Hall A smaller Studio area than Studio A. The Soft knob is patched to Pre-echo Levels 3 and 4. Advancing the Soft knob makes the Studio more reflective. 5-2 The Presets # Name Algorithm P111 * Brick Wall Random Hall This preset is wide and abrupt sounding. The Soft knob makes the Wall smaller. P112 * Deep End Random Hall This preset actually goes from the Deep End to the Shallow End. We just didn’t have the space in the display to fit the title. P113 Oil Tanker Random Hall Round and booooomy. All of the pre-echoes are utilized to present strong reflections from the original source. P114 *Synth Hall Random Hall A very diffuse, medium-sized with a long RT value. The Soft knob advances Shape, Spread, Predelay, and Rolloff. P115 Dance Hall Random Hall Medium bright hall. 1.4 seconds of reverb time. Super on "backing" vox. Great for the whole band. # Description Name Algorithm Description P116 * Ambience Random Ambience This preset creates a great sounding starting point. Wonderful for soloists. The Soft knob makes the space smaller and more randomized. P117 In A Room Random Ambience Definitely short and abrupt. Very realistic for ADR work. P118 Stairwell Random Ambience About 14 stories up and very "fluttery" sounding. Increasing the Size parameter will move you higher into the concrete building. P119 Hangar Random Ambience Big, wide, open, enclosed space (38.8M). Very diffuse. Akin to a hangar with two 747's in it. P120 MarbleFoyer Random Ambience A very realistic hotel or apartment foyer area. The Mix control in Setup Edit is set to 70% while the dry delay in Effect Edit is set to 19.1ms to create a single hard reflection before the onset of the main reverb effect. P121 Early Reflect RandomAmbience Very, very diffuse ... almost gated sound. A nice short ambience never gets in the way of the effect. P122 Lecture Hall Random Ambience University-sized (24.8 Meters) without the 150 students in it. P123 *Car Interior Random Ambience Not much explanation nessessary here, except that the Soft knob is attached to Spin, which “waffles” the audio around. P124 Score Stage Random Ambience Makes use of a large size (33.2) with a moderate amount of diffusion. Great on string parts. P125 Gate It!! Random Ambience Loud and dense. Use the size parameter to match duration of the gate to the tempo of the music. Boom-boom on drums. 5-3 300 V 3.0 Owner's Manual Lexicon Single Setup Presets cont'd. # Name Algorithm P126 * Rich Plate Rich Plate The old standard comes back to the future. Advancing the Soft knob controls the reverb time negatively. P127 Glossy Plate Rich Plate This preset shines a little differently. Some close in pre-echoes gives a strong impact to the original source. P128 Warm Plate Rich Plate Not your average bright plate — rather a slightly dull version which will work very well on horn tracks, adding point and definition. P129 Perc Plate Rich Plate For drums and the like. Not bad on piano either. P130 Contem-Plate Rich Plate Bright and splashy-sounding. Should work well to brighten a track without getting too washy-sounding. P131 *EKO Plate Rich Plate Combines a sweet combination of recirculating pre-echoes and bright sounding reverb. The Soft knob is negatively patched to RTIM and Delays 1 and 2. P132 Bright Plate Rich Plate Slightly smaller version of Contem-Plate. Great of vocals. Some strong pre-echoes to help the direct sound stand out. P133 * Round Plate Rich Plate Soft, but articulate. The Soft knob is patched to feedback paths surrounding pre-echoes 1 and 2, which feedback into the reverberator. # Description Name Algorithm P134 StereoAdjust Stereo Adjust Sets you up to fix audio sources. Null preset with pages for EQ, delays, phase and channel swaps, and DC offset removal. P135 Phase Invert Stereo Adjust The right channel is phase reversed to the left. If you put a mono signal into this program and pan the output returns left and right, you’ll definitely twist your head off. *NOTE This phase-reversed mono signal will also decode to the surround channel if run through a surround decoder. P136 2 Frame Delay Stereo Adjust 66.3 ms of delay running at 44.1kHz and 65.9 ms at 48kHz. P137 3 Frame Delay Stereo Adjust 100 ms of delay at both operating frequencies. P138 4 Frame Delay Stereo Adjust 133 ms of delay at both operating frequencies. P139 MS Decode Stereo Adjust Take a 2-channel Mid (left input) Side (right input) recording and this program will properly decode to stereo output. P140 *MultiEchoes Stereo Adjust This preset combines echoes under the control of the Soft knob. As you advance the Soft knob, the delays will get longer. P141 LFO Panner Stereo Adjust This preset attaches the LFO to the Stereo Adjust balance control. Once again, the LFO Rate determines the speed of the pan. This preset should be used from a pre-fade send source. P142 Telephone Stereo Adjust No bottom end....AT ALL. 5-4 Description The Presets Name Algorithm P143 # *Stereo Shift Stereo Pitch Shift Straight ahead stereo pitch shifting with the Soft knob attached to the Glide parameter. The stored value of the Soft knob is 55 which, when turned negatively to zero, will yield an output 2 octaves down; when turned all the way up, will give an output 1 octave above unison. Description P144 Octave Down Stereo Pitch Shift Just like the name sez.. P145 Vox Chorus Stereo Pitch Shift This preset is configured with different preset values of pitch shift for left and right: down 23 cents on the left and down 43 cents on the right. There are also different delays for the left and right with small amounts of feedback for each. Whip this one on either the lead vocal or BG Vox. P146 Pole Flange Stereo Pitch Shift Similar to a “Barber Pole” type flange. Mix 50/50 between source and returns. P147 Bulkie Roll Stereo Pitch Shift Fluffy-sounding chorus effect. Mode is set to Mono so you can independently pitch left or right. When sent to the 300 pre-fader, the return audio has a slow motion movement around the stereo field. P148 Heavy Roll Stereo Pitch Shift Another independent left/right preset except much stronger amounts of shift between the two channels. Don’t use this on anything pretty, make the nasty... nastier. P149 Going, Going Stereo Pitch Shift Up, Up, Up....in whole steps. The Soft knob is patched to the delay, which you adjust to suit your taste. P150 Zorch! Stereo Pitch Shift Up and down with delays and feedback. Nightmare audio. 5-5 300 V 3.0 Owner's Manual Lexicon Split Setup Presets and their Effects Split Setups are divided into two types: Dual Mono (numbered 201-225 in Setup Select mode), and Cascade (numbered 301-325 in Setup Select mode). Most Dual Mono Setups have the left input feeding Machine A, and the right input feeding Machine B. Each Setup description below is followed by a description of the two effects incorporated in the Setup. Dual Mono Setups and Effects P201 DM: Rev/Rev EA:701:Chamber EB:702:Key Chamber This setup utilizes two independent reverbs. The left input feeds Machine A; the right input feeds Machine B. Each can be used independently and, in fact, should be used that way. Pan the output of each Machine (at the console) to suit the mix. MchA EA:701 Chamber A great general purpose reverb tail. The size is set to 28.1M (the largest value is 64M) so the density is rather close in. As you adjust SIZE, the Rt value will also change. If you want to unlink this natural phoenomena, set LINK to Unlink (on Page Two). MchB EB:702 Key Chamber A nice “bloommy” sounding reverb. Diffusion is set midway, so there is some good articulation at the begining of the reverb envelope. Use this on most keyboards, but those with a strong point may require a bit more Diffusion. P202 DM: Rev/Dly EA:703:Drum Chamber EB:607:LFO:Faze Delays REV/DLY utilizes a great sounding mono reverb for kick and snare. Machine B runs Faze Delays, getting its signal from the right input. The LFO in Setup Edit runs at .24Hz with a triangle waveform. The FDLY parameter in Machine B is patched to this LFO. MchA EA:703 Drum Chamber Good starting point for acoustic drums. This preset is slightly larger than the standard chamber, but has less Diffusion. Rt is set to 1.0 second at mid frequencies. MchB EB:607 LFO:FazeDlys Faze Dlys makes use of the LFO patched to the Flange Glide Delay(FDLY). The base delays are set in different time domains: one side at 1.9ms with a feedforward gain; the other at 5.6 with a negative feed gain. As the Glide passes over each base delay, the phase of each gain is changed. In between, the output is a mixture of each. A great effect on a ripping guitar solo. P203 DM: Rev/Pch EA:705:Guitar Room EB:802: Guit Shift This Dual Mono preset will get you set for your guitar tracks. The LFO is set to 0.24 . Increase the rate (in Setup Edit) to increase the pitch glide in the Guitar Shift Effect preset. MchA EA:705 Guitar Room This is a big, wide-sounding room for your guitars. For heavy rock stuff, you might consider panning “in” the returns. The room is a little bottom heavy for additional warmth. Could also work well on vocals. MchB EB:802 Guitar Shift This preset offers a medium amount of micropitch shift(-14c), along with a small amount of recirculating predelay. Actually, the glide pitch parameter (GLD) is patched to the LFO running in the Setup. The LFO causes the GLD to glide between -14c and -7 cents. If you move the GLD parameter (in Effect Edit) to -21c, the preset becomes raunchy sounding on “beefy” guitars. 5-6 The Presets P204 DM: Rev/Comp EA:707:”U”Chamber EB:901:EZ Comp2:1 This preset utilizes a chamber preset on the left input and a compressor preset on the right input. Typically, EZ Comp2:1 should be used at a patch point on the console. If used on an effect send, make sure the fader sends are pre-fade, or a phase error will occur between the fader signal and the return to the console. MchA EA:707 “U” Chamber This preset is shaped liked an upside down “U” with the speaker on top of the wall, and a microphone on either side of the wall. MchB EB:901 EZ Comp 2:1 An “easy” preset to add to an overall stereo mix or mono or stereo submix. You might need to adjust Threshold to make it work for the particular signal you feed it. Release is set to gently (2:1) fall away after 363ms. P205 DM: Dly/Dly EA:609: Chorus EB:612: Chorus+EKOz Think of this preset as the chorus preset for mono sources. Left input feeds Machine A; right feeds Machine B. Both effects have their flange glides attached to the Setup LFO. The LFO is set to 1.38Hz with a sine waveform. MchA EA:609 Chorus The Chorus preset makes use of a small variation in the glide delay to modulate the sound. The glide moves between 9.7ms and 11.8ms. Advancing the LFO to values near 1.50Hz to 2.0 Hz, yields a nice chorusing effect. There are no other delay lines, but the output lines are channel-swapped such that the left input passes to the right output and vice-versa. In a Dual Mono Setup, this is ,of course, inaudible. MchB EB:612 Chorus+EKOz Chorus+EKOz makes use of the flange gliding delay (via the Setup LFO) and several longer recurring echoes. P206 DM: *Dly/Pch EA:601: *Dual Delays EB:804: Sky Down This preset incorporates a Setup Soft knob patch to the effect in Machine A (*Dual Delays). Paging up one page will activate the Soft knob as a multi-parameter controller. In this Setup, going to this location in Setup Select mode will change the stereo delay parameter in preset 601 which is loaded into Machine A (left input). Machine B (right input) loads a pitch shift program. MchA EA:601 *Dual Delays Baseline effect with the Soft knob patched to the last two delay lines in the signal path. Advancing the Soft knob will cause the two post-delays to move in sync out to almost 3000ms. MchB EB:804 Sky Down This preset tunnels downward due to the liberal amount of delay feedback. If the effect is too heavy, lower the Feedback value. This preset has no Mod Edit patches. P207 DM: Dly/Comp EA:602 Space Delays EB:902 DrumComp3:1 This preset presents a delay preset to the left effect input/output, and a Drum compressor preset to the right effect input/ output. MchA EA:602 Space Delays This preset incorporates a bit of left-right diffused delay, along with some small delay offset between left and right delay outputs. If the effect is too strong, try lowering feedback levels for delays 3 and 4. MchB EB:902 DrumComp 3:1 This is a bit more aggressive, with 7dB of boost below the selected threshold. A quick release of 58ms snaps up the volume. As with all compressor presets, Threshold is the critical parameter. 5-7 300 V 3.0 Owner's Manual P208 DM: *Pch/Pch EA:803 *Up Shift Lexicon EB:806 Echo Down A true Dual-Mono pitch preset. Going to the Soft knob parameter location (in Setup Select mode) will enable you to advance the delay parameter in the Machine A effect. MchA EA:803 *Up Shift Up Shift is a sweet sounding microshift up +7cents. There is a slight “chorus edge” due to a modest amount feedback around a 0ms delay line. The Soft knob controls the delay line length. MchB EP:806 Echo Down 14 cents down with a 258ms recirculating delay line. This effect works great either before or after a Reverb preset (in a Cascade Setup). P209 DM: Pch/Comp EA:810 Vocal Shift EB:902 DrumComp3:1 Send a vocal track into the left input and send a mono prefade drum premix into the right input. MchA EA:810 Vocal Shift This preset combines a short delay line recirculating around a -7 cent pitch shifter. MchB EB:902 DrumComp 3:1 This is a bit more agressive, with 7dB of boost below the selected threshold. A quick release of 58ms snaps up the volume. As with all compressor presets, Threshold is the critical parameter. P210 DM: Comp/Comp EA:901 EZ Comp EB:902 DrumComp 3:1 This is a true “Dual Mono” Setup. Any audio (analog or digital) should be sent pre-fade or inserted in a patch point. MchA EA:901 EZ Comp 2:1 A nice preset to add to an overall mix. You may need to adjust Threshold to make it work for the particular signal you’re feeding it. The release parameter is set to gently fall away after 363ms. MchB EB:902 DrumComp 3:1 This is a bit more agressive, with 7dB of boost below the selected threshold. A quick release of 58ms snaps up the volume. As with all compressor presets, Threshold is the critical parameter. P211 DM:Slow Spin EA:607 LFO:FazeDlys EB:609 Chorus The LFO is set to 0.90Hz with a Triangle waveform, and is attached to both Machine Flange Glide Delays. Turning the LFO faster will speed things up, but may cause Machine A to pitch too heavily. This preset can be used with either mono or stereo sources, but discrete echoes will appear at the left output. MchA EP:607 LFO:FazeDlys Faze Dlys makes use of the LFO to the Flange Glide Delay (FDLY). The base delays are set in different time domains: one side at 1.9ms with a feedforward gain; the other at 5.6 with a negative feed gain. As the Glide passes over each base delay, the phase of each gain is changed. In between, the output is a mixture of each. A great effect on a ripping guitar solo. MchB EP609 Chorus This preset makes use of a small variation in the glide delay to modulate the sound. The glide moves between 9.7ms and 11.8ms. Advancing the LFO to values near 1.50Hz to 2.0 Hz yields a nice chorusing effect. There are no other delay lines, but the output lines are channel-swapped such that the left input passes to the right output and viceversa. In a Dual Mono Setup, this is ,of course, inaudible. 5-8 The Presets P212 DM:WideFlang EA:605 OverTheTop1 EB:606 OverTheTop2 This preset can be used with either two mono sources, or one stereo source. One channel glides with a positive resonance, the other flanges with a negative resonance. This preset sounds really awesome with a pre-fade mono send going to each input. The LFO, which is set to 0.22Hz with a triangle waveform, determines the speed of the flange glides in each Machine. MchA EP:605 OverTheTop1 This preset should be used pretty much through the box, i.e. send it a pre-fader signal, then mix only the returns. The Flange Delay is patched to the LFO. When properly modulated, the flange delay glides between 9.5ms and 18ms. The base delays are set to 10ms with a positive feedback gain. Over the top cancellation occurs as the glide delay passes over the 10ms base delay.!Remember, the LFO lives in the Setup domain, so if you load the effect into a setup where there is no LFO activity, the preset will sound “hollow” and resonant! MchB EP:606 OverTheTop2 Similar to OverTheTop1, except the flange delay glides between .08 ms and 10.7ms. This flange delay is patched to the LFO. The base delays are set to 10ms, with a negative amplifier gain. Over the top cancellation occurs as the glide delay passes over the 10ms base delay. The channel outputs are reversed such that the left input will pass through to the right output and vice-versa.!Remember, the LFO lives in the Setup domain, so if you load the effect into a setup where there is no LFO activity, the preset will sound “hollow” and resonant! P213 DM:X-Traffic EA:612 Chorus+EKOz EB: *Sky Delays This preset has cross panning (ABAL and BBAL) patched between the source inputs of each Machine. That is, the left input signal will pan between Machine A and Machine B; the right input will do the same thing in the other direction. One idea might be to take a pair of related tracks (say a couple of different sounding keyboards) and cross pan them between Machine inputs. The rate of the pan is set by the LFO. Remember, the LFO (set to 0.14Hz with a triangle waveform) is also patched to the flange glides in both Machine A and Machine B. MchA EA:612 Chorus+EKOz Chorus+EKOz makes use of the flange gliding delay and several recurring echoes. MchB EB:610 *Sky Delays This preset combines a bit of giding delay along with all sets of delays. Delays 1 and 2 are set short with feedback and “tuned” diffusion gains. Delays 3 and 4 are also set short and crossfeed into 2 and 1, respectively. The is a small amount of post delay (LDLY and RDLY), and these two post echoes are patched to the Soft knob. Use the Soft knob parameter to adjust post delays to match the tempo. By itself, *Sky Delays is sort of a chorused cluster echo — very similar to a bright resonant small room. Beautiful effect on stacked vocals. P214 DM:*GearUp EA:803 *Up Shift EB:805 Env*EKOShift This preset has both Machines linked to the Soft knob value location. As you advance the Soft knob parameter, the delay line lengths will get progressively longer. MchA EP:803 *Up Shift A sweet sounding microshift up +7cents. There is a slight “chorus edge” due to a modest amount feedback around a 0ms delay line. The Soft knob controls the delay line length. MchB EP:805 Env*EKOShift The Soft knob parameter controls the delay line length, and the L-Meter is negatively patched to the feedback (FBK) parameter, such that when signal is present, delay feedback is reduced; when the signal disappears, feedback is increased. This is a very interesting effect when the echo fits the beat of the music. 5-9 300 V 3.0 Owner's Manual Lexicon P215 DM:TwoRooms EA:P715 Joe’s Garage EB:P709 Basement Garage band and Basement band. Use with Dual Mono sources and place behind the source. MchA EA:715 Joe’s Garage Two bays, no waiting. Small and bright. MchB EP:709 Basement Tight and short. Size is 15.8 meters, and the tonality is fairly resonant sounding. Almost trashysounding (low diffusion), and will certainly get so if the Rt is made longer. P216 DM:TwoHalls EA:720 Recital Hall EB:710 Big Hall Two mono halls (left to left, and right to right). Try reversing the returns relative to the sources at the console for a different effect. MchA voice. EA:720 Recital Hall This medium large (44.5M) space opens sound sources beautifully. Made for string pads and MchB EP:710 Big Hall Big and open sounding. The 44ms of predelay help to separate the stage from the seating area. Real good sounding on ballad vocals. P217 DM:*Verbs EA:717 *Drum Rooms EB:711 *Great Room Advancing the Soft knob parameter will change the characteristics of each Machine preset as described below... MchA EP:717 *Drum Rooms Deep and narrow in shape. The Soft knob parameter makes the room “shallower” and gated sounding. MchB EP:711 *Great Room The Soft knob parameter advances Predelay and Spread to open the room up nearly to hall proportions. Bass multiply (BASS) is set to 2.0X to round out the bottom end. P218 DM:*RevPan EA:707 “U”Chamber EB:708 *’L’Chamber This preset has two Setup Edit parameters patched to the LFO; ABAL and BBAL. Sources going into Machine A and B will cross pan between them, as in X-Traffic. The LFO is set to 0.06Hz with a triangle waveform. MchA EA:707 “U” Chamber This preset is shaped liked an upside down “U” with the speaker on top of the wall and a microphone on either side of the wall. MchB EP:708 *“L” Chamber “L” Chamber mimics the shape of a chamber shaped like that letter. A little bigger than the “U” chamber. Reverb time is patched to the Soft knob parameter. P219 DM:Up&Down EA:807 HalfStepsUp EB:808 HalfStepsDn Left to Machine A and right to Machine B. Diabolical and horrifying sounding. MchA EA:807 HalfStepsUp Just what you think... MchB EB:808 HalfStepsDn(down) Ditto... 5-10 The Presets P220 DM:MyGuitar EA:802 Guit Shift EB:614 Env:Peak Great stuff for either a mono or stereo guitar. Machine B should get a very strong, if not a total, pre-fade signal. MchA EA:802 Guitar Shift This preset offers a moderate amount of micropitch shift(-14c), along with a small amount of recirculating predelay. Raunchy sounding on beefy” guitars. MchB EB:614 Env:Peak This preset is similar to an OverTheTop type of effect, except the flange delay is patched to the meter balistics. Depending on the dynamics of your guitar playing, you may wish to adjust the scaling parameter which is found in the Mod Edit patch. P221 DM:EnvSpooge EA:614 Env:Peak EB:608 Env:Phazer This preset uses two effects which have meter ballistics patched to the flange glide delays, with a twist: the Machine A Mod Edit patch gets its modulation information from the R-meter; the Machine B flange glide Mod patch is specified to modulate from the ballistics of the L-meter. One input modulates the other — A T-shirt to the engineer who gets the most creative. MchA EP:614 Env:Peak This preset is similar to an OverTheTop type effect except the flange delay is patched to meter ballistics. Some modification of the scaling parameter in the Mod Edit patch may be nessessary to suit Machine B ballistics. MchB EP:608 Env:Phazer This preset makes use of a patch between the L-Meter and the flange glide delay. As signal becomes stronger, the glide delay drops in the time domain, eventually crossing the 5.2ms base delays. As audio signal strength lessens, the glide returns to its preset value of 10ms. Very good on vocals. To make this effect work properly, be sure to drive the 300 to within 12dB of full scale (dBfs). Remember, in this setup the effects are reversed from the meter ballistics which drive them. Good Luck!!! P222 DM:Flng&Dlys EA:615 Negative Flang EB:602 Space Dlys This is a true Dual Mono Setup. The Setup LFO is set to 0.6Hz with a triangle waveform. It drives the flange glide delay (FDLY) in Machine A. MchA EA:615 NegativeFlng This is a really stiff flange which goes almost 20ms deep. Flange gain is set extremely negative, so the sound is tunnel-like. MchB EB:602 Space Delays This preset incorporates a bit of multi-diffused delays along with some small delay offsets between the post delay outputs. If the effect is too strong, try lowering feedback levels for delays 3 and 4. You may hear a kind of resonant “tuning” to the return signal. This is because the flange delay has gain (LFLG and RFLG) in the circuit, but it is not patched to the LFO. It just stays in its preset location at 8.6ms. If you want to change the “tuning,” adjust flange glide (FDLY) in Effect Edit mode to another value. P223 DM:*Dly Daze EA:604*3VoiceDlys EB:603*PingoPongo The Soft knob parameter affects the delay spacing in both Machine effect presets. Increasing the Soft knob parameter value will make each delay effect longer and longer; decreasing it will make each delay effect shorter. The Soft knob value is set to 12 when the setup is selected. MchA EA:604 *3Voice Dlys Two taps (Delays 3 and 4 ) are set with delay ratios of 1:2, meaning that, when one is 200ms, the other is 400ms, or when one is 359, the other is 718ms. This relationship is patched to the Soft knob parameter in Setup Select mode. MchB EB:603 *Pingo Pongo Ping - Pong delays bouncing back and forth. The Soft knob controls the timing of the bounce. 5-11 300 V 3.0 Owner's Manual P224 DM:Clusters EA:612 Chorus+EKOz Lexicon EB:604 *3Voice Dlys This preset is intended for “dual-mono” use. The LFO is set to a Triangle shape moving at 2.50Hz. The Soft knob changes the spacing of the delays in Machine B. The Soft knob value is set to 20 when the setup is selected. This means that the Soft knob can go down from its preset value if the application warrants it. MchA EP:612 Chorus+EKOz Chorus+EKOz makes use of the flange gliding delay and several recurring echoes. MchB EP:604 *3Voice Dlys Two taps (Delays 3 and 4 ) are set with delay ratios of 1:2, meaning that, when one is 200ms, the other is 400ms, or when one is 359, the other is 718ms. This relationship is patched to the Soft knob parameter in Setup Select mode. P225 DM:2 Flanges EA:606 OverTheTop2 EB:804 Sky Down Two dual mono flange effects. This preset can work nicely with the same signal going to both Machines. MchA EA:606 OverTheTop2 Similar to OverTheTop1, except the flange delay glides between 0.08 ms and 10.7ms. This flange delay is patched to the LFO. The base delays are set to 10ms with a negative amplifier gain. MchB EB:804 Sky Down This preset tunnels downward due to the liberal amount of delay feedback. If the effect is too heavy, lower the feedback amount. Cascade Setups and Their Effects P301 CC:Rev ->*Dly EA:701 Chamber EB:601*Dual Delays This preset passes a reverb efffect into a delay effect with a delay Soft knob patch. As the Soft knob parameter is advanced, the reverb will be delayed. If you modify the BMIX to some value less than its full wet preset value, an interesting pre-echo effect will occur. MchA EA:701 Chamber A great general purpose reverb tail. Size is set to 28.1M (the largest value is 64M), so the density is rather close in. As you adjust Size, Rt will also change. If you want to unlink this natural phoenomena, set LINK to unlinl (on Page Two). MchB EB:601 *Dual Delays Baseline effect with the Soft knob parameter patched to the last two delay lines in the signal path. Advancing the Soft knob parameter will cause the two post-delays to move in sync out to more than 2200ms. P302 CC:*Dly ->*Rev EA:601 *Dual Delays EB:714 *Joe’s B&G Advance the Soft knob parameter, and the Machine A effect gets longer, and the reverb effect gets bigger. If you modify BMIX, after advancing the Soft knob parameter, an even more distant echo effect can occur. Yeah, go ahead, give it a try!!!! MchA EA:601 *Dual Delays Baseline effect with the Soft knob patched to the last two delay lines in the signal path. Advancing the Soft knob parameter will cause the two post-delays to move in sync out to almost 3000ms. MchB EB:714 *Joe’s B&G- Live performances in Joe’s 14.6M bar. Turn the Soft knob and the room size grows into a Bar and Grill. 5-12 The Presets P303 CC:Rev->Pch EA:707 “U”Chamber EB:802 Guit Shift This preset runs 70% of a reverb effect into a pitch shift program. The remaining 30% of the reverb effect bypasses the pitch shifter, and appears at the stereo output. Modify BMIX to some lesser value if you want to bypass some of the reverb around the pitch shifter. If BMIX is set to all wet, the reverb will be mono (because the algorithm is mono in-mono out). Mcha EA:707 “U” Chamber This preset is shaped liked an upside down “U” with the speaker on top of the wall and a microphone on either side of the wall. MchB EB:802 Guitar Shift This preset offers a moderate amount of micropitch shift(-14c), along with a small amount of recirculating predelay. In this preset, it’s more like a reverb pitch-shift. P304 CC:Pch->Rev EA:804 Sky Down EB:703 Drum Chamber This Setup links a tunneling-downward pitch program into a great sounding reverb. Play around with BMIX for a different kind of effect. MchA EA:804 Sky Down This preset tunnels downward due to the liberal amount of delay feedback. If the effect is too heavy, lower the feedback amount. MchB EB:703 Drum Chamber Good starting point for acoustic drums. This preset is slightly larger than the standard chamber, but has less Diffusion. Rt is set to 1.0 second at mid frequencies. P305 CC:Rev->Comp EA:705 Guitar Room EB:901 EZ Comp 2:1 This preset changes the dynamics of the Guitar Room effect preset. If you play around with the compressor preset, you can, no doubt, get some strange effects. MchA EA:705 Guitar Room This is a big, wide-sounding room for your guitars. For heavy rock stuff, consider panning “in” the returns. The room is a little bottom heavy for additional warmth. MchB EB:901 EZ Comp 2:1 A nice preset to add to an overall mix. You may need to adjust Threshold to make it work for the particular signal you’re feeding it. Release is set to gently fall away after 363ms. P306 CC:Comp->Rev EA:902 Drum Comp 3:1 EB:709 Basement Squash it up a little before they (the drums) go into the Basement. MchA EA:902 DrumComp 3:1 This is a bit more aggressive, with 7dB of boost below the selected threshold. A quick release of 58ms snaps up the volume. As with all compressor presets, Threshold is the critical parameter. MchB EB:709 Basement Tight and short. Room size 15.8 meters, and the tonality is fairly resonant sounding. Almost trashy-sounding (low diffusion), and will certainly get so if the Rt is made longer. 5-13 300 V 3.0 Owner's Manual Lexicon P307 CC:Dly->Pch EA:609 Chorus EB:801 Mono Shift This preset combines a stereo chorus passing into a mono shift program. Go to Machine B Effect Edit and modify the Glide Pitch (GLD) parameter. If you want to open the stereo chorus effect, reduce BMIX so that some of the Chorus program passes by the Mono Shift program. The LFO is set moderatly fast, to 2.14Hz, with a Triangle shape. MchA EA:609 Chorus This preset makes use of a small variation in the glide delay to modulate the sound. The glide moves between 9.7ms and 11.8ms. Advancing the LFO to values near 1.50Hz to 2.0 Hz yields a nice chorusing effect. There are no other delay lines, but the output lines are channel-swapped such that the left input passes to the right output, and viceversa. (In a Dual Mono Setup, of course, this is inaudible.) MchB EB:801 Mono Shift Baseline mono shift program with no pitch shift. Go to the glide parameter (GLD) in Effect Edit mode to select the amount of pitch shifting you want. P308 CC:Pch->*Dly EA:810 Vocal Shift EB:603 *PingoPongo This is a very interesting detuned left/right delay effect. The Soft knob parameter controls the timing of the bouncing delays. The stored value of the Soft knob parameter is 16. MchA EA:810 Vocal Shift This preset combines a short delay line recirculating around a -7 cent pitch shifter. MchB EB:603 *Pingo Pongo Ping Pong delays bouncing back and forth. The Soft knob controls the timing of the bounce. P309 CC:*Dly->Comp EA:604 *3Voice Dly EB:901 EZ Comp 2:1 The Soft knob controls the timing relationships of the delay settings in the Machine A effect. The Soft knob parameter is stored with a value of 31. MchA EA:604 *3Voice Dlys Two taps (Delays 3 and 4 ) are set with delay ratios of 1:2, meaning that, when one is 200ms, the other is 400ms, or when one is 359, the other is 718ms. This relationship is patched to the Soft knob in Setup Select. MchB EB:901 EZ Comp 2:1 A nice preset to add to an overall mix. You may need to adjust the Threshold parameter to make it work for the particular signal you’re feeding it. Release is set to gently fall away after 363ms. P310 CC:Comp->*Dly EA:901 EZ Comp 2:1 EB:613*Wall Slaps This effect places a soft compressor ahead of Machine B, which is running a delay program. The Soft knob value is set to 20 when the setup is selected. MchA EA:901 EZ Comp 2:1 A “soft” preset to add to an overall mix. You may need to adjust the Threshold parameter to make it work for the particular signal you’re feeding it. Release is set to gently fall away after 363ms. MchB 5-14 EB:613*Wall Slaps Walls tied to the Soft knob move outward. A small amount of diffusion to smear the attack. The Presets P311 CC:Pch->Comp EA:802 Guit Shift EB:901 EZ Comp 2:1 This preset combines a guitar shift effect going into an “easy” compressor effect. The LFO controls the Glide Shift parameter (GLD) in Machine A. The LFO rate is set to 0.16Hz with a sine waveform. MchA EA:802 Guitar Shift This preset offers a heavy amount of micropitch shift (-21c), along with a small amount of recirculating predelay. Raunchy sounding on “beefy” guitars. MchB EB:901 EZ Comp 2:1 A nice preset to add to an overall mix. You may need to adjust the Threshold parameter to make it work for the particular signal you’re feeding it. Release is set to gently fall away after 363ms. If you’re using this with a guitar, you might want to grab the SLP (slope) control and increase the value. P312 CC:*SurrVerb EA:720 Recital Hall EB:010 *Small St. Adj Machine B (Small Stereo Adjust) has three Soft knob patches which control the spacial placement of the source audio — in this case, the output of the reverb effect. In a surround mixing environment, advancing the Soft knob parameter will place more of the reverb into the surround channel — assuming the returns of the 300 are panned hard left and right at the console. MchA voice. EA:720 Recital Hall This medium large (44.5M) space opens sound sources beautifully. Made for string pads and MchB EB:010 *Small St.Adj This preset is a cut down version of the larger Stereo Adjust program available in Single Setups. This particular preset has the Soft knob patched to three parameters: Spatial EQ (SPEQ), Bass Left (BASL), and Bass Right (BASR) boosts and cuts. P313 CC:*V3Comp EA:010 *Small St Adj EB:901 EZ Comp 2:1 This is a straight ahead stereo compressor setup. Use it in a mix insert point or pre-fade send. MchA EA:010 *Small St.Adj This preset is a cut down version of the larger Stereo Adjust program available in Single Setups. This particular preset has the Soft knob patched to three parameters: Spatial EQ (SPEQ), Bass Left (BASL), and Bass Right (BASR) boosts and cuts. MchB EB:901 EZ Comp 2:1 A soft and easy preset to add to an overall mix. You may need to adjust the Threshold parameter to make it work for the particular signal you’re feeding it. Release is set to gently fall away after 363ms. P314 CC:V3Chamber EA:701 Chamber EB:001 PONS+Dither This preset is a reverb ahead of the dither program. The reverb is essentially untouched as it passes through Machine B. Remember, the chamber algorithm is actually mono in, stereo out. MchA EA:701 Chamber A great general purpose reverb tail. Size is set to 28.1M (the largest value is 64M), so the density is rather close in. As you adjust Size, Rt will also change. If you want to unlink this natural phoenomena, set LINK to Unlink (on Page Two). MchB EB:001PONS / Dither This preset has dither turned on and set to PONS (Psycoacoustically Optimized Noise Shaping), with level of 32. Experiments have shown this to be an optimum starting level of dither. 5-15 300 V 3.0 Owner's Manual P315 CC:*SpaceOut EA:711 *Great Room Lexicon EB:604 *3Voice Dlys This preset loads two effects, both of which have Soft knob parameterpatches. The Soft knob parameter has a Setup value of 18. AMIX is set to 37%, so that much of the dry signal bypasses the reverb preset and passes through to the delay effect. If you want to increase the amount of reverb going into the delay effect, locate the AMIX Setup parameter and increase it. MchA EA:711 *Great Room The Soft knob parameter advances Predelay and Spread to open the room up nearly to hall proportions. Bass multiply (BASS) is set to 2.0X to round out the bottom end. MchB EB:604 *3Voice Dlys Two taps (Delays 3 and 4 ) are set with delay ratios of 1:2, meaning that, when one is 200ms, the other is 400ms, or when one is 359, the other is 718ms. This relationship is patched to the Soft knob parameter in Setup Select mode. P316 CC:*JetVerb EA:712 *Great Hall EB:616 NegativeFlng Take off!!! The long reverb in Machine A (which can be made longer by advancing the Soft knob parameter) passes into a flange driven by 0.14Hz triangle LFO. MchA EA:712 *Great Hall The largest room size yet at 64meters. Similar to Great Room, with Spread and Predelay patched to the Soft knob, with the addition of reverb time also patched. Dig Deep!! MchB EB:616 NegativeFlng This is a really stiff flange which goes almost 20ms deep. Flange gain is set extremely negative, so the sound is tunnel-like. P317 CC:BigBricks EA:713 Big Bricks EB:902 Drum Comp 3:1 This Setup really enunciates the Big Bricks preset. 100% of the reverb in Machine A preset feeds into the compressor in Machine B. MchA EA:713 Big Bricks Real “ratchety” sounding effect. Powerful for non-linear applications. MchB EB:902 DrumComp 3:1 This preset amplifies Big Bricks, with 7dB of boost below the selected Threshold. A quick release of 58ms snaps up the volume. As with all compressor presets, Threshold is the critical parameter. P318 CC:Rev->EKOz EA:710 Big Hall EB:612 Chorus+EKOz This is a beautiful long lasting effect. Half (50% AMIX) of the input signal passes around Big Hall and feeds directly to the Chorus and EKOz effect in Machine B. If you need a pristine effect for a pristine track, this is it!! The LFO is set moderately high with a rate of 2.92Hz (sine wave). You may want to slow it down if the glide is too much. MchA EA:710 Big Hall Big and open sounding. The 44ms of Predelay helps to separate the stage from the seating area. Real good sounding on ballad vocals. MchB EB:612 Chorus+EKOz Chorus+EKOz makes use of the flange gliding delay under the control of the Setup LFO plus several recurring long echoes. 5-16 The Presets P319 CC:Rev->Korus EA:706 Big & Short EB:609 Chorus This Setup is a variation of the one above, except that it’s a shorter “close in” effect. There is also a different twist to this Setup preset — L-Meter ballistics are patched to the AMIX Setup parameter. As the signal becomes stronger, AMIX becomes progressively dryer, allowing more of the input signal to pass directly into the chorus effect. The LFO is set to 1.98Hz with a triangle waveform. It controls the speed of the Glide in Machine B. MchA EA:706 Big & Short This reverb effect is short, almost gated. Big room size set to 54.6M, and Rt set to 0.3 seconds. This preset really “opens up a sparse track. MchB EB:609 Chorus This preset makes use of a small variation in the glide delay to modulate the sound. The glide moves between 9.7ms and 11.8ms. Advancing the LFO to values near 1.50Hz to 2.0 Hz yields a nice chorusing effect. There are no other delay lines, but the output lines are channel-swapped such that the left input passes to the right output, and vice-versa. P320 CC:Over!Top EA:605 OverTheTop1 EB:606 OverTheTop2 Use pre-fade. One flanger feeds the next. Very heavy duty. The input gain to the Setup is set to -4dB. This is to compensate for the heavy amount of flange gain in both Machines. Since the LFO is in the setup domain, it drives both flange glide delays in each Machine. !Remember the outputs of OverThe Top2 are reversed, so don’t drive yourself crazy trying to find reversed patch cords! MchA EA:605 OverTheTop1 This preset should be used pretty much through the box, i.e. patched to the LFO. When properly modulated, the flange delay glides between 9.5ms and 18.7ms. The base delays are set to 10ms with a positive feedback gain. Over the top cancellation occurs as the glide delay passes over the 10ms base delay. MchB EB:606 OverTheTop2 Similar to OverTheTop1, except the flange delay glides between 0.08 ms and 10.7ms. This flange delay is patched to the LFO. Base delays are set to 10ms with a negative amplifier gain. Over the top cancellation occurs as the glide delay passes over the 10ms base delay. The channel outputs are reversed such that the left input will pass through to the right output and vice-versa. P321 CC:GuitarXP EA:611 LFO:Pan&Faze EB:607 LFO:Faze Dlys GuitarXP incorporates a left/right panning effect in Machine A into a modulating glide effect with added delays. The LFO (set to 0.20Hz with a triangle waveform) ties it all together. Here’re some suggestions: add some extra LDLY (Left delay) and RDLY (Right delay) to Machine B in Effect Edit. Go back to Setup Edit,and reduce BMIX to less than the preset 100% — say, to something like 45%, find the Cascade feedback parameter and add a small amount of feedback gain, either positive or negative, then store it all in a Setup Register. MchA EA:611 LFO:Pan&Faze This cool wavy preset should be run pre-fader with the Setup LFO at about .20Hz. With a mono or stereosignal attached to both inputs, the acoustic effect is a slow rotation in phase. Thank goodness for CD’s. No record cutting lathe could handle this one. Clean compressed guitars are the best here. MchB EB:607 LFO:FazeDlys Faze Dlys makes use of the LFO patched to the Flange Glide Delay(FDLY). The base delays are set in different time domains: one side at 1.9ms with a feedforward gain; the other at 5.6 with a negative feed gain. As the Glide passes over each base delay, the phase of each gain is changed. In between, the output is a mixture of each. A great effect on a ripping guitar solo. 5-17 300 V 3.0 Owner's Manual Lexicon P322 CC:*EKO->Faze EA:805 Env*EKOShift EB:608 Env:Phazer This pitch into Gliding delay Setup is great for the “rockers”. Use the Soft knob parameter to set the timing of the echoes in Machine A. MchA EA:805 Env*EKOShift The Soft knob paramter controls the delay line length, and the L-Meter is negatively patched to the feedback (FBK) parameter so that, when signal is present, delay feedback is reduced; when the signal disappears, feedback is increased. This is a very interesting effect when the echo fits the beat of the music. MchB EB:608 Env:Phazer This preset makes use of a patch between the envelope detector in the meters and the flange glide delay. As signal becomes stronger, the glide delay drops in the time domain, eventually crossing the 5.2ms base delays. As audio signal strength lessens, the glide returns to its preset value of 10ms. Very good on vocals. To make this effect work properly, be sure to drive the 300 to within 12dB of full scale (dBfs). P323 CC: Verb->Down EA:720 Recital Hall EB:806 Echo Down This cascade preset has the net effect of a stereo reverb field followed by delayed mono pitch shift which recirculates downward... in pitch. BMIX is set with a relatively low value of 38%. This means that most of the effect at the main output is the reverb effect from Machine A. If you increase BMIX, more of the reverb will pass directly into the mono shift program. Bear in mind, this will cause the reverb to become more mono. MchA voice. EA:720 Recital Hall This medium large (44.5M) space opens sound sources beautifully. Made for string pads and MchB EB:806 Echo Down 14 cents down with a 258ms recirculating delay line. In this setup, the reverb echoes downward in pitch into the middle of the mix field ...Very Interesting. P324 CC:*The Sky EA:804 Sky Down EB:610 *Sky Delays This setup’s got a little bit of everything. A downward flanging pitch shifter cascading into a dual delay preset with many recirculating delay clusters. The Soft knob parameter is patched to the left and right delays (LDLY and RDLY). This Setup also incorporates cascade feedback set to -36%. Don’t try to add too much more, you might take off your head. This is definitely a WOWIEE!!- ZOWIEEE!!! effect. The Soft knob parameter, which is stored with a value of 28, is patched to LDLY and RDLY in Machine B. MchA EA:804 Sky Down This preset tunnels downward due to the liberal amount of delay feedback. If the effect is too heavy, lower the feedback. MchB EB:610 *Sky Delays This preset combines a bit of giding delay along with all sets of delays. Delays 1 and 2 are set short with feedback and “tuned” diffusion gains. Delays 3 and 4 are also set short and crossfeed into 2 and 1, respectively. There is a small amount of post delay (LDLY and RDLY), and these two post echoes are patched to the Soft knob. Use the Soft knob parameter to adjust the post delays to match the tempo. By itself, *Sky Delays is sort of a chorused cluster echo. Very similar to a bright resonant small room. Beautiful effect on stacked vocals. If you use this preset in a Cascade setup which has a small amount of Machine B feedback, the chorus will trail itself upand down in pitch. A very interesting twist. !Be CAREFUL. Do not use too much feedback ,as a runnaway feedback situaton may occur. 5-18 The Presets P325 CC:Spinola EA:609Chorus EB:011Panola This is a sort of "retro" sounding audio effect. The Chorus preset passes into the fast panning Panola effect. Mix post-fader. Kind of like a rotating speaker — only different. The LFO is set to 8.00Hz, with a sine waveform. MchA EA:609Chorus This preset makes use of a small variation in the glide delay to modulate the sound. The glide moves between 9.7 and 11.8ms. If the LFO is advanced to values near 1.50Hz to 2.0Hz, a nice chorusing effect is achieved. There are no other delay lines, but the output lines are channel swapped such that the left input passes to the right output and vice-versa. MchB EB:011Panola This preset is a stereo adjust program with the Balance set to full left. The Balance parameter is patched to the LFO. If loaded into a Setup which has the LFO running, Panola will cause the audio to move between the left and right speakers. 5-19 300 V 3.0 Owner's Manual Lexicon Split Setup Effect Descriptions EP # For your reference, all of the presets effects available in the split mode are listed and described below, in numerical order. Name Algorithm 601 *Dual Delays Dual Delays Baseline effect with the Soft knob patched to the last two delay lines in the signal path. Advancing the Soft knob parameter will cause the two post-delays to move in sync out to more than 2200ms. 602 Space Delays Dual Delays This preset incorporates a bit of left-right diffused delay along with some small delay offset between left and right delay outputs. If the effect is too strong you could try turning back the feedback levels for Delays 3 and 4. 603 *Pingo Pongo Dual Delays Ping - Pong delays bouncing back and forth. The Soft knob parameter controls the timing of the bounce. 604 *3Voice Dlys Dual Delays Two taps (Delay 3 and 4 ) are set with delay ratios of 1:2 — meaning when one is 200ms the other is 400ms, or when one is 359 the other is 718ms. This relationship is patched to the Soft knob. 605 OverTheTop1 Dual Delays This preset should be used pretty much through the box, i.e. send it a pre-fader signal then mix only the returns. Flange Delay is patched to the LFO. When properly modulated, the flange delay glides between 9.5 and 18.7ms. The base delays are set to 10ms with a positive feedback gain. Over the top cancellation occurs as the glide delay passes over the 10ms base delay. Remember, the LFO is part of the Setup, so if you load the effect into a Setup where there is no LFO activity, the preset will sound “hollow” and resonant! 606 OverTheTop2 Dual Delays Similar to OverTheTop1 except the flange delay glides between 0.08 and 10.7ms. Flange Delay is patched to the LFO. The base delays are set to 10ms with a negative amplifier gain. Over the top cancellation occurs as the glide delay passes over the 10ms base delay. The channel outputs are reversed such that the left input will pass through to the right output and vice-versa. Remember, the LFO is part of the Setup, so if you load the effect into a Setup where there is no LFO activity, the preset will sound “hollow” and resonant! 607 LFO:FazeDlys Dual Delays Faze Dlys also makes use of the LFO again to the Flange Glide Delay (FGLD). The base delays are set in different time domains; one side at 1.9ms with a feedforward gain and the other at 5.6 with a negative feed gain. As the glide passes over each base delay the phase of each gain is changed and in between the output is a mixture of each. A great effect on a ripping guitar solo. 608 Env:Phazer Dual Delays This preset makes use of a patch between the envelope detector in the meters and the Flange Glide Delay. As signal becomes stronger the glide delay drops in time domain eventually crossing the 5.2 ms base delays. As audio signal strength lessens the glide returns to its preset value of 10ms. Very good on vocals. To make this effect work properly be sure to drive the 300 to within 12dB of full scale (dBfs). 5-20 Description The Presets 609 Chorus Dual Delays This preset makes use of a small variation in the glide delay to modulate the sound. The glide moves between 9.7 and 11.8ms. If the LFO is advanced to values near 1.50Hz to 2.0 Hz, a nice chorusing effect is achieved. There are no other delay lines, but the output lines are channel swapped such that the left input passes to the right output and vice-versa. 610 *Sky Delays Dual Delays This preset combines a bit of giding delay along with all sets of delays. Delays 1 and 2 are set short with feedback and “tuned” diffusion gains. Delays 3 and 4 are also set short and crossfeed into 2 and 1 respectively. There is a small amount of post delay (LDLY and RDLY) and these two post echoes are patched to the Soft knob. Use the Soft knob parameter to adjust the post delays to match the tempo. By itself, *Sky Delays is sort of a chorused cluster echo. Very similar to a bright resonant small room. Beautiful effect on stacked vocals. If you use this preset in a cascade setup which has some small amount of Machine B feedback, the chorus will trail itself upand down in pitch. Very interesting twist. Be careful not to use too much feedback to avoid runaway feedback. 611 LFO:Pan&Faze Dual Delays This cool wavy preset runs pre-fader with the Setup LFO at about 20Hz LFO drifts back and forth with a stereo signal attached to it. With a mono signal attached to both inputs, the acoustic effect is a slow rotation in phase. Thank goodness for CD’s. No record cutting lathe could handle this one. Clean compressed guitars are the best here. 612 Chorus+EKOz Dual Delays This preset makes use of a gliding delay and several reccuring echoes. 613 *Wall Slaps Dual Delays Walls tied to the Soft knob parameter move outward. A small amount of diffusion to smear the attack. 614 Env:Peak Dual Delays This preset is similar to an OverTheTop type effect, except the flange delay is patched to the meter ballistics. 615 NegativeFlng Dual Delays This is a really stiff flange, which goes almost 20ms deep. Flange gain is set extremely negative, so the sound is tunnel-like. 5-21 300 V 3.0 Owner's Manual EP # Lexicon Name Algorithm Description 701 Chamber Split Chamber A great general purpose reverb tail. The size is set to 28.1M (the largest value is 64M) so the density is rather close in. As you adjust size the Rt value will also change. If you want to unlink this natural phenomena, you can set the link value to unlink. 702 Key Chamber Split Chamber A nice “bloomy”-sounding reverb. The diffusion is set midway so there is some good articulation at the begining of the reverb envelope. Use this on most keyboards but those with a strong point may require a bit more diffusion. 703 Drum Chamber Split Chamber Good starting point for acoustic drums. This preset is slightly larger than the standard chamber but has lass diffusion. RT is set to 1.0 second at mid frequencies. 704 Drum Plate Split Chamber Tight and diffuse with all the “ring” you could possibly want. 705 Guitar Room Split Chamber This is a big wide sounding room for your guitars. For the heavy rock stuff you might consider panning “in” the returns. The room is a little bottom heavy for additional warmth. Could also work well on vocals. 706 Big & Short Split Chamber This reverb effect is sort of gated. Big room size set to 54.6 meters and RT set to 0.3 seconds. This preset really “opens up" a sparse track. 707 “U” Chamber Split Chamber This preset is shaped liked an upside down “U” with the speaker on top of the wall and a microphone on either side of the wall. 708 “L” Chamber Split Chamber “L” Chamber mimics the shape of a chamber by that letter. One side is shorter than the other with the speaker closer to one side. A little bigger than the “U” chamber. 709 Basement Split Chamber Tight and short. The room size 15.8 meters and the tonality is fairly resonant sounding. Almost trashy sounding (low diffusion) and will certainly get so if the RT is made longer. 710 Big Hall Split Chamber Big and open sounding. The 44ms of predelay help to separate the stage from the seating area. Real good sounding on ballad vocals. 711 *Great Room Split Chamber The Soft knob parameter advances the Predelay and spreads to open the room up almost to hall proportions. Bass multiply is set to 2.0X to round out the bottom end. 712 *Great Hall Split Chamber The largest room size yet at 64meters. Similar to Great Room with Spread and Predelay patched to the Soft knob with RT also patched. Dig Deep!! 713 Big Bricks Split Chamber Real “ratchety"-sounding effect. Powerful effect for non-line applications. 714 Joe’s B&G Split Chamber Live performances in Joe’s 14.6M Bar. Advance the Soft knob parameter and the room size grows into a Bar and Grill. 715 Joe’s Garage Split Chamber Two bays, no waiting. Small and bright. 716 Sizzle City Split Chamber Small and long type Plate. Very metallic reverb effect Great for cheap cymbals. 5-22 The Presets 717 *Drum Rooms Split Chamber Deep and narrow in shape. The Soft knob parameter makes the room “shallower” and gated-sounding. 718 *BigBathroom Split Chamber Bright and clean. Generic WC. Great for solo stuff. or for adding liveness to a track. Soft knob draws out the Reverb Time. 719 *Delay Room Split Chamber This preset offers a nice room reference. The Soft knob parameter is patched to Predelay. Use this to make a bounce off the back wall effect without changing the Reverb Time. 720 Recital Hall Split Chamber This medium large (44.5M) space opens sound sources beautifully. Made for string pads and voice. Name Algorithm Description 801 Mono Shift Mono Pch Shift Baseline program with no pitch shift. Go to the glide parameter (GLD) in the Effect Edit mode to dial up the amount of pitch shifting you want. 802 Guitar Shift Mono Pch Shift This preset offers a heavy amount of micropitch shift(-21c) along with a small amount of recirculating predelay. Raunchy sounding on the “beefy” guitars. 803 *Up Shift Mono Pch Shift Up Shift is a sweet sounding microshift up +7cents. There is a slight “chorus edge” due to a modest amount feedback around a 0ms delay line. The Soft knob parameter controls the delay line length. 804 Sky Down Mono Pch Shift This preset is tunnels downward due to the liberal amount of delay feedback. If the effect is too heavy, dial back the feedback amount. 805 Env*EKOShift Mono Pch Shift The Soft knob parameter controls the delay line length and the L-Meter is negatively patched to the feedback (FBK) parameter such that when signal is present delay feedback is reduced, but when the signal disappears, the feedback is increased. This is a very interesting effect when the echo fits the beat of the music. 806 Echo Down Mono Pch Shift 14 cents down with a 258ms recirculating delay line. This effect works great either before or after a Reverb preset. 807 HalfStepsUp Mono Pch Shift Just what you would think..... 808 HalfStepsDn Mono Pch Shift Ditto.... 809 Octave Down Mono Pch Shift Sounds good and deep. 810 Vocal Shift Mono Pch Shift This preset combines a short delay line recirculating around a -7 cent pitch shifter. EP # 5-23 300 V 3.0 Owner's Manual EP # Lexicon Name Algorithm Description 901 EZ Comp 2:1 Compressor A nice preset to add to an overall mix. You might need to adjust the threshold parameter to make it work for the particular signal you feed it. The release parameter is set to gently fall away after 363ms. 902 DrumComp 3:1 Compressor This is a bit more agressive with 7dB of boost below average selected threshold. A quick release of 58ms snaps up the volume. As is the case with all compressor presets, the threshold is the critical parameter. EP # Name Algorithm Description PONS / Dither PONS This preset has dither turned on and set to PONS with a level of 32. Experiments have shown this to be an optimum starting level of dither. Name Algorithm Description 010 *Small St.Adj Small Stereo Adj This preset is cut-down version of the larger stereo adjust program in Single Setups. This particular preset has the Soft knob patched to three parameters: Spatial EQ (SPEQ), Bass Left (BASL), and Bass Right (BASR) boosts and cuts. As you advance the Soft knob parameter, the stereo image should move outward, beyond the boundaries of the left and right speakers. 011 Panola Small Stereo Adj This preset is a stereo adjust program with the Balance set to full left. The Balance parameter is patched to the LFO. If loaded into a Setup which has the LFO running, Panola will cause the audio to move between the left and right speakers. 001 EP # 5-24 The Presets Effect Preset Parameters Effect Presets Using the Random Hall Algorithm RTIM 2.0s RLVL full P101 Large Hall SIZE ROLL 37.1M 0.9k TDCY BASS 3.6k 1.2X PDLY 0m XOVR 0.2k RTIM 4.0s RLVL full P104 *Church SIZE ROLL 38.8M 4.0k TDCY BASS 2.9k 1.5X PDLY 36m XOVR 0.9k RTIM 1.3s RLVL full P106 RehursalRoom SIZE ROLL PDLY 15.2M 5.1k 0m TDCY BASS XOVR 4.4k 0.4X 2.4k SPIN 38 DIFF 65 WAND 10.1m LINK link SHAP 120 SHLF -6dB SPRD 157 SIZE 37.1M SPIN 40 DIFF 70 WAND 10.1 LINK link SHAP 82 SHLF off SPRD 226 SIZE 38.8M SPIN 0 DIFF 98 WAND 0u LINK link SHAP 124 SHLF off- SPRD 65 SIZE 15.2M DLY1 14m LVL1 off DLY2 20m LVL2 off RTIM 2.03s RLVL full - DLY1 32m LVL1 -8dB DLY2 26m LVL2 -7dB RTIM 4.0s RLVL full - DLY1 56m LVL1 off DLY2 60m LVL2 off RTIM 1.3s RLVL -4dB - DLY3 40m LVL3 off FBK3 0% - DLY4 48m LVL4 off FBK4 0% - DLY3 374m LVL3 -14dB FBK3 12% - DLY4 462m LVL4 -18dB FBK4 12% - DLY3 0m LVL3 off FBK3 0% - DLY4 0m LVL4 -10dB FBK4 0% - RTIM 1.7s RLVL full P102 Medium Hall SIZE ROLL 29.3M 1.0k TDCY BASS 4.4k 1.2X PDLY 0m XOVR 0.2k SPIN 33 DIFF 68 WAND 8016u LINK link SPRD 97 SIZE 29.3M SHAP 100 SHLF -6dB DLY1 14m LVL1 off DLY2 20m LVL2 off RTIM 1.7s RLVL full - DLY3 40m LVL3 off FBK3 0% - DLY4 48m LVL4 off FBK4 0% - RTIM 1..1S RLVL full P103 Small Hall SIZE ROLL 23.6M 1.3k TDCY BASS 5.5k 1.2X PDLY 0m XOVR 0.2k SPIN 28 DIFF 65 WAND 6762u LINK link SHAP 70 SHLF -6dB SPRD 64 SIZE 23.6M DLY1 8m LVL1 off DLY2 18m LVL2 off RTIM 1.1s RLVL full - DLY3 44m LVL3 off FBK3 0% - DLY4 34m LVL4 off FBK4 0% - MOD EDIT SOURCE: SOFTKNOB DEST SCALE Size -49% TDCY --30% LVL3 -14% LVL4 -10% MOD EDIT SOURCE: SOFTKNOB DEST SCALE PDLY +2.4% SPRD -63% SHAP -24% TDCY +16% RTIM 0.7s RLVL full P105 * Rooms SIZE ROLL 19.1M 6.6k TDCY BASS 3.6k 1.2X PDLY 0m XOVR 0.5k RTIM 1.3s RLVL full P107 *Chamber SIZE ROLL 25.3M 3.4k TDCY BASS 4.4k 1.5X PDLY 2m XOVR 0.4k SPIN 38 DIFF 65 WAND 6258u LINK link SHAP 52 SHLF off SPRD 82 SIZE 19.1M SPIN 34 DIFF 79 WAND 6258u LINK link SHAP 67 SHLF off SPRD 95 SIZE 25.3M DLY1 10m LVL1 -12dB DLY2 20m LVL2 -10dB RTIM 0.7s RLVL full - DLY1 8m LVL1 -7dB DLY2 20m LVL2 -7dB RTIM 1.3s RLVL full - DLY3 40m LVL3 off FBK3 0% - DLY4 48m LVL4 off FBK4 0% - DLY3 40m LVL3 off FBK3 0% - DLY4 48m LVL4 off FBK4 0% - MOD EDIT SOURCE: SOFTKNOB DEST SCALE Size -25% MOD EDIT SOURCE: SOFTKNOB DEST SCALE Size -30% 5-25 300 V 3.0 Owner's Manual Lexicon Effect Presets Using the Random Hall Algorithm, Cont'd. RTIM 1.0s RLVL full P108 LiveDrumRoom SIZE ROLL PDLY 18.6M 8.2k 0m TDCY BASS XOVR 7.5k 0.8X 26.5k RTIM 0.6s RLVL -2dB P110 * Studio B SIZE ROLL 16.9M 5.5k TDCY BASS 4.4k 1.2X PDLY 4m XOVR 1.0k RTIM 2.4s RLVL full P112 *Deep End SIZE ROLL 29.3M 4.0k TDCY BASS 4.4k 2.0X PDLY 20m XOVR 0.5k SPIN 34 DIFF 18 WAND 11348u LINK link SHAP 168 SHLF off- SPRD 11 SIZE 18.6M SPIN 34 DIFF 57 WAND 2562u LINK link SHAP 75 SHLFoff SPRD 87 SIZE 16.9M SPIN 37 DIFF 67 WAND 5922u LINK unlk SHAP 141 SHLF off SPRD 137 SIZE 29.3M DLY1 14m LVL1 off DLY2 20m LVL2 off RTIM 1.0s RLVL full - DLY1 18m LVL1 -10dB DLY2 12m LVL2 -10dB RTIM 0.6s RLVL -2dB - DLY1 76m LVL1 -1dB DLY2 50m LVL2 -2dB RTIM 2.4s RLVL full - DLY3 40m LVL3 off FBK3 0% - DLY4 48m LVL4 off FBK4 0% - DLY3 14m LVL3 off FBK3 0% - DLY4 28m LVL4 off FBK4 0% - DLY3 612m LVL3 -14dB FBK3 18% - DLY4 600m LVL4 -14dB FBK4 18% - MOD EDIT SOURCE: SOFTKNOB DEST SCALE 1 Size -27% 2 Dly3 -19% 3 Dly4 -18% 4 RTIM -41% MOD EDIT SOURCE: SOFTKNOB DEST SCALE 1 LVL3 94% 2 LVL4 94% MOD EDIT SOURCE: SOFTKNOB DEST SCALE Size 11% Roll 11% PDLY 0.8% RTIM 0.5s RLVL full P109 * Studio A SIZE ROLL 24.8M 4.6k TDCY BASS 5.5k 1.2X PDLY 14m XOVR 1.0k RTIM 0.2s RLVL full P111 * Brick Wall SIZE ROLL 27.0M 10.1k TDCY BASS 15.9k 3.0X PDLY 6m XOVR 1.9k SPIN 25 DIFF 86 WAND 4914u LINK link SHAP 95 SHLFoff SPRD 120 SIZE 24.8M SPIN 45 DIFF 31 WAND 210u LINK unlk SHAP 255 SHLF off SPRD 16 SIZE 27.0M DLY1 18m LVL1 -6dB DLY2 6m LVL2 -8dB RTIM 0.5s RLVL full - DLY1 38m LVL1 -3dB DLY2 66m LVL2 -3dB RTIM 0.2s RLVL full - DLY3 38m LVL3 0ff FBK3 0% - DLY4 20m LVL4 off FBK4 0% - DLY3 50m LVL3 -3dB FBK3 0% - DLY4 64m LVL4 -3dB FBK4 0% - MOD EDIT SOURCE: SOFTKNOB DEST SCALE 1 LVL3 94% 2 LVL4 94% 3 Roll 22% 4 TDCY 19% 5-26 MOD EDIT SOURCE: SOFTKNOB DEST SCALE Size -21% RTIM 1.6s RLVL full P113 Oil Tanker SIZE ROLL 12.4M 2.9k TDCY BASS 4.4k 2.0X PDLY 14m XOVR 0.5k SPIN 33 DIFF 92 WAND 1890u LINK Unlink SHAP 141 SHLF off SPRD 108 SIZE 12.4M DLY1 28m LVL1 -1dB DLY2 12m LVL2 -2dB RTIM 1.6s RLVL full - DLY3 62m LVL3 -3dB FBK3 12% - DLY4 54m LVL4 -3dB FBK4 12% - The Presets Effect Presets Using the Random Hall Algorithm, Cont'd. RTIM 3.7s RLVL full P114 *Synth Hall SIZE ROLL 22.0M 4.8k TDCY BASS 5.5k 0.6X PDLY 0m XOVR 0.4k SPIN 30 DIFF 99 WAND 147u LINK link SPRD 0 SIZE 22.0M DLY1 12m LVL1 off DLY3 0m LVL3 off DLY2 16m LVL2 off FBK3 0% - SHAP 0 SHLF off RTIM 3.7s RLVL full DLY4 0m LVL4 off FBK4 0% - MOD EDIT SOURCE: SOFTKNOB DEST SCALE Shape 47% SPRD 44% PDLY 7.1% Roll 16% RTIM 1.4s RLVL full P115 Dance Hall SIZE ROLL 20.3M 8.5k TDCY BASS 7.5k 1.2X PDLY 44m XOVR 1.4k SPIN 18 DIFF 98 WAND 4410u LINK link SHAP 135 SHLF off SPRD 129 SIZE 20.3M DLY1 6m LVL1 -4dB DLY2 22m LVL2 -4dB RTIM 1.4s RLVL full - DLY3 40m LVL3 off FBK3 0% - DLY4 48m LVL4 off FBK4 0% - Effect Presets Using the Random Ambience Algorithm RTIM 2.0s RLVL -14dB P201 * Ambience SIZE DIFF 29.3M 75 DDLY PDLY 0m 0m SPIN 30 WAND 7098 - RTIM 0.3s RLVL full P206 EarlyReflectl SIZE DIFF 8.5M 59 DDLY PDLY 0m 0.1m SPIN 30 WAND 0u RTIM 1.1s RLVL -12dB P207 Lecture Hall SIZE DIFF 24.8M 32 DDLY PDLY 0m 27.7m ROLL 5.5k - SPIN 34 WAND 9450u - RTIM 0.3s RLVL off P208 *CarInterior SIZE DIFF 4.5M 0 DDLY PDLY 0m 0m ROLL 6.3k - SPIN 18 WAND 1008 ROLL 3.6k - MOD EDIT SOURCE: SOFTKNOB DEST SCALE 1 Size -63% 2 Spin 18% RTIM 0.9s RLVL -7dB P202 In A Room SIZE DIFF 9.0M 79 DDLY PDLY 0m 7.3m SPIN 15 WAND 63u RTIM 3.6s RLVL -4dB P203 Stairwell SIZE DIFF 27M 99 DDLY PDLY 0m 17.1m SPIN 0 WAND 0u - - - MOD EDIT SOURCE: SOFTKNOB DEST SCALE Size -5.5% Roll -13% PDLY -21% RTIM -2.4% RTIM 6.6s RLVL -8dB P204 *Hangar SIZE DIFF 39.4M 34 DDLY PDLY 56.5m 1m SPIN 33 WAND 7434u MOD EDIT SOURCE: SOFTKNOB DEST SCALE Size -25% RTIM 2.9s RLVL -7dB P205 Marble Foyer SIZE DIFF 19.7M 63 DDLY PDLY 17.5m 0m SPIN 26 WAND 2730u - ROLL 5.5k - - - - ROLL 21.2k - ROLL 8.9k - ROLL 6.3k - MOD EDIT SOURCE: SOFTKNOB DEST SCALE Spin 60% RTIM 2.1s RLVL -4dB P209 Score Stage SIZE DIFF 20.3M 94 DDLY PDLY 0m 9.6m SPIN 9 WAND 6426u RTIM 0.0s RLVL full P210 Gate It!! SIZE DIFF 14.1M 59 DDLY PDLY 0m 0m SPIN 33 WAND 6426u - - ROLL 4.4k - ROLL 21.2k - ROLL 6.3k 5-27 300 V 3.0 Owner's Manual Lexicon Effect Presets Using the Rich Plate Algorithm RTIM 1.7s RLVL full P301 *Rich Plate SIZE ROLL 24.2M 14.2k TDCY BASS 12.8k 1.0X PDLY 0m XOVR 0.8k RTIM 1.1s RLVL full P304 Perc Plate SIZE ROLL 16.3M 8.5k TDCY BASS 10.6k 0.8X PDLY 0m XOVR 1.4k RTIM 1.3s RLVL full P307 Bright Plate SIZE ROLL 23.1M 10.6k TDCY BASS 12.8k 1.0X PDLY 0m XOVR 1.0k RAND 82% DIFF 99 LINK link SHAP 16 - SPRD 31 SIZE 24.2M RAND 77% DIFF 87 LINK link SHAP 15 - SPRD 29 SIZE 16.3M RAND 0ff DIFF 88 LINK link SHAP 0 - SPRD 0 SIZE 23.1M DLY1 500m FBK1 0% DLY2 500m FBK2 0% DLY3 30m LVL3 off DLY4 38m LVL4 off DLY1 90m FBK1 0% DLY2 92m FBK2 0% DLY3 18m LVL3 -4dB DLY4 8m LVL4 -4dB DLY1 0m FBK1 0% DLY2 0m FBK2 0% DLY3 2m LVL3 -2dB DLY4 14m LVL4 -2dB DLY5 74 LVL5 off FBK5 0% - DLY6 250m LVL6 off FBK6 0% - DLY5 8m LVL5 off FBK5 0% - DLY6 16m LVL6 off FBK6 0% - DLY5 14m LVL5 -2dB FBK5 0% - DLY6 2m LVL6 -2dB FBK6 0% - RTIM 1.7s RLVL full P305 Contem-Plate SIZE ROLL 29.8M 9.7k TDCY BASS 8.9k 0.8X PDLY 0m XOVR 0.6k RTIM 0.7s RLVL full P306 * Round Plate SIZE ROLL 27.6M 15.0k TDCY BASS 5.5k 2.0X PDLY 0m XOVR 3.6k MOD EDIT SOURCE: SOFTKNOB DEST SCALE 1 RTIM -33% RTIM 1.8s RLVL full P302 Glossy Plate SIZE ROLL 20.3M flat TDCY BASS 21.2k 0.6X PDLY 0m XOVR 0.2k RAND 22% DIFF 99 LINK link SHAP 22 - SPRD 50 SIZE 29.8M RAND off DIFF 99 LINK link SHAP 0 - SPRD 0 SIZE 27.6M RAND 64% DIFF 99 LINK link SHAP 24 - SPRD 20 SIZE 20.3M DLY1 0m FBK1 0% DLY2 0m FBK2 0% DLY3 6m LVL3 -8dB DLY4 22m LVL4 -6dB DLY1 582m FBK1 0% DLY2 592m FBK2 0% DLY3 30m LVL3 off DLY4 38m LVL4 off DLY1 90m FBK1 0% DLY2 92m FBK2 0% DLY3 30m LVL3 full DLY4 20m LVL4 full DLY5 0m LVL5 off FBK5 0% - DLY6 0m LVL6 off FBK6 0% - DLY5 18m LVL5 -3dB FBK5 0% - DLY6 10m LVL6 -3dB FBK6 0% - DLY5 8m LVL5 -3dB FBK5 0% - DLY6 16m LVL6 -3dB FBK6 0% - RTIM 1.5s RLVL -4dB P306 * EKO Plate SIZE ROLL 28.7M 8.5k TDCY BASS 6.3k 1.0X PDLY 10m XOVR 1.0k RTIM 1.2s RLVL full P303 Warm Plate SIZE ROLL 18.6M 7.5k TDCY BASS 8.9k 1.2X PDLY 0m XOVR 2.5k RAND 46% DIFF 67 LINK link SHAP 0 - SPRD 0 SIZE 28.7M RAND off DIFF 83 LINK link SHAP 115 - SPRD 74 SIZE 18.6M DLY1 660m FBK1 43% DLY2 628m FBK2 -37% DLY3 30m LVL3 -4dB DLY4 34m LVL4 -4dB DLY1 90m FBK1 0% DLY2 92m FBK2 0% DLY3 30m LVL3 off DLY4 20m LVL4 off DLY5 54m LVL5 -4dB DLY5 8m LVL5 off 5-28 FBK5 0% - DLY6 16m LVL6 off FBK6 0% - FBK5 DLY6 25% 28m LVL6 -4dB MOD EDIT SOURCE: SOFTKNOB DEST SCALE 1 RTiM -24% 2 Dly1 -27% 3 Dly2 -29% FBK6 25% - MOD EDIT SOURCE: SOFTKNOB DEST SCALE 1 FBK1 -29% 2 FBK2 -29% 3 SIZE 100% 4 SIZE 100% The Presets Effect Presets Using the Stereo Adjust Algorithm MSTR 0dB D-EM off P401 Stereo Adjust BAL ROT <0> <0> 11uS RFnS off +L+R DLAY 0m - MSTR 0dB D-EM off P404 3 Frame Dly BAL ROT <0> <0> 11uS RFnS off +L+R DLAY 100m - MSTR 0dB D-EM off P407 *MultiEchoes BAL ROT <0> <0> 11uS RFnS off +L+R DLAY 0m - BASS flat BXOV 0.5k TREB flat TXOV 7.5k LTRB flat TXLR 12.2k RTRB flat SPEQ flat BASS flat BXOV 0.5k TREB flat TXOV 7.5k LTRB flat TXLR 12.2k RTRB flat SPEQ flat BASS flat BXOV 0.5k TREB flat TXOV 7.5k LTRB flat TXLR 12.2k RTRB flat SPEQ flat LDLY 0m LFBK 0% LFIN 0S Lfbk 0% RDLY 0m RFBK 0% RFIN 0S Rfbk 0% LDLY 0m LFBK 0% LFIN 0S Lfbk 0% RDLY 0m RFBK 0% RFIN 0S Rfbk 0% LDLY 60m LFBK 45% LFIN 434S Lfbk -20% RDLY 270m RFBK 28% RFIN 436S Rfbk -17% MSTR 0dB D-EM off P402 Phase Invert BAL ROT <0> <0> 11uS RFnS off +L-R DLAY 0m - MSTR 0dB D-EM off P405 4 Frame Dly BAL ROT <0> <0> 11uS RFnS off +L+R DLAY 130m - BASS flat BXOV 0.5k TREB flat TXOV 7.5k LTRB flat TXLR 12.2k RTRB flat SPEQ flat BASS flat BXOV 0.5k TREB flat TXOV 7.5k LTRB flat TXLR 12.2k RTRB flat SPEQ flat MSTR 0dB D-EM off P408 LFO Panner BAL ROT L+78 <0> 11uS RFnS off +L+R DLAY 0m - LDLY 0m LFBK 0% LFIN 0S Lfbk 0% RDLY 0m RFBK 0% RFIN 0S Rfbk 0% LDLY 0m LFBK 0% LFIN 133S Lfbk 0% RDLY 0m RFBK 0% RFIN 133S Rfbk 0% BASS flat BXOV 0.5k TREB flat TXOV 7.5k LTRB flat TXLR 12.2k RTRB flat SPEQ flat MSTR 0dB D-EM off P403 2 Frame Dly BAL ROT <0> <0> 11uS RFnS off +L+R DLAY 60m - MSTR 0dB D-EM off P406 MS Decode BAL ROT L+0 R+67 11uS RFnS off +L+R DLAY 0m - LDLY 0m LFBK 0% LFIN 0S Lfbk 0% RDLY 0m RFBK 0% RFIN 0S Rfbk 0% BASS flat BXOV 0.5k TREB flat TXOV 7.5k LTRB flat TXLR 12.2k RTRB flat SPEQ flat BASS flat BXOV 0.5k TREB flat TXOV 7.5k LTRB flat TXLR 12.2k RTRB flat SPEQ flat LDLY 0m LFBK 0% LFIN 282S Lfbk 0% RDLY 0m RFBK 0% RFIN 282S Rfbk 0% LDLY 0m LFBK 0% LFIN 0S Lfbk 0% RDLY 0m RFBK 0% RFIN 0S Rfbk 0% MSTR 0dB D-EM off P404 2 Frame Dly BAL ROT <0> <0> 11uS RFnS off +L+R DLAY 60m - BASS flat BXOV 0.5k TREB flat TXOV 7.5k LTRB flat TXLR 12.2k RTRB flat SPEQ flat LDLY 0m LFBK 0% LFIN 282S Lfbk 0% RDLY 0m RFBK 0% RFIN 282S Rfbk 0% MOD EDIT SOURCE: SOFTKNOB DEST SCALE 1 DLAY 100% MOD EDIT SOURCE: SOFTKNOB DEST SCALE LFO 100% MSTR 0dB D-EM off P410 Telephone BAL ROT <0> <0> 11uS RFnS off +L+R DLAY 0m - BASS -15 BXOV 1.4k TREB +6.0 TXOV 0.5k LTRB -16 TXLR 6.6k RTRB cut SPEQ flat LDLY 0m LFBK 0% LFIN 0S Lfbk 0% RDLY 0m RFBK 0% RFIN 0S Rfbk 0% 5-29 300 V 3.0 Owner's Manual Lexicon Effect Presets Using the Stereo Pitch Shift Algorithm MODE ster PCHL nul P501 Stereo Shift GLDL 100% FINL PCHR 0C nul GLDR 100% FINR 0C MODE Mono PCHL Nul P505 Bulkie Roll GLDL 99% FINL PCHR -14C Nul GLDR 101% FINR +13C LDLY 32m BNPS on LFBK 0% SYNC on RFBK 0% - LDLY 8m BNPS On LFBK 18% SYNC On RFBK 18% - MODE Mono PCHL Nul P506 Heavy Roll GLDL 99% FINL PCHR -14C Nul GLDR 101% FINR +20C LDLY 50m BNPS On LFBK 20% SYNC On RFBK 20% - MODE Ster PCHL +Ma2 P507 *Going, Going GLDL 112% FINL PCHR +0C +Ma2 GLDR 112% FINR +0C LDLY 150m BNPS On LFBK 60% SYNC On RFBK 60% - RDLY 32m - MOD EDIT SOURCE: SOFTKNOB DEST SCALE 1 GLDL 100% MODE ster PCHL -Oct P502 Octave Down GLDL 50% FINL PCHR 0C -Oct GLDR 50% FINR 0C LDLY 30m BNPS On LFBK 0% SYNC On RFBK 0% - MODE Mono PCHL Nul P503 Vox Chorus GLDL 100% FINL PCHR -7C Nul GLDR 99% FINR -14C LDLY 16m BNPS On LFBK 11% SYNC Off RFBK 7% - MODE Ster PCHL Nul P504 Pole Flange GLDL 100% FINL PCHR -7C Nul GLDR 100% FINR -7C LDLY 0m BNPS On LFBK 46% SYNC On RFBK 46% - 5-30 RDLY 30m - RDLY 26m - RDLY 0m - RDLY 8m - RDLY 60m - RDLY 150m - MOD EDIT SOURCE: SOFTKNOB DEST SCALE 1 LDly 69% 2 RDly 69% MODE Mono PCHL +mi2 P508 Zorch! GLDL 111% FINL PCHR +81C -Ma2 GLDR 87% FINR -38C LDLY 38m BNPS On LFBK 57% SYNC On RFBK 50% - RDLY 76m - The Presets Effect Presets using the Dual Delays Algorithm CC: MchA P601 *Dual Delays FDLY LFBD 0.0m 0.0m LFLG 0% CC: MchA CC: MchA CC: MchA CC: MchA Patch #1 Knob #2 Knob CC: MchA CC: MchA CC: MchA CC: MchA CC: MchA LDLY 0 RDLY 0 RFBD 0.0m RFLG 0% DLY1 0.0m DLY2 0.0m FBK1 0% FBK2 0% APD1 0.0m APD2 0.0m APG1 0 APG2 0 DLY3 0.0m DLY4 0.0m FBK3 0% FBK4 0% LDLY 0.0m RDLY 0.0m LPAN L-CH RPAN R-CH 0 85% 0 85% P602 Space Delays FDLY LFBD 8.6m 0.0m LFLG 57% RFBD 0.0m RFLG 86% CC: MchA P603 *PingoPongo FDLY LFBD 0.0m 0.0m LFLG 0% CC: MchA CC: MchA CC: MchA CC: MchA #1 Knob #2 Knob #3 Knob CC: DLY1 470m DLY2 437m FBK1 22% FBK2 23% MchA APD1 4.0m APD2 7.4m APG1 185 APG2 50 MchA DLY3 186m DLY4 228m FBK3 28% FBK4 36% MchA LDLY 36.2m RDLY 18.9m LPAN L-CH RPAN R-CH MchA Patch DLY1 0 DLY2 0 LDLY 0 FBK1 30% FBK2 40% APD1 4.8m APD2 8.6m APG1 100 APG2 100 DLY3 0.0m DLY4 0.0m FBK3 0% FBK4 0% LDLY 75m RDLY 0m LPAN L-CH RPAN R-CH 0 80% 0 80% 0 40% RFBD 0.0m RFLG 0% DLY1 0.0m DLY2 0.0m FBK1 0% FBK2 0% APD1 0.0m APD2 0.0m APG1 0 APG2 0 DLY3 147m DLY4 294m FBK3 40% FBK4 32% LDLY 18m RDLY 18m LPAN L-CH RPAN R-CH Patch DLY3 0 0 40% 0 0 80% CC: CC: CC: MchA #1 Knob #2DLY4 Knob DLY1 150m DLY2 150m P604 *3VoiceDlys FDLY LFBD 0.0m 0.0m LFLG 0% CC: RFBD 0.0m RFLG 0% CC: MchA P605 OverTheTop1 FDLY LFBD 9.5m 10.0m LFLG 91% CC: MchA CC: MchA CC: MchA CC: MchA #1 LFO CC: MchA DLY1 0.0m DLY2 0.0m FBK1 0% FBK2 0% APD1 0.0m APD2 0.0m APG1 0 APG2 0 DLY3 0.0m DLY4 0.0m FBK3 0% FBK4 0% LDLY 0.0m RDLY 0.0m LPAN L-CH RPAN R-CH 0 49% Patch FDLY P606 OverTheTop2 FDLY LFBD 0.8m 10.0m LFLG -85% CC: MchA CC: MchA CC: MchA CC: MchA #1 LFO RFBD 10.0m RFLG 91% RFBD 10.0m RFLG -85% DLY1 0.0m DLY2 0.0m FBK1 0% FBK2 0% APD1 0.0m APD2 0.0m APG1 0 APG2 0 DLY3 0.0m DLY4 0.0m FBK3 0% FBK4 0% LDLY 0.0m RDLY 0.0m LPAN R-CH RPAN L-CH 0 49% Patch FDLY 5-31 300 V 3.0 Owner's Manual Lexicon Effect Presets using the Dual Delays Algorithm, Cont'd. CC: MchA P607 LFO:FazeDlys FDLY LFBD 6.0m 1.9m LFLG -99% RFBD 5.6m RFLG 99% CC: MchA CC: CC: MchA CC: MchA DLY1 382m DLY2 366m FBK1 23% FBK2 19% APD1 6.6m APD2 8.4m APG1 164 APG2 152 DLY3 149m DLY4 130m FBK3 18% FBK4 26% LDLY 18.2m RDLY 12.3m LPAN L-CH RPAN R-CH MchA CC: MchA CC: MchA CC: MchA CC: MchA Patch #1 LFO FDLY 0 CC: MchA #1 LFO CC: -22% MchA P608 Env:Phazer FDLY LFBD 9.7m 5.2 LFLG 86% CC: MchA CC: MchA CC: MchA CC: MchA Patch #1 L-Meter FDLY 0 RFBD 5.2 RFLG 86% DLY1 0.0m DLY2 0.0m FBK1 0% FBK2 0% APD1 6.6m APD2 8.4m APG1 0 APG2 0 DLY3 0.0m DLY4 0.0m FBK3 0% FBK4 0% LDLY 0.0m RDLY 0.0m LPAN L-CH RPAN R-CH -30% RFBD 19.4m RFLG 19% FBK1 0% FBK2 0% APG1 0 APG2 0 FBK3 0% FBK4 0% LPAN R-CH RPAN L-CH CC: MchA CC: MchA CC: MchA CC: MchA Patch FDLY 0 P610 *Sky Delays FDLY LFBD 1.8m 5.8m LFLG -28% RFBD 4.3m RFLG 28% DLY1 79.8m DLY2 28.7m FBK1 22% FBK2 -20% APD1 10.2m APD2 5.6m APG1 47 APG2 36 MchA DLY3 81.7m DLY4 56.0m FBK3 40% FBK4 -30% MchA LDLY 57.2m RDLY 41.4m LPAN L-CH RPAN R-CH MchA CC: MchA CC: MchA CC: MchA CC: MchA Patch #1 Knob #2 Knob #3 LFO MchA 9.5% Patch #1 LFO #2 LFO #3 LFO CC: FDLY 0 RPAN 0 LPAN 0 CC: CC: MchA LDLY 0 RDLY 0 FDLY 0 78% 0 72% 0 75% CC: MchA FDLY 5 RFBD 9.0m RFLG 99% DLY1 0.0m DLY2 0.0m FBK1 0% FBK2 0% APD1 6.6m APD2 8.4m APG1 0 APG2 0 DLY3 0.0m DLY4 0.0m FBK3 0% FBK4 0% LDLY 0.0m RDLY 0.0m LPAN L-CH RPAN R-CH -33% 100% 100% P612 Chorus+EKOz FDLY LFBD 8.4m 0.0m LFLG -37% CC: Patch #1 LFO 5-32 P611 LFO:Pan&Faze FDLY LFBD 10.1m 3.5m LFLG -99% CC: MchA CC: P609 Chorus FDLY LFBD 9.7m 1.4m LFLG 19% DLY1 0.0m DLY2 0.0m APD1 0.0m APD2 0.0m DLY3 0.0m DLY4 0.0m LDLY 5.7m RDLY 16.0m RFBD 0.0m RFLG -30% DLY1 411 DLY2 223m FBK1 15% FBK2 20% APD1 4.9m APD2 7.1m APG1 71 APG2 74 DLY3 330m DLY4 616m FBK3 32% FBK4 22% LDLY 16.6m RDLY 31.7m LPAN L-CH RPAN R-CH 7.5% The Presets Effect Presets using the Dual Delays Algorithm, Cont'd. CC: MchA P613 *Wall Slaps FDLY LFBD 0.0m 0.0m LFLG 0% RFBD 0.0m RFLG 0% DLY1 40.4m DLY2 57.4m FBK1 31% FBK2 25% APD1 8.9m APD2 6.0m APG1 74 APG2 83 DLY3 0.0m DLY4 0.0m FBK3 0% FBK4 0% LDLY 26.9m RDLY 26.9m LPAN L-CH RPAN R-CH CC: MchA CC: MchA CC: MchA CC: MchA Patch #1 Knob #2 Knob CC: MchA DLY1 0 DLY2 0 5.5.% 0 7.1% P614 Env:Peak FDLY LFBD 6.2m 10.0m LFLG 87% RFBD 11.5m RFLG 87% DLY1 0m DLY2 0m FBK1 0% FBK2 0% APD1 0m APD2 0m APG1 0 APG2 0 DLY3 0.0m DLY4 0.0m FBK3 0% FBK4 0% LDLY 0m RDLY 0m LPAN L-CH RPAN R-CH CC: MchA CC: MchA CC: MchA CC: MchA #1 R-Meter 0 Patch FDLY 0 CC: MchA P615 NegativeFlng FDLY LFBD 18.5m 8.3m LFLG -96% CC: MchA CC: MchA CC: MchA CC: MchA #1 LFO Patch FDLY 0 RFBD 8.7m RFLG -96% DLY1 0m DLY2 0m FBK1 0% FBK2 0% APD1 0m APD2 0m APG1 0 APG2 0 DLY3 0m DLY4 0m FBK3 0% FBK4 0% LDLY 0m RDLY 0m LPAN R-CH RPAN L-CH -48% 30% 5-33 300 V 3.0 Owner's Manual Lexicon Effect Presets using the Split Chamber Algorithm CC: MchA CC: MchA CC: MchA CC: MchA CC: MchA P701 Chamber RTIM SIZE 1.8s 28.1M TDCY SHAP 1.6k 20 BASS 1.2X XORV 0.8k DIFF 65 LINK Link P702 Key Chamber RTIM SIZE 1.4s 43.9M TDCY SHAP 0,5k 122 BASS 1.5X XORV 0.5k DIFF 61 LINK Link P703 Drum Chamber RTIM SIZE 1.0s 24.2M TDCY SHAP 1.0k 26 PDLY 6m SPRD 50 RAND 96% CC: MchA CC: MchA PDLY 18m SPRD 124 RAND 90% CC: MchA CC: MchA PDLY 24m SPRD 50 Patch #1 Knob CC: CC: MchA BASS 1.2X XOVR 0.8k DIFF 50 LINK Link RAND 97% MchA CC: CC: MchA P704 Drum Plate RTIM SIZE 1.4s 42.2M TDCY SHAP 3.6k 0 PDLY 0 SPRD 30 MchA CC: CC: MchA BASS 0.8X XOVR 0.6k DIFF 67 LINK Link RAND 87% MchA CC: CC: MchA P705 Guitar Room RTIM SIZE 0.7s 28.7M TDCY SHAP 1.0k 62 PDLY 12m SPRD 77 MchA CC: CC: MchA BASS 2.0X XOVR 1.4k DIFF 64 LINK Link RAND 90% MchA CC: CC: MchA 1.6k CC: MchA 5-34 P706 Big & Short RTIM SIZE 0.3s 54.6M TDCY SHAP 95 160 BASS 2.0X XOVR 1.2k DIFF 64 LINK Link PDLY 30m SPRD RAND 90% MchA Patch #1 Knob #2 Knob P707 ‘U’Chamber RTIM SIZE 2.5s 32.1M TDCY SHAP 1.0k 83 BASS 1.2X XOVR 0.6k DIFF 56 LINK Link P708 *”L”Chamber RTIM SIZE 1.3s 29.3M TDCY SHAP 1.6k 164 BASS 1.2X XOVR 0.6k RTIM 0 DIFF 77 LINK Link 0 DIFF 27 LINK Link P710 Big Hall RTIM SIZE 2.4s 48.4M TDCY SHAP 0.5k 109 BASS 1.5X XOVR 0.6k DIFF 68 LINK Link P711 *Great Room RTIM SIZE 0.7s 28.7M TDCY SHAP 1.0k 62 BASS 2.0X XOVR 1.4k PDLY 0 SPRD 0 RAND 98% CC: MchA CC: MchA PDLY 4m SPRD 31 RAND 98% Patch #1 Knob #2 Knob #3 Knob CC: MchA P709 Basement RTIM SIZE 0.5s 15.8M TDCY SHAP 1.0k 27 BASS 1.5X XOVR 0.8k PDLY 8m SPRD 61 16% CC: PDLY 14m SPRD 57 RAND 89% MchA CC: MchA CC: PDLY 44m SPRD 141 RAND 93% MchA Patch #1 Knob CC: PDLY 12m SPRD 77 DIFF 64 LINK Unlk RAND 90% 0 1.6% 0 22% MchA CC: MchA P712 *Great Hall RTIM SIZE 2.1s 66.4M TDCY SHAP 1.0k 34 BASS 2.0X XOVR 0.9k PDLY 0 SPRD 0 RTIM 0 DIFF 80 LINK Link RAND 95% 0 4.0% 0 30% 0 13% P713 Big Bricks RTIM SIZE 0.5s 36.0M TDCY SHAP 2.9k 85 BASS 1.5X XOVR 1.4k PDLY 26m SPRD 173 DIFF 59 LINK Unlk P714 Joe’s B&G RTIM SIZE 0.5s 14.6M TDCY SHAP 0.5 20 PDLY 6m SPRD 111 RAND 96% PDLY 2m SPRD 41 BASS 1.5X XOVR 1.4k DIFF 66 LINK Link RAND 98% SIZE 0 0 25% P715 Joe’s Garage RTIM SIZE 0.7s 7.3M TDCY SHAP 2.2k 11 BASS 1.2X XOVR 2.0k DIFF 30 LINK Unlk PDLY 0m SPRD 50 RAND 59% The Presets Effect Presets using the Split Chamber Algorithm, Cont'd. CC: MchA CC: MchA CC: MchA CC: MchA Patch #1 Knob #2 Knob #3 Knob CC: MchA CC: MchA Patch #1 Knob #2 Knob CC: MchA CC: MchA Patch #1 Knob P716 Sizzle City RTIM SIZE 2.6s 13.5M TDCY SHAP 10.6k 161 BASS 0.4X XOVR 1.9k DIFF 68 LINK Unlk P717 *Drum Rooms RTIM SIZE 1.1s 16.3M TDCY SHAP 3.6k 58 BASS 1.5X XOVR 0.8k XOVR 0 SPRD 0 RTIM 0 RTIM 0 TDCY 0 RAND 97% MchA CC: P720 Recital Hall RTIM SIZE 2.3s 44.5M TDCY SHAP 1.0k 125 BASS 1.2X XOVR 0.9k DIFF 60 LINK Link PDLY 30m SPRD 59 RAND 96% PDLY 16m SPRD 32 RAND MAX 0 85% 0 40% 0 -16% PDLY 0m SPRD 68 DIFF 44 LINK Unlk RAND 30% 0 25% 0 -30% P719 *Delay Room RTIM SIZE 0.7s 33.2M TDCY SHAP 1.0k 138 CC: MchA DIFF 15 LINK Link P718 *BigBathroom RTIM SIZE 1.1s 18.0M TDCY SHAP 10.6k 205 BASS 1.2X XOVR 5.8k PDLY 0m SPRD 11 PDLY 30m SPRD 78 BASS 1.2X XOVR 3.6k DIFF 65 LINK Unlk RAND 96% PDLY 0 0 16% 5-35 300 V 3.0 Owner's Manual Lexicon Effect Presets using the Mono Pitch Shift Algorithm CC: MchA: CC: MchA: #1 LFO CC: MchA: Patch #1 Knob P801 Mono Shift PCH DLY Nul 40m GLD FIN 100% 0c P802 Guit Shift PCH DLY Nul 8m GLD FIN 99% -14c Patch GLD 0 FBK 17% BNPS On CC: MchA: CC: MchA: P809 Octave Down PCH DLY -Oct 30m GLD FIN 50% -0c FBK 0% BNPS On P810 Vocal Shift PCH DLY Nul 40m GLD FIN 100% -7% FBK 26% BNPS On 0.4% MchA: CC: MchA: FBK 27% BNPS On CC: MchA: CC: 0 #1 Knob #2 L-Meter P804 Sky Down PCH DLY Nul 2m GLD FIN 100% -7% P805 Env*EKOShift PCH DLY Nul 10m GLD FIN 100% +7% Patch DLY 0 FBK 0 100% FBK 49% BNPS On CC: MchA: CC: FBK 69% BNPS On MchA: CC: MchA: CC: MchA: 5-36 MchA: CC: P901 EZ Comp2:1 PDLY ATC 6m 7 THRS GAIN -12 3 RTC 363 RATO 1.88 #1 Knob #2 Knob #3 Knob X-TH -52 X-RT 2.00 CC: X-GN 7 P902 Drum Comp3:1 PDLY ATC 4m 7 THRS GAIN -17 7 X-TH -52 X-GN 7 MchA: RTC 58 RATO 3.00 93% CC: -47% P806 Echo Down PCH DLY Nul 258m GLD FIN 99% -14c FBK 25% BNPS On P807 HalfStepsUp PCH DLY +mi2 388m GLD FIN 106% +0c FBK 40% BNPS On P808 HalfStepsDn PCH DLY -mi2 388m GLD FIN 95% -0c FBK 50% BNPS On MchA: #1 Knob Effect Presets using the PONS Algorithm 0 CC: X-RT 2.00 MchA: MchA: CC: CC: Effect Presets using the Compressor Algorithm MchA: CC: Effect Presets using the Small Stereo Adjust Algorithm MchA: P803 *Up Shift PCH DLY Nul 0m GLD FIN 100% +7c DLY 0 FBK 0% BNPS On P001 PONS DITH PONS 32 On P010 *Small St Ad MSTR BAL 0dB 0 SPEQ Flat ROT 0 RFnS +L+R BASL +0dB BASR +0dB LTRB +0dB RTRB +0dB BXOV 1.2k TXLR 2.0k 0 49% 0 30% 0 30% Patch SPEQ 0 BASL 0 BASR 0 P011Panola MSTR BAL 0dB L+78 SPEQ Flat ROT 0 RFnS +L+R BASL +0dB BASR +0dB LTRB +0dB RTRB +0dB BXOV 1.2k TXLR 2.0k Patch BAL 0 0 100% Time Code Operation 6 Time Code Operation 6-1 300 V3.0 Owner's Manual Lexicon Using time code The 300 utilizes time code to trigger Setup and Effect changes. It can also use time code to trigger parameter glides. In order for any of the time code functions to work, a time code source must be plugged into the Time Code Input on the 300 rear panel. Time code is an electronic signal applied to tape or film which identifies each individual video frame. The ability to uniquely identify any frame provides a reference system for fast and accurate location of any point on the tape. This referencing system maintains its accuracy regardless of changes in playback or editing equipment, allowing precise synchronization of an entire editing system. Time code identifies each video frame by assigning it a unique “address”. Frames are sequentially identified by hour, minute, second, and frame. For example, a typical timecode address appears as: 09 hours : 42 : 31 : 07 minutes seconds frames As each frame is advanced, the time code address is increased by one frame “count”. Because the time code signal is locked to advancing video frames, both advance at exactly the same rate. In the USA, there are two standard frame rates, one for black and white (monochrome) and one for color. Monochromatic video runs at a rate of 30 frames per second. If a black and white TV program is measured by time code, the program length, time code display, and clock time will all be in synchronization. Color video signals run at a rate of 29.97 frames per second, and clocking a one-hour color program at 30 frames per second will result in a time discrepancy of 3.6 seconds (or 108 frames). In order to correct this discrepancy, a version of time code called SMPTE Drop Frame was developed. SMPTE Drop Frame Time Code, as its name implies, eliminates frame addresses from the Time Code each hour to allow matching of time code and clock time. Specifically, frame addresses .00 and .01 are eliminated at the end of every minute in an hour, except for minutes: 00,10,20,30,40 and 50. For example, 00.00.59.29 advances to the number 00.01.00.02. In Drop Frame mode, the frame numbers .00 and .01 do not exist, except for minutes 00, 10, 20, 30, 40 and 50. Since Drop Frame time code eliminates only frame addresses, the actual video is unaffected. Color video frames continue to progress at the rate of 29.97 per second. Any calculations of program length based on Drop Frame time code will, therefore, agree with standard clock time. The 300 reads time code in the following formats: SMPTE NON-DROP SMPTE DROP FRAME 6-2 SMPTE Standard time code, compatible with a monochromatic frame rate of 30 frames per second SMPTE Standard Drop Frame time code, compatible with a color frame rate of 29.97 frames per second EBU Compatible with the European broadcast standard frame rate of 25 frames per second FILM Compatible with frame rates of 24 frames per second. Time Code Operation The 300 allows you to use time code (in any of the recognized formats) to trigger Setup, Effect, and parameter changes. The Event List Up to 50 time code entries can be made on an Event List. Time codes can be entered via the numeric keypad, they can be "snapped" on the fly while time code is running, or they can be selected with the soft knob. Using time code to initiate program To access the Event List simply press the front panel CONTROL button to enter changes Control mode, then use the Page Down button to step to the Event List display: Pressing this button enables/disables the Event List Event List: OFF VIEW ADD EDIT SNAP DEL Pressing one of these buttons selects a control page for the Event List Pressing the second button from the right on the top row allows you to choose to have a Timecode Event list enabled (ON) or disabled (OFF). Pressing any of the bottom row of buttons selects a page of controls for the item displayed directly above that button. Four pages are available for: addition of events to the list (ADD), deletion of items from the list (DEL), modification of entries (EDIT), and "on the fly" insertion of items to the list (SNAP). The 300 automatically sorts the Event List based on the time code addresses. If you add a new event it will be placed on the list at the appropriate place, and other entries will move in position. If you delete an entry, the remaining entries will retain their relative positions, but will move up one position. 6-3 300 V3.0 Owner's Manual Snapping events Lexicon The easiest way to develop a list in the 300 is to “SNAP” entries into the list. To use the snap function, select OFF and turn the Soft knob to enable time code (ON). Locate the source machine to the beginning of the section you want to experiment with. Give yourself about a 5 second preroll and “roll tape”. Now, press SNAP. The display should show rolling time code. #01 _ _ _ _ 00 : 00 : 00 : 00 SNAP CLR 00 : 00 : 00 : 00 The number displayed in the upper left portion of the display indicates the event number which you are about to snap. Simply press the key directly below "SNAP" wherever you want effect changes to happen. This will assign those time code addresses to the Event List. The upper right portion of the display shows running time code. The lower line of the display shows the time code of the most recently snapped entry, and allows you to clear the most recently snapped time code. Time code formats are indicated as follows: SV valid SMPTE Non-Drop SDV valid SMPTE Drop Frame E-V valid EBU F-V valid Film V Editing the Event List indicates valid time code Editing the list includes trimming snapped time codes, choosing the type of automation change, and selecting the event. The EDIT function also allows you to enter time code numbers directly into the list rather than snapping them. To edit the event list, press the key directly below “EDIT”. The display will show: Pressing the key directly above “#01” allows you to use the Soft knob to scroll through the Event List to select the event number you want to edit. You will obviously want to start with number one. 6-4 Edit #01 * *: New Event 00 : 00 : 00 : 00 Time Code Operation Press the key directly beneath “**”. Use the Soft knob to select the automation type. Turn the Soft knob clockwise or counterclockwise to cause the letter S to appear. The first entry must be a Setup (S). Other available types of Automation are: Setup changes (S) Effect changes Mach A (EA) Effect changes Mach B (EB) — only available if a “split” setup is running Parameter Glide Mach A (PA) Parameter Glide Mach B (PB) — only available if a “split” setup is running Parameter Glide Setup (PS) Now, press the key under “P101”. You can now use the Soft knob to scroll through the entire list of setups, including any Setup registers which you might have stored. (Remember, the first entry must be a Setup.) Once you decide which Setup you want to start the list, press STORE. Your first event has all the nessessary elements: a time code address, the type of automaton change, and the event to which it changes. To move on to edit #2, press the key directly above “01”, then turn the Soft knob one “tick”. Once you’ve got the list edited, and want to test a portion of it, press CNTRL. Ths will bring you back to the main time code menu. Locate the time code source machine to the top of the production piece. Give yourself a 5 second preroll. *NOTE: Your first Event (Edit #1) should occur before first picture or music. You may have to trim edit the first event to reflect this — After all, you really don’t want the 300 cueing up the first Setup while music or dialog is passing through the box. From Edit mode, select the 8-digit time code number by pressing either of the two keys above the time code entry. Use the Soft knob to increase or decrease the time code value. Usually, when first using time code automation, your first event will need to be trimmed up several seconds to allow the first Setup to load before audio, as expalined above. Turn the Soft knob counter-clockwise. When the correct number is displayed, press STORE. Trimming Time Codes in the Event List Press CNTRL to return to the main time code menu. Press VIEW. If you’ve given yourself the correct “pre-roll”, roll tape. The 300 should display time code and all subsequent events which you have programmed into the Event List. 6-5 300 V3.0 Owner's Manual Programming Parameter Glides Lexicon Parameter glides can be a verypoweful feature. When you select a parameter glide (PA,PB, or PS) as type of automation change, the display will update and display three entries; Parameter Selection (RTIM, PDLY, DLY1,FBK1...), final parameter value (12.5s, 125m, 225m, 45%...), and the frame duration (25Fr) of the glide. The keys beneath each display entry allow you to select the function for Soft knob programming of the parameter glides. All parameter glides are based on the current Setup and effect which loaded. Example: Let’s say at the end of a scene, we want the Reverb Time to increase from its preset value to 15 seconds. We want this glide to take 100 frames. At the same time, we want the Input parameter to glide from its Setup value to OFF over the same amount of time. Suppose the current Setup and Effect is Dance Hall, then all of the parameters in the Setup and effect can Be glided. The Event List up to the glide might look something like this: Edit #01 00 : 59 : 27 : 00 S: Large Hall Edit #02 S: Dance Hall Edit #03 * *: New Event 01 : 00 : 15 : 00 01 : 00 : 21 : 07 You will need to make a copy of event 03 (because you want 2 parameter glides) into the list, then edit both entries. 6-6 Time Code Operation From the main time code menu, select “ADD”. Now select the edit event number by pressing the key directly above “#”. Use the Soft knob to selet “#3”, then press STORE. This makes a complete copy of event # 3 and places it into slot #4. Note that Event #3 and Event #4 now have the same time code adress. PRESS CNTRL to return to the main time code menu. Press EDIT, then select Edit #3. Now, press the key directly below “**” and use the Soft knob to program PA:(parameter,Machine A). Press the next button to the right to use the Soft knob to program the actual parameter. Turn the Soft knob until the “RTIM” is displayed. Press the next button to the right to use the Soft knob to select the final reverb time. Adjust the value as close to 15 seconds as possible. Finally, press the next button to the right. Turn the Soft knob clockwise to enter frame duration values. (100 Fr will equal approximately 3 seconds.) Press STORE. Event #3 should look like this: Edit #03 01 : 00 : 21 : 05 PA: RTIM->14.1s 100Fr Press the key directly above “#”, and repeat the above steps so that the display looks like this: Edit #04 PS: ALVL->Off 01 : 00 : 21 : 05 100Fr Parameter glides which have been programmed into the Event List will be viewed singly, as the event happens. If you are VIEWing two or more glides which happen to be programmed for the same time code (as in the example above), only the last entry will be displayed. 6-7 300 V3.0 Owner's Manual Things to Consider About Glides Lexicon All parameter glides are based on the effect loaded in the list immediately preceding the glide. For example, let’s say that Medium Hall is Event Edit #4 and Event Edit #5 specifies PA RTIM moving to a value of 3.8s, with a duration of 007 Frames. Q What happens if you change Event #4 from Medium Hall to Vox Chorus? Edit #04 00 : 59 : 27 : 00 S: VoxChorus Edit #05 PA: GLD-> +Ma4 01 : 00 : 21 : 05 100Fr A Event #5 is now being driven by an algorithm which does not have RTIM as a selectable parameter and which cannot, therefore, have a final parameter value. New values will be automatically placed there based on the selected algorithm’s available parameters. The proper thing to do is to delete Event #5. 6-8 Time Code Operation Once you have created an Event List, you can also modify it by adding effect changes. Select ADD. The display will show: Adding an event Add #XX (Event no.) 00 : 00 : 00 : 00 * * : Setup name or "No Event" The ADD function is used in two different ways. To duplicate an event, press the button directly above the Event number field and use the Soft knob to scroll to the event that you want to copy. When you press STORE, the event will be copied. (The copy will be placed directly after the original on the list.) To edit the event effect, return to the main Time Code menu (by pressing CONTROL), then press the button directly above "EDIT". The second way to use the ADD function allows you to edit an existing event and add the edited version as a new event in the list. To do this, press the button directly above the event number, and use the Soft knob to scroll to the event you want to start with. Now select the effect number, or the time code field, by pressing the button directly above these display choices, and change the values as needed. Each time you alter a time code entry, press ENTER. When you have made all the changes you want, press STORE and the modified events will be added to the list. To delete an entry from the Event List, select DEL. The display will show: Del #XX * * : Setup name or "No Event" Deleting an event 00 : 00 : 00 : 00 Selecting #XX allows soft knob selection from among the Event List entry numbers (1-50). The time code associated with the event number is displayed to the right. Press the key directly above "Del" to delete any event number from the list. Note that if an entry number is deleted from the list, all subsequent entries will move up on the list. The Event List can be transferred via MIDI data dump via the MIDI Control page in Control Mode. Dumping the list to MIDI storage devices 6-9 300 Event List 300 V3.0 Owner's Manual # 1 2 3 4 5 6 7 8 9 10 11 12 13 14 15 16 17 18 19 20 21 22 23 24 25 26 27 28 29 30 31 32 33 34 35 36 37 38 39 40 41 42 43 44 45 46 47 48 49 50 6-10 Event Time Code : : : : : : : : : : : : : : : : : : : : : : : : : : : : : : : : : : : : : : : : : : : : : : : : : : : : : : : : : : : : : : : : : : : : : : : : : : : : : : : : : : : : : : : : : : : : : : : : : : : : # Effect Name Lexicon Comment : : : : : : : : : : : : : : : : : : : : : : : : : : : : : : : : : : : : : : : : : : : : : : : : : : This page may be reproduced as needed for recording any Event List you create. MIDI Operation 7 MIDI Operation 7-1 300 V 3.0 Owner's Manual Lexicon The 300 contains innovative MIDI features that exemplify Lexicon's commitment to using the power of MIDI to provide new functions to our users. In the 300 most of these functions fall into one of four categories: 1. Real-time (Dynamic MIDI®) control of as many as ten of the 300's variable parameters simultaneously. Two Setup patches can run on the channel specified for System changes, and each machine can have four patches on a user-designated channel. 2. Automatic selection of a 300 effect via MIDI Program Change messages. 3. Real-time effects automation using MIDI System Exclusive or Non-registered parameters. 4. Transfer of setups, effects, the Event List and corresponding MIDI table to a computer, other MIDI-compatible device, or to another 300. Each of these applications will be discussed in this chapter, but first, let's cover some typical installations. MIDI Connections All MIDI connections described in this chapter use the MIDI IN, OUT and THRU connectors located on the rear panel of the 300. As with any MIDI connection, use only standard MIDI cables, and keep them as short as possible to avoid possible data errors. Fifteen meters is generally accepted as the maximum length that should be used to maintain data integrity. MIDI Out MIDI In PAGE MIDI UP 48 kHz 44.1 kHz 32 kHz 8 9 5 6 SETUP 1 DOWN — 2 0 CONTROL BYPASS SETUP BYPASS EDIT B SELECT A MACH PAGE LEVEL 300 7 4 STORE EFFECT VALUE MOD 3 EDIT ENTER EDIT DIGITAL EFFECTS SYSTEM POWER 300 with keyboard MIDI In MIDI Out MIDI In PAGE MIDI UP 48 kHz 44.1 kHz 32 kHz DOWN 300 7-2 7 8 9 4 5 6 PAGE LEVEL 300 with sequencer/computer MIDI Out DIGITAL EFFECTS SYSTEM 1 — 2 0 SETUP MACH BYPASS SETUP BYPASS EDIT B A STORE EFFECT VALUE MOD 3 ENTER CONTROL SELECT EDIT EDIT POWER MIDI Operation MIDI Out MIDI In MIDI Out MIDI In PAGE MIDI UP 48 kHz 44.1 kHz 32 kHz 8 9 5 6 PAGE DOWN 1 — LEVEL 300 7 4 2 0 SETUP MACH BYPASS SETUP BYPASS EDIT B A STORE EFFECT VALUE MOD 3 ENTER CONTROL SELECT EDIT EDIT DIGITAL EFFECTS SYSTEM POWER The 300 can receive MIDI information on two independent channels: one for SysEx and Dump messages, and one for Program Change and Dynamic MIDI® patches. MIDI Channel assignments are made in Control mode. To select this function, press CONTROL and use the PAGE UP/DOWN keys to display the MIDI control page. Midi Mode Map Table: 300 with sequencer/computer and keyboard Setting MIDI Channels AUTO CHNL EDIT DUMP Pressing the button above "CHNL" will cause the following display to appear: Channels: MachA-(1-16, OMNI) Sys- (1-16, OMNI) MachB- (1-16, OMNI) Press either of the left hand buttons in the lower row to select the MIDI Channel for SysEx system and effect changes. Setup patch channel assignments are also set here. Press either of the right hand buttons in the Upper row to select the MIDI Channel for Dynamic MIDI® parameter changes for Machine A. Press either of the righthand buttons in the lower row for Machine B. (All selections may, of course, be set to the same channel.) 7-3 300 V 3.0 Owner's Manual Dynamic MIDI® Lexicon Dynamic MIDI® allows you to patch virtually any MIDI controller to any effect parameter in the 300. Mod Edit mode is used to create or modify Dynamic MIDI® patches. To use Dynamic MIDI®, you assign a MIDI controller or an event to a setup parameter or to an effect parameter, using the patch parameters found on the pages in Mod Edit. (Two pages for setup patches are available in Setup Edit mode.) Four parameter patch pages are available at any one time in Mod Edit mode. These pages will be for Machine A or Machine B, depending on the type of setup currently running, and on the machine currently selected. Each of the four patch pages available for each machine shows the following parameters: Off Cntlr- 0 ModWheel Breath Cntlr-3 FootPedal PortaTime Volume Cntlr-9 Pan Expression Cntlr-12-15 GP Cntlr-1-4 Cntlr-20-31 Sustain PortaSw SostenSw SoftPedal Switch-68-79 GP Cntlr-5-8 Sitch-84-95 PitchWheel AfterTouch LastNote LastVel MidiClock Knob-> L-Meter R-Meter LFO-1 Available "Source" selections Patch # 1A DEST VALUE SOURCE THRS SCALE Destination: This is used to select the effect parameter that the MIDI controller is patched to. The available parameters are based on the algorithm that you are currently running. Value: This is used to set the initial value of the parameter that you are controlling. This is provided as a convenience so that you do not have to go into Effect Edit mode to view the available parameters of the running algorithm. Source: This is used to select the MIDI controller, or event, that will control an effect parameter in the 300. The list contains the selections shown to the left. Threshold: This is used to set the point below which controller values will not have an effect on the parameter. Scale: This is used to set the effective control range of the MIDI controller. Scaling can be set from -200% to +200%. When Scale is set to 100%, the full range of the MIDI controller will correspond to the full range of the selected Destination parameter. Setting a negative value will cause the 300 to reduce the setting of the parameter as the controller increases. You can store any patches you create with the Effect simply by pressing STORE, selecting a register number with the Soft knob, and then pressing STORE again. Note: Be extremely careful when creating patches while a MIDI device is connected. If you accidentally send a MIDI Program Change before saving the patches in a register, they will be lost. To avoid this possibility, you may want to set the MIDI Master Channel (in Control Mode) to OFF, or unplug the MIDI cable from the 300's rear-panel MIDI IN connector. 7-4 MIDI Operation The 300 provides two different methods for using MIDI Program Change messages. These functions are accessed in Control mode (selected by pressing CONTROL). From Control mode, use the PAGE UP/DOWN keys to select the MIDI Control page and press the key directly beneath "EDIT". Using MIDI Program Change messages with the 300 MIDI Table mode has three selections: OFF, FIX and MAP. MIDI Table mode OFF sets the 300 to ignore all incoming Program Change messages. If you are in the FIX mode, and are transmitting on the System channel, Program Change messages 0-99 will select 300 Setup Presets P1-P100; Program Change messages 100-127 will select the first 28 Setup Registers (R1-R28). Note that R29-R50 are not accessible to the MIDI Program Change mechanism. Setup changes will take precedence over Effect changes. In FIX mode, if you are transmitting on channels assigned to Machine A and B which are different from the System channel number, Setup changes will be ignored. For each Machine, Program Change messages 0-99 will select Effect Presets P1-P100; Program Change messages 100-127 will select Effect Registers R1-R28. Only effects which are legal for the setup will be selected. Illegal effects will be ignored (the currently running effect will not change.) An error message will be displayed. You will quickly discover that a fixed relationship between MIDI Program Changes and the 300's preset and register numbers is not very convenient. Changing the presets in a synth, or the registers in the 300, is not all that easy when you have to arrange everything so that MIDI Program Changes have the desired effect. To solve this problem, the 300 has a corresponding map table which is used when the MIDI Table mode is set to MAP. In this mode, program changes are transmitted on the System channel you have assigned. Setups, effects for Machine A and effects for Machine B can be mapped to any program change message. Dealing with MIDI Program Changes becomes much easier since you can completely rearrange the relationship of MIDI Program Change numbers to the 300's registers and presets in minutes. To assign Program Change messages to presets or setup registers, call up the Editing the MIDI Table MIDI Control page (from Control mode), and press the button directly below "EDIT". Map:(1-128) -> S or E(AorB) # Ch _ _ 1: preset or reg name Press either the first or second button on the top line, and use the Soft knob to select the MIDI Program Change number you want to use. The third button on the top line allows you to select S (Setup), EA (Effect A) or EB (Effect B). The rightmost button allows Soft knob selection of the setup or effect preset or register number you want loaded by the Program Change number displayed on the top line. Continue this procedure until the table contains all of the entries you need. 7-5 300 V 3.0 Owner's Manual Lexicon Real-time MIDI The 300 can be automated in a number of different ways, depending on your Effects Automation applications, and on the capabilities of your MIDI sequencer. The six major categories of MIDI Automation are: 1. Using the 300's System Exclusive transmissions to record and play individual parameter changes. 2. Using the 300's Non-Registered Parameter transmissions to record and play individual parmeter changes. 3. Using MIDI Program Change messages to load Setups or Effects. 4. Using MIDI Controller information and Dynamic MIDI® patches to record and play parameter changes. 5. Using the 300's System Exclusive or Non-Registered Parameter messages that are the result of Dynamic MIDI® patches. This allows you to control, record, and play as many as five of the 300's variable parameters simultaneously. 6. Controlling multiple 300s from a single master 300. When using the 300's Automation capabilities, it is good practice to put the 300 on a different MIDI Channel from those used by other equipment in your system. This avoids the possibility of the 300 responding to commands that aren't really intended for it. Using Real-time SysEx and Non-Registered Parameters The 300 will transmit System Exclusive or Non-Registered Parameter messages as you vary any of the available parameters if this function is assigned in automation mode. As you turn the Soft knob to vary one of the 300's effect parameters, MIDI data in the selected output format will be transmitted from the 300's rear panel MIDI OUT connector as a Program Change. (All parameter values are sent when the effect itself is changed.) This information can be recorded on your sequencer. To set the automation mode, use the MIDI Control page in Control mode. Press the key under "AUTO", and use the Soft knob to select either "SysEx" or "Nonregistered Params". There is also an "OFF" setting to prevent unwanted MIDI transmissions. Once you have selected an automation mode, simply put your sequencer into Record, and change the 300's parameters to get the sounds you want. When you play the sequence back, the 300 will respond to the recorded information just as it was recorded. Note: The choice between SysEx or Non-Registered Parameters is determined by your sequencer's capabilities, and your current utilization of its available functions. With a bit of experimentation, and taking into consideration other MIDI data you need to record, you can find the best combination for your equipment. Note: Program Change messages are transmitted over the PARAM MIDI channel, regardless of automation mode. 7-6 MIDI Operation Some sequencers cannot record SysEx or Non-Registered Parameter information. In this case, you can use Dynamic MIDI® patches and record the MIDI Controller information used to get the real-time effect changes you want. Simply create the patches you want, and record the Controller information on your sequencer. When the sequence is played back, the 300's Dynamic MIDI® patches will respond to the recorded Controller commands. This type of operation gives the best of all the 300's MIDI capabilities. As previously described, create the patches you want. Set the 300 to one of the Automation modes. Put your sequencer into Record, and use the MIDI Controllers to create the effect parameter changes you need. As you change the effect parameters, the 300 will transmit information to your sequencer in the format you have chosen (System Exclusive or Non-registered Parameters). This allows you to control and record as many as five parameters simultaneously. Again, when you play back the sequence, the 300 will respond just as the changes were recorded. In applications that require more than one 300 to work together, you can use one 300 as a master, and slave as many 300s as you need to the master. This is done by connecting the MIDI OUT of the master machine to the MIDI IN of the first slave, then connecting the MIDI THRU of the first slave to the next slave, and so on. Using Dynamic MIDI® to transmit and receive MIDI Controller Information Using SysEx and Dynamic MIDI® Patches Controlling Multiple 300s Set the Automation mode on all machines to the same setting, and make sure that all machines are operating on the same MIDI Channel. To see the results, select an effect from the master machine, then put all of the machines in Effect Edit mode — displaying the same page. When you turn the soft knob on the master machine, all of the slaves will respond to the command. Note that, even if the displays are set to different pages on the various slave machines, the parameter changes are still taking place. Note: If master and slave machines have different input sources, i.e. a mix of analog and digital, effect changes will not work in SysEx and Non-Registered Parameter modes. 7-7 300 V 3.0 Owner's Manual Lexicon MIDI Dumps of Current Go to the MIDI page in Control mode and select "DUMP": The following display Setup, Event List, will appear: MIDI Table, and All Registers Dump: ALL REGISTERS Bulk Dump Dly: 2ms Pressing any of the buttons in the top row will allow Soft knob selection of the type of dump you want: All Registers, Current Setup, MIDI Map Table, or MTC Event List. Pressing any of the buttons on the bottom row allow Softknob selection of predump delay of 2ms, 50ms, 100ms or 200ms. Once you have made the selections you want here, press STORE to send this MIDI information. Please note that some dumps will take longer than others, depending on the amount of information to be passed. 7-8 Troubleshooting 8 Troubleshooting 8-1 300 V 3.0 Owner's Manual Lexicon Troubleshooting This chapter is intended primarily to help you recognize some common error states which can be corrected from the 300 front panel, or by simple means such as cable replacement. Any error states which are not covered here should be referred to your local dealer for service by a qualified technician. Low Voltage In a low-voltage, or "brown-out" condition, the 300 will freeze in its current state. None of the controls will have any effect. When power returns to a normal level the unit will reset itself as though it had just been powered on. If the unit does not reset itself, turn the power OFF, then ON to resume normal operation. Overheating Temperature extremes may cause the 300 to exhibit unpredictable behavior. If the unit as been subjected to temperatures below 32°F (0°C) or above 95°F (35°C), it should be turned off and allowed to return to normal temperature before use. The unit may be damaged by exposure to temperatures below -22°F (-30°C) or above 167°F (75°C), or by exposure to humidity in excess of 95%. If a unit exposed to such conditions fails to operate after it returns to a normal operating temperature, contact your local service representative. Common MIDI The 300 doesn't respond to MIDI Program Changes. Problems Check the PARAM MIDI channel on the MIDI Control page in Control mode and check the Table Mode setting on the same page. The Table Mode should be set to FIX or TABLE. Also check MIDI In/Out connections between the units. The 300 doesn't respond to Controller messages when using Dynamic MIDI®. Check the PARAM MIDI Channel number on the MIDI Control page in Control mode and check the patches in MOD Edit mode. Also check MIDI In/Out connections between the units. The 300 doesn't respond to SysEx commands. Check the SYSTEM MIDI Channel on the MIDI Control page in Control mode. The 300 does not send MIDI parameter changes. Check the Automation mode on the MIDI Control page in Control mode. This should be set to SYS EX or NON-REGISTERED PARAMS. 8-2 Troubleshooting The 300 does not change effects to incoming time code. Check your cable connections and the setting of the Event List mode in Control mode. Also check the signal level of the incoming time code. If it is too low, the 300 may not respond. Common Time Code Problems The 300 will not lock to the incoming time code. Check the signal level of the incoming time code. If the level is too high or too low, the 300 may not lock to the signal. Also check the wiring of the time code cable. The time code input on the 300 is electronically balanced and, if the cable is not wired with this in mind, the 300 may not lock to the signal. The 300 changes effects too late. Trim the time code values using the Edit function on the Time Code Event List page in Control mode. The 300 will not lock onto an incoming digital signal. Check the cables that you are using. If the signal is coming in through the RCA conector, cable length must be kept to a minimum. If you are using the XLR input, remember that this is a transformer-balanced input, and the cable must be wired with this in mind. DO NOT USE ANALOG AUDIO CABLE TO CONNECT DIGITAL AUDIO. Common Digital Interfacing Problems When using the ANA+DIG input mode, there is no audio output. If you are using this mode and you are not sending a digital signal to the 300, audio may not pass through the system. To correct this, choose the ANALOG mode, or enter Effect Edit mode and turn the digital input level all the way down. The meters do not show any incoming signal. The meters may be set to read the wrong inputs. Use the Meter page in Setup Edit mode to select the inputs you are using. 8-3 MIDI Implementation Data 9 MIDI Implementation Details are available to assist experienced programmers in developing software for use with the 300. These can be obtained from your dealer, or directly from Lexicon. Request: Model 300 MIDI Implementation Details. MIDI Implementation Chart 9-1 300 V 3.0 Owner's Manual Lexicon MIDI Implementation Chart Lexicon 300 Digital Effects System Function Basic Channel Default Channel Mode Defaullt Messages Altered Note Number Transmitted Recognized 1 1-16, OMNI 1 1-16, OMNI Remarks Mach A, Mach B, and System on separate channels; Memorized Mode 1, 3 X 0 - 127 Used as controller Used as controller True Voice Velocity Note ON Note OFF X X O v=1-127 X After Touch Keys Channels X X X X X O MSB only 0-95 X OX 0-99 Controllers can be patched to control effects parameters 96 97 98 99 OX OX OX OX OX OX O O Data Increment Data Decrement N-RPN N-RPN O O 0 - 127 O 0 - 127 System Exclusive O O System Common :Song Pos :Song Sel :Tune X X X X X X System Real Time :Clock :Commands X X O X Aux Messages :Local ON/OFF :All Notes OFF :Active Sense :Reset X X X X X X X X Notes If Channel is set to OFF, 300 will not recognize any messages Pitch Bender Control Change Program Change True # Mode 1: OMNI ON, POLY Mode 3: OMNI OFF, POLY 9-2 Version: 3.0 Mode 2: OMNI ON, MONO Mode 4: OMNI OFF, MONO as Controller O : Yes X : No Specifications 10 300 Specifications 10-1 300 V 3.0 Owner's Manual Lexicon 300 Specifications Audio Input and A/D Conversion Input Channels (2) Input Impedance Full Scale Input Level Common Mode Rejection Frequency Response Phase Linearity Delay Crosstalk Signal to Noise Ratio Total Harmonic Distortion SMPTE Intermodulation Distortion Dynamic Range Pre-emphasis Gain Control Balanced XLR, pin 2 "high" 50kΩ, unbalanced; 100kΩ, balanced Gain switch in 0dB position: +2dBu minimum; +20dBu maximum Gain switch in +16dB position: -14dBu minimum; +4dBu maximum DC to 2kHz: 60dB minimum; 2kHz to 20kHz: 40dB minimum 48kHz sample rate: 10Hz to 21.5kHz, +0.2dB 44.1kHz sample rate: 10Hz to 20kHz, +0.2dB 32kHz sample rate: 10Hz to 14.5kHz, +0.2dB +5 degrees, 10Hz to 20kHz (Frequency Independent) From Analog Input to Digital Output: 0.75mS 80dB maximum, 10Hz to 20kHz 90dB minimum, A-weighted 0.01% maximum, 10Hz to 20kHz 0.01% maximum 90dB minimum 15µs (+0.9µs) and 50µs (+3µs) 20dB in 0.1dB increments D/A Conversion and Analog Output Output Channels (2) Output Impedance Full Scale Output Level Frequency Response Phase Linearity Delay Crosstalk Signal-to-Noise Ratio Total Harmonic Distortion SMPTE Intermodulation Distortion Dynamic Range Balanced XLR, pin 2 "high" 75Ω -2dBu to +18dBu 48kHz sample rate: 10Hz to 21.5kHz, +0.2dB 44.1kHz sample rate: 10Hz to 20kHz, +0.2dB 32kHz sample rate: 10Hz to 14.5kHz, +0.2dB +5 degrees, 10Hz to 20kHz (Frequency Independent) From Digital Input to Analog Output: 1.8mS 90dB maximum, 10Hz to 20kHz 100dB minimum, A weighted 0.01% maximum, 10Hz to 20kHz 0.01% maximum 90dB minimum De-emphasis 15µs (+0.9µs) and 50µs (+3µs) Gain Control 20dB in 0.1dB increments Unless otherwise specified, specifications presume 48kHz sample rate, Emphasis off, Gain switch at 0dB, and Gain Control at unity (0dB) 10-2 Specifications Analog Input to Analog Output (48kHz sampling rate) 48kHz sample rate: 10Hz tp 21.5kHz, +0.2dB 80dB maximum, 10Hz to 20kHz 90dB minimum, A-weighted 0.01% maximum, 10Hz to 20kHz 0.01% maximum 90dB minimum Frequency Response Crosstalk Signal-to-Noise Ratio Total Harmonic Distortion SMPTE Intermodulation Distortion Dynamic Range Digital Audio Interfaces Balanced female XLR digital input; Balanced male XLR digital output Conforms to AES 3-1992 (ANSI S4.40-1992). Both input and output are transformer-coupled. Input/output levels and impedance comply with CCITT V.11 and EIA RS-422A. AES/EBU professional digital audio interface Unbalanced coaxial "RCA" type digital input and output; SPDIF compatible Optical (fiber optic) type digital input and output EIAJ CP-340/SPDIF consumer digital audio interface Master: 48kHz+5Hz 44.1 kHz +5Hz Slave: 42 kHz to 50kHz Sample Frequency Control Interfaces Balanced female XLR, EIA-422 input, 100mV p-p minimum. Formats supported:: Speed Range SMPTE 0.75 to 1.18 (Drop or Non-drop) EBU 0.80 to 1.33 Film 0.82 to 1.33 5-pin DIN connectors provided for MIDI IN, MIDI OUT, and MIDI THRU Time Code Input MIDI Interface General 19.0"W x3.5"H x13.6"D (483x89x346mm) 19" rack mount standard, 2U high Net weight:18.9 lbs (8.6 kg) Shipping weight: 24.5 lbs (11.1 kg) Dimensions Weight 100/120/220/240 VAC (-10%, +5%) 50-60 Hz 3-pin IEC power connector Power Requirements 75 VA maximum Power Consumption Operating Temperature: 32° to 95°F (0° to 35° C) Storage Temperature: -22° to 167°F (-30° to 75°C) Humidity: 95% max without condensation Two lines of 20 alphanumeric characters each Level 8 soft buttons for parameter selection and adjustment Soft Knob Numeric Keypad for data entry Edit Keypad Bypass A and B Power Switch CLA approval Environment Front Panel Display Front Panel Controls Safety Approvals Specifications subject to change without notice. 10-3