1
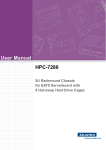
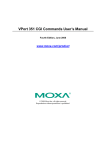
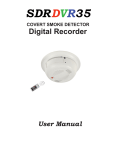
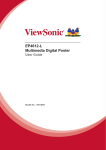
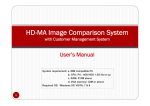
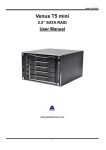
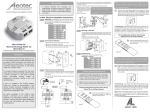
JM-LW User Manual
Mobile
Digital Video
Transmission System
JM-LW
User Manual
www.jcally.com
JM-LW User Manual
Content
Basic
!
JM-LW
!
Accessories
!
Features
!
Specifications
!
Instruction
Preference Setup
!
!
Home Screen
Controls
!
!
!
LIVE
Live Video
Camera Setup
!
HISTORY
!
EVENT
!
NETWORK
!
SETUP
!
LOG OUT
!
STATUS
!
DATE/TIME
!
DIGITAL I/O
!
!
JM-LW User Manual
Basic
JM-LW
Accessories
Kit Pack
VGA & USB Adapter
Vehicle Charger
Power Adapter
GPS Receiver
RCA Connector
1.2G Antenna
3G Antenna
JM-LW User Manual
Features
Power
Switch
3.5G
Switch
1.2G
Switch
Back Up
LED
3.5G
Antenna Port
1.2G
Antenna Port
Console Port
GPS Receiver Port
Power Port
CCD Port
DVR
JM-LW power switch
3.5G
3.5G network swtich
1.2G
1.2G radio switch
Back Up
Back up video and GPS data
IP
ON: connected to the internet ; OFF: disconnected from the internet
Regist
ON: connected to the server ; OFF: disconnected from the server
Status
if the LED is on/off/irregularly flashes, please check the system
Charge
ON: charging ; OFF: charge complete
3.5G ANT
3.5G antenna port
1.2G ANT
1.2G antenna port
Console
USB & VGA adapter connection port
GPS
GPS receiver connection port
CCD
Video camera connection port
Charge 19V DC
Power adapter/vehicle charger connection port
JM-LW User Manual
Specification
Dimensions
222x146x85 mm
AC Power
110V/220V > 19V
REC. Frame Rate
30 fps
Transmission Frequency
3 to 30 fps
Weight
2.7 kg
Battery
12V 7800mA
Codec Format
MPEG4 / M-JPEG
Ingress Protection Rating
IP65
I/O Interface
CIR656, GPIO
Storage
Compact Flash
Resolution
QVGA! 320 x 240
VGA! 640 x 480
Operating Requirements
Temperature: -10 to 60 ℃
Humidity: 10% to 90%
Instruction
Setting Up and Using JM-LW
Step 1: Plug in the 3.5G antenna
Step 2: Connect the video camera via RCA connector
Step 3: Press DVR Button to turn on JM-LW
Step 4: Press 3.5G Button to enable 3.5G network
Step 5: Press 1.2G Button to enable 1.2G radio
important:To ensure the capability and quality of the connection between the camera and , we strongly
recommend using the cameras that provide by JCALLY. To get more information about wireless portable
cameras, please visit www.jcally.com.
Back Up Video and GPS Data
Step 1: Connect the VGA & USB adapter
Step 2: Plug in USB storage devices
Step 3: Press Back Up Button to back up datas into the USB storage device
Note: When backing up, the status LED light with flash rapidly. Wait for the flash to become normal to finish
the backup process.
JM-LW User Manual
Preference Setup
Controls and Icons
Enter
Esc
: Enter the current selection / Activate the setup menu
: Exit
Tab
Page up
←
→
Page down
↑
↓
O
: Save and exit!
+
−
: Move the selection
: Adjust value
!
X
: Exit without saving
Home Screen
Main Menu
LIVE
HISTORY
EVENT
Live images / Camera setup
System status
Playback
DATE/TIME
Date/Time setup
Event logs
DIGITAL I/O
Digital I/O setup
NETWORK
Network setup
SETUP
System setup
LOG OUT
STATUS
Log out / Shut down
LIVE - View live videos / Camera Setup
DATE/TIME - Date / time setup
HISTORY - Play history records
DIGITAL I/O - Digital input / output setup
EVENT - View event logs
NETWORK - Network preference setup
SETUP - System preference setup
LOG OUT - Log out / shut down
STATUS - View system status
!
JM-LW User Manual
LIVE
Live Video
After entered LIVE, you will see the live video in single frame or several videos in split frames like below:
Tile mode
camera number
Recording
1
Motion:0
REC
2
2010/09/17 15:16:17
2010/09/17 15:16:17
date / time
motion detection activated
(red frame)
Focus mode
current selected camera
(white frame)
Maximized mode
Camera Setup
Select a camera and press
camera.
Enter
to activate the setup menu and adjust the preferences of the selected
Open/Hide Cameras
Show/hide the selected camera
Open All
Show all cameras
JM-LW User Manual
Hide All
Hide all cameras
Record Continuously
Start/stop continuously recording
Record Motion
Start/stop motion detection recording
Stop Recording
Stop recording from the selected camera
Record All
All cameras start recording
Stop Recording All
All cameras stop recording
Video Recording Quality
Set video recording quality
Cont. Recording F.R.
Set continuously recording frame rate
On Motion Recording F.R.
Set recording frame rate when motion detection is activated and
triggered
No Motion Recording F.R.
Set recording frame rate when motion detection is activated but
no motion detected
Alarm Recording F.R.
Set recording frame rate when alarm is triggered
Pre Record
Set pre record time
Post Record
Set post record time
M.D. Trigger Threshold
Set motion detection trigger threshold
M.D. Noise Filter
Set motion detection noise filter
Apply To All
Apply settings to all cameras
Hue
Adjust video hue
Contrast
Adjust video contrast
U Saturation
Adjust video chrominance
V Saturation
Adjust video chroma
Brightness
Adjust video brightness
Volume
Adjust video volume
Recall Hardware Default
Recall default settings
Record Audio
Enable/disable record audio
Arrange Mode
Set display arrangement
Auto Scale View
Enable/disable auto scaling frame to fit the screen
Auto Sequence
Enable/disable auto sequence switching between cameras
JM-LW User Manual
History
Play video records from the built-in memory.
selected camera
date
history records
time
control panel
Fast backward !
Play backward !
Pause !
Play forward !
Fast forward !
Previous frame !
Next frame !!
Home !
End
i Info !
!
X Delete !
USB Back up to USB devices !!
!
!
!
Capture images
CF Back up to CF card
Note: GPS information only shows in primary camera (camera 1)
EVENT
View event logs and test network connection — Event logs includes video camera connection history, login
history, IP address, video recording mode, HDD status, DI/DO status, and video backup records. Users can
also test network connections by keying in the test IP address in the field, and select ➔ then press Enter .
Event Viewer
VideoServer: Booting...
File database updated: 4 file(s), 0.0 sec
VideoServer: Boot completed
VideoServer: Start listen; 17860 successfully
Testing Network Address:
key in the test IP address here
➔
JM-LW User Manual
NET WORK
1. Registered host name/ID
Host Name/ID:
JM-LW01
2. 3G router network setup
1
Host Description:
3. Server connection port
IP Obtain Type:!
Static
IP Address:
192.168. 0.100
Net Mask:
255.255.255. 0
Default Gateway: 192.168.
0.
DNS Address:
0.
0. 1
2
Disable
TEL:
*99#
4. Connect to the server
6
APN / User Name: internet
5. Server IP address
Password:
6. Internet connection
0. 0
Local Port No: 17860
3
Name Server Register: Enable
4
Address:
5
O
Dial Up Service: !
X
SETUP
Modify system preference (videos, sounds, alarms, languages, etc.)
LOG OUT
Log in with a different account to access the system.
STATUS
1. System status
System Status
PDVR 1.4.2 (Oct 29, 2005)
Loged in User: Admin
2. Digital Input / output
LAN IP = 0.0.0.0
Dial Up: No Service
3. Network connection
Name Server: Disable
Alarm Status: Normal
Total Capacity:
Free Space: 36%, 10.90 GB
Total Video File(s): 4
I
30.0GB
HDD2
HDD3
HDD4
I
I
I
O O O O
1
2
Download: 0 Byte(s)
Upload: 0 Byte(s)
Total Download: 0.0 KB
Total Upload: 0.0 KB
Client Connection: 0
Date:
UTC:
Status: Out of Signal
Satellite Count:
Latitude:
Longitude:
Speed:
Course:
3
4
4. GPS status
JM-LW User Manual
DATE/TIME
Set up system date and time
Date / Time Setup
System Date (YYYY/MM/DD): !
2010/04/21
System Time (HH:MM:SS):! !
18:49:19
O
X
DIGITAL I/O
Digital input / output information.
Digital I/O Setup
DI 1:
DI 2:
DI 3:
DI 4:
O
X