1
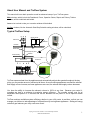
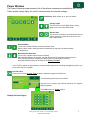
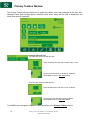
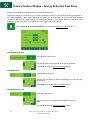
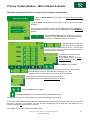
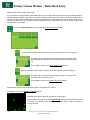
TruFlow
User Manual
___________________________
Spring Air Systems Inc., Oakville, Ontario
Phone (866) 874-4505, Fax (905) 338-0179, [email protected]
www.springairsystems.com
April 2010
TABLE OF CONTENTS
Title
Page
Manual Overview and Components
…………………..………...1-2
Log In / Log Out ……………………………………………………..3
Dashboard Window
………………………………………………..4
Efficiency and Target Graph overview
…………..………………..…4
Motor Starters operation ……………………….……………………….4
Power Window...……………………………………………………….5
Operation Status Window
………………….……………………6-7
Acknowledging and Clearing Messages
……………………………6-7
Report Window ....…………………………………………………..8-9
Primary Toolbox Window………………………………………..11-16
Changing the Date and Time……………………………………………11
Changing the Message Center Text……………………………………12
Changing the Company Name………………………………………….12
Changing the Time to Dashboard………………………………………12
Changing Language to French………………………………………….12
Energy Reduction Goal & Utilities Cost Setup…………………….12-13
Automatic Start/Stop Setup…………………………………………..14-15
Hood ON/OFF Schedule setup…………………………………….…….14
Motor Starters Schedule setup…………………………………….…….15
Water Wash Timer Setup
……………………………………………..16
About User Manual and TruFlow System
This manual will cover basic operation as well as advanced setup of your TruFlow system.
Main windows, which include the Dashboard, Power, Operation Status, Report and Primary Toolbox
windows, will be underlined and bolded.
Icons to be touched to take you to another window will be bolded.
Auxiliary windows, like the Automatic Start/Stop Schedule setting windows, will be underlined.
Typical TruFlow Setup:
Makeup Air Unit
Exhaust Fan
FRESH AIR
Roof Deck
Exhaust Duct
Variable Frequency Drive
J-COUPLE
Finished Ceiling
Exhaust Hood
Touchscreen
Finished Floor
Appliance Lineup
TruFlow measures heat from the appliances and automatically adjusts fan speeds throughout the day,
giving you the precise amount of exhaust at all times. As more cooking appliances are used the exhaust
and supply volume increase; as fewer appliances are used, the exhaust and supply volume decrease.
You have the ability to increase the exhaust volume to 100% at any time. Because you control it,
overrides are kept to a minimum to maximize energy efficiency. The override system runs for an
adjustable timed period of 15 minutes and can be activated on the panel or via as optional remote
control.
TruFlow monitors ventilation system efficiency relative to your utility costs, in real-time, so that you can
manage your kitchen to take advantage of off peak times by turning down appliances. Setting an energy
reduction goal reduces your utility costs even more!
Spring Air Systems TruFlow User Manual April 2010
“SEE YOUR SAVINGS”
1
Main System Components
This is your TruFlow Touchscreen panel.
The panel can be mounted on a wall or on of the hoods and puts
operation of your kitchen exhaust equipment at your fingertips.
Additionally, the TruFlow can be set up to control up to seven
cooking appliances, seven external lighting zones, and two extra
exhaust hoods connected to motor starters.
J-Couple
TruFlow measures the temperature in each exhaust duct
collar for each hood connected to an exhaust fan that will be
sped up or slowed down using a j-couple.
Variable Frequency Drive (VFD)
Each exhaust fan has its own variable frequency drive. The
TruFlow sends a signal to the drive telling it to slow down or
speed up the fan.
Some makeup air units will also have a VFD.
2
Spring Air Systems TruFlow User Manual April 2010
“SEE YOUR SAVINGS”
Log In / Log Out
In order to make any changes to the settings on your TruFlow system, you will need to log in.
Touch the Primary Toolbox icon.
Touch the Login icon.
Touch the white field beside Name.
Type your login name using the pop-up
keyboard.
Touch Enter key.
The login window will return.
The login name is case sensitive.
The CAPS key is on
automatically. If you do not know your login name and password
call Spring Air Systems.
Touch the white field beside Password
Type your password using
keyboard.
Touch Enter key.
The login window will return.
the
pop-up
The password is also case sensitive.
Touch the UNLOCK icon.
Touch the word Close to close the login box.
You are now logged in.
Logout
TruFlow will automatically log you out after a set amount of time (see Changing Time to Dashboard)
Touch the Primary Toolbox window icon.
Touch the lock.
Touch the lock again.
You are now logged out.
Spring Air Systems TruFlow User Manual April 2010
“SEE YOUR SAVINGS”
3
Dashboard Window
The Main Dashboard is the heart of the TruFlow system. It provides current exhaust operating data and
a visual representation to the kitchen staff whether or not they are meeting your Energy Reduction Goal.
Target
This icon shows the operating efficiency of the
kitchen as it relates to your Energy Reduction
Goal. In the example, the kitchen has exceeded the Energy
Reduction Goal by 27%. When the system is operating in override,
the text turns red and a hand is shown.
Current Exhaust Volume
Current Outdoor Temperature
Canopy Lights
Touch this icon to turn on and off the canopy lights.
When the lights are on the bulb is yellow.
Target Graph
This graph is a visual representation of the operating efficiency and updates continuously.
When the staff is meeting or exceeding your Energy Reduction Goal, this graph will be on
target (shown above) and the efficiency icon will show the percentage the Energy
Reduction Goal is being exceeded. When the Energy Reduction Goal is not been
achieved, the graph will show a red hunting target (shown left), and the Efficiency icon will
show the percentage of the Energy Reduction Goal that is being reached.
Override
To override the TruFlow, touch the Efficiency icon. Operation will drive to 100% for a pre-set
length of time and the Efficiency icon will be crossed out. The override time is adjustable through
the Power window.
Touch to open the Power window
Touch to open the Operation Status window
Touch to open the Report window
Touch to open the Primary Toolbox window.
This window is accessible only with a password.
The Company Name, Message Center, Date and Time of Day can be changed in the
Primary Toolbox window with a password.
Lon or BACnet Connection
When this symbol is displayed on the Dashboard, the complete TruFlow operation is controlled by
the building computer. The only local interaction with the TruFlow is the Override. The TruFlow
ON/OFF operation is controlled by the building computer.
Motor Starters
Touch the Hand icon beside the motor starter you would like to turn on or off.
When the motor starter is turned on, the Hand is highlighted in white.
Multiple Kitchen Display:
The Dashboard on a multiple-kitchen TruFlow system is shown left. Each kitchen’s
individual Dashboard can be accessed by touching the Kitchen’s target graph.
4
Spring Air Systems TruFlow User Manual April 2010
“SEE YOUR SAVINGS”
Power Window
The Power Window provides access to all of the exhaust components controlled by the TruFlow.
These include canopy lights, fan on/off, summer/winter and override settings.
Fan Status. When system is on, fan icon rotates.
Canopy Lights.
Touch icon to turn on/off lights. When canopy
lights are on, icon has a white border.
Kitchen Start.
Touch icon to manually turn on/off kitchen exhaust
system. When the system is turned on, the icon
has a white border.
Summer/Winter.
Touch icon to switch between summer and winter mode.
When in winter mode, makeup air burner will activate as required to maintain makeup
air temperature.
Manual System Operation.
Touch icon to operate exhaust system manually.
When manual operation is engaged, icon has white border and exhaust system will need
to be manually started by touching the kitchen start icon and stopped every day.
Automatic start/stop times can be setup in the Primary Toolbox.
If your TruFlow system is controlled by a remote start/stop signal from a building management system, you
will not have this icon available.
Override Timer
Touch icon to access Override Timer window to adjust the length of Override time.
Touch the dark green field next to minutes.
Type the time, in minutes, the Override should run for using the
pop-up keyboard.
Touch OK to return to Power window.
Multiple Kitchen Display:
Spring Air Systems TruFlow User Manual April 2010
“SEE YOUR SAVINGS”
5
Operation Status Window
The Operation Status window provides a list of current and previous messages that have been recorded
by the TruFlow. You will need to go to this screen to clear messages. Unacknowledged messages will
show in red on the list; acknowledged messages will be yellow or green.
Acknowledge All Messages icon
Touch this icon to acknowledge
all active messages.
Acknowledge Message icon
Touch this icon to acknowledge only
the highlighted active message.
Scroll Up one line
Touch this icon to scroll
the page up by one line.
Scroll Down one line
Touch this icon to scroll the page
down by one line.
Scroll Up one page
Touch this icon to scroll
the page up by one page.
Scroll Down one page
Touch this icon to scroll the page
down by one line.
Clear errors on VFD.
Touching this icon to clear the drive errors.
Messages (errors) will also be recorded on the VFD. Some messages also require the VFD to be restarted. For a
list of messages that require the VFD to be restarted prior to touching clear error on drive, see Appendix L on the
TruFlow Maintenance manual.
The exception to this is Thermal Start messages and J-Couple Trouble messages. These messages will not be
recorded on the VFD.
Unless directed to do by an authorized service agent, or Spring Air Systems, do not turn off power to the TruFlow
Lite Touchscreen. Turning off the power to the TruFlow Lite Touchscreen will cause all recorded messages to be
deleted.
6
Spring Air Systems TruFlow User Manual April 2010
“SEE YOUR SAVINGS”
Operation Status Window
Operation Messages
When a message that requires immediate attention or action occurs, the
screen will change to red with a yellow exclamation mark. These types of
alarm include certain drive errors where the VFD cannot reset
automatically, and catastrophic equipment failures (exhaust fan or makeup
air unit not running).
Touching the screen anywhere and opens the Operation Status window.
The current message including the date, time, state and whether the
message has been acknowledged will be shown. There will also be an
explanation of the cause of the message.
Once the cause of the message has been corrected, it can be acknowledged by touching the Acknowledge
Message icon and then the Clear Error On Drive icon to resume normal operation.
Current messages will be highlighted in red; messages that have been acknowledged but not cleared will be
highlighted yellow; messages that have been both acknowledged and cleared will be highlighted in green.
Thermal Start
The TruFlow will automatically turn on the exhaust and supply fans when a
threshold temperature under the hood is reached.
When this occurs, the window shown left will popup.
Touch ok to exit the thermal start warning window.
Be sure to turn the fans on manually, or switch operation (if setup) to schedule for continual operation. If you do not,
the thermal start will turn the system off after four hours, and this process will begin again.
J-Couple Cable Trouble
J-Couple Cable Trouble messages occur when the J-couple cable has been unplugged. This occurrence will cause
the TruFlow to operate on high (100%) until the cable is plugged back in. J-Couple Cable Trouble message will not
shut down the exhaust system.
Surface Fire Suppression
In the event the surface fire suppression activates, the TruFlow will show this popup:
Once the fire is out and the suppression system is reset, touch reset to return to normal
operation. If you have a multiple-kitchen TruFlow system, you will need to repeat this
step on each kitchen’s dashboard.
Communication Alarm Popups
This is a typical popup displayed after a MODbus, Comm Port or communication
message.
Communication messages occur when there is a timeout or lack of communication
between the TruFlow and one or more of the VFDs. Communication messages are not
fatal; however, the message that causes them may be.
7
Spring Air Systems TruFlow User Manual April 2010
“SEE YOUR SAVINGS”
Report Window
The Report Window provides access to reports generated using gas and electricity rates as entered by
you. For accurate reports, make sure gas and electricity rates are kept up-to-date. These rates can
be changed in the Primary Toolbox window.
The reports available are listed on the window.
Touch any bar to view the reports named.
YTD Cost of Gas
The YTD Cost of Gas report is a chart of the cost of gas in dollars for the
month. The cost of gas includes the cost to heat the kitchen makeup air
during winter operation.
Year to Date Cost
accumulative gas cost
of
Gas
is
the
YTD Cost of Electricity
The YTD Cost of Electricity report is a chart of the cost of electricity in dollars
for the month. The electricity cost includes the cost to run any motor
connected to the TruFlow and the cost to air condition the kitchen during the
summer, if any.
Year to Date Cost of Electricity is the
accumulative electricity cost
8
Spring Air Systems TruFlow User Manual April 2010
“SEE YOUR SAVINGS”
Report Window
Daily Cost of Utilities
The Daily Cost of Utilities report is a chart of the daily cost of gas and
electricity in dollars for the day of the week. The daily costs combines
electricity and gas.
% Time in Override
The % Time in Override graph plots the percentage of time in override vs
the total time of operation.
% Time Exceeding Goal
The % Time Exceeding goal graph plots the percentage of time you have
exceeded your Energy Reduction Goal vs the total time of operation.
If the value is above zero you are exceeding your Energy Reduction Goal.
Some TruFlows have a built-in Auto Goal Setting feature. The Truflow will
analyze the rate of change of the percentage of time exceeding goal and
automatically increase your Energy Reduction Goal to increase energy savings.
Spring Air Systems TruFlow User Manual April 2010
“SEE YOUR SAVINGS”
9
Primary Toolbox Window
The Primary Toolbox window allows you to update the utilities costs, make changes to the date, time,
Message Center and Company Name, automatic on/off times, along with the time to dashboard, and
water wash timer (if equipped).
Changing Date and Time
Touch the dark green field with the date.
Touch the dark green field next to Month, Day or Year.
.
Type the new information in the pop-up keyboard.
Touch enter to return to Set Date window.
Touch the dark green field with the time.
Touch the dark green field next to Hour or Minute
Type the new time using the pop-up keyboard.
Touch enter to return to Set Date window.
Touch OK to save changes or Cancel to delete and return to the Primary Toolbox window.
10
Spring Air Systems TruFlow User Manual April 2010
“SEE YOUR SAVINGS”
Primary Toolbox Window
Changing Message Centre Text
Touch the dark green field to change Message Centre Text.
Type new text using the pop-up keyboard.
Touch Enter to save or ESC to cancel and
return to the Primary Toolbox window.
Changing Company Name
Touch the dark green field to change Company Name.
Type new Company Name using the pop-up
keyboard.
Touch Enter to save or ESC to cancel and
return to the Primary Toolbox window.
Changing Time to Dashboard
Touch the dark green text box to adjust the number of seconds
before TruFlow view changes back to Dashboard window.
Type the new setting (in seconds) using the
pop-up keyboard.
Touch enter to return to Primary Toolbox window.
Changing Language to French
Touch the dark green box besides French to switch to the French language.
Spring Air Systems TruFlow User Manual April 2010
“SEE YOUR SAVINGS”
11
Primary Toolbox Window – Energy Reduction Goal Setup
Setting up and changing the Energy Reduction Goal and utilities costs.
The Energy Reduction Goal is set by you. It is the percentage of energy you would like to save by turning down or
off unused appliances. Once these appliances are turned off, the temperature in the hood will drop, allowing
TruFlow to slow down the exhaust fan(s) and makeup air. Setting up your Energy Reduction Goal and setting
guidelines for staff to turn down or off appliances is key to getting the most savings.
Touch the Energy Reduction Goal Setup icon to access the Energy Goal Setup window.
Change Reduction Goal
Touch the dark green text box.
Type the reduction goal percentage in the pop-up keyboard.
Touch Enter to return to Energy Goal Setup window.
Change Gas Cost
Touch the dark green field.
Type the gas cost based on $/thm ($/1,000,000 btu’s) using the popup keyboard.
Touch Enter to return to Energy Goal Setup window.
Change Electricity Cost
Touch the green text box.
Type the electricity cost based $/KWH using the pop up key
board.
Touch Enter to return to Energy Goal Setup window.
12
Spring Air Systems TruFlow User Manual April 2010
“SEE YOUR SAVINGS”
Primary Toolbox Window – Energy Reduction Goal Setup
Air Conditioning Cost
Touch A/C icon when the kitchen makeup air is cooled.
When summer mode is selected on the Power window, additional electricity costs will be
included in the energy usage calculations for air conditioning.
Touch A/C icon to de-select air conditioning if none is available.
Time-of-Use Electricity
Touch the checkbox if your electricity rate increases during peak
periods of the day.
When Time-of-Use Electricity is selected, additional setup options
become available.
Touch the dark green field besides Cost.
Type the rate based on $/kWH using the pop-up keyboard.
Touch enter to return to Energy Goal Setup window.
Touch up/down icons to change the hour and
minute of day the peak electrical rate starts.
Touch up/down icons to change the hour
and minute of day the Peak electrical rate ends.
Touch AM/PM icon to adjust time of day.
Touch the Primary Toolbox icon to exit Energy Goal Setup window.
Spring Air Systems TruFlow User Manual April 2010
“SEE YOUR SAVINGS”
13
Primary Toolbox Window – Automatic Start/Stop Setup
Setting the automatic Start/Stop Times
The automatic schedule is useful if you would like your exhaust system,
external lights, appliances and motor starters to turn on and off at a set time
each day. You can set up a different automatic start and stop time for each
day of the week, and each lighting zone/appliance/motor starter. You will
need to set an automatic start/stop time for every day of the week you will
not be operating the exhaust system in manual (HAND) mode.
From the Primary Toolbox window, Touch Automatic Schedule
icon.
The screen will change to the Automatic Schedule window if
your TruFlow controls fans with variable frequency drives only.
If your TruFlow also controls your appliances, zone lights, or exhaust fans with
motor starters, you will need to also touch the Hood ON/OFF Schedule
bar after touching the Automatic Schedule icon.
Touch the light green fields
next to the open door to set
the hour and minute for the exhaust system to turn on.
The first field is for the hour (6 in the example) and the
second field is for minute (00 in the example).
Using the pop-up keyboard, type
the number for the time.
Touch enter to return to the
Automatic Schedule window.
Touch the am/pm icon change.
Touch the light green field next to the closed door to set the hour and minute for
the exhaust system to turn off. The first field is for the hour (11 in the example)
and the second field is for the minute (00 in the example).
Using the pop-up keyboard, type the number for the time.
Touch enter to return to the Automatic Schedule window.
.
Touch the am/pm icon to change.
Touch the next page icon to set the times for Friday, Saturday and Sunday.
If you want the hood to stay turned off on a particular day, set the on and off times to the same. For example, if you
are not open Sundays, set Sunday’s opening and closing time to 12:00 a.m.
14
Spring Air Systems TruFlow User Manual April 2010
“SEE YOUR SAVINGS”
Primary Toolbox Window – Motor Starters Schedule
Setting the automatic on/off times for exhaust fans running on motor starters.
Touch the Motor Starters bar to switch to the Motor Starters Schedule
window.
Touch the Hand icon beside the motor starter to turn on or off the automatic
schedule.
If the automatic schedule is turned off, the Hand icon will be highlighted in
white and the motor starter must be turned on manually from the Dashboard
window.
Touch the motor starter bar you would like to .set up a
schedule for. Your motor starters will be name at the time
of startup (i.e. Dishwasher rather than Zone 1).
Touch the light green fields next
to the open door to set the hour
and minute for the motor starter to turn on. The first field
is for the hour (6 in the example) and the second field is
for minute (00 in the example).
Using the pop-up keyboard, type
the number for the time.
Touch enter to return to the Motor
Starters Schedule window.
.
Touch the am/pm icon to change.
Touch the light green field next to the closed door to set the hour and minute for
the motor starter to turn off. The first field is for the hour (11 in the
example) and the second field is for the minute (00 in the example)
Using the pop-up keyboard, type the number for the time.
Touch enter to return to the Motor Starter Schedule window.
.
Touch the am/pm icon to change.
Touch the next page icon to set the times Friday, Saturday and Sunday.
Repeat these steps for each motor starter you want to automatically turn on and off.
If you want a motor starter set on an automatic on/off schedule to stay turned off on a particular day, set the on and
off times to the same. For example, if you are not open Sundays and do not want the motor starters on, set
Sunday’s opening and closing time to 12:00 a.m.
Touch OK to return to the Automatic Schedule window.
Spring Air Systems TruFlow User Manual April 2010
“SEE YOUR SAVINGS”
15
Primary Toolbox Window – Water Wash Setup
Optional Water Wash Sequence(s) setup.
If your hoods are equipped with a water wash system, you can adjust the length of time after the exhaust system is
turned off before the wash cycle will turn on and how long the wash sequence will run for. A different setting can be
set for up to three different water wash systems as long as they are connected to the TruFlow control panel. These
settings are adjusted by your Spring Air Systems authorized service technician at the time of startup; however you
can adjust them as needed.
Touch the water wash timer icon to access the Water Wash Timer window.
Touch the dark green field beneath the delay time for the sequence you are setting up.
Using the pop-up keyboard, type the length of time (in seconds) after
the exhaust system has been turned off before the wash sequence will
run.
Press enter to return to the Water Wash Timer window.
Press the dark green field under the wash time for the sequence you are setting up.
Using the pop-up keyboard, type the length of time (in seconds) after
the wash sequence should run for.
Press enter to return to the Water Wash Timer window.
Repeat these steps for each water wash system connected to the TruFlow.
Press OK to return to the Primary Toolbox window.
The wash cycle will run when the exhaust fan is turned OFF.
A blinking water drop will show on the Dashboard window when the wash sequence
is running. The number in the water drop indicates which number sequence is
currently running.
16
Spring Air Systems TruFlow User Manual April 2010
“SEE YOUR SAVINGS”