1
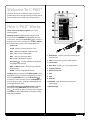
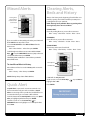
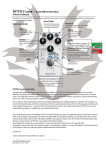
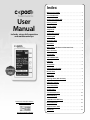
Index
Welcome To C-PAD™ . . . . . . . . . . . . . . . . . . . . . . . . . . . . . . . . . . . . 2
How C-PAD Works . . . . . . . . . . . . . . . . . . . . . . . . . . . . . . . . . . . . . . 2
User
Manual
Includes setup, daily operation
and maintenance tips.
At The Start of Each Shift . . . . . . . . . . . . . . . . . . . . . . . . . . . . . . . . 3
Getting Started . . . . . . . . . . . . . . . . . . . . . . . . . . . . . . . . . . . . . . . . . 3
Charge C-PAD . . . . . . . . . . . . . . . . . . . . . . . . . . . . . . . . . . . . . . . . . . . 3
Sleep Mode . . . . . . . . . . . . . . . . . . . . . . . . . . . . . . . . . . . . . . . . . . . . . 3
Turning the Unit On . . . . . . . . . . . . . . . . . . . . . . . . . . . . . . . . . . . . . 3
Powering-Off . . . . . . . . . . . . . . . . . . . . . . . . . . . . . . . . . . . . . . . . . . . 3
Set Date & Time . . . . . . . . . . . . . . . . . . . . . . . . . . . . . . . . . . . . . . . . . 3
Main Menu . . . . . . . . . . . . . . . . . . . . . . . . . . . . . . . . . . . . . . . . . . . . . . 4
Other Tools: Calculator & Pulse Rate Timer . . . . . . . . . . . . . 4
Menu Structure . . . . . . . . . . . . . . . . . . . . . . . . . . . . . . . . . . . . . . . . . 4
Set-Up Beds . . . . . . . . . . . . . . . . . . . . . . . . . . . . . . . . . . . . . . . . . . . . . 5
Add & Delete Beds . . . . . . . . . . . . . . . . . . . . . . . . . . . . . . . . . . . . . . 5
Edit Beds . . . . . . . . . . . . . . . . . . . . . . . . . . . . . . . . . . . . . . . . . . . . . . . . 5
Set An Alert . . . . . . . . . . . . . . . . . . . . . . . . . . . . . . . . . . . . . . . . . . . . . 6
Also
Features:
Acknowledge the Alert . . . . . . . . . . . . . . . . . . . . . . . . . . . . . . . . . . 6
and
Missed Alerts . . . . . . . . . . . . . . . . . . . . . . . . . . . . . . . . . . . . . . . . . . . . 7
Calculator
Pulse
Timer
Quick Alert . . . . . . . . . . . . . . . . . . . . . . . . . . . . . . . . . . . . . . . . . . . . . . 7
Clearing Alerts, Beds & History . . . . . . . . . . . . . . . . . . . . . . . . . . 7
Adjusting Settings . . . . . . . . . . . . . . . . . . . . . . . . . . . . . . . . . . . . . . 8
The C-PAD Utility . . . . . . . . . . . . . . . . . . . . . . . . . . . . . . . . . . . . . . . . 9
Specifications . . . . . . . . . . . . . . . . . . . . . . . . . . . . . . . . . . . . . . . . . . . 9
Care & Maintenance . . . . . . . . . . . . . . . . . . . . . . . . . . . . . . . . . . . . 10
Patent Pending . . . . . . . . . . . . . . . . . . . . . . . . . . . . . . . . . . . . . . . . 10
C-PAD One Year Warranty . . . . . . . . . . . . . . . . . . . . . . . . . . . . . . 10
Download a Printable Adobe
Acrobat PDF Version
FCC Certification . . . . . . . . . . . . . . . . . . . . . . . . . . . . . . . . . . . . . . . 10
Register Your C-PAD . . . . . . . . . . . . . . . . . . . . . . . . . . . . . . . . . . . 10
Contact Us . . . . . . . . . . . . . . . . . . . . . . . . . . . . . . . . . . . . . . . . . . . . . 10
Download Acrobat Reader
Welcome To C-PAD™
9
8
7
Thank you for choosing C-PAD, the simple, easy-to-use
portable device that is designed to help you keep track of
and be alerted to time-critical assessments/protocols.
6
1
How C-PAD™ Works
2
5
3
Touch screen and button navigation can be used
interchangeably.
Selecting an item: Highlight an item using the touch
screen or use the PREV/NEXT to highlight the first item
on the menu. Then use the Arrow Keys
to scroll up or
down. On some screens you have to press OK or ENTER at
the bottom of the screen to select a highlighted item.
4
Commands:
Cancel – Returns you to the previous menu
10
Done – Back to View My Beds (default screen)
11
Edit – Takes you to the Edit My Beds
1. Wake Button – Hold 2-3 seconds to awaken or put
device to sleep
Main – Takes you to the Main Menu
OK - Accepts a highlighted selection
2. Alert! – Flashes when you have a Missed Alert
– Scroll up and down through lists
Arrow Keys
to highlight your selection
3. Touch Screen
PREV and NEXT buttons – Navigate back and forth
between pages
4. Quick Alert – Quickly sets a 3 or 5 minute Alert!
ENTER – Chooses a highlighted selection
6. Battery Charge Icon
5. Scroll Bar Indicator
Scrolling: With the exception of the View My Beds screen,
highlight the first item on the list using the touch screen,
or by using PREV/NEXT, then use the Arrow Keys
to scroll up or down one item at a time or PREV/NEXT to
move one page at a time. Scrolling is indicated by the bar
on the right side of the screen.
7. Time
To scroll through beds on the View My Beds: Highlight
the first item using PREV/NEXT, then use the arrow
keys
to scroll up or down one bed at a time. Using the
touch screen to select a bed will take you directly to setting
up an alert for that bed.
11.Outlet Charger
8. Date
9. USB Port
10.USB Cable – Plugs directly into your PC, or the
outlet charger
2
Back to Index
At the Start of
Each Shift
Sleep Mode
Put the device to sleep by holding the wake button.
Device will automatically go into sleep mode after 90
seconds (factory default). You are able to adjust this setting
from 10 to 99 seconds. See page 8 for Adjusting Settings.
1.Check date and time
If battery was drained or C-PAD is powered off, the date
and time will need to be reset.
Main – Setup – C-PAD Config – Maintenance –
Set Time – SAVE – Done
Turning the Unit On
2.Clear History
History holds a max of 500 alerts. Clearing History makes
it easier to navigate to review alerts. Clearing History
clears all Missed Alerts.
Turn on your device by depressing the wake button on
the left hand side for 2-3 seconds. This button also puts the
device to sleep. You are able to adjust the sleep wake from
01 to 5 seconds. See page 8 for Adjusting Settings.
Main – Setup – Clear History – Yes/No – Done
Powering-Off
3.Edit bed assignments
Press Edit (at bottom of View My Beds/default screen)
Go to Edit My Beds – press Add/Delete.
For more information see Set-Up Beds on page 5.
Powering-Off prolongs battery life. You should Power-Off
when not using C-PAD for extended days off such as a
vacation. Powering-Off will delete your beds, date and
time settings.
Getting Started
Charge C-PAD™
Main – Setup – C-PAD Config – Maintenance –
Shutdown C-PAD.
Hold wake button for 2-3 seconds to turn unit back on.
Charge C-PAD by either plugging into your computer’s
USB port, or plugging into an outlet. C-PAD takes
approximately 60 minutes to fully charge. Disconnect
C-PAD from USB cable to operate.
Set Date & Time
Main – Setup – C-PAD Config – Maintenance – Set Time
NOTE: You cannot operate the C-PAD while charging.
To Charge C-PAD
Prev/Next
USB Port + Attach USB Cable + Attach to your computer or
the outlet charger
Arrow Keys
Save
Use the PREV and NEXT buttons to navigate through
month/day/year, hour/minutes, 12/24 hour format.
Use the Arrow Keys
to make changes. When done
press SAVE or highlight SAVE and press ENTER.
Battery Life|
Charge every 3-4 days with routine use. The charge can
be extended by adjusting certain settings, such as
shortening the sleep time-out and decreasing LED
brightness.
IMPORTANT:
Change your clock for daylight savings time.
3
Back to Index
Main Menu
Menu Structure
From the Main Menu you can navigate through all the
C-PAD’s menus as illustrated in the Menu Structure chart
on the right.
The following chart illustrates the menu structure of C-PAD.
Subsequent sections detail the operation of each menu.
When no beds are entered and you wake-up the device,
the C-PAD defaults to the Main Menu with Enter My Beds
highlighted, so you can quickly enter your beds, set the
date and time, as well as access the Calculator and
Pulse Rate Timer.
Quick Alert
View My Beds
USB Port
Main
View My Beds
Wake Button
Main Menu
Edit My Beds
Main Menu
View My Alerts
Edit My Alerts
Setup
(Set Date & Time)
History
Calculator & Pulse
Set-Up
Other Tools
Missed Alerts
Once you have entered your beds the C-PAD wakes to the
View My Beds screen, so you can quickly set an Alert. The
Main Menu can then be accessed by touching Main at the
bottom of the View My Beds screen. (See below).
Beds
Clear Alerts
Clear Beds
Clear History
View My Beds
C-PAD Config.
Main Menu
Alert Mode
Display Config.
Other Tools
Floors/Beds
Sleep/Wake
For your convenience C-PAD comes with a Calculator and
Pulse Rate Timer, so that you have these tools at your
fingertips at all times.
Sound Config.
Maintenance
To access these tools select Main from the bottom of the
View My Beds screen, select Other Tools:
Order Code
Main – Other Tools
Set Time
Pulse Rate
Shutdown C-PAD
The pulse rate timer counts from 0 to 90 seconds.
Touch Calibrate
Timer starts as soon as you select Pulse.
Version
To restart time just press clear.
4
Back to Index
Set-Up Beds
Add or Delete Beds
Main Menu – Enter My Beds
On the Add Bed screen, type in the room number into the
highlighted box.
Press OK.
Alpha (A,B)
101A, 101B
Room number
entered here
Numeric (1,2)
101-1, 101-2
Window/Door (W,D)
101-W, 101-D
Semi-private
bed location
(A, B; 1, 2;
or W,D)
All Private
101, 102
Keys for
semi-private
bed locations
On the Bed Config. screen, use the NEXT button or touch
screen to select Alpha (A,B); Numeric (1,2); or Window/Door
(W,D) to denote the door or window bed location in a semiprivate room.
To Add another bed, touch Add or press Enter and repeat
the above steps.
Select All Private only when the care setting is 100% private,
as this selection disables the bed location box.
To Delete a bed, highlight the bed using the touch screen,
an asterisk will appear next to the bed, then press Delete.
Alpha (A,B); Numeric (1,2); and Window/Door (W,D) bed
locations cannot be used interchangeably.
When you have entered all your beds press Done.
SHORTCUT:
IMPORTANT:
Edit button, at the bottom of the
View My Beds screen, lets you quickly
add or delete beds on-the-fly!
To expedite the process for entering and
editing beds the Bed Config. screen will not
show up again once the semi-private or all
private choice is made.
To switch between alpha, numeric or
window/door:
Main Menu – Setup – cpad Config. – Bed Config.
Edit Beds
To make it quick to add or delete beds on-the-fly, you are
able to go directly to the Edit My Beds Screen:
From the default View My Beds screen press Edit.
Changing Semi-Private/All Private Settings
After you have selected a semi-private or all private bed
setting you are able to change this setting at any time by
accessing the Bed Config. screen: Main – Setup – cpad Config. – Bed Config.
Bed Config. Screen allows you to switch your semi-private
bed setting by simply highlighting your new selection:
Alpha (A,B), Numeric (1,2) or All Private then press Done.
NOTE: Switching from alpha to numeric or visa versa, after
entering one or more beds, will change the bed location for
the ones you have previously entered to the new sufffix
(A to -1 and B to -2) .
Edit Beds Shortcut
Add or Delete
To add or delete beds follow the directions
outlined above.
5
Back to Index
Acknowledge
the Alert
Set An Alert
Highlight
the bed
Wake
Button
Enter
Acknowledge
Gimme 3
To highlight the bed – touch the bed you want from the
View My Beds (default screen).
The alarm will shut off after 15 seconds (factory default).
You are able to select any combination of audible/visual/
vibrate alarm modes, as well as customize the sound of
the alarm. You are also able to extend the time that the
alarm sounds/vibrates from 10-30 seconds, (see page 8 for
Adjusting Settings).
Bed
Categories
List of Alerts
To Acknowledge the Alert – Press the Wake Button to
unlock touch screen.
Highlight Acknowledge or highlight Gimme 3 for a
3 minute snooze, press any key to exit.
Missed Alerts – If you were unable to acknowledge the alert,
the alert will be stored in Missed Alerts and also in History
with an asterisk next to it. (See page 7 on Missed Alerts).
Use the PREV/NEXT buttons to scroll through the
categories of alerts.
Simply touch Alert you wish to set.
Alert
IMPORTANT:
Final screen displays
the Alert info.,
reminds you to wash hands
and check patient ID.
Prev/Next
Date/Time
Arrow Keys
Repeat up to
12 times
OK
Use the Arrow Keys
Reminder to
Wash Hands and
Check Patient ID.
to set time.
Alert Info.
Use the PREV/NEXT buttons to navigate to Repeat Every,
and move between hours, minutes and times.
Use Arrow Keys to set hours, minutes and repeats (repeats
up to 12 times).
When done press OK.
6
Back to Index
Missed Alerts
Clearing Alerts,
Beds and History
Always clear history at the beginning of each shift to save
memory capacity. The C-PAD can hold up to 500 past or
pending Alerts for up to 100 beds.
Flashing Alert!
acknowledges
that Alerts have
been missed
NOTE: Clearing history will NOT affect any pending Alerts.
Clearing history clears ALL missed Alerts.
History
CLEAR ALERTS
Clears all pending Alerts so you are able to start over.
Missed Alerts
Main – Setup – Clear Alerts –Yes/No – Enter – Done.
CLEAR BEDS
Clears all beds so you are able to start over.
If you are unable to acknowledge the Alert your C-PAD will
flash ALERT! at the top of the screen.
To review Missed Alerts select Missed Alerts from the
Main screen:
Main – Missed Alerts – when done press ENTER.
Main – Setup – Clear Beds – Yes/No – Enter – Done.
CLEAR HISTORY
Clear history at the start of each shift.
Scroll through missed alerts one at a time with the Arrow
Keys
, or use the PREV/NEXT buttons to jump to the next
several items. When done press ENTER.
Main – Setup – Clear History – Yes/No – Enter – Done.
The flashing Alert! notification is cleared when you exit the
Missed Alert menu.
Menu Options
To view Missed Alerts in History
Arrow Keys
C-PAD Config.
Missed Alerts will also be saved in History with an asterisk
next to it.
Main – History – when done press ENTER.
Enter
NOTE: Clearing History clears all Missed Alerts.
C-PAD will ask: Are you sure?
Touch screen, or use the Arrow Keys
highlight Yes or No.
Quick Alert
, or press Next to
Press ENTER.
A Quick Alert is a personal 3 or 5 minute reminder. You
have to remember why you set the reminder as Quick
Alerts are not assigned to a specific bed, and therefore are
not stored in History or are treated as Missed Alerts.
From the bottom of the View My Beds screen, press Quick
Alert, or highlight Quick Alert then press ENTER.
IMPORTANT:
Clearing history clears all Alerts.
Touch the screen or use the Arrow Keys
or
PREV/NEXT buttons to highlight a 3 or 5 min. Quick Alert.
Press Done.
7
Back to Index
IMPORTANT:
Select any combination of three different Alert modes: Vibrate/Audible/Visual
Adjusting Settings
Customizing Sound
Main – Setup – C-PAD Config – Sound Config
The C-PAD allows you to customize the following Settings:
Alert Mode, Display, Sleep/Wake and Sound.
Use the PREV/NEXT buttons to select the function you
want to change, use the Arrow Keys
to change the
function setting. When done highlight Save and press
ENTER.
Adjusting the Alert Mode
Main – Setup – C-PAD Config – Alert Mode
Touch the screen or use the PREV/NEXT buttons to
highlight the function, press ENTER to turn on or off the
function. When the function is turned on a bullet will
show to the left.
Vibrate
Audible
Visual
Disable
Adjust the time the Alert sounds/flashes/vibrates from
10 - 30 seconds, (Missed after 15 seconds is the factory
default). Touch the screen or use the PREV/NEXT buttons
to highlight the number of seconds, use the Arrow Keys
to adjust the setting. When done press ENTER.
Use the PREV/NEXT buttons to select the function you want
to change, use the Arrow Keys
to change the function
setting. When done highlight Save and press ENTER.
Brightness 50 (factory default)
Adjust setting between 0 to 50.
Alt Splash:
Alert Freq 4100 Hz
Determines the tone of the beep that is heard when
an Alert is due.
Main – Setup – C-PAD Config – Maintenance –
Touch Calibr
Version
Use this screen to view the version of the software
application, date and time it was installed, and the
technical specifications of your C-PAD CPU.
Select YES or NO
Adjusting Sleep/Wake
Key Freq 4100 Hz
Determines the tone of the beep that is heard when
the key is pressed.
CAUTION: Improper calibration of the touch interface
could render the unit inoperable! The user should not
attempt this calibration unless absolutely necessary.
If the unit becomes inoperable due to a poor calibration,
the user may force a new calibration from the
C-PAD Utility.
The C-PAD can display an alternate splash screen (an
optional graphic or personalized screen) when waking up
from sleep mode. You are able to turn this function on or off.
Follow the on-screen prompts and select “Save” when
prompted to activate the new calibration. If, for any reason,
the requested touches were not performed accurately the
user may “Cancel” the calibration and restart.
Main – Setup – C-PAD Config – Display Cfg
Key Click ON or OFF
Provides audible tone for any key pressed.
The user is required to touch designated points on the
screen with a stylus or pen.
Adjusting Display Configuration
Contrast 40 (factory default)
Adjust setting between 0 to 63.
IMPORTANT:
Volume 10 (factory default)
Adjust volume between 0 to 10.
Touch Screen Calibration
Adjust the screen contrast and brightness
to best suit your eyes.
Main – Setup – C-PAD Config – Maintenance – Version
To update your C-PAD with the latest software version,
go to www.c-pad.net, <http://www.c-pad.net> click
on Download C-PAD Utility. Follow the instructions
for downloading the C-PAD Utility to your desktop
and installing the latest Application Version (Example:
V.1.0.9300).
Main – Setup – C-PAD Config – Sleep/Wake
Use the PREV/NEXT buttons to select the function you want
to change, use the Arrow Keys
to change the function
setting. When done highlight Save and press ENTER.
NOTE: Setting Sleep Mode to a low setting will extend
the battery charge.
• Sleep After 90 Seconds (factory default)
• Wake After 01 Second (factory default)
8
Back to Index
IMPORTANT:
Use the C-PAD Utility to customize your alert lists to suit your job and care setting!
The C-PAD Utility
Download the C-PAD Utility
The C-PAD Utility is intended for use with a Windows-based
computer.
The C-PAD Utility allows you to personalize the C-PAD,
customize the Categories and Lists of Alerts to suit your
needs, and perform various diagnostics.
1. Go to www.c-pad.net
2. Click on Download the C-PAD Utility
Use the C-PAD Utility User Manual, located
within the C-PAD Utility, for additional help.
Customizing Alert Categories & Lists
By linking the C-PAD to the C-PAD Utility (using the USB
cable) Alert Categories and Lists can be customized and
displayed to fit your specific role, responsibilities and the
nomenclature used in your facility. The C-PAD has the
capacity to display up to five (5) Alert Categories; each
Alert Category can display a list of eight (8) alerts.
Specifications
Battery
Set-Up Beds
Battery Life
As an alternative to entering/editing bed assignments
directly into your device you have the option to use the
C-PAD Utility and PC keyboard to set up beds. Using the
Utility may be faster and easier when entering more than
15 to 20 bed assignments at a time.
Memory
Update Software
Bed Assignment
Capacity
100 beds
The C-Pad Utility allows you update the software running
your C-PAD by downloading the latest version into your
device.
Alerts and
History Capacity
500 pending or historical Alerts
Make sure you clear history at
the start of each shift.
Customizing
Alert Categories
& Lists using the
C-PAD Utility
5 categories – max
8 alerts per category – max
13 characters per alert – max
By registering your C-PAD and providing your e-mail
address, we will contact you when we’ve updated the
C-PAD Utility software or the C-PAD device firmware.
Diagnostic Testing
3-5 days, depending on use.
Make sure you check you
battery icon at the top of the
screen.
The C-PAD utility enables the user to run tests to ensure
routine functions are working properly (e.g. alarm modes).
Custom Splash Screens
Your C-PAD can be programmed to display your
institutions logo on the opening Splash Screen. Use the
C-PAD Utility to customize the splash screen with any
bitmap files (128 x 64 pixels).
Personalization of C-PAD
Use the C-PAD Utility to personalize the C-PAD splash
screen with the following items:
• Username
• Institution Name
• Phone Number (Institution phone recommended)
9
Back to Index
Care & Maintenance
FCC Certification
Safety
The device complies with FCC 47 CFR, Part 15 rules.
Operation is subject to the two following conditions:
(1) this device may not cause harmful interference and
(2) this device must accept any interference received,
including interference that may cause undesirable
operation.
Lead-Free Construction
Lithium Battery – Not serviceable
Touch Screen contains glass – Do not drop
Avoid placing heavy objects on unit
FCC Tested – No interference
Keep out of extreme temperatures, (such as leaving C-PAD
in your car on extreme hot or cold days)
Register Your C-PAD™
Cleaning
Use disinfectant wipes to clean your C-PAD
Clean display with a soft cloth
DO NOT IMMERSE IN LIQUID
By registering your C-PAD™ at www.c-pad.net and
providing your e-mail address, we will contact you when
updates become available for the software that runs
your C-PAD.
Trouble Shooting/Diagnostics
From our web site you are able to download our simple PC
program — the C-PAD Utility — which allows you to
customize many of the functions of your C-PAD.
Use the C-PAD Utility to perform diagnostics on your
C-PAD. Should you have further problems call our
Customer Service Center at (866) 963-2723.
C-PAD Utility allows you to:
• Customize Alert Lists and Categories
Patent Pending
• Enter/Edit Bed Assignments
Nightingale Products LLC is the owner of pending United
States patent application(s) directed to the C-PAD™
portable Alert to render critical time-sensitive interventions
on multiple bed assignments [standards of care]. In addition
to such pending patent application(s), Nightingale
Products LLC owns protectable rights in its proprietary
designs under copyright, trade dress, common law
trademark and other legal principles.
• Personalize your C-PAD with your name, your
institution’s name and phone number
• Upload your institution’s logo
• Perform diagnostics on your C-PAD
• Set date/time, clock format (12/24 hour)
• Update C-PAD application for latest features
• Calibrate touch screen
• And much, much more!
C-PAD One Year
Warranty
To find out more visit:
www.c-pad.net
or
Call our Customer Service Center
at (866) 963-2723
Your Nightingale product is warranted to be free of
defects in materials and workmanship for one year after
the date of purchase. In the event of a defect under this
warranty, we will, at our option repair or replace the
product, provided that you return the product postage
prepaid. This warranty does not cover damages caused by
misuse, improper handling, installation, or maintenance
provided by someone other than a Nightingale Authorized
Service Department. For more information please contact
customer service at (866) 963-2723.
© 2009, all rights reserved.
Developed by Nightingale Products
Cleveland, Ohio
10
Back to Index