Download Total Remote v1.1x user guide
Transcript
Total Remote v1.1x user guide Total Remote allows your favorite Pocket PC to function as one master control for all your remote controlled devices. Total Remote comes with device profiles for thousands of devices such as TV, VCR, DVD and more. You can easily make your own device profiles by installing new ones or creating your own. You can sample the commands from your hardware remotes and create “virtual” remotes that look and function the way you want. The program provides you with a set of skins that enables you to change the remote control appearance any time you want. The Total Remote Transmitter Module allows you to control infrared devices nearly 100 feet away using a typical iPaq. Because it uses your PDA’s audio hardware, its range is up to 3 times greater than that of your current remotes. Since some Pocket PCs do not have audio hardware of sufficient quality to use the Total Remote Transmitter Module, Total Remote also supports built in Infrared ports (IrDA). While range is severely limited compared to the transmitter module, it is an effective back-up in the event that you misplace or damage the transmitter module. Please save the UPC code that is printed on the Total Remote packaging as “proof of purchase”. If you misplace your transmitter module and need to purchase another one you will need to send us the UPC code along with your order. Orders for the transmitter module that are not accompanied by the UPC proof of purchase cannot be processed. Table of Contents Remote controls Using pre-installed device configurations Creating a new remote control Creating a remote control copy Current remote control Renaming a remote control Assigning actions to hardware buttons Turning the display off Changing a remote control’s appearance Selecting device profiles Deleting devices from the master list Sampling mode Sampling mode for remote controls One-shot sampling Continuous sampling Rotating screen when sampling Second signal concept Total Remote v1.1x desktop user manual Page 1 Appearance & Skins Fullscreen mode Selecting skins for remote controls Creating and adding skins Setting device and skin paths Advanced functions Macro functions How macros work Start recording a macro Adding an adjustable delay in macro commands Cancel recording a macro What makes the IR dongle so cool? Total Remote pre-installed device list Total Remote’s built-in device skins Total Remote v1.1x desktop user manual Page 2 Total Remote – How To Using pre-installed device configurations There are hundreds of thousands of device configurations included with Total Remote, covering the majority of equipment manufacturers. If your original remote is listed in the master device list you can select it by name, assign it a skin, and you are ready to go. Not all of the possible infrared commands are implemented on all of the pre-installed devices, so if you find that you are missing a function you can add it by sampling your original remote control rather than create a whole new profile from scratch. Many manufacturers use the same set of infrared commands for many of their products, so even if you don’t have your particular model listed you may find that similar ones work just as well. For instance, during the testing of Total Remote we found that almost all of the Sony VCR profiles work either partially or completely on a Sony VCR we used that was not listed by its specific model number in our master device list. Creating a new remote control Total Remote comes with thousands of preset devices built in, but there may be situations where you have a device that is not included in the list. Total Remote allows you to select a configuration based on the type of device the remote control is created for. By specifying the device type you can select a skin that closely matches the functions of your original remote. You can set up a custom virtual remote and sample all the commands from your original remote to create your own personal remote control, either using the standard skins or your own custom skin. In this example we will set up a custom Apex DVD player remote control. 1. Select Device->New. You will get to the adding device dialog. Give a name to the new remote control. (Apex AD-500W). 3, Specify the device type. Choose one from the list of devices. (DVD). 4, Select the skin for the remote control appearance. You may select a skin file from the list of skins available for the chosen device type. (Standard DVD). Click on Finish, and your new device profile is ready to program. Total Remote v1.1x desktop user manual Page 3 Creating a remote control copy Sometimes there is no need to create a completely new remote control. Instead, you may wish to create a remote control based on the current one. The current device settings, such as skin file, device type, and all command buttons will be inherited by the new device (although you may change any of them as you like). If a Total Remote preset has most of the controls of your device, but it’s missing some of the features, you could copy a preset that “mostly” works and rename it to match your device. You could then sample the missing commands from your original remote to your Pocket PC. You could also make different configurations of the same remote with names like Sony DVD #1, Sony DVD #2, Sony DVD #3, and set up different functions like macro commands, while keeping certain commands like power or volume available at all times. To create a copy of the current device select Device->Create Copy. Here’s an example: You have a Sony N51 VCR. You discover that the preconfigured “Sony VCR #3” works for your particular model, but it only has the basic functionality (transport controls, channel up/down, power, and little else). You can copy the Sony #3 profile and add additional controls to it by using learning mode to capture the data from your original remote control. Add a check in the checkbox for “Sony VCR #3” to add it to your active devices. From the Device menu (or by clicking on the “next device” button onscreen until you get there) select the “Sony VCR #3” as the current device, then select Create Copy from the Device menu. This will create a new device, “Sony VCR #3 (Copy)”. Make this the active device, then go to the Edit menu and select Rename…and give whatever name you’d like (such as “Sony N51”). Now you can begin using learning mode to add any additional commands not present in the preconfigured device profile, such as onscreen guide controls, tape tracking adjustments, input and output selectors and so on. Current remote control There can be many remote controls created on your PDA, but there can be only one currently “activated” (displayed on-screen). To select another device or switch between several remote controls, go to the Device menu and select a device you have added to the list. It is also possible for skins to display the name of the current remote control in a small window, with forward/backward arrows to select the next/previous device in the Device menu. This makes Total Remote even more convenient and intuitive for users. Renaming a remote control You may rename any device profile with a custom name and change it at any time. Make the device you wish to rename to be the current active device, and rename it using Edit>Rename… Total Remote v1.1x desktop user manual Page 4 Assigning actions to hardware buttons Some remote control actions can be assigned to hardware buttons as well as to the virtual onscreen ones. To assign the actions go to Edit->Assign Hardware Buttons... menu. You will be taken to the hardware button dialog. In it, choose a hardware button and assign an action from the drop down menu. You may return to default actions predefined to each hardware button by tapping the Set Default Values button. Assigning actions to hardware buttons is especially useful because you may use them when the display of your PDA is turned off. Most used actions (volume+, volume-, channel+, channel-) are default values for the hardware buttons, which are sufficient in most cases. Turning the display off You may turn off the display of your PDA while using it as a remote control. This saves battery resources, while still allowing you to use the hardware buttons for control. To turn the display off select Tools->Turn Display Off. To return to the normal state you should quickly press the Power button twice. Be careful, as pressing it three times will turn it off! Changing a remote control’s appearance You can easily change the appearance of your virtual remote by using different “skins.” A skin is a set of images representing the functions of your virtual remote control. The skins built into Total Remote cover many commonly used devices and many commonly used controls on those devices. You can also make your own skins. For more information refer to the Appearance & Skins section. Selecting device profiles You can create and store literally thousands of remote controls, but you may wish to show only a few of them on the Device list of the main menu. To do so, select Device->Select. You will get to the dialog that enables selecting or deselecting available remote controls. Click on the plus/minus symbol next to a device category to expand/contract the list. To select or deselect an item, check or uncheck the corresponding check boxes. For convenience, the devices are grouped by type. Note you cannot deselect the device you are currently using; you must switch to another device and then deselect the old device from the menu. Total Remote v1.1x desktop user manual Page 5 Deleting devices from the master list You can delete any of the user-created devices listed in the Active Devices tree. Simply tap-andhold on the device you wish to delete, and a pop-up menu will display the option to remove that device from the list. Note that this only works for the user-added devices shown in black in the device list; the devices marked in red are built-in to the IR database and cannot be deleted. Setting the infrared output Total Remote can send IR signals via either the IrDA port or the Total Remote Transmitter Module. This option is set from Tools>Options…, under the heading “Send signal via”. If you have any problems using the Total Remote transmitter, make sure you have the output set to use it. If you are using the demo version you will not have the option of using the Total Remote transmitter (enabled in the full version only). Device database changes for Total Remote v1.0 and v1.01 users The old database of infrared device commands that was included with previous versions of Total Remote has been removed from Total Remote v1.1 in favor of the new database. Users upgrading from a previous version of Total Remote will still have the use of the original 371 devices in the old format, and the installer will not remove them. Unless you actually need one of the devices from the old database we would suggest deleting them as they increase the time required to load and run Total Remote. The simplest way to delete them is to navigate to the “DeviceFiles” directory with a file explorer (Pocket PC or desktop computer via Activesync) and delete them all. CAUTION! If you have created any device profiles of your own they are also kept in this directory! Make sure you only delete what you don’t need! Total Remote v1.1x desktop user manual Page 6 Total Remote – Sampling mode Sampling mode for remote controls Each device profile can 'learn' to send custom IR (InfraRed) signals. The sampling process is based on the principle of IR signal interception. You must send signals from your original remote control to your PDA while it is in the sampling mode. Total Remote will read these signals and link them with certain actions and/or selected buttons. When the sampling process is finished, your PDA is ready to send corresponding IR signals to your TV, VCR, DVD, etc. Important. Some standard buttons of your remote controls may not produce infrared signals because they are “modifiers”. These buttons could include “shift” buttons that select alternate functions of a given button like holding down the “shift” key on a keyboard. In this case you are not sampling the individual button presses but instead the command issued by the “shift + button” combination. Another very important note is that the standard skins typically have some on-screen buttons that cannot be programmed because they are control keys for Total Remote. They can include: • Shift button. This button switches to the next skin page if the current skin has more than one page. • Next/Previous device panel. This panel includes a text bar with the name of the current remote control and two arrows that allow switching between the remote controls you have added to the Device menu. • Fullscreen button. This button toggles the fullscreen mode where the skin can occupy the whole PDA screen or standard mode where you can access the menu bar and the Windows Start menu. One-shot sampling If you need to sample just one virtual button you should select Edit->Start One-Shot Sampling. The program will be placed into fullscreen mode and you will be asked to perform the following steps: • Tap the desired button of your virtual remote control that you wish to assign a learned command • Align the IR port of your PDA and the IR window of your original remote control (the application will wait for a valid infrared signal for only about 10 seconds) • Press and hold the remote control button for about 0.5 seconds (a NORMAL press, not too short and not too long) Total Remote v1.1x desktop user manual Page 7 Total Remote will read the IR signal, analyze it and assign it to the virtual button you selected. In case of signal reception failure the program will display an error message and offer to retry. • When the signal has been assigned correctly you’ll be presented with two more buttons – Second Signal and Finish. Very few remotes require a second signal, but Total Remote provides the capability for those that do. To provide the second signal, tap the Second Signal button (follow the same steps for sampling the second signal). For more information, see Second Signal Concept at the end of this section. • Tap Finish to quit the sampling mode Continuous sampling If you need to sample a lot of buttons, like copying every function from your original remote to a custom Total Remote device profile, you should select Edit->Start Continuous Sampling. Total Remote will enter fullscreen mode and you will be allowed to assign a function to every button of your virtual remote control. • Tap the desired button of your virtual remote control that you wish to assign a learned command • Align the IR port of your PDA and the IR window of your original remote control (the application will wait for a valid infrared signal for only about 10 seconds) • Press and hold the remote control button for about 0.5 seconds (a NORMAL press, not too short and not too long) Total Remote will read the IR signal, analyze it and assign it to the virtual button you selected. In case of signal reception failure the program will display an error message and offer to retry. • When the signal has been assigned correctly you’ll be presented with two more buttons – Second Signal and Finish. Very few remotes require a second signal, but Total Remote provides the capability for those that do. To provide the second signal, tap the Second Signal button (follow the same steps for sampling the second signal). For more information, see Second Signal Concept at the end of this section. • Tap Finish to finish sampling the current button and to start sampling another one. • To quit the Sampling mode go to the main menu and select Edit->Stop sampling Total Remote v1.1x desktop user manual Page 8 
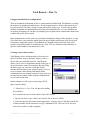
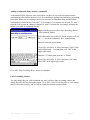
Rotating screen when sampling It is often useful to rotate the remote control skin/screen 180 degrees in sampling mode. This can provide a better way of handling both the devices. For example, using an iPaq or other PDA that has the IrDA window at the top you would have to orient at least one device (the PDA or your OEM remote control) upside down in order to align the IR port and window. Rotating the screen solves this problem so that you will see all the buttons oriented the same way as your physical remote control making the process of continuous sampling a lot easier on the eyes and neck as well as speeding data entry. After you quit the sampling mode the screen will be rotated back to normal. You can still toggle fullscreen mode using the fullscreen button on the skin, so that when you have finished sampling you can access the menu bar and Edit->Stop sampling. To rotate the skin/screen in sampling mode, go to the Tools menu and make sure to have the Rotate screen when sampling item selected. Second signal concept Some electronic standards require that each button of the remote control send two IR signals, which alternate each time you press a button. For these types of equipment you can make each virtual button learn a pair of signals in order to maintain the same functionality as the original remote. If you program a button successfully into your Pocket PC and it works once and only once, you need to sample a second signal. If you are certain that your remote control does not support two signals for each button, you may skip the second signal sampling and tap Finish right after sampling the first one. Total Remote v1.1x desktop user manual Page 9 Total Remote - Appearance & Skins Fullscreen mode You may switch between fullscreen and menubar mode by tapping the fullscreen button in the bottom left corner of the screen (in menubar mode) or the fullscreen button on the skin. The fullscreen mode is useful when you use the program as a remote control, while the menubar mode is useful when you customize preferences or perform the sampling process. Fullscreen mode icons: the icon to the left is the fullscreen button when in menubar mode, and the icon to the right is the fullscreen button used in all of the included standard skins. Selecting skins for remote controls Each remote control is supplied with a skin when it is created. You can change the remote control skin by selecting Edit->Change Skin... from the main menu. You may select a skin from the list of available skins. You should choose skins that are specially designed for certain devices, because they contain different functions. For instance, you don’t need a record button for a TV, so using the VCR skin for a TV remote wouldn’t make much sense.You may create and add your own skins. Put the skin files in the \SkinFiles folder. They will appear in the list of available skins. Creating and adding skins Total Remote provides you with a rich set of standard skins for most major device types, as well as some more specialized skins. However, you may create your own skins for your remote controls. Each skin is represented by a PNG image, stored in \SkinFiles folder (by default \Program Files\Total Remote\SkinFiles\). Full documentation for creating your own skins is provided on our web site in the Total Remote area, and is a free download for all Total Remote users. The Total Remote web site also features a “skin community” where you can download skins that other Total Remote users have made, or upload your own custom skin for others to enjoy. Total Remote v1.1x desktop user manual Page 10 Setting device and skin paths Total Remote’s installation process gives you the choice of installing to either the “Main Memory” or the “Storage Card”, but it is possible to change the location of the user-created device files and skin files to a different directory. For example, you may want to have Total Remote available to you all the time so you instruct the ActiveSync installer to put Total Remote in main memory, but you may want to keep a lot of user-created device profiles or skin files on an external storage card. In this way you always have the universal IR database and the ability to learn new remotes even if you do not have the external storage card installed, and if you do have the external storage card installed you can select from any of your skins or devices. The only real reason to do this is because skin files can take up a comparatively large amount of storage space, and keeping a few dozen skins in main memory would probably fill up your Pocket PC very quickly! Let’s say you do a standard installation to main memory, and you intend to keep a LOT of skins (or very large skins) on your storage card. Copy the Total Remote DeviceFiles and SkinFiles directories to your storage card (i.e. Storage Card\Total Remote stuff\DeviceFiles or SkinFiles) In Total Remote, go to Tools>Options… Change the “Device files folder” to the new location by either browsing to it (click on the “…” icon to bring up a file navigator) or type in the full path name in the text box. Do the same for the “Skin files folder” entry You may need to do a soft-reset before Total Remote recognizes the change. Total Remote v1.1x desktop user manual Page 11 Advanced Functions Macro functions In Total Remote a “macro” is a sequence of commands that are sent using only one button press. For example, you have a TV, VCR, DVD player, CD changer and AV receiver in your home theater. If you want to watch a DVD you have to follow a pretty specific sequence: Turn on DVD player Turn on AV receiver Select the DVD input on the AV receiver Turn on TV Select the input from your AV receiver Additionally, you are required to wait for some equipment to “warm up” before you can use it, which means you may have to wait 4 seconds before your AV receiver will allow you to switch to the DVD input (as an example). Let’s see how we could do this with macros: Press the “Turn everything on and switch to DVD” button Much easier! Of course, you have to have all of the commands already programmed in Total Remote, but once they are there you have a lot of flexibility in how you queue them up to create long command sequences. Start recording a macro Once you have a device profile set up the way you want you can create a command macro and assign it to a button. Go to Edit>Start recording macro to begin a new macro. You will see “Press a button” flashing in the lower left corner; press the Total Remote button you wish to assign a macro to. You will now see “Rec” flashing in the corner, indicating that you are actually creating the macro command sequence; press the onscreen buttons you wish to add to the macro. Note that certain buttons do not get recorded in a macro command, such as the fullscreen mode button or the on-skin “shift” button, but they retain their normal function. For example, if you are making a macro and you need to use buttons that are on a different “page” you can press the “Shift” button to access the other pages just like normal, or if you need to access buttons that are hidden by the menubar you can select fullscreen mode to get at them. When you have added all the commands you wish to include in the macro, go to the menubar and select Edit>Stop Recording Macro to finish this macro. Total Remote v1.1x desktop user manual Page 12 Adding an adjustable delay in macro commands As mentioned before, there are some cases where you have to wait a period of time between commands in order to allow the device you are controlling to perform one task before proceeding to the next. When you are creating a macro you can insert an adjustable delay period between commands to account for this “busy time”. For example, if you want to turn on your TV, wait 3 seconds for it to come on, change to channel 56, wait 0.5 seconds for it to change, and mute the volume you could do something like this: Begin recording a macro (Edit>Start Recording Macro); “Press a button” flashes Select the button you wish to use for the macro (we’ll use the “-/--“ key next to channel); “Rec” starts flashing Press the onscreen power button Go to Edit>Add Delay To Macro and enter “3000” (Note: 1000 milliseconds = 1 second) then click “OK” in the upper right corner Press the “5” button, then press the “6” button Go to Edit>Add Delay To Macro and enter “500” then click “OK” in the upper right corner Press the Mute button Go to Edit>Stop Recording Macro, and you’re finished. Cancel recording a macro You may decide that you wish to abandon any work you have done in creating a macro and simply discard it mid-way through creation. Go to Edit>Cancel Recording Macro, your current macro will be thrown away, and you will be returned to normal operating mode. Total Remote v1.1x desktop user manual Page 13 Why is the Transmitter Module so cool? The Total Remote infrared Transmitter Module is a marvel of clever engineering. When talking about infrared control there are a few things you need to know: Infrared signals are usually modulated at about 35KHz-60KHz, which means the digital data is sent inside a high-frequency tone, similar to the way radio signals work. The apparent problem is that the audio output of most high-fidelity consumer gear is limited to 20KHz, which is far too low to create an infrared control signal. The Total Remote transmitter effectively doubles the “data rate” of an audio port, so it can generate a 38KHz signal out of a 19KHz signal. Infrared LEDs, like the kind in your original remote or the Total Remote transmitter, require more power to turn on than an audio port normally delivers. Our transmitter’s design allows it to effectively double the power output when combined with our software’s particular method of sending signals. The IrDA port built in to most handheld computers is entirely the wrong standard for data rate, wavelength of light, and communications protocol to be used with consumer infrared. The result is that while it is possible to “hack the port” so that you can transmit remote control data, it works very poorly compared to the correct standards used in OEM remotes. Most people find that transmission via IrDA provides only 10-20 feet of range with most devices, and as little as a few feet for some others! Because the Total Remote transmitter is designed just like the transmitter on your original remote, it works just as well (or better) than the original. Ironically, the IrDA port works pretty well for sampling remotes, just not for transmitting that signal. Coolest of all is the fact that a good audio port can create a signal FAR more powerful than a standard OEM remote control. Using a Compaq iPaq 3600 series Pocket PC we have been able to control most devices over a distance of ONE HUNDRED FEET using the Total Remote transmitter. The average operational range of most “real” remotes is about 40 feet at best, with some being as low as 20 feet. You may say, “Hey, my living room isn’t 100 feet long, so who cares?” When we did our distance tests we used the best possible test environment, which showed the best possible performance of the remotes. Real life isn’t quite so optimized. Your VCR’s infrared sensor window may be dusty, you may have a habit of waving the remote around, your dog (or child) may have chewed on it, etc. Whatever the reason, in real life you can easily reduce a remote’s performance. So using our more powerful transmitter will give you better signal reliability than a weaker remote. It also looks really cool. Total Remote v1.1x desktop user manual Page 14 Total Remote v1.1 infrared database listed by manufacturer and number of profiles Cable Mfg ABC Allegro Archer Cableview Citizen Comtronics Eagle Comtronics Electricord Garrard GE General Instrument Hamilton Hitachi Jasco Kingston Memorex Movie Time NSC Omega Paragon Pioneer RCA Regency Runco Scientific Atlanta Signature Sprucer Starcom Starquest Tandy Telecaption Texscan Tocom Tusa United Artists Universal Videostar Number of device profiles 8 5 4 1 2 2 1 1 1 2 16 3 1 2 1 1 4 4 1 1 4 1 1 1 4 1 2 4 1 1 1 2 4 1 1 7 3 Mfg Antronix Cabletenna Century Comcast Comtronics Eagle Eastern Everquest GC Electronics Gemini Goldstar Hamlin Hitex Jerrold Macom Motorola Digital Novavision Oak Panasonic Philips Pulsar Regal Rembrandt Samsung Signal SL Marx Standard Compnt Stargate Sylvania Teknika Teleview Time Warner Toshiba Unika United Cable Video Way Number of device profiles 2 1 1 2 2 1 2 1 4 2 7 1 16 1 2 2 3 4 9 1 7 3 2 2 1 2 2 1 1 1 1 1 3 1 1 DVD Mfg JVC Panasonic Proscan Sony Number of device profiles 1 1 1 1 Total Remote v1.1x desktop user manual Mfg Mitsubishi Pioneer RCA Toshiba Number of device profiles 1 1 1 1 Page 15 SAT (Satellite) Mfg DishNet Hitachi Mitsubishi RCA Number of device profiles 1 1 1 3 Mfg General Instrument Hughes Primestar Sony Number of device profiles 1 1 2 2 TV Mfg Admiral Aiko Akai Amark AOC Audiovox Bell and Howell Brokwood Candle Carnivale CCE Centurion Citizen Classic Concerto Coronado Crown Curtis Mathes Daewoo Dumont Dynatech Electrohome Envision Fortress Funai GE Gibralter Goldstar TV/VCR Combo Grunpy Havard IMA Inteq Janeil JCB JVC Kaypani Kenwood Kloss Novabeam KTV Lodgenet Logik Number of device profiles 6 1 5 1 9 2 4 3 4 1 1 1 11 1 4 2 2 8 10 2 1 4 1 1 3 11 3 1 2 4 1 1 1 1 4 1 3 2 6 1 3 Total Remote v1.1x desktop user manual Mfg Adventura Aiwa Alleron Anam National Archer Belcor Bradford Brooksonic Capehart Carver Celebrity Cetronic Clairtone Colortyme Contec/Cony Craig CTX CXC Daytron Dynasty Electroband Emerson Fisher Fujitsu Futuretech GE Combo Goldstar Griswold Hallmark Hitachi Infinity J.C. Penney JBL Jensen Kawasho KEC Kloss KMC Linatech Loewe Luxman Number of device profiles 1 1 2 5 1 3 1 4 1 3 1 1 1 3 2 2 1 1 6 1 2 15 2 1 1 1 7 2 5 13 1 14 1 3 4 2 3 1 2 1 4 Page 16 LXI Magnatron Majestic Megatron Memorex Midland Mitsubishi Motorola Multitech NEC Nikko Onking Optimus Optonica Panasonic Philiph CDR Philips TV/VCR Combo Pioneer Prism Proton Quasar Radio Shack TV/VCR Combo Realistic Rhapsody Sampo Samsung Combo Scimitsu Scott Sharp Signature 2000 Sonic Soundesign SSS Supre-Macy Sylvania Tandy Technics Techwood Tera TMK Tosonic Universal Victor Video Tech Vidtech Wards York Zenith Zonda 9 1 2 5 9 4 10 6 2 6 4 1 6 2 15 3 1 5 2 7 13 1 7 1 5 2 1 7 7 4 1 6 5 2 12 5 2 6 4 5 1 3 1 3 3 16 1 10 2 Total Remote v1.1x desktop user manual LXI Combo Magnavox Marantz MEI MGA Minutz Montgomery Ward MTC NAD Nikei NTC Onwa Optimus TV/VCR Orion Philco Philips Pilot Portland Proscan Pulsar Radio Shack RCA Realistic TV/VCR Combo Runco Samsung Sanyo Scotch Sears Shogun Simpson Sony Spectracon Starlite Supreme Symphonic Tatung Technol ACE Teknika Thomson Toshiba Totevision Vector Research Video Concepts Vidikron Viking Yamaha Yupiteru Zenith Combo 1 10 6 2 6 1 14 7 5 1 1 1 6 4 8 10 3 5 9 5 10 14 1 2 8 5 3 14 3 3 7 6 3 1 3 4 1 14 2 5 1 2 1 1 1 3 1 1 Page 17 VCR Mfg Admiral Aiko Akai American High Audio Dynamics Beaumark Brooksonic Candle Capehart CCE Colortyme Consonic Curtis Mathes Daewoo Dynatech Electrophonic Emerson Fuji Garrard Go Video Gradiente Harman Kardon Havard Hi-Q Instant Replay J.C. Penney Jensen KEC KLH Lloyd LXI M. Ward Magnavox Marantz Masushita Memorex MGN Technology Mitsubishi Motorola Multitech NEC Nikon Olympus Optimus TV/VCR Combo Orion Pentax Philco Philips TV/VCR Combo Pioneer Protec Number of device profiles 6 1 7 3 3 1 6 3 1 1 1 1 8 4 2 1 20 5 1 3 1 3 1 1 3 11 3 2 1 4 1 16 6 7 3 13 1 8 3 4 10 1 2 7 13 4 3 1 4 1 Total Remote v1.1x desktop user manual Mfg Adventura Aiwa Allegro Asha Audiovox Bell and Howell Calix Canon Carver Citizen Colt Craig Cybernex DBX Electrohome Emerex Fisher Funai GE Goldstar Harley Davidson Harwood Headquarter Hitachi Inteq JCL JVC Kenwood Kodak Logik LXI Combo Magnasonic Magnin Marta MEI MGA Minolta Montgomery Ward MTC NAD Nikko Noblex Optimus Optonica Panasonic Pentex Research Philips Pilot Proscan Pulsar Number of device profiles 1 8 1 1 2 4 1 4 1 7 1 5 2 3 3 1 7 5 13 4 1 2 1 11 1 2 8 6 3 1 1 5 1 1 2 3 3 6 3 2 1 1 3 1 14 1 6 1 2 1 Page 18 Quarter Quasar Radioshack Randex Realistic Ricoh Salora Samsung TV/VCR Combo Sansui Scott Sharp Shogun Singer STS Symphonic Tashiko Teac Teknika Toshiba Unitech Victor Videosonic XR-1000 Zenith 1 7 9 1 9 2 1 2 8 6 3 2 4 3 3 2 3 6 8 1 3 3 5 5 Total Remote v1.1x desktop user manual Quartz Radio Shack TV/VCR Combo Radix RCA Realistic TV/VCR Combo Runco Samsung Sanky Sanyo Sears Shintom Signature 2000 Sony Sylvania Tandy Tatung Technics TMK Totevision Vector Research Video Concepts White Westinghouse Yamaha Zenith TV/VCR Combo 1 1 1 18 7 1 6 2 5 14 4 1 8 6 2 3 2 3 2 4 5 1 5 4 Page 19 Total Remote’s built-in device skins These are the three interface screens for the standard “Audio System” skin This is the interface screen for the standard “CD” skin These are the two interface screens for the standard “DVD” skin Total Remote v1.1x desktop user manual Page 20 This is the interface screen for the standard “Tuner” skin These are the two interface screens for the standard “TV” skin These are the two interface screens for the standard “VCR” skin Total Remote v1.1x desktop user manual Page 21