Transcript
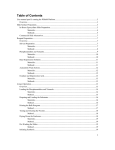
Digital Micrometer
[1] Name and Function of Each Part
Safety Precautions
1
16 ensure operator safety use this instrument in conformanca with the directions and speciTeaiions given in this User's Manual.
3
2
8
7
4
5
6
/1\e edge of the contact point ol this instrument is sharp.
CAUTION
Handle ftwiln great care lo avoid Injury
IMPORTANT
• Do not disassemble this instrument
• Do not use and sloie this instrument at sites where the temperature will
change abruptly. Prior to use, thermally stabilize (he instrument suffcienlly
at a room temperature.
• Avoid storing this instrument in places where Ihere is plenty of moisture
and dust, and using it at sites where it is directly subject to water or oil.
1 .Frame
2.Spindle
3.Anvtl
4.Sleeve
S.Thimble
6-Ratehel slop
• Be sura to perform (he zero point adjustment before measurement
7.Clamp
S.Counter
g.Wrench
• After use. wipe off dust, cuBing chips, and moisture from this instrument, then
• Do not apply excessive force to Ihis instrument or drop h.
apply mst-pTEvenlive'afl lo H.
[1] Name and Function of Each Part
[2] How to Read
Courier
See the fgure on the left.
Thimble
.
[2] How to Read
See the fgure on the left.
[3] Zero Paint Adjustment
IMPORTANT
0 OOimmfVemier)
"Be SUIB to use ^6ea'cs-te!i gauge block for the iero point adjustment (all or
001mm. G* GQt$ these should be inspected periodically), me standard bar for micrometer, or
A. (id*}
dedicated master gages for the workplace to perform the zero point adjust"• 7T
O •£ "
*
mentoftMsinstrument
- Wipe off the pleasuring faces of the gage used and this instrument cleanly
before performing the zero point adjustment
Perform the zero point adjustment in the same posture and conditions as the
[3] Zero Point Adjustment
measurement
1) When the reading is correct on the counter and wrong on
the thimble
(1) If the deviation is less than 0.02mm:
Rotate the sleeve with the supplied wrench by the observed error as in
the case lor conventional micrometers. (Fig. 1)
(2) If the deviation is over 0.02mm:
Remove tne ratchet stop with tne supplied wrench. Push the thimble
outward lo disengage it from the spindle, then rotate it to zero position.
(Pi9.2)
Hg.l
Fig.2