1
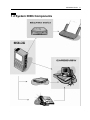
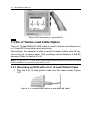
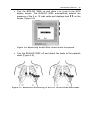
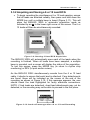
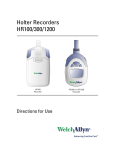
BIOLOG 3000i ™
User Manual
6 AND 12-LEAD SIMULTANEOUS ECG RECORDER
QRS DIAGNOSTIC, LLC
14755 27th Ave North
Plymouth, MN 55447
USA
Tel (763) 559-8492
Fax (763) 559-2961
http://www.qrsdiagnostic.com
WARRANTY
All instruments sold and supplied by QRS Diagnostic, LLC are
guaranteed to be free from defects in material and workmanship for a
period of 3 years from date of purchase. All supplies and accessories
carry a 90-day limited warranty. This includes ECG lead wires.
If in the judgement of QRS Diagnostic the instrument is proven to be
defective during the warranty period it will be repaired or replaced with
no charge for parts or labor. An extended hardware warranty is
available at additional cost.
This warranty does not cover any instrument that has been damaged
by accident, misuse, abuse or has been altered or repaired by anyone
other than an authorized QRS Diagnostic agent. This warranty also
does not cover any unit that has had a serial number removed, defaced
or rendered illegible.
This warranty is in lieu of all other warranties expressed or implied.
Including warranties of merchantability and fitness, and is hereby
limited to repair or replacement of instruments found defective during
the warranty period.
ALL REPAIRS MUST BE MADE BY AN AUTHORIZED QRS
DIAGNOSTIC AGENT. THE INSTRUMENT MUST BE RETURNED
FOR REPAIRS AT THE EXPENSE OF THE PURCHASER. INWARRANTY REPAIRED UNITS WILL BE RETURNED AT THE
EXPENSE OF QRS DIAGNOSTIC OR ITS AUTHORIZED AGENT.
INSTRUMENTS SENT BY MAIL OR COMMON CARRIER SHOULD
BE INSURED AGAINST LOSS OR DAMAGES, AS THEY ARE NOT
COVERED BY THIS WARRANTY.
6000-4182 Rev B
SERVICE
For service, please contact the QRS Diagnostic, LLC Service
Department at (763) 559-8492. Service Representatives are
available by phone Monday through Friday, from 8 a.m. to 5 p.m. Central
Standard Time. You can also contact Technical Support by email at
[email protected]. In the event that your problem can not
be fixed over the phone or via email you will be issued a Returned
Merchandize Authorized number (RMA#). Please have the serial
number of your unit available. Please re-package your unit in the original
packing materials if possible and ship it to:
QRS Diagnostic
14755 27th Ave N
Plymouth, MN 55447
This document contains proprietary information, which is protected by
copyright. All rights are reserved. No part of this document may be
photocopied, reproduced, or translated to another language without
the written consent of QRS Diagnostic, LLC. The information
contained in this document is subject to change without notice.
FOREWORD
Thank you for choosing the BIOLOG 3000i portable ECG monitor.
BIOLOG 3000i is the world’s most portable multi-functional ECG
recorder. It which can be used on its own for instant cardiac monitoring
or with other System 3000i components to provide an integrated
diagnostic monitoring system.
The BIOLOG 3000i consists of a unit weighing 270 grams and a
simultaneous patient cable. This allows you to obtain, store and
analyze patient ECG data quickly and with great confidence.
Cardiac records are stored by the BIOLOG 3000i, which then can be
transferred to QRS Diagnostic’s patient management software,
CardioView. Alternatively they can be printed to an inkjet printer via the
Biolog Printer Interface.
The BIOLOG 3000i’s capability to perform electrocardiograms by direct
chest placement makes it especially suited for Emergency Care,
allowing when necessary the use of real time telephonic monitoring.
We are sure that this device will enhance your medical practice and
allow you to achieve a greater level of freedom without losing the
power of diagnosis you have been accustomed to.
European Representative:
Advena Ltd.
P.O. Box 30, Leominster
Herefordshire HR6 0ZQ
UK
PRECAUTIONS
WARNING: To prevent the possibility of electrocution, ensure that the rear electrodes are
not in contact with the patient while device is connected to any peripheral device.
WARNING: The following precautions need to be taken when a defibrillator is used on a
patient:
•
Do not touch the patient during defibrillation.
•
Do not touch the defibrillator’s paddle-electrode surface when discharging the
defibrillator.
•
Keep defibrillator electrodes well clear of other electrodes or metal parts in contact
with the patient.
•
If a person is touching the patient, bed, or any conductive material in contact with the
patient during defibrillation, the delivered energy may be partially discharged through
that person. Make sure persons stand away from the patient, bed, and other
conductive material before discharging the defibrillator.
2
WARNING: Batteries and other disposables used in conjunction with this device must be
disposed of in accordance with the national requirements in the country of use.
CAUTION: A 6L Biolog Patient cable or 12L Biolog patient cable is required to be used in
conjunction with the BIOLOG 3000i in order to provide protection against the effect of the
discharge of a cardiac defibrillator and against high frequency burns.
Conductive parts of electrodes and associated connectors, including the neutral electrode,
should not contact other conductive parts including earth.
The BIOLOG 3000i is not intended to be sterilized or used in a sterile environment and
therefore is not suitable for direct cardiac application.
The BIOLOG 3000i is not suitable for use with flammable anaesthetics and offers no
water ingress protection.
Inspect the BIOLOG 3000i electrocardiograph and 6L Biolog Patient Cable or 12L Biolog
patient cable regularly for signs of mechanical damage, particularly around patient leads.
To verify correct operation of the electrocardiograph, connect all patient leads to a patient
and check that there is a valid ECG signal on every lead by viewing the signal on the
BIOLOG 3000i screen.
CAUTION: Federal law in U.S.A. restricts this device to the sale by or on the order of a
physician.
CAUTION: An authorized QRS Diagnostic, LLC service agent must service this device.
Symbols used on the BIOLOG 3000i and patient cables
Attention: Consult
documents.
Type BF equipment.
O
Patient cable connection
socket.
Power off.
I
Power on.
accompanying
Type BF defibrillator proof applied
part.
Class II equipment.
Internally powered device.
Regulatory compliance:
•
IEC60601-1 amendments 1 & 2
•
C22.2 No 601.1-M90 & UL 2601-1 (when used as part of the BLY-501 adapter
system)
TABLE OF CONTENTS
INTRODUCTION................................................................................... 7
1.1 W HAT IS THE BIOLOG 3000I? ........................................................ 7
1.2 SYSTEM 3000I COMPONENTS .......................................................... 8
1.3 FEATURE LOCATIONS ...................................................................... 9
SETTING UP THE BIOLOG 3000I...................................................... 10
2.1 SET UP INSTRUCTIONS.................................................................. 10
2.1.1 Installing the Batteries .......................................................... 10
2.1.2 Start Up ............................................................................... 11
2.2 CHECKING THE BATTERY STATUS ................................................... 12
2.3 THE SET UP MENU ....................................................................... 13
2.3.1 To Access the Set Up Menu ................................................. 13
2.3.2 Navigating through the Set Up Menu.................................... 14
2.4 SET UP SCREEN 1 ........................................................................ 16
2.4.1 LCD Backlight Illumination.................................................... 16
2.4.2 Mute the QRS Beeping ........................................................ 16
2.4.3 Transtelephonic Mode .......................................................... 16
2.4.4 Automatic Device Identification (ADI).................................... 17
2.4.5 Setting the Time................................................................... 17
2.5 SET UP SCREEN 2 ........................................................................ 18
2.5.1 Date Format......................................................................... 18
2.5.2 Setting the Date ................................................................... 18
2.5.3 Enabling Simultaneous Acquisition ....................................... 18
2.5.4 Total Single Lead Recording Time ........................................ 19
2.5.5 Selecting the Mains (50/60 Hz) Filter .................................... 20
2.5.6 Print Speed .......................................................................... 20
2.6 SET UP SCREEN 3 ........................................................................ 21
2.6.1 Transmission Settings .......................................................... 21
2.6.2 Modem selection.................................................................. 21
2.6.3 Power down......................................................................... 21
2.7 SET UP SCREEN 4 ........................................................................ 22
2.7.1 Menu Display ....................................................................... 22
2.7.2 Saving the Set Up Parameters ............................................. 22
RECORDING THE ECG...................................................................... 23
3.1 GENERAL PREPARATIONS .............................................................. 23
3.2 THORAX PLACEMENT OPTION ........................................................ 24
3.2.1 Acquiring an ECG in Thorax Placement Mode...................... 25
3.2.2 Saving a Single Lead ECG to Memory ................................. 26
3.2.3 Reviewing an ECG Stored in Memory .................................. 26
3.4 SIX OR TWELVE LEAD CABLE OPTION.............................................. 27
3.4.1 Recording an ECG with a 6 or 12 Lead Patient Cable .......... 27
3.4.2 Acquiring and Saving a 6 or 12 Lead ECG ........................... 30
PRINTING & TRANSMITTING THE ECG ........................................... 31
4.1 TELEPHONE TRANSMISSION ........................................................... 31
4.2 DIGITAL TRANSTELEPHONIC MODE ................................................. 32
4.3 USE WITH CARDIOVIEW ................................................................ 35
4.4 PRINTING WITH THE Biolog Printer Interface................................... 35
MAINTENANCE .................................................................................. 36
1. Batteries ................................................................................... 36
2. Electrodes................................................................................. 36
3. Cleaning and Disinfection.......................................................... 37
TROUBLESHOOTING ........................................................................ 38
APPENDIX A: SPECIFICATIONS ....................................................... 41
APPENDIX B: NOTICES..................................................................... 42
7
INTRODUCTION
CHAPTER 1
INTRODUCTION
1.1 What is the BIOLOG 3000i?
BIOLOG 3000i is a hand-held battery operated device designed to:
• Acquire and store in memory 5 to 200 secs. of a single lead ECG
via thorax placement.
• Acquire 5 to 80 seconds of simultaneous 6 or 12 Lead ECG, via
the 6 or 12 Lead patient cable.
The BIOLOG 3000i incorporates the following features:
• Single lead ECG acquisition.
• Diagnostic quality 6 and 12 Lead Simultaneous ECG acquisition.
• High definition LCD screen, readable in bright light and with
switchable backlighting for low light conditions.
• Heart rate monitoring (20 to 250 beats per Min.) and display.
• Automatic Device Identification facility for management of
recordings.
• Battery status bar on screen.
• Infra-red linked companion printer interface with 25 and 50
mm/second print speeds.
• Transtelephonic transfer of recordings.
INTRODUCTION
1.2 System 3000i Components
8
9
INTRODUCTION
1.3 Feature Locations
AUDIBLE
TELEPHONE
OUTPUT
DISPLAY
PATIENT CABLE
SOCKET
ON/OFF SWITCH
INFRARED
WINDOW
CONTRAST
CONTROL
MODE SWITCH
HOLD SWITCH
REVIEW SWITCH
Figure 1.1 BIOLOG 3000i Top View
ELECTRODE
IDENTIFICATION
LABEL
BATTERY
COMPARTMENT
COVER
Figure 1.2 BIOLOG 3000i Bottom View
SETTING UP THE BIOLOG 3000i
10
CHAPTER 2
Setting up the BIOLOG 3000i
2.1 Set Up Instructions
2.1.1 Installing the Batteries
Your BIOLOG 3000i is supplied with two AA (LR6) 1· 5V alkaline
batteries.
• Slide the ON/OFF switch to OFF position.
• Remove the battery compartment cover, by pressing down on the
cover, while simultaneously sliding it backwards (Figure 2.1).
Figure 2.1 Opening the Battery Hatch
• Load the Batteries with Correct Polarity.
• Match the battery polarity signs with the polarity marked on the
interior of the battery compartment casing.
Figure 2.2 Inserting the batteries
• Close the battery compartment
NOTE: Check the batteries were inserted with correct polarity (Figure 2.2).
11
SETTING UP THE BIOLOG 3000i
Align, press and slide the battery compartment cover until the locking
catch snaps into position (Figure 2.3).
Figure 2.3 Closing the battery hatch
2.1.2 Start Up
Slide the BIOLOG 3000i ON/OFF key to the ON position (Figure 2.4).
The screen will display:
• The title screen for 2 seconds;
• The Set Up Menu for 2 seconds (if configured to); and
• The ECG display screen. If the electrodes are not applied, the
center of the screen will show the “Leads Off” symbol:
(- - - - -)
Figure 2.4: Turning the BIOLOG 3000i on
At any time, you can adjust the contrast of the LCD display with the
CONTRAST control button situated on the side of the unit (this may be
necessary to produce a visible display if it has been misadjusted).
SETTING UP THE BIOLOG 3000i
12
2.2 Checking the Battery Status
The power remaining in the batteries is displayed on screen by the
battery status bar.
The battery status bar is located.
• At the bottom of the Set Up Menu screen (Figure 2.5).
Or
• At the top of the screen during normal operation (Figure 2.5).
The battery status bar is an indicator of the battery voltage, with 8
segments showing the voltage range for usable operation. You can
visually check at any time how much power remains in the batteries.
When the voltage approaches the minimum for reliable operation, the
symbol BAT appears at the bottom of the screen. At this stage, you
should complete your procedure and replace the batteries, as some
operations such as printing and transferring data to a PC cause a dip in
the power levels, which can cause the Biolog to shut down without
warning.
Battery longevity is affected by backlighting. To preserve battery life, you
should turn off the backlight. If you turn the backlight ON or OFF, you
will notice that the battery status bar adjusts itself to the new condition.
Figure 2.5: Checking Battery Status
13
SETTING UP THE BIOLOG 3000i
2.3 The Set Up Menu
The Set Up Menu displays the following functions and their current
settings:
Screen 1
• The Backlight
• Mute the QRS beeping
• The Transtelephonic Mode
• Automatic Device Identification header for transtelephonic
transmission
• Time
Screen 2
• Date format
• Date
• Simultaneous Acquisition Enabled
• Length of recording
• The 50/60 Hz AC Filter
• The Print Speed of the printer
Screen 3
• Infra-red transmission settings
• Modem settings
• Power down time
Screen 4
• Menu Display
2.3.1 To Access the Set Up Menu
There are two ways to access the setup menu:
• If the setup menu appears briefly after power up, press any key
while it is displayed. The setup menu only appears at power up
if the Biolog has been configured this way.
or
• Press and hold the MODE key, then press the HOLD key at the
same time. The HOLD key must be pressed shortly after holding
the MODE key, if left too long there will be a timeout and the
screen will briefly go blank. If this happens, release both keys and
try again. When the setup screen appears, both keys can be
released.
SETTING UP THE BIOLOG 3000i
14
2.3.2 Navigating through the Set Up Menu
• The Hold KEY selects…
The Hold key selects and highlights the items you wish to change
within the Set Up Menu.
Each time you press the Hold key within the Set Up Menu, the
cursor moves to the next field or screen. There is no button to go
backwards, if necessary you can repeat the cycle through all of
the fields and screens, until again reaching the required field.
• The Review (REV) Key changes…
The Review key changes the value of the highlighted selected
item. If there is more than one option, you can cycle through all of
them until reaching the required selection.
• The Mode Key saves…
Press the Mode key to save the new values.
Cancelling changes: The Set Up Menu will revert to previous settings
when Mode key is not pressed after changing the Set Up Menu. To
confirm cancellation of changed items, turn the power off and on, then
review the Set Up Menu.
• The rightmost column of the setup screen displays symbols to
remind you to:
(^)
Press the 'Up' arrow key (REV) to increase values
(`)
Press 'Right' arrow key (HOLD) to select values
( OK )
Press 'OK’ symbol key (MODE) to save the settings
15
SETTING UP THE BIOLOG 3000i
Figure 2.6: Moving the cursor to the desired position
• To increase the number, press the REV key (up arrow) until the
desired number is shown. Hold the key down for fast scrolling.
Release the key when the desired value is displayed (Figure 2.7).
Figure 2.7: Selecting a desired value
SETTING UP THE BIOLOG 3000i
16
2.4 Set Up Screen 1
Figure 2.8: Screen 1
2.4.1 LCD Backlight Illumination
The LCD Backlight can be turned ON or OFF as desired.
• First move the cursor to the small circle ($) on the Set Up Menu
using the HOLD key.
• To turn the backlight ON/OFF press the REV key. When the
backlight is turned on, the small circle symbol changes to a sun
symbol (%).
The Battery Status Bar adjusts itself automatically (Refer to Section 2.2).
2.4.2 Mute the QRS Beeping
Some patients may be disturbed by the beeping sound made on the
detection of every QRS.
• To mute this sound, press the HOLD key to select the open symbol
(•)
• To change the setting press the REV key. The symbol will change to
(~), indicating that QRS Beeping is muted.
2.4.3 Transtelephonic Mode
BIOLOG 3000i is able to transmit a stored ECG recording, using
acoustic coupling via a telephone to a remote site equipped with a
suitable reception system. This is provided for backward compatibility
with old systems, and is no longer supported. Transmission by digital
modem is now recommended (see modem selection).
17
SETTING UP THE BIOLOG 3000i
The following table highlights the different transtelephonic modes of the
BIOLOG 3000i.
Symbol
Meaning
[
DEFAULT
disabled.
MODE:
Analog
transtelephonic
mode
is
Choose this mode for silence during recording or review.
\
Analog transtelephonic mode is enabled only for the review
or transmission of data. The acquisition of data is silent.
Choose this mode for silence during recording. Sound will
be emitted during review.
]
Analog transtelephonic mode is enabled for the acquisition,
review and transmission of data.
This mode is for transtelephonic transmission of the ECG in
real time to a receiving center. Sound will be emitted during
recording and review.
2.4.4 Automatic Device Identification (ADI)
You can send the serial number of your BIOLOG 3000i monitor when
sending a transtelephonic ECG with your BIOLOG 3000i to a reception
center equipped with QRS Diagnostic's CardioView software. This
facility is called Automatic Device Identification or ADI in brief.
Turn the ADI ON if sending an ANALOG Transtelephonic recording to
CardioView. Turn ADI OFF if sending an ANALOG Transtelephonic
recording to a non-QRS Diagnostic receiving station.
• To Select the ADI function, press the HOLD key.
• To change the setting press the REV key.
2.4.5 Setting the Time
• To change the time, move the cursor to the appropriate position
(HH for hours or MM for minutes) by pressing the HOLD key (right
arrow) repeatedly.
• Press the REV key (up arrow) to change to the desired time.
NOTE: The time is preset in 24-hour format (e.g. 3:30 PM will be shown as 15:30). The factory
setting is Australian Eastern Standard Time.
SETTING UP THE BIOLOG 3000i
18
2.5 Set Up Screen 2
Figure 2.9: Set Up Screen 2
2.5.1 Date Format
• To change the date format from DD:MM:YY (European) to MM:
DD:YY (US), move the cursor by pressing the HOLD key (right
arrow) repeatedly until the symbol (EU) is highlighted.
• To change the date format to US format (MM:DD:YY), press
briefly the REV key (up arrow). The symbol (US) will appear on
the screen and the date format will change to MM:DD:YY.
The date format is preset DD:MM:YY (European format).
2.5.2 Setting the Date
• To change the date, move the cursor to the appropriate position
(MM or DD or YY) by pressing the HOLD key (right arrow)
repeatedly.
• To set the date briefly press the REV key (up arrow).
2.5.3 Enabling Simultaneous Acquisition
The Sim selection must be enabled before the BIOLOG 3000i can be
used with the 6 or 12 Lead simultaneous cable.
Even if the Sim selection is changed and saved, the ECG in memory will
still be stored. If the BIOLOG 3000i is turned OFF during Set Up any
changes to the Set Up will not be saved, however, the current saved
ECG will be preserved.
19
SETTING UP THE BIOLOG 3000i
2.5.4 Total Single Lead Recording Time
The memory of the BIOLOG 3000i is programmable (in 5 second
increments) between 5 and 200 seconds for a single lead ECG.
It is also possible to record a single rhythm strip off a 6 or 12 Lead
simultaneous cable. When the 6 or 12 Lead is enabled you can record
between 5 and 80 seconds of single lead ECG.
To change the Recording Time, move the cursor to the Recording Time
area, Rec, by pressing the HOLD key and then increment the Recording
Time by pressing the REV key.
Figure 2.10 Changing the single lead recording time
SETTING UP THE BIOLOG 3000i
20
2.5.5 Selecting the Mains (50/60 Hz) Filter
You can select between 50 Hz and 60 Hz filters, in accordance with the
mains current, in the country of use. The default factory setting is 50 Hz.
• To select a 60 Hz mains filter value, move the cursor to the
symbol 50 position, by pressing the HOLD key repeatedly.
• To change the mains filter to 60 Hz, simply press the REV key
(Figure 2.11).
Figure 2.11: Selecting Mains Filter
2.5.6 Print Speed
The Biolog Printer Interface can be set to either 25mm/sec or 50mm/sec.
• To select print speed press the Hold key (right arrow).
• To set print speed press the REV key to the desired value
25mm/sec or 50mm/sec.
21
SETTING UP THE BIOLOG 3000i
2.6 Set Up Screen 3
Figure 2.12: Screen 3
2.6.1 Transmission Settings
When transmitting to the Biolog Printer Interface, or Analogue Transtelephonic
transmission to CardioView, the BIOLOG 3000i may be set to
transmit either 3· 5 seconds per lead or 10 seconds per lead.
2.6.2 Modem selection
Selecting this (&) allows the BIOLOG 3000i to communicate with a
modem or GSM digital mobile phone (refer to section 4.2). This also
allows the user to enter the modem telephone number (Num) to be
dialed, as well as selecting the Baud Rate (BR) at which the BIOLOG
3000i will communicate with the modem or GSM digital mobile phone.
2.6.3 Power down
This is an adjustable time in minutes, after which the BIOLOG 3000i will
turn off if not in use. If this value is set to zero, the power down function
will be cancelled.
SETTING UP THE BIOLOG 3000i
22
2.7 Set Up Screen 4
Figure 2.13: Screen 4
2.7.1 Menu Display
Selecting this (&) allows the set up menu to be displayed briefly when
turning on the BIOLOG 3000i as mentioned in section 2.3.1. If (') is
selected the menu will not be displayed on start up, however, it can still
be accessed by pressing the MODE and HOLD keys simultaneously.
2.7.2 Saving the Set Up Parameters
To save the Set Up Menu parameters, press the MODE key (OK on the
display) at any time during the set up (Figure 2.12).
When OK is selected, the new set up parameters will be adopted and
any old parameters will be cleared.
Figure 2.14: Saving the set up menu parameters
23
RECORDING THE ECG
CHAPTER 3
RECORDING THE ECG
3.1 General Preparations
Place the patient in an 'at rest' position, preferably prone on their back.
Turn the BIOLOG 3000i on by sliding the power switch on (Figure 2.4).
To change or review any of the Set Up parameters, refer to the Set Up
Menu Instructions. If no changes are needed, allow the BIOLOG 3000i
to proceed to the ECG display screen.
For best results:
• For better contact when applying the BIOLOG 3000i directly on
the skin surface, moisten the electrodes with electrode gel or
water.
When using patient cable accessories:
• Use with Ag/AgCl ECG “skin” electrodes. Attach all electrodes
before turning the unit ON ().
• Keep the patient and cables as motionless as possible during
monitoring.
• Lay the BIOLOG 3000i on a flat surface during monitoring to
ensure least disturbance.
Two options are available to obtain the ECG, Thorax placement and 6
lead or 12 lead patient cable acquisition.
After briefly displaying the set up menu for 2 seconds, the BIOLOG
3000i goes into the ECG display screen (Figure 3.1).
SINGLE LEAD mode is indicated by the symbol SL at the bottom of the
ECG display screen.
RECORDING THE ECG
24
NOTE: The gain of the ECG can be switched between 5(}) and 10 ({) mm/mV. The normal
adult setting should be 10 mm/mV, which is represented by a taller calibration symbol at the
bottom of the center ECG Display screen. To select 5 mm/mV (e.g. for pediatrics applications)
briefly press the REV key.
-----
Figure 3.1: The ECG Display screen
3.2 Thorax Placement Option
Place the BIOLOG 3000i on the patient’s left anterior chest with the
electrode feet firmly against the skin.
For ideal placement in Lead II, when viewing the BIOLOG 3000i from
the front:
• The lower right electrode foot is the positive electrode (+). It
should be placed over the apex of the heart.
• The upper left electrode foot is the negative electrode (–). It
should be placed on the sternum, as close as possible to the
manubrium.
• The other two electrodes act as references, with at least one
reference electrode in contact with the thorax.
• The BIOLOG 3000i is now ready for monitoring.
25
RECORDING THE ECG
Figure 3.2: Different Leads using Back Electrodes
3.2.1 Acquiring an ECG in Thorax Placement Mode
• Turn on the BIOLOG 3000i as described above. Allow the unit to
settle in ECG display mode.
• Place the BIOLOG 3000i on the patient's chest as indicated
above.
• The leads off (- - - - -)indication
-)
should vanish, and
after a few seconds, the baseline of the patient's ECG will settle
down and appear on the screen. Maintain the BIOLOG 3000i in
this position for at least as long as the Recording Time selected in
the Set up Menu.
To change or review any of the set up parameters, refer to the Set Up
Menu Instructions.
RECORDING THE ECG
26
3.2.2 Saving a Single Lead ECG to Memory
• To save an ECG to memory, press the HOLD button, at the end of
the ECG recording (Figure 3.3).
• A H will appear in the lower right of the screen. This indicates that
the ECG is saved and stored in the memory. It will remain in
memory until a new ECG is recorded and saved.
NOTE: The BIOLOG 3000i is equipped with a small backup battery. It will keep its memory
when the unit is turned OFF or when the batteries are removed for replacement.
Figure 3.3: Saving an ECG to memory
3.2.3 Reviewing an ECG Stored in Memory
To review an ECG stored in memory:
• Press the REV button for about 1 second until a long beep is
heard. The ECG saved in memory will begin scrolling across the
screen. A R will be displayed in the right lower corner of the
screen to indicate that the unit is in REVIEW mode (Figure 3.4).
• To freeze any portion of the ECG for closer examination, press the
HOLD key once. To release the freeze, press the HOLD key once
again. This can be done as often as desired.
• A review can be performed as many times as desired on an ECG
saved in memory.
27
RECORDING THE ECG
Figure 3.4: Reviewing a stored ECG
3.3 Six or Twelve Lead Cable Option
The 6 or 12 lead BIOLOG 3000i cable is used to perform simultaneous 6
or 12 lead ECG acquisition and monitoring.
Alternatively, the operator is able to record a single rhythm strip off any
one of the six or twelve leads. This recording can be between 5 and 80
seconds (Refer to Section 2.5.4).
NOTE: To use the 6 or 12 lead Biolog Patient cable with the BIOLOG 3000i the Sim option
must be enabled in set up menu 2 (see section 2.5.3).
3.4.1 Recording an ECG with a 6 or 12 Lead Patient Cable
• Plug the 6 or 12 lead patient cable into the cable socket (Figure
3.5).
Figure 3.5: Connecting Cables to the BIOLOG 3000i
RECORDING THE ECG
28
• Turn the BIOLOG 3000i on and allow it to cycle to the ECG
display screen. The BIOLOG 3000i automatically detects the
presence of the 6 or 12 lead cable and displays lead II on the
screen (Figure 3.6).
Figure 3.6: Monitoring Screen with 12-lead Cable Connected
• Turn the BIOLOG 3000i off and attach the leads to the patient's
chest (Figure 3.9).
Figure 3.7: Anatomical Positioning of the 6 or 12 lead Cable Electrodes
29
RECORDING THE ECG
• Once attached, lead II will automatically begin monitoring. If
any lead other than lead II is desired as the rhythm strip, briefly
press the MODE key and release. This will advance the selected
rhythm strip to lead III.
III Any lead may be selected by
repeatedly pressing the MODE key. Leads available for selection
are identified as I,II,III,AVR,AVL,AVF for the 6
lead
cable
and
I,II,III,AVR,AVL,AVF,V1,V2,V3,V4,V
5 and V6 for the 12 lead cable.
• Once the lead is selected, the BIOLOG 3000i will continue to
monitor that lead until you are ready to record and save.
Figure 3.8: 12 Lead Biolog Patient Cable
RECORDING THE ECG
30
3.3.2 Acquiring and Saving a 6 or 12 Lead ECG
• To begin recording the simultaneous 6 or 12 lead samples, ensure
that all leads are attached reliably, then press and hold down the
MODE key until a multiple beep is heard (Figure 3.11). This will
place the BIOLOG 3000i in automatic acquisition mode as
indicated by an A in the lower right corner of the screen. The 6 or
12 leads will then be simultaneously recorded.
Figure 3.9: St arting 12-lead ECG Acquisition
The BIOLOG 3000i will automatically save each of the leads when the
recording is finished. When all leads have been sampled, a multiple
beep is sounded, and a screen will display the status of the acquisition.
To exit this screen, press the MODE key (to return to rhythm strip
monitoring) or REV (to print and/or review).
As the BIOLOG 3000i simultaneously records from the 6 or 12 lead
cable, it checks to ensure that each lead is attached. If any detachments
are found, these will be indicated on the screen at the end of the
recording as shown at Figure 3.10. If this message appears, the user
should check the lead highlighted for faulty electrode connections.
NOTE: if limb leads are detached, chest lead detachments may not be
detected, or the recording may not be able to proceed in the first place.
Figure 3.10: Leads off message after a 6 or 12 Lead Recording
31
PRINTING & TRANSMITTING THE ECG
CHAPTER 4
PRINTING & TRANSMITTING
THE ECG
The BIOLOG 3000i has a number of methods of printing and
transmitting its data, after a recording has been made (Refer to Section
1.2).
4.1 Transtelephonic Transmission
This is provided for backward compatibility with old systems, and is no
longer supported. Transmission by digital modem is now recommended
(see next section).
To use this option:
The BIOLOG 3000i must be set to TRANSTELEPHONIC MODE (Refer
to section 2.4.3.).
Dial the number of the reception station then place the telephone
mouthpiece over the Audio Outlet located on the lower right of the unit’s
face (Figure 4.3).
Figure 4.3: Setting up BIOLOG 3000i for transmitting an ECG by
telephone
PRINTING & TRANSMITTING THE ECG
32
Depress the REV key and hold until the long audio tone is heard (Figure
4.4). The recorded ECG will be heard during the transmission.
Figure 4.4: Transmitting an ECG by telephone
During the transmission a high pitched variable audio tone will be heard.
To ensure a clear transmission, avoid moving the BIOLOG 3000i or
telephone handset during the transmission.
4.2 Digital Transtelephonic Mode
The BIOLOG 3000i has the ability to send your ECG by a standard
modem or GSM digital mobile phone for interpretation by CardioView.
This digital transfer allows for high speed, accurate transmission
of ECG data.
Figure 4.5: Digital Transtelephonic ECG Data Transfer
33
PRINTING & TRANSMITTING THE ECG
You will need a Biolog to Modem Adapter Cable and a standard
serial adapter or cable from the modem to a DB9 female
socket.
To transfer a stored ECG to CardioView by modem, enable the
modem field in Set up screen 3 (refer to section 2.6). Enter the full
telephone number of the receiving station, and set the baud rate as
recommended by your modem manufacturer (refer to section 2.6). The
telephone dial string may contain the following:
0…9
Normal telephone number digits
A…D
Normal telephone digits
#
Hash key
*
Star key
,
Dial pause (for switchboards)
T
Tone dialling (default)
P
Pulse (decadic) dialling
W
Wait for dial tone
@
Wait for silence
!
Flash/On hook
– and <space>
Ignored: may be used to format the dial string
Power the BIOLOG 3000i on, and then connect the BIOLOG 3000i to
the modem or digital mobile phone using the cable. Press and hold
the REV button to start the transfer.
NOTE: The receiving station must be ready to receive the data (refer to the CardioView
user manual for more information).
The BIOLOG 3000i should make the call and send the data
automatically.
If there is a failure in the connection to the modem, it is not switched on,
or the baud rate is incorrect, a higher then a lower long tone will sound
and normal review mode will be entered.
If the modem is connected and operating correctly, a screen headed
“Transfer
Transfer Mode”
Mode will appear. Below this, the modem’s
responses to the setup string and dial command will be displayed. If the
response “ERROR
ERROR” is seen then the modem has a problem with the
initialization string or the dial string. You will need to set the “init” string
to values recommended by your modem instructions, and ensure that
the dial string does not contain any incorrect characters. Note that
configuration of the “setup string” requires the Biolog 3000i Setup utility,
supplied with CardioView.
PRINTING & TRANSMITTING THE ECG
34
There will be no response to the dial string for a time while the call is
made and the remote station answers. If this takes more than 60
seconds the process will abort (there is a counter at the top of the screen
showing the progress of the timeout). If the line is busy or there is a
problem establishing the connection you may see the message
“NO
NO CARRIER”
CARRIER in which case press any key to reset the Biolog and
try again.
When connection is established a progress indicator “DATA>>>>
DATA>>>>”
will extend to the right of the screen until the call is completed. Below
this “Connected
Connected to ..”
.. (name of the receiving station,
defaults to Cardioview) will be shown. Pressing any key during the
data transfer will abort the transmission.
When the transmission is complete the BIOLOG 3000i will display a
message
“Data
Data transfer
t ransfer successful”
successful
(or
unsuccessful). Below this will be displayed “Received
Received by ..”
..
(name of the receiving station, defaults to Cardioview) followed by
the date and time.
To return to the normal mode of operation press any key. The Biolog will
reset and go through the normal power up sequence.
NOTE: The BIOLOG 3000i should work with any modem 100% compatible with the Hayes
command set.
The modem initialization string can only be edited using the BIOLOG Setup utility provided with
CardioView. The BIOLOG 3000i is factory pre-set to AT&FX0W2E1&K0. This should
work with the majority of modems, but in some cases (eg GSM mobile phones) it will be
necessary to simply use AT&F.
CAUTION: There may be a hazard associated with using a GSM phone close to hearing
aids and pacemakers. A GSM phone should not be used within a 5 metre range from
these devices. GSM phones can also interfere with the ECG signal.
35
PRINTING & TRANSMITTING THE ECG
4.3 Use with CardioView
The BIOLOG 3000i can be used with QRS Diagnostic’s CardioView
software.
For
more
information
please
refer
to
the
user manual or consult your nearest QRS Diagnostic distributor.
4.4 Printing with the Biolog Printer Interface
Stored ECGs can be printed using the Biolog Printer Interface.
For more information, please refer to the Biolog Printer Interface user
manual or consult your nearest QRS Diagnostic distributor.
MAINTENANCE
36
CHAPTER 5
MAINTENANCE
1. Batteries
Should the BIOLOG 3000i not operate properly when turned ON, check
the battery polarity. Incorrect battery insertion may damage the unit.
Only alkaline AA (LR6) 1.5V batteries should be used in the BIOLOG
3000i. Do not use Rechargeable Nickel/Metal Hydride batteries with the
BIOLOG 3000i.
NOTE: Please consult your local supplier for further details.
Without electrode contact (through the electrode feet or through the
patient cable), the BIOLOG 3000i will turn itself off automatically after
the period of time specified, (section 2.6.3 power down), to preserve
battery longevity.
In continuous use the batteries will last approximately for more than 10
hours with backlighting and more than 24 hours without backlighting.
To preserve battery life turn backlighting off when not needed and turn
unit off when not in use.
Remove batteries from the unit if not being used over a long period of
time, as they may leak and cause damage to the unit.
2. Electrodes
The contact electrode feet at the back of the BIOLOG 3000i are made of
high grade stainless steel and are corrosion resistant.
Wipe the electrode feet clean of gel or other residue after each use.
Residue left on the electrodes may affect the BIOLOG 3000i sensitivity.
37
MAINTENANCE
3. Cleaning and Disinfection
BIOLOG 3000i can be cleaned and disinfected very simply, as follows:
To clean the BIOLOG 3000i plastic case, wipe the surfaces of the case
with a clean cloth moistened with water only.
To clean the display, gently wipe the plastic display lens with a soft,
damp cloth moistened with water or a commercial glass cleaner.
NOTE: Do not wipe the case or the display lens with alcohol. Alcohol will damage plastic
surfaces over time, and may cause them to crack. In addition, the display lens may become
'foggy' in appearance.
To disinfect the BIOLOG 3000i, wipe the back of the device, including
the electrodes, with a hospital grade disinfectant.
NOTE: Do not saturate the BIOLOG 3000i with any liquid because excess fluid could enter the
case and damage the electronics.
TROUBLESHOOTING
38
CHAPTER 6
TROUBLESHOOTING
Symptom, Likely Problem and Solution
If you should experience any difficulty when using your BIOLOG 3000i,
please review the suggestions for troubleshooting some minor difficulties
presented below. If you cannot resolve the difficulty after following these
procedures, please contact your supplier, or call QRS Diagnostic, LLC.
No power: the unit is off after being on.
When not engaged in real-time monitoring, the BIOLOG 3000i will
automatically shut off after the period of time specified, (section 2.6.3
power down), to conserve battery power. Move the ON/OFF Switch to
the OFF position, then turn the unit ON again.
If the unit shuts down during download to PC or printing, it is likely that
the batteries are flat or are not of the recommended type. Replace the
batteries if this is occurring. Turning off the backlight may give some
extra operational time if no fresh batteries are immediately available.
NOTE: Data stored in memory will not be lost.
No power: the unit will not turn on.
The batteries are flat or they are not properly installed. Remove the
Battery Compartment cover and check the position of the batteries (refer
to section 2.1.1 Installing the batteries).
Try adjusting the contrast knob. If misadjusted, no display will be visible.
If the unit is more than 4 years old, the unit may need servicing. Ensure
that the previous steps have been taken, and if necessary return it to an
authorized QRS Diagnostic, LLC service center.
'BATT' Message Appears in the Display.
Battery voltage has dropped below an acceptable level. The BATT
message will remain on the screen until the batteries have been
replaced. Complete the procedure and change the batteries as soon as
possible.
39
MAINTENANCE
'- - - - -'
- Appears in the Display.
This is a normal message indicating the “Leads Off” condition. It will
appear if any electrodes fail to make good contact with the skin. Check
the electrode skin contact until the ECG monitoring mode is established.
If using a multi lead cable, also check any electrode adapters by
swapping them. If a leads off indication occurs consistently for a
particular patient lead after changing the electrode and the adapter, it
may indicate a fault in the lead, in which case please contact your
QRS Diagnostic, LLC service center.
NOTE: For better direct thorax contact, moisten the back electrodes.
ECG signal appears noisy or shows interference.
Check that the ECG electrodes are well adhered and applied according
to the manufacturer's instructions. Distance the BIOLOG 3000i and the
patient from other electrical equipment.
“This cable is incompatible with the 3000i” Message When
Transferring ECG to PC
This can occur if you are touching the back electrodes or are near a
source of electrical noise while the download cable is connected. It does
not interfere with the download operation, however to clear the message
ensure that the Biolog is resting on an insulated surface and away from
power cables, transformers or other electrically noisy equipment.
Unable to take a multi lead ECG with the Biolog Patient cable
Make sure that the cable is connected properly. Examine the cable’s
plug for bent pins. Ensure that the Biolog is configured for simultaneous
cable support on the setup screen.
Read the instructions for multi lead ECGs carefully. If you press the
“Hold” button, only a single lead will be stored. To acquire a multi lead
ECG, the “Mode” button must be pressed and held until acquisition mode
is entered.
Biolog emits a constant sound
The Biolog will emit a faint sound when the LCD backlight is on. If the
backlight is not needed, switch it off using the setup screen (this will
greatly extend the battery life).
TROUBLESHOOTING
40
Serial Number shown at startup as “UUUUU” (or random value)
Won’t keep correct time and date
This is likely to occur if the unit is more than 4 years old. Return it to an
authorized QRS Diagnostic, LLC service center for routine servicing and testing.
Scrolling lines on the Screen
This can occur if holding buttons while switching the Biolog on. To correct this, turn the Biolog off, remove the batteries for ten seconds, replace the batteries, and turn the Biolog back on, making sure you do not
touch any of the buttons.
If the problem continues, contact your QRS Diagnostic, LLC service center.
41
APPENDIX
APPENDIX A: Specifications*
ELECTRICAL CHARACTERISTICS
6 – 12 Lead
Rear Electrodes
500 Hz
300 Hz
Sampling Rate
0· 05 – 175
0· 5 – 100 Hz
Frequency Response
Hz
12 Bit
8 Bit
Resolution
> 60dB
> 80 dB (0 – 100 Hz)
CMRR:
4kV
Requires 6-12 Lead
Isolation
DISPLAY
Sweep Speed ECG:
20 mm/sec ± 1 mm/sec
Display Sensitivity ECG:
5 or 10 mm/mV ± 0· 5 mm/mV
Viewing Area:
40 × 48 mm
No. of Pixels:
240 h × 160 w
Display Type:
LCD
Back Light:
Electro-luminescent
MEASURED PARAMETERS
Heart Rate (HR):
20 – 250 bpm ± 2%
POWER REQUIREMENTS
Battery Type:
Battery Life:
2 × AA 1·5V Alkaline cells (recommend Sanyo LR6)
(typical) 12 Hours continuous use
PHYSICAL CHARACTERISTICS
Length:
Width:
Thickness:
Weight:
134 mm
88 mm
32 mm
270 g
ENVIRONMENTAL CHARACTERISTICS TEMPERATURE
Operating:
0°C – 40°C
Storage:
-20°C – 70°C
HUMIDITY
Operating:
Storage:
5% – 95%
5% – 95%
ATMOSPHERIC PRESSURE
General:
500 hPa – 1060 hPa
*Specifications are subject to change without prior notice.
APPENDIX
42
APPENDIX B: Notices
Copyright Notice
Copyright © 2003 by QRS Diagnostic, LLC. All rights reserved.
This document contains proprietary information, which is protected by copyright. All rights are
reserved. No part of this document may be photocopied, reproduced, or translated to another
language without the written consent of QRS Diagnostic, LLC. The information contained in
this document is subject to change without notice and does not represent a commitment on the
part of QRS Diagnostic, LLC.
BIOLOG 3000i, CardioView & Biolog Printer Interface are registered trademarks of
QRS Diagnostic, LLC USA. Patents pending.
The BIOLOG 3000i is year 2000 compliant.
APPENDIX
43
ELECTROMAGNETIC COMPATIBILITY NOTICE
This equipment has been tested and found to comply with the limits for a
class B digital device, pursuant to part 15 of the FCC Rules,
AS/NZS3200.1.2:1995 and IEC601–1–2:1993. These limits are designed
to provide reasonable protection against harmful interference in a
residential installation. This equipment generates, uses and can radiate
radio frequency energy and, if not installed and used in accordance with
the instructions, may cause harmful interference to radio
telecommunications. In addition, radio frequency transmitters such as
CB radios and wireless or cellular mobile phones may adversely affect
this device.
There is no guarantee that interference will not occur in a particular
installation. If this equipment does cause harmful interference to radio or
television reception, or is itself affected by equipment off and on, the
user is encouraged to try to correct the interference by one or more of
the following antenna:
• Reorient or relocate the receiving antenna.
• Increase the separation between the interfering devices.
• Connect the equipment into an outlet on a circuit different from
that to which the other equipment is connected.
• Consult the dealer or an experienced radio/TV technician for help.
CAUTION: In order to meet 47 CF R 15, IEC601–1–2 and AS NZS3200.1.2, all cables
used to connect this device to peripherals must be shielded. Operation with unshielded
cables may result in interference to radio or television reception.