1
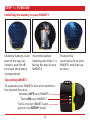
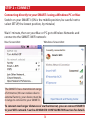
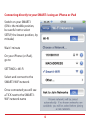
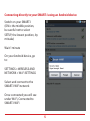
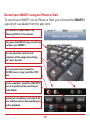
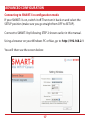
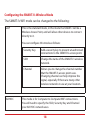
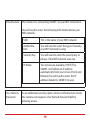
User Manual
Thank you for purchasing SMART-I, the new way to view & record your world!
Please read this user manual before using your SMART-I.
Contents:
2 Turning on SMART-I
3 Connecting to SMART-I
6 View SMART-I on a PC or Mac
8 View SMART-I on an iPhone or iPad
10 View SMART-I on an Android
12 Record SMART-I on a PC or Mac
14 Record SMART-I on an iPhone or iPad
16 Record SMART-I on an Android
18 Configuring the SMART-I’s WiFi
20 Accessing SMART-I over the
Internet
STEP 1 > TURN ON
Installing the battery in your SMART-I
Slide the battery cover
part of the way (as
shown), and lift off
to reveal the battery
compartment
Insert the battery
(making sure that ‘+’ is
facing the top of your
SMART-I)
Operating SMART-I
To opearate your SMART-I move the switch to
the desired function:
Switches OFF your SMART-I
Turns ON your SMART-I
Turns on your SMART-I and
puts it in to SETUP mode
2
Position the
cover back on to your
SMART-I and slide up
to close
STEP 2 > CONNECT
Connecting directly to your SMART-I using a Windows PC or Mac
Switch on your SMART-I (ON is the middle position, be careful not to
select SETUP, the lowest position, by mistake)
Wait 1 minute, then on your Mac or PC go to Wireless Networks and
connect to the SMART-I WiFi network:
Mac Screenshot:
Windows Screenshot:
The SMART-I has a transmission range
of 20 metres (this can reduce due to
external factors), your device must be
in range to connect to your SMART-I.
To connect over longer distances or via the Internet, you can connect SMART-I
to your WiFi network. See the ADVANCED CONFIGURATION section for details.
3
Connecting directly to your SMART-I using an iPhone or iPad
Switch on your SMART-I
(ON is the middle position,
be careful not to select
SETUP, the lowest position, by
mistake)
Wait 1 minute
On your iPhone (or iPad),
go to:
SETTINGS > Wi-Fi
Select and connect to the
SMART-I-WiFi network
Once connected you will see
a TICK next to the SMART-IWiFi network name
4
Connecting directly to your SMART-I using an Android device
Switch on your SMART-I
(ON is the middle position,
be careful not to select
SETUP, the lowest position, by
mistake)
Wait 1 minute
On your Android device, go
to:
SETTINGS > WIRELESS AND
NETWORK > Wi-Fi SETTINGS
Select and connect to the
SMART-I-WiFi network
Once connected you will see
under Wi-Fi, Connected to
SMART-I-WiFi
5
STEP 3 > VIEW
View your SMART-I using a Windows PC or Mac
Open your browser and browse to: http://192.168.2.1
You will then see the screen below:
6
To view your SMART-I, select a stream type:
Stream Images
Streams Video to your browser using MJPEG
View using Java
Streams Video to your browser using Java
View & Listen using Java
Streams Video and Audio to your browser using Java
Javascript
Streams Video to your browser using Javascript
Not all stream types will work with all browsers.
The SMART-I is compatible with Microsoft Internet Explorer, Google
Chrome, Mozilla Firefox & Apple Safari.
To adjust video attributes, press the + or - next to Contrast & Brightness.
To change the Image Resolution and Compression type, select from the
dropdowns.
Reducing the image resolution from VGA to QVGA or QQVGA and increasing the
compression from Standard to High, will increase the frame rate in low bandwidth
conditions, but will also reduce the image quality.
7
View your SMART-I using an iPhone or iPad
Open the Safari app on your device and browse to: 192.168.2.1
You will then see the screen below:
8
To view your SMART-I, select one of the following stream types:
Stream Images
Streams Video to your browser using MJPEG
Javascript
Streams Video to your browser using Javascript
To adjust video attributes, press the + or - next to Contrast & Brightness.
Audio monitoring & Resolution adjustments are not possible when using the Safari
app to connect to the SMART-I.
For the best streaming performance on your iPhone or iPad, as well as Audio
monitoring and Recording of your SMART-I, we recommend using the SMART-I
app, available from the App Store.
9
View your SMART-I using an Android device
Open the Browser app on your device and browse to: 192.168.2.1
You will then see the screen below:
10
To view your SMART-I, select the following stream type:
Javascript
Streams Video to your browser using Javascript
To adjust video attributes, press the + or - next to Contrast & Brightness.
To change the Image Resolution and Compression type, select from the
dropdowns.
Reducing the image resolution from VGA to QVGA or QQVGA and increasing the
compression from Standard to High, will increase the frame rate in low bandwidth
conditions, but will also reduce the image quality.
Audio monitoring is not possible when using the Browser app to connect to the
SMART-I.
For the best streaming performance on your Android device, as well as Audio
monitoring and Recording of your SMART-I, we recommend using the SMART-I
app, available from the Market.
11
STEP 4 > RECORDING
Record your SMART-I using a Windows PC or Mac
Open your browser and go to http://192.168.2.1, and select View
using Java (for video only recording) or View & Listen using Java (for
video and audio recording), from the screen below:
12
When the camera image appears, click on the centre of the image.
Then hover your mouse over the left edge of the image and the
following menu will appear:
By clicking the icons you can perform the
following actions:
Changes the folder that recordings
and snapshots are saved to.
Allows you to specify the maximum
file size for recordings.
Starts and stops recordings, RED
indicates recording is in progress,
GREEN shows that recordings are
not being made.
Takes a single snapshot and saves it
in the recordings folder.
To playback recordings or view snapshots, browse to the recordings folder and
double click the file to view. (Your default file player will the play the recording)
13
Record your SMART-I using an iPhone or iPad
To record your SMART-I on an iPhone or iPad, you will need the SMART-I
app which is available from the app store.
First, connect to your SMART-I by
following STEP 2 in this manual.
Then open the SMART-I app, you will see
and hear your SMART-I.
You can adjust the contrast and
brightness of the image by touching
the + and - by each.
To record your Smart I touch the
RECORD icon, to stop, touch the STOP
icon.
To take snapshots, touch the SNAPSHOT
icon. A snapshot will be saved to your
Photo Album.
To playback recordings, touch the PLAY
icon, and then choose the recording you
wish to playback.
14
For help with using the app, touch the HELP icon.
To transfer recordings to your computer, connect your iPhone or iPad to
iTunes and download the recordings.
Additional settings for the SMART-I app
can be adjusted by going to the iPhone or
iPad’s SETTINGS menu, and scrolling down
to the SMART-I icon, and opening it.
You will then see the screen opposite.
On this screen you can:
Specify the IP address of the SMART-I you
wish to connect to (this could be an external
address if you want to connect to a SMART-I
over the internet).
Set the maximum size of recorded files.
Input the user name and password of the
SMART-I (only required if one has been set).
For further details of these settings, see the
ADVANCED CONFIGURATION section.
15
Record your SMART-I using an Android device
To record your SMART-I on an Android device, you will need the app,
SMART-I, which is available from the Market.
Open the SMART-I app and press
SETTINGS.
On the settings screen press SCAN WIFI
and select Smart-I-WiFi from the list,
enter the maximum file size for
recordings and press SAVE.
Press RECORD and you will see and hear
your SMART-I.
To begin recording press the red circle,
to stop press the grey square.
To take a snapshot press the camera
icon.
To playback press the grey play symbol
and then select the file you wish to
playback.
Recordings and snapshots are saved to
the Smart-I folder on your device, this
can be viewed by using the My Files app
on your device.
16
ADVANCED CONFIGURATION
Connecting to SMART-I in configuration mode
If your SMART-I is on, switch it off. Then turn it back on and select the
SETUP position (make sure you go straight from OFF to SETUP).
Connect to SMART-I by following STEP 2 shown earlier in this manual.
Using a browser on your Windows PC or Mac, go to: http://192.168.2.1
You will then see the screen below:
17
Configuring the SMART-I’s Wireless Mode
The SMART-I’s WiFi mode can be changed to the following:
uAP
This is the standard mode, in this mode the SMART-I will be a
Wireless Access Point, and will allow other devices to connect
directly to it.
You can configure this mode as follows:
ADHOC
Security Key
Add a security key to prevent unauthorised
connections to the SMART-I’s access point.
SSID
Change the name of the SMART-I’s wireless
network.
Channel
Allows you to change the channel number
that the SMART-I’s access point uses.
Changing channel can help improve the
signal, especially if there are many other
wireless networks in use at your location.
This mode is for Computer to Computer WiFi connections.
You will need to specify the SSID, Security Key and Channel
your AD HOC network uses.
18
Infrastructure
This mode is for connecting SMART-I to your WiFi connection:
You will need to enter the following information about your
WiFi network:
User Name &
Password
SSID
This is the name of your WiFi network
Authentication
You will need to select the type of security
your WiFi network is using
Security Key
You will need to enter the security key or
phrase, if the WiFi network uses one
IP Mode
Two modes are available, DHCP (The
SMART-I will obtain an IP address
automatically from your Access Point) and
Manual (You will need to enter the IP
address details for SMART-I to use).
As an additional security option, when in Infrastructure mode,
the camera can request a User Name & Password before
allowing access.
19
Accessing SMART-I from a Local Network or the Internet
Local Network:
To access the SMART-I from your local network, connect the SMART-I to your
Wireless Access Point using SMART-I’s Infrastructure mode.
To view SMART-I using a PC/Mac browser, type in the SMART-I’s IP address.
To view SMART-I using the SMART-I app for iPhone/iPad, press SEARCH and then
select the SMART-I from the list.
The SMART-I app for Android devices, cannot connect to SMART-I when SMART-I
is in Infrastructure mode, to view the SMART-I use the Android Browser app.
Internet:
To access the SMART-I over the Internet, connect the SMART-I to your network in
Infrastructure mode, and then setup port forwarding on your router.
For further information about port forwarding, see www.portforward.com or
contact the SMART-I Product Support Line.
To view SMART-I using a PC/Mac browser, type in your routers external IP address.
To view SMART-I using the SMART-I app for iPhone/iPad, go to SETTINGS >
SMART-I on your device and type in the external IP address under SERVER URL.
The SMART-I app for Android devices, cannot connect to SMART-I over the
Internet, to view the SMART-I use the Android Browser app.
20
Don’t have a Fixed External IP Address?
If you do not have a fixed external IP address from your internet provider, then you
will need to join a Dynamic DNS service, as your external IP address will change
all the time, so you will not know what address to use for remote viewing of your
SMART-I.
The Dynamic DNS service will give you a host name that never changes, so you
have a permanent address that you can use to access your SMART-I over the
internet.
The Dynamic DNS service we recommend to use, is dyndns, which can be found at
www.dyndns.org.
For help with DYNDNS setup, contact the SMART-I Product Support Line.
Reprogramming your SMART-I’s WiFi Settings
If you have made an error while changing the SMART-I’s WiFi settings, and are
unable to access it any more, you can enter the SETUP mode again and reprogram
the WiFi settings.
To do this, turn off SMART-I, wait 10 secs, turn SMART-I on in the SETUP position.
Connect to SMART-I by following STEP 2 shown earlier in this manual.
Using a browser on your Windows PC or Mac, go to: http://192.168.2.1, you will
now be able to reprogram the WiFi settings.
21
Upgrading the SMART-I’s firmware
To check if your SMART-I has the latest firmware, go to www.smartwitness.com,
find SMART-I on the Support page and check for the latest firmware.
To upgrade your SMART-I’s firmware, switch it off, then turn it back on and select
the SETUP position (make sure you go straight from OFF to SETUP).
Connect to SMART-I by following STEP 2 shown earlier in this manual.
Using a browser on your Windows PC or Mac, go to: http://192.168.2.1, you will
see the following screen:
22
Make sure you have downloaded the firmware file and you know where it is
located on your computer.
Do not proceed any further unless you have new firmware to apply,
otherwise your SMART-I will stop operating and will need to be
reset at your nearest SMART-I service centre!!!
Click on Firmware Upgrade, and then click Switch
Follow the on screen instructions, which are to turn SMART-I OFF, and then turn it
back on again in SETUP mode.
Now connect to SMART-I again, this time you will notice the WiFi network
name has changed to Smart-I Firmware AP, connect to this and browse to
htpp://192.168.2.1 again.
You will be prompted to enter a User Name and Password, these will be shown on
the Support page on smartwitness.com that you downloaded the firmware from,
along with the final steps to complete the firmware upgrade.
23
Specifications
SPECIFICATIONS
Model Number
SMART-I
Image Sensor
Digital CMOS
Minimum Illumination
1.0 Lux
Viewing Angle
50°
Video Resolution & Speed 640x480 @ 30fps
WiFi Compatibility
802.11 b/g/n
Battery
CR2 (supplied)
Battery Life
2 hours (estimated)
Dimensions (WHD in mm) 30x30x35
Unit 2, Valley Point, Beddington Farm Road,
Croydon, Surrey. CR0 4WP. U.K.
www.smartwitness.com
Product Support: +44 (0)871 222 1430
© Copyright 2011, Specifications are subject to change without notice