1
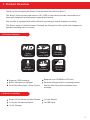
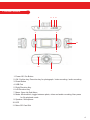
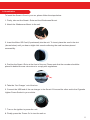
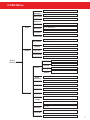
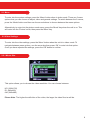
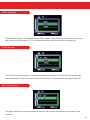
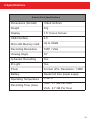
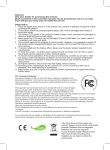
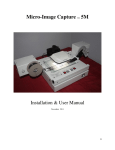
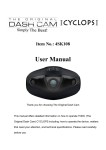
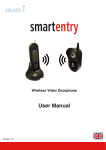
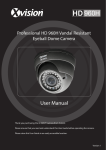
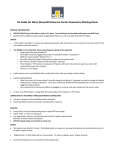
Drive
HD
HD Vehicle Accident Camera
User Manual
USB
Version 1
Video
Video
Video
1920x1080
1280x720
Supports
up to 32GB
Windows
2.0
Compatible
16.9
Mac Built-in
and Windows
Compatible
Microphone
Night
Operation
1.5” LCD
Screen
Contents
1. Product Overview ............................................................................
3
1.1. Product Features ................................................................
1.2. What’s In The Box ...............................................................
1.3. Button Functions .................................................................
1.4. Installation ...........................................................................
1.5. Basic Operation ..................................................................
3
3
4
5
6
2. OSD Menu ........................................................................................
7
2.1. Menu ..................................................................................
2.2. Video Settings ....................................................................
2.2.1. Movie Size ...........................................................
2.2.2. Date Stamp ..........................................................
2.2.3. Motion Detection ..................................................
2.2.4. Loop Recording ...................................................
2.2.5. Loop Time ............................................................
2.2.6. Continue ..............................................................
2.2.7. Video Sound ........................................................
2.3. Picture Settings ..................................................................
2.3.1. Resolution ............................................................
2.3.2. Quality ..................................................................
2.3.3. Exposure ..............................................................
2.3.4. Driver Mode .........................................................
2.3.5. Date Stamp ..........................................................
2.4. General Settings .................................................................
2.4.1. Sounds .................................................................
2.4.2. Power Frequency .................................................
2.4.3. Power Save .........................................................
2.4.4. Panel Protect .......................................................
2.4.5. Date / Time ..........................................................
2.4.6. Language .............................................................
2.4.7. Start-up Image .....................................................
2.4.8. Format .................................................................
2.4.9. LED Light .............................................................
2.4.10. Reset All .............................................................
2.4.11. Version ...............................................................
8
8
8
8
9
9
10
10
10
11
11
11
12
12
12
13
13
14
14
14
15
15
15
16
16
16
17
3. Recording & Playback ....................................................................
18
3.1. Video Recording .................................................................
3.1.1 Manual Recording .................................................
3.1.2 LED Recording .....................................................
3.1.3 Auto Recording .....................................................
3.2. Snapshot Mode ..................................................................
3.3 Audio Recording ..................................................................
3.4 Playback ..............................................................................
3.4.1 Video Playback .....................................................
3.4.2 Photo Browsing .....................................................
3.4.3 Audio Playback .....................................................
18
18
18
18
18
19
19
19
20
20
4. Connect to a Computer ..................................................................
21
4.1. Mobile HDD Mode ..............................................................
4.2. PC Camera Mode ...............................................................
21
21
4. Specifications ..................................................................................
22
1. Product Overview
Thank you for purchasing the Smart-i Drive Accident Camera from Smart-i.
The Smart-i Drive records road events in HD (720P) to help drivers provide clear evidence of
what really happened and help protect against false claims.
The recorder is equipped with motion detection recording as well as snapshot recording.
The Smart-i range of Vehicle Accident Cameras are designed to offer crystal clear images and
represent amazing value for money.
1.1 Product Features
USB
Video
Video
1920x1080
1280x720
Supports
up to 32GB
Windows
2.0
Compatible
16.9
Mac Built-in
and Windows
Compatible
Microphone
Night
Operation
Supports 720P recording
Built-in Microphone / Speaker
Quick Recording Open / Close Choice
1.5” LCD
Screen
Supports up to 32GB Micro SD Card
Recorder charges while in recording function
and the video loop offers seamless video
coverage
1.2 What’s in the Box
Smart-i Drive Vehicle Accident Camera
1x Suction Windscreen Mount
1x Car Charger
1x User Manual
1x USB Cable
3
1.3 Button Functions
4
3
1
2
5
7
11
6
8
10
9
1. Power Off / On Button
2. OK: Confirm key. Execution key for photograph / video recording / audio recording.
3. Reset Button
4. USB Port
5. Right Direction Key
6. Left Direction Key
7. Menu: Open Up Sub-Menu
8. Mode: Mode switch, toggle between photo, video and audio recording. Also press
for file playback mode.
9. Speaker / Microphone
10. LED
11. Micro SD Card Slot
4
1.4 Installation
To Install the Smart-i Drive in your car, please follow the steps below:
1. Firstly, take out the Smart-i Drive and the Windscreen Mount.
2. Attach the Windscreen Mount to the unit.
3. Insert the Micro SD Card (if purchased) into the unit. To insert, place the card in the slot
(shown below) until you hear a slight click sound confirming the card has been placed
successfully.
4. Position the Smart-i Drive at the front of the car. Please note that the recorder should be
placed in behind the rear view mirror to comply with regulations.
5. Take the ‘Car Charger’ out of the box.
6. Connect the USB end of the car charger to the Smart-i Drive and the other end to the Cigarette
Lighter Power Socket in your vehicle.
7. Turn on the ignition to power the unit.
8. Finally, press the ‘Power On’ to turn the unit on.
5
1.5 Basic Operation
Power On / Off
Before powering on the recorder, please insert the Micro SD Card. Insert the Micro SD Card into
the slot until there is a slight ‘click’ sound, which means the card has been successfully installed.
Power On
Manual - Press the power on / off button, to turn the recorder on.
Auto - When connected to a working power adaptor, the recorder will automatically turn on. If
a Micro SD Card has already been installed, the recorder will automatically begin
recording.
Power Off
Manual - Press and hold the power On / Off button.
Battery
Please note the Smart-I Drive requires power all the time to be able to function.
When not powered the unit’s built in battery will last enough time to close the last recording safely.
6
2 OSD Menu
Video
Resolution
Date Stamp
Motion
Detection
Loop Record
Video
Loop Time
Continue
Video Sound
Resolution
Quality
Picture
Exposure
Driver Mode
Date Stamp
System
Settings
HD (1280x720) D1 (848x480) 640 (640x480)
Off / On
Off / On
Off / On
2 / 5 / 10 Minutes
Off / 5 / 10 Minutes
On / Off
5 Megapixel, 3 M, 2 M, 1 M
Super Fine, Fine, Normal
-2.0 ~ +2.0
Off / Self Timer 2 Sec, Self Timer 10 Sec, Burst
On / Off
Shutter
Start Up
Sounds
Beep
Volume
Power
Frequency
Power Save
Panel Protect
Date & Time
General
Language
Start-up
Image
Format
LED Light
Reset All
Version
On / Off
Off / (Choose from 3 Sounds)
On / Off
0 -3
50 Hz / 60 Hz
Off / 1 Min / 3 Min / 5 Min
Off / 30 Sec / 1 Min / 2 Min
Set Date & Time
12 Languages
Off / System / My Image
Yes / No
On / Off
On / Off
View Version Information
7
2.1 Menu
To enter into the system settings, press the ‘Menu’ button when in video mode. There are 2 menu
options that you can choose to adjust, video and general settings. To switch between the 2 menus,
press the ‘Mode’ button and then use the arrow buttons to choose between the menu options.
Alternatively, to enter into the picture mode menu, press the ‘Mode’ key when the unit is on. This
will enter into the ‘Picture’ mode, then press the ‘Menu’ key.
2.2 Video Settings
To enter into the video settings, press the ‘Menu’ button when the unit is in video mode. To
navigate between menu options, use the arrow key then press ‘OK’ to enter into that option.
Once you have adjusted the settings, press the ‘OK’ button to confirm.
2.2.1 Movie Size
This option allows you to choose the video resolution. You can choose between:
HD (1280x720)
D1 (848x480)
640 (640x480)
Please Note: The higher the definition of the video, the larger the video file size will be.
8
2.2.2 Date Stamp
The date stamp option allows you to add the time and date on the screen of the recorded videos.
To adjust the time and date, go to section 2.4.5 on page 15.
2.2.3 Motion Detection
By turning this function on, when a moving object is detected and the recorder will begin to
record. If the object stops moving the recorder will stop, and begin again once the same object
moves again.
2.2.4 Loop Recording
This option allows the user to turn on the loop recording function. To adjust the loop recording
times, go to the ‘Loop Time’ section (2.2.5) on page 10.
9
2.2.5 Loop Time
This option allows you to change the video sizes when in loop record. By turning on this function,
the unit will record for either 2, 5 or 10 minutes and then start a new video recording file.
2.2.6 Continue
Turn on the continue function to enable the recorder to continue to record after the ignition has
been switched off. This can be set to record 5 minutes or 10 minutes after the engine turns off.
2.2.7 Video Sound
This option allows you to record sound as well as video via the microphone on the front of the
recorder.
10
2.3 Picture Settings
To enter into the picture settings, press the ‘Menu’ button when the unit is in picture mode. The
picture settings allow you to adust the following; Resolution, Quality, Exposure, Driver Mode and
Date Stamp.
Once you have adjusted the settings, press the ‘OK’ button to confirm.
2.3.1 Resolution
Set the resolution of the image taken. The Smart-i Drive can take images up to 5 Megapixels. The
resolution can be set to:
5 Megapixel (2592x1944)
3 Megapixel (2048x1536)
2 Megapixel (1600x1200)
1 Megapixel (1280x1024)
2.3.2 Quality
Adjust the quality of the image from Super Fine, Fine and Normal. Please note that the higher the
quality of image, the larger the file size.
11
2.3.3 Exposure
The exposure levels of the camera will determine how much light will reach the camera. The
higher the levels, the more light will enter the camera and the picture will be brighter, lighter and
whiter. The exposure level can be adjusted from -2.0 to +2.0 (-2 being less light).
2.3.4 Driver Mode
The Driver Mode option allows you to set the Smart-i Drive to take images using a timer or take
several pictures at once in ‘burst’ mode.
This mode can be set to: Off, 2 second self-timer, 10 second self timer and burst.
2.3.5 Date Stamp
The date stamp option allows you to add the time and date on the screen of the recorded videos.
To adjust the time and date, go to section 2.4.5 on page 15.
12
2.4 General Settings
The general settings allow you to alter the following on the recorder:
Sounds
Power Frequency
Power Save Options
Date, Time and Language
Formatting the SD Card
LED Light
Factory reset on the unit
To enter into this menu, press the ‘Mode’ key when in the video or picture menu. To navigate
between the options use the arrow keys.
2.4.1 Sounds
The sound menu opens up a sub-menu which allows you to adjust the following volumes:
Shutter - Turn the shutter volume on or off
Start-up - Turn the start up sound off or choose between 3 sounds
Beep - Turn on the beep sound when buttons are pressed on the recorder.
Volume - Adjust volume level from 0-3
13
2.4.2 Power Frequency
Set the power frequency on the recorder, this can be either 50Hz or 60Hz.
2.4.3 Power Save
The power save option will allow the unit to record for longer. If the power save setting is turned
on, the unit will be powered for longer without the need to re-charge as the screen will be turned
off but the unit will still record. You can set the screen to turn off after 1, 3 or 5 minutes of inactivity.
2.4.4 Panel Protect
The panel protect function will save power on the recorder by turning off the screen after 30
seconds, 1 minute or 2 minutes.
14
2.4.5 Date / Time
Change the Date and Time using the format shown above. This will be shown on the Date Stamp
if you have turned that feature on. To adjust the date and time, use the arrow keys and press the
‘Mode’ key to switch between digits.
You can adjust the Date format by pressing the ‘Mode’ key to navigate the format and using the
arrow keys to toggle between the different date formats. When finished, press the ‘OK’ button.
2.4.6 Language
Change the language displayed on the recorder, there are 12 languages available.
2.4.7 Start-up Image
This option allows you to change the image that displays when the unit is turned on or off. This
can be set to off or use the default image that comes with the unit, or choose your own image.
15
2.4.8 Format
Format the SD Card on the unit.
Please Note: Formatting the card will erase all of the current recorded files, so please back these
up before formatting.
2.4.9 LED Light
The LED Light option allows you to switch the LED’s on or off.
2.4.10 Reset All
Reset all the the settings to the factory default settings.
16
2.4.11 Version
View the version number and recorder details.
17
3 Recording & Playback
3.1 Video Recording
To enter into video recording mode, turn on the recorder and press mode button until you see the
icon on top of the screen.
3.1.1 Manual Recording
1. Turn on the recorder and press the ‘mode’ button until in the video record mode preview. The
screen will display some general information, including current capture mode, preset
size, remaining recording time.
2. Press the OK key to start recording.
Please Note: If loop recording is enabled, the recorder will keep recording accordingly. If there is
not enought memory space, it will automatically delete the oldest recorded files. Please backup
important records to avoid them being over-written automatically.
3.1.2 LED Recording
When the recorder is off, connect to a working power adapter. When, the recorder is turned on
automatically, the device will enter video recording state automatically and the LED will light up.
3.1.3 Auto Recording
When the recorder is turned off, connect a working power adapter. After the device is turned on
automatically, the device will enter video recording mode. Disconnect the adaptor to stop
automatic recording.
18
3.2 Snapshot Mode
1. To enter into snapshot recording mode, turn on the recorder and press the mode button until
you see the
icon on top of the screen.
2. Press the ‘OK’ key to take photo directly.
3. To set the picture parameters, press MENU key to pop-up menu. The user can set
resolution, quality, white balance, etc.
3.3 Audio Recording
1. After the recorder has been turned on, in standby status, press MODE key to switch until you
see the
icon.
2. Press the ‘OK’ key to start recording.
3. Press the ‘OK’ key again to stop recording.
3.4 Playback
To enter into playback mode, press the ‘Mode’ key until you see the recorded files. Then, press the
left of right key to select the file you wish to play back or view.
The playback mode will contain all recorded files, including pictures, videos and audio recordings.
3.4.1 Video Playback
When you have found the file you wish to playback:
1. Press the ‘OK’ button. All recorded files will have a
icon on the bottom left of the screen.
2. To playback the video, simply press the ‘OK’ button.
3. To pause the video, press the ‘OK’ button again when the video is playing back.
4. To enter into the menu on the playback, in pause status, press the ‘Meny’ key. This will open up
a pop-up menu to lock or delete the current file.
19
3.4.2 Photo Browsing
All photos will appear on the screen with no icon in the bottom left of the screen.
When you have found the image you wish to view, press the ‘Menu’ to bring up the pop-up menu to
lock or delete the files. The menu also allows you to add effects to the image such as distortion etc.
3.4.3 Audio Playback
The audio recorded files will have both a playback icon on the top left of the screen and an
icon in the bottom left corner.
1. When you have found the desired audio file, press the ‘OK’ button to play.
2. To pause the video, press the ‘OK’ button again when the audio is playing back.
3. Press the ‘Menu’ button in pause status to bring up the menu to lock or delete the current file.
4. To stop the recording, press the ‘Menu’ key.
20
4 Connect to a Computer
There are 2 methods to connect the Smart-i Drive to a computer, Mobile HDD mode and PC
Camera Mode.
4.1 Mobile HDD Mode
This option will allow you to view recorded files and save them onto your computer from the
memory card after it has been connected to the computer.
To connect this way;
1. Before connecting the USB, enter into the USB menu settings.
2. Select ‘Mobile HDD’.
3. Connect the USB to the Smart-i Drive and then insert the USB into the computer.
4. You can now view, backup and remove all of your saved files.
4.2 PC Camera Mode
The PC Camera Mode option allows the camera to be used as a web cam as part of the computer.
To switch between Mobile HDD and PC camera mode, press the ‘Mode’ key.
To connect this way;
1. Before connecting the USB, enter into the USB menu settings.
2. Select ‘Camera’.
3. Connect the USB to the Smart-i Drive and then insert the USB into the computer.
Please Note: If you wish to use the camera as a webcam, you will need to install the
corresponding software.
21
5 Specifications
Smart-i Drive Specifications
Dimensions (WxHxD)
109x41x33mm
Weight
97g
Display
1.5” Colour Screen
USB Interface
2.0
Micro SD Memory Card
Up to 32GB
Recording Resolution
720P / VGA
Viewing Angle
72°
G-Sensor Recording
Yes
IR Light
Yes
Photo
Format: JPG. Resolution: 1.3MP
Battery
Needs full time power supply
Operating Temperature
0~40°C
Recording Time (max)
720P: 3.7 GB Per Hour
VGA: 2.7 GB Per Hour
20
Manufactured for:
Smart-i, Unit 2 Valley Point, Beddington Farm Road, Croydon Surrey CR0 4WP