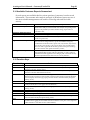
1
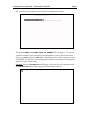
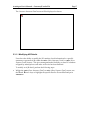
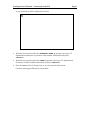
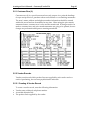
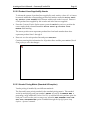
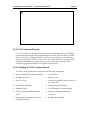
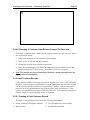
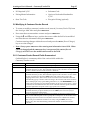
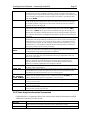
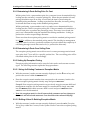
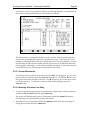
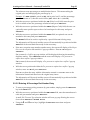
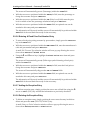
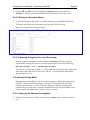
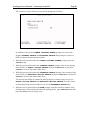
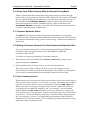
Autologue User’s Manual – Customer/Vendor File
Page i
Table Of Contents
5. Introduction – Customer/Vendor File ............................................................................. 1
5.1 Accessing & Viewing A Customer Record ................................................................... 1
5.2 Viewing A Customer’s Sales History ............................................................................ 4
5.2.1 Clearing Product History ........................................................................................ 5
5.2.2 Modifying A Customer’s Sales History ............................................................... 5
5.3 Customer’s Statement/Payment Detail.......................................................................... 5
5.3.1 Viewing A Customer’s Statement/Payment Detail ........................................... 6
5.3.1.1 Modifying A/R Details .................................................................................. 7
5.3.2 Customer Transaction Codes ................................................................................. 9
5.4 Vendor’s Statement Detail............................................................................................... 9
5.4.1 Vendor Transaction Codes ..................................................................................... 9
5.5 Type Of Accounts .............................................................................................................. 9
5.5.1 Customer Zero (0)..................................................................................................... 10
5.5.2 Vendor Records ........................................................................................................ 10
5.5.2.1 Creating A Vendor Record............................................................................ 10
5.5.2.2 Product Lines Supplied By Vendor ............................................................ 11
5.5.2.3 Vendor Pricing Matrix (Standard & Exception) ....................................... 11
5.5.3 Charge Customer Records ...................................................................................... 12
5.5.3.1 Creating A Charge Customer Record.......................................................... 12
5.5.4 C.O.D. Customer Records....................................................................................... 13
5.5.4.1 Creating A C.O.D. Customer Record .......................................................... 13
5.5.4.2 Changing A Customer From Balance Forward To Open Item ............... 14
5.5.5 Cash Customer Records .......................................................................................... 14
5.5.5.1 Creating A Cash Customer Record ............................................................. 14
5.6 Modifying A Customer/Vendor Record ........................................................................ 15
5.6.1 Customer/Vendor Record Fields Summarized................................................... 15
5.6.2 Sales Analysis Information Summarized............................................................ 17
5.7 Salesman/Report Codes.................................................................................................... 18
5.7.1 Using Salesman/Report Codes .............................................................................. 18
5.8 Standard Pricing Matrix ................................................................................................... 18
5.8.1 Creating A Customer’s Standard Pricing Matrix ............................................... 18
5.8.2 Standard Pricing Matrix Flexibility ...................................................................... 19
5.9 Exception Pricing Matrix .................................................................................................. 20
5.9.1 Determining A Parts Selling Price Or Cost......................................................... 21
5.9.2 Determining A Parts Core Selling Price .............................................................. 21
5.9.3 Setting Up Exception Pricing ................................................................................. 21
5.9.3.1 Using An Existing Customer’s Exception Matrix ..................................... 21
5.9.3.2 Editing A New Or Existing Exception Matrix ........................................... 21
5.9.3.3 Cursor Movements ......................................................................................... 22
5.9.3.4 Entering A Product Line Entry ..................................................................... 22
5.9.3.5 Entering A Percentage Part Number Entry ................................................ 23
5.9.3.6 Entering A Fixed Price Part Number Entry................................................ 24
5.9.3.7 Adding An Exception Entry.......................................................................... 24
5.9.3.8 Deleting An Exception Entry........................................................................ 24
5.9.3.9 Printing An Exception Report ...................................................................... 25
5.9.3.10 Entering A Negative Price Level Percentage ........................................... 25
Revision 01/10
Linux Version 7.1
Autologue User’s Manual – Customer/Vendor File
Page ii
5.10 Alternate Pricing Matrix ................................................................................................. 25
5.10.1 Setting Up An Alternate Pricing Matrix ............................................................ 25
5.10.2 How Point Of Sale Interacts With An Alternate Pricing Matrix................... 27
5.11 Customer Backorder Status ........................................................................................... 27
5.12 Setting A Customer Password For ePartConnection/ePaperless Office ............... 27
5.13 Core Customer Account.................................................................................................. 27
5.14 Available Customer Reports Summarized ................................................................. 28
5.15 Function Keys ................................................................................................................... 28
Revision 01/10
Linux Version 7.1
Autologue User’s Manual – Customer/Vendor File
Page 1
5. Introduction – Customer/Vendor File
The Customer/Vendor Update program provides the functions for maintaining the
Customer/Vendor file. Included in the Customer file is the following information
per customer account:
•
Account number
•
Customer’s pricing matrix
•
Name
•
Taxing status
•
Accounts receivable
•
Sales analysis information (24 months)
•
Credit limit
•
Billing & shipping addresses
•
Billing terms
•
Phone numbers (3)
•
Service charge totals
•
Exception pricing matrix
•
PO Required
•
State Tax Code
•
Tax Percentage
•
Vendor/Customer Status Code
•
Salesman Code
•
Backorder Status
•
COD Status
•
Statement Status
•
Report Codes
•
Month On Systems
All customer records are instantly updated through point of sale invoicing and
month end programs.
The vendor information available includes the following:
•
Account number
•
Phone numbers (3)
•
Name
•
Accounts payable
•
Billing & shipping addresses
•
Product lines supplied
The vendor records are updated through the apply receipts mode within point of
sale and also the purchasing program.
This chapter of the User’s Manual will aid and instruct in the correct method of
creating or modifying customer and vendor records. In addition, it explains the use
and design of salesman codes, report codes, state tax codes, discounting terms and
the customer’s standard and exception pricing matrixes.
5.1 Accessing & Viewing A Customer Record
•
From the Autologue Main Menu, enter 3 (Customer/Vendor File) and press <Return>.
Autologue User’s Manual – Customer/Vendor File
Page 2
The Customer/Vendor Update screen will now be displayed as shown:
The prompt ENTER CUSTOMER NAME OR NUMBER will now appear. To access a
specific customer record, enter their account number or one of the words in their
name (e.g. AUTO) and press <Return>. Entering a portion of the customer’s name
will display a sorted list of all customer names that have the entered string (letters)
within any part of their name.
Example: Entering AUTOMOTIVE will display a selection list of all customers with
the AUTOMOTIVE string within any part of their name as shown:
Autologue User’s Manual – Customer/Vendor File
•
Page 3
Use the and arrow keys to move the highlighted bar to the desired customer
and press <Return>.
Note: User’s can also enter the customer’s number that is beside the customer’s
name and press <Return>. If there are many customers matching the entered
string, the <F8> (Forward) and <F9> (Backward) keys can be used to scroll forward
and backward a page at a time through the selection list window.
The Customer/Vendor Update screen will now be displayed as shown:
Autologue User’s Manual – Customer/Vendor File
Page 4
5.2 Viewing A Customer’s Sales History
•
From the Customer/Vendor Update screen, press the <F2> (Sales Analysis) key and the
Customer Analysis menu will appear as shown:
•
With the cursor positioned next to the SELECT DATA TO BE DISPLAYED prompt,
enter a number (1-8) that corresponds to the graph data to be displayed and press
<Return>.
Graph information for the past 24 months of sales history will be displayed for the
selection entered as shown:
Autologue User’s Manual – Customer/Vendor File
•
Page 5
With the cursor positioned next to the ENTER GRAPH # OR FUNCT. prompt, enter
a number (1-8) which corresponds the graph data to be displayed and press
<Return> or press <Return> to return back to the Customer Analysis screen.
Below is a summary of the various sales graphs:
1-Net Sales
2-Net Core Sales
3-Cost Of Sales
4-Profit In %
5-No. Of Invoices
6-Items/Invoice
7-Product History
8-Profit $ Amount
The invoiced value of all merchandise sold minus the value of inventory and
warranty returns, less the invoice discounts given (Lab/Misc codes C and D). It
does not include core charges, core returns or labor/freight charges.
The value of core deposits invoiced minus the value of core returns invoiced. A
positive number means that a customer has purchased more dollars of cores than he
returned and a negative value means that he has returned more cores than
purchased.
The cost of all merchandise sold minus the cost of all inventory and warranty
returns.
The gross profit dollar amount divided by net sales (gross profit dollar amount
equals net sales minus cost of sales).
The number of all finalized cash and charge invoices printed. Pick ticket/interim
invoices do not update this field.
The total number of all extended lines on all finalized invoices.
Tracks by customer sales history level (See Product Line Update - Customer Sales
History Level) the value of merchandise purchased minus the value of inventory
and warranty returns. Each level graphically displayed corresponds to the product
line customer sales history level. The sales history level (1-24) is set for each product
line (within Product Line Update) and allows for tracking the types of merchandise
purchased by individual or groups of customers. This information can be printed
using the Customer Sales Analysis Report.
The net sales minus cost of sales.
5.2.1 Clearing Product History
Information and sales totals will accumulate within each customer’s product history
until cleared by answering Y to the prompt CLEAR GRAPH # 7 IN CUSTOMER
FILE during the month end closing procedure.
Note: Most users clear this field monthly or quarterly.
5.2.2 Modifying A Customer’s Sales History
•
To make changes to a customer’s sales graph, display the customer’s record and
press the <F2> (Sales Analysis) key to display the Customer Analysis menu.
•
Press the <F6> key, enter the number (1-8) that corresponds to the graph data to be
modified and press <Return>.
•
Enter the new monthly values and press the <F10> (Record Changes) key to record all
changes.
5.3 Customer’s Statement/Payment Detail
Customer’s statement detail tracks, by customer, all invoices finalized during the
current month for balance forward type accounts and all invoice details that are still
open (not paid) for open item type accounts. For balance forward accounts,
statement detail information is stored until cleared through month end processing
Autologue User’s Manual – Customer/Vendor File
Page 6
(which rolls the total amount of the details into the 30 day balance). For open item
accounts, invoice detail information is stored until completely paid.
The Customer Statement Detail screen displays the following information for each
detail stored:
•
Store number
•
Invoice number
•
Date
•
Dollar amount
•
PO number
•
Check information
•
Reference information
•
Transaction code
If there has not been any sales activity within the current month, the message NO
DETAILS will be displayed for balance forward accounts or for open item accounts
without any open details.
Customer’s payment detail tracks, by customer, all payment details applied during
the current month. Payment details accumulate until cleared through month end
processing.
5.3.1 Viewing A Customer’s Statement/Payment Detail
•
To view a customer’s statement detail information, display the customer’s record
and press the <F3> (Show Statement Detail) key.
The Customer Statement Detail screen will be displayed as shown:
•
To view a customer’s current month payment detail information, display the
customer’s record and press the <F5> (Show Payment Detail) key.
Autologue User’s Manual – Customer/Vendor File
Page 7
The Customer Statement Detail screen will be displayed as shown:
5.3.1.1 Modifying A/R Details
Users have the ability to modify the PO number, check information for a specific
statement or payment A/R within the <F3> (Show Statement Detail) or <F5> (Show
Payment Detail) screens. This gives management the flexibility to enter PO numbers
assigned by municipal accounts after an invoice has been finalized.
To modify an A/R detail, perform the following steps:
•
Within the <F3> (Show Statement Detail) or <F5> (Show Payment Detail) screen, use
the and arrow keys to highlight the specific detail to be modified and press
<Return>.
Autologue User’s Manual – Customer/Vendor File
Page 8
A pop up window will be displayed as shown:
•
With the cursor positioned at the PURCHASE ORDER # prompt, enter up to 15
alphanumeric characters of purchase order number information and press
<Return>.
•
With the cursor positioned at the CHECK # prompt, enter up to 15 alphanumeric
characters of check number information and press <Return>.
•
Press the <F10> (Record Changes) key to save the entered information.
Continue entering modifications as described.
Autologue User’s Manual – Customer/Vendor File
Page 9
5.3.2 Customer Transaction Codes
Listed below are all possible transaction codes for a customer’s statement/payment
detail:
Transaction Code
INV-CUR
INV-30
INV-60
INV-90
ROB
RCB
DIS
PFC
SPE
COR
Transaction Type
Point of Sale Invoice - Current - Both Account Types
Point of Sale Invoice - 30 days - Open Item Accounts Only
Point of Sale Invoice - 60 days - Open Item Accounts Only
Point of Sale Invoice - 90 days - Open Item Accounts Only
Payment to Old Balance
Payment to Current Balance
Statement Discounts Applied
Paid Finance Charges
Special Order Deposits
Core Credits Issued - Through Core Bank Program
5.4 Vendor’s Statement Detail
Vendor’s statement detail tracks, by vendor, all purchases and payment details
finalized during the current month. Statement details will accumulate until cleared
during the month end procedure. If there has not been any activity within the
current month, a NO DETAILS message will be displayed.
5.4.1 Vendor Transaction Codes
Listed below are all possible transaction codes for a vendor’s statement/payment
detail:
Transaction Code
RPO
PCR
PWR
ROB
RCB
DIS
PFC
Transaction Type
Purchase Orders Received
Cores Returned
Warranties Returned
Payment to Old Balance
Payment to Current Balance
Statement Discounts Taken
Paid Finance Charges
5.5 Type Of Accounts
The customer/vendor file creates and/or updates all customer and vendor records.
There are four different types of accounts that can be set up and maintained:
1. Customer Zero (0)
2. Charge Customers: Balance Forward/Open Item
3. Vendor Records
4. Cash Customers
Autologue User’s Manual – Customer/Vendor File
Page 10
5.5.1 Customer Zero (0)
Customer zero (0) is a special account whose only purpose is to print the headings
for tape receipt invoices, purchase orders and customer or core banking statements.
The store’s name, address and telephone number information should be entered
within this record and can be modified at any time. When using the prior month
statement feature, customer zero is also stored at month end. If changes need to be
made to customer zero and prior month statements are going to be printed, be sure
changes are performed subsequent to running month end.
5.5.2 Vendor Records
Vendor records track which product lines are supplied by each vendor and as a
result of purchasing, the accounts payable details and totals.
5.5.2.1 Creating A Vendor Record
To create a vendor record, enter the following information:
•
•
•
Vendor name, address & telephone number
A V within the V/C field
The product lines supplied by the vendor
Autologue User’s Manual – Customer/Vendor File
Page 11
5.5.2.2 Product Lines Supplied By Vendor
To inform the system of product lines supplied by each vendor, values of 1 or 0 must
be entered within the corresponding product line number under the Price Level
By Product Line Number field columns within each vendor’s record. Enter a 1
on all product lines supplied by this vendor and 0 for lines not supplied.
•
From the Customer/Vendor Update screen, press the <F15> key twice to position the
cursor under the 0 column beneath the Price Level By Product Line
Number field heading.
The cursor position now represents product line 0 and each number there after
represents product lines 1 through 9.
•
Enter a 1 or 0 for each product line and press <Return>.
Continue entering this information for all product lines and the press <F10> (Record
Changes) key to save the changes.
5.5.2.3 Vendor Pricing Matrix (Standard & Exception)
Vendor pricing is handled by two different methods:
The first and lowest priority method is the standard pricing matrix. This method
works by multiplying each part number’s PRICE 0 (cost) by the VENDOR NET %
percentage, setup within the Product Line File, to calculate the unit purchase price for
each part. It will use the part’s average cost, when the USE AVERAGE COST FOR
ALL COST CALCULATIONS option is enabled through the Specify System Setup
Options - System Commands.
Autologue User’s Manual – Customer/Vendor File
Page 12
The second and highest priority method is the exception-pricing matrix. This
method is used to setup discount percentages for specific product lines or fixed
prices for specific part numbers. Purchasing first checks for fixed prices or discount
percentage’s setup with a vendor’s exception pricing matrix when calculating a
part’s cost price. If a part does not have a discount percentage or fixed price setup
within the vendor’s exception pricing matrix, it will use the standard pricing method
as previously described.
5.5.3 Charge Customer Records
Charge customers differ from cash customers in that they have a credit limit greater
than zero and can receive merchandise on credit. There are two types of charge
customers, balance forward or open item.
A balance forward customer will track old balances by 30, 60 and 90+ day periods
only. Payments can be applied against the old or current balances only. The system
tracks the current month’s statement detail of all charges, credits and payments.
An open item customer will track old and current balances by invoice number and
date. Payments can be applied against specific invoices or against the oldest
invoice’s first. Open invoices remain within the customer record until completely
paid.
Sales history is accumulated by invoicing activity and includes all charge and cash
sales.
5.5.3.1 Creating A Charge Customer Record
To create a charge customer record, enter the following information:
•
Name, Address & Telephone Number
•
Credit Limit
•
PO Required Y/N ?
•
Report Codes
•
State Tax Code
•
Account Type (B for balance forward or
O for open item)
•
C within the V/C field
•
Pricing Matrix Information
•
Salesman Code
•
Tax ID Number (for non-taxable)
•
Option to Backorder Merchandise
Y/N?
•
Exception Pricing Information
(optional)
•
Statement Discounting and Service
Charge Percentage
•
COD Account Y/N ?
•
Print Statement Y/N?
•
Customer Matrix Number
Autologue User’s Manual – Customer/Vendor File
Page 13
5.5.4 C.O.D. Customer Records
C.O.D. customers are identical to charge customers in that they have a credit limit
greater than zero and can receive merchandise on credit. However the COD field
needs to be set to Y. When this field is set, all invoices will need to be finalized as
charge and will print “COD” on the invoice. This will alert drivers to collect when
delivering merchandise to the customer account. When the money has been
collected, a payment will need to be applied to the account.
5.5.4.1 Creating A C.O.D. Customer Record
To create a charge customer record, enter the following information:
•
Name, Address & Telephone Number
•
Credit Limit
•
PO Required Y/N ?
•
Report Codes
•
State Tax Code
•
Account Type (B for balance forward or
O for open item)
•
C within the V/C field
•
Pricing Matrix Information
•
Salesman Code
•
Tax ID Number (for non-taxable)
•
Option to Backorder Merchandise
Y/N?
•
Exception Pricing Information
(optional)
•
Statement Discounting and Service
Charge Percentage
•
Y within the COD field
Autologue User’s Manual – Customer/Vendor File
Page 14
5.5.4.2 Changing A Customer From Balance Forward To Open Item
To change a customer from a balance forward type account to an open item type, follow
the steps outline below:
1. Print out a statement for the customer to be changed.
2. Zero out the 30, 60, and 90+ day balances.
3. Change the account type to an O for open item
4. Enter the outstanding invoice detail information by invoice number, date and
period using the Back Office Posting - Miscellaneous Functions program.
Note: This should only be performed just following a month end and before any
payments have been applied!
5.5.5 Cash Customer Records
Cash customers differ from charge accounts in that they have a zero credit limit and
therefore, cannot purchase merchandise on credit. Individual cash customer records
can be setup for specific customers or a generalized “walk-in” cash account can be
setup for invoicing merchandise to the general public (walk-in customers). Sales
history is accumulated based upon all finalized invoices. Cash customers may have
either a simple or complex pricing matrix as required.
5.5.5.1 Creating A Cash Customer Record
To create a cash customer record, enter the following information:
•
Name, Address & Telephone Number
•
Tax ID Number (for non-taxable)
•
Report Codes
•
C within the V/C field
Autologue User’s Manual – Customer/Vendor File
Page 15
•
PO Required Y/N?
•
Salesman Code
•
Pricing Matrix Information
•
Option to Backorder Merchandise
Y/N?
•
State Tax Code
•
Exception Pricing (optional)
5.6 Modifying A Customer/Vendor Record
•
To create or modify a customer/vendor record, enter 3 (Customer/Vendor File) from
the Autologue Main Menu and press <Return>.
•
Next enter the account number or name and press <Return>.
•
Using the and arrow keys, position the cursor within the field to be modified
and enter the new information and press <Return>.
Continue entering changes within the record and press the <F10> (Record Changes)
key to save the changes.
Note: Always press <Return> after entering new information into a field. When
a field is changed and the <Return> key is not pressed, the <F10> (Record
Changes) will NOT save the modifications made to the field!
5.6.1 Customer/Vendor Record Fields Summarized
Outlined below is a summary table of the various fields within the
Customer/Vendor record:
Field
NAME:
BILL:
SHIP:
TEL1:
PO REQ:
Field Summary
Stores the customer/vendor name; stores up to 35 printable characters;
Stores the customer/vendor billing address information; stores 3 lines of up to 35
printable characters per line; This information prints on the customer’s invoices within
the Bill To header area and on the customer’s statement;
Stores the customer/vendor shipping address information; Stores 3 lines of up to 35
printable characters per line; This information prints on the customer’s invoices within
the Ship To header area; Press the <F8> (Show Other Address) key to access the
shipping address lines; These 3 lines can also be used for notes information that will
automatically pop up a window when invoicing to the customer; This can be useful to
alert counterpeople of any special billing instructions, etc.; The AUTONOTES uservar
setup option will need to be activated through the Specify System Setup Options - System
Commands; The first SHIP line must have an ‘*’ character in the first position and NOT
A SPACE right after it for point of sale to pop up the note’s window!
Stores up to 3 different phone numbers for the customer/vendor; Stores up to 35
printable characters per phone number; Press the <F9> (Show Other Phone) key to
access the next phone number field;
Defines whether this customer must have PO number on all invoices within point of
sale; A value of Y tells point of sale to prompt the counterperson for PO number when
finalizing any invoices for this account; If the customer issues a blanket PO number,
This can be preset within the customer’s record by using the <F6> (Enter P/O
Number) key; This will automatically print this PO number on all invoices for the
customer;
Autologue User’s Manual – Customer/Vendor File
ST CD:
TAX%:
V/C:
SLSM:
BKORD:
SRV CHG%:
COD:
SRV TOT:
STMT:
DAYS:
NET%:
CREDIT
LIMIT:
REPT CODES:
POP % EXC=X:
DISCNT %:
MTHS ON SYS:
ACT(O/B):
Page 16
Defines a numeric character (0-255) which designates the taxing district/state code for
this account; The system can track up to 256 different taxing totals of taxable sales and
tax collected; The tax codes and rates need to be setup through the Tax Table
Maintenance - Utility Menu 3.
Automatically assigns the tax rate percentage value corresponding to the state code
entered;
Defines whether this account is a vendor or customer; Accepts a V for vendor or a C
for a customer record;
Defines a customer’s salesman code for commission totals and report printing
purposes; Accepts any single alphanumeric character; valid characters are A-Z or
0-9;
Defines whether this customer can backorder parts within point of sale; A value of Y
tells point of sale to backorder merchandise not in stock for this customer; N disallows
backordering merchandise;
Defines a service charge percentage; accepts values up to 99.99% although 1.50% is
standard; Service charges are calculated during month end processing on any unpaid
old balances (30 days & older); To exclude a customer from being charged service
charges, enter 0 for the service charge percent;
Defines whether this customer is a COD (Cash On Delivery) account; A value of Y
tells point of sale to print “COD” on all charge invoices within point of sale; Otherwise
it will print the normal “Cash” or “Charge” on the invoices;
Displays the total unpaid service charges owed; accepts values up to $999,999.99
(updated through the month end procedure);
Defines whether a statement is to be printed for this customer when running the Print
Statements program; A value of Y tells the statement program to print a statement for
this customer; N will not print a statement and your customer would need to print
their statement through the ePaperless Office;
Defines the number of days the customer is allowed in order to take advantage of
early payment discounting; A value of up to 999 days may be entered although 10
days is standard; Optionally defines the number of invoices are considered overdue
when the CustDaysOverDue uservar option is enabled;
Defines the early payment discount percentage offered when the current balance is
paid within ? days; Example: 10 days net 2%, means that if the balance of the
statement is paid within 10 days, the customer may take a 2% discount off of his
current balance; Accepts a percentage of up to 99.99 although 2% is standard; The
system automatically calculates and prints the discount allowed on the bottom of the
customers statement;
Defines the maximum value of credit available to a charge customer; This field is
limited to whole dollars and has a maximum value of $999,999;
Accepts any printable character or number; up to six report codes can be entered per
customer record for report, label, and statement printing; Useful for developing
custom mailings by geographic area or customer type;
Allows a customer to be excluded from the effects of popularity percentage pricing; A
value of X to the right of each price level excludes popularity pricing for the particular
price level; for more information, See Product Line Update - Popularity Pricing;
Defines the percentage at which the customer is to purchase merchandise based upon
the inventory price level; 90% percent refers to a 10% discount; 115% refers to a 15%
surcharge; The discount percent may range from 0.00 - 325.00% for each price level;
Displays the number of months the customer has been active on the system;
Automatically updated from the month end procedures; Has a maximum value of 255
months (21 years, 3 months);
Defines the type of account; O for open item accounting and B for balance forward
accounting; If the account type is blank, the system defaults to balance forward;
Autologue User’s Manual – Customer/Vendor File
MATRIX:
CORE CUST:
LIST PRICE:
VENDOR:
30,60,90+
DAYS:
LAST PMT:
RECEIPTS:
CURR BAL:
OPEN BAL:
PRICE LEVEL
BY PRODUCT
LINE NUMBER:
TXBL SALES:
TAX COLLTD:
TAX ID:
Page 17
Defines a matrix number which corresponds to a particular customers exception
pricing matrix; This allows multiple customers to share one specific matrix that was
previously setup for a particular customer; Displays the customer’s own number when
a new exception pricing matrix is setup for itself; If no number is specified, the field
will display NONE.
Defines a customer number that corresponds to a separate core customer number
setup specifically for tracking all core sales; This allows all core sales to be charged to
the customer number setup and not to the normal customer record; If no number is
specified, the field will display 0.
Defines the list price level and percentage which is used to calculate the list prices
within point of sale; The list price level field accepts price levels of 0-5 or SELL;
With a value of SELL, the list price will be calculated based upon the selling price;
The list price percentage is entered after the price level; Valid percentages range from
0.00 - 325.00%; The list price is multiplied by this figure to produce the actual list price
to be used;
This field allows for the entry of a three (3) character WD / Transnet vendor
identification code setup within the 6. Warehouse and Transnet Vendor File menu option
within the W/D Transmission Functions Menu; When you have a broadband internet
connection and are signed up with Autologue Central internet connectivity, you can
transmit orders to your suppliers within the W/D Transmit screen; It also allows for
part inquiry within point of sale and purchasing;
The outstanding balances on charge accounts for each period; On balance forward
accounts only, payments to old balance are not applied against these fields until the
month end processing, but the open balance is adjusted!
The amount and date of the last payment made to the account; If several payments
were made on this date, they will accumulate in the last payment dollar value as if
there were one payment;
The accumulated total of all payments made in the current month against old
balances, statement discounts allowed, service charges paid, and special order
deposits; Payments made to current balance are immediately deducted and are,
therefore, not included; Maximum value accepted is $65,535;
The current month balance of all charge and credit invoices this month less any
payments to the current balance;
For balance forward, the sum of service total and 30, 60, and 90+ day balances plus the
current balance less receipts; For open item, the sum of service total and 30, 60, 90+
day balances plus the current balance less service charges paid;
Defines the inventory price level the customer will be charged for each product line;
Includes any discount at that price level as established under the DISCNT %
column; Defines the product lines supplied for a vendor record;
The accumulated total of taxable sales since last cleared through Month End Processing
- Zero Out All Tax Totals;
The accumulated total of tax collected since last cleared through Month End Processing
- Zero Out All Tax Totals;
Defines the accounts tax exemption ID number; any account that has any character
entered will be exempt from sales tax;
5.6.2 Sales Analysis Information Summarized
Outlined below is a summary table of the various sales analysis information tracked
within the Customer/Vendor record:
Sales Information
Net Sales:
Net Core Sales:
Sales Information Summary
The sum of merchandise sold less the merchandise value of warranty and inventory
returns and invoice discounts; Maximum value to $327,670 per month;
The sum of core charges less core returns; Maximum value up to $327,670 per month;
Autologue User’s Manual – Customer/Vendor File
Cost Of Sales:
Profit In %:
No. Of Invoices:
Items/Invoice:
Product History:
Profit $ Amount:
Page 18
The inventory value of merchandise sold (price 0 x vendor net %); Maximum value to
$327,670 per month;
Net exchange sales less cost of sales = net profit; Net profit divided by net exchange
sales = profit % on sales;
Number of invoices finalized during the month;
Average number of line items per invoice; number of line items divided by number
of invoices;
The sum of merchandise purchased in all product lines with a corresponding
customer sales history level defined in Product Line Update; Maximum value is
$327,670 for each level;
Net sales less cost of sales = net profit $ amount;
5.7 Salesman/Report Codes
Salesman and report codes can be used to filter the following reports by salesman,
customer type, geographic location or any other classification:
•
Mailing Labels
•
Customer Sales Analysis
•
Index Cards
•
Statements
•
Standard Customer Lists
•
Aged A/R Balance
5.7.1 Using Salesman/Report Codes
Utilizing these codes, report processing programs can print, sort and total
information by salesman or report codes.
Example: Set up report code 3 to be all car dealerships in the area and report code 4
to be all weekly statement customers.
Generating one of the above mentioned reports by customer type is as easy as
entering the report code to print by. Using salesman codes, the Customer Sales
Analysis report will print and total sales and profitability of each salesman to help
determine salesman performance and commission earning.
5.8 Standard Pricing Matrix
Point of sale determines the unit sell price of each part number based upon the
following information within the customer’s record:
•
Customer price level for that product line
•
Customer discount percent for that price level
•
Customer popularity pricing status (include/exclude)
5.8.1 Creating A Customer’s Standard Pricing Matrix
To create a customer’s pricing matrix, enter the following information:
•
A price level for each product line
•
A discount percentage for each price level
Autologue User’s Manual – Customer/Vendor File
•
A popularity pricing status for each price level
•
A list price level and percentage
Page 19
Insert the discount percentage for each price level in the upper right corner of the
customer record beneath the DISCNT % column heading. The discount percentage
can range from 0 - 325.00%.
If the discount percentage is set to:
•
100%, the customer will buy at the straight inventory price level;
•
85%, the customer will buy at 15% off of the inventory price level;
•
110%, the customer will buy at the inventory price level plus 10%;
Determine and enter the price level at which the customer will purchase each
product line under the PRICE LEVEL BY PRODUCT LINE NUMBER column. The
product lines are grouped in multiples of ten (0-9, 10-19, etc.) and refer to the
product line number within the product line file. Enter a 0 to sell a product line at a
percentage of price 0. Enter the correct price level (0-5) for each product line.
•
Enter the popularity pricing status for each price level in the upper right hand corner
of the customer record (to the left of the discount percentage). Enter an X to exclude
this customer from the effects of popularity pricing on all product lines purchased at
this price level. To include popularity pricing in this customer’s pricing matrix,
leave this field blank. Popularity pricing is based upon the part number’s popularity
code and the pop pricing discount percentage setup within the product line file.
•
Enter the list price level (0-5 or SELL) and the list price percentage. Example: To
have the list price for a customer always be 35% above their selling price, enter SELL
as the list price level and 167.00 as the list price percentage. It defaults to list price
level 5 and list price percentage of 100.00 within these fields.
5.8.2 Standard Pricing Matrix Flexibility
To sell specific product lines at a different discount percentage than the standard
price sheet levels, use a different price level and calculate a discount percentage to
arrive at the desired markup.
Example: Suppose most product lines are sold to a customer at 100% of price level 2
but on several lines the customer is allowed a 10% discount. This can be handled in
one of two ways:
1. Use the automatic price adjustment program (see Report Processing) to adjust the
price level 4 to be equal to 90% of price level 2 on the specific product lines.
2. Calculate a discount percentage of another price level in that line to be equal to 90%
of price 2. Example: selling at 108.25% of price 3 or 65% of price 5 may be equal to
90% of price level 2. Check the markup percentage by price level with a Gross
Margin Pricing report.
For greater flexibility, use the exception-pricing matrix.
Autologue User’s Manual – Customer/Vendor File
Page 20
5.9 Exception Pricing Matrix
In today’s world, pricing merchandise to the customer has become more and more
complex. Specialized pricing deals with the customer are becoming the rule, not the
exception! To help in managing these special pricing schemes, we have designed the
exception-pricing matrix. It’s designed to be flexible enough to implement fairly
complex pricing schemes.
The exception-pricing matrix takes precedence over the normal standard matrix
discounting when selling parts within point of sale and when determining a part’s
cost through purchasing. Management has the ability to price a specific product line
by a different percentage than is setup in the standard pricing matrix for a particular
customer. Specific report coded parts within a product line can also have their own
specific discount also. This is particularly useful when discounts are given for sublines. For example, if you wanted to give a special discount for only Borg Warner
water pumps, but you wanted the rest of the product line to use a standard markup,
then the water pump numbers would have to be report coded. The system also
allows a specific part number to be given a special discount by percentage or a fixed
price!
The following describes how the system works when determining how an exception
price is determined. First the system will try to return the price from an exception
that has an exact part number (not just the product line number) and a matching
(non-blank) report code. It is important to note that the program references the
RepCdSens uservar option setting. If an exception is not found, the system will
then try to find an exception with an exact part number match and a completely
blank report code. Exceptions with blank report codes are considered “wild cards”
which means that they match all parts. If the system can't find a matching exception
using the report code and the part number, it will look at the exceptions that apply to
whole product lines. Second, the system will look for the product line and a
matching report code. Lastly, the system will look for a product line exception price
that has a completely blank report code. If the system cannot find any qualifying
exceptions, the default price from the standard pricing matrix for that customer is
returned without an exception.
Autologue User’s Manual – Customer/Vendor File
Page 21
5.9.1 Determining A Parts Selling Price Or Cost
Within point of sale, a part numbers price for a customer is now determined first by
looking into the customer’s exception pricing file. When the part number is found,
pricing calculation stops! If an entry is not found, the item is priced using the
standard pricing mechanism - looking at product line discounts, inventory pricing
levels and discounts as setup in the standard pricing matrix.
Within purchasing, a part numbers cost for a vendor is now determined first by
looking into the vendor’s exception pricing file. If the part number is found there, it
uses its fixed price or product line percentage setup. If an entry is not found, the
part’s cost is determined using the standard discounting mechanism - looking at
product line vendor net percentage discounts.
Please note that the exception-pricing matrix overrides the standard pricing matrix!
It is NOT in addition to the standard pricing matrix! This should give management
complete control over how a particular customer is priced without the complexity of
calculating through several discount levels (i.e. product line discount!).
5.9.2 Determining A Parts Core Selling Price
The exception pricing matrix screen allows user’s to enter percentage entries based
upon price level 7 (core sell) for a specific product line. The core-selling price will be
calculated within point of sale accordingly.
5.9.3 Setting Up Exception Pricing
Exception pricing information can be setup for both vendor and customer account
types. The following sections explain the setup procedures.
5.9.3.1 Using An Existing Customer’s Exception Matrix
•
With the customer/vendor account currently displayed, use the arrow key and
position the cursor within the MATRIX field.
•
Enter the exception matrix number that corresponds to the customer/vendor who
has an exception-pricing matrix already setup and press <Return>.
Example: If an exception pricing matrix was previously setup in customer #100 and
management wanted to use the same matrix for customer #250, simply enter 100
into the MATRIX field within customer #250’s record and press <Return> then
<F10> to save the information!
Note: the exception matrix is shared between both customers and any changes to
the matrix will affect both customers! Care should be taken when modifying!
5.9.3.2 Editing A New Or Existing Exception Matrix
•
With the customer/vendor account currently displayed, press the <F7> (Exception
Pricing) key within the Customer/Vendor Update screen to access the exception-pricing
matrix.
Autologue User’s Manual – Customer/Vendor File
Page 22
A Modify Exception Pricing window will pop up allowing the entry or modification of
the exception pricing information for the customer as shown:
The information is presented in blocks of twelve records. Each record can specify a
product line percentage discount from a specific price level, a fixed price for a part
number, a percentage discount from a specific price level for a part number. Product
line discount records can also include specific report codes to so different discounts
can be applied. Optionally, a notes can be attached each entry. A discount Type code
of $ (Fixed Price) or % (Percentage) is displayed for each entry.
5.9.3.3 Cursor Movements
To advance to the next block of records, press the <F8> key (Forward). To go to the
previous block of records, press the <F9> (Backward) key. The and arrow keys
move the cursor from one line to the next. The arrow key moves the cursor from
one field to the next. To advance to the next field, without change, press the
<Return> key.
5.9.3.4 Entering A Product Line Entry
•
To enter a special pricing structure by product line, simply enter a valid product line
number within the PROD field and press <Return>.
The screen will automatically put a % (Percentage) within the TYPE field because
fixed pricing is not permitted for product line entries.
•
With the cursor now positioned within the PRICE/% field, enter the percentage to
charge the customer and press <Return>.
Autologue User’s Manual – Customer/Vendor File
Page 23
The software treats percentages as multiplication factors. This means taking the
original price and multiplying the percentage by it.
Example: If a FUD-12345 is priced at $22.12 in price level 3, and the percentage
given is 150.00% of 3, than the result will be ($22.12*1.50 = $33.18).
•
With the cursor now positioned within the LVL (Price Level) field, enter the price
level on which to base the percentage calculation and press <Return>.
•
With the cursor now positioned within the RPTCD (Report Code) field, the user can
optionally enter specific report codes to be based upon for this entry and press
<Return>.
•
With the cursor now positioned within the NOTES field, an optional note can be
attached to this entry and press <Return>.
The NOTES field can be used to explain why a special discount is being setup.
The information will be saved and the cursor will automatically be positioned within
PROD field of the next blank line ready for the next entry.
•
If the new exception entry matches another entry, the screen will display a Would you
like to see the exceptions that match this? pop up window. Enter Y or N and press
<Return>.
If Y is entered, a Conflicts pop up window will be displayed showing the matching
duplicate entries. Press <Return> and the screen will display a Do you want to
replace these conflicts? pop up window.
If N is entered, the screen will display a Do you want to replace these conflicts? pop up
window.
•
With the cursor positioned within the Do you want to replace these conflicts? pop up
window, enter Y or N and press <Return>.
Enter Y to replace the entry with the information entered or enter N to remove the
information entered and thus leave the original entry intact.
The information will be saved and the cursor will automatically be positioned within
PROD field of the next blank line ready for the next entry.
5.9.3.5 Entering A Percentage Part Number Entry
•
To enter a percentage pricing structure by part number, simply press the <Return>
key in the PROD field.
•
With the cursor now positioned within the MFR-PART field, enter the manufacturer’s
code and part number and press <Return>.
A small Pick Discount Type selection window will now pop up allowing the user to
choose from Percent or Fixed Price.
•
Using the and arrow keys, highlight the Percent menu item and press
<Return>.
Autologue User’s Manual – Customer/Vendor File
Page 24
The screen will automatically put a % (Percentage) within the TYPE field.
•
With the cursor now positioned within the PRICE/% field, enter the percentage to
charge the customer and press <Return>.
•
With the cursor now positioned within the LVL (Price Level) field, enter the price
level on which to base the percentage calculation and press <Return>.
•
With the cursor now positioned within the NOTES field, an optional note can be
attached to this entry and press <Return>.
The information will be saved and the cursor will automatically be positioned within
PROD field of the next blank line ready for the next entry.
5.9.3.6 Entering A Fixed Price Part Number Entry
•
To enter a fixed price pricing structure by part number, simply press the <Return>
key in the PROD field.
•
With the cursor now positioned within the MFR-PART field, enter the manufacturer’s
code and part number and press <Return>.
A small Pick Discount Type selection window will now pop up allowing the user to
choose from Percent or Fixed Price.
•
Using the and arrow keys, highlight the Fixed Price menu item and press
<Return>.
The screen will automatically put a $ (Dollar sign symbol denoting a fixed price)
within the TYPE field.
•
With the cursor now positioned within the PRICE/% field, enter the fixed price to
charge the customer and press <Return>.
The screen will automatically skip past the LVL and RPTCD fields.
•
With the cursor now positioned within the NOTES field, an optional note can be
attached to this entry and press <Return>.
The information will be saved and the cursor will automatically be positioned within
PROD field of the next blank line ready for the next entry.
5.9.3.7 Adding An Exception Entry
•
To add an exception entry, simply position the cursor onto a blank line using the arrow or <F10> (END) key and add the information as previously described.
5.9.3.8 Deleting An Exception Entry
•
To delete an exception entry, simply position the cursor onto the entry in which to
delete and press the <F4> (DELETE/CHANGE) key.
A small Change or Delete? selection window will now pop up allowing the user to
choose from Delete, Percent or Fixed Price.
Autologue User’s Manual – Customer/Vendor File
•
Page 25
Using the and arrow keys, highlight the Delete menu item and press
<Return>. The entry line will be deleted and the information will be saved.
5.9.3.9 Printing An Exception Report
•
To print an Exception Report for a customer, simply press the <F7> (PRINT) key.
The report will print out to the printer setup through Flexible Printing.
Below is a sample Price Exception Report:
Customer Matrix Report: Cust 250 - 250
Wed MM/DD/YY 14:15:56Page
1
* * * M a t r i x
N u m b e r
00250
Prod Type
Mfr-Part Number
Pct/Price Price Level
Notes
-------------------------------------------------------------------------------1 Percent
151.00% 4 Example line of notes
2 Percent
153.00% 3
3 Percent
163.00% 3
4 Percent
142.00% 4
5 Percent
93.00% 4
6 Percent
97.00% 1
7 Percent
10.00% 0
8 Percent
135.00% 3
32 Percent
135.00% 3
50 Fixed
FRM-PH8A
$
2.54
50 Percent
135.00% 2
57 Fixed
CSP-RV8C
$
1.39
58 Percent BCA-A6
130.25% 3
221 Percent
135.00% 4
222 Percent
222.00% 3
255 Percent
35.20% 5
Sample Price Exception Report
5.9.3.10 Entering A Negative Price Level Percentage
When a negative percentage is entered within the PRICE/% field, the program
automatically changes the value to a positive percentage based on the following:
New Percentage = 100 + Percentage Entered.
Therefore if -15 was entered, 100 + (-15) or 85.00 will be displayed. This helps
when users enter 15% off price level 1 as -15 of 1, yet it will display the familiar
85.00 of price level 1.
5.10 Alternate Pricing Matrix
Management has the ability to sell to customers using two different pricing matrix
schemes. This is useful when selling to customers in both wholesale and retail
business environments. To sell to customers using two different pricing matrix
schemes, the user must enter a customer number next to the Alternate Matrix field
heading within the <F4> (Show Common Customers) screen.
5.10.1 Setting Up An Alternate Pricing Matrix
•
From the Customer/Vendor Update screen, press the <F4> (Show Common Customers)
key.
Autologue User’s Manual – Customer/Vendor File
Page 26
The Common Customer Number screen will be displayed as shown:
In addition to the normal COMMON CUSTOMER NUMBER prompt, the screen will
display STANDARD MATRIX and ALTERNATE MATRIX label prompts as well as a
field to enter an alternate matrix number.
•
With the cursor positioned at the COMMON CUSTOMER NUMBER prompt, press the
<Return> key.
•
With the cursor positioned at the STANDARD MATRIX prompt, enter a new pricing
matrix label (i.e. RETAIL PRICING MATRIX) and press <Return> or just press
<Return> to leave the matrix label alone.
•
With the cursor positioned at the ALTERNATE MATRIX prompt, enter a new pricing
matrix label (i.e. WHOLESALE PRICING MATRIX) and press <Return> or just press
<Return> to leave the matrix label alone.
The user has the ability to rename the label prompts to whatever they choose (i.e.
RETAIL PRICING MATRIX and WHOLESALE PRICING MATRIX) as well as enter
an alternate pricing matrix number to use for the ALTERNATE MATRIX label.
•
With the cursor positioned on the NONE prompt, enter the customer number of the
pricing matrix to be used for the alternate pricing matrix, press <Return> and then
press the <F10> (Record Changes) key.
Autologue User’s Manual – Customer/Vendor File
Page 27
5.10.2 How Point Of Sale Interacts With An Alternate Pricing Matrix
When a customer that has an alternate pricing matrix setup is accessed through
point of sale, a pop up selection window will be displayed. The window will contain
the two separate pricing matrix labels that were setup in the customer’s account. If
the first menu item (STANDARD MATRIX) is selected, point of sale will calculate
prices based upon the customer’s standard pricing. If the second menu item
(ALTERNATE MATRIX) is selected, point of sale will calculate prices based upon the
customer’s alternate matrix number setup.
5.11 Customer Backorder Status
The BKORD field controls the ability to backorder merchandise for a particular
customer account. When Y is entered within this field, the customer will be allowed
to backorder merchandise during point of sale invoicing. Otherwise merchandise is
disallowed.
5.12 Setting A Customer Password For ePartConnection/ePaperless Office
To set up a customer password for ePartConnection purchasing capabilities or
ePaperless Office through the internet, press the <F12> key within the
customer/vendor record.
A window will pop up prompting for Customer Password.
•
With the cursor positioned under the Customer Password: prompt, enter a
password and press <Return>.
•
Press the <F10> (Record Changes) key to save the entered password.
This is the password the customer will need to enter when logging into the
ePartConnection website to purchase merchandise from your store or viewing their
invoices and statement information through the ePaperless Office website.
5.13 Core Customer Account
When customers do not want core dollar amounts shown on invoices and charged to
their account, setup a separate “core customer” account. Then within the customer’s
normal account, enter the new core account number within the CORE CUST field.
When a part with core charge is charged to the customer within point of sale, the
core charges are automatically charged to the “core customer” account number
defined within the CORE CUST field when an invoice is finalized as a charge sale.
Two separate invoices are generated. First the normal charge invoice and second an
extra invoice. The second will have strictly the core dollars and be charged against
the “core customer” account. It will print the invoice number of the first invoice
within the DOC # invoice heading. The core eligibility quantity information is kept
within the original customer account.
Autologue User’s Manual – Customer/Vendor File
Page 28
5.14 Available Customer Reports Summarized
Several reports are available that list various portions of customer/vendor record
information. The customer sales analysis and aged A/R balance reports are two of
the most valuable management tools used for reviewing sales and receivable
activity.
Customer Report
Print Customer Reports
Customer Backorder Report
Special Orders Report
Statements
Aged A/R Balance Report
A/R Adjustment Report
Description Summary
Allows mailing labels, index cards, standard lists, sales analysis,
limited sales analysis, current month sales analysis and pricing matrix
reports to be printed by customer number range, report codes or
salesman codes;
Prints or screen displays customer backorder information;
Prints all outstanding special orders by customer;
Prints customer or vendor statements by account numbers, salesman
codes or report codes;
Prints a report for customers or vendors, listing open, current, 30, 60,
90+ and service charge balances; report can be filtered using any
combination of salesman code, report code, only current, only 30 days,
only 60 days, only 90 days, only service charge, only customers that
have not made a payment this month; reports can be spaced with up
to 9 lines between each printed customer/vendor;
Prints all adjustment transactions performed on customer accounts
through Back Office Posting, Delete A/R Details, as well as totals of
statement discounts applied, service charges paid or canceled and any
manual adjustments made to the 30, 60 or 90 day balances;
5.15 Function Keys
Function Key
F1
F2
F3
F4
F5
F6
F7
F8
F9
F10
F11
F12
Action
Returns to the ENTER CUSTOMER NAME OR NUMBER prompt
Displays the Customer Analysis menu; Returns to the Customer/Vendor Update screen
from the Customer Analysis menu;
Displays statement detail information; Returns to the Customer/Vendor Update screen
from the Customer Statement Detail screen;
Displays the common customer number setup (used with multi-store software);
Returns to the Customer/Vendor Update screen from the Common Customer Number
screen; Displays the Price Type pop up selection window from the Modify Exception
Pricing screen;
Shows payment detail;
Displays a pop up window used to enter a “blanket” p/o number; From the Customer
Analysis menu, allows sales graph data modification;
Prints a customer/vendor’s Exception Pricing Report from the Modify Exception
Pricing screen;
Toggles between displaying the billing or shipping address information;
Toggles between displaying the 3 different telephone numbers;
Records changes to the file;
Exits back to the Autologue Main Menu; Exits back to the Customer/Vendor Update
screen from the Modify Exception Pricing screen;
Displays a customer password pop up window; This password is to be used by the
installer when logging into the ePartConnection website to order parts or the ePaperless
Office website to view their invoices and statements;