1
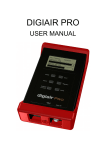
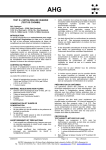
INDUSTRIAL BLUETOOTH™
Serial Port Adapter™
Product Guide 3.3
cB-SPA312, cB-RSPA333
Serial Port Adapter™
Product Guide
Copyright © 2006 connectBlue AB
The contents of this document can be changed by connectBlue AB without prior notice and
do not constitute any binding undertakings from connectBlue AB. connectBlue AB is not
responsible under any circumstances for direct, indirect, unexpected damage or consequent
damage that is caused by this document.
All rights reserved.
Release: 0910
Document version: 3.4
Document number: cBProduct-0610-05 (8)
Printed in Sweden
Trademarks
Registered trademarks from other companies are: Bluetooth is a trademark owned by the
Bluetooth SIG, Inc. Microsoft™, Windows™, Windows NT™, Windows 2000™, Windows
CE™, Windows ME™, Windows XP™ are registered trademarks from Microsoft
Corporation
Contents
1
INTRODUCTION ..................................................................................... 8
1.1
1.2
1.3
1.4
2
RELATED DOCUMENTS ........................................................................... 9
WHAT IS BLUETOOTH WIRELESS TECHNOLOGY?.................................. 9
HOW CAN I USE MY SERIAL PORT ADAPTER?...................................... 10
GETTING STARTED ............................................................................... 10
INSTALLATION .................................................................................... 11
2.1 OEM SERIAL PORT ADAPTERS ............................................................ 11
2.2 SERIAL PORT ADAPTER 312I ................................................................ 11
2.2.1 Mounting ....................................................................................... 11
2.2.2 Power Supply ................................................................................ 12
2.2.3 RS232 ............................................................................................ 12
2.2.4 Buttons and LED........................................................................... 13
2.3 RUGGED SERIAL PORT ADAPTER 333S ................................................ 14
2.3.1 Mounting ....................................................................................... 14
2.3.2 Power Supply ................................................................................ 15
2.3.3 RS232 ............................................................................................ 15
2.3.4 RS422 ............................................................................................ 16
2.3.5 RS485 ............................................................................................ 18
2.3.6 Button and LED ............................................................................ 18
3
REGULATORY INFORMATION........................................................ 20
3.1 FCC STATEMENT ................................................................................. 20
3.1.1 RF-Exposure Statement................................................................. 20
3.1.2 Antenna ......................................................................................... 20
3.1.3 Caution.......................................................................................... 21
3.2 DECLARATION OF CONFORMITY .......................................................... 22
4
BLUETOOTH QUALIFICATION ....................................................... 23
5
ADDITIONAL INFORMATION .......................................................... 24
5.1 GUIDELINES FOR EFFICIENT AND SAFE USE ........................................ 24
5.1.1 Product Care................................................................................. 24
5.1.2 Radio Frequency Exposure ........................................................... 24
5.1.3 Electronic Equipment.................................................................... 26
5.1.4 Potentially Explosive Atmospheres ............................................... 26
5
5.1.5 Power Supply................................................................................. 26
5.2 TROUBLESHOOTING .............................................................................. 26
5.3 TECHNICAL SPECIFICATIONS ................................................................ 27
5.3.1 Environmental ............................................................................... 27
5.3.2 Certifications and Compliance...................................................... 28
5.3.3 Type Approval ............................................................................... 28
5.3.4 Radio Output Power...................................................................... 28
5.3.5 Power Supply................................................................................. 28
5.3.6 Serial Interface.............................................................................. 28
5.3.7 Housing ......................................................................................... 28
5.3.8 Dimensions .................................................................................... 29
6
7
1 Introduction
Congratulations on your purchase of a connectBlue Serial Port Adapter™. The Serial Port
Adapter can be used as a component in many types of systems allowing them to
communicate wirelessly with other Bluetooth products such as PC-cards, laptops, handheld
computers, mobile phones and other Serial Port Adapters. The Serial Port Adapter is a
suitable component in new products as well as in existing products. A wide range of models
is available to cover a wide range of usage areas.
This manual covers all the boxed Serial Port Adapters from connectBlue. It especially focuses
on how to mount the Serial Port Adapter and how to use the connectors of the Serial Port
Adapter.
Brief overview of the features of the different Serial Port Adapter models:
Serial Port
Adapter
312i
Rugged
Serial Port
Adapter
333s
Plastic housing, short
range (7 dBm), RS232
(DSUB), internal
antenna, 5 VDC power
supply. AT command
interface.
Metal housing (IP65),
long range
(20 dBm),
RS232/RS422/RS485
(DSUB), stub antenna, 830 VDC power supply.
AT and ECI command
interface.
Please read the chapter “Guidelines for Efficient and Safe use” before using your Serial Port
Adapter.
8
1.1 Related Documents
•
The Serial Port Adapter Product Guide, this document, contains information on
how to use the Serial Port Adapter. Study this document before moving on to the
others.
•
The Serial Port Adapter AT Commands document contains a description of the
AT commands supported in the Serial Port Adapter. It also contains information on
how to use the AT commands to create Bluetooth applications.
•
The OEM Serial Port Adapter Electrical & Mechanical Datasheets contains
important information about the OEM Serial Port Adapter. Read this document if
you are using the OEM Serial Port Adapter.
•
The Bluetooth Enabler Development Kit is required when using the ECI
functionality embedded in the Serial Port Adapter (only available on
OEMSPA333i/x and RSPA333s).
o
The ECI Protocol Specification contains detailed descriptions of the ECI
protocol.
Serial Port Adapter
AT Commands
OEM Serial Port Adapter
Electrical & Mechanical Datasheet
Serial Port Adapter
Product Guide
Bluetooth Enabler Development Kit
ECI Driver with
connectBlue
Extensions
User Manual
ECI Protocol Specification
Picture 1. Serial Port Adapter documents
1.2 What is Bluetooth Wireless Technology?
Bluetooth allows compatible portable and stationary communications devices to
communicate without using cables. The technology is based on a radio link that offers fast
and reliable transmission of voice and data information. It doesn’t require a line-of-sight
connection in order to establish and maintain communication. The Bluetooth wireless
9
technology uses a globally available frequency range intended to ensure communication
compatibility worldwide. Bluetooth is available in mobile phones, laptops, handheld
computers, industrial devices, cars, and more.
1.3 How can I use my Serial Port Adapter?
Your Serial Port Adapter communicates with its host system using RS232, RS422, or RS485.
Once connected to its host system and configured, the Serial Port Adapter can
communicate, using Bluetooth, with a wide range of other Bluetooth enabled devices such
as other Serial Port Adapters, mobile phones, handheld computers and laptops.
Picture 2. The Serial Port Adapter connected to the controller communicates wirelessly with a Bluetooth
enabled Laptop.
The Serial Port Adapter can initiate as well as accept connections to and from other
Bluetooth devices. When initiating a connection to another device, the Serial Port Adapter
acts as a client. When accepting a connection from another device, the Serial Port Adapter
acts as a server. In most cases the Serial Port Adapter communicates with one Bluetooth
device at a time, but in some variants it is possible for the Serial Port Adapter to
simultaneously communicate with several Bluetooth devices. This feature is called Wireless
Multidrop™. For further details please read the Serial Port Adapter AT Command
Specification or the ECI Protocol Specification.
1.4 Getting Started
Before using your Serial Port Adapter you must:
10
•
Install your Serial Port Adapter. For more information, see chapter 2.
•
Configure your Serial Port Adapter. For more information, please read the Serial Port
Adapter AT Command Specification or the ECI Protocol Specification. It is also possible
to use the Serial Port Adapter Wizard for easy configuration.
2 Installation
Before using your Serial Port Adapter it must be connected to its host system and it must be
connected to a power supply. The installation differs slightly from model to model.
This chapter describes how to install your Serial Port Adapter.
2.1 OEM Serial Port Adapters
If you are using the OEM Serial Port Adapter please refer to the “Electrical & Mechanical
Datasheet” for the specific model, for installation instructions. The latest “Electrical &
Mechanical Datasheet” can be downloaded from www.connectblue.se.
2.2 Serial Port Adapter 312i
2.2.1 Mounting
Picture 3. The Serial Port Adapter can be mounted using the mounting holes.
11
Picture 4. The Serial Port Adapter can be mounted on a DIN socket using the mounting holes.
Note that the Serial Port Adapter 312i has internal antenna. Therefore it cannot be mounted
inside a shielded enclosure.
2.2.2 Power Supply
If you are not using the power adapter provided with the product of if there is none
provided you must use a DC plug 2,1 mm centerpin (-) connector.
The product shall have a power supply of 5 VDC, min 200 mA on the power connector.
Picture 5. DC plug 2,1 mm centerpin (-) and 9-pin DSUB male.
2.2.3 RS232
RS232 male 9-pin DSUB:
12
•
Pin 1: NC, not connected
•
Pin 2: RD, input, receive data
•
Pin 3: TD, output, transmit data
•
Pin 4: DTR, output, data terminal ready
•
Pin 5: GND, ground
•
Pin 6: DSR, input, data set ready
•
Pin 7: RTS, output, request to send
•
Pin 8: CTS, input, clear to send
•
Pin 9: NC, not connected
RD, 2
RD, 2
TD, 3
TD, 3
DTR, 4
DTR, 4
GND, 5
GND, 5
DSR, 6
DSR, 6
RTS, 7
RTS, 7
CTS, 8
CTS, 8
Host System (DTE)
Serial Port Adapter (DTE)
The model is designed to operate as a DTE (Data Terminal Equipment). When connecting
the Serial Port Adapter to a DCE (Data Communication Equipment), e.g. a modem, a regular
modem cable, straight cable, shall be used. When connecting the Serial Port Adapter to
another DTE, e.g. a PC, a crossover serial cable must be used. The crossover cable must have
TD and RD crossed (pins 2-3 and 3-2), RTS and CTS crossed (pins 7-8 and 8-7) and
optionally DTR and DSR crossed (pins 4-6 and 6-4).
RD, 2
TD, 2
TD, 3
RD, 3
DTR, 4
DSR, 4
GND, 5
GND, 5
DSR, 6
DTR, 6
RTS, 7
CTS, 7
CTS, 8
RTS, 8
Host System (DCE)
Serial Port Adapter (DTE)
Picture 6. Crossover cable
Picture 7. Straight cable
2.2.4 Buttons and LED
If the restore button (see Picture 5) is pressed during power on, the default serial settings as
well as the default escape sequence are restored. If the function button (see Picture 5) is
pressed and a remote peer is configured for “external connect” the connect attempt is
initiated. See AT Command Specification for further details.
The status LED uses the following color indications.
13
•
Green: The current mode is data mode and no connection attempt is in progress.
•
Orange: The current mode is AT mode.
•
Purple: A connection attempt is in progress.
•
Blue: A connection is currently active.
•
Blue Blinking: A connection is active and data is transmitted or received over air.
•
Red Blinking: Buffer overflow, parity or framing error detected on the UART.
2.3 Rugged Serial Port Adapter 333s
2.3.1 Mounting
Picture 8. The Serial Port Adapter can be mounted using the mounting holes.
Rugged Serial Port Adapter 333s must only be used with the antenna provided with the
product. Using another antenna will violate the regulatory type approval. The product
cannot be mounted inside a shielded enclosure.
14
2.3.2 Power Supply
The product shall have a power supply of 8-30 VDC, 1 W on pin 1 (-) and 2 (+) on the
power connector. Use a female power connector 712 series from Binder.
Picture 9. DSUB serial connector (male).
2.3.3 RS232
This model supports RS232 with a male 9-pin DSUB:
•
Pin 1: NC, not connected
•
Pin 2: RD, input, receive data
•
Pin 3: TD, output, transmit data
•
Pin 4: DTR, output, data terminal ready
•
Pin 5: GND, ground
•
Pin 6: DSR, input, data set ready
•
Pin 7: RTS, output, request to send
•
Pin 8: CTS, input, clear to send
•
Pin 9: NC, not connected
The model is designed to operate as a DTE (Data Terminal Equipment). When connecting
the Serial Port Adapter to a DCE (Data Communication Equipment), e.g. a modem, a regular
modem cable, straight cable, shall be used. When connecting the Serial Port Adapter to
another DTE, e.g. a PC, a crossover serial cable must be used. The crossover cable must have
TD and RD crossed (pins 2-3 and 3-2), RTS and CTS crossed (pins 7-8 and 8-7) and
optionally DTR and DSR crossed (pins 4-6 and 6-4).
15
TD, 3
TD, 3
DTR, 4
DTR, 4
GND, 5
GND, 5
DSR, 6
DSR, 6
RTS, 7
RTS, 7
CTS, 8
CTS, 8
Serial Port Adapter (DTE)
Picture 10.
Crossover cable
RD, 2
TD, 2
TD, 3
RD, 3
DTR, 4
DSR, 4
GND, 5
GND, 5
DSR, 6
DTR, 6
RTS, 7
CTS, 7
CTS, 8
RTS, 8
Picture 11.
Host System (DTE)
RD, 2
Host System (DCE)
Serial Port Adapter (DTE)
RD, 2
Straight cable
2.3.4 RS422
In this model, the same DSUB connector is used when using RS232, RS422 and RS485.
However, in the case of RS422 and RS485, the pins have different meanings compared to
RS232. For details please read the AT command specification document.
In the RS422 case, the following pinning is used:
16
•
Pin 1: R-, input, receiver
•
Pin 2: T-, output, transmitter
•
Pin 3: NC, not connected
•
Pin 4: NC, not connected
•
Pin 5: NC, not connected
•
Pin 6: R+, input, receiver
•
Pin 7: NC, not connected
•
Pin 8: T+, output, transmitter
•
Pin 9: NC, not connected
For four-wire RS422 multidrop, the following connection setup shall be used:
Picture 12.
Four-wire RS422 connection setup
Note: The definition of R+/R-,T+/T- may vary between manufacturers.
17
2.3.5 RS485
In the case of RS485, the same pinning as for RS422 is used, except that pins T- and R- must
be connected externally and pins T+ and R+ must be connected externally to produce the
signals T-/R- and T+/R+. For two-wire RS485 multidrop, the following connection setup shall
be used:
Picture 13.
Two-wire RS485 connection setup
2.3.6 Button and LED
If the restore button (see Picture 9) is pressed during power on, the default serial settings as
well as the default escape sequence are restored.
The status LED uses the following color indications.
18
•
Green: The current mode is data mode and no connection attempt is in progress.
•
Orange: The current mode is AT mode.
•
Purple: A connection attempt is in progress.
•
Blue: A connection is currently active.
•
Blue Blinking: A connection is active and data is transmitted or received over air.
•
Red Blinking: Buffer overflow, parity or framing error detected on the UART.
19
3 Regulatory Information
3.1 FCC Statement
This device complies with Part 15 of the FCC Rules. Operation is subject to the following
two conditions: (1) this device may not cause harmful interference, and (2) this device must
accept any interference received, including interference that may cause undesired operation.
NOTE: This equipment has been tested and found to comply with the limits for a Class B
digital device, pursuant to Part 15 of the FCC Rules. These limits are designed to provide
reasonable protection against harmful interference in a residential installation. This
equipment generates, uses and can radiate radio frequency energy and, if not installed and
used in accordance with the instructions, may cause harmful interference to radio
communications. However, there is no guarantee that interference will not occur in a
particular installation. If this equipment does cause harmful interference to radio or
television reception, which can be determined by turning the equipment off and on, the
user is encouraged to try to correct the interference by one or more of the following
measures:
•
Reorient or relocate the receiving antenna
•
Increase the separation between the equipment and receiver
•
Connect the equipment into an outlet on a circuit different from that to which the
receiver is connected
Consult the dealer or an experienced radio/TV technician for help
3.1.1 RF-Exposure Statement
This transmitter MUST have a separation distance of at least 20 cm between the antenna
and the body of the user or nearby persons, excluding hands, wrists, feet, and ankles.
If the radio is installed in a laptop display, transmission MUST be prevented if the lid is
closed to ensure that the minimum distance of 20 cm between the user and the
transmitting antenna is maintained.
Any notification to the end user of installation or removal instructions about the integrated
radio is NOT allowed.
3.1.2 Antenna
The antenna is fixed and cannot be removed or replaced by the user.
20
3.1.3 Caution
Any changes or modifications NOT explicitly APPROVED by connectBlue AB could cause the
device to cease to comply with FCC rules part 15,and thus void the user’s authority to
operate the equipment.
21
3.2 Declaration of Conformity
We, connectBlue AB, of
Norra Vallgatan 64 3V
SE-211 22 Malmö, Sweden
declare under our sole responsibility that our products:
cB-RSPA333s (cB-0144), cB-SPA312i (cB-0090)
to which this declaration relates, conforms to the following product specifications:
R&TTE Directive 1999/5/EC
EN 300 328 V1.7.1 (2006-05)
EMC
EN 301 489-1 V1.8.1 (2008-04)
EN 301 489-17 V1.2.1 (2002-08)
EN 61000-6-2 (2005)
Safety Compliance
st
EN 60950-1:2001 and/or IEC 60950-1:2001 (1 Edition)
EN 60950-1/A11:2004 + Corrigendum:2004
Medical Electrical Equipment
IEC 60601-1-2 (2001)
09/10/2009 Malmö, Sweden
Mats Andersson
CTO of connectBlue AB
If an RSPA333s or SPA312i is used within EU a notification must be made to each of the
national authorities responsible for radio spectrum management of the intention to place
radio equipment that uses frequency bands whose use is not harmonized throughout the
EU, on its national market.
More information at: http://europa.eu.int/comm/enterprise/rtte/gener.htm
22
4 Bluetooth Qualification
All Serial Port Adapter models have been qualified according to the Bluetooth specification.
Module
Bluetooth
specification
QDID
List date
SPA312i
2.0
B010960
2007-01-24
RSPA333s
2.0
B011801
2007-01-24
The following Bluetooth profiles are supported (covered functionality):
•
Generic Access Profile
•
Serial Port Profile
•
Dial-up Networking Profile
•
LAN Access Profile
1
When creating end products based on the Serial Port Adapter the following applies:
•
The end product does not have to be re-qualified.
•
A free of charge Bluetooth End Product Listing (EPL) must be completed at the
Bluetooth SIG website www.bluetooth.org This applies for all products implementing
Bluetooth technology. The EPL requires no testing (online listing only) and is good
marketing since the product is published at the Bluetooth web site www.bluetooth.com
When creating the EPL you shall refer to the Qualified Design ID (QDID) of the
connectBlue device. Easy-to-follow EPL guides are available at www.bluetooth.org to
assist you with the EPL. A free of charge "Bluetooth SIG Adopter membership" is
required.
•
The Bluetooth trademark may be placed on the end product and/or used in material
related to the end product. This requires a free of charge “Bluetooth SIG Adopter
membership”. For more information see www.bluetooth.org
For more information please visit www.connectblue.com
1
LAN profile only supported in RSPA333s.
23
5 Additional Information
5.1 Guidelines for Efficient and Safe Use
Read this information before using your Serial Port Adapter.
For any exceptions, due to national requirements or limitations, when using your Serial Port
Adapter, please visit www.bluetooth.com.
Note: Changes or modifications to the product not expressly approved by
connectBlue AB will void the user’s authority to operate the equipment.
5.1.1 Product Care
•
Do not expose your product to liquid or moisture.
•
Do not expose you product to extreme hot or cold temperature (see Technical
Specification for further information)
•
Do not expose your product to lit candles, cigarettes, cigars, open flames, etc.
•
Do not drop, throw or try to bend your product since rough treatment could damage
your product.
•
Do not attempt to disassemble your product. Doing so will void warranty. The product
does not contain consumer serviceable or replaceable components. Service should only
be performed by connectBlue AB.
•
Do not paint your product as the paint could prevent normal use.
•
If you will not be using your product for a while, store it in a place that is dry, free from
damp, dust and extreme heat and cold.
•
The clearance and creepage distances required by the end product must be withheld
when the module is installed.
•
The cooling of the end product shall not negatively be influenced by the installation of
the module when the module is installed.
5.1.2 Radio Frequency Exposure
The Serial Port Adapter contains a small radio transmitter and receiver. During
communication with other Bluetooth products the Serial Port Adapter receives and transmits
radio frequency (RF) electromagnetic fields (microwaves) in the frequency range 2400 to
2500 MHz. The output power of the radio transmitter is very low.
24
When using the Serial Port Adapter, you will be exposed to some of the transmitted RF
energy. This exposure is well below the prescribed limits in all national and international RF
safety standards and regulations.
25
5.1.3 Electronic Equipment
Most modern electronic equipment, for example, in hospitals and cars, is shielded from RF
energy. However, certain electronic equipment is not. Therefore:
Note: This equipment emits RF energy in the ISM (Industrial, Scientific, Medical) band.
Please insure that all medical devices used in proximity to this device meet appropriate
susceptibility specifications for this type of RF energy.
5.1.4 Potentially Explosive Atmospheres
Turn off your electronic device when in any area with potentially explosive atmosphere. It is
rare, but your electronic device could generate sparks. Sparks in such areas could cause an
explosion or fire resulting in bodily injury or even death.
Areas with a potentially explosive atmosphere are often, but not always, clearly marked.
They include fuelling areas, such as petrol station, below deck on boats, fuel or chemical
transfer or storage facilities, and areas where the air contains chemicals or particles, such as
grain, dust, or metal powders.
5.1.5 Power Supply
The Serial Port Adapter must be supplied by a limited power source according to
EN 60950-1.
•
Connect your power supply only to designated power-sources as marked on the
product.
•
Make sure all cords and cable are positioned so that they will not be stepped on,
tripped over or otherwise subject to damage or stress.
•
To reduce risk of electric shock, unplug the unit from any power source before
attempting to clean it.
5.2 Troubleshooting
This section lists some problems that you might encounter while using your Serial Port
Adapter.
1.
26
I cannot connect. The data I send to the Serial Port Adapter does not arrive at the
remote device.
•
Make sure that you have connected power to your Serial Port Adapter. The
LED indicator should emit a green light when powered up, being ready to
send and receive data.
•
Your Serial Port Adapter is not configured to use the same serial settings (e.g.
baud rate) as your host system. Use the configuration wizard to set the correct
baud rate.
2.
3.
•
You have configured your Serial Port Adapter to act as a client but you have
not selected a server device to connect to. Select a server device using the
configuration wizard.
•
Your Serial Port Adapter is too far away from the selected server device. Move
the Serial Port Adapter closer to the server device.
•
You are not using the correct Bluetooth profile. Your Serial Port Adapter must
be configured to use the same profile as the device you want to communicate
with.
•
The remote device is not in connectable mode. If the server device is another
Serial Port Adapter use the configuration wizard to set the device in
connectable mode. If the device is another Bluetooth device, consult the
manual for that device to set it in connectable mode.
•
Make sure that the Serial Port Adapter is in transparent data mode (green
light). Make sure that the Serial Port Adapter is not in configuration mode
(orange light). After configuring your Serial Port Adapter, remember to exit
the configuration wizard before disconnecting it from the PC.
•
If high security mode has been selected on one of the devices wanting to
communicate, the two devices have to be paired with each other. Either
disable security or perform pairing. Also, note that pairing is automatic during
a connection setup if it is needed.
The Bluetooth link between my Serial Port Adapter and my selected remote peer
disconnects.
•
Your Serial Port Adapter is configured to disconnect if no data is received or
sent during a longer period of time. Use the configuration wizard to disable
the automatic disconnect or change the value of the timer.
•
Your Serial Port Adapter is too far away from the device it is communicating
with. Move the two devices closer to each other.
There is no color on the LED indicator.
•
4.
Make sure that power is connected to the Serial Port Adapter.
When I search for other devices using the configuration wizard I cannot find the device
I’m searching for.
•
The remote device is too far away. Move it closer to your Serial Port Adapter.
•
The remote device is not in discoverable mode. If the remote device is a Serial
Port Adapter use the configuration wizard to set it in discoverable mode. If
the remote device is another device, consult the manual of that device to set it
in discoverable mode.
5.3 Technical Specifications
5.3.1 Environmental
Storage temperature: -30 - +85 °C
Maximum operating temperature: -30 - +85 °C
27
Humidity RH 5-90% non-condensing
Shock and vibration: IEC 61131-2
5.3.2 Certifications and Compliance
EMC compliance: ENV 50081-1, ENV 50081-2
Environment: IEC 61131-2
Medical: IEC 60601-01-2
5.3.3 Type Approval
FCC/CFR 47, part 15 for: RSPA333s, SPA312i
ETS 300 328,300 826
5.3.4 Radio Output Power
Model
Output Power
Serial Port Adapter 312i
7 dBm
Rugged Serial Port Adapter 333s
16.9 dBm
0 dBm = 1 mW, 4dBM = 2,5 mW, 20 dBm = 100 mW.
5.3.5 Power Supply
Model
Power Supply
Serial Port Adapter 312i
Rugged Serial Port Adapter 333s
5 VDC
8-30 VDC
5.3.6 Serial Interface
Model
Serial Interface
Serial Port Adapter 312i
RS232, male DSUB-9, 300-921600 baud,
CTS/RTS flow control or no flow control.
Rugged Serial Port Adapter 333s
RS232/RS422/RS485, male DSUB-9, 300921600 baud, CTS/RTS flow control or no
flow control.
5.3.7 Housing
28
Model
Housing
Serial Port Adapter 312i
Plastic housing, IP20.
Rugged Serial Port Adapter 333s
Aluminum housing, IP65.
5.3.8 Dimensions
Model
Dimensions (with x depth x height)
Serial Port Adapter 312i
Rugged Serial Port Adapter 333s
63.5 x 81.5 x 25.7 mm (see 2.2.1)
75.8 x 85.5 x 35 mm (see 2.3.1)
29