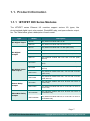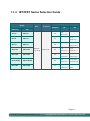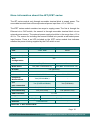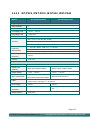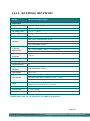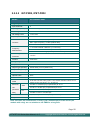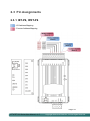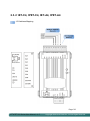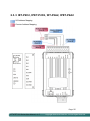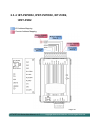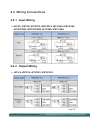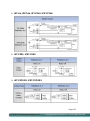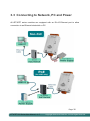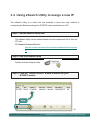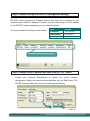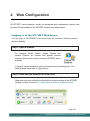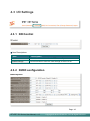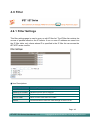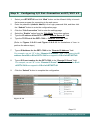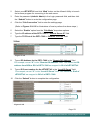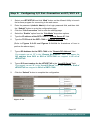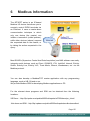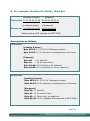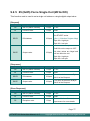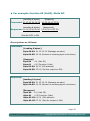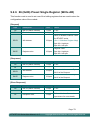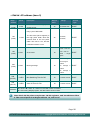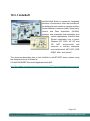
1
tET/tPET DIO Series User Manual Version 1.5, Jan 2012 Service and usage information for tET-P6 tPET-P6 tET-C4 tPET-C4 tET-A4 tPET-A4 tET-P2A2 tPET-P2A2 tET-P2POR2 tPET-P2POR2 tET-P2R2 tPET-P2R2 tET-P2C2 tPET-P2C2 Page: 1 tET/tPET DIO Series User Manual, v1.5 Copyright © 2012 ICP DAS Co., Ltd. All Rights Reserved. Warranty All products manufactured by ICP DAS are under warranty regarding defective materials for a period of one year, beginning from the date of delivery to the original purchaser. Warning ICP DAS assumes no liability for any damage resulting from the use of this product. ICP DAS reserves the right to change this manual at any time without notice. The information furnished by ICP DAS is believed to be accurate and reliable. However, no responsibility is assumed by ICP DAS for its use, nor for any infringements of patents or other rights of third parties resulting from its use. Copyright Copyright @ 2010 by ICP DAS Co., Ltd. All rights are reserved. Trademarks Names are used for identification only and may be registered trademarks of their respective companies. Contact US If you have any questions, please feel free to contact us and we will respond within 2 working days. Email: [email protected] , [email protected] Page: 2 tET/tPET DIO Series User Manual, v1.3 Copyright © 2010 ICP DAS Co., Ltd. All Rights Reserved. Table of Contents 1. Introduction ....................................................................................... 6 1.1. Product Information ............................................................................................ 7 1.1.1 tET/tPET DIO Series Modules .................................................................. 7 1.1.2 tET/tPET Series Selection Guide .............................................................. 8 1.1.3 tET/tPET Comparison ............................................................................... 9 1.2 Features ............................................................................................................. 11 2 Hardware Information ................................................................... 14 2.1 Front Panel ........................................................................................................ 14 2.2 Specifications .................................................................................................... 18 2.2.1 System Specifications ............................................................................. 18 2.2.2 I/O Specifications .................................................................................... 19 2.2.2.1 tET-P6, tPET-P6 .................................................................................. 19 2.2.2.2 tET-C4, tPET-C4, tET-A4, tPET-A4 ..................................................... 19 2.2.2.3 tET-P2C2, tPET-P2C2, tET-P2A2, tPET-P2A2 .................................... 20 2.2.2.4 tET-P2POR2, tPET-P2POR2 .............................................................. 21 2.2.2.5 tET-P2R2, tPET-P2R2 ......................................................................... 22 2.3 Pin Assignments ................................................................................................ 23 2.3.1 tET-P6, tPET-P6 ..................................................................................... 23 2.3.2 tET-C4, tPET-C4, tET-A4, tPET-A4 ......................................................... 24 2.3.3 tET-P2C2, tPET-P2C2, tET-P2A2, tPET-P2A2 ....................................... 25 2.3.4 tET-P2POR2, tPET-P2POR2, tET-P2R2, tPET-P2R2............................. 26 2.4 Wiring Connections ........................................................................................... 27 2.4.1 Input Wiring ............................................................................................ 27 2.4.2 Output Wiring .......................................................................................... 27 2.5 Dimensions........................................................................................................ 29 3 Getting Started .............................................................................. 30 3.1 Mounting the Module ......................................................................................... 30 3.2 Configuring the Boot Mode ................................................................................ 31 Page: 3 tET/tPET DIO Series User Manual, v1.5 Copyright © 2012 ICP DAS Co., Ltd. All Rights Reserved. 3.3 Connecting to Network, PC and Power ............................................................. 32 3.4 Using eSearch Utility to assign a new IP ........................................................... 33 4 Web Configuration ........................................................................ 36 4.1 Home page ........................................................................................................ 38 4.2 Network Settings ............................................................................................... 39 4.2.1 Network and Miscellaneous Settings ...................................................... 39 4.2.2 IP Address Selection ............................................................................... 39 4.2.2.1 Dynamic Configuration ........................................................................ 40 4.2.2.2 Manual Configuration .......................................................................... 41 4.2.3 General Configuration Settings ............................................................... 41 4.2.4 Restore Factory Defaults ........................................................................ 42 4.3 I/O Settings........................................................................................................ 43 4.3.1 DO Control .............................................................................................. 43 4.3.2 DI/DO configuration ................................................................................ 43 4.4 PWM Setting ..................................................................................................... 45 4.4.1 PWM Configuration................................................................................. 45 4.5 Pair-Connection ................................................................................................. 46 4.5.1 Settings ................................................................................................... 46 4.6 Filter................................................................................................................... 48 4.6.1 Filter Settings .......................................................................................... 48 4.7 Change Password ............................................................................................. 49 4.8 Logout ............................................................................................................... 49 5 I/O Pair-Connection Applications ................................................ 50 Step 1: Connecting to a network, PC and Power ........................................ 50 Step 2: Configuring Ethernet Settings .......................................................... 51 Step 3: Configuring I/O Pair-Connection on Web Server........................... 51 Push Mode ............................................................................................. 51 Poll Mode ................................................................................................ 53 5.1 Two Ethernet I/O Modules for Poll Mode (One to One) ..................................... 54 5.2 Two Ethernet I/O Modules for Push Mode (One to One) ................................... 56 5.3 Multi Ethernet I/O Modules for Poll Mode (Multi to One) ................................... 59 5.4 Multi Ethernet I/O Modules for Push Mode (Multi to One) ................................. 62 Page: 4 tET/tPET DIO Series User Manual, v1.3 Copyright © 2010 ICP DAS Co., Ltd. All Rights Reserved. 6 Modbus Information...................................................................... 65 9.1 What is Modbus TCP/IP? .................................................................................. 66 9.2 Modbus Message Structure ............................................................................... 66 9.2.1 01 (0x01) Read Coils Status (Readback DOs)........................................ 69 9.2.2 02 (0x02) Read Input Status (Read DIs) ................................................. 71 9.2.3 03 (0x03) Read Holding Registers (Readback AOs)............................... 73 9.2.4 04 (0x04) Read Input Registers (Read AIs) ............................................ 75 9.2.5 05 (0x05) Force Single Coil (Write DO) .................................................. 77 9.2.6 06 (0x06) Preset Single Register (Write AO) .......................................... 79 9.2.7 15 (0x0F) Force Multiple Coils (Write DOs) ............................................ 81 9.2.8 16 (0x10) Preset Multiple Registers (Write AOs) .................................... 83 9.3 Modbus Register Map ....................................................................................... 86 9.3.1 Common Functions................................................................................. 86 9.3.2 Specific Functions ................................................................................... 88 10 Related Tools........................................................................ 91 10.1 LabVIEW ................................................................................................ 91 10.2 OPC Server ............................................................................................ 92 10.3 SCADA ................................................................................................... 93 10.3.1 InduSoft .................................................................................................. 94 10.3.2 Citect ...................................................................................................... 95 10.3.3 iFix .......................................................................................................... 96 A. How to avoid browser access error that causes a blank page to be displayed when using IE. ................................................................................................. 97 B. Firmware Updates via the Ethernet ................................................................. 99 C. Why cannot computer ping or search the tET/tPET series module? ......... 103 Page: 5 tET/tPET DIO Series User Manual, v1.3 Copyright © 2010 ICP DAS Co., Ltd. All Rights Reserved. 1. Introduction Providing networking ability and various digital I/O functions, the tET/tPET series are IP-based Ethernet I/O monitoring and control modules. The module can be remotely controlled through a 10/100 M Ethernet network by using Modbus TCP/UDP protocol. Modbus has become a de facto standard communications protocol in industry, and is now the most commonly available means of connecting industrial electronic devices. This makes the tET/tPET series perfect integration with the HMI, SCADA, PLC and other software systems. Page: 6 tET/tPET DIO Series User Manual, v1.3 Copyright © 2010 ICP DAS Co., Ltd. All Rights Reserved. 1.1. Product Information 1.1.1 tET/tPET DIO Series Modules The tET/tPET series Ethernet I/O modules support various I/O types, like photo-isolated digital input, relay contact, PhotoMOS relay, and open-collector output, etc. The Table below gives a description of each model. Type DC Digital Input DC Digital Output DC Digital Input and Output Power Relay Output PhotoMOS Relay Output Model Description tET-P6 Tiny Ethernet module with 6-ch DI tPET-P6 Tiny Ethernet module with PoE and 6-ch DI tET-C4 Tiny Ethernet module with 4-ch DO (NPN, Sink) tET-A4 Tiny Ethernet module with 4-ch DO (PNP, Source) tPET-C4 Tiny Ethernet module with PoE and 4-ch DO (NPN, Sink) tPET-A4 Tiny Ethernet module with PoE and 4-ch DO (PNP, Source) tET-P2C2 Tiny Ethernet module with 2-ch DI and 2-ch DO (NPN, Sink) tET-P2A2 Tiny Ethernet module with 2-ch DI and 2-ch DO (PNP, Source) tPET-P2C2 Tiny Ethernet module with PoE, 2-ch DI and 2-ch DO (NPN, Sink) tPET-P2A2 Tiny Ethernet module with PoE, 2-ch DI and 2-ch DO (PNP, Source) tET-P2R2 Tiny Ethernet module with 2-ch DI and 2-ch Form A power relay tPET-P2R2 Tiny Ethernet module with PoE, 2-ch DI and 2-ch Form A power relay tET-P2POR2 Tiny Ethernet module with 2-ch DI and 2-ch Form A PhotoMOS relay tPET-P2POR2 Tiny Ethernet module with PoE, 2-ch DI and 2-ch Form A PhotoMOS relay Page: 7 tET/tPET DIO Series User Manual, v1.5 Copyright © 2012 ICP DAS Co., Ltd. All Rights Reserved. 1.1.2 tET/tPET Series Selection Guide I/O Specification Model Ethernet tET-P6 Bus Protocol PoE tPET-P6 Isolation Yes DI 6-ch DO - (Sink/Source) tET-C4 tPET-C4 Yes - tET-A4 tPET-A4 Yes - tET-P2C2 tPET-P2C2 tET-P2A2 tPET-P2A2 Yes tET-P2POR2 tPET-P2POR2 Yes tET-P2R2 tPET-P2R2 Yes Ethernet 10/100 M Modbus TCP Yes 4-ch (NPN, Sink) 4-ch (PNP, Source) 2-ch 2-ch (Sink/Source) (NPN, Sink) 2-ch 2-ch (Sink/Source) (PNP, Source) 2-ch 2-ch Form A (Sink/Source) PhotoMos Relay 2-ch 2-ch Form A (Sink/Source) Relay Page: 8 tET/tPET DIO Series User Manual, v1.5 Copyright © 2012 ICP DAS Co., Ltd. All Rights Reserved. 1.1.3 tET/tPET Comparison The tPET series features true IEEE 802.3af-compliant (classification, Class 1) Power over Ethernet (PoE) functions. Now, not only is data carried through an Ethernet cable, but power is also provided. This feature makes installation of tPET series modules a piece of cake. Imagine no more unnecessary wires with only an Ethernet cable needed to take care of everything in the field. The tET/tPET series also features a built-in web server that allows basic configuration, I/O monitoring and I/O control to be performed by simply using a web browser meaning that remote control of your modules is as easy as surfing the Internet. The tET/tPET series also supports the Modbus TCP/UDP protocols that enable perfect integration with SCADA software. Industrial PoE Solutions When using PoE devices such as the tPET series, you are able to select the ICP DAS “PoE” switch, the “NS-205PSE”, as the power source. The NS-205PSE automatically detects any connected devices, whether they are PoE devices or not. This mechanism ensures that the NS-205PSE will work with both PoE and non-PoE devices simultaneously. When acting as a power source for PoE devices, the NS-205PSE requires a power input ranging from +46 to +55 VDC. Page: 9 tET/tPET DIO Series User Manual, v1.5 Copyright © 2012 ICP DAS Co., Ltd. All Rights Reserved. More information about the tET/tPET series The tET series module only through removable terminal block to supply power. The removable terminal block will accept external power input from +12 to +48 VDC. The tPET series module contains two ways to supply power. The first is through the Ethernet via a PoE switch; the second is through removable terminal block via an external power source. The external power supply should be in the range from +12 to 48 VDC. The reason for including the second method is to provide a redundant power input feature. There is an LED included on the tPET series module that indicates whether the power is being supplied by the PoE switch or not. tPET CPU PETL-7000 PET-7000 80186 32-bit ARM Ethernet 10/100 M, PoE Modbus TCP/UDP Yes Web Yes Configuration Web HMI Multi-client Simplified Yes Yes (Max. Connections: 5) IP Filter Yes (white list) Latched DI Yes DI as counter Frequency Measurement I/O pair-connection PWM 32-bit, 3.5 kHz 32-bit, 500 Hz Yes (3.5 kHz Max.) - Yes (Poll/Push Mode) Yes (Poll Mode) Yes (100 Hz Max.) - Yes (CPU, host) Yes (Module, host) Dual-Watchdog ESD Protection Surge Protection Form Factor Remarks Yes (Max. Connections: 12) +/- 4 kV - +/- 0.5 kV Tiny Size Palm Size Cost-effective - Note: tET = tPET without PoE. Page: 10 tET/tPET DIO Series User Manual, v1.5 Copyright © 2012 ICP DAS Co., Ltd. All Rights Reserved. 1.2 Features Built-in Web Server Each tET/tPET series module contains a built-in web server that allows users to easily configure, monitor and control the module from a remote location using a web browser. Modbus Protocol The Modbus TCP/UDP slave function on the Ethernet port can be used to provide data to remote SCADA software. Built-in Multi-function I/O All Digital Output modules provide: A Power-on value (On boot up, the DO status is set to the Power-on value) A Safe value (If Modbus TCP communication is lost for a certain period, the DO status will be set to the user-defined safe value) PWM function: The DOs on the tET/tPET series provide PWM (pulse generation) function. Uses can set different frequency (50 or 100 Hz Max.) and duty cycle for each digital output channel. In addition, the two DO channels can work independently or simultaneously. “High Duty Cycle” describes the proportion of 'on' time to the regular interval or 'period' of time; And “Low Duty Cycle” corresponds to 'off' status. It is unnecessary to keep switching the ON/OFF from remote controller. The tET/tPET series product reduces the complexity of the control system and enhances the timing accuracy. Page: 11 tET/tPET DIO Series User Manual, v1.3 Copyright © 2010 ICP DAS Co., Ltd. All Rights Reserved. All Digital Input modules provide: DI channels that can also be used as 32-bit high speed (3.5 kHz) counters. High/Low latched status: The modules provide commands to read the latched high digital input and latched low digital input status. Following is an example to show the usefulness of the latched digital input. When we want to read the key stroke of a key switch connected to the digital input channel of a module, the input signal of the key stroke is a pulse signal as shown in the following figure. If we just use the read digital input status command to read the signal and we cannot send the command during the B period due to some reasons, then we will lose the key stroke information. However, with the read latched digital input command, we can still get the key stroke information even we are not able to send command in B period. Frequency Measurement: The tET/tPET series module also provides the function of the frequency measurement; it gets the DI count in a certain time and calculates the frequency. Rather than polling by the remote host, our module can count out the frequency directly, reduce the communication delay caused by two ends and also increase the accuracy of frequency measurement. In order to applying for more applications, this module provides 3 scan modes and 4 moving average methods for user to select the best way in their applications. All-in-one Module Various I/O components are mixed with multiple channels in a single module, which provides the most cost effective I/O usage and enhances the performance of I/O operations. Page: 12 tET/tPET DIO Series User Manual, v1.5 Copyright © 2012 ICP DAS Co., Ltd. All Rights Reserved. Automatic MDI/MDI-X Crossover for Plug-and-play The RJ-45 port supports automatic MDI/MDI-x that can automatically detect the type of connection to the Ethernet device without requiring special straight or crossover cables. Built-in Dual Watchdog The Dual Watchdog consists of a CPU Watchdog (for hardware functions) and a Host Watchdog (for software functions). The CPU Watchdog automatically resets it-self when the built-in firmware runs abnormally. The Host Watchdog set the digital output with predefined safe-value when there is no communication between the module and host (PC or PLC) over a period of time (Watchdog timeout). I/O Pair-Connection This function is used to create a DI to DO pair through the Ethernet. Once the configuration is completed, the tET/tPET series module can continuously poll the status of a remote DI device using the Modbus TCP protocol, and then write to local DO channels in the background. Page: 13 tET/tPET DIO Series User Manual, v1.5 Copyright © 2012 ICP DAS Co., Ltd. All Rights Reserved. 2 Hardware Information 2.1 Front Panel Here is a brief overview of the tET/tPET series module components and a description. 5. J2 Connector Robust insulated and fire retardant case 4. S1: System LED Indicator 3. Operating Mode Switch 2. J1 Connector 1. Ethernet Port Page: 14 tET/tPET DIO Series User Manual, v1.5 Copyright © 2012 ICP DAS Co., Ltd. All Rights Reserved. 1. Ethernet Port The tET/tPET series modules are equipped with a RJ-45 jack that is used as the 10/100 Base-TX Ethernet port and features networking capability. When an Ethernet link is detected and an Ethernet packet is received, the Link/Act LED (Green) indicator and 10/100 M LED (Yellow) indicator will be illuminated. Note: The Ethernet port supports PoE (Power-over-Ethernet) functional for tPET series only. 2. J1 Connector J1 connector depends on the type of the tET/tPET series module. For more detailed information regarding the pin assignments for the J1 Connector, please refer to Section 2.3. “Pin Assignments” DC Power Input The definition of Pin 3 and Pin 4 applies to all types of tET/tPET series module for used as the power supply. Pin Name Function 3 +Vs +12 ~ +48 VDC power input 4 GND Ground connection Page: 15 tET/tPET DIO Series User Manual, v1.5 Copyright © 2012 ICP DAS Co., Ltd. All Rights Reserved. Frame Ground Electronic circuits are constantly vulnerable to Electrostatic Discharge (ESD), which become worse in a continental climate area. tET/tPET series modules feature a new design for the frame ground, which provides a path for bypassing ESD, resulting in an enhanced ESD protection capability and ensuring that the module is more reliable. Pin Name 1 F.G. Function Frame Ground 3. Operating Mode Switch Init mode: Configuration mode Run mode: Firmware running mode In the tET/tPET series, the operating mode Switch is in the Run position by default. When updating the tET/tPET firmware, the switch needs to be moved from the Run position to the Init position. The Switch must be returned to the Run position after the update is complete. Page: 16 tET/tPET DIO Series User Manual, v1.3 Copyright © 2010 ICP DAS Co., Ltd. All Rights Reserved. 4. S1: System LED Indicator Once power is supplied to the tET/tPET, the system LED indicator will be illuminated as follows: Function System LED Behavior Running Firmware ON (Red) Network ready Flashing per 3 seconds (Red) Serial Port Busy Flashing per 0.2 seconds (Red) PoE (for tPET only) ON (Green) Note: The PoE LED (Green) indicator for tPET series only. 5. J2 Connector J2 connector depends on the type of the tET/tPET series module. For more detailed information regarding the pin assignments for the J2 Connector, please refer to Section 2.3. “Pin Assignments” Page: 17 tET/tPET DIO Series User Manual, v1.5 Copyright © 2012 ICP DAS Co., Ltd. All Rights Reserved. 2.2 Specifications 2.2.1 System Specifications Moduls tET Series tPET Series System CPU 32-bit MCU Dual Watchdog Yes Communication 10/100 Base-TX, 8-Pin RJ-45 x1, Ethernet Port (Auto-negotiating, Auto-MDI/MDIX, LED indicator) - PoE (IEEE 802.3af, Class 1) - PoE indicator (Green) LED Display S1 System indicator (Red) Link/Act indicator (Green) E1 10/100 M indicator (Yellow) Mechanical Dimensions 52 mm x 27 mm x 98 mm Installation DIN-Rail mounting Environment Operating Temperature Storage Temperature Humidity -25 ˚C ~ +75 ˚C -30 ˚C ~ +80 ˚C 10 ~ 90 % RH, non-condensing Power Requirements - PoE: IEEE 802.3af, Class 1 Power Input Terminal block: +12 ~ 48 VDC (non-regulated) Power Consumption 0.04 A @ 24 VDC for tET-P2R2 0.03 A @ 48 VDC for tPET-P2R2 Page: 18 tET/tPET DIO Series User Manual, v1.5 Copyright © 2012 ICP DAS Co., Ltd. All Rights Reserved. 2.2.2 I/O Specifications 2.2.2.1 tET-P6, tPET-P6 Models tET-P6/tPET-P6 Digital Input Input Channels 6 Input Type (Device) Wet Contact (Sink, Source) On Voltage Level +10 VDC ~ +50 VDC Off Voltage Level +4 VDC max. Input Impedance 10 k Ohm Max. Count: 4,294,967,285 (32 bits) Counters Max. Input Frequency: 3.5 kHz (without filter) Min. Pulse Width: 0.15 ms Frequency Measurement Overvoltage Protection Isolation 1 ~ 3.5 kHz in Mode “1000 ms” (+/-1 Hz error) 10 ~ 3.5 kHz in Mode “100 ms“ (+/-10 Hz error) 0.01 ~1 Hz in Mode “Single-pulse“ (+/- 0.01 Hz error) +70 VDC 3750 Vrms 2.2.2.2 tET-C4, tPET-C4, tET-A4, tPET-A4 Models tET-C4/tPET-C4 tET-A4/tPET-A4 Digital Output Output Channels Output Type (Module) Output Voltage Max. Load Current PWM Over-Voltage Short Circuit Protection Output Isolation 4 Sink, Open Collector (NPN) Source, Open Collector (PNP) +5 VDC ~ +30 VDC +10 VDC ~ +40 VDC 100 mA/channel at 25 °C Direct drive power relay module 650 mA/channel at 25 °C 100 Hz Max. The unit of duty cycle is 1 ms, and the resolution is about 5 ms. (High/Low duty cucle range = 5 ~ 65,535 ms) +60 VDC +48 VDC - Yes 3750 Vrms Page: 19 tET/tPET DIO Series User Manual, v1.5 Copyright © 2012 ICP DAS Co., Ltd. All Rights Reserved. 2.2.2.3 tET-P2C2, tPET-P2C2, tET-P2A2, tPET-P2A2 Models tET-P2C2/tPET-P2C2 tET-P2A2/tPET-P2A2 Digital Input Input Channels 2 Input Type (Device) Wet Contact (Sink, Source) On Voltage Level +10 VDC ~ +50 VDC Off Voltage Level +4 VDC max. Input Impedance 10 k Ohm Max. Count: 4,294,967,285 (32 bits) Counters Max. Input Frequency: 3.5 kHz (without filter) Min. Pulse Width: 0.15 ms Frequency Measurement Overvoltage Protection Isolation 1 ~ 3.5 kHz in Mode “1000 ms” (+/-1 Hz error) 10 ~ 3.5 kHz in Mode “100 ms“ (+/-10 Hz error) 0.01 ~1 Hz in Mode “Single-pulse“ (+/- 0.01 Hz error) +70 VDC 3750 Vrms Digital Output Output Channels Output Type (Module) Output Voltage Max. Load Current PWM Over-Voltage Short Circuit Protection Output Isolation 2 Sink, Open Collector (NPN) Source, Open Collector (PNP) +5 VDC ~ +30 VDC +10 VDC ~ +40 VDC 100 mA/channel at 25 °C Direct drive power relay module 650 mA/channel at 25 °C 100 Hz Max. The unit of duty cycle is 1 ms, and the resolution is about 5 ms. (High/Low duty cycle range = 5 ~ 65,535 ms) +60 VDC +48 VDC - Yes 3750 Vrms Page: 20 tET/tPET DIO Series User Manual, v1.5 Copyright © 2012 ICP DAS Co., Ltd. All Rights Reserved. 2.2.2.4 tET-P2POR2, tPET-P2POR2 Models tET-P2POR2/tPET-P2POR2 Digital Input Input Channels 2 Input Type (Device) Wet Contact (Sink, Source) On Voltage Level +10 VDC ~ +50 VDC Off Voltage Level +4 VDC max. Input Impedance 10 k Ohm Max. Count: 4,294,967,285 (32 bits) Counters Max. Input Frequency: 3.5 kHz (without filter) Min. Pulse Width: 0.15 ms Frequency Measurement Overvoltage Protection Isolation 1 ~ 3.5 kHz in Mode “1000 ms”, (+/-1 Hz error) 10 ~ 3.5 kHz in Mode “100 ms“, (+/-10 Hz error) 0.01 ~1 Hz in Mode “Single-pulse“, (+/- 0.01 Hz error) +70 VDC 3750 Vrms Relay Output Output Channels Output Type (Module) Load Voltage 2 PhotoMOS Relay, Form A 60 VDC/ VAC 60 V/1.0 A (Operating Temperature -25°C ~ -40°C) Load Current 60 V/0.8 A (Operating Temperature +40°C ~ +60°C) 60 V/0.7 A (Operating Temperature +60°C ~ +75°C) PWM 50 Hz max. The unit of duty cycle is 1 ms, and the resolution is about 10 ms. (High/Low duty cycle range = 10 ~ 65,535 ms) Turn ON Time 1.3 ms (Typical) Turn Off Time 0.1 ms (Typical) Output Isolation 3000 Vrms Note: Because the characteristic of relay, t(P)ET-P2POR2/t(P)ET-P2R2 series (the module with relay) are not suitable to use PWM for a long time. Page: 21 tET/tPET DIO Series User Manual, v1.5 Copyright © 2012 ICP DAS Co., Ltd. All Rights Reserved. 2.2.2.5 tET-P2R2, tPET-P2R2 Models tET-P2R2/tPET-P2R2 Digital Input Input Channels 2 Input Type (Device) Wet Contact (Sink, Source) On Voltage Level +10 VDC ~ +50 VDC Off Voltage Level +4 VDC max. Input Impedance 10 k Ohm Max. Count: 4,294,967,285 (32 bits) Counters Max. Input Frequency: 3.5 kHz (without filter) Min. Pulse Width: 0.15 ms 1 ~ 3.5 kHz in Mode “1000 ms” (+/-1 Hz error) Frequency Measurement 10 ~ 3.5 kHz in Mode “100 ms“ (+/-10 Hz error) 0.01 ~1 Hz in Mode “Single-pulse“ (+/- 0.01 Hz error) Overvoltage +70 VDC Protection Isolation 3750 Vrms Relay Output Output Channels 2 Output Type (Module) Power Relay, Form A (SPST N.O.) Output Voltage Range 250 VAC/30 VDC Max. Load Current 5.0 A/channel at 25 °C Operate Time 6 ms Release Time 3 ms 50 Hz max. The unit of duty cycle is 1 ms, and the resolution is about 10 ms. PWM Electrical (High/Low duty cycle range = 10 ~ 65,535 ms) VED 5 A 30 VDC 70,000 ops (10 ops/minute) at 75 °C Life (Resistive load) 5 A 250 VAC 30,000 ops (10 ops/minute) at 75 °C UL 5 A 250 VAC/30 VDC 6,000 ops 3 A 250 VAC/30 VDC 100,000 ops Mechanical Life 20,000,000 ops. At no load (300 ops./ minute) Output Isolation 3000 Vrms Note: Because the characteristic of relay, t(P)ET-P2POR2/t(P)ET-P2R2 series (the module with relay) are not suitable to use PWM for a long time. Page: 22 tET/tPET DIO Series User Manual, v1.5 Copyright © 2012 ICP DAS Co., Ltd. All Rights Reserved. 2.3 Pin Assignments 2.3.1 tET-P6, tPET-P6 : I/O Address Mapping : Counter Address Mapping Page: 23 tET/tPET DIO Series User Manual, v1.5 Copyright © 2012 ICP DAS Co., Ltd. All Rights Reserved. 2.3.2 tET-C4, tPET-C4, tET-A4, tPET-A4 : I/O Address Mapping Page: 24 tET/tPET DIO Series User Manual, v1.5 Copyright © 2012 ICP DAS Co., Ltd. All Rights Reserved. 2.3.3 tET-P2C2, tPET-P2C2, tET-P2A2, tPET-P2A2 : I/O Address Mapping : Counter Address Mapping Page: 25 tET/tPET DIO Series User Manual, v1.5 Copyright © 2012 ICP DAS Co., Ltd. All Rights Reserved. 2.3.4 tET-P2POR2, tPET-P2POR2, tET-P2R2, tPET-P2R2 : I/O Address Mapping : Counter Address Mapping Page: 26 tET/tPET DIO Series User Manual, v1.5 Copyright © 2012 ICP DAS Co., Ltd. All Rights Reserved. 2.4 Wiring Connections 2.4.1 Input Wiring tET-P6, tPET-P6, tET-P2C2, tPET-P2C2, tET-P2A2, tPET-P2A2, tET-P2POR2, tPET-P2POR2, tET-P2R2, tPET-P2R2: 2.4.2 Output Wiring tET-C4, tPET-C4, tET-P2C2, tPET-P2C2: Page: 27 tET/tPET DIO Series User Manual, v1.5 Copyright © 2012 ICP DAS Co., Ltd. All Rights Reserved. tET-A4, tPET-A4, tET-P2A2, tPET-P2A2: tET-P2R2, tPET-P2R2: tET-P2POR2, tPET-P2POR2: Page: 28 tET/tPET DIO Series User Manual, v1.5 Copyright © 2012 ICP DAS Co., Ltd. All Rights Reserved. 2.5 Dimensions All dimensions are in millimeters. Front View Rear View Top View Left Side View Right Side View Bottom View Page: 29 tET/tPET DIO Series User Manual, v1.5 Copyright © 2012 ICP DAS Co., Ltd. All Rights Reserved. 3 Getting Started This chapter provides a basic overview of how to install, configure and operate your tET/tPET series module. 3.1 Mounting the Module The tET/tPET series module can be mounted by attaching the bottom of the chassis to a DIN-Rail, the wall or if can be piggybacked to another module. DIN-Rail mounting The tET/tPET series module contains simple rail clips to enable if to be reliably mounted on a standard 35 mm DIN rail. Mounting on a DIN-Rail Dismounting from a DIN-Rail 1 3 2 3 2 1 Page: 30 tET/tPET DIO Series User Manual, v1.3 Copyright © 2010 ICP DAS Co., Ltd. All Rights Reserved. 3.2 Configuring the Boot Mode All tET/tPET series modules have two operating modes that can be selected using the switch mechanism incorporated on the chassis. Init Mode Init Mode should only be selected when updating the firmware or troubleshooting. Init Run Run Mode Run Mode is the default operating mode and the mode that should be selected most of the time. Init Run ! Note: Be sure to return the switch to the Normal position after any firmware update is complete. Page: 31 tET/tPET DIO Series User Manual, v1.5 Copyright © 2012 ICP DAS Co., Ltd. All Rights Reserved. 3.3 Connecting to Network, PC and Power All tET/tPET series modules are equipped with an RJ-45 Ethernet port to allow connection to an Ethernet hub/switch or PC. Page: 32 tET/tPET DIO Series User Manual, v1.5 Copyright © 2012 ICP DAS Co., Ltd. All Rights Reserved. 3.4 Using eSearch Utility to assign a new IP The eSearch Utility is a useful tool that provides a quick and easy method of configuring the Ethernet settings for tET/tPET series modules from a PC. Step 1: Get the eSearch Utility tool The eSearch Utility can be obtained either from the companion CD or from our FTP site: CD:\Napdos\Software\eSearch\ http://ftp.icpdas.com/pub/cd/tinymodules/napdos/software/esearc h/ Step 2: Run the eSearch Utility Double-click the eSearch Utility. Step 3: Click the “Search Servers” button to search for your tET/tPET module Click Page: 33 tET/tPET DIO Series User Manual, v1.5 Copyright © 2012 ICP DAS Co., Ltd. All Rights Reserved. Page: 34 tET/tPET DIO Series User Manual, v1.3 Copyright © 2010 ICP DAS Co., Ltd. All Rights Reserved. Step 4: Double-Click your tET/tPET to configure the settings. tET/tPET series modules are IP-based devices that may not be suitable for your network using a default IP address. Therefore, you must first assign a new IP address to the tET/tPET module depending on your network settings. The factory default IP settings are as follows: Item Default IP Address 192.168.255.1 Subnet Mask 255.255.0.0 Gateway 192.168.0.1 Double-Click your tET/tPET Step 5: Assign a new IP address and then click the “OK” button Contact your Network Administrator to obtain the correct network configuration. Modify the network settings and then click the “OK” button. The tET/tPET series module will use the new settings immediately. Page: 35 tET/tPET DIO Series User Manual, v1.5 Copyright © 2012 ICP DAS Co., Ltd. All Rights Reserved. 4 Web Configuration All tET/tPET series modules contain an advanced web configuration system that provides I/O accessibility to the tET/tPET module via a web browser. Logging in to the tET/tPET Web Server You can login to the tET/tPET web server from any computer that has Internet access capability. Step 1: Open a browser For example, Mozilla Firefox, Google Chrome and Internet Explorer are reliable and popular internet browsers that can be used to configure tET/tPET series modules. If using IE, please disable its cache to avoid browser accessing error. The detail settings steps refer to “Appendix: A”. Step 2: Enter the URL address of the tET/tPET Make sure you have correctly configured the network settings of the tET/tPET module, or refer to Section 3.4 “Using eSearch Utility to Assign a New IP”. Page: 36 tET/tPET DIO Series User Manual, v1.5 Copyright © 2012 ICP DAS Co., Ltd. All Rights Reserved. Step 3: Enter the Password After entering the IP address, the login dialog page will prompt you to enter a password. The factory default password is as follows: Item Default Login password Admin Step 4: Login to the tET/tPET web server After logging into the tET/tPET web server, the main page will be displayed. Page: 37 tET/tPET DIO Series User Manual, v1.5 Copyright © 2012 ICP DAS Co., Ltd. All Rights Reserved. 4.1 Home page The Home tab links to the main page, which is divided in to three parts. The first part of the page provides basic information about the tET/tPET hardware and software. The second part provides information about the status of the I/O. The third part provides the status of the I/O pair-connections. Page: 38 tET/tPET DIO Series User Manual, v1.3 Copyright © 2010 ICP DAS Co., Ltd. All Rights Reserved. 4.2 Network Settings 4.2.1 Network and Miscellaneous Settings Check the Model name and the software information The software information includes the following data items: Model Name, Firmware version, IP Address, Initial Switch, Alias Name, MAC Address, TCP Port Timeout and System Timeout. After updating the tET/tPET firmware, you can check the tET/tPET software version information from this page. 4.2.2 IP Address Selection Page: 39 tET/tPET DIO Series User Manual, v1.5 Copyright © 2012 ICP DAS Co., Ltd. All Rights Reserved. ■ Item Descriptions: Item Description MAC Address Static IP: If you don’t have a DHCP server in your network, you can configure the network settings manually. Please refer to the section “4.2.2.2 Manually Configuration” DHCP/AutoIP: Dynamic Host Configuration Protocol (DHCP) is a network application protocol that automatically assigns an IP address to each device. Please refer to the section “4.2.2.1 Dynamic Configuration” Each tET/tPET on the network must have a unique IP address. This item used to assign specific IP address. The subnet mask indicates which portion of the IP address is used to identify the local network or subnet. A gateway (or router) is a system that is used to connect an individual network with one or more additional networks. Each tET/tPET can be allocated a unique alias name so that it can be identified the network. The User-defined MAC address. Local TCP port Default is 502 Local Modbus Net ID Default is 1 Update Settings Click this button to save the new settings to the tET/tPET. Address Type Static IP Address Subnet Mask Default Gateway Alias Name 4.2.2.1 Dynamic Configuration Dynamic configuration is very easy to perform. If you have a DHCP server, a network address can be configured dynamically using the following steps: Step 1: Select “DHCP/ AutoIP” as the address type Step 2: Click the “Update Settings” button to finish the configuration 1 2 Page: 40 tET/tPET DIO Series User Manual, v1.5 Copyright © 2012 ICP DAS Co., Ltd. All Rights Reserved. 4.2.2.2 Manual Configuration When using manual configuration, you have to assign all the network settings in the following manner: Step 1: Select the “Static IP” as the address type Step 2: Enter the appropriate network settings Step 3: Click the “Update Settings” button to finish configuration 1 2 3 4.2.3 General Configuration Settings The General Configuration Settings provides the following functions: ■ Item Descriptions: Item System Timeout (Network Watchdog) TCP Timeout (Seconds) Web Auto-logout Update Settings Description If no network communication occurs for a certain period, the system will be rebooted based on the configured system timeout value. If Modbus TCP communication is lost for a certain period, the system will cut off the connection. If there is no action for a certain period in the web server, user account will be logout. Click this button to save the new settings to the tET/tPET. Page: 41 tET/tPET DIO Series User Manual, v1.5 Copyright © 2012 ICP DAS Co., Ltd. All Rights Reserved. 4.2.4 Restore Factory Defaults To reset the settings to their factory default, follow these steps: Step 1: Click the “Restore Defaults” button to reset the configuration. Step 2: Click the “OK” button in the message dialog box. Step 3: Check whether the tET/tPET module is reset to factory default settings for use with the eSearch Utility. Refer to the Section 3.4 Using eSearch Utility to assign a new IP”. 1 2 3 ■ The table below lists the factory default settings: Data Item Factory Default Settings Network Settings IP 192.168.255.1 Gateway 192.168.0.1 Mask 255.255.0.0 DHCP Disabled Basic Settings Module Name Depends on the module name Alias Name EtherIO Page: 42 tET/tPET DIO Series User Manual, v1.5 Copyright © 2012 ICP DAS Co., Ltd. All Rights Reserved. 4.3 I/O Settings 4.3.1 DO Control ■ Item Descriptions: Item Description Set DO value User can set certain value to DO manually Update Settings Click this button to save the new settings to the tET/tPET. 4.3.2 DI/DO configuration Page: 43 tET/tPET DIO Series User Manual, v1.3 Copyright © 2010 ICP DAS Co., Ltd. All Rights Reserved. ■ Item Descriptions: Item Description Host Watchdog Timeout If Modbus TCP communication is lost for a certain period, the safe (Seconds) value will be set. Safe Value for DO Power-On value for DO Enable high speed digital counter Clear high speed digital counter Preset value for high speed digital counter If Modbus TCP communication is lost for a certain period, the DO status will be set to the user defined safe value. On boot up, the DO status is set to the Power-on value. Set the counters to enable. Clear the all values of all counters. Sets the default values for the counters. Set the frequency measurement to enable. Scan Mode: 1000 ms ==> 1 ~ 3.5 kHz, (+/- 1 Hz error) 100 ms ==> 10 ~ 3.5 kHz, (+/- 10 Hz error) Enable DI frequency measurement Single-pulse ==> 0.01 ~ 1 Hz, (+/- 0.01 Hz error) Moving Average: 1 ==> No Average 2 ==> The average of 2 continuous sample values 4 ==> The average of 4 continuous sample values 8 ==> The average of 8 continuous sample values Enable all latched value for DI Clear all DI latched status (high) Clear all DI latched status (low) Update Settings Set the latched status to enable. Clear the high latched status of all counters. Clear the low latched status of all counters. Click this button to save the new settings to the tET/tPET. Page: 44 tET/tPET DIO Series User Manual, v1.3 Copyright © 2010 ICP DAS Co., Ltd. All Rights Reserved. 4.4 PWM Setting 4.4.1 PWM Configuration ■ Item Descriptions: Item Enable PWM Description Default Set the PWM to enable. 0 These are 2 parameters each DO channel. The first parameter is the high pulse width, while Duty Cycle the second word is the low pulse width. The unit is 1000 (ms) 1 ms, and the resolution is about 5 ms.(5~65535 ms) Note: Because the characteristic of relay, t(P)ET-P2POR2/t(P)ET-P2R2 series (the module with relay) are not suitable to use PWM for a long time. Page: 45 tET/tPET DIO Series User Manual, v1.5 Copyright © 2012 ICP DAS Co., Ltd. All Rights Reserved. 4.5 Pair-Connection 4.5.1 Settings The I/O pair-connection function is a particular feature of tET/tPET series modules that can enable a pair of DI-to-DO connections via the Modbus TCP (Ethernet). Page: 46 tET/tPET DIO Series User Manual, v1.5 Copyright © 2012 ICP DAS Co., Ltd. All Rights Reserved. ■ Item Descriptions: Item Description Default I/O Pair-Connection Settings Pair Mode Remote Server IP Remote TCP Port Enable/Disable the I/O pair-connection Range: The IP address of the remote device Range:The Port number of the remote device Range: 0~65535 The maximum time period before abandoning an attempt to establish a connection Connection Timeout Range: 1000~42949672965 ms Reconnect Interval The interval time of reconnect Modbus Net ID of remote device Remote Net ID Range: 1~247 The Time period required to establish communication Scan Time Range: 1000~42949672965 ms Remote DI to Local DO (Poll mode) Local DO Address The DO base address of the local DO register that will be mapped to the remote DI device. Range: Depends on the type of tET/tPET module The DI base address of the Remote DI device that will be mapped to the local DO register Remote DI Address Range: Depends on the type of remote device The DI count that is mapped from the base address Remote DI count Range: 1~255 Local DI to Remote DO (Push Mode) Mode TCP/UDP Local DI Address Remote DO Address Local DI count Force Update Time The DI base address of local DI register that will be mapped to the remote DO device. Range: Depend on the tET/tPET The DO base address of the Remote DO device that will be mapped to the local DI register Range: Depends on the type of remote device The DI count that is mapped from the base address Range: 1~255 The interval time to force pushing Disabled 0 502 5000 10000 ms 1 1000 0 0 0 TCP 0 0 0 60 s Page: 47 tET/tPET DIO Series User Manual, v1.5 Copyright © 2012 ICP DAS Co., Ltd. All Rights Reserved. 4.6 Filter 4.6.1 Filter Settings This filter settings page is used to query or edit IP filter list. The IP filter list restricts the access of packets based on the IP header. If one or more IP address are saved into the IP filter table, only clients whose IP is specified in the IP filter list can access the tET/tPET series module. ■ Item Descriptions: Item Description Add “IP” to the list Adds an IP address to the IP filter list Delete IP # “number” Deletes IP# from the IP filter list Delete All Deletes all items from the IP filter list Save to Flash Save a new IP filter list to the Flash. Submit Click this button to save the new settings to the tET/tPET. Page: 48 tET/tPET DIO Series User Manual, v1.3 Copyright © 2010 ICP DAS Co., Ltd. All Rights Reserved. 4.7 Change Password To change a password, first enter the old password (default is Admin) in the “Current password” field and then enters a new password in the “New password” field. Re-enter the new password in the “Confirm new password” field, and then click the “Submit” button to update your password. 4.8 Logout Click the “Logout” tab to log out from the system and return to the login page. Page: 49 tET/tPET DIO Series User Manual, v1.3 Copyright © 2010 ICP DAS Co., Ltd. All Rights Reserved. 5 I/O Pair-Connection Applications The tET/tPET series module can be used to create DI to DO pair-connect through the Ethernet. Once the configuration is completed, the modules can poll the status of the local DI channels and then use the Modbus/TCP protocol to continuously write to a remote DO device in the background. It's useful when connecting digital I/O devices that do not themselves have Ethernet capability. Please refer to the following steps to set I/O pair-connection function: Step 1: Connecting to a network, PC and Power Confirm that the tET/tPET modules are functioning correctly. Refer to Section 3. Getting Started for more details. For example as follows: Page: 50 tET/tPET DIO Series User Manual, v1.5 Copyright © 2012 ICP DAS Co., Ltd. All Rights Reserved. Step 2: Configuring Ethernet Settings Contact your Network Administrator to obtain a correct and functioning network configuration (such as IP/Mask/Gateway details) for tET/tPET series modules. Please also refer to Section 3.4 Using eSearch Utility to assign a new IP. Figure 5-1 Step 3: Configuring I/O Pair-Connection on Web Server Push Mode 1 Select your tET/tPET #1 and click “Web” button on the eSearch Utility to launch the browser program for connecting to the web server. 2 Enter the password (default: Admin) in the Login password field, and then click the “Submit” button to enter the configuration page. Figure 5-2 Page: 51 tET/tPET DIO Series User Manual, v1.5 Copyright © 2012 ICP DAS Co., Ltd. All Rights Reserved. 3 Click the “Pair Connection” link to enter the settings page. Figure 5-3 4 5 6 Select the “Enable” option from the “Pair Mode” drop down options. Type the IP address of the tET/tPET #2 in “Remote Server IP” field. Type the TCP Port of the tET/tPET #2 in “Remote TCP Port” field. Figure 5-4 Page: 52 tET/tPET DIO Series User Manual, v1.5 Copyright © 2012 ICP DAS Co., Ltd. All Rights Reserved. 7 Type a DI Count number for the tET/tPET #1 in the “Local DI Count” field. For example, we set “2” in the “Local DI Count” field. This means the DI x2 of tET/tPET #1 are mapped to DO x2 of tET/tPET #2. 8 Click the “Submit” button to complete the configuration. Figure 5-5 Poll Mode 1 Select your tET/tPET #1 and click “Web” button on the eSearch Utility to launch the browser program for connecting to the web server. 2 Enter the password (default: Admin) in the Login password field, and then click the “Submit” button to enter the configuration page. 3 Click the “Pair Connection” link to enter the settings page. 4 Select the “Enable” option from the “Pair Mode” drop down options. 5 Type the IP address of the tET/tPET #2 in “Remote Server IP” field. 6 Type the TCP Port of the tET/tPET #2 in “Remote TCP Port” field. (Refer to Figures 5-2~5-4 for illustrations of how to perform the above steps.) Page: 53 tET/tPET DIO Series User Manual, v1.5 Copyright © 2012 ICP DAS Co., Ltd. All Rights Reserved. 7 Type a DI Count number for the tET/tPET #2 in the “Remote DI Count” field. For example, we set “2” in the “Remote DI Count” field. This means the DI x2 of tET/tPET #2 are mapped to DO x2 of tET/tPET #1. 8 Click the “Submit” button to complete the configuration. Figure 5-6 5.1 Two Ethernet I/O Modules for Poll Mode (One to One) Page: 54 tET/tPET DIO Series User Manual, v1.5 Copyright © 2012 ICP DAS Co., Ltd. All Rights Reserved. Step 1: Configuring I/O Pair-Connection on tET/tPET #1 1 Select your tET/tPET #1 and click “Web” button on the eSearch Utility to launch the browser program for connecting to the web server. 2 Enter the password (default: Admin) in the Login password field, and then click the “Submit” button to enter the configuration page. 3 Click the “Pair Connection” link to enter the settings page. 4 Select the “Enable” option from the “Pair Mode” drop down options. 5 Type the IP address of the tET/tPET #2 in “Remote Server IP” field. 6 Type the TCP Port of the tET/tPET #2 in “Remote TCP Port” field. (Refer to Figures 5-2~5-4 for illustrations of how to perform the above steps.) 7 Type a DI Count number for the tET/tPET #2 in the “Remote DI Count” field. For example, we set “1” in the “Remote DI Count” field. This means the DI x1 of tET/tPET #2 are mapped to DO x1 of tET/tPET #1. 8 Click the “Submit” button to complete the configuration. Figure 5-7 Page: 55 tET/tPET DIO Series User Manual, v1.5 Copyright © 2012 ICP DAS Co., Ltd. All Rights Reserved. Step 2: Configuring I/O Pair-Connection on tET/tPET #2 1 Select your tET/tPET #2 and click “Web” button on the eSearch Utility to launch the browser program for connecting to the web server. 2 Enter the password (default: Admin) in the Login password field, and then click the “Submit” button to enter the configuration page. 3 Click the “Pair Connection” link to enter the settings page. 4 Select the “Enable” option from the “Pair Mode” drop down options. 5 Type the IP address of the tET/tPET #1 in “Remote Server IP” field. 6 Type the TCP Port of the tET/tPET #1 in “Remote TCP Port” field. (Refer to Figures 5-2~5-4 for illustrations of how to perform the above steps.) 7 Type a DI Count number for the tET/tPET #1 in the “Remote DI Count” field. For example, we set “1” in the “Remote DI Count” field. This means the DI x1 of tET/tPET #1 are mapped to DO x1 of tET/tPET #2, Refer to Figures 5-7 for illustrations. 8 Click the “Submit” button to complete the configuration. 5.2 Two Ethernet I/O Modules for Push Mode (One to One) Page: 56 tET/tPET DIO Series User Manual, v1.5 Copyright © 2012 ICP DAS Co., Ltd. All Rights Reserved. Step 1: Configuring I/O Pair-Connection on tET/tPET #1 1 Select your tET/tPET #1 and click “Web” button on the eSearch Utility to launch the browser program for connecting to the web server. 2 Enter the password (default: Admin) in the Login password field, and then click the “Submit” button to enter the configuration page. 3 Click the “Pair Connection” link to enter the settings page. 4 Select the “Enable” option from the “Pair Mode” drop down options. 5 Type the IP address of the tET/tPET #2 in “Remote Server IP” field. 6 Type the TCP Port of the tET/tPET #2 in “Remote TCP Port” field. (Refer to Figures 5-2~5-4 for illustrations of how to perform the above steps.) 7 Type a DI Count number for the tET/tPET #1 in the “Local DI Count” field. For example, we set “1” in the “Local DI Count” field. This means the DI x1 of tET/tPET #1 are mapped to DO x1 of tET/tPET #2. 8 Click the “Submit” button to complete the configuration. Figure 5-8 Page: 57 tET/tPET DIO Series User Manual, v1.5 Copyright © 2012 ICP DAS Co., Ltd. All Rights Reserved. Step 2: Configuring I/O Pair-Connection on tET/tPET #2 1 Select your tET/tPET #2 and click “Web” button on the eSearch Utility to launch the browser program for connecting to the web server. 2 Enter the password (default: Admin) in the Login password field, and then click the “Submit” button to enter the configuration page. 3 Click the “Pair Connection” link to enter the settings page. 4 Select the “Enable” option from the “Pair Mode” drop down options. 5 Type the IP address of the tET/tPET #1 in “Remote Server IP” field. 6 Type the TCP Port of the tET/tPET #1 in “Remote TCP Port” field. (Refer to Figures 5-2~5-4 for illustrations of how to perform the above steps.) 7 Type a DI Count number for the tET/tPET #2 in the “Local DI Count” field. For example, we set “1” in the “Loacl DI Count” field. This means the DI x1 of tET/tPET #2 are mapped to DO x1 of tET/tPET #1, refer to Figures 5-8 for illustrations. 8 Click the “Submit” button to complete the configuration. Page: 58 tET/tPET DIO Series User Manual, v1.5 Copyright © 2012 ICP DAS Co., Ltd. All Rights Reserved. 5.3 Multi Ethernet I/O Modules for Poll Mode (Multi to One) Step 1: Configuring I/O Pair-Connection on tET/tPET #1 1 Configuring Ethernet settings for tET/tPET #1, tET/tPET #2 and PETL-7060. Please also refer to Section 3.4 Using eSearch Utility to assign a new IP. Figure 5-9 tET/tPET DIO Series User Manual, v1.5 Page: 59 Copyright © 2012 ICP DAS Co., Ltd. All Rights Reserved. 2 Select your tET/tPET #1 and click “Web” button on the eSearch Utility to launch the browser program for connecting to the web server. 3 Enter the password (default: Admin) in the Login password field, and then click the “Submit” button to enter the configuration page. 4 Click the “Pair Connection” link to enter the settings page. (Refer to Figures 5-2~5-3 for illustrations of how to perform the above steps.) 5 Select the “Enable” option from the “Pair Mode” drop down options. 6 Type the IP address of the PETL-7060 in “Remote Server IP” field. 7 Type the TCP Port of the PETL-7060 in “Remote TCP Port” field. Figure 5-10 8 Type a DI Address for the PETL-7060 in the “Remote DI Address” field. For example, we set “0” in the “Remote DI Address” field. This means the DI address from DI0 to DI1 of PETL-7060 are mapped to DO x2 of tET/tPET #1. 9 Type a DI Count number for the PETL-7060 in the “Remote DI Count” field. For example, we set “2” in the “Remote DI Count” field. This means the DI x2 of PETL-7060 are mapped to DO x2 of tET/tPET #1. 10 Click the “Submit” button to complete the configuration. Figure 5-11 Page: 60 tET/tPET DIO Series User Manual, v1.5 Copyright © 2012 ICP DAS Co., Ltd. All Rights Reserved. Step 2: Configuring I/O Pair-Connection on tET/tPET #2 1 Select your tET/tPET #2 and click “Web” button on the eSearch Utility to launch the browser program for connecting to the web server. 2 Enter the password (default: Admin) in the Login password field, and then click the “Submit” button to enter the configuration page. 3 Click the “Pair Connection” link to enter the settings page. 4 Select the “Enable” option from the “Pair Mode” drop down options. 5 Type the IP address of the PETL-7060 in “Remote Server IP” field. 6 Type the TCP Port of the PETL-7060 in “Remote TCP Port” field. (Refer to Figures 5-2~5-3 and Figures 5-9~5-10 for illustrations of how to perform the above steps.) 7 Type a DI Address for the PETL-7060 in the “Remote DI Address” field. For example, we set “2” in the “Remote DI Address” field. This means the DI address from DI2 to DI3 of PETL-7060 are mapped to DO x2 of tET/tPET #2. 8 Type a DI Count number for the PETL-7060 in the “Remote DI Count” field. For example, we set “2” in the “Remote DI Count” field. This means the DI x2 of PETL-7060 are mapped to DO x2 of tET/tPET #2. 9 Click the “Submit” button to complete the configuration. Figure 5-12 Page: 61 tET/tPET DIO Series User Manual, v1.5 Copyright © 2012 ICP DAS Co., Ltd. All Rights Reserved. 5.4 Multi Ethernet I/O Modules for Push Mode (Multi to One) Step 1: Configuring I/O Pair-Connection on tET/tPET #1 1 Configuring Ethernet settings for tET/tPET #1, tET/tPET #2 and PETL-7060. Figure 5-13 tET/tPET DIO Series User Manual, v1.5 Page: 62 Copyright © 2012 ICP DAS Co., Ltd. All Rights Reserved. 2 Select your tET/tPET #1 and click “Web” button on the eSearch Utility to launch the browser program for connecting to the web server. 3 Enter the password (default: Admin) in the Login password field, and then click the “Submit” button to enter the configuration page. 4 Click the “Pair Connection” link to enter the settings page. (Refer to Figures 5-2~5-3 for illustrations of how to perform the above steps.) 5 Select the “Enable” option from the “Pair Mode” drop down options. 6 Type the IP address of the PETL-7060 in “Remote Server IP” field. 7 Type the TCP Port of the PETL-7060 in “Remote TCP Port” field. Figure 5-14 8 Type a DO Address for the PETL-7060 in the “Remote DO Address” field. For example, we set “0” in the “Remote DO Address” field. This means the DO address from DO0 to DO1 of PETL-7060 are mapped to DI x2 of tET/tPET #1. 9 Type a DI Count number for the tET/tPET #1 in the “Local DI Count” field. For example, we set “2” in the “Local DI Count” field. This means the DI x2 of tET/tPET #1 are mapped to DO x2 of PETL-7060. 10 Click the “Submit” button to complete the configuration. Figure 5-15 Page: 63 tET/tPET DIO Series User Manual, v1.5 Copyright © 2012 ICP DAS Co., Ltd. All Rights Reserved. Step 2: Configuring I/O Pair-Connection on tET/tPET #2 1 Select your tET/tPET #2 and click “Web” button on the eSearch Utility to launch the browser program for connecting to the web server. 2 Enter the password (default: Admin) in the Login password field, and then click the “Submit” button to enter the configuration page. 3 Click the “Pair Connection” link to enter the settings page. 4 Select the “Enable” option from the “Pair Mode” drop down options. 5 Type the IP address of the PETL-7060 in “Remote Server IP” field. 6 Type the TCP Port of the PETL-7060 in “Remote TCP Port” field. (Refer to Figures 5-2~5-3 and Figures 5-13~5-14 for illustrations of how to perform the above steps.) 7 Type a DO Address for the PETL-7060 in the “Remote DO Address” field. For example, we set “2” in the “Remote DO Address” field. This means the DO address from DO2 to DO3 of PETL-7060 are mapped to DI x2 of tET/tPET #2. 8 Type a DI Count number for the tET/tPET #2 in the “Local DI Count” field. For example, we set “2” in the “Local DI Count” field. This means the DI x2 of tET/tPET #2 are mapped to DO x2 of PETL-7060. 9 Click the “Submit” button to complete the configuration. Figure 5-16 Page: 64 tET/tPET DIO Series User Manual, v1.5 Copyright © 2012 ICP DAS Co., Ltd. All Rights Reserved. 6 Modbus Information The tET/tPET series is an IP-based Modbus I/O device that allows you to remotely control DI/DO terminals via an Ethernet. It uses a master-slave communication technique in which only one device (the master) can initiate a transaction (called queries), while other devices (slaves) respond the requested data to the master, or by taking the action requested in the query. Most SCADA (Supervisor Control And Data Acquisition) and HMI software can easily integrate serial devices, such as Citect, ICONICS, iFIX, InduSoft, Intouch, Entivity Studio, Entivity Live, Entivity VLC, Trace Mode, Wizcon, Wonderware, etc. via the Modbus protocol. You can also develop a Modbus/TCP master application with any programming language, such as VB, C# and so on. We provide Modbus SDK for developing Modbus applications on PC. For the relevant demo programs and SDK can be obtained from the following locations: VB Demo:http://ftp.icpdas.com/pub/cd/6000cd/napdos/et7000/demo/pc_client/ .Net demo and SDK:http://ftp.icpdas.com/pub/cd/8000cd/napdos/modbus/nmodbus/ Page: 65 tET/tPET DIO Series User Manual, v1.5 Copyright © 2012 ICP DAS Co., Ltd. All Rights Reserved. 9.1 What is Modbus TCP/IP? Modbus is a communication protocol developed by Modicon in 1979. You can also visit http://www.modbus.org to find more valuable information. The Different versions of Modbus used today include Modbus RTU (based on serial communication interfaces such as RS485 and RS232), Modbus ASCII and Modbus TCP, which is the Modbus RTU protocol embedded into TCP packets. Modbus TCP is an internet protocol. The protocol embeds a Modbus frame into a TCP frame so that a connection oriented approach is obtained, thereby making it reliable. The master queries the slave and the slave responds with the reply. The protocol is open and, hence, highly scalable. 9.2 Modbus Message Structure Modbus devices communicate using a master-slave (client-server) technique in which only one device (the master/client) can initiate transactions (called queries). The other devices (slaves/servers) respond by supplying the requested data to the master, or by taking the action requested in the query. A query from a master will consist of a slave address (or broadcast address), a function code defining the requested action, any required data, and an error checking field. A response from a slave consists of fields confirming the action taken, any data to be returned, and an error checking field. Modbus/TCP Message Structure Byte 00~05 Byte 06~11 6-byte header RTU Data Page: 66 tET/tPET DIO Series User Manual, v1.5 Copyright © 2012 ICP DAS Co., Ltd. All Rights Reserved. Leading 6 bytes of Modbus/TCP protocol: Byte 00 Byte 01 Byte 02 Transaction identifier Byte 03 Protocol identifier Byte 04 Byte 05 Length field Length field (upper byte ) (lower byte) Transaction identifier = Assigned by Modbus/TCP master (client) Protocol identifier = 0 Length field (upper byte) = 0 (since all messages are smaller than 256) Length field (lower byte) = Number of following RTU data bytes RTU Data Structure Byte 06 Byte 08-09 Byte 07 Byte 10-11 Data Field Net ID (Station number) Function Code Reference number Number of (Address Mapping) points Net ID specifies the address of the receiver (Modbus/TCP slave). Function Code specifies the message type. Data Field is the data block. Page: 67 tET/tPET DIO Series User Manual, v1.3 Copyright © 2010 ICP DAS Co., Ltd. All Rights Reserved. ■ Net ID (Station Number) The first byte in the Modbus structure of the Modbus RTU is the receiver’s address. The Valid addresses are in the range of 0 to 247. Addresses 0 is used for broadcast, while addresses 1 to 247 are given to individual Modbus devices. ■ Function Code The second byte in the frame structure of the Modbus RTU is the function code. The function code describes what the slave is required to do. Valid function codes are between 1 and 255. The slave uses the same function code as the request to answer it. Only when an error occurs in the system will the highest bit of the function code be set to ‘1’. Hence the master will know whether the message has been transmitted correctly or not. Section Code Function Reference (Address) 6.2.1 01 (0x01) Read Coils status (Readback DOs) 0xxxx 6.2.2 02 (0x02) Read Input Status (Read DIs) 1xxxx 6.2.3 03 (0x03) Read Holding Registers (Readback AOs) 4xxxx 6.2.4 04 (0x04) Read Input Registers (Read AIs) 3xxxx 6.2.5 05 (0x05) Force Single Coil (Write DO) 0xxxx 6.2.6 06 (0x06) Preset Single Register (Write AO) 4xxxx 6.2.7 15 (0x0F) Force Multiple Coils (Write DOs) 0xxxx 6.2.8 16 (0x10) Preset Multiple Registers (Write AOs) 4xxxx ■ Data Data is transmitted in 8-, 16- and 32-bit format. The data of 16-bit registers is transmitted in high-byte first (For example: 0x0A0B ==> 0x0A, 0x0B). The data of 32-bit registers is transmitted as two 16-bit registers, and is low-word first. (For example: 0x0A0B0C0D ==> 0x0C, 0x0D, 0x0A, 0x0B.) Page: 68 tET/tPET DIO Series User Manual, v1.5 Copyright © 2012 ICP DAS Co., Ltd. All Rights Reserved. 9.2.1 01 (0x01) Read Coils Status (Readback DOs) This function code is used to read the current coils status or the current digital output readback value. [Request] Byte Description Size Value 00 Net ID (Station number) 1 Byte 1~247 01 Function code 1 Byte 0x01 Refer to Modbus Address Table for tET/tPET series. 02-03 Starting DO address 2 Bytes (Sec. 6.3 Modbus Register Map) Byte 02 = high byte Byte 03 = low byte 04-05 Byte 04 = high byte Number of points (channels) 2 Bytes Description Size Value 00 Net ID (Station number) 1 Byte 1-247 01 Function code 1 Byte 0x01 02 Byte Count 1 Byte Byte 05 = low byte [Response] Byte Byte count of response ( n = (Points+7)/8 ) n= 1; Byte 03 = data bit 7~0 n= 2; Byte 04 = data bit 15~8 03 Data n Byte ....... n= m; Byte m+2 = data bit (8m-1)~ 8(m-1) [Error Response] Byte Description Size Value 00 Net ID (Station number) 1 Byte 1-247 01 Function code 1 Byte 0x81 02 Exception code 1 Byte Refer to Modbus Standard Specification for more details Page: 69 tET/tPET DIO Series User Manual, v1.5 Copyright © 2012 ICP DAS Co., Ltd. All Rights Reserved. For example: function 01 (0x01), Readback DOs [Leading 6 bytes] [Request] Command: 01 02 00 00 00 06 01 01 00 00 00 02 [Leading 6 bytes] [Response] Response: 01 02 00 00 00 04 01 01 01 03 Reads digital output value Descriptions as follows: Command: [Leading 6 bytes] Byte 00-03: 01 02 00 00 (Message number) Byte 04-05: 00 06 (Number of remaining bytes in this frame) [Request] Byte 00 : 01 (Net ID) Byte 01 : 01 (Function Code) Byte 02-03: 00 00 (Starting DO address) Byte 04-05: 00 02 (Number of points) Response: [Leading 6 bytes] Byte 00-03: 01 02 00 00 (Message number) Byte 04-05: 00 04 (Number of remaining bytes in this frame) [Response] Byte 00: 01 (Net ID) Byte 01: 01 (Function Code) Byte 02: 01 (Byte count of response) Byte 03: 03 (DO1~DO0 Value) Page: 70 tET/tPET DIO Series User Manual, v1.5 Copyright © 2012 ICP DAS Co., Ltd. All Rights Reserved. 9.2.2 02 (0x02) Read Input Status (Read DIs) This function code is used to read the current digital input value. [Request] Byte Description Size Value 00 Net ID (Station number) 1 Byte 1-247 01 Function code 1 Byte 0x02 Refer to Modbus Address table for tET/tPET series. 02-03 Starting DI address 2 Bytes (Sec. 6.3 Modbus Register Map) Byte 02 = high byte Byte 03 = low byte 04-05 Byte 04 = high byte Number of points (channels) 2 Bytes Description Size Value 00 Net ID (Station number) 1 Byte 1-247 01 Function code 1 Byte 0x02 02 Byte Count 1 Byte Byte 05 = low byte [Response] Byte Byte count of response ( n =(Points+7)/8 ) n= 1; Byte 03 = data bit 7~0 n= 2; Byte 04 = data bit 15~8 03 Data n Byte ....... n= m; Byte m+2 = data bit (8m-1)~ 8(m-1) [Error Response] Byte Description Size Value 00 Net ID (Station number) 1 Byte 1-247 01 Function code 1 Byte 0x82 02 Exception code 1 Byte Refer to Modbus Standard Specification for more details Page: 71 tET/tPET DIO Series User Manual, v1.5 Copyright © 2012 ICP DAS Co., Ltd. All Rights Reserved. For example: function 02 (0x02), Read DIs [Leading 6 bytes] [Request] Command: 01 02 00 00 00 06 01 02 00 00 00 02 [Leading 6 bytes] [Response] Response: 01 02 00 00 00 04 01 02 01 03 Reads digital input value Descriptions as follows: Command: [Leading 6 bytes] Byte 00-03: 01 02 00 00 (Message number) Byte 04-05: 00 06 (Number of remaining bytes in this frame) [Request] Byte 00 Byte 01 : 01 (Net ID) : 02 (Function Code) Byte 02-03: 00 00 (Starting DI address) Byte 04-05: 00 02 (Number of points) Response: [Leading 6 bytes] Byte 00-03: 01 02 00 00 (Message number) Byte 04-05: 00 04 (Number of remaining bytes in this frame) [Response] Byte 00: 01 Byte 01: 02 Byte 02: 01 Byte 03: 03 (Net ID) (Function Code) (Byte count of response) (DI1~DI0 Value) Page: 72 tET/tPET DIO Series User Manual, v1.5 Copyright © 2012 ICP DAS Co., Ltd. All Rights Reserved. 9.2.3 03 (0x03) Read Holding Registers (Readback AOs) This function code is used to readback the holding registers or the analog output value. These registers are also used to store the preset value of digital counter, host watch dog timer, module name and TCP timeout, etc. [Request] Byte Description Size Value 00 Net ID (Station number) 1 Byte 1-247 01 Function code 1 Byte 0x03 02-03 04-05 Starting AO address Number of 16-bit registers (channels) 2 Bytes 2 Bytes Refer to Modbus Address Table for tET/tPET series. (Sec. 6.3 Modbus Register Map) Byte 02 = high byte Byte 03 = low byte Word count Byte 04 = high byte Byte 05 = low byte [Response] Byte Description Size Value 00 Net ID (Station number) 1 Byte 1-247 01 Function code 1 Byte 0x03 02 Byte Count 1 Byte Register values n Bytes 03~ Byte count of response (n = Points x 2 Bytes) Register values n= 2; Byte 03 = high byte Byte 04 = low byte ....... n= m; Byte 03 = high byte Byte 04 = low byte ....... Byte m+1 = high byte Byte m+2 = low byte [Error Response] Byte Description Size Value 00 Net ID (Station number) 1 Byte 1-247 01 Function code 1 Byte 02 Exception code 1 Byte 0x83 Refer to Modbus Standard Specification for more details Page: 73 tET/tPET DIO Series User Manual, v1.5 Copyright © 2012 ICP DAS Co., Ltd. All Rights Reserved. For example: function 03 (0x03), Readback AOs [Leading 6 bytes] [Request] Command: 01 02 00 00 00 06 01 03 01 03 00 02 [Leading 6 bytes] [Response] Response: 01 02 00 00 00 07 01 03 04 50 32 41 32 Reads module’s name for tPET-P2A2 Descriptions as follows: Command: [Leading 6 bytes] Byte 00-03: 01 02 00 00 (Message number) Byte 04-05: 00 06 (Number of remaining bytes in this frame) [Request] Byte 00 Byte 01 : 01 (Net ID) : 03 (Function Code) Byte 02-03: 01 03 (Starting AO Address) Byte 04-05: 00 02 (Number of 16-bit registers) Response: [Leading 6 bytes] Byte 00-03: 01 02 00 00 (Message number) Byte 04-05: 00 07 (Number of remaining bytes in this frame) [Response] Byte 00: 01 (Net ID) Byte 01: 03 (Function Code) Byte 02: 04 (Byte count of response) Byte 03-04: 50 32 (Low word of module name: ASCII “0x50, 0x32” represent to character “P”, “2”) Byte 05-06: 41 32 (High word of module name: ASCII “0x41, 0x32” represent to character “A”, “2”) Page: 74 tET/tPET DIO Series User Manual, v1.5 Copyright © 2012 ICP DAS Co., Ltd. All Rights Reserved. 9.2.4 04 (0x04) Read Input Registers (Read AIs) This function code is used to read the input registers or the current analog input value. These registers are also used to store the current value of digital counter, number of DI channels and number of DO channels, etc. [Request] Byte Description Size Value 00 Net ID (Station number) 1 Byte 1-247 01 Function code 1 Byte 0x04 02-03 04-05 Starting AI address Number of 16-bit registers (channels) 2 Bytes 2 Bytes Refer to Modbus Address Table for tET/tPET series. (Sec. 6.3 Modbus Register Map) Byte 02 = high byte Byte 03 = low byte Word count Byte 04 = high byte Byte 05 = low byte [Response] Byte Description Size Value 00 Net ID (Station number) 1 Byte 1-247 01 Function code 1 Byte 0x04 02 Byte Count 1 Byte Register values n Byte 03~ Byte count of response ( n = Points x 2 Bytes ) Register values n= 2; Byte 03 = high byte Byte 04 = low byte ....... n= m; Byte 03 = high byte Byte 04 = low byte ....... Byte m+1 = high byte Byte m+2 = low byte [Error Response] Byte Description Size Value 00 Net ID (Station number) 1 Byte 1-247 01 Function code 1 Byte 0x84 02 Exception code 1 Byte Refer to Modbus Standard Specification for more details Page: 75 tET/tPET DIO Series User Manual, v1.5 Copyright © 2012 ICP DAS Co., Ltd. All Rights Reserved. For example: function 04 (0x04), Read AIs [Leading 6 bytes] [Request] Command: 01 02 00 00 00 06 01 04 00 64 00 01 [Leading 6 bytes] [Response] Response: 01 02 00 00 00 05 01 04 02 00 02 Reads number of DI channels for tPET-P2A2 Descriptions as follows: Command: [Leading 6 bytes] Byte 00-03: 01 02 00 00 (Message number) Byte 04-05: 00 06 (Number of remaining bytes in this frame) [Request] Byte 00 Byte 01 : 01 (Net ID) : 04 (Function Code) Byte 02-03: 00 64 (Starting AI Address) Byte 04-05: 00 01 (Number of 16-bit registers) Response: [Leading 6 bytes] Byte 00-03: 01 02 00 00 (Message number) Byte 04-05: 00 05 (Number of remaining bytes in this frame) [Response] Byte 00: 01 (Net ID) Byte 01: 04 (Function Code) Byte 02: 02 (Byte count of response) Byte 03-04: 00 02 (Number of DI channels of tPET-P2A2) Page: 76 tET/tPET DIO Series User Manual, v1.5 Copyright © 2012 ICP DAS Co., Ltd. All Rights Reserved. 9.2.5 05 (0x05) Force Single Coil (Write DO) This function code is used to set a single coil status or a single digital output value. [Request] Byte Description Size Value 00 Net ID (Station number) 1 Byte 1-247 01 Function code 1 Byte 0x05 Refer to Modbus Address Table for tET/tPET series. 02-03 DO Address 2 Bytes (Sec. 6.3 Modbus Register Map) Byte 02 = high byte Byte 03 = low byte 0xFF 00 set the output to ON. 0x00 00 set the output to OFF. 04-05 Output value 2 Bytes All other values are illegal and will not affect the coil. Byte 04 = high byte Byte 05 = low byte [Response] Byte Description Size Value 00 Net ID (Station number) 1 Byte 1-247 01 Function code 1 Byte 0x05 02-03 DO Address 2 Bytes 04-05 Output value 2 Bytes The value is the same as Byte 02-03 of the Request The value is the same as Byte 04-05 of the Request [Error Response] Byte Description Size Value 00 Net ID (Station number) 1 Byte 1-247 01 Function code 1 Byte 0x85 02 Exception code 1 Byte Refer to Modbus Standard Specification for more details Page: 77 tET/tPET DIO Series User Manual, v1.5 Copyright © 2012 ICP DAS Co., Ltd. All Rights Reserved. For example: function 05 (0x05), Write DO [Leading 6 bytes] [Request] Command: 01 02 00 00 00 06 01 05 00 01 FF 00 [Leading 6 bytes] [Response] Response: 01 02 00 00 00 06 01 05 00 01 FF 00 Sets the DO1 to ON Descriptions as follows: Command: [Leading 6 bytes] Byte 00-03: 01 02 00 00 (Message number) Byte 04-05: 00 06 (Number of remaining bytes in this frame) [Request] Byte 00 : 01 (Net ID) Byte 01 : 05 (Function Code) Byte 02-03: 00 01 (DO address) Byte 04-05: FF 00 (Set the output to ON) Response: [Leading 6 bytes] Byte 00-03: 01 02 00 00 (Message number) Byte 04-05: 00 06 (Number of remaining bytes in this frame) [Response] Byte 00 : 01 (Net ID) Byte 01 : 05 (Function Code) Byte 02-03: 00 01 (DO address) Byte 04-05: FF 00 (Set the output to ON) Page: 78 tET/tPET DIO Series User Manual, v1.5 Copyright © 2012 ICP DAS Co., Ltd. All Rights Reserved. 9.2.6 06 (0x06) Preset Single Register (Write AO) This function code is used to set one of the holding registers that are used to store the configuration value of the module. [Request] Byte Description Size Value 00 Net ID (Station number) 1 Byte 1-247 01 Function code 1 Byte 0x06 Refer to Modbus Address Table for tET/tPET series. 02-03 AO Address 2 Bytes (Sec. 6.3 Modbus Register Map) Byte 02 = high byte Byte 03 = low byte Register value 04-05 Register value 2 Bytes Byte 04 = high byte Byte 05 = low byte [Response] Byte Description Size Value 00 Net ID (Station number) 1 Byte 1-247 01 Function code 1 Byte 0x06 02-03 AO Address 2 Bytes 04-05 Register value 2 Bytes The value is the same as Byte 02-03 of the Request The value is the same as Byte 04-05 of the Request [Error Response] Byte Description Size Value 00 Net ID (Station number) 1 Byte 1-247 01 Function code 1 Byte 0x86 02 Exception code 1 Byte Refer to Modbus Standard Specification for more details Page: 79 tET/tPET DIO Series User Manual, v1.5 Copyright © 2012 ICP DAS Co., Ltd. All Rights Reserved. For example: function 06 (0x06), Write AO [Leading 6 bytes] [Request] Command: 01 02 00 00 00 06 01 06 01 08 00 3C [Leading 6 bytes] [Response] Response: 01 02 00 00 00 06 01 06 01 08 00 3C Sets the system timeout to 60 seconds Descriptions as follows: Command: [Leading 6 bytes] Byte 00-03: 01 02 00 00 (Message number) Byte 04-05: 00 06 (Number of remaining bytes in this frame) [Request] Byte Byte Byte Byte 00 : 01 (Net ID) 01 : 06 (Function Code) 02-03: 01 08 (AO Address) 04-05: 00 3C (Set the 60 seconds) Response: [Leading 6 bytes] Byte 00-03: 01 02 00 00 (Message number) Byte 04-05: 00 06 (Number of remaining bytes in this frame) [Response] Byte 00 : 01 (Net ID) Byte 01 : 06 (Function Code) Byte 02-03: 01 08 (AO Address) Byte 04-05: 00 3C (Set the 60 seconds) Page: 80 tET/tPET DIO Series User Manual, v1.5 Copyright © 2012 ICP DAS Co., Ltd. All Rights Reserved. 9.2.7 15 (0x0F) Force Multiple Coils (Write DOs) This function code is used to set multiple coils status or write multiple digital output value. [Request] Byte Description Size Value 00 Net ID (Station number) 1 Byte 1-247 01 Function code 1 Byte 0x0F Refer to Modbus Address Table for tET/tPET series. (Sec. 6.3 Modbus Register Map) Byte 02 = high byte Byte 03 = low byte Byte 04 = high byte Byte 05 = low byte 02-03 Starting DO address 2 Bytes 04-05 Number of output channels (Points) 2 Bytes 06 Byte count 1 Byte 07 Output value n Byte Description Size Value 00 Net ID (Station number) 1 Byte 1-247 01 Function code 1 Byte 0x0F 02-03 Starting DO address 2 Bytes 04-05 Number of output channels (Points) 2 Bytes n = (Points +7)/8 A bit corresponds to a channel. Value 1 for a bit denotes the channel is ON, while the value 0 is OFF. n= 1; Byte 07 = data bit 7 ~ 0 n= 2; Byte 08 = data bit 15 ~ 8 ....... n= m; Byte m+6 = data bit (8m-1)~ 8(m-1) [Response] Byte The value is the same as Byte 02-03 of the Request The value is the same as Byte 04-05 of the Request [Error Response] Byte Description Size Value 00 Net ID (Station number) 1 Byte 1-247 01 Function code 1 Byte 02 Exception code 1 Byte 0x8F Refer to Modbus Standard Specification for more details Page: 81 tET/tPET DIO Series User Manual, v1.5 Copyright © 2012 ICP DAS Co., Ltd. All Rights Reserved. For example: function 15 (0x0F), Write DOs [Leading 6 bytes] [Request] Command: 01 02 00 00 00 08 01 0F 01 0B 00 02 01 03 [Leading 6 bytes] [Response] Response: 01 02 00 00 00 06 01 0F 01 0B 00 02 Sets Safe value (DO0-DO1) Descriptions as follows: Command: [Leading 6 bytes] Byte 00-03: 01 02 00 00 (Message number) Byte 04-05: 00 08 (Number of remaining bytes in this frame) [Request] Byte 00 : 01 (Net ID) Byte 01 : 0F (Function Code) Byte 02-03: 01 0B (Starting DO address) Byte 04-05: 00 02 (Number of output channels) Byte 06 : 01 (Byte count) Byte 07 : 03 (Output value) Response: [Leading 6 bytes] Byte 00-03: 01 02 00 00 (Message number) Byte 04-05: 00 06 (Number of remaining bytes in this frame) [Response] Byte 00 : 01 (Net ID) Byte 01 : 0F (Function Code) Byte 02-03: 01 0B (Starting DO address) Byte 04-05: 00 02 (Number of input channels) Page: 82 tET/tPET DIO Series User Manual, v1.5 Copyright © 2012 ICP DAS Co., Ltd. All Rights Reserved. 9.2.8 16 (0x10) Preset Multiple Registers (Write AOs) This function code is used to set multiple holding registers that are used to store the configuration value of the module. [Request] Byte Description Size Value 00 Net ID (Station number) 1 Byte 1-247 01 Function code 1 Byte 0x10 02-03 04-05 Starting AO address Number of 16-bit registers (channels) 2 Bytes 2 Bytes Refer to Modbus Address Table for tET/tPET series. (Sec. 6.3 Modbus Register Map) Byte 02 = high byte Byte 03 = low byte Word count Byte 04 = high byte Byte 05 = low byte Byte count of the following data ( n =Points x 2 Bytes ) Register values n= 2; Byte 03 = high byte Byte 04 = low byte ....... n= m; Byte 03 = high byte Byte 04 = low byte ....... Byte m+1 = high byte Byte m+2 = low byte 06 Byte Count 1 Byte 07 Register values n Bytes Description Size Value 00 Net ID (Station number) 1 Byte 1-247 01 Function code 1 Byte 0x10 02-03 Starting AO address 2 Byte 04-05 Number of 16-bit registers (channels) 2 Byte [Response] Byte The value is the same as Byte 02-03 of the Request The value is the same as Byte 04-05 of the Request [Error Response] Byte Description Size Value 00 Net ID (Station number) 1 Byte 1-247 01 Function code 1 Byte 0x90 02 Exception code 1 Byte Refer to Modbus Standard Specification for more details Page: 83 tET/tPET DIO Series User Manual, v1.5 Copyright © 2012 ICP DAS Co., Ltd. All Rights Reserved. For example: function 16 (0x10), Write AOs [Leading 6 bytes] [Request] Command: 01 02 00 00 00 0B 01 10 00 32 00 01 02 03 E8 00 00 [Leading 6 bytes] [Response] Response: 01 02 00 00 00 06 01 10 00 32 00 01 Sets Preset value for digital counter Descriptions as follows: Command: [Leading 6 bytes] Byte 00-03: 01 02 00 00 (Message number) Byte 04-05: 00 0B (Number of remaining bytes in this frame) [Request] Byte 00 : 01 (Net ID) Byte 01 : 10 (Function Code) Byte 02-03: 00 32 (Starting AO Address) Byte 04-05: 00 01 (Number of 16-bit registers) Byte 06 : 02 (Byte count) Byte 07-10: 03 E8 00 00 (Preset value for digital counter) Response: [Leading 6 bytes] Byte 00-03: 01 02 00 00 (Message number) Byte 04-05: 00 06 (Number of remaining bytes in this frame) [Response] Byte 00 : 01 (Net ID) Byte 01 : 10 (Function Code) Byte 02-03: 00 32 (Starting AO Address) Byte 04-05: 00 01 (Word Count) Page: 84 tET/tPET DIO Series User Manual, v1.5 Copyright © 2012 ICP DAS Co., Ltd. All Rights Reserved. ■ Data Field The data field of messages sent between a master and a slave contains additional information about the action to be taken by the master or any information requested by the slave. If the master does not require this information, the data field can be empty. Reference (Address) Description Read/Write Discrete Outputs or Coils. A 0x reference 0xxxx address is used to output device data to a digital output channel. Read Discrete Inputs. The ON/OFF status of a 1x 1xxxx reference address is controlled by the corresponding digital input channel. Read Input Registers. A 3x reference register contains a 3xxxx 16-bit number received from an external source, e.g. an analog signal. Read/Write Output or Holding Registers. A 4x register is 4xxxx used to store 16 bits of numerical data (binary or decimal), or to send the data from the CPU to an output channel. For more detail of Address Mapping (Reference number), refer to 6.3 Modbus Register Map. Page: 85 tET/tPET DIO Series User Manual, v1.5 Copyright © 2012 ICP DAS Co., Ltd. All Rights Reserved. 9.3 Modbus Register Map Data is transmitted in 8-, 16- and 32-bit format. The data of 16-bit registers is transmitted in high-byte first (For example: 0x0A0B ==> 0x0A, 0x0B). The data of 32-bit registers is transmitted as two 16-bit registers, and is low-word first. (For example: 0x0A0B0C0D ==> 0x0C, 0x0D, 0x0A, 0x0B.) 9.3.1 Common Functions 0xxxx: DO address (base 0) Begin Points Description address 127 (0x7F) 128 (0x80) 133 (0x85) Remarks Bits per Range Access Point 1 1 1 Recovers all web default settings Default ID settings Reboots the tET/tPET module Type 1 1 = recover 1 1 = recover 1 1 = reboot Bits per Range W (Pulse) W (Pulse) W (Pulse) “W”: Write 3xxxx: AI address (base 0) Begin Points Description address 151 (0x97) 158 (0x9E) 160 (0xA0) Remarks Access Point 1 1 Firmware version Modbus communication status 16 16 Type 123 denotes that the version=1.2.3 0 = No Error R R 1 = Timeout 0 = Normal 1 Pair-Connection status 16 1 = Timeout R 2 = Disconnected “R”: Read Page: 86 tET/tPET DIO Series User Manual, v1.5 Copyright © 2012 ICP DAS Co., Ltd. All Rights Reserved. 4xxxx: AO address (base 0) Begin Points Description address Bits per Range Access Point Type 1 = at Power-on 255 (0xFF) 1 CPU reset status 16 2 = by the WDT R/W 3 = by the reset command <5: Disabled 5~65535: Enabled (units: seconds) (Default=0) When the tET/tPET module loses 257 (0x101) communication with host 1 Set host watch dog timer 16 PC for more than the R/W/F period defined in the WDT settings, DO channels will revert to their safe values and the host WDT events counter will increase by one. Denotes how many host 258 (0x102) 1 Host WDT events 16 WDT events have occurred since the last R/W CPU reset 259 (0x103) 263 (0x107) 264 (0x108) Remarks 1 Module name 16 1 Set TCP timeout 16 1 Set System timeout 16 Module name R <5: Disabled 5~65535: Enabled (units: second) (default=0) <30: Disabled 30~65535: Enabled (unit: second) (default=0) R/W/F R/W/F “R”: Read; “W”: Write; “F”: Setting is recorded in flash as default. Page: 87 tET/tPET DIO Series User Manual, v1.5 Copyright © 2012 ICP DAS Co., Ltd. All Rights Reserved. 9.3.2 Specific Functions The nDI and nDO parameters of each model used in the following Modbus address tables are shown as follows: Model name tET series tET-P6 tET-C4 tET-A4 tET-P2C2 tET-P2A2 tET-P2POR2 tET-P2R2 tPET series tPET-P6 tPET-C4 tPET-A4 tPET-P2C2 tPET-P2A2 tPET-P2POR2 tPET-P2R2 Number of DO channels (nDO) Number of DI channels (nDI) 0 4 4 2 2 2 2 6 0 0 2 2 2 2 0xxxx: DO address (base 0) Begin address Points 0 (0x00) 1~nDO 32 (0x20) Bits per Point Description Access Type Range Digital Output 1 0 = Off 1 = On 1 Clear all DI latched status (high) 1 1 = Clear W 33 (0x21) 1 Clear all DI latched status (low) 1 1 = Clear W 34 (0x22) 1~nDI Clear high speed digital counter 1 1 = Clear W 60 (0x3C) 1 Save specific data to Flash (The access type of some register are labeled by “E”) 1 1 = Clear W 100 (0x64) 1~nDO Enable DO PWM 1 0 = Off 1 = On (Default= 0) R/W 150 (0x96) 1 1 0 = Disable 1 = Enable (Default= 0) R/W/F 151 (0x97) 1~nDI Enable high speed digital counter 1 0 = Disable 1 = Enable (Default= 0) R/W/F 190 (0xBE) 1~nDI Enable DI frequency measurement 1 0 = Disable 1 = Enable (Default= 0) R/W/F 235 (0xEB) 1~nDO Power-on value for DO 1 0 = Off 1 = On (Default= 0) R/W/F Enable all (high/low) DI latched status R/W Page: 88 tET/tPET DIO Series User Manual, v1.5 Copyright © 2012 ICP DAS Co., Ltd. All Rights Reserved. 0 = Off 1 = On (Default= 0) 267 (0x10B) 1~nDO Remarks “R”: Read; “W”: Write; “F”: Setting is recorded in flash as default. “E”: After writing DO[60] register, the data will be stored in flash. ! Safe value for DO 1 R/W/F Note: Because the characteristic of relay, t(P)ET-P2POR2/t(P)ET-P2R2 series (the module with relay) are not suitable to use PWM for a long time. 1xxxx: DI address (base 0) Begin address 0 (0x00) 32 (0x20) 64 (0x40) Remarks Points Bits per Description Point 1~nDI Digital Input status 1 1~nDI Digital latched status (high) 1 1~nDI Digital latched status (low) 1 Access Range Type 0 = Off R 1 = On 0 = no 1 = latched 0 = no 1 = latched R R “R”: Read 3xxxx: AI address (base 0) Begin address 16 (0x10) 100 (0x64) 110 (0x6E) 121 (0x79) Remarks ! Points Bits per Description Point Access Value Type 1~nDI Value of digital counter 32 1 Number of DI channels 16 nDI R 1 Number of DO channels 16 nDO R 1 Number of high-speed counters 16 nDI R 0~4294967296 R “R”: Read Note: Each 32-bit point occupies two 16-bit registers, and has address offset 2. The second point is at begin-address +2, and so on. Page: 89 tET/tPET DIO Series User Manual, v1.3 Copyright © 2010 ICP DAS Co., Ltd. All Rights Reserved. 4xxxx: AO address (base 0) Begin Points Description Bits per address 50 (0x32) Range Access Point 1~nDI Preset value for the high speed digital counter 32 Type R/W/E 0~4294967296 Duty cycle of DO PWM The first word (16-bit register) is 100 (0x64) 1~nDO the high pluse width, while the 32 second word is the low pluse 0~65535; R/W/E 0~65535; width. The unit is 1 ms, and the resolution is about 10 ms. 1000 = 1000 ms 150 (0x64) 1~nDO Scan mode 16 100 = 100 ms 2000 = Single R/W/F pulse 1=No average 2=Average 2 200 (0x64) values 1~nDO Moving average 16 4= Average 4 R/W/F values 8= Average 8 values 268 (0x10C) 284 (0x11C) Remarks ! 1~nDO Min-Switching Time for DO 16 1~65535 second R/W/F 1~nDO Auto-off Time for DO 16 1~65535 second R/W/F “R”: Read; “W”: Write; “F”: Setting is recorded in flash as default. “E”: After writing DO[60] register, the data will be stored in flash. Note: Each 32-bit point occupies two 16-bit registers, and has address offset 2. The second point is at begin-address +2, and so on. Page: 90 tET/tPET DIO Series User Manual, v1.5 Copyright © 2012 ICP DAS Co., Ltd. All Rights Reserved. 10 Related Tools 10.1 LabVIEW LabVIEW is the best way to acquire, analyze, and present data. LabVIEW delivers a graphical development environment that can be used to quickly build data acquisition quickly, instrumentation and control systems, boosting productivity and saving development time. With LabVIEW, it is possible to quickly create user interfaces that enable interactive control of software systems. To specify your system functionality, simply assemble block diagram – a natural design notation for scientists and engineers. The document for linking LabVIEW to the tET/tPET using the Modbus protocol is located at: CD:\NAPDOS\tPET\Document\Application\LabVIEW\ http://ftp.icpdas.com/pub/cd/tinymodules/napdos/tPET/document/application/labVIEW / Page: 91 tET/tPET DIO Series User Manual, v1.5 Copyright © 2012 ICP DAS Co., Ltd. All Rights Reserved. 10.2 OPC Server OPC (OLE for Process Control) is the first standard resulting from the collaboration of a number of leading worldwide automation suppliers working in cooperation with Microsoft. Originally based on Microsoft's OLE COM (Component Object Model) and DCOM (Distributed Component Object Model) technologies, the specification defines a standard set of objects, interfaces and methods for use in process control and manufacturing automation applications to facilitate interoperability. There are many different mechanisms provided by various vendors that allow access to a variety of devices via specific applications. However, if an OPC server is provided for the device, other applications will also be able to access the device via the OPC interface. Page: 92 tET/tPET DIO Series User Manual, v1.3 Copyright © 2010 ICP DAS Co., Ltd. All Rights Reserved. 10.3 SCADA SCADA stands for Supervisor Control and Data Acquisition and is a PC-based production automation and control system. SCADA is widely used in many fields, e.g. power generation, water systems, the oil industry, and the chemical, and automobile industry. Different fields require different functions, but they all have the same common features: Graphical interface Process mimicking Real time and historic trend data Alarm system Data acquisition and recording Data analysis Report generator Accessing the tET/tPET module SCADA software is able to access tET/tPET devices using the Modbus communication protocol without the need for other software drivers. Popular SCADA software Some of the more popular SCADA software includes Citect, ICONICS, iFIX, InduSoft, Intouch, Entivity Studio, Entivity Live, Entivity VLC, Trace Mode, Wizcon, Wonderware ... etc In the following sections, three popular brands of SCADA software are introduced, together with detailed instructions of how to use them to communicate with tET/tPET series modules using the Modbus TCP protocol. Page: 93 tET/tPET DIO Series User Manual, v1.5 Copyright © 2012 ICP DAS Co., Ltd. All Rights Reserved. 10.3.1 InduSoft InduSoft Web Studio is a powerful, integrated collection of automation tools that includes all the building blocks needed to develop modern Human Machine Interfaces (HMI), Supervisory Control and Data Acquisition (SCADA) systems, and embedded instrumentation and control applications. InduSoft Web Studio’s application runs in native Windows NT, 2000, XP, CE and CE .NET environments and conforms to industry standards such as Microsoft .NET, OPC, DDE, ODBC, XML, and ActiveX. The document describing how to link InduSoft to the tET/tPET series module using the Modbus protocol is located at: CD:\NAPDOS\tPET\Document\Application\InduSoft\ http://ftp.icpdas.com/pub/cd/tinymodules/napdos/tPET/document/application/indusoft/ Page: 94 tET/tPET DIO Series User Manual, v1.5 Copyright © 2012 ICP DAS Co., Ltd. All Rights Reserved. 10.3.2 Citect CitectSCADA is a fully integrated Human Machine Interface (HMI) / SCADA solution that enables users to increase return on assets by delivering a highly scalable, reliable control and monitoring system. Easy-to-use configuration tools and powerful features enable the rapid development and deployment of solutions for applications of any size. The document describing how to link Citect to the tET/tPET module using the Modbus protocol is located on CD:\NAPDOS\tPET\Document\Application\Citect\ http://ftp.icpdas.com/pub/cd/tinymodules/napdos/tPET/document/application/citect/ Page: 95 tET/tPET DIO Series User Manual, v1.5 Copyright © 2012 ICP DAS Co., Ltd. All Rights Reserved. 10.3.3 iFix The document describing how to link iFix to the tET/tPET series module using the Modbus protocol is located at: CD:\NAPDOS\tPET\Document\Application\iFix\ http://ftp.icpdas.com/pub/cd/tinymodules/napdos/tPET/document/application/ifix/ Page: 96 tET/tPET DIO Series User Manual, v1.5 Copyright © 2012 ICP DAS Co., Ltd. All Rights Reserved. Appendix A. How to avoid browser access error that causes a blank page to be displayed when using IE. Disable the IE cache in the following manner: Step 1: Click “Tools” >> “Internet Options...”. 1 2 Step 2: Click the “General” tab and then click the “Settings...” button in the Temporary Internet files frame of the Internet Options dialog. 3 4 Page: 97 tET/tPET DIO Series User Manual, v1.3 Copyright © 2010 ICP DAS Co., Ltd. All Rights Reserved. Step 3: Click the “Every visit to the page” option and then click the “OK” button in both Settings dialog and Internet Options dialog. 5 6 7 Step 4: Click the “Refresh” button to press F5 on your keyboard to refresh the tET/tPET web server, or re-open IE. 8 Page: 98 tET/tPET DIO Series User Manual, v1.5 Copyright © 2012 ICP DAS Co., Ltd. All Rights Reserved. B. Firmware Updates via the Ethernet Introduction The tET/tPET supports firmware updates across an Ethernet network via the BOOTP/TFTP protocol. The tET/tPET module (network client) uses the BOOTP protocol to obtain an IP address from the eflash.exe utility program (configuration server), and then uses the TFTP protocol to transfer the firmware image from the eflash.exe (server) to the tET/tPET (client) module. The code (in the boot loader) used to update the firmware image is not part of the firmware itself. Thus, users can update the firmware even if the built-in version is corrupted or does not exist. If the firmware update fails, the update procedures simply need to be run again. The tET/tPET module has a built-in flash protection feature that prohibits any modification to the firmware in the flash. Before updating the firmware, the “Init Switch” must be set to the “Init” state and then power-on reset is performed on the tET/tPET to disable the flash protection. Since the flash becomes writable, the firmware can be remotely updated via the Ethernet network. Mode Flash Protection Firmware Update Configuration Initial No Yes Factory Run Yes No User-Defined Notes: 1. Ensure that the network settings of your computer are correctly configured or the update procedures via the Ethernet network may not work properly. 2. The eflash.exe program may not start correctly if there is another TFTP server running on the same computer. 3. RFC-951 defines the BOOTP (Bootstrap Protocol, uses UDP Ports 67 and 68). 4. RFC-1350 defines the TFTP (Trivial File Transfer Protocol, uses UDP Port 69). Page: 99 tET/tPET DIO Series User Manual, v1.5 Copyright © 2012 ICP DAS Co., Ltd. All Rights Reserved. Procedure for updating Firmware via the Ethernet 1. Connect the tET/tPET module to the same HUB or the same sub-network as your PC. Do not connect it to either a router or the Internet as if may cause the update to fail. 2. Run the eSearch Utility to search for the tET/tPET module and take not of its IP and MAC addresses. IP Address MAC Address If the above IP address does not work correctly (for example, it does not respond to a ping command), contact your network administrator to obtain a valid IP address for the tET/tPET module. 3. Create an “update.bat” file in the firmware folder (for example, C:\ETL7K). Enter the following eflash.exe command strings in the file. eflash –i [IP address] –m [MAC address] [Firmware Name] pause The “pause” command ensures that the DOS box remains open so that you can then check the result and press “Enter” to close it later. For example, of assign the IP address 10.0.8.3 to the tET/tPET module that has a MAC of address of 00.0d.e0:80:02:02. The IP address assigned to the tET/tPET module can be the same as that assigned by the DHCP (since it works), or if can be another valid IP address that is in the same sub-network and is not in conflict with other devices. eflash -i 10.0.8.3 -m 00-0d-e0-80-02-02 ETL7K.dat pause Page: 100 tET/tPET DIO Series User Manual, v1.5 Copyright © 2012 ICP DAS Co., Ltd. All Rights Reserved. 4. Double-click the update.bat file you just created above on a Windows 2000/XP/2003 system to begin waiting for an update request from the tET/tPET series module. Assign a valid IP address to the tET/tPET module before beginning update. Wait for a request from the tET/tPET module to start updating the device. 5. Set the “Init Switch” of the tET/tPET module to the in “Init” position. 6. Reboot the tET/tPET module in init mode to initial the update request. Responds to the update request from the device 100% . 7. Set the “Init Switch” to the "Run" position once the update is finished, when the complete rate shows “100%”. 8. Reboot the tET/tPET module so that if is running in normal mode. Page: 101 tET/tPET DIO Series User Manual, v1.3 Copyright © 2010 ICP DAS Co., Ltd. All Rights Reserved. 9. Run the eSearch Utility to search for the tET/tPET module again to check that it is now working. If any problem causes the firmware not to work, for example, the module cannot be found by searching or the system LED is always off, download a new firmware image from our website and then update the module again. 10. Log in to the web configuration for the tET/tPET module to check the firmware version/date (the default password is “Admin”). Page: 102 tET/tPET DIO Series User Manual, v1.3 Copyright © 2010 ICP DAS Co., Ltd. All Rights Reserved. C. Why cannot computer ping or search the tET/tPET series module? The computer can make a communication with the module through some specific ports. Please confirm with your network administrator that UDP Port 7, Port 57188 and Port 54321 can’t be denying by network device. About the detailed information of TCP/UDP port refers to following table: TCP Port: Port Number Description 80 HTTP (HyperText Transport Protocol ) 502 Modbus Data Port UDP Port: Port Number Description 7 Echo (Ping) 57188 Request of UDP search 54321 Response of UDP search Page: 103 tET/tPET DIO Series User Manual, v1.5 Copyright © 2012 ICP DAS Co., Ltd. All Rights Reserved.