1
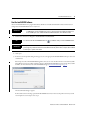
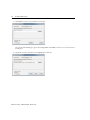
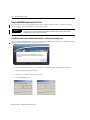
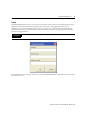
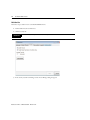
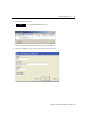
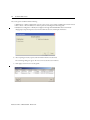
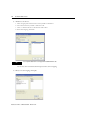
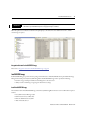
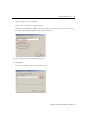
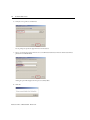
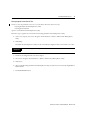
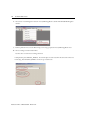
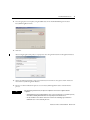
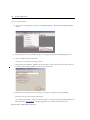
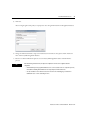
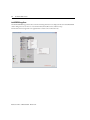
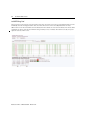
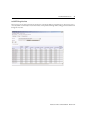
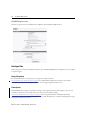
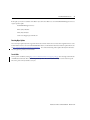
IntelliCENTER Software
User Manual
Important User Information
Solid state equipment has operational characteristics differing from those of electromechanical
equipment. Safety Guidelines for the Application, Installation and Maintenance of Solid State Controls
(publication SGI-1.1 available from your local Rockwell Automation sales office or online at
http://www.rockwellautomation.com/literature describes some important differences between solid state
equipment and hard-wired electromechanical devices. Because of this difference, and also because of the wide
variety of uses for solid state equipment, all persons responsible for applying this equipment must satisfy
themselves that each intended application of this equipment is acceptable.
In no event will Rockwell Automation, Inc. be responsible or liable for indirect or consequential damages
resulting from the use or application of this equipment.
The examples and diagrams in this manual are included solely for illustrative purposes. Because of the many
variables and requirements associated with any particular installation, Rockwell Automation, Inc. cannot
assume responsibility or liability for actual use based on the examples and diagrams.
No patent liability is assumed by Rockwell Automation, Inc. with respect to use of information, circuits,
equipment, or software described in this manual.
Reproduction of the contents of this manual, in whole or in part, without written permission of
Rockwell Automation, Inc., is prohibited.
Throughout this manual, when necessary, we use notes to make you aware of safety considerations.
Rockwell Automation, Allen-Bradley, Rockwell Software, TechConnect, IntelliCENTER, RSLinx, RSNetWorx, PowerFlex, SMC, FactoryTalk, Logix5000, and RSView are trademarks of Rockwell
Automation, Inc.
Trademarks not belonging to Rockwell Automation are property of their respective companies.
Table of Contents
IntelliCENTER Software Introduction. . . . . . . . . . . . . . . . . . . . . . . . . . . . . . . . . . . . . . . . . . . . . . . . . . . . . . . . . . . . . . . . . . . . 5
System and Equipment Requirements . . . . . . . . . . . . . . . . . . . . . . . . . . . . . . . . . . . . . . . . . . . . . . . . . . . . . . . . . . . . . . . . . . . . . 5
Minimum Permission Requirements . . . . . . . . . . . . . . . . . . . . . . . . . . . . . . . . . . . . . . . . . . . . . . . . . . . . . . . . . . . . . . . . . . . . . . 5
Firewall Changes Made by the IntelliCENTER Software Installation . . . . . . . . . . . . . . . . . . . . . . . . . . . . . . . . . . . . 5
IntelliCENTER – Known Folders and File-Extensions . . . . . . . . . . . . . . . . . . . . . . . . . . . . . . . . . . . . . . . . . . . . . . . . . 5
Services IntelliCENTER Depends On . . . . . . . . . . . . . . . . . . . . . . . . . . . . . . . . . . . . . . . . . . . . . . . . . . . . . . . . . . . . . . . . 6
Equipment Necessary for Connecting the Computer . . . . . . . . . . . . . . . . . . . . . . . . . . . . . . . . . . . . . . . . . . . . . . . . . . . . . . . 6
DeviceNet Network . . . . . . . . . . . . . . . . . . . . . . . . . . . . . . . . . . . . . . . . . . . . . . . . . . . . . . . . . . . . . . . . . . . . . . . . . . . . . . . . . 6
ControlNet Network . . . . . . . . . . . . . . . . . . . . . . . . . . . . . . . . . . . . . . . . . . . . . . . . . . . . . . . . . . . . . . . . . . . . . . . . . . . . . . . . 7
Ethernet Network . . . . . . . . . . . . . . . . . . . . . . . . . . . . . . . . . . . . . . . . . . . . . . . . . . . . . . . . . . . . . . . . . . . . . . . . . . . . . . . . . . . 7
Recommended Additional Software . . . . . . . . . . . . . . . . . . . . . . . . . . . . . . . . . . . . . . . . . . . . . . . . . . . . . . . . . . . . . . . . . . 7
Online Help. . . . . . . . . . . . . . . . . . . . . . . . . . . . . . . . . . . . . . . . . . . . . . . . . . . . . . . . . . . . . . . . . . . . . . . . . . . . . . . . . . . . . . . . . . . . . 7
Install the Software . . . . . . . . . . . . . . . . . . . . . . . . . . . . . . . . . . . . . . . . . . . . . . . . . . . . . . . . . . . . . . . . . . . . . . . . . . . . . . . . . . . . . . 8
New IntelliCENTER Software Installation. . . . . . . . . . . . . . . . . . . . . . . . . . . . . . . . . . . . . . . . . . . . . . . . . . . . . . . . . . . 10
Installing IntelliCENTER Software Data Disks. . . . . . . . . . . . . . . . . . . . . . . . . . . . . . . . . . . . . . . . . . . . . . . . . . . . . . . 11
Electronic Data Sheets . . . . . . . . . . . . . . . . . . . . . . . . . . . . . . . . . . . . . . . . . . . . . . . . . . . . . . . . . . . . . . . . . . . . . . . . . . . . . . . . . . 13
Manually Install EDS Files . . . . . . . . . . . . . . . . . . . . . . . . . . . . . . . . . . . . . . . . . . . . . . . . . . . . . . . . . . . . . . . . . . . . . . . . . . 13
Configure RSLinx Software Drivers . . . . . . . . . . . . . . . . . . . . . . . . . . . . . . . . . . . . . . . . . . . . . . . . . . . . . . . . . . . . . . . . . . . . . . 14
Start the IntelliCENTER Software . . . . . . . . . . . . . . . . . . . . . . . . . . . . . . . . . . . . . . . . . . . . . . . . . . . . . . . . . . . . . . . . . . . . . . . 15
Using IntelliCENTER Software for the First Time . . . . . . . . . . . . . . . . . . . . . . . . . . . . . . . . . . . . . . . . . . . . . . . . . . . . . . . . 18
Setup RSLinx Software to Run on Windows Vista, Windows 7, or Windows 8 Operating Systems . . . . . . . . 18
Security . . . . . . . . . . . . . . . . . . . . . . . . . . . . . . . . . . . . . . . . . . . . . . . . . . . . . . . . . . . . . . . . . . . . . . . . . . . . . . . . . . . . . . . . . . . 19
Add a New User. . . . . . . . . . . . . . . . . . . . . . . . . . . . . . . . . . . . . . . . . . . . . . . . . . . . . . . . . . . . . . . . . . . . . . . . . . . . . . . . . . . . 20
Toolbar . . . . . . . . . . . . . . . . . . . . . . . . . . . . . . . . . . . . . . . . . . . . . . . . . . . . . . . . . . . . . . . . . . . . . . . . . . . . . . . . . . . . . . . . . . . 23
Real-time Monitoring . . . . . . . . . . . . . . . . . . . . . . . . . . . . . . . . . . . . . . . . . . . . . . . . . . . . . . . . . . . . . . . . . . . . . . . . . . . . . . . . . . . 24
Elevation View . . . . . . . . . . . . . . . . . . . . . . . . . . . . . . . . . . . . . . . . . . . . . . . . . . . . . . . . . . . . . . . . . . . . . . . . . . . . . . . . . . . . . 24
Monitor (unit) View. . . . . . . . . . . . . . . . . . . . . . . . . . . . . . . . . . . . . . . . . . . . . . . . . . . . . . . . . . . . . . . . . . . . . . . . . . . . . . . . 24
Spreadsheet View. . . . . . . . . . . . . . . . . . . . . . . . . . . . . . . . . . . . . . . . . . . . . . . . . . . . . . . . . . . . . . . . . . . . . . . . . . . . . . . . . . . 32
Event Log. . . . . . . . . . . . . . . . . . . . . . . . . . . . . . . . . . . . . . . . . . . . . . . . . . . . . . . . . . . . . . . . . . . . . . . . . . . . . . . . . . . . . . . . . . 33
Electronic Documentation . . . . . . . . . . . . . . . . . . . . . . . . . . . . . . . . . . . . . . . . . . . . . . . . . . . . . . . . . . . . . . . . . . . . . . . . . . . . . . 34
CAD Drawings . . . . . . . . . . . . . . . . . . . . . . . . . . . . . . . . . . . . . . . . . . . . . . . . . . . . . . . . . . . . . . . . . . . . . . . . . . . . . . . . . . . . 34
User Manuals . . . . . . . . . . . . . . . . . . . . . . . . . . . . . . . . . . . . . . . . . . . . . . . . . . . . . . . . . . . . . . . . . . . . . . . . . . . . . . . . . . . . . . 35
Spare Parts. . . . . . . . . . . . . . . . . . . . . . . . . . . . . . . . . . . . . . . . . . . . . . . . . . . . . . . . . . . . . . . . . . . . . . . . . . . . . . . . . . . . . . . . . 36
Additional Software Information . . . . . . . . . . . . . . . . . . . . . . . . . . . . . . . . . . . . . . . . . . . . . . . . . . . . . . . . . . . . . . . . . . . . . . . . 36
ActiveX Controls . . . . . . . . . . . . . . . . . . . . . . . . . . . . . . . . . . . . . . . . . . . . . . . . . . . . . . . . . . . . . . . . . . . . . . . . . . . . . . . . . . . . . . . 37
Elevation ActiveX Control . . . . . . . . . . . . . . . . . . . . . . . . . . . . . . . . . . . . . . . . . . . . . . . . . . . . . . . . . . . . . . . . . . . . . . . . . . 37
Monitor ActiveX Control. . . . . . . . . . . . . . . . . . . . . . . . . . . . . . . . . . . . . . . . . . . . . . . . . . . . . . . . . . . . . . . . . . . . . . . . . . . 37
Documents ActiveX Controls . . . . . . . . . . . . . . . . . . . . . . . . . . . . . . . . . . . . . . . . . . . . . . . . . . . . . . . . . . . . . . . . . . . . . . . 37
Spreadsheet ActiveX Control . . . . . . . . . . . . . . . . . . . . . . . . . . . . . . . . . . . . . . . . . . . . . . . . . . . . . . . . . . . . . . . . . . . . . . . 37
IntelliCENTER Software Integration Assistant . . . . . . . . . . . . . . . . . . . . . . . . . . . . . . . . . . . . . . . . . . . . . . . . . . . . . . . . . . . 37
Integration Assistant for Logix5000 Software . . . . . . . . . . . . . . . . . . . . . . . . . . . . . . . . . . . . . . . . . . . . . . . . . . . . . . . . . 38
Integration Assistant for IntelliCENTER Energy . . . . . . . . . . . . . . . . . . . . . . . . . . . . . . . . . . . . . . . . . . . . . . . . . . . . . 41
IntelliCENTER Energy . . . . . . . . . . . . . . . . . . . . . . . . . . . . . . . . . . . . . . . . . . . . . . . . . . . . . . . . . . . . . . . . . . . . . . . . . . . . . . . . . 41
Install IntelliCENTER Energy . . . . . . . . . . . . . . . . . . . . . . . . . . . . . . . . . . . . . . . . . . . . . . . . . . . . . . . . . . . . . . . . . . . . . . 41
Install the IntelliCENTER Energy Data CDs. . . . . . . . . . . . . . . . . . . . . . . . . . . . . . . . . . . . . . . . . . . . . . . . . . . . . . . . . 42
Integration Assistant for IntelliCENTER Energy . . . . . . . . . . . . . . . . . . . . . . . . . . . . . . . . . . . . . . . . . . . . . . . . . . . . . 44
Publication MCC-UM001E-EN-P - March 2014
4
IntelliCENTER Software
IntelliCENTER Energy Views. . . . . . . . . . . . . . . . . . . . . . . . . . . . . . . . . . . . . . . . . . . . . . . . . . . . . . . . . . . . . . . . . . . . . . .
Your Support Plan . . . . . . . . . . . . . . . . . . . . . . . . . . . . . . . . . . . . . . . . . . . . . . . . . . . . . . . . . . . . . . . . . . . . . . . . . . . . . . . . . . . . . .
Change of Registration . . . . . . . . . . . . . . . . . . . . . . . . . . . . . . . . . . . . . . . . . . . . . . . . . . . . . . . . . . . . . . . . . . . . . . . . . . . . .
Product Updates . . . . . . . . . . . . . . . . . . . . . . . . . . . . . . . . . . . . . . . . . . . . . . . . . . . . . . . . . . . . . . . . . . . . . . . . . . . . . . . . . . .
Receiving Major Updates . . . . . . . . . . . . . . . . . . . . . . . . . . . . . . . . . . . . . . . . . . . . . . . . . . . . . . . . . . . . . . . . . . . . . . . . . . .
Service Packs . . . . . . . . . . . . . . . . . . . . . . . . . . . . . . . . . . . . . . . . . . . . . . . . . . . . . . . . . . . . . . . . . . . . . . . . . . . . . . . . . . . . . . .
Rockwell Automation Support. . . . . . . . . . . . . . . . . . . . . . . . . . . . . . . . . . . . . . . . . . . . . . . . . . . . . . . . . . . . . . . . . . . . . . . . . . .
Installation Assistance . . . . . . . . . . . . . . . . . . . . . . . . . . . . . . . . . . . . . . . . . . . . . . . . . . . . . . . . . . . . . . . . . . . . . . . . . . . . . .
New Product Satisfaction Return . . . . . . . . . . . . . . . . . . . . . . . . . . . . . . . . . . . . . . . . . . . . . . . . . . . . . . . . . . . . . . . . . . . .
Documentation Feedback. . . . . . . . . . . . . . . . . . . . . . . . . . . . . . . . . . . . . . . . . . . . . . . . . . . . . . . . . . . . . . . . . . . . . . . . . . .
Publication MCC-UM001E-EN-P - March 2014
52
56
56
56
57
57
60
60
60
60
IntelliCENTER Software
5
IntelliCENTER Software Introduction
The IntelliCENTER® software, together with advanced Allen-Bradley® network components, lets you monitor loads, use data
trending information for predictive maintenance, and access electronic documentation.
System and Equipment Requirements
These minimum system requirements provide optimal operation of the IntelliCENTER software:
• Operating system: Windows XP SP3, Windows Vista SP2, Windows 7, Windows 8 or later
•
•
•
•
•
•
Processor: 2 GHz minimum [1]
Video resolution: 1024 x 768 resolution with True Color (24 bit or better)
CD-ROM drive: 4X (16X recommended)
Hard disk space: 3 GB free disk space
Mouse: Microsoft compatible
RAM: 2 GB minimum (4 GB recommended)
Minimum Permission Requirements
The user who installs and runs IntelliCENTER software should be an Administrator. In some cases, a non-Administrator may be
set up to use IntelliCENTER software, but this requires additional work as described in Knowledgebase article 68413.
The information below is provided in order to help support antivirus and firewall programs and security policies that may
interfere with IntelliCENTER software operation.
Firewall Changes Made by the IntelliCENTER Software Installation
During IntelliCENTER software installation, the IntelliCENTER.exe application is added to the list of allowed programs
within the Windows Firewall settings.
IntelliCENTER – Known Folders and File-Extensions
IntelliCENTER software must have read/write access to the following folders:
• Software Installation folder (set during install)
• Data CD Installation folder (set during install)
[1]
The IntelliCENTER software is a monitoring/communication software package requiring a very large amount of processor speed to
function efficiently and quickly. The processor speeds listed allow the software to function correctly. However, for speed and efficiency, we
recommend that the processor used be the fastest processor available to you.
Publication MCC-UM001E-EN-P - March 2014
6
IntelliCENTER Software
The known file extensions that are created/used by IntelliCENTER software are:
•
•
•
•
•
•
•
•
•
•
•
.dwg (Drawing)
.txt (Text Document)
.wsp (Work Space File)
.csv
.png (PNG Image)
.ldb (temporary database file)
.tlb (TLB File)
.acd (RSLogix/Studio 5000 Project)
.L5X (L5X File)
.InstallLog (INSTALLLOG File)
.InstallState (INSTALLSTATE File)
Services IntelliCENTER Depends On
The services that IntelliCENTER depends on are:
• IntelliCENTER Communication Server
• RSLinx Classic
• Windows Event Log
Equipment Necessary for Connecting the Computer
This is the equipment you need to connect your computer through your network.
DeviceNet Network
For a DeviceNet network, you need the following equipment.
Laptop computer
1784-U2DN USB to DeviceNet cable
or 1784-PCD DeviceNet personal computer interface card and 1784-PCD1
cable
Desktop computer
1784-U2DN USB to DeviceNet cable
or 1784-PCID DeviceNet personal computer interface card
RS232 interface (reduced
performance)
TIP
1770-KFD module
A 2100H-ICPC120 patch cable is necessary for connecting interface (laptop, desktop, RS232) to IntelliCENTER MCC wireway.
Publication MCC-UM001E-EN-P - March 2014
IntelliCENTER Software
7
ControlNet Network
For a ControlNet network, you need the following equipment:
• Laptop computer: 1784-PCC ControlNet personal computer interface card and 1784-C1 cable
• Desktop computer: 1784-PCIC ControlNet personal computer interface card and 1784-TPR ControlNet tap
TIP
Consult the ControlNet Coax Media Planning and Installation Guide, publication CNET-IN002, for configuration and installation of
the ControlNet cable.
Ethernet Network
For an Ethernet network, you need a laptop or desktop computer. Consult your local computer-support personnel for Ethernet
interface requirements.
Recommended Additional Software
Use RSNetWorx™ for DeviceNet software to configure DeviceNet nodes, save parameters, and communicate to all types of
DeviceNet components (sensors, non-Allen-Bradley products, and other products not found in MCCs).
Online Help
The online help included in the IntelliCENTER software complements and adds to the information in this document. To access
the online help, choose Start > Programs > IntelliCENTER > IntelliCENTER Help.
Publication MCC-UM001E-EN-P - March 2014
8
IntelliCENTER Software
Install the Software
These next sections guide you through installing the IntelliCENTER software. Follow this order for installing the disks.
1. Install the IntelliCENTER Software Program Disk.
This disk installs the IntelliCENTER program onto your computer. Follow the steps to install all dependencies for
IntelliCENTER software and finally IntelliCENTER software itself.
2. Install the IntelliCENTER Software Data Disk.
This disk provides the details about a particular IntelliCENTER motor control center. It installs the databases, drawings,
manuals, and EDS files necessary for IntelliCENTER software to operate. Also included, in the Access folder on this
CD, are the DNT files for your order.
Publication MCC-UM001E-EN-P - March 2014
IntelliCENTER Software
9
3. (Optional) Install the Electronic Data Sheet (EDS) files disk.
This is a complimentary disk that contains only a current snapshot of EDS files that you may find useful. This is not a list
of all EDS files, nor is there any guarantee that the EDS files you need are on this disk. If you are looking for an EDS file
that was not installed by the IntelliCENTER Software data disk and is not on this disk, then refer to the Rockwell
Automation EDS file site http://www.rockwellautomation.com/resources/eds/.
Publication MCC-UM001E-EN-P - March 2014
10
IntelliCENTER Software
New IntelliCENTER Software Installation
TIP
If the IntelliCENTER software program disk is installed already, skip to Installing IntelliCENTER Software Data Disks.
Follow these steps to install the software.
1. Close all programs.
2. Insert the IntelliCENTER software program disk into your CD-ROM drive.
If Autorun is enabled on your computer, the installation starts automatically and you can skip steps 3. and 4.
3. From the Start menu, choose Run.
4. Type D:\Setup.exe (substitute the appropriate letter of your CD-ROM drive for D) and click OK.
TIP
You may also click Browse to find the Setup.exe file located on the CD.
5. Follow the instructions to install the dependencies needed to support IntelliCENTER software.
When it is time to install IntelliCENTER software, you are prompted for which type of IntelliCENTER software
installation you would like to perform.
6. Choose the setup type, either IntelliCENTER setup or ActiveX Only setup.
• IntelliCENTER setup - This option includes the IntelliCENTER software standalone application and all of its
features. This is a full functioning version of the software and requires a license for each machine it is installed onto.
• ActiveX only - This option is to support HMIs developed using the IntelliCENTER ActiveX controls. This version
does not contain the IntelliCENTER software standalone application. This version may be installed on as many
computers as desired.
7. Follow the remaining instructions on the screen to finish installing IntelliCENTER software.
Publication MCC-UM001E-EN-P - March 2014
IntelliCENTER Software
11
Installing IntelliCENTER Software Data Disks
The information on the data disks includes all user manuals, CAD drawings, spare parts, and two database files. The data disks
can be installed on the local hard disk drive or on a server (where more than one user can access it). The Installation Wizard asks
for the preferred location. During normal operation of the IntelliCENTER software, files are read from and written to the data
disk files located either on the hard disk drive or a server.
Install the First IntelliCENTER Software Data Disk
Follow these steps to install the first data disk. To install an additional data disk, see Install Additional Data Disks.
1. Close all programs.
2. Insert the IntelliCENTER software data disk into your CD-ROM drive.
If Autorun is enabled on your computer, the installation starts automatically and you may skip steps 3 and 4.
3. From the Start menu, choose Run.
4. Type D:\Setup.exe (substitute the appropriate letter of your CD-ROM drive for D) and click OK.
TIP
You may also click Browse to find the Setup.exe file located on the CD.
5. Follow the instructions on the screen.
IMPORTANT
During the installation process, you are prompted to choose a directory into which the new database is installed. We suggest that
you choose the default directory. If you select a different directory than the default directory, the IntelliCENTER software needs to
be reconfigured to the new directory. To do this, in IntelliCENTER software from the Edit menu, choose Preferences and click the
File Locations tab. All additional IntelliCENTER software data disks must be installed in the same directory.
Publication MCC-UM001E-EN-P - March 2014
12
IntelliCENTER Software
Install Additional Data Disks
Follow these steps to install data disks other than the initial disk that was installed with the IntelliCENTER software.
1. Insert the IntelliCENTER software data disk into the CD-ROM drive.
The Merge Data dialog box appears automatically and the Select New Database box is populated with the path
D:\Order\Item\Access\ic.mdb. This is the location of the database on the CD-ROM drive of your computer.
If there is more than one MCC lineup on the new data disk, the New Database Lineup Names pull-down menu lets you
choose which lineup is merged into the existing database on the computer.
2. Select the MCC lineup that is to be merged.
IMPORTANT
If more than one lineup is to be merged from the data disk, each lineup has to be merged individually until all lineups have been
merged into the existing database.
3. Click ‘Add as a new lineup’ or ‘Add to an existing lineup’.
Choose Add to an existing lineup when adding replacement units or new sections to a lineup that already exists within
the database. Otherwise, choose Add as a new lineup to have the lineup merge in as a new lineup, separate from the other
lineups in your database.
4. Click OK to merge the databases together.
The database is checked for errors. If there are errors, the database is not merged. If there are no errors, the new database
is merged with the existing database; this may take a few minutes. There is a confirmation that the databases were merged
successfully. If there is more than one lineup on the new data disk, a dialog box appears, asking if you are done merging. If
you are not, repeat the steps for additional lineups until you are done merging all the lineups.
Publication MCC-UM001E-EN-P - March 2014
IntelliCENTER Software
IMPORTANT
13
If you are merging a replacement or new unit into an existing lineup, make sure the location of the new units is empty in the
existing database. If necessary, open the Spreadsheet View and delete or move the unit currently residing where the new unit is
to be placed.
Electronic Data Sheets
Electronic data sheet (EDS) files are simple text files used by network configuration tools, such as RSNetWorx software, and by
IntelliCENTER software to help identify products and easily commission them on a network. EDS files describe a product’s
device type, product revision, and configurable parameters on a network.
EDS files must be registered for each unique device in the MCC. All required EDS files are installed automatically and registered
when the IntelliCENTER software data disk is installed. However, there may be an instance where an EDS file needs to be
installed and registered manually. To do this, follow the steps under Manually Install EDS Files.
Manually Install EDS Files
The EDS files are installed with a program from Rockwell Software®. To install the EDS files, choose
Programs > Rockwell Software > RSLinx > Tools > EDS Hardware Installation Tool.
1. Click Add.
2. Select Register an EDS File and click Next.
3. Choose Register a Directory of EDS Files.
The IntelliCENTER software data disk supplied with your IntelliCENTER MCC contains a directory
(<CDROM>:\<Order>\<Item>\EDS) of all EDS files necessary for the devices in your IntelliCENTER MCC.
4. Browse to the EDS directory on the data CD and click Next.
The Installer displays the test results.
5. Click Next to continue.
The Installer lets you change the graphic image for each device.
6. Click Next to continue.
The Installer displays the final task summary.
7. Click Next to continue.
8. Click Finish when completed.
EDS Files for Other Devices
EDS files also can be obtained at http://www.rockwellautomation.com/resources/eds/.
Publication MCC-UM001E-EN-P - March 2014
14
IntelliCENTER Software
Configure RSLinx Software Drivers
During the installation of the IntelliCENTER software program disk, RSLinx® Classic Lite software was installed (unless
RSLinx software was installed on the personal computer prior to installation of the IntelliCENTER software). RSLinx Classic
software is the communication platform between the IntelliCENTER hardware and software.
TIP
If IntelliCENTER software data disks or EDS files were recently installed, then restart the computer before browsing the associated
network in RSLinx Classic software. This is because certain EDS files require a restart of the computer before RSLinx Classic
software is able to identify the device in the RSWho. If the devices do not appear in the RSWho, then IntelliCENTER software is
not able to monitor the device.
Follow these steps to configure the RSLinx software drivers needed on your computer.
1. From the Start menu, choose Programs > Rockwell Software > RSLinx > RSLinx Classic.
TIP
If RSLinx Classic software does not start, then start the application from the RSLinx Classic Launch Control Panel. From the Start
Menu, choose Programs > Rockwell Software > RSLinx > RSLinx Classic Launch Control Panel. Clear the Always Run as Service
checkbox, and click Start.
2. In RSLinx Classic software, from the Communications menu, choose Configure Drivers.
3. From the Available Driver Types pull-down menu, choose the most appropriate driver for your communication platform.
More than one driver can be configured.
IMPORTANT
IntelliCENTER software version 5.00.01 and later does not communicate with PowerFlex 753/755 drives via the
20-COMM-D option card. The 20-COMM-D option card is not a supported option for the PowerFlex 753/755 drives. Use
the 20-750-DNET option card to communicate with the PowerFlex 753/755 drives over the DeviceNet network.
4. Complete the information in the Driver Configuration dialog box that is displayed.
TIP
The Driver Configuration dialog box varies depending on which driver you select.
After successfully adding the new driver, the network must be browsed.
5. From the Communications pull-down menu, choose RSWho.
6. Select the driver and browse to the appropriate networks that IntelliCENTER software is communicating with.
7. Allow all nodes on a network to be browsed.
8. If you have multiple networks, browse each network that IntelliCENTER software monitors.
IMPORTANT
If a device is not first browsed in RSLinx Classic software, the IntelliCENTER software cannot communicate to that device and
IntelliCENTER software shows the device to be in communication loss. Once a network has been fully browsed in RSLinx Classic
software, it does not need to be re-browsed until the network is modified. This browse must happen in RSLinx Classic software; it
is not sufficient to browse the network in IntelliCENTER software's Select Network Path dialog box.
Publication MCC-UM001E-EN-P - March 2014
IntelliCENTER Software
15
Start the IntelliCENTER Software
After the IntelliCENTER software program disk and data disk have been installed and the RSLinx software driver has been
configured, the IntelliCENTER software is ready for use.
IMPORTANT
IntelliCENTER software version 5.00.01 and later does not communicate with PowerFlex 753/755 drives via the
20-COMM-D option card. The 20-COMM-D option card is not a supported option for the PowerFlex 753/755 drives. Use
the 20-750-DNET option card to communicate with the PowerFlex 753/755 drives over the DeviceNet network.
1. From the Start menu, choose Programs > IntelliCENTER > IntelliCENTER.
TIP
IMPORTANT
You could also double-click the IntelliCENTER software icon
on your Windows desktop to start the IntelliCENTER software.
When you start the IntelliCENTER software for the first time, a welcome screen appears and asks you to set the administrator’s
password. Type the password in the New Password and Confirm Password fields, and then click OK. Security should be established
for all users prior to operation of the software.
2. Click Open.
3. In the Select the Lineup Name dialog box that appears, select the appropriate IntelliCENTER MCC lineup to be viewed
and click Next.
If the lineup selected is an IntelliCENTER Energy MCC, then you can enter the URL where the associated FactoryTalk®
EnergyMetrix server is located. This enables the software to display IntelliCENTER Energy views for the devices within
the MCC. For more information about IntelliCENTER Energy see IntelliCENTER Energy on page 41.
The Network Paths dialog box appears.
If this is the first time monitoring a particular IntelliCENTER network, then the network path is not known yet. If all
network paths are associated, proceed to step 6.
Publication MCC-UM001E-EN-P - March 2014
16
IntelliCENTER Software
4. Click RSWho to associate a network with it’s network path.
The Select Network Path dialog box appears after clicking RSWho. The RSWho network tree is seen on the left side of
the dialog box.
5. Expand the network tree until the network is highlighted, then click OK.
Publication MCC-UM001E-EN-P - March 2014
IntelliCENTER Software
TIP
17
If the IntelliCENTER MCC lineup has multiple networks included in it, there are multiple RSWho network paths listed. Each
network needs to be configured individually the first time they are monitored.
6. Click the Connection Type using the option boxes provided.
Intermediate: This type of connection checks all the units as they appear in the computer’s database against what is found
in the network. This is used to resolve differences between the hardware and software database. This is useful the first
time in connecting to a lineup or after changes have taken place (such as a replaced device).
Express: This type of connection assumes that no changes have taken place in the lineup since the last time the computer
was connected. This is the fastest connection.
Refer to Communication in the online help for further information on the connection type.
7. After the network paths and the connection type have been selected, click Finish.
The Elevation View appears automatically.
Notice the Elevation
, Monitor
IntelliCENTER software.
, and Spreadsheet
icons are now active, and you are ready to use the
Publication MCC-UM001E-EN-P - March 2014
18
IntelliCENTER Software
Using IntelliCENTER Software for the First Time
This section instructs you on setting up RSLinx software for use on Windows Vista, Windows 7, or Windows 8 operating
systems, changing your password, adding new users, and using the toolbar.
IMPORTANT
When you start the IntelliCENTER software for the first time, a welcome screen appears and asks you to set the administrator’s
password. Type the password in the New Password and Confirm Password fields, and then click OK. Security should be
established for all users prior to operation of the software.
Setup RSLinx Software to Run on Windows Vista, Windows 7, or Windows 8 Operating Systems
When opening IntelliCENTER software on a personal computer running Windows Vista, Windows 7, or Windows 8 operating
systems, you need to set RSLinx Classic software to run as a service.
1. From the Start menu, choose Programs > Rockwell Software > RSLinx > RSLinx Classic Launch Control Panel.
2. Click Stop and check Always Run As Service.
3. Click Start to run RSLinx Classic software as a service.
4. Start IntelliCENTER software.
Publication MCC-UM001E-EN-P - March 2014
IntelliCENTER Software
19
Security
The IntelliCENTER software features a secure logon screen that appears when the software is started. The default user name is
‘Administrator’ and the default password is ‘password’ (both are case sensitive). After logging in for the first time, the
administrator (the person who installed the software and/or has complete access to all device settings) should change their
password, then set up user names and passwords for all other persons using the software. To change a password, from the File
menu, choose Change Password.
IMPORTANT
The user must be logged in to the software prior to changing their password.
The administrator determines the levels of other users’ access in the IntelliCENTER software. The administrator also determines
their own level of access.
Publication MCC-UM001E-EN-P - March 2014
20
IntelliCENTER Software
Add a New User
Follow these steps to add a new user to the IntelliCENTER software.
1. From the Edit menu, choose Preferences.
2. Click the Security tab.
IMPORTANT
The administrator is the only user with access to the security features of the IntelliCENTER software.
3. In the Security tab, click User Manager so that the User Manager dialog box appears.
Publication MCC-UM001E-EN-P - March 2014
IntelliCENTER Software
21
4. From the Edit menu, choose Insert.
TIP
You can also right-click the file and choose Insert.
This starts the Add a New User Wizard. Follow the directions on the dialog box.
5. Click the Access Rights box to specify the level of security needed for the new user.
Publication MCC-UM001E-EN-P - March 2014
22
IntelliCENTER Software
The security options available include the following:
• Add New Items—Ability to add and delete new users, units, sections, events, manuals, CAD diagrams, and user manuals.
• Write to Device—Allows modification to all device parameters, including FLA, and warning levels.
• Modify Device Configuration—Modify unit configuration through the IntelliCENTER software. This includes
changing input/output descriptions, location of units within the structure, and nameplate information.
6. After completing the Security Options, click OK and then Finish to end the wizard.
The User Manager dialog box appears. The new user is located at the bottom of the list.
7. Click Apply to save the new-user security profile.
Publication MCC-UM001E-EN-P - March 2014
IntelliCENTER Software
23
Toolbar
The toolbar that appears at the top of the IntelliCENTER software window allows for easy access to IntelliCENTER software
features.
These are the functions of the icons in the toolbar.
Workspace Open—Opens an existing workspace
Workspace Save—Saves the current workspace that is in use
Add Lineup to Workspace—Adds an existing lineup to the current workspace
Delete Lineup from Workspace—Deletes the specified lineup from the workspace
Elevation View—Displays the elevation view of the active lineup in the workspace
Spreadsheet View—Displays the spreadsheet view of the active lineup in the workspace
Monitor (Unit) View—Displays the Monitor view of the selected unit from the Elevation or Spreadsheet view
Event Log—Displays the Event log of the selected unit, or if no unit is selected, displays the entire lineup
Lineup Selection—Pull-down menu of all lineups that have been added to
the workspace. When clicking Elevation or Spreadsheet view, this is the
active lineup that is displayed.
Publication MCC-UM001E-EN-P - March 2014
24
IntelliCENTER Software
Real-time Monitoring
The IntelliCENTER software uses a polling method that allows real-time monitoring information to be displayed in the various
IntelliCENTER software dialog boxes. The monitoring information takes second priority to control commands on the network,
thereby ensuring that the IntelliCENTER software polling does not impact the response time for control commands.
Elevation View
To access the Elevation View, from the View menu, choose Elevation or click the Elevation View
icon. The Elevation
View displays the actual MCC lineup, complete with nameplates and status indicators on each door. The status indicators show
unit status (ready, running, warning, fault, no communication) so you can identify anomalies at a glance. Refer to the online help
for more information about the Elevation View.
To change the size of the Elevation View, drag the edge (top, bottom, sides, or corners) of the Elevation View window.
To see a more detailed status of the units, double-click the device icon for the unit in the Elevation View and the Monitor (unit)
View is displayed for that unit.
Monitor (unit) View
The Monitor View screen lets you access device-level data to monitor and configure the devices in your MCC. This view lets you
see key data, such as amperes, time-to-trip, trip cause, and ground fault amperes.
Publication MCC-UM001E-EN-P - March 2014
IntelliCENTER Software
25
Starting with version 5.00.01, there are two Monitor Views for two sets of devices:
• All drives and the SMC™ Flex controller use a newer Monitor View that reuses a common user interface that is used in
other Rockwell Automation products.
• All other devices use the legacy IntelliCENTER Monitor View. This Monitor View gives you access to the I/O mappings
of the device, trending capabilities, and access to parameters.
To access the Monitor View do one of the following:
• Double-click the unit to be viewed from the Elevation View.
• Select the unit and from the View menu, choose Monitor .
• Select the unit and click the Monitor View
icon.
Monitor View - PowerFlex Drives and SMC-Flex
When the Monitor View opens, you see the status Connected (highlighted in green) near the top right corner of the window.
This appears if you are online with the lineup.
Publication MCC-UM001E-EN-P - March 2014
26
IntelliCENTER Software
The Monitor View lets you access real-time data about each unit, such as amperes, current, and fault information. The toolbar at
the top of this view lets you access different views and functionality that are available for the device. The tabs at the bottom let
you switch between different ports associated with the device. If multiple network devices are associated with a single MCC unit,
then the Monitor View includes tabs (at the top) to toggle between the different devices.
View Different Parameters in the Monitor View
To view the parameters for the device, click the Parameters icon on the toolbar.
IMPORTANT
IntelliCENTER software version 5.00.01 and later does not communicate with PowerFlex 753/755 drives via the
20-COMM-D option card. The 20-COMM-D option card is not a supported option for the PowerFlex 753/755 drives. Use
the 20-750-DNET option card to communicate with the PowerFlex 753/755 drives over the DeviceNet network.
Publication MCC-UM001E-EN-P - March 2014
IntelliCENTER Software
27
IntelliCENTER opens the Parameter Window, which lets you view all of the device's parameters. You can configure parameters
from here, as well as monitor them in real-time.
One useful feature of this view is the Filter Value box..
In the Filter Value box, you can type the parameter you want to view, and IntelliCENTER displays the parameters that match
what you typed.
Publication MCC-UM001E-EN-P - March 2014
28
IntelliCENTER Software
Change Parameter Values
The Value cell appears white and is enabled for those parameters that are editable. To change a parameter value, scroll down the
Parameter List view and find the parameter you want to change. Then type the new value into the Value field.
IMPORTANT
The new value entered must be within the Min Value and Max Value displayed in the corresponding columns. The Min
and Max values are specific to the device and the parameter being changed. After entering the new value, it is written to
the device.
Publication MCC-UM001E-EN-P - March 2014
IntelliCENTER Software
29
Monitor View - Overloads, PowerMonitors, I/O, and Other
The Monitor or Unit View displays real-time data about each unit, such as amperes, time-to-trip, trip cause, ground fault
amperes, and I/O status. Each window comes pre-configured to show the parameters typically of greatest interest, but you can
customize the parameters to be displayed. Trending graphs and analog dials are featured on the Monitor window, as well as I/O
(if applicable), Data, and Parameters. Refer to the online help for more information about the Monitor View. A different window
has been designed for each family of Allen-Bradley products (PowerFlex® drives, SMC Flex soft starters, E3 Solid-state overload,
and others). If multiple network devices are associated with a single MCC unit, the Monitor View includes tabs to toggle
between the devices.
Publication MCC-UM001E-EN-P - March 2014
30
IntelliCENTER Software
View Different Parameters in the Monitor View
To view different parameters in the Monitor View, right-click the display (analog dials, trending graphs, data, or parameters),
choose Change Parameter Monitored, and then choose the new parameter from the pull-down menu.
IMPORTANT
Changes do not take effect until you click Apply on the Monitor dialog box. Changing parameters to be displayed in the analog
dials or trend graphs affects all other similar devices. That is, if the Monitor view of an E3 overload is changed to display Average
current, Ground Fault current, and Phase imbalance on the analog dials, all other E3 Monitor dialog boxes display the same
information.
Publication MCC-UM001E-EN-P - March 2014
IntelliCENTER Software
31
Change Parameter Values
To change the parameter value of those parameters that are editable (for example, changing FLA setting from 1.0…5.0 A), click
the text box associated with the Parameter Value to be changed and change it to the desired value by using the Edit Parameter
dialog box that appears.
IMPORTANT
The new value entered must be within the Min Value and Max Value displayed at the bottom of the Edit Parameter dialog box.
The Min and Max values are specific to the device and the parameter being changed. Click Apply in the Edit Parameter dialog box
to have the new value written to the device.
Publication MCC-UM001E-EN-P - March 2014
32
IntelliCENTER Software
Spreadsheet View
To access the Spreadsheet View, from the View menu, choose Spreadsheet or click the Spreadsheet
icon.
The Spreadsheet View is used for editing data that seldom changes. This includes node number, network, nameplate, and catalog
numbers. The data can be sorted. By choosing Show/Hide from the Edit menu, you can select the specific information to be
displayed. Additional columns are provided in case you want to add your own information, such as type of motor load. Refer to
the online help for more information about the Spreadsheet View.
Publication MCC-UM001E-EN-P - March 2014
IntelliCENTER Software
33
Event Log
To access the Event Log, from the View menu, choose Events, or click the Events
icon.
The Event Log is used to keep a history of changes (trip settings), parameter events (warnings, faults), equipment changes, or
other changes you would like to document. In addition to having the ability to manually log events, the software can create an
‘Auto Log’ of changes in the equipment parameters (trip settings, warnings, and faults). Additional columns are provided in case
you want to add your own information, such as a maintenance schedule. Refer to the online help for more details on the Event
Log.
Publication MCC-UM001E-EN-P - March 2014
34
IntelliCENTER Software
Electronic Documentation
IntelliCENTER software provides CAD drawings and user documentation for your IntelliCENTER MCC unit.
CAD Drawings
To access the CAD drawings, from the Documentation menu, choose Drawings. Select the unit and then the drawing to be
viewed, then double-click the drawing to launch the AutoCAD viewer. The one-line (if requested) and elevation drawings are on
the MCC level of the drawings view.
The one-line drawing (if requested), as-built wiring diagrams, and elevation drawing for the IntelliCENTER MCC are installed
via the IntelliCENTER software data disk. Anytime you need to view a CAD drawing, open the drawing in IntelliCENTER
software. Autodesk DWG TrueView, an AutoCAD viewer, is provided with the software to aid viewing of the drawings. In
addition, you can open and view your own CAD drawings. Refer to the online help for more information about viewing CAD
drawings.
Publication MCC-UM001E-EN-P - March 2014
IntelliCENTER Software
35
User Manuals
To access the user manuals, from the Documentation menu, choose Manuals. Select the unit and then the manual to be viewed,
then double-click the manual to launch the manual viewer.
All user manuals needed for the IntelliCENTER MCC are installed via the IntelliCENTER software data disk. The manuals
provided are specific to the IntelliCENTER MCC ordered, so there is no need to search through unnecessary information. Refer
to the online help for more information about viewing user manuals.
Publication MCC-UM001E-EN-P - March 2014
36
IntelliCENTER Software
Spare Parts
To access the spare parts list, from the Documentation menu, choose Spare Parts.
Use the spare parts list to quickly identify replacement parts. A list of spare parts is provided for each unit. The data can be sorted.
From the Edit menu, choose Show/Hide to select the specific information to view. Additional columns are provided in case you
want to add your own information, such as tool crib stack number. Refer to the online help for more information about the spare
parts list.
Additional Software Information
Additional information on the use and configuration of the software can be found in the online help. To access the online help,
from the Help menu, choose IntelliCENTER Help.
Publication MCC-UM001E-EN-P - March 2014
IntelliCENTER Software
37
ActiveX Controls
ActiveX controls are available in the IntelliCENTER software to interface the Elevation, Monitor, Spreadsheet, and Documents
views into HMI applications, such as FactoryTalk View SE and RSView® 32.
IMPORTANT
ActiveX Controls are used for monitoring purposes only. To change the configuration of the MCC lineup, a complete installation of
the IntelliCENTER software is needed.
From the Start menu, choose Programs > IntelliCENTER > IntelliCENTER Help for programming information on individual
controls.
Elevation ActiveX Control
This control provides a means of showing the elevation view to monitor the status of a lineup.
Monitor ActiveX Control
This control provides all the features of the standard Monitor View in the IntelliCENTER software. You can use it to view,
trend, and change parameters.
Documents ActiveX Controls
This control provides the ability to view drawings, manuals, spare parts, and events for a specific lineup or device.
Spreadsheet ActiveX Control
This control provides a way to view data for a single device or an entire lineup.
IntelliCENTER Software Integration Assistant
Integration Assistant, as part of IntelliCENTER software, lets you update other software project files such as Logix Designer
projects and FactoryTalk EnergyMetrix database.
Publication MCC-UM001E-EN-P - March 2014
38
IntelliCENTER Software
Integration Assistant for Logix5000 Software
Integration Assistant adds the devices in your MCC lineup to the controller I/O tree and gets the controller tags ready for
programming. The purpose of the tool is to save you time and energy of adding each device manually to the I/O tree via the
Logix5000™ application and get you ready for control programming as quickly as possible.
1. Choose Tools > Launch Integration Assistant > Logix 5000.
2. Select the project file (*.ACD) you want to update and click Update Project.
Publication MCC-UM001E-EN-P - March 2014
IntelliCENTER Software
39
3. Select an MCC lineup and one of its Ethernet networks to begin the mapping.
You must choose one of the device naming conventions:
• NameplateText_NetworkNumber_IPAddress - the unit nameplates are used to determine the device names in I/O tree
• DeviceType_NetworkNumber_IPAddress - the device type is used instead
4. Click Next.
You are prompted to add devices to the controller I/O tree in your project:
• The Ethernet Cards pull-down menu contains all the Ethernet cards in your project.
• The Available Devices dialog box lists the devices for the lineup/network which can be mapped.
Publication MCC-UM001E-EN-P - March 2014
40
IntelliCENTER Software
5. Add devices to the I/O tree.
a. Select the appropriate Ethernet card to which you'd like to add devices.
b. Next select the devices you'd like to add to that card.
c. Click > to add those devices to the Ethernet card's scanlist.
d. When done mapping, click Finish.
TIP
You can split the available devices to be mapped between different Ethernet cards.
You can select other networks and other lineups/networks to do more mapping.
6. When you are done mapping, click Update.
Publication MCC-UM001E-EN-P - March 2014
IntelliCENTER Software
IMPORTANT
41
When all the devices under a network have been mapped, the network appears dimmed and the Next button is disabled. When
all networks for a particular MCC Lineup have been mapped, the lineup also is dimmed.
When the update is successful, the tool launches the updated project, the devices have been added to the I/O tree, and the
controller tags are in place.
Integration Assistant for IntelliCENTER Energy
Please refer to Integration Assistant for IntelliCENTER Energy on page 44.
IntelliCENTER Energy
IntelliCENTER Energy is a premier software package with all the features of IntelliCENTER software plus additional Energy
Management benefits powered by FactoryTalk EnergyMetrix. IntelliCENTER Energy software provides the following:
• Real-time energy consumption and historical trending down to the device level
• Ability to monitor and manage energy usage for substantial cost savings
Install IntelliCENTER Energy
The installation CD for IntelliCENTER Energy contains FactoryTalk EnergyMetrix software version 2.0 SP1 and the required
software:
•
•
•
•
FactoryTalk Activation Manager V3.50
RSLinx Classic Lite 2.59 CPR 9 SR 3
Microsoft .NET Framework 3.5 SP1
Adobe Acrobat Reader 9.1
Publication MCC-UM001E-EN-P - March 2014
42
IntelliCENTER Software
TIP
We recommend, but do not require, that you install FactoryTalk EnergyMetrix software on a dedicated server with a local installation
of Microsoft SQL Server.
System Requirements
These minimum system requirements provide optimal operation of the FactoryTalk EnergyMetrix software:
• Server Software Requirements for Installing FactoryTalk EnergyMetrix Software
– Windows 2003 Server or Windows 2008 Server, Application Server role. Windows 2000 Server is not supported.
– Microsoft SQL Server 2005 or 2008, installed with mixed-mode authentication (Windows and SQL). TCP/IP
access must be enabled and IIS must be installed and setup. A system administrator SQL login must be used for the
FactoryTalk EnergyMetrix software installation.
– SQL Management Studio to create a user in order to install FactoryTalk EnergyMetrix software.
– You must have machine administrator privileges to install FactoryTalk EnergyMetrix software.
• Hardware Requirements - The database requires these minimum standards:
– 1.4 GHz or better Intel or Compatible Processor
– 2 GB RAM
– 160 GB hard disk (with separate disks for operating system and log files and RAID 5 for main database files
preferred)
These are general guidelines. FactoryTalk EnergyMetrix software is capable of running on a variety of hardware platforms. The
main scalability issue is related to processing of logged data (for example, report generation, trending). CPU speed, number of
CPUs, RAM, and RAID 5 for the database files are the main scalability factors (in that order). All hardware platforms require the
following:
–
–
–
–
–
Processor, RAM and hard drive as noted below
DVD drive
One or more Ethernet network ports
Internet access
Monitor, keyboard, pointing device (mouse)
For installation instructions please refer to the FactoryTalk EnergyMetrix User Manual, publication FTALK-UM001.
Install the IntelliCENTER Energy Data CDs
The IntelliCENTER Energy Data CD has two uses:
• Installing the databases and documentation needed for IntelliCENTER Software to display information for your MCC.
• Populating the IntelliCENTER Energy server with information about the devices in the MCC, when run from the
server.
Publication MCC-UM001E-EN-P - March 2014
IntelliCENTER Software
43
Follow these steps to run the IntelliCENTER Energy Data CD.
1. Close all programs.
2. Insert the IntelliCENTER Energy Data CD into your CD-ROM.
3. If Autorun is enabled on your computer, the installation starts automatically and you can skip steps 4 and 5.
4. From the Start menu, choose Run.
5. Type D:\Setup.exe (substitute the appropriate letter of your CD-ROM drive for D) and click OK.
The IntelliCENTER Energy Data CD determines if it is being run from an IntelliCENTER Energy server machine. If
the machine is an IntelliCENTER Energy server, then the Integration Assistant for IntelliCENTER Energy runs. For
information on how to use Integration Assistant refer to Integration Assistant for IntelliCENTER Energy.
TIP
If the machine is not an IntelliCENTER Energy server, refer to Installing IntelliCENTER Software Data Disks on page 11.
• After the Integration Assistant is completed, the EDS files is registered on the machine.
• IntelliCENTER Energy is now populated for the devices in your MCC.
• At this point, you are prompted whether you would like to install the IntelliCENTER Software Data CD as well
(databases and documentation). If you do, then refer to Installing IntelliCENTER Software Data Disks on page 11.
Publication MCC-UM001E-EN-P - March 2014
44
IntelliCENTER Software
Integration Assistant for IntelliCENTER Energy
Integration Assistant is used to populate the FactoryTalk EnergyMetrix server with the device of the MCC. This can be done
from either the server or the client machine.
Running Integration Assistant from the Server
Follow these steps to run Integration Assistant to populate the FactoryTalk EnergyMetrix server from the server.
1. To launch the Integration Assistant from within IntelliCENTER Software, choose Tools > Launch Integration Assistant
> FactoryTalk EnergyMetrix to launch the IntelliCENTER Integration Assistant.
2. From the pull-down menu, select the MCC lineup you are using to populate the FactoryTalk EnergyMetrix server.
Publication MCC-UM001E-EN-P - March 2014
IntelliCENTER Software
45
3. Choose a naming convention and click Next.
You must choose one of the device naming conventions:
• NameplateText_NetworkNumber_IPAddress - the unit nameplates are used to determine the device names in I/O tree
• DeviceType_NetworkNumber_IPAddress - the device type is used instead
4. Select the path for each network within the MCC Lineup.
5. Click RSWho.
This opens a new dialog box where the network can be selected.
Publication MCC-UM001E-EN-P - March 2014
46
IntelliCENTER Software
6. Verify the correct path is set and click Next.
You are prompted to provide the login information for the database.
7. Since we are running the populator from the server, select Windows Authentication from the Authentication Mode
pull-down menu and click Finish.
A dialog box opens indicating that the lineup was successfully added.
8. Click OK.
Publication MCC-UM001E-EN-P - March 2014
IntelliCENTER Software
47
Running Integration Assistant from the Client
You have to select the path that the server uses to access the devices. This can be done in two ways:
• By using the RSLinx Classic Backup Restore Utility
• By using the Network Path
Option 1: Use the RSLinx Classic Backup Restore Utility
Follow these steps to populate the server from the client by using the RSLinx Classic Backup Restore Utility.
1. On the server computer, choose Start > Programs > Rockwell Software > RSLinx > RSLinx Classic Backup Restore
Utility.
2. Click Backup.
The RSLinx Classic Backup Restore Utility saves the current RSLinx configuration of the server machine as an .rsx file.
IMPORTANT
For this to work properly, the client computer should be able to access the same devices on the same networks as the server.
3. Transfer the .rsx configuration file to the client computer.
4. Choose Start > Programs > Rockwell Software > RSLinx > RSLinx Classic Backup Restore Utility.
5. Click Restore.
6. After successfully running the RSLinx Classic Backup Restore utility you must browse the networks by using RSWho in
RSLinx software.
7. Start IntelliCENTER software.
Publication MCC-UM001E-EN-P - March 2014
48
IntelliCENTER Software
8. Choose Tools > Launch Integration Assistant > FactoryTalk EnergyMetrix to launch the IntelliCENTER Integration
Assistant.
9. From the pull-down menu, select the MCC lineup you are using to populate the FactoryTalk EnergyMetrix server.
10. Choose a naming convention and click Next.
You must choose one of the device naming conventions:
• NameplateText_NetworkNumber_IPAddress - the unit nameplates are used to determine the device names in I/O tree
• DeviceType_NetworkNumber_IPAddress - the device type is used instead
Publication MCC-UM001E-EN-P - March 2014
IntelliCENTER Software
49
11. Select the appropriate network path by using the RSWho button in the IntelliCENTER Integration Assistant
FactoryTalk EnergyMetrix wizard.
12. Click Next.
After entering the right network path you are prompted to enter the login information for the EnergyMetrix Database.
13. Change the Authentication Mode to ‘SQL Server Authentication’ and make sure the SQL Server Name matches the
name of the FactoryTalk EnergyMetrix Database.
14. Enter the User Name and Password required to access the FactoryTalk EnergyMetrix database and click Finish to
proceed.
TIP
If the wizard is being run from the client, it is important to verify that the server has been configured to allow the
configuration:
• The firewall/virus protection program should allow for user to connect to database. In the case of Symantec protection,
this would mean disabling ‘Network Threat Protection’ and possibly ‘Proactive Threat Protection’.
• The ‘SQL Server Browser’ service must be started on the server. This can be enabled by going to Control Panel >
Administrative Tools > Services and starting the service.
Publication MCC-UM001E-EN-P - March 2014
50
IntelliCENTER Software
Option 2: Use Network Path
1. Choose Tools > Launch Integration Assistant > FactoryTalk EnergyMetrix to launch the IntelliCENTER Integration
Assistant.
2. From the pull-down menu, select the MCC lineup you are using to populate the FactoryTalk EnergyMetrix server.
3. Choose a naming convention and click Next.
You must choose one of the device naming conventions:
• NameplateText_NetworkNumber_IPAddress - the unit nameplates are used to determine the device names in I/O tree
• DeviceType_NetworkNumber_IPAddress - the device type is used instead
4. Identify the network path used on the server and type it into ‘Network: 1’ address instead of using RSWho.
This way the user can enter the network path in directly.
For more information on how to determine the network path please see Chapter 4 of the FactoryTalk EnergyMetrix User
Manual, publication FTALK-UM001. The sub-heading of the section is ‘Device Communication Setup’.
Publication MCC-UM001E-EN-P - March 2014
IntelliCENTER Software
51
5. Click Next.
After entering the right network path you are prompted to enter the login information for the EnergyMetrix Database.
6. Change the Authentication Mode to ‘SQL Server Authentication’ and make sure the SQL Server Name matches the
name of the FactoryTalk EnergyMetrix Database.
7. Enter the User Name and Password required to access the FactoryTalk EnergyMetrix database and click Finish to
proceed.
TIP
If the wizard is being run from the client, it is important to verify that the server has been configured to allow the
configuration:
• The firewall/virus protection program should allow for user to connect to database. In the case of Symantec protection,
this would mean disabling ‘Network Threat Protection’ and possibly ‘Proactive Threat Protection’.
• The ‘SQL Server Browser’ service must be started on the server. This can be enabled by going to Control Panel >
Administrative Tools > Services and starting the service.
Publication MCC-UM001E-EN-P - March 2014
52
IntelliCENTER Software
IntelliCENTER Energy Views
The IntelliCENTER Energy software allows real-time monitoring information to be displayed in the various IntelliCENTER
software dialog boxes. You can choose to view Calendar Trends, Trends, Meter Data, and Device Setup.
From the Elevation View, right-click on an applicable device and select the view from the menu.
Publication MCC-UM001E-EN-P - March 2014
IntelliCENTER Software
53
IntelliCENTER Energy Calendar Trend
This screen shows how the value of a meter tag or value type you select varies over a full month. You can select the meter tag to
display from the pull-down menu.
To zoom in to a day, click on the day in the calendar. You can overlay days by selecting additional days from the small calendar
under the zoomed display.
Publication MCC-UM001E-EN-P - March 2014
54
IntelliCENTER Software
IntelliCENTER Energy Trend
This screen lets you select and view tags as their values vary by time. You can select up to five tags to be displayed. Each pen can be
individually selected to be displayed as a line chart or bar chart. The user time zone is selected by default. You can select a
different time zone for the trend and the start and end dates from the calendars. Or, enter start and end dates into the date fields
and click the Go button. One day is the minimum trend period. If you select an end date earlier than the start date, the system
adjusts the start date, and vice versa.
Publication MCC-UM001E-EN-P - March 2014
IntelliCENTER Software
55
IntelliCENTER Energy Meter Data
This screen lets you view the logged meter data for the device selected. The display is arranged by log rate. The user time zone is
selected by default. Controls let you select the desired date, scroll up and down through the data, and page backward and forward
through the meter data.
Publication MCC-UM001E-EN-P - March 2014
56
IntelliCENTER Software
IntelliCENTER Energy Device Setup
The Device Setup Screen lets you modify the devices added into the FactoryTalk EnergyMetrix Server.
Your Support Plan
Software support for 12 months is included in the purchase price of IntelliCENTER software. During this term, you are entitled
to telephone support.
Change of Registration
If you transfer the software to another party, you are required to complete the form at
http://www.software.rockwell.com/support/regtrns/. Select Transfer Software Registration on the left to view the form.
The products you transferred are re-registered to the new owner for support updates and other services.
Product Updates
IntelliCENTER software updates are provided at no charge to users of registered software under a support contract. You can
verify that you have the most recent major version release of your software product by visiting
http://www.rockwellautomation.com/support/pcdc.page, then choosing Get Downloads > Find Product Downloads.
Otherwise, you can contact IntelliCENTER Support Services at (440) 646-5800. You are entitled to available updates as long as
you remain in a TechConnect contract.
Publication MCC-UM001E-EN-P - March 2014
IntelliCENTER Software
57
If the update you need is not available on the Web or if you do not have Web access, contact IntelliCENTER Support Services to
request a product update.
IntelliCENTER Support Services
Phone: (440) 646-5800
FAX: (414) 382-0505
email: [email protected]
Receiving Major Updates
You receive major updates if you have registered software that is under a TechConnect contract when a significant release occurs.
To download the most recent version of IntelliCENTER software, visit the Rockwell Automation Software Update Internet site
at http://support.automation.rockwell.com/webupdates/. You can download many product updates directly from the website.
You are required to provide your serial number.
Service Packs
Service packs are available by visiting http://www.rockwellautomation.com/support/pcdc.page, then choosing Get Downloads
> Find Product Downloads. Then search for the product by name. The search result lists all major versions and service packs.
The service packs are freely available to everyone.
Publication MCC-UM001E-EN-P - March 2014
58
IntelliCENTER Software
Notes:
Publication MCC-UM001E-EN-P - March 2014
IntelliCENTER Software
59
Notes:
Publication MCC-UM001E-EN-P - March 2014
Rockwell Automation Support
Rockwell Automation provides technical information on the Web to assist you in using its products.
At http://www.rockwellautomation.com/support/, you can find technical manuals, a knowledge base of FAQs, technical and application
notes, sample code and links to software service packs, and a MySupport feature that you can customize to make the best use of these tools.
For an additional level of technical phone support for installation, configuration and troubleshooting, we offer TechConnect support
programs. For more information, contact your local distributor or Rockwell Automation representative,
or visit http://www.rockwellautomation.com/support/.
Installation Assistance
If you experience a problem within the first 24 hours of installation, please review the information that's contained in this manual. You can
also contact a special Customer Support number for initial help in getting your product up and running.
United States or
Canada
1.440.646.3434
Outside United States Use the Worldwide Locator at http://www.rockwellautomation.com/support/
or Canada
americas/phone_en.html, or contact your local Rockwell Automation
representative.
New Product Satisfaction Return
Rockwell Automation tests all of its products to ensure that they are fully operational when shipped from the manufacturing facility.
However, if your product is not functioning and needs to be returned, follow these procedures.
United States
Contact your distributor. You must provide a Customer Support case number (call
the phone number above to obtain one) to your distributor to complete the return
process.
Outside United States Please contact your local Rockwell Automation representative for the return
procedure.
Documentation Feedback
Your comments help us serve your documentation needs better. If you have any suggestions on how to improve this
document, complete this form, publication RA-DU002, available at http://www.rockwellautomation.com/literature.
Publication MCC-UM001E-EN-P - March 2014
Supersedes PublicationMCC-UM001D-EN-P - November 2012
PN-245228
Copyright ©2014 Rockwell Automation, Inc. All Rights Reserved. Printed in USA.