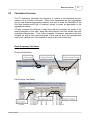
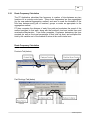
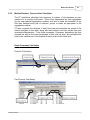
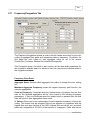
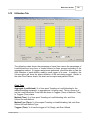
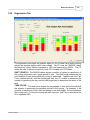
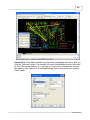
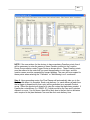
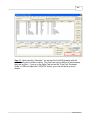
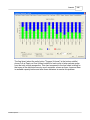
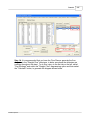
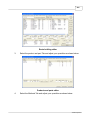
1
Flow Planner Help
© 2006 Proplanner
2
1
Proplanner FlowPlanner
Help Version 2.0
Proplanner Copyright 2006
© 2006 Proplanner
Proplanner FlowPlanner
2
Table of Contents
Introduction
Getting Started
Preparing the drawing
Preparing the routing
Conducting the analysis
Reference Section
Aggregation Methods
Calculation Formulas
Route Frequency Calculation
Method Distance, Time and Cost Calculation
Routings Tab
Main controls
Calculate
Results
Routing Editor Controls
Editor Controls
Route Format
Products Tab
Products
Parts
Locations Tab
Location Table
Group Table
Define Location
Location Text
Paths Tab
Aggregated Paths List Group
Editing Commands in Bottom right of screen
Aisle Paths
Path Thickness
Path Arrows
Path Labels
Methods Tab
Methods Format
Method Type's Format
Editing
Processes Tab
Containers Tab
Filter Tab
Frequency/Congestion Tab
Frequency Color Scale
© 2006 Proplanner
3
4
Congestion
Utilization Tab
Tuggers Tab
Ergonomics Tab
Reports Tab
Flow Report
Legend
Methods Report
Report Settings
Licensing/Settings Tab
Tutorial
Hydra Pumps Example
Tugger add-on Tutorial
Exercises
How To Guide
Troubleshooting
Appendix
Application Limitations
Application Layers
Input File Format
Sample Routing File (Hydra Pumps.csv)
Sample Product/Parts File (Hydra Pumps.prd)
Sample Methods/Processes/Containers File (Hydra Pumps.mhe)
Sample Locations/Groups File (Hydra Pumps.loc)
Sample Paths File (Hydra Pumps.pth)
Sample Tugger Delivery File (Hydra Pumps Tugger.csv)
© 2006 Proplanner
Table of Contents
3
5
Introduction
The Flow Planner (FP) is an application used by industrial and manufacturing
engineers to evaluate material flow in industrial facilities in order to identify and
reduce the waste associated with materials handling. The FP diagrams, charts and
computes detailed flow information within specific layers in an AutoCAD layout
drawing. Flow diagrams can be generated in a straight-line or aisle-path route and
can be aggregated according to trip frequency in many different ways (called
aggregations).
The FP is tightly integrated with the AutoCAD application. As such, two versions of
the FP exist (stand-alone and add-on). These two FP versions are identical in
functionality, except that the stand-alone version incorporates the AutoCAD engine
inside of the application. The AutoCAD engine provided with the stand-alone
application does not have all of the features of the full AutoCAD license and is more
similar to that of the AutoCAD LT license. The add-on version links to a
user-provided AutoCAD license and essentially enhances that license with the
capabilities provided by the FP.
The FP application requires a license code (provided by your Proplanner sales
person) in order to operate fully. Without the license code, the FP will default into
Evaluation mode whereby only the Hydra Pumps.csv input routing files will be
accepted.
To use the FP add-on application you must have a version of AutoCAD, ADT, or
Mechanical Desktop (Supported versions of these are found in the README.TXT
file located on the installation CD) loaded on your computer, and you must provide
the serial number of this application to your Proplanner sales representative in order
to get your FP license code.
© 2006 Proplanner
6
4
Getting Started
Getting Started - Starting from Scratch
When starting from scratch, it is best to first start by loading a drawing of your factory
and preparing it for analysis.
Preparing the drawing
The FP can work in either Engineering (Foot-Inch) or Decimal (Metric) units. By
default, the application will assume that if your drawing is set to Engineering units
(Done with the Units command in AutoCAD) that your base unit is 1 inch in size. If
your drawing is set to Decimal units, then Proplanner will assume that your base
drawing unit is 1 millimeter. Once the FP is running, you can reset your default base
units (to either Inches, Millimeters or Meters) if these defaults are incorrect.
AutoCAD Note: Remember that if you use the AutoCAD UNITS command to
change your drawing units, that you will also probably need to set your drawing limits
(size) by using the AutoCAD LIMITS command. You will then need to follow the
limits command with the ZOOM ALL command in order to ensure that you are
viewing the entire work area.
Since the FP reads the distance from your drawing, it is important that the drawing is
created in actual size. This means that if the distance between a table and a box is
3’6” in the real world then the drawing needs to be created such that the table is 42
base units from the box (in foot-inch units of course).
The drawing does not need to be highly detailed for the FP to work. Essentially, the
drawing needs to contain enough detail that the FP user can determine where
locations specified in the operator routing would be located within the workplace.
Preparing the routing
The flow routings can be defined in another application (such as MS Excel) and
imported into the FP, or the routings can be defined within the FP application. If you
wish to create your routing file in MS Excel, it is best to first import the sample Hydra
Pump.csv file into Excel and modify it in an effort to ensure that the file format is
correct. Documentation on the format of each field in this file can be found in the
appendix of this manual. You may also define a flow routing within the FP by Adding
and Inserting lines within the routing editor.
Conducting the analysis
Now that your drawing is drawn to actual scale and your routing has been created,
© 2006 Proplanner
Getting Started
7
you are ready to select the Calc command on the main routings window. Calc will
create your locations, methods, method types, and container for you and will also
ensure that all locations (From and To) specified in the routings are actually located
within your drawing. If any routing locations are missing, the FP will prompt you to
locate those within the drawing. Once all of the locations have been specified, the
FP will update the Paths listing with the computed times and distance, and then will
compute the summary distance, time and travel information in the results window
and on the Utilization and Ergonomics Charts.
Selecting the “Save As” button will save your results out to a file. The routing data,
method/processes/containers data, products/parts data and results data are all
stored in separate files. These files are all simple comma-delimited text files that are
easy to import into a word processor or spreadsheet.
You may right click in the list windows or on the chart to copy the information to other
applications such as Word, Excel and PowerPoint. Future versions of the FP will
have advanced reporting capabilities.
© 2006 Proplanner
8
4.1
Preparing the Drawing
Getting Started - Starting from Scratch
When starting from scratch, it is best to first start by loading a drawing of your factory
and preparing it for analysis.
Preparing the drawing
The FP can work in either Engineering (Foot-Inch) or Decimal (Metric) units. By
default, the application will assume that if your drawing is set to Engineering units
(Done with the Units command in AutoCAD) that your base unit is 1 inch in size. If
your drawing is set to Decimal units, then Proplanner will assume that your base
drawing unit is 1 millimeter. Once the FP is running, you can reset your default base
units (to either Inches, Millimeters or Meters) if these defaults are incorrect.
AutoCAD Note: Remember that if you use the AutoCAD UNITS command to
change your drawing units, that you will also probably need to set your drawing limits
(size) by using the AutoCAD LIMITS command. You will then need to follow the
limits command with the ZOOM ALL command in order to ensure that you are
viewing the entire work area.
Since the FP reads the distance from your drawing, it is important that the drawing is
created in actual size. This means that if the distance between a table and a box is
3’6” in the real world then the drawing needs to be created such that the table is 42
base units from the box (in foot-inch units of course).
The drawing does not need to be highly detailed for the FP to work. Essentially, the
drawing needs to contain enough detail that the FP user can determine where
locations specified in the operator routing would be located within the workplace.
Preparing the routing
The flow routings can be defined in another application (such as MS Excel) and
imported into the FP, or the routings can be defined within the FP application. If you
wish to create your routing file in MS Excel, it is best to first import the sample Hydra
Pump.csv file into Excel and modify it in an effort to ensure that the file format is
correct. Documentation on the format of each field in this file can be found in the
appendix of this manual. You may also define a flow routing within the FP by Adding
and Inserting lines within the routing editor.
Conducting the analysis
Now that your drawing is drawn to actual scale and your routing has been created,
you are ready to select the Calc command on the main routings window. Calc will
© 2006 Proplanner
Getting Started
9
create your locations, methods, method types, and container for you and will also
ensure that all locations (From and To) specified in the routings are actually located
within your drawing. If any routing locations are missing, the FP will prompt you to
locate those within the drawing. Once all of the locations have been specified, the
FP will update the Paths listing with the computed times and distance, and then will
compute the summary distance, time and travel information in the results window
and on the Utilization and Ergonomics Charts.
Selecting the “Save As” button will save your results out to a file. The routing data,
method/processes/containers data, products/parts data and results data are all
stored in separate files. These files are all simple comma-delimited text files that are
easy to import into a word processor or spreadsheet.
You may right click in the list windows or on the chart to copy the information to other
applications such as Word, Excel and PowerPoint. Future versions of the FP will
have advanced reporting capabilities.
© 2006 Proplanner
10
4.2
Preparing the Routing
Getting Started - Starting from Scratch
When starting from scratch, it is best to first start by loading a drawing of your factory
and preparing it for analysis.
Preparing the drawing
The FP can work in either Engineering (Foot-Inch) or Decimal (Metric) units. By
default, the application will assume that if your drawing is set to Engineering units
(Done with the Units command in AutoCAD) that your base unit is 1 inch in size. If
your drawing is set to Decimal units, then Proplanner will assume that your base
drawing unit is 1 millimeter. Once the FP is running, you can reset your default base
units (to either Inches, Millimeters or Meters) if these defaults are incorrect.
AutoCAD Note: Remember that if you use the AutoCAD UNITS command to
change your drawing units, that you will also probably need to set your drawing limits
(size) by using the AutoCAD LIMITS command. You will then need to follow the
limits command with the ZOOM ALL command in order to ensure that you are
viewing the entire work area.
Since the FP reads the distance from your drawing, it is important that the drawing is
created in actual size. This means that if the distance between a table and a box is
3’6” in the real world then the drawing needs to be created such that the table is 42
base units from the box (in foot-inch units of course).
The drawing does not need to be highly detailed for the FP to work. Essentially, the
drawing needs to contain enough detail that the FP user can determine where
locations specified in the operator routing would be located within the workplace.
Preparing the routing
The flow routings can be defined in another application (such as MS Excel) and
imported into the FP, or the routings can be defined within the FP application. If you
wish to create your routing file in MS Excel, it is best to first import the sample Hydra
Pump.csv file into Excel and modify it in an effort to ensure that the file format is
correct. Documentation on the format of each field in this file can be found in the
appendix of this manual. You may also define a flow routing within the FP by Adding
and Inserting lines within the routing editor.
Conducting the analysis
Now that your drawing is drawn to actual scale and your routing has been created,
you are ready to select the Calc command on the main routings window. Calc will
© 2006 Proplanner
Getting Started
11
create your locations, methods, method types, and container for you and will also
ensure that all locations (From and To) specified in the routings are actually located
within your drawing. If any routing locations are missing, the FP will prompt you to
locate those within the drawing. Once all of the locations have been specified, the
FP will update the Paths listing with the computed times and distance, and then will
compute the summary distance, time and travel information in the results window
and on the Utilization and Ergonomics Charts.
Selecting the “Save As” button will save your results out to a file. The routing data,
method/processes/containers data, products/parts data and results data are all
stored in separate files. These files are all simple comma-delimited text files that are
easy to import into a word processor or spreadsheet.
You may right click in the list windows or on the chart to copy the information to other
applications such as Word, Excel and PowerPoint. Future versions of the FP will
have advanced reporting capabilities.
© 2006 Proplanner
12
4.3
Conducting the analysis
Getting Started - Starting from Scratch
When starting from scratch, it is best to first start by loading a drawing of your factory
and preparing it for analysis.
Preparing the drawing
The FP can work in either Engineering (Foot-Inch) or Decimal (Metric) units. By
default, the application will assume that if your drawing is set to Engineering units
(Done with the Units command in AutoCAD) that your base unit is 1 inch in size. If
your drawing is set to Decimal units, then Proplanner will assume that your base
drawing unit is 1 millimeter. Once the FP is running, you can reset your default base
units (to either Inches, Millimeters or Meters) if these defaults are incorrect.
AutoCAD Note: Remember that if you use the AutoCAD UNITS command to
change your drawing units, that you will also probably need to set your drawing limits
(size) by using the AutoCAD LIMITS command. You will then need to follow the
limits command with the ZOOM ALL command in order to ensure that you are
viewing the entire work area.
Since the FP reads the distance from your drawing, it is important that the drawing is
created in actual size. This means that if the distance between a table and a box is
3’6” in the real world then the drawing needs to be created such that the table is 42
base units from the box (in foot-inch units of course).
The drawing does not need to be highly detailed for the FP to work. Essentially, the
drawing needs to contain enough detail that the FP user can determine where
locations specified in the operator routing would be located within the workplace.
Preparing the routing
The flow routings can be defined in another application (such as MS Excel) and
imported into the FP, or the routings can be defined within the FP application. If you
wish to create your routing file in MS Excel, it is best to first import the sample Hydra
Pump.csv file into Excel and modify it in an effort to ensure that the file format is
correct. Documentation on the format of each field in this file can be found in the
appendix of this manual. You may also define a flow routing within the FP by Adding
and Inserting lines within the routing editor.
Conducting the analysis
Now that your drawing is drawn to actual scale and your routing has been created,
you are ready to select the Calc command on the main routings window. Calc will
© 2006 Proplanner
Getting Started
13
create your locations, methods, method types, and container for you and will also
ensure that all locations (From and To) specified in the routings are actually located
within your drawing. If any routing locations are missing, the FP will prompt you to
locate those within the drawing. Once all of the locations have been specified, the
FP will update the Paths listing with the computed times and distance, and then will
compute the summary distance, time and travel information in the results window
and on the Utilization and Ergonomics Charts.
Selecting the “Save As” button will save your results out to a file. The routing data,
method/processes/containers data, products/parts data and results data are all
stored in separate files. These files are all simple comma-delimited text files that are
easy to import into a word processor or spreadsheet.
You may right click in the list windows or on the chart to copy the information to other
applications such as Word, Excel and PowerPoint. Future versions of the FP will
have advanced reporting capabilities.
© 2006 Proplanner
14
5
Reference Section
This section explains in detail the functioning of each tab control associated with Flow
Planner.
Aggregation Methods
Calculation Formulas
Routings Tab
Products tab
Locations Tab
Paths Tab
Methods Tab
Processes Tab
Containers Tab
Filter Tab
Frequency/Congestion Tab
Utilization Tab
Ergonomics Tab
Reports Tab
Licensing/Settings Tab
© 2006 Proplanner
Reference Section
5.1
15
Aggregation Methods
The FP application allows you to generate flow diagrams with frequency (line width)
summaries using 9 different aggregation (grouping) methods. Each of these
aggregations can be generated with the Calc command, and once created, can be
viewed in the Paths tab by selecting the aggregation name from the top-left
pull-down list box. Once the paths are generated by the calc command, their
frequency, distance, origin, destination, and method properties are encoded within
the poylines in AutoCAD. As such, you can run the FP in subsequent sessions and
view, query, filter, scale and color-code these paths without needing to reload the
routings file and recalculating the analysis.
None– No aggregation is used.
Congestion – Aggregates all flows between each aisle network node (every
aisle path segment). Color is assigned in the Frequency/Congestion tab.
Product – Aggregates all flows between a From and To (or Via) location for
all part routings within a product. Thus the frequency of flow From a Location
to another Location represents all of the part flows between those locations
for each product shown. Color is assigned to each unique Product in the
Products/Parts tab.
Part – Aggregates all flows between a From and To (or Via) location for all
unique Parts routings within all products. Thus the frequency of flow From a
Location to another Location represents all of the part flows between those
locations for each a uniquely named Part regardless of the product it is under.
Color is assigned to each unique Part by the Part color in the Products/Parts
tab. If the same part name is found under multiple products, then the color for
the last referenced part name is used.
Product&Part– Aggregates all flows between a From and To (or Via) location
for all unique Parts routings within each Product. Thus the frequency of flow
From a Location to another Location represents all of the part flows between
© 2006 Proplanner
16
those locations for each unique Part in each unique Product. Colors are
assigned to each unique Product&Part pair by the Part color in the
Products/Parts tab.
Method – Aggregates all flows between a From and To (or Via) location for all
part routings that reference a unique move Method. Thus the frequency of
flow From a Location to another Location represents all of the part flows
between those locations for each unique Method used between those
locations. Colors are assigned to each unique method in the Methods tab.
Method Type – Aggregates all flows between a From and To (or Via) location
for all part routings that reference a unique move Method Type. Thus the
frequency of flow From a Location to another Location represents all of the
part flows between those locations for each unique Method Type used
between those locations. Colors are assigned to each unique method type in
the Methods tab.
From-To Loc – Aggregates all flows between a From and To (or Via) location
for all part routings. Thus the frequency of flow From a Location to another
Location represents all of the part flows between those locations for all parts,
products, methods, method types and containers. Colors are assigned to
each unique From-To Location pair based upon the color assigned to the
Group that is referenced by the From location in the Locations tab.
From-To Group – Aggregates all flows between a From and To (or Via)
location for all part routings within a product. Thus the frequency of flow From
a Location to another Location represents all of the part flows between those
locations for each product shown. Colors are assigned to each unique
From-To Group pair based upon the color assigned to the From Group in the
Locations tab.
Container – Aggregates all flows between a From and To (or Via) location for
all part routings that reference each unique container. Thus the frequency of
flow From a Location to another Location represents all of the part flows
between those locations for each container type moved between those
locations. Color is assigned to each unique Container in the Containers tab.
© 2006 Proplanner
Reference Section
5.2
17
Calculation Formulas
The FP Application calculates flow frequency in number of trips between any two
locations on a route-by-route basis. These route frequencies are then aggregated
(by the user-selected aggregation method) and used to scale the thickness of the
flow lines between every pair of locations, groups or nodes as appropriate to the
aggregation method.
FP then computes the distance of each flow path and evaluates the speed of the
method assigned to that path, along with that method’s load and unload time and
acceleration/deceleration. From these properties, Proplanner determines the time
required (as well as the travel percentage of that total trip time) and multiplies this
time by the variable cost of the method to arrive at the route’s travel cost.
Route Frequency Calculation
Products Tab (below)
Part Routings Tab (below)
© 2006 Proplanner
18
Route Frequency Parameters
·
RF - Route Frequency
·
PQ - Product Quantity
·
PPP - Parts Per Product
·
PU - Part Use %
·
PF - Route Flow %
·
CPT - Containers Per Trip
·
PPC - Parts Per Container
RF = (PQ * PPP * PU * PF) / (CPT * PPC)
Method Distance, Time and Cost Calculation
Paths Tab (below)
Methods Tab – Methods List (below)
Methods Tab - Method Types List (below)
© 2006 Proplanner
Reference Section
19
Method Distance, Time and Cost Parameters
·
LT – Load Time
·
UT – Unload Time
·
Q – Quantity of Method Type
·
EF – Effective %
·
MM – Maximum Minutes Available per time period
·
FC – Fixed Cost per Method Type
·
VC – Variable Cost per Hour
·
D – Path Distance (Calculated from ACAD unless a user specified dist exists)
·
T – Total Path time (Travel plus Load plus Unload)
·
SS – Straight Speed
·
TS – Turn Speed
·
TA – Turn Angle
·
TT – Path Travel Time
·
TC – Total Method Type Cost
·
TM – Total Method Type Minutes
(Simplified version without Accel/Decel) TT = (D / EF) / SS
T = TT+UT+LT
Q = Round Up(TM / MM)
TC = (FC * Q) + Paths Summation(T) * VC
© 2006 Proplanner
20
5.2.1
Route Frequency Calculation
The FP Application calculates flow frequency in number of trips between any two
locations on a route-by-route basis. These route frequencies are then aggregated
(by the user-selected aggregation method) and used to scale the thickness of the
flow lines between every pair of locations, groups or nodes as appropriate to the
aggregation method.
FP then computes the distance of each flow path and evaluates the speed of the
method assigned to that path, along with that method’s load and unload time and
acceleration/deceleration. From these properties, Proplanner determines the time
required (as well as the travel percentage of that total trip time) and multiplies this
time by the variable cost of the method to arrive at the route’s travel cost.
Route Frequency Calculation
Products Tab (below)
Part Routings Tab (below)
© 2006 Proplanner
Reference Section
Route Frequency Parameters
·
RF - Route Frequency
·
PQ - Product Quantity
·
PPP - Parts Per Product
·
PU - Part Use %
·
PF - Route Flow %
·
CPT - Containers Per Trip
·
PPC - Parts Per Container
RF = (PQ * PPP * PU * PF) / (CPT * PPC)
Method Distance, Time and Cost Calculation
Paths Tab (below)
Methods Tab – Methods List (below)
Methods Tab - Method Types List (below)
© 2006 Proplanner
21
22
Method Distance, Time and Cost Parameters
·
LT – Load Time
·
UT – Unload Time
·
Q – Quantity of Method Type
·
EF – Effective %
·
MM – Maximum Minutes Available per time period
·
FC – Fixed Cost per Method Type
·
VC – Variable Cost per Hour
·
D – Path Distance (Calculated from ACAD unless a user specified dist exists)
·
T – Total Path time (Travel plus Load plus Unload)
·
SS – Straight Speed
·
TS – Turn Speed
·
TA – Turn Angle
·
TT – Path Travel Time
·
TC – Total Method Type Cost
·
TM – Total Method Type Minutes
(Simplified version without Accel/Decel) TT = (D / EF) / SS
T = TT+UT+LT
Q = Round Up(TM / MM)
TC = (FC * Q) + Paths Summation(T) * VC
© 2006 Proplanner
Reference Section
5.2.2
23
Method Distance, Time and Cost Calculation
The FP Application calculates flow frequency in number of trips between any two
locations on a route-by-route basis. These route frequencies are then aggregated
(by the user-selected aggregation method) and used to scale the thickness of the
flow lines between every pair of locations, groups or nodes as appropriate to the
aggregation method.
FP then computes the distance of each flow path and evaluates the speed of the
method assigned to that path, along with that method’s load and unload time and
acceleration/deceleration. From these properties, Proplanner determines the time
required (as well as the travel percentage of that total trip time) and multiplies this
time by the variable cost of the method to arrive at the route’s travel cost.
Route Frequency Calculation
Products Tab (below)
Part Routings Tab (below)
© 2006 Proplanner
24
Route Frequency Parameters
·
RF - Route Frequency
·
PQ - Product Quantity
·
PPP - Parts Per Product
·
PU - Part Use %
·
PF - Route Flow %
·
CPT - Containers Per Trip
·
PPC - Parts Per Container
RF = (PQ * PPP * PU * PF) / (CPT * PPC)
Method Distance, Time and Cost Calculation
Paths Tab (below)
Methods Tab – Methods List (below)
Methods Tab - Method Types List (below)
© 2006 Proplanner
Reference Section
25
Method Distance, Time and Cost Parameters
·
LT – Load Time
·
UT – Unload Time
·
Q – Quantity of Method Type
·
EF – Effective %
·
MM – Maximum Minutes Available per time period
·
FC – Fixed Cost per Method Type
·
VC – Variable Cost per Hour
·
D – Path Distance (Calculated from ACAD unless a user specified dist exists)
·
T – Total Path time (Travel plus Load plus Unload)
·
SS – Straight Speed
·
TS – Turn Speed
·
TA – Turn Angle
·
TT – Path Travel Time
·
TC – Total Method Type Cost
·
TM – Total Method Type Minutes
(Simplified version without Accel/Decel) TT = (D / EF) / SS
T = TT+UT+LT
Q = Round Up(TM / MM)
TC = (FC * Q) + Paths Summation(T) * VC
© 2006 Proplanner
26
5.3
Routings Tab
The routings tab is the main window of the FP interface. In this window, you can
Import, Save, and calculate your studies, as well as enter and edit part routings.
Flow routings are organized by Product names, which do not need to be actual
products, but could instead be main flow path groupings. In each Product (flow
grouping) you could have many parts (sub flow groupings) with multiple from-to and
via location routings.
Product names are entered, or selected, in the top left combo box (showing
Small_Pump). Once a name is entered, or selected, the associated Part routings for
that Product selection will be shown in the main routings list view below. Routings
may be added, removed or updated with the editing controls located in the
middle-right of the screen.
© 2006 Proplanner
Reference Section
27
Main Controls
File Open: Loads the routing file into the routing editor and reads the drawing for
locations referenced by the routing.
The routing file is a comma-delimited text file with a .csv extension. This file can be
originally authored in the FP application or imported from an external application,
such as MS Excel. The format to this main routing file is shown in the Appendix.
The routing file must be created in a contiguous manner with respect to the Product
names (the first field of each line in the file). This means that all routings for a
particular Product must be located together in the file. Future versions of the FP
application will correct for this limitation.
At a minimum you need only create the routing file, as the FP application will create
the information contained within the Products/Parts, Methods/Processes/Containers
and Locations/Groups files automatically. Once these files are created, you will want
to save them in order to record any changes that you have made. Next time you
wish to load the routing file, you will be prompted for these additional files with the
application screen shown above. In addition, you will have the option to remove
unused method types that were created by the program when new methods were
encountered in the part routings. Most of the time you will want to have this option
selected.
When loading existing data files, the FP application will first load the part flow
routings file and create all referenced parts, locations, methods, and containers.
Then the FP application loads the corresponding products, methods and locations
files and updates the user-specified quantity, color and option information. In this
way, if the routing file contains locations, methods, parts or containers that did not
exist in the last session they will be automatically added. Likewise, any locations,
parts, or methods that no longer exist in the routing will not be loaded and thus will
© 2006 Proplanner
28
not appear in the editor.
In summary, the routing file is the master data set for the FP application and thus the
Products/Parts, Locations/Groups and Methods/Containers/Processes files only
serve to update the user-defined properties associated with those entities.
Save As: Saves the routings in the editor to a file, as well as optionally saving the
corresponding
Products/Parts,
Locations/Groups
and
Methods/Processes/Containers data to their corresponding files. In addition, the
results from the last calculation can also be saved to a new file or appended to an
existing analysis results file.
·
Append product and part quantities- Attaches quantities and names for
products and parts to the CSV file. These originally come from the PRD file
but can be attached here for ease of input and output checking. The user can
now edit both route and part information in the same file.
·
Include distance, time, and frequency- Attaches output frequencies,
distances, and times to the input file so that it can be analyzed route by route.
New (Clear): Clears the current routings list, so that new routings may be entered.
Goto AutoCAD: Hides the FP Modal window and displays a smaller Modeless
editing window. This command is used when you need to work in the AutoCAD
editor environment but wish to return to the WPP application and retain your
information. The Modeless window (shown below) will appear in the far upper-left
corner of the AutoCAD window. The controls included within this modeless window
are discussed in their respective sections (i.e. Locations, Paths, etc.)
© 2006 Proplanner
Reference Section
29
Modeless window displayed after Goto AutoCAD
Calculate
Calculate: The calculate button performs the distance, time, and cost calculations
and generates and updates the flow paths. The calculation is aggregated according
to the selected item in the “Aggregate-by” drop-down list. Please reference the
Calculation Formula section for a better understanding of the calculation algorithms.
Calc first looks in the drawing to see that all of the referenced locations exist. If
some locations that appear in the routing do not appear in the drawing, then the FP
will prompt the user to enter each location.
Each Aggregation (i.e. Product, Part, Method, Container, From-To Location, etc) is
stored on its own unique set of layers. As such, one drawing file could contain the
flow diagrams for all aggregations. Once the calc command finishes, the selected
aggregation will be shown. To look at other aggregated flow diagrams, go to the
Path Tab and select those aggregations from the top-left combo-box. If the
congestion diagram is selected during an Aisle Flow aggregation, then the
aggregation will be shown at the end of the calculation and thus the congestion
diagram that was just created can only be seen by selecting the Congestion
aggregation in the Paths tab.
© 2006 Proplanner
30
Straight or Aisle Flow: The Straight Flow and Aisle Flow radio buttons
determine the route method for the generation of missing paths. Straight flow
paths are typically the best for viewing where flows originate from and travel
to, whereas Aisle path flows are best for evaluating actual travel distances,
travel paths and aisle congestion.
Prior to performing an Aisle flow study you will need to create an Aisle Path
network (via the Add/Edit Aisle button in the bottom left of the Path tab
window), and you will then want to select the Join Locs button to join your
location points to the path network.
Congestion diagrams can only be created when an Aisle flow diagram is
being generated. As the aisle congestion is the summary of all flows down
specific aisle segments, it will be the same for any flow aggregation. Thus,
there is only one aisle congestion diagram and this option should only be
selected for one aggregation to save on processing time. Note that it is highly
recommended to use the “Regen all Paths” option when creating congestion
diagrams to ensure that all flow paths are included within the analysis.
To perform congestion analyses for specific products or method types go to
either the Products or Methods tab and set their Calculate option to Yes while
turning the undesired ones to No.
Finally the FP application has only one set of layers for each flow aggregation;
therefore you will need to determine if your drawing is going to contain Aisle
Flows or Straight Flows. If you wish to save both types of flow routes for each
aggregation, then it is recommended that you create one layout drawing for
Aisle Flow diagrams and another diagram for Straight Flow diagrams.
If the Aisle Path flows method is selected, and the FP application is unable to
find any path from the FROM location to the TO or VIA location then the FP
will default to using a Straight Flow method for that specific path. As such, if
you see Straight Flow lines in your Aisle Flow study, look at your path network
and make sure that intersecting aisle path lines exist from the insertion point
of the originating Location text all the way to the insertion point of the
destination Location text (also verify that aisle direction linestyles – IF USED are appropriate for your direction of flow).
Color by Frequency: By default, the FP will color code the flow lines
according to the aggregate color specified in the appropriate tab (i.e. Products
and Parts, or Methods, or Containers, or Groups). Optionally you may color
code the flows according to their trip frequency. Trip frequency colors and
intensities are specified in the “Freq/Congest” tab.
Skip Via Locations: The routing file requires a minimum of a From and a To
location for each route. In many factory logistics situations there is a storage
area between the dock where the material is received and the line, or
workstation, where the material is delivered. For these routings from the dock
to the line via a storage location, you will want to enter the storage location
© 2006 Proplanner
Reference Section
31
name in the “VIA” field of the part’s routing. Selecting the Skip-Via option will
then allow the FP calculation to generate flow directly from the FROM location
and to the TO location to quickly assist you in evaluating the travel issues
caused by off-line storage locations.
Regen All Paths: If selected OFF, the FP application will only generate flow
lines if they are missing in the drawing. As such, if the prior flow analysis was
done using the Straight Flow method and your current analysis is using the
Aisle-Path method, then only the new flow lines will be generated along the
aisles. To delete all of the existing flow lines, and thus generate all new flow
lines, you will want to select this option ON, before selecting the Calc button.
This selective path generation capability is useful if you have generated many
manually routed paths and do not wish these to be deleted upon your next
calculation. In addition, large studies will benefit from the performance
advantages of re-generating only missing flow paths instead of all existing
flow paths.
Path Arrows: If selected on, the FP will generate arrows at the end of all the
flow lines. If arrows are not generated at the time of the calculation, then they
can always be added later via the Arrows button in the Paths tab window.
Results
The Results table lists the aggregation summary statistics according to the selected
aggregation method
Aggregate: The name of the aggregated flow method.
Dist (Ft): The total sum of the distance in Feet or Meters.
Time: The total sum of the time in Hours:Minutes:Seconds
Cost: The total sum of the cost by aggregate and by total. Note that only variable
costs are shown with each aggregate and then these are totaled and added to the
total fixed cost in the Cost total. The only exception to this is when the aggregate
“Method Type” is selected. With this aggregate, the fixed costs are included for each
method type in the individual aggregate summaries.
Travel%: The travel percentage is the percentage of time that is travel time versus
© 2006 Proplanner
32
the total time which would also include Load and Unload times associated with each
trip. This statistic is provided to aid in prioritizing your effort in reducing waste
associated with traveling versus loading/unloading.
TugVol%: Used for Tugger Analysis to represent the percentage of a full tugger
train required on this route.
Routing Editor Controls
Description: Allows you to add, and view, a description to each route.
Editor Controls
Insert Row: Inserts a row above the selected row and copies the information from
the selected row into this new row as a default starting point.
Remove Row: Removes the selected row.
Add Row: Takes the data in the input boxes below the routing display and adds
them to the end of the routing file.
Update Row: Takes the data in the input boxes below the routing display and
updates them to the selected routing in that display.
Route Format
Part: Name for part (or sub group of flow) moving along the stated route
© 2006 Proplanner
Reference Section
33
Route %: Percent of part flow for the stated part, in the stated product, taking
this route.
From: From location for flow path analysis.
Method: Transport device (i.e. fork truck, AGV or hand cart) used to move the
material from the FROM location to the TO location or the VIA location (if a
via location is specified)
(C)ontainer: Name of container used for holding the
loading/unloading of the device. Often a pallet, tub, barrel, etc.
parts
and
C/Trip: Quantity of containers that will fit in a typically loaded method
Parts/C: Quantity of Parts that will fit in a typically loaded container
To Loc: To location for flow path analysis.
Via Loc: Optional intermediate travel location, such as storage or a pass-thru
point.
Method: Transport device (i.e. fork truck, AGV or hand car) used to move the
material from the VIA location to the TO location (if a via location name is
specified)
C/Trip: Quantity of containers that will fit in a typically loaded method from the
Via location to the TO location (if a via location name is specified)
Note: The time fields below are NOT necessary.
From Load Time: If this field contains data, this number will overwrite the
load time specified on the Methods tab at the From location.
To Unload Time: If this field contains data, this number will overwrite the
unload time specified on the Methods tab at the To location.
Via Load Time: If this field contains data, this number will overwrite the load
time specified on the Methods tab at the Via location.
Via Unload Time: If this field contains data, this number will overwrite the
unload time specified on the Methods tab at the Via location.
© 2006 Proplanner
34
5.3.1
Main Controls
The routings tab is the main window of the FP interface. In this window, you can
Import, Save, and calculate your studies, as well as enter and edit part routings.
Flow routings are organized by Product names, which do not need to be actual
products, but could instead be main flow path groupings. In each Product (flow
grouping) you could have many parts (sub flow groupings) with multiple from-to and
via location routings.
Product names are entered, or selected, in the top left combo box (showing
Small_Pump). Once a name is entered, or selected, the associated Part routings for
that Product selection will be shown in the main routings list view below. Routings
may be added, removed or updated with the editing controls located in the
middle-right of the screen.
© 2006 Proplanner
Reference Section
35
Main Controls
File Open: Loads the routing file into the routing editor and reads the drawing for
locations referenced by the routing.
The routing file is a comma-delimited text file with a .csv extension. This file can be
originally authored in the FP application or imported from an external application,
such as MS Excel. The format to this main routing file is shown in the Appendix.
The routing file must be created in a contiguous manner with respect to the Product
names (the first field of each line in the file). This means that all routings for a
particular Product must be located together in the file. Future versions of the FP
application will correct for this limitation.
At a minimum you need only create the routing file, as the FP application will create
the information contained within the Products/Parts, Methods/Processes/Containers
and Locations/Groups files automatically. Once these files are created, you will want
to save them in order to record any changes that you have made. Next time you
wish to load the routing file, you will be prompted for these additional files with the
application screen shown above. In addition, you will have the option to remove
unused method types that were created by the program when new methods were
encountered in the part routings. Most of the time you will want to have this option
selected.
When loading existing data files, the FP application will first load the part flow
routings file and create all referenced parts, locations, methods, and containers.
Then the FP application loads the corresponding products, methods and locations
files and updates the user-specified quantity, color and option information. In this
way, if the routing file contains locations, methods, parts or containers that did not
exist in the last session they will be automatically added. Likewise, any locations,
parts, or methods that no longer exist in the routing will not be loaded and thus will
© 2006 Proplanner
36
not appear in the editor.
In summary, the routing file is the master data set for the FP application and thus the
Products/Parts, Locations/Groups and Methods/Containers/Processes files only
serve to update the user-defined properties associated with those entities.
Save As: Saves the routings in the editor to a file, as well as optionally saving the
corresponding
Products/Parts,
Locations/Groups
and
Methods/Processes/Containers data to their corresponding files. In addition, the
results from the last calculation can also be saved to a new file or appended to an
existing analysis results file.
·
Append product and part quantities- Attaches quantities and names for
products and parts to the CSV file. These originally come from the PRD file
but can be attached here for ease of input and output checking. The user can
now edit both route and part information in the same file.
·
Include distance, time, and frequency- Attaches output frequencies,
distances, and times to the input file so that it can be analyzed route by route.
New (Clear): Clears the current routings list, so that new routings may be entered.
Goto AutoCAD: Hides the FP Modal window and displays a smaller Modeless
editing window. This command is used when you need to work in the AutoCAD
editor environment but wish to return to the WPP application and retain your
information. The Modeless window (shown below) will appear in the far upper-left
corner of the AutoCAD window. The controls included within this modeless window
are discussed in their respective sections (i.e. Locations, Paths, etc.)
© 2006 Proplanner
Reference Section
37
Modeless window displayed after Goto AutoCAD
Calculate
Calculate: The calculate button performs the distance, time, and cost calculations
and generates and updates the flow paths. The calculation is aggregated according
to the selected item in the “Aggregate-by” drop-down list. Please reference the
Calculation Formula section for a better understanding of the calculation algorithms.
Calc first looks in the drawing to see that all of the referenced locations exist. If
some locations that appear in the routing do not appear in the drawing, then the FP
will prompt the user to enter each location.
Each Aggregation (i.e. Product, Part, Method, Container, From-To Location, etc) is
stored on its own unique set of layers. As such, one drawing file could contain the
flow diagrams for all aggregations. Once the calc command finishes, the selected
aggregation will be shown. To look at other aggregated flow diagrams, go to the
Path Tab and select those aggregations from the top-left combo-box. If the
congestion diagram is selected during an Aisle Flow aggregation, then the
aggregation will be shown at the end of the calculation and thus the congestion
diagram that was just created can only be seen by selecting the Congestion
aggregation in the Paths tab.
© 2006 Proplanner
38
Straight or Aisle Flow: The Straight Flow and Aisle Flow radio buttons
determine the route method for the generation of missing paths. Straight flow
paths are typically the best for viewing where flows originate from and travel
to, whereas Aisle path flows are best for evaluating actual travel distances,
travel paths and aisle congestion.
Prior to performing an Aisle flow study you will need to create an Aisle Path
network (via the Add/Edit Aisle button in the bottom left of the Path tab
window), and you will then want to select the Join Locs button to join your
location points to the path network.
Congestion diagrams can only be created when an Aisle flow diagram is
being generated. As the aisle congestion is the summary of all flows down
specific aisle segments, it will be the same for any flow aggregation. Thus,
there is only one aisle congestion diagram and this option should only be
selected for one aggregation to save on processing time. Note that it is highly
recommended to use the “Regen all Paths” option when creating congestion
diagrams to ensure that all flow paths are included within the analysis.
To perform congestion analyses for specific products or method types go to
either the Products or Methods tab and set their Calculate option to Yes while
turning the undesired ones to No.
Finally the FP application has only one set of layers for each flow aggregation;
therefore you will need to determine if your drawing is going to contain Aisle
Flows or Straight Flows. If you wish to save both types of flow routes for each
aggregation, then it is recommended that you create one layout drawing for
Aisle Flow diagrams and another diagram for Straight Flow diagrams.
If the Aisle Path flows method is selected, and the FP application is unable to
find any path from the FROM location to the TO or VIA location then the FP
will default to using a Straight Flow method for that specific path. As such, if
you see Straight Flow lines in your Aisle Flow study, look at your path network
and make sure that intersecting aisle path lines exist from the insertion point
of the originating Location text all the way to the insertion point of the
destination Location text (also verify that aisle direction linestyles – IF USED are appropriate for your direction of flow).
Color by Frequency: By default, the FP will color code the flow lines
according to the aggregate color specified in the appropriate tab (i.e. Products
and Parts, or Methods, or Containers, or Groups). Optionally you may color
code the flows according to their trip frequency. Trip frequency colors and
intensities are specified in the “Freq/Congest” tab.
Skip Via Locations: The routing file requires a minimum of a From and a To
location for each route. In many factory logistics situations there is a storage
area between the dock where the material is received and the line, or
workstation, where the material is delivered. For these routings from the dock
to the line via a storage location, you will want to enter the storage location
© 2006 Proplanner
Reference Section
39
name in the “VIA” field of the part’s routing. Selecting the Skip-Via option will
then allow the FP calculation to generate flow directly from the FROM location
and to the TO location to quickly assist you in evaluating the travel issues
caused by off-line storage locations.
Regen All Paths: If selected OFF, the FP application will only generate flow
lines if they are missing in the drawing. As such, if the prior flow analysis was
done using the Straight Flow method and your current analysis is using the
Aisle-Path method, then only the new flow lines will be generated along the
aisles. To delete all of the existing flow lines, and thus generate all new flow
lines, you will want to select this option ON, before selecting the Calc button.
This selective path generation capability is useful if you have generated many
manually routed paths and do not wish these to be deleted upon your next
calculation. In addition, large studies will benefit from the performance
advantages of re-generating only missing flow paths instead of all existing
flow paths.
Path Arrows: If selected on, the FP will generate arrows at the end of all the
flow lines. If arrows are not generated at the time of the calculation, then they
can always be added later via the Arrows button in the Paths tab window.
Results
The Results table lists the aggregation summary statistics according to the selected
aggregation method
Aggregate: The name of the aggregated flow method.
Dist (Ft): The total sum of the distance in Feet or Meters.
Time: The total sum of the time in Hours:Minutes:Seconds
Cost: The total sum of the cost by aggregate and by total. Note that only variable
costs are shown with each aggregate and then these are totaled and added to the
total fixed cost in the Cost total. The only exception to this is when the aggregate
“Method Type” is selected. With this aggregate, the fixed costs are included for each
method type in the individual aggregate summaries.
Travel%: The travel percentage is the percentage of time that is travel time versus
© 2006 Proplanner
40
the total time which would also include Load and Unload times associated with each
trip. This statistic is provided to aid in prioritizing your effort in reducing waste
associated with traveling versus loading/unloading.
TugVol%: Used for Tugger Analysis to represent the percentage of a full tugger
train required on this route.
Routing Editor Controls
Description: Allows you to add, and view, a description to each route.
Editor Controls
Insert Row: Inserts a row above the selected row and copies the information from
the selected row into this new row as a default starting point.
Remove Row: Removes the selected row.
Add Row: Takes the data in the input boxes below the routing display and adds
them to the end of the routing file.
Update Row: Takes the data in the input boxes below the routing display and
updates them to the selected routing in that display.
Route Format
Part: Name for part (or sub group of flow) moving along the stated route
© 2006 Proplanner
Reference Section
41
Route %: Percent of part flow for the stated part, in the stated product, taking
this route.
From: From location for flow path analysis.
Method: Transport device (i.e. fork truck, AGV or hand cart) used to move the
material from the FROM location to the TO location or the VIA location (if a
via location is specified)
(C)ontainer: Name of container used for holding the
loading/unloading of the device. Often a pallet, tub, barrel, etc.
parts
and
C/Trip: Quantity of containers that will fit in a typically loaded method
Parts/C: Quantity of Parts that will fit in a typically loaded container
To Loc: To location for flow path analysis.
Via Loc: Optional intermediate travel location, such as storage or a pass-thru
point.
Method: Transport device (i.e. fork truck, AGV or hand car) used to move the
material from the VIA location to the TO location (if a via location name is
specified)
C/Trip: Quantity of containers that will fit in a typically loaded method from the
Via location to the TO location (if a via location name is specified)
Note: The time fields below are NOT necessary.
From Load Time: If this field contains data, this number will overwrite the
load time specified on the Methods tab at the From location.
To Unload Time: If this field contains data, this number will overwrite the
unload time specified on the Methods tab at the To location.
Via Load Time: If this field contains data, this number will overwrite the load
time specified on the Methods tab at the Via location.
Via Unload Time: If this field contains data, this number will overwrite the
unload time specified on the Methods tab at the Via location.
© 2006 Proplanner
42
5.3.2
Calculate
The routings tab is the main window of the FP interface. In this window, you can
Import, Save, and calculate your studies, as well as enter and edit part routings.
Flow routings are organized by Product names, which do not need to be actual
products, but could instead be main flow path groupings. In each Product (flow
grouping) you could have many parts (sub flow groupings) with multiple from-to and
via location routings.
Product names are entered, or selected, in the top left combo box (showing
Small_Pump). Once a name is entered, or selected, the associated Part routings for
that Product selection will be shown in the main routings list view below. Routings
may be added, removed or updated with the editing controls located in the
middle-right of the screen.
© 2006 Proplanner
Reference Section
43
Main Controls
File Open: Loads the routing file into the routing editor and reads the drawing for
locations referenced by the routing.
The routing file is a comma-delimited text file with a .csv extension. This file can be
originally authored in the FP application or imported from an external application,
such as MS Excel. The format to this main routing file is shown in the Appendix.
The routing file must be created in a contiguous manner with respect to the Product
names (the first field of each line in the file). This means that all routings for a
particular Product must be located together in the file. Future versions of the FP
application will correct for this limitation.
At a minimum you need only create the routing file, as the FP application will create
the information contained within the Products/Parts, Methods/Processes/Containers
and Locations/Groups files automatically. Once these files are created, you will want
to save them in order to record any changes that you have made. Next time you
wish to load the routing file, you will be prompted for these additional files with the
application screen shown above. In addition, you will have the option to remove
unused method types that were created by the program when new methods were
encountered in the part routings. Most of the time you will want to have this option
selected.
When loading existing data files, the FP application will first load the part flow
routings file and create all referenced parts, locations, methods, and containers.
Then the FP application loads the corresponding products, methods and locations
files and updates the user-specified quantity, color and option information. In this
way, if the routing file contains locations, methods, parts or containers that did not
exist in the last session they will be automatically added. Likewise, any locations,
parts, or methods that no longer exist in the routing will not be loaded and thus will
© 2006 Proplanner
44
not appear in the editor.
In summary, the routing file is the master data set for the FP application and thus the
Products/Parts, Locations/Groups and Methods/Containers/Processes files only
serve to update the user-defined properties associated with those entities.
Save As: Saves the routings in the editor to a file, as well as optionally saving the
corresponding
Products/Parts,
Locations/Groups
and
Methods/Processes/Containers data to their corresponding files. In addition, the
results from the last calculation can also be saved to a new file or appended to an
existing analysis results file.
·
Append product and part quantities- Attaches quantities and names for
products and parts to the CSV file. These originally come from the PRD file
but can be attached here for ease of input and output checking. The user can
now edit both route and part information in the same file.
·
Include distance, time, and frequency- Attaches output frequencies,
distances, and times to the input file so that it can be analyzed route by route.
New (Clear): Clears the current routings list, so that new routings may be entered.
Goto AutoCAD: Hides the FP Modal window and displays a smaller Modeless
editing window. This command is used when you need to work in the AutoCAD
editor environment but wish to return to the WPP application and retain your
information. The Modeless window (shown below) will appear in the far upper-left
corner of the AutoCAD window. The controls included within this modeless window
are discussed in their respective sections (i.e. Locations, Paths, etc.)
© 2006 Proplanner
Reference Section
45
Modeless window displayed after Goto AutoCAD
Calculate
Calculate: The calculate button performs the distance, time, and cost calculations
and generates and updates the flow paths. The calculation is aggregated according
to the selected item in the “Aggregate-by” drop-down list. Please reference the
Calculation Formula section for a better understanding of the calculation algorithms.
Calc first looks in the drawing to see that all of the referenced locations exist. If
some locations that appear in the routing do not appear in the drawing, then the FP
will prompt the user to enter each location.
Each Aggregation (i.e. Product, Part, Method, Container, From-To Location, etc) is
stored on its own unique set of layers. As such, one drawing file could contain the
flow diagrams for all aggregations. Once the calc command finishes, the selected
aggregation will be shown. To look at other aggregated flow diagrams, go to the
Path Tab and select those aggregations from the top-left combo-box. If the
congestion diagram is selected during an Aisle Flow aggregation, then the
aggregation will be shown at the end of the calculation and thus the congestion
diagram that was just created can only be seen by selecting the Congestion
aggregation in the Paths tab.
© 2006 Proplanner
46
Straight or Aisle Flow: The Straight Flow and Aisle Flow radio buttons
determine the route method for the generation of missing paths. Straight flow
paths are typically the best for viewing where flows originate from and travel
to, whereas Aisle path flows are best for evaluating actual travel distances,
travel paths and aisle congestion.
Prior to performing an Aisle flow study you will need to create an Aisle Path
network (via the Add/Edit Aisle button in the bottom left of the Path tab
window), and you will then want to select the Join Locs button to join your
location points to the path network.
Congestion diagrams can only be created when an Aisle flow diagram is
being generated. As the aisle congestion is the summary of all flows down
specific aisle segments, it will be the same for any flow aggregation. Thus,
there is only one aisle congestion diagram and this option should only be
selected for one aggregation to save on processing time. Note that it is highly
recommended to use the “Regen all Paths” option when creating congestion
diagrams to ensure that all flow paths are included within the analysis.
To perform congestion analyses for specific products or method types go to
either the Products or Methods tab and set their Calculate option to Yes while
turning the undesired ones to No.
Finally the FP application has only one set of layers for each flow aggregation;
therefore you will need to determine if your drawing is going to contain Aisle
Flows or Straight Flows. If you wish to save both types of flow routes for each
aggregation, then it is recommended that you create one layout drawing for
Aisle Flow diagrams and another diagram for Straight Flow diagrams.
If the Aisle Path flows method is selected, and the FP application is unable to
find any path from the FROM location to the TO or VIA location then the FP
will default to using a Straight Flow method for that specific path. As such, if
you see Straight Flow lines in your Aisle Flow study, look at your path network
and make sure that intersecting aisle path lines exist from the insertion point
of the originating Location text all the way to the insertion point of the
destination Location text (also verify that aisle direction linestyles – IF USED are appropriate for your direction of flow).
Color by Frequency: By default, the FP will color code the flow lines
according to the aggregate color specified in the appropriate tab (i.e. Products
and Parts, or Methods, or Containers, or Groups). Optionally you may color
code the flows according to their trip frequency. Trip frequency colors and
intensities are specified in the “Freq/Congest” tab.
Skip Via Locations: The routing file requires a minimum of a From and a To
location for each route. In many factory logistics situations there is a storage
area between the dock where the material is received and the line, or
workstation, where the material is delivered. For these routings from the dock
to the line via a storage location, you will want to enter the storage location
© 2006 Proplanner
Reference Section
47
name in the “VIA” field of the part’s routing. Selecting the Skip-Via option will
then allow the FP calculation to generate flow directly from the FROM location
and to the TO location to quickly assist you in evaluating the travel issues
caused by off-line storage locations.
Regen All Paths: If selected OFF, the FP application will only generate flow
lines if they are missing in the drawing. As such, if the prior flow analysis was
done using the Straight Flow method and your current analysis is using the
Aisle-Path method, then only the new flow lines will be generated along the
aisles. To delete all of the existing flow lines, and thus generate all new flow
lines, you will want to select this option ON, before selecting the Calc button.
This selective path generation capability is useful if you have generated many
manually routed paths and do not wish these to be deleted upon your next
calculation. In addition, large studies will benefit from the performance
advantages of re-generating only missing flow paths instead of all existing
flow paths.
Path Arrows: If selected on, the FP will generate arrows at the end of all the
flow lines. If arrows are not generated at the time of the calculation, then they
can always be added later via the Arrows button in the Paths tab window.
Results
The Results table lists the aggregation summary statistics according to the selected
aggregation method
Aggregate: The name of the aggregated flow method.
Dist (Ft): The total sum of the distance in Feet or Meters.
Time: The total sum of the time in Hours:Minutes:Seconds
Cost: The total sum of the cost by aggregate and by total. Note that only variable
costs are shown with each aggregate and then these are totaled and added to the
total fixed cost in the Cost total. The only exception to this is when the aggregate
“Method Type” is selected. With this aggregate, the fixed costs are included for each
method type in the individual aggregate summaries.
Travel%: The travel percentage is the percentage of time that is travel time versus
© 2006 Proplanner
48
the total time which would also include Load and Unload times associated with each
trip. This statistic is provided to aid in prioritizing your effort in reducing waste
associated with traveling versus loading/unloading.
TugVol%: Used for Tugger Analysis to represent the percentage of a full tugger
train required on this route.
Routing Editor Controls
Description: Allows you to add, and view, a description to each route.
Editor Controls
Insert Row: Inserts a row above the selected row and copies the information from
the selected row into this new row as a default starting point.
Remove Row: Removes the selected row.
Add Row: Takes the data in the input boxes below the routing display and adds
them to the end of the routing file.
Update Row: Takes the data in the input boxes below the routing display and
updates them to the selected routing in that display.
Route Format
Part: Name for part (or sub group of flow) moving along the stated route
© 2006 Proplanner
Reference Section
49
Route %: Percent of part flow for the stated part, in the stated product, taking
this route.
From: From location for flow path analysis.
Method: Transport device (i.e. fork truck, AGV or hand cart) used to move the
material from the FROM location to the TO location or the VIA location (if a
via location is specified)
(C)ontainer: Name of container used for holding the
loading/unloading of the device. Often a pallet, tub, barrel, etc.
parts
and
C/Trip: Quantity of containers that will fit in a typically loaded method
Parts/C: Quantity of Parts that will fit in a typically loaded container
To Loc: To location for flow path analysis.
Via Loc: Optional intermediate travel location, such as storage or a pass-thru
point.
Method: Transport device (i.e. fork truck, AGV or hand car) used to move the
material from the VIA location to the TO location (if a via location name is
specified)
C/Trip: Quantity of containers that will fit in a typically loaded method from the
Via location to the TO location (if a via location name is specified)
Note: The time fields below are NOT necessary.
From Load Time: If this field contains data, this number will overwrite the
load time specified on the Methods tab at the From location.
To Unload Time: If this field contains data, this number will overwrite the
unload time specified on the Methods tab at the To location.
Via Load Time: If this field contains data, this number will overwrite the load
time specified on the Methods tab at the Via location.
Via Unload Time: If this field contains data, this number will overwrite the
unload time specified on the Methods tab at the Via location.
© 2006 Proplanner
50
5.3.3
Results
The routings tab is the main window of the FP interface. In this window, you can
Import, Save, and calculate your studies, as well as enter and edit part routings.
Flow routings are organized by Product names, which do not need to be actual
products, but could instead be main flow path groupings. In each Product (flow
grouping) you could have many parts (sub flow groupings) with multiple from-to and
via location routings.
Product names are entered, or selected, in the top left combo box (showing
Small_Pump). Once a name is entered, or selected, the associated Part routings for
that Product selection will be shown in the main routings list view below. Routings
may be added, removed or updated with the editing controls located in the
middle-right of the screen.
© 2006 Proplanner
Reference Section
51
Main Controls
File Open: Loads the routing file into the routing editor and reads the drawing for
locations referenced by the routing.
The routing file is a comma-delimited text file with a .csv extension. This file can be
originally authored in the FP application or imported from an external application,
such as MS Excel. The format to this main routing file is shown in the Appendix.
The routing file must be created in a contiguous manner with respect to the Product
names (the first field of each line in the file). This means that all routings for a
particular Product must be located together in the file. Future versions of the FP
application will correct for this limitation.
At a minimum you need only create the routing file, as the FP application will create
the information contained within the Products/Parts, Methods/Processes/Containers
and Locations/Groups files automatically. Once these files are created, you will want
to save them in order to record any changes that you have made. Next time you
wish to load the routing file, you will be prompted for these additional files with the
application screen shown above. In addition, you will have the option to remove
unused method types that were created by the program when new methods were
encountered in the part routings. Most of the time you will want to have this option
selected.
When loading existing data files, the FP application will first load the part flow
routings file and create all referenced parts, locations, methods, and containers.
Then the FP application loads the corresponding products, methods and locations
files and updates the user-specified quantity, color and option information. In this
way, if the routing file contains locations, methods, parts or containers that did not
exist in the last session they will be automatically added. Likewise, any locations,
parts, or methods that no longer exist in the routing will not be loaded and thus will
© 2006 Proplanner
52
not appear in the editor.
In summary, the routing file is the master data set for the FP application and thus the
Products/Parts, Locations/Groups and Methods/Containers/Processes files only
serve to update the user-defined properties associated with those entities.
Save As: Saves the routings in the editor to a file, as well as optionally saving the
corresponding
Products/Parts,
Locations/Groups
and
Methods/Processes/Containers data to their corresponding files. In addition, the
results from the last calculation can also be saved to a new file or appended to an
existing analysis results file.
·
Append product and part quantities- Attaches quantities and names for
products and parts to the CSV file. These originally come from the PRD file
but can be attached here for ease of input and output checking. The user can
now edit both route and part information in the same file.
·
Include distance, time, and frequency- Attaches output frequencies,
distances, and times to the input file so that it can be analyzed route by route.
New (Clear): Clears the current routings list, so that new routings may be entered.
Goto AutoCAD: Hides the FP Modal window and displays a smaller Modeless
editing window. This command is used when you need to work in the AutoCAD
editor environment but wish to return to the WPP application and retain your
information. The Modeless window (shown below) will appear in the far upper-left
corner of the AutoCAD window. The controls included within this modeless window
are discussed in their respective sections (i.e. Locations, Paths, etc.)
© 2006 Proplanner
Reference Section
53
Modeless window displayed after Goto AutoCAD
Calculate
Calculate: The calculate button performs the distance, time, and cost calculations
and generates and updates the flow paths. The calculation is aggregated according
to the selected item in the “Aggregate-by” drop-down list. Please reference the
Calculation Formula section for a better understanding of the calculation algorithms.
Calc first looks in the drawing to see that all of the referenced locations exist. If
some locations that appear in the routing do not appear in the drawing, then the FP
will prompt the user to enter each location.
Each Aggregation (i.e. Product, Part, Method, Container, From-To Location, etc) is
stored on its own unique set of layers. As such, one drawing file could contain the
flow diagrams for all aggregations. Once the calc command finishes, the selected
aggregation will be shown. To look at other aggregated flow diagrams, go to the
Path Tab and select those aggregations from the top-left combo-box. If the
congestion diagram is selected during an Aisle Flow aggregation, then the
aggregation will be shown at the end of the calculation and thus the congestion
diagram that was just created can only be seen by selecting the Congestion
aggregation in the Paths tab.
© 2006 Proplanner
54
Straight or Aisle Flow: The Straight Flow and Aisle Flow radio buttons
determine the route method for the generation of missing paths. Straight flow
paths are typically the best for viewing where flows originate from and travel
to, whereas Aisle path flows are best for evaluating actual travel distances,
travel paths and aisle congestion.
Prior to performing an Aisle flow study you will need to create an Aisle Path
network (via the Add/Edit Aisle button in the bottom left of the Path tab
window), and you will then want to select the Join Locs button to join your
location points to the path network.
Congestion diagrams can only be created when an Aisle flow diagram is
being generated. As the aisle congestion is the summary of all flows down
specific aisle segments, it will be the same for any flow aggregation. Thus,
there is only one aisle congestion diagram and this option should only be
selected for one aggregation to save on processing time. Note that it is highly
recommended to use the “Regen all Paths” option when creating congestion
diagrams to ensure that all flow paths are included within the analysis.
To perform congestion analyses for specific products or method types go to
either the Products or Methods tab and set their Calculate option to Yes while
turning the undesired ones to No.
Finally the FP application has only one set of layers for each flow aggregation;
therefore you will need to determine if your drawing is going to contain Aisle
Flows or Straight Flows. If you wish to save both types of flow routes for each
aggregation, then it is recommended that you create one layout drawing for
Aisle Flow diagrams and another diagram for Straight Flow diagrams.
If the Aisle Path flows method is selected, and the FP application is unable to
find any path from the FROM location to the TO or VIA location then the FP
will default to using a Straight Flow method for that specific path. As such, if
you see Straight Flow lines in your Aisle Flow study, look at your path network
and make sure that intersecting aisle path lines exist from the insertion point
of the originating Location text all the way to the insertion point of the
destination Location text (also verify that aisle direction linestyles – IF USED are appropriate for your direction of flow).
Color by Frequency: By default, the FP will color code the flow lines
according to the aggregate color specified in the appropriate tab (i.e. Products
and Parts, or Methods, or Containers, or Groups). Optionally you may color
code the flows according to their trip frequency. Trip frequency colors and
intensities are specified in the “Freq/Congest” tab.
Skip Via Locations: The routing file requires a minimum of a From and a To
location for each route. In many factory logistics situations there is a storage
area between the dock where the material is received and the line, or
workstation, where the material is delivered. For these routings from the dock
to the line via a storage location, you will want to enter the storage location
© 2006 Proplanner
Reference Section
55
name in the “VIA” field of the part’s routing. Selecting the Skip-Via option will
then allow the FP calculation to generate flow directly from the FROM location
and to the TO location to quickly assist you in evaluating the travel issues
caused by off-line storage locations.
Regen All Paths: If selected OFF, the FP application will only generate flow
lines if they are missing in the drawing. As such, if the prior flow analysis was
done using the Straight Flow method and your current analysis is using the
Aisle-Path method, then only the new flow lines will be generated along the
aisles. To delete all of the existing flow lines, and thus generate all new flow
lines, you will want to select this option ON, before selecting the Calc button.
This selective path generation capability is useful if you have generated many
manually routed paths and do not wish these to be deleted upon your next
calculation. In addition, large studies will benefit from the performance
advantages of re-generating only missing flow paths instead of all existing
flow paths.
Path Arrows: If selected on, the FP will generate arrows at the end of all the
flow lines. If arrows are not generated at the time of the calculation, then they
can always be added later via the Arrows button in the Paths tab window.
Results
The Results table lists the aggregation summary statistics according to the selected
aggregation method
Aggregate: The name of the aggregated flow method.
Dist (Ft): The total sum of the distance in Feet or Meters.
Time: The total sum of the time in Hours:Minutes:Seconds
Cost: The total sum of the cost by aggregate and by total. Note that only variable
costs are shown with each aggregate and then these are totaled and added to the
total fixed cost in the Cost total. The only exception to this is when the aggregate
“Method Type” is selected. With this aggregate, the fixed costs are included for each
method type in the individual aggregate summaries.
Travel%: The travel percentage is the percentage of time that is travel time versus
© 2006 Proplanner
56
the total time which would also include Load and Unload times associated with each
trip. This statistic is provided to aid in prioritizing your effort in reducing waste
associated with traveling versus loading/unloading.
TugVol%: Used for Tugger Analysis to represent the percentage of a full tugger
train required on this route.
Routing Editor Controls
Description: Allows you to add, and view, a description to each route.
Editor Controls
Insert Row: Inserts a row above the selected row and copies the information from
the selected row into this new row as a default starting point.
Remove Row: Removes the selected row.
Add Row: Takes the data in the input boxes below the routing display and adds
them to the end of the routing file.
Update Row: Takes the data in the input boxes below the routing display and
updates them to the selected routing in that display.
Route Format
Part: Name for part (or sub group of flow) moving along the stated route
© 2006 Proplanner
Reference Section
57
Route %: Percent of part flow for the stated part, in the stated product, taking
this route.
From: From location for flow path analysis.
Method: Transport device (i.e. fork truck, AGV or hand cart) used to move the
material from the FROM location to the TO location or the VIA location (if a
via location is specified)
(C)ontainer: Name of container used for holding the
loading/unloading of the device. Often a pallet, tub, barrel, etc.
parts
and
C/Trip: Quantity of containers that will fit in a typically loaded method
Parts/C: Quantity of Parts that will fit in a typically loaded container
To Loc: To location for flow path analysis.
Via Loc: Optional intermediate travel location, such as storage or a pass-thru
point.
Method: Transport device (i.e. fork truck, AGV or hand car) used to move the
material from the VIA location to the TO location (if a via location name is
specified)
C/Trip: Quantity of containers that will fit in a typically loaded method from the
Via location to the TO location (if a via location name is specified)
Note: The time fields below are NOT necessary.
From Load Time: If this field contains data, this number will overwrite the
load time specified on the Methods tab at the From location.
To Unload Time: If this field contains data, this number will overwrite the
unload time specified on the Methods tab at the To location.
Via Load Time: If this field contains data, this number will overwrite the load
time specified on the Methods tab at the Via location.
Via Unload Time: If this field contains data, this number will overwrite the
unload time specified on the Methods tab at the Via location.
© 2006 Proplanner
58
5.3.4
Routing Editor Controls
The routings tab is the main window of the FP interface. In this window, you can
Import, Save, and calculate your studies, as well as enter and edit part routings.
Flow routings are organized by Product names, which do not need to be actual
products, but could instead be main flow path groupings. In each Product (flow
grouping) you could have many parts (sub flow groupings) with multiple from-to and
via location routings.
Product names are entered, or selected, in the top left combo box (showing
Small_Pump). Once a name is entered, or selected, the associated Part routings for
that Product selection will be shown in the main routings list view below. Routings
may be added, removed or updated with the editing controls located in the
middle-right of the screen.
© 2006 Proplanner
Reference Section
59
Main Controls
File Open: Loads the routing file into the routing editor and reads the drawing for
locations referenced by the routing.
The routing file is a comma-delimited text file with a .csv extension. This file can be
originally authored in the FP application or imported from an external application,
such as MS Excel. The format to this main routing file is shown in the Appendix.
The routing file must be created in a contiguous manner with respect to the Product
names (the first field of each line in the file). This means that all routings for a
particular Product must be located together in the file. Future versions of the FP
application will correct for this limitation.
At a minimum you need only create the routing file, as the FP application will create
the information contained within the Products/Parts, Methods/Processes/Containers
and Locations/Groups files automatically. Once these files are created, you will want
to save them in order to record any changes that you have made. Next time you
wish to load the routing file, you will be prompted for these additional files with the
application screen shown above. In addition, you will have the option to remove
unused method types that were created by the program when new methods were
encountered in the part routings. Most of the time you will want to have this option
selected.
When loading existing data files, the FP application will first load the part flow
routings file and create all referenced parts, locations, methods, and containers.
Then the FP application loads the corresponding products, methods and locations
files and updates the user-specified quantity, color and option information. In this
way, if the routing file contains locations, methods, parts or containers that did not
exist in the last session they will be automatically added. Likewise, any locations,
parts, or methods that no longer exist in the routing will not be loaded and thus will
© 2006 Proplanner
60
not appear in the editor.
In summary, the routing file is the master data set for the FP application and thus the
Products/Parts, Locations/Groups and Methods/Containers/Processes files only
serve to update the user-defined properties associated with those entities.
Save As: Saves the routings in the editor to a file, as well as optionally saving the
corresponding
Products/Parts,
Locations/Groups
and
Methods/Processes/Containers data to their corresponding files. In addition, the
results from the last calculation can also be saved to a new file or appended to an
existing analysis results file.
·
Append product and part quantities- Attaches quantities and names for
products and parts to the CSV file. These originally come from the PRD file
but can be attached here for ease of input and output checking. The user can
now edit both route and part information in the same file.
·
Include distance, time, and frequency- Attaches output frequencies,
distances, and times to the input file so that it can be analyzed route by route.
New (Clear): Clears the current routings list, so that new routings may be entered.
Goto AutoCAD: Hides the FP Modal window and displays a smaller Modeless
editing window. This command is used when you need to work in the AutoCAD
editor environment but wish to return to the WPP application and retain your
information. The Modeless window (shown below) will appear in the far upper-left
corner of the AutoCAD window. The controls included within this modeless window
are discussed in their respective sections (i.e. Locations, Paths, etc.)
© 2006 Proplanner
Reference Section
61
Modeless window displayed after Goto AutoCAD
Calculate
Calculate: The calculate button performs the distance, time, and cost calculations
and generates and updates the flow paths. The calculation is aggregated according
to the selected item in the “Aggregate-by” drop-down list. Please reference the
Calculation Formula section for a better understanding of the calculation algorithms.
Calc first looks in the drawing to see that all of the referenced locations exist. If
some locations that appear in the routing do not appear in the drawing, then the FP
will prompt the user to enter each location.
Each Aggregation (i.e. Product, Part, Method, Container, From-To Location, etc) is
stored on its own unique set of layers. As such, one drawing file could contain the
flow diagrams for all aggregations. Once the calc command finishes, the selected
aggregation will be shown. To look at other aggregated flow diagrams, go to the
Path Tab and select those aggregations from the top-left combo-box. If the
congestion diagram is selected during an Aisle Flow aggregation, then the
aggregation will be shown at the end of the calculation and thus the congestion
diagram that was just created can only be seen by selecting the Congestion
aggregation in the Paths tab.
© 2006 Proplanner
62
Straight or Aisle Flow: The Straight Flow and Aisle Flow radio buttons
determine the route method for the generation of missing paths. Straight flow
paths are typically the best for viewing where flows originate from and travel
to, whereas Aisle path flows are best for evaluating actual travel distances,
travel paths and aisle congestion.
Prior to performing an Aisle flow study you will need to create an Aisle Path
network (via the Add/Edit Aisle button in the bottom left of the Path tab
window), and you will then want to select the Join Locs button to join your
location points to the path network.
Congestion diagrams can only be created when an Aisle flow diagram is
being generated. As the aisle congestion is the summary of all flows down
specific aisle segments, it will be the same for any flow aggregation. Thus,
there is only one aisle congestion diagram and this option should only be
selected for one aggregation to save on processing time. Note that it is highly
recommended to use the “Regen all Paths” option when creating congestion
diagrams to ensure that all flow paths are included within the analysis.
To perform congestion analyses for specific products or method types go to
either the Products or Methods tab and set their Calculate option to Yes while
turning the undesired ones to No.
Finally the FP application has only one set of layers for each flow aggregation;
therefore you will need to determine if your drawing is going to contain Aisle
Flows or Straight Flows. If you wish to save both types of flow routes for each
aggregation, then it is recommended that you create one layout drawing for
Aisle Flow diagrams and another diagram for Straight Flow diagrams.
If the Aisle Path flows method is selected, and the FP application is unable to
find any path from the FROM location to the TO or VIA location then the FP
will default to using a Straight Flow method for that specific path. As such, if
you see Straight Flow lines in your Aisle Flow study, look at your path network
and make sure that intersecting aisle path lines exist from the insertion point
of the originating Location text all the way to the insertion point of the
destination Location text (also verify that aisle direction linestyles – IF USED are appropriate for your direction of flow).
Color by Frequency: By default, the FP will color code the flow lines
according to the aggregate color specified in the appropriate tab (i.e. Products
and Parts, or Methods, or Containers, or Groups). Optionally you may color
code the flows according to their trip frequency. Trip frequency colors and
intensities are specified in the “Freq/Congest” tab.
Skip Via Locations: The routing file requires a minimum of a From and a To
location for each route. In many factory logistics situations there is a storage
area between the dock where the material is received and the line, or
workstation, where the material is delivered. For these routings from the dock
to the line via a storage location, you will want to enter the storage location
© 2006 Proplanner
Reference Section
63
name in the “VIA” field of the part’s routing. Selecting the Skip-Via option will
then allow the FP calculation to generate flow directly from the FROM location
and to the TO location to quickly assist you in evaluating the travel issues
caused by off-line storage locations.
Regen All Paths: If selected OFF, the FP application will only generate flow
lines if they are missing in the drawing. As such, if the prior flow analysis was
done using the Straight Flow method and your current analysis is using the
Aisle-Path method, then only the new flow lines will be generated along the
aisles. To delete all of the existing flow lines, and thus generate all new flow
lines, you will want to select this option ON, before selecting the Calc button.
This selective path generation capability is useful if you have generated many
manually routed paths and do not wish these to be deleted upon your next
calculation. In addition, large studies will benefit from the performance
advantages of re-generating only missing flow paths instead of all existing
flow paths.
Path Arrows: If selected on, the FP will generate arrows at the end of all the
flow lines. If arrows are not generated at the time of the calculation, then they
can always be added later via the Arrows button in the Paths tab window.
Results
The Results table lists the aggregation summary statistics according to the selected
aggregation method
Aggregate: The name of the aggregated flow method.
Dist (Ft): The total sum of the distance in Feet or Meters.
Time: The total sum of the time in Hours:Minutes:Seconds
Cost: The total sum of the cost by aggregate and by total. Note that only variable
costs are shown with each aggregate and then these are totaled and added to the
total fixed cost in the Cost total. The only exception to this is when the aggregate
“Method Type” is selected. With this aggregate, the fixed costs are included for each
method type in the individual aggregate summaries.
Travel%: The travel percentage is the percentage of time that is travel time versus
© 2006 Proplanner
64
the total time which would also include Load and Unload times associated with each
trip. This statistic is provided to aid in prioritizing your effort in reducing waste
associated with traveling versus loading/unloading.
TugVol%: Used for Tugger Analysis to represent the percentage of a full tugger
train required on this route.
Routing Editor Controls
Description: Allows you to add, and view, a description to each route.
Editor Controls
Insert Row: Inserts a row above the selected row and copies the information from
the selected row into this new row as a default starting point.
Remove Row: Removes the selected row.
Add Row: Takes the data in the input boxes below the routing display and adds
them to the end of the routing file.
Update Row: Takes the data in the input boxes below the routing display and
updates them to the selected routing in that display.
Route Format
Part: Name for part (or sub group of flow) moving along the stated route
© 2006 Proplanner
Reference Section
65
Route %: Percent of part flow for the stated part, in the stated product, taking
this route.
From: From location for flow path analysis.
Method: Transport device (i.e. fork truck, AGV or hand cart) used to move the
material from the FROM location to the TO location or the VIA location (if a
via location is specified)
(C)ontainer: Name of container used for holding the
loading/unloading of the device. Often a pallet, tub, barrel, etc.
parts
and
C/Trip: Quantity of containers that will fit in a typically loaded method
Parts/C: Quantity of Parts that will fit in a typically loaded container
To Loc: To location for flow path analysis.
Via Loc: Optional intermediate travel location, such as storage or a pass-thru
point.
Method: Transport device (i.e. fork truck, AGV or hand car) used to move the
material from the VIA location to the TO location (if a via location name is
specified)
C/Trip: Quantity of containers that will fit in a typically loaded method from the
Via location to the TO location (if a via location name is specified)
Note: The time fields below are NOT necessary.
From Load Time: If this field contains data, this number will overwrite the
load time specified on the Methods tab at the From location.
To Unload Time: If this field contains data, this number will overwrite the
unload time specified on the Methods tab at the To location.
Via Load Time: If this field contains data, this number will overwrite the load
time specified on the Methods tab at the Via location.
Via Unload Time: If this field contains data, this number will overwrite the
unload time specified on the Methods tab at the Via location.
© 2006 Proplanner
66
5.3.5
Editor Controls
The routings tab is the main window of the FP interface. In this window, you can
Import, Save, and calculate your studies, as well as enter and edit part routings.
Flow routings are organized by Product names, which do not need to be actual
products, but could instead be main flow path groupings. In each Product (flow
grouping) you could have many parts (sub flow groupings) with multiple from-to and
via location routings.
Product names are entered, or selected, in the top left combo box (showing
Small_Pump). Once a name is entered, or selected, the associated Part routings for
that Product selection will be shown in the main routings list view below. Routings
may be added, removed or updated with the editing controls located in the
middle-right of the screen.
© 2006 Proplanner
Reference Section
67
Main Controls
File Open: Loads the routing file into the routing editor and reads the drawing for
locations referenced by the routing.
The routing file is a comma-delimited text file with a .csv extension. This file can be
originally authored in the FP application or imported from an external application,
such as MS Excel. The format to this main routing file is shown in the Appendix.
The routing file must be created in a contiguous manner with respect to the Product
names (the first field of each line in the file). This means that all routings for a
particular Product must be located together in the file. Future versions of the FP
application will correct for this limitation.
At a minimum you need only create the routing file, as the FP application will create
the information contained within the Products/Parts, Methods/Processes/Containers
and Locations/Groups files automatically. Once these files are created, you will want
to save them in order to record any changes that you have made. Next time you
wish to load the routing file, you will be prompted for these additional files with the
application screen shown above. In addition, you will have the option to remove
unused method types that were created by the program when new methods were
encountered in the part routings. Most of the time you will want to have this option
selected.
When loading existing data files, the FP application will first load the part flow
routings file and create all referenced parts, locations, methods, and containers.
Then the FP application loads the corresponding products, methods and locations
files and updates the user-specified quantity, color and option information. In this
way, if the routing file contains locations, methods, parts or containers that did not
exist in the last session they will be automatically added. Likewise, any locations,
parts, or methods that no longer exist in the routing will not be loaded and thus will
© 2006 Proplanner
68
not appear in the editor.
In summary, the routing file is the master data set for the FP application and thus the
Products/Parts, Locations/Groups and Methods/Containers/Processes files only
serve to update the user-defined properties associated with those entities.
Save As: Saves the routings in the editor to a file, as well as optionally saving the
corresponding
Products/Parts,
Locations/Groups
and
Methods/Processes/Containers data to their corresponding files. In addition, the
results from the last calculation can also be saved to a new file or appended to an
existing analysis results file.
·
Append product and part quantities- Attaches quantities and names for
products and parts to the CSV file. These originally come from the PRD file
but can be attached here for ease of input and output checking. The user can
now edit both route and part information in the same file.
·
Include distance, time, and frequency- Attaches output frequencies,
distances, and times to the input file so that it can be analyzed route by route.
New (Clear): Clears the current routings list, so that new routings may be entered.
Goto AutoCAD: Hides the FP Modal window and displays a smaller Modeless
editing window. This command is used when you need to work in the AutoCAD
editor environment but wish to return to the WPP application and retain your
information. The Modeless window (shown below) will appear in the far upper-left
corner of the AutoCAD window. The controls included within this modeless window
are discussed in their respective sections (i.e. Locations, Paths, etc.)
© 2006 Proplanner
Reference Section
69
Modeless window displayed after Goto AutoCAD
Calculate
Calculate: The calculate button performs the distance, time, and cost calculations
and generates and updates the flow paths. The calculation is aggregated according
to the selected item in the “Aggregate-by” drop-down list. Please reference the
Calculation Formula section for a better understanding of the calculation algorithms.
Calc first looks in the drawing to see that all of the referenced locations exist. If
some locations that appear in the routing do not appear in the drawing, then the FP
will prompt the user to enter each location.
Each Aggregation (i.e. Product, Part, Method, Container, From-To Location, etc) is
stored on its own unique set of layers. As such, one drawing file could contain the
flow diagrams for all aggregations. Once the calc command finishes, the selected
aggregation will be shown. To look at other aggregated flow diagrams, go to the
Path Tab and select those aggregations from the top-left combo-box. If the
congestion diagram is selected during an Aisle Flow aggregation, then the
aggregation will be shown at the end of the calculation and thus the congestion
diagram that was just created can only be seen by selecting the Congestion
aggregation in the Paths tab.
© 2006 Proplanner
70
Straight or Aisle Flow: The Straight Flow and Aisle Flow radio buttons
determine the route method for the generation of missing paths. Straight flow
paths are typically the best for viewing where flows originate from and travel
to, whereas Aisle path flows are best for evaluating actual travel distances,
travel paths and aisle congestion.
Prior to performing an Aisle flow study you will need to create an Aisle Path
network (via the Add/Edit Aisle button in the bottom left of the Path tab
window), and you will then want to select the Join Locs button to join your
location points to the path network.
Congestion diagrams can only be created when an Aisle flow diagram is
being generated. As the aisle congestion is the summary of all flows down
specific aisle segments, it will be the same for any flow aggregation. Thus,
there is only one aisle congestion diagram and this option should only be
selected for one aggregation to save on processing time. Note that it is highly
recommended to use the “Regen all Paths” option when creating congestion
diagrams to ensure that all flow paths are included within the analysis.
To perform congestion analyses for specific products or method types go to
either the Products or Methods tab and set their Calculate option to Yes while
turning the undesired ones to No.
Finally the FP application has only one set of layers for each flow aggregation;
therefore you will need to determine if your drawing is going to contain Aisle
Flows or Straight Flows. If you wish to save both types of flow routes for each
aggregation, then it is recommended that you create one layout drawing for
Aisle Flow diagrams and another diagram for Straight Flow diagrams.
If the Aisle Path flows method is selected, and the FP application is unable to
find any path from the FROM location to the TO or VIA location then the FP
will default to using a Straight Flow method for that specific path. As such, if
you see Straight Flow lines in your Aisle Flow study, look at your path network
and make sure that intersecting aisle path lines exist from the insertion point
of the originating Location text all the way to the insertion point of the
destination Location text (also verify that aisle direction linestyles – IF USED are appropriate for your direction of flow).
Color by Frequency: By default, the FP will color code the flow lines
according to the aggregate color specified in the appropriate tab (i.e. Products
and Parts, or Methods, or Containers, or Groups). Optionally you may color
code the flows according to their trip frequency. Trip frequency colors and
intensities are specified in the “Freq/Congest” tab.
Skip Via Locations: The routing file requires a minimum of a From and a To
location for each route. In many factory logistics situations there is a storage
area between the dock where the material is received and the line, or
workstation, where the material is delivered. For these routings from the dock
to the line via a storage location, you will want to enter the storage location
© 2006 Proplanner
Reference Section
71
name in the “VIA” field of the part’s routing. Selecting the Skip-Via option will
then allow the FP calculation to generate flow directly from the FROM location
and to the TO location to quickly assist you in evaluating the travel issues
caused by off-line storage locations.
Regen All Paths: If selected OFF, the FP application will only generate flow
lines if they are missing in the drawing. As such, if the prior flow analysis was
done using the Straight Flow method and your current analysis is using the
Aisle-Path method, then only the new flow lines will be generated along the
aisles. To delete all of the existing flow lines, and thus generate all new flow
lines, you will want to select this option ON, before selecting the Calc button.
This selective path generation capability is useful if you have generated many
manually routed paths and do not wish these to be deleted upon your next
calculation. In addition, large studies will benefit from the performance
advantages of re-generating only missing flow paths instead of all existing
flow paths.
Path Arrows: If selected on, the FP will generate arrows at the end of all the
flow lines. If arrows are not generated at the time of the calculation, then they
can always be added later via the Arrows button in the Paths tab window.
Results
The Results table lists the aggregation summary statistics according to the selected
aggregation method
Aggregate: The name of the aggregated flow method.
Dist (Ft): The total sum of the distance in Feet or Meters.
Time: The total sum of the time in Hours:Minutes:Seconds
Cost: The total sum of the cost by aggregate and by total. Note that only variable
costs are shown with each aggregate and then these are totaled and added to the
total fixed cost in the Cost total. The only exception to this is when the aggregate
“Method Type” is selected. With this aggregate, the fixed costs are included for each
method type in the individual aggregate summaries.
Travel%: The travel percentage is the percentage of time that is travel time versus
© 2006 Proplanner
72
the total time which would also include Load and Unload times associated with each
trip. This statistic is provided to aid in prioritizing your effort in reducing waste
associated with traveling versus loading/unloading.
TugVol%: Used for Tugger Analysis to represent the percentage of a full tugger
train required on this route.
Routing Editor Controls
Description: Allows you to add, and view, a description to each route.
Editor Controls
Insert Row: Inserts a row above the selected row and copies the information from
the selected row into this new row as a default starting point.
Remove Row: Removes the selected row.
Add Row: Takes the data in the input boxes below the routing display and adds
them to the end of the routing file.
Update Row: Takes the data in the input boxes below the routing display and
updates them to the selected routing in that display.
Route Format
Part: Name for part (or sub group of flow) moving along the stated route
© 2006 Proplanner
Reference Section
73
Route %: Percent of part flow for the stated part, in the stated product, taking
this route.
From: From location for flow path analysis.
Method: Transport device (i.e. fork truck, AGV or hand cart) used to move the
material from the FROM location to the TO location or the VIA location (if a
via location is specified)
(C)ontainer: Name of container used for holding the
loading/unloading of the device. Often a pallet, tub, barrel, etc.
parts
and
C/Trip: Quantity of containers that will fit in a typically loaded method
Parts/C: Quantity of Parts that will fit in a typically loaded container
To Loc: To location for flow path analysis.
Via Loc: Optional intermediate travel location, such as storage or a pass-thru
point.
Method: Transport device (i.e. fork truck, AGV or hand car) used to move the
material from the VIA location to the TO location (if a via location name is
specified)
C/Trip: Quantity of containers that will fit in a typically loaded method from the
Via location to the TO location (if a via location name is specified)
Note: The time fields below are NOT necessary.
From Load Time: If this field contains data, this number will overwrite the
load time specified on the Methods tab at the From location.
To Unload Time: If this field contains data, this number will overwrite the
unload time specified on the Methods tab at the To location.
Via Load Time: If this field contains data, this number will overwrite the load
time specified on the Methods tab at the Via location.
Via Unload Time: If this field contains data, this number will overwrite the
unload time specified on the Methods tab at the Via location.
© 2006 Proplanner
74
5.3.6
Route Format
The routings tab is the main window of the FP interface. In this window, you can
Import, Save, and calculate your studies, as well as enter and edit part routings.
Flow routings are organized by Product names, which do not need to be actual
products, but could instead be main flow path groupings. In each Product (flow
grouping) you could have many parts (sub flow groupings) with multiple from-to and
via location routings.
Product names are entered, or selected, in the top left combo box (showing
Small_Pump). Once a name is entered, or selected, the associated Part routings for
that Product selection will be shown in the main routings list view below. Routings
may be added, removed or updated with the editing controls located in the
middle-right of the screen.
© 2006 Proplanner
Reference Section
75
Main Controls
File Open: Loads the routing file into the routing editor and reads the drawing for
locations referenced by the routing.
The routing file is a comma-delimited text file with a .csv extension. This file can be
originally authored in the FP application or imported from an external application,
such as MS Excel. The format to this main routing file is shown in the Appendix.
The routing file must be created in a contiguous manner with respect to the Product
names (the first field of each line in the file). This means that all routings for a
particular Product must be located together in the file. Future versions of the FP
application will correct for this limitation.
At a minimum you need only create the routing file, as the FP application will create
the information contained within the Products/Parts, Methods/Processes/Containers
and Locations/Groups files automatically. Once these files are created, you will want
to save them in order to record any changes that you have made. Next time you
wish to load the routing file, you will be prompted for these additional files with the
application screen shown above. In addition, you will have the option to remove
unused method types that were created by the program when new methods were
encountered in the part routings. Most of the time you will want to have this option
selected.
When loading existing data files, the FP application will first load the part flow
routings file and create all referenced parts, locations, methods, and containers.
Then the FP application loads the corresponding products, methods and locations
files and updates the user-specified quantity, color and option information. In this
way, if the routing file contains locations, methods, parts or containers that did not
exist in the last session they will be automatically added. Likewise, any locations,
parts, or methods that no longer exist in the routing will not be loaded and thus will
© 2006 Proplanner
76
not appear in the editor.
In summary, the routing file is the master data set for the FP application and thus the
Products/Parts, Locations/Groups and Methods/Containers/Processes files only
serve to update the user-defined properties associated with those entities.
Save As: Saves the routings in the editor to a file, as well as optionally saving the
corresponding
Products/Parts,
Locations/Groups
and
Methods/Processes/Containers data to their corresponding files. In addition, the
results from the last calculation can also be saved to a new file or appended to an
existing analysis results file.
·
Append product and part quantities- Attaches quantities and names for
products and parts to the CSV file. These originally come from the PRD file
but can be attached here for ease of input and output checking. The user can
now edit both route and part information in the same file.
·
Include distance, time, and frequency- Attaches output frequencies,
distances, and times to the input file so that it can be analyzed route by route.
New (Clear): Clears the current routings list, so that new routings may be entered.
Goto AutoCAD: Hides the FP Modal window and displays a smaller Modeless
editing window. This command is used when you need to work in the AutoCAD
editor environment but wish to return to the WPP application and retain your
information. The Modeless window (shown below) will appear in the far upper-left
corner of the AutoCAD window. The controls included within this modeless window
are discussed in their respective sections (i.e. Locations, Paths, etc.)
© 2006 Proplanner
Reference Section
77
Modeless window displayed after Goto AutoCAD
Calculate
Calculate: The calculate button performs the distance, time, and cost calculations
and generates and updates the flow paths. The calculation is aggregated according
to the selected item in the “Aggregate-by” drop-down list. Please reference the
Calculation Formula section for a better understanding of the calculation algorithms.
Calc first looks in the drawing to see that all of the referenced locations exist. If
some locations that appear in the routing do not appear in the drawing, then the FP
will prompt the user to enter each location.
Each Aggregation (i.e. Product, Part, Method, Container, From-To Location, etc) is
stored on its own unique set of layers. As such, one drawing file could contain the
flow diagrams for all aggregations. Once the calc command finishes, the selected
aggregation will be shown. To look at other aggregated flow diagrams, go to the
Path Tab and select those aggregations from the top-left combo-box. If the
congestion diagram is selected during an Aisle Flow aggregation, then the
aggregation will be shown at the end of the calculation and thus the congestion
diagram that was just created can only be seen by selecting the Congestion
aggregation in the Paths tab.
© 2006 Proplanner
78
Straight or Aisle Flow: The Straight Flow and Aisle Flow radio buttons
determine the route method for the generation of missing paths. Straight flow
paths are typically the best for viewing where flows originate from and travel
to, whereas Aisle path flows are best for evaluating actual travel distances,
travel paths and aisle congestion.
Prior to performing an Aisle flow study you will need to create an Aisle Path
network (via the Add/Edit Aisle button in the bottom left of the Path tab
window), and you will then want to select the Join Locs button to join your
location points to the path network.
Congestion diagrams can only be created when an Aisle flow diagram is
being generated. As the aisle congestion is the summary of all flows down
specific aisle segments, it will be the same for any flow aggregation. Thus,
there is only one aisle congestion diagram and this option should only be
selected for one aggregation to save on processing time. Note that it is highly
recommended to use the “Regen all Paths” option when creating congestion
diagrams to ensure that all flow paths are included within the analysis.
To perform congestion analyses for specific products or method types go to
either the Products or Methods tab and set their Calculate option to Yes while
turning the undesired ones to No.
Finally the FP application has only one set of layers for each flow aggregation;
therefore you will need to determine if your drawing is going to contain Aisle
Flows or Straight Flows. If you wish to save both types of flow routes for each
aggregation, then it is recommended that you create one layout drawing for
Aisle Flow diagrams and another diagram for Straight Flow diagrams.
If the Aisle Path flows method is selected, and the FP application is unable to
find any path from the FROM location to the TO or VIA location then the FP
will default to using a Straight Flow method for that specific path. As such, if
you see Straight Flow lines in your Aisle Flow study, look at your path network
and make sure that intersecting aisle path lines exist from the insertion point
of the originating Location text all the way to the insertion point of the
destination Location text (also verify that aisle direction linestyles – IF USED are appropriate for your direction of flow).
Color by Frequency: By default, the FP will color code the flow lines
according to the aggregate color specified in the appropriate tab (i.e. Products
and Parts, or Methods, or Containers, or Groups). Optionally you may color
code the flows according to their trip frequency. Trip frequency colors and
intensities are specified in the “Freq/Congest” tab.
Skip Via Locations: The routing file requires a minimum of a From and a To
location for each route. In many factory logistics situations there is a storage
area between the dock where the material is received and the line, or
workstation, where the material is delivered. For these routings from the dock
to the line via a storage location, you will want to enter the storage location
© 2006 Proplanner
Reference Section
79
name in the “VIA” field of the part’s routing. Selecting the Skip-Via option will
then allow the FP calculation to generate flow directly from the FROM location
and to the TO location to quickly assist you in evaluating the travel issues
caused by off-line storage locations.
Regen All Paths: If selected OFF, the FP application will only generate flow
lines if they are missing in the drawing. As such, if the prior flow analysis was
done using the Straight Flow method and your current analysis is using the
Aisle-Path method, then only the new flow lines will be generated along the
aisles. To delete all of the existing flow lines, and thus generate all new flow
lines, you will want to select this option ON, before selecting the Calc button.
This selective path generation capability is useful if you have generated many
manually routed paths and do not wish these to be deleted upon your next
calculation. In addition, large studies will benefit from the performance
advantages of re-generating only missing flow paths instead of all existing
flow paths.
Path Arrows: If selected on, the FP will generate arrows at the end of all the
flow lines. If arrows are not generated at the time of the calculation, then they
can always be added later via the Arrows button in the Paths tab window.
Results
The Results table lists the aggregation summary statistics according to the selected
aggregation method
Aggregate: The name of the aggregated flow method.
Dist (Ft): The total sum of the distance in Feet or Meters.
Time: The total sum of the time in Hours:Minutes:Seconds
Cost: The total sum of the cost by aggregate and by total. Note that only variable
costs are shown with each aggregate and then these are totaled and added to the
total fixed cost in the Cost total. The only exception to this is when the aggregate
“Method Type” is selected. With this aggregate, the fixed costs are included for each
method type in the individual aggregate summaries.
Travel%: The travel percentage is the percentage of time that is travel time versus
© 2006 Proplanner
80
the total time which would also include Load and Unload times associated with each
trip. This statistic is provided to aid in prioritizing your effort in reducing waste
associated with traveling versus loading/unloading.
TugVol%: Used for Tugger Analysis to represent the percentage of a full tugger
train required on this route.
Routing Editor Controls
Description: Allows you to add, and view, a description to each route.
Editor Controls
Insert Row: Inserts a row above the selected row and copies the information from
the selected row into this new row as a default starting point.
Remove Row: Removes the selected row.
Add Row: Takes the data in the input boxes below the routing display and adds
them to the end of the routing file.
Update Row: Takes the data in the input boxes below the routing display and
updates them to the selected routing in that display.
Route Format
Part: Name for part (or sub group of flow) moving along the stated route
© 2006 Proplanner
Reference Section
81
Route %: Percent of part flow for the stated part, in the stated product, taking
this route.
From: From location for flow path analysis.
Method: Transport device (i.e. fork truck, AGV or hand cart) used to move the
material from the FROM location to the TO location or the VIA location (if a
via location is specified)
(C)ontainer: Name of container used for holding the
loading/unloading of the device. Often a pallet, tub, barrel, etc.
parts
and
C/Trip: Quantity of containers that will fit in a typically loaded method
Parts/C: Quantity of Parts that will fit in a typically loaded container
To Loc: To location for flow path analysis.
Via Loc: Optional intermediate travel location, such as storage or a pass-thru
point.
Method: Transport device (i.e. fork truck, AGV or hand car) used to move the
material from the VIA location to the TO location (if a via location name is
specified)
C/Trip: Quantity of containers that will fit in a typically loaded method from the
Via location to the TO location (if a via location name is specified)
Note: The time fields below are NOT necessary.
From Load Time: If this field contains data, this number will overwrite the
load time specified on the Methods tab at the From location.
To Unload Time: If this field contains data, this number will overwrite the
unload time specified on the Methods tab at the To location.
Via Load Time: If this field contains data, this number will overwrite the load
time specified on the Methods tab at the Via location.
Via Unload Time: If this field contains data, this number will overwrite the
unload time specified on the Methods tab at the Via location.
© 2006 Proplanner
82
5.4
Products Tab
The Products tab is where you specify the quantity, color and calculation attributes
for the Product (main flow groups) and Part (sub-flow groups) specified in the routing
file. These tables will be created automatically by the program upon reading the
routing file and then can be edited and saved for subsequent reloading.
Selecting a product in the list view on the left will change the available parts list
referenced by that product in the list view on the right.
Products
Product Name – Name of the Product (main flow group). Changes to the
name of the product in this field will subsequently change all like named
products in the routings file. New products can be added to this list and then
will appear in the product’s pull-down list in the top-right of the routings
window. You can also type in a new product name in the pull-down list in the
routings window and that product will automatically appear in this Product list
box.
Calc – Tells the FP if it should calculate flow diagrams, distances and costs
for that Product. This feature is typically only used for studies with thousands
of flow routes where it might be desired to speed up the calculation by not
calculating products of interest. To filter the flow diagram by product, use the
Filter tab features.
© 2006 Proplanner
Reference Section
83
Quantity – The Quantity of Products that will be multiplied by the quantity of
Parts per Product.
Color – The color for the product layers created by the Product Aggregation.
Parts
Part Name – Name of the part (sub-flow group).
changed in this editor at this time.
Part names cannot be
Quantity/Product – The Quantity of Parts per referenced Product
Use % - The percentage of the referenced Product Quantity that uses this
part in the aforementioned quantities.
Days Inventory – Not yet implemented
Color – The color for the Part and Product&Part layers created by the Part
and Product&Part aggregations.
Import Prod/Part: Reads a new product/part file (of the extension .PRD) which will
update the properties (color, quantity, percent, etc) of all Products and Parts found in
the current routing.
Save Prod/Part: Saves the Product and Part properties to a product/part file (of the
extension .PRD) for future use.
© 2006 Proplanner
84
5.4.1
Products
The Products tab is where you specify the quantity, color and calculation attributes
for the Product (main flow groups) and Part (sub-flow groups) specified in the routing
file. These tables will be created automatically by the program upon reading the
routing file and then can be edited and saved for subsequent reloading.
Selecting a product in the list view on the left will change the available parts list
referenced by that product in the list view on the right.
Products
Product Name – Name of the Product (main flow group). Changes to the
name of the product in this field will subsequently change all like named
products in the routings file. New products can be added to this list and then
will appear in the product’s pull-down list in the top-right of the routings
window. You can also type in a new product name in the pull-down list in the
routings window and that product will automatically appear in this Product list
box.
Calc – Tells the FP if it should calculate flow diagrams, distances and costs
for that Product. This feature is typically only used for studies with thousands
of flow routes where it might be desired to speed up the calculation by not
calculating products of interest. To filter the flow diagram by product, use the
Filter tab features.
© 2006 Proplanner
Reference Section
85
Quantity – The Quantity of Products that will be multiplied by the quantity of
Parts per Product.
Color – The color for the product layers created by the Product Aggregation.
Parts
Part Name – Name of the part (sub-flow group).
changed in this editor at this time.
Part names cannot be
Quantity/Product – The Quantity of Parts per referenced Product
Use % - The percentage of the referenced Product Quantity that uses this
part in the aforementioned quantities.
Days Inventory – Not yet implemented
Color – The color for the Part and Product&Part layers created by the Part
and Product&Part aggregations.
Import Prod/Part: Reads a new product/part file (of the extension .PRD) which will
update the properties (color, quantity, percent, etc) of all Products and Parts found in
the current routing.
Save Prod/Part: Saves the Product and Part properties to a product/part file (of the
extension .PRD) for future use.
© 2006 Proplanner
86
5.4.2
Parts
The Products tab is where you specify the quantity, color and calculation attributes
for the Product (main flow groups) and Part (sub-flow groups) specified in the routing
file. These tables will be created automatically by the program upon reading the
routing file and then can be edited and saved for subsequent reloading.
Selecting a product in the list view on the left will change the available parts list
referenced by that product in the list view on the right.
Products
Product Name – Name of the Product (main flow group). Changes to the
name of the product in this field will subsequently change all like named
products in the routings file. New products can be added to this list and then
will appear in the product’s pull-down list in the top-right of the routings
window. You can also type in a new product name in the pull-down list in the
routings window and that product will automatically appear in this Product list
box.
Calc – Tells the FP if it should calculate flow diagrams, distances and costs
for that Product. This feature is typically only used for studies with thousands
of flow routes where it might be desired to speed up the calculation by not
calculating products of interest. To filter the flow diagram by product, use the
Filter tab features.
© 2006 Proplanner
Reference Section
87
Quantity – The Quantity of Products that will be multiplied by the quantity of
Parts per Product.
Color – The color for the product layers created by the Product Aggregation.
Parts
Part Name – Name of the part (sub-flow group).
changed in this editor at this time.
Part names cannot be
Quantity/Product – The Quantity of Parts per referenced Product
Use % - The percentage of the referenced Product Quantity that uses this
part in the aforementioned quantities.
Days Inventory – Not yet implemented
Color – The color for the Part and Product&Part layers created by the Part
and Product&Part aggregations.
Import Prod/Part: Reads a new product/part file (of the extension .PRD) which will
update the properties (color, quantity, percent, etc) of all Products and Parts found in
the current routing.
Save Prod/Part: Saves the Product and Part properties to a product/part file (of the
extension .PRD) for future use.
© 2006 Proplanner
88
5.5
Locations Tab
Locations referenced by the FP are simple text located on a layer (Default =
PP_LOCATIONS) within the drawing, specified by the user in the Licensing/Settings
Tab. Text positions are referenced via their insertion points, which FP sets at
Bottom-Center when using the Add Location controls. Users adding text to this layer
manually will want to specify the text insertion points accordingly.
Location Table
The location table is a list of all locations referenced by the routing file. Upon
selecting the calc command, the FP application will read the drawing to ensure that
all locations are found and their positions are updated. The FP application will
prompt you for any missing locations.
Group Table
Locations are assigned to a location group. They are also assigned a tugger route
group if using the tugger module. If a specific group is not assigned, then the
UNASSIGNED group name will be referenced. Typically groups are geographically
contiguous areas within the facility. Typically location groups are assembly lines,
© 2006 Proplanner
Reference Section
89
dock banks, storage areas, workcenters, or departments. Groups are used to assign
color to the locations, as well as for filtering the flow diagrams and generating the
From-To Group flow aggregation.
Groups can have the same name as an existing location (although this is not
recommended). In this situation, the location’s position in the drawing will determine
the location for the group when a From-To Group aggregation flow diagram is
generated.
Changing the name of a group and then selecting the Update button will do a search
and replace in the location list and update the referenced groups in that list with the
group’s new name.
Add Location: Will prompt you to enter a location name and position within the
AutoCAD drawing environment and then will add this location to the location display
list.
Erase Selected Location and Erase All Locs: Erases the selected location (or all
locations) from the drawing (locations will stay in the list as they are referenced by
the routing, however their positions will be reset to 0,0. If you wish to erase locations
from the drawing, you can select the Goto AutoCAD control on the Routings tab and
use the AutoCAD erase command.
Add Missing Locs: Searches the drawing to prompt the user for any missing
locations, the same as when a calculation is performed.
AutoCAD Selection: Takes the user to AutoCAD in order to select locations from
the drawing.
Import Locs/Grps: Importing a Locations/Group file will update the group names for
all locations in the location window that were also in the group file. The import will
also create all of the group names and assign them the user-defined colors.
Save Locs/Grps: Saves the locations list, group assignments and X,Y drawing
positions to a comma-delimited CSV file in the same format as shown in the display.
Used for exportation of locations to other applications, and for saving the group
assignment and group color information. The FP application only uses the group
and color information when it reads this file and will not create locations not
referenced in the current routing, nor will it modify the position of any locations in the
location list.
Goto AutoCAD: Hides the FP modal window and displays a smaller Modeless
editing window.
Define Location
© 2006 Proplanner
90
This set of radio buttons allows the user to select what set of groups they are seeing
listed in the groups list view to the right. They can work with either the location
groups or the tugger routes. Groups are used to aggregate flow diagrams and flow
data between groups of locations (i.e. flow between assembly lines, instead of
between each location on those lines). Routes are used by the Tugger module to
assign locations to route drivers.
Location Text
Location Text Height: Specifying a new location text height.
Color: specify the color used for the location text. It could be “ByLayer”, “Group” or
“Route”
Update: Will change the size and color of all text on the location text layer.
© 2006 Proplanner
Reference Section
5.5.1
91
Location Table
Locations referenced by the FP are simple text located on a layer (Default =
PP_LOCATIONS) within the drawing, specified by the user in the Licensing/Settings
Tab. Text positions are referenced via their insertion points, which FP sets at
Bottom-Center when using the Add Location controls. Users adding text to this layer
manually will want to specify the text insertion points accordingly.
Location Table
The location table is a list of all locations referenced by the routing file. Upon
selecting the calc command, the FP application will read the drawing to ensure that
all locations are found and their positions are updated. The FP application will
prompt you for any missing locations.
Group Table
Locations are assigned to a location group. They are also assigned a tugger route
group if using the tugger module. If a specific group is not assigned, then the
UNASSIGNED group name will be referenced. Typically groups are geographically
contiguous areas within the facility. Typically location groups are assembly lines,
dock banks, storage areas, workcenters, or departments. Groups are used to assign
© 2006 Proplanner
92
color to the locations, as well as for filtering the flow diagrams and generating the
From-To Group flow aggregation.
Groups can have the same name as an existing location (although this is not
recommended). In this situation, the location’s position in the drawing will determine
the location for the group when a From-To Group aggregation flow diagram is
generated.
Changing the name of a group and then selecting the Update button will do a search
and replace in the location list and update the referenced groups in that list with the
group’s new name.
Add Location: Will prompt you to enter a location name and position within the
AutoCAD drawing environment and then will add this location to the location display
list.
Erase Selected Location and Erase All Locs: Erases the selected location (or all
locations) from the drawing (locations will stay in the list as they are referenced by
the routing, however their positions will be reset to 0,0. If you wish to erase locations
from the drawing, you can select the Goto AutoCAD control on the Routings tab and
use the AutoCAD erase command.
Add Missing Locs: Searches the drawing to prompt the user for any missing
locations, the same as when a calculation is performed.
AutoCAD Selection: Takes the user to AutoCAD in order to select locations from
the drawing.
Import Locs/Grps: Importing a Locations/Group file will update the group names for
all locations in the location window that were also in the group file. The import will
also create all of the group names and assign them the user-defined colors.
Save Locs/Grps: Saves the locations list, group assignments and X,Y drawing
positions to a comma-delimited CSV file in the same format as shown in the display.
Used for exportation of locations to other applications, and for saving the group
assignment and group color information. The FP application only uses the group
and color information when it reads this file and will not create locations not
referenced in the current routing, nor will it modify the position of any locations in the
location list.
Goto AutoCAD: Hides the FP modal window and displays a smaller Modeless
editing window.
Define Location
© 2006 Proplanner
Reference Section
93
This set of radio buttons allows the user to select what set of groups they are seeing
listed in the groups list view to the right. They can work with either the location
groups or the tugger routes. Groups are used to aggregate flow diagrams and flow
data between groups of locations (i.e. flow between assembly lines, instead of
between each location on those lines). Routes are used by the Tugger module to
assign locations to route drivers.
Location Text
Location Text Height: Specifying a new location text height.
Color: specify the color used for the location text. It could be “ByLayer”, “Group” or
“Route”
Update: Will change the size and color of all text on the location text layer.
© 2006 Proplanner
94
5.5.2
Group Table
Locations referenced by the FP are simple text located on a layer (Default =
PP_LOCATIONS) within the drawing, specified by the user in the Licensing/Settings
Tab. Text positions are referenced via their insertion points, which FP sets at
Bottom-Center when using the Add Location controls. Users adding text to this layer
manually will want to specify the text insertion points accordingly.
Location Table
The location table is a list of all locations referenced by the routing file. Upon
selecting the calc command, the FP application will read the drawing to ensure that
all locations are found and their positions are updated. The FP application will
prompt you for any missing locations.
Group Table
Locations are assigned to a location group. They are also assigned a tugger route
group if using the tugger module. If a specific group is not assigned, then the
UNASSIGNED group name will be referenced. Typically groups are geographically
contiguous areas within the facility. Typically location groups are assembly lines,
dock banks, storage areas, workcenters, or departments. Groups are used to assign
© 2006 Proplanner
Reference Section
95
color to the locations, as well as for filtering the flow diagrams and generating the
From-To Group flow aggregation.
Groups can have the same name as an existing location (although this is not
recommended). In this situation, the location’s position in the drawing will determine
the location for the group when a From-To Group aggregation flow diagram is
generated.
Changing the name of a group and then selecting the Update button will do a search
and replace in the location list and update the referenced groups in that list with the
group’s new name.
Add Location: Will prompt you to enter a location name and position within the
AutoCAD drawing environment and then will add this location to the location display
list.
Erase Selected Location and Erase All Locs: Erases the selected location (or all
locations) from the drawing (locations will stay in the list as they are referenced by
the routing, however their positions will be reset to 0,0. If you wish to erase locations
from the drawing, you can select the Goto AutoCAD control on the Routings tab and
use the AutoCAD erase command.
Add Missing Locs: Searches the drawing to prompt the user for any missing
locations, the same as when a calculation is performed.
AutoCAD Selection: Takes the user to AutoCAD in order to select locations from
the drawing.
Import Locs/Grps: Importing a Locations/Group file will update the group names for
all locations in the location window that were also in the group file. The import will
also create all of the group names and assign them the user-defined colors.
Save Locs/Grps: Saves the locations list, group assignments and X,Y drawing
positions to a comma-delimited CSV file in the same format as shown in the display.
Used for exportation of locations to other applications, and for saving the group
assignment and group color information. The FP application only uses the group
and color information when it reads this file and will not create locations not
referenced in the current routing, nor will it modify the position of any locations in the
location list.
Goto AutoCAD: Hides the FP modal window and displays a smaller Modeless
editing window.
Define Location
© 2006 Proplanner
96
This set of radio buttons allows the user to select what set of groups they are seeing
listed in the groups list view to the right. They can work with either the location
groups or the tugger routes. Groups are used to aggregate flow diagrams and flow
data between groups of locations (i.e. flow between assembly lines, instead of
between each location on those lines). Routes are used by the Tugger module to
assign locations to route drivers.
Location Text
Location Text Height: Specifying a new location text height.
Color: specify the color used for the location text. It could be “ByLayer”, “Group” or
“Route”
Update: Will change the size and color of all text on the location text layer.
© 2006 Proplanner
Reference Section
5.5.3
97
Define Location
Locations referenced by the FP are simple text located on a layer (Default =
PP_LOCATIONS) within the drawing, specified by the user in the Licensing/Settings
Tab. Text positions are referenced via their insertion points, which FP sets at
Bottom-Center when using the Add Location controls. Users adding text to this layer
manually will want to specify the text insertion points accordingly.
Location Table
The location table is a list of all locations referenced by the routing file. Upon
selecting the calc command, the FP application will read the drawing to ensure that
all locations are found and their positions are updated. The FP application will
prompt you for any missing locations.
Group Table
Locations are assigned to a location group. They are also assigned a tugger route
group if using the tugger module. If a specific group is not assigned, then the
UNASSIGNED group name will be referenced. Typically groups are geographically
contiguous areas within the facility. Typically location groups are assembly lines,
dock banks, storage areas, workcenters, or departments. Groups are used to assign
© 2006 Proplanner
98
color to the locations, as well as for filtering the flow diagrams and generating the
From-To Group flow aggregation.
Groups can have the same name as an existing location (although this is not
recommended). In this situation, the location’s position in the drawing will determine
the location for the group when a From-To Group aggregation flow diagram is
generated.
Changing the name of a group and then selecting the Update button will do a search
and replace in the location list and update the referenced groups in that list with the
group’s new name.
Add Location: Will prompt you to enter a location name and position within the
AutoCAD drawing environment and then will add this location to the location display
list.
Erase Selected Location and Erase All Locs: Erases the selected location (or all
locations) from the drawing (locations will stay in the list as they are referenced by
the routing, however their positions will be reset to 0,0. If you wish to erase locations
from the drawing, you can select the Goto AutoCAD control on the Routings tab and
use the AutoCAD erase command.
Add Missing Locs: Searches the drawing to prompt the user for any missing
locations, the same as when a calculation is performed.
AutoCAD Selection: Takes the user to AutoCAD in order to select locations from
the drawing.
Import Locs/Grps: Importing a Locations/Group file will update the group names for
all locations in the location window that were also in the group file. The import will
also create all of the group names and assign them the user-defined colors.
Save Locs/Grps: Saves the locations list, group assignments and X,Y drawing
positions to a comma-delimited CSV file in the same format as shown in the display.
Used for exportation of locations to other applications, and for saving the group
assignment and group color information. The FP application only uses the group
and color information when it reads this file and will not create locations not
referenced in the current routing, nor will it modify the position of any locations in the
location list.
Goto AutoCAD: Hides the FP modal window and displays a smaller Modeless
editing window.
Define Location
© 2006 Proplanner
Reference Section
99
This set of radio buttons allows the user to select what set of groups they are seeing
listed in the groups list view to the right. They can work with either the location
groups or the tugger routes. Groups are used to aggregate flow diagrams and flow
data between groups of locations (i.e. flow between assembly lines, instead of
between each location on those lines). Routes are used by the Tugger module to
assign locations to route drivers.
Location Text
Location Text Height: Specifying a new location text height.
Color: specify the color used for the location text. It could be “ByLayer”, “Group” or
“Route”
Update: Will change the size and color of all text on the location text layer.
© 2006 Proplanner
100
5.5.4
Location Text
Locations referenced by the FP are simple text located on a layer (Default =
PP_LOCATIONS) within the drawing, specified by the user in the Licensing/Settings
Tab. Text positions are referenced via their insertion points, which FP sets at
Bottom-Center when using the Add Location controls. Users adding text to this layer
manually will want to specify the text insertion points accordingly.
Location Table
The location table is a list of all locations referenced by the routing file. Upon
selecting the calc command, the FP application will read the drawing to ensure that
all locations are found and their positions are updated. The FP application will
prompt you for any missing locations.
Group Table
Locations are assigned to a location group. They are also assigned a tugger route
group if using the tugger module. If a specific group is not assigned, then the
UNASSIGNED group name will be referenced. Typically groups are geographically
contiguous areas within the facility. Typically location groups are assembly lines,
dock banks, storage areas, workcenters, or departments. Groups are used to assign
© 2006 Proplanner
Reference Section
101
color to the locations, as well as for filtering the flow diagrams and generating the
From-To Group flow aggregation.
Groups can have the same name as an existing location (although this is not
recommended). In this situation, the location’s position in the drawing will determine
the location for the group when a From-To Group aggregation flow diagram is
generated.
Changing the name of a group and then selecting the Update button will do a search
and replace in the location list and update the referenced groups in that list with the
group’s new name.
Add Location: Will prompt you to enter a location name and position within the
AutoCAD drawing environment and then will add this location to the location display
list.
Erase Selected Location and Erase All Locs: Erases the selected location (or all
locations) from the drawing (locations will stay in the list as they are referenced by
the routing, however their positions will be reset to 0,0. If you wish to erase locations
from the drawing, you can select the Goto AutoCAD control on the Routings tab and
use the AutoCAD erase command.
Add Missing Locs: Searches the drawing to prompt the user for any missing
locations, the same as when a calculation is performed.
AutoCAD Selection: Takes the user to AutoCAD in order to select locations from
the drawing.
Import Locs/Grps: Importing a Locations/Group file will update the group names for
all locations in the location window that were also in the group file. The import will
also create all of the group names and assign them the user-defined colors.
Save Locs/Grps: Saves the locations list, group assignments and X,Y drawing
positions to a comma-delimited CSV file in the same format as shown in the display.
Used for exportation of locations to other applications, and for saving the group
assignment and group color information. The FP application only uses the group
and color information when it reads this file and will not create locations not
referenced in the current routing, nor will it modify the position of any locations in the
location list.
Goto AutoCAD: Hides the FP modal window and displays a smaller Modeless
editing window.
Define Location
© 2006 Proplanner
102
This set of radio buttons allows the user to select what set of groups they are seeing
listed in the groups list view to the right. They can work with either the location
groups or the tugger routes. Groups are used to aggregate flow diagrams and flow
data between groups of locations (i.e. flow between assembly lines, instead of
between each location on those lines). Routes are used by the Tugger module to
assign locations to route drivers.
Location Text
Location Text Height: Specifying a new location text height.
Color: specify the color used for the location text. It could be “ByLayer”, “Group” or
“Route”
Update: Will change the size and color of all text on the location text layer.
© 2006 Proplanner
Reference Section
5.6
103
Paths Tab
The Paths tab is the main interface for path viewing, editing and annotation. The
path list is filled from information embedded within the paths shown in the AutoCAD
window for the selected aggregation method. Therefore, if there are no paths in
AutoCAD for the selected aggregation, then no paths will be shown in the list view.
When you select an aggregation in the top-left pull-down list, the FP application will
turn off all flow lines in the drawing and then turn on those flow lines for the selected
aggregation and subsequently fill the list view with the information stored within
those flow path polylines.
Since the information in the Paths window is pre-generated, it is not necessary to
load the routing file and calculate it in order to view, query, filter, color code (via the
Freq/Congest tab), delete or alter the thickness of the flow lines for all previously
generated aggregations.
Aggregated Paths List Group
Aggregation Method: Selecting an aggregation method will filter the flow path lines
in the drawing to only those for that method, and then the information within those
lines will be displayed in the list view.
User Specified Distance Update: For all selected paths you can specify a path
© 2006 Proplanner
104
distance that will override the distance that the FP application computed from the
drawing. This feature is useful for paths that may extend to other buildings, or
locations not in the current drawing.
Erase Selected Paths: Will erase the selected flow path in the current drawing and
the list view.
Erase All Listed Paths: Will erase all of the listed flow paths in the current drawing
for the selected aggregation.
Erase All DWG Paths: Will erase all of the flow paths in the current drawing for the
selected aggregation.
Edit/Redo Selected Path: Will allow you to specify a manually generated flow path
line for the selected path.
Editing Commands in Bottom right of screen
Query Path: Hides the FP Modal window and allows you to select a flow path to
query. Unlike the older versions of Flow Path, the user can now select multiple lines
and must hit enter when done selecting the lines they wish to query. Then all the
paths information will come up in the window below just like on the Paths tab.
Erase Path: Will allow you to select a flow path in the drawing to erase.
Edit/Redo Path: Will allow you to select a flow path in the drawing to specify a
manual route for.
Goto AutoCAD: Hides the FP Modal window and displays a smaller Modeless
editing window. You can also execute any AutoCAD command on the menus or
command line.
Save Paths (File): Saves the location display to a comma-delimited CSV file in the
same format as shown in the display. Used for exportation of flow path distances to
© 2006 Proplanner
Reference Section
105
other applications. The FP application does not read this file.
Aisle Paths
The FP application can automatically generate flow path lines down the aisles of
your factory drawing using a shortest path algorithm to find the best route. To
perform this function, the FP application references a layer in AutoCAD that contains
lines (not polylines) that show the valid routes. If these lines intersect, then the FP
application assumes an intersection.
If the lines have the linetype of “BYLAYER” then those lines are assumed to
represent bi-directional flows. Otherwise, if the line is labeled with “UR” then the line
represents flow only in the direction of 0 to 179 degrees. If the line is labeled with
“DL” then the line represents flow only in the direction of 180 to 359 degrees.
Selecting the Add/Edit Aisle button will allow you to easily set these linetypes.
The FP application allows you to specify more than one layer for your aisle lines.
You are then allowed to assign these layers to your Method Types so that you can
specify a different set of aisles for Fork Trucks versus those for People or AGV’s (for
example).
Use Aisle Direction: Allows you to create aisle path lines and edit the direction and
width of existing aisle lines. You can only add lines on the layers specified in the
pull-down list. These layers come from the specified layers for the method types in
your current session. Therefore, if you wish to add a layer to draw aisle lines on, you
will need to first add that layer to one of your Method types in the Methods tab.
Incorrect Aisle Drawing: If the aisle paths are drawn incorrectly, this will cause the
© 2006 Proplanner
106
calculation to produce straight line flows. Below are examples of the most common
ways to cause problems by incorrectly drawing aisle path lines.
Most of these errors are only viewable zoomed in or if you know where you
overlapped. To avoid these issues, the best way is to try and draw the entire aisle
network at once, instead of making many individual lines. If these issues occur in
pre-made drawings, consult the troubleshooting section of the FP help file, located
on the Options/help tab.
Join Locs to Aisle: Lines must be connected from each Location text insertion point
to an aisle path line in order for the FP application to know how to get to, and from,
that location. You can manually draw the line from the insertion point (make sure to
use your object snap modes) to another aisle path line, or you can select this button
and have those lines drawn for you.
When the FP application automatically creates “Join Lines” from each Location text
to the aisle network it does so by selecting the closest aisle path line perpendicular,
or end-point connection. Join lines are placed on a layer of the same name as the
user-specified aisle path layer plus the following extension “-JOIN”. In this way, the
FP application can easily remove these lines and recreate them as the Location
points are moved around in the drawing by the user.
While you can use this “-JOIN” layer to manually draw connecting lines from the
Location text to the aisle network, the program will remove these lines whenever the
Erase Aisle Joins button is selected. As such, it is recommended that all manually
joined Locations are created on the same layer in which the aisle path lines are
drawn.
The “Join Locs” function will first check to see if the Location text is already joined to
the aisle network, and will not add an automatic Join line if an existing line is found
drawn to that insertion point.
In the case where multiple aisle path layers exist, the “Join Locs” command will only
join Location text to an aisle path line on a particular layer if that location is
referenced in a routing that uses a method that references a method type that is
© 2006 Proplanner
Reference Section
107
mapped to that layer.
Erase Aisle Joins: Will remove all lines found on the Aisle Path Join Layer (the
name of the aisle path layer with a “-JOIN” suffix)
Path Thickness
Flow Path Thickness: Allows you to specify a scale factor for the flow line path
thickness. Selecting update will apply this scale factor to the flow path lines for the
selected aggregation.
Congestion Thickness: Allows you to specify a scale factor for the congestion flow
lines. Selecting update will apply this scale factor to the congestion lines.
Path Arrows
Delete: Deletes all arrows in the selected aggregation.
Update: Any change to the arrow size or placement option will only occur on the
next calc or when this Update button is selected.
Path Arrows checkbox: Determines if paths should have arrows.
Path Ends/Path Vertices: Determines if arrows are to be placed at path ends only,
or also at each path vertex.
Arrow Width/Arrow Length: Specifies the size of the arrow for a zero width path.
As the path is scaled larger by the Path Thickness value and the Path Frequency,
the arrows for those specific paths will be factored accordingly.
Path Labels
Delete: Deletes all labels.
Update: Any change to the label size or placement option will only occur on the next
calc or when this Update button is selected.
Path Labels checkbox: Determines if paths should have labels.
Segment Dist.: Includes the distance of the individual segment with the path label.
Above Line/On Line: Determines if labels are placed center on the line or
positioned slightly above the line (i.e. text insertion point Center or Bottom-Center) to
the center of the line segment.
© 2006 Proplanner
108
Label Text: Determines if the path label will be Length, Aggregate, From/To,
Frequency, and Method Type.
Label Height: Specifies the height of the label.
Precision: Determines how many decimal places to show in the path distance
labels.
© 2006 Proplanner
Reference Section
5.6.1
109
Aggregated paths list group
The Paths tab is the main interface for path viewing, editing and annotation. The
path list is filled from information embedded within the paths shown in the AutoCAD
window for the selected aggregation method. Therefore, if there are no paths in
AutoCAD for the selected aggregation, then no paths will be shown in the list view.
When you select an aggregation in the top-left pull-down list, the FP application will
turn off all flow lines in the drawing and then turn on those flow lines for the selected
aggregation and subsequently fill the list view with the information stored within
those flow path polylines.
Since the information in the Paths window is pre-generated, it is not necessary to
load the routing file and calculate it in order to view, query, filter, color code (via the
Freq/Congest tab), delete or alter the thickness of the flow lines for all previously
generated aggregations.
Aggregated Paths List Group
Aggregation Method: Selecting an aggregation method will filter the flow path lines
in the drawing to only those for that method, and then the information within those
lines will be displayed in the list view.
User Specified Distance Update: For all selected paths you can specify a path
© 2006 Proplanner
110
distance that will override the distance that the FP application computed from the
drawing. This feature is useful for paths that may extend to other buildings, or
locations not in the current drawing.
Erase Selected Paths: Will erase the selected flow path in the current drawing and
the list view.
Erase All Listed Paths: Will erase all of the listed flow paths in the current drawing
for the selected aggregation.
Erase All DWG Paths: Will erase all of the flow paths in the current drawing for the
selected aggregation.
Edit/Redo Selected Path: Will allow you to specify a manually generated flow path
line for the selected path.
Editing Commands in Bottom right of screen
Query Path: Hides the FP Modal window and allows you to select a flow path to
query. Unlike the older versions of Flow Path, the user can now select multiple lines
and must hit enter when done selecting the lines they wish to query. Then all the
paths information will come up in the window below just like on the Paths tab.
Erase Path: Will allow you to select a flow path in the drawing to erase.
Edit/Redo Path: Will allow you to select a flow path in the drawing to specify a
manual route for.
Goto AutoCAD: Hides the FP Modal window and displays a smaller Modeless
editing window. You can also execute any AutoCAD command on the menus or
command line.
Save Paths (File): Saves the location display to a comma-delimited CSV file in the
same format as shown in the display. Used for exportation of flow path distances to
© 2006 Proplanner
Reference Section
111
other applications. The FP application does not read this file.
Aisle Paths
The FP application can automatically generate flow path lines down the aisles of
your factory drawing using a shortest path algorithm to find the best route. To
perform this function, the FP application references a layer in AutoCAD that contains
lines (not polylines) that show the valid routes. If these lines intersect, then the FP
application assumes an intersection.
If the lines have the linetype of “BYLAYER” then those lines are assumed to
represent bi-directional flows. Otherwise, if the line is labeled with “UR” then the line
represents flow only in the direction of 0 to 179 degrees. If the line is labeled with
“DL” then the line represents flow only in the direction of 180 to 359 degrees.
Selecting the Add/Edit Aisle button will allow you to easily set these linetypes.
The FP application allows you to specify more than one layer for your aisle lines.
You are then allowed to assign these layers to your Method Types so that you can
specify a different set of aisles for Fork Trucks versus those for People or AGV’s (for
example).
Use Aisle Direction: Allows you to create aisle path lines and edit the direction and
width of existing aisle lines. You can only add lines on the layers specified in the
pull-down list. These layers come from the specified layers for the method types in
your current session. Therefore, if you wish to add a layer to draw aisle lines on, you
will need to first add that layer to one of your Method types in the Methods tab.
Incorrect Aisle Drawing: If the aisle paths are drawn incorrectly, this will cause the
© 2006 Proplanner
112
calculation to produce straight line flows. Below are examples of the most common
ways to cause problems by incorrectly drawing aisle path lines.
Most of these errors are only viewable zoomed in or if you know where you
overlapped. To avoid these issues, the best way is to try and draw the entire aisle
network at once, instead of making many individual lines. If these issues occur in
pre-made drawings, consult the troubleshooting section of the FP help file, located
on the Options/help tab.
Join Locs to Aisle: Lines must be connected from each Location text insertion point
to an aisle path line in order for the FP application to know how to get to, and from,
that location. You can manually draw the line from the insertion point (make sure to
use your object snap modes) to another aisle path line, or you can select this button
and have those lines drawn for you.
When the FP application automatically creates “Join Lines” from each Location text
to the aisle network it does so by selecting the closest aisle path line perpendicular,
or end-point connection. Join lines are placed on a layer of the same name as the
user-specified aisle path layer plus the following extension “-JOIN”. In this way, the
FP application can easily remove these lines and recreate them as the Location
points are moved around in the drawing by the user.
While you can use this “-JOIN” layer to manually draw connecting lines from the
Location text to the aisle network, the program will remove these lines whenever the
Erase Aisle Joins button is selected. As such, it is recommended that all manually
joined Locations are created on the same layer in which the aisle path lines are
drawn.
The “Join Locs” function will first check to see if the Location text is already joined to
the aisle network, and will not add an automatic Join line if an existing line is found
drawn to that insertion point.
In the case where multiple aisle path layers exist, the “Join Locs” command will only
join Location text to an aisle path line on a particular layer if that location is
referenced in a routing that uses a method that references a method type that is
© 2006 Proplanner
Reference Section
113
mapped to that layer.
Erase Aisle Joins: Will remove all lines found on the Aisle Path Join Layer (the
name of the aisle path layer with a “-JOIN” suffix)
Path Thickness
Flow Path Thickness: Allows you to specify a scale factor for the flow line path
thickness. Selecting update will apply this scale factor to the flow path lines for the
selected aggregation.
Congestion Thickness: Allows you to specify a scale factor for the congestion flow
lines. Selecting update will apply this scale factor to the congestion lines.
Path Arrows
Delete: Deletes all arrows in the selected aggregation.
Update: Any change to the arrow size or placement option will only occur on the
next calc or when this Update button is selected.
Path Arrows checkbox: Determines if paths should have arrows.
Path Ends/Path Vertices: Determines if arrows are to be placed at path ends only,
or also at each path vertex.
Arrow Width/Arrow Length: Specifies the size of the arrow for a zero width path.
As the path is scaled larger by the Path Thickness value and the Path Frequency,
the arrows for those specific paths will be factored accordingly.
Path Labels
Delete: Deletes all labels.
Update: Any change to the label size or placement option will only occur on the next
calc or when this Update button is selected.
Path Labels checkbox: Determines if paths should have labels.
Segment Dist.: Includes the distance of the individual segment with the path label.
Above Line/On Line: Determines if labels are placed center on the line or
positioned slightly above the line (i.e. text insertion point Center or Bottom-Center) to
the center of the line segment.
© 2006 Proplanner
114
Label Text: Determines if the path label will be Length, Aggregate, From/To,
Frequency, and Method Type.
Label Height: Specifies the height of the label.
Precision: Determines how many decimal places to show in the path distance
labels.
© 2006 Proplanner
Reference Section
5.6.2
115
Editing commands in bottom right of screen
The Paths tab is the main interface for path viewing, editing and annotation. The
path list is filled from information embedded within the paths shown in the AutoCAD
window for the selected aggregation method. Therefore, if there are no paths in
AutoCAD for the selected aggregation, then no paths will be shown in the list view.
When you select an aggregation in the top-left pull-down list, the FP application will
turn off all flow lines in the drawing and then turn on those flow lines for the selected
aggregation and subsequently fill the list view with the information stored within
those flow path polylines.
Since the information in the Paths window is pre-generated, it is not necessary to
load the routing file and calculate it in order to view, query, filter, color code (via the
Freq/Congest tab), delete or alter the thickness of the flow lines for all previously
generated aggregations.
Aggregated Paths List Group
Aggregation Method: Selecting an aggregation method will filter the flow path lines
in the drawing to only those for that method, and then the information within those
lines will be displayed in the list view.
User Specified Distance Update: For all selected paths you can specify a path
© 2006 Proplanner
116
distance that will override the distance that the FP application computed from the
drawing. This feature is useful for paths that may extend to other buildings, or
locations not in the current drawing.
Erase Selected Paths: Will erase the selected flow path in the current drawing and
the list view.
Erase All Listed Paths: Will erase all of the listed flow paths in the current drawing
for the selected aggregation.
Erase All DWG Paths: Will erase all of the flow paths in the current drawing for the
selected aggregation.
Edit/Redo Selected Path: Will allow you to specify a manually generated flow path
line for the selected path.
Editing Commands in Bottom right of screen
Query Path: Hides the FP Modal window and allows you to select a flow path to
query. Unlike the older versions of Flow Path, the user can now select multiple lines
and must hit enter when done selecting the lines they wish to query. Then all the
paths information will come up in the window below just like on the Paths tab.
Erase Path: Will allow you to select a flow path in the drawing to erase.
Edit/Redo Path: Will allow you to select a flow path in the drawing to specify a
manual route for.
Goto AutoCAD: Hides the FP Modal window and displays a smaller Modeless
editing window. You can also execute any AutoCAD command on the menus or
command line.
Save Paths (File): Saves the location display to a comma-delimited CSV file in the
same format as shown in the display. Used for exportation of flow path distances to
© 2006 Proplanner
Reference Section
117
other applications. The FP application does not read this file.
Aisle Paths
The FP application can automatically generate flow path lines down the aisles of
your factory drawing using a shortest path algorithm to find the best route. To
perform this function, the FP application references a layer in AutoCAD that contains
lines (not polylines) that show the valid routes. If these lines intersect, then the FP
application assumes an intersection.
If the lines have the linetype of “BYLAYER” then those lines are assumed to
represent bi-directional flows. Otherwise, if the line is labeled with “UR” then the line
represents flow only in the direction of 0 to 179 degrees. If the line is labeled with
“DL” then the line represents flow only in the direction of 180 to 359 degrees.
Selecting the Add/Edit Aisle button will allow you to easily set these linetypes.
The FP application allows you to specify more than one layer for your aisle lines.
You are then allowed to assign these layers to your Method Types so that you can
specify a different set of aisles for Fork Trucks versus those for People or AGV’s (for
example).
Use Aisle Direction: Allows you to create aisle path lines and edit the direction and
width of existing aisle lines. You can only add lines on the layers specified in the
pull-down list. These layers come from the specified layers for the method types in
your current session. Therefore, if you wish to add a layer to draw aisle lines on, you
will need to first add that layer to one of your Method types in the Methods tab.
Incorrect Aisle Drawing: If the aisle paths are drawn incorrectly, this will cause the
© 2006 Proplanner
118
calculation to produce straight line flows. Below are examples of the most common
ways to cause problems by incorrectly drawing aisle path lines.
Most of these errors are only viewable zoomed in or if you know where you
overlapped. To avoid these issues, the best way is to try and draw the entire aisle
network at once, instead of making many individual lines. If these issues occur in
pre-made drawings, consult the troubleshooting section of the FP help file, located
on the Options/help tab.
Join Locs to Aisle: Lines must be connected from each Location text insertion point
to an aisle path line in order for the FP application to know how to get to, and from,
that location. You can manually draw the line from the insertion point (make sure to
use your object snap modes) to another aisle path line, or you can select this button
and have those lines drawn for you.
When the FP application automatically creates “Join Lines” from each Location text
to the aisle network it does so by selecting the closest aisle path line perpendicular,
or end-point connection. Join lines are placed on a layer of the same name as the
user-specified aisle path layer plus the following extension “-JOIN”. In this way, the
FP application can easily remove these lines and recreate them as the Location
points are moved around in the drawing by the user.
While you can use this “-JOIN” layer to manually draw connecting lines from the
Location text to the aisle network, the program will remove these lines whenever the
Erase Aisle Joins button is selected. As such, it is recommended that all manually
joined Locations are created on the same layer in which the aisle path lines are
drawn.
The “Join Locs” function will first check to see if the Location text is already joined to
the aisle network, and will not add an automatic Join line if an existing line is found
drawn to that insertion point.
In the case where multiple aisle path layers exist, the “Join Locs” command will only
join Location text to an aisle path line on a particular layer if that location is
referenced in a routing that uses a method that references a method type that is
© 2006 Proplanner
Reference Section
119
mapped to that layer.
Erase Aisle Joins: Will remove all lines found on the Aisle Path Join Layer (the
name of the aisle path layer with a “-JOIN” suffix)
Path Thickness
Flow Path Thickness: Allows you to specify a scale factor for the flow line path
thickness. Selecting update will apply this scale factor to the flow path lines for the
selected aggregation.
Congestion Thickness: Allows you to specify a scale factor for the congestion flow
lines. Selecting update will apply this scale factor to the congestion lines.
Path Arrows
Delete: Deletes all arrows in the selected aggregation.
Update: Any change to the arrow size or placement option will only occur on the
next calc or when this Update button is selected.
Path Arrows checkbox: Determines if paths should have arrows.
Path Ends/Path Vertices: Determines if arrows are to be placed at path ends only,
or also at each path vertex.
Arrow Width/Arrow Length: Specifies the size of the arrow for a zero width path.
As the path is scaled larger by the Path Thickness value and the Path Frequency,
the arrows for those specific paths will be factored accordingly.
Path Labels
Delete: Deletes all labels.
Update: Any change to the label size or placement option will only occur on the next
calc or when this Update button is selected.
Path Labels checkbox: Determines if paths should have labels.
Segment Dist.: Includes the distance of the individual segment with the path label.
Above Line/On Line: Determines if labels are placed center on the line or
positioned slightly above the line (i.e. text insertion point Center or Bottom-Center) to
the center of the line segment.
© 2006 Proplanner
120
Label Text: Determines if the path label will be Length, Aggregate, From/To,
Frequency, and Method Type.
Label Height: Specifies the height of the label.
Precision: Determines how many decimal places to show in the path distance
labels.
© 2006 Proplanner
Reference Section
5.6.3
121
Aisle paths
The Paths tab is the main interface for path viewing, editing and annotation. The
path list is filled from information embedded within the paths shown in the AutoCAD
window for the selected aggregation method. Therefore, if there are no paths in
AutoCAD for the selected aggregation, then no paths will be shown in the list view.
When you select an aggregation in the top-left pull-down list, the FP application will
turn off all flow lines in the drawing and then turn on those flow lines for the selected
aggregation and subsequently fill the list view with the information stored within
those flow path polylines.
Since the information in the Paths window is pre-generated, it is not necessary to
load the routing file and calculate it in order to view, query, filter, color code (via the
Freq/Congest tab), delete or alter the thickness of the flow lines for all previously
generated aggregations.
Aggregated Paths List Group
Aggregation Method: Selecting an aggregation method will filter the flow path lines
in the drawing to only those for that method, and then the information within those
lines will be displayed in the list view.
User Specified Distance Update: For all selected paths you can specify a path
© 2006 Proplanner
122
distance that will override the distance that the FP application computed from the
drawing. This feature is useful for paths that may extend to other buildings, or
locations not in the current drawing.
Erase Selected Paths: Will erase the selected flow path in the current drawing and
the list view.
Erase All Listed Paths: Will erase all of the listed flow paths in the current drawing
for the selected aggregation.
Erase All DWG Paths: Will erase all of the flow paths in the current drawing for the
selected aggregation.
Edit/Redo Selected Path: Will allow you to specify a manually generated flow path
line for the selected path.
Editing Commands in Bottom right of screen
Query Path: Hides the FP Modal window and allows you to select a flow path to
query. Unlike the older versions of Flow Path, the user can now select multiple lines
and must hit enter when done selecting the lines they wish to query. Then all the
paths information will come up in the window below just like on the Paths tab.
Erase Path: Will allow you to select a flow path in the drawing to erase.
Edit/Redo Path: Will allow you to select a flow path in the drawing to specify a
manual route for.
Goto AutoCAD: Hides the FP Modal window and displays a smaller Modeless
editing window. You can also execute any AutoCAD command on the menus or
command line.
Save Paths (File): Saves the location display to a comma-delimited CSV file in the
same format as shown in the display. Used for exportation of flow path distances to
© 2006 Proplanner
Reference Section
123
other applications. The FP application does not read this file.
Aisle Paths
The FP application can automatically generate flow path lines down the aisles of
your factory drawing using a shortest path algorithm to find the best route. To
perform this function, the FP application references a layer in AutoCAD that contains
lines (not polylines) that show the valid routes. If these lines intersect, then the FP
application assumes an intersection.
If the lines have the linetype of “BYLAYER” then those lines are assumed to
represent bi-directional flows. Otherwise, if the line is labeled with “UR” then the line
represents flow only in the direction of 0 to 179 degrees. If the line is labeled with
“DL” then the line represents flow only in the direction of 180 to 359 degrees.
Selecting the Add/Edit Aisle button will allow you to easily set these linetypes.
The FP application allows you to specify more than one layer for your aisle lines.
You are then allowed to assign these layers to your Method Types so that you can
specify a different set of aisles for Fork Trucks versus those for People or AGV’s (for
example).
Use Aisle Direction: Allows you to create aisle path lines and edit the direction and
width of existing aisle lines. You can only add lines on the layers specified in the
pull-down list. These layers come from the specified layers for the method types in
your current session. Therefore, if you wish to add a layer to draw aisle lines on, you
will need to first add that layer to one of your Method types in the Methods tab.
Incorrect Aisle Drawing: If the aisle paths are drawn incorrectly, this will cause the
© 2006 Proplanner
124
calculation to produce straight line flows. Below are examples of the most common
ways to cause problems by incorrectly drawing aisle path lines.
Most of these errors are only viewable zoomed in or if you know where you
overlapped. To avoid these issues, the best way is to try and draw the entire aisle
network at once, instead of making many individual lines. If these issues occur in
pre-made drawings, consult the troubleshooting section of the FP help file, located
on the Options/help tab.
Join Locs to Aisle: Lines must be connected from each Location text insertion point
to an aisle path line in order for the FP application to know how to get to, and from,
that location. You can manually draw the line from the insertion point (make sure to
use your object snap modes) to another aisle path line, or you can select this button
and have those lines drawn for you.
When the FP application automatically creates “Join Lines” from each Location text
to the aisle network it does so by selecting the closest aisle path line perpendicular,
or end-point connection. Join lines are placed on a layer of the same name as the
user-specified aisle path layer plus the following extension “-JOIN”. In this way, the
FP application can easily remove these lines and recreate them as the Location
points are moved around in the drawing by the user.
While you can use this “-JOIN” layer to manually draw connecting lines from the
Location text to the aisle network, the program will remove these lines whenever the
Erase Aisle Joins button is selected. As such, it is recommended that all manually
joined Locations are created on the same layer in which the aisle path lines are
drawn.
The “Join Locs” function will first check to see if the Location text is already joined to
the aisle network, and will not add an automatic Join line if an existing line is found
drawn to that insertion point.
In the case where multiple aisle path layers exist, the “Join Locs” command will only
join Location text to an aisle path line on a particular layer if that location is
referenced in a routing that uses a method that references a method type that is
© 2006 Proplanner
Reference Section
125
mapped to that layer.
Erase Aisle Joins: Will remove all lines found on the Aisle Path Join Layer (the
name of the aisle path layer with a “-JOIN” suffix)
Path Thickness
Flow Path Thickness: Allows you to specify a scale factor for the flow line path
thickness. Selecting update will apply this scale factor to the flow path lines for the
selected aggregation.
Congestion Thickness: Allows you to specify a scale factor for the congestion flow
lines. Selecting update will apply this scale factor to the congestion lines.
Path Arrows
Delete: Deletes all arrows in the selected aggregation.
Update: Any change to the arrow size or placement option will only occur on the
next calc or when this Update button is selected.
Path Arrows checkbox: Determines if paths should have arrows.
Path Ends/Path Vertices: Determines if arrows are to be placed at path ends only,
or also at each path vertex.
Arrow Width/Arrow Length: Specifies the size of the arrow for a zero width path.
As the path is scaled larger by the Path Thickness value and the Path Frequency,
the arrows for those specific paths will be factored accordingly.
Path Labels
Delete: Deletes all labels.
Update: Any change to the label size or placement option will only occur on the next
calc or when this Update button is selected.
Path Labels checkbox: Determines if paths should have labels.
Segment Dist.: Includes the distance of the individual segment with the path label.
Above Line/On Line: Determines if labels are placed center on the line or
positioned slightly above the line (i.e. text insertion point Center or Bottom-Center) to
the center of the line segment.
© 2006 Proplanner
126
Label Text: Determines if the path label will be Length, Aggregate, From/To,
Frequency, and Method Type.
Label Height: Specifies the height of the label.
Precision: Determines how many decimal places to show in the path distance
labels.
© 2006 Proplanner
Reference Section
5.6.4
127
Path thickness
The Paths tab is the main interface for path viewing, editing and annotation. The
path list is filled from information embedded within the paths shown in the AutoCAD
window for the selected aggregation method. Therefore, if there are no paths in
AutoCAD for the selected aggregation, then no paths will be shown in the list view.
When you select an aggregation in the top-left pull-down list, the FP application will
turn off all flow lines in the drawing and then turn on those flow lines for the selected
aggregation and subsequently fill the list view with the information stored within
those flow path polylines.
Since the information in the Paths window is pre-generated, it is not necessary to
load the routing file and calculate it in order to view, query, filter, color code (via the
Freq/Congest tab), delete or alter the thickness of the flow lines for all previously
generated aggregations.
Aggregated Paths List Group
Aggregation Method: Selecting an aggregation method will filter the flow path lines
in the drawing to only those for that method, and then the information within those
lines will be displayed in the list view.
User Specified Distance Update: For all selected paths you can specify a path
© 2006 Proplanner
128
distance that will override the distance that the FP application computed from the
drawing. This feature is useful for paths that may extend to other buildings, or
locations not in the current drawing.
Erase Selected Paths: Will erase the selected flow path in the current drawing and
the list view.
Erase All Listed Paths: Will erase all of the listed flow paths in the current drawing
for the selected aggregation.
Erase All DWG Paths: Will erase all of the flow paths in the current drawing for the
selected aggregation.
Edit/Redo Selected Path: Will allow you to specify a manually generated flow path
line for the selected path.
Editing Commands in Bottom right of screen
Query Path: Hides the FP Modal window and allows you to select a flow path to
query. Unlike the older versions of Flow Path, the user can now select multiple lines
and must hit enter when done selecting the lines they wish to query. Then all the
paths information will come up in the window below just like on the Paths tab.
Erase Path: Will allow you to select a flow path in the drawing to erase.
Edit/Redo Path: Will allow you to select a flow path in the drawing to specify a
manual route for.
Goto AutoCAD: Hides the FP Modal window and displays a smaller Modeless
editing window. You can also execute any AutoCAD command on the menus or
command line.
Save Paths (File): Saves the location display to a comma-delimited CSV file in the
same format as shown in the display. Used for exportation of flow path distances to
© 2006 Proplanner
Reference Section
129
other applications. The FP application does not read this file.
Aisle Paths
The FP application can automatically generate flow path lines down the aisles of
your factory drawing using a shortest path algorithm to find the best route. To
perform this function, the FP application references a layer in AutoCAD that contains
lines (not polylines) that show the valid routes. If these lines intersect, then the FP
application assumes an intersection.
If the lines have the linetype of “BYLAYER” then those lines are assumed to
represent bi-directional flows. Otherwise, if the line is labeled with “UR” then the line
represents flow only in the direction of 0 to 179 degrees. If the line is labeled with
“DL” then the line represents flow only in the direction of 180 to 359 degrees.
Selecting the Add/Edit Aisle button will allow you to easily set these linetypes.
The FP application allows you to specify more than one layer for your aisle lines.
You are then allowed to assign these layers to your Method Types so that you can
specify a different set of aisles for Fork Trucks versus those for People or AGV’s (for
example).
Use Aisle Direction: Allows you to create aisle path lines and edit the direction and
width of existing aisle lines. You can only add lines on the layers specified in the
pull-down list. These layers come from the specified layers for the method types in
your current session. Therefore, if you wish to add a layer to draw aisle lines on, you
will need to first add that layer to one of your Method types in the Methods tab.
Incorrect Aisle Drawing: If the aisle paths are drawn incorrectly, this will cause the
© 2006 Proplanner
130
calculation to produce straight line flows. Below are examples of the most common
ways to cause problems by incorrectly drawing aisle path lines.
Most of these errors are only viewable zoomed in or if you know where you
overlapped. To avoid these issues, the best way is to try and draw the entire aisle
network at once, instead of making many individual lines. If these issues occur in
pre-made drawings, consult the troubleshooting section of the FP help file, located
on the Options/help tab.
Join Locs to Aisle: Lines must be connected from each Location text insertion point
to an aisle path line in order for the FP application to know how to get to, and from,
that location. You can manually draw the line from the insertion point (make sure to
use your object snap modes) to another aisle path line, or you can select this button
and have those lines drawn for you.
When the FP application automatically creates “Join Lines” from each Location text
to the aisle network it does so by selecting the closest aisle path line perpendicular,
or end-point connection. Join lines are placed on a layer of the same name as the
user-specified aisle path layer plus the following extension “-JOIN”. In this way, the
FP application can easily remove these lines and recreate them as the Location
points are moved around in the drawing by the user.
While you can use this “-JOIN” layer to manually draw connecting lines from the
Location text to the aisle network, the program will remove these lines whenever the
Erase Aisle Joins button is selected. As such, it is recommended that all manually
joined Locations are created on the same layer in which the aisle path lines are
drawn.
The “Join Locs” function will first check to see if the Location text is already joined to
the aisle network, and will not add an automatic Join line if an existing line is found
drawn to that insertion point.
In the case where multiple aisle path layers exist, the “Join Locs” command will only
join Location text to an aisle path line on a particular layer if that location is
referenced in a routing that uses a method that references a method type that is
© 2006 Proplanner
Reference Section
131
mapped to that layer.
Erase Aisle Joins: Will remove all lines found on the Aisle Path Join Layer (the
name of the aisle path layer with a “-JOIN” suffix)
Path Thickness
Flow Path Thickness: Allows you to specify a scale factor for the flow line path
thickness. Selecting update will apply this scale factor to the flow path lines for the
selected aggregation.
Congestion Thickness: Allows you to specify a scale factor for the congestion flow
lines. Selecting update will apply this scale factor to the congestion lines.
Path Arrows
Delete: Deletes all arrows in the selected aggregation.
Update: Any change to the arrow size or placement option will only occur on the
next calc or when this Update button is selected.
Path Arrows checkbox: Determines if paths should have arrows.
Path Ends/Path Vertices: Determines if arrows are to be placed at path ends only,
or also at each path vertex.
Arrow Width/Arrow Length: Specifies the size of the arrow for a zero width path.
As the path is scaled larger by the Path Thickness value and the Path Frequency,
the arrows for those specific paths will be factored accordingly.
Path Labels
Delete: Deletes all labels.
Update: Any change to the label size or placement option will only occur on the next
calc or when this Update button is selected.
Path Labels checkbox: Determines if paths should have labels.
Segment Dist.: Includes the distance of the individual segment with the path label.
Above Line/On Line: Determines if labels are placed center on the line or
positioned slightly above the line (i.e. text insertion point Center or Bottom-Center) to
the center of the line segment.
© 2006 Proplanner
132
Label Text: Determines if the path label will be Length, Aggregate, From/To,
Frequency, and Method Type.
Label Height: Specifies the height of the label.
Precision: Determines how many decimal places to show in the path distance
labels.
© 2006 Proplanner
Reference Section
5.6.5
133
Path Arrows
The Paths tab is the main interface for path viewing, editing and annotation. The
path list is filled from information embedded within the paths shown in the AutoCAD
window for the selected aggregation method. Therefore, if there are no paths in
AutoCAD for the selected aggregation, then no paths will be shown in the list view.
When you select an aggregation in the top-left pull-down list, the FP application will
turn off all flow lines in the drawing and then turn on those flow lines for the selected
aggregation and subsequently fill the list view with the information stored within
those flow path polylines.
Since the information in the Paths window is pre-generated, it is not necessary to
load the routing file and calculate it in order to view, query, filter, color code (via the
Freq/Congest tab), delete or alter the thickness of the flow lines for all previously
generated aggregations.
Aggregated Paths List Group
Aggregation Method: Selecting an aggregation method will filter the flow path lines
in the drawing to only those for that method, and then the information within those
lines will be displayed in the list view.
User Specified Distance Update: For all selected paths you can specify a path
© 2006 Proplanner
134
distance that will override the distance that the FP application computed from the
drawing. This feature is useful for paths that may extend to other buildings, or
locations not in the current drawing.
Erase Selected Paths: Will erase the selected flow path in the current drawing and
the list view.
Erase All Listed Paths: Will erase all of the listed flow paths in the current drawing
for the selected aggregation.
Erase All DWG Paths: Will erase all of the flow paths in the current drawing for the
selected aggregation.
Edit/Redo Selected Path: Will allow you to specify a manually generated flow path
line for the selected path.
Editing Commands in Bottom right of screen
Query Path: Hides the FP Modal window and allows you to select a flow path to
query. Unlike the older versions of Flow Path, the user can now select multiple lines
and must hit enter when done selecting the lines they wish to query. Then all the
paths information will come up in the window below just like on the Paths tab.
Erase Path: Will allow you to select a flow path in the drawing to erase.
Edit/Redo Path: Will allow you to select a flow path in the drawing to specify a
manual route for.
Goto AutoCAD: Hides the FP Modal window and displays a smaller Modeless
editing window. You can also execute any AutoCAD command on the menus or
command line.
Save Paths (File): Saves the location display to a comma-delimited CSV file in the
same format as shown in the display. Used for exportation of flow path distances to
© 2006 Proplanner
Reference Section
135
other applications. The FP application does not read this file.
Aisle Paths
The FP application can automatically generate flow path lines down the aisles of
your factory drawing using a shortest path algorithm to find the best route. To
perform this function, the FP application references a layer in AutoCAD that contains
lines (not polylines) that show the valid routes. If these lines intersect, then the FP
application assumes an intersection.
If the lines have the linetype of “BYLAYER” then those lines are assumed to
represent bi-directional flows. Otherwise, if the line is labeled with “UR” then the line
represents flow only in the direction of 0 to 179 degrees. If the line is labeled with
“DL” then the line represents flow only in the direction of 180 to 359 degrees.
Selecting the Add/Edit Aisle button will allow you to easily set these linetypes.
The FP application allows you to specify more than one layer for your aisle lines.
You are then allowed to assign these layers to your Method Types so that you can
specify a different set of aisles for Fork Trucks versus those for People or AGV’s (for
example).
Use Aisle Direction: Allows you to create aisle path lines and edit the direction and
width of existing aisle lines. You can only add lines on the layers specified in the
pull-down list. These layers come from the specified layers for the method types in
your current session. Therefore, if you wish to add a layer to draw aisle lines on, you
will need to first add that layer to one of your Method types in the Methods tab.
Incorrect Aisle Drawing: If the aisle paths are drawn incorrectly, this will cause the
© 2006 Proplanner
136
calculation to produce straight line flows. Below are examples of the most common
ways to cause problems by incorrectly drawing aisle path lines.
Most of these errors are only viewable zoomed in or if you know where you
overlapped. To avoid these issues, the best way is to try and draw the entire aisle
network at once, instead of making many individual lines. If these issues occur in
pre-made drawings, consult the troubleshooting section of the FP help file, located
on the Options/help tab.
Join Locs to Aisle: Lines must be connected from each Location text insertion point
to an aisle path line in order for the FP application to know how to get to, and from,
that location. You can manually draw the line from the insertion point (make sure to
use your object snap modes) to another aisle path line, or you can select this button
and have those lines drawn for you.
When the FP application automatically creates “Join Lines” from each Location text
to the aisle network it does so by selecting the closest aisle path line perpendicular,
or end-point connection. Join lines are placed on a layer of the same name as the
user-specified aisle path layer plus the following extension “-JOIN”. In this way, the
FP application can easily remove these lines and recreate them as the Location
points are moved around in the drawing by the user.
While you can use this “-JOIN” layer to manually draw connecting lines from the
Location text to the aisle network, the program will remove these lines whenever the
Erase Aisle Joins button is selected. As such, it is recommended that all manually
joined Locations are created on the same layer in which the aisle path lines are
drawn.
The “Join Locs” function will first check to see if the Location text is already joined to
the aisle network, and will not add an automatic Join line if an existing line is found
drawn to that insertion point.
In the case where multiple aisle path layers exist, the “Join Locs” command will only
join Location text to an aisle path line on a particular layer if that location is
referenced in a routing that uses a method that references a method type that is
© 2006 Proplanner
Reference Section
137
mapped to that layer.
Erase Aisle Joins: Will remove all lines found on the Aisle Path Join Layer (the
name of the aisle path layer with a “-JOIN” suffix)
Path Thickness
Flow Path Thickness: Allows you to specify a scale factor for the flow line path
thickness. Selecting update will apply this scale factor to the flow path lines for the
selected aggregation.
Congestion Thickness: Allows you to specify a scale factor for the congestion flow
lines. Selecting update will apply this scale factor to the congestion lines.
Path Arrows
Delete: Deletes all arrows in the selected aggregation.
Update: Any change to the arrow size or placement option will only occur on the
next calc or when this Update button is selected.
Path Arrows checkbox: Determines if paths should have arrows.
Path Ends/Path Vertices: Determines if arrows are to be placed at path ends only,
or also at each path vertex.
Arrow Width/Arrow Length: Specifies the size of the arrow for a zero width path.
As the path is scaled larger by the Path Thickness value and the Path Frequency,
the arrows for those specific paths will be factored accordingly.
Path Labels
Delete: Deletes all labels.
Update: Any change to the label size or placement option will only occur on the next
calc or when this Update button is selected.
Path Labels checkbox: Determines if paths should have labels.
Segment Dist.: Includes the distance of the individual segment with the path label.
Above Line/On Line: Determines if labels are placed center on the line or
positioned slightly above the line (i.e. text insertion point Center or Bottom-Center) to
the center of the line segment.
© 2006 Proplanner
138
Label Text: Determines if the path label will be Length, Aggregate, From/To,
Frequency, and Method Type.
Label Height: Specifies the height of the label.
Precision: Determines how many decimal places to show in the path distance
labels.
© 2006 Proplanner
Reference Section
5.6.6
139
Path labels
The Paths tab is the main interface for path viewing, editing and annotation. The
path list is filled from information embedded within the paths shown in the AutoCAD
window for the selected aggregation method. Therefore, if there are no paths in
AutoCAD for the selected aggregation, then no paths will be shown in the list view.
When you select an aggregation in the top-left pull-down list, the FP application will
turn off all flow lines in the drawing and then turn on those flow lines for the selected
aggregation and subsequently fill the list view with the information stored within
those flow path polylines.
Since the information in the Paths window is pre-generated, it is not necessary to
load the routing file and calculate it in order to view, query, filter, color code (via the
Freq/Congest tab), delete or alter the thickness of the flow lines for all previously
generated aggregations.
Aggregated Paths List Group
Aggregation Method: Selecting an aggregation method will filter the flow path lines
in the drawing to only those for that method, and then the information within those
lines will be displayed in the list view.
User Specified Distance Update: For all selected paths you can specify a path
© 2006 Proplanner
140
distance that will override the distance that the FP application computed from the
drawing. This feature is useful for paths that may extend to other buildings, or
locations not in the current drawing.
Erase Selected Paths: Will erase the selected flow path in the current drawing and
the list view.
Erase All Listed Paths: Will erase all of the listed flow paths in the current drawing
for the selected aggregation.
Erase All DWG Paths: Will erase all of the flow paths in the current drawing for the
selected aggregation.
Edit/Redo Selected Path: Will allow you to specify a manually generated flow path
line for the selected path.
Editing Commands in Bottom right of screen
Query Path: Hides the FP Modal window and allows you to select a flow path to
query. Unlike the older versions of Flow Path, the user can now select multiple lines
and must hit enter when done selecting the lines they wish to query. Then all the
paths information will come up in the window below just like on the Paths tab.
Erase Path: Will allow you to select a flow path in the drawing to erase.
Edit/Redo Path: Will allow you to select a flow path in the drawing to specify a
manual route for.
Goto AutoCAD: Hides the FP Modal window and displays a smaller Modeless
editing window. You can also execute any AutoCAD command on the menus or
command line.
Save Paths (File): Saves the location display to a comma-delimited CSV file in the
same format as shown in the display. Used for exportation of flow path distances to
© 2006 Proplanner
Reference Section
141
other applications. The FP application does not read this file.
Aisle Paths
The FP application can automatically generate flow path lines down the aisles of
your factory drawing using a shortest path algorithm to find the best route. To
perform this function, the FP application references a layer in AutoCAD that contains
lines (not polylines) that show the valid routes. If these lines intersect, then the FP
application assumes an intersection.
If the lines have the linetype of “BYLAYER” then those lines are assumed to
represent bi-directional flows. Otherwise, if the line is labeled with “UR” then the line
represents flow only in the direction of 0 to 179 degrees. If the line is labeled with
“DL” then the line represents flow only in the direction of 180 to 359 degrees.
Selecting the Add/Edit Aisle button will allow you to easily set these linetypes.
The FP application allows you to specify more than one layer for your aisle lines.
You are then allowed to assign these layers to your Method Types so that you can
specify a different set of aisles for Fork Trucks versus those for People or AGV’s (for
example).
Use Aisle Direction: Allows you to create aisle path lines and edit the direction and
width of existing aisle lines. You can only add lines on the layers specified in the
pull-down list. These layers come from the specified layers for the method types in
your current session. Therefore, if you wish to add a layer to draw aisle lines on, you
will need to first add that layer to one of your Method types in the Methods tab.
Incorrect Aisle Drawing: If the aisle paths are drawn incorrectly, this will cause the
© 2006 Proplanner
142
calculation to produce straight line flows. Below are examples of the most common
ways to cause problems by incorrectly drawing aisle path lines.
Most of these errors are only viewable zoomed in or if you know where you
overlapped. To avoid these issues, the best way is to try and draw the entire aisle
network at once, instead of making many individual lines. If these issues occur in
pre-made drawings, consult the troubleshooting section of the FP help file, located
on the Options/help tab.
Join Locs to Aisle: Lines must be connected from each Location text insertion point
to an aisle path line in order for the FP application to know how to get to, and from,
that location. You can manually draw the line from the insertion point (make sure to
use your object snap modes) to another aisle path line, or you can select this button
and have those lines drawn for you.
When the FP application automatically creates “Join Lines” from each Location text
to the aisle network it does so by selecting the closest aisle path line perpendicular,
or end-point connection. Join lines are placed on a layer of the same name as the
user-specified aisle path layer plus the following extension “-JOIN”. In this way, the
FP application can easily remove these lines and recreate them as the Location
points are moved around in the drawing by the user.
While you can use this “-JOIN” layer to manually draw connecting lines from the
Location text to the aisle network, the program will remove these lines whenever the
Erase Aisle Joins button is selected. As such, it is recommended that all manually
joined Locations are created on the same layer in which the aisle path lines are
drawn.
The “Join Locs” function will first check to see if the Location text is already joined to
the aisle network, and will not add an automatic Join line if an existing line is found
drawn to that insertion point.
In the case where multiple aisle path layers exist, the “Join Locs” command will only
join Location text to an aisle path line on a particular layer if that location is
referenced in a routing that uses a method that references a method type that is
© 2006 Proplanner
Reference Section
143
mapped to that layer.
Erase Aisle Joins: Will remove all lines found on the Aisle Path Join Layer (the
name of the aisle path layer with a “-JOIN” suffix)
Path Thickness
Flow Path Thickness: Allows you to specify a scale factor for the flow line path
thickness. Selecting update will apply this scale factor to the flow path lines for the
selected aggregation.
Congestion Thickness: Allows you to specify a scale factor for the congestion flow
lines. Selecting update will apply this scale factor to the congestion lines.
Path Arrows
Delete: Deletes all arrows in the selected aggregation.
Update: Any change to the arrow size or placement option will only occur on the
next calc or when this Update button is selected.
Path Arrows checkbox: Determines if paths should have arrows.
Path Ends/Path Vertices: Determines if arrows are to be placed at path ends only,
or also at each path vertex.
Arrow Width/Arrow Length: Specifies the size of the arrow for a zero width path.
As the path is scaled larger by the Path Thickness value and the Path Frequency,
the arrows for those specific paths will be factored accordingly.
Path Labels
Delete: Deletes all labels.
Update: Any change to the label size or placement option will only occur on the next
calc or when this Update button is selected.
Path Labels checkbox: Determines if paths should have labels.
Segment Dist.: Includes the distance of the individual segment with the path label.
Above Line/On Line: Determines if labels are placed center on the line or
positioned slightly above the line (i.e. text insertion point Center or Bottom-Center) to
the center of the line segment.
© 2006 Proplanner
144
Label Text: Determines if the path label will be Length, Aggregate, From/To,
Frequency, and Method Type.
Label Height: Specifies the height of the label.
Precision: Determines how many decimal places to show in the path distance
labels.
© 2006 Proplanner
Reference Section
5.7
145
Methods Tab
Methods are used to determine the time and cost of a flow routing. The methods tab
contains both a list of Methods and a list of Method types. A Method must reference
a specific Method Type. The user can set a quantity for method. Method type
quantities are automatically calculated by summing up all referenced method
quantities (Note that the method type quantity may not be correct until calculation
button in the Part Routing Tab is hit). Quantities for both methods and method types
can be fractional or whole. This allows the user to get more exact numbers for output
and later round it to whole numbers representing a whole cart or forklift, as desired.
Methods are device instances (specific devices) or device usage types (specific load
and unload combinations), while Method Types are classes of devices with
performance and cost information. In the example shown above, the CART is a
method with a 5 second load and unload time that uses the performance and cost
properties of the method type HAND. A flow routing would reference the method
© 2006 Proplanner
146
CART which would have the performance of the Method Type HAND.
Methods Format
Method Name: Name of a method referenced in the routing file. Changing
this name and selecting the Update button will search and replace all
occurrences of that method within the routing file.
Calc: For large studies, you may wish to turn off the calculation of certain
method types when they are not the focus of a particular study.
The congestion diagram is generated for all Products and Methods that have
their Calc option selected to YES. As a result, if you wish to generate a
congestion analysis for a subset of Products and/or material handling
methods, then you need only de-select (by setting the calc option to NO),
those Products and/or methods that you do not wish included in your
congestion analysis.
Qty: Quantity of the Method.
Method Type: Name of method type (discussed below) to use the
performance data and aisle network for.
Load & Unload: Determines the time (in seconds) for the Load or Unload
activity. Times can be specified directly, or the name of a Process (located in
the process tab) can be referenced. If there is a load/unload time specified on
the routings tab for a specific route, that time will override this value
automatically.
Start Loc: Sets the default starting location for material handling device
objects in the flow animation (coming with a future release).
Color: Color for the Method Type when Aggregate by Method Type is
selected.
Method Types Format
© 2006 Proplanner
Reference Section
147
Method Type Name: Name of a Method Type referenced in the Method list.
Changing this name and selecting the Update button will search and replace
all occurrences of that method type within the method list file.
Quantity: Quantity of Method Types. Used to determine the total fixed costs
for the Method Type.
Effective %: (1 to 100) Typically, the routings file contains only productive
moves of material, however method types will need to deadhead (move empty
to another pickup location) a certain percentage of the time. The effective
percentage is the time that the device typically travels loaded (accounted for
in the routings) divided by the total travel time (including loaded and
empty-deadheading). If all moves of the Method Type are accounted for in
the routing, then set this value to 100, otherwise, if only productive moves are
accounted for in the routing and the device will typically return back empty,
then set this value to 50.
Maximum Minutes: The maximum minutes per time period (same as that
which the Product Quantity is determined for) that the device is available.
115200 minutes is the default, which is equivalent to 1 shift, full-time
operation.
Fixed Cost $: The fixed cost per time period (same as that for the Product
Quantity). This value is multiplied by the total Quantity of Method Types and
then added to the total handling cost in the summary report.
Variable Cost $: The variable cost per hour for use of the method type. This
value is multiplied by the time of usage for the method type.
Straight Speed: Straight moving speed for the Method Type.
Acceleration/Deceleration: Rate of Acceleration and Deceleration for the
method type. This is used to slow down and speed up the device around
corners. As a result, a 100’ straight move will take less time (and thus be
cheaper), than a 100’ move would be that turns several times.
Turn Angle: An integer value in degrees that determines if an angle between
two path segments (lines) constitutes a turn that the method type would need
to slow down and speed up for. The default value of 100 degrees means that
any angle less then or equal to 100 degrees would be considered a turn.
Aisle Path Layer: Identifies the layer in the AutoCAD drawing to look in for
the Aisle Path lines used by the method type. Each method type could use a
different layer so that different aisle networks can be specified (i.e. different
aisles may be used by Fork Trucks, Tugger Trucks, AGV’s and People).
© 2006 Proplanner
148
Color: Selects which aggregate flow paths to change the color coding for.
Editing
Update: Changes to the Method or Method Type names will be automatically made
in the Routings and Method lists that reference that Method or Method Type.
Remove: Methods and Method Types cannot be removed if they are currently being
referenced in the routing or Method respectively.
Add: Adding a Method, or Method Type, will display it in the:
Method – Method and Via Method pull-down lists on the Routings tab
Method Type - Load and Unload pull-down lists on the Methods tab.
Import Methods: The methods file contains information about Containers, Methods,
Method Types and Processes. Selecting the Import option will reload all three lists in
their appropriate tabs.
Save Methods: The methods file contains information about Containers, Methods,
Method Types and Processes. Selecting the Save option will save all three lists from
their appropriate tabs
© 2006 Proplanner
Reference Section
5.7.1
149
Methods format
Methods are used to determine the time and cost of a flow routing. The methods tab
contains both a list of Methods and a list of Method types. A Method must reference
a specific Method Type. The user can set a quantity for method. Method type
quantities are automatically calculated by summing up all referenced method
quantities (Note that the method type quantity may not be correct until calculation
button in the Part Routing Tab is hit). Quantities for both methods and method types
can be fractional or whole. This allows the user to get more exact numbers for output
and later round it to whole numbers representing a whole cart or forklift, as desired.
Methods are device instances (specific devices) or device usage types (specific load
and unload combinations), while Method Types are classes of devices with
performance and cost information. In the example shown above, the CART is a
method with a 5 second load and unload time that uses the performance and cost
properties of the method type HAND. A flow routing would reference the method
© 2006 Proplanner
150
CART which would have the performance of the Method Type HAND.
Methods Format
Method Name: Name of a method referenced in the routing file. Changing
this name and selecting the Update button will search and replace all
occurrences of that method within the routing file.
Calc: For large studies, you may wish to turn off the calculation of certain
method types when they are not the focus of a particular study.
The congestion diagram is generated for all Products and Methods that have
their Calc option selected to YES. As a result, if you wish to generate a
congestion analysis for a subset of Products and/or material handling
methods, then you need only de-select (by setting the calc option to NO),
those Products and/or methods that you do not wish included in your
congestion analysis.
Qty: Quantity of the Method.
Method Type: Name of method type (discussed below) to use the
performance data and aisle network for.
Load & Unload: Determines the time (in seconds) for the Load or Unload
activity. Times can be specified directly, or the name of a Process (located in
the process tab) can be referenced. If there is a load/unload time specified on
the routings tab for a specific route, that time will override this value
automatically.
Start Loc: Sets the default starting location for material handling device
objects in the flow animation (coming with a future release).
Color: Color for the Method Type when Aggregate by Method Type is
selected.
Method Types Format
© 2006 Proplanner
Reference Section
151
Method Type Name: Name of a Method Type referenced in the Method list.
Changing this name and selecting the Update button will search and replace
all occurrences of that method type within the method list file.
Quantity: Quantity of Method Types. Used to determine the total fixed costs
for the Method Type.
Effective %: (1 to 100) Typically, the routings file contains only productive
moves of material, however method types will need to deadhead (move empty
to another pickup location) a certain percentage of the time. The effective
percentage is the time that the device typically travels loaded (accounted for
in the routings) divided by the total travel time (including loaded and
empty-deadheading). If all moves of the Method Type are accounted for in
the routing, then set this value to 100, otherwise, if only productive moves are
accounted for in the routing and the device will typically return back empty,
then set this value to 50.
Maximum Minutes: The maximum minutes per time period (same as that
which the Product Quantity is determined for) that the device is available.
115200 minutes is the default, which is equivalent to 1 shift, full-time
operation.
Fixed Cost $: The fixed cost per time period (same as that for the Product
Quantity). This value is multiplied by the total Quantity of Method Types and
then added to the total handling cost in the summary report.
Variable Cost $: The variable cost per hour for use of the method type. This
value is multiplied by the time of usage for the method type.
Straight Speed: Straight moving speed for the Method Type.
Acceleration/Deceleration: Rate of Acceleration and Deceleration for the
method type. This is used to slow down and speed up the device around
corners. As a result, a 100’ straight move will take less time (and thus be
cheaper), than a 100’ move would be that turns several times.
Turn Angle: An integer value in degrees that determines if an angle between
two path segments (lines) constitutes a turn that the method type would need
to slow down and speed up for. The default value of 100 degrees means that
any angle less then or equal to 100 degrees would be considered a turn.
Aisle Path Layer: Identifies the layer in the AutoCAD drawing to look in for
the Aisle Path lines used by the method type. Each method type could use a
different layer so that different aisle networks can be specified (i.e. different
aisles may be used by Fork Trucks, Tugger Trucks, AGV’s and People).
© 2006 Proplanner
152
Color: Selects which aggregate flow paths to change the color coding for.
Editing
Update: Changes to the Method or Method Type names will be automatically made
in the Routings and Method lists that reference that Method or Method Type.
Remove: Methods and Method Types cannot be removed if they are currently being
referenced in the routing or Method respectively.
Add: Adding a Method, or Method Type, will display it in the:
Method – Method and Via Method pull-down lists on the Routings tab
Method Type - Load and Unload pull-down lists on the Methods tab.
Import Methods: The methods file contains information about Containers, Methods,
Method Types and Processes. Selecting the Import option will reload all three lists in
their appropriate tabs.
Save Methods: The methods file contains information about Containers, Methods,
Method Types and Processes. Selecting the Save option will save all three lists from
their appropriate tabs
© 2006 Proplanner
Reference Section
5.7.2
153
Method type's format
Methods are used to determine the time and cost of a flow routing. The methods tab
contains both a list of Methods and a list of Method types. A Method must reference
a specific Method Type. The user can set a quantity for method. Method type
quantities are automatically calculated by summing up all referenced method
quantities (Note that the method type quantity may not be correct until calculation
button in the Part Routing Tab is hit). Quantities for both methods and method types
can be fractional or whole. This allows the user to get more exact numbers for output
and later round it to whole numbers representing a whole cart or forklift, as desired.
Methods are device instances (specific devices) or device usage types (specific load
and unload combinations), while Method Types are classes of devices with
performance and cost information. In the example shown above, the CART is a
method with a 5 second load and unload time that uses the performance and cost
properties of the method type HAND. A flow routing would reference the method
© 2006 Proplanner
154
CART which would have the performance of the Method Type HAND.
Methods Format
Method Name: Name of a method referenced in the routing file. Changing
this name and selecting the Update button will search and replace all
occurrences of that method within the routing file.
Calc: For large studies, you may wish to turn off the calculation of certain
method types when they are not the focus of a particular study.
The congestion diagram is generated for all Products and Methods that have
their Calc option selected to YES. As a result, if you wish to generate a
congestion analysis for a subset of Products and/or material handling
methods, then you need only de-select (by setting the calc option to NO),
those Products and/or methods that you do not wish included in your
congestion analysis.
Qty: Quantity of the Method.
Method Type: Name of method type (discussed below) to use the
performance data and aisle network for.
Load & Unload: Determines the time (in seconds) for the Load or Unload
activity. Times can be specified directly, or the name of a Process (located in
the process tab) can be referenced. If there is a load/unload time specified on
the routings tab for a specific route, that time will override this value
automatically.
Start Loc: Sets the default starting location for material handling device
objects in the flow animation (coming with a future release).
Color: Color for the Method Type when Aggregate by Method Type is
selected.
Method Types Format
© 2006 Proplanner
Reference Section
155
Method Type Name: Name of a Method Type referenced in the Method list.
Changing this name and selecting the Update button will search and replace
all occurrences of that method type within the method list file.
Quantity: Quantity of Method Types. Used to determine the total fixed costs
for the Method Type.
Effective %: (1 to 100) Typically, the routings file contains only productive
moves of material, however method types will need to deadhead (move empty
to another pickup location) a certain percentage of the time. The effective
percentage is the time that the device typically travels loaded (accounted for
in the routings) divided by the total travel time (including loaded and
empty-deadheading). If all moves of the Method Type are accounted for in
the routing, then set this value to 100, otherwise, if only productive moves are
accounted for in the routing and the device will typically return back empty,
then set this value to 50.
Maximum Minutes: The maximum minutes per time period (same as that
which the Product Quantity is determined for) that the device is available.
115200 minutes is the default, which is equivalent to 1 shift, full-time
operation.
Fixed Cost $: The fixed cost per time period (same as that for the Product
Quantity). This value is multiplied by the total Quantity of Method Types and
then added to the total handling cost in the summary report.
Variable Cost $: The variable cost per hour for use of the method type. This
value is multiplied by the time of usage for the method type.
Straight Speed: Straight moving speed for the Method Type.
Acceleration/Deceleration: Rate of Acceleration and Deceleration for the
method type. This is used to slow down and speed up the device around
corners. As a result, a 100’ straight move will take less time (and thus be
cheaper), than a 100’ move would be that turns several times.
Turn Angle: An integer value in degrees that determines if an angle between
two path segments (lines) constitutes a turn that the method type would need
to slow down and speed up for. The default value of 100 degrees means that
any angle less then or equal to 100 degrees would be considered a turn.
Aisle Path Layer: Identifies the layer in the AutoCAD drawing to look in for
the Aisle Path lines used by the method type. Each method type could use a
different layer so that different aisle networks can be specified (i.e. different
aisles may be used by Fork Trucks, Tugger Trucks, AGV’s and People).
© 2006 Proplanner
156
Color: Selects which aggregate flow paths to change the color coding for.
Editing
Update: Changes to the Method or Method Type names will be automatically made
in the Routings and Method lists that reference that Method or Method Type.
Remove: Methods and Method Types cannot be removed if they are currently being
referenced in the routing or Method respectively.
Add: Adding a Method, or Method Type, will display it in the:
Method – Method and Via Method pull-down lists on the Routings tab
Method Type - Load and Unload pull-down lists on the Methods tab.
Import Methods: The methods file contains information about Containers, Methods,
Method Types and Processes. Selecting the Import option will reload all three lists in
their appropriate tabs.
Save Methods: The methods file contains information about Containers, Methods,
Method Types and Processes. Selecting the Save option will save all three lists from
their appropriate tabs
© 2006 Proplanner
Reference Section
5.7.3
157
Editing
Methods are used to determine the time and cost of a flow routing. The methods tab
contains both a list of Methods and a list of Method types. A Method must reference
a specific Method Type. The user can set a quantity for method. Method type
quantities are automatically calculated by summing up all referenced method
quantities (Note that the method type quantity may not be correct until calculation
button in the Part Routing Tab is hit). Quantities for both methods and method types
can be fractional or whole. This allows the user to get more exact numbers for output
and later round it to whole numbers representing a whole cart or forklift, as desired.
Methods are device instances (specific devices) or device usage types (specific load
and unload combinations), while Method Types are classes of devices with
performance and cost information. In the example shown above, the CART is a
method with a 5 second load and unload time that uses the performance and cost
properties of the method type HAND. A flow routing would reference the method
© 2006 Proplanner
158
CART which would have the performance of the Method Type HAND.
Methods Format
Method Name: Name of a method referenced in the routing file. Changing
this name and selecting the Update button will search and replace all
occurrences of that method within the routing file.
Calc: For large studies, you may wish to turn off the calculation of certain
method types when they are not the focus of a particular study.
The congestion diagram is generated for all Products and Methods that have
their Calc option selected to YES. As a result, if you wish to generate a
congestion analysis for a subset of Products and/or material handling
methods, then you need only de-select (by setting the calc option to NO),
those Products and/or methods that you do not wish included in your
congestion analysis.
Qty: Quantity of the Method.
Method Type: Name of method type (discussed below) to use the
performance data and aisle network for.
Load & Unload: Determines the time (in seconds) for the Load or Unload
activity. Times can be specified directly, or the name of a Process (located in
the process tab) can be referenced. If there is a load/unload time specified on
the routings tab for a specific route, that time will override this value
automatically.
Start Loc: Sets the default starting location for material handling device
objects in the flow animation (coming with a future release).
Color: Color for the Method Type when Aggregate by Method Type is
selected.
Method Types Format
© 2006 Proplanner
Reference Section
159
Method Type Name: Name of a Method Type referenced in the Method list.
Changing this name and selecting the Update button will search and replace
all occurrences of that method type within the method list file.
Quantity: Quantity of Method Types. Used to determine the total fixed costs
for the Method Type.
Effective %: (1 to 100) Typically, the routings file contains only productive
moves of material, however method types will need to deadhead (move empty
to another pickup location) a certain percentage of the time. The effective
percentage is the time that the device typically travels loaded (accounted for
in the routings) divided by the total travel time (including loaded and
empty-deadheading). If all moves of the Method Type are accounted for in
the routing, then set this value to 100, otherwise, if only productive moves are
accounted for in the routing and the device will typically return back empty,
then set this value to 50.
Maximum Minutes: The maximum minutes per time period (same as that
which the Product Quantity is determined for) that the device is available.
115200 minutes is the default, which is equivalent to 1 shift, full-time
operation.
Fixed Cost $: The fixed cost per time period (same as that for the Product
Quantity). This value is multiplied by the total Quantity of Method Types and
then added to the total handling cost in the summary report.
Variable Cost $: The variable cost per hour for use of the method type. This
value is multiplied by the time of usage for the method type.
Straight Speed: Straight moving speed for the Method Type.
Acceleration/Deceleration: Rate of Acceleration and Deceleration for the
method type. This is used to slow down and speed up the device around
corners. As a result, a 100’ straight move will take less time (and thus be
cheaper), than a 100’ move would be that turns several times.
Turn Angle: An integer value in degrees that determines if an angle between
two path segments (lines) constitutes a turn that the method type would need
to slow down and speed up for. The default value of 100 degrees means that
any angle less then or equal to 100 degrees would be considered a turn.
Aisle Path Layer: Identifies the layer in the AutoCAD drawing to look in for
the Aisle Path lines used by the method type. Each method type could use a
different layer so that different aisle networks can be specified (i.e. different
aisles may be used by Fork Trucks, Tugger Trucks, AGV’s and People).
© 2006 Proplanner
160
Color: Selects which aggregate flow paths to change the color coding for.
Editing
Update: Changes to the Method or Method Type names will be automatically made
in the Routings and Method lists that reference that Method or Method Type.
Remove: Methods and Method Types cannot be removed if they are currently being
referenced in the routing or Method respectively.
Add: Adding a Method, or Method Type, will display it in the:
Method – Method and Via Method pull-down lists on the Routings tab
Method Type - Load and Unload pull-down lists on the Methods tab.
Import Methods: The methods file contains information about Containers, Methods,
Method Types and Processes. Selecting the Import option will reload all three lists in
their appropriate tabs.
Save Methods: The methods file contains information about Containers, Methods,
Method Types and Processes. Selecting the Save option will save all three lists from
their appropriate tabs
© 2006 Proplanner
Reference Section
5.8
161
Processes Tab
Processes are used by Methods to define the Load and Unload time for each trip of
that Method. While load times can be specified directly in the Load and/or Unload
fields for a method, it may be more descriptive to include a reference to a process
that has a specific time defined.
You can specify a time directly in a process or you can define a process time using a
predetermined time system, such as Modapts, MTM-1, MTM-2, MTM-B, 4M,
MTM-UAS or Most (Note: MTM-1, MTM-2, MTM-UAS and 4M are available to MTM
association members only. Consult www.mtm.org or your Proplanner representative
for more information).
When using a predetermined time system, simply enter the time codes in the Activity
Code field (and optionally the special codes field [SC]). Then, select the Activity
Parsing system that you wish to use (i.e. Modapts, MTM-B, etc) and select the Add
or Update buttons. Your time codes will be parsed and a MOD or MU quantity, in
addition to seconds, will be computed automatically by the FP application. The
computed time will be displayed in the time field directly next to the Process name.
This is the actual time that the application will use for the Load and/or Unload tasks.
For syntax specifics regarding the use of predetermined time systems in Proplanner,
please consult the Proplanner Predetermined Time Systems Parser guide (available
from your Proplanner representative).
When using the "Template" method, the application will automatically determine
each route's appropriate Load and/or Unload time based upon the template settings
© 2006 Proplanner
162
(described below). In this case, the time displayed next to the Process name
should be given a value of -1, to tell the application that it needs to re-compute
the time for each individual route.
Update: Changes to the container name will be automatically made in the routings
that reference that container.
Remove: Processes cannot be removed if they are currently being referenced in the
routing.
Add: Adding a process will display it in the Load and Unload pull-down lists on the
Methods tab.
Import Methods: The methods file contains information about Containers, Methods,
Method Types and Processes. Selecting the Import option will reload all three lists in
their appropriate tabs.
Save Methods: The methods file contains information about Containers, Methods,
Method Types and Processes. Selecting the Save option will save all three lists from
their appropriate tabs
Activity Parsing “Template”: The purpose of this Activity Parsing setting is to allow
the user to set process times specific to container groups and to/from location
groups that can vary from route to route. The user can even get so specific as to
designate times for empty or full containers or locations. Below are details on how
this works.
There are 5 different codes
BT – Base time
CF – Container that is full
CE – Container that is empty
CX – container that is full or empty
LF – Location for full container
LE – Location for empty container
LX – Location for full or empty containers
Since Processes are mapped to a Method’s Load or Unload field, you need to create
a naming convention for your processes so that you know which rules (i.e
processes) apply to which methods, as well as to either load or unload processes of
those methods. The Load process for a Method will always be used at the Route’s
From location, and the Unload process for a method will always be used for the
Route’s To Location (of course the program understands what is From and To if Via
locations are also used).
© 2006 Proplanner
Reference Section
163
Containers are assumed full unless they have an asterisk in front of their name, as
specified in the route line. So a container called TUB would be full, however a
container called *TUB would be considered empty.
Multiple rules can be used in one process activity and their impact will be additive.
Rules are parsed from left to right. Times specified in the rules can be positive or
negative. Only one container (or container group) name can be specified within
each individual rule, at this time. Likewise only one Location (or location group
name) can be specified. As such, rules that apply to multiple containers or locations
need to use groups.
The syntax for the 5 different codes is shown below.
The base time code has only two parameters
BT(6/9) – Base time of 6 seconds plus a time of 9 seconds per container
BT(6/0) – Base time of 6 seconds with no additional time per container
BT(0/5) – Base time of 0 seconds with an additional 5 seconds per container
The CF, CE, CX, LF, LE and LX codes have the prior two parameters, plus an
Include/Exclude parameter and a Location/Container name (or group name)
parameter
CF, CE or CX (depending on if the rule applies to a full, empty container, or both
containers (thus both rules may be specified in one activity since only one will ever
be true at a time)
Examples:
CF(6/9/I/TUB) – base time of 6 seconds plus a time of 9 seconds per container and
this only applies for the container name (or group name) TUB. The “I” means
inclusive for the container (or group) TUB. If an “E” was specified where the “I” is,
then this would apply to all containers (or container groups) EXCEPT the TUB.
LF, LE or LX (depending on if the rule applies to a full or empty container at the
specified location (thus both rules may be specified in one activity since only one will
ever be true at a time)
LF(6/9/I/ASSEMBLY) – base time of 6 seconds plus a time of 9 seconds per
container and this only applies if the route is at the location (or location group name)
© 2006 Proplanner
164
ASSEMBLY. The “I” means inclusive for the location (or location group) ASSEMBLY.
If an “E” was specified where the “I” is, then this would apply to all locations (or
location groups) EXCEPT ASSEMBLY.
Additive Example:
BT(0/4) CF(3/0/I/TUB) CE(1/1/I/TUB) LE(-2/0/E/DOCK) - A base time of 4 seconds
per container, plus a time of 3 seconds if a Full TUB or a time of 1 second plus 1
second per container if an Empty tub, minus a time of 2 seconds for all locations
EXCEPT the DOCK if the container is empty. All of the 5 codes are optional (you
don’t need to specify a base time).
© 2006 Proplanner
Reference Section
5.9
165
Containers Tab
When containers are specified in the routing, they will automatically appear on the
container list in the Containers tab. Containers have length, width and height which
are used in the tugger add-on to estimate containers/trip when creating mixed pallet
routes. In addition, the width of the container is optionally used by the congestion
feature to factor additional congestion frequency if the container width is equal to, or
greater than, a specified percentage of the aisle width. The color field is used by the
aggregation.
Update: Changes to the container name will be automatically made in the routings
that reference that container.
Remove: Containers cannot be removed if they are currently being referenced in the
routing.
Add: Adding a container will display it in the pull-down list on the Routings tab.
Insert Containers at Locations: Add container blocks in the drawing where the
parts are delivered to. The following dialog will show up.
© 2006 Proplanner
166
The automatic container insertion feature will automatically create and insert
container blocks at Activity locations. This module will read the current routings file
and look for all containers delivered to a TO location that matches the selected
locations in the dialog box shown above. If a match is found, then this module will
look at the number of containers delivered to that TO location per trip. This
containers/trip quantity of container blocks will then be inserted at the activity
location text insertion point on the layer specified in the dialog box shown above. It is
recommended to insert containers on a unique layer so that they are easy to identify
and remove if necessary.
If a container block is defined in the drawing (defined by the name of the container)
then this application will insert that block. If the block is not defined, then this module
will create a container block using the sizes specified for that container in the
container tab. NOTE: this module will not re-define a container block should you later
change the size of the referenced container. As such, if you need to update the size
of a container (using the same name) then you must delete all insertions of that
container in your drawing and purge the definition from your drawing before you can
re-run this module and expect it to create, define and insert the container using its
newly specified size.
© 2006 Proplanner
Reference Section
167
The update containers option is used to re-run this application for a set of activity
locations that have already had containers inserted to them. In this case, the
program will only insert containers at locations that are missing containers. This is
possible, even if the previously inserted containers were moved from the insertion
point of the activity location text (where they were originally inserted) because each
container block has an attribute that states what activity location it is assigned to.
Attributes to Display in Container Blocks: choose which data to be
displayed.
Locations to Insert Containers At: select the locations to display container
blocks.
Clear Selections: Clear the selected locations in the list box.
DWG Select Locs: Select the locations in the drawing by specifying an area.
Insert Containers: Insert the container blocks for selected locations
Erase Containers: Erase the container blocks for selected locations
Update Containers: This function is not enabled
Cancel: Return to the main window
Import Methods: The methods file contains information about Containers, Methods,
Method Types and Processes. Selecting the Import option will reload all three lists in
their appropriate tabs.
Save Methods: The methods file contains information about Containers, Methods,
Method Types and Processes. Selecting the Save option will save all three lists from
their appropriate tabs
Container Group: Allows the user to define groups which containers belong to and
to set container specific load/unload times for them on the Process tab.
© 2006 Proplanner
168
5.10
Filter Tab
The Filter tab allows you to select an aggregation to view and then filter specific flow
lines according to aggregate type, From Location or Group and/or To Location or
Group. You can also further filter this selection by flow frequency.
Aggregate Pull-down and List: Allows you to select the aggregate method to filter
and then select specific aggregate names to view for that method. In the example
above, only the Large Pump flows are selected.
The aggregate names shown are generated from the actual flow lines in the drawing.
As such, if new flow routes, or aggregates have been added in the current session,
they will not show up in the filter aggregates window until after the next Calculation.
From Loc (Name or Group): Allows you to select specific locations (or location
groups) to view the flows originating from. In the example shown above, only the
flows from the selected locations will be shown.
And/Or: Determines if the flows shown are FROM AND TO or FROM OR TO. If the
AND option is selected then only flows specifically from the FROM locations AND to
the TO locations will be shown. If the OR option is selected then all flows from the
selected FROM locations TO Anywhere, and those flows from Anywhere and to the
selected TO locations will be shown. In the example above only flows going from the
© 2006 Proplanner
Reference Section
169
4 selected FROM locations AND to locations in the 2 selected Groups will be shown
for the Large Pump.
To Loc (Name or Group): Allows you to select specific locations (or location groups)
to view the flows with the selected TO destinations.
Frequency Filter: Allows you to select further filter the frequency of flows to view. In
the example shown above, only the flows with trip frequencies greater than 250 will
be shown.
Filter Flows: Executes the filter function to show only the selected flows.
Show All Flows: Ignores the filter selection and shows all flows for the selected
aggregation.
Query Path: Hides the FP Modal window and allows you to select a flow path to
query.
Update Arrows/Labels: Regenerates the Arrows and Labels such that only the
displayed filtered paths will have arrows.
Filtered Path Information: Displays the path information found on the Paths Tab for
only the filtered paths. This information can then be copied and pasted to an Excel
file.
Inches Only: Converts feet and inches to inches to avoid possible conversion
problems. Make it easier to paste the distance into a spreadsheet and then perform
additional calculations on them.
Goto AutoCAD: Hides the FP Modal window and displays a smaller Modeless
editing window. You can also execute any AutoCAD command on the menus or
command line.
© 2006 Proplanner
170
5.11
Frequency/Congestion Tab
The Frequency/Congestion window is used to set the values and colors for the color
coding of aggregate flow paths and congestion paths by frequency. By default, the
flow paths are color coded by their aggregate name as set in the various
Product/Part, Container, Method and Locations/Groups tabs.
This Congestion group of controls is also used to set the aisle width parameters for
the congestion analysis when it is desired to take into account the container width in
the congestion analysis.
Frequency Color Scale
Aggregate Name: Selects which aggregate flow paths to change the color coding
for.
Maximum Aggregate Frequency: shows the largest frequency path found in the
selected aggregation.
Color by Frequency: If selected when the Update button is pressed, then the flow
lines for the selected aggregation will be color coded by the following frequency
parameters. If this is not selected when the update button is pressed then the flow
lines will return to their aggregation name colors.
% Values: Allows you to set a percentage of total congestion frequency for the color
coding. This means that the program looks at the segment of congestion with the
highest flow and says that that is the 100% highest flow and will be red, as will all
paths with congestion at 95-100% of that amount of congestion. Paths with half as
© 2006 Proplanner
Reference Section
171
much congestion as that path will have the color assigned to 50%, etc.
Absolute Values: You can also specify actual frequency values such that anything
equal to or greater than the specified value will get the associated color. In the
greyed-out boxes you can see that anything greater than (or equal to) 1000 trips
would be RED while anything from 700 trips to below 1000 trips would be yellow.
Congestion
Note that no changes will take effect with setting values in this group until after the
next Calculate.
Add Flows in Both Directions: If selected then when the Calc button is pressed
then there will only be one line between every two aisle nodes in the drawing and
this line’s thickness will represent the total flow frequency along that segment in both
directions. If not selected, then there will be two lines created on that segment (one
on top of the other), and each line’s width will represent the amount of flow
frequency in the line’s respective direction.
Aisle Width: Allows you to specify the color of the aisle line in the drawing that
would represent an aisle width that you specify. This is then used by the Aisle
Add/Edit command (located in the Paths tab) to set the color of the aisle lines in the
drawing when they are created. As mentioned in the Path tab documentation, the
color of the aisle lines determines their thickness. If the color of an aisle path line is
“BYLAYER” then it is given the “Undefined” Aisle thickness and will be ignored for
container-width congestion analysis.
Include Container Width in Congestion Analysis: (Not Enabled in Version 1.9) If
selected, during the Calc command, then the FP application will evaluate the
container width for each route and multiply that route’s flow frequency by the
© 2006 Proplanner
172
user-provided factor if the container is equal to, or greater than, the user-specified
Container-to-Aisle width percentage.
© 2006 Proplanner
Reference Section
173
5.11.1 Frequency color scale
The Frequency/Congestion window is used to set the values and colors for the color
coding of aggregate flow paths and congestion paths by frequency. By default, the
flow paths are color coded by their aggregate name as set in the various
Product/Part, Container, Method and Locations/Groups tabs.
This Congestion group of controls is also used to set the aisle width parameters for
the congestion analysis when it is desired to take into account the container width in
the congestion analysis.
Frequency Color Scale
Aggregate Name: Selects which aggregate flow paths to change the color coding
for.
Maximum Aggregate Frequency: shows the largest frequency path found in the
selected aggregation.
Color by Frequency: If selected when the Update button is pressed, then the flow
lines for the selected aggregation will be color coded by the following frequency
parameters. If this is not selected when the update button is pressed then the flow
lines will return to their aggregation name colors.
% Values: Allows you to set a percentage of total congestion frequency for the color
coding. This means that the program looks at the segment of congestion with the
highest flow and says that that is the 100% highest flow and will be red, as will all
paths with congestion at 95-100% of that amount of congestion. Paths with half as
© 2006 Proplanner
174
much congestion as that path will have the color assigned to 50%, etc.
Absolute Values: You can also specify actual frequency values such that anything
equal to or greater than the specified value will get the associated color. In the
greyed-out boxes you can see that anything greater than (or equal to) 1000 trips
would be RED while anything from 700 trips to below 1000 trips would be yellow.
Congestion
Note that no changes will take effect with setting values in this group until after the
next Calculate.
Add Flows in Both Directions: If selected then when the Calc button is pressed
then there will only be one line between every two aisle nodes in the drawing and
this line’s thickness will represent the total flow frequency along that segment in both
directions. If not selected, then there will be two lines created on that segment (one
on top of the other), and each line’s width will represent the amount of flow
frequency in the line’s respective direction.
Aisle Width: Allows you to specify the color of the aisle line in the drawing that
would represent an aisle width that you specify. This is then used by the Aisle
Add/Edit command (located in the Paths tab) to set the color of the aisle lines in the
drawing when they are created. As mentioned in the Path tab documentation, the
color of the aisle lines determines their thickness. If the color of an aisle path line is
“BYLAYER” then it is given the “Undefined” Aisle thickness and will be ignored for
container-width congestion analysis.
Include Container Width in Congestion Analysis: (Not Enabled in Version 1.9) If
selected, during the Calc command, then the FP application will evaluate the
container width for each route and multiply that route’s flow frequency by the
© 2006 Proplanner
Reference Section
175
user-provided factor if the container is equal to, or greater than, the user-specified
Container-to-Aisle width percentage.
© 2006 Proplanner
176
5.11.2 Congestion
The Frequency/Congestion window is used to set the values and colors for the color
coding of aggregate flow paths and congestion paths by frequency. By default, the
flow paths are color coded by their aggregate name as set in the various
Product/Part, Container, Method and Locations/Groups tabs.
This Congestion group of controls is also used to set the aisle width parameters for
the congestion analysis when it is desired to take into account the container width in
the congestion analysis.
Frequency Color Scale
Aggregate Name: Selects which aggregate flow paths to change the color coding
for.
Maximum Aggregate Frequency: shows the largest frequency path found in the
selected aggregation.
Color by Frequency: If selected when the Update button is pressed, then the flow
lines for the selected aggregation will be color coded by the following frequency
parameters. If this is not selected when the update button is pressed then the flow
lines will return to their aggregation name colors.
% Values: Allows you to set a percentage of total congestion frequency for the color
coding. This means that the program looks at the segment of congestion with the
highest flow and says that that is the 100% highest flow and will be red, as will all
paths with congestion at 95-100% of that amount of congestion. Paths with half as
© 2006 Proplanner
Reference Section
177
much congestion as that path will have the color assigned to 50%, etc.
Absolute Values: You can also specify actual frequency values such that anything
equal to or greater than the specified value will get the associated color. In the
greyed-out boxes you can see that anything greater than (or equal to) 1000 trips
would be RED while anything from 700 trips to below 1000 trips would be yellow.
Congestion
Note that no changes will take effect with setting values in this group until after the
next Calculate.
Add Flows in Both Directions: If selected then when the Calc button is pressed
then there will only be one line between every two aisle nodes in the drawing and
this line’s thickness will represent the total flow frequency along that segment in both
directions. If not selected, then there will be two lines created on that segment (one
on top of the other), and each line’s width will represent the amount of flow
frequency in the line’s respective direction.
Aisle Width: Allows you to specify the color of the aisle line in the drawing that
would represent an aisle width that you specify. This is then used by the Aisle
Add/Edit command (located in the Paths tab) to set the color of the aisle lines in the
drawing when they are created. As mentioned in the Path tab documentation, the
color of the aisle lines determines their thickness. If the color of an aisle path line is
“BYLAYER” then it is given the “Undefined” Aisle thickness and will be ignored for
container-width congestion analysis.
Include Container Width in Congestion Analysis: (Not Enabled in Version 1.9) If
selected, during the Calc command, then the FP application will evaluate the
container width for each route and multiply that route’s flow frequency by the
© 2006 Proplanner
178
user-provided factor if the container is equal to, or greater than, the user-specified
Container-to-Aisle width percentage.
© 2006 Proplanner
Reference Section
5.12
179
Utilization Tab
The utilizations chart shows the percentage of travel time versus the percentage of
Load/Unload time, busy time, or loaded volume for flows grouped according to the
aggregation method. If a tugger analysis was performed, you will be able to view the
time utilization of each delivery made by each tugger in its zone. In addition, the
Volume option will show the space utilization of the carts being tugged. Similar to
the other Flow Planner charts, this chart can be copied and pasted to Excel.
Chart Type
Aggregate (Load/Unload): % of time spent Traveling vs Load/Unloading for the
material handling equipment, or aggregate as it is being used. This is a zoom-in of
just the Load/Unload and Travel time as shown in Tuggers (Time) or Methods (Time)
or Tuggers (Time) charts.
Method (Time): % of time spent Traveling vs Load/Unloading, Idle, and Over
Utilized for each Method.
Method Type (Time): % of time spent Traveling vs Load/Unloading, Idle, and Over
Utilized for each Method Type.
Tuggers (Time): % of time the tugger is Full, Empty, and Over Utilized
© 2006 Proplanner
180
Tuggers (Volume): % of available volume of the tugger that is Full, Empty, and
Over Utilized. Available volume for each delivery route is specified on the Tuggers
tab.
© 2006 Proplanner
Reference Section
5.13
181
Tuggers Tab
Note: This tab is functional only with purchase of the Tugger add-on.
The purpose of the Tugger module is to create a set of routings to represent a mixed
delivery scenario. This scenario occurs when a material handling device is used to
deliver (or pick up) multiple parts to multiple locations along a shortest path route.
The order in which the parts are delivered (or picked up) is determined by the tugger
module such that the travel path distance (either straight, or aisle-based) is
minimized and the tugger travels through each user-defined Passthru point (if any
are specified) in the sequence specified in the route definition.
Step 1: Import Deliveries
Clicking the Import Deliveries button prompts the user to select a file containing
delivery information for each part. An example of this file can be found in the Help
Files folder. The input window where you specify your delivery file name (and also
your Methods and Locations file names) is shown below.
© 2006 Proplanner
182
ID: Unique identifier for the delivery of this part to these locations. It is important that
there be no duplicates in this field.
Part: Part name that is being moved in this delivery. This will populate the Products
tab automatically.
Container: Name of the container being used to transport this part. This is tied to
the size information located in the Containers tab. Container sizes are used to
determine loaded container volume on the tugger’s carts.
Container Qty.: Number of containers that will be delivered, for each delivery
event, between these locations. Please reference the description on the ETD field to
note a special condition with the Uniform or Triangular distribution methods.
From: Location where the part is picked up to be taken to the staging area. This
could be an actual pickup location or a drop-off location. While the ‘FROM’ location
is typically specified for loading containers; containers could also be dropped of at
these locations (i.e. drop off an empty container and pick up a full one). Use the
Direction field to specify if a container is being picked up (dir=1), or dropped off
(dir=-1) at this ‘FROM’ location.
Stage: Location where the carts (trailers) are staged to be delivered to the final
destination.
Note: load and unload time is added (combined) at the staging area via the
staging time input box at the bottom of this window.
To: Final destination of the parts. This could be an actual delivery location or
in-plant drop-off locations. While the ‘TO’ location is typically specified for deliveries;
containers could also be picked up at these locations (i.e. drop off a full container
and pick up an empty one). Use the Direction field in this file to specify if a
container is being picked up (dir=-1), or dropped off (dir=1) at this ‘TO’ location.
ETD: Sets up the time that these delivery events need to be made within the given
time period. Time is input as a fixed decimal time, a randomly determined decimal
time from a Uniform, or Triangular Distribution.
Decimal Time
© 2006 Proplanner
Reference Section
183
This is input as a number 0-23 representing the hour plus a decimal portion of
that hour.
7.5 Represents a delivery being made at 7:30AM
Uniform Distribution
This allows the user to set an upper and lower bounds for the deliveries to fall
between in a bell curve or uniform distribution pattern with most deliveries
taking place around the median time.
UFM(7/15/3/.5) Represents a uniform distribution of deliveries. This
distribution will randomly generate a delivery time between 7 am and 3
pm.
UFM(7/15/3/.5) This code means that deliveries are made between
7AM-3PM.
UFM(7/15/3/.5) Three deliveries are made. Each delivery carries the
Container Qty. and thus this number acts as a multiplier for the number
of containers being delivered.
UFM(7/15/3/.5) They have a 50% probability of being delivered
between 7 am and 3pm. Otherwise, this delivery will not result in a
container delivery being scheduled in the routings file.
Triangular Distribution
Triangular is similar to the Uniform Distribution with an added third time that
sets up the mean time for where the most deliveries occur.
TRG(7/15/10/2/.33) Represents a triangular distribution of deliveries.
This distribution will randomly generate a delivery time between 7 am
and 3 pm with a statistical preference for times around 10 am.
TRG(7/15/10/2/.33) This code means that deliveries are made between
7AM-3PM.
TRG(7/15/10/2/.33) The mean time that these deliveries is made falls
at 10AM
TRG(7/15/10/2/.33) Two deliveries are made. Each delivery carries the
Container Qty. and thus this number acts as a multiplier for the number
of containers being delivered.
TRG(7/15/10/2/.33) They have a 33% probability of being delivered
being between 7 am and 3 pm. Otherwise, this delivery will not result
in a container delivery being generated in the routings file.
Dir: This is either a 1 if containers are loaded at the ‘FROM’ location and unloaded
at the ‘TO’ location, or -1 if they are unloaded at the ‘FROM’ location and loaded at
the ‘TO’ location. This is used to account for empty returns for example.
1: Staging -> From(load) -> Staging-> To(unload) -> Staging
-1: Staging -> From(unload) -> Staging -> To(load) -> Staging
© 2006 Proplanner
184
Load: The load time or code(process codes are specified on the Processes tab)
being used for this part container’s delivery.
Unload: The unload time or code(process codes are specified on the Processes tab)
being used for this part container’s delivery.
Notice: there are no load or unload times for carts (or containers) that are
temporarily stored in the staging area.
Strategies for creating the Deliveries file
There are 4 different formats available to define your deliveries in the Tugger
Deliveries File. A delivery file can contain any combination of these formats. Each
of the formats discussed below, apply for each delivery time interval for every route.
(i.e. for 7am, 8am, 9am, etc. for Route 1 and Route 2 – assuming that deliveries for
those routes occur every hour).
1) If a FROM, STAGE and TO location are defined, then the Tugger module will
assume that the route delivery RETURN time interval includes the time from
STAGING then to all of the FROM locations and then back to STAGING and
then out to all of the TO locations, and finally back to STAGING. Essentially,
the Tugger route generator is assuming that the material handler who is
loading the carts is the same person who delivers all of the containers out in
the factory.
2) If a FROM and STAGE location are defined and the TO field is left blank,
then the Tugger module will assume that the material handler is just taking
carts from STAGING to all of the FROM locations and back to staging.
Therefore, there is an implication that a different material handler is unloading
these containers out into the factory, in parallel.
3) If a STAGE and TO location are defined and the FROM field is left blank, then
the Tugger module will assume that the material handler is just taking carts
from STAGING to all of the TO locations and back to staging. Therefore,
there is an implication that a different material handler is loading these
containers back in the receiving area, in parallel.
4) If a FROM and TO location are defined and the STAGE field is left blank, then
the Tugger module will assume that there is no staging area and that
containers are being picked up at the FROM location and delivered directly to
the TO location. In this situation, the Tugger route generator will sequence
the deliveries in order to minimize the total distance for all pickups and
deliveries.
© 2006 Proplanner
Reference Section
185
Step 2: Location Route Groups
Import Locs/Grps: Imports a location file that includes the route information for a
tugger study.
Save Locs/Grps: Saves the location file with route information appended to it.
Route: This is the name of the route, such as tugger1, route3, etc.
Interval (hours for start and end time and minutes for departure and return
intervals): This field defines the daily start and end times (in decimal hours) during
which the route is being serviced. In addition, this field defines the time interval (in
decimal minutes) when a route driver departs the staging area, and the amount of
time that the route driver is allowed to perform the deliveries on that route before
he/she must return back to the staging area.
For example:
7/15/30/60 Deliveries are made on this route between 7AM-3PM.
7/15/30/60 Deliveries are made in 30 minute intervals and the route driver has
60 minutes to complete the deliveries and return. The fact that a driver is
dispatched every 30 minutes and has 60 minutes to complete their work,
implies that there are two people delivering on this route, in parallel. The
return time must always be equal to or greater than the interval time, and the
departure time interval should be a multiple of the return time interval.
Include: This tells the Flow Planner whether or not to include the route in the study.
Turning off routes is one way of speeding up the calculations when reports and
diagrams for only a subset of the route drivers is desired.
Path: This is where the Passthru point sequence is defined. Passthru points are
separated by forward slashes, and must be listed in the same sequence that you
wish the route driver to visit those locations. Take special care to ensure that
pass-thru points are located directly on an aisle path, or are “Snapped” to an aisle
path intersection.
For example:
A Passthru point sequence of P1/P2/P3 specifies that this route’s deliveries
have to pass through points P1, P2 and P3, in that order (as such, they are
called Passthru points). If they do not exist, these Passthru points will be
prompted for upon generation of routes. These locations should be uniquely
named (different than FROM, TO or STAGE locations, and it is recommended
that these names be very short. A Passthru point can appear multiple times
in the path field (i.e. P1/P2/P3/P1/P4).
Passthru points apply to BOTH the FROM to STAGE route and the STAGE to
TO route. Most of the time you will be analyzing EITHER of these and thus
you can simply specify the passthru points as shown above. If you are doing
© 2006 Proplanner
186
a study involving flows FROM to STAGE AND STAGE to TO, and you only
want the Passthru points to apply EITHER to the FROM to STAGE or the
STAGE to TO delivery, then you must prefix your Passthru point sequence
with either *F or *T indicating if the list applies to the FROM portion or the TO
portion of the delivery respectively. The following example, shows a Passthru
point sequence that applies only to the STAGE to TO portion of the delivery
*T/P1/P2/P3.
Volume: Represents the volume capacity (specified in cubic Meters or cubic Feet) of
the tugger’s carts (trailers) operating along that Route. So if you want to do tugger
cart capacity using QUANTITY of containers as opposed to VOLUME of
containers, then you will need to specify the size of each container as 12x12x12
inches (or 1000x1000x1000 millimeters) depending upon your base drawing units,
so that each container is exactly one cubic foot, or meter.
The Flow Planner will first compute the quantity of containers required for storage on
the carts for each route delivery. These quantities will be multiplied by the volume
for each of the containers in order to compute the total requested delivery volume.
You may reference the Utilizations and Reports tabs to view the comparison of the
requested container volume to that of the available volume.
IMPORTANT NOTE: If the FROM to STAGING to TO format is used (described
above), the program computes the Total volume of containers for the entire
route, and thus will double count the required cart volume. In this case double
the amount of available volume on this delivery route. A future enhancement
to the software will fix this potential issue.
Eff%: This number is the packing efficiency of the tugger’s carts (trailers) operating
along that route. For example, a tugger with a total volume capacity of 10 cubic
meters and with a packing efficiency of 80% (given the general size and shape of the
containers put on the carts) would have an actual volume capacity of 8 cubic meters.
Staging Area: Normally, the staging location for a delivery is specified in the
deliveries file - STAGE field. This forces the delivered part to always use that
staging area, regardless of what zone driver delivers the part. Often, you may wish
to have the staging area mapped to the zone driver and not to the delivered part. In
this case, you simply specify the name of the Staging area for that zone driver and
this will override the name of the staging area specified in that part's delivery route.
It is important to note, that you still must specify a Staging location name for the
delivery route in the deliveries file, even if you intend to override this name with the
zone driver's staging area. In this situation, simply specify a default name (i.e. like
STAGE) in the delivery file, so that the application will know that you want to route
that part through a staging area.
Update: Updates any changes made to a selected route’s properties.
© 2006 Proplanner
Reference Section
187
Step 3: Generate Routings
Tugger Name: Name of the Method Type that will represent the tugger routes.
The Method name will be the Route name. As such, each tugger Route will have its
own unique method.
Straight Flow: Creates routings where the shortest path between locations is
determined based on Euclidean (Straight point-to-point) flows.
Aisle Flow: Creates routings where the shortest path between locations is
determined based on Aisle-Based flows.
Random Seed: This value sets the start point for creating the random sample used
to create the Uniform or Triangular distributions.
Append Routes: If selected, the Tugger routings will be attached to any existing
flow path routings on the Routings tab instead of overwriting them.
Generate Routes: Creates the tugger routes in the Routings window for each tugger
route at each departure time in which there are containers to deliver.
Staging Time: Defines the amount of time (in seconds) that all tuggers will be
delayed at the staging location. In the example screen shown above, the time has
been set to 60 seconds. Note this time is added once per cycle (trip out and back)
and not for both the trip out and back.
Unused Deliveries
© 2006 Proplanner
188
If one or more delivery lines (from the deliveries file) does not generate one, or more,
corresponding routing lines, then these original delivery lines will be shown in the
unused deliveries list. As with all list boxes in the Flow Planner, you may copy and
paste this list into MS Excel.
This can happen if:
1) The delivery’s ETD is not within its corresponding route driver service interval
(i.e. start and end time)
2) The FROM and/or TO location (if specified) is not assigned to a route
3) If the delivery time was specified with a random probability of occurrence and
it did not get selected by the random number generator.
Tugger Created Routing Notes
© 2006 Proplanner
Reference Section
189
The routings generated by the Tuggers tab for the Routings tab look very different
than the standard setup for the Flow Planner. We will use the simple example above
to discuss the differences.
·
This route makes eight deliveries of one part to eight different locations (A-H).
The part name Return represents a return trip to the staging area where no
load or unload time is calculated, thus the “!NA” container name. This tells the
program to calculate the distance and walk time and ignore the load/unload
time.
·
The Tugger Module creates products that represent the tugger route name
and start time (ie. Route1-7 means these are the routings for Route1 at 7AM).
·
The routings themselves are broken down into their individual segments to
show every load or unload at each location for the appropriate number of
containers.
·
Because the material handling device starts at staging and goes to the From
location first, the volume is calculated for on the first routing from Staging to
Receiving because it is Loading 8 containers at Receiving.
·
The Parts per container are -1 to if a load is performed at the TO location and
-2 when an unload is performed. This is only a signal for the program, not a
value actually used for calculation.
Given this information, the example above shows the empty material handling device
© 2006 Proplanner
190
starting at Staging. It then goes to Receiving where it Loads 8 containers and returns
to Staging. The next step takes it to location A-H in the shortest paths to make sure
deliveries are made at the times designated on the Tuggers tab. Finally, the material
handling device returns to staging where again no load/unload time is calculated
because it is assumed empty at this time.
Note: The deliveries in this example were made in this order due to having
sequential ETDs on the Tuggers tab. Had these been set up using Uniform or
Triangular Distributions with a random seed, there is no guarantee the routes would
have been scheduled at this time of day or in this order.
© 2006 Proplanner
Reference Section
191
5.13.1 Step 1: Import Deliveries
Note: This tab is functional only with purchase of the Tugger add-on.
The purpose of the Tugger module is to create a set of routings to represent a mixed
delivery scenario. This scenario occurs when a material handling device is used to
deliver (or pick up) multiple parts to multiple locations along a shortest path route.
The order in which the parts are delivered (or picked up) is determined by the tugger
module such that the travel path distance (either straight, or aisle-based) is
minimized and the tugger travels through each user-defined Passthru point (if any
are specified) in the sequence specified in the route definition.
Step 1: Import Deliveries
Clicking the Import Deliveries button prompts the user to select a file containing
delivery information for each part. An example of this file can be found in the Help
Files folder. The input window where you specify your delivery file name (and also
your Methods and Locations file names) is shown below.
© 2006 Proplanner
192
ID: Unique identifier for the delivery of this part to these locations. It is important that
there be no duplicates in this field.
Part: Part name that is being moved in this delivery. This will populate the Products
tab automatically.
Container: Name of the container being used to transport this part. This is tied to
the size information located in the Containers tab. Container sizes are used to
determine loaded container volume on the tugger’s carts.
Container Qty.: Number of containers that will be delivered, for each delivery
event, between these locations. Please reference the description on the ETD field to
note a special condition with the Uniform or Triangular distribution methods.
From: Location where the part is picked up to be taken to the staging area. This
could be an actual pickup location or a drop-off location. While the ‘FROM’ location
is typically specified for loading containers; containers could also be dropped of at
these locations (i.e. drop off an empty container and pick up a full one). Use the
Direction field to specify if a container is being picked up (dir=1), or dropped off
(dir=-1) at this ‘FROM’ location.
Stage: Location where the carts (trailers) are staged to be delivered to the final
destination.
Note: load and unload time is added (combined) at the staging area via the
staging time input box at the bottom of this window.
To: Final destination of the parts. This could be an actual delivery location or
in-plant drop-off locations. While the ‘TO’ location is typically specified for deliveries;
containers could also be picked up at these locations (i.e. drop off a full container
and pick up an empty one). Use the Direction field in this file to specify if a
container is being picked up (dir=-1), or dropped off (dir=1) at this ‘TO’ location.
ETD: Sets up the time that these delivery events need to be made within the given
time period. Time is input as a fixed decimal time, a randomly determined decimal
time from a Uniform, or Triangular Distribution.
Decimal Time
© 2006 Proplanner
Reference Section
193
This is input as a number 0-23 representing the hour plus a decimal portion of
that hour.
7.5 Represents a delivery being made at 7:30AM
Uniform Distribution
This allows the user to set an upper and lower bounds for the deliveries to fall
between in a bell curve or uniform distribution pattern with most deliveries
taking place around the median time.
UFM(7/15/3/.5) Represents a uniform distribution of deliveries. This
distribution will randomly generate a delivery time between 7 am and 3
pm.
UFM(7/15/3/.5) This code means that deliveries are made between
7AM-3PM.
UFM(7/15/3/.5) Three deliveries are made. Each delivery carries the
Container Qty. and thus this number acts as a multiplier for the number
of containers being delivered.
UFM(7/15/3/.5) They have a 50% probability of being delivered
between 7 am and 3pm. Otherwise, this delivery will not result in a
container delivery being scheduled in the routings file.
Triangular Distribution
Triangular is similar to the Uniform Distribution with an added third time that
sets up the mean time for where the most deliveries occur.
TRG(7/15/10/2/.33) Represents a triangular distribution of deliveries.
This distribution will randomly generate a delivery time between 7 am
and 3 pm with a statistical preference for times around 10 am.
TRG(7/15/10/2/.33) This code means that deliveries are made between
7AM-3PM.
TRG(7/15/10/2/.33) The mean time that these deliveries is made falls
at 10AM
TRG(7/15/10/2/.33) Two deliveries are made. Each delivery carries the
Container Qty. and thus this number acts as a multiplier for the number
of containers being delivered.
TRG(7/15/10/2/.33) They have a 33% probability of being delivered
being between 7 am and 3 pm. Otherwise, this delivery will not result
in a container delivery being generated in the routings file.
Dir: This is either a 1 if containers are loaded at the ‘FROM’ location and unloaded
at the ‘TO’ location, or -1 if they are unloaded at the ‘FROM’ location and loaded at
the ‘TO’ location. This is used to account for empty returns for example.
1: Staging -> From(load) -> Staging-> To(unload) -> Staging
-1: Staging -> From(unload) -> Staging -> To(load) -> Staging
© 2006 Proplanner
194
Load: The load time or code(process codes are specified on the Processes tab)
being used for this part container’s delivery.
Unload: The unload time or code(process codes are specified on the Processes tab)
being used for this part container’s delivery.
Notice: there are no load or unload times for carts (or containers) that are
temporarily stored in the staging area.
Strategies for creating the Deliveries file
There are 4 different formats available to define your deliveries in the Tugger
Deliveries File. A delivery file can contain any combination of these formats. Each
of the formats discussed below, apply for each delivery time interval for every route.
(i.e. for 7am, 8am, 9am, etc. for Route 1 and Route 2 – assuming that deliveries for
those routes occur every hour).
1) If a FROM, STAGE and TO location are defined, then the Tugger module will
assume that the route delivery RETURN time interval includes the time from
STAGING then to all of the FROM locations and then back to STAGING and
then out to all of the TO locations, and finally back to STAGING. Essentially,
the Tugger route generator is assuming that the material handler who is
loading the carts is the same person who delivers all of the containers out in
the factory.
2) If a FROM and STAGE location are defined and the TO field is left blank,
then the Tugger module will assume that the material handler is just taking
carts from STAGING to all of the FROM locations and back to staging.
Therefore, there is an implication that a different material handler is unloading
these containers out into the factory, in parallel.
3) If a STAGE and TO location are defined and the FROM field is left blank, then
the Tugger module will assume that the material handler is just taking carts
from STAGING to all of the TO locations and back to staging. Therefore,
there is an implication that a different material handler is loading these
containers back in the receiving area, in parallel.
4) If a FROM and TO location are defined and the STAGE field is left blank, then
the Tugger module will assume that there is no staging area and that
containers are being picked up at the FROM location and delivered directly to
the TO location. In this situation, the Tugger route generator will sequence
the deliveries in order to minimize the total distance for all pickups and
deliveries.
© 2006 Proplanner
Reference Section
195
Step 2: Location Route Groups
Import Locs/Grps: Imports a location file that includes the route information for a
tugger study.
Save Locs/Grps: Saves the location file with route information appended to it.
Route: This is the name of the route, such as tugger1, route3, etc.
Interval (hours for start and end time and minutes for departure and return
intervals): This field defines the daily start and end times (in decimal hours) during
which the route is being serviced. In addition, this field defines the time interval (in
decimal minutes) when a route driver departs the staging area, and the amount of
time that the route driver is allowed to perform the deliveries on that route before
he/she must return back to the staging area.
For example:
7/15/30/60 Deliveries are made on this route between 7AM-3PM.
7/15/30/60 Deliveries are made in 30 minute intervals and the route driver has
60 minutes to complete the deliveries and return. The fact that a driver is
dispatched every 30 minutes and has 60 minutes to complete their work,
implies that there are two people delivering on this route, in parallel. The
return time must always be equal to or greater than the interval time, and the
departure time interval should be a multiple of the return time interval.
Include: This tells the Flow Planner whether or not to include the route in the study.
Turning off routes is one way of speeding up the calculations when reports and
diagrams for only a subset of the route drivers is desired.
Path: This is where the Passthru point sequence is defined. Passthru points are
separated by forward slashes, and must be listed in the same sequence that you
wish the route driver to visit those locations. Take special care to ensure that
pass-thru points are located directly on an aisle path, or are “Snapped” to an aisle
path intersection.
For example:
A Passthru point sequence of P1/P2/P3 specifies that this route’s deliveries
have to pass through points P1, P2 and P3, in that order (as such, they are
called Passthru points). If they do not exist, these Passthru points will be
prompted for upon generation of routes. These locations should be uniquely
named (different than FROM, TO or STAGE locations, and it is recommended
that these names be very short. A Passthru point can appear multiple times
in the path field (i.e. P1/P2/P3/P1/P4).
Passthru points apply to BOTH the FROM to STAGE route and the STAGE to
TO route. Most of the time you will be analyzing EITHER of these and thus
you can simply specify the passthru points as shown above. If you are doing
© 2006 Proplanner
196
a study involving flows FROM to STAGE AND STAGE to TO, and you only
want the Passthru points to apply EITHER to the FROM to STAGE or the
STAGE to TO delivery, then you must prefix your Passthru point sequence
with either *F or *T indicating if the list applies to the FROM portion or the TO
portion of the delivery respectively. The following example, shows a Passthru
point sequence that applies only to the STAGE to TO portion of the delivery
*T/P1/P2/P3.
Volume: Represents the volume capacity (specified in cubic Meters or cubic Feet) of
the tugger’s carts (trailers) operating along that Route. So if you want to do tugger
cart capacity using QUANTITY of containers as opposed to VOLUME of
containers, then you will need to specify the size of each container as 12x12x12
inches (or 1000x1000x1000 millimeters) depending upon your base drawing units,
so that each container is exactly one cubic foot, or meter.
The Flow Planner will first compute the quantity of containers required for storage on
the carts for each route delivery. These quantities will be multiplied by the volume
for each of the containers in order to compute the total requested delivery volume.
You may reference the Utilizations and Reports tabs to view the comparison of the
requested container volume to that of the available volume.
IMPORTANT NOTE: If the FROM to STAGING to TO format is used (described
above), the program computes the Total volume of containers for the entire
route, and thus will double count the required cart volume. In this case double
the amount of available volume on this delivery route. A future enhancement
to the software will fix this potential issue.
Eff%: This number is the packing efficiency of the tugger’s carts (trailers) operating
along that route. For example, a tugger with a total volume capacity of 10 cubic
meters and with a packing efficiency of 80% (given the general size and shape of the
containers put on the carts) would have an actual volume capacity of 8 cubic meters.
Staging Area: Normally, the staging location for a delivery is specified in the
deliveries file - STAGE field. This forces the delivered part to always use that
staging area, regardless of what zone driver delivers the part. Often, you may wish
to have the staging area mapped to the zone driver and not to the delivered part. In
this case, you simply specify the name of the Staging area for that zone driver and
this will override the name of the staging area specified in that part's delivery route.
It is important to note, that you still must specify a Staging location name for the
delivery route in the deliveries file, even if you intend to override this name with the
zone driver's staging area. In this situation, simply specify a default name (i.e. like
STAGE) in the delivery file, so that the application will know that you want to route
that part through a staging area.
Update: Updates any changes made to a selected route’s properties.
© 2006 Proplanner
Reference Section
197
Step 3: Generate Routings
Tugger Name: Name of the Method Type that will represent the tugger routes.
The Method name will be the Route name. As such, each tugger Route will have its
own unique method.
Straight Flow: Creates routings where the shortest path between locations is
determined based on Euclidean (Straight point-to-point) flows.
Aisle Flow: Creates routings where the shortest path between locations is
determined based on Aisle-Based flows.
Random Seed: This value sets the start point for creating the random sample used
to create the Uniform or Triangular distributions.
Append Routes: If selected, the Tugger routings will be attached to any existing
flow path routings on the Routings tab instead of overwriting them.
Generate Routes: Creates the tugger routes in the Routings window for each tugger
route at each departure time in which there are containers to deliver.
Staging Time: Defines the amount of time (in seconds) that all tuggers will be
delayed at the staging location. In the example screen shown above, the time has
been set to 60 seconds. Note this time is added once per cycle (trip out and back)
and not for both the trip out and back.
Unused Deliveries
© 2006 Proplanner
198
If one or more delivery lines (from the deliveries file) does not generate one, or more,
corresponding routing lines, then these original delivery lines will be shown in the
unused deliveries list. As with all list boxes in the Flow Planner, you may copy and
paste this list into MS Excel.
This can happen if:
1) The delivery’s ETD is not within its corresponding route driver service interval
(i.e. start and end time)
2) The FROM and/or TO location (if specified) is not assigned to a route
3) If the delivery time was specified with a random probability of occurrence and
it did not get selected by the random number generator.
Tugger Created Routing Notes
© 2006 Proplanner
Reference Section
199
The routings generated by the Tuggers tab for the Routings tab look very different
than the standard setup for the Flow Planner. We will use the simple example above
to discuss the differences.
·
This route makes eight deliveries of one part to eight different locations (A-H).
The part name Return represents a return trip to the staging area where no
load or unload time is calculated, thus the “!NA” container name. This tells the
program to calculate the distance and walk time and ignore the load/unload
time.
·
The Tugger Module creates products that represent the tugger route name
and start time (ie. Route1-7 means these are the routings for Route1 at 7AM).
·
The routings themselves are broken down into their individual segments to
show every load or unload at each location for the appropriate number of
containers.
·
Because the material handling device starts at staging and goes to the From
location first, the volume is calculated for on the first routing from Staging to
Receiving because it is Loading 8 containers at Receiving.
·
The Parts per container are -1 to if a load is performed at the TO location and
-2 when an unload is performed. This is only a signal for the program, not a
value actually used for calculation.
Given this information, the example above shows the empty material handling device
© 2006 Proplanner
200
starting at Staging. It then goes to Receiving where it Loads 8 containers and returns
to Staging. The next step takes it to location A-H in the shortest paths to make sure
deliveries are made at the times designated on the Tuggers tab. Finally, the material
handling device returns to staging where again no load/unload time is calculated
because it is assumed empty at this time.
Note: The deliveries in this example were made in this order due to having
sequential ETDs on the Tuggers tab. Had these been set up using Uniform or
Triangular Distributions with a random seed, there is no guarantee the routes would
have been scheduled at this time of day or in this order.
© 2006 Proplanner
Reference Section
201
5.13.2 Step 2: Location Route Groups
Note: This tab is functional only with purchase of the Tugger add-on.
The purpose of the Tugger module is to create a set of routings to represent a mixed
delivery scenario. This scenario occurs when a material handling device is used to
deliver (or pick up) multiple parts to multiple locations along a shortest path route.
The order in which the parts are delivered (or picked up) is determined by the tugger
module such that the travel path distance (either straight, or aisle-based) is
minimized and the tugger travels through each user-defined Passthru point (if any
are specified) in the sequence specified in the route definition.
Step 1: Import Deliveries
Clicking the Import Deliveries button prompts the user to select a file containing
delivery information for each part. An example of this file can be found in the Help
Files folder. The input window where you specify your delivery file name (and also
your Methods and Locations file names) is shown below.
© 2006 Proplanner
202
ID: Unique identifier for the delivery of this part to these locations. It is important that
there be no duplicates in this field.
Part: Part name that is being moved in this delivery. This will populate the Products
tab automatically.
Container: Name of the container being used to transport this part. This is tied to
the size information located in the Containers tab. Container sizes are used to
determine loaded container volume on the tugger’s carts.
Container Qty.: Number of containers that will be delivered, for each delivery
event, between these locations. Please reference the description on the ETD field to
note a special condition with the Uniform or Triangular distribution methods.
From: Location where the part is picked up to be taken to the staging area. This
could be an actual pickup location or a drop-off location. While the ‘FROM’ location
is typically specified for loading containers; containers could also be dropped of at
these locations (i.e. drop off an empty container and pick up a full one). Use the
Direction field to specify if a container is being picked up (dir=1), or dropped off
(dir=-1) at this ‘FROM’ location.
Stage: Location where the carts (trailers) are staged to be delivered to the final
destination.
Note: load and unload time is added (combined) at the staging area via the
staging time input box at the bottom of this window.
To: Final destination of the parts. This could be an actual delivery location or
in-plant drop-off locations. While the ‘TO’ location is typically specified for deliveries;
containers could also be picked up at these locations (i.e. drop off a full container
and pick up an empty one). Use the Direction field in this file to specify if a
container is being picked up (dir=-1), or dropped off (dir=1) at this ‘TO’ location.
ETD: Sets up the time that these delivery events need to be made within the given
time period. Time is input as a fixed decimal time, a randomly determined decimal
time from a Uniform, or Triangular Distribution.
Decimal Time
© 2006 Proplanner
Reference Section
203
This is input as a number 0-23 representing the hour plus a decimal portion of
that hour.
7.5 Represents a delivery being made at 7:30AM
Uniform Distribution
This allows the user to set an upper and lower bounds for the deliveries to fall
between in a bell curve or uniform distribution pattern with most deliveries
taking place around the median time.
UFM(7/15/3/.5) Represents a uniform distribution of deliveries. This
distribution will randomly generate a delivery time between 7 am and 3
pm.
UFM(7/15/3/.5) This code means that deliveries are made between
7AM-3PM.
UFM(7/15/3/.5) Three deliveries are made. Each delivery carries the
Container Qty. and thus this number acts as a multiplier for the number
of containers being delivered.
UFM(7/15/3/.5) They have a 50% probability of being delivered
between 7 am and 3pm. Otherwise, this delivery will not result in a
container delivery being scheduled in the routings file.
Triangular Distribution
Triangular is similar to the Uniform Distribution with an added third time that
sets up the mean time for where the most deliveries occur.
TRG(7/15/10/2/.33) Represents a triangular distribution of deliveries.
This distribution will randomly generate a delivery time between 7 am
and 3 pm with a statistical preference for times around 10 am.
TRG(7/15/10/2/.33) This code means that deliveries are made between
7AM-3PM.
TRG(7/15/10/2/.33) The mean time that these deliveries is made falls
at 10AM
TRG(7/15/10/2/.33) Two deliveries are made. Each delivery carries the
Container Qty. and thus this number acts as a multiplier for the number
of containers being delivered.
TRG(7/15/10/2/.33) They have a 33% probability of being delivered
being between 7 am and 3 pm. Otherwise, this delivery will not result
in a container delivery being generated in the routings file.
Dir: This is either a 1 if containers are loaded at the ‘FROM’ location and unloaded
at the ‘TO’ location, or -1 if they are unloaded at the ‘FROM’ location and loaded at
the ‘TO’ location. This is used to account for empty returns for example.
1: Staging -> From(load) -> Staging-> To(unload) -> Staging
-1: Staging -> From(unload) -> Staging -> To(load) -> Staging
© 2006 Proplanner
204
Load: The load time or code(process codes are specified on the Processes tab)
being used for this part container’s delivery.
Unload: The unload time or code(process codes are specified on the Processes tab)
being used for this part container’s delivery.
Notice: there are no load or unload times for carts (or containers) that are
temporarily stored in the staging area.
Strategies for creating the Deliveries file
There are 4 different formats available to define your deliveries in the Tugger
Deliveries File. A delivery file can contain any combination of these formats. Each
of the formats discussed below, apply for each delivery time interval for every route.
(i.e. for 7am, 8am, 9am, etc. for Route 1 and Route 2 – assuming that deliveries for
those routes occur every hour).
1) If a FROM, STAGE and TO location are defined, then the Tugger module will
assume that the route delivery RETURN time interval includes the time from
STAGING then to all of the FROM locations and then back to STAGING and
then out to all of the TO locations, and finally back to STAGING. Essentially,
the Tugger route generator is assuming that the material handler who is
loading the carts is the same person who delivers all of the containers out in
the factory.
2) If a FROM and STAGE location are defined and the TO field is left blank,
then the Tugger module will assume that the material handler is just taking
carts from STAGING to all of the FROM locations and back to staging.
Therefore, there is an implication that a different material handler is unloading
these containers out into the factory, in parallel.
3) If a STAGE and TO location are defined and the FROM field is left blank, then
the Tugger module will assume that the material handler is just taking carts
from STAGING to all of the TO locations and back to staging. Therefore,
there is an implication that a different material handler is loading these
containers back in the receiving area, in parallel.
4) If a FROM and TO location are defined and the STAGE field is left blank, then
the Tugger module will assume that there is no staging area and that
containers are being picked up at the FROM location and delivered directly to
the TO location. In this situation, the Tugger route generator will sequence
the deliveries in order to minimize the total distance for all pickups and
deliveries.
© 2006 Proplanner
Reference Section
205
Step 2: Location Route Groups
Import Locs/Grps: Imports a location file that includes the route information for a
tugger study.
Save Locs/Grps: Saves the location file with route information appended to it.
Route: This is the name of the route, such as tugger1, route3, etc.
Interval (hours for start and end time and minutes for departure and return
intervals): This field defines the daily start and end times (in decimal hours) during
which the route is being serviced. In addition, this field defines the time interval (in
decimal minutes) when a route driver departs the staging area, and the amount of
time that the route driver is allowed to perform the deliveries on that route before
he/she must return back to the staging area.
For example:
7/15/30/60 Deliveries are made on this route between 7AM-3PM.
7/15/30/60 Deliveries are made in 30 minute intervals and the route driver has
60 minutes to complete the deliveries and return. The fact that a driver is
dispatched every 30 minutes and has 60 minutes to complete their work,
implies that there are two people delivering on this route, in parallel. The
return time must always be equal to or greater than the interval time, and the
departure time interval should be a multiple of the return time interval.
Include: This tells the Flow Planner whether or not to include the route in the study.
Turning off routes is one way of speeding up the calculations when reports and
diagrams for only a subset of the route drivers is desired.
Path: This is where the Passthru point sequence is defined. Passthru points are
separated by forward slashes, and must be listed in the same sequence that you
wish the route driver to visit those locations. Take special care to ensure that
pass-thru points are located directly on an aisle path, or are “Snapped” to an aisle
path intersection.
For example:
A Passthru point sequence of P1/P2/P3 specifies that this route’s deliveries
have to pass through points P1, P2 and P3, in that order (as such, they are
called Passthru points). If they do not exist, these Passthru points will be
prompted for upon generation of routes. These locations should be uniquely
named (different than FROM, TO or STAGE locations, and it is recommended
that these names be very short. A Passthru point can appear multiple times
in the path field (i.e. P1/P2/P3/P1/P4).
Passthru points apply to BOTH the FROM to STAGE route and the STAGE to
TO route. Most of the time you will be analyzing EITHER of these and thus
you can simply specify the passthru points as shown above. If you are doing
© 2006 Proplanner
206
a study involving flows FROM to STAGE AND STAGE to TO, and you only
want the Passthru points to apply EITHER to the FROM to STAGE or the
STAGE to TO delivery, then you must prefix your Passthru point sequence
with either *F or *T indicating if the list applies to the FROM portion or the TO
portion of the delivery respectively. The following example, shows a Passthru
point sequence that applies only to the STAGE to TO portion of the delivery
*T/P1/P2/P3.
Volume: Represents the volume capacity (specified in cubic Meters or cubic Feet) of
the tugger’s carts (trailers) operating along that Route. So if you want to do tugger
cart capacity using QUANTITY of containers as opposed to VOLUME of
containers, then you will need to specify the size of each container as 12x12x12
inches (or 1000x1000x1000 millimeters) depending upon your base drawing units,
so that each container is exactly one cubic foot, or meter.
The Flow Planner will first compute the quantity of containers required for storage on
the carts for each route delivery. These quantities will be multiplied by the volume
for each of the containers in order to compute the total requested delivery volume.
You may reference the Utilizations and Reports tabs to view the comparison of the
requested container volume to that of the available volume.
IMPORTANT NOTE: If the FROM to STAGING to TO format is used (described
above), the program computes the Total volume of containers for the entire
route, and thus will double count the required cart volume. In this case double
the amount of available volume on this delivery route. A future enhancement
to the software will fix this potential issue.
Eff%: This number is the packing efficiency of the tugger’s carts (trailers) operating
along that route. For example, a tugger with a total volume capacity of 10 cubic
meters and with a packing efficiency of 80% (given the general size and shape of the
containers put on the carts) would have an actual volume capacity of 8 cubic meters.
Staging Area: Normally, the staging location for a delivery is specified in the
deliveries file - STAGE field. This forces the delivered part to always use that
staging area, regardless of what zone driver delivers the part. Often, you may wish
to have the staging area mapped to the zone driver and not to the delivered part. In
this case, you simply specify the name of the Staging area for that zone driver and
this will override the name of the staging area specified in that part's delivery route.
It is important to note, that you still must specify a Staging location name for the
delivery route in the deliveries file, even if you intend to override this name with the
zone driver's staging area. In this situation, simply specify a default name (i.e. like
STAGE) in the delivery file, so that the application will know that you want to route
that part through a staging area.
Update: Updates any changes made to a selected route’s properties.
© 2006 Proplanner
Reference Section
207
Step 3: Generate Routings
Tugger Name: Name of the Method Type that will represent the tugger routes.
The Method name will be the Route name. As such, each tugger Route will have its
own unique method.
Straight Flow: Creates routings where the shortest path between locations is
determined based on Euclidean (Straight point-to-point) flows.
Aisle Flow: Creates routings where the shortest path between locations is
determined based on Aisle-Based flows.
Random Seed: This value sets the start point for creating the random sample used
to create the Uniform or Triangular distributions.
Append Routes: If selected, the Tugger routings will be attached to any existing
flow path routings on the Routings tab instead of overwriting them.
Generate Routes: Creates the tugger routes in the Routings window for each tugger
route at each departure time in which there are containers to deliver.
Staging Time: Defines the amount of time (in seconds) that all tuggers will be
delayed at the staging location. In the example screen shown above, the time has
been set to 60 seconds. Note this time is added once per cycle (trip out and back)
and not for both the trip out and back.
Unused Deliveries
© 2006 Proplanner
208
If one or more delivery lines (from the deliveries file) does not generate one, or more,
corresponding routing lines, then these original delivery lines will be shown in the
unused deliveries list. As with all list boxes in the Flow Planner, you may copy and
paste this list into MS Excel.
This can happen if:
1) The delivery’s ETD is not within its corresponding route driver service interval
(i.e. start and end time)
2) The FROM and/or TO location (if specified) is not assigned to a route
3) If the delivery time was specified with a random probability of occurrence and
it did not get selected by the random number generator.
Tugger Created Routing Notes
© 2006 Proplanner
Reference Section
209
The routings generated by the Tuggers tab for the Routings tab look very different
than the standard setup for the Flow Planner. We will use the simple example above
to discuss the differences.
·
This route makes eight deliveries of one part to eight different locations (A-H).
The part name Return represents a return trip to the staging area where no
load or unload time is calculated, thus the “!NA” container name. This tells the
program to calculate the distance and walk time and ignore the load/unload
time.
·
The Tugger Module creates products that represent the tugger route name
and start time (ie. Route1-7 means these are the routings for Route1 at 7AM).
·
The routings themselves are broken down into their individual segments to
show every load or unload at each location for the appropriate number of
containers.
·
Because the material handling device starts at staging and goes to the From
location first, the volume is calculated for on the first routing from Staging to
Receiving because it is Loading 8 containers at Receiving.
·
The Parts per container are -1 to if a load is performed at the TO location and
-2 when an unload is performed. This is only a signal for the program, not a
value actually used for calculation.
Given this information, the example above shows the empty material handling device
© 2006 Proplanner
210
starting at Staging. It then goes to Receiving where it Loads 8 containers and returns
to Staging. The next step takes it to location A-H in the shortest paths to make sure
deliveries are made at the times designated on the Tuggers tab. Finally, the material
handling device returns to staging where again no load/unload time is calculated
because it is assumed empty at this time.
Note: The deliveries in this example were made in this order due to having
sequential ETDs on the Tuggers tab. Had these been set up using Uniform or
Triangular Distributions with a random seed, there is no guarantee the routes would
have been scheduled at this time of day or in this order.
© 2006 Proplanner
Reference Section
211
5.13.3 Step 3: Generate Routings
Note: This tab is functional only with purchase of the Tugger add-on.
The purpose of the Tugger module is to create a set of routings to represent a mixed
delivery scenario. This scenario occurs when a material handling device is used to
deliver (or pick up) multiple parts to multiple locations along a shortest path route.
The order in which the parts are delivered (or picked up) is determined by the tugger
module such that the travel path distance (either straight, or aisle-based) is
minimized and the tugger travels through each user-defined Passthru point (if any
are specified) in the sequence specified in the route definition.
Step 1: Import Deliveries
Clicking the Import Deliveries button prompts the user to select a file containing
delivery information for each part. An example of this file can be found in the Help
Files folder. The input window where you specify your delivery file name (and also
your Methods and Locations file names) is shown below.
© 2006 Proplanner
212
ID: Unique identifier for the delivery of this part to these locations. It is important that
there be no duplicates in this field.
Part: Part name that is being moved in this delivery. This will populate the Products
tab automatically.
Container: Name of the container being used to transport this part. This is tied to
the size information located in the Containers tab. Container sizes are used to
determine loaded container volume on the tugger’s carts.
Container Qty.: Number of containers that will be delivered, for each delivery
event, between these locations. Please reference the description on the ETD field to
note a special condition with the Uniform or Triangular distribution methods.
From: Location where the part is picked up to be taken to the staging area. This
could be an actual pickup location or a drop-off location. While the ‘FROM’ location
is typically specified for loading containers; containers could also be dropped of at
these locations (i.e. drop off an empty container and pick up a full one). Use the
Direction field to specify if a container is being picked up (dir=1), or dropped off
(dir=-1) at this ‘FROM’ location.
Stage: Location where the carts (trailers) are staged to be delivered to the final
destination.
Note: load and unload time is added (combined) at the staging area via the
staging time input box at the bottom of this window.
To: Final destination of the parts. This could be an actual delivery location or
in-plant drop-off locations. While the ‘TO’ location is typically specified for deliveries;
containers could also be picked up at these locations (i.e. drop off a full container
and pick up an empty one). Use the Direction field in this file to specify if a
container is being picked up (dir=-1), or dropped off (dir=1) at this ‘TO’ location.
ETD: Sets up the time that these delivery events need to be made within the given
time period. Time is input as a fixed decimal time, a randomly determined decimal
time from a Uniform, or Triangular Distribution.
Decimal Time
© 2006 Proplanner
Reference Section
213
This is input as a number 0-23 representing the hour plus a decimal portion of
that hour.
7.5 Represents a delivery being made at 7:30AM
Uniform Distribution
This allows the user to set an upper and lower bounds for the deliveries to fall
between in a bell curve or uniform distribution pattern with most deliveries
taking place around the median time.
UFM(7/15/3/.5) Represents a uniform distribution of deliveries. This
distribution will randomly generate a delivery time between 7 am and 3
pm.
UFM(7/15/3/.5) This code means that deliveries are made between
7AM-3PM.
UFM(7/15/3/.5) Three deliveries are made. Each delivery carries the
Container Qty. and thus this number acts as a multiplier for the number
of containers being delivered.
UFM(7/15/3/.5) They have a 50% probability of being delivered
between 7 am and 3pm. Otherwise, this delivery will not result in a
container delivery being scheduled in the routings file.
Triangular Distribution
Triangular is similar to the Uniform Distribution with an added third time that
sets up the mean time for where the most deliveries occur.
TRG(7/15/10/2/.33) Represents a triangular distribution of deliveries.
This distribution will randomly generate a delivery time between 7 am
and 3 pm with a statistical preference for times around 10 am.
TRG(7/15/10/2/.33) This code means that deliveries are made between
7AM-3PM.
TRG(7/15/10/2/.33) The mean time that these deliveries is made falls
at 10AM
TRG(7/15/10/2/.33) Two deliveries are made. Each delivery carries the
Container Qty. and thus this number acts as a multiplier for the number
of containers being delivered.
TRG(7/15/10/2/.33) They have a 33% probability of being delivered
being between 7 am and 3 pm. Otherwise, this delivery will not result
in a container delivery being generated in the routings file.
Dir: This is either a 1 if containers are loaded at the ‘FROM’ location and unloaded
at the ‘TO’ location, or -1 if they are unloaded at the ‘FROM’ location and loaded at
the ‘TO’ location. This is used to account for empty returns for example.
1: Staging -> From(load) -> Staging-> To(unload) -> Staging
-1: Staging -> From(unload) -> Staging -> To(load) -> Staging
© 2006 Proplanner
214
Load: The load time or code(process codes are specified on the Processes tab)
being used for this part container’s delivery.
Unload: The unload time or code(process codes are specified on the Processes tab)
being used for this part container’s delivery.
Notice: there are no load or unload times for carts (or containers) that are
temporarily stored in the staging area.
Strategies for creating the Deliveries file
There are 4 different formats available to define your deliveries in the Tugger
Deliveries File. A delivery file can contain any combination of these formats. Each
of the formats discussed below, apply for each delivery time interval for every route.
(i.e. for 7am, 8am, 9am, etc. for Route 1 and Route 2 – assuming that deliveries for
those routes occur every hour).
1) If a FROM, STAGE and TO location are defined, then the Tugger module will
assume that the route delivery RETURN time interval includes the time from
STAGING then to all of the FROM locations and then back to STAGING and
then out to all of the TO locations, and finally back to STAGING. Essentially,
the Tugger route generator is assuming that the material handler who is
loading the carts is the same person who delivers all of the containers out in
the factory.
2) If a FROM and STAGE location are defined and the TO field is left blank,
then the Tugger module will assume that the material handler is just taking
carts from STAGING to all of the FROM locations and back to staging.
Therefore, there is an implication that a different material handler is unloading
these containers out into the factory, in parallel.
3) If a STAGE and TO location are defined and the FROM field is left blank, then
the Tugger module will assume that the material handler is just taking carts
from STAGING to all of the TO locations and back to staging. Therefore,
there is an implication that a different material handler is loading these
containers back in the receiving area, in parallel.
4) If a FROM and TO location are defined and the STAGE field is left blank, then
the Tugger module will assume that there is no staging area and that
containers are being picked up at the FROM location and delivered directly to
the TO location. In this situation, the Tugger route generator will sequence
the deliveries in order to minimize the total distance for all pickups and
deliveries.
© 2006 Proplanner
Reference Section
215
Step 2: Location Route Groups
Import Locs/Grps: Imports a location file that includes the route information for a
tugger study.
Save Locs/Grps: Saves the location file with route information appended to it.
Route: This is the name of the route, such as tugger1, route3, etc.
Interval (hours for start and end time and minutes for departure and return
intervals): This field defines the daily start and end times (in decimal hours) during
which the route is being serviced. In addition, this field defines the time interval (in
decimal minutes) when a route driver departs the staging area, and the amount of
time that the route driver is allowed to perform the deliveries on that route before
he/she must return back to the staging area.
For example:
7/15/30/60 Deliveries are made on this route between 7AM-3PM.
7/15/30/60 Deliveries are made in 30 minute intervals and the route driver has
60 minutes to complete the deliveries and return. The fact that a driver is
dispatched every 30 minutes and has 60 minutes to complete their work,
implies that there are two people delivering on this route, in parallel. The
return time must always be equal to or greater than the interval time, and the
departure time interval should be a multiple of the return time interval.
Include: This tells the Flow Planner whether or not to include the route in the study.
Turning off routes is one way of speeding up the calculations when reports and
diagrams for only a subset of the route drivers is desired.
Path: This is where the Passthru point sequence is defined. Passthru points are
separated by forward slashes, and must be listed in the same sequence that you
wish the route driver to visit those locations. Take special care to ensure that
pass-thru points are located directly on an aisle path, or are “Snapped” to an aisle
path intersection.
For example:
A Passthru point sequence of P1/P2/P3 specifies that this route’s deliveries
have to pass through points P1, P2 and P3, in that order (as such, they are
called Passthru points). If they do not exist, these Passthru points will be
prompted for upon generation of routes. These locations should be uniquely
named (different than FROM, TO or STAGE locations, and it is recommended
that these names be very short. A Passthru point can appear multiple times
in the path field (i.e. P1/P2/P3/P1/P4).
Passthru points apply to BOTH the FROM to STAGE route and the STAGE to
TO route. Most of the time you will be analyzing EITHER of these and thus
you can simply specify the passthru points as shown above. If you are doing
© 2006 Proplanner
216
a study involving flows FROM to STAGE AND STAGE to TO, and you only
want the Passthru points to apply EITHER to the FROM to STAGE or the
STAGE to TO delivery, then you must prefix your Passthru point sequence
with either *F or *T indicating if the list applies to the FROM portion or the TO
portion of the delivery respectively. The following example, shows a Passthru
point sequence that applies only to the STAGE to TO portion of the delivery
*T/P1/P2/P3.
Volume: Represents the volume capacity (specified in cubic Meters or cubic Feet) of
the tugger’s carts (trailers) operating along that Route. So if you want to do tugger
cart capacity using QUANTITY of containers as opposed to VOLUME of
containers, then you will need to specify the size of each container as 12x12x12
inches (or 1000x1000x1000 millimeters) depending upon your base drawing units,
so that each container is exactly one cubic foot, or meter.
The Flow Planner will first compute the quantity of containers required for storage on
the carts for each route delivery. These quantities will be multiplied by the volume
for each of the containers in order to compute the total requested delivery volume.
You may reference the Utilizations and Reports tabs to view the comparison of the
requested container volume to that of the available volume.
IMPORTANT NOTE: If the FROM to STAGING to TO format is used (described
above), the program computes the Total volume of containers for the entire
route, and thus will double count the required cart volume. In this case double
the amount of available volume on this delivery route. A future enhancement
to the software will fix this potential issue.
Eff%: This number is the packing efficiency of the tugger’s carts (trailers) operating
along that route. For example, a tugger with a total volume capacity of 10 cubic
meters and with a packing efficiency of 80% (given the general size and shape of the
containers put on the carts) would have an actual volume capacity of 8 cubic meters.
Staging Area: Normally, the staging location for a delivery is specified in the
deliveries file - STAGE field. This forces the delivered part to always use that
staging area, regardless of what zone driver delivers the part. Often, you may wish
to have the staging area mapped to the zone driver and not to the delivered part. In
this case, you simply specify the name of the Staging area for that zone driver and
this will override the name of the staging area specified in that part's delivery route.
It is important to note, that you still must specify a Staging location name for the
delivery route in the deliveries file, even if you intend to override this name with the
zone driver's staging area. In this situation, simply specify a default name (i.e. like
STAGE) in the delivery file, so that the application will know that you want to route
that part through a staging area.
Update: Updates any changes made to a selected route’s properties.
© 2006 Proplanner
Reference Section
217
Step 3: Generate Routings
Tugger Name: Name of the Method Type that will represent the tugger routes.
The Method name will be the Route name. As such, each tugger Route will have its
own unique method.
Straight Flow: Creates routings where the shortest path between locations is
determined based on Euclidean (Straight point-to-point) flows.
Aisle Flow: Creates routings where the shortest path between locations is
determined based on Aisle-Based flows.
Random Seed: This value sets the start point for creating the random sample used
to create the Uniform or Triangular distributions.
Append Routes: If selected, the Tugger routings will be attached to any existing
flow path routings on the Routings tab instead of overwriting them.
Generate Routes: Creates the tugger routes in the Routings window for each tugger
route at each departure time in which there are containers to deliver.
Staging Time: Defines the amount of time (in seconds) that all tuggers will be
delayed at the staging location. In the example screen shown above, the time has
been set to 60 seconds. Note this time is added once per cycle (trip out and back)
and not for both the trip out and back.
Unused Deliveries
© 2006 Proplanner
218
If one or more delivery lines (from the deliveries file) does not generate one, or more,
corresponding routing lines, then these original delivery lines will be shown in the
unused deliveries list. As with all list boxes in the Flow Planner, you may copy and
paste this list into MS Excel.
This can happen if:
1) The delivery’s ETD is not within its corresponding route driver service interval
(i.e. start and end time)
2) The FROM and/or TO location (if specified) is not assigned to a route
3) If the delivery time was specified with a random probability of occurrence and
it did not get selected by the random number generator.
Tugger Created Routing Notes
© 2006 Proplanner
Reference Section
219
The routings generated by the Tuggers tab for the Routings tab look very different
than the standard setup for the Flow Planner. We will use the simple example above
to discuss the differences.
·
This route makes eight deliveries of one part to eight different locations (A-H).
The part name Return represents a return trip to the staging area where no
load or unload time is calculated, thus the “!NA” container name. This tells the
program to calculate the distance and walk time and ignore the load/unload
time.
·
The Tugger Module creates products that represent the tugger route name
and start time (ie. Route1-7 means these are the routings for Route1 at 7AM).
·
The routings themselves are broken down into their individual segments to
show every load or unload at each location for the appropriate number of
containers.
·
Because the material handling device starts at staging and goes to the From
location first, the volume is calculated for on the first routing from Staging to
Receiving because it is Loading 8 containers at Receiving.
·
The Parts per container are -1 to if a load is performed at the TO location and
-2 when an unload is performed. This is only a signal for the program, not a
value actually used for calculation.
Given this information, the example above shows the empty material handling device
© 2006 Proplanner
220
starting at Staging. It then goes to Receiving where it Loads 8 containers and returns
to Staging. The next step takes it to location A-H in the shortest paths to make sure
deliveries are made at the times designated on the Tuggers tab. Finally, the material
handling device returns to staging where again no load/unload time is calculated
because it is assumed empty at this time.
Note: The deliveries in this example were made in this order due to having
sequential ETDs on the Tuggers tab. Had these been set up using Uniform or
Triangular Distributions with a random seed, there is no guarantee the routes would
have been scheduled at this time of day or in this order.
© 2006 Proplanner
Reference Section
221
5.13.4 Tugger Created Routing Notes
Note: This tab is functional only with purchase of the Tugger add-on.
The purpose of the Tugger module is to create a set of routings to represent a mixed
delivery scenario. This scenario occurs when a material handling device is used to
deliver (or pick up) multiple parts to multiple locations along a shortest path route.
The order in which the parts are delivered (or picked up) is determined by the tugger
module such that the travel path distance (either straight, or aisle-based) is
minimized and the tugger travels through each user-defined Passthru point (if any
are specified) in the sequence specified in the route definition.
Step 1: Import Deliveries
Clicking the Import Deliveries button prompts the user to select a file containing
delivery information for each part. An example of this file can be found in the Help
Files folder. The input window where you specify your delivery file name (and also
your Methods and Locations file names) is shown below.
© 2006 Proplanner
222
ID: Unique identifier for the delivery of this part to these locations. It is important that
there be no duplicates in this field.
Part: Part name that is being moved in this delivery. This will populate the Products
tab automatically.
Container: Name of the container being used to transport this part. This is tied to
the size information located in the Containers tab. Container sizes are used to
determine loaded container volume on the tugger’s carts.
Container Qty.: Number of containers that will be delivered, for each delivery
event, between these locations. Please reference the description on the ETD field to
note a special condition with the Uniform or Triangular distribution methods.
From: Location where the part is picked up to be taken to the staging area. This
could be an actual pickup location or a drop-off location. While the ‘FROM’ location
is typically specified for loading containers; containers could also be dropped of at
these locations (i.e. drop off an empty container and pick up a full one). Use the
Direction field to specify if a container is being picked up (dir=1), or dropped off
(dir=-1) at this ‘FROM’ location.
Stage: Location where the carts (trailers) are staged to be delivered to the final
destination.
Note: load and unload time is added (combined) at the staging area via the
staging time input box at the bottom of this window.
To: Final destination of the parts. This could be an actual delivery location or
in-plant drop-off locations. While the ‘TO’ location is typically specified for deliveries;
containers could also be picked up at these locations (i.e. drop off a full container
and pick up an empty one). Use the Direction field in this file to specify if a
container is being picked up (dir=-1), or dropped off (dir=1) at this ‘TO’ location.
ETD: Sets up the time that these delivery events need to be made within the given
time period. Time is input as a fixed decimal time, a randomly determined decimal
time from a Uniform, or Triangular Distribution.
Decimal Time
© 2006 Proplanner
Reference Section
223
This is input as a number 0-23 representing the hour plus a decimal portion of
that hour.
7.5 Represents a delivery being made at 7:30AM
Uniform Distribution
This allows the user to set an upper and lower bounds for the deliveries to fall
between in a bell curve or uniform distribution pattern with most deliveries
taking place around the median time.
UFM(7/15/3/.5) Represents a uniform distribution of deliveries. This
distribution will randomly generate a delivery time between 7 am and 3
pm.
UFM(7/15/3/.5) This code means that deliveries are made between
7AM-3PM.
UFM(7/15/3/.5) Three deliveries are made. Each delivery carries the
Container Qty. and thus this number acts as a multiplier for the number
of containers being delivered.
UFM(7/15/3/.5) They have a 50% probability of being delivered
between 7 am and 3pm. Otherwise, this delivery will not result in a
container delivery being scheduled in the routings file.
Triangular Distribution
Triangular is similar to the Uniform Distribution with an added third time that
sets up the mean time for where the most deliveries occur.
TRG(7/15/10/2/.33) Represents a triangular distribution of deliveries.
This distribution will randomly generate a delivery time between 7 am
and 3 pm with a statistical preference for times around 10 am.
TRG(7/15/10/2/.33) This code means that deliveries are made between
7AM-3PM.
TRG(7/15/10/2/.33) The mean time that these deliveries is made falls
at 10AM
TRG(7/15/10/2/.33) Two deliveries are made. Each delivery carries the
Container Qty. and thus this number acts as a multiplier for the number
of containers being delivered.
TRG(7/15/10/2/.33) They have a 33% probability of being delivered
being between 7 am and 3 pm. Otherwise, this delivery will not result
in a container delivery being generated in the routings file.
Dir: This is either a 1 if containers are loaded at the ‘FROM’ location and unloaded
at the ‘TO’ location, or -1 if they are unloaded at the ‘FROM’ location and loaded at
the ‘TO’ location. This is used to account for empty returns for example.
1: Staging -> From(load) -> Staging-> To(unload) -> Staging
-1: Staging -> From(unload) -> Staging -> To(load) -> Staging
© 2006 Proplanner
224
Load: The load time or code(process codes are specified on the Processes tab)
being used for this part container’s delivery.
Unload: The unload time or code(process codes are specified on the Processes tab)
being used for this part container’s delivery.
Notice: there are no load or unload times for carts (or containers) that are
temporarily stored in the staging area.
Strategies for creating the Deliveries file
There are 4 different formats available to define your deliveries in the Tugger
Deliveries File. A delivery file can contain any combination of these formats. Each
of the formats discussed below, apply for each delivery time interval for every route.
(i.e. for 7am, 8am, 9am, etc. for Route 1 and Route 2 – assuming that deliveries for
those routes occur every hour).
1) If a FROM, STAGE and TO location are defined, then the Tugger module will
assume that the route delivery RETURN time interval includes the time from
STAGING then to all of the FROM locations and then back to STAGING and
then out to all of the TO locations, and finally back to STAGING. Essentially,
the Tugger route generator is assuming that the material handler who is
loading the carts is the same person who delivers all of the containers out in
the factory.
2) If a FROM and STAGE location are defined and the TO field is left blank,
then the Tugger module will assume that the material handler is just taking
carts from STAGING to all of the FROM locations and back to staging.
Therefore, there is an implication that a different material handler is unloading
these containers out into the factory, in parallel.
3) If a STAGE and TO location are defined and the FROM field is left blank, then
the Tugger module will assume that the material handler is just taking carts
from STAGING to all of the TO locations and back to staging. Therefore,
there is an implication that a different material handler is loading these
containers back in the receiving area, in parallel.
4) If a FROM and TO location are defined and the STAGE field is left blank, then
the Tugger module will assume that there is no staging area and that
containers are being picked up at the FROM location and delivered directly to
the TO location. In this situation, the Tugger route generator will sequence
the deliveries in order to minimize the total distance for all pickups and
deliveries.
© 2006 Proplanner
Reference Section
225
Step 2: Location Route Groups
Import Locs/Grps: Imports a location file that includes the route information for a
tugger study.
Save Locs/Grps: Saves the location file with route information appended to it.
Route: This is the name of the route, such as tugger1, route3, etc.
Interval (hours for start and end time and minutes for departure and return
intervals): This field defines the daily start and end times (in decimal hours) during
which the route is being serviced. In addition, this field defines the time interval (in
decimal minutes) when a route driver departs the staging area, and the amount of
time that the route driver is allowed to perform the deliveries on that route before
he/she must return back to the staging area.
For example:
7/15/30/60 Deliveries are made on this route between 7AM-3PM.
7/15/30/60 Deliveries are made in 30 minute intervals and the route driver has
60 minutes to complete the deliveries and return. The fact that a driver is
dispatched every 30 minutes and has 60 minutes to complete their work,
implies that there are two people delivering on this route, in parallel. The
return time must always be equal to or greater than the interval time, and the
departure time interval should be a multiple of the return time interval.
Include: This tells the Flow Planner whether or not to include the route in the study.
Turning off routes is one way of speeding up the calculations when reports and
diagrams for only a subset of the route drivers is desired.
Path: This is where the Passthru point sequence is defined. Passthru points are
separated by forward slashes, and must be listed in the same sequence that you
wish the route driver to visit those locations. Take special care to ensure that
pass-thru points are located directly on an aisle path, or are “Snapped” to an aisle
path intersection.
For example:
A Passthru point sequence of P1/P2/P3 specifies that this route’s deliveries
have to pass through points P1, P2 and P3, in that order (as such, they are
called Passthru points). If they do not exist, these Passthru points will be
prompted for upon generation of routes. These locations should be uniquely
named (different than FROM, TO or STAGE locations, and it is recommended
that these names be very short. A Passthru point can appear multiple times
in the path field (i.e. P1/P2/P3/P1/P4).
Passthru points apply to BOTH the FROM to STAGE route and the STAGE to
TO route. Most of the time you will be analyzing EITHER of these and thus
you can simply specify the passthru points as shown above. If you are doing
© 2006 Proplanner
226
a study involving flows FROM to STAGE AND STAGE to TO, and you only
want the Passthru points to apply EITHER to the FROM to STAGE or the
STAGE to TO delivery, then you must prefix your Passthru point sequence
with either *F or *T indicating if the list applies to the FROM portion or the TO
portion of the delivery respectively. The following example, shows a Passthru
point sequence that applies only to the STAGE to TO portion of the delivery
*T/P1/P2/P3.
Volume: Represents the volume capacity (specified in cubic Meters or cubic Feet) of
the tugger’s carts (trailers) operating along that Route. So if you want to do tugger
cart capacity using QUANTITY of containers as opposed to VOLUME of
containers, then you will need to specify the size of each container as 12x12x12
inches (or 1000x1000x1000 millimeters) depending upon your base drawing units,
so that each container is exactly one cubic foot, or meter.
The Flow Planner will first compute the quantity of containers required for storage on
the carts for each route delivery. These quantities will be multiplied by the volume
for each of the containers in order to compute the total requested delivery volume.
You may reference the Utilizations and Reports tabs to view the comparison of the
requested container volume to that of the available volume.
IMPORTANT NOTE: If the FROM to STAGING to TO format is used (described
above), the program computes the Total volume of containers for the entire
route, and thus will double count the required cart volume. In this case double
the amount of available volume on this delivery route. A future enhancement
to the software will fix this potential issue.
Eff%: This number is the packing efficiency of the tugger’s carts (trailers) operating
along that route. For example, a tugger with a total volume capacity of 10 cubic
meters and with a packing efficiency of 80% (given the general size and shape of the
containers put on the carts) would have an actual volume capacity of 8 cubic meters.
Staging Area: Normally, the staging location for a delivery is specified in the
deliveries file - STAGE field. This forces the delivered part to always use that
staging area, regardless of what zone driver delivers the part. Often, you may wish
to have the staging area mapped to the zone driver and not to the delivered part. In
this case, you simply specify the name of the Staging area for that zone driver and
this will override the name of the staging area specified in that part's delivery route.
It is important to note, that you still must specify a Staging location name for the
delivery route in the deliveries file, even if you intend to override this name with the
zone driver's staging area. In this situation, simply specify a default name (i.e. like
STAGE) in the delivery file, so that the application will know that you want to route
that part through a staging area.
Update: Updates any changes made to a selected route’s properties.
© 2006 Proplanner
Reference Section
227
Step 3: Generate Routings
Tugger Name: Name of the Method Type that will represent the tugger routes.
The Method name will be the Route name. As such, each tugger Route will have its
own unique method.
Straight Flow: Creates routings where the shortest path between locations is
determined based on Euclidean (Straight point-to-point) flows.
Aisle Flow: Creates routings where the shortest path between locations is
determined based on Aisle-Based flows.
Random Seed: This value sets the start point for creating the random sample used
to create the Uniform or Triangular distributions.
Append Routes: If selected, the Tugger routings will be attached to any existing
flow path routings on the Routings tab instead of overwriting them.
Generate Routes: Creates the tugger routes in the Routings window for each tugger
route at each departure time in which there are containers to deliver.
Staging Time: Defines the amount of time (in seconds) that all tuggers will be
delayed at the staging location. In the example screen shown above, the time has
been set to 60 seconds. Note this time is added once per cycle (trip out and back)
and not for both the trip out and back.
Unused Deliveries
© 2006 Proplanner
228
If one or more delivery lines (from the deliveries file) does not generate one, or more,
corresponding routing lines, then these original delivery lines will be shown in the
unused deliveries list. As with all list boxes in the Flow Planner, you may copy and
paste this list into MS Excel.
This can happen if:
1) The delivery’s ETD is not within its corresponding route driver service interval
(i.e. start and end time)
2) The FROM and/or TO location (if specified) is not assigned to a route
3) If the delivery time was specified with a random probability of occurrence and
it did not get selected by the random number generator.
Tugger Created Routing Notes
© 2006 Proplanner
Reference Section
229
The routings generated by the Tuggers tab for the Routings tab look very different
than the standard setup for the Flow Planner. We will use the simple example above
to discuss the differences.
·
This route makes eight deliveries of one part to eight different locations (A-H).
The part name Return represents a return trip to the staging area where no
load or unload time is calculated, thus the “!NA” container name. This tells the
program to calculate the distance and walk time and ignore the load/unload
time.
·
The Tugger Module creates products that represent the tugger route name
and start time (ie. Route1-7 means these are the routings for Route1 at 7AM).
·
The routings themselves are broken down into their individual segments to
show every load or unload at each location for the appropriate number of
containers.
·
Because the material handling device starts at staging and goes to the From
location first, the volume is calculated for on the first routing from Staging to
Receiving because it is Loading 8 containers at Receiving.
·
The Parts per container are -1 to if a load is performed at the TO location and
-2 when an unload is performed. This is only a signal for the program, not a
value actually used for calculation.
Given this information, the example above shows the empty material handling device
© 2006 Proplanner
230
starting at Staging. It then goes to Receiving where it Loads 8 containers and returns
to Staging. The next step takes it to location A-H in the shortest paths to make sure
deliveries are made at the times designated on the Tuggers tab. Finally, the material
handling device returns to staging where again no load/unload time is calculated
because it is assumed empty at this time.
Note: The deliveries in this example were made in this order due to having
sequential ETDs on the Tuggers tab. Had these been set up using Uniform or
Triangular Distributions with a random seed, there is no guarantee the routes would
have been scheduled at this time of day or in this order.
© 2006 Proplanner
Reference Section
5.14
231
Ergonomics Tab
The Ergonomics tab charts the operator safety for the Lift and Carry tasks involving
weight and posture defined within the routings. The FP uses the “SNOOK” tables
developed by Liberty Mutual Insurance in 1991 and approved by OSHA. The FP
allows the user to compute results for both 75% Females and 75% Males.
SHIFT LENGTH – The SNOOK tables require a number of cycles (or repetitions) of
the routing performed over a given period of time. The Shift length determines the
total duration of time during which the routing is performed. Together with the Task
Focus (defined below), and the load/unload time, the FP is able to determine the
number of repetitions per day over the shift length time to determine the safety of the
task.
TASK FOCUS – The task focus defines the percentage of time during the shift that
the operator is performing the activities defined in the routing. For example, if the
operator is working an 8 hour shift (as defined in the shift length), but only performs
the routing cycle ½ of the time during this shift, then the Task Focus value would be
50 to represent 50%.
© 2006 Proplanner
232
5.15
Reports Tab
The Reports window is an interface for creating an XML based spreadsheet output
that is pre-formatted with the Path output information desired by the user. This setup
allows for easy printing, viewing, and sending to other programs such as Excel for
further evaluation.
Once the report is generated, you can hit ctrl+A to select all and copy and paste the
information into Excel for a preformatted and editable Excel file. Right clicking on the
data will give the option to export to Excel as a non formatted and editable Excel
table.
Flow Report
Aggregate to Report – Selects which aggregate type to display the path information
for.
Report type – Chooses the report type from a pull-down list. Here you can also
designate whether All Flow Paths or their Subtotals only are displayed.
Fields to Print – This column selects which data sets to display in the final reports.
The reports will automatically be resized and formatted to allow for any combination
of this information desired.
© 2006 Proplanner
Reference Section
233
Create Report – Generates the XML report in a browser window. You may have to
tell Windows to allow the active content if using Windows XP service pack 2 or
higher.
Legend
Creates a legend that identifies flow paths by aggregate color shown below. The
user designates the default size and selects the insertion point within the drawing.
This legend can be resized by selecting it’s height from the reports tab or using the
scale command within AutoCAD.
Once the legend has been placed for that aggregation method, it will automatically
update with any changes made in a calculation or of desired line color. It must be
placed once for the aggregation type chosen but will remain there for future viewing.
It will not automatically appear for all aggregate methods if placed for only one but
will remain for those methods once placed.
Methods Report
Creates a report that will display quantity, travel time, load/unload time, total time,
available time/quantity, and the utilization percentage. This can be set to be
displayed for the last aggregation method, Method, or Method Type.
Report Settings
Time Units – Selects the default time units to display the output information in.
Conversions will automatically be made if this unit is different than the input unit
designated in the routings.
© 2006 Proplanner
234
5.15.1 Flow Report
The Reports window is an interface for creating an XML based spreadsheet output
that is pre-formatted with the Path output information desired by the user. This setup
allows for easy printing, viewing, and sending to other programs such as Excel for
further evaluation.
Once the report is generated, you can hit ctrl+A to select all and copy and paste the
information into Excel for a preformatted and editable Excel file. Right clicking on the
data will give the option to export to Excel as a non formatted and editable Excel
table.
Flow Report
Aggregate to Report – Selects which aggregate type to display the path information
for.
Report type – Chooses the report type from a pull-down list. Here you can also
designate whether All Flow Paths or their Subtotals only are displayed.
Fields to Print – This column selects which data sets to display in the final reports.
The reports will automatically be resized and formatted to allow for any combination
of this information desired.
© 2006 Proplanner
Reference Section
235
Create Report – Generates the XML report in a browser window. You may have to
tell Windows to allow the active content if using Windows XP service pack 2 or
higher.
Legend
Creates a legend that identifies flow paths by aggregate color shown below. The
user designates the default size and selects the insertion point within the drawing.
This legend can be resized by selecting it’s height from the reports tab or using the
scale command within AutoCAD.
Once the legend has been placed for that aggregation method, it will automatically
update with any changes made in a calculation or of desired line color. It must be
placed once for the aggregation type chosen but will remain there for future viewing.
It will not automatically appear for all aggregate methods if placed for only one but
will remain for those methods once placed.
Methods Report
Creates a report that will display quantity, travel time, load/unload time, total time,
available time/quantity, and the utilization percentage. This can be set to be
displayed for the last aggregation method, Method, or Method Type.
Report Settings
Time Units – Selects the default time units to display the output information in.
Conversions will automatically be made if this unit is different than the input unit
designated in the routings.
© 2006 Proplanner
236
5.15.2 Legend
The Reports window is an interface for creating an XML based spreadsheet output
that is pre-formatted with the Path output information desired by the user. This setup
allows for easy printing, viewing, and sending to other programs such as Excel for
further evaluation.
Once the report is generated, you can hit ctrl+A to select all and copy and paste the
information into Excel for a preformatted and editable Excel file. Right clicking on the
data will give the option to export to Excel as a non formatted and editable Excel
table.
Flow Report
Aggregate to Report – Selects which aggregate type to display the path information
for.
Report type – Chooses the report type from a pull-down list. Here you can also
designate whether All Flow Paths or their Subtotals only are displayed.
Fields to Print – This column selects which data sets to display in the final reports.
The reports will automatically be resized and formatted to allow for any combination
of this information desired.
© 2006 Proplanner
Reference Section
237
Create Report – Generates the XML report in a browser window. You may have to
tell Windows to allow the active content if using Windows XP service pack 2 or
higher.
Legend
Creates a legend that identifies flow paths by aggregate color shown below. The
user designates the default size and selects the insertion point within the drawing.
This legend can be resized by selecting it’s height from the reports tab or using the
scale command within AutoCAD.
Once the legend has been placed for that aggregation method, it will automatically
update with any changes made in a calculation or of desired line color. It must be
placed once for the aggregation type chosen but will remain there for future viewing.
It will not automatically appear for all aggregate methods if placed for only one but
will remain for those methods once placed.
Methods Report
Creates a report that will display quantity, travel time, load/unload time, total time,
available time/quantity, and the utilization percentage. This can be set to be
displayed for the last aggregation method, Method, or Method Type.
Report Settings
Time Units – Selects the default time units to display the output information in.
Conversions will automatically be made if this unit is different than the input unit
designated in the routings.
© 2006 Proplanner
238
5.15.3 Methods Report
The Reports window is an interface for creating an XML based spreadsheet output
that is pre-formatted with the Path output information desired by the user. This setup
allows for easy printing, viewing, and sending to other programs such as Excel for
further evaluation.
Once the report is generated, you can hit ctrl+A to select all and copy and paste the
information into Excel for a preformatted and editable Excel file. Right clicking on the
data will give the option to export to Excel as a non formatted and editable Excel
table.
Flow Report
Aggregate to Report – Selects which aggregate type to display the path information
for.
Report type – Chooses the report type from a pull-down list. Here you can also
designate whether All Flow Paths or their Subtotals only are displayed.
Fields to Print – This column selects which data sets to display in the final reports.
The reports will automatically be resized and formatted to allow for any combination
of this information desired.
© 2006 Proplanner
Reference Section
239
Create Report – Generates the XML report in a browser window. You may have to
tell Windows to allow the active content if using Windows XP service pack 2 or
higher.
Legend
Creates a legend that identifies flow paths by aggregate color shown below. The
user designates the default size and selects the insertion point within the drawing.
This legend can be resized by selecting it’s height from the reports tab or using the
scale command within AutoCAD.
Once the legend has been placed for that aggregation method, it will automatically
update with any changes made in a calculation or of desired line color. It must be
placed once for the aggregation type chosen but will remain there for future viewing.
It will not automatically appear for all aggregate methods if placed for only one but
will remain for those methods once placed.
Methods Report
Creates a report that will display quantity, travel time, load/unload time, total time,
available time/quantity, and the utilization percentage. This can be set to be
displayed for the last aggregation method, Method, or Method Type.
Report Settings
Time Units – Selects the default time units to display the output information in.
Conversions will automatically be made if this unit is different than the input unit
designated in the routings.
© 2006 Proplanner
240
5.15.4 Report Settings
The Reports window is an interface for creating an XML based spreadsheet output
that is pre-formatted with the Path output information desired by the user. This setup
allows for easy printing, viewing, and sending to other programs such as Excel for
further evaluation.
Once the report is generated, you can hit ctrl+A to select all and copy and paste the
information into Excel for a preformatted and editable Excel file. Right clicking on the
data will give the option to export to Excel as a non formatted and editable Excel
table.
Flow Report
Aggregate to Report – Selects which aggregate type to display the path information
for.
Report type – Chooses the report type from a pull-down list. Here you can also
designate whether All Flow Paths or their Subtotals only are displayed.
Fields to Print – This column selects which data sets to display in the final reports.
The reports will automatically be resized and formatted to allow for any combination
of this information desired.
© 2006 Proplanner
Reference Section
241
Create Report – Generates the XML report in a browser window. You may have to
tell Windows to allow the active content if using Windows XP service pack 2 or
higher.
Legend
Creates a legend that identifies flow paths by aggregate color shown below. The
user designates the default size and selects the insertion point within the drawing.
This legend can be resized by selecting it’s height from the reports tab or using the
scale command within AutoCAD.
Once the legend has been placed for that aggregation method, it will automatically
update with any changes made in a calculation or of desired line color. It must be
placed once for the aggregation type chosen but will remain there for future viewing.
It will not automatically appear for all aggregate methods if placed for only one but
will remain for those methods once placed.
Methods Report
Creates a report that will display quantity, travel time, load/unload time, total time,
available time/quantity, and the utilization percentage. This can be set to be
displayed for the last aggregation method, Method, or Method Type.
Report Settings
Time Units – Selects the default time units to display the output information in.
Conversions will automatically be made if this unit is different than the input unit
designated in the routings.
© 2006 Proplanner
242
5.16
Licensing/Settings Tab
For Proplanner Applications working on an existing AutoCAD License
When you first run the application you will need to go to the Licensing/Settings tab
and enter your License Code. License codes are provided by your Proplanner sales
representative, or can also be obtained by contacting Technical Support. License
codes are generated to link the FP to your copy of AutoCAD. Therefore you will
need to provide the Proplanner representative with your AutoCAD serial number
(shown on the options screen) so that they can generate the appropriate code for
you.
Upon entering the code and selecting the Update License button, the WPP will save
this code to a license file in the WPP application directory specified at installation
time.
Precision: Determines the desired number of decimal places to show for results
Output Units (Feet/Meters): Determines the desired output units for the results and
paths windows, as well as the basis for method type speed.
Base Drawing Units (Inches/Feet/millimeters/Meters): Determines the value of
one unit of distance in the drawing. This is used for extracting travel distances
© 2006 Proplanner
Reference Section
243
between locations and for paths extracted from the drawing.
Location Text Layer: Designates the layer on which the location information is
stored. This can be changed to save different location settings on the same drawing.
Currency: the currency used in Proplanner FP
Loaded Walk Speed: the speed used in FP for loaded walk
Unloaded Walk Speed: the speed used in FP for unloaded walk
Line Delimiter: This setting allows the user to select either the comma or
semi-colon for the delimiter it uses to separate information in the input files. The
default comma separated files are not always standard for foreign numeric notations
that use commas instead of periods.
© 2006 Proplanner
244
6
Tutorial
There are two tutorials helping you get familiar with Proplanner FlowPlanner:
Hydra Pumps Example
Tugger add-on Tutorial
© 2006 Proplanner
Tutorial
6.1
245
Hydra Pumps Example
STEP 1: To get started, run AutoCAD and Open the file HydraPumps.DWG. You
should be able to see the Proplanner Applications menu on your screen. If not, you
will need to load this menu using the Menu Installation Guide titled Install.pdf.
STEP 2: Select the “F” Proplanner icon button, and when the FP application loads it
will present an intro screen similar to that shown below. Simply clicking anywhere on
this screen will load the main FP application window.
STEP 3: To import an existing flow routing file, select the File Open button from the
top right corner of the Part Routings tab that comes up when the program first starts.
Then select the Hydra Pumps. CSV file provided with the FP application. This can
most commonly be found in “C:\Program Files\Proplanner\AutoCAD Programs”.
Once the file is selected, click OK to load the sample file.
STEP 4: Part Routings
© 2006 Proplanner
246
Note that the “Small Pump” will already be selected from the list of products
available in the top left pull-down menu.
Next, input routing information into the input boxes shown by the arrow below.
Give the following details for the Part Routing
Part name = “VALVE”
%
= “100”
From Loc
= “LOCATION1”
Method
= “TROLLEY”
Container
= “BIN”
C/Trip
= “1”
Part/C
= “200”
To Loc
= “LOCATION2”
Make the other three fields empty
Click on the “Add Row” to the right after entering these values.
The added row is outlined. Now click on “Insert Row”. The information for VALVE is
inserted above the previously highlighted row.
© 2006 Proplanner
Tutorial
247
Change only the following details in the inserted row and hit Update.
Part Name = “BASEPLATE”
From Loc
= “LOCATION3”
To Loc
= “LOCATION4”
Part/C
= “100”
Select the added row now and now click on the Update Row button. This will update
the row with the same information as the inserted row so that both new rows are
alike. This was just to get you familiar with the update function.
© 2006 Proplanner
248
Now we select the last row “VALVE”, and click “Remove Row”. This will leave us with
the following:
Click on the “Calculate” button. A Flow Path Alert message shows up
© 2006 Proplanner
Tutorial
249
Click OK. At the command line of AutoCAD you will note a prompt for adding the
location.
Add Location1, Location 2 anywhere on the drawing. For locations 3 and 4 refer to
the image below and add them as shown. [NOTE: red circles will not appear in the
drawing. You can remove Location 1 and Location 2 in the locations Tab later since
they are not needed now.]
After entering Location 4 the paths are drawn on the AutoCAD drawing. At this stage
click on "Return to Flow Path Calc" to get back to the application.
© 2006 Proplanner
250
Special Note: if the drawing shows very big arrows overlapping each other after you
click the “Calculate” button. It is probably the units of the drawing and the units used
by Flow Planner are different. You can type in "units" in the command line and see
the drawing units. Then go to "Licensing/Settings" Tab to change the units used by
Flow Planner.
© 2006 Proplanner
Tutorial
251
Click on the Go to AutoCAD button and in there click on “QueryPath” on the small
modeless window that comes up. Click on the edge of the path connecting Location3
and Location4. Hit enter and the following window is shown.
STEP 5: Products Tab
Click on “Return to Flow Path Calc”.
To change the color of the flow lines for BASEPLATE, go to the “Products” tab
Select “Small_Pump” from the product window on the left which causes the part
names to change on the right. Select BASEPLATE in the parts window on the right
© 2006 Proplanner
252
and change color to “2-Yellow” to the left of the update button. Click on the Update
button to apply the color.
On the Part Routings tab change the “Aggregate by” control, near the calculate
button in the bottom right, to “Part” and click calculate.
You will now see that the line that was red is now yellow. This is because the
calculations and lines are drawn by part movements not summarily for the product
movements.
Return to the FP by clicking on “Return to Flow Path Calc”.
Note: To prepare for the next steps re-run a calculation by “Product”. Next in the
Part Routings window, change the from and to locations for the BASEPLATE trip by
clicking the that row. Now, update the "From" location - Location 3 to Location 5,
and update the "To" location - Location 4 to Location 6. The user can update the
information by clicking on the "Update Row" button . Do not do another calculation
yet. You will be shown another way to add locations to the drawing.
STEP 6: Locations Tab
Since you just changed the trip to go from “LOCATION3 TO LOCATION4” to
“LOCATION5 TO LOCATION6” on the part routings tab, LOCATION5 and
LOCATION6 need added to the drawing. This can be done on the Locations tab by
selecting “Add Missing Location”.
© 2006 Proplanner
Tutorial
253
The program now goes to AutoCAD where you can specify where LOCATION5 is,
click somewhere near where LOCATION3 was. With LOCATION6, click where
LOCATION4 was.
The new locations will show up in the Locations display list. The “Group” of the
location will be assigned UNASSIGNED” by default. This part of the exercise was to
show that locations can be added here one at a time as well as entering many of
them when a calculation is performed on a new drawing.
STEP 7: Paths Tab
Click on the first routing listed on the Paths tab. It should be for product Small Pump
going from Receiving to Storage1. Enter “0” in the “User Specified Distance” and
select update. The user specified distance overrides the calculated distance
The field “User Dist/Trip” changes to zero after updating for the selected path. On
Part Routings tab uncheck “Regen All Paths” and calculate. The total distance for
Small_Pump reduces by about 43 feet if you run a calculation this way.
Re-check “Regen All Paths” for the rest of this tutorial because user defined
distances are not needed in this case.
In “Paths” tab, click on “Add/Edit Aisle” in the lower-left corner of the Paths tab. You
will be taken to the AutoCAD drawing with the Aisle Add/Edit window.
© 2006 Proplanner
254
Set the aisle direction to "Left and Down" as shown in the image and press "Set
Dir/Width". Click on the aisle above "LOCATION5". The solid line changes to a
dashed-line to show it represents a “Left and Down” directional aisle.
Similarly, set “Down and Left” direction to 2 other paths as shown here in red.
[NOTE: Red rectangles will not appear in the drawing.]
© 2006 Proplanner
Tutorial
255
Next Set “Up and Right” direction to the two aisle paths boxed in blue in the drawing.
Click “Return”. You will be taken back to the Paths tab.
Click on “Join Locs to Aisle”. A message says “All Locations now joined to Paths”.
Go to Part Routings tab, check the “Aisle Flow” option as shown and click Calculate.
This shows routings over the aisle paths which follow the shortest path allowable
between two points. This also takes into account one way aisles, if they exist. Click
on Return to Flow Path Calc once the aisle flow lines are drawn.
Step 8:
© 2006 Proplanner
256
Go to Filter Tab. Click the Product as shown below and select LOCATION5 and
LOCATION6 as the from and to locations.
Click “Filter Flows”. The AutoCAD drawing shows the path taken from LOCATION5
to LOCATION6 as shown in the image. It does not take a shorter path as the shorter
path is given a “Right and Up” direction.
Step 9: Congestion Tab
© 2006 Proplanner
Tutorial
257
Go to the "Part Routings" tab. Change “Aggregate by” to "Method Type" and check
the "Color by Frequency" option. Press "Calculate".
The drawing shows the colors according to settings on the "Freq/Congestion" tab.
The "Frequency Color Scale" shows that the path colors are.
0 - 50%
51 - 70%
71 - 85%
85 - 95%
96 - 100%
- Cyan
- Blue
- Green
- Yellow
- Red
The percentages are based upon the highest frequency of flow. Therefore, the red
lines will be those with flow frequencies between 95% and 100% of the highest
frequency flow in the study.
To see a Congestion diagram that demonstrates where the largest amount of plant
wide flow is, change the aggregate name on the "Congestion Tab" to congestion and
select update.
© 2006 Proplanner
258
This will show information based on the calculation you have already done and sum
travel over each segment of the aisle path network. When done, a diagram of where
transportation bottlenecks may occur is provided.
© 2006 Proplanner
Tutorial
259
STEP 10: Go to Methods Tab.
(These are added automatically from the routing information or can be added
manually)
You can add a new “Method Type” by adding new values in the “Method Types”
control in the lower half of the window, as shown in the following:
The user can add a new method type or use an existing one for this tutorial.
Next, we can add a “Material Handling Method”. In the upper half of the window, give
the following values to the “Material Handling Methods” parameters.
Method Name
= “TROLLEY2”
Calc
= “Yes” (drop-down selection)
Qty
= “1”
Method Type
= “HAND” (drop-down selection)
Load Process
= “5” (drop-down selection)
UnLoad Process
= “5” (drop-down selection)
Start Loc
= “RECEIVING” (drop-down selection)
Color
= “3” (drop-down selection)
Click on the “Add” button after entering the values. This row adds to the 3 methods
already present.
© 2006 Proplanner
260
STEP 11: Go to Containers Tab. (Also added automatically from the routing
information or manually on this tab) Give the following values to the “Containers”
parameters.
Container ID = “BIN2”
Length
= “1”
Width
= “1”
Height
= “1”
Full Qty
= “1”
EmptyQty
= “1”
Color
= “3-Green” (drop-down selection)
Click on the “Add” button to add this new Container
STEP 12: Reports
Next go to the Reports tab. Notice that Method Type should already be selected as
your aggregate type in “Part Routings” tab and “Calculate” should already be hit,
because it was the last calculation type performed. Select all Fields to Print and set
the report type to All Flow Paths.
Clicking the Create Report button now will create a XML based report including all
the path information in a well organized, easy to read web format.
© 2006 Proplanner
Tutorial
261
If the time units, report type, or fields are selected differently than displayed in a
previous report, creating a new report will automatically display data according to the
new settings.
A Material Handling Device report by method, method type, or the last aggregation
can be created here also. This is produced in the same manner as the Flow Report
and shows the Methods output specifically for Aggregate, method, or method type.
© 2006 Proplanner
262
6.2
Tugger add-on Tutorial
This tutorial applies only to the Tugger Add-on that can be optionally purchased with
the full version of the Flow Planner application. The Tugger analysis module
provides you with the ability to quickly and easily evaluate the many prospective
benefits of material delivery using tow-train tuggers that pull multiple carts of material
along prescribed routes through the factory. With this module, you need only specify
what materials that you wish to deliver and when you would like those deliveries to
happen and then sit back and watch the Tugger route generator do the rest.
Preparing the Data
When starting from new, you will need to either create, or import, your delivery
information into a spreadsheet in the format shown below. Once the fields are filled
with their respective data, (described in the Tuggers section of the Flow Planner
manual), this file will be ready to import into the Flow Planner Tugger module.
This is an example of the route file which is saved in a .CSV format.
This file contains the part movements, pick/drop information, and delivery times.
For this example you will use a pre-created set of input files, supplied with the
software installation. These files can be found in the directory where the program is
installed (most commonly “C:\Program Files\Proplanner\AutoCAD Programs”).
There is a back-up set of these tutorial files within the PPFP_Exercise_Samples
directory under the Help directory on your CD.
This analysis is set up to analyze a material handling person starting at a STAGE
location and then leaving to pick up containers in a receiving area to fill their tugger's
carts (in the shortest path order). This person then returns to the STAGE location
© 2006 Proplanner
Tutorial
263
and drives out to the shop floor to deliver those containers (in the shortest path
order). When completed, this person will return to the STAGE location. If you
intended to only analyze deliveries to the shop floor, or instead the filling of tugger
carts in the receiving area, then you could leave the FROM or TO columns blank,
respectively.
This analysis has the Estimated Times of Delivery (ETD) specified as decimal hour
values (from 0 to 24), with the exception of 2 containers whereby the ETD is
statistically determined as any time between 7am and 10am. The 2nd container in
this file (row 3) also specifies that 2 container deliveries (individually) must be
performed and each of them has a 50% probability of being delivered
(UFM/7/10/2/0.5). The 4th container (row 5) specifies that 1 delivery will be
scheduled with a 100% probability of happening.
The 4th column (ContQty) specifies how many containers will be delivered per
scheduled delivery. Most of the time this column will have a value of 1, as
containers are often delivered to the line individually (as opposed to in lots of 2, 3, 4,
etc).
The Direction column in this file specifies if containers are LOADED in the FROM
location and UNLOADED in the TO location (default value = 1), or if the containers
are UNLOADED at the FROM location and LOADED at the TO location (value = -1)
as is often done when picking up empty containers. As such, the value in this
column is either 1 or -1.
Finally, the LOAD and UNLOAD columns allow you to override the handling time set
to the TUG device and instead use the times specified in this delivery file. Only one
container (row 6) has its LOAD and UNLOAD time specified.
Note: For a more detailed explanation of the inputs and data definitions, please
reference the Tuggers Window section of the Flow Planner manual.
Step 1. To begin with, open the drawing Hydra Pumps.dwg found at "C:\Program
Files\Proplanner\AutoCAD Programs"
© 2006 Proplanner
264
Step 2. Next open the Flow Planner and go to the Tuggers Tab (seen below). Select
"Import Deliveries" as highlighted in red below, to open the delivery information files.
A window like the one below will come up prompting the user to select the delivery
© 2006 Proplanner
Tutorial
265
files to be imported. If you select the CSV file button and find "Hydra Pumps
Tugger.csv" from the folder where the program is installed to, the rest of the fields
will populate.
Step 3. At this point you can check to see delivery and location route group
information has been imported correctly and then go to the Locations tab to ensure
that coordinates are tied to each location referenced in the delivery information.
© 2006 Proplanner
266
Step 4. By clicking "Add Missing Locs" the program will ensure that locations are tied
to the coordinates or the user will be prompted to place missing locations onto the
drawing. Notice that the ROUTE column in the Locations list box has a value of
either ZONE1 or ZONE2. This determines which tugger route driver services that
particular location (i.e. like which houses are on a mailman's delivery route). These
assignments (i.e. location to route) can be done via the list box, or they can also be
done graphically, by windowing a set of locations in the AutoCAD drawing and
assigning them to a particular route driver (i.e. ZONE1 or ZONE2 in this tutorial).
Step 5. Now select the Methods Tab to view the material handling device
information. Each route driver has its own LOAD and UNLOAD time data. You can
see in this example, that the LOAD time is 15 seconds for both drivers (ZONE 1 and
ZONE2) and is set to a Process name of UNLOAD for the ZONE1 driver's UNLOAD
time and 15 seconds for ZONE2 driver's UNLOAD time. You can view the Process
information for the UNLOAD task in the Process tab. Both driver's use a Method
Type (device) of TUG and this device is set to have a speed of 5 feet/second.
© 2006 Proplanner
Tutorial
267
Step 6. Now select the Process Tab to view the material handling device's
LOAD/UNLOAD process information. Processes are an optional way to specify
LOAD and UNLOAD time. In this case, we have established an UNLOAD macro
time of 15 seconds per location visited plus an additional 15 seconds per CRATE
OR an additional 9 seconds per BOX. CRATE and BOX are container group names
and are assigned to sets of containers that belong to that group. We can see the
container group settings in the Containers Tab.
© 2006 Proplanner
268
Step 7. Now select the Containers Tab to view the container information. In this
window, you can see the container group assignments referred to by the Process
tab, and you can also see the sizes of each unique container specified within the
deliveries file. Like the Methods Tab, the Containers Tab is automatically created
when you load a deliveries file and containers are given a size of 1x1x1 as default.
You can specify your sizes in this interface or load the Methods file (MHE) into MS
Excel and edit these values there. Container sizes are used by the tugger module to
determine the available volume capacity on the tugger carts.
© 2006 Proplanner
Tutorial
269
Step 8. Now that Delivery, Location and Route data has been imported and verified,
you can create routings by clicking the "Generate Routes" button highlighted in the
red box (below). Before selecting this button, you should provide a time for the
staging activity (i.e. hookup of carts) which is shown as 30 seconds in the blue box
(below), and you should select the Aisle Flow option (directly above the red box).
The Aisle Flow option computes the shortest path between delivery locations using
the aisles. This option takes longer than the Straight Flow option, but produces
more realistic delivery sequences. It is usually best to use the Straight flow option
when doing the first few runs to ensure that all of the data is correct, and then select
the Aisle Flow option when you are ready for your final validated results.
The GENERATE ROUTES button will assign all of the deliveries to a specific route
(based upon which route is assigned to the delivery's FROM and/or TO location (in
the Locations tab). The program will then assign that delivery to a specific delivery
time slot for that route. For example, in the screen shown below, ZONE1 operates
from 7am to 3pm (1500 hours), is dispatched every 10 minutes and has 10 minutes
to return from its delivery before it is expected to go out again for the next delivery
run. This driver also has a cart capacity of 300 cubic feet and is expected to be able
to obtain a 100% packing efficiency (i.e. use all of the available space). The ZONE1
route driver also has 2 Passthru points along the aisle network that he/she must visit
sometime during their delivery from STAGE to the TO locations. You will notice that
the ZONE2 driver has no Passthru points, and thus can take the most efficient path
through the plant for each delivery. NOTE: you will need to adjust the column widths
in the the Route Groups list box on the right in order to see all of the fields of data.
© 2006 Proplanner
270
NOTE: If the user wishes for the devices to have mandatory Passthru points, then it
will be necessary to enter the names of these Passthru points into the Location
Route Groups section under Tugger Route as shown above. These Passthru points
must be entered in the order that you want the application to visit them, and the
location names must be separated by forward slashes. The user will be prompted for
these points when selecting the "Calculate" or "Add Missing Locs" commands.
Step 9. Upon generating routes, the Flow Planner will automatically take you to the
Routings tab when it is complete. Each route delivery (i.e. each delivery at each time
that a tugger is dispatched on that route) will be generated as a separate Product
group. Select the product pull-down list to view the routes that have been created. If
a particular route delivery (i.e. ZONE1-07_0 which would be the 7am and 0 minutes
dispatch on route 1) is not shown, then this is likely due to the fact that no deliveries
were required in the plant between 7am and the next route delivery time.
© 2006 Proplanner
Tutorial
271
In the screen shown above, you are looking at the deliveries for the route ZONE1
that is dispatched at 7:00am and 0 minutes (07_30 would mean 7.5 hours). This
delivery route runs from the STAGE staging area to REC_2, REC_14, REC_15,
REC_4 and then back to STAGE and then on to the Passthru points P1 and P2
before going to locations BORE etc. before returning back to the STAGE staging
area. The Tugger Route Generator created this sequence of deliveries such that it
would minimize the total distance to visit those locations.
Step 10. Now that routes have been created for every time increment, select the
Aisle Flow button (shown in the blue box) and then select the Calculate button (red
box) to generate your tugger flow diagrams and compute your delivery times and
utilizations.
© 2006 Proplanner
272
Step 11. Upon selecting "Calculate", you will see the AutoCAD drawing with the
added routing lines, similar to below. The flow lines may be difficult to see because
they are very thin. If you go to the Paths Tab and set the "Flow Path Thickness
Scale" to 1000 and select the "UPDATE" button, your lines will show up much
thicker.
© 2006 Proplanner
Tutorial
273
Step 12. In addition to filtering the output by route or locations, you can view
utilization charts for each route on the Utilization tab. The first chart shows Traveling
vs. Load/Unload time percentages for the last aggregate. In this case it is by
route/product.
© 2006 Proplanner
274
The next chart (select the radio button "Tuggers (Time)" at the bottom middle) shows
Busy vs Idle vs Over Utilized time specifically for each route. This will show if more
deliveries can be made by that route from a time utilization point of view.
© 2006 Proplanner
Tutorial
275
The final chart (select the radio button "Tuggers (Volume)" at the bottom middle)
shows Full vs Empty vs Over Utilized volume for each route to help evaluate usage
from the total volume perspective. This chart compared to the time chart is telling us
that some of the deliveries have too much container volume on them, however there
is available capacity before and after those deliveries to resolve this problem.
© 2006 Proplanner
276
Step 13. Volume percentages are calculated from the available volume information
found on the Tuggers tab for each route shown below. This is the cubic unit volume
with respect to the drawing units for the space available on the handling device. Also
taken into consideration is the volume efficiency of the tugger carts.
© 2006 Proplanner
Tutorial
277
Step 14. It is recommended that you have the Flow Planner generate the flow
diagrams in the "Straight Flow" technique, to better see where the deliveries are
traveling throughout the plant. To do this, return to the first tab on the left, called
"Part Routings" and select the "Straight Flow" diagramming option and then select
the "Calculate" button, to generate the diagram shown below.
© 2006 Proplanner
278
Step 15. To make better sense of this output, you can go to the Filter tab and filter
flows for a selected route or set of locations. Select the options shown below to
specify ZONE2 at 7:10am between all locations and select the Filter Flows button to
see those flows.
© 2006 Proplanner
Tutorial
279
Step 16. To show reports for your actual path distances and times, return to the
Flow Planner and go to the Reports tab. Select "Create Report".
© 2006 Proplanner
280
© 2006 Proplanner
Tutorial
281
Step 17. Lastly a legend can be created on the Reports tab and used to explain the
path color and assign which color represents which aggregate by selecting a text
size (try 36 inches) and clicking the "Insert Legend" button and then clicking in the
drawing where you would like the legend inserted as shown in the final picture.
© 2006 Proplanner
282
CONGRATULATIONS!!! You have completed your first Proplanner Tugger analysis
flow study. Please reference the Tugger module section of the Flow Planner manual
for additional information on the many Tugger module options not covered in this
tutorial.
© 2006 Proplanner
Tutorial
7
283
Exercises
Plant wide material flow analysis
Special thanks to Dr. Beverly Jaeger at Northeastern University in Boston for
creating these exercises
The objective of this exercise will be to use the techniques learned in the Tutorial,
along with the aid of the How To Guide and Sample FP Input (in Proplanner fold
\Help Files\PPFP_Exercise_Samples), to take a simple set of material flow data and
perform a complete Flow Planner analysis.
Exercise One: Format a data set for importing to the Flow Planner
Use this Excel Spreadsheet (in Proplanner fold \Help
Files\PPFP_Exercise_Samples\FP1.xls) of flow and part data along with the Sample
FP Input to create a CSV and MHE file to import into the FP.
1. To do this extract the data and format it similar to the sample input.
2. Include routing, product, and part information in the CSV and material handling
information in the MHE. It will need picked out of the original spreadsheet and
re-organized.
3. We will treat quantity of products per day as an input that we know the target
value. 1500 will be the goal for MOTOR and 1000 will be the target for TURBINE.
4. The Start Location for the HILO1 method will be RECEIVING and for HILO2 will
be SHIPPING. These locations do not matter in the calculation unless referenced
in the routings but are needed in the MHE file.
5. Make sure there are no special characters in the CSV data by opening it in
notepad. Also remove any superfluous commas at the end of the routing lines.
The Sample FP Input has more details on this. Most common errors include
spaces and quotation marks.
6. Once the data is set up correctly open the FP within AutoCAD and try opening the
CSV. If done correctly the files will open flawlessly.
7. If the files cause an error, consult your instructor or the Troubleshooting Guide.
Results – Flow Planner will open the files with no errors.
Exercise Two: Prepare layout drawing
1. Create layer PF_AISLEPATH in “in Proplanner fold \Help
Files\PPFP_Exercise_Samples\FP_Ex.dwg” by opening the FP while the drawing
is open.
2. Insert the names of the locations using the Flow Planner’s Add Location
© 2006 Proplanner
284
command. The location names can be found in the CSV file.
3. Add the aisle path lines with the Add/Edit Aisle Path button on the Paths tab.
4. Attach the locations to aisles with the Join Locs to Aisle button on the Paths tab.
5. Once this is done, open “in Proplanner fold \Help
Files\PPFP_Exercise_Samples\FP2.csv” and “in Proplanner fold \Help
Files\PPFP_Exercise_Samples\FP2.mhe” to run an aisle flow calculation.
Results – Flow Planner will not ask user to place locations when a calculation is run.
The Aisle Path calculation will not send any straight lines as long as all locations
have been attached to the aisle.
Exercise Three: Perform a Euclidian flow study
Using “in Proplanner fold \Help
Files\PPFP_Exercise_Samples\FP_Ex_LOC_AISLE.dwg” instead of the drawing file
just created, along with “in Proplanner fold \Help
Files\PPFP_Exercise_Samples\FP2.csv” and “in Proplanner fold \Help
Files\PPFP_Exercise_Samples\FP2.mhe” will ensure that we get the same results
when this exercise is complete.
1. Open the drawing and notice that all the locations have been placed as in
exercise two.
2. Start the Flow Planner and open the CSV and MHE files mentioned above. They
should be identical for the most part to the files created in the first exercise.
3. Check the Routings, Products, and Methods tabs to make sure all the data has
been imported.
4. Go to the Options tab to ensure that the units are in feet and inches.
5. Return to the Routings tab and select the Straight Flow radio button.
6. Run the calculation. A Euclidian or straight line study will now be drawn on the
AutoCAD drawing.
7. Because there is more work than one transport device can do in the week, the
program will say it is over utilized and offer to automatically increase the number
of the appropriate device. Click yes.
8. Now that the calculation is complete, return to the Routings tab and look at the
Results Window in the lower left side of the FP window.
Results – The results window should equal those below if the calculation has been
run correctly.
© 2006 Proplanner
Exercises
285
Exercise Four: Perform an aisle based flow study
Using “in Proplanner fold \Help
Files\PPFP_Exercise_Samples\FP_Ex_LOC_AISLE.dwg” instead of the drawing just
created, along with “in Proplanner fold \Help
Files\PPFP_Exercise_Samples\FP2.csv” and “in Proplanner fold \Help
Files\PPFP_Exercise_Samples\FP2.mhe” will ensure that we get the same results
when this exercise is complete. - If you just completed exercise three, skip to step
five.
1. Open the drawing and notice that all the locations have been placed as in
exercise two.
2. Start the Flow Planner and open the CSV and MHE files mentioned above. They
should be identical for the most part to the files created in the first exercise.
3. Check the Routings, Products, and Methods tabs to make sure all the data has
been imported.
4. Go to the Options tab to ensure that the units are in feet and inches.
5. Return to the Routings tab and select the Aisle Flow radio button.
6. Run the calculation. An Aisle Path study will now be drawn on the AutoCAD
drawing.
7. Because there is more work than one transport device can do in the week, the
program will say it is over utilized and offer to automatically increase the number
of the appropriate device. Click yes.
8. Now that the calculation is complete, return to the Routings tab and look at the
Results Window in the lower left side of the FP window.
Results – The results window should equal those below if the calculation has been
run correctly.
© 2006 Proplanner
286
Exercise Five: Analyze the congestion diagram created by the Flow Planner
Using “in Proplanner fold \Help
Files\PPFP_Exercise_Samples\FP_Ex_LOC_AISLE.dwg” instead of the drawing just
created, along with “in Proplanner fold \Help
Files\PPFP_Exercise_Samples\FP2.csv” and “in Proplanner fold \Help
Files\PPFP_Exercise_Samples\FP2.mhe” will ensure that we get the same results
when this exercise is complete. - If you just completed exercise four, skip to step six.
1. Open the drawing and notice that all the locations have been placed as in
exercise two.
2. Start the Flow Planner and open the CSV and MHE files mentioned above. They
should be identical for the most part to the files created in the first exercise.
3. Check the Routings, Products, and Methods tabs to make sure all the data has
been imported.
4. Go to the Options tab to ensure that the units are in feet and inches.
5. Return to the Routings tab and select the Aisle Flow radio button.
6. Make sure that the check box for Create Aisle Congestion is checked.
7. Run the calculation. An Aisle Path study will now be drawn on the AutoCAD
drawing and the congestion data has been created.
8. Go to the Freq/Congestion tab to switch the view to congestion and hit update to
be taken to the drawing with congestion data drawn on the aisle paths.
Results – You will see the top five percent of flows located on the incoming/outgoing
path from the shipping and receiving docks. If you do a Query Path on the line you
will see that it has 3,535 trips as its frequency.
This amount of traffic over such a large aisle path can be a safety risk for the
operators. This can also cause handling devices to need un-necessary amounts of
maintenance or delays, dependant on aisle width and raise their costs. This kind of
problem requires a layout or aisle path redesign.
Exercise Six: Rearrange layout to reduce congestion and improve throughput
You may wish to alter the drawing a few ways. For the sake of matching output, do a
calculation on the drawing “in Proplanner fold \Help
Files\PPFP_Exercise_Samples\FP_Ex_LOC_AISLE_2.dwg” using the same “in
Proplanner fold \Help Files\PPFP_Exercise_Samples\FP2.csv” and “in Proplanner
fold \Help Files\PPFP_Exercise_Samples\FP2.mhe” as before.
There are several ways to improve layout, the most obvious of which being to push
locations closer together. In this case the product assembly areas were assumed to
© 2006 Proplanner
Exercises
287
be monumental. Only the aisle paths and dock input/output sides have been
changed to take advantage of being closer to their use locations and avoid aisle
crossovers between the shipping and receiving dock traffic.
Results – The area of highest congestion has now been minimized to a small area
near receiving and the congestion over which is only 2952.5 trips. That’s over a 16%
reduction of congestion in the area of highest concentration and a drastic reduction
in space in which the major congestion lies.
Additionally, the results which should match those given below have been improved
by 128840.4 feet in reduced travel distance and nearly fifteen minutes of total time
saved.
Exercise Seven: Adjust product/part quantities and method information to
predict future state
Looking at this data, the engineer can see that there is large room for improvement
or altering the product quantities produced. Assuming that demand for this product
will grow, what happens when the amount manufactured needs to be increased? To
do this analysis the operator only needs to alter the product information to have the
new quantities. With these changes, the program will automatically change the
number of handling devices used after informing the user that the route is over
utilized.
1. Open the drawing “in Proplanner fold \Help
Files\PPFP_Exercise_Samples\FP_Ex_LOC_AISLE.dwg” and “in Proplanner fold
\Help Files\PPFP_Exercise_Samples\FP2.csv” and “in Proplanner fold \Help
Files\PPFP_Exercise_Samples\FP2.mhe”.
2. On the Products tab increase the quantity of MOTOR to 3000 and TURBINE to
2000 to simulate increase in production quantities. This can also be used to
simulate a reduction in available method time by altering the Method Type
available minutes on the Methods tab.
3. Run an Aisle Flow calculation to best evaluate the real distance.
4. Select Yes when the over utilization dialogue boxes pop up. This will change the
number of material handling devices as necessary.
5. View the changes to the method handling device quantities on the Methods tab.
6. Save the routing files as different file names to save that alternative scenario for
© 2006 Proplanner
288
future analysis.
Results – The operator can see that despite drastic increases in demand, the
optimized material flow patterns only require an increase of two operators by looking
at the Methods tab. Additionally, they have all the distance, time, and cost evaluation
data figured without doing a test run on the line.
This method can be used to determine the outcome of several different material
information changes. Additionally for all the devices, the operator can track their
utilization percentages and decide how much time they can spend doing other tasks.
Assuming the work locations are movable, large amounts of plant space can be
saved as well.
© 2006 Proplanner
Exercises
8
289
How To Guide
Plant wide material flow analysis
Base steps:
1.
Import plant drawing to AutoCAD.
2.
Input routing information either by using Excel to copy and paste the larger
quantities of information into the proper columns to be imported directly to FP, or
using our route building editor.
Excel
© 2006 Proplanner
290
Route building editor
3.
Select the product and part Tab and adjust your quantities as shown below.
Products and parts editor
4.
Select the Methods Tab and adjust your quantities as shown below.
© 2006 Proplanner
How To Guide
291
Methods editor
5.
Select the Calculate button on the Routings Tab, with straight flow option
selected.
6.
© 2006 Proplanner
You can now see the straight flow lines.
292
Straight flow lines
7.
Define your aisle path network by drawing a path line down the aisles of the
drawing. This can be seen in the example as the purple lines.
Aisle path network
8.
Select the Calculate button on the Routings Tab, with Aisle flow option
selected.
© 2006 Proplanner
How To Guide
293
You can now see the aisle flow lines.
Aisle flow lines
8.
Observe summary results on the routings tab, path information, or reported
information.
© 2006 Proplanner
294
Path information
Reported information
Aggregation methods of calculation:
1.
Product - Accounts for movements belonging to each product. Path colors are
dependant on the colors assigned to the product.
© 2006 Proplanner
How To Guide
295
2.
Part - Uses quantities of each part as well as product to show results specific
to each part name. Colors for the assigned lines are dependant on the colors
assigned to the individual parts.
3.
Product + Part - Calculates movements for each unique combination of
product and part. Colors for the assigned lines are dependant on the colors assigned
to the individual parts.
4.
Method - Sums the flows for the method, such as each time a specific forklift
or cart moves. Colors for the assigned lines are dependant on the colors assigned to
the methods.
5.
Method Type - Looks at the flow information for general method types such as
forklift, cart, or truck. Path colors are dependant on the colors assigned to the
method types.
6.
From To-Loc - Calculates flow results for each movement between different
sets of from and to locations. Colors for the assigned lines are dependant on the
colors assigned to the from location's group color.
7.
From To-Group - Calculates flow results for movements between each unique
combination of from and to groups. Colors for the assigned lines are dependant on
the colors assigned to the from location's group color.
8.
Container - This calculation takes into account the movements for each
individual container type. Colors for the assigned lines are dependant on the colors
assigned to the container.
Predetermined time parsing:
This example shows a plain l/ul process as well as the three most popular
predetermined time parser codes.
© 2006 Proplanner
296
Example
1.
Template - This rule will be applied to each routing using the method that
references this "template" load/unload process. This process string allows the user
to define a rule for load/unload times that can take into account the from and to
locations, container, and if the containers or locations are empty or full for each
individual routing. A base time can also be set for the other rules in this process
string to add or subtract from, dependant on the container and location status. This
example shows a base time that changes if there are additional containers, time
added for full containers and locations, and time subtracted for empty containers and
locations. This is Load2 in the example.
2.
Modapts - Uses Modapts predetermined time codes to parse the activity
times. Output can be seen in minutes or seconds. This is Unload1 in the example.
3.
MTM-B - Uses MTM-B predetermined time codes to parse the activity times.
Output can be seen in minutes or seconds. This is Unload2 in the example.
4.
"User Defined" - User can define a list of time codes and their respective
values that can be used to parse the activity times.
Congestion diagrams:
1.
Load your drawing and make sure that the aisle paths are defined by a line on
the appropriate aisle path layer. The aisle path lines can be drawn by going to the
paths tab and selecting Add/Edit Aisle Path.
© 2006 Proplanner
How To Guide
297
Drawing
Paths tab
2.
Once your path lines are there, attach the locations to the aisle so that all
parts have a complete aisle path network.
3.
Perform an aisle flow analysis by selecting the aisle flow radio button near
calculate on the Part Routings tab and then hitting calculate.
4.
When this is finished, the Flow Planner will create an alert saying that the
congestion diagram has been drawn and will take you to the drawing with the regular
© 2006 Proplanner
298
aisle flows.
Aisle flows
5.
To see the congestion data that was created, select congestion from
Frequency/Congestion tab and hit the update button.
Frequency/Congestion
6.
The drawing will now display the flow congestion calculated for each aisle
section with the highest areas being shown with the greatest thickness and red or
yellow lines. Initially it will be set to a percentage so there will always be paths that
© 2006 Proplanner
How To Guide
299
can show up red.
Flow congestion
7.
If the user wants to see congestion of specific amounts they can return to the
Frequency/Congestion tab and select the Absolute Values radio button and define
custom breakpoints for the colors to show up on the drawing. This will help eliminate
flows with more specific troublesome congestion numbers.
Filtering:
Filtering helps single out the flow lines that you wish to see without letting other less
important lines interfere. The ones filtering removes are still there, just turned off until
"Show All Flows" is hit.
© 2006 Proplanner
300
Filtering
1.
Aggregate - Selects what aggregate/s to filter. This selection will only show
flows for this aggregate. There must have been a calculation done for that
aggregation method prior to doing a filter.
2.
From and to locs - Selects which locations to show flows between.
3.
And vs. Or - The "And" radio button says that both the selected locations or
groups for "from and to" must be true for the same path for it to be displayed. The
"or" radio button says that either the selected locations or groups for "from and to"
must be true for a path for it to be displayed.
4.
Frequency - Sets the high and low range a paths frequency must fall between
to be displayed after the filter has been applied.
5.
Aggregate, from and to locations, and frequency can all be used at the same
time to more specifically filter the calculate flow paths.
Utilization charts:
1.
Aggregate - Displays a bar chart showing Travel, Load/Unload, Idle, and Over
Utilization times for each unique aggregate.
© 2006 Proplanner
How To Guide
301
Aggregate
2.
Method - Displays a bar chart showing Travel, Load/Unload, Idle, and Over
Utilization times for each unique method name, ie. fork1, fork2, fork3.
Method
3.
Method type - Displays a bar chart showing Travel, Load/Unload, Idle, and
Over Utilization times for each unique method type, ie. forklift, cart, pull_cart.
© 2006 Proplanner
302
Method type
Advanced reporting:
Reports are generated after a calculation by hitting the "Generate" button next to it's
corresponding report type on the Reporting tab. A calculation must have been
performed to create the reports.
Reporting tab
1.
Simple Report - This report displays all the general path information that was
© 2006 Proplanner
How To Guide
calculated from the drawing in one pre-formatted page that looks like an Excel
spreadsheet. The user can shut off selected columns of data by selecting their
appropriate checkboxes and re-selecting "Generate"
Simple Report
2.
Aggregate - Displays a detailed report of calculations performed for the
methods handling device by Aggregate.
© 2006 Proplanner
303
304
Aggregate
3.
Method - Displays a detailed report of calculations performed for the methods
handling device by Method.
Method
4.
Method type - Displays a detailed report of calculations performed for the
methods handling device by Method Type.
© 2006 Proplanner
How To Guide
305
Method type
5.
Legend - Besides the reports, the drawing itself can be used as a valuable
output tool. On the Reporting tab, a legend can be added to the drawing at any
desired scale once the calculations have been performed. This legend displays the
line color and name of each unique aggregation line. Once added, the legend will
update with new information. The legend must be added for each aggregation the
user wishes to display it for however.
Legend
© 2006 Proplanner
306
9
Troubleshoot
Symptom
Possible Causes
Solution
© 2006 Proplanner
Troubleshoot
1. FP will not start up.
307
Previous version was not
uninstalled before this
installation.
Uninstall by going to
Add/Remove Programs in
the control panel,
selecting Proplanner
AutoCAD Programs and
selecting remove. When
done, install from the disk.
If using the stand-alone
version that comes with
AutoCAD included,
“Supplemental” Install was
not performed.
This setup file can be
found on the install disk in
a folder titled
“Supplemental”
Microsoft .NET version
1.1 may not be installed
on your computer.
There is a folder titled
“Microsoft .NET Install” on
the install disk. The setup
file is called “dotnetfx.exe”
If using an older version of
our software, this folder
may not be there. In that
case, this file can be
downloaded and
automatically installed by
going to Windows Update
which can most commonly
be reached by clicking a
link in the Control Panel or
by going to Microsoft.com.
The menu bar was not
installed.
For the 2002 to 2005
versions of AutoCAD, Go
to Tools\VBA Manager
and load
MENULOAD.dvb. Go to
Tools\Macros and run the
addtoolbar macro.
For the 2006 or higher
versions of AutoCAD or
AutoCAD Engine, type
"cuiload" in the command
line, then load "PP.cui"
from proplanner install
fold.
© 2006 Proplanner
More detailed steps can
be found in the Install
guide on the Proplanner
AutoCAD Programs disk.
308
2. .csv, .prd, .loc, .mhe
files do not open.
Excel by default saved the
files as a tab-delimited
.csv or an .xls instead of a
comma-delimited .csv.
In Excel, select “Save As”
and choose .csv
(comma-delimited) from
the “Save As Type” pull
down menu. If dealing
with the files which do not
end in .csv make sure that
there are single quotes
around the filename such
as ‘expl.loc’
Note that there is also an
option to save as
.csv(tab-delimited). This is
sometimes the default
.csv setting within Excel
and is what causes this
problem most often.
An extra comma has been
placed in the document,
making the program think
there is an extra column
of information.
Open the file in Excel and
do a “Find and Replace”
or “ctrl + h”. Replace the
comma symbol with
nothing.
Files are not sorted
Open the file in Excel and
alphabetically by Product. select only the data rows
that are not being read
correctly, i.e. routing
information or the
product/part list. Sort the
data ascending
alphabetically.
Files may be delimited by
“;” instead of a comma.
This is allowed for in the
FP and can be corrected
by going to the
Options/Help tab and
changing the “Line
Deliminator” in the
“Default Settings” from “,”
to “;”.
© 2006 Proplanner
Troubleshoot
309
3. Flow Planner will only
open the Hydra Pumps
example.
License code and or
expiration date has not
been entered.
4. License code is
rejected.
License code or expiration Enter the license code
date is not typed correctly. exactly as it was emailed
to you. It is case sensitive.
Also enter the expiration
date in the same way, if
applicable. The best way
is to just copy and paste it
from the email you
received from Proplanner.
Make sure there are no
extra spaces in the input
box before you paste.
© 2006 Proplanner
Go to the Options/Help
tab and enter the license
code exactly as it was
emailed to you. It is case
sensitive. Also enter the
expiration date in the
same way, if applicable.
The best way is to just
copy and paste it from the
email you received from
Proplanner.
310
5. Aisle based flow is
being calculated as
straight line.
Aisle paths are not
actually joined to each
other.
In AutoCAD select and
make sure all lines are
actually touching, making
use of the “Snap to
Object” Osnap ability
which is activated or de
activated with F3.
No aisle path has been
defined.
On the Paths tab select
“Add/Edit Aisle”. This will
take you to AutoCAD and
show a modeless window
with FP options. Selecting
“Add Line” will allow the
user to draw the aisle
paths just like a regular
AutoCAD line. It is
recommended to draw as
much of the aisle paths at
once, without breaking the
line, to avoid
disconnections and
overlaps.
Locations have not been
attached to aisles.
On the Paths tab select
“Join Locs to Aisle”.
Duplicate or overlapping
lines exist on the same
aisle path, most
commonly caused by
backtracking while
creating the path lines
originally.
In AutoCAD look for any
obvious overlapping lines
and delete or redraw them
with the “Add Line”
command within the FP
modeless window. Next
select the lines one by
one until you have the
whole aisle structure
selected. Do not select
them all at once because
that will include the hidden
overlapped lines. Once
they are all selected, copy
them with base point 0,0
and then delete them.
This will show any that
were hidden. Delete the
lines that were covered
up. Right click and insert
the copied paths as a
block with insert point 0,0.
Make sure that the layer is
Proplanner
the PP_Aislepath© 2006
layer
when you insert the lines.
Troubleshoot
6. Distances and times
are drastically incorrect.
Proplanner units differ
from drawing units.
311
Go to the “Options/Help”
tab and select the
appropriate units, “feet,
inches, meters, and
millimeters”. If you do not
know the drawing units,
go to AutoCAD and type
“UNITS” into the
command line. This will
bring up a window where
you can get or enter the
desired units.
7. Load and Unload times Methods referenced by
routes do not have their
are zero when using
Load or Unload times
Processes.
specified to the
processes. Also, if you
are using the process
Templates where the
Load and Unload times
are dynamically computed
by route, then the TIME
field on these processes
must be set to -1.
Ensure that each
Method's Load and
Unload time is referencing
the correct Process, and
that all TEMPLATE-based
processes have a -1
specified for their process
TIME field.
8. No paths, reports, or
output information is
shown.
Calculation has not been
performed for that
aggregation. All this
information is stored on
the drawing or in the input
files once the calculation
is run, but this is not
automatically created until
the first calculation is run
or any time there is a
change in information.
Make sure the output tab
you are on is set to the
aggregation type you are
wishing to show and that
the calculation has been
run for that aggregation
on the routings tab.
9. Reports are showing no
information or format is
being distorted when
opened.
Operator is using old
version of Internet
Explorer with which some
of the reporting functions
are not compatible.
Go to Windows Update,
for which a link is usually
located in the Control
Panel under Settings and
update to the latest
version.
© 2006 Proplanner
312
10. Path lines are either
too small or too large.
These do not
automatically scale so
must be set manually.
These can be set
manually on the Paths tab
in the Path Thickness/100
trips. This thickness is
scaled in the drawing
units.
© 2006 Proplanner
Troubleshoot
10
313
Appendix
This section deals with the naming conventions, sample routing files and limitations
of Flow Planner.
Application Limitations
Application Layers
Input File Format
Sample Routing File (Hydra Pumps.csv)
Sample Product/Parts File (Hydra Pumps.prd)
Sample Methods/Processes/Containers File (Hydra Pumps.mhe)
Sample Locations/Groups File (Hydra Pumps.loc)
Sample Paths File (Hydra Pumps.pth)
Sample Tugger Delivery File (Hydra Pumps Tugger.csv)
© 2006 Proplanner
314
10.1
Application Limitations
These application limitations have been defined in order to limit potentially excessive
memory requirements of the application. If these limits prove constraining for certain
situations, please contact your Proplanner representative with your specific request.
Maximum Input Routing Lines (file length) = 20,000
Maximum Products (unique names) = 1,000
Maximum Parts (a unique Product – Part pair is one part) = 1,000
Maximum Unique Aggregate Names (per aggregate) = 2,000
Maximum Flow Paths (unique From-To polylines per aggregate) = 20,000
Maximum Locations (unique names) = 2,000
Maximum Nodes (line intersections and endpoints per aisle path layer) = 30,000
Maximum Groups (unique names) = 250
Maximum Methods (unique names) = 250
Maximum Method Types (unique names) = 50
Maximum Processes (unique names) = 100
Maximum Containers (unique names) = 100
Maximum Length of Keyword User-defined time standard = 500 lines
10.2
Application Layers
All Proplanner FP layers begin with “PF_” with the exception of the Locations layer
which has the “PP_” designation which is the same as the Workplace Planner
application. The FP application will consistently add and remove text, lines, blocks
and polylines from those layers. Proplanner will not alter any graphics on layers
other than those beginning with “PP_” or “PF_”.
Note: aggname is the aggregate name specified in the routing file (i.e. the Product
names or the Part names, or the Method names, etc)
aggtype is the aggregate type. The following options are valid:
PROD - Product
PART - Part
PDPT – Product&Part
MTHD – Method
MTYP – Method Type
FLOC – From-To Location
FGRP – From-To Group
CONT - Container
Layer Names
PP_LOCATIONS (contains the location text)
PF_CONG – Contains congestion flow diagram
PF_FPTH-aggtype-aggname (contains the flow paths for the specified operator)
PF_AISLEPATH (contains the lines that define the aisles available for the method
© 2006 Proplanner
Appendix
315
types to use for Aisle Path Flows)
PF_AiSLEPATH-JOIN (contains the lines linking the Location text to the aisle
network)
NOTE: AISLEPATH is the default name for the aisle lines in the factory, however
you can specify your own layer names (or multiple layers – one for each method
type).
10.3
Input file format
The input file is a comma delimited file with a CSV extension. As such, no commas,
spaces, tabs, plus signs, forward-slashes or back-slashes are allowed within the text
in a field. Proplanner can also read the output files as input files.
NOTE: The input file must be sorted by PRODUCT NAME (column
1). Product names must be contiguously located in the file
Data Value
Column
1
Product name
2
User field (ignored by program but must exist
3
Part name
4
Percent Flow on Part on route (integer from 1 to 100)
5
From Location name
6
Method name
7
Container name
8
Containers per Trip (real number greater than 0)
9
Parts per Container (real number greater than 0)
10
To Location name
11
Via Location name [optional but field must exist]
12
Via Method [only if Via Loc Name specified – field must exist]
13
Via Containers Per Trip (real number greater than 0) [only if via name –
field must exist]
14
Description (field must exist and can contain anything)
Sample Routing File (Hydra Pumps.csv)
Sample Product/Parts File (Hydra Pumps.prd)
Sample Methods/Processes/Containers File (Hydra Pumps.mhe)
Sample Locations/Groups File (Hydra Pumps.loc)
Sample Paths File (Hydra Pumps.pth)
© 2006 Proplanner
316
10.3.1 Sample routing file(Hydra Pumps.csv)
Product and part information at bottom is optional. If there is Product and Part information in the CSV
file, the PRD file will be ignored but can still be written out to. Dist (in), Freq, L/UL time, Travel Time, Via
Dist (in), Via Freq, Via L/UL Time, and Via Travel Time are outputs, added to the CSV after calculations
and are not needed for input use.
*ROUTINGS (Product, User Defined, Part, Flow%, From, Method, Container, Containers/Trip, Parts/Container, To, Via Loc, Via Method, Via
Containers/Trip, Description, Dist (in), Freq, L/UL Time, Travel Time, Via Dist (in), Via Freq, Via L/UL Time, Via Travel Time)
SMALL_PUMP,0,HOUSING,100,RECEIVING,CART,TUB,1,20,BORE1,STORAGE1,CART,1,,2531.4978,500,10,17.5798,515.6086,500,10,3.5806
SMALL_PUMP,1,HOUSING,100,HAND-FINISHING,CART,TUB,1,22,DE-BURING1,STORAGE2,
CART,1,,1822.1433,454.5454,10,12.6538,2137.3606,454.5454,10,14.8428
SMALL_PUMP,1,GASKETS,100,RECEIVING,CART,TUB,2,300,ASSEMBLY1,STORAGE2,CART,2,,1929.4518,33.33333,10,95.7069,1556.1726,33.33333,10,10.8068
SMALL_PUMP,1,PUMP-BASE,100,RECEIVING,CART,TUB,2,35,HOLEPUNCH,STORAGE2,CART,2,,1929.4518,71.42857,10,44.6632,2040.9498,71.42857,10,14.1733
SMALL_PUMP,1,PUMP-BASE,100,HOLEPUNCH,CART,TUB,1,35,METALCUTTING,,,,,810.513,142.8571,10,5.6286,,,,
SMALL_PUMP,1,HOUSING,100,BORE,CART,TUB,1,22,HAND-FINISHING,STORAGE2,CART,1,,2374.6179,454.5454,10,16.4904,1822.1433,454.5454,10,12.6538
SMALL_PUMP,0,STEEL-BLANK,100,RECEIVING,CART,TUB,1,150,METAL-STAMPING,STORAGE2,
CART,1,,1929.4518,133.3333,10,23.9267,1038.896,133.3333,10,7.2146
SMALL_PUMP,1,STEEL-BLANK,100,METAL-STAMPING,CART,TUB,1,150,WELDING,,,,,862.639,133.3333,10,5.9905,,,,
SMALL_PUMP,1,PUMP-BASE,100,METALCUTTING,CART,TUB,1,50,WELDING,,,,,1766.3767,100,10,24.533,,,,
SMALL_PUMP,1,PUMP-BASE,100,METALCUTTING,CART,TUB,1,50,WELDING,,,,,1766.3767,100,10,24.533,,,,
SMALL_PUMP,0,MOTOR2,100,RECEIVING,CART,TUB,1,22,ASSEMBLY_SM,RECEIVING-STORAGE,
CART,1,,427.3479,454.5454,10,5.9354,933.4389,454.5454,10,12.9644
SMALL_PUMP,1,MOTOR,100,RECEIVING,CART,TUB,1,22,ASSEMBLY_SM,RECEIVING-STORAGE,
CART,1,,427.3479,454.5454,10,5.9354,933.4389,454.5454,10,12.9644
Large_Pump,0,HOUSING,100,RECEIVING,FORKLIFT,PALLET,1,20,BORE,STORAGE1,FORKLIFT,1,,2531.4978,2700,22,28.1278,589.8697,2700,22,6.5541
Large_Pump,1,HOUSING,100,HAND-FINISHING,FORKLIFT,PALLET,1,22,DE-BURING,STORAGE2,
FORKLIFT,1,,1822.1433,2454.545,22,20.246,2012.4394,2454.545,22,22.3604
Large_Pump,1,MOTOR,100,RECEIVING,FORKLIFT,PALLET,1,22,ASSEMBLY,RECEIVING-STORAGE,
FORKLIFT,1,,427.3479,818.1818,22,4.7483,904.1515,818.1818,22,10.0461
Large_Pump,1,GASKETS,100,RECEIVING,FORKLIFT,TUB,2,300,ASSEMBLY1,STORAGE2,FORKLIFT,2,,1929.4518,135,22,148.0267,1556.1726,135,22,17.2908
Large_Pump,1,PUMP-BASE,100,RECEIVING,FORKLIFT,PALLET,2,35,HOLEPUNCH,STORAGE2,
FORKLIFT,2,,1929.4518,257.1429,22,77.714,2040.9498,257.1429,22,22.6772
Large_Pump,1,PUMP-BASE,100,HOLEPUNCH,FORKLIFT,PALLET,1,35,METALCUTTING,,,,,810.513,514.2857,22,9.0057,,257.1429,22,
Large_Pump,1,HOUSING,100,BORE,FORKLIFT,PALLET,1,22,HAND-FINISHING,STORAGE2,
FORKLIFT,1,,2374.6179,2454.545,22,26.3846,1822.1433,2454.545,22,20.246
Large_Pump,0,STEEL-BLANK,100,RECEIVING,FORKLIFT,PALLET,1,150,METAL-STAMPING,STORAGE2,
FORKLIFT,1,,1929.4518,480,22,41.6325,1038.896,480,22,11.5433
Large_Pump,1,STEEL-BLANK,100,METAL-STAMPING,FORKLIFT,PALLET,1,150,WELDING,,,,,862.639,480,22,9.5849,,480,22,
Large_Pump,1,PUMP-BASE,100,METALCUTTING,FORKLIFT,PALLET,1,50,WELDING,,,,,1766.3767,360,22,39.2528,,,,
Large_Pump,1,PUMP-BASE,100,METALCUTTING,FORKLIFT,PALLET,1,50,WELDING,,,,,1766.3767,360,22,39.2528,,,,
Large_Pump,1,PUMP-BASE,100,WELDING,FORKLIFT,PALLET,1,50,SUB-ASSEMBLY,,,,,763.6838,360,22,8.4854,,,,
Large_Pump,1,VALVE,100,RECEIVING,FORKLIFT,PALLET,1,175,MILLING,,,,,1215.1264,102.8571,22,13.5014,,,,
Large_Pump,1,HOUSING,100,DE-BURING,FORKLIFT,PALLET,1,25,DE-GREASING,,,,,876.4749,2160,22,10.2024,,,,
Large_Pump,1,VALVE,100,MILLING,FORKLIFT,PALLET,1,175,METAL-FORMING,,,,,1001.3975,102.8571,22,11.1266,,,,
Large_Pump,1,VALVE,100,METAL-FORMING,FORKLIFT,PALLET,1,175,DE-GREASING,DE-BURING,
FORKLIFT,1,,897.8385,102.8571,22,9.976,876.4749,102.8571,22,214.2495
Large_Pump,0,PLASTIC-RAW-MATERIAL,100,RECEIVING,FORKLIFT,PALLET,1,300,MOLDING,STORAGE2,
FORKLIFT,1,,1929.4518,60,22,333.0601,748.6937,60,22,8.3188
Medium_Pump,0,HOUSING,100,RECEIVING,FORKLIFT,PALLET,1,20,BORE3,STORAGE1,FORKLIFT,1,,2531.4978,750,22,28.1278,660.0758,750,22,7.3342
Medium_Pump,1,HOUSING,100,HAND-FINISHING,FORKLIFT,PALLET,1,22,DE-BURING2,STORAGE2,
FORKLIFT,1,,1822.1433,681.8182,22,20.246,1890.5375,681.8182,22,21.006
Medium_Pump,1,MOTOR,100,RECEIVING,FORKLIFT,PALLET,1,22,ASSEMBLY,RECEIVING-STORAGE,
FORKLIFT,1,,427.3479,340.9091,22,4.7483,904.1515,340.9091,22,10.0461
Medium_Pump,1,GASKETS,100,RECEIVING,FORKLIFT,TUB,2,300,ASSEMBLY1,STORAGE2,FORKLIFT,2,,1929.4518,50,22,110.2544,1556.1726,50,22,17.2908
Medium_Pump,1,PUMP-BASE,100,RECEIVING,FORKLIFT,PALLET,2,35,HOLEPUNCH,STORAGE2,
FORKLIFT,2,,1929.4518,107.1429,22,51.452,2040.9498,107.1429,22,22.6772
Medium_Pump,1,PUMP-BASE,100,HOLEPUNCH,FORKLIFT,PALLET,1,35,METALCUTTING,,,,,810.513,214.2857,22,9.0057,,107.1429,22,
© 2006 Proplanner
Appendix
Medium_Pump,1,HOUSING,100,BORE,FORKLIFT,PALLET,1,22,HAND-FINISHING,STORAGE2,
FORKLIFT,1,,2374.6179,681.8182,22,26.3846,1822.1433,681.8182,22,20.246
Medium_Pump,0,STEEL-BLANK,100,RECEIVING,FORKLIFT,PALLET,1,150,METAL-STAMPING,STORAGE2,
FORKLIFT,1,,1929.4518,100,22,55.1272,1038.896,100,22,11.5433
Medium_Pump,1,STEEL-BLANK,100,METAL-STAMPING,FORKLIFT,PALLET,1,150,WELDING2,,,,,767.1911,100,22,8.5243,,100,22,
Medium_Pump,1,PUMP-BASE,100,METALCUTTING1,FORKLIFT,PALLET,1,50,WELDING3,,,,,1386.1671,150,22,30.8037,,,,
Medium_Pump,1,PUMP-BASE,100,METALCUTTING1,FORKLIFT,PALLET,1,50,WELDING4,,,,,1146.7389,150,22,25.4831,,,,
Medium_Pump,1,STEEL-BLANK,100,METAL-STAMPING,FORKLIFT,PALLET,1,150,WELDING5,,,,,882.5761,100,22,9.8064,,,,
Medium_Pump,1,PUMP-BASE,100,METALCUTTING1,FORKLIFT,PALLET,1,50,WELDING3,,,,,1386.1671,150,22,30.8037,,,,
Medium_Pump,1,PUMP-BASE,100,METALCUTTING1,FORKLIFT,PALLET,1,50,WELDING4,,,,,1146.7389,150,22,25.4831,,,,
*PRODUCTS (Name, Quantity, Color, Calc)
SMALL_PUMP,10000,1,Yes
Large_Pump,18000,2,Yes
Medium_Pump,7500,3,Yes
*PARTS (Product Name, Part Name, Qty Parts/Product, Use%, Days Inventory, Color)
SMALL_PUMP,HOUSING,1,100,1,1
SMALL_PUMP,GASKETS,2,100,1,3
SMALL_PUMP,PUMP-BASE,1,50,1,4
SMALL_PUMP,STEEL-BLANK,2,100,1,6
SMALL_PUMP,MOTOR2,1,100,1,1
SMALL_PUMP,MOTOR,1,100,1,2
Large_Pump,HOUSING,3,100,1,1
Large_Pump,MOTOR,1,100,1,2
Large_Pump,GASKETS,6,75,1,3
Large_Pump,PUMP-BASE,1,100,1,4
Large_Pump,STEEL-BLANK,8,50,1,6
Large_Pump,VALVE,1,100,1,1
Large_Pump,PLASTIC-RAW-MATERIAL,1,100,1,1
Medium_Pump,HOUSING,2,100,1,1
Medium_Pump,MOTOR,1,100,1,2
Medium_Pump,GASKETS,4,100,1,3
Medium_Pump,PUMP-BASE,1,100,1,4
Medium_Pump,STEEL-BLANK,4,50,1,6
© 2006 Proplanner
317
318
10.3.2 Sample product/parts file (Hydra Pumps.prd)
*PRODUCTS
Small_Pump,10000,1,Yes
Large_Pump,18000,2,Yes
Medium_Pump,7500,3,Yes
*PARTS
Small_Pump,HOUSING,1,100,1,1
Small_Pump,GASKETS,2,100,1,3
Small_Pump,PUMP-BASE,1,50,1,4
Small_Pump,STEEL-BLANK,2,100,1,6
Small_Pump,MOTOR2,1,100,1,1
Small_Pump,MOTOR,1,100,1,2
Large_Pump,HOUSING,3,100,1,1
Large_Pump,MOTOR,1,100,1,2
Large_Pump,GASKETS,6,75,1,3
Large_Pump,PUMP-BASE,1,100,1,4
Large_Pump,STEEL-BLANK,8,50,1,6
Large_Pump,VALVE,1,100,1,1
Large_Pump,PLASTIC-RAW-MATERIAL,1,100,1,1
Medium_Pump,HOUSING,2,100,1,1
Medium_Pump,MOTOR,1,100,1,2
Medium_Pump,GASKETS,4,100,1,3
Medium_Pump,PUMP-BASE,1,100,1,4
Medium_Pump,STEEL-BLANK,4,50,1,6
© 2006 Proplanner
Appendix
10.3.3 Sample Methods/processes/containers file (Hydra Pumps.mhe)
*METHODS
"CART","1","HAND","5","5","100","RECEIVING","1","Yes"
"FORKLIFT","1","FORK","10","10","100","RECEIVING","2","Yes"
*METHODTYPES
"HAND","80","0","20","15","5","5","PF_AISLEPATH","1","115200","1"
"FORK","50","3000","40","15","5","5","PF_AISLEPATH","2","115200","1"
*CONTAINERS
"TUB","1","1","1","1","1","1"
"PALLET","1","1","1","1","1","2"
*PROCESSES
"LOAD","10","0","None","0","0"
"UNLOAD","12","0","None","0","0"
© 2006 Proplanner
319
320
10.3.4 Sample Locations/Groups file (Hydra Pumps.loc)
*LOCATIONS (NAME X Y GROUP)
RECEIVING,0,0,UNASSIGNED
BORE1,0,0,MACHINING
STORAGE1,0,0,STORAGE
HAND-FINISHING,0,0,ASSEMBLY
DE-BURING1,0,0,MACHINING
STORAGE2,0,0,STORAGE
ASSEMBLY1,0,0,ASSEMBLY
HOLEPUNCH,0,0,STAMPING
METALCUTTING,0,0,MACHINING
BORE,0,0,MACHINING
METAL-STAMPING,0,0,STAMPING
WELDING,0,0,WELDING
ASSEMBLY_SM,0,0,ASSEMBLY
RECEIVING-STORAGE,0,0,STORAGE
DE-BURING,0,0,MACHINING
ASSEMBLY,0,0,ASSEMBLY
SUB-ASSEMBLY,0,0,ASSEMBLY
MILLING,0,0,MACHINING
DE-GREASING,0,0,UNASSIGNED
METAL-FORMING,0,0,STAMPING
MOLDING,0,0,UNASSIGNED
BORE3,0,0,MACHINING
DE-BURING2,0,0,MACHINING
WELDING2,0,0,WELDING
METALCUTTING1,0,0,MACHINING
WELDING3,0,0,WELDING
WELDING4,0,0,WELDING
WELDING5,0,0,WELDING
*GROUPS (NAME COLOR
UNASSIGNED,1,0,0
WELDING,2,0,0
MACHINING,3,0,0
STAMPING,4,0,0
ASSEMBLY,6,0,0
STORAGE,1,0,0
X Y)
*DRAWING EXTENTS (MINX MINY MAXX MAXY) in INCHES
-222,-180,4500.5,2955.8183
© 2006 Proplanner
Appendix
321
10.3.5 Sample paths file (Hydra Pumps.pth)
Flow Path Type: Product
FLOW PATHS (PATHNUM, AGGREGATE, FROM LOC, TO LOC, CALC DISTANCE, FREQUENCY, USER
DISTANCE, L/UL TIME, TRAVEL TIME, TOTAL COST, METHOD TYPE NAME)
1,Medium_Pump,METAL-STAMPING,WELDING5,1803.35,100,None,2000,2003.72,44.49,FORK
2,Medium_Pump,METALCUTTING1,WELDING4,3386,300,None,6000,11286.67,192.07,FORK
3,Medium_Pump,METALCUTTING1,WELDING3,3765,300,None,6000,12550,206.11,FORK
4,Medium_Pump,METAL-STAMPING,WELDING2,906.35,100,None,2000,1007.05,33.41,FORK
5,Medium_Pump,STORAGE2,METAL-STAMPING,2711.35,100,None,2000,3012.61,55.7,FORK
6,Medium_Pump,STORAGE2,HAND-FINISHING,3489.94,681.82,None,13636.36,26438.91,445.28,
FORK
7,Medium_Pump,BORE,STORAGE2,3838,681.82,None,13636.36,29075.76,474.58,FORK
8,Medium_Pump,HOLEPUNCH,METALCUTTING,1138,214.29,None,4285.71,2709.52,77.72,FORK
9,Medium_Pump,STORAGE2,HOLEPUNCH,3732,107.14,None,2142.86,4442.86,73.17,FORK
10,Medium_Pump,STORAGE2,ASSEMBLY1,4370.97,50,None,1000,2428.32,38.09,FORK
11,Medium_Pump,RECEIVING,STORAGE2,4450,257.14,None,5142.86,12714.29,198.41,FORK
12,Medium_Pump,RECEIVING-STORAGE,ASSEMBLY,2138,340.91,None,6818.18,8098.49,165.74,
FORK
13,Medium_Pump,RECEIVING,RECEIVING-STORAGE,554,340.91,None,6818.18,2098.48,99.07,
FORK
14,Medium_Pump,STORAGE2,DE-BURING2,3757.69,681.82,None,13636.36,28467.37,467.82,
FORK
15,Medium_Pump,HAND-FINISHING,STORAGE2,2949.94,681.82,None,13636.36,22348,399.83,
FORK
16,Medium_Pump,STORAGE1,BORE3,2672.91,750,None,15000,22274.22,414.16,FORK
17,Medium_Pump,RECEIVING,STORAGE1,3017,750,None,15000,25141.67,446.02,FORK
18,Large_Pump,STORAGE2,MOLDING,2100,60,None,1200,1400,28.89,FORK
19,Large_Pump,METAL-FORMING,DE-BURING,1666,102.86,None,2057.14,1904,44.01,FORK
20,Large_Pump,MILLING,METAL-FORMING,1666,102.86,None,2057.14,1904,44.01,FORK
21,Large_Pump,DE-BURING,DE-GREASING,1484,1542.86,None,30857.14,25440,625.52,FORK
22,Large_Pump,RECEIVING,MILLING,1758,102.86,None,2057.14,2009.14,45.18,FORK
23,Large_Pump,WELDING,SUB-ASSEMBLY,4108.97,360,None,7200,16435.88,262.62,FORK
24,Large_Pump,METALCUTTING,WELDING,3619,720,None,14400,28952,481.69,FORK
25,Large_Pump,METAL-STAMPING,WELDING,1780.35,240,None,4800,4747.59,106.08,FORK
26,Large_Pump,STORAGE2,METAL-STAMPING,2711.35,240,None,4800,7230.26,133.67,FORK
27,Large_Pump,STORAGE2,HAND-FINISH,3489.94,1636.36,None,32727.27,63453.4,1068.67,
FORK
28,Large_Pump,BORE,STORAGE2,3838,1636.36,None,32727.27,69781.84,1138.99,FORK
29,Large_Pump,HOLEPUNCH,METALCUTTING,1138,514.29,None,10285.71,6502.86,186.54,FORK
30,Large_Pump,STORAGE2,HOLEPUNCH,3732,257.14,None,5142.86,10662.86,175.62,FORK
31,Large_Pump,STORAGE2,ASSEMBLY1,4370.97,120,None,2400,5827.96,91.42,FORK
32,Large_Pump,RECEIVING,STORAGE2,4450,677.14,None,13542.86,33480.95,522.49,FORK
33,Large_Pump,RECEIVING-STORA,ASSEMBLY,2138,818.18,None,16363.64,19436.36,397.78,
FORK
34,Large_Pump,RECEIVING,RECEIVING-STORAGE,554,818.18,None,16363.64,5036.36,237.78,
FORK
35,Large_Pump,STORAGE2,DE-BURING,3928,1636.36,None,32727.27,71418.2,1157.17,FORK
36,Large_Pump,HAND-FINISH,STORAGE2,2949.94,1636.36,None,32727.27,53635.22,959.58,
FORK
37,Large_Pump,STORAGE1,BORE,2593,1800,None,36000,51860,976.22,FORK
38,Large_Pump,RECEIVING,STORAGE1,3017,1800,None,36000,60340,1070.44,FORK
39,Small_Pump,RECEIVING-STORA,ASSEMBLY_SM,2186,909.09,None,9090.91,13800.5,127.17,
HAND
40,Small_Pump,RECEIVING,RECEIVING-STORAGE,554,909.09,None,9090.91,3497.47,69.94,
HAND
41,Small_Pump,METALCUTTING,WELDING,3619,400,None,4000,10052.78,78.07,HAND
42,Small_Pump,METAL-STAMPING,WELDING,1780.35,133.33,None,1333.33,1648.47,16.57,HAND
43,Small_Pump,STORAGE2,METAL-STAMPING,2711.35,133.33,None,1333.33,2510.51,21.35,
HAND
44,Small_Pump,STORAGE2,HAND-FINISHING,3489.94,909.09,None,9090.91,22032.43,172.91,
HAND
45,Small_Pump,BORE,STORAGE2,3838,909.09,None,9090.91,24229.8,185.12,HAND
46,Small_Pump,HOLEPUNCH,METALCUTTING,1138,285.71,None,2857.14,2257.94,28.42,HAND
47,Small_Pump,STORAGE2,HOLEPUNCH,3732,142.86,None,1428.57,3702.38,28.51,HAND
48,Small_Pump,STORAGE2,ASSEMBLY1,4370.97,66.67,None,666.67,2023.6,14.95,HAND
© 2006 Proplanner
322
49,Small_Pump,RECEIVING,STORAGE2,4450,342.86,None,3428.57,10595.24,77.91,HAND
50,Small_Pump,STORAGE2,DE-BURING1,3510,909.09,None,9090.91,22159.09,173.61,HAND
51,Small_Pump,HAND-FINISHING,STORAGE2,2949.94,909.09,None,9090.91,18623.34,153.97,
HAND
52,Small_Pump,STORAGE1,BORE1,729,1000,None,10000,5062.5,83.68,HAND
53,Small_Pump,RECEIVING,STORAGE1,3017,1000,None,10000,20951.39,171.95,HAND
DRAWING EXTENTS (MINX, MINY, MAXX, MAXY) in INCHES
-180,-180,4500.5,2412
PATH VERTICES (PATHNUM, #VERTICES, node1, node2, node3, node4 ...)
1,11,1,2,3,4,5,6,7,8,9,10,11
2,11,12,13,14,15,16,17,7,6,5,18,19
3,12,12,13,14,15,16,17,7,6,5,18,20,21
4,7,1,2,3,4,5,6,22
5,11,23,24,25,17,7,6,5,4,3,2,1
6,11,23,24,25,17,16,15,14,26,27,28,29
7,13,30,31,32,33,34,35,36,37,16,17,25,24,23
8,6,38,39,40,27,26,41
9,12,23,24,25,17,16,15,14,26,27,40,39,38
10,17,23,24,42,8,9,43,44,45,46,47,48,49,50,51,52,53,54
11,14,55,56,57,58,59,60,13,14,15,16,17,25,24,23
12,11,61,57,58,59,62,63,64,53,52,51,65
13,4,55,56,57,61
14,12,23,24,25,17,16,37,36,35,34,33,66,67
15,11,29,28,27,35,36,37,16,17,25,24,23
16,10,68,40,27,35,34,33,32,31,30,69
17,12,55,56,57,58,59,60,13,14,26,27,40,68
18,8,23,24,25,17,16,15,70,71
19,9,72,37,36,35,27,40,39,73,74
20,8,75,60,13,14,15,16,37,72
21,8,74,73,39,40,27,35,36,76
22,7,55,56,57,58,59,60,75
23,16,77,10,9,43,44,45,46,47,48,49,50,51,52,53,64,78
24,11,41,26,14,15,16,17,7,8,9,10,77
25,11,1,2,3,4,5,6,7,8,9,10,77
26,11,23,24,25,17,7,6,5,4,3,2,1
27,11,23,24,25,17,16,15,14,26,27,28,29
28,13,30,31,32,33,34,35,36,37,16,17,25,24,23
29,6,38,39,40,27,26,41
30,12,23,24,25,17,16,15,14,26,27,40,39,38
31,17,23,24,42,8,9,43,44,45,46,47,48,49,50,51,52,53,54
32,14,55,56,57,58,59,60,13,14,15,16,17,25,24,23
33,11,61,57,58,59,62,63,64,53,52,51,65
34,4,55,56,57,61
35,13,23,24,25,17,16,15,14,26,27,40,39,73,74
36,11,29,28,27,35,36,37,16,17,25,24,23
37,9,68,40,27,35,34,33,32,31,30
38,12,55,56,57,58,59,60,13,14,26,27,40,68
39,11,61,57,58,59,62,63,64,53,52,79,80
40,4,55,56,57,61
41,11,41,26,14,15,16,17,7,8,9,10,77
42,11,1,2,3,4,5,6,7,8,9,10,77
43,11,23,24,25,17,7,6,5,4,3,2,1
44,11,23,24,25,17,16,15,14,26,27,28,29
45,13,30,31,32,33,34,35,36,37,16,17,25,24,23
46,6,38,39,40,27,26,41
47,12,23,24,25,17,16,15,14,26,27,40,39,38
48,17,23,24,42,8,9,43,44,45,46,47,48,49,50,51,52,53,54
49,14,55,56,57,58,59,60,13,14,15,16,17,25,24,23
50,11,23,24,25,17,16,37,36,35,34,33,66
51,11,29,28,27,35,36,37,16,17,25,24,23
52,6,68,40,39,73,81,82
53,12,55,56,57,58,59,60,13,14,26,27,40,68
© 2006 Proplanner
Appendix
NODE LOCATIONS (NODENUM Xloc Yloc)
10.3.6 Sample Tugger Delivery file (Hydra Pumps Tugger.csv)
*ID,Part,Container,ContQty,From,Stage,To,ETD,Direction,Load,Unload
Consumable1,111456,BOX35,4,RECEIVING,STORAGE1,HOLEPUNCH,7.1,1,,
Consumable2,111847,BOX36,4,RECEIVING,STORAGE1,DE-BURING,7.2,1,,
Consumable3,111332,CRATE2,6,RECEIVING,STORAGE1,BORE,7.3,1,,
Consumable4,111445,CRATE2,6,RECEIVING,STORAGE1,DE-BURING1,7.4,1,,
Casting1,235448,FLAT,5,RECEIVING,STORAGE1,DE-GREASING,7.5,1,,
Casting2,235449,FLAT,5,RECEIVING,STORAGE1,METAL-FORMING,7.6,1,,
Casting3,235450,FLAT,5,RECEIVING,STORAGE1,METAL-STAMPING,7.7,1,,
Casting4,235988,FLAT,5,RECEIVING,STORAGE1,METALCUTTING,7.8,1,,
Casting5,235989,FLAT,5,RECEIVING,STORAGE1,HAND-FINISHING,7.9,1,,
Subassembly1,851001,CRATE2,10,RECEIVING2,STORAGE2,WELDING,7.1,1,,
Subassembly2,851002,CRATE3,6,RECEIVING2,STORAGE2,WELDING3,7.2,1,,
Subassembly3,851003,CRATE4,8,RECEIVING2,STORAGE2,WELDING4,7.3,1,,
Subassembly4,851004,CRATE5,4,RECEIVING2,STORAGE2,SUB-ASSEMBLY,7.4,1,,
Subassembly5,851005,FLAT,2,RECEIVING2,STORAGE2,ASSEMBLY1,7.5,1,,
Subassembly6,851006,FLAT,2,RECEIVING2,STORAGE2,ASSEMBLY,7.6,1,,
Part-1234,999126,BOX42,1,RECEIVING2,STORAGE2,WELDING2,7.7,1
© 2006 Proplanner
323