1
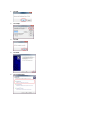
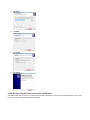
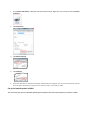
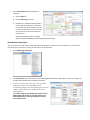
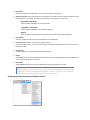
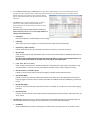
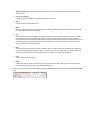
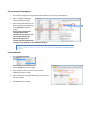
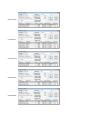
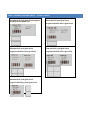
ZEBRA BARCODE SETUP INSTRUCTIONS AIMSI V10.0 AND NEWER Zebra GC420 Setup in Windows 1. Install the barcode labels in the barcode printer and hook up the printer to the computer. If you need help with this refer to the User Guide included with your barcode printer or view it here: www.zebra.com/content/dam/zebra/manuals/en-us/printer/gc420d-ug-en.pdf. 2. Download the current driver from Zebra or Tri-Tech. Zebra at www.zebra.com/us/en/support-downloads/desktop/gc420d.html Tri-Tech at www.technology4retailers.com/t-hardwaresetup.aspx. 3. After the driver is downloaded double click to install it. Click Run if you get any open file security warnings. The Print Driver 1. Click OK. 2. Click Unzip. 3. Click OK. 4. Click Next. 5. Click Install Printer. 6. Choose ZDesigner GC420d (EPL) and click Next. 7. Choose the Port then click Next. 8. Click Finish. The Zebra Font Downloader Wizard 1. Click Next. 2. Click Next. 3. Click Next. 4. Click Install. 5. Click Finish. Install the Direct Thermal Labels in the printer and Calibrate. The labels should face upward once you have them installed. Calibrate the printer once you install the labels so that it prints the correct number of labels when printed from AIMsi. 1. Go to Devices and Printers in Windows and find the Zebra Printer. Right-click on the printer and choose Printer Properties. 2. Click Preferences. 3. Click Advanced Setup. 4. Click Calibrate. 5. When the calibration is complete and feeding of blank labels has stopped, turn the printer off and then back on. Press the green feed button on the printer to make sure that it only feeds one label. Set up the barcode printer in AIMsi. You must install your printer in Windows following the installation instructions above before you install it in AIMsi. 1. Go to Work Station Maintenance in AIMsi. 2. On the Work Station window, complete the following. a) Click the Misc tab. b) Click the Misc Page 2 sub-tab. c) Establish up to 3 different barcode printers and the label styles they print in the boxes on the lower-right of the window. If you do not have any label styles to select, set those up first (refer to the instructions below to complete this). Hint: You can choose “Screen” as a print option to preview the label then print it from the preview screen. Barcode Label Setup Styles You can choose from a wide variety of barcode labels and tags each with different sizes and dimensions. In order for the barcode printer to print them correctly you will need to set up label styles. 1. Go to Add/Change Label Styles. 2. Click Load Defaults to pre-load all the Tri-Tech label/tag defaults (labels and tags sold by Tri-Tech). The image is an example of the window after the defaults are loaded. 3. If you have a custom label that is not one of the default labels/tags sold by Tri-Tech click Add (see #3 on corresponding image) to match the label/tag that you have loaded in the barcode printer. Complete the boxes as described below. Hint: When setting up a new label/tag compare it to the default labels and use that as a starting point for your label/tag dimensions. Use a tape measure or ruler for exact measurements. Description Enter a description for the label style. You can enter up to 40 characters here. Dimension options Take measurements of your labels in inches and convert the inches to decimals for the following boxes. For example, if you have a measurement of 1-2/16 inches, enter 1.125. o Page Width / Page Height Enter the width and height of your roll of media. o Label Width / Label Height Enter the width and height of an individual label/tag. o Margins Enter the amount of white space to leave around each side of an individual label/tag. # of Columns Enter the number of columns to print horizontally across the label/tag. Col Positions (only used if “# of Columns” is greater than 1) Enter the starting position, in inches, of each column on the label. Separate entries with a semi-colon. For example, 0;1.125. Row Spacing Enter the amount of vertical space between each label/tag. Duplex Select None unless you are using double-sided media. If you are using double-sided media, indicate if you want to duplex horizontally or vertically. Orientation Select Portrait unless you want to print labels/tags using the long side of your media. Note: We believe you should be able to use any printer and labels/tags as long as the correct dimensions are entered in Add/Change Label Styles. However, Tri-Tech can only support the printers and barcode labels/tags that are purchased directly from us. Designing the label/ Setup Barcode Blaster Default 1. Go to Setup Barcode Defaults. 2. Use the Next, Previous, Top, and Bottom buttons (see #2 in image below) to review the default label layouts (created when you clicked in step 2 of Barcode Label Setup Styles). The following image is an example of one default label layout. Examples of the remaining default layouts and finished label can be found at the end of this document. 3. Click Add (see #3 in corresponding image) to create a layout for a custom label. Complete the boxes as described below. Use a tape measure or ruler for exact measurements. Hint: This step is only necessary if you are not using a default label/tag sold by Tri-Tech. Use a tape measure or ruler for exact measurements. 4. Description Enter a description for the label default you are creating. Label Style Select a label style for your default. You created label styles in Barcode Label Setup Styles. SA Inventory / Titles Inventory Indicate if this default is for your serialized and accessories inventory or your titles inventory. Barcode Type Select a barcode type for this label default. Refer to your printer documentation for additional information on barcode types. Hint: We recommend keeping barcode type Code 30 or Code 128 if you create your own default layout. You can also set this to None if you do not want to use a barcode for this default layout. L to R, R to L, B to T, and T to B Select an option to indicate if the barcode should print on the labels left to right, right to left, bottom to top, or top to bottom. L to R and R to L print horizontally on the label and B to T and T to B print vertically. Barcode Left Pos and Barcode Top Pos Indicate, in inches, how far from the left and top edges of the label the barcode should start. Barcode Bar Width Indicate, in inches, the maximum width of the barcode on the label. This is the width between the barcode lines; we suggest a minimum value no smaller than 0.0075 or 0.0085 for accurate readability by your barcode printer. Barcode Bar Height Indicate, in inches, the maximum height of the barcode on the label. Tri-Tech does not recommend changing this value. Barcode Font Size Enter the size of the font for the text below the barcode (typically the barcode number). Valid values are 8, 10, 12 14, and 16. Click Add (directly below the grid, see #4 in the image above) to add additional fields to your barcode label. This makes available the columns in the grid. Enter information in each column as described below. Field Name Select the AIMsi field you want the label printer to reference when creating an item on your label or select Type Your Own Text.For descriptions of each field name, refer to the Field Name values for barcodes topic in the online help. 5. Left Pos and Top Pos Indicate, in inches, how from the left and top the field should print. Lgth Enter the character length of the field. Code Enter the type of information that should print on the label. Enter B for the barcodes, C for character fields, $ for currency fields, and L for logical fields. Rtl Determines when the field should print on the label based on the item's Retail and Ourprice values. Select Y to print the print the field on the label when the item's Ourprice value is less than its Retail value. Select N to prevent the field from printing on the label when the item's Ourprice value is equal to or greater than its Retail value. Most often, only the Retail field would be excluded from the printed label when the Ourprice value is equal to or greater than the Retail value. Font Enter the font family you want to use for your labels, such as Verdana, Arial, or Times New Roman. Valid fonts are any supported by your label printer. Refer to the user manual for your label printer for a list of options. For bold font, enter the font family name followed by the word Bold. For example, Verdana Bold. Fsize Enter the printed size of the Font. Angle Controls the pitch, or angle, of your text. Enter any number between 0 and 359. To print text in italics, enter 45. To print text vertically, enter a value between 90 and 270. Enter a SKU and quantity to test your barcode label and press Enter (be sure your cursor is in the Sku for Test Label box). Set up Inventory Subcategories 1. Go to Edit Sub Categories to assign different label defaults to your inventory subcategories. 2. Select a category/subcategory from the grid (#2 on image). 3. Select the barcode default you use when printing barcode labels/tags in the Barcode box (see #3 on image). Hint: If you are assigning the same label default to all subcategories in a category, save time by right-clicking in the Barcode box (after you’ve selected and saved a default) and click Copy to all subcategories with matching categories. **Note: In order for labels to print for items, their subcategory must have a barcode default assigned. Printing Barcodes 1. Go to Print Barcode Labels. 2. Click the Single tab (see #2 on image). 3. Enter the SKU for which you want to print barcode labels/tags (see #3 on image). 4. Enter the quantity of barcodes labels/tags you want to print (see #4 on image). 5. Click Print (see #5 on image). DEFAULT BARCODE LABEL LAYOUTS The following images are snippets of Tri-Tech’s default barcode label layouts from the Setup Barcode Defaults window (refer to section Designing the label/ Setup Barcode Blaster Default, above). 50-LDTP-2312 50-LDTP-2313 50-LDTP-1213 50-LDTP-1310 50-LDTP-1210 50-T7D-2314 50-T7D-2314-C 50-LSDP-2205 50-LSDP-2206 DIRECT THERMAL BARCODE LABELS - ZLABELS/LABELS Zebra 50-LDTP-2312 @ $9.72/roll Cognitive 20-LDTP-2312-3 @ $9.97/roll Zebra 50-LDTP-2313 @ $9.72/roll Cognitive 20-LDTP-2313-3 @ $9.97/roll Zebra 50-LDTP-1213 @ $9.72/roll Zebra 50-LDTP-1210 @ $9.30/roll Cognitive 20-LDTP-1213-3 @ 9.97/roll Cognitive 20-LDTP-1210-3 @ 9.97/roll Zebra 50-LDTP-1310 @ $9.13/roll Cognitive 20-LDTP-1310-3 @ $9.97/roll DIRECT THERMAL BUTTERFLY LABELS – ZBLABELS Zebra 50-LSDP-2205 @ $17.98/roll Zebra 50-LSDP-2206 @ $17.98/roll DIRECT THERMAL TAGS – ZTAGS/TAGS Cognitive 20-T7D-2410 @ $14.00/roll Zebra 50-T7D-2314 @ $11.30/roll Cognitive 20-T7D-2420 @ $14.00/roll Zebra 50-T7D-2314-C @ $11.30/roll