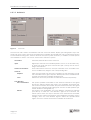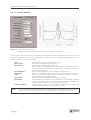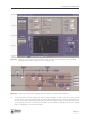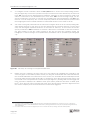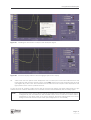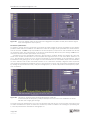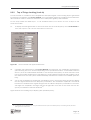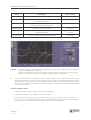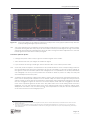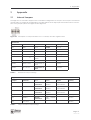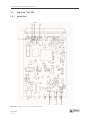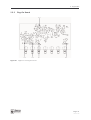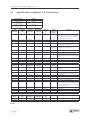
1
Digilock 110 Feedback Controlyzer Manual Manual: M-031 Version 02 Copyright 2008 TOPTICA Photonics AG TOPTICA Photonics AG Lochhamer Schlag 19 D-82166 Graefelfing/Munich Tel.: +49 89 85837-0 Fax: +49 89 85837-200 email: [email protected] http://www.toptica.com (October 2008 Subject to changes without notice) Feedback Controlyzer DigiLock 110 Dear Customer, welcome to the TOPTICA community! We have designed this product to be easy to use and reliable so that you can focus on your actual work. Should you anyway have questions regarding its use or need advice on how to integrate it into your setup, please do not hesitate to ask. We will provide you with quick and competent help through our service staff and product managers. You can contact us in the following ways: - internet: - email: - phone: www.toptica.com. In our support section you can find a list of frequently asked questions and a service contact form [email protected] +49-89-85837-0. Please have your product-ID/serial number ready when contacting us so we can quickly retrieve all relevant information from our databases. We are constantly refining and improving our products and therefore highly valuate feedback from our customers. We would therefore like to encourage you to let us know what you like about our products and of course also if there is something we could improve. Best regards, Harald Ellmann Service Manager TOPTICA Photonics AG Status: 21.10.08 Feedback Controlyzer DigiLock 110 Contents 1 The Feedback Controlyzer DigiLock 110 1.1 Package Contents 1.2 Design and Operating Principle of the DigiLock 110 3 3 4 2 Safety Instructions and Warnings 2.1 General Safety Terms 2.2 Identification of Manufacturer 6 6 7 3 Operator Controls and Connections 3.1 Front Panel 3.2 Description of Front Panel Operator Controls and Connectors 3.3 Backplane Connections 8 8 9 10 4 Hardware Installation 10 5 Software Installation 5.1 System Requirements 5.2 USB-Driver Installation 5.3 Control Software Installation 11 11 11 11 6 Operation Frontend 6.1 General User Interface 6.2 Functions 6.2.1 Scan and Lock 6.2.2 Controller Design 6.2.3 Network Analysis 6.2.4 System Setup 6.2.5 Settings 6.3 Display Area 6.3.1 Scope Mode 6.3.2 AutoLock Mode 6.3.3 Frequency Analysis 6.4 Status Display 12 13 15 15 22 23 24 25 29 29 30 31 31 7 Notes on Feedback Control Loops with the DigiLock 110 7.1 Signal to Noise and Bandwidth Considerations 7.2 Frequency Modulation Techniques 7.3 Controller Parameter Adjustment and Optimization 7.4 Identification of Signal Polarity and Slope 7.5 Relock Feature 7.6 Signal Limitations in Analyzing the Locking Performance 32 32 32 33 34 36 37 Status: 21.10.08 Feedback Controlyzer DigiLock 110 8 Application Examples 8.1 General System Setup 8.2 Doppler-Free Saturation Spectroscopy 8.2.1 Side of Fringe Locking 8.2.2 Top of Fringe Locking (Lock-In) 8.3 Pound-Drewer-Hall Stabilization to a Cavity 38 38 43 44 49 53 9 Appendix 9.1 Internal Jumpers 9.2 DigiLock 110 PCBs 9.2.1 Baseboard 9.2.2 Plug-On Board 9.3 Specifications of DigiLock 110 Connections 9.4 Pin Assignment of the DigiLock 110 Backplane 57 57 58 58 59 60 61 10 Guarantee and Service Status: 21.10.08 62 Feedback Controlyzer DigiLock 110 1 The Feedback Controlyzer DigiLock 110 Stabilized lasers see an increasing number of applications in research and development. To meet the different requirements a number of locking techniques have been developed. So far the different schemes require a corresponding set of adapted electronics. The DigiLock 110 integrates fast analog and digital electronics into a versatile general purpose locking module. Its up-to-date digital hardware allows to implement the scan generator, PID controllers and optional frequency modulation techniques all into one plug-in module. Together with a graphical user interface running on a PC, the module facilitates the procedure of laser locking enormously and provides features to analyze and optimize the control system. DigiLock 110 features: • • • • • • • • • • • 1.1 Generation of scan waveforms Two separate PID controllers Lock-in error signal generator Pound-Drever-Hall (PDH) error signal generator Computer assisted hardware zoom Automatic lock (“Click and Lock”) Configurable relock Integrated multi-channel digital oscilloscope Network analyzer Spectrum analyzer Controller simulation Package Contents 1 DigiLock 110 plug-in module 1 Installation CD containing software and drivers 1 DigiLock 110 manual (color version is provided on the installation CD) 1 USB cable 2 BNC-SMB cables Page 3 Status: 21.10.08 Feedback Controlyzer DigiLock 110 1.2 Figure 1 Page 4 Status: 21.10.08 Design and Operating Principle of the DigiLock 110 Schematic Block Diagram of the DigiLock 110 Module 1. The Feedback Controlyzer DigiLock 110 Figure 2 Schematic Block Diagram of the DigiLock 110 Functional Units and their Interaction Figure 3 Schematic Block Diagram of the Connections to the DC 110 Backplane Page 5 Status: 21.10.08 Feedback Controlyzer DigiLock 110 2 Safety Instructions and Warnings 2.1 General Safety Terms The following safety terms are used in this manual: The DANGER ! heading in this manual explains danger that could result in personal injury or death. The CAUTION ! heading in this manual explains hazards that could damage the instrument. In addition, a NOTE ! heading provides information to the user that may be beneficial in the use of the instrument. DANGER ! Before operating the DigiLock 110 plug-in module please read this manual carefully to CAUTION ! prevent from damage to the electronics, connected diode lasers and injury to persons. The following safety instructions must be followed at all times. DANGER ! The electrical units should not be operated in a hazardous environment. DANGER ! Any plug-in module should only be opened by trained personnel. Before exchanging and opening any module, the Sys DC 110 Supply Electronics must be switched off and disconnected from the mains supply. DANGER ! Do not look into the beam from the laser diode under conditions which exceed the limits specified by the United States Food and Drug Administration, Department of Health and Human Services, Center for Devices and Radiological Health, 21 CFR 1040.10 and 2 CFR 1040.11. Take precautions to eliminate exposure to a direct or reflected beam. DANGER ! It is essential to check the adjusted parameters of the supply units before switching on the modules ! Therefore the operator must make sure that the ON/OFF switches of the modules are in position OFF before the Key Switch of the DC 110 monitor Unit is switched to position ON. In particular pay attention to the Imax limitation, the POS/NEG switch and the CURRENT/ POWER switch of the Current Control DCC 110. As long as the ON/OFF switches are set to position OFF, the laser diode is short-circuited by the relay integrated in the Toptica Diode Laser Head. DANGER ! The user must not open the Diode Laser Supply Electronics Sys DC 110 or any of the plug-in modules during operation. Internal tuning as well as the replacement of components may only be carried out by authorized and specially trained service personnel. Under certain circumstances there may be dangerous voltages, even if the device is disconnected from the mains supply. CAUTION ! Special precautions are necessary if the Diode Laser Supply Electronics Sys DC 110 is to be operated in surroundings of high electro-magnetic radiation such as close to a plasma discharge. Please refer to TOPTICA Photonics AG for technical support. CAUTION ! Please assure with particular care that the electrical safety conditions are met especially concerning the high voltage outputs. Also carefully read the instruction for operation of the Supply Rack DC 110 before using the device. Page 6 Status: 21.10.08 2. Safety Instructions and Warnings 2.2 Identification of Manufacturer Manufacturer (name and address), serial number, article number, compliance with CE standards are given by the identification label: Size: Color: Location: 46 mm x 25 mm Silver/black Rear Panel of the plug-in module Page 7 Status: 21.10.08 Feedback Controlyzer DigiLock 110 3 Operator Controls and Connections 3.1 Front Panel Figure 4 Front Panel of the DigiLock 110 1 ON/OFF switch and indicator LED 6 Main out high-speed analog output 11 General purpose digital input/ output 2 Precise analog input 7 Aux out high-speed analog output 12 Trigger output 3 Aux in high-speed analog input 8 Sum input 13 USB connector 4 Main in high-speed analog input 9 General purpose analog input/output 2 5 Error output 10 General purpose analog input/output 1 CAUTION ! All high-speed inputs are 50 Ohm terminated and all high-speed outputs including Trigger output (12) are able to drive 50 Ohm loads. Page 8 Status: 21.10.08 3. Operator Controls and Connections 3.2 Description of Front Panel Operator Controls and Connectors Range [V] Impedance [Ω] 1 ON/OFF Switch • Switch and LED ON/OFF Switch for the DigiLock 110 module. 2 Precise analog input • SMB-connector Precision analog input ±2V 10k 3 Aux in high-speed analog input • SMB-connector High-speed input analog ±2V 50 4 Main in high-speed analog input • SMB-connector Versatile high-speed analog input ±2V 50 5 Error output • SMB-connector Output of the error signal: (Main in - Input offset) x Gain/2 ± 1.7 V 50 6 Main out high-speed analog output • SMB-connector Versatile high-speed analog output ±1V 50 7 Aux out high-speed analog output • SMB-connector High-speed output analog ±1V 50 8 Sum input • SMB-connector Signal input is added to Main out ±1V 50 9 General purpose analog input/ output 2 • SMB-connector General purpose analog input/output Input: ± 12.5 V Output: ± 6.5 V Input: 47k Output: high 10 General purpose analog input/ output 1 • SMB-connector General purpose analog input/output Input: ± 12.5 V Output: ± 6.5 V Input: 47k Output: high 11 General purpose digital input/ output • SMB-connector General purpose digital input/output 0 V; 2.6 V TTL Input: 47k Output: 50 12 Trigger output • SMB-connector Trigger output 0 V; 2.6 V TTL 50 13 USB connector Connector for puter Control Com- Page 9 Status: 21.10.08 Feedback Controlyzer DigiLock 110 3.3 Backplane Connections The DigiLock 110 module is capable of accessing several analog signals on the backplane of the Sys DC 110 rack. On the one hand analog signals can be set in order to remote control other modules (see Table below). On the other hand actual parameters of modules can be read (DCC 110 Iact, DTC 110 Iact). Backplane Line Adressed Module Parameter Comment #DA 1 DCC 110 Iset not jumpered by default #DA 2 SC 110 Offset jumpered by default #DA 3 DTC 110 Tset not jumpered by default Table 1 NOTE ! 4 The assignment of the #DA-lines to the respective parameter is fixed inside the DigiLock 110 module. Be sure that the jumpers of the corresponding modules are set according to the table above. For detailed information please see the appropriate paragraphs in the Sys DC 110 manual. Hardware Installation The DigiLock 110 module is designed as a plug-in module for the TOPTICA DC 100 or DC 110 supply rack. Before installation, switch off all other modules and disconnect the supply rack from the mains supply. The DigiLock 110 can be plugged into any slot of a 19’’ or 12’’ rack, except the one reserved for the DC 110/Mon on the right. Make sure that no module other than the SC 110 uses the #DA 2 analog backplane line. By default the DigiLock 110 communicates via #DA 2 with the SC 110. If you do not need this functionality, you can disconnect #DA 2 from the backplane by removing the appropriate jumper (see Paragraph 9.1). As described in Paragraph 9.3, the DigiLock 110 can read the DCC 110 Iact and DTC 110 T act parameters via the backplane. This readout only works for modules installed on channel 1 of the rack (slot 2, 3 and 6). It is recommended to install the DigiLock 110 in slot 6 (see Figure 5). For further information on the arrangement of the modules please see the Sys DC 110 manual. Figure 5 Page 10 Status: 21.10.08 DigiLock 110 installed in Supply Rack DC 110 5. Software Installation 5 NOTE ! 5.1 Software Installation The installation of the USB-driver and the control software requires administrator privileges. Please uninstall any previously installed DigiLock 110 software as otherwise the installations may interfere. Read the Readme.html file located on the installation CD for up to date information about the current software version. System Requirements Processor: RAM: Screen resolution: Operating System: Interface: x86 Platform (e.g. Pentium III, 4, M), min. 800 MHz (recommended > 1.2 GHz) min. 256 MB (recommended 512 MB) min. 1024 x 768 Windows XP SP2, Windows 2000 SP4 (not tested with Windows Vista) 1 x USB 1.1 or USB 2.0 To view the user manual provided in the Help Menu, installation of Adobe Acrobat Reader is necessary. 5.2 USB-Driver Installation The DigiLock 110 provides a USB connection to load the firmware and to control the module via the supplied PC based software. In order to communicate with the DigiLock 110, the USB driver has to be installed before the installation of the application software. The driver is located in the directory “Drivers\USB” on the installation CD supplied with the DigiLock 110 module. Run the .exe file to install the driver on the PC. After the driver is installed successfully, connect the DigiLock 110 module to the PC with the appropriate USB cable. The operating system will recognize the new hardware. 5.3 NOTE ! Control Software Installation The Control Software will not work if the DigiLock 110 module has not been connected at least once to the PC before Control Software installation. Start the program “setup.exe” located in the folder “Installer” on the installation CD. The installer will guide you through the installation process. Page 11 Status: 21.10.08 Feedback Controlyzer DigiLock 110 6 NOTE ! Operation Frontend This DigiLock 110 manual refers to the software version 1.1.3.40 Visit www.toptica.com for information about the most recent software version. The DigiLock 110 frontend consists of two main areas and a status bar. In the upper part of the screen the user can set the appropriate operation parameters for the chosen function. The lower part is used to display various signals by the means of an oscilloscope or a spectrum analyzer. Figure 6 Page 12 Status: 21.10.08 DigiLock 110 Operation Frontend (Example: Autolock mode displaying a saturated absorption spectrum) 6. Operation Frontend 6.1 General User Interface To operate the software efficiently it is necessary to be familiar with the user interface. Some helpful remarks are presented in the following: • Changing numeric input controls Set the focus on the desired numeric control (left click on the field). A cursor appears in the input field. The digit to the left of the cursor can be incremented/decremented with the up/down arrow keys. To select the desired digit use the arrow keys left/right. • Engineering units All input fields in this software are capable of handling engineering units. For example: u = micro (10-6) m = milli (10-3) k = kilo (103) M = mega (106) • Graph display: Dynamic range scaling The axes of the graphs have a dynamic range scaling optimized for the data displayed. If this behavior is not desired, it can be turned on or off by clicking on the button marked in the figure below. Page 13 Status: 21.10.08 Feedback Controlyzer DigiLock 110 • Graph Display: Setting the scale of a graph When the dynamic range scaling option is deactivated, the limits of the scaling of an axis can be modified manually. To change the lower/upper limit click on the value in the graph and modify it by typing a new value. • Description of controls To get information about a control, move the mouse pointer across the desired control and a brief description appears. Page 14 Status: 21.10.08 6. Operation Frontend 6.2 Functions In the upper part of the screen all the available functions and options of the DigiLock 110 are displayed on different layers. With the buttons on the left hand side you can select the desired function and then browse the corresponding options and parameters. 6.2.1 Scan and Lock This function comprises all the modules needed for scanning and locking the laser. 6.2.1.1 Scan Module Figure 7 Scan Module The Scan Module is used to generate periodic waveforms with user adjustable parameters. The signal can be directed to different output channels. Signal type: Frequency: Amplitude: Scan button: Output: Type of the generated waveform (sine, triangle, square or sawtooth). Repetition frequency of the chosen waveform in Hz. Peak-to-peak amplitude in Volts. Turn signal generation on/off (indicated by the green light). Output channel to which the generated signal is directed. 6.2.1.2 Offset Adjustment Figure 8 Offset Adjustment With the Offset Adjustment Module it is possible to view and change the DC voltage level of the selected output channel. Offset: Output: Signal level in Volts. Output channel to which the offset voltage applies. Page 15 Status: 21.10.08 Feedback Controlyzer DigiLock 110 6.2.1.3 AutoLock Figure 9 AutoLock The AutoLock tab is used in combination with the “AutoLock Mode” display (see Paragraph 6.3.2) in the lower part of the screen. This mode combines the controllers and enables the user to interactively search for the desired locking point, select it and lock the system (“click and lock”). In addition, several options are available to detect “out of lock” states and to relock the system. Checkbox: Activation/deactivation of the AutoLock. Input: Signal input used for the controllers (Main in, Aux in, LI out and PDH out). In AutoLock mode the inputs of both PIDs (PID 1, PID 2) are set according to this selection. Once selected for AutoLock, the input channels of the controllers cannot be modified any longer in the corresponding tabs. AutoLock controllers: General: Setpoint: Lock: Lock Window: Use Lock Window: Relock: Page 16 Status: 21.10.08 After the automatic lock has been engaged via the interactive mode the controllers have a given setpoint. This setpoint can be modified here for all of the selected controllers simultaneously. Initiates the AutoLock procedure and releases the lock respectively. This option specifies boundaries for the selected channel. If the signal leaves the selected range (Min, Max), the controllers associated with the AutoLock feature are on hold. They are reactivated when the signal is back in the selected range taking into account a 10% hysteresis (for further details see Paragraph 7.5). This option is only available if “Use Lock Window” checkbox is selected (see above). In case the “Lock Window” signal is out of bounds, the relock option scans the output channel of the selected PID controller with the chosen values for frequency and amplitude (waveform type is triangle). Once the Lock Window signal is within the specified limits again, the scan is turned off and the controllers are activated. 6. Operation Frontend 6.2.1.4 PID 1 Figure 10 PID 1 Controller The PID 1 is a standard PID controller with the special feature that the user can set a frequency below which the integral part is limited (as illustrated by the transfer function, Paragraph 6.2.2). This limitation of the integral part is important in case PID 1 is used together with PID 2 in one control system. This prevents the controllers from integrating offsets in opposite directions. NOTE ! In case the controller is not selected for AutoLock, it can be used as an independent controller (Manual Mode). Input: Locked LED: Sign: Gain: P: I: I cut-off: D: NOTE ! Input source for the controller (Main in, Aux in, LI out or PDH out). Cannot be changed when the AutoLock for this controller is active. This indicator shows the status of the controller. In the typical setup the PID 2 output is directed to <SC110 out> and the PID 1 output to the current modulation input of the laser head. In this case the PID 2 sign is positive. The sign of PID 1 is defined by the polarity of the current controller DCC110. It is positive (negative) if the polarity of the DCC110 is negative (positive) respectively. For details see Paragraph 7.4. Overall gain. Proportional gain. Integral gain. Frequency in Hz below which the integrator is limited. Derivative gain. If the gain parameters are out of range an error message is displayed in the controller tab. Output: Limits: Output channel of the controller. Voltage values to which the PID output is limited relative to the offset of the output channel. Page 17 Status: 21.10.08 Feedback Controlyzer DigiLock 110 General: Setpoint: Slope: Lock: Lock Window: Use Lock Window: Relock: These parameters are intended to manually operate the controller. In the AutoLock mode these parameters are set automatically. Since the interactive AutoLock covers most standard locking situations, the manual options should only be needed in special cases. Setpoint of the controller. Sign of the slope to which the system is locked to. Turns the controller ON/OFF. This option specifies boundaries for the selected channel. If the signal leaves the selected range (Min, Max), the controller is disabled. This option is only available if the “Use Lock Window” checkbox is selected (see above). In case the “Lock Window” signal is out of bounds, the relock option scans the output channel of the PID controller with the chosen values for frequency and amplitude (waveform type is triangle). Once the “Lock Window” signal is again within the specified limits, the scan is turned off and the controller is activated. NOTE ! The tabs General/Lock Window for the individual PID controller and the Analog P are only visible when the respective controller is not selected for AutoLock (Manual Mode). NOTE ! The turn-off behavior of the PID controllers can be configured by the user (see Paragraph 6.2.5.1). 6.2.1.5 PID 2 Figure 11 PID 2 Controller The PID 2 controller is identical to PID 1. PID 2 does not have an integral cut-off frequency, because when combining two PID controllers this is only needed at the controller which has to drive the output with the higher bandwidth (usually PID 1). Instead it comprises an additional low-pass output filter (see “System Setup“ in Paragraph 6.2.4). NOTE ! Page 18 Status: 21.10.08 In case the controller is not selected for AutoLock, it can be used as an independent controller (Manual Mode). 6. Operation Frontend 6.2.1.6 Analog P Figure 12 Analog P In order to overcome the signal delay introduced by digital signal processing, the DigiLock 110 features a very fast analog path. Its high bandwidth allows the experienced user to achieve further improvements in particularly demanding locking situations. Note that an improvement of the lock relies on a correspondingly high actuator and detection bandwidth. NOTE ! In case the controller is not selected for AutoLock, it can be used as an independent controller (Manual Mode). P: Sign: General Slope: Lock: Proportional gain. Sign of the controller input signal. Sign of the slope the system is locked to. Turns the controller ON/OFF. Page 19 Status: 21.10.08 Feedback Controlyzer DigiLock 110 6.2.1.7 Lock-In-Module Figure 13 Left: Lock-in Module Tab Right: Error Signal generated with the Lock-In Modulation Technique The Lock-In-Module can be used to generate an error signal for the PID controller with the Lock-in-modulation/demodulation scheme. Since it generates the derivative of the original signal, it allows the user to stabilize a system to a peak or a valley. Input: Mod set freq: Mod act freq: Mod amplitude: Phase shift: Offset: Mod output: Modulation: AutoLock Display: NOTE ! Page 20 Status: 21.10.08 Input source for the module (Main in, Aux in). The desired modulation frequency in Hz. The actual modulation frequency in Hz. Due to signal processing limitations only discrete modulation frequencies are possible (even fractions of 781.25 kHz). The closest frequency is chosen automatically. Peak-to-peak amplitude of the modulation signal in Volts. Phase shift in degrees between the output and the reference signal. Offset in units corresponding to the oscilloscope display. The offset is substracted from the original signal. Output channel to which the modulation is applied. Turn ON/OFF the modulation. The modulation is automatically switched on for locking. Therefore it only needs to be activated manually for the adjustment of the phase shift or in manual lock mode. Channel that is used in the AutoLock display (only available in Advanced Settings mode, see Paragraph 6.2.5.5) Due to signal processing limitations it is recommended to optimize the lock with the demodulated <LI out> signal, and not the modulated input signal. (see Paragraph 7.6). 6. Operation Frontend 6.2.1.8 PDH-Module Figure 14 Left: PDH Module Tab Right: Error Signal generated with the Pound-Drever-Hall Modulation Technique The principle of operation is similar to the Lock-In-Module but the available modulation frequencies are higher and restricted to even fractions of 25 MHz (25 MHz, 12.5 MHz, 6.25 MHz, 3.13 MHz, 1.56 MHz). Input: Mod set freq: Mod amplitude: Phase shift: Offset: Mod output: Modulation: AutoLock Display: NOTE ! Input source for the module (Main in, Aux in). The desired modulation frequency in Hz. Peak-to-peak amplitude of the modulation signal in Volts. Phase shift in degrees between the output and the reference signal. Offset in units corresponding to the oscilloscope display. The offset is substracted from the original signal. Output channel to which the modulation is applied. Turn ON/OFF the modulation. The modulation is automatically switched on for locking. Therefore it only needs to be activated manually for the adjustment of the phase shift or in manual lock mode. Channel that is used in the AutoLock display (only available in Advanced Settings mode, see Paragraph 6.2.5.5). Due to signal processing limitations it is recommended to optimize the lock with the demodulated <PDH out> signal, and not the modulated input signal. (see Paragraph 7.6). Page 21 Status: 21.10.08 Feedback Controlyzer DigiLock 110 6.2.2 Figure 15 Controller Design Controller Design This function visualizes the transfer function of the selected PID controller according to the parameters chosen. The transfer function graph consists of two traces: the magnitude and the phase which are plotted versus the frequency. It also includes filters and signal delay (e.g. ADC conversion, FPGA calculations,...). This information is very helpful in designing the control loop to the frequency response of the actuators. Selected PID: Get parameters PID input: Gain: P: I: I cut-off: D: PID output: Send parameters: Initial freq: Final freq: Freq unit: PID controller to which the parameter set belongs. Actual parameters of the selected PID are transferred to the controller design environment. Input channel to the controller (Main in, Aux in, LI out, PDH out). Overall gain. Proportional gain. Integral gain. Frequency in Hz at which the integral part is limited (only applies to PID 1). Derivative gain. Output channel of the controller. Sends the above parameters to the selected PID controller (see Paragraph 6.2.1). Start frequency of the simulation. End frequency of the simulation. Units used on the frequency axis. You can change these parameters and the transfer function graph will be updated automatically. If you are satisfied with the displayed transfer function you can send the parameters to the selected PID controller (see Paragraph 6.2.1). Page 22 Status: 21.10.08 6. Operation Frontend 6.2.3 Figure 16 Network Analysis Network Analysis In order to determine the dynamic behavior of a system, it is a common strategy to perform a network analysis. The result of such an analysis is the transfer function of the device under test (DUT) defined by the amplitude and phase values with respect to the frequency of the stimulus. In particular it is possible to analyze the complete feedback loop comprising of frequency discriminator, detector, controller and actuator. How it works: The stimulus signal of a certain frequency and amplitude travels through the DUT and generates a response signal. These two signals are analyzed regarding their phase and amplitude relation and displayed with respect to the frequency of the stimulus. Start freq: Stop freq: # of samples: Mod amplitude: Freq scaling: Averaging: Mod source: Signal input: Show reference tracks: Show time signal during analysis: NOTE ! Start frequency of the stimulus for the determination of the transfer function. Stop frequency of the stimulus for the determination of the transfer function. Number of measurement points between the start and stop frequency. Amplitude (peak-to-peak) of the stimulus signal. Method to distribute the measurement points between the start and stop frequency (logarithmic or linear). Number of measurements to average for one resulting measurement value. Output channel for the stimulus signal. Input channel for the response signal. Option to display the reference tracks saved before. Option to display the response signal in the scope unit during the measurement (the scope has to be selected manually by the user). Any filters applied to the signal path (see Figure 17) influence the measured transfer function, too. Page 23 Status: 21.10.08 Feedback Controlyzer DigiLock 110 6.2.4 Figure 17 System Setup System Setup Schematic of the high-speed signal path inside the DigiLock 110 module. Some parameters can only be set on this screen (<Main in> input offset, <Main in> gain, invert signal, all kinds of filters). All parameters set here are automatically updated throughout the whole system. The filters (three low-pass and one high-pass) are either configured via the corresponding input fields (fc: cut-off frequency, order of the filter function). Alternatively, pressing the filter symbol opens a screen which shows the simulation of the transfer function of the filter with the specified parameters. By modifying the parameters (fc, order) you can change this transfer function. Pressing OK confirms the parameters and transfers them to the setup. Note that the filters introduce additional phase lags and delays corresponding to the processing time. The processing time for an active low-pass filter is (2+order) x 10 ns, for an active high-pass filter (1+order) x 10 ns. Page 24 Status: 21.10.08 6. Operation Frontend 6.2.5 Settings The settings layer enables the user to access additional options of the DigiLock 110. It is divided into the following four tabs: 6.2.5.1 PID On this tab all advanced parameters for the PID modules can be found. Figure 18 PID Tab on the Settings Layer PID 1 and PID 2 keep PID value/ reset PID: relock delay: DIO output port: DIO output port function: Manual state: Sets the behavior of the PID controllers when switching off the lock. Both PID controllers can be set individually for AutoLock as well as Manual Mode. Either the PID output is transferred to the offset value of its output or the PID output is simply set to zero. In the first case the scan will be centered around the last output value, which is suitable when the PID controller offset compensated an offset drift. Sets the time that passes after the detection of the Lock Window out of lock state (see Paragraph 6.2.1.3) until the relock scan is activated. Configures the function of the DIO (digital input/output) port when jumpered as output (factory setting). Four different modes are available (manual operation, PID 1 within Lock Window range, PID 2 within Lock Window range, PID 1 and PID 2 within Lock Window range). When the function selector is in mode "manual operation", the state of the DIO output port can be set. Page 25 Status: 21.10.08 Feedback Controlyzer DigiLock 110 6.2.5.2 LI/PDH Figure 19 LI/PDH Tab on the Settings Layer Modulation signal type: First filter notch (LI-Module): Type of the waveform used for modulation and demodulation. The LI-Module only works properly if a low-pass filter is applied to the demodulated signal in order to filter frequency components located at the modulation frequency. This filter is implemented as a “moving average” filter in the digital domain. The first notch of such a filter is at the modulation frequency. In order to reduce noise this first filter notch can be set to lower frequencies. It has to be taken into account that a moving average filter introduces a linear phase shift to the output signal of the LI-Module. At the first notch frequency the phase shift is -180 °. As a consequence, lowering the filter frequency reduces the maximum available regulation bandwidth ! 6.2.5.3 Display On this tab the settings for displaying the data can be chosen. Figure 20 Display Tab on the Settings Layer Update rate: FFT-Window: Scope average #: Freq analysis average #: Page 26 Status: 21.10.08 Rate at which new data sets are displayed in the various graphs. Window type used for fast fourier transformation (FFT). Number of averaged data sets if the avg-option is used in the Scope Mode. Number of averaged data sets if the avg-option is used in the Frequency Analysis Mode. 6. Operation Frontend 6.2.5.4 General General system settings can be accessed on this tab. Figure 21 General Tab on the Settings Layer Ask to upload firmware at startup: By default the firmware of the DigiLock 110 is uploaded at startup of the software. This upload takes some seconds and resets the module. During a module reset, all analog output channels are set to 0 V before they are loaded with the values specified in the interface software. The firmware must be uploaded each time the DigiLock 110 is switched on. If the module is already configured and running (e.g. you already worked with the system but you closed down the interface software for a while) the upload and reset are not necessary. By activating this option the user is asked at startup whether a firmware upload should be performed. 6.2.5.5 Visibility Modules included in the software that are not used in a specific application might distract the user. Therefore the visibility status of some modules can be configured. Figure 22 Visibility Tab on the Settings Layer Module and Function visibility: Advanced Settings: Show or hide the respective functions and modules. Show or hide settings that give the user access to additional functionality. This functionality is not needed for standard operation scenarios (The option is only recommended for experienced users). Page 27 Status: 21.10.08 Feedback Controlyzer DigiLock 110 6.2.5.6 Profiles NOTE ! Loading profiles is only possible if the PID controllers are off (see Status display). The user can save and load profiles. A profile is a set of system parameters, e.g. all settings of the different modules, display settings, etc. Profiles are useful and save time if the user has to change between different control tasks. Figure 23 Load and Save Profiles If the user saves a profile, all system parameters are recorded. To load a profile, a dialog window opens in which the desired parameters can be selected to be imported (see Figure 24). Figure 24 Page 28 Status: 21.10.08 Dialog Window to select the Profile Source File and the Parameters to be imported 6. Operation Frontend 6.3 Display Area The lower part of the screen shows three different displays that are accessible through the buttons on the left hand side. 6.3.1 Scope Mode Figure 25 Scope Mode Display Two channel digital oscilloscope to display different available system signals. CH 1: CH 2: CH x: Hold: Ovld: Timescale: Mean: RMS-error: Show: Avg: Signal displayed on channel 1. Signal displayed on channel 2. Signal on the x-axis. Only available in x-y-mode. Freezes the trace for the respective channel. Indicates whether the signal has reached the limits of the channel during the last acquisition. Timescale displayed on the time axis. Mean value calculated from the trace for CH 1 and CH 2. RMS value calculated from the difference between the displayed trace and its mean value. Shows or hides the trace. Option to average consecutive scans of a channel (the number of traces for the average can be set in the Advanced Settings (see Paragraph 6.2.5.3). Page 29 Status: 21.10.08 Feedback Controlyzer DigiLock 110 6.3.2 AutoLock Mode Figure 26 AutoLock Mode Display This display is used in conjunction with the AutoLock tab in the upper part of the screen. In this mode the user can handle two major tasks: • Search the desired point to lock to via panning and zooming the displayed signal. • Initiate the locking procedure with the help of the context menu. CH 1: CH x: Hold: Ovld: Lockpoint tracker: Mean: RMS-error: Can not be modified. Input signal chosen in the AutoLock tab (see Figure 9). Can not be modified. Signal displayed on the x-axis. Output signal of the Scan Module. Freezes the trace. Indicates whether the selected channel was at its limits during the last acquisition. After choosing the desired lock point (signal level for side of fringe lock or peak/valley lock in case of LI or PDH), the crosshairs automatically follow this lock point even if the signal is drifting or the user changes the offset. Mean value calculated from the trace for CH 1 and CH 2. RMS value calculated from the difference between the displayed trace and its mean value. The following shortcuts (AutoLock Mode only) allow a more convenient operation: CTRL+<arrow left>: CTRL+<arrow right>: CTRL+<arrow down>: CTRL+<arrow up>: Page 30 Status: 21.10.08 increases the offset of the x-channel by scanrange*0.1 decreases the offset of the x-channel by scanrange*0.1 increases the scanrange of the x-channel to scanrange*1.2 decreases the scanrange of the x-channel to scanrange/1.2 6. Operation Frontend 6.3.3 Frequency Analysis Figure 27 Frequency Analysis Display The frequency analysis displays the fast fourier transform (FFT) of the signal. The functionality is similar to the scope mode but in the frequency domain. NOTE ! The selected frequency range defines the sampling rate of the signal used for the FFT. CH 1: CH 2: Hold: Ovld: f-scale: Show: Avg: Mean: RMS-error: 6.4 Signal displayed on channel 1. Signal displayed on channel 2. Freezes the trace for this channel. Indicates whether the selected channel was at its limits during the last acquisition. Frequency span displayed on the frequency axis. Within this range 500 measurement points are calculated from a time signal of 1000 measurement points (sample rate = 2 x f-scale). Shows or hides the trace. Option to average consecutive frequency spectra of a channel (the number of traces for the average can be set in the Advanced Settings (see Paragraph 6.2.5.3). Mean value calculated from the time signal for CH 1 and CH 2. RMS value calculated from the difference between the time signal and its mean value. Status Display On the bottom of the window the status bar displays the current state of the most important modules, system messages and a progress bar used for time consuming processes. Figure 28 Status Display Page 31 Status: 21.10.08 Feedback Controlyzer DigiLock 110 7 Notes on Feedback Control Loops with the DigiLock 110 The DigiLock 110 is a universal module to realize different locking scenarios. It provides two PID controllers, means for frequency modulation techniques as well as tools for analyzing the lock. This paragraph is indented as a starting point for more detailed information on the implementation of control loops and their optimization. For application examples see Paragraph 8. Before discussing the adjustment of the controller parameters (Paragraph 7.3) it is helpful to consider a few signal path issues (Paragraph 7.1). Frequency modulation is necessary to generate an error signal for top of fringe locking. It also offers advantages in terms of insensitivity with respect to amplitude modulation and frequency noise and can provide a larger capture range (Paragraph 7.2). The AutoLock mode of the DigiLock 110 relies on a consistent choice of polarity and slope, the determination of which is discussed in Paragraph 7.4. Details on the Relocking and signal analysis features can be found in Paragraph 7.4 and 7.5, respectively. 7.1 Signal to Noise and Bandwidth Considerations To take full advantage of the possible bandwidth of the control loop, care should be taken to implement a true 50 Ohms wave guide and to avoid extra cable length in the signal path. The fast inputs and outputs of the DigiLock 110 are 50 Ohms in the standard setting upon delivery. Bandwidths and sampling rates of the inputs and outputs are listed in Table 7. Due to the limited gain-bandwidth product in analog amplification, a higher gain generally reduces the bandwidth1. In the DigiLock 110 the digital signal paths do not show this effect, but instead every processing step inherently contributes a fixed delay. The implementation of extra filters, e.g. low-pass filters to “clean-up” the error signal, usually has a negative influence by introducing extra phase lag and should hence be avoided. Improvements based on filters usually rely on a detailed analysis of the frequency response of the control loop and have to be carefully designed. In case of the digital filters in the DigiLock 110 the phase lag is due to additional signal delay. For most cases it is hence recommended to bypass the digital input filters in the System Setup (Paragraph 6.2.4). To optimize the signal to noise ratio of the input, subtract the dc offset from the input signal by setting the input offset to the mean value as read from the oscilloscope display (see Figure 17). The gain can now be increased to take advantage of the full +/-2 V range of the analog-to-digital converter. 7.2 Frequency Modulation Techniques Frequency modulation techniques are applied to obtain a steep slope of the error signal at the lock point. The typical spectroscopy signal in transmission or absorption consists of a resonance line, e.g. a Lorenzian or Gaussian (see application examples in Paragraph 8). To lock to the maximum of the resonance a dispersive signal is needed, which is generated by frequency modulation and subsequent demodulation. There are two regimes depending on the choice of the modulation frequency with respect to the characteristic line width Dn of the resonance: A modulation frequency νmod smaller than ∆ν leads to the derivative of the resonance signal as obtained from the Lock-In-Regulator (cp. Paragraph 8.2.2)2. A modulation frequency much larger than ∆ν (cp. Pound-Drever-Hall, Paragraph 8.3) will lead to an error signal – and hence capture range – that extends from one sideband to the other [ν0 - νmod , ν0 + νmod]. The later situation is preferable and used in situations where the resonance is well isolated, e.g. on a Fabry-Perot cavity where no neighboring resonances spoil the signal. In this case a higher modulation frequency also provides a higher bandwidth error signal after mixing with the local oscillator (LO). The phase of the local oscillator has to be adjusted to obtain a large error signal with steep slopes at the maximum of the spectral signal. The sign of the error signal can be inverted by changing the phase by 180°. It should be adjusted such, that the lock-in/PDD signal is the derivative of the input signal. 1. 2. Note, that the analog preamplifiers in the DigiLock have a fixed bandwidth independent of the selected gain. Some details on the generation of the error signal by frequency modulation can be found in the SYS DC 110 manual in the corresponding chapters of LIR 110 and PDD 110, respectively. Page 32 Status: 21.10.08 7. Notes on Feedback Control Loops with the DigiLock 110 The optimum phase can be found by first adjusting to the minimum signal at a phase shift of 90° to the optimum setting: 1. 2. 3. Change the phase value until you get the minimum signal close to the carrier. Then subtract 90° to obtain the maximum signal. If you observe the wrong sign, add or subtract 180° to the current phase value. Note that the phase should always be adjusted on the local oscillator (as implemented in the DigiLock 110), because any additional phase in the signal path deteriorates the control loop performance. Once the optimum phase is found and the offset is properly adjusted, the control loop can be closed and the controller parameters can be optimized. 7.3 Controller Parameter Adjustment and Optimization Once a suitable error signal is at hand, the feedback loop can be closed and optimized. The general working principle of the Proportional-Integral-Derivative (PID) controller is to minimize the deviation of a physical measure (process variable) from a selected set value by modifying the actuator drive (manipulated variable) accordingly. The output of the controller is a weighted sum of the integral (I), proportional (P) and differential (D) paths scaled by the overall gain. The digital PIDs in the DigiLock 110 allow for a precise and reproducible control of the gain settings.3 The three contributions differ in their frequency dependence: 1. The integral (I) part is given by the time integral of the error signal. Therefore its gain increases to lower frequencies and it is responsible for the compensation of offset changes. The residual deviation of the error signal from zero respectively the difference between the physical measure and the set point decreases with increasing integral gain. 2. The proportional (P) part has a flat frequency response and is limited by the bandwidth of the control loop. A larger proportional gain KP reduces the deviation from the set point and is limited by the onset of oscillations. 3. The differential (D) part reacts on sudden changes to reduce deviations, e.g. an over shoot in the transient response. Its frequency response increases with frequency and is limited to higher frequencies by the bandwidth of the control loop. Since it provides a phase lead, the differential (D) part can help to improve the phase-response at higher frequencies, which in turn allows to increase the gain on the I and P parts. Note, that due to the high-bandwidth transient response the differential part is also particularly prone to amplification of noise. Before adjusting the parameters of the controllers the correct phase and polarity should be chosen, for details see Paragraph 7.2 and 7.4, respectively. To start, select a low input gain and set all contributions (P, I, D) to zero. Now, increase the integral part until the system locks4. Generally speaking, at this point the quality of the lock improves with increasing gain on the controller until the feedback loop starts to oscillate. This is the case when the feedback loop reaches a gain of 1 at a 180° phase shift. Therefore the usable bandwidth of many actuators (e.g. piezos) is limited by their characteristic frequencies. In any case phase-shifts due to finite bandwidths and signal propagation times in the control loop lead to phase lags which increase with frequency. The appearance of oscillations can be observed in the oscilloscope display of the error signal (see Paragraph 7.6 for details). However, the frequency analysis is better suited because it is more sensitive and directly shows the resonance peak at its frequency. Usually it is helpful to drive the system into oscillation and note the characteristic frequencies for reference. A simple parameter adjustment is obtained in an iterative process: 1. Set the integral gain KI to a finite value (all others to zero) and increase the overall gain until the system locks. 2. Alternate between increasing the proportional KP and the integral gain KI each until the feedback loop oscillates, then reduce the gains until the oscillation definitely stops. Standard optimization procedures set the proportional KP gain to about half the value at which oscillation starts. 3. Alternate between increasing the differential KD and the integral KI gain each until the feedback loop just oscillates, increase one and the other until the oscillation will not stop by further increase. At that point reduce the gain until the oscillation definitely stops.5 3. 4. In analog controller circuits the integral part is sensitive to persistent DC deviations of the error signal, e.g. internal IC offsets. Therefore, the integral gain KI should always be kept at a finite setting to reduce residual offsets. If the system does not lock check the polarity, i.e. try the opposite polarity or consult Paragraph 7.4. Page 33 Status: 21.10.08 Feedback Controlyzer DigiLock 110 Note that the optimized parameters depend on the slope of the error signal at the current lock point and the actuator response. Therefore there is usually a trade-off between a good locking result and a reasonable robustness against oscillations due to additional external disturbance and variations in the overall response. The DigiLock 110 features a build in network analyzer (see Paragraph 6.2.3) which can be used to analyze the frequency dependent amplitude and phase response of the actuators and control loop elements. In particular, it can be used to do an in-loop analysis of the stability of the closed lock. 7.4 Identification of Signal Polarity and Slope To support the AutoLock features, the DigiLock 110 software frontend takes a consistent approach to the definition of the signal polarity of each controller and the slope of the error signal. The polarity of the controller is used to match the action of the corresponding output to the direction of the scan. It should be chosen such that an increased output acts in the same direction as an increase of the scan output. Hence, if the output of the controller is identical to the scan output the polarity is positive. Otherwise the direction has to be determined for the particular actuator used. For example, if the DigiLock 110 scan module scans the laser via the Scan Control SC 110 and the output of PID 2 is also chosen to be the SC 110, its polarity is trivially positive. If the output of PID 1 is then directed to the current of the laser diode, the polarity of the controller will depend on the polarity of the laser diode as defined by the DCC 110 current control (see Sys DC 110 manual for details). In this case the polarity of PID 1 has to be opposite to the polarity of the laser diode. The polarity of the controller output, for any actuator, can be figured out by comparing the signals of the scan output with the change observed while scanning the controller output. To determine the resulting effect one can look at a characteristic part of the error signal, e.g. close to the lock point, or use the wavemeter reading if available. The slope is defined by the lock point given by the display during scan. It is automatically chosen in AutoLock mode. If the controller is used in manual mode the user can define the lock point by selecting the corresponding slope direction. A general method to verify the correct overall polarity6 is to compare the signals during scan with the controller switched on and off while using just the proportional part. To do so, only activate the PID controller in question. Set the integrator and differentiator parts to zero and the P part and overall gain to some finite value (e.g. 10). Use the System setup input offset (see Paragraph 6.2.4) to center the signal around zero. Switch on the PID controller while scanning across the characteristic lock point. Increase the proportional part and/or overall gain until you see a significant distortion of the signal. To check the observed effect, you can compare with the cases of the other polarity and the controller being switched off. The cases of side of fringe locking and locking to a lamb dip of saturated absorption signal are illustrated in Figure 29 and Figure 30, respectively. 5. 6. Alternatively, there are several optimization methods for PID controllers which mostly originate from slow (temperature type) controller applications. The Ziegler–Nichols method gives rule of thumb values derived from the proportional gain KP, osc where oscillation of frequency νosc starts: KP = 0.6 × KP,osc ; KI = 2 KP,osc / ν osc; KI = (KP,osc × ν osc)/ 8 The overall polarity is given by the product of the PID controller polarity and the slope. Page 34 Status: 21.10.08 7. Notes on Feedback Control Loops with the DigiLock 110 Figure 29 Polarity of PID Controller for Side of Fringe Lock The graph shows the characteristic distortions of the error signal of a side of fringe lock for different polarities. The displayed example is a zoom into the saturated absorption spectroscopy of Rb. The undistorted signal (solid black) is given for reference. When the polarity is chosen to lock on a negative slope (dashed red), the negative slopes are shallower while the positive slopes are steeper. The opposite is true for locking onto the positive slopes (dotted green). The traces have successively been exported from the scope display of the DigiLock 110 (right click on scope graph). Page 35 Status: 21.10.08 Feedback Controlyzer DigiLock 110 Figure 30 Polarity of PID Controller using Frequency Modulation The graph shows the characteristic distortions of the error signal as well as the saturated absorption signal of a top of fringe lock for different polarities. The undistorted signal (solid black) is given for reference. For the correct overall polarity (dashed red) the slope of the error signal at the peak is shallower while the peak itself is broader (see boxed part of the graph). In contrast for the wrong polarity (dotted green) the slope is steeper and the peak narrower. If the overall sign is correct (incorrect) a resonance should become wider (narrower) as compared to the case of the controller being inactive. The slope of the error signal, e.g. in frequency modulation should become flatter (steeper) when the overall sign is correct (incorrect). If the overall gain is too high, oscillations will be observed, which will be either at the original position with multiple zero crossings or repelled from the original position with oscillations positive and/or negative at different parts of the signal, for correct and incorrect overall polarity, respectively. To suppress the oscillations reduce the overall gain. Generally, the change in slope (as explained earlier) is easier to interpret. NOTE ! 7.5 The AutoLock feature of the DigiLock 110 expects a consistent choice of the slope setting for all PID controllers involved, see above. Once the overall polarity is found, a correction of the slope can be compensated by changing the polarity also. Relock Feature The basis of the relock feature of the DigiLock 110 is the out of lock detection. It is based on a window comparator which is defined by the minimum and maximum bounds. The laser is considered in lock when the signal of the selected channel is within these bounds (100 % window). Once the signal has left this window, the corresponding PID controller is in hold state, i.e. its output is frozen. Reentering the comparator window takes into account a 10 % hysteresis, i.e. the input signal has to be within the 80 % window (see Figure 31). Once the signal has been within these bounds, the PID controller is reactivated. The time between the detection of the unlocked state and the activation of the relock scan can be set by the relock delay on the PID tab of the Settings function (see Paragraph 6.2.5.1). The output channel, fre- Page 36 Status: 21.10.08 7. Notes on Feedback Control Loops with the DigiLock 110 quency and amplitude of the relock scan are defined in the Lock Window tab of the AutoLock tab or the corresponding PID controller. Figure 31 7.6 Relock Window. The relock window is defined by the Min and Max values. When the signal leaves this window the out of lock state is detected and the output of the controller is frozen. Once the signal has reentered the inner 80 % window the system is considered to be locked again. The time between detection of the out of lock state and the activation of the relock scan is defined by the relock delay as set in the Setting function. Signal Limitations in Analyzing the Locking Performance NOTE ! To analyze the performance of a lock based on a frequency modulation technique as provided by the PDH and LI modules, it is highly recommended to use the demodulated signal (<PDH out> or <LI out>) to observe residual excursions in scope mode as well as using the frequency analysis tools. As common to any digital signal sampling, the DigiLock 110 oscilloscope shows effects of aliasing. When the sampled signals have frequency components faster than half the sampling rate, they will be folded into the frequency band from zero to this Nyquist frequency. The sampling rate of the DigiLock 110 is automatically set to make full use of the number of acquired points. Therefore, in Scope and AutoLock mode the sampling rate is given by the number of points per trace (1000) divided by the time range chosen. According to the Nyquist theorem the sampling rate in the frequency analysis (FFT) is set to twice the selected maximum frequency. Because of the aliasing effects it is hence irritating to look at the input signal with frequency modulation applied. On the other hand the non-demodulated signal can serve as an example to discuss the possible effects observed7. In the frequency analysis the modulation frequency will be observed at a lower value, i.e. modulus the sampling rate. For a sampling rate lower than the modulation frequency, an undersampled oscillation will be observed, i.e. a rather fast “noisy” signal that can breathe in amplitude from shot to shot. This effect is well known from digital oscilloscopes. In the case of the DigiLock 110 there is an additional effect to be observed for sampling rates well below the Nyquist frequency (especially using PDH modulation): Due to the complete synchrony of the sampling with the applied modulation the undersampled signal can show as a (noisy) line at a finite offset that varies from shot to shot. Note, that this is not an indication of the performance of the lock but merely an artifact of sampling the input signal including the applied modulation and explains why it is highly recommended to use the demodulated signal for analysis. 7. By additionally applying the signal to the Aux input, a low passed signal for analysis can be derived using the built-in digital filter (see Paragraph 6.2.4). Page 37 Status: 21.10.08 Feedback Controlyzer DigiLock 110 8 Application Examples There are numerous different schemes to stabilize lasers, for example to atomic or molecular resonances and cavities. The DigiLock 110 is designed to cover a large range of locking scenarios. This paragraph describes step-by-step how to implement some of the most common ones with the DigiLock 110. NOTE ! 8.1 This chapter assumes that the user has some basic knowledge of the laser system and the electronics involved. For further information see the Sys DC 110 manual. General System Setup The general setup for the stabilization is shown in Figure 32. All locking schemes are based on a spectroscopic signal provided by the experimental setup which serves as a reference. The DigiLock 110 is capable of supplying the scan to find the resonance and lock point, derive the error signal and it provides the controllers for the feedback loop. It can optionally generate an error signal by means of a frequency modulation technique. Furthermore the graphical user interface supports both a user-friendly auto-lock mode as well as intuitive access to all locking parameters. The integrated frequency analysis allows to optimize the regulators in advanced applications. This section introduces the common setup for the different locking scenarios described in the following paragraphs. Figure 32 Page 38 Status: 21.10.08 Typical Setup for Laser Locking The signal from the photo detector (PD) is fed into the <Main in> input of the DigiLock 110. The two PID controllers act via the backplane and SC 110 on the grating piezo and via the <Main out> on the laser diode current (mod DC). 8. Application Examples Initial setup: CAUTION ! Make sure that the laser current is switched off while installing or exchanging the DigiLock 110 or any other module. Take care of proper (personal) grounding while handling the laser head, e.g. when connecting cables. 1. 2. Switch OFF all modules in the DC 110 electronics to install the DigiLock 110. The DigiLock 110 provides the Scan Control SC 110 with a signal via the backplane. Therefore the external control of the SC 110 has to be configured to #DA2 by appropriately setting the jumpers/dip switches on the SC 110 board. For detailed description on the SC 110 please see the Sys DC 110 user manual. Make sure that the laser head is properly connected to the Temperature Controller DTC 110 and the Current Controller DCC 110. In these examples, a DLpro extended cavity diode laser (ECDL) is used. The same setup can equally well be realized with the DL 100 and translated to other diode based laser systems like the tapered amplifier TA 100, DLX 110 RockSolid and SHG 110. For the DL 100 laser head the corresponding connections are labelled as follows: DLpro DL 100 Comment mod DC curr. mod. DC coupled current feedback is used for the fast feedback in addition to the slow feedback to the piezo. mod AC bias-t AC coupled fast current feedback can optionally be used for feedback or modulation at high frequencies in the MHz range. CAUTION ! Check the maximum current Imax of the current controller DCC 110 to prevent damage of the laser diode. To do so turn on the key switch but leave the modules and laser switches off and check the Imax setting on the DC 110 Monitor Unit 3. Connect the output of the Scan Control SC 110 to the piezo of the ECDL. Since the DigiLock 110 provides the scan capability set the trigger switch on the front panel of the SC 110 to position ext (external). 4. The fast feedback via the Main out (6) SMB connector of the DigiLock 110 is applied to the DC coupled modulation input of the DLpro. 5. The output of the photodetector is connected to the Main in (4) connector of the DigiLock 110. CAUTION ! To allow for high bandwidth the Main in (4) connector of the DigiLock 110 is jumpered in the factory settings as a 50 Ohm input. Check that the photodetector amplifier can drive the 50 Ohm input. Alternatively, the input can be jumpered to high impedance (see Paragraph 9.1). 6. When all connections are established, switch ON the DigiLock 110, connect the USB port to the PC and start the software. Afterwards turn on the Temperature and Current Control (DTC 110 and DCC 110) as well as the SC 110. After a few minutes the laser will thermally stabilize. Adjust the parameters Iset and Tset in order to get stable single mode cw operation. Figure 33 shows the user interface software after startup. All parameters of the DigiLock 110 can be reset by loading the default profile: Functions/Setup->Load profile. For the standard installation the default profiles can be found at: • ...\Documents and Settings\<User Name>\Application Data\Toptica\DigiLock\Profiles\DigiLock_default.pro (for English Windows setup) • ...\Dokumente und Einstellungen\<User Name>\Anwendungsdaten\Toptica\DigiLock\Profiles\DigiLock_default.pro (for German Windows setup) Page 39 Status: 21.10.08 Feedback Controlyzer DigiLock 110 The laser frequency can be adjusted to the desired resonance by several means with increasing precision: • Coarse tuning in the 0.1 nm range - usually only required for the initial setup - can be achieved by modifying the angle of the grating with the fine thread screw. • Change the current (and if necessary the temperature) of the laser to tune the frequency and achieve single mode operation. • The built in piezo allows mode-hop-free scanning of the laser over several 10 GHz. The DigiLock 110 generates the scan signal that drives the piezo using the SC 110 as a high voltage amplifier. The output is the sum of the voltage specified in the DigiLock 110 software and the offset of the SC 110. The SC 110 offset can hence additionally be used to scan the laser. 7. In the Scan Module of the DigiLock 110 you can choose the parameters for the scan signal generation: 1. Name Description Value to set to1 Signal type type of scan ramp triangle Frequency frequency of full scan (back and forth) 10 Hz Amplitude scan amplitude peak-peak 10 V Output output to which the scan signal is added <SC 110 out> The numerical values are guidelines and depend on the individual setup Table 2 DigiLock 110 Scan Module Settings The maximum scan range of the DigiLock 110 module is obtained in the following way: 8. Choose <SC 110 out> in the Offset adjustment control box of the DigiLock 110 Control Software and set the Offset to 0 V. 9. Set the Offset adjust ten-turn potentiometer on the SC 110 front panel to half the available output range (“5“) which corresponds to an output voltage of 75 V. The DigiLock 110 software can now access the full output range (0..150 V). 10. All the relevant signals can be analyzed through the DigiLock 110 computer interface. However, the DigiLock 110 also provides a trigger output (TRIG) which can be used for monitoring with an auxiliary external oscilloscope. CAUTION ! The SC 110 output can deliver high voltages (up to 150 V). Please make sure that your oscilloscope has suitable inputs. Now all the hardware is set up and the system can be completely controlled by the DigiLock 110 software: 11. The photodetector signal connected to the Main in (4) connector on the DigiLock 110 front panel can be examined in the scope mode (shown in the lower part of Figure 33). Page 40 Status: 21.10.08 8. Application Examples Figure 33 DigiLock 110 User Interface after Startup. Here, the laser is scanned across the saturated absorption lines of Rb at 780.24 nm, see Paragraph 8.2. Figure 34 Graphical Overview of the Signal Path through the Controller (System Setup) 12. The System Setup function (Figure 34) shows a block diagram of the control loop. Here several options for the analog gain and offset as well as different filters for the <Main in> signal path can be set. Their function and default setting are given in the following table. The default values are a good starting point and can later be optimized for the specific application by the user. Please refer to Paragraph 7 for further information. Page 41 Status: 21.10.08 Feedback Controlyzer DigiLock 110 Name Description Standard Value Input offset offset to be subtracted from the input signal before digitalization to use the full resolution of the analog-to-digital converter (ADC) 0.0 V Gain gain to amplify the signal. The maximum range is +/-2 V 1 Invert inverts the input signal off (box not checked) High-pass filter high-pass filter of given frequency and order bypass (box checked) Low-pass filter low-pass filter of given frequency and order bypass (box checked) Table 3 Page 42 Status: 21.10.08 Input Signal Path Settings 8. Application Examples 8.2 Doppler-Free Saturation Spectroscopy After realizing the initial setup in Paragraph 8.1 this section describes the stabilization to an atomic transition by Doppler-free saturation spectroscopy of Rb. Figure 35 shows the experimental setup. Figure 35 Experimental Setup for Doppler-free Saturation Spectroscopy Once the Doppler-free saturation spectroscopy is adjusted and the laser is tuned to the appropriate transition, the photodetector signal at the Main in connector (4, in Figure 4) can be optimized by scanning the laser wavelength across the desired resonance. 13. To scan the laser with the piezo, use the Scan Module control box of the DigiLock 110 Control Software. Select <SC 110 out> as output, set the signal type to triangle, the frequency to 10 Hz and the amplitude in the order of 10 Volts. Depending on the laser this corresponds to several GHz of frequency tuning. Switch on the scan by pressing the button Scan. 14. The scope mode provides a two channel oscilloscope and is a general tool to view a variety of signals of the DigiLock. To display the spectroscopy signal use a timescale of 50 ms (corresponding to the 10 Hz scan frequency), choose <Main in> as CH 1 and <SC 110 out> as CH 2. The scope triggers on the rising slope of the internal scan ramp. The signal expected after the adjustment will look similar to the one shown in Figure 36. Page 43 Status: 21.10.08 Feedback Controlyzer DigiLock 110 Figure 36 Absorption Signal of a Doppler-free Rb Spectroscopy Once the laser scans across the spectral feature two different locking schemes can be implemented using the AutoLock feature of the DigiLock 110. First locking to the side of a fringe is presented (Paragraph 8.2.1) then the use of frequency modulation/demodulation to lock to a maximum or minimum is explained (Paragraph 8.2.2). 8.2.1 Side of Fringe Locking We are now ready to use the AutoLock feature to lock the laser to the slope of a Doppler-free absorption line. Figure 37 Page 44 Status: 21.10.08 AutoLock Setup for the PID Controllers 8. Application Examples 15. First the AutoLock is activated and the controllers PID 1 and PID 2 are selected by checking the corresponding boxes (see Figure 37). PID 1 will handle the high frequencies (by controlling the laser current via the modulation option in the laser head) whereas PID 2 will be responsible for the lower frequencies by controlling the piezo voltage. As input channel select <Main in> where the photodetector signal enters the module. In AutoLock operation the input channel chosen in the AutoLock tab is taken as input for all the selected controllers. 16. To use the AutoLock features, change the display from Scope Mode to Auto Lock Mode. The x-axis of the display is the output of the Scan Module and the y-axis is the corresponding value of the selected AutoLock input channel. In the AutoLock mode the software will actually perform a hardware zoom and pan, i.e. modify the scan amplitude of the Scan Module and the offset of the corresponding output channel according to the displayed x-axis. To graphically and interactively magnify the part of the absorption spectrum in the vicinity of the desired lock point: Select the “x-axis Zoom“ tool (see Figure 38), place the cursor left of the desired xvalue, hold the left mouse button, move the mouse to the right of the desired x-value and release the left mouse button. Figure 38 Available Tools for the Graph Displays To increase the scan range again use the “Zoom out“ tool: The graph will zoom as long as you press the left mouse button. To shift the spectrum to the left or right (i.e. modifying the offset) use the “Pan“ tool. In our example the 85 Rb D2 transitions at 780 nm are used (Figure 39) and the locking point is chosen to be at the rising slope of the second peak. Figure 39 85Rb D2 transitions at 780 nm. The Crosshairs mark the currently selected locking point Page 45 Status: 21.10.08 Feedback Controlyzer DigiLock 110 17. To configure the PID controllers, select the PID 1/PID 2 tab to access the corresponding parameters (see Figure 40). In AutoLock operation the input channel of the PIDs is defined by the AutoLock input. PID 1 is used for the high frequency feedback, therefore its output channel is <Main out> which is connected to the modulation input of the laser. PID 2 is used for large range, low frequency feedback to the piezo. To prevent the controllers from mutual interaction, the PID 1 features an “I cut-off“ frequency. The “I cut-off“ frequency defines the corner frequency below which the integral gain of the controller is limited. A reasonable choice is in the order of 100 Hz. 18. The values of the gain parameters for the PIDs shown in Figure 40 are set in the corresponding tabs. Their settings depend on the slope of the error signal and the actuator response. For the given setup the error signal amplitude should be on the order of 100 mVpp. In most cases the low frequency feedback of PID 2 is sufficient to achieve a first lock8. It is advisable to start with conservative gain settings. To find the correct settings of the sign for each PID controller, please see Paragraph 7.4. Once locking is accomplished the parameters can be optimized (see Paragraph 7.3). Figure 40 19. PID Setup for Locking to a Doppler-free Rb Peak Before the lock is initiated, the lock point has to be selected by dragging the crosshairs in the AutoLock graph to the desired position. When you drag the vertical line in the horizontal direction the crosshairs will follow the current trace. Once chosen, the crosshairs will automatically track the lock point while the laser might slowly drift. To engage the lock, click the right mouse button and choose PID: Lock to slope from the context menu (see Figure 41). Starting with the next trigger the trace captured is displayed in a different color (here yellow) while the held trace is visible (here blue9). Once the lock point is reached the trace stops and the lock is activated. Figure 42 shows the AutoLock display some seconds after the lock has been triggered. 8. 9. The output of the controllers can be restricted using the Limit settings (Paragraph 6.2.1.4 and 6.2.1.5), e.g. to about the scan range. This helps to avoid destabilization of the laser by driving it far from the lock point especially during initial setup and optimization. The colors of the traces can be changed by the user. To restore the factory settings, load the default profile. Page 46 Status: 21.10.08 8. Application Examples Figure 41 Initiating the AutoLock to a slope of the absorption signal Figure 42 Autolock Display while the lock is engaged (PID: lock to slope) 20. After some time the yellow trace disappears and a scatter plot is left which indicates both the input signal (y-axis) and the current output of the PID 2 which in this case coincides with the scan (see Figure 43) on the x-axis. The calculated rms deviation from the setpoint value displayed in the right panel can be used to optimize the lock. To turn the lock off, perform a right mouse click in the AutoLock graph and select either Unlock to just release the lock or Unlock & Restart scan to release the lock and immediately start scanning again. NOTE ! The behavior of the output value of the PID controllers when switching off the lock can be configured by the user: Either the PID controller output is set to zero or its current value is transferred to the offset value of its output channel. The latter setting leads to the scan being centered at the last output value (see Paragraph 6.2.5.1 for details) Page 47 Status: 21.10.08 Feedback Controlyzer DigiLock 110 Figure 43 AutoLock Display after the lock has been triggered. The yellow scatter plot indicates signal input and regulator output (PID 2) Parameter optimization: To obtain a “good“ lock it is necessary to increase the gain settings of the PID controllers to the highest possible values without oscillations. The RMS error value in the right panel quantifies the residual excursions of the laser. As PID 2 is only responsible for the low frequency components, this controller can be left at moderate gains. The performance of the lock is predominantly affected by the settings of PID 1 connected to the fast actuator (Mod input of the DLpro). A helpful tool in the optimization process is the Frequency Analysis display (see Figure 44). Here the result of the Fourier transformation of the sampled time signal is shown. In our case select <Main in> as CH 1. The frequency scale has to be chosen according to the bandwidths of the experiment. Typical bandwidth of the gratings are in the range of a few kHz while the DC modulation input has bandwidths of a few 100 kHz. Turn off the autoscale function of CH 1 because normally a high DC offset is present and therefore small signal amplitudes may not be observed. Choose the appropriate amplitude range by setting the upper bound of the y-axis (see Paragraph 6.1) to resolve all peaks in the frequency spectrum as desired. Figure 44 Frequency Analysis of the Photodiode Signal at <Main in> In this example the frequency analysis clearly shows the onset of an oscillation at about 600 kHz due to high gain settings. To improve the lock performance you can now increase the gain of the I, P and D parts of the PID in turn to values well below the point at which the control loop starts to oscillate. The strategy for optimizing the P, I and D parameters is described in Paragraph 7.3. Page 48 Status: 21.10.08 8. Application Examples 8.2.2 Top of Fringe Locking (Lock-In) To lock the laser to a maximum of the Doppler-free absorption signal, a zero crossing slope is generated by frequency modulation. The Lock-In-Module uses a modulation frequency smaller than the characteristic resonance width to obtain the derivative of the absorption signal by demodulation. For the setup follow the initial steps 1. to 18. described above, but choose <LI out> as input to the AutoLock module. 21. To display the error signal switch to AutoLock Mode. Set the scan frequency of the Scan Module to 10 Hz, the output to <SC 110 out> and switch on the scan. Figure 45 Lock-In-Module with typical Parameters 22. Configure the parameters for the Lock-In-Module (see Figure 45). The modulation set frequency (Mod set freq) has to be chosen depending on the spectral resonance. A reasonable choice is about 1/10 of the characteristic linewidth. In this example a frequency of about 100 kHz is used. Due to the specific architecture of the DigiLock 110 only discrete frequencies are possible. Type in the desired one and the system will automatically calculate the nearest one available (Mod act freq). 23. Turn on the modulation by pressing the “Modulation“ button. The second trace should now display the error signal derived from the frequency modulation. The modulation amplitude is a trade-off between the desired lock-in signal strength and the allowed frequency modulation of the laser. The larger the amplitude, the larger the lock-in signal but note that at the same time the frequency modulation of the laser increases10. Figure 46 shows the resulting scope display (with optimized phase). 10. This tradeoff can be eliminated by using an additional electro-optical modulator (EOM) in the locking beam path after splitting from the main beam. Page 49 Status: 21.10.08 Feedback Controlyzer DigiLock 110 Name Description Value to set to Input signal input to be demodulated <Main In> Mod set freq modulation set frequency is the user selected modulation frequency 100 [kHz] Mod act freq modulation act frequency is automatically set to the nearest possible discrete frequency (automatically set) Mod amplitude amplitude of the modulation 0.01 [Vpp] Phase shift phase shift of the local oscillator with respect to the applied modulation 0 [°]((to be optimized, see text) Mod Output output to which the modulation is added <Main out> Figure 46 24. AutoLock Display of the Doppler-free Rb-spectrum (upper yellow trace) with the corresponding Lock-in Signal (lower red trace) Note that the sign/phase of the error signal is chosen to be the derivative of the absorption signal, i.e. it is positive (negative) on positive (negative) slopes, respectively. The phase between the modulation and the reference signal has to be adjusted to obtain a large error signal with steep slopes and zero crossings at the maxima of the spectral signal. The sign of the error signal can be inverted by changing the phase by 180°. The sign should be adjusted such, that the lock-in signal is the derivative of the input signal, i.e. positive error signal on positive signal slope and vice versa. To find the optimum phase: • Change the phase value until you get the minimum signal. • Then subtract 90° and you will get the maximum signal. • If you observe the wrong sign, add or subtract 180° to the current phase value. To set the lock point, i.e. the zero-crossing of the error signal, any residual offset can be compensated by setting the offset in the Lock-In-Module to the value observed in the scope display. Page 50 Status: 21.10.08 8. Application Examples 25. 26. Once the phase is adjusted, turn off the modulation of the Lock-In-Module. Check the parameters of the PID controllers. Now you can position the crosshairs to either a peak or a valley and it will automatically track the lock point. To find the correct settings of the sign for each PID controller, please see Paragraph 7.411. To initiate the lock, perform a right mouse click to access the context menu and select between LI/PDH: Lock to nearest peak or LI/PDH: Lock to nearest valley. The trace changes its color (here from yellow to blue) to show that the actual trace is captured in the background. During the next scan the lock is triggered. Figure 48 shows the AutoLock display while the lock is triggered. The blue trace is the captured signal of the last scan. The yellow trace is the scan during which the lock is triggered. You can see that the trace stops at the selected peak. After a while the yellow trace disappears and there is only a scatter plot left. The interpretation of this plot and the optimization of the lock can be found in Paragraph 8.2.1. For optimization of the PID parameters see Paragraph 7.3. 11. The output of the controllers can be restricted using the Limit settings (Paragraph 6.2.1.4 and 6.2.1.5), e.g. to about the scan range.This helps to avoid destabilization of the laser by driving it far from the lock point especially during initial setup and optimization. Page 51 Status: 21.10.08 Feedback Controlyzer DigiLock 110 Figure 47 Initiating the automatic LI-lock to a Peak Select the lock point by positioning the crosshairs. When the Lockpoint tracker is on, it snaps to the nearest peak or dip and if the laser drifts the lock point is tracked automatically. Activate the lock by selecting LI/PHD: Lock to nearest peak/valley from the context menu. Figure 48 AutoLock Display while the lock is triggered (LI/PDH: Lock to nearest peak) The background trace (blue) displays the last scan before. The trace (yellow) captured during the engagement of the lock stops at the selected lock point where the scan stops and the selected controllers are switched on. Page 52 Status: 21.10.08 8. Application Examples 8.3 Pound-Drewer-Hall Stabilization to a Cavity The second important application described here is the stabilization of a laser to a cavity with the PoundDrever-Hall technique. Figure 49 shows an overview of the setup used for a Pound-Drever-Hall stabilization onto a cavity in reflection. In this example the cavity is a FPI 100 Fabry-Perot interferometer, available from TOPTICA Photonics AG. Figure 49 Experimental Setup of a Pound-Drewer-Hall (PDH) Stabilization to a Cavity. Note that the modulation is directly added to the <Main out> channel of the DigiLock 110. Alternatively the modulation can be applied to the mod AC input of the DLpro. The initial setup is the same as in the other examples, see Paragraph 8.1 steps 1 to 12. Once the spectroscopy signal is obtained, the following steps are analogous to the case of the Doppler-free absorption spectroscopy, see Paragraph 8.2 steps 13 and 14. Figure 51 shows the expected signal for scanning across a resonance of the cavity. It can directly be used for side of fringe locking analogous to Paragraph 8.2.1. 15a. To generate the error signal for locking to the maximum of the resonance use the PDH-Module. The PDH-Module provides a number of higher modulation frequencies in the MHz range. In the case of the cavity with well separated modes, modulation frequencies much larger than the characteristic linewidth combine steep slopes with a large capture range. To activate the PDH-Module check the box on the corresponding tab. Page 53 Status: 21.10.08 Feedback Controlyzer DigiLock 110 The parameters of the PDH-Module are analogous to the LI-Module and are listed in the following table. Name Description Value to set to Input signal input to be demodulated <Main In> Mod set freq modulation set frequency can be selected for a set of 5 discrete modulation frequencies 12.5 [MHz] Mod amplitude amplitude of the modulation 0.1 [Vpp] Phase shift phase shift of the local oscillator with respect to the applied modulation 0 [°](to be optimized, see text) Mod Output output to which the modulation is added <Main out> Table 4 Note that the capture range is given by the modulation frequency but a larger modulation amplitude is needed with increasing modulation frequency. For standard applications a modulation frequency of 12.5 MHz or less is preferred, because at 25 MHz the analog electronics bandwidth additionally reduces the signal strength. 16a. Set the input of the AutoLock Mode to <PDH out>. To display the PDH error signal use the AutoLock Mode. In the Scan Module set the scan frequency to 10 Hz and the output to <SC 110 out>. Figure 50 17a. PDH-Module with typical Parameters. Phase and offset should be optimized to the specific setup. To obtain an error signal the modulation amplitude has to be set. The amplitude is a trade-off between the signal-to-noise ratio and the tolerated frequency modulation of the laser12. The larger the amplitude the larger the error signal and the frequency modulation of the laser. Turn on the modulation and start to scan the laser with the Scan Module. In Figure 51 the resulting scope display (with optimized phase) is shown. 12. This trade-off can be eliminated by using an additional electro-optical modulator (EOM) in the locking beam path after splitting from the main beam. Page 54 Status: 21.10.08 8. Application Examples Figure 51 18a. AutoLock Display of the reflection signal of a Fabry-Perot Cavity (upper yellow trace) with the corresponding PDH-Signal (lower red trace) The phase between the modulation and the reference signal has to be adjusted to obtain a large, symmetric error signal with steep slopes at the maximum of the spectral signal. The sign of the error signal can be inverted by changing the phase by 180°. The sign should be adjusted such, that the lock-in signal is the derivative of the input signal. To find the optimum phase: • Change the phase value until you get the minimum signal at the carrier. • Then subtract 90° and you will get the maximum signal. • If you observe the wrong overall sign, add or subtract 180° to the current phase value. 19a. Once the phase is adjusted, compensate for any residual offset13 at the corresponding control of the PDH-Module and check the parameters of the PID controllers. To find the correct settings of the sign for each PID controller, please see Paragraph 7.4. For optimization of the PID parameters see Paragraph 7.3. Now you can position the crosshairs to either a peak or a valley and they will automatically track the lock point. 20a. To initiate the lock perform a right mouse click to access the context menu and select between LI/ PDH: Lock to nearest peak or LI/PDH: Lock to nearest valley. The trace changes its color (here from yellow to blue) to show that the actual trace is captured in the background. During the next scan the lock is triggered. Figure 53 shows the AutoLock display while the lock is triggered. The blue trace is the captured signal of the last scan. The yellow trace is the scan during which the lock is triggered. You can see that the trace stops at the selected peak. After a while the yellow trace disappears and there is only a scatter plot left. The interpretation of this plot and the optimization of the lock can be found in Paragraph 8.2.114 . 13. Residual offsets in the demodulated error signal are mostly due to unintended intensity modulations that come with the phase modulation. 14. The output of the controllers can be restricted using the Limit settings (Paragraph 6.2.1.4 and 6.2.1.5), e.g. to about the scan range.This helps to avoid destabilization of the laser by driving it far from the lock point especially during initial setup and optimization. Page 55 Status: 21.10.08 Feedback Controlyzer DigiLock 110 Figure 52 Initiating the automatic PDH-Lock to a Valley Figure 53 AutoLock display after triggering the lock (LI/PDH: Lock to nearest valley) Page 56 Status: 21.10.08 9. Appendix 9 Appendix 9.1 Internal Jumpers The DigiLock 110 module is shipped with a standard configuration of its inputs and outputs. The internal jumpers allow to modify this configuration. The table below shows all jumpers and their function. For location of the jumpers please see Figure 55 and Figure 56. Figure 54 Description of Jumper Positions. Pos. 1 is always near the angled corner Baseboard Jumper Channel Pos 1 Pos 2 Factory JP 7 DIO input output Pos 2 JP 8 AIO 1 output input Pos 1 JP 9 AIO 2 output input Pos 2 Jumper Channel Closed Open Factory JP 300 DTC 110 Tset connected to #DA3 JP 301 not used JP 302 DCC 110 Iset connected to #DA1 open JP 303 SC 110 out connected to #DA2 closed Table 5 open open Baseboard Jumper Settings Plug-on board Jumper Channel Pos 1 Pos 2 Open Factory JP 2 Aux in 50 Ohm terminated connection to Main in high impedance Pos 1 JP 3 Precise in 50 Ohm terminated connection to Main in high impedance open JP 5 Sum in 50 Ohm terminated connection to Main in high impedance Pos 1 Jumper Channel Closed Open JP 1 Main in 50 Ohm terminated high ance JP 4 not used Table 6 Factory imped- closed closed Plug-on-board Jumper Settings Page 57 Status: 21.10.08 Feedback Controlyzer DigiLock 110 9.2 DigiLock 110 PCBs 9.2.1 Baseboard Figure 55 Page 58 Status: 21.10.08 DigiLock 110 Jumpers on Baseboard 9. Appendix 9.2.2 Figure 56 Plug-On Board DigiLock 110 Plug-On Board Page 59 Status: 21.10.08 Feedback Controlyzer DigiLock 110 9.3 Specifications of DigiLock 110 Connections Power Supply Supply Voltage Supply Current +15V (max) Supply Current -15V (max) Value +-15 V 700 mA 200 mA Comment Input Impedance [Ohm] 50 Input signal at <Main in> has to be between +- 3.5 V; it can be shifted with the <Input Offset> and amplified with the input gain 50 10 k 40 k Backplane; default: not connected > 500 k Backplane; (40 k in Ver- default: not connected sion 1V1) 47 k Default: not connected 47 k 50 Bandwidth value refers to signal path between <Sum in> and <Main out> 47 k Default: not connected; TTL-Level Input Channel Resolution [bit] Sample Rate [Hz] Bandwidth (- 3dB) [Hz] Range [V] Main in 14 100 M 14 M +- 2.0 Aux in Precise in DCC Iact 14 16 16 100 M 200 k 100 k 15 M 50 k 15 k +- 2.0 +- 2.0 +- 13.1 DTC Tact 16 100 k 15 k +- 13.1 AIO 1 in AIO 2 in Sum in 16 16 100 k 100 k 15 k 15 k 27 M +- 12.5 +- 12.5 +- 1.0 DIO in 1 Output Channel Main out Resolution [bit] 14 Sample Rate [Hz] 100 M Bandwidth (- 3dB) [Hz] 19 M Range [V] +- 1.0 50 Ohm Driver Yes Aux out SC110 out 14 21 100 M 100 k 19 M 18 k +- 1.0 +- 6.5 Yes No DCC Iset DTC Tset AIO 1 out AIO 2 out Error out 21 16 16 16 100 k 100 k 100 k 100 k 18 k 18 k 16 k 16 k 20 M +- 6.5 +- 6.5 +- 6.5 +- 6.5 +- 1.7 No No No No Yes TRIG DIO out 1 1 0, 2.6 0, 2.6 Yes Yes Internal Signal Input Offset Analog P Resolution [bit] 16 16 Table 7 Page 60 Status: 21.10.08 0, 2.6 Sample Rate [Hz] 100 k 100 k Bandwidth (- 3dB) [Hz] - Range [V] +- 2.5 +- 0.58 Comment Sum of <Sum in> and Analog P branch Backplane; amplification by 15 with SC110 backplane backplane default: not connected Error out = (<Main in> + <Input Offset>) * Gain / 2; bandwidth value refers to signal path between <Main in> and <Error out> TTL-Level TTL-Level Comment - 9. Appendix 9.4 Pin Assignment of the DigiLock 110 Backplane Actual pins needed for normal operation of the DigiLock 110 Module are marked with a grey background color. (VG-64-a/b/c standard connector according to IEC 60603-2) Figure 57 VG-64-a/b/c Standard Connector System GND Digital Signals (not used) D #0 D #2 D #4 D #6 Analog Signals DA #0 DA #2 Address Lines (not used) A #0 A #2 A #4 A #6 read/write r/-w Indicated Parameter Photo Diode Channel 1 (DCC) Umax Channel 1 (DCC) I(TEC)max Channel 1 (DTC) Tmax Channel 1 (DTC) Imax Channel 1 (DCC) Tmin Channel 1 (DTC) Iset Channel 1 (DCC) Tset Channel 1 (DTC) Iact Channel 1 (DCC) Tact Channel 1 (DTC) ITEC Channel 1 (DTC) HV ON - Power (typ. 6.8 V GND) (floating if no DCC 110/3A implemented) HV + Supply Error beep Reference GND + Uref General supply lines -15 V stabilized +15 V stabilized + Power (typ. 6.8 V) (floating if no DCC 110/3A implemented) = 1a = 1c 2a 3a 4a 5a 2c 3c 4c 5c D #1 D #3 D #5 D #7 6a 7a 6c 7c DA #1 DA #3 10a 11a 12a 13a 14a 10c 11c 12c 13c 14c A #1 A #3 A #5 A #7 Address Enable AEN 8a 9a 15a 16a 17a 18a 19a 20a 21a 22a 23a 24a 25a 8c 9c 15c 16c 17c 18c 19c 20c 21c 22c 23c 24c 25c (DCC) Photo Diode Channel 2 (DCC) Umax Channel 2 (DTC) I(TEC)max Channel 2 (DTC) T max Channel 2 (DCC) Imax Channel 2 (DTC) T min Channel 2 (DCC) Iset Channel 2 (DTC) T set Channel 2 (DCC) Iact Channel 2 (DTC) T act Channel 2 (DTC) ITEC Channel 2 HV ON - Power (typ. 6.8 V GND) (floating if no DCC 110/3A implemented) HV + Supply (Error LED on, when GND) Blink (Remote On/Off (low)) Power down - Uref = = 26a 27a 28a 29a = 26c 27c 28c 29c 30a 31a 32a = = = 30c 31c 32c + Power (typ. 6.8 V) (floating if no DCC 110/3A implemented) lines connected on backplane Page 61 Status: 21.10.08 Feedback Controlyzer DigiLock 110 10 Guarantee and Service To obtain information concerning factory service, contact your local distributor or TOPTICA Photonics AG directly. On the following pages you find the Guarantee Registration Form and the Service and Technical Support Form. Please fill in the Guarantee Registration Form immediately after you have received your device and return it to TOPTICA Photonics AG by mail or fax. In case your device has to be returned to TOPTICA Photonics AG for service or technical support first call TOPTICA Photonics AG for a Return Authorization Number which you should use as a reference in your shipping documents and mark clearly on the outside of the shipping container. Then fill in the Service and Technical Support Form and return it to TOPTICA Photonics AG together with the device. Please specify the problems with the device as detailed as possible. Page 62 Status: 21.10.08 Guarantee Registration Form F-015 QM form: Status of form: 22.02.05 Version of form: 01 return to sender: TOPTICA Photonics AG Customer Service Lochhamer Schlag 19 D- 82166 Graefelfing/Munich Germany _____________________________ _____________________________ _____________________________ _____________________________ _____________________________ Page: 1 of 1 FAX: +49 89 85837-200 Guarantee Conditions The products of TOPTICA Photonics AG are produced with the greatest possible care using high-quality components and are checked in detail before being delivered. Therefore, as the manufacturer, TOPTICA Photonics AG gives a guarantee of durability according to the following terms: 1. TOPTICA Photonics AG guarantees the buyer that there will be no defects in the product based on defective material or processing, for a period of 12 months from first delivery (guarantee period). Natural wear and tear as well as defects resulting from improper use or use contrary to the specifications, from failure to observe operating instructions, from insufficient maintenance and care or from modifications, interventions or attempted repairs that are neither carried out nor authorized by TOPTICA Photonics AG, are not covered by the guarantee. 2. 3. 4. 5. 6. 7. 8. Unless expressively stated in the order acknowledgement or the invoice semiconductor light emitting devices like laser diodes, tapered amplifier chips etc. whether sold as single parts or integrated in systems are not covered by the guarantee. If a defect covered by the guarantee arises during the guarantee period, TOPTICA Photonics AG shall rectify such defect within a reasonable period at its own discretion by repairing or replacing the product or the defective part. The guarantee period shall commence upon delivery of the product by TOPTICA Photonics AG or by a third party that obtained the product directly from TOPTICA Photonics AG for the purpose of selling it to the buyer. The claim under the guarantee shall be excluded if the defect is not notified to TOPTICA Photonics AG in writing immediately after having been discovered, and no later than one month after expiry of the guarantee period. For the purpose of rectifying a defect covered by the guarantee, the product or the relevant part shall be sent to TOPTICA Photonics AG at the expense and risk of the buyer. The product shall be returned at the expense and risk of TOPTICA Photonics AG. No claims may be derived from this guarantee other than claims for rectification of the defects falling within the scope hereof, in accordance with the present terms. In particular, the buyer is not entitled under this guarantee to claim damages or a reduction in price from TOPTICA Photonics AG, or to rescind the contract. Potential, more far-reaching claims of the buyer against its seller shall not be affected by this guarantee. Important!: The obligation of TOPTICA Photonics AG under this guarantee is subject to the condition that the buyer gives his/her express consent to them by sending the signed duplicate of this form to TOPTICA Photonics AG immediately after delivery, also truthfully indicating the model number, the serial number and the date on which the product was delivered. The buyer may not assign claims under this guarantee to third parties without the prior written consent of TOPTICA Photonics AG. This guarantee is governed by substantive German law to the exclusion of the provisions of the UN-Convention on Contracts for the International Sale of Goods (CISG). The Regional Court [Landgericht] Munich I shall be the court of exclusive international, local and subject-matter jurisdiction for legal disputes arising under or in connection with this guarantee. I request the above mentioned guarantee for the purchased products and herewith consent to the above mentioned Guarantee Conditions: Model No.: ____________________ Date: ________________________ Serial No.: ____________________ Signature: ________________________ Date of Delivery: ____________________ Name/Title: ________________________ To be completed by the buyer and returned to TOPTICA Photonics AG by mail or fax (+49 - 89 – 85837 – 200). Version: 01/02-05 5HWXUQWR 7237,&$3KRWRQLFV$* &XVWRPHU6HUYLFH /RFKKDPHU6FKODJ '*UDHIHOILQJ0XHQFKHQ *HUPDQ\ )$; 5HWXUQ$XWKRUL]DWLRQQXPEHU50$9% %HIRUHJRRGVDUHUHWXUQHGSOHDVHDVNWKH 7237,&$&XVWRPHU6HUYLFHIRUD50$QXPEHU 3URGXFWVPRGHO,'QXPEHUV /RFDWHGRQWKHEDFNSDQHORIWKHGHYLFH 6HQGHU BBBBBBBBBBBBBBBBBBBBBBBBBBBBBBBB BBBBBBBBBBBBBBBBBBBBBBBBBBBBBBBB BBBBBBBBBBBBBBBBBBBBBBBBBBBBBBBB BBBBBBBBBBBBBBBBBBBBBBBBBBBBBBBB BBBBBBBBBBBBBBBBBBBBBBBBBBBBBBBB BBBBBB BBBBBBBBBBBBB61BBBBBBBBBBBBB BBBBBBBBBBBBB61BBBBBBBBBBBBB BBBBBBBBBBBBB61BBBBBBBBBBBBB 3OHDVHJLYHXVDGHWDLOHGGHVFULSWLRQRI\RXUSUREOHPVHJZKDWWKHV\PSWRPVDUHDQGXQGHU ZKLFKFLUFXPVWDQFHVWKH\RFFXU BBBBBBBBBBBBBBBBBBBBBBBBBBBBBBBBBBBBBBBBBBBBBBBBBBBBBBBBBBBBBBBBBBBBBBBBBBBBBBBBBB BBBBBBBBBBBBBBBBBBBBBBBBBBBBBBBBBBBBBBBBBBBBBBBBBBBBBBBBBBBBBBBBBBBBBBBBBBBBBBBBBB BBBBBBBBBBBBBBBBBBBBBBBBBBBBBBBBBBBBBBBBBBBBBBBBBBBBBBBBBBBBBBBBBBBBBBBBBBBBBBBBBB BBBBBBBBBBBBBBBBBBBBBBBBBBBBBBBBBBBBBBBBBBBBBBBBBBBBBBBBBBBBBBBBBBBBBBBBBBBBBBBBBB BBBBBBBBBBBBBBBBBBBBBBBBBBBBBBBBBBBB $GGLWLRQDOLQIRUPDWLRQHJPRGLILFDWLRQVDGGLWLRQDOHTXLSPHQWHWF BBBBBBBBBBBBBBBBBBBBBBBBBBBBBBBBBBBBBBBBBBBBBBBBBBBBBBBBBBBBBBBBBBBBBBBBBBBBBBBBBB BBBBBBBBBBBBBBBBBBBBBBBBBBBBBBBBBBBBBBBBBBBBBBBBBBBBBBBBBBBBBBBB 0DLQVYROWDJHBBBBB9BBBBB+]'LG\RXQRWLFHLUUHJXODULWLHVVSLNHVHWF"BBBBBBBB 7REHFRPSOHWHGE\WKHFXVWRPHUDQGUHWXUQHGWR7237,&$3KRWRQLFV$*E\PDLORUID[²