1
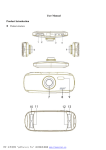
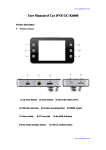
User Manual Product Introduction Product structure 1)UP 2)DOWN 3)MENU 4)Mode 5)OK 6)Reset 7)Power 8)TF Slot 9)AV-OUT 10)USB 11)Bracket Hold 12)HDMI-OUT Description of Function Keys: 1)UP In Menu , up to select options; Standby or recording mode, digital magnification function 2) Down In Menu, down to select options; Standby or recording mode, digital narrow function 3)Menu button Short-Press to bring up the feature set menu; 4)MODE Short Press to switch between each other in the video / camera / playback; 5)OK Video and take pictures to confirm button, the camera mode, short press this key to start recording again press stop recording; camera mode Short Press to take pictures; 6)RESET Select to reset 7) Power Long press to turn device on/off. Short press to turn on/off the night vision led lights; 8) TF Slot TF Memory Card Slot 9)AV-OUT Connect with TV. 10) USB SB data interface, (1) for connecting a PC to transfer data; (2) for connecting an external power supply to charge the battery or supplies power to operate; 11)Bracket Mounting Hole 12) HDMI-OUT HD video output interface Connect the car bracket mounting screw holes; Special Function Description: G-sensor When gravity acceleration up to 6g (1g = 9.80 m / sec ^ 2), the machine will automatically save the current video of the accident, not delete the file; G-Senser function can be adjusted in Menu 2G-4G-6G-8G, 4G is default. SOS Press button when recording video, the current video file is saved as can not be deleted; Automatically turn on/off When connected with car charger, device will turn on when car start, turn off and save the last video when car power off. Seamless video recording, do not leak any second REC/photo operation specifications Power on/off Long Press to turn on, blue indicator light on. Long press again to turn off, blue indicator light off. Note: The device will have a low battery warning and then turn off when battery is very low. REC mode Short press key, switch to recording mode, the upper left corner of the screen displays a VCR icon; Short press button to start recording, the VCR icon will appear flashing, indicating the video work Photo mode Short press key, switch to camera mode, the upper-left corner of the screen displays the camera icon; Short press key camera, take pictures of the screen flashes once said camera to complete. Video / photo playback Short press key, switch to playback mode, the upper-left corner of the screen to display the playback icon Short press key up to select the file; Short press key down to select the file; Short press button to play the selected video files; Menu setting Short press key to enter the menu options; Short press Press or to setting options. Quit Menu Setting Press ,to select options to quit menu setting. Time setting Short press twice to enter menu setting, press to enter time setting. Press press to select time setting option, then press to set among Y/M/D/H/M/S, adjust number by , to confirm adjusting. USB mode Separate USB cable and computer, press “power on” button, car DVR will automatically show USB menu, there are three modes available : 1. USB-Disk In this mode we can access video files and photo files 2. PC-Camera In this mode USB video equipment are shown, can take photo or make video chat 3. REC-Mode Choose this mode can take video recording when connected to PC Battery instruction Battery indication image: Full battery slightly low battery low battery battery empty There are three methods to charge, the red indicator light up when charging, the entire charging time is about 180 minutes, and the red indicator light automatically off when charging completed. 1. Use power adapter to charge 2. Use PC-USB to charge 3. Use vehicle power to charge Remark: when appear crash because of improper operation, remove battery or press “reset” button to restart. Products specifications Features HD Camera, HD Video Program Umbrella G-sensor Built-in (car accident case of emergency save, will not be deleted) LCD screen size Lens 2..7LTPS (16:9) 170 degree A + grade high-resolution ultra-wide-angle lens Russian, Japanese, English, Chinese (simplified), Language (Traditional), Korean, etc… Files format Camera Recording video format Color Continuous loop video MOV. 5 Mega Pixels H.264, Audio: AAC standard seamless loop recording, don’t leak second Automatically power on/off Support auto ignition boot, turn off shutdown Motion Detection Function support Time synchronization Carrier media Support (Y/M/D/H/M) Built-in memory ( total:32MB) Photo mode 12 Mega Photo format JPEG Memory card TF (max 32GB) MIC Support Built-in stereo Support Infrared night vision Video format Support PAL/NTSC Chinese Current frequency 50HZ/60HZ 1. USB-Disk USB function 2. PC-Camera 3. REC-Mode Power interface Battery 5V 800ma Built-in 200mAh Trouble shooting: For problems in normal operating situation ,please try these methods below: Can’t take photo and recording Check the if the TF card has enough space or locked Automatically stop when recording Use the compatible high-speed TF card with SDHC because of big HD video data, the high-speed TF card have identifying of C4 and C6 Appear “files error” when replay photo or video Uncompleted files because of TF card storage error, please use formatting function to format your TF card Unclear video Checks if there are any dirt or fingerprint; and use lens paper to clear the camera lens. Black image when recording sky or water scene Scenes with big contrast will influence the automatic exposure function of camera; you can adjust “EV in setting mode to correct. Color is not perfect in cloudy day and outdoor light Set the “white balance” function to automatic cross stripe interference in image Because of wrong “light frequency”, please set it to 50Hz or 60Hz according to the local power supply frequency Crash Restart by pressing shortly on” RESET” after crash