1
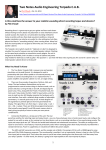
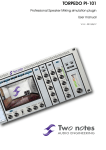
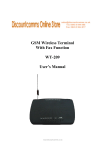
Wombat ™ Bias Meter User's Manual Aiken Amplification, Inc. 1225 Montague Avenue Greenwood, SC 29649 Tel: 864-993-8383 http://www.aikenamps.com WombatManual.doc 12/08/11 Copyright 2010-2011, Aiken Amplification, Inc. Page 1 of 13 December 20, 2010 Contents Getting Started.....................................................................................................3 Display..................................................................................................................5 Front Panel Jacks and Switches........................................................................6 Battery Installation..............................................................................................7 Biasing an amplifier with the Wombat..............................................................8 Matching tubes with the Wombat......................................................................9 Frequently-asked questions.............................................................................10 Troubleshooting................................................................................................12 Specifications....................................................................................................13 Page 2 of 13 Getting Started Congratulations on purchasing your new Aiken Wombat™bias meter! The Wombat™ bias meter is a compact, innovative solution to allow anyone to properly bias a tube amplifier. This revolutionary biasing meter was the first of its kind to give a digital readout of the actual power dissipated in the output tubes. This is the only truly accurate method of biasing. Features include: Provides a digital readout of plate voltage and plate current, and automatically calculates and displays the actual plate dissipation in watts - no more math or guesswork! Eliminates dangerous multimeter probing of internal amplifier high-voltage wiring The only truly useful biasing tool, because it takes into account actual plate dissipation. Eliminates error-prone, inaccurate biasing methods such as the oscilloscope "crossovernotch" biasing method Eliminates the need for expensive digital multimeters and having to add 1 ohm "current sense" resistors in amps in order to measure bias current.. Uses only the highest quality components and construction. Features high-resolution 12-bit analog-to-digital converters and 0.1% tolerance voltage sense resistors for unparalleled accuracy of measurement. No other bias meter can come close to this accuracy. Measures plate voltages up to 750V, current up to 500mA. Internally protected against voltage/current overloads and ESD (static) discharge. Ultra-compact size - only 3.8" x 2.4" x 1.1" - doesn't take up valuable bench space, easily portable. Works on both fixed-bias and cathode-biased amplifiers Can be used to accurately match tubes in circuit Easy to use - simply adjust the amplifier bias potentiometer until the desired plate current is obtained, and check to make sure the max recommended plate dissipation for the tube is not being exceeded as indicated on the display. Rear panel has overlay showing power ratings for most common tube types, for ease of use. White backlit LCD display to allow easy viewing on dark stages WombatManual.doc 12/08/11 Copyright 2010-2011, Aiken Amplification, Inc. Page 3 of 13 Runs on two AA alkaline batteries (not included), easily accessible via the rear panel snap-on cover. Low-power backlight for long battery life. RoHS-compliant Page 4 of 13 Display Probe: Indicates which probe is currently active for the following mA, Volts, and Watts reading on that line. mA: Indicates the current in mA (in increments of 0.1mA) for the indicated probe. Volts: Indicates the voltage in volts (in increments of 1V) for the indicated probe. Watts: Indicates the power in watts for the indicated probe. Page 5 of 13 Front Panel Jacks and Switches PROBE 1/2: Plug the dual probe 1/2 into this jack. If using only one probe, it can be connected to this jack or the Probe 3/4 jack. For use in testing single-tube and two-tube amplifiers, or 4 tube amplifiers one side at a time. PROBE 3/4: Plug the dual probe 3/4 into this jack. If using only one probe, it can be connected to this jack or the Probe 1/2 jack. For use in testing 4 tube amplifiers without having to switch probes. ON OFF: This switch turns the unit on and off. Be sure to turn the unit off when not in use, in order to conserve battery life. When first switching the unit on, it will light the backlight and display the current software revision, then go into testing mode. If there are no probes attached, it will display the “No probes connected” message. Plugging a probe into the PROBE 1/2 or PROBE 3/4 jack will enable the measurement display. Page 6 of 13 Battery Installation The Wombat uses two AA-size alkaline batteries. Other battery chemistry types of the same size will work, but some types, such as carbon-zinc, will not give as long a life as alkaline, and carbon-zinc types are more prone to leakage if stored for a long time, which may ruin the unit. Rechargeable batteries may also be used. Note the battery alignment shown below – the top battery “+” side (with the little “tip” on it) goes to the left, the bottom battery “+” side goes to the right. There are “+” and “-” markings in the plastic below the batteries to remind you of the correct orientation in case you lose this manual, or if you never read it in the first place. Page 7 of 13 Biasing an amplifier with the Wombat With the amplifier off, unplug the tubes from the amplifier, insert the Wombat probe adapters into the sockets, then plug the tubes into the top socket of the Wombat probe adapters. Be sure to note the correct orientation of the keyway in the octal probes and on the base of the tubes. If the key is broken off the tube, don't use it! You risk damaging the Wombat or your amplifier. Unplug any guitar cords going into the input jack, and be sure to have a speaker or dummy load connected to the amplifier output. Turn the volume controls all the way down (other control positions don’t matter). Turn the Wombat on, then turn the amplifier power switch on, wait a minute or so for the tubes to warm up, then turn on the standby switch. Wait a few more minutes for the tubes to reach their stable operating point. Locate the bias adjustment potentiometer in the amplifier chassis, and adjust the bias so the reading is somewhere below the maximum power indicated on the rear panel of the Wombat. This will be either the 50%, 70%, or 100% column, depending on the amplifier type and class of operation. If in doubt, consult your amplifier manufacturer for bias current recommendations. The 50%/70%/100% setting given on the rear panel overlay should be considered a maximum setting. It is perfectly acceptable to bias at a lower setting. This will result in longer tube life, lower background noise, and a cleaner tone, although if you go too low the increased crossover distortion may become objectionable. You may prefer the tone with the tubes biased colder, so feel free to experiment, it won’t hurt anything as long as you don’t bias the tubes hotter than the recommended setting. The display automatically recognizes how many probes are connected. If two dual probes are connected, it will cycle between probes 1/2 and 3/4 every few seconds to allow bias measurement and display on up to 4 tubes simultaneously. If you want to see only two tubes for a greater period of time, simply unplug the probe jack for the other pair from the Wombat and the display will stay on the two tubes that are still connected to the unit. Note: if in doubt about the current setting for your particular amplifier, contact the manufacturer for their recommendations, as each amplifier is different. The guidelines presented in this manual are generic, and may not be appropriate for an amplifier that uses an odd-ball biasing scheme, or if you are unsure of the class of operation of the amplifier. Note: It is normal for tubes to drift a bit, particularly when new, until they have had several hours of playing time on them. The bias will also vary a bit with variations in AC line voltage (a Variac is used to set the AC line voltage to 120V at the factory before biasing the tubes). Small variations like this shouldn't cause any problems, so don't worry about constantly checking the bias and driving yourself crazy trying to keep it at exactly the setting you chose. If a tube is biased too hot, the plate will glow a dull red color. The plate is the large grey metal "box" structure seen inside the tube. Don't confuse normal filament glow with plate glow. Plate glow can usually be seen as a "hot spot" near the center of the plate, sometimes accompanied by a "hot" smell and some "ticking" noises as the metal expands. Continued operation with glowing plates will soon result in failure of the tubes, possibly damaging screen grid resistors or other amplifier components. The HT fuse should prevent any major damage to output or power transformers, or other expensive components. Page 8 of 13 Matching tubes with the Wombat The Wombat can also be used to accurately match pairs or quads of tubes in circuit in the amplifier they will be used in. There are two methods of doing this, as described below: To match a pair/quad of tubes, simply plug the adapters into the amplifier as described in the bias setup in the previous section, and follow the procedure to set the bias so one tube is in the range you want it. Next, swap different tubes in the other socket(s) until you find a pair/quad that all read the same as the first tube, to within whatever tolerance you desire (typically, 5mA is plenty close enough). Note that the plate voltage and currents will vary somewhat as you change tubes, because the difference in current draw will cause a different voltage drop across the output transformer primary. This shouldn't affect the procedure very much, as the end result you are looking for is two/four that match. Be sure to allow ample time for the tubes to warm up as you change them. Another method, which is useful if you want to individually grade and mark tubes for later use, is to use a single socket and plug each tube in individually, and take note of the bias current reading and mark the tubes with that value. In order for this method to be accurate, the grid bias voltage needs to be the same for all measurements, so the bias pot should be set to give the same control grid voltage each time you screen a batch of tubes. If you don't do this, the readings from one batch will not match the readings from other batches. CAUTION! Do not use this method with cathode-biased amps, as they depend on two (or four) tubes to be installed for the correct current draw of the pair/quad. The first method is the preferred method if you aren't tech-savvy, but even if you do accidentally measure a batch wrong using the second method, you will find out the next time you plug them into and amp and check the pair/quad with the Wombat. Page 9 of 13 Frequently-asked questions Is it "safe" to play through the amp with the probes attached and Wombat turned on or not? It is not recommended, because the plate voltage while playing could exceed the maximum voltage rating of the plate voltage sense resistors and arc over, which might damage the unit. The head unit has spike/ESD protection, so it would likely survive, but the probe itself may be damaged. Can the Wombat be used to match tubes in a cathode-biased amp? Yes, the Wombat could be used to match tubes in a cathode biased amp. It will simply display the current each tube draws, and you could swap tubes around until you found two that measured the same on the current draw. Now, having said that, a cathode-biased amp is not a good idea to test and grade tubes for use in other amps, because the cathode voltage will vary up and down as the tubes are changed, so the readings might be invalid for another amp. It is best to match and grade all tubes in an identical setup with the same effective grid-to-cathode and plate voltage when grading for plate current, but if the tubes are only being matched for that particular cathode-biased amp they will be used in, you are okay. What if the cathode-biased amp uses separate cathode resistors? Can the Wombat still be used? Yes, the Wombat will simply short the two/four cathodes together through the probes, so they will be at the same potential. This is the equivalent of having a single, shared cathode resistor, and you will get a more accurate idea of the tube matching, since the grid-to-cathode voltage will be the same for each tube. Does the Wombat have a power-down mode to conserve battery life? No, but the LED backlight is very low current (total unit current draw is only 36mA at 3V (fresh batteries), and 46mA at 2.5V), so the battery life is still plenty long enough for normal use. The typical discharge characteristics of an AA Duracell is around 110 hours at 36mA (the new 1.5V per cell battery current draw of the Wombat), and around 25 hours at 100mA (old 0.8V per cell depleted battery current draw), so, depending on battery type, the battery life should average around 40-80 hours of continuous operation, which is a long time with average use of a few minutes per bias. The unit has an internal regulated switching power supply that will function down to 1.1V (0.55V per AA cell), so the product will function down the last bit of energy left in the battery. When powered off, the unit draws no current from the battery (the power switch completely disconnects the battery). Does it have an on/off option for the backlight? No, it is on all the time for best contrast on the display in all lighting conditions. Page 10 of 13 Can the Wombat use Lithium or rechargeable batteries? Yes, anything in an AA size, Alkaline, NiCad, or NiMH. The cell voltage is not critical, due to the internal voltage regulator and calibrated ADC reference that maintain accurate measurements at any battery voltage within operating range. Note that all batteries are not alike - NiCads range from 500mAH to 1100mAH, NiMH range from 1550mAH to 2300mAH, and alkaline range from 2700mAH to 3125mAH. Higher mAH ratings typically give longer life, although different battery chemistries have different discharge profiles, so you will get varying lifespans. You can estimate the lifetime by dividing the mAH rating by the current draw in mA of the Wombat - 36mA at 3V, 46mA at 2.5V, 100mA at 1.6V (voltages are for two batteries in series, so each cell voltage is half that). You'll know when your batteries are dead by the display shutting off. It will maintain accurate measurements up to the point where it dies completely. Why aren't batteries included? It is to keep the product cost down. I realize this is a big disappointment, kind of like opening your toy on Christmas morning, only to find out there are no batteries, and you can't run out to the store and buy some. How about safety issues, any high voltages at the ends of the plugs were they plug into the meter? Any chance on getting zapped etc.? No, only low voltages (less than 5V) are on the cables and in the display unit. All HV is contained inside the probe heads, so as long as you don't take them apart, you are okay. Is the Wombat capable of factory software updates through downloads? Hopefully there won't need to be any software updates, if I did my job correctly, but there is an internal header on the board for software update functionality. While it could be done by the customer, it would be recommended to do it at the factory, because a USB download cable would be required, which would have to be purchased by the customer ($35). Page 11 of 13 Troubleshooting Unit won't turn on: Are the batteries fresh? Replace the batteries with two new AA alkaline batteries. Are the batteries correctly inserted into unit? Battery orientation is indicated in the battery compartment under the rear panel. Inserting batteries in the wrong direction may damage the unit and will void the warranty, so pay attention! Note the battery alignment shown in the “Battery Installation” section of the manual – the top battery “+” side goes to the left, the bottom battery “+” side goes to the right. Display is on, indicating “No Probes Connected”: Is at least one probe connected to the unit? Remove it and plug it in again, or try the other jack to see if the unit recognizes it. If not, the probe or the unit may be defective, and will have to be returned for service. Incorrect, or obviously inaccurate readings: Is the probe properly inserted into the unit and the amplifier tube socket? Is the tube properly inserted into the adapter probe socket? Are the tubes good? Replace with a known good set of tubes and try again. Smoke coming from unit: RUN FOR THE HILLS! You've done something really bad! Turn off amplifier power (quickly!) then turn off the unit and return it for servicing. Once you let the smoke out of the unit, it is toast. Prepare a good lie and practice it before you call if you expect it to be covered under warranty. Why did this occur? Most likely you incorrectly inserted a tube into adapter socket, or incorrectly inserted the adapter socket into amplifier's tube socket., causing damage to unit. Those octal keyways are there for a reason! Pay close attention to how you install the probe adapter socket and tube! Other possibilities are shorted tubes. While there is some internal protection inside the Wombat probe and meter unit, we can't protect against every fault. Always make sure your tubes are good before you use the Wombat! Page 12 of 13 Specifications Socket adapters (not included, available separately in any combination): Dual octal probes with 24" leads to allow biasing of all common 8-pin guitar amplifier output tubes, including EL34, 6L6, 6550, 5881, and others. Each of the probe assemblies has dual octal sockets, so with one probe you can measure and display voltage, current, and power for up to two tubes at once, or with two probes you can measure and display up to four tubes at once. Dual noval (9-pin) probes are also available, to allow biasing of amplifiers using two (with one probe) or four (with two probes) EL84 output tubes. There is also a special dual-triode bias probe to allow measurement of bias current in lowpower amplifiers using a single 12BH7/12AT7/12AX7/12AU7 or other dualtriode tubes. One probe will display the current, voltage, and power for both triode sides simultaneously. Two probes will allow the measurement of two dual-triode tubes simultaneously. Display: The display automatically recognizes how many probes are connected. If two dual probes are connected, it will cycle between probes 1/2 and 3/4 every few seconds to allow bias measurement and display on up to 4 tubes simultaneously. Power consumption: 36mA @ 3V (108mW) Dimensions: 3.8" long x 2.4" wide x 1.1" tall. Weight: 6 ounces (excluding batteries) Warranty: Head unit: 1 year, parts and labor Probes: 90 days, parts and labor Page 13 of 13