1
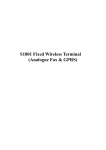
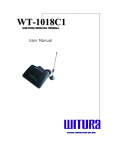
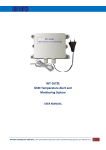
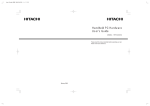
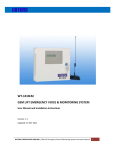
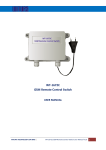
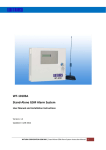
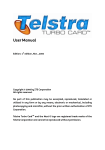
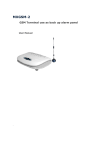
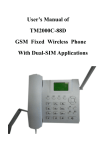
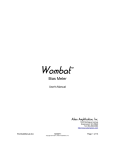
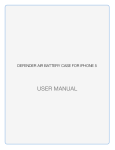
GSM Wireless Terminal
With Fax Function
WT-209
User’s Manual
www.discountcomms.co.uk
____________________WT-209 GSM Wireless Terminal with Fax Function____________________
Contents
1.
2.
3.
OVERVIEW……………………………….……………………………………………… 3
1.1
Definitions And Abbreviations……….……...……….………………………….. 3
1.2
Equipment Description.……….……….…..………………………………….…. 3
1.3
LED Indicators……….…...……………….….………………………………..… 4
1.4
Back Panel……………………………………………………………………….. 4
FUNCTIONS..………………………………………………………………………….… 5
2.1
Main Functions…….……………………………………...…………………….. 5
2.2
Technical Specifications…………….……...…………………………………… 5
OPERATION GUIDE……………………………………………...…………………… 6
3.1
Installation……………………………………………………………………… 6
3.2
Swift Dial…………………………………………………………………..…… 7
3.3
Connect Fax Machine…………………………………………………………... 7
3.4
Running Status Specification…………………………………………………… 7
3.5
Connect Fax Machine…………………………………………………………... 8
4.
Keypad Configure Parameter……………………………………...…………………… 8
5.
Care And Maintenance……………………………………………...…………………… 9
6.
Battery………………...……………………………………………...…………………… 10
7.
6.1
Battery Insert……….………………………………………………………….… 10
6.2
Battery Specification………………………………………………………..…… 10
Troubleshooting …………………………………………...……………………………. 11
COPYRIGHT ©2006 WITURA CORPORATION SDN BHD
2
____________________WT-209 GSM Wireless Terminal with Fax Function____________________
1.
Overview
1.1 Definitions and Abbreviations
-
GSM: Global System for Mobile Communications
FXS: Foreign Exchange Subscriber
DTMF: Dual-Tone Multi-Frequency
1.2 Equipment Description
WT-209 GSM Wireless Terminal with Fax Function (Refer to as WT-209 in the following sections) is a
device for voice and analogue fax communication. It provides wireless access functionality by GSM
network. WT-209 is fit for all kinds of areas and scenarios especially in places where wired network is
impossible or hard to reach.
WT-209 is a dual-board device, which one can support GSM network, another can support analogue fax.
The device provides external interfaces as below:
a)
b)
c)
d)
e)
One FXS interface, connect to a telephone set
One SIM card slot, for SIM card installation
One battery slot
One antenna interface
One program interface, connect special program cable for update terminal
Figure 1-1 WT-209 GSM Wireless Terminal with Fax Function
COPYRIGHT ©2006 WITURA CORPORATION SDN BHD
3
____________________WT-209 GSM Wireless Terminal with Fax Function____________________
1.3 LED Indicators
9 Light indicators indicate running state:
Type
LED
Label
Fee
Color
Yellow
LED
LED
Power
Run
Green
Green
LED
Hook
Green
LED
LED
Battery
Net
Red
Green
LED
Signal
(3 indicators)
Green
LED
FAX
Green
Meaning
When incoming /outgoing call begin to connect, send polarity
charging signal, light on
Light on connect to external power, light off when battery works
Sparks - device under proper operation
On or Off - device failed
On – telephone off hook
Off – telephone on hook
On-battery is exhausted, need rechargeable
Indicates connection status
Off – wireless module not started
Sparks quickly – network registration not completed
Sparks once every 4 seconds – network registration succeeded.
Indicates signal intensity of the network. The more the number
of the lighted lamp, the stronger the signal intensity of the
network
Flash—standby or calling, on 1 second, off 4 seconds.
It indicates faxing under fax mode.
Flashes means transmit fax; flash speed relate to transmit speed
1.4 Back Panel
The back panel of the equipment is shown as in Figure 1-2
Figure 1-2: Back Panel
a)
b)
c)
d)
e)
Power: DC12v power supply socket.
Power switch: DC power switch, push down to switch on the equipment
Phone: RJ11 telephone set socket, connect to telephone set by normal 6P4 phone line
Console: Two RJ11, special cable for update terminal
Antenna socket: for external antenna.
COPYRIGHT ©2006 WITURA CORPORATION SDN BHD
4
____________________WT-209 GSM Wireless Terminal with Fax Function____________________
2.
Functions
2.1 Main Functions
Table 2 – 1 lists the main functions of the equipment. Refer to Chapter 3 for more details.
Functions
Voice
Communication
Fax
Specification
Provides one FXS interface for connecting to a
telephone set, for incoming/outgoing call
Support T3.0 Fax, Max 14400kbps,Such
Max speed depends on network
Caller ID indication
Support caller ID indication
GSM network access
Polarity reverse
Protection
Keypad NMS
Support GSM network access
Send polarity reverse signal for charge
Lock SIM card, lock PIN etc.
Network management over keypad
Notes
WT-209
Table 2-1: WT-209 Functions
2.2 Technical Specifications
a)
b)
c)
d)
e)
f)
g)
h)
Working Environment
i) Operation Temperature: -10ºC ~ +55 ºC
ii) Relative Humidity: 10% ~ 95%
iii) Air Pressure: 86kPa ~ 106kPa
iv) Environment noise: ≤ 60dB(A)
Working Frequency: GSM900/GSM1800MHz (automatically select)
Frequency Stability: Better than 2.5 x 10⁻⁶
Signal Sensitivity: Less than -103dBm
Radiation Power: GSM <2W
Power Supply: AC 220 x (1 ± 15%)V
Caller ID Mode: DTMF
Telephone Line Length: No more than 1000m
COPYRIGHT ©2006 WITURA CORPORATION SDN BHD
5
____________________WT-209 GSM Wireless Terminal with Fax Function____________________
3.
Operation Guide
3.1 Installation
Step 1: Insert SIM card into socket
Open the back cover, insert the SIM card, and then restore the back cover. Refer to Figure 3-1, Slide the
card holder and open it by lifting it up. Insert the SIM card into the card holder. Make sure that the cut
angle is on the right side and the golden connectors on the SIM card are facing downwards. Close the card
holder and slide it back into its place.
NOTE: The equipment supports only 3.3V SIM Cards. Don’t use any other types SIM Card
Figure 3-1: SIM Card Installation
Step 2: Connect the telephone set
Connect the telephone set and device with the telephone line by inserting the connector into the “Phone”
port on the device
Step 3: Install the Antenna
Step 4: Connect the power adapter
Connect the power adapter to 220v AC power. Be sure that the AC power has been grounded. Connect the
other side of power adapter to the DC Power socket in the device.
Step 5: Switch on the device
The device may be ready for use after about 15 seconds later. (The registration time may vary according to
the network environment in different area)
Press “#” after finish dialed numbers, can shorten dialing time.
WARNING: Many types of telephone sets exist and they always have different electronic characteristics,
so it’s recommended that the telephone set keeps at least 2 meters away from the equipment so as to protect
the equipment and the phone set from interfering with each other.
Outer electromagnetic rays may interface with the equipment via radiation or conduction. Some protection
actions should be taken:
1) Use only single-phase 3-line alternating current power socket with the PE line installed well so that the
filter circuit in the equipment works normally to filter the interference that come from the electricity
network.
2) Keep the equipment out of the radio transmitters and radar transmitters with high transmission power
and high frequency large current equipments.
3) Use electromagnetic shielding methods when necessary. For example use the shielded cables.
4) The cables should distribute inside the office room so as to protect the equipment from being damaged
by high voltage and current caused by thunder. Distributing the cables outside is strongly discouraged.
COPYRIGHT ©2006 WITURA CORPORATION SDN BHD
6
____________________WT-209 GSM Wireless Terminal with Fax Function____________________
3.2 Swift Dial
Since GSM call is one time send number, it will send number after receive all numbers. WT-209 will treat
has received all numbers and send number after stop dial 5s. Also add “#” can treat as received numbers,
and then no need wait 5s to send numbers.
3.3 Connect Fax machine
i) Connect Fax machine to WT-209 “Phone” port.
ii) During GSM network call only can use one channel (Voice/Data). So it only can support auto reply,
not support manual reply.
iii) When send Fax, dial * and destination number, For example, when need fax to“87654321” fax
machine, then dial “*87654321#”(# is swift dial mode). When hear fax indicating which means
connecting to machine, press fax machine “start”, and then can send fax. Also can use auto send mode,
press “start” after hear ring-back tone.
iv) When receive fax, phone ringing, off-hook hear fax indicating tone then press “start”, then to receive
fax. It can also use auto reply mode.
NOTE: GSM analogue fax only support auto send-receive fax mode. It does not support manual reply
3.4 Running Status Specification
a) The power LED keeps long time on when connect to external power, OFF when use battery.
b) After powered, module initializations, RUN LED quick sparks, 0.25s on 0.25s off; finish initialization,
RUN slow flash, 1 second on 1 second off, indicate device is operational.
c) When un-insert SIM card or cannot search network, NET LED flash per second, RUN quick flash;
when succeeded in registering network, NET flashes per 1.5s off 0.5s on.
d) The phone indicator indicates the status of telephone connected to the device. On when off hook, off
when on hook. Charge on when a call succeeds and off call terminated.
e) If wrong number or prohibited number is dialed, “Du Du” busy tone will be heard, which means the
user should hang up the phone.
f) “Signal Intensity” indicator includes 3 lamps. More light on means more strong signal. Under proper
1s on 4s off, if off over 5s, then network may have problem. There should be at least 2 lamps to keep
light for the device to work properly. When fax, such 3 lamps indicates fax pages, 5 pages is one
showed circle as Table 3-2
Pages
1, 6, 11
2, 7, 12
3, 8, 13
4, 9, 14
5, 10, 15
1
●
●
●
○
○
LED
2
○
●
●
●
○
3
○
○
●
●
●
Table 3-2: Fax pages LED status
COPYRIGHT ©2006 WITURA CORPORATION SDN BHD
7
____________________WT-209 GSM Wireless Terminal with Fax Function____________________
3.5 Fax Test
WT-209 has pre-save 4 pages content. Under idle set fax machine as auto reply mode. Fax machine offhook will hear dial tone, press“**91#”, hear dial tone again then on-hook. After on-hook fax machine
ringing, receive incoming call“0123456789”,auto reply fax. Press“**91#” to fax content WT-209
product profile as Table 3-3
Press
**91#
**92#
**93#
**94#
**95#
Content
WT-209 Profile
Trouble
Keypad Explanation
Version
Above total 4 pages content
Table 3-3: Test Pages Content
4.
Keypad Configure Parameter
NOTICE: Keypad configures parameter set need off-hook, then on-hook and exit, parameter will auto save.
Indicating tone will inform configure success or failure, if success then releases dialing tone, otherwise
release busy tone.
* --begin as *, set; # -- begin as #, cancel. Followed two numbers indicate function code, function code and
content or contents are separated by *
X: digital key, 0 – 9
Functions
Adjust incoming call volume
Parameter Command
##*X#
X: 1 - 5
Adjust outgoing call volume
###X#
X: 1 - 5
Specification
X indicates incoming call volume, from 1
to 5, 1 is lowest and 5 is highest.
Password is unnecessary for setting, you
will hear dialing tone if success
X indicates incoming call volume, from 1
to 5, 1 is lowest and 5 is highest.
Password is unnecessary for setting, you
will hear dialing tone if success
Table 4-1: Adjust Voice Volume
Functions
Input parameter set password
Parameter Command
##XXXX#
Specification
Success verify 4-digit password to enter
management (parameter set)
Table 4-2: Keypad Set
COPYRIGHT ©2006 WITURA CORPORATION SDN BHD
8
____________________WT-209 GSM Wireless Terminal with Fax Function____________________
Functions
Polarity reverse
PIN1
Modify PIN1
Set default parameter
Modify password
Parameter Command
Set
Cancel
*20#
#20#
*71*PIN1#
#71*PIN1#
*72* old PIN1*New
PIN1*New PIN1#
*81#
**XXXX*XXXX#
(**New Password*New
Password#)
Specification
Send polarity reverse signal for charge
Set: Send
Cancel: No Send (default)
PIN1 Max 8-digit, no less then 4-digit
Before modify PIN, PIN under active
status
Set default parameter
Password is 4-digit.
Defaulted password is “1234” before
factory. Password cannot delete, only can
replace old password with new password.
Above only can operate after enter
management (parameter set)
Table 4-3: Modify Parameter After Enter Keypad Set
5.
Care and Maintenance
Operation of any radio transmitting equipment, including cellular phones, may interfere with the
functionality of inadequately protected medical devices.
Keep the device dry. Precipitation, humidity and liquids contain minerals that will corrode electronic
circuits. Don’t drop, knock or shake the device.
TV set, telephone set, radio set, PC and other electronic equipments may cause interference with the
device’s performance.
Wipe the slightly device with a soft dampened cloth. Don’t use harsh chemicals, cleaning solvents, or
strong detergents to clean the device. Always switch off the device before cleaning.
The device may generate electromagnetic field, don’t keep the device in the same place with magnetic
storage media such as computer diskettes.
Don’t keep the device under strong sunlight to prevent it from being too hot.
Don’t attempt to connect the device with any other unauthorized devices or equipments.
Remember to follow any special regulations in force about the using of wireless telephones in any area.
COPYRIGHT ©2006 WITURA CORPORATION SDN BHD
9
____________________WT-209 GSM Wireless Terminal with Fax Function____________________
6.
Battery
6.1 Battery Insert
Battery slot as Error! Reference source not found.. When change battery terminal shall under off state.
Figure 6-1: WT-209 Battery Slot
6.2 Battery Specification
WT-209 use (1.2 * 6) V Ni-hi battery
Max call time
Max standby time
Duration charge to 95% capacity
Ni-Hi Battery (1600mAh)
4 hours
8 hours
Around 10 hours
Ni-Hi Battery (2300mAh)
6 hours
12 hours
Around 14 hours
1) Call/Standby time will be effected by base station signal and administrators’ setting parameter. When
near base, WT-209will consume less electricity.
2) Battery can recharge several hundred times, capacity will drop off. When call/standby time dropped to
half time, need buy new battery.
3) WT-209 only can recharge for equipped battery.
4) Not use such battery for other application.
5) Battery will self-discharge if long time no use.
6) Battery need keep under dry and warm environment, keep in indoor condition. Li battery will greatly
effected when less than 0 ºC.
7) Not make battery short-circuit. Avoid metal thing (such as coin, pin) to insert battery slot.
8) Dispose old battery shall avoid pollute environment.
COPYRIGHT ©2006 WITURA CORPORATION SDN BHD
10
____________________WT-209 GSM Wireless Terminal with Fax Function____________________
7.
Troubleshooting
Problem
Solution
Failed network registering
a)
b)
Check SIM good insert
Make sure antenna contact well, or pull antenna outside door
Power LED off
a) Make sure power supply connected to power socket correctly.
b) Make sure power adapter is good, use multi-meter when necessary.
Only free call permitted
a) Make sure account balance of the SIM card is sufficient
Caller or called party hear
nothing
a) Make sure phone set works properly, Ensure the connectivity of
telephone line cable
b) Check network
Bad voice quality
a) Signal intensity insufficient, try moving device position
b) Keep the antenna long away form telephone.
Echo when talking
a) Adjust voice volume
b) Network quality
No ring tone
a) Try another telephone set
b) Measure the ring voltage with a multi-meter.
a) Make sure such SIM Card has Fax feature
b) Make sure WT-209 normal connect with fax machine
Cannot fax
Table 7-1: Troubleshooting
Sometimes WT-209 may fail in start, RUN LED quick flash. Please refer to the following table for solution
Signal LED
○○●
○●○
○●●
●○○
●○●
Problem
Switch to Data side
Cannot detect card
Lock PIN
Lock PIN
Lock Card
Solution
Pull switch to call side
Confirm SIM/UIM Card in good
installation. Card slot loose or not
PIN locked, please unlock PIN, retry
PIN locked, need input PUK to unlock
Disable lock function or change old
SIM/UIM Card
Table 7-2: Failed Start
COPYRIGHT ©2006 WITURA CORPORATION SDN BHD
www.discountcomms.co.uk
11