1
User’s Guide
High Compliance Current Source
LDX-3232
ILX Lightwave Corporation · 31950 Frontage Road · Bozeman, MT, U.S.A. 59715 · U.S. & Canada: 1-800-459-9459 · International Inquiries: 406-556-2481 · Fax 406-586-9405
ilx.custhelp.com · www.ilxlightwave.com
70037802 January 2010
TA B L E O F C O N T E N T S
TABLE OF CONTENTS
Safety Information and the Manual . . . . . . . . . . . . . . . . . . . . . . . . . . . . . . . . . ix
General Safety Considerations . . . . . . . . . . . . . . . . . . . . . . . . . . . . . . . . . . . . ix
Safety Marking Symbols . . . . . . . . . . . . . . . . . . . . . . . . . . . . . . . . . . . . . . . . . x
Comments, Suggestions, and Problems . . . . . . . . . . . . . . . . . . . . . . . . . . . xiii
Chapter 1
Introduction and Specifications
Product Overview . . . . . . . . . . . . . . . . . . . . . . . . . . . . . . . . . . . . . . . . . . . . . . . . 1
Initial Inspection . . . . . . . . . . . . . . . . . . . . . . . . . . . . . . . . . . . . . . . . . . . . . . . . . 2
Installing Your LDX-3232 High Compliance Current Source . . . . . . . . . . . . . . 2
Grounding Requirements . . . . . . . . . . . . . . . . . . . . . . . . . . . . . . . . . . . . . . . . 2
AC Line Power Requirements . . . . . . . . . . . . . . . . . . . . . . . . . . . . . . . . . . . . 2
GPIB Connector . . . . . . . . . . . . . . . . . . . . . . . . . . . . . . . . . . . . . . . . . . . . . . . 3
The GPIB Address . . . . . . . . . . . . . . . . . . . . . . . . . . . . . . . . . . . . . . . . . . . . . 3
Tilt-Foot Adjustment . . . . . . . . . . . . . . . . . . . . . . . . . . . . . . . . . . . . . . . . . . . . 3
Operating the LDX-3232 Precision Current Source . . . . . . . . . . . . . . . . . . . . 3
Maintenance . . . . . . . . . . . . . . . . . . . . . . . . . . . . . . . . . . . . . . . . . . . . . . . . . . . . . 5
Specifications . . . . . . . . . . . . . . . . . . . . . . . . . . . . . . . . . . . . . . . . . . . . . . . . . . . 6
Available Options and Accessories . . . . . . . . . . . . . . . . . . . . . . . . . . . . . . . . 8
Chapter 2
Operation
Applying Power to Your LDX-3232 . . . . . . . . . . . . . . . . . . . . . . . . . . . . . . . . . . . 9
The Power On Sequence . . . . . . . . . . . . . . . . . . . . . . . . . . . . . . . . . . . . . . . . 9
The Power On State . . . . . . . . . . . . . . . . . . . . . . . . . . . . . . . . . . . . . . . . . . . 10
01_10
LDX-3232
i
TA B L E O F C O N T E N T S
Connecting to the Laser . . . . . . . . . . . . . . . . . . . . . . . . . . . . . . . . . . . . . . . . . . 10
Interlock Connections . . . . . . . . . . . . . . . . . . . . . . . . . . . . . . . . . . . . . . . . . . 12
Photodiode Connections . . . . . . . . . . . . . . . . . . . . . . . . . . . . . . . . . . . . . . . . 13
Setting the PD Bias . . . . . . . . . . . . . . . . . . . . . . . . . . . . . . . . . . . . . . . . . . . . 13
Grounding Considerations . . . . . . . . . . . . . . . . . . . . . . . . . . . . . . . . . . . . . . 13
Front Panel Operation . . . . . . . . . . . . . . . . . . . . . . . . . . . . . . . . . . . . . . . . . . . . 14
The Display . . . . . . . . . . . . . . . . . . . . . . . . . . . . . . . . . . . . . . . . . . . . . . . . . . 14
Operating a Laser in Constant Current (I) Mode . . . . . . . . . . . . . . . . . . . . . . 14
Setting Up the Precision Current Source . . . . . . . . . . . . . . . . . . . . . . . . . . . 15
Conditions That Will Automatically Shut Off the LASER OUTPUT . . . . . . . . 17
Operating a Laser in Constant Power (P) Mode . . . . . . . . . . . . . . . . . . . . . . . 17
Entering Photodiode Responsivity Values . . . . . . . . . . . . . . . . . . . . . . . . . . 17
Error Indicators . . . . . . . . . . . . . . . . . . . . . . . . . . . . . . . . . . . . . . . . . . . . . . . . . 19
Chapter 3
Remote Operation
Reading the GPIB Address . . . . . . . . . . . . . . . . . . . . . . . . . . . . . . . . . . . . . . 21
Changing the GPIB Address . . . . . . . . . . . . . . . . . . . . . . . . . . . . . . . . . . . . . 21
Changing Operation from Local to Remote . . . . . . . . . . . . . . . . . . . . . . . . . 22
LDX-3232 Current Source Command Set . . . . . . . . . . . . . . . . . . . . . . . . . . . . 22
Command Syntax . . . . . . . . . . . . . . . . . . . . . . . . . . . . . . . . . . . . . . . . . . . . . 22
Command Paths . . . . . . . . . . . . . . . . . . . . . . . . . . . . . . . . . . . . . . . . . . . . . . . . 25
IEEE488.2 Command Commands . . . . . . . . . . . . . . . . . . . . . . . . . . . . . . . . . . 26
LDX-3232 Frequently Used Commands . . . . . . . . . . . . . . . . . . . . . . . . . . . . . 27
Status Reporting . . . . . . . . . . . . . . . . . . . . . . . . . . . . . . . . . . . . . . . . . . . . . . . . 28
Event and Condition Registers . . . . . . . . . . . . . . . . . . . . . . . . . . . . . . . . . . . 28
Operation Complete Definition . . . . . . . . . . . . . . . . . . . . . . . . . . . . . . . . . . . 28
Output Off Register . . . . . . . . . . . . . . . . . . . . . . . . . . . . . . . . . . . . . . . . . . . . 30
Command Timing and Completion . . . . . . . . . . . . . . . . . . . . . . . . . . . . . . . . . 32
Error Messages . . . . . . . . . . . . . . . . . . . . . . . . . . . . . . . . . . . . . . . . . . . . . . . . . 32
ii
LDX-3232
TA B L E O F C O N T E N T S
Chapter 4
Command Reference
LDX-3232 Device-Dependent Commands . . . . . . . . . . . . . . . . . . . . . . . . . . . . 39
LDX-3232 Device-Dependent Command Reference . . . . . . . . . . . . . . . . . . . . 40
Chapter 5
Functions and Features
Saving and Recalling from the Front Panel . . . . . . . . . . . . . . . . . . . . . . . . . . 83
Saving and Recalling Under Remote Operation . . . . . . . . . . . . . . . . . . . . . . . 84
Using the Laser Compliance Voltage Adjustment . . . . . . . . . . . . . . . . . . . . . 84
Using the LDX-3232 Current Source’s Trigger Function . . . . . . . . . . . . . . . . 85
Using the LDX-3232 Current Sources’s BNC Interlock Connection . . . . . . . 86
BNC Interlock Usage Example . . . . . . . . . . . . . . . . . . . . . . . . . . . . . . . . . . . 86
Modulating the Laser Current Source . . . . . . . . . . . . . . . . . . . . . . . . . . . . . . . 86
Chapter 6
Calibration and Troubleshooting
Calibration Overview . . . . . . . . . . . . . . . . . . . . . . . . . . . . . . . . . . . . . . . . . . . . . 89
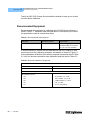
Recommended Equipment . . . . . . . . . . . . . . . . . . . . . . . . . . . . . . . . . . . . . . . . 90
Local Calibration of the LDX-3232 Current Source . . . . . . . . . . . . . . . . . . . . 91
Current Source Calibration . . . . . . . . . . . . . . . . . . . . . . . . . . . . . . . . . . . . . . 91
IPD Current Calibration . . . . . . . . . . . . . . . . . . . . . . . . . . . . . . . . . . . . . . . . . 92
Laser Forward Voltage Measurement Calibration . . . . . . . . . . . . . . . . . . . . 94
Remote Calibration of the LDX-3232 Current Source . . . . . . . . . . . . . . . . . . 95
Current Source Calibration . . . . . . . . . . . . . . . . . . . . . . . . . . . . . . . . . . . . . . 95
IPD Current Calibration . . . . . . . . . . . . . . . . . . . . . . . . . . . . . . . . . . . . . . . . . 96
Laser Forward Voltage Measurement Calibration . . . . . . . . . . . . . . . . . . . . 98
Troubleshooting Guide . . . . . . . . . . . . . . . . . . . . . . . . . . . . . . . . . . . . . . . . . . . 99
Error Messages . . . . . . . . . . . . . . . . . . . . . . . . . . . . . . . . . . . . . . . . . . . . . . . . 101
01_10
LDX-3232
iii
TA B L E O F C O N T E N T S
iv
LDX-3232
LIST OF FIGURES
LIST OF FIGURES
Figure 1.1 LDX-3232 Front View . . . . . . . . . . . . . . . . . . . . . . . . . . . . 4
Figure 1.2 LDX-3232 Rear View . . . . . . . . . . . . . . . . . . . . . . . . . . . . . 4
Figure 2.1 Common Laser Cathode - Photodiode Cathode . . . . . . . 11
Figure 2.2 Common Laser Cathode - Photodiode Anode . . . . . . . . 11
Figure 2.3 Common Laser Anode - Photodiode Cathode . . . . . . . . 11
Figure 2.4 Common Laser Anode - Photodiode Anode . . . . . . . . . . 12
Figure 2.5 Back Panel LD Connector . . . . . . . . . . . . . . . . . . . . . . . . 12
Figure 3.1 LDX-3232 Command Path Structure . . . . . . . . . . . . . . . . 25
Figure 3.2 LDX-3232 Status Reporting Schematic Diagram . . . . . . 29
Figure 3.3 LDX-3232 Output Off Register . . . . . . . . . . . . . . . . . . . . 31
Figure 4.1 Command Description Format . . . . . . . . . . . . . . . . . . . . 39
Figure 5.1 LDX-3232 Rear Panel . . . . . . . . . . . . . . . . . . . . . . . . . . . 85
Figure 6.1 IPD Calibration Circuit . . . . . . . . . . . . . . . . . . . . . . . . . . . 91
01_10
LDX-3232
v
LIST OF FIGURES
vi
LDX-3232
L I S T O F TA B L E S
LIST OF TABLES
Table 2.1
Table 2.2
Table 3.1
Table 3.2
Table 3.3
Table 3.4
Table 3.5
Table 4.1
Table 6.1
Table 6.2
Table 6.3
Table 6.4
01_10
LDX-3232 Default Settings. . . . . . . . . . . . . . . . . . . . . . . . . . . . 10
LDX-3232 Error Indicators . . . . . . . . . . . . . . . . . . . . . . . . . . . . 19
Substitute Parameter Names . . . . . . . . . . . . . . . . . . . . . . . . . . 23
LDX-3232 Often Used Commands . . . . . . . . . . . . . . . . . . . . . 27
LDX-3232 Series Default Settings for Output Off Registers . . 30
Error Code Classifications . . . . . . . . . . . . . . . . . . . . . . . . . . . . 33
LDX-3232 Series Error Codes . . . . . . . . . . . . . . . . . . . . . . . . . 33
LDX-3232 Series Device-Dependent Commands . . . . . . . . . . 35
Recommended Test Equipment. . . . . . . . . . . . . . . . . . . . . . . . 90
Required Calibration Components . . . . . . . . . . . . . . . . . . . . . . 90
Error Code Classifications . . . . . . . . . . . . . . . . . . . . . . . . . . . 101
LDX-3232 Series Error Codes . . . . . . . . . . . . . . . . . . . . . . . . 101
LDX-3232
vii
L I S T O F TA B L E S
viii
LDX-3232
S A F E T Y A N D WA R R A N T Y I N F O R M A T I O N
SAFETY AND WARRANTY INFORMATION
The Safety and Warranty Information section provides details about cautionary
symbols used in the manual, safety markings used on the instrument, and
information about the Warranty including Customer Service contact information.
Safety Information and the Manual
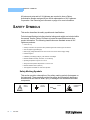
Throughout this manual, you will see the words Caution and Warning indicating
potentially dangerous or hazardous situations that, if not avoided, could result in
death, serious or minor injury, or damage to the product. Specifically:
Caution indicates a potentially hazardous situation that can result in minor or moderate
injury or damage to the product or equipment.
Warning indicates a potentially dangerous situation that can result in serious injury or
death.
WARNING
Visible and/or invisible laser radiation. Avoid direct exposure to the beam.
General Safety Considerations
If any of the following conditions exist, or are even suspected, do not use the
instrument until safe operation can be verified by trained service personnel:
• Visible damage
• Severe transport stress
• Prolonged storage under adverse conditions
• Failure to perform intended measurements or functions
If necessary, return the instrument to ILX Lightwave, or authorized local ILX
Lightwave distributor, for service or repair to ensure that safety features are
maintained (see the contact information on page xiii).
01_10
LDX-3232
ix
SAFETY SYMBOLS
All instruments returned to ILX Lightwave are required to have a Return
Authorization Number assigned by an official representative of ILX Lightwave
Corporation. See Returning an Instrument on page xi for more information.
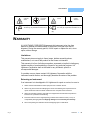
SAFETY SYMBOLS
This section describes the safety symbols and classifications.
Technical specifications including electrical ratings and weight are included within
the manual. See the Table of Contents to locate the specifications and other
product information. The following classifications are standard across all ILX
Lightwave products:
•
Indoor use only
•
Ordinary Protection: This product is NOT protected against the harmful ingress of moisture.
•
Class I Equipment (grounded type)
•
Mains supply voltage fluctuations are not to exceed ±10% of the nominal supply voltage.
•
Pollution Degree II
•
Installation (overvoltage) Category II for transient overvoltages
•
Maximum Relative Humidity: <80% RH, non-condensing
•
Operating temperature range of 0°C to 40°C
•
Storage and transportation temperature of -40°C to 70°C
•
Maximum altitude: 3000 m (9843 ft.)
•
This equipment is suitable for continuous operation.
Safety Marking Symbols
This section provides a description of the safety marking symbols that appear on
the instrument. These symbols provide information about potentially dangerous
situations that can result in death, injury, or damage to the instrument and other
components.
Caution,
refer to
manual
x
LDX-3232
Earth
ground
Terminal
Alternating
current
Visible and/or
invisible laser
radiation
WA R R A N T Y
Caution, risk
of electric
shock
Protective
Conductor
Terminal
Caution, hot
surface
On: In position of a bistable push control.
The slash (I) only denotes that mains are on.
or
(I)
Frame or
chassis
Terminal
Off: Out position of a bistable push control.
The circle (O) only denotes that mains are off.
or
(O)
WARRANTY
ILX LIGHTWAVE CORPORATION warrants this instrument to be free from
defects in material and workmanship for a period of one year from date of
shipment. During the warranty period, ILX will repair or replace the unit, at our
option, without charge.
Limitations
This warranty does not apply to fuses, lamps, defects caused by abuse,
modifications, or to use of the product for that it was not intended.
This warranty is in lieu of all other warranties, expressed or implied, including any
implied warranty of merchantability or fitness for any particular purpose. ILX
Lightwave Corporation shall not be liable for any incidental, special, or
consequential damages.
If a problem occurs, please contact ILX Lightwave Corporation with the
instrument's serial number, and thoroughly describe the nature of the problem.
Returning an Instrument
If an instrument is to be shipped to ILX Lightwave for repair or service, be sure to:
01_10
1
Obtain a Return Authorization number (RA) from ILX Customer Service.
2
Attach a tag to the instrument identifying the owner and indicating the required service or
repair. Include the instrument serial number from the rear panel of the instrument.
3
Attach the anti-static protective caps that were shipped with the instrument and place the
instrument in a protective anti-static bag.
4
Place the instrument in the original packing container with at least 3 inches (7.5 cm) of
compressible packaging material. Shipping damage is not covered by this warranty.
5
Secure the packing box with fiber reinforced strapping tape or metal bands.
LDX-3232
xi
WA R R A N T Y
6
Send the instrument, transportation pre-paid, to ILX Lightwave. Clearly write the return
authorization number on the outside of the box and on the shipping paperwork. ILX
Lightwave recommends you insure the shipment.
If the original shipping container is not available, place your instrument in a
container with at least 3 inches (7.5 cm) of compressible packaging material on all
sides.
Repairs are made and the instrument returned transportation pre-paid. Repairs
are warranted for the remainder of the original warranty or for 90 days, thatever is
greater.
Claims for Shipping Damage
When you receive the instrument, inspect it immediately for any damage or
shortages on the packing list. If the instrument is damaged, file a claim with the
carrier. The factory will supply you with a quotation for estimated costs of repair.
You must negotiate and settle with the carrier for the amount of damage.
xii
LDX-3232
WA R R A N T Y
Comments, Suggestions, and Problems
To ensure that you get the most out of your ILX Lightwave product, we ask that
you direct any product operation or service related questions or comments to ILX
Lightwave Customer Support. You may contact us in whatever way is most
convenient:
Phone . . . . . . . . . . . . . . . . . . . . . . . . . . . (800) 459-9459 or (406) 556-2481
Fax . . . . . . . . . . . . . . . . . . . . . . . . . . . . . . . . . . . . . . . . . . . . . (406) 586-9405
Online FAQ: . . . . . . . . . . . . . . . . . . . . . . . . . . . . . . . . . www.ilxlightwave.com
Or mail to:
ILX Lightwave Corporation
P. O. Box 6310
Bozeman, Montana, U.S.A 59771
www.ilxlightwave.com
When you contact us, please have the following information:
Model Number:
Serial Number:
End-User Name:
Company:
Phone:
Fax:
Description of what is
connected to the ILX
Lightwave instrument:
Description of the problem:
If ILX Lightwave determines that a return to the factory is necessary, you are
issued a Return Authorization (RA) number. Please mark this number on the
outside of the shipping box.
You or your shipping service are responsible for any shipping damage when
returning the instrument to ILX Lightwave; ILX recommends you insure the
shipment. If the original shipping container is not available, place your instrument
01_10
LDX-3232
xiii
WA R R A N T Y
in a container with at least 3 inches (7.5 cm) of compressible packaging material
on all sides.
We look forward to serving you even better in the future!
xiv
LDX-3232
INTRODUCTION AND SPECIFICATIONS
Product Overview
CHAPTER
CHAPTER
1
1
INTRODUCTION AND SPECIFICATIONS
This chapter is an introduction to the LDX-3232 High Compliance Current Source.
This chapter contains first time setup information, important safety considerations,
maintenance information, instrument specifications, and general LDX-3232
information.
If any of the following symptoms exist, or are even suspected, remove the LDX-3232
from service. Do not use the LDX-3232 until trained service personnel can verify safe
operation.
Visible damage
Severe transport stress
Prolonged storage under adverse conditions
Failure to perform intended measurements or functions
If necessary, return the LDX-3232 to ILX Lightwave for service and repair to ensure that
safety features are maintained.
Product Overview
The LDX-3232 instrument is a high compliance laser diode current source
intended for use with quantum cascade laser diodes and other devices requiring a
high compliance output. The LDX-3232 current source provides a high stability
output with multiple laser protection features and a fully redundant current limit.
The LDX-3232 offers the added benefits of dual laser interlocks and a GPIB
interface to allow full automation of testing.
01_10
LDX-3232
1
CHAPTER
1
INTRODUCTION AND SPECIFICATIONS
Initial Inspection
Initial Inspection
When you receive your LDX-3232 instrument, verify that the following items were
shipped with the instrument:
• LDX-3232 High Compliance Current Source
• LDX-3232 Series Instruction Manual
• Power Cord
• Shipping Kit
Installing Your LDX-3232 High Compliance Current Source
Grounding Requirements
The LDX-3232 High Compliance Current Source comes with a three conductor
AC power cable. The power cable must either be plugged into an approved threecontact electrical outlet or used with a three-contact or two-contact adapter with
the grounding wire connected to an electrical ground (safety ground). The
LDX-3232's power jack and supplied power cable meet IEC safety standards.
AC Line Power Requirements
You can operate the LDX-3232 instrument from a single phase power source
delivering nominal line voltages of 100, 120, 220-240 VAC (all values RMS), at
50/60 Hz. The line power voltage can vary ±10% but cannot exceed 250 VAC.
Maximum power consumption is 60 VA (Volt-Amps). The instrument's operational
voltage is factory configurable and need not be changed before operating the
instrument. However, check to be sure that the voltage printed on the back panel
of the instrument matches the power-line voltage in your area.
Before connecting the LDX-3232 High Compliance Current Source to a power source,
verify that the AC power source matches the setting of the LDX-3232's voltage printed on
the rear panel of the instrument.
To avoid electrical shock hazard, connect the instrument to properly earth-grounded,
3-prong receptacles only. Failure to observe this precaution can result in severe injury or
death.
2
LDX-3232
INTRODUCTION AND SPECIFICATIONS
Installing Your LDX-3232 High Compliance Current Source
CHAPTER
1
GPIB Connector
The IEEE 488 GPIB interface connector is located on the rear panel, directly
above the power input module and fuse. See Figure 1.2, LDX-3232 Rear View.
Attach the GPIB cable to the 24-pin connector located on the rear panel. The
connector is tapered to ensure proper orientation. Using your fingers, tighten the
two screws on the cable connector.
A total of 15 devices can be connected together on the same GPIB interface bus.
The cables have single male/female connectors on each end so that several
cables can be stacked. This allows more than one cable to be attached to any
one device. However, the maximum length of the GPIB cables must not exceed
20 meters (65 feet) total or 2 meters (6.5 feet) per device.
The GPIB Address
The talk and listen addresses on the LDX-3232 High Compliance Current Source
are identical. This GPIB address is read locally by pressing the (GPIB) LOCAL
switch with the address displayed on the LED display. The instrument comes from
the factory configured with the GPIB address set to 1. You can change the
LDX-3232's GPIB address locally (via front panel). A procedure for changing the
address can be found in the section "Changing the GPIB Address" in Chapter 3.
Tilt-Foot Adjustment
The LDX-3232 High Compliance Current Source comes standard with folding
front legs and two rear feet for use as a bench top instrument. Extending the front
feet so that the instrument front panel sits up makes it easier to view the LED
displays. To use them, place the unit on a stable base and rotate the front legs
downward until they lock into position.
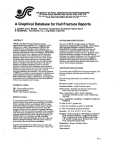
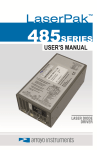
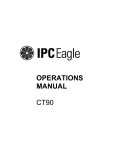
Operating the LDX-3232 Precision Current Source
Now that the LDX-3232 High Compliance Current Source is installed and ready
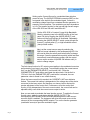
for use, you can begin to learn about its operation. The following photos show the
functional keypad groupings, back panel connectors, and so on. Use these figures
to familiarize yourself with the LDX-3232. After that, use Chapter 2 for
fundamentals of operating your instrument.
01_10
LDX-3232
3
CHAPTER
1
INTRODUCTION AND SPECIFICATIONS
Installing Your LDX-3232 High Compliance Current Source
Adjust
Section
Display
Power
Switch
GPIB Section
Parameter
Selection
Laser Mode
Selection
Current Range
Selection
Modulation Input
Connector
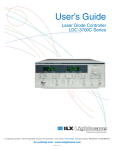
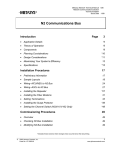
Figure 1.1 LDX-3232 Front View
PD Bias Adjust
Fan
GPIB Connector
LD Connector
Trigger Output
Connector
Interlock Input
Connector
Figure 1.2 LDX-3232 Rear View
4
LDX-3232
Power Cord
Connector
INTRODUCTION AND SPECIFICATIONS
Maintenance
CHAPTER
1
Maintenance
You may have to return your instrument to the ILX Lightwave facility at some time
for repair or service whether or not it is under warranty. There is a charge for
repairs after the warranty period has expired. Contact an ILX Lightwave service
representative for shipping instructions prior to returning the instrument. Have the
model number, instrument serial number, and a description of the problem or
request at the time of the call. All ILX Lightwave instruments are identified by a
serial number located on the rear panel. The first four or five digits are the model
number; the last four digits are unique to the instrument and identify your
instrument specifically. A return authorization number will be given to you at the
time of your request for repair or service. Please use this number in all
communications concerning your instrument.
If you need to ship your LDX-3232 High Compliance Current Source back to the
factory for repair, be sure that the LDX-3232 is packaged in an enclosure with
cushioning material to prevent damage to the instrument during shipment (use the
original shipping containers and accessories if possible). Re-install the ESD
protective caps on the rear and front panels over the connectors (9 pin D, BNC,
and GPIB). Shipping damage is not covered under warranty.
Attach a tag to the instrument identifying the owner and indicating the service or
repair needed. Include the model number and serial number. We suggest that you
insure the shipment.
In North America, contact ILX Lightwave for return authorization and shipping
instructions. Outside of North America, contact your ILX distributor for shipping
information.
For more information on how to obtain repair services, see the Safety and
Warranty section of this manual.
If cleaning is required, use a clean dry cloth. Do not use solvents.
Potentially lethal voltages exist within the LDX-3232 High Compliance Current Source. To
avoid electric shock, do not perform any of the maintenance on the instrument unless
you are qualified to do so. Qualified service personnel are required to wear protective
eyeglasses and anti-static wristbands while working on the LDX-3232 High Compliance
Current Source circuit boards. High voltages are present on and around the instrument’s
printed circuit boards.
01_10
LDX-3232
5
CHAPTER
1
INTRODUCTION AND SPECIFICATIONS
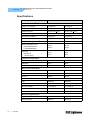
Specifications
Specifications
LDX-3232
Drive Current
Output1
Output Current Range
0 to 2000 mA
0 to 4000 mA
40 µA
80 µA
Setpoint Accuracy
±0.15% of SP +2 mA
±0.15% of SP +2 mA
Compliance Voltage
0 - 15 V, adjustable
0 - 15 V, adjustable
<100 ppm/°C
<100 ppm/°C
Short Term Stability (1 hour)
<20 ppm
<20 ppm
Long Term Stability (24 hours)4
<40 ppm
<40 ppm
<20 µA
<20 µA
<40 µA
<20 µA
<4 mA
<8 mA
<4 mA
<8 mA
Range
0 - 15 V
0 - 15 V
Resolution
10 mV
20 mV
Accuracy
±20%
±40%
Range
1 to 2020 mA
1 to 4040 mA
Resolution
10 mA
20 mA
Accuracy
±20 mA
±40 mA
Type
Differential
Differential
PD Reverse Bias
0 - 5V, adjustable
0 - 5V, adjustable
PD Current Range
5 to 10,000 µA
5 to 10,000 µA
±0.02%
±0.02%
±0.05%
±0.05%
Input
0 - 10 V, 1 k
0 - 10 V, 1 k
Transfer Function
200 mA / V
400 mA / V
Setpoint Resolution
2
Temperature Coefficient
3
Noise and Ripple (µA rms)
5
High Bandwidth Mode
Low Bandwidth Mode
Transients
Operational6
1 kV EFT/Surge7
Compliance Voltage Adjust
Drive Current Limit Settings
Photodiode Feedback
Output Stability
8
Accuracy, setpoint (% of FS)
External Analog Modulation
6
LDX-3232
INTRODUCTION AND SPECIFICATIONS
Specifications
CHAPTER
1
LDX-3232
Bandwidth (3
dB)9
DC to 250 kHz
DC to 10 kHz
DC to 250 kHz
DC to 10 kHz
Type
TTL
TTL
Pulse Width
13 µs
13 µs
Delay
12 ms
12 ms
0 to 2000.0 mA
0 to 4000.0 mA
0.1 mA
0.1 mA
Photodiode Current Range
0 to 10,000 µA
0 to 10,000 µA
Photodiode Current Resolution
1 µA
1 µA
Photodiode Current Accuracy
±4 µA
±4 µA
0.00 to 1000.00 µA/mW
0.00 to 1000.00 µA/mW
PD Responsivity Resolution
0.01 µA/mW
0.01 µA/mW
Optical Power Range
0.00 to 5000.0 mW
0.00 to 5000.0 mW
Optical Power Resolution
0.1 mW
0.1 mW
Forward Voltage Range
0.000 to 10.000 V
0.000 to 10.000 V
Forward Voltage Resolution
1 mV
1 mV
Forward Voltage Accuracy12
±2 mV
±2 mV
High Bandwidth
Low Bandwidth
Trigger Output
Measurement (Display)
Output Current Range
Output Current
Resolution10
PD Responsivity Range
11
General
Size (H x W x D)
4” x 8.5” x 13.4”; 102 mm x 216 mm x 340 mm
Weight
~ 20 pounds (9 kg)
Power
100/120/230-240 V~; 2/2/1A 50/60 Hz
Temperature
0°C – 40°C operating; -40°C – 70°C storage
Humidity
< 90% relative humidity, non-condensing
Laser Safety Features
Key switch, interlock and output delay (meets CDRH US
21 CFR 1040.10)
Display Type
5-digit, green LED
Notes
1. All values relate to a one-hour warm-up period at room temperature, 25°C.
2. Based on resolution of digital-to-analog converters used in the design.
3. Over any 1-hour period, half-scale output.
4. Over any 24-hour period, half-scale output.
5. Measured electrically with a 1 ohm load at half-scale output; evaluating spectral noise density over a 150kHz bandwidth from
125kHz to 275 kHz.
6. Maximum output current transient from normal operational situations (e.g., power on-off, current on-off), as well as accidental
situations (e.g., power line plug removal).
7. Maximum output current transient resulting from a 1000 V power-line transient spike. Tested to ILX Lightwave Technical Standard
#LDX-00196.
01_10
LDX-3232
7
CHAPTER
1
INTRODUCTION AND SPECIFICATIONS
Specifications
8. Maximum monitor photodiode current drift over any 30 minute period. Assumes zero drift in responsivity of photodiode.
9. 50% modulation at mid-scale output. Higher bandwidth is possible with smaller magnitude modulation signal.
10.Similar resolution available over GPIB.
11.Responsivity value is user-defined and is used to calculate the optical power.
12.Four wire voltage measured at the load. Voltage measurement accuracy while driving calibration load. Accuracy is dependent
upon load and cable used.
Available Options and Accessories
Options and accessories available for the LDX-3232 High Compliance Current
Sources include the following:
DESCRIPTION
MODEL NUMBER
Noise Filter
LNF-320
Current Source Interconnect Cable (terminated)
CC-305S
Current Source Interconnect Cable (unterminated)
CC-306S
DIL Laser Diode Mount
LDM-4982
Butterfly Laser Diode Mount
LDM-4894
High Power Laser Diode Mount
LDM-4442
Single Rack Mount Kit
RM-139
Dual Rack Mount Kit
RM-140
Other laser diode mounts are available. Please contact ILX Lightwave for information on
additional options for your application.
Our goal is to make the best laser diode instrumentation available anywhere. To
achieve this, we need your ideas and comments on ways we can improve out
products. We invite you to contact us at any time with your suggestions.
8
LDX-3232
OPERATION
Applying Power to Your LDX-3232
CHAPTER
CHAPTER
2
2
OPERATION
This chapter introduces you to the operation of the LDX-3232 High Compliance
Current Source. It offers instructions for connecting your laser to the current
source and describes powering up the instrument. This chapter also contains step
by step procedures that teach you how to operate your current source in Constant
Current Mode and Constant Power Mode. We recommend that you review the
contents of this chapter at a minimum before operating the LDX-3232 Current
Source.
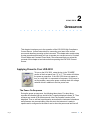
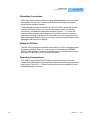
Applying Power to Your LDX-3232
To turn on the LDX-3232, rotate the key in the "POWER"
section of the front panel from "O" to "I". This action will initiate
the power on sequence. If the LDX-3232 does not appear to
turn on, verify that it is connected to line power. If line power is
not the problem, remove the power cord and check the voltage
selection block in addition to the line power fuse.
The Power On Sequence
During the power-up sequence, the following takes place. For about three
seconds all indicators light up, and all of the 7-segment displays indicate "8". Then
all lamps are turned off for three seconds. Next, the firmware version will be
displayed. Then, a self-test is performed to ensure that the instrument's hardware
and processor are communicating. After this test, the instrument is ready to
operate and is configured to the state it was in when the power was last shut off.
01_10
LDX-3232
9
CHAPTER
2
OPERATION
Connecting to the Laser
The Power On State
You can choose to "clear" the last saved state by recalling the default values.
These values are stored in BINS to that you can save or recall instrument
configurations (described in more detail in Chapter 5). "BIN 0" contains all of the
default configurations listed in Table 2.1.
Note: If the instrument cannot successfully complete the power on test, an error message
of E-512 or E-513 will be displayed on the Display. See Chapter 3 for a list of error codes
and actions to take when your instrument indicates these errors.
Table 2.1 LDX-3232 Default Settings
GPIB mode in LOCAL via front panel, or in REMOTE via GPIB
PARAMETERS not selected
CAL PD = 0 µA / mW
LIM I (high range) = 1000 mA
LIM I (low range) = 500 mA
LIM V = 15 volts
LIM P = 5000 mW
Output off
DISPLAY enabled, in I mode
Constant I, low bandwidth mode selected
I setpoint = 0 mA
IPD setpoint = 0 µA
PPD setpoint = 0 mW
RECALL BIN number = 0
Connecting to the Laser
When connecting your laser to the LDX-3232, we recommend that the instrument
be powered up with the output off. In this condition, a low impedance shunt is
active across the output terminals. When disconnecting devices, it is only
necessary to turn the current source output off.
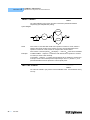
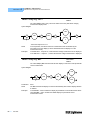
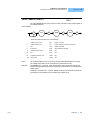
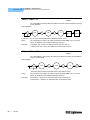
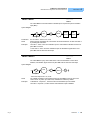
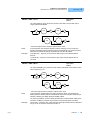
It is also recommended that the connections to the LDX-3232 output be made
using twisted wire pairs with an earth-grounded shield (see Figures 2.1 - 2.4). The
output terminals of the instrument are left floating relative to earth ground to
suppress AC power-on/power-off transients that may occur through an earthground path. If the output circuit is earth-grounded at some point (such as through
the laser package and mount), the user must be careful to avoid multiple earth
10
LDX-3232
OPERATION
Connecting to the Laser
CHAPTER
2
grounds in the circuit. Multiple earth grounds may provide circuit paths that induce
spurious currents in the photodiode feedback circuit and output leads.
Note: Cable connections to the laser must be secure! Loose connections can cause
momentary open circuits that can damage the laser.
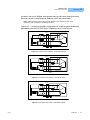
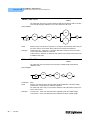
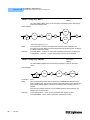
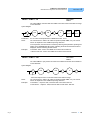
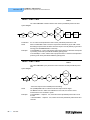
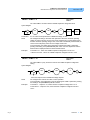
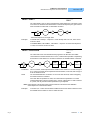
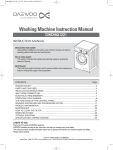
Figures 2.1 - 2.4 show the possible configurations of connecting laser diodes and
photodiodes with the LDX-3232 High Compliance Laser Current Source.
OUTPUT
LDX-3232 Current Source
7
+
Bias
6
+
9
5
P. D.
3
L. D.
Earth Ground
Figure 2.1 Common Laser Cathode - Photodiode Cathode
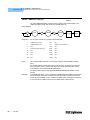
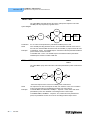
OUTPUT
LDX-3232 Current Source
7
+
6
Bias
+
9
5
P. D.
L. D.
3
Earth Ground
Figure 2.2 Common Laser Cathode - Photodiode Anode
OUTPUT
LDX-3232 Current Source
7
+
Bias
6
+
9
5
P. D.
L. D.
3
Earth Ground
Figure 2.3 Common Laser Anode - Photodiode Cathode
01_10
LDX-3232
11
CHAPTER
2
OPERATION
Connecting to the Laser
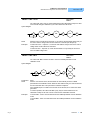
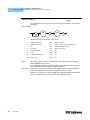
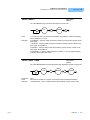
OUTPUT
LDX-3232 Current Source
7
+
6
Bias
+
9
5
P. D.
3
L. D.
Earth Ground
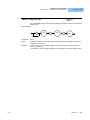
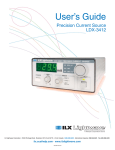
Figure 2.4 Common Laser Anode - Photodiode Anode
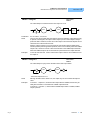
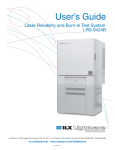
The 9-pin connector marked CURRENT SOURCE on the back panel is used to
connect your laser diode to the LDX-3232. There are connections provided for
laser cathode and anode, photodiode cathode and anode, chassis ground and
interlock. The pinout diagram for this connector is shown in Figure 2.5.
1, 2
3
4
5
6
7
8
9
Interlock
Chassis Ground
Cathode Voltage Sense
Laser Cathode
PD Cathode (+)
PD Anode (-)
Anode Voltage Sense
Laser Anode
1
2
6
7
3
4
8
9
5
Figure 2.5 Back Panel LD Connector
Interlock Connections
In order for the laser output to be enabled a short circuit must exist between the
Interlock Pins (Pins 1 and 2) of the connector. The short can be a direct short
across the pins or a switch to prevent laser operation until the switch is closed. If a
short does not exist between these two pins, the INTERLOCK LED will illuminate
on the front panel and the laser output will be disabled.
Note: The BNC Interlock Connection from the BNC connector on the rear panel will also
make the INTERLOCK LED illuminate. Please see the notes in chapter five on use of the
BNC interlock connection to learn more about its operation.
The interlock terminals on the LASER connector, pins 1 and 2, must be kept isolated
from all other connections including earth ground.
12
LDX-3232
OPERATION
Connecting to the Laser
CHAPTER
2
Photodiode Connections
Many laser diode modules contain an internal photodiode that monitors the backfacet emission of the laser. Usually, this photodiode is internally connected to
either the laser anode or cathode.
The photodiode and laser connections to the LDX-3232 are electrically isolated
from ground and each other. So, if a 4 pin connection is made (no common
connections), no additional jumpers are required. Figures 2.1 - 2.4 show the
recommended connections and shielding for 3-pin lasers (where the common
connection is internal to the device). A 4-pin laser should be connected with the
same shielding as shown in Figure 2.1, but the common connection (between the
photodiode and the laser) is optional.
Setting the PD Bias
The LDX-3232 provides an adjustable reverse bias of 0-5 VDC for the photodiode.
To set the photodiode bias to 5 V reverse bias, turn the back panel PD BIAS
ADJUST fully clockwise. To set the photodiode bias to 0 V reverse bias, turn the
back panel PD BIAS ADJUST fully counter-clockwise.
Grounding Considerations
The LASER outputs of the LDX-3232 High Compliance Current Source are
isolated from chassis ground, allowing either output terminal to be grounded at the
user's option. Figures 2.1 - 2.4 show the proper earth-ground shielding for laser
diode/photodiode connections.
01_10
LDX-3232
13
CHAPTER
2
OPERATION
Front Panel Operation
Front Panel Operation
This section describes fundamentals of operation for your LDX-3232 in two
operating modes: Constant Current (I) and Constant Power (P).
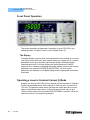
The Display
The digital display is used to show control parameters such as laser drive current
(mA), laser current limit (mA), laser forward voltage (V), voltage limit (V), monitor
photodiode current (µA), and laser optical power (mW) in both setpoint and
measurement modes. It will also display error codes that relate to LASER
operation. Error indicators underneath the display indicate control errors and are
explained in the section titled “ERROR INDICATORS”. All laser control
parameters are displayed on this digital display with the appropriate annunciator
illuminated.
Operating a Laser in Constant Current (I) Mode
Suppose you have an LDX-3232 and you want to run the instrument in Constant
Current, low bandwidth mode, with a setpoint of 1500 mA and a current limit of
1750 mA. This particular mode uses a low-pass filter on the laser drive current
output to significantly reduce noise. In this mode a modulation input of up to
10 kHz may be used via the front panel MOD EXTERNAL connector. Follow the
instructions below in the sequence presented.
14
LDX-3232
OPERATION
Operating a Laser in Constant Current (I) Mode
CHAPTER
2
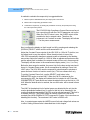
Setting Up the Precision Current Source
Set the LDX-3232 in Constant Current, low bandwidth mode
by selecting I in the MODE section of the front panel. Do this
by toggling the SELECT push button until the I indicator is
illuminated. Repeatedly pressing the (MODE) SELECT
switch cycles through the current (I), light power (P), or
high-bandwidth current (IHBW) control modes.
Next, in the RANGE section set the current source range by
selecting the 2000 mA range indicated by the accompanying
LED. You will need to press the SELECT push button twice
to change the range. It must be pressed twice quickly (within
less than 1 second) to switch between ranges, and the
LASER output must be off (LASER MODE ON indicator
unlit) in order to change ranges.
Configure the display so that it reads laser current in mA. Press and release the
SELECT switch in the DISPLAY section of the front panel until the mA annunciator
is lit. The (DISPLAY) SELECT switch is also used to select the IPD (PD current,
µA), PPD (laser power, mW), or V (forward voltage, V) measurement or setpoint
display modes. When the setpoint mode is active, the corresponding annunciator
will flash to indicate setpoint rather than measurement display.
To only view the setpoint, press and hold down the display SELECT switch for two
or more seconds. When the SELECT switch is released the previous
measurement mode will be restored.
At this point the LDX-3232 is in Constant Current Mode, (I), in the 2000 mA range,
and the display is reading in mA. Next, we need to adjust the setpoint of the laser
current source.
To adjust the setpoint of the current source to 1500 mA, turn the adjust knob to
vary the setpoint. When the adjust knob is turned, the LDX-3232 automatically
changes to setpoint mode indicated by the flashing annunciator. Adjust the
setpoint to 1500 mA. After an adjustment has been made, and the adjust knob is
released, the setpoint mode will time out in three seconds. The display will revert
to the original measurement display mode (I, IPD, V, or PPD).
The instrument is still not ready to turn on the laser. One of the laser protection
features our precision current sources offer is a fully independent hardware
current limit. The current limit protects your laser by never allowing the laser drive
current to exceed the limit independent of the setpoint and the output control
mode (Constant Current or Constant Power).
01_10
LDX-3232
15
CHAPTER
2
OPERATION
Operating a Laser in Constant Current (I) Mode
To set the current source limit, use the SELECT
push button in the PARAMETER section of the front
panel to select LIM I. Press the (PARAMETER)
SET push button and rotate the adjust knob to vary
the limit setpoint value. After three seconds, the
new parameter value is stored in non-volatile
memory.
When the LASER current limit is reached, the CURRENT LIMIT error indicator
flashes. The current limit setting is independent of the voltage drop of the device
connected to the LASER output, and therefore, no dummy load is required for
precise adjustment of the current limit. Furthermore, since the current limit
circuitry is fully independent of the main current control, the current limit can be
adjusted safely, even while the LASER output is active.
An additional feature of the LDX-3232 instrument is an adjustable voltage limit.
This allows an extra level of laser protection in the event of an intermittent open
circuit. For maximum protection via the fastest open-circuit detection, the voltage
limit should be set to a value slightly greater than the intended operating voltage.
To set the LASER voltage limit, use the SELECT push
button in the PARAMETER section of the front panel to
select COMP V and then press the (PARAMETER) SET
push button to adjust the voltage limit using the adjust knob.
Now you are ready to enable the current source output for
your laser diode.
In the MODE section of the front panel, press the push button labeled OUTPUT.
The accompanying LED labeled ON will illuminate, indicating that the laser current
source's output is enabled. The instrument will drive the current source to the
value set by the corresponding MODE setpoint. When the LASER output is off, an
internal short is placed across the LASER output. The OUTPUT switch has a
toggling action. Pressing the switch again will disable the current source output
and the ON LED will not be illuminated. The default condition for the current
source output is off when the instrument is first powered up. With the laser output
enabled, the LASER display should be indicating measured laser current. If the
output won't function, check the following conditions:
16
LDX-3232
OPERATION
Operating a Laser in Constant Power (P) Mode
CHAPTER
2
Conditions That Will Automatically Shut Off the LASER OUTPUT
The following conditions will automatically cause the instrument to disable the
current source output:
• LASER High Power Limit
• LASER Interlock / Key Lock Turned Off
• LASER Open Circuit or Voltage Limit
Operating a Laser in Constant Power (P) Mode
Suppose you want to operate a 3 mW laser at constant 1mW level. The LDX-3232
allows you to operate the laser current source driver in a Constant Power mode.
In this mode, the LDX-3232 drives current to the laser to reach a setpoint power
value (in mW). The control loop feedback parameter is photodiode current that the
LDX-3232 converts to optical power via a user-defined photodiode responsivity
number. If laser power changes due to internal or environmental conditions, the
LDX-3232 will increase/decrease the current to the laser to maintain the power
setpoint. The following paragraphs detail the instrument configuration in Constant
Power Mode.
To set the LDX-3232 in Constant Power mode, select P in the MODE section of
the front panel by toggling the SELECT push button. Repeatedly pressing the
(MODE) SELECT switch cycles through the current (I), light power (P), or high
bandwidth current (IHBW) control modes. The LED indicator shows the selected
mode.
Entering Photodiode Responsivity Values
The photodiode responsivity, CAL photodiode, is
used to convert between photodiode current and
optical power of the laser diode. To enter the CAL
photodiode parameter, select CAL PD with the
(PARAMETER) SELECT push button by toggling
down past LIM P. The indicator becomes lit when
CAL PD is selected and the display indicates the
responsivity parameter in µA/mW
(not an-nunciated). Rotate the adjust knob after
pressing the (PARAMETER) SET push button to
enter a new value for responsivity. After three
seconds, the new parameter value is stored in nonvolatile memory.
01_10
LDX-3232
17
CHAPTER
OPERATION
Operating a Laser in Constant Power (P) Mode
2
A method to calculate the responsivity is suggested below.
1
Measure (with a calibrated detector) the output power of the device.
2
Measure the corresponding photodiode current.
3
Calculate the responsivity by dividing the photodiode current by the optical power noting
the units required are µA/mW.
The LDX-3232 High Compliance Current Source can be put
into a special mode with the CAL PD parameter set to zero.
When the CAL PD value is zero, the LASER output will be
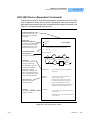
controlled to the IPD setpoint value. Therefore, the
instrument is in Constant IPD mode. The display will indicate
"-.-" for the power measurement.
Next, configure the display so that it reads in mW by pressing and releasing the
(DISPLAY) SELECT switch until the mW annunciator is lit.
Adjust the Constant Power setpoint of the LDX-3232 to 1.00 mW. To do this, turn
the adjust knob to vary the setpoint. When the adjust knob is turned, the
LDX-3232 automatically changes to setpoint mode as indicated by the flashing
annunciator. Adjust the setpoint to 1.00 mW. After an adjustment has been made,
and the adjust knob is released, the setpoint mode will time out in three seconds.
The display will then return to the measurement display mode (I, IPD, V, or PPD).
Before the laser output is enabled, the power limit for the laser under test should
be set. In Constant Power mode, this is accomplished by setting a Power limit,
LIM P value. The LDX-3232 uses the responsivity value entered to calculate a
power limit as a function of monitor current (IPD). This is a software limit only.
To set the Constant Power limit, use the SELECT push button in the
PARAMETER section to select LIM P. When the LIM P is indicated by the
accompanying LED, the display will indicate the limit setpoint in mW. Press the
(PARAMETER) SET push button and rotate the adjust knob to set the limit to 1.50
mW. When the desired value is reached, the new limit value. will be stored in three
seconds.
The LIM P is the absolute limit of optical power, as detected by the unit via the
monitor photodiode feedback loop. In order for this limit to be meaningful, the
monitor photodiode responsivity (CAL PD) must be adjusted correctly. This limit is
a software limit only. The LASER output is normally turned off if this limit is
reached (See LASer:ENABle:OUTOFF command in Chapter 4 for instructions on
disabling this function). The maximum LIM P value is 5000.0 mW.
Also, in constant power mode the LASER current limit and voltage limit values are
in effect. Setting of these limits is described later in this chapter.
18
LDX-3232
OPERATION
Error Indicators
CHAPTER
2
Now the instrument is configured to operate in Constant
Power Mode. In the MODE section, enable the output of the
laser current source by depressing the OUTPUT push
button once. The accompanying LED labeled ON will
illuminate indicating that the laser output is on and current is
being driven to the laser. The LDX-3232 current source will
drive the laser to the Constant Power setpoint and maintain
closed loop control with the photodiode current
measurement.
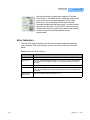
Error Indicators
The LDX-3232 High Compliance Current Sources indicate general operational
error conditions. Each error condition results in an action as shown in the table
below.
Table 2.2 LDX-3232 Error Indicators
01_10
Error Condition
Action
Interlock
Output off; INTERLOCK light flashes at 1 Hz
Open Circuit
Output off; OPEN CIRCUIT light flashes at 1 Hz; if this condition was caused by
an excessively high compliance voltage, the VOLTAGE LIMIT light will also be
turned on.
Current Limit
CURRENT LIMIT light flashes at 1 Hz
Voltage Limit
VOLTAGE LIMIT light flashes at 1 Hz; this indicator warns that the output is within
0.25 V of LIM V setting; if the voltage limit (LIM V) is reached, the LASER output
will shut off.
Optical Output
Power Limit
Output off; POWER LIMIT light flashes at 1 Hz
LDX-3232
19
CHAPTER
20
LDX-3232
2
OPERATION
Error Indicators
REMOTE OPERATION
CHAPTER
CHAPTER
3
3
REMOTE OPERATION
Everything you learned to do from the front panel can also be done remotely and
in some cases, with more flexibility. For instance, in remote mode, you have
access to commands for functions not found on the front panel, such as
commands that will increment (INC) and decrement (DEC) the current setpoint by
a pre-defined step value. The following sections show you the fundamentals of
operating your LDX-3232 High Compliance Current Source remotely through the
GPIB interface.
Reading the GPIB Address
Before you can operate the LDX-3232 instrument from a remote location, you
need to know its GPIB address. Simply press the LOCAL switch in the section
labeled GPIB on the front panel. The instrument will display the address. The
default address from the factory is address "Adr 01".
Changing the GPIB Address
Every device on the GPIB bus must have a unique address. If it is necessary to
change the address, press and hold in the (PARAMETER) SET switch while
displaying the GPIB address. Turn the ADJUST knob until the desired address
value is displayed, then release the SET switch. The new GPIB address will then
be stored in non-volatile memory. The allowable address range is 0-30 for primary
GPIB addressing. Extended GPIB addressing is not implemented on the
LDX-3232 at this time.
01_10
LDX-3232
21
CHAPTER
3
REMOTE OPERATION
LDX-3232 Current Source Command Set
Changing Operation from Local to Remote
Sending a command over the GPIB will automatically put the
instrument in REMOTE mode. The REMOTE indicator will
identify when the Current Source is in remote operation mode.
When the instrument is in REMOTE mode, pressing the LOCAL
switch returns the instrument to LOCAL control mode unless a
Local Lockout state has been activated by the low level GPIB
command LLO from the host computer. Local Lockout disables
all LDX-3232 High Compliance Current Source front panel
switches until this condition is changed by the host computer. In
this condition, the REMOTE indicator will flash at a 1Hz rate.
The TALK/LISTEN indicator is illuminated when the instrument is
communicating over the GPIB bus.
For more information on low level interface commands such as LLO, refer to the
IEEE488.1 specification.
LDX-3232 Current Source Command Set
For the most efficient and effective remote control of your LDX-3232 High
Compliance Current Source, we recommend you study the following sections. You
will learn about the LDX-3232 command sets, both GPIB-IEEE488 Command
Commands and the most used device specific commands, and command syntax.
Later in this chapter you will be introduced to the error and status registers.
Command Syntax
Any command or command query must contain all of the letters that are shown in
the LDX-3232 Command Path Structure, Figure 3.2. However, the Current
Source's command parser is NOT CASE SENSITIVE so upper or lower case may
be used in any combination. The lower case letters shown with the Device
Dependent commands in Chapter 4 are optional letters and may be used for
clarity. For example, the following commands are equal:
• LAS:DIS 1
• LAS:DisP 1
• LAS:DISPLAY 1
In this example, only the first three letters "DIS" are required, while the other
letters, "play" are optional. These optional letters must be used in the proper
sequence as shown.
22
LDX-3232
REMOTE OPERATION
LDX-3232 Current Source Command Set
CHAPTER
3
The syntax of the LDX-3232 High Compliance Current Source commands follows
the rules laid out in the GPIB-IEEE488 standard. Colons (:) indicate the start of a
new command path, while semicolons (;) indicate a separation of commands
within a command string. A leading colon on a command may be used to return
the LDX-3232 High Compliance Current Source command parser to the
command path root (see Figure 3.1).
Spaces or white space may be used to separate commands and/or data (after the
command header or query question mark). Spaces or white space must be used
to separate the command (header) from the first parameter (or program data). The
following examples show valid syntax for commands with the LDX-3232 High
Compliance Current Source:
• LAS:display:ldi
• Laser:limit:ldi 400
• LAS:DIS 1; las:set:ldi?
• Las:MODE:Mdp; LAS:OUT 1
The following are examples of invalid syntax for the LDX-3232 High Compliance
Current Source. These command strings would produce an erroneous result, as
explained:
LAS:MODE MDP
Missing colon, MODE? expected
LAS:MODE:ILBW DEC
Missing semicolon, DEC command generates an error
LAS:DIS ?
Space not allowed before question mark, DIS command
expected
Las:LDI33;dis?
Space missing between LDI command and the parameter
value, 33
For further clarity in programming, the (Boolean) values of one (1) and zero (0)
may be used or their names as indicated in the following table:
Table 3.1 Substitute Parameter Names
01_10
Substitute Name
Value
ON
1
OFF
0
OLD
1
NEW
0
TRUE
1
FALSE
0
SET
1
RESET
0
LDX-3232
23
CHAPTER
3
REMOTE OPERATION
LDX-3232 Current Source Command Set
If multiple parameters are expected, they should be separated with commas:
LAS:INC 100,50
A query has no space between the mnemonic and the question mark:
LAS:LDI?
The LDX-3232 High Compliance Current Source uses a terminator of
<NL><^END> (new line with EOI). For users whose GPIB driver defaults expect a
carriage return in the terminator, <CR><NL><^END>, the TERM command may be
used for convenience (see TERM command in Chapter 4). For more information,
refer to your GPIB driver configuration manual.
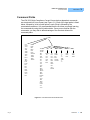
The command structure is illustrated in Figure 3.1. Table 4.1 lists all of the
LDX-3232 High Compliance Current Source’s device-dependent commands, with
the full path shown for each command and a brief explanation of its usage.
24
LDX-3232
REMOTE OPERATION
Command Paths
CHAPTER
3
Command Paths
The LDX-3232 High Compliance Current Source device-dependent commands
are structured into a tree format (see Figure 3.1). Each of the legal paths is listed
below, followed by its list of path options, each of that is followed by the
commands themselves. It is recommended that the first-time user begin learning
the commands by using the full path notation. Once you are familiar with the
commands, you may wish to take advantage of the shortcuts allowed for
command paths.
(root)
(com.
cmds)
*CAL?
*CLS
*ESE
*ESE?
*ESR?
*IDN?
*OPC
*OPC?
*PSC
*PSC?
*PUD
*PUD?
DELAY
LAS
ERR?
MES
MES?
RAD
RAD?
SECURE
TERM
TERM?
TIME?
TIMER?
:CALMD
:CALMD?
:COND?
:DEC
:DIS
:CAL
:CONST?
:DIS?
:EVE?
:LDI
:LDI?
:LDV
:INC
:LDI
:LDV?
:MDI
:LDI?
:MDI?
:DIS
:LDI
:COND
:LDI?
:COND?
:EVE
:LDV
:LDV? :EVE?
:MDI
:OUTOFF
:MDI? :OUTOFF?
:MDP
:LDV
:MDP?
*RCL
:LDV?
:SET
*RST
*SAV
:MDI
:MDI?
:MDLN
:MDLN?
:MDP
:MDP?
*SRE
*SRE?
*STB?
*TST?
*WAI
:ENAB
:LIM
:I1
:I1?
:I3
:I3?
:MDP
:MDP?
:V
:V?
:MODE
:SET
:IHBW
:ILBW
:LDI?
:MDP
:MDI?
:MDP?
:SET?
:PARAM
:MODE?
:OUT
:OUT?
:RAN
:RAN?
:STEP
:STEP?
:TOL
:TOL?
Figure 3.1 LDX-3232 Command Path Structure
01_10
LDX-3232
25
CHAPTER
3
REMOTE OPERATION
IEEE488.2 Command Commands
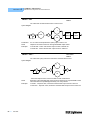
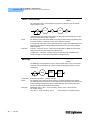
IEEE488.2 Command Commands
The IEEE488.2 Common Commands and Queries are distinguished by the "*"
that begins each mnemonic. The diagrams below show the syntax structure for
common commands, common commands with numeric data required, and
command command queries.
:
:
*
*
COMM A ND
:
COM MA ND
*
COMMAND
< w hit e
space>
Common Command
< Decimal
Numeric Program
Data>
Common Command w ith Numeric Data
?
Common Command Query
Numeric data is required with *PSC (1=on, 0=off), *RCL (0 to 10, see front panel
RECALL function), *SAV (1 to 10, see front panel SAVE function), *ESE (0 to 255,
see Figure 3.2), *SRE (0 to 255, see Figure 3.2), and *PUD (used at factory only).
A list of all of the GPIB-IEEE488 Common Commands supported by the
LDX-3232 follows:
*CAL?
*CLS
*ESE
*ESE?
*ESR?
*IDN?
*OPC
*OPC?
*PSC
*PSC?
*PUD
*PUD?
*RCL
*RST
*SAV
*SRE?
*SRE
*STB?
*TST?
*WAI
For more information on these commands, refer to an ANSI/IEEE 488-1987
standards reference.
Note: Care should be taken to set the GPIB time-out appropriately for use with the *WAI,
DELAY, or *OPC? Commands. If the time for a response after one of these commands
exceed the GPIB time-out period, a bus (timeout) error will occur. Usually, after this timeout
error, the LDX-3232 Series Instrument will generate a query error (E302). This error code is
reported via the ERR? Query.
26
LDX-3232
REMOTE OPERATION
LDX-3232 Frequently Used Commands
CHAPTER
3
LDX-3232 Frequently Used Commands
The LDX-3232 High Compliance Current Source’s complete command set
contains over 60 commands that allow you to operate the current source for a
variety of applications. Within the command set, however, is a smaller subset of
commands that will meet most of your needs. These commands are listed in
Table 3.2.
Table 3.2 LDX-3232 Often Used Commands
01_10
Name
Parameters
Function
ERR?
NONE
Returns errors generated since the last query
LAS:CALMD
1
Used to set the CAL PD (monitor responsivity) constant
LAS:LDI
1
Used to set the current source setpoint value
LAS:LDI?
NONE
Used to return the constant current source measured value
LAS:LDV?
NONE
Used to return the measured laser voltage value
LAS:LIM:I2
1
Used to set the low range current limit
LAS:LIM:I4
1
Used to set the high range current limit
LAS:LIM:MDP
1
Used to set the constant optical power (from monitor
photodiode) limit value
LAS:LIM:V
1
Used to set the current source compliance voltage limit value
(LIM V)
LAS:MDP
1
Used to set the constant optical power setpoint
LAS:MDP?
NONE
Returns the actual monitor photodiode power value
LAS:MODE?
NONE
Returns the mode, ILBW, IHBW, or MDP (optical power)
LAS:MODE:IHBW
NONE
Sets the mode to constant current, high bandwidth mode
LAS:MODE:ILBW
NONE
Sets the mode to constant current, low bandwidth mode
LAS:MODE:MDP
NONE
Sets the mode to constant optical power mode
LAS:OUT
1
Used to enable/disable the current source output
LAS:OUT?
NONE
Returns the current source output status
LAS:RAN
1
Sets the laser current output range
LDX-3232
27
CHAPTER
3
REMOTE OPERATION
Status Reporting
Status Reporting
This section contains information that is relevant for understanding instrument
error and statu reporting. It also contains information regarding the use of the
instrument status for generating interrupts for interrupt driven programs or
subroutines. Understanding the Operation Complete definition for the instrument
is useful for programming synchronization. The Output Off Register section also
contains iformation on setting some of the conditions that will force the laser
current source output off.
The following sections describe the Event and Condition registers, Operation
Complete Flag, Output Off registers, and Error Messages.
Event and Condition Registers
In addition to the required GPIB-IEEE488 status reporting structures, the
LDX-3232 High Compliance Current Source remote interface provides Event and
Condition Registers for LASER operations. The Event Registers are used to
report events that occur during the operation of the LDX-3232 High Compliance
Current Source. Events differ from conditions in that events signal an occurrence
once, and are not reset until the Event Register is queried, the status cleared by
the *CLS command, or the instrument is powered off. Conditions reflect the
current state of the device and therefore may change many times during
operation. Querying a Condition Register does not change its contents.
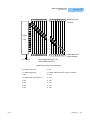
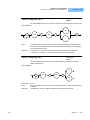
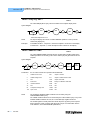
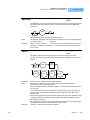
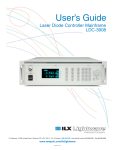
Figure 3.3 shows the status reporting scheme of the LDX-3232 High Compliance
Current Source. Each of the registers that may be accessed by a command or
query has the appropriate command or query written above or below the register
representation. For example, the LASER Condition Register may be queried via
the LASer:COND? query.
The condition or event registers are logically ANDed with their respective enable
registers. These bits are then logically ORed to form a summary message in the
status byte for that particular register.
Operation Complete Definition
Note that Bit 0 of the Standard Event Status Register contains the status of the
Operation Complete flag. Enabling this bit via the *ESE command allows the user
to update bit 5 of the status byte. Then, if the SRE mask has bit 5 set, and the user
issues an *OPC command, the SRQ (bus) signal will be generated upon
completion of the currently processed commands. This bus signal (SRQ) may be
used to initiate service request routines, that depend on the completion of all
previous commands.
28
LDX-3232
REMOTE OPERATION
Status Reporting
CHAPTER
3
For example, the user may turn the current source on (LAS:OUT 1), enable an
SRQ on Operation Complete (set *ESE 1 and *SRE 5), and have an SRQ
handling routine in the user's software, that reads a new measurement after the
output on state has been reached. This allows the use of the operation complete
features of the LDX-3232, without the need for program looping or polling that can
tie up the GPIB. Operation Complete on the LDX-3232 is defined as:
1
No operations to the LASER current source hardware are pending.
2
No EEPROM (non-volatile) memory write cycles are in progress.
Standard
Event Status Register
*ESR?
7
&
6
&
LOGICAL
OR
7
6
5 4
&
3 2 1
&
&
5 4
&
0
&
&
3 2 1
0
LASER Condition Status Register
LASer :COND?
0 - Operation Complete
1 - Request Control
2 - Query Error
3 - Device-Dependendent Error
4 - Execution Error
5 - Command Error
6 - User Request
7 - Power On
Standard
Event Status Enable
Register
*ESE
*ESE?
SERVICE
REQUEST
GENERATION
&
7
6 5
4 3 2 1 0
&
7
5
&
&
&
4 3 2
&
&
1 0
Service Request Enable
Register
*SRE
*SRE?
QUEUE
{
ERROR
QUEUE
&
&
&
&
&
15 14 13 12 11 10 9 8
&
&
&
&
&
&
&
&
7 6 5 4 3 2 1 0
{
LASER Condition Status Enable
LAS :ENABle :COND
LAS :ENABle :
0 – N/A
1 - N/A
2 – LASER Event
3 – LASER Cond.
4 - Message Available
5 - Event Status Summary
6 - Request Service/Master Status Summary
7 - Error Available
0 – Current Limit
1 – Voltage Limit
2 – N/A
3 – Power Limit
4 – Interlock
5 – N/A
6 – Comp. Voltage Limit
7 – Open Circuit
8 – Output Shorted
9 – Out of Tolerance
10 – Output On
11 – Ready for Calibration
12 – N/A
13 – N/A
14 – N/A
15 – N/A
LASER Event Status Register
LASer :EVEnt?
Status Byte Register
*STB?
&
{
&
LOGICAL
OR
OUTPUT
QUEUE
{
7 6 5 4 3 2 1 0
&
QUEUE
NOT-EMPTY
LOGICAL
OR
NOT-EMPTY
15 14 13 12 11 10 9 8
15 14 13 12 11 10 9 8
&
LOGICAL
OR
&
&
&
&
&
7 6 5 4 3 2 1 0
&
&
15 14 13 12 11 10 9 8
&
&
&
&
&
&
&
&
7 6 5 4 3 2 1 0
LASER EventStatus Enable
LAS :ENABle :EVEnt
LAS :ENABle :
0 – Current Limit
1 – Voltage Limit
2 – N/A
3 – Power Limit
4 – Interlock
5 – N/A
6 – Comp. Voltage Limit
7 – Open Circuit
8 – Output Shorted
9 – Tolerance Change
10 – Output On/Off change
11 – New Measurement Ready
12 – N/A
13 – N/A
14 – N/A
15 – N/A
Figure 3.2 LDX-3232 Status Reporting Schematic Diagram
Note: If the GPIB times out while waiting for a response, either set the GPIB time-our
longer or use SRQ generated interrupts in your program. See your GPIB manual for
time-out configuration or SRQ programming setup.
The *OPC, *OPC? and *WAI commands should not be used inside a calibration routine.
01_10
LDX-3232
29
CHAPTER
3
REMOTE OPERATION
Status Reporting
Output Off Register
The Output Off Enable Register allows you to determine that conditions and
events in the LDX-3232 High Compliance Current Source can cause the current
source output to be turned off. This reigster is configured in a manner similar to
the status reporting registers. However, the register output is not reported in the
Status Byte Register. Rather, it sets the hardware that controls the output
switching. The events and conditions that may be set to cause the current source
output to be turned off are shown in Figure 3.3.
The default (factory) settings for this register are shown in Table 3.3. These
settings are not affected by the *PSC (Power-On Status Clear) command.
Table 3.3 LDX-3232 Series Default Settings for Output Off Registers
30
LDX-3232
0 - disabled
8 - N/A
1 - disabled
9 - disabled
2 - N/A
10 - N/A
3 - enabled
11 - N/A
4 - N/A
12 - N/A
5 - N/A
13 - N/A
6 - N/A
14 - N/A
7 - N/A
15 - N/A
REMOTE OPERATION
Status Reporting
CHAPTER
3
r
15 14 13 12 11 10 9 8
&
7 6 5 4 3 2 1 0
LASER Output Off
Register
&
&
&
&
&
&
Logical
&
&
OR
&
&
&
&
&
&
15 14 13 12 11 10 9 8
Turn Output Off
&
7 6 5 4 3 2 1 0
LASER Output Off
Enable Register
LASer:ENABle:OUTOFF <nrf>
LASer:ENABle:OUTOFF?
Figure 3.3 LDX-3232 Output Off Register
01_10
0 - LASER Current Limit
8 - N/A
1 - LASER Voltage Limit
9 - LASER Output Changed to be Out of Tolerance
2 - N/A
10 - N/A
3 - LASER Power Limit (output on)
11 - N/A
4 - N/A
12 - N/A
5 - N/A
13 - N/A
6 - N/A
14 - N/A
7 - N/A
15 - N/A
LDX-3232
31
CHAPTER
3
REMOTE OPERATION
Command Timing and Completion
Command Timing and Completion
This section describes, for each device-dependent command, whether that
command is performed in an overlapped or sequential manner. In other words, it
states whether the next command may begin while the current command is being
executed, or if the next command must wait until the current command is
completed before its execution begins. The conditions for setting the operation
complete flag are given in the Chapter 3 section titled Operation Complete
Definition.
All LDX-3232 device-dependent commands are executed in an overlapped
manner, except the DELAY command that is sequential. The operation complete
flag is set after the conditions outlined in the Operation Complete Definition have
been satisfied.
The *WAI (common command) is an example of a sequential command that
forces the next command to wait until the no-operation-pending flag is true. This is
essentially the same as waiting for the OPC flag to become true, because the nooperations-pending flag is used to set the OPC flag (bit 0 of the Standard Event
Status Register).
Commands that change the status of the instrument limits or change its mode or
current range, step value, or status enable registers will not have their OPC flag
set until all current writing to non-volatile memory has been completed. This is
done to ensure that the OPC flag is never set prematurely.
Whenever there is any output (response) data in the Output Queue, bit 4 is set in
the Status Byte Register. Whenever there is any error message in the Error
Queue, bit 7 is set in the Status Byte Register.
Error Messages
In the event of a hardware error condition, error messages will be displayed on the
display. In most cases, the error message will appear for three seconds. In some
cases the error code display will remain until the user changes display modes. In
the case of multiple error messages, the display may sequentially show each
message for three seconds. In addition to the hardware errors, GPIB errors may
be read via the ERR? query. Table 3.4 lists the numerical error ranges by function.
Table 3.5 contains all of the error messages that may be generated. Not all of
these messages may appear on the front panel displays. Some refer to GPIB
activities only.
In remote operation, the errors can be read by issuing the ERR? query. When this
is done, all of the error messages that are resident in the error queue are returned
32
LDX-3232
REMOTE OPERATION
Error Messages
CHAPTER
3
(up to 10 may be stored). Reading the error queue via GPIB clears the error
queue.
Table 3.4 Error Code Classifications
Error Code Range
Area of Operation
E-001 to E-099
Internal Program Errors
E-100 to E-199
Parser Errors
E-200 to E-299
Execution Control Errors
E-300 to E-399
GPIB Errors
E-500 to E-599
LASER Control Errors
Table 3.5 LDX-3232 Series Error Codes
01_10
Error Code
Explanation
E-001
Memory allocation failure
E-103
<DEFINITE LENGTH ARBITRARY BLOCK PROGRAM DATA> length too long
E-104
<NON-DECIMAL NUMERIC PROGRAM DATA> type not defined
E-105
<DECIMAL PROGRAM DATA> exponent not valid
E-106
<DECIMAL PROGRAM DATA> digit expected
E-123
Command not found
E-124
<program mnemonic> Lookup, failed because query/command type match failed
E-126
Too few or too many program data elements
E-201
<PROGRAM DATA> value out of range
E-202
<PROGRAM DATA> will not convert to valid type
E-203
Security violation, command is not available without clearance
E-205
<PROGRAM DATA> is not a Boolean value or word
E-207
<PROGRAM DATA> will not convert to an unsigned 16-bit value
E-209
<PROGRAM DATA> will not convert to an unsigned 32-bit value
E-210
<PROGRAM DATA> will not convert to a floating point value
E-211
<PROGRAM DATA> will not convert to a character value
E-213
<PROGRAM DATA> is incorrect block data length
E-214
<PROGRAM DATA> length exceeds maximum
E-302
Query error; device was addressed to talk, but GPIB controller failed to read all of the
<RESPONSE MESSAGE>
LDX-3232
33
CHAPTER
34
LDX-3232
3
REMOTE OPERATION
Error Messages
Error Code
Explanation
E-501
LASER interlock disabled output
E-503
LASER open circuit disabled output
E-504
LASER current limit disabled output
E-505
LASER voltage limit disabled output
E-507
LASER power limit disabled output
E-510
LASER out of tolerance disabled output
E-511
LASER control error disabled output
E-512
Analog section status is all 1’s or all 0’s (power down)
E-513
Serial EEPROM checksum error
E-515
Laser output must be off to change ranges
E-516
Incorrect configuration for calibration sequence to start
E-519
Setting a measurement is only valid during the calibration phase for that measurement;
user has tried to calibrate a measurement without first entering the required calibration
mode.
COMMAND REFERENCE
CHAPTER
CHAPTER
4
4
COMMAND REFERENCE
This chapter is a guide to all of the device-dependent commands for the
LDX-3232 High Compliance Current Source. This chapter is divided into two
parts. The first part contains an overview of the remote commands used by the
LDX-3232 High Compliance Current Source. The second part contains all of the
LDX-3232 commands in alphabetical order. Figure 4.1 shows the format for the
device command descriptions in this chapter. The commands that emulate local
(front panel) operation are denoted by the solid box next to the Local label in the
upper left corner of the command description.
Table 4.1 LDX-3232 Series Device-Dependent Commands
01_10
Name
Parameters
Function
DELAY
1
Used to create a delay in the execution of further
commands
ERR?
NONE
Returns errors generated since the last query
LAS:CALMD
1
Used to set the CAL PD (monitor responsivity) constant
LAS:CALMD?
NONE
Returns the CAL PD (monitor responsivity) constant
LAS:CAL:CONST?
1
Factory use only
LAS:CAL:LDI
NONE
Used to enter the laser current calibration mode
LAS:CAL:LDI?
NONE
Returns the ready state for entering the laser current
calibration value
LAS:CAL:LDV
NONE
Used to enter the laser voltage calibration mode
LAS:CAL:LDV?
NONE
Returns the ready state for entering the laser voltage
calibration mode
LAS:CAL:MDI
NONE
Used to enter the monitor photodiode current calibration
mode
LDX-3232
35
CHAPTER
36
LDX-3232
4
COMMAND REFERENCE
Name
Parameters
Function
LAS:CAL:MDI?
NONE
Returns the ready state for entering the monitor
photodiode current calibration value
LAS:COND?
NONE
Returns the value of the LASER condition register
LAS:DEC
0
Used to decrease the laser current setpoint value by
one step
LAS:DIS
1
Turns the LASER display on or off
LAS:DIS?
NONE
Returns the LASER display value
LAS:DIS:LDI
NONE
Turn on/off LASER display to show laser output current
LAS:DIS:LDI?
NONE
Returns status of laser output current display, on/off
LAS:DIS:LDV
NONE
Turn on/off LASER display to show laser output voltage
LAS:DIS:LDV?
NONE
Returns status of laser output voltage display, on/off
LAS:DIS:MDI
NONE
Turn on/off LASER display to show photodiode monitor
current
LAS:DIS:MDI?
NONE
Returns status of photo diode monitor current display,
on/off
LAS:DIS:MDP
NONE
Turns on/off LASER display to show photodiode monitor
power
LAS:DIS:MDP?
NONE
Returns status of photodiode monitor power display,
on/off
LAS:DIS:PARAM
NONE
Enables LASER display to show parameter values
LAS:DIS:SET
NONE
Shows the LASER display setpoint corresponding to
mode
LAS:DIS:SET?
NONE
Returns status of LASER setpoint display, on/off
LAS:ENAB:COND
1
Sets the enable register for LASER conditions
LAS:ENAB:COND?
NONE
Returns the value of the LAS conditions enable register
LAS:ENAB:EVE
1
Sets the enable register for LAS events
LAS:ENAB:EVE?
NONE
Returns the value of the LAS event enable register
LAS:ENAB:OUTOFF
1
Sets the enable register for LAS conditions, that turn the
LAS output off
LAS:ENAB:OUTOFF?
NONE
Returns the value of the LAS outoff enable register
LAS:EVENT?
NONE
Returns the value of the LAS event register
LAS:LDI
1
Used to set the LASER constant current source setpoint
value
LAS:LDI?
NONE
Used to return the constant current source measured
value
LAS:INC
0, 1, or 2
Used to increment the LASER setpoint value by one or
more steps
LAS:LDV
1
Used to set the laser voltage value for calibration
LAS:LDV?
NONE
Used to return the measured laser voltage value
COMMAND REFERENCE
01_10
CHAPTER
4
Name
Parameters
Function
LAS:LIM:I2
1
Used to set the LASER low range current source limit
LAS:LIM:I2?
NONE
Used to return the LASER low range current source limit
LAS:LIM:I4
1
Used to set the LASER high range current source limit
LAS:LIM:I4?
NONE
Used to return the LASER high range current source
limit
LAS:LIM:MDP
1
Used to set the constant optical power (from monitor
photodiode) limit value
LAS:LIM:MDP?
NONE
Used to return the optical power (from monitor
photodiode) limit value
LAS:LIM:V
1
Used to set the LASER compliance voltage limit value
LAS:LIM:V?
NONE
Used to return the LASER compliance voltage limit
value
LAS:MDI
1
Used to set the constant optical power setpoint, if
photodiode responsivity is 0
LAS:MDI?
NONE
Used to return the monitor photodiode current
measured value
LAS:MDLN
1
Used to enable/disable the front panel modulation input
LAS:MDLN?
NONE
Used to return the status of the front panel modulation
input
LAS:MDP
1
Used to set the constant optical power setpoint
LAS:MDP?
NONE
Returns the actual monitor photodiode power value
LAS:MODE?
NONE
Returns the mode, I (current), IHBW (high bandwidth),
or P (optical power)
LAS:MODE:IHBW
NONE
Sets the mode to constant current, high bandwidth
LAS:MODE:ILBW
NONE
Sets the mode to constant current, low bandwidth
LAS:MODE:MDP
NONE
Sets the mode to constant optical power mode
LAS:OUT
1
Used to enable/disable the current source output
LAS:OUT?
NONE
Returns the current source output status
LAS:RAN
1
Sets the laser current output range
LAS:RAN?
NONE
Returns the laser current output range
LAS:SET:LDI?
NONE
Returns the laser constant I (current) setpoint
LAS:SET:MDI?
NONE
Returns the laser constant optical power setpoint
LAS:SET:MDP?
NONE
Returns the constant P (optical power) setpoint
LAS:STEP
1
Used to set the LASER setpoint step value
LAS:STEP?
NONE
Returns the LASER setpoint step value
LAS:TOL
2
Used to set the LASER setpoint tolerance value and
time period value
LDX-3232
37
CHAPTER
38
LDX-3232
4
COMMAND REFERENCE
Name
Parameters
Function
LAS:TOL?
NONE
Used to return the LASER setpoint tolerance value and
time period value
MES
1
Used to enter a string message of up to 16 bits
MES?
NONE
Returns a previously stored ASCII message
RAD
1
Sets the radix type for numerical data; decimal, binary,
octal or hexadecimal
RAD?
NONE
Used to return the radix type for numerical data
TERM
1
Used to add a carriage return to the device terminator
TERM?
NONE
Returns the status of the TERM command
TIME?
NONE
Returns the elapsed time since the instrument was last
powered up
TIMER?
NONE
Returns the elapsed time since the timer was last reset
COMMAND REFERENCE
LDX-3232 Device-Dependent Commands
CHAPTER
4
LDX-3232 Device-Dependent Commands
This section contains all of the device-dependent commands for the LDX-3232
High Compliance Current Source, listed in alphabetical order. Sub-sections for
each path are presented, listing the commands that are legal for that path. See
Figure 3.1 for command path tree structure.
Command Path:Name
Required letters are shown in
upper case; lower case letters
are optional.
Front Panel/
Remote Execution
A solid box means the command
can be executed in that mode.
Command mnemonics in front
panel (local) mode may vary.
Command Description
Front Panel
The LASer:LIMit:I2 command sets the laser current
limit value.
SYNTAX DIAGRAM
Syntax Diagram
(For Remote Commands)
:
Parameters
Tells what parameters are
expected, and their type.
LAS
:
An <nrf value> refers to a
flexible numeric notation
(IEEE-488.2). Integer,
exponential, or floating point
may be used with the decimal
radix. Alternate radices may be
selected in remote operation.
I2
:
<white
space>
LIM
< nrf
value >
PARAMETERS
An <nrf value> that represents the LASER limit
current, in mA.
POINTS OF
INTEREST
The current limit is in effect in all modes of
operation of the laser output.
In local operation, the limit current is entered
by selecting the LIM I parameter, pressing and
holding in the (PARAMETER) SET switch,
adjusting the ADJUST knob until the desired value
is displayed, and then releasing the SET switch.
EXAMPLES
"Las:Lim:I2 100" - action: the LASER current limit
is set to 100.0 mA.
Points of Interest
Has special information
about the command.
Examples
Shows typical statements
using the command.
LASer:LIMit:I1
Remote
"LAS:LIM:I4 3000" - action: the LASER current limit
is set to 3000.0 mA.
Figure 4.1 Command Description Format
01_10
LDX-3232
39
CHAPTER
4
COMMAND REFERENCE
LDX-3232 Device-Dependent Command Reference
LDX-3232 Device-Dependent Command Reference
The following pages contain a reference for the device-dependent commands of
the LDX-3232 High Compliance Current Source. This reference contains useful
information for both local and remote operation of the LDX-3232.
References to the front panel labels are capitalized in the following reference
pages (as is done throughout this manual). Therefore, a reference to the LOCAL
switch is meant to signify the actual switch labeled LOCAL on the front panel of
the LDX-3232.
In some reference, parentheses are used to signify the labeled are for a particular
switch or LED indicator on the front panel. For example, (PARAMETER) SET
refers to the switch labeled “SET” in the PARAMETER area of the front panel.
DELAY
FRONT PANEL
REMOTE
The DELAY command causes the execution of commands to be delayed by a userdefined time. This command is similar to the *WAI common command, except that
execution resumes after the specified number of miliseconds, instead of waiting for the
Operation-Complete flag to be set.
Syntax Diagram
:
Parameters
Notes
Examples
DELAY
<white
space>
<nrf
value>
An <nrf value> that represents the delay time in milliseconds.
The Operation-Complete flag is held false until the delay period elapses, but the *OPC?
query will not execute until the delay period has elapsed.
This command is useful for creating delays that don't require a lot of program code and
don't tie up the GPIB during execution.
The delay time is approximate, with an error of about ±10%.
"DELAY 500" -action: Further commands and queries are not executed until about 0.5
seconds have elapsed from the time this command is executed.
“LAS:LDI 22;Delay 2000;LAS:LDI?” -actions: The current is set to 22.0 mA, then the
LDX-3232 High Compliance Current Source waits for about 2.0 seconds before returning
the measured current.
Note: Care should be taken to set the GPIB time-out appropriately for use with the Delay
command.
40
LDX-3232
COMMAND REFERENCE
LDX-3232 Device-Dependent Command Reference
ERRors?
CHAPTER
4
FRONT PANEL
REMOTE
The ERRors? query returns a list of command and device errors that have occurred
since the last query. These errors are notated by a number that corresponds to the type
of error that occurred. See Chapter 3 for information regarding error handling.
Syntax Diagram
:
Parameters
Notes
Examples
ERR
?
None.
The response data will be a list of the current errors. The errors are represented by
numbers and are separated by commas. A response of 0 indicates that no errors were
reported. The response data is sent as character data. Up to 10 error codes are stored
between error queries.
"ERR?" -response: 0, means no errors reported.
"Errors?" -response: 201, means that the <PROGRAM DATA> (parameter) value out of
range error was reported since the last ERR? query.
LASer:CALMD
FRONT PANEL
REMOTE
The LASer:CALMD command sets the laser's photodiode feedback responsivity
(the CAL PD parameter).
Syntax Diagram
CALMD
:
LAS
<white
space>
:
<nrf
value>
CALPD
Parameters
Notes
Examples
01_10
An <nrf value>, in mA/mW. The range is 0 to 1000.
If the parameter is set to 0, the LDX-3232 will operate in a constant IPD mode, when
Constant P (MDP) mode is selected.
The parameter should be set to 0 for IPD operation modes. Otherwise, the value of this
parameter is used to convert between IPD and PPD values. The units of this parameter are
mA/mW.
"LAS:CALMD 0" -action: sets the CAL PD parameter to 0. This enables the constant IPD
mode of operation.
"Laser:Calmd 1" -action: sets the CAL PD parameter to 1.00 mA/mW. Therefore, a
photodiode feedback current of 1 mA will cause the PPD display to read 1 mW.
LDX-3232
41
CHAPTER
4
COMMAND REFERENCE
LDX-3232 Device-Dependent Command Reference
LASer:CALMD?
FRONT PANEL
REMOTE
The LASer:CALMD? query returns the value of the laser's photodiode feedback
responsivity (CAL PD parameter) setting.
Syntax Diagram
CALMD
:
LAS
:
?
CALPD
Notes
Examples
If this value is 0, the LDX-3232 will be set to operate in constant IPD mode, and the IPD
setpoint value will be in effect. If this value is non-zero, the LDX-3232 will be set to
operate in constant PPD mode, and the PPD setpoint value will be in effect.
If this value is 0, the front panel PPD will display "-.-” and no PPD value can be calculated.
"LASER:CALMD?" -response: 0, means the LDX-3232 is set for operation in constant
IPD mode (if P mode is also selected).
"Las:Calmd?" -response: 1.1, means the LDX-3232 is set for operation in constant PPD
mode (if P mode is also selected) and the responsivity is set to 1.1 µA/mW. 1.1 µA of
photodiode feedback current represents 1 mW of optical power.
LAS:CAL:CONST?
FRONT PANEL
REMOTE
The LAS:CAL:CONST? query returns a stored calibration value. It is intended for factory
use only.
42
LDX-3232
COMMAND REFERENCE
LDX-3232 Device-Dependent Command Reference
LASer:CAL:LDI
CHAPTER
4
FRONT PANEL
REMOTE
The LASer:CAL:LDI command is used to enter the LASER current setpoint,
measurement, and limit (in low bandwidth mode) calibration mode.
Syntax Diagram
LDI
:
LAS
:
CAL
:
I
Parameters
Notes
Examples
01_10
None
Since the limit circuit is the same for both high and low bandwidth modes, it is only
calibrated when low bandwidth mode is selected.
After this command is issued, the LDX-3232 High Compliance Current Source will allow
calibration of the current setpoint, measurement, and limit (if low bandwidth mode is
selected). This procedure is outlined in Chapter 6.
The calibration defaults to the selected bandwidth setting. Therefore, it is necessary to
select the desired bandwidth (I or IHBW) and turn the LASER output on before performing
the calibration for that bandwidth.
Calibration is performed at the current setpoint, wherever it is set. If the LASER output is
not on, E516 is displayed.
In remote operation, the LASer:CAL:LDI? query may be used to determine if the
LDX-3232 High Compliance Current Source is ready for the user to enter a value.
"Las:CAL:LdI" -action: the LDX-3232 enters calibration mode for LASER current.
"Las:Cal:LDI" -action: the LDX-3232 enters calibration mode for LASER current.
LDX-3232
43
CHAPTER
4
COMMAND REFERENCE
LDX-3232 Device-Dependent Command Reference
LASer:CAL:LDI?
FRONT PANEL
REMOTE
The LASer:CAL:LDI? query is used to determine that the LDX-3232 is ready for a value
to be entered during the calibration cycle of the LASer:CAL:LDI mode.
Syntax Diagram
LDI
:
:
LAS
CAL
:
?
I
Notes
Examples
After this query is issued and a response of 1 is received, the LDX-3232 will be ready for
the user to enter a current value via the LASer:LDI command (see Chapter 6).
"LASer:CAL:LDI?" -response: 1, means the LDX-3232 is ready for the user to enter a
current value via the LASer:LDI command.
“LASer:Cal:LdI?” -response: 0, means the LDX-3232 is not yet ready for the user to enter
a LASER current value
LASer:CAL:LDV
FRONT PANEL
REMOTE
The LASer:CAL:LDV command is used to enter the LASER voltage measurement
calibration mode.
Syntax Diagram
:
Parameters
Notes
Examples
44
LDX-3232
LAS
:
CAL
:
LDV
None
After this command is issued, the LDX-3232 will allow calibration of the laser voltage
measurement. This procedure is outlined in Chapter 6.
The LASer:CAL:LDV? query may be used to determine if the LDX-3232 is ready for the
user to enter a value.
"Las:CAL:Ldv" -action: the LDX-3232 enters calibration mode for LASER voltage.
"Las:Cal:LDV" -action: the LDX-3232 enters calibration mode for LASER voltage.
COMMAND REFERENCE
LDX-3232 Device-Dependent Command Reference
LASer:CAL:LDV?
CHAPTER
4
FRONT PANEL
REMOTE
The LASer:CAL:LDV? query is used to determine that the LDX-3232 is ready for a value
to be entered during the calibration cycle of the LASer:CAL:LDV mode.
Syntax Diagram
:
Notes
Examples
LAS
:
CAL
:
?
LDV
After this query is issued and a response of 1 is received, the LDX-3232 will be ready for
the user to enter a voltage value via the LASer:LDV command (see Chapter 6).
"LASer:CAL:LDV?" -response: 1, means the LDX-3232 is ready for the user to enter a
voltage value via the LASer:LDV command.
"LASer:Cal:LdV?" -response: 0, means the LDX-3232 is not yet ready for the user to
enter a LASER voltage value.
LASer:CAL:MDI
FRONT PANEL
REMOTE
The LASer:CAL:MDI command is used to enter the LASER photodiode current
calibration mode.
Syntax Diagram
IPD
:
LAS
:
CAL
:
MDI
Parameters
Notes
Examples
01_10
None
After this command is issued, the LDX-3232 will automatically enter the LASER
photodiode current calibration mode. When the LDX-3232 is ready, the user should enter
the true measured value. This procedure is outlined in Chapter 6.
If the LASER output is not ON or if the P mode is not selected, error code E-516 will be
generated.
In remote operation, the LASer:CAL:MDI? query may be used to determine if the
LDX-3232 is ready for the user to enter a value via the LASer:MDI command.
"Las:CAL:MDI" -action: the LDX-3232 enters the LASER photodiode current calibration
mode.
"LAS:Cal:MDI" -action: the LDX-3232 enters the LASER photodiode current calibration
mode.
LDX-3232
45
CHAPTER
4
COMMAND REFERENCE
LDX-3232 Device-Dependent Command Reference
LASer:CAL:MDI?
FRONT PANEL
REMOTE
The LASer:CAL:MDI? query is used to determine that the LDX-3232 is ready for a value
to be entered during the calibration cycle of the LASer:CAL:MDI mode.
Syntax Diagram
MDI
:
:
LAS
:
CAL
?
IPD
Notes
Examples
After this query is issued and a response of 1 is received, the LDX-3232 be ready for the
user to enter a photodiode current value via the LASer:MDI command (see Chapter 6).
"LAS:CAL:MDI?" -response: 1, means the LDX-3232 is ready for the user to enter a
photodiode current value via the LASer:MDI command.
LASer:COND?
FRONT PANEL
REMOTE
The LASer:COND? query returns the value of the status condition register of the LASER
operations.
Syntax Diagram
:
:
LAS
COND
?
-where the response is the sum of the following:
1
Notes
46
LDX-3232
LASER Current Limit
256
Output is shorted
2
LASER Voltage Limit
512
Output is outside tolerance limit
4
N/A
1024
Output on/off state
8
Power limit
2048
Ready for calibration data state
16
Interlock disabled
4096
N/A
32
N/A
8192
N/A
64
Compliance Voltage Limit
16384
N/A
128
Open circuit
32768
N/A
The LASER conditions that are reported to the status byte are set via the
LASer:ENABle:COND command.
The Open circuit condition is only present while the LASER output is on, and when the
hardware detects this condition, it will turn the LASER output off. Therefore, the Open
COMMAND REFERENCE
LDX-3232 Device-Dependent Command Reference
Examples
CHAPTER
4
Circuit condition is fleeting and may be missed via the LAS:COND? query. Therefore, the
user should test for the Open Circuit Event via the LAS:EVEnt? query.
The LASER condition status is constantly changing, while the event status is only
cleared when the event status is read or the *CLS command is issued.
"LAS:COND?" -response: 513, means that the LASER limit current and out of tolerance
LASER conditions currently exist.
"Radix Hex; Laser:Cond?" -response: #H108, means that the LASER Output shorted
and Power limit conditions currently exist.
LASer:DEC
FRONT PANEL
REMOTE
The LASer:DEC command decrements the selected laser control mode setpoint by one
step. This is an overlapped command. Other commands may be executed while this
function is in progress.
Syntax Diagram
Parameters
Notes
Examples
None.
The decremental default amount is one step. The step size can be edited via the
LAS:STEP command. LDX-3232 default values are 0.1 mA, 0.1 mW, or 1 µA
(if CALMD = 0).
The minimum time to complete one decrement is about 20 ms.
"LAS:MODE:I; LAS:STEP 3; LAS:DEC" -action: The laser source current setpoint is
decremented by 0.3 mA.
LASer:DISplay
FRONT PANEL
REMOTE
The LASer:DISplay command enables or disables (turns off) the display and some LEDs
Syntax Diagram
:
Parameters
Notes
Examples
01_10
LAS
:
DIS
<white
space>
<nrf
value>
An <nrf value>; -where 1 = on, 0 = off.
Turning the display and LEDs off means that a message of all blank spaces is sent to the
display, and most of the LEDs will be turned off.
"las:dis 1" -action: turns the LASER display on and enables the LASER indicator LEDs.
"Laser:dis Off" -action: turns the LASER display and disables the LASER indicator
LEDs.
LDX-3232
47
CHAPTER
4
COMMAND REFERENCE
LDX-3232 Device-Dependent Command Reference
LASer:DISplay?
FRONT PANEL
REMOTE
The LASer:DISplay? query returns the value shown on the display.
Syntax Diagram
:
Notes
Examples
:
LAS
DIS
?
Returns the actual (6-character) string from the output buffer to the display. If the display
is disabled, it returns " .".
"LAS:DIS?" -response: "- 99.9", means the LASER display shows "- 99.9".
"Laser:DISp?" -response: " 0.6", means the LASER display shows " 0.6".
LASer:DISplay:LDI
FRONT PANEL
REMOTE
The LASer:DISplay:LDI command sets the laser display to show the constant current
measurement.
Syntax Diagram
I
:
LAS
:
DIS
:
LDI
Parameters
Notes
Examples
48
LDX-3232
None.
The LDI measurement display mode is turned off automatically when another display
selection is enabled.
"LAS:DIS:LDI" -action: enables the display for current values.
COMMAND REFERENCE
LDX-3232 Device-Dependent Command Reference
LASer:DISplay:LDI?
CHAPTER
4
FRONT PANEL
REMOTE
The LASer:DISplay:LDI? query returns the status of the LDI measurement display mode.
Syntax Diagram
LDI
:
:
LAS
DIS
:
?
I
Notes
Examples
- where the response is 0 or 1.
In local operation, the status of the LDI measurement display mode is indicated by the
enunciator next to the display (mA will be illuminated and not blinking when the display is
in LDI measurement mode).
"LAS:DIS:LDI?" -response: 0, means that the LDI measurement is not displayed.
"Las:dis:ldI?" -response: 1, means that the LDI measurement is displayed.
LASer:DISplay:LDV
FRONT PANEL
REMOTE
The LASer:DISplay:LDV command sets the laser display to show the laser forward
voltage measurement.
Syntax Diagram
V
:
LAS
:
DIS
:
LDV
Parameters
Notes
Examples
01_10
None
The LDV measurement mode is turned off automatically when another display selection
is enabled.
"LAS:DIS:LDV" -action: enables the display for LDV measurement mode.
LDX-3232
49
CHAPTER
4
COMMAND REFERENCE
LDX-3232 Device-Dependent Command Reference
LASer:DISplay:LDV?
FRONT PANEL
REMOTE
The LASer:DISplay:LDV? query returns the status of the LDV (laser diode voltage)
measurement display mode.
Syntax Diagram
LDV
:
:
LAS
:
DIS
?
V
Notes
Examples
- where the response is 0 or 1.
In local operation, the status of the LDV measurement mode is indicated by the
enunciator next to the display (V will be illuminated when the display is in LDV
measurement mode).
"LAS:DIS:LDV?" -response: 0, means that laser voltage measurement is not displayed.
"LAS: DIS:LDV?" -response: 1, means that the laser voltage measurement is displayed.
LASer:DISplay:MDI
FRONT PANEL
REMOTE
The LASer:DISplay:MDI command sets the laser display to show the monitor photodiode
current measurement.
Syntax Diagram
IPD
:
LAS
:
DIS
:
MDI
Parameters
Notes
Examples
50
LDX-3232
None
The MDI measurement display is turned off automatically when another display selection
is enabled.
"LAS:DIS:MDI" -action: enables the display for photodiode current measurement values.
Laser:Disp:Mdi" -action: enables the LASER display for photodiode current
measurement values.
COMMAND REFERENCE
LDX-3232 Device-Dependent Command Reference
LASer:DISplay:MDI?
CHAPTER
4
FRONT PANEL
REMOTE
The LASer:DISplay:MDI? query returns the status of the (LASER DISPLAY) IPD switch.
Syntax Diagram
MDI
:
:
LAS
:
DIS
?
IPD
Notes
Examples
- where the response is 0 or 1
In local operation, the status of the MDI measurement mode is indicated by the
enunciator next to the display (µA will be illuminated and not blinking when the display is
in MDI measurement mode).
"LAS:DIS:MDI?" -response: 0, means that the laser photodiode monitor current
measurement is not displayed.
"Las:dis:MDI?" -response: 1, means that the monitor photodiode current measurement
is displayed.
LASer:DISplay:MDP
FRONT PANEL
REMOTE
The LASer:DISplay:MDP command sets the display to show the monitor photodiode
power measurement.
Syntax Diagram
PPD
:
LAS
:
DIS
:
MDP
Parameters
Notes
Examples
01_10
None
The MDP measurement display is turned off automatically when another display
selection is enabled.
"Las:Display:MDp" -action: enables the display for photodiode power measurement
values.
"Laser:Disp:MDP" -action: enables the display for photodiode power measurement
values.
LDX-3232
51
CHAPTER
4
COMMAND REFERENCE
LDX-3232 Device-Dependent Command Reference
LASer:DISplay:MDP?
FRONT PANEL
REMOTE
The LASer:DISplay:MDP? query returns the status of the MDP (monitor diode power)
measurement display mode.
Syntax Diagram
MDP
:
:
LAS
:
DIS
?
PPD
Notes
Examples
- where the response is 0 or 1.
In local operation, the status of the MDP measurement mode is indicated by the
enunciator next to the display (mW will be illuminated and not blinking when the display
is in MDP measurement mode).
"LAS:DISp:MDp?" -response: 0, means that the MDP measurement is not displayed.
"Las:dis:MDP?" -response: 1, means that the MDP measurement is displayed.
LASer:DISplay:PARAM
FRONT PANEL
REMOTE
The LASer:DISplay:PARAM command enables the display to show the parameter
values.
Syntax Diagram
:
Parameters
Notes
Examples
52
LDX-3232
LAS
:
DIS
:
PARAM
None
This command has the same effect as pressing the (PARAMETER) SELECT switch
while in LASER mode. The selected parameter will be displayed for three seconds. The
actual LASER PARAM display is turned off automatically when a display selection is
enabled.
Each time the command is issued, the next LASER parameter will be selected, see
Chapter 2 for more information.
"Laser:Display:Param" -action: selects a parameter and displays its value.
"LAS:DIS:PARAM" -action: selects a parameter and displays its value.
COMMAND REFERENCE
LDX-3232 Device-Dependent Command Reference
LASer:DISplay:SET
CHAPTER
4
FRONT PANEL
REMOTE
The LASer:DISplay:SET command sets the display to show the setpoint of the selected
display mode.
Syntax Diagram
:
Parameters
Notes
Examples
01_10
LAS
:
DIS
:
SET
None
Using this command has the same effect as physically holding the (DISPLAY) SELECT
switch down continuously.
"Las:Dis:Set" -action: enables the display for the setpoint of the selected mode: LDI,
MDI (IPD) or MDP (PPD)
"LAS:Dis:Set" -action: enables the display for the setpoint of the selected display mode.
LDX-3232
53
CHAPTER
4
COMMAND REFERENCE
LDX-3232 Device-Dependent Command Reference
LASer:DISplay:SET?
FRONT PANEL
REMOTE
The LASer:DISplay:SET? query returns the status of the setpoint display mode.
Syntax Diagram
:
Notes
Examples
LAS
:
:
DIS
SET
?
- where the response is 0 or 1.
The setpoint display will not time out when REMOTE operation is used. (It will be
continuously displayed.)
"LAS:DISPLAY:SET?" -response: 0, means the setpoint is not shown on the display.
"Las:Dis:Set?" -response: 1, means the setpoint value is shown on the display.
LASer:ENABle:COND
FRONT PANEL
REMOTE
The LASer:ENABle:COND command sets the condition status enable register of the
LASER operations for summary (in bit 3 of the status byte) and generation of service
requests.
Syntax Diagram
:
Parameters
Notes
54
LDX-3232
LAS
:
ENAB
:
COND
<white
space>
<nrf
value>
An <nrf value> whose sum represents the enabled bits:
1
LASER Current Limit
256
Output is shorted
2
LASER Voltage Limit
512
Output is outside tolerance limit
4
N/A
1024
Output on/off state
8
Power limit
2048
Ready for calibration data state
16
Interlock disabled
4096
N/A
32
N/A
8192
N/A
64
Compliance Voltage Limit
16384
N/A
128
Open circuit
32768
N/A
The enabled or disabled LASER conditions can be read by using the
LASer:ENABle:COND? query.
The LASER condition status can be monitored by the LASer:COND? query. If any of the
enabled LASER conditions are true, bit 3 of the status byte register will be set.
The enable registers normally retain their values at power-up (as they were at powerdown) unless the power-on status clear flag is set true (for more information see the
*PSC definition, in the GPIB-IEEE488 specification).
COMMAND REFERENCE
LDX-3232 Device-Dependent Command Reference
Examples
CHAPTER
4
"LAS:ENAB:COND 129" -action: enables the LASER status condition register so that the
Open circuit and LASER current limit conditions will be summarized in the status byte
(bit 3).
Laser:Enable:Cond #H0F9B" - action: enables the LASER status condition register so
that any and all of the above conditions will be reported in the status byte register (bit 3).
LASer:ENABle:COND?
FRONT PANEL
REMOTE
The LASer:ENABle:COND? query returns the value of the status condition enable
register of the LASER operations.
Syntax Diagram
:
LAS
:
ENAB
:
COND
?
- where the response is the sum of the following:
1
LASER Current Limit
256
Output is shorted
2
LASER Voltage Limit
512
Output changed to be in/out of tolerance
4
N/A
1024
Output on/off state
8
Power limit
2048
Ready for calibration data state
16
Interlock disabled
4096
N/A
32
N/A
8192
N/A
64
Compliance Voltage Limit
16384
N/A
128
Open circuit
32768
N/A
Notes
Examples
01_10
The enabled LASER conditions can be set by using the LASer:ENABle:COND
command.
The LASER condition status can be monitored by the LASer:COND? query.
"LAS:ENAB:COND?" -response: 17, means that the Laser Current Limit and Interlock
disabled LASER conditions will be reported (in summarized form) to the status byte
(bit 3).
"Radix Hex; Laser:Enable:Cond?" -response: #H0F9B, means that all of the above
conditions will be reported (in summarized form) to the status byte (bit 3).
LDX-3232
55
CHAPTER
4
COMMAND REFERENCE
LDX-3232 Device-Dependent Command Reference
LASer:ENABle:EVEnt
FRONT PANEL
REMOTE
The LASer:ENABle:EVEnt command sets the status event enable register of the LASER
operations. These events are summarized in bit 2 of the status byte register.
Syntax Diagram
:
Parameters
ENAB
:
EVE
<white
space>
<nrf
value>
An <nrf value> whose sum represents the bits that are enabled:
LASER Current Limit
256
Output is shorted
2
LASER Voltage Limit
512
Output changed to be in/out of tolerance
4
N/A
1024
Output on/off state changed
8
Power limit
2048
New measurements taken
16
Interlock changed state
4096
N/A
32
N/A
8192
N/A
64
Compliance Voltage Limit
16384
N/A
128
Open circuit
32768
N/A
Examples
LDX-3232
:
1
Notes
56
LAS
The enabled LASER events can be read by using the LASer:ENABle:EVEnt? query. The
LASER event status can be monitored by the LASer:EVEnt? query.
The enable registers normally retain their values at power-up (as they were at powerdown) unless the power-on status clear flag is set true (for more information see the
*PSC definition, in the GPIB-IEEE488 specification).
"LAS:ENAB:EVENT 136" -action: enables the LASER status event register so that the
Open circuit and Power limit events will be reported (in summarized form) to the status
byte (bit 2).
"Laser:Enable:Event #H0F9B" -action: enables the LASER status event register so all of
the above events will be reported (in summarized form) to the status byte (bit 2).
COMMAND REFERENCE
LDX-3232 Device-Dependent Command Reference
LASer:ENABle:EVEnt?
CHAPTER
4
FRONT PANEL
REMOTE
The LASer:ENABle:EVEnt? query returns the value of the status event enable register of
the LASER operations.
Syntax Diagram
:
LAS
:
ENAB
:
EVE
?
- where the response is the sum of the following:
1
LASER Current Limit
256
Output is shorted
2
LASER Voltage Limit
512
Output changed to be in/out of tolerance
4
N/A
1024
Output on/off state
8
Power limit
2048
New measurements taken
16
Interlock state changed
4096
N/A
32
N/A
8192
N/A
64
Compliance Voltage Limit
16384
N/A
128
Open circuit
32768
N/A
Notes
Examples
01_10
The enabled LASER events can be set by using the LASer:ENABle:EVEnt command.
The LASER event status can be monitored by the LASer:EVEnt? query.
"LAS:ENAB:EVE?" -response: 1040, means that the Output on/off state change and
Interlock changed LASER events will be reported (in summarized form) to the status byte
register (bit 2).
"Radix Hex; Las:Enab:Eve?" -response: #HFDB, means that all of the above events will
be reported (in summarized form) to the status byte register (bit 2).
LDX-3232
57
CHAPTER
4
COMMAND REFERENCE
LDX-3232 Device-Dependent Command Reference
LASer:ENABle:OUTOFF
FRONT PANEL
REMOTE
The LASer:ENABle:OUTOFF command sets the status outoff enable register of the
LASER operations (things that will turn the LASER output off).
Syntax Diagram
:
Parameters
ENAB
:
OUTOFF
<white
space>
<nrf
value>
An <nrf value> whose sum represents the enabled bits:
LASER Current Limit
256
N/A
2
LASER Voltage Limit
512
Output is out of tolerance*
4
N/A
1024
N/A
8
Power limit (with output on)
2048
N/A
16
N/A
4096
N/A
32
N/A
8192
N/A
64
N/A
16384
N/A
128
N/A
32768
N/A
Examples
LDX-3232
:
1
Notes
58
LAS
The enabled LASER outoff bits can be read by using the LASer:ENABle:OUTOFF?
query.
The enable registers normally retain their values at power-up (as they were at powerdown) unless the power-on status clear flag is set true (for more information see the
*PSC definition, in the GPIB-IEEE488 specification).
The factory default value for this register is #B0000100000001000, #H808, or 2056
decimal.
"LAS:ENAB:OUTOFF 9" -action: enables the LASER status outoff register so that Power
limit and LASER current limit conditions will cause the LASER output to be turned off.
"Las:Enab:Outoff #HE0B" -action: enables the LASER status outoff register so that any
or all of the above conditions will cause the LASER output to be turned off.
COMMAND REFERENCE
LDX-3232 Device-Dependent Command Reference
CHAPTER
4
.
LASer:ENABle:OUTOFF?
FRONT PANEL
REMOTE
The LASer:ENABle:OUTOFF? query returns the value of the status outoff enable register
of the LASER operations.
Syntax Diagram
:
LAS
:
ENAB
:
OUTOFF
?
-where the response is the sum of the following:
1
LASER Current Limit
256
N/A
2
LASER Voltage Limit
512
Output if out of tolerance
4
N/A
1024
N/A
8
Power limit (with output on)
2048
N/A
16
N/A
4096
N/A
32
N/A
8192
N/A
64
N/A
16384
N/A
128
N/A
32768
N/A
Notes
Examples
01_10
The enabled LASER events can be set by using the LASer:ENABle:OUTOFF command.
The LASER output status can be monitored by the LASer:EVEnt? query.
"LAS:ENAB:OUTOFF?" -response: 1, means that Current Limit Condition will cause the
LASER output to be turned off.
"Radix Hex; Las:Enab:Eve?" -response: #H20B, means that all of the above conditions
will cause the LASER output to be turned off.
LDX-3232
59
CHAPTER
4
COMMAND REFERENCE
LDX-3232 Device-Dependent Command Reference
LASer:EVEnt?
FRONT PANEL
REMOTE
The LASer:EVEnt? query returns the value of the status event register of the LASER
operations.
Syntax Diagram
:
LAS
:
EVE
?
-where the response is the sum of the following:
1
LASER Current Limit
256
Output is shorted
2
LASER Voltage Limit
512
Output changed to be in/out of tolerance
4
N/A
1024
Output on/off state changed
8
Power limit
2048
Measurement ready
16
Interlock disabled
4096
N/A
32
N/A
8192
N/A
64
Compliance Voltage Limit
16384
N/A
128
Open circuit
32768
N/A
Notes
Examples
60
LDX-3232
The LASER conditions that are reported in the status byte can be set by using the
LASer:ENABle:EVEnt command.
The LASER event status is only cleared when the event status is read or by the *CLS
command while the condition status is constantly changing.
"LAS:EVE?" -response: 513, means that the LASER output tolerance changed and
current limit events have occurred since the last LASer:EVEnt? query.
"Radix Hex; Laser:Event?" -response: #H88, means that the LASER Power limit and
Open circuit events have occurred since the last LASer:EVEnt? query.
COMMAND REFERENCE
LDX-3232 Device-Dependent Command Reference
LASer:INC
CHAPTER
4
FRONT PANEL
REMOTE
The LASer:INC command increments the selected laser control mode setpoint by one or
more steps. Optional parameters allow multiple steps to be incremented and the time (in
ms) between increments to be set, respectively. This is an overlapped command. Other
commands may be executed while this function is in progress.
Syntax Diagram
:
Parameters
Notes
Examples
01_10
LAS
:
INC
<white
space>
<nrf
value>
,
<nrf
value>
0, 1, or 2. The first optional parameter is the number of steps, and the second optional
parameter is the number of ms between steps.
The decremental default amount is one step. The step size can be edited via the
LAS:STEP command. LDX-3232 default values are 0.1 mA, 0.1 mW, or 1 µA.
If the first optional parameter is used, but not the second, the LASER setpoint is
incremented by a multiple of the LAS:STEP size without changing the LAS:STEP size.
The second optional parameter is the time, in ms, between steps.
If both optional parameters are used, the user may create an automated stepping ramp
function for the LASER output.
If the first optional parameter is entered as zero, “LAS:INC 0”, the command will do
nothing.
The minimum time to complete one increment is about 20 ms. Therefore, values for the
second optional parameter (time between increments) have a practical minimum of 20.
This command should not be overlapped with “LAS:DEC” or other “LAS:INC” commands.
“LAS:MODE:I; LAS:STEP 3; LAS:INC” -action: The laser source current setpoint is
incremented by 0.03 mA.
“LAS:MODE:I; LAS:STEP 3; LAS:INC 3” -action: The laser source current setpoint is
incremented by three times the amount described in the first example.
“LAS:MODE:I; LAS:STEP 3; LAS:INC 3,5000” -action: The laser source current setpoint
is incremented by the amount described in the first example, three times, with
fiveseconds between incremental steps.
“LAS:STEP 1; LAS:Mode:P; Las:INC” -action: The power setpoint is incremented by
0.01 mW.
LDX-3232
61
CHAPTER
4
COMMAND REFERENCE
LDX-3232 Device-Dependent Command Reference
LASer:LDI
FRONT PANEL
REMOTE
The LASer:LDI command sets the laser control current.
Syntax Diagram
I
:
<white
space>
:
LAS
<nrf
value>
LDI
Parameters
Notes
Examples
An <nrf value> that represents the (laser) output current in mA.
setpoint is the same for both low and high bandwidth output modes.
"Las:LDI 400" -action: sets the laser output current to 400.00 mA.
"LAS:ldi 100" -action: sets the laser output current to 100.0 mA.
LASer:LDI?
FRONT PANEL
REMOTE
The LASer:LDI? query returns the value of the measured laser current.
Syntax Diagram
I
:
LAS
:
?
LDI
Notes
Examples
62
LDX-3232
- where the response is the most recent laser current measurement.
Response is the measured laser output current for either low or high bandwidth modes.
This measurement is updated approximately once every 600 ms.
"LAS:ldi?" -response: 30.0, means the measured laser output current is 30.0 mA.
"Laser:LDI?" -response: 100.0, means the measured laser output current is 100.0 mA.
COMMAND REFERENCE
LDX-3232 Device-Dependent Command Reference
LASer:LDV
CHAPTER
4
FRONT PANEL
REMOTE
The LASer:LDV command sets the laser voltage for calibration of the laser voltage
measurement.
Syntax Diagram
:
Parameters
Notes
Examples
LAS
:
LDV
<white
space>
<nrf
value>
An <nrf value> that represents the (laser) output voltage, in volts.
setpoint is the same for both low and high bandwidth output modes and is entered only
for LDV calibration.
"Las:LDV 4" -action: enters a value of 4.000 V.
"LAS:ldv 1.025" -action: enters a value of 1.025 V.
LASer:LDV?
FRONT PANEL
REMOTE
The LASer:LDV? query returns the value of the measured laser voltage.
Syntax Diagram
:
Notes
Examples
01_10
LAS
:
LDV
?
- where the response is the measured laser output voltage for either low or high
bandwidth modes.
This measurement is updated approximately once every 600 ms.
"LAS:ldv?" -response: 3.03, means the measured laser output voltage is 3.03 V.
"Laser:LDV?" -response: 1.0, means the measured laser output voltage is 1.000 V.
LDX-3232
63
CHAPTER
4
COMMAND REFERENCE
LDX-3232 Device-Dependent Command Reference
LASer:LIMit:I2
FRONT PANEL
REMOTE
The LASer:LIMit:I2 command sets the LASER current limit value for the 2000 mA range
on the LDX-3232.
Syntax Diagram
:
Parameters
Notes
Examples
LAS
:
LIM
:
<white
space>
I2
<nrf
value>
An <nrf value> that represents the LASER limit current, in mA.
The current limit is in effect in all modes of operation (ILBW, IHBW, or P). The current
limit in use depends on the LASER output range selection.
"LAS:LIM:I2 180" -action: the LASER current limit is set to 180 mA.
":Laser:Limit:I2 160" -action: the LASER current limit is set to 160 mA.
LASer:LIMit:I2?
FRONT PANEL
REMOTE
The LASer:LIMit:I2? query returns the value of the LASER current limit for the 2000 mA
range on the LDX-3232.
Syntax Diagram
:
Notes
Examples
64
LDX-3232
LAS
:
LIM
:
I2
?
- where the response is the current limit value for the 2000 mA range.
The current limit is in effect in all modes of operation (ILBW, IHBW, or P). The current
limit in use depends on the LASER output range selection.
"LAS:LIM:I2?" -response: 40, means the laser current limit is 40 mA.
"Laser:LIM:I2?" -response: 50, means the laser current limit is 50 mA .
COMMAND REFERENCE
LDX-3232 Device-Dependent Command Reference
LASer:LIMit:I4
CHAPTER
4
FRONT PANEL
REMOTE
The LASer:LIMit:I4 command sets the LASER current limit value for the 4000 mA range
on the LDX-3232.
Syntax Diagram
:
Parameters
Notes
Examples
LAS
:
LIM
:
<nrf
value>
<white
space>
I4
An <nrf value> that represents the LASER limit current, in mA.
The current limit is in effect in all modes of operation (ILBW, IHBW, or P). The current
limit in use depends on the LASER output range selection.
In local operation, the limit current is entered by selecting LIM I parameter, pressing and
holding in the (PARAMETER) SET switch, adjusting the knob until the desired value is
displayed, and then releasing the SET switch.
"LAS:LIM:I4 1800" -action: the LASER current limit is set to 1800 mA.
":Laser:Limit:I4 160" -action: the LASER current limit is set to 160 mA.
LASer:LIMit:I4?
FRONT PANEL
REMOTE
The LASer:LIMit:I4? query returns the value of the LASER current limit for the 4000 mA
on the LDX-3232.
Syntax Diagram
:
Notes
Examples
01_10
LAS
:
LIM
:
I4
?
- where the response is the current limit value for the 4000 mA range.
The current limit is in effect in all modes of operation (ILBW, IHBW, or P). The current
limit in use depends on the LASER output range selection.
"LAS:LIM:I4?" -response: 400, means the laser current limit is 400 mA.
"Laser:LIM:I4?" -response: 1500, means the laser current limit is 1500 mA.
LDX-3232
65
CHAPTER
COMMAND REFERENCE
LDX-3232 Device-Dependent Command Reference
4
LASer:LIMit:MDP
FRONT PANEL
REMOTE
The LASer:LIMit:MDP command sets the laser monitor photodiode power limit value.
Syntax Diagram
MDP
:
:
LAS
<white
space>
:
LIM
<nrf
value>
P
Parameters
Notes
Examples
An <nrf value> that represents the laser monitor photodiode power limit in mW.
When constant MDP mode is used, the output level is limited only by the LIM Ix value.
Exceeding the powere limit will either cause the output to shut off (default) or generate a
warning (see LAS:ENAB:OUTOFF command).
"LAS:LIM:MDP 10" -action: sets the laser output power limit to a value that corresponds
to producing 10.00 mW of photodiode feedback (optical) power.
"Las:Limit:MDp 5" -action: sets the laser output power limit to a value that corresponds to
producing 5.00 mW of photodiode feedback (optical) power.
LASer:LIMit:MDP?
FRONT PANEL
REMOTE
The LASer:LIMit:MDP? query returns the value of the laser monitor photodiode power
limit.
Syntax Diagram
MDP
:
LAS
:
LIM
:
?
P
Notes
Examples
66
LDX-3232
- where the response is the LASER power limit setting.
The (LASER) MDP limit is in effect for both laser output current ranges.
The MDP limit is not in effect when CALMD=0. In this case, the monitor current
measurement is not converted to power.
"LAS:LIM:MDP?" -response: 3.0, means the monitor photodiode power limit is set to
3.0 mW.
":LAS:Limit:MDP?" -response: 10.0, means the monitor photodiode power limit is set to
10.0 mW.
COMMAND REFERENCE
LDX-3232 Device-Dependent Command Reference
LASer:LIMit:V
CHAPTER
4
FRONT PANEL
REMOTE
The LASer:LIMit:V command sets the LASER compliance voltage limit value.
Syntax Diagram
:
Parameters
Notes
Examples
LAS
:
LIM
:
<nrf
value>
<white
space>
V
An <nrf value> that represents the LASER limit voltage, in volts.
The voltage limit setting is useful for laser protection. When the maximum operating
voltage of a laser is known, the user may set the voltage limit to a value slightly higher
than the maximum operating voltage. Then, if the laser is accidentally disconnected, the
current source will quickly sense the over-voltage and shut off.
In local operation, the voltage limit is entered by selecting the COMP V parameter,
pressing and holding in the (PARAMETER) SET switch. Turn the adjust knob until the
desired value is displayed and then release the SET switch.
"LAS:LIM:V 5.0" -action: the LASER compliance voltage limit is set to 5.0 V.
":Laser:Limit:V 4.60" -action: the LASER compliance voltage limit is set to 4.6 V.
LASer:LIMit:V?
FRONT PANEL
REMOTE
The LASer:LIMit:V? query returns the value of the LASER compliance voltage limit
setting.
Syntax Diagram
:
Notes
Examples
01_10
LAS
:
LIM
:
V
?
- where the response is the LASER limit voltage setpoint.
The voltage limit is valid for all modes of Laser operation.
In local operation, the voltage limit is seen by selecting the COMP V parameter, pressing
and holding in the (PARAMETER) SELECT switch.
"LAS:LIM:V?" -response: 4.5, means the laser compliance voltage limit is 4.5 V.
"Laser:LIM:V?" -response: 10.0, means the laser compliance voltage limit is set to
10.0 V.
LDX-3232
67
CHAPTER
4
COMMAND REFERENCE
LDX-3232 Device-Dependent Command Reference
LASer:MDI
FRONT PANEL
REMOTE
The LASer:MDI command sets the value of the optical power setpoint, in µA, if the
CALMD (CAL PD) responsivity is 0.
Syntax Diagram
MDI
:
<white
space>
:
LAS
<nrf
value>
IPD
Parameters
Notes
Examples
An <nrf value> that represents the photodiode feedback current, in µA.
If the CALMD (CAL PD) parameter is not set to 0, the LAS:MDI value will not be used. In
this case, the measured MDI would be converted to MDP (PPD, by the CAL PD factor),
and the MDP (PPD) setpoint would be used.
"Las:Mdi 40" -action: The LASER output is controlled so that the photodiode feedback
current remains constant at 40 µA.
"Laser:MDI 200" -action: The LASER output is controlled so that the photodiode
feedback current remains constant at 200 µA.
LASer:MDI?
FRONT PANEL
REMOTE
The LASer:MDI? query returns the value of the laser photodetector current measurement
in µA.
Syntax Diagram
MDI
:
LAS
:
?
IPD
Notes
Examples
68
LDX-3232
- where the response is the most recent LASER monitor current measurement.
The response is in µA. The response is valid, even when the unit is not in constant P
mode.
This measurement is updated approximately once every 600 ms.
"Las:Mode:MDP; Las:Calmd 0; Las:MDi?" -response: 100.0, means 100 µA of
photodetector current. This feedback is controlling the laser current output.
"LAS:MODE:IHBW; LAS:MDI?" -response: 20.0, means 20 µA of photodetector current,
but photodiode monitor current is not controlling the laser output current.
COMMAND REFERENCE
LDX-3232 Device-Dependent Command Reference
LASer:MDLN
CHAPTER
4
FRONT PANEL
REMOTE
The LASer:MDLN command enables or disables (turns off) the front panel modulation
input (BNC).
Syntax Diagram
:
Parameters
Notes
Examples
LAS
:
MDLN
<white
space>
<nrf
value>
An <nrf value> - where 1=on, 0=off.
After turning the modulation off, it will remain off until turned back on via this command or
by resetting the instrument.
“las:mdln 1” -action: turns the modulation input on and enables modulation via the front
panel BNC connector.
“Laser:mdln 0” -action: turns the modulation input off. Modulation signals at the front
panel BNC will not effect the LAS output.
LASer:MDLN?
FRONT PANEL
REMOTE
The LASer:MDLN? query returns that status of the LAS modulation control. When
disabled, a modulation signal at the front panel BNC will not effect the LAS output.
Syntax Diagram
:
Notes
Examples
01_10
LAS
:
MDLN
?
- where the response of 1=on, 0=off.
The LASER modulation control switches the front panel BNC in and out of the LAS
control circuit. At power up or after reset, modulation is enabled by default.
“LAS:MDLN?” -response: 1, means that the LAS modulation input is enabled.
“las:mdln?” -response: 0, means that the LAS modulation input is disabled.
LDX-3232
69
CHAPTER
4
COMMAND REFERENCE
LDX-3232 Device-Dependent Command Reference
LASer:MDP
FRONT PANEL
REMOTE
The LASer:MDP command sets the value of the optical power setpoint in mW if the
CALMD (CAL PD) responsivity is greater than 0.
Syntax Diagram
MDP
:
<white
space>
:
LAS
<nrf
value>
P
Parameters
Notes
Examples
An <nrf value> that represents the photodiode feedback power in mW.
If the CALMD (CAL PD) parameter is set to 0, the LAS:MDP value will not be used. In
this case, the measured MDP would be invalid, and the MDI (IPD) setpoint would be used.
"Las:Mdp 40" -action: The LASER output is controlled so that the photodiode feedback
power remains constant at 40 mW.
"Laser:MDP 200" -action: The LASER output is controlled so that the photodiode
feedback power remains constant at 200 mW.
LASer:MDP?
FRONT PANEL
REMOTE
The LASer:MDP? query returns the value of the laser photodetector power measurement
in mW.
MDP
:
LAS
:
?
P
Notes
Examples
70
LDX-3232
- where the response is the most recent LASER power measurement.
The response is in mW. The response is valid, even when the unit is not in constant P
mode. This measurement is updated approximately once every 600 ms.
"Las:Mode:MDP; Las:Calmd 460; Las:MDp?" -response: 100.0, means 100 mW of
photodetector power. This feedback is controlling the laser current output.
"LAS:MODE:IHBW; LAS:MDP?" -response: 20.0, means 20 mW of photodetector
power, but photodiode monitor current is not controlling the laser output current.
COMMAND REFERENCE
LDX-3232 Device-Dependent Command Reference
LASer:MODE?
CHAPTER
4
FRONT PANEL
REMOTE
The LASer:MODE? query returns the selected laser control mode.
:
Notes
Examples
:
LAS
?
MODE
IHBW mode is the same as I mode (low bandwidth), except that the output low bandpass
filter is disabled in IHBW mode.
"LAS:MODE?" -response: ILBW, means that constant I (current) mode is in effect for the
laser output.
":Las:Mode?" -response: MDP, means that constant P (power) mode is in effect for the
laser output, and CALMD>0.
"Las:Mode?" -response: MDI, means that constant P (power) mode is in effect for the
laser output, and CALMD=0.
"Laser:MODE?" -response: IHBW, means that constant IHBW (current, high bandwidth)
mode is in effect for the laser output.
LASer:MODE:IHBW
FRONT PANEL
REMOTE
The LASer:MODE:IHBW command selects laser high bandwidth constant current mode.
:
Parameters
Notes
Examples
01_10
LAS
:
MODE
:
IHBW
None
This mode of operation is constant I mode with the output lowpass filter disabled.
"LAS:Mode:Ihbw" -action: enables the laser high bandwidth constant current mode.
LDX-3232
71
CHAPTER
4
COMMAND REFERENCE
LDX-3232 Device-Dependent Command Reference
LASer:MODE:ILBW
FRONT PANEL
REMOTE
The LASer:MODE:ILBW command selects laser constant current mode.
I
:
LAS
:
MODE
:
ILBW
Parameters
Notes
Examples
None
Constant I mode (low bandwidth) enables the output low bandpass filter.
"LAS:MODE:ILBW" -action: sets the laser output for constant I mode (low bandwidth).
LASer:MODE:MDP
FRONT PANEL
REMOTE
The LASer:MODE:MDP command selects laser constant power mode.
P
:
LAS
:
MODE
:
MDP
Parameters
Notes
Examples
72
LDX-3232
None
This mode of laser operation requires the laser's monitor photodiode feedback to
maintain constant optical power or constant monitor current.
In this mode, the displayed parameter will be either IPD (if CALMD=0) in µA, or PPD (if
CALMD>0) in mW.
"LAS:MODE:MDP" -action: sets the laser output mode of operation to constant optical
power mode.
COMMAND REFERENCE
LDX-3232 Device-Dependent Command Reference
LASer:OUTput
CHAPTER
4
FRONT PANEL
REMOTE
The LASer:OUTput command turns the laser output on or off.
:
Parameters
Notes
Examples
:
LAS
OUT
<white
space>
<nrf
value>
An <nrf value>; 1=on, 0=off.
There is a two-second delay after the output is turned on before the output shorting relay
is opened. Following this, the output current ramps up to the current setpoint slowly to
protect the laser. Therefore, the time to turn the output on and reach the setpoint current
varies from two to about three seconds.
After the output is turned on, it may be useful to wait until the output is stable (within
tolerance) before performing further operations, but it is not necessary. When the LASER
output is off, it is safe to connect or disconnect devices to the LASER output terminals.
When the LASER output is off, an internal short is placed across the output terminals.
"LAS:I 20; LAS:OUT ON" -action: sets the laser output current to 20 mA and then turns
the output on.
LASer:OUTput?
FRONT PANEL
REMOTE
The LASer:OUTput? query returns the status of the laser output switch.
:
Notes
Examples
01_10
LAS
:
OUT
?
- where the response is 0 or 1
Although the status of the switch is on, the output may not have reached the setpoint
value.
"Las:OUT?" -response: 0, means that the output switch is disabled, devices may be
safely disconnected or connected at the LASER output terminals.
"LAS:OUT?" -response: 1, means that the LASER output switch is enabled, LASER
output is present.
LDX-3232
73
CHAPTER
4
COMMAND REFERENCE
LDX-3232 Device-Dependent Command Reference
LASer:RANge
FRONT PANEL
REMOTE
The LASer:RANge command selects the laser's drive current output range.
:
Parameters
Notes
Examples
LAS
:
RAN
<white
space>
<nrf
value>
An <nrf value> that represents the laser current output range.
2 = 2000 mA, and 4= 4000 mA range
This range setting effects the Laser Drive Current output current range only. The Laser
Drive Current output should be “off” when this command is issued. If the Laser Diode
Current output is “on” when this command is issued, the LDX-3232 will generate error
E515, and the range will not be changed.
"LAS:RAN 4" -action: sets the laser output drive current range to 4000 mA.
"Laser:range 2" -action: sets the laser output drive current range to 2000 mA.
LASer:RANge?
FRONT PANEL
REMOTE
The LASer:RANge? query returns the value of the Laser Drive Current range.
:
Notes
Examples
74
LDX-3232
LAS
:
RAN
?
- where the response is in integer; 2 means 2000 mA range and 4 means 4000 mA
range.
The resolution and accuracy of the laser limit current are dependent on the Laser Drive
Current output range.
"LAS:RAN?" -response: 2, means that the Laser Drive Current range is 2000mA.
"LAS:range?" -response: 4, means that the Laser Drive Current range is 4000mA.
COMMAND REFERENCE
LDX-3232 Device-Dependent Command Reference
LASer:SET:LDI?
CHAPTER
4
FRONT PANEL
REMOTE
The LASer:SET:LDI? query returns the constant I value that is used for both output
ranges and both bandwidths.
:
:
LAS
Examples
?
I
LDI
Notes
:
SET
- where the response is the constant I setpoint value, in mA.
In local operation, the constant I setpoint is read by selecting I or IHBW mode, then
pressing and holding down the SELECT switch in the DISPLAY area of the front panel.
When the mA indicator is blinking, the display will show the LDI setpoint.
"LAS:SET:LDI?" -response: 50.0, means the laser output current setpoint value is
50.0 mA.
"Laser:set:ldi?" -response: 120.0 means the laser output current setpoint value is
120.0 mA.
LASer:SET:MDI?
FRONT PANEL
REMOTE
The LASer:SET:MDI? query returns the laser monitor photodiode current setpoint value
(when CALPD=0), in µA.
:
:
LAS
MDI
Notes
Examples
01_10
SET
IPD
:
?
- where the response is the constand IPD setpoint value, in µA.
In local operation, the MDI setpoint is read by selecting P mode, then pressing and
holding down the SELECT switch in the DISPLAY area of the front panel. When the µA
indicator is blinking, the display will show the MDI setpoint.
The monitor photodiode current is directly proportional to the laser optical output power.
Therefore, the MDI (IPD) setpoint may be used to control optical output of the laser.
"las:set:mdi?" -response: 30.0, means the laser monitor photodiode current is setpoint is
30 µA, for use in constant P mode with CALPD = 0.
LDX-3232
75
CHAPTER
4
COMMAND REFERENCE
LDX-3232 Device-Dependent Command Reference
"LAS:Set:MDI?" -response: 100.0 means the laser monitor photodiode current is
setpoint is 100 µA, for use in constant P mode with CALMD=0.
LASer:SET:MDP?
FRONT PANEL
REMOTE
The LASer:SET:MDP? query returns the laser monitor photodiode power setpoint value
(when CALMD [CAL PD] is not zero), in mW.
:
:
LAS
SET
P
MDP
Notes
Examples
:
?
- where the response is the constand PPD setpoint, in mW.
In local operation, the MDP setpoint is read by selecting P mode, then pressing and
holding down the SELECT switch in the DISPLAY area of the front panel. When the mW
indicator is blinking, the display will show the MDP setpoint. This setpoint is used in
constand MDP mode only.
"LAS:Set:MDP?" -response: 10.0, means the laser monitor photodiode feedback
setpoint is 10.0 mW (CALPD>0).
"Laser:Set:MDP?" -response: 25.0, means the laser monitor photodiode feedback
setpoint is 25.0 mW (CALPD>0).
LASer:STEP
FRONT PANEL
REMOTE
The LASer:STEP command is used to increment or decrement the selected laser control
mode setpoint by the given amount, when used with the LASer:INC or LASer:DEC
command.
:
Parameters
Notes
Examples
76
LDX-3232
LAS
:
STEP
<white
space>
<nrf
value>
An integer value of the step amount, in the range 1 to 9999.
The step of one corresponds to the smallest display resolution for the mode. For
example, a step of one means 0.1 mA, 0.1 mW, or 1 µA (if CALPD=0).
"Las:Mode:i; Las:ldi 20; Las:Step 100; Las:Inc; Las:set:ldi?" -action: sets the step to
10.0 mA, so the Las:set:ldi? query will return a value of 21.0 mA.
"LAS:STEP 100" -action: sets the step size to 100; could mean 10.0 mA , 10.0 mW, or
100 µA.
COMMAND REFERENCE
LDX-3232 Device-Dependent Command Reference
LASer:STEP?
CHAPTER
4
FRONT PANEL
REMOTE
The LASer:STEP? query is used to read back the LASer STEP value. This value is used
to increment or decrement the selected laser control mode setpoint by the given amount
when used with the LASer:INC or LASer:DEC command.
:
Examples
LAS
:
STEP
?
- where the response is an integer value.
"Las:Mode:LDI; Las:Step?" -response: 1 means the step size is 0.1 mA, since Const I
mode is in effect.
"LAS:MODE:MDP; LAS:CALMD 1; LAS:STEP?" -response: 10 means the step size is
1.0 mW, since Const P mode is in effect.
LASer:TOLerance
FRONT PANEL
REMOTE
The LASer:TOLerance command allows the programmer to determine the LASER
current tolerance and time window for it to occur, in order that the operation complete flag
be set after a "LASer:OUTput 1" command is issued or the LASER setpoint is changed.
:
Parameters
Notes
LAS
:
TOL
<white
space>
<nrf
value>
,
<nrf
value>
Two <nrf values>; the first represents the LASER current tolerance in mA with a range of
0.1 to 100.0 mA; and the second represents the time window, in seconds, with a range of
0.001 to 50.000 seconds.
The LDX-3232 defaults to a tolerance of 1.0 mA for three seconds, unless changed by
the LASer:TOLerance command.
If the LDX-3232 is operated in P mode, the current tolerance parameter is not used.
Instead a fixed value of 50 µA is used for the IPD current. A fixed value of 1 mW is used for
PPD power, and only the time window parameter may be adjusted.
Note: If the tolerance is set too tight it may never be achieved. This is due to the calibration
of the setpoint and measurement values.
Examples
01_10
"Las:Tol 0.5,10" -action: the LDX-3232's LASER current source will be in tolerance when
the LASER current is within 0.5 mA for 10.000 seconds.
LDX-3232
77
CHAPTER
4
COMMAND REFERENCE
LDX-3232 Device-Dependent Command Reference
LASer:TOLerance?
FRONT PANEL
REMOTE
The LASer:TOLerance? query allows the programmer to determine how the LASER
current tolerance is set.
:
Notes
Examples
LAS
:
TOL
?
- where the response consists of two values, the first is the current tolerance in mA and
the second is the time window, in seconds.
The tolerance of the LDX-3232 LASER current may be used to delay programming after
an "LASer:OUTput 1" command is issued or the setpoint is changed.
A change of the output into or out of tolerance flag sets a flag in the LASER status event
register and so entering or exiting LASER current tolerance may be used to generate
service requests.
"Las:Tol?" -response: "0.2,5.0", means the LDX-3232 has a LASER current tolerance
setting of 0.2 mA with a time window of 5.000 seconds.
"LASER:TOL?" -response: "1.0,20.0", means the LDX-3232 has a LASER current
tolerance setting of 1.0 mA with a time window of 20.000 seconds.
MESsage
FRONT PANEL
REMOTE
The MESsage command allows the user to enter an ASCII string of up to 16 non-NULL
characters. This command may be useful for storing messages that relate to a test or
configuration.
:
Parameters
Notes
Examples
78
LDX-3232
MES
<white
space>
<ascii
string>
An ASCII string that is 1 - 16 bytes in length.
The message may contain any ASCII character, but will be terminated when a NULL
terminator character is received. If the message has less than 16 bytes, the software will
fill the remaining message space with the space character. After 16 bytes have been
entered, the software will null-terminate the string.
MESSAGE "This is a test." -action: The string, "This is a test. " will be stored in
non-volatile memory.
Mes "Test 3" -action: The string, "Test 3
" will be stored in non-volatile memory.
COMMAND REFERENCE
LDX-3232 Device-Dependent Command Reference
MESsage?
CHAPTER
4
FRONT PANEL
REMOTE
The MESsage? query returns the previously stored message. This message will always
be 16 bytes long and enclosed in quotes. The message is entered via the MESsage
command.
:
Notes
Examples
MES
?
- where the response is a 16-byte long character string.
The response data will be a 16-byte long string. If there is no previously stored message,
the response will be "
", all spaces.
"MES?" -response: "Test 3
", means the previously stored message was "Test 3".
"Message?" -response: "This is a test. ", means the previously stored message was
"This is a test."
RADix
FRONT PANEL
REMOTE
The RADix command allows the programmer to select the radix type for status,
condition, and event query response data. Decimal, binary, hexadecimal, and octal are
allowed.
:
DEC
Parameters
Notes
Examples
01_10
RAD
HEX
<white
space>
BIN
OCT
As shown above, character program data is expected.
DECimal is the default type. Only the first three letters of the words decimal,
hexadecimal, binary, or octal are required.
When the RADIX is selected, all status, condition, and event queries will return values in
the new radix.
In the cases where the radix is not DECimal, the flexible numeric type <nrf value> (as
shown in the Command Reference diagrams) will be replaced by HEX, BIN, or OCT
representation.
All of the above radixes may be used to enter program data at any time, without the need
for issuing the RADix command. The proper prefix must also be used with Hex (#H),
binary (#B), or octal (#Q).
This command may be useful for setting up status reporting blocks. The bit-wise status
representation may be more easily read in BIN, HEX, or OCT.
"RAD dec" -action: the decimal radix is selected.
LDX-3232
79
CHAPTER
4
COMMAND REFERENCE
LDX-3232 Device-Dependent Command Reference
"rad hex; *ESR?" -action: the hexadecimal radix is selected; -response: #H80, means
power-on was detected.
RADix?
FRONT PANEL
REMOTE
The RADix? query allows the programmer to determine that radix type for status,
condition, and event query response data is currently selected. Decimal, binary, octal,
and hexadecimal are allowed.
:
Notes
Examples
RAD
?
- where the character response data of DEC means decimal, BIN means binary, HEX
means hexadecimal, and OCT means octal.
DEC is the default type. The LDX-3232 defaults to this radix at power-up.
The RADix command is used to select the desired radix. Once it is changed, the new
radix will remain in effect until the power is shut off or a new RADix command is issued.
"RAD?" -response: Dec, means the selected radix is decimal.
"rad?" -response: Hex, means the selected radix is hexadecimal.
"RADIX?" -response: Oct, means the selected radix is octal.
SECURE
FRONT PANEL
REMOTE
The SECURE command allows the service technician access to the protected user data
command, *PUD, that is a common command. This data is normally changed only at the
factor, and therefore the SECURE command is not needed by the user.
TERM
FRONT PANEL
REMOTE
The TERM command allows the programmer to change the default
(GPIB/IEEE488 standard) terminator to include the carriage return.
:
Parameters
Notes
Examples
80
LDX-3232
TERM
<white
space>
<nrf
value>
An <nrf value>, 0=FALSE, non-zero=TRUE
An altered terminator will be in the form <CR><NL><^END>. This technically takes the
LDX-3232 out of GPIB/IEEE488 specification, but may be done for convenience when
using non standard GPIB controllers. This termination will be sent with all output until the
"TERM 0" command is sent or the LDX-3232 is powered off.
"Term 1" -temporarily sets <CR><NL><^END> as the output terminator.
"Term 0" -sets the GPIB/IEEE488 standard <NL><^END>terminator. This is the
LDX-3232 default value.
COMMAND REFERENCE
LDX-3232 Device-Dependent Command Reference
TERM?
CHAPTER
4
FRONT PANEL
REMOTE
The TERM? query allows the programmer to determine whether the default
(IEEE488.2 standard) terminator has been altered to include a carriage return.
:
Notes
Examples
TERM
?
- where the response is 0 or 1.
An altered terminator will be in the form <CR><NL><^END>. This termination will be
sent with all output until the "TERM 0" command is sent, or the LDX-3232 is powered off.
"Term?" -response: 1, means that the <CR><NL><^END> terminator is temporarily
being used.
"Term?" -response: 0, means that the <NL><^END> terminator (GPIB/IEEE488
standard) is being used.
TIME?
FRONT PANEL
REMOTE
The TIME? query allows the programmer to determine how much time has passed since
the LDX-3232 was last powered up.
:
Notes
Examples
01_10
TIME
?
- where the response is character data in the form: hours:minutes:seconds.
The TIME clock is independent of the TIMER clock.
"Time?" -response: 1:02.36, means that one minute and 2.36 seconds have passed
since the LDX-3232 was powered up.
"TIME?" -response: 32:00:76, means that 32 minutes and 0.76 seconds have passed
since the LDX-3232 was powered up.
LDX-3232
81
CHAPTER
4
COMMAND REFERENCE
LDX-3232 Device-Dependent Command Reference
TIMER?
FRONT PANEL
REMOTE
The TIMER? query allows the programmer to determine how much time has passed
since the last TIMER? query was issued.
:
Notes
Examples
82
LDX-3232
TIMER
?
- where the response is character data that represents hours:minutes:seconds.
Each time the TIMER? query is issued, the timer is reset to 0 and the elapsed time since
the last TIMER? query is returned.
The timer counter is initially set at power-up, the same as the TIME? counter. So the first
time the TIMER? is issued its response will be the same as if a TIME? query's response.
"Timer?" -response: 00:02:00.31, means the LDX-3232 has been on for two minutes and
0.31 seconds since the last TIMER? query was issued.
"TIMER?" -response: 00:00:12.03, means the LDX-3232 has been on for 12.03 seconds
since the last TIMER? query was issued.
FU N C T I O N S A N D FE A T U R E S
Saving and Recalling from the Front Panel
CHAPTER
CHAPTER
5
5
FUNCTIONS AND FEATURES
This chapter introduces you to the LDX-3232 High Compliance Current Source
functions and operating features such as event triggering, analog modulation of
laser injection current, and Save and Recall.
Saving and Recalling from the Front Panel
For applications where you might need to alternate between particular instrument
configurations, the LDX-3232 Current Source offers a unique SAVE and RECALL
feature. The SAVE feature allows you to easily store all front panel settings for any
given instrument configuration. These settings, that are stored in one of ten
memory bins, can be retrieved at any time with the RECALL function. This saves
setup time, and it reduces the chance of setup error for tests that are periodically
repeated. For example, using the configuration described in Chapter 2 where the
Current Source is operating in Constant Current mode, the instrument parameters
saved by using the SAVE function would be Constant Current Mode, 2000 mA
range, a limit setpoint of 1750 mA, a laser current setpoint of 1500 mA, and
Display Mode I. Once this setup is saved, the LDX-3232 Current Source may be
configured for another unique setup. You can recall the original setup for the first
experiment any time using the RECALL function.
To enter the SAVE/RECALL mode, press the SELECT switch in the PARAMETER
section until the SAVE indicator LED becomes lit and the unit displays the SAVE
"bin" on the display. If another bin number is desired, press and hold the SET
switch and rotate the adjust knob until the desired bin number is displayed.
Releasing the SET switch completes the SAVE operation and all of the instrument
parameters are saved to the indicated bin number as they appear on the front
panel.
01_10
LDX-3232
83
CHAPTER
5
FU N C T I O N S A N D FE A T U R E S
Saving and Recalling Under Remote Operation
To recall a previously saved instrument setup, press the SELECT switch until the
RECALL indicator led becomes lit. The instrument will display a RECALL "bin"
number on the display. If you desire to change the RECALL bin, press and hold
the SET switch and rotate the adjust knob until the desired bin number is
displayed. Releasing the SET switch completes the RECALL operation. The
instrument is restarted and the front panel parameters are reconfigured to the new
parameters saved under that bin number.
The factory default values for front panel parameters may be restored by recalling
"bin" zero (0). See Table 2.1 for the default settings.
Saving and Recalling Under Remote Operation
For saving under remote operation, use the command *SAV x, where x is the
desired "bin" number (1-10). For a recall under remote operation, use the
command *RCL x, where x is the desired "bin" number (0 - 10).
Using the Laser Compliance Voltage Adjustment
For applications where you need to have critical protection of the laser, we
recommend the following. Using a 1 resistor or other non-critical load, set the
LASER voltage limit as described in Chapter 2.
Then with the LASER output on, slowly increase the LASER current and watch
the LASER voltage measurement. Press the (DISPLAY) SELECT push button to
see the voltage. At about 0.25 V below the LASER voltage limit value, the
VOLTAGE LIMIT warning indicator will become lit on the display. Continue to
adjust the current upwards until the voltage limit is reached and the output is shut
off. Record the voltage at that the LASER output shuts off. It should be within the
specification of the LASER voltage limit accuracy. However, there is typically
some offset error. For example, if the LASER voltage limit is set to 5.0 V, the
actual voltage where it shuts off may be 4.9 V. This error term of 0.1 V should be
considered when setting the LASER compliance voltage limit.
The closer the LASER voltage limit shut off point is to the operating voltage of
your laser, the faster the circuit will work in the event of an open circuit. Some
experimentation may be necessary for optimum results.
84
LDX-3232
FU N C T I O N S A N D FE A T U R E S
Using the LDX-3232 Current Source’s Trigger Function
CHAPTER
5
Using the LDX-3232 Current Source’s Trigger Function
For applications where you need to synchronously initiate a measurement task
from a remote instrument with the LDX-3232 Current Source, the Current Source
offers a trigger output signal. The TTL pulse is initiated with any remote change in
setpoint of the laser current source. A typical application for utilization of this
feature is laser characterization tasks where an L-I curve is generated. For a
programmed step in laser current, a light measurement can be triggered for each
step in laser current. The trigger output is enabled only in remote mode via the
GPIB/IEEE 488 GPIB Interface.
The trigger output is available via a standard BNC connector on the rear panel of
the LDX-3232 Current Source. See Figure 5.1. The TTL pulse is approximately
13 µs wide and has a delay time of about 10-12 ms after the current setpoint is
changed via GPIB. This delay does not include the GPIB transmission time. The
time for any command to be sent via GPIB depends on the interface hardware
and software control. The current setpoint may be changed by the LAS:LDI,
LAS:INC, or LAS:DEC commands.
Note: The minimum step change time required for a corresponding trigger pulse is 20 ms.
Care should be used with respect to the timing of any setpoint commands in relation to the
actual hardware function. The INC and DEC commands have a minimum step time of
about 20 ms that allows for the hardware initiation of a setpoint change and the settling of
the output. The LAS:LDI command does not have any fixed delay for settling. With this
command, some trigger pulses may be missed if the program step time is less than the
20 ms minimum.
A one shot trigger pulse will occur on power up of the instrument due to the states of the
processor I/O.
Figure 5.1 LDX-3232 Rear Panel
01_10
LDX-3232
85
CHAPTER
5
FU N C T I O N S A N D FE A T U R E S
Using the LDX-3232 Current Sources’s BNC Interlock Connection
Using the LDX-3232 Current Sources’s BNC Interlock
Connection
The LDX-3232 BNC interlock connection is designed to allow an external
emergency input signal to turn the current output off. The BNC interlock is TTL
compatible and configured to be normally closed (as opposed to the DB-9
interlock connection, that is normally open). The BNC interlock connection, when
left unconnected, is pulled to a logic high with a 100 k resistor. High values
(+5 V) will keep the interlock closed (current source in the operational state), while
low values (0 V) will open the BNC interlock (forces the output off). Once the
BNC interlock is opened, the output will stay off until the interlock is closed again,
and you re-enable the output.
BNC Interlock Usage Example
When using the LDX-3232 Current Source to drive a temperature controlled laser
diode, the BNC interlock can be used to accept an error signal from the laser
diode temperature controller unit. Linking the LDX-3232 Current Source to a
temperature controller* with the ability to signal when its temperature control has
gone outside of some tolerance window will allow the LDX-3232 to safely shutoff
its output before thermal damage occurs to the laser diode.
*The ILX Lightwave LDT-5900 series of temperature controllers include an output
BNC connector that is compatible with the BNC interlock feature of the LDX-3232.
The output BNC connector of the LDT-5900 has a TTL compatible output signal
that will signal when the temperature control has gone outside of a programmable
temperature window. For more information about the LDT-5900 series of
temperature controllers, please call 1-800-459-9459 (USA or Canada only),
1-406-556-2481 (International), or go to www.ilxlightwave.com.
Modulating the Laser Current Source
The LDX-3232 Current Source allows a modulated signal to be superimposed on
the source output current. For example, assume you are using an LED for your
experiment where you need to operate the LED in constant current at POP =
100 mW, with a modulated signal from 3 to 30 kHz. The experiment requires the
LDX-3232's laser Current Source to be configured for the 2000 mA range, high
bandwidth mode with a limit of 1750 mA. The allowable bandwidth of the
modulated analog signal, defined as the 3 dB roll off point, is dependent on the
output current range and the mode (constant current low/high bandwidth). See the
section, LASER CURRENT SOURCE SPECIFICATIONS, in Chapter 1 for
external analog modulation bandwidth specifications.
86
LDX-3232
FU N C T I O N S A N D FE A T U R E S
Modulating the Laser Current Source
CHAPTER
5
Setting up the Current Source for a modulated laser injection
current is easy. The (MOD) EXTERNAL connector (BNC) on the
front panel is the input for the modulated signal. Connect a
modulating voltage signal from a standard function generator, for
example, to this connector. The modulation port input impedance
is 1 k. The transfer function for the low and high current ranges
of the LDX-3232 are 200 mA/V and 400 mA/V.
Set the LDX-3232 in Constant Current High Bandwidth
Mode by selecting IHBW in the MODE section of the front
panel. Do this by toggling the (MODE) SELECT push
button until the IHBW indicator is illuminated. Repeatedly
pressing the (MODE) SELECT switch cycles through the
current (I), optical power (P), or high bandwidth current
(IHBW) control modes.
Next, set the current source range by selecting the
2000 mA range indicated by the accompanying LED. You
will need to press the select push button twice to change
the range. It must be pressed twice quickly (within less than
one second) to switch between modes, and the current
source output must be off (MODE ON indicator unlit) in
order to change ranges.
The limit clamp function for DC output current applies to the modulated current as
well protecting your laser in any mode. To accomplish setting the current source
limit, use the (PARAMETER) SELECT push button LIM I. Press the
(PARAMETER) SET push button and rotate the adjust knob. Set the limit to
1750 mA. Once the (PARAMETER) SET push button is released, the new
parameter value is stored in non-volatile memory.
When the laser current limit is reached, the CURRENT LIMIT error indicator
flashes. The current limit setting is independent of the voltage drop of the device
connected to the laser output, and therefore, no dummy load is required for
precise adjustment of the current limit. Furthermore, since the current limit
circuitry is fully independent of the main current control, the current limit can be
adjusted safely, even while the current source output is active.
Now you are ready to modulate the laser injection current. To enable the Current
Source output, press the push button labeled (MODE) OUTPUT. The
accompanying LED labeled ON will illuminate indicating that the laser current
source's output is enabled. The instrument will drive the current source to the
value set by the corresponding MODE setpoint. Turn on the function generator
(modulation source) to inject the modulation signal.
01_10
LDX-3232
87
CHAPTER
5
FU N C T I O N S A N D FE A T U R E S
Modulating the Laser Current Source
To disable the output, press the OUTPUT push button again. When the LDX-3232
current output is off, an internal short is placed across the output. This short will
prevent the modulation signal from reaching the LED in our example experiment.
Thus, it is safe to disconnect the test device (LED) when the LDX-3232's output is
off, regardless of the presence of the modulation signal.
88
LDX-3232
CALIBRATION AND TROUBLESHOOTING
Calibration Overview
CHAPTER
CHAPTER
6
6
CALIBRATION AND TROUBLESHOOTING
This chapter describes calibration of your LDX-3232 Series Current Source.
Descriptions of the required test instruments, calibration conditions, and the
detailed procedures for calibration of the instrument's Laser Diode Current Source
are included. A troubleshooting guide is also offered for some of the more
common failure symptoms. This chapter is divided into three major sections, local
(front panel) calibration, remote (through the GPIB Interface) calibration, and a
troubleshooting guide.
Calibration Overview
There are several calibrations to be performed to completely calibrate your
LDX-3232 Current Source. The Laser Diode Current Source calibration consists
of calibrating the current source in both ranges and both modes (low and high
bandwidth), calibrating the photodiode monitor feedback ammeter and finally the
forward voltage measurement. The current limits are calibrated internally by the
instrument as part of the calibration process.
Your LDX-3232 Current Source can be calibrated with the case closed. It should
be calibrated every 12 months or whenever performance verification indicates that
calibration is necessary, such as differences between setpoint and measurement
display values that exceed the accuracy specification. Calibrate the instrument
under laboratory conditions. We recommend calibration at 23°C ± 1.0°C. When
necessary, however, the LDX-3232 Current Source may be calibrated at its
intended use temperature if this is within the specified operating temperature
range of 0 to 40°C.
01_10
LDX-3232
89
CHAPTER
6
CALIBRATION AND TR OUBLESHOOTING
Recommended Equipment
Finally, the LDX-3232 Current Source should be allowed to warm up for at least
one hour before calibration.
Recommended Equipment
Recommended test equipment for calibrating the LDX-3232 Current Source is
listed in Table 6.1. Equipment other than that shown in the table may be used if
the specifications meet or exceed those listed.
Table 6.1 Recommended Test Equipment
Description
Manufacturer/Model
Specification
DMM
HP 3457A
DC Amps (@ 1.0 A): ±0.02%
Resistance (@ 10 ): ±0.02%
0.1 µA or 0.1 mV resolution
It will be necessary to connect various loads and circuits to the outputs of each
current source for the calibration procedure. A schematic is shown in Figure 6.1
for the photodiode calibration circuit with the required components listed in Table
6.2. Also, the devices required for other calibration loads are listed in Table 6.2.
Table 6.2 Required Calibration Components
Laser Current Source Calibration
Current Source Calibration, all models
10 20 W resistor, low TCR
Voltage Measurement Calibration
15 5 W resistor, low TCR
PD Monitor Calibration (See Schematic in Figure 6.1)
PD Calibration Circuit
90
LDX-3232
R1
49 resistor, 1%, 1/4 W
R2
100 resistor, 1%, 1/4 W
R4
1.0 M resistor, 1%, 1/4 W
R3
5 , 1%, 10W
U1
TIL 117 opto isolator
CALIBRATION AND TROUBLESHOOTING
Local Calibration of the LDX-3232 Current Source
CHAPTER
6
9-Pin D-Sub
LD C athode (5)
LD Anode (9)
R4
1M
PD C athode + (6)
PD Anode - (7)
Voltm eter
A
R2
100
R1
49
V
R3
U 1 TIL117
6
1
5
Ipd C urrent
Am m eter
2
4
3
CA LIB RATIO N CIRCUIT
Figure 6.1 IPD Calibration Circuit
Local Calibration of the LDX-3232 Current Source
There are three calibration adjustments required for the LASER current source of
the LDX-3232 Current Source. They are calibration of the constant current source
for both bandwidths and ranges, calibration of the laser voltage measurement,
and calibration of the constant light power (IPD) feedback circuits.
The LDX-3232 Current Source implements a two-point calibration for the Laser
current source. Two currents (approximately 80% and 20% of FS) are applied to
a test load, and the resulting actual currents are fed back (by the user) to the
Current Source. The Laser Current Source calibration program uses the two sets
of data to calculate new calibration constants. These calibration constants are
used to set the actual current output of the current source.
Current Source Calibration
The following procedure is for calibrating each range of the current source.
Calibration must be performed on both bandwidth modes. A total of four
calibrations will be performed on the current source. Start with the low range, low
bandwidth mode. Configure the Laser Current Source in the following state:
01_10
Function
State
MODE
I (constant current low bandwidth)
RANGE
low (lowest per instrument model)
CURRENT LIMIT
90% of FS (full scale of range)
SETPOINT
80% of FS
LDX-3232
91
CHAPTER
6
CALIBRATION AND TR OUBLESHOOTING
Local Calibration of the LDX-3232 Current Source
a.
Measure and record the resistance of a 1, 20 W resistor (A 4-wire [Kelvin]
resistance measurement is recommended.) Connect the load resistor across the
LASER output terminals (Laser Anode and Laser Cathode) on the 9 pin connector of
the rear panel.
b.
Connect the calibrated DMM across the load resistor. Configure the multimeter to
measure voltage in volts. You will be calculating the actual Laser current in the
following manner using Ohm's Law.
I = V/ R
--where V is the accurately measured voltage across the resistor, and R is the
accurately measured load resistance in Ohms. I is the actual Laser current in Amps.
Note: Check the current measuring range of your multimeter. You may be able to measure
Laser Output current in mA by connecting the meter directly to the outputs of the Laser
Current Source.
c.
Press the (MODE) ON switch to turn the current source output on. The output must
be on in order to enter the LASER I calibration mode.
d.
Enter the LASER I calibration mode by pushing the (GPIB) LOCAL and (DISPLAY)
SELECT switches at the same time. The display will blank and the Current Source
will drive the current output to the setpoint and the Display will indicate output current
in mA.
e.
Calculate the actual current through the load as described in step b. Press and hold
in the (PARAMETER) SET switch and turn the adjust knob until the display indicates
the calculated actual current.
f.
Release the (PARAMETER) SET switch. After the (PARAMETER) SET switch is
released, the Current Source will drive the current output to about 25% of the first
calibration setpoint.
g.
Calculate the measured current again through the load resistor.
h.
Press and hold in the (PARAMETER) SET switch and turn the adjust knob until the
display indicates the actual current as calculated in step g.
i.
Release the (PARAMETER) SET switch to accept the second calibration point. After
the (PARAMETER) SET switch is released, the Current Source will calculate the
calibration constants and store them to nonvolatile memory. In low bandwidth
calibration mode, the LDX-3232 Series Current Source will also perform current limit
calibration, indicated by the CURRENT LIMIT LED flashing.
j.
Turn the current source output off. Change the Mode to IHBW (high bandwidth
constant current mode). Repeat the calibration procedure as described above.
k.
Change the output range to high range and repeat the calibration procedure as
described above.
IPD Current Calibration
The following procedure is for calibrating the LASER IPD (PD monitor) setpoint
and measurement. This procedure calibrates the feedback circuits for constant
IPD and constant PPD modes. When these values are reached and are stable, the
user enters the actual value of the monitor current, measured with a DMM. The
92
LDX-3232
CALIBRATION AND TROUBLESHOOTING
Local Calibration of the LDX-3232 Current Source
CHAPTER
6
LDX-3232 Series Current Source then automatically calibrates the LASER
feedback circuits.
Configure the Current Source in the following manner for the Laser Current
Source calibration:
Function
State
MODE
P (constant power)
CAL PD
set equal to zero
CURRENT LIMIT
90% of FS (full scale of range)
IPD SETPOINT
80% of FS
a.
With the LASER output off, connect a calibrated ammeter to the PD Anode output of
the Laser Current Source output connector (9 pin on rear panel), and connect the
circuit of Figure 6.1 to the LASER and PD outputs with the correct load resistor for
the Current Source model you are calibrating (See Table 6.2).
Note: If a precision ammeter is not available, use a zero-Ohm jumper in place of the
ammeter. Then, place a calibrated DMM (with 0.1 mV resolution) to measure the voltage
across the resistor, R1, as shown in Figure 6.1. Calculate the current in the following steps
by using Ohm's Law:
I = V/ R
--where V is the accurately measured voltage across the resistor, and R is the accurately
measured load resistance. I is the actual photodiode current to be measured by the
LDX-3232 Current Source. (A 4-wire [Kelvin] resistance measurement is recommended.)
b.
Press the (MODE) ON switch to turn the current source output on. Verify proper
operation, i.e. the IPD measurement (via DMM) and setpoint should be close, and the
unit should not be in current limit.
c.
Press the (GPIB) LOCAL and FINE switches at the same time to place the Current
Source in its IPD Current Calibration mode.
After a few seconds the display will show the IPD setpoint value.
d.
After the value on the display is stable (has not changed by more than one digit for
several seconds) the LDX-3232 Current Source is ready for the actual IPD value to be
entered.
Press and hold in the (PARAMETER) SET switch and turn the adjust knob until the
display shows the actual monitor current, as shown on the calibrated ammeter (or the
calculated IPD value from Step a).
01_10
e.
Release the (PARAMETER) SET switch to store the first calibration value. The
Current Source will then set the second calibration current, approximately one-fourth
(1/4) of the original current. (For example, if the first calibration setpoint was 4000 µA,
the second setpoint will be about 1000 µA.)
f.
Press and hold in the (PARAMETER) SET switch and turn the adjust knob until the
display indicates the actual current as measured by the ammeter or as calculated.
LDX-3232
93
CHAPTER
6
CALIBRATION AND TR OUBLESHOOTING
Local Calibration of the LDX-3232 Current Source
g.
Release the (PARAMETER) SET switch to accept the second calibration point. After
the (PARAMETER) SET switch is released, the LDX-3232 Series Current Source will
calculate the calibration constants and store them to nonvolatile memory.
Laser Forward Voltage Measurement Calibration
The following procedure is for calibrating the LASER voltage measurement.
Configure the Current Source in the following manner for the Laser Current
Source Voltage calibration:
Function
State
LASER MODE
I (constant current low bandwidth)
RANGE
2000 mA
CURRENT LIMIT
Set to FS (full scale of range)
I SETPOINT
800 mA
a.
With the current source output off, connect a calibrated voltmeter, in parallel with a
resistor (15 , 5 W), to the LASER output (Laser Anode and Laser Cathode) on the
rear panel of the Current Source.
b.
Press the (MODE) ON switch to turn the current source output on. The current
source output must be on in order to enter the LDV calibration mode.
c.
Enter the LASER V calibration mode by pushing the (GPIB) LOCAL and RANGE
switches at the same time. The display will blank and the Current Source will drive
the LASER current output to the respective setpoint and the display will indicate
forward voltage in Volts.
d.
Enter the measured voltage (in volts). Press and hold in the (PARAMETER) SET
switch and turn the adjust knob until the display indicates the measured voltage.
e.
Once the actual voltage value is entered, the Current Source will set the current to
approximately one-fourth (1/4) of the original value. It will then expect the second
calibration voltage point.
f.
Input the second actual (measured) LASER forward voltage as in Step d.
g.
Once the second actual voltage value is entered, the Current Source will store the
new calibration constants.
This ends the section on front panel calibration of your LDX-3232 Current Source.
The next section discusses calibration through the GPIB/IEEE488 interface.
94
LDX-3232
CALIBRATION AND TROUBLESHOOTING
Remote Calibration of the LDX-3232 Current Source
CHAPTER
6
Remote Calibration of the LDX-3232 Current Source
The LDX-3232 Current Sources can be calibrated remotely via the GPIB
Interface. All of the required calibration commands are listed in Table 4.1 in
Chapter 4. The procedures below are general guidelines for writing a program to
calibrate your instrument.
Note: The operation complete flag (bit 0 of the Standard Event Status Register) may be
used to trigger a service request. This type of interrupt is enabled by setting bit 0 of the
Service Request Enable register (via the *ESE command) and bit 5 of the Service Request
Enable register (via the *SRE command). Service request (SRQ) handling depends on your
GPIB hardware. Refer to your GPIB user's manual for details.
After a calibration value is entered, the *OPC? query may be used to determine when the
calibration sequence is done. However, the *OPC, *WAI command, or *OPC? query should
not be issued until after the expected calibration value is entered, or the system will "hang".
This happens because the LDX-3232 Current Source will wait indefinitely for an input, yet
not allow any input until the calibration is finished.
Current Source Calibration
There are three calibration adjustments required for the LDX-3232 Current
Source. They are calibration of the constant current source for both bandwidths
and ranges, calibration of the laser voltage measurement, and calibration of the
constant light power (IPD) feedback circuits.
The LDX-3232 Current Source implements a two-point calibration for the current
source. Two currents (approximately 20% and 80% of FS) are applied to a test
load, and the resulting actual currents are fed back (by the user) to the current
source. The laser current source calibration program uses the two sets of data to
calculate new calibration constants. These calibration constants are used to set
the actual current of the current source.
The following procedure is for calibrating each range of the current source. Start
with the low range. After calibration is complete in this range, switch to the high
range and repeat the procedure.
Configure the current source in the following manner for the laser current source
calibration:
01_10
Function
State
GPIB COMMAND
LASER MODE
I (constant current low bandwidth)
LAS:MODE:ILBW
RANGE
Low (lowest per instrument model)
LAS:RAN x
LIMIT
90% of FS (full scale of range)
LAS:LIM:Ix
SETPOINT
80% of FS
LAS:LDI
LDX-3232
95
CHAPTER
6
CALIBRATION AND TR OUBLESHOOTING
Remote Calibration of the LDX-3232 Current Source
a.
Measure and record the resistance of a 1 , 20 W resistor. (A 4-wire [Kelvin]
resistance measurement is recommended.) Connect the load resistor across the
LASER output terminals (Laser Anode and Laser Cathode) on the 9 pin connector of
the rear panel.
b.
Connect the calibrated DMM across the load resistor. Configure the multimeter to
measure voltage in volts. You will be calculating the actual Laser current in the
following manner using Ohm's Law.
I = V/ R
--where V is the accurately measured voltage across the resistor, and R is the
accurately measured load resistance in Ohms. I is the actual Laser current in Amps.
c.
The current source output must be on in order to enter the LASER I calibration mode.
Enter the LAS:OUTPUT ON command to turn the current source output on.
d.
Enter the LASER I calibration mode by issuing the LAS:CAL:LDI command. The
display will indicate a current in mA.
e.
Input the first actual (measured) output current (as an <nrf value>) via the
LAS:LDI <nrf value> command.
If this value is to be measured and entered remotely via a GPIB controlled DMM, for
example, the measured value of the current should not be entered until the
LDX-3232 Series Current Source is ready to receive it. The Current Source will be
ready to receive the new measured value when, after a LAS:CAL:LDI? query is
sent, the response from the Current Source is "1".
f.
Once the newly measured I value is entered via the LAS:LDI command, the Current
Source will apply a new current equal to about 25% of the previous set current.
g.
Input the second actual (measured) output current (as an <nrf value>) as in
Step e.
h.
Once the second actual I value is entered via the LAS:LDI command, the new
calibration constants will be calculated and stored into non-volatile memory. In low
bandwidth calibration mode, the LDX-3232 Current Source will also perform current
limit calibration as indicated by the CURRENT LIMIT LED flashing. The OPC? query
may be used (after the LAS:LDI value is sent) to determine when the calibration is
completed. Or, wait about two seconds before continuing with other GPIB
commands.
i.
Turn the current source output off. Change the Mode to IHBW (high bandwidth
constant current mode) with the LAS:IHBW command. Repeat the calibration
procedure as described above.
IPD Current Calibration
The following procedure is for calibration the LASER IPD constant current source.
This procedure calibrates the feedback circuits for constant IPD and constant PPD
modes. When these values are reached and are stable, the user enters the actual
value of the current, as measured by an external DMM. The LDX-3232 Current
Source then automatically calibrates the LASER feedback circuits.
96
LDX-3232
CALIBRATION AND TROUBLESHOOTING
Remote Calibration of the LDX-3232 Current Source
CHAPTER
6
Configure the current source in the following manner for the laser current source
calibration:
01_10
Function
State
GPIB COMMAND
LASER MODE
I (constant current low bandwidth)
LAS:MODE:ILBW
RANGE
Low (lowest per instrument model)
LAS:RAN x
LIMIT
90% of FS (full scale of range)
LAS:LIM:Ix
IPD SETPOINT
80% of FS
LAS:LDI
a.
With the LASER output off, connect a calibrated ammeter to the PD Anode output of
the Laser Current Source output connector (9 pin on rear panel), and connect the
circuit of Figure 6.1 to the LASER and PD outputs with the correct load resistor for
the Current Source model you are calibrating (See Table 6.2).
b.
Enter the LAS:OUT ON command to turn the LASER output on. Verify proper
operation, i.e. the IPD output should be close to the setpoint, and the unit should not
be in current limit (read the limit status via the LAS:COND? query, bit 0).
c.
Enter the LAS:CAL:MDI command to place the Current Source in its LASER Current
Calibration mode. The Current Source will increase the laser current output until the
current at the PD monitor (IPD) inputs equals the targeted setpoint.
d.
After a few seconds, the Current Source will be ready for the actual IPD current to be
entered via the LAS:MDI <nrf value> command. The measured value of the
current should not be entered until the Current Source is ready to receive it. The
Current Source will be ready to receive the current value when, after a
LAS:CAL:MDI? query is sent, the response from the Current Source is "1".
e.
Once the actual IPD value is entered via the LAS:MDI <nrf value> command, the
Current Source will store the new calibration value. It will then set the output to
approximately one-fourth (1/4) of the original current. (For example, if the first
calibration setpoint was 4000 µA, the second setpoint will be 1000 µA.) Then, it will
be ready to receive the second calibration value.
f.
Input the second actual (measured) monitor diode current (as an <nrf value>) as
in Step d.
g.
Once the second actual IPD value is entered via the LAS:MDI command, the new
calibration constants will be calculated and stored into non-volatile memory. The
OPC? query may be used (after the LAS:MDI value is sent) to determine when the
calibration is completed. Or, wait about two seconds before continuing with other
GPIB commands.
LDX-3232
97
CHAPTER
6
CALIBRATION AND TR OUBLESHOOTING
Remote Calibration of the LDX-3232 Current Source
Laser Forward Voltage Measurement Calibration
The following procedure is for calibrating the LASER voltage measurement.
Configure the current source in the following manner for the laser current source
voltage calibration:
98
LDX-3232
Function
State
GPIB Command
LASER MODE
I (constant current low bandwidth)
LAS:MODE:ILBW
RANGE
2000 mA
LAS:RANGE1
CURRENT LIMIT
Set to FS (full scale of range)
LAS:LIM:Ix
I SETPOINT
400 mA
LAS:LDI 400
a.
With the LASER output off, connect a calibrated voltmeter, in parallel with a resistor
(15 , 5 W), to the LASER output (Laser Anode and Laser Cathode) on the rear
panel of the Current Source.
b.
The current source output must be on in order to enter the LDV calibration mode.
Enter the LAS:OUT ON command to turn the current source output on.
c.
Enter the LAS:CAL:LDV command to place the Current Source in its LASER Voltage
Calibration mode.
d.
Enter the measured voltage (in volts) via the LAS:LDV <nrf value> command.
The measured value of the voltage should not be entered until the LDX-3232 Current
Source is ready to receive it. The current source will be ready to receive the voltage
value when, after a LAS:CAL:LDV? query is sent, the response from the Current
Source is "1".
e.
Once the actual voltage value is entered via the LAS:LDV <nrf value> command,
the Current Source will set the current to approximately one-fourth (1/4) of the
original value. It will then expect the second calibration voltage point.
f.
Input the second actual (measured) LASER forward voltage (as an <nrf value>)
as in Step d.
g.
Once the second actual voltage value is entered via the LAS:LDV command, the
Current Source will store the new calibration constants. The OPC? query may be
used (after the LAS:LDV value is sent) to determine when the calibration is
completed. Or, wait about two seconds before continuing with other GPIB
commands.
CALIBRATION AND TROUBLESHOOTING
Troubleshooting Guide
CHAPTER
6
Troubleshooting Guide
This section is a guide to troubleshooting the LDX-3232 Current Sources. Some
of the more common symptoms are listed here, and the appropriate
troubleshooting actions are given. We recommend that the user start at the
beginning of this guide. Read the symptom descriptions, and follow the steps for
the corrective actions that apply. If you encounter problems that are beyond the
scope of this guide, contact your ILX Lightwave customer service representative.
Symptom
Corrective Actions
GENERAL
LDX-3232 unit will not power up
Check AC power line voltage and power cord connection.
Power on, but display is frozen
and switches don’t operate
This may occur if the instrument loses power (AC line) briefly.
turn the power switch off and on again to restart.
Displays E514 on power up on
display
Hold (GPIB) LOCAL button, RANGE button and FINE button as
you are powering up the instrument. This clears the laser board
EEPROM, LLLLL will be displayed on the display; the laser
current source must be recalibrated.
Instrument resets at power up or
any LASER mode change
Hold (GPIB) LOCAL button, RANGE button and FINE button as
you are powering up the instrument. This clears the laser board
EEPROM, LLLLL will be displayed on the display; the laser
current source must be recalibrated.
LASER CURRENT SOURCE
Power on, but no current output
Check interlock pins on LASER input connector on instrument
rear panel; these pins must be shorted either directly or though
a switch.
If OPEN CIRCUIT indicator is lit, check the load connections
and then try again.
Check the OUTPUT ON switch, the corresponding LED should
be lit.
Output current at limit; can’t be
lowered
If POWER mode is used, check the monitor diode (feedback)
connections; try reversing the polarity of the monitor
photodiode; also check the photodiode bias adjustment on the
rear panel.
If in I or IHBW mode, check the current setpoint and I LIMIT
setting; setting the output below the limit may require several
turns of the adjust know if the setpoint is much greater than the
desired limit setting.
Output goes off intermittently
Check the interlock circuit; an intermittent interlock will turn the
output off.
Check that the AC power cord connection is secure; power line
drop-outs may reset the unit and when power is restored, the
output will be off.
01_10
LDX-3232
99
CHAPTER
100
LDX-3232
6
CALIBRATION AND TR OUBLESHOOTING
Troubleshooting Guide
Symptom
Corrective Actions
Unable to adjust output
Check the I LIMIT parameter for the output range in use, see
that it is set above 0 mA.
Power mode operation has high
output current, but little or no
power measured
Check back panel PD BIAS; if set too low, may act as an open
feedback loop; if in doubt, set the PD BIAS to mid range (2.5 V)
Output exceeds power limit
The “power limit” is not a hardware limit. It only serves as a
warning that the power measurement has exceeded the limit
setpoint. Normally this limit will cause the output to shut off. This
feature can be defeated via the LAS:ENABLE:OUTOFF
command.
Open circuit error occurs during
calibration
Check load connections; check that measuring meter does not
auto-range (use non-auto-ranging modes).
Calibration is aborted
unintentionally
Calibration modes will be aborted if an open circuit is detected.
VOLTAGE LIMIT indicator blinks
This indicates a voltage limit error; check laser connections. A
high impedance may cause this condition.
Open circuit error E503 or voltage
limit error E505 prevents output
from reaching desired value
The LDX-3232 instruments have an adjustable laser
compliance voltage. Check to see if the LASER voltage limit
setting is too low (Chapter 2); check laser connections.
CALIBRATION AND TROUBLESHOOTING
Error Messages
CHAPTER
6
Error Messages
In the event of a hardware error condition, error messages will be displayed on the
display. In most cases, the error message will appear for three seconds. In some
cases the error code display will remain until the user changes display modes. In
the case of multiple error messages, the display may sequentially show each
message for three seconds. In addition to the hardware errors, GPIB errors may
be read via the ERR? query. Table 3.4 lists the numerical error ranges by function.
Table 3.5 contains all of the error messages that may be generated. Not all of
these messages may appear on the front panel displays. Some refer to GPIB
activities only.
In remote operation, the errors can be read by issuing the ERR? query. When this
is done, all of the error messages that are resident in the error queue are returned
(up to 10 may be stored). Reading the error queue via GPIB clears the error
queue.
Table 6.3 Error Code Classifications
Error Code Range
Area of Operation
E-001 to E-099
Internal Program Errors
E-100 to E-199
Parser Errors
E-200 to E-299
Execution Control Errors
E-300 to E-399
GPIB Errors
E-500 to E-599
LASER Control Errors
Table 6.4 LDX-3232 Series Error Codes
01_10
Error Code
Explanation
E-001
Memory allocation failure
E-103
<DEFINITE LENGTH ARBITRARY BLOCK PROGRAM DATA> length too long
E-104
<NON-DECIMAL NUMERIC PROGRAM DATA> type not defined
E-105
<DECIMAL PROGRAM DATA> exponent not valid
E-106
<DECIMAL PROGRAM DATA> digit expected
E-123
Command not found
E-124
<program mnemonic> Lookup, failed because query/command type match failed
E-126
Too few or too many program data elements
E-201
<PROGRAM DATA> value out of range
E-202
<PROGRAM DATA> will not convert to valid type
LDX-3232
101
CHAPTER
102
LDX-3232
6
CALIBRATION AND TR OUBLESHOOTING
Error Messages
Error Code
Explanation
E-203
Security violation, command is not available without clearance
E-205
<PROGRAM DATA> is not a Boolean value or word
E-207
<PROGRAM DATA> will not convert to an unsigned 16-bit value
E-209
<PROGRAM DATA> will not convert to an unsigned 32-bit value
E-210
<PROGRAM DATA> will not convert to a floating point value
E-211
<PROGRAM DATA> will not convert to a character value
E-213
<PROGRAM DATA> is incorrect block data length
E-214
<PROGRAM DATA> length exceeds maximum
E-302
Query error; device was addressed to talk, but GPIB controller failed to read all of the
<RESPONSE MESSAGE>
E-501
LASER interlock disabled output
E-503
LASER open circuit disabled output
E-504
LASER current limit disabled output
E-505
LASER voltage limit disabled output
E-507
LASER power limit disabled output
E-510
LASER out of tolerance disabled output
E-511
LASER control error disabled output
E-512
Analog section status is all 1’s or all 0’s (power down)
E-513
Serial EEPROM checksum error
E-515
Laser output must be off to change ranges
E-516
Incorrect configuration for calibration sequence to start
E-519
Setting a measurement is only valid during the calibration phase for that measurement;
user has tried to calibrate a measurement without first entering the required calibration
mode.