1
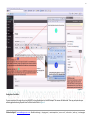
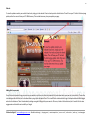
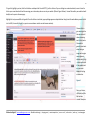
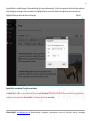
Azul Web Management System
User Guide
Deploying websites using Azul Web Management System has revolutionised the editing and publishing of web
pages, bringing the powerful functionality of content management based systems to the masses. Publishing
websites will never be the same again.
Malachite Digital
6/1/2012
2
Azul Web Management
User Guide
th
6 January 2012
Written for Version 3.0 and beyond
Marco Pereira
Copyright 2011 Malachite Digital CC (SA)
© Malachite Digital CC. www.webdesignservice.co.za affordable web design | shopping carts | contact acquisition | mass e- mail | online video | online pr | viral campaigns
3
Table of Contents
Introduction: ............................................................................................................................................................................................................................................... 5
Using Azul Web Management System ....................................................................................................................................................................................................... 5
First Concepts ............................................................................................................................................................................................................................................. 5
Great Things About Azul Web Management System ................................................................................................................................................................................. 5
Navigating Around the Administration Panel ............................................................................................................................................................................................ 8
Understanding the difference between pages and posts .......................................................................................................................................................................... 9
Adding and Editing Content...................................................................................................................................................................................................................... 10
Preparing Text for your website. .............................................................................................................................................................................................................. 10
Publishing Settings: .................................................................................................................................................................................................................................. 11
Adding Text:.............................................................................................................................................................................................................................................. 12
Pasting from a Text Editor. ....................................................................................................................................................................................................................... 13
Formatting text using the rich web editor ............................................................................................................................................................................................... 14
Publishing your page ................................................................................................................................................................................................................................ 14
Text Styling Notes: .................................................................................................................................................................................................................................... 14
Blog Posts ................................................................................................................................................................................................................................................. 16
Creating and managing your categories................................................................................................................................................................................................... 17
Writing a post ........................................................................................................................................................................................................................................... 17
Adding links to your posts ........................................................................................................................................................................................................................ 18
Opening a link in a new window VS. using the current window. ............................................................................................................................................................ 20
Adding images to your posts .................................................................................................................................................................................................................... 21
Preparing (Optimising) Pictures, Graphics and Photos for your website: ................................................................................................................................................ 21
Adding pictures, photos and other graphics ............................................................................................................................................................................................ 23
Video for your website ............................................................................................................................................................................................................................. 30
© Malachite Digital CC. www.webdesignservice.co.za affordable web design | shopping carts | contact acquisition | mass e- mail | online video | online pr | viral campaigns
4
Refining your Video placement. ............................................................................................................................................................................................................... 33
Re-activating Previous Page/Post versions - your safety net ................................................................................................................................................................... 35
Media:....................................................................................................................................................................................................................................................... 36
Partner Links ............................................................................................................................................................................................................................................. 37
How to contact us:.................................................................................................................................................................................................................................... 39
Addresses: ................................................................................................................................................................................................................................................ 39
© Malachite Digital CC. www.webdesignservice.co.za affordable web design | shopping carts | contact acquisition | mass e- mail | online video | online pr | viral campaigns
5
Introduction:
This guide covers the basics in editing and publishing web pages using Azul Web Management System and takes a progressive approach so that each section builds on
knowledge and skill acquired earlier in the guide.
Screenshots and usage all come from Azul Web Management System installed on normal hosted web server. We use Microsoft’s Internet Explorer as our default web
browser.
Please note that this is a guide intended for people learning to use Malachite Digital’s Azul Website Management System. A basic to intermediate level of computing
working knowledge is assumed.
Using Azul Web Management System
First Concepts
Azul Web Management System has really moved the game forward for non-experts who want to maintain their own websites. Previously they had to either write their
sites with clunky, proprietary site-builder software, or use expensive and difficult to learn packages like Dreamweaver which could require an understanding of often
difficult to grasp languages and code such as HTML and CSS. With Azul Web Management System, users have a powerful Content Management System (CMS) to
manage your all one’s important content.
What Azul Web Management System also does is to make possible the building of a semantically and chronologically structured website or blog which makes the job of
search engines such as Google, Bing and Yahoo etc much easier. It provides an excellent platform for building everything from simple blogs, corporate website to
significant news platforms.
Great Things About Azul Web Management System
•
•
•
•
•
It's easy to learn
It's stable and relatively bug free
In its various forms, it's used by millions of people around the globe
It scales well – although you could run a hugely popular blog on your site, with a hundred thousand visitors a day, Azul Web Management System will still be
adequate – and will still work on a light-duty, single server
It's simple to understand, yet flexible and powerful – editors and webmasters love it
© Malachite Digital CC. www.webdesignservice.co.za affordable web design | shopping carts | contact acquisition | mass e- mail | online video | online pr | viral campaigns
6
As you learn more about Azul Web Management System you’ll learn a lot about what it can (and cant) do with relatively few limitations and you have a powerful and
flexible friend managing your website.
Once your website has been handed over, the first thing to do is: Log In! Your account manager will have confirmed your username and password as well as your
website’s back end login link.
To work on your site, it is best practice to browse to your website’s front end, then open another tab alongside through which you log into your site’s back end (refer
to Figure 1 below). This will enable you to update the
backend, then immediately verify the published results
on the site’s front end. No modifications to a website
can be effected via the front end at all.
If you have forgotten your backend login link, in most
cases, one can simply add /wp-admin to the root
address and one will arrive at the login page as per Figure
1 below. E.g. if your website front end
address is : www.yourwebsiteaddress.com, the back end
login address will be www.yourwebsiteaddress.com/wpadmin.
Figure 1.
Click “Remember me” if your computer is secure and only
used by you and you’d like not to have to log in each time,
and click on the Login button. Now you're logged in, you'll arrive at the Dashboard – a screen that gives a range of information about your website:
© Malachite Digital CC. www.webdesignservice.co.za affordable web design | shopping carts | contact acquisition | mass e- mail | online video | online pr | viral campaigns
7
Figure 2.
On the left hand side, you’ll notice that there is a list of links such as Posts, Media, Links, Pages and so on. This section contains the core of your website content and
will be the main focus of this guide.
© Malachite Digital CC. www.webdesignservice.co.za affordable web design | shopping carts | contact acquisition | mass e- mail | online video | online pr | viral campaigns
8
Navigating Around the Administration Panel
Figure 3.
Navigation of the admin panels in the Azul Web Management System is pretty straightforward, but initially, it can feel like there are a bewildering range of options to
choose from. You’ll notice that to the left of the dashboard there are a series of links that you can quickly and easily click on – these then expand out to show you other
options. The quick reference in Figure 3 above reveals the range of functions, with a brief explanation alongside:
© Malachite Digital CC. www.webdesignservice.co.za affordable web design | shopping carts | contact acquisition | mass e- mail | online video | online pr | viral campaigns
9
Blog Menu - Used to create new Blog categories and add or edit blog pages. Works similar to “Pages” section. Results are normally seen on vertical left or right front
end or bottom horizontal menu.
Comments: - Used to manage website visitor comments should this functionality be activated. Normally not active unless required.
Media - Used to add photos, pictures, Pdf documents, Entire MS excel or other files prior to placement on a page for publishing. PLEASE OPTIMISE ALL CONTENT
BEFORE UPLOADING 1Mb file size limit.
Links - Used to add external (in some cases internal) hyperlinks to your vertical Left or Right (or bottom horizontal) menu. Please include entire address including http
prefix e.g.: http://webdesignservice.co.za/ set to open separate tag.
Pages - Used to add or edit pages along your main (normally vertical) menu. Please paste all text into a new UNFORMATED MS Word document or MS Note pad
document before pasting onto your page. All formatting occurs on the page backend.
Tools - Used to add extra functionality to your site. Please consult your website Administrator / Account manager to purchase / install additional functionality should
this be required. This functionality could include various calculators such as mortgage calculators, affordability calculators, shopping carts, weather modules, archiving
modules, news archiving functionality, social media functionality, Google Map functionality, live chat, video in side menu, etc.
Appearance - This is ALWAYS Locked out to all except the original web designer, web developer graphic designer and server administrator. It is used to set web server,
database, software and customised website design parameters. Malachite Digital CC makes no exception to this rule as a tick in the wrong box can literally make your
website disappear. For this reason we de-activate this option to editors and lower access levels.
Understanding the difference between pages and posts
Before you start working on your website, it’s important to have a clear understanding of the difference between pages and posts:
Pages are usually those which have a static purpose in life. For example an About, Home, Products or Services page or Contact page. They do not usually contain
information about news items, for example, which are added to the site on a regular basis. Pages are generally defined so that they are always accessible from the
front page. Some people build entire sites with just Pages – this is especially the case for sites with little need for dynamic content and is very popular with small
businesses who simply want an online brochure.
Posts usually contain semantically and chronographically arranged information – for example, news reports, event results, and of course blog entries! The semantic
structure is defined by categories and tags, and whilst making it easy for people to navigate your site will also help search engines to understand the content of your
site and so improve the relevance of search results. Google tends to rate Blogs highly so it would be prudent to publish to your blog regularly.
© Malachite Digital CC. www.webdesignservice.co.za affordable web design | shopping carts | contact acquisition | mass e- mail | online video | online pr | viral campaigns
10
Adding and Editing Content
Rather than drone on about concepts, structure and methods, let’s start to get some content into the site right away. The Azul Web Management System provides a
number of tools – for editing, and for image management. It allows you to easily manage your content with a familiar editing interface. You don’t need to learn HTML
already acquired using word processors like Microsoft Word.
Preparing Text for your website.
You would obviously need to have some text to publish to your site (Please ensure your caps lock is turned OFF when typing and run all text through a spell /
grammatical checker such as Microsoft Word (MS Word) or even your webmail account. This must ALWAYS be done before you post any material to your site in order
to avoid embarrassment. Do not format (bold, indent, bullet points etc) your Word document as you will have to format the text on your website’s Azul Web
Management application. Simply pasting formatted MS Word text WILL corrupt your web page so don’t do it!
It is important to note that MS Word adds extraneous, invisible code to text contained within and generated by their documents which will corrupt your web pages
and ultimately your site. Therefore all text generated by MS Word or any other word processor, e-mail, website etc should be pasted into a plain Microsoft Notepad
document as this application strips the text of all extra (and hidden) code.
To invoke Notepad if you have a Windows machine, go to
Start >
All Programs >
Accessories >
then right click on Notepad and either “pin” the application to your Start menu or “send” to your desktop where it will be within easy reach. You can also download a
free text editor here if you wish.
As a rule of thumb, only copy & paste Notepad generated text/content into the back end of the site following which you may proceed with formatting of the web page.
MS Word text should only be pasted provided it is a fresh Word document that you created yourself and that does not contain any formatting.
By default you’ll only see one row of buttons – that’s because you need to press the Advanced Options or Kitchen Sink button on the far right to
activate the second row of functions.
© Malachite Digital CC. www.webdesignservice.co.za affordable web design | shopping carts | contact acquisition | mass e- mail | online video | online pr | viral campaigns
11
Figure 4.
Publishing Settings:
Use this section to publish your page / post and to determine the order of your page (sub page or sub, sub page) on your menu.
Press the “Kitchen Sink” to expose more editing buttons.
© Malachite Digital CC. www.webdesignservice.co.za affordable web design | shopping carts | contact acquisition | mass e- mail | online video | online pr | viral campaigns
12
Post / page work area. Use these buttons to place (paste) text and photos, pictures and PDF documents as well as audio in your media library.
Understanding your editor icons and functions:
Figure 5.
Adding Text:
Pasting from a Microsoft Word document.
If you have original text, that you have typed out yourself, in a fresh MS Word document, without any formatting, simply copy & paste your text onto the text section
of your page backend. Do Not use INDENT, BULLET POINTS etc in the Word document. All formatting will be done on the Azul website backend. Figure 6
© Malachite Digital CC. www.webdesignservice.co.za affordable web design | shopping carts | contact acquisition | mass e- mail | online video | online pr | viral campaigns
13
Figure 6.
Pasting from a Text Editor.
If you are uncertain of the origin of your text, ALWAYS first copy & paste your text into MS Notepad. This removes all hidden code. Then copy and paste into your
website page backend using the paste from Text Editor button. Refer to Figure 6
© Malachite Digital CC. www.webdesignservice.co.za affordable web design | shopping carts | contact acquisition | mass e- mail | online video | online pr | viral campaigns
14
Formatting text using the rich web editor
You can also easily enter format text using the rich editor if you're familiar with any word processing packages such as MS Word. Note that the Azul Website System
does not currently have a spell checker function as standard but this is an option that can be purchased and installed if this is your preferred method of text / content
input.
Publishing your page
Once your text is in place, select the parent option of your choice (if it’s a page or one or multiple categories ) to set where your page will appear on your website.
Once this is complete, depress the publish or update button. You will notice the system saving the changes to the web server. Provided you have a decent broadband
connection, this should only take a few seconds at most. You could also preview your work by pressing the preview on the backend. We prefer to simply publish
straight away as this is faster and one can make instant modifications should a mistake be made.
Once this publishing step is complete, toggle back to the front end of the website, making sure you have browsed to the same page on the front end that you are
updating on the backend. Now depress the web browser’s refresh button. This will force your computer to download the very latest version of the page that you have
just published. Again, the refresh should only take a few seconds. One you can see you changes, you can proceed to tweak your content formatting, continuously
switching to your front-end to verify your updates.
Text Styling Notes:
When you’re writing, you may have a style guide to work with. In all cases, Malachite Digital’s web designers, will determine the look of your site before handover.
Editors will only have a limited control over their website’s style. If this is your own site, the following will be useful to you when choosing what text styles to apply.
Adding Content:
•
•
•
•
•
•
Heading 1 through to Heading 6 – in most themes headings within a post or page will start at Heading 3 (H3), going down to H6. The higher the value, the
more important a search engine will consider it, but remember that H1 is usually reserved for the site title at the top of the page, and H2 for the post or page’s
title. Interfering with that order can result in search engine penalisation.
Use Unordered or Ordered lists for lists that are relatively short, but resist the temptation to use them for lists of paragraphs – instead, use the Heading styles.
Use Bold and Italic in moderation. Do NOT use bold as a substitute for heading styles – bold is not as important to a search engine.
Some themes may override your styling decisions – for example, enforcing alignment, what an italic actually looks like and so on. You should experiment with
this.
Most themes will highlight links in a different colour and with hover properties – you should not need to worry too much about these.
Unfortunately, what something looks like in the visual editor and how it will look on the page are quite different – If you are unsure, make good use of the
Preview button before publishing.
© Malachite Digital CC. www.webdesignservice.co.za affordable web design | shopping carts | contact acquisition | mass e- mail | online video | online pr | viral campaigns
15
Formatting text using the HTML editor – PLEASE DO NOT USE THE HTML EDITOR UNLESS YOU ARE FAMILIAR WITH HTML, XHTML, XML AND CSS.
You can also click on the HTML tab on the editor and input text in HTML – the language that describes web pages. This is strictly for the technically inclined but does
have the advantage of making it easier for you to create more sophisticated designs.
IMPORTANT (1): When using the html editor it's essential that you close all tags, or ask Azul Web Management System to do it for you by pressing the 'Close Tags'
button. If you don't then your site's layout will be broken whenever that posting or page is displayed.
IMPORTANT (2): If a page or posting has been written using the html editor then any attempt to edit that article using the visual rich editor may result in content or
formatting being lost. This isn’t the problem it used to be, however please do not use the html button unless you have a working knowledge of html.
For the uninitiated, the following is a snippet of HTML code used on a typical web page. This is how almost all web pages are coded. The Azul Web
Management System installs a what–you-see-is-what-you-get (WYSIWYG) editor interface between the user and the web code, making it easier for
the lay person and non coders to edit their web content.
</div><div class="art-box art-block widget widget_sp_image" id="widget_sp_image-3">
<div class="art-box-body art-block-body"><div class="art-bar art-blockheader">
<h3 class="t">See our Specials</h3>
</div><div class="art-box art-blockcontent">
<div class="art-box-body art-blockcontent-body"><a class="widget_sp_image-image-link" href="http://www.yourwebsite.com/see-our-specials/"
target="_self"><img src="http://www.yoursitename.com/ac-content/downloads/2001/159851/what_you_do_eg_Safaris_Specials_V2.png" style="max-width:
235px;max-height: 224px;" class="aligncenter" alt="What _You_Do_Hunting_SafarisV2" /></a>
<div class="cleared"></div>
</div></div>
<div class="cleared"></div>
</div></div><div class="art-box art-block widget widget_categories" id="categories-2">
<div class="art-box-body art-block-body"><div class="art-bar art-blockheader">
<h3 class="t">Categories</h3>
</div><div class="art-box art-blockcontent">
<div class="art-box-body art-blockcontent-body"><ul><li class="cat-item cat-item-1"><a
href="http://www.adrenalinhuntingsafaris.com/category/the_professional_hunter/" title="View all posts filed under The
© Malachite Digital CC. www.webdesignservice.co.za affordable web design | shopping carts | contact acquisition | mass e- mail | online video | online pr | viral campaigns
16
Blog Posts
Before you create a blog post (same as a page) you have to create and manage your categories. This is where creating Posts differ from Pages.
Figure 7.
© Malachite Digital CC. www.webdesignservice.co.za affordable web design | shopping carts | contact acquisition | mass e- mail | online video | online pr | viral campaigns
17
Creating and managing your categories
Organising categories can be one of the greatest influences on how easy it is to navigate your site and how easily Google and other search engines find your website. It
can also be one of the hardest things to get right, and there are many blog owners who wished they had done it differently.
You can always reorganise the categories at a later date, but that can be quite a tedious task as you will often need to re-categorise each and every posting that is
affected. However, adding a new category is always easy and straightforward and can even be done while you create a post, if you are an editor on the site.
To create categories, go to Posts and then Categories in the Azul Web Management System administration area. To do this, go back to your site Admin and click on
Posts, and then the Categories link beneath that. You should see something like the screenshot above. Refer to Figure 7.
As you can see, there may already a category called Uncategorized which comes with the standard installation of Azul Web Management System. It is likely that your
web account manager would have suggested a few and may even have already created one or more categories depending on your industry.
The slug box should always be completed as these are used by Google and other search engines. Slugs should always be a duplication of the Category name but with
underscores _ to separate words. Note: Always_use_underscores_to_separate_words.
If you create a category in error, you can also delete it here by selecting the category you want to delete in the box to the left, then clicking the delete button. Be
careful – there is no undo function here!
Writing a post
As you can see from the screenshot below, writing a post is just the same as a page – but it’s something that, if you’re using Azul Web Management System for
blogging, is going to be far more important for you. To get there, select Write, then, if it’s not already on Post, select Post. Some options are slightly different, because
posts are organised differently.
Editor level access have a Publish button. Once pressed, the post becomes available on (published to) the website. Before the post is ready, however, you can save it
and keep it as a draft.
Azul Web Management System has and auto save as well as a revision history, making it possible to see changes and revert to older versions of posts and pages. In the
example above, you can see the Categories box to the bottom-right of the editor window. Select a category of whatever is available e.g.: News.
To create a few posts, enter any text you like in the post box and make sure to click on the category you wish the posts to appear in. Don’t forget to add tags as well
which will make your page more visible to search engines such as Google, Bing, Yahoo! Etc. Once you have published this, go to the front end of your site and refresh
the page to show your updates.
© Malachite Digital CC. www.webdesignservice.co.za affordable web design | shopping carts | contact acquisition | mass e- mail | online video | online pr | viral campaigns
18
Refresh:
To view the updates made to your website’s back end, simply go to the website’s front end and press the refresh button. This will force your PC to fetch the latest page
update, rather than serve it from your PC’s RAM memory. This must be done every time you update your page.
Adding links to your posts
One of the most important things you can do on your website is to link out to other sites (external links) and indeed within your own site (internal links). Those other
sites will appreciate the links, but it also shows where you get your information from. This is useful to the reader and also a sign of an experienced and skilful blogger
who cites his references. There’s also absolutely nothing wrong with linking within your own site. Of course, it takes a little extra time, but it’s worth it for the extra
engagement and indeed the extra visibility on Google.
© Malachite Digital CC. www.webdesignservice.co.za affordable web design | shopping carts | contact acquisition | mass e- mail | online video | online pr | viral campaigns
19
To hyperlink, highlight your text, click the link button and deposit the link with HTTP:// prefix in the box. If you are linking to an external website, be sure to force the
link to open a new tab when clicked thus ensuring your visitors always have access to your website. (Refer to Figure 8 below.) Internal links within your website should
ideally be set to open in the same page.
Highlight the text you would like to hyperlink. Once the link icon is selected, a pop-up dialog appears as depicted below: Simply insert the web address you want to link
to in Link URL, choose the Target (i.e., open in a new window or use the current browser window).
Choose a title to
give meaning to the
link and which will
show on hovering
over the link, and a
Class which is
generally used most
when linking an
image and may give
some alignment
options and styling’s
– do be careful with
it, few people use it
as it can cause
issues with styling
on some sites.
Figure 8.
Once you’re done,
click Insert and the
link has been
created. Now press
© Malachite Digital CC. www.webdesignservice.co.za affordable web design | shopping carts | contact acquisition | mass e- mail | online video | online pr | viral campaigns
20
the publish button to re-publish the page. It’s always worth testing links in case a mistake was made. To do this, once again go to the front end of your website and
refresh the page you are working on. Now as you mouse over the highlighted text link, you will notice that the text changes colour and in some cases is also
highlighted. If clicked you will now be taken to the linked page.
Figure 9.
Opening a link in a new window VS. using the current window.
For external links, our advice is to be sure to force the link to open a new tab (window) (OPEN LINK IN A NEW WINDOW) when clicked thus ensuring your visitors
always have access to your website. For internal links, it is best to open the link in the same window.
© Malachite Digital CC. www.webdesignservice.co.za affordable web design | shopping carts | contact acquisition | mass e- mail | online video | online pr | viral campaigns
21
Many site owners agree with us because it means their site remains in the browser. Some however feel that a link should keep you in the current window – otherwise
after an hour of browsing the user could have dozens of windows open that all need to be closed down. In other words, opening a link in a new window is usually an
inconvenience for a site visitor.
Adding images to your posts
You can easily add images using the standard Azul Web Management System tools. Again, like so much of Azul Web Management System, there have been some
dramatic improvements in recent versions – including the automatic sizing of images, thumb nailing and image management. To add media to your post, you’ll see a
number of tools added. You may find that on a lot of custom installations of Azul Web Management System you only have the small button that looks like a sun, on the
right. If that’s the case then for most things you can use that image, but you may be limited with items such as YouTube videos. This is often done for security reasons.
If the feature is necessary, speak to your web administrator or customer support team.
Preparing (Optimising) Pictures, Graphics and Photos for your website:
Before you proceed, please optimise all pictures/photographs or graphics prior to uploading. All photographs must ALWAYS be optimised before uploading to your
website. NO ECXEPTIONS! This is a relatively simple process of reducing the physical dimensions and file size of a digital or scanned photo. You could use your digital
camera’s photo/graphical editing software, or if you are using a Windows machine you already have a graphical editor in the form of Microsoft Paint. To invoke MS Paint,
go to:
Start >
All Programs >
Accessories >
then right click on Paint and either “pin” the application to your Start menu or “send” to your desktop where it will always be within easy reach. Then simply open up your
photo,
select >
image >
resize or skew and alter the percentages.
In all cases, photographs, graphics and pictures should always be prepared to the final size before uploading. These would normally be a maximum of 300 pixels (px) to
350px wide. Uploads should be a maximum of 1000 pixels wide, and be no more than between 50 - 140Kb (roughly 0.05Mb - 0.140Mb) in size prior to uploading to your
website. Other suitable widths would be 640px X 480px or 300px wide. This will ensure that pages load quickly which is important as Google now penalises slow loading
websites which will negatively influence traffic referred to your site. You will not be allowed to upload a single file size greater than 0.5 Mb to your site’s management
© Malachite Digital CC. www.webdesignservice.co.za affordable web design | shopping carts | contact acquisition | mass e- mail | online video | online pr | viral campaigns
22
system. Most web designs allow for a pages that are between 750px to 1000px wide, maximum. Please ask your administrator to confirm the maximum width of your
website’s design and the optimum photo width to be used. This can be covered during the training session.
WARNING:
All photographs and graphics MUST always be optimised prior to uploading. NO EXCEPTIONS! Failure to optimize photographs will mean that
you quickly exceed your diskspace allowance forcing you to buy more diskspace but most importantly, Non optimised photographs will slow
your site down and your website will be penalised by Google and other search engines who may rank your website lower than your
competitors.
To optimize your photos using Microsoft Paint, simply do the following: 1) Open MS Paint.
2) Press File > Open > select a picture of your choosing. Depending on the original size of your photo you will probably see your photo spill over the size of your window
as per the example below. Refer to Figure 10 a.
3) Now depress image, then Resize and Skew. We reduced the photo by 92 % i.e. selected a value of 8% for vertical and & horizontal resizing. Be sure to decrease both
vertical and horizontal parameters by the same rate or your original pixel ratio will be distorted resulting in a pixilated picture.
4) Press OK. Your picture should now be instantly resized.
5) If you now check the attributes button it will depict a more manageable width VS. height pixel size. You will need to experiment with these parameters in order to reach
the optimal horizontal/vertical px size recommended by your account administrator. Refer to Figure 10 b.
It is recommended that you use a software application that will enable you to exercise better control the horizontal/vertical px size of your images.
© Malachite Digital CC. www.webdesignservice.co.za affordable web design | shopping carts | contact acquisition | mass e- mail | online video | online pr | viral campaigns
23
Figure 10 a.
Figure 10 b.
Adding pictures, photos and other graphics
If you press the Add Image button you’ll be presented with the following pop-up window:
© Malachite Digital CC. www.webdesignservice.co.za affordable web design | shopping carts | contact acquisition | mass e- mail | online video | online pr | viral campaigns
24
Figure 11.
You can close this window with the small X in the top-right corner, or by clicking outside of the box. Generally you won’t upload images from a URL and will use the
button “Choose files to upload”. Here you can upload one or many images. On most servers you’ll be limited to images of 0.5MB or less in size. You can upload
multiple images with the Flash up loader. Simply selected the different images while holding CTL:
© Malachite Digital CC. www.webdesignservice.co.za affordable web design | shopping carts | contact acquisition | mass e- mail | online video | online pr | viral campaigns
25
Once you’ve selected the images, simply press the Open button, and you’ll see the window come back with the following showing in it as it uploads and resizes the
images. Once done, you’ll see a list of the images you’ve just attached to the post. If something went wrong at this stage and no thumbnails were created, there may
be a problem with your connection or with the server’s configuration. So, click on “Show‟ for each image and you’ll get a dialog expanding into place:
When placing Pictures and Photos, be sure to enter a descriptive picture title, keeping in mind your key words and how you would like to be found. ALWAYS PUBLISH
ALTERNATIVE TEXT AS WELL. Position your picture taking cognisance of maintaining balance on your page. Depending on your site’s design, a maximum picture width
of 750 or 1000 pixels is usual.
Clickable buttons & pictures
To make your picture a clickable button, select POST URL, then copy & past the target URL in the Link Box.
Insert into post, Publish and test the link. This dialogue provides a lot of options and controls – let’s go through them:
Title – this is the title of the image.
Caption – NEVER USE THE CAPTION OPTION AS PICTURES BEMOME DIFFICTLT TO CONTROLL SHOULD THIS OPTION BE ACTIVE. Shows as alternate text, but since Azul
Web Management System 2.6 if your theme supports captions, it will allow you to caption your image.
Description – the description. Not used by all themes, but handy to complete and may be used further in the future. It’s often just seen when you view an image as an
attachment.
Link URL – this is the address of the original image you’ve uploaded, by default, but it also allows you to create a link to another website here – quickly and effectively.
You can also press the three buttons – None, meaning the image has no link, File URL, the default, and Post URL which will show your image within the design of the
site rather than as an image on its own.
Alignment – This allows you to set how the image is aligned. The small icons show the effect on the text-wrapping.
Size –you’ll want to choose how big the image is. If it’s not too massive, you can use the Full Size image – just make sure it fits into the space available. Otherwise, a
Thumbnail, by default is a 150px X 150px square, and Medium is cropped to fit in a 300px X 300px space. Once you’ve selected your options, you press the Insert into
Post button to add the image to where your cursor was when you chose to Add Images. In this example we’ve gone for a thumbnail to the right, with a caption. In the
© Malachite Digital CC. www.webdesignservice.co.za affordable web design | shopping carts | contact acquisition | mass e- mail | online video | online pr | viral campaigns