1
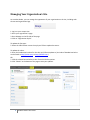
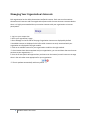
CollegiateLink 2010 Student Leader User Guide Last updated August 2010 0 Student Leader User Guide Table of Contents Getting Started.............................................................................................................................................. 2 Managing Your Organization’s Site ............................................................................................................... 3 Managing Your Organization’s Interests....................................................................................................... 5 Managing Your Organization’s Roster .......................................................................................................... 6 Adding Content to Your Organization’s Site ................................................................................................. 8 Wall posts.................................................................................................................................................. 8 News articles ............................................................................................................................................. 8 Photos ....................................................................................................................................................... 8 Documents, such as your constitution or by-laws .................................................................................... 9 Events .......................................................................................................................................................... 10 Tracking Service Hours ................................................................................................................................ 12 Changing Leadership ................................................................................................................................... 14 Organization Registration ........................................................................................................................... 16 Assessment Options: Forms ........................................................................................................................ 17 1 Student Leader User Guide Getting Started Each organization has its own site where members can collaborate in discussion posts, events, photos, and other online features. As a student leader, you control the majority of these features. Access your organization’s site 1. Log in to your campus site. 2. From the main page, the organizations you belong to will be listed under “My Involvement” on the right side. 3. Click on the name of your organization and you will be taken directly to your organization’s site. OR 4. Go to the My Involvement tab at the top of the page. Your Organization Memberships are listed by default. 5. Click on the name of your organization to expand the options. 6. Click on “Organization Site” to the far right. Connect your organization’s site to your organization’s Facebook page 1. Log in to your campus site. 2. Go to “Account” at the very top of the screen. 3. Click the “f Connect” button just below your profile information to connect your personal account to Facebook. ** This must be done first before your organization can be connected. ** 4. Log in using your Facebook username and password. 5. When prompted, click Allow. ** When you return to your campus site, the “f Connect” button in your Account will now be a “Remove Facebook” button. ** 6. Go to your organization’s page. 7. Go to Manage on the left side of the page. 8. Click the “Facebook” link. 9. Select the appropriate Facebook Group from the drop-down menu. ** You must have Admin rights to the Facebook Group in order to connect it. ** 10. Click “Attach”. Once your organization is connected, any wall posts made on the organization site will appear on Facebook, as well as any posts made on Facebook will appear on your organization site. You will also be able to invite people to join your organization through their Facebook profile. 2 Student Leader User Guide Managing Your Organization’s Site As a student leader, you can manage the appearance of your organization on the site, including color scheme and organization logo. 1. Log in to your campus site. 2. Go to your organization’s page. 3. Go to Manage on the left side of the page. 4. Click on “Organization Styles”. To update the font type: 5. Select the radio button next to the style you’d like to update the text to. To update the colors: 6. Enter the hexidecimal number for the color you’d like to update to. (An index of Hexadecimal colors can be found at http://colour.pro/ or http://0to255.com.) OR 7. Click the colored box and select a color from the 16 color options. 8. Click “Submit” at the bottom of the page to save your updates. 3 Student Leader User Guide To update the header image: 9. Go to the Organization Header Images tab at the top of the Organization Styles page. 10. Click the “Add Header Image” button to select the image file. ** You may upload a 960px wide by no more than 150px high “jpg”, “png”, or “gif” file. The image can be smaller than these specifications. It just cannot be any larger. It is important to stay within the height boundary, keeping the width at 960, and making sure it is RGB and not CMYK graphic (if using a JPG format). ** 4 Student Leader User Guide Managing Your Organization’s Interests Each organization has the ability be associate itself with interests. Each user can also associate themselves with interests and have organizations/events with the same interests recommended to them. It is highly recommended that you associate interests with your organization to increase participation. 1. Log in to your campus site. 2. Go to your organization’s page. 3. Go to Manage on the left side of the page. Organization Interests are displayed by default 4. Available interests are displayed in the left module. Interests currently associated with your organization are displayed in the right module. 5. Click on an available interest for your organization to add it to the right module. ** Once interests have been associated with your organization, you can rank those that are the most pertinent to your organization. ** 6. User the arrows (which will appear when you hover over the interest) on each interest to arrange them in the rank order most appropriate for your organization. ** The site updates automatically with every action. ** 5 Student Leader User Guide Managing Your Organization’s Roster You can update the status of current members, whether removing them or promoting them into positions. You can also invite other people on campus to become members of your organization. Access your Organization’s Roster 1. Log in to your campus site. 2. Go to your organization’s page. 3. Go to Roster on the left side of the page. 4. The complete Roster for your organization is now displayed. The Officers are listed at the top with their position identified. Invite New Members to Join From the Roster option on your organization’s page: 1. Click “Manage Roster” near the top right corner of the page. 2. Click on “Invite People” in the top right corner. 3. Up to 4 tabs can display to invite people from. Users: This tab lists out all users within the campus community for you to invite to join your organization. Email: This tab allows you to enter individual e-mail addresses for invitations to you be sent to. Facebook Friends: This tab displays all of your Facebook friends for you to invite. It will only display if you are connected to Facebook. Facebook Group: This tab lists the members of your Facebook group to invite to join the organization on the site. It will only display if you and your organization are connected to Facebook. 4. As you select people and add e-mail addresses, they will be moved below the tabbed module to the complete list of people to be sent invitations. 5. Click “Send Invitations” when all people have been added to this list. Approve New Members New members can join by locating your organization on the campus site or through an invitation. You must Approve these new members before they are added to the organization’s roster. 1. Go to Roster on the left side of your organization’s page. 2. Click “Manage Roster” near the top right corner of the page. 3. Go to the tab with a number in the parentheses: Pending or Prospective. ** Pending members are those you invited. Prospective members are those who found the organization and indicated they wanted to join. ** 6 Student Leader User Guide 4. Review the users who are awaiting membership approval. 5. Click “Approve” or “Deny” next to each user. 6. Confirm action. Create New Positions Specific to your Organization From the Roster option on your organization’s page: 1. Click the “Manage Positions” link. 2. A list of all the current positions available for your organization will be listed. Some of these can be organization created, while others may system-wide positions. 3. Click the “Create New Position” button at the top of the page. 4. Identify the name of the new position. 5. Select the type of position most appropriate for the new position. 6. Set the following options as appropriate: Visible on Roster: The user holding the position is visible on the organization’s roster. Visible on CCT: The position is visible on the users Co-Curricular Transcript. Is Active: The position is available for a user to hold. If this is not checked, the position will only be available as a Past Position. 7. Grant the position no, all, or limited access to the organization’s site. Limited access allows you to select each aspect of the organization’s site that the position should not access, have full access to, or only be able to view. 8. Click “Create”. Promote Members to Positions, including Primary Contact From the Roster option on your organization’s page: 1. Click on “Manage Roster” near the top right corner of the page. 2. Locate the member you’d like to promote to an officer position on the Current tab. 3. Click “Promote” to the right of the member’s name. 4. Select the Position from the drop-down menu that the member should now have. 5. The page will load and create a separate entry for the user with the new position while maintaining their existing Member status. Remove Members from your Organization From the Roster option on your organization’s page: 1. Click on “Manage Roster” near the top right corner of the page. 2. Locate the member you’d like to remove. 3. Check the box on the far right of the member’s name. 4. Click “Delete Selected” at the top of that tab. 5. Confirm deletion. ** This will also remove just a user from a position but maintain their Member status. To remove an individual completely, you must delete each position associated with them. ** 7 Student Leader User Guide Adding Content to Your Organization’s Site Specific content can be added to round out your organization’s site. These include wall posts, news articles, photos, and documents. Wall posts 1. Log in to your campus site. 2. Go to your organization’s page. 3. Type in the text field below “Wall”. 4. Click “Post”. ** Your post will automatically be added to your organization’s wall. Anyone in your organization can post/comment on your organization’s wall. You can remove any post or comment that is inappropriate or unwanted. ** News articles 1. Log in to your campus site. 2. Go to your organization’s page. 3. Click on “Post News Article” next to “Wall”. 4. Enter the Title, Summary, and the full Story (text) of the article. You can use the text editing features to customize the style of the Story of your article. 5. Click “Save Article”. ** Only officers of your organization can post News Articles. Your article will automatically post to your organization’s wall. ** Photos 1. Log in to your campus site. 2. Go to your organization’s page. 3. Go to Photos on the left side of the page. 4. Click “New Album”. 5. Enter a name for the album and a brief description. 6. Indicate who can view the photo album. 7. Click “Create Album”. 8. Click “Add Photo”. 9. Enter a title and brief description of the photo, and select the file from a saved location. 10. Click “Save Photo.” 11. Repeat steps 8-10 for each photo to be added. 8 Student Leader User Guide 12. Click “Back to Albums” once all photos have been uploaded to the album. Photos can also be removed at any time. From the Photos option on your organization’s page: 1. Locate the photo to be removed within an album. 2. Click the red X in the corner of the photo. 3. Confirm deletion. Documents, such as your constitution or by-laws 1. Log in to your campus site. 2. Go to your organization’s page. 3. Go to Documents on the left side of the page. To upload a new document: 4. Click “Upload” in the upper right corner. 5. Select the file you wish to upload from a saved location by clicking on “Upload File”. Files must be less than 4 MB in size. 6. Provide a title and brief description of the document. 7. Indicate the type of document from the drop down menu. 8. Click “Submit Request”. To edit the information associated with a document: 1. Locate the document you’d like to update information for. 2. Click “Edit” on the far right side of the document listing. 3. Update the title, description, and/or type of the document. 4. Update the Security Options for which positions can view the document. 5. Click “Update Document”. To replace existing documents: 1. Locate the document you’d like to replace. 2. Click “Delete” on the far right side of the document listing. ** Once a document is deleted, it cannot be recovered. ** 3. Confirm deletion. 4. Upload the new version of the document you were replacing. 9 Student Leader User Guide Events Events can only be created by student leaders and associated with an organization. Events that have an image or flyer uploaded along with it will appear on the Event Flyerboard on the main page. You can set who can see and RSVP to the event during the creation process. 1. Log in to your campus site and go to your organization’s page. 2. Go to Events on the left side. 3. Click on “Create Event”. 4. Enter the Name, Location, Start Time, and End Time. These fields are required. 5. Enter a brief description of the event. 6. Attach a flyer to associate with your event. Supported files include image files (jpg, jpeg, tif, tiff, gif, png, bmp), office files (xls, xlsx, ppt, pptx, doc, docx, pub, rtf) and html, htm, mht and pdf. 7. Specify the type of event: Public: Anyone who accesses the site will be able to view this event. Campus Only: Any logged-in user can view this event. Organization Only: Only members of your organization can view this event. Invitation Only: Only those invited to this event can view it. 8. Specify the RSVP Option for the event: None, Open, or Invite. 9. Add any additional information that your campus requires. 10. Click “Create”. 11. Identify who you’d like to invite to the event: by username, e-mail address, or Facebook. 12. Click “Add” to include those you selected/identified in the invitee list. 13. Click “Send Invitations”. As people RSVP for your event, you can view and manage the attendance. From the Events option on your organization’s page: 1. Click on the name of the event you’d like to manage. 2. Click on the “Track Attendance” button on the right side of the page. 3. The top module allows you to update those who RSVPd to the event, identifying their actual attendance and adding any comments. 4. The bottom module allows you to add attendees who had not previously RSVPd, by e-mail or by uploading a CSV (comma delimited) file containing just e-mail addresses. 5. Select the appropriate Status. 6. Click “Add”. THEN: 10 Student Leader User Guide 1. Click on “Manage Responses”. 2. Indicate which attendees will be hidden from public view as attending the event. 11 Student Leader User Guide Tracking Service Hours You can not only record your individual community service hours, but you can also record and approve the community service hours of members of your organization. Record your personal community service hours 1. Log in to your campus site. 2. Go to the My Involvement tab at the top of the page. 3. Click on the name of the organization you wish to associate service hours with. 4. Click on “Add” next to Service Hours in the top right corner of the expanded view of the organization. 5. Enter the date the services hours took place and a brief description of the type or place of the service hours. 6. Indicate the number of hours spent performing the service hours (in the 1:30 format). 7. Type in the name of the person that can verify the service hours. A drop-down menu of all users with those characters will populate. Select the individual from the list. 8. Click “Submit”. ** All service hours entries must be approved by an organization officer or campus administrator. ** Record organization members’ community service hours 1. Log in to your campus site. 2. Go to your organization’s page. 3. Go to Service Hours on the left side of the page. 4. Enter the following information in the top “Record New Entry” module: Name of the person to receive the service hours (a drop-down menu will appear when characters have been typed) Date when service hours took place A brief description of the event The number of hours (in 1:30 format) 5. Click “Submit” just below the fields. Approve organization members’ community service hours From the Service Hours option on your organization’s page: 1. On the Pending tab in the lower module, you will see the member’s name, date, description of service event, and duration of service. 2. Click “Approve” or “Deny” on the far right of the person based on the appropriate action. 3. Confirm approval action. OR 4. Add in an administrator message as to why the hours were denied, and click “Deny” again. 12 Student Leader User Guide Generate reports of your organization’s community service hours From the Service Hours option on your organization’s page: 1. Go to the “Reporting” tab in the lower module. 2. Adjust the date range and users you’d like to see a report for in the fields. 3. Click “Show Report”. ** The results based on the criteria you entered will display on the page. ** 13 Student Leader User Guide Changing Leadership As positions in your organization are filled, you will need to update the campus site with the new student leader information. Due to the way the system operates, there is a specific process that you must follow in order to successfully update your organization’s leadership. Identify New Leaders The individual(s) who will be assuming the leadership positions must be members of your organization. If they are not already, have them join the organization first before proceeding. 1. Log in to your campus site. 2. Go to your organization’s page. 3. Go to Roster on the left side of the page. 4. Click on “Manage Roster”. 5. Locate each individual who will be assuming a leadership position. 6. Click “Promote” to the far right of their name. 7. Select the position the member should now have. ** Be sure to identify one of the new leaders as the Primary Contact if the current one is not remaining in that position. Only Primary Contacts can update the roster for an organization. ** Remove Current Leaders Once the new leaders have been identified in the system, the current leaders can be removed from that position in the organization. This can be done two ways. Individual removal: Have each current leader that is being replaced follow these steps: 1. Log in to your campus site. 2. Your Organization Memberships are displayed by default. 4. Click on the organization you are leaving. 5. Click the red X on the far right of the position. You will remain as a member of the organization but will no longer have the leadership position. 6. Click “Leave Organization” to end the membership completely from the organization, if applicable. Group removal: The primary contact of the organization can remove individuals from the organization. You can remove them completely from the organization or just the one position they held, but maintain their membership. 1. Log in to your campus site. 2. Go to your organization’s page. 14 Student Leader User Guide 3. Go to Roster on the left side of the page. 4. Click on “Manage Roster”. 5. Locate each individual that needs to be removed from the organization with the appropriate position labeled. Each individual will be listed for their position and as a member. 6. Check the box to the far right of each individual. 7. Click “Delete Selected”. 8. Confirm deletion. 15 Student Leader User Guide Organization Registration Your campus may have a registration process that each new organization on campus must go through. This may also entail re-registering existing organizations. If you are the primary contact of your organization, you may have the opportunity to re-register your organization prior to anyone else. 1. Log in to your campus site. 2. Go to your organization’s site. ** If your organization must register, a Register button will display during the appropriate time period in the top right corner of the Home page for your organization. ** 3. Click “Register”. 4. Follow the steps outlined by your campus, updating any information as needed. 5. Click “Next” at the bottom of the page to continue to the next step. 6. You will have the opportunity to review each step prior to submitting the completed registration. 7. Click the link associated with each step to review and update the information. 8. Click “Submit for Approval” when all information has been included. ** All registration submissions must be reviewed and approved by a campus administrator. You can view the status of your submissions and/or update any submissions still in “InProgress” status. ** View/Update Submissions 1. Log in to your campus site. 2. Go to the My Involvement tab at the top of the page. 3. Go to the My Forms Submissions option on the left side of the page. 4. Locate the submission you’d like to view/update in the list. 5. The current status is listed in the third column over. 6. Click “View” to the far right of the submission to review your submission and/or any comments a campus administrator made regarding your submission. OR 7. Click “View” to the far right of the submission. 8. You will be taken to the final review screen where you can return to any step to make the appropriate updates. 9. Once all steps have been updated, click “Submit for Approval”. 16 Student Leader User Guide Assessment Options: Forms Create a form for your organization to use to gather specific information, such as application information. Create a Form 1. Log in to your campus site. 2. Go to your organization’s page. 3. Click on Forms on the left side of the page. 4. Click the “Create Form” button. 5. Identify the Name of the form, if it should immediately be Active, and the date range you’d like the form to be available during. 6. Identify if the form should accept multiple submissions from the same user. 7. Identify any access restrictions based on positions in your organization that should be in place for this form. 8. Click “Save”. You are now taken to the Form Creation tool. 1. Click the format on the left side of the page of the question you’d like to add to the form: Single Check Box: Includes question text with a single checkbox on the left. Check Box List: Includes question text and answer set, where multiple answers can be selected. Radio Button List: Includes question text and answer set, where only one answer can be selected. Drop Down List: Includes question text and answer set, where only one answer can be selected. Text Field: Includes question text and one text box as the answer, which can be formatted to the desired size. Instructions: Includes question text with no answer set. 2. Type in text for the question and answer set, if applicable. Click “OK”. ** Text fields can be associated with an answer, e.g., Other (please specify), if needed.** 3. Click on a question and then “Edit” to make any adjustments to the question as a whole. Update question text under the Properties tab. Reformat the size of the text box, either at the bottom of the properties tab or on the Answers tab by adjusting the number of rows to the desired size. 4. Click “Ok” when all edits have been made. 5. Repeat steps 1-4 for each question you’d like to add to page 1. New pages must be created in order to apply conditions. See below for instructions on conditions. 17 Student Leader User Guide 1. Click the “Page List” button on the top right side of the page to add more pages to the form. 2. Click “Page” under Add New on the left side of the page. 3. Repeat steps 1-4 above for each question you’d like to add to the additional pages. Forms can include conditions that specify what should be seen based on previous answer selections. While accessing your form: 1. Go to the page you’d like to apply conditions to by accessing the “Page List” or scrolling through the pages. ** Page 1 cannot have conditions applied to them. ** 2. Click the Page Properties button in the top right corner. 3. Click “Add Condition” then select the question and answer the page should display based off of. 4. Repeat step 4 to add multiple conditions to display the page. 5. Click “Save” when all conditions have been added to the page. ** Please note that the page will display if the conditions are met. ** Conditions can be grouped together to add greater specificity. To group conditions: 6. Go to the page with the conditions added. 7. Check the box to the left of each condition that should be grouped together. 8. Click “Group Selected”. 9. Indicate if the grouping should be True or False. 10. Repeat step 4 for each needed grouping. 11. Click “Save” when all conditions have been grouped. You can update the title, date range, and/or description for an existing form. While accessing your form: 1. Click the “Properties” button in the top left corner of the page. 2. Update the name, active date range, and description as needed. 3. Also update the Access Restrictions and other settings as needed. 4. Click “Save”. Publish Form From the Forms option on your organization’s page: 1. Locate the form you’d like to publish. 2. Click the “Publish” link to the far right of the form name. 3. Update the Form Status to “Active”. 4. Include the specific text you’d like to display in association with the link to complete the form. 5. Click “Publish Form”. Review Form Submissions From the Forms option on your organization’s page: 1. Locate the form you’d like to review submissions for. 18 Student Leader User Guide 2. Click the “Submissions” link to the far right of the form name. 3. Click on “View” to the far right of each pending submission. 4. Click the link for each page to review the submission. 5. Make any changes as you review the submission. 6. Click “Next” at the bottom of the page to move to the next step for review. 7. Click “Approve” or “Deny” after review of the entire submission. 8. A comment can be added prior to approval or denial of the submission. 9. You will return to the Form Submissions page to review the remaining submissions. 10. Repeat steps 3-8 as needed. 19 Student Leader User Guide