1
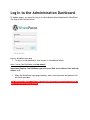
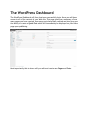
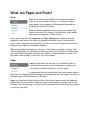
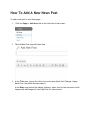
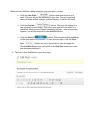
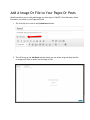
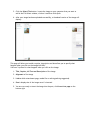
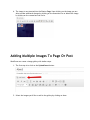
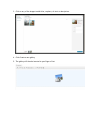
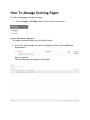
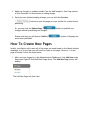
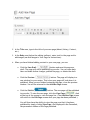
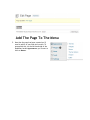
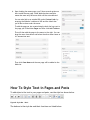
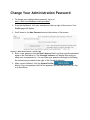
We get you there.
WordPress 3.5 User Manual
Table of Contents
1.
Table of Contents
2.
Log in to the Administration Dashboard
3.
The WordPress Dashboard
4.
What are Pages and Posts?
5.
How To Add A New News Post
6.
Add One Image Or File to Your Pages Or Posts
7.
Adding Multiple Images To Post
8.
How To Manage Pages
9.
How To Create New Pages
10.
Style Text in Pages & Posts
11.
Kitchen Sink
12.
Change Your Administration Password
Log In to the Administration Dashboard
To update pages, you must first log in to the Administration Dashboard in WordPress.
The login area is shown below.
Figure 1: WordPress Login Area
1. To log in to the dashboard, first browse to the address below:
http://www.YourSiteName.com/wp-admin/
Important: Replace YourSiteName.com with your Web site’s address then add /wpadmin/ to it.
2. When the WordPress login page displays, enter your username and password in
the fields provided.
Your Dashboard address, user name and password are located in your Welcome email you received upon payment
The WordPress Dashboard
The WordPress Dashboard will then load upon successfully login. Here you will have
access to all of the content of your Web site. This page gives you a summary of how
many pages you have created, how many posts have been created and also gives you
the ability to create a Quick Post which will immediately be displayed on your News
page upon publishing.
Most importantly this is where will you edit and create new Pages and Posts.
What are Pages and Posts?
Posts
Posts are the entries that display in reverse chronological
order on your news page (if one is ). In contrast to pages,
posts usually have comments fields beneath them and are
included in your site's RSS feed.
Posts are usually populated with one or two test posts that
usually referring to the launch of the Web site, event details
and other press releases or news articles.
Posts can be organized by Categories and Tags. Categories are used for a broad
grouping of post topics, but when you wanted to describe a post in more specific
terms, more categories were required. That led to very long category lists inside the
blog and very long lists in Categories Widgets.
Tags are the digital equivalent of real tags — little labels you attach to things. Tags
have an advantage over categories in that they aren’t pre-set. When you attach tags
you write them in manually and have the freedom to write whatever you want. If a
tag doesn’t exist already, it will once you’ve hit publish.
Pages
Pages are the different sections of your Web site and are
typically static in nature. A good example of a page is the
information contained in About or Contact pages.
A page should not be confused with the time-oriented objects
like Posts, nor should a WordPress page be confused with the word "page" referring to
any Web page or HTML document on the Web.
Pages are sometimes filled with Latin text called Lorem Ipsum, which is a gibberish
placeholder for your content. When you want to add content to a page, just click on
All Pages, click on the page you’d like to edit and delete the Lorem Ipsum and replace
it with your own text.
How To Add A New News Post
To add a new post to your News page:
1.
Click the Pages > Add News link on the left side of the screen:
2. The Add New Post page will then load.
3. In the Title area, type in the title of your new post (New Staff Changes, Happy
Mardi Gras, Hurricane Announcement.)
In the Body area (below the editing toolbars), enter text for the post and/or add
images (see Add Images to Your Page/Post for instructions).
When you have finished adding content to your new post, you can:
●
Click the Save Draft (
) button and save this post as a
draft. The post will not be published to your site. You can come back
later and make further changes, publish the post, or delete the draft.
●
Click the Preview (
) button. The post will display in a
new window for your review. This is how your post will look when it is
published. When you are finished reviewing the post , close the preview
window. You will be returned to the Add Post screen.
●
Click the Publish (
) button. The new post will be published
to the news portion of your site. To view the new post, click the View
Post (
) link at the top of the screen to view the page live.
(The Add New Post screen will switch to the Edit Post screen once your
post has been published.)
4. The Post is then Published to your news page.
Add A Image Or File to Your Pages Or Posts
WordPress allows you to easily add images any other type of file(PDF, Excel Document, Word
Document, etc) easily to your Pages and Posts.
1. The first step is to click on the Upload/Insert button.
2. This will bring up the Add Media window where you can either drag and drop the files
or images you’d like to insert into the Page or Post.
3. Click the Select Files button. Locate the image on your computer that you want to
add in the File Select window, click on it and then click Open.
4. After your image has been uploaded successfully, a thumbnail version of the image will
display:
This page will allow you to add a caption, description and also allow you to specify what
happens when you click on the image(Link URL).
You have 3 options for what happens when you click on the image:
1. Title, Caption, Alt Text and Description of the image
2. Alignment of the image
3. Link to which attachment page, media file or nothing(nothing suggested).
4. Size is display size of the image once it’s inserted
5. You are now ready to insert the image into the post, click Insert into page on the
bottom right
6. The image is now inserted into the Post or Page. Upon clicking on the image you are
able to make additional changes by clicking on the mountain icon or delete the image
by clicking on the crossed out red circle.
Adding Multiple Images To Page Or Post
WordPress can create a image gallery with similar steps.
1. The first step is to click on the Upload/Insert button.
2. Select the images you’d like to add to the gallery by clicking on them
3. Click on any of the images to add titles, captions, alt text or descriptions
4. Click Create a new gallery
5. The gallery will then be inserted to your Page or Post
How To Manage Existing Pages
To edit existing pages, do the following:
1. Click the Pages > All Pages link on the left side of the screen:
Figure 2: Edit/Add New Pages Area
All pages contained within your site will be listed.
2. In the list, find the page you want to manage and then click the Edit link
underneath it.
Figure 3: Page List
The selected page will display in edit mode.
3. Make any changes or updates needed. See the Add Images to Your Page section
of this document for instructions on adding images.
4. Once you have finished making changes, you can click the Preview
(
publishing.
) button to open the page in a new window for review before
Or, you can click the Update Page (
changes without previewing the changes.
Please note that you will have a Publish (
never been published.
) button to publish your
) button if the page has
How To Create New Pages
Usually, point2point will create all of the pages you need based on the Needs Analysis
meetings, so it is rare that you will need to create a new page. However, if a new
page is needed, follow the steps below.
1. After you have logged in to the Administration Dashboard, click Add New under
Pages (see Figure 2: Edit/Add New Pages Area). The Add New Page screen will
display:
The Add New Page will then load.
2. In the Title area, type in the title of your new page (About, History, Contact,
etc.)
3. In the Body area (below the editing toolbars), enter text for the page and/or
add images (see Add Images to Your Page for instructions).
4. When you have finished adding content to your new page, you can:
●
Click the Save Draft (
) button and save this page as a
draft. The page will not be published to your site. You can come back
later and make further changes, publish the page, or delete the draft.
●
Click the Preview (
) button. The page will display in a
new window for your review. This is how your page will look when it is
published. When you are finished reviewing the page, close the preview
window. You will be returned to the Add New Page screen.
●
Click the Publish (
) button. The new page will be published
to your site. To view the new page, click the View Page (
) link
at the top of the screen to view the page live. (The Add New Page screen
will switch to the Edit Page screen once your page has been published.)
You will then have the ability to view the page now that it has been
published by simply clicking View Page. Also displayed is the Permalink,
the permanent address of the Page published.
Add The Page To The Menu
5. Now that the page has been created you’ll
need to add it to your Web site’s menu. To
accomplish this, on the left hand side of the
Dashboard under Appearances you’ll want to
click on Menus.
6. Upon loading the menus page, you’ll have several options on
how to add the new page. Some Web sites have multiple
menus but most only have one which will be auto selected.
You can also link to an outside URL under Custom Links by
entering the Website’s address in URL and the Label that
you’d like to show under the menu.
To add the page we just created simply check the box next to
the page you’d like under Pages and then click Add To Menu.
This will then add the page to the menu to the right. You can
drag the menu item above and below the other menu items to
it’s appropriate spot.
Then click Save Menu and the new page will be added to the
Web site.
How To Style Text in Pages and Posts
To add styles to the text in your pages and posts, use the style bar shown below.
Figure 8: Style Bar - Basic
The buttons in the style bar and their functions are listed below.
Change Your Administration Password
1. To change your administration password, log in at
http://www.YourSiteName.com/wp-admin/
2. From the dashboard, click your username at the top right of the screen. Your
Profile page will display.
3. Scroll down to the New Password area at the bottom of the screen.
Figure 11: New Password Area - Profile Page
4. Enter a new password into the New Password field, and then type the password
again in the field below it. The Strength Indicator will display how strong or
weak your new password is. You can make your password stronger by following
the instructions provided to the right of the Strength Indicator.
5. When you are finished, click the Update Profile (
)
button. Your new password will be the password you use the next time you log
in to WordPress.