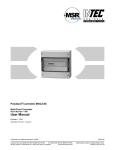
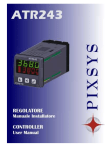
1
MA8120-2
“Aero-Weigh” Digital Display & Load Cell, User Manual & Parts List
Rev. G 06/08/2012
Morgan Aero Products
“Aero-Weigh” Digital Display & Load Cell
User Manual & Parts List
Morgan Aero 1450 80
th Street
SW Everett, WA. 98203 – USA PH. (425) 438-9600 FAX. (425) 438-1907
1 of 24
MA8120-2
“Aero-Weigh” Digital Display & Load Cell, User Manual & Parts List
Rev. G 06/08/2012
Table of Contents
General Information
Set-Up and Activation
Load Cell Keyboard Functions
Customizing Load Cell Reader Functions
Charging the Internal Battery
Parts List
Load Cell Specifications
General Safety Information
Troubleshooting Guide
Load Cell Calibration - Appendix A
Morgan Aero 1450 80
th Street
3
5
6
8
14
15
16
16
17
18
SW Everett, WA. 98203 – USA PH. (425) 438-9600 FAX. (425) 438-1907
2 of 24
MA8120-2
“Aero-Weigh” Digital Display & Load Cell, User Manual & Parts List
Rev. G 06/08/2012
General Information:
The Morgan Aero model MA8120-2 & MA8120-2S is a combination of a custom
crafted pin type load cell and Morgan “Aero-Weigh” precision display which
comes calibrated as a unit from Morgan Aero Products. It does NOT need to
be calibrated before each use. The load cell reader may merely be
connected, using the custom cable to the pin type load cell and turned on to
begin.
The Morgan “Aero-Weigh” is designed to provide an accurate, lightweight display
of load weights. In conjunction with a Morgan Aero load cell and cables one
operator is able to accurately observe and manage loads and applied stress on
various pieces of equipment. The “Aero-Weigh” has been designed for durability
and use in rugged conditions. However, it should be treated as an electronic
device: Avoid pulling, tearing, or cutting the cables. Avoid damaging the
connectors in the cable connector plugs. Avoid dropping the load cell pin, reader,
or battery charger. Avoid immersing the reader, cable or pin in water. To reduce
the potential for damage the Aero Weigh is shipped in a protective case (figure
page 2 of 13). It should always be stored in the case provided.
If the ‘S’ option specified: part number MA8120-2S the set includes a 16K-lb
shackle for operation with alternate mounted components. This shackle can also
be used as an aid in calibration. The operation of the unit is identical with either
part number).
Each load cell reader, cable set, and load cell pin is a matched set. The load cell
readers or load cell pins from other sets should not be exchanged without
contacting Morgan Aero. (See Parts page & page 9 of 13)
The “Aero-Weigh” electronics, battery and display are enclosed in a weatherproof
NEMA 4 enclosure with sealed MS style connections. Controls on the display are
used to turn the “Aero-Weigh” on and off, and set other functions of the “AeroWeigh” (see Display section for details)
An internal, 8.4 V 800 mah NiMH rechargeable battery powers the “Aero-Weigh”.
The charger is a 120 VAC 60hz charger designed especially for charging batteries
of the type used in the “Aero-Weigh”. The operation time of a completely
charged battery is approximately 20 hours. Normal recharge time for a fully
discharged battery is 4 hours using the supplied charger. If battery replacement
does become necessary it is easily changed by removing the top cover of the
load cell reader and unplugging the battery. Replacement batteries are available
from Morgan Aero under part number MA9258.
Morgan Aero 1450 80
th Street
SW Everett, WA. 98203 – USA PH. (425) 438-9600 FAX. (425) 438-1907
3 of 24
MA8120-2
“Aero-Weigh” Digital Display & Load Cell, User Manual & Parts List
Rev. G 06/08/2012
The load cell reader batteries should be kept fully charged to allow the unit to be
ready to use at all times. A battery charger is provided. It is connected to the
“Aero-Weigh” with the cable provided. The state of charge of the batteries in the
load cell is indicated by plugging the load cell reader into the charger. If the
charger light shows red continuously, it is charging. If the red light extinguishes
immediately the batteries are fully charged. The reader should then be removed
from the charger.
The load cell reader and load cell pin should be connected prior to turning on the
load cell reader. If the load cell reader is turned on before it is connected, the
reader may indicate an overload or other fault code. It also may damage the
load cell reader.
The load cell pin cables are sealed with a durable coating. They connect to the
load cell pin and load cell reader using the MS style connector.
The load cell pin is a strain gage device which imbedded in a metal pin. Electrical
current is transmitted via a cable to the load cell reader. Changes in this current
provide the changes in load which are displayed on the digital readout of the
load reader. The pin, cable and reader are all calibrated as a system.
Morgan Aero 1450 80
th Street
SW Everett, WA. 98203 – USA PH. (425) 438-9600 FAX. (425) 438-1907
4 of 24
MA8120-2
“Aero-Weigh” Digital Display & Load Cell, User Manual & Parts List
Rev. G 06/08/2012
Set-Up and Activation of the Load Cell Reader System
The Morgan Aero Products load cell reader comes calibrated and ready to use
from the factory. The load cell reader does NOT need to be calibrated
before each use. The device may merely be assembled and turned on to begin.
Each load cell reader and load cell pin is a matched set. The Load cell readers
from other sets should not be exchanged without contacting Morgan Aero.
The load cell reader batteries should be kept fully charged to allow the unit to be
ready to use at all times.
The load cell reader and load cell pin should be connected prior to turning on the
load cell reader.
1) Prior to turning the unit on ensure the battery has been fully charged (see
battery & charger section)
2) Remove the load cell reader from the protective storage case
3) If you are going to perform and engine change, install the load cell pin in
the location of the engine change equipment as specified in the Airplane
Maintenance Manual (AMM).
4) Prior to turning on the load cell reader connect the cable from the load
cell pin to the connector on the top of the “Aero-Weigh” load cell reader
(see last figure page 11 of 13). (If load cell reader is turned on without
the load cell pin connected the reader could be damaged.)
5) Push and hold the “ON” button on the face of the load cell reader for 2
seconds. (last figure page 11 of 13)(The reader backlight should illuminate
and the reader should indicate “0” – meaning zero load is applied) (last
figure page 11 of 13)
6) If the reader indicates a value other than “0”, push the “Enter/Zero”
button to set the value to “0”. The reader will now indicate the correct
weight on the reader display when a load is applied.
7) Press the ‘Off’ button to turn the unit off.
Note that the “Aero -Weigh” is programmed to go into a standby battery saving
mode after a period of non-use (see Display section for setting the length of
non-use). If the reader goes into standby mode, simply press the ‘On’ button to
turn the display on and show the currently applied weight if any had been
applied when the battery saving feature was activated.
See the Fault Isolation section of this manual for any operation assistance.
Morgan Aero 1450 80
th Street
SW Everett, WA. 98203 – USA PH. (425) 438-9600 FAX. (425) 438-1907
5 of 24
MA8120-2
“Aero-Weigh” Digital Display & Load Cell, User Manual & Parts List
Rev. G 06/08/2012
Load Cell Keyboard Functions & Operation:
There are six (6) buttons on the keyboard which surrounds the load cell display.
(Figure 1)
Figure 1
ON – Turns the load cell reader on. Press button for 2 seconds and release.
OFF - Turns the load cell device off. Press button for 2 seconds and release.
DOWN ARROW / MENU – This is a dual function button. While in ‘Menu’ mode
the down arrow is functional. This button is used to enable the ‘Menu’ mode
when Customizing load cell reader functions (The functions in the “Menu” mode
are described in the Customizing the Load Cell Reader Functions section
below.)
Morgan Aero 1450 80
th Street
SW Everett, WA. 98203 – USA PH. (425) 438-9600 FAX. (425) 438-1907
6 of 24
MA8120-2
“Aero-Weigh” Digital Display & Load Cell, User Manual & Parts List
Rev. G 06/08/2012
UP ARROW / RESET – This is a dual function button. While in ‘Menu’ mode, the’
Up Arrow is functional. If ‘Peak’ is enabled in setup mode, the Up Arrow doubles
as the ‘Re-Arm Peak’ button. While in normal operating mode this button
functions as a load reset button.
ESC / LB/KG – This is a dual function button. ESC is used to exit the ‘Menu’
mode. When LB/KG is active the button changes the readout between pounds
and kilograms.
ENTER / ZERO – This is a dual function button. If pressed when reader is in
‘Menu’ mode it will select the currently displayed menu item. When pressed
during a load measuring operation it will zero the scale – any additional load will
be measured form that zero point. (This is a “Tare” function). If this button is
depressed when no load is applied the display will show “0”.
Morgan Aero 1450 80
th Street
SW Everett, WA. 98203 – USA PH. (425) 438-9600 FAX. (425) 438-1907
7 of 24
MA8120-2
“Aero-Weigh” Digital Display & Load Cell, User Manual & Parts List
Rev. G 06/08/2012
Customizing Load Cell Reader Functions:
The functions of the load cell reader can be changed using the two (2) Menu
modes described below:
Using the Menu Mode:
To enter the Menu Mode when the unit is on press and hold the ‘DOWN ARROW
/ MENU’ button for 5 seconds then release it. Within the Menu Mode four (4)
items are selectable: (When you have selected the item you want by pressing
the DOWN ARROW / MENU’ or ‘UP ARROW / RESET’ buttons. Press the ‘ENTER /
ZERO’ button to enable it). (Note: After 2 minutes of inactivity in this mode the
load cell will return to normal mode and display will read “0”)
1. FILTER – This mode sets the filter band averaging of the load cell pin
signal that is entering the unit. Any weight changes within this band will
be displayed as an average. This helps maintain a steady reading with a
load that might be in motion. If the band is set at 20 any weight readings
with +- 20 pounds will be displayed as an Average.
To set the filter band:
After the ‘ENTER / ZERO’ button has been pushed and the unit is in
“Filter” mode the display shows ‘FLT XX’ (Filter and value in pounds or
Kg). Press the ‘DOWN ARROW / MENU’ or ‘UP ARROW / RESET’ buttons to
adjust the band. Press the ‘ENTER / ZERO’ button to save the value. The
display will now show “0”.
2. SETPOINT – This mode allows you to indicate a maximum load you do not
wish to exceed. This will be a visual warning that a pre-selected weight
has been exceeded. When it is exceeded the display will alternated
between the applied weight and ‘WT OVER’.
To set the setpoint:
After the ‘ENTER / ZERO’ button has been pushed and the unit is in
“Setpoint” mode the display shows ‘SP1 XXXXX’ (setpoint1 and a load
value in pounds or Kg). Press the ‘DOWN ARROW / MENU’ or ‘UP ARROW
/ RESET’ buttons to adjust the weight. Press the ‘ENTER / ZERO’ button to
save the value. The display will now show “0”.
Morgan Aero 1450 80
th Street
SW Everett, WA. 98203 – USA PH. (425) 438-9600 FAX. (425) 438-1907
8 of 24
MA8120-2
“Aero-Weigh” Digital Display & Load Cell, User Manual & Parts List
Rev. G 06/08/2012
3. POWER – This reduces the battery power used by saving by 1) turning the
backlight off after a set time the time, or 2) turning the entire load cell off
after a set time the time. When ‘ENTER / ZERO’ button is pushed, the unit
may be programmed to save power:
To set a backlight turnoff time:
After the ‘ENTER / ZERO’ button has been pushed and the unit is in
“power save” mode the display shows ‘BL
YES’ or ‘BL NO’ (backlight
Yes or backlight No) ;
(Note: if ‘‘BL NO’ is displayed and the ENTER / ZERO button is pressed,
the load cell will now move on to the power turnoff mode, and the display
shows “PWTO YES’ or ’PWTO NO’). (see loadcell power turnoff time
below for instructions in this mode).
Press the DOWN ARROW / MENU button until ‘BL
YES’ displays. Press
the ENTER / ZERO button. The display shows ‘BLTO
YES’. Press the
ENTER / ZERO button. The display shows ‘BLM X.XX’ (backlight turnoff
time in minutes). Press the DOWN ARROW / MENU or ‘UP ARROW /
RESET’ buttons to set the turnoff time. Press the ENTER / ZERO button.
The load cell will now move on to the power turnoff mode, and the display
shows “PWTO YES’ or ’PWTO NO’ (see load cell power turnoff time
below for instructions in this mode).
To have no back light turnoff time:
After Enter has been pushed and the unit is in “power save” mode the
display shows ‘BL
YES’ or ‘BL NO’ (back ight Yes or back light No) ;
Pressing the DOWN ARROW / MENU button until ‘BL
YES’ displays.
(Note: if ‘‘BL NO’ is displayed and the ENTER / ZERO button is pressed,
the load cell will now move on to the power turnoff mode, and the display
shows “PWTO YES’ or ’PWTO NO’) (see load cell power turnoff time
below for instructions)
Press the ENTER / ZERO button. The display shows ‘BLTO
NO’. Press
the ENTER / ZERO button. The load cell will now move on to the power
turnoff mode, and the display shows “PWTO’ (see loadcell power turnoff
time below for instructions).
To set a load cell power turnoff time:
When unit is in Power Turnoff Mode (PWTO), the display will read “PWTO
YES” or ‘PWTO NO’. Press the DOWN ARROW / MENU button until
‘PWTO
YES’ displays. Press the ENTER / ZERO button. The display will
show “TOM X.X” (turnoff Minutes). Press the ENTER / ZERO button. The
load cell is now set to turn off after the set amount of minutes. The
display will read “0”.
To have no load cell turnoff time:
Morgan Aero 1450 80
th Street
SW Everett, WA. 98203 – USA PH. (425) 438-9600 FAX. (425) 438-1907
9 of 24
MA8120-2
“Aero-Weigh” Digital Display & Load Cell, User Manual & Parts List
Rev. G 06/08/2012
When unit is in Power turnoff Mode (PWTO) the display will read the
display will read “PWTO YES” or ‘PWTO NO’. Press the DOWN ARROW
/ MENU button until ‘PWTO
NO’ displays. Press the ENTER / ZERO
button. The load cell is now set to turn off after the set amount of
minutes. The display will read “0”.
4. DIAGNOST (diagnostics) – This mode is used to diagnose problems with
the reader or the battery. In this mode the reader will display raw load
data (R= XXXX) and load cell reader battery voltage (BV = XX.X).
To view the diagnostics:
After the ‘ENTER / ZERO’ button has been pushed and the unit is in
“Diagnostic” mode. The display shows ‘R= XXXX’ (this is a raw data
value) and a load value in pounds or Kg). Press the Press the DOWN
ARROW / MENU button until ‘BV= XX.X’ (battery voltage). Press the
ENTER / ZERO button. The load cell is now in normal operating mode.
The display will read “0”.
Using the Setup Menu Mode:
There are two functions that can be carried out in the Setup Menu Mode: 1)
“Setup” and 2) “Calibration”. To enter the Setup Menu Mode, start with the unit
turned off. Press and hold the ‘UP ARROW / MENU’ button down. Press the ‘ON’
button until the display comes on. Release ‘ON’ button and in three seconds
release the ‘UP ARROW / MENU’ button. The display should now read ‘SET UP’.
Now press the ‘ENTER / ZERO’ button to begin ‘SET UP’ functions. (Note: After 2
minutes of inactivity in this mode the load cell will return to normal mode and
display will read “0”)
1. SET UP (setup) – This mode allows the user to change increments of load
displayed and to change the units of loads displayed on the load cell from
Pounds (LBS) to Kilograms (KG).(Only make these changes if they are
absolutely necessary)
To change the increments of units displayed:
After the ‘ENTER / ZERO’ button has been pushed and the unit is in Setup
Menu Mode. The display will read ‘INC XXXX’ (Increments of load to be
displayed). Press the ‘UP ARROW / MENU’ button or the ‘DOWN ARROW /
RESET’ button to select the incremental load reading. (For normal usage
1500 should be selected). The available increments are: 1000 1500 2000
Morgan Aero 1450 80
th Street
SW Everett, WA. 98203 – USA PH. (425) 438-9600 FAX. (425) 438-1907
10 of 24
MA8120-2
“Aero-Weigh” Digital Display & Load Cell, User Manual & Parts List
Rev. G 06/08/2012
2500 3000 5000 10000. When the desired value is selected, press
‘ENTER/ ZERO’. The display will now read ‘CTBY =XX’ (count by a set load
range). Press the ‘UP ARROW / MENU’ button or the ‘DOWN ARROW /
RESET’ button to select the desired incremental Countby. When the
desired Countby is selected press the ‘ENTER / ZERO’ button and
‘FS=XXXXX’ will display, press the ‘ENTER / ZERO’ button. The load cell
will now move to the load value unit display mode (see section below)
To change the units displayed to Kilograms or Pounds:
After the above steps have been performed, the display will read ‘L>K
YES’ (pounds to Kilogram change? Yes) or ‘L>K NO’ (pounds to Kilogram
change? No). If ‘L>K YES’ is chosen, the display will now read in pounds,
If the display is ‘L>K NO’ is chosen it will read in kilograms. Press the ‘UP
ARROW / MENU’ button or the ‘DOWN ARROW / RESET’ button to select
the desired value. Press ‘ENTER / ZERO ’ to enter the setting.
Morgan Aero 1450 80
th Street
SW Everett, WA. 98203 – USA PH. (425) 438-9600 FAX. (425) 438-1907
11 of 24
MA8120-2
“Aero-Weigh” Digital Display & Load Cell, User Manual & Parts List
Rev. G 06/08/2012
To enable the peak hold function:
After the above steps have been performed, the display will read ‘PEAK
YES’ (set peak value? Yes) or ‘PEAK NO’ (set peak value? No). If ‘PEAK
YES’ is chosen a peak load value for the reader is set. If the display is
‘PEAK NO’ is chosen, no peak value is set. Press the ‘UP ARROW / MENU’
button or the ‘DOWN ARROW / RESET’ button to select the desired value.
Press ‘ENTER / ZERO ’ to enter the setting.
2. CALIBRATION (Calibration) – This mode allows the user to change the
preset calibration of the load cell system when performing a periodic
calibration. This should only be done by calibration certification personnel.
The load cell system comes pre-calibrated from the manufacturer. (Please
see Appendix A. for Calibration instructions).
WARNING DO NOT ENTER THE CALIBRATION MODE UNLESS YOU
ARE GOING TO CALIBRATE THE UNIT AND HAVE BEEN PROPERLY
TRAINED OR CERTIFIED IN THIS PROCEDURE
Morgan Aero 1450 80
th Street
SW Everett, WA. 98203 – USA PH. (425) 438-9600 FAX. (425) 438-1907
12 of 24
MA8120-2
“Aero-Weigh” Digital Display & Load Cell, User Manual & Parts List
Rev. G 06/08/2012
Charging the Internal Battery
To recharge the battery use the supplied Morgan Aero MA9259 charger only.
1) Unplug the load cell pin from the “Aero-Weigh” reader.
2) Turn the “Aero-Weigh” reader off.
3) Plug the charger into a 120 VAC outlet BEFORE connecting to the “AeroWeigh” reader.
DO NOT USE ANY OTHER CHARGER THAN THE ONE SUPPLIED WITH
YOUR “AERO-WEIGH” OR DAMAGE MAY OCCUR!
IF USING THE CHARGER IN A COUNTRY THAT USES A DIFFERENT PLUG
CONFIGURATION AND A VOLTAGE OTHER THAN 120 VAC AND 60 CYCLES,
OBTAIN A UNIVERSAL ADAPTER WITH A POWER CONVERTER LOCALLY OR A
CONVERTER MAY BE OBTAINED FROM MORGAN AERO PRODUCTS.
When the charger is plugged in an indicator light on the front of the charger will
flash red two times and then extinguish. This indicates the charger is powered
and ready to charge. Next connect the charger output connector to the proper
receptacle on the “Aero-Weigh”. When the charger is operating and properly
connected the indicator light will show red.
Morgan Aero 1450 80
th Street
SW Everett, WA. 98203 – USA PH. (425) 438-9600 FAX. (425) 438-1907
13 of 24
MA8120-2
“Aero-Weigh” Digital Display & Load Cell, User Manual & Parts List
Rev. G 06/08/2012
Parts List
Item.
Description
1
2
3
Keeper Pin
Load Cell
Display
load cell cable, complete
MA9267 (Not Shown)
Part
Number
MA8203
MA8192
MA8173
MA9267-XX
Quantity
Req.
1
1
1
1
dash equals number of feet in
length required
Morgan Aero 1450 80
th Street
SW Everett, WA. 98203 – USA PH. (425) 438-9600 FAX. (425) 438-1907
14 of 24
MA8120-2
“Aero-Weigh” Digital Display & Load Cell, User Manual & Parts List
Rev. G 06/08/2012
Load Cell Specifications
Load cell maximum capacity
Creep (% load in 30 min.)
Max. Excitation (V-Acor DC
Storage Temp. Range (*F)
Operating Temp. Range (*F)
Insulation resistance (MΏ@50VDC)
Input resistance (Ώ Nominal)
Output resistance (Ώ Nominal)
Temp. effect on output (% FSO’/*F)
Temp effect on zero (% FSO/*F)
Output mV/V
Accuracy
Safe load limit (% capacity)
Wiring Code
Morgan Aero 1450 80
th Street
16,000 lb’s
<.05%
15.0
-58 – 185
-58 – 185
>5000
750
700
<.008%
<.015%
2 mV/V (+-) 20%
(+-) 1%
150%
Excitation (+) – Pin A
Excitation (-) – Pin B
Signal (+) – Pin C
Signal (-) – Pin D
SW Everett, WA. 98203 – USA PH. (425) 438-9600 FAX. (425) 438-1907
15 of 24
MA8120-2
“Aero-Weigh” Digital Display & Load Cell, User Manual & Parts List
Rev. G 06/08/2012
General Safety Information
1. Always connect the load cell above the load to be weighed.
2. Always make sure the “Aero-Weigh” is fully charged prior to use.
3. Always ensure that the display has been calibrated with the load cell it is to be
used with.
4. Make sure all cables are securely tightened.
5. Follow all instructions provided in the aircraft manufactures instructions for the
task being performed. In all instances they will take precedence over any
instructions provided within.
6. Prior to any use of any lifting equipment check be familiar with the following:
WARNING!
Improper operation of any hoist or lifting device can create a potentially
hazardous situation which, if not avoided, could result in death or serious injury.
To avoid such a potentially hazardous situation, the operator shall:
1. NOT operate a malfunctioning or unusually performing hoist.
2. NOT lift or pull more than rated load for the hoist
3. NOT use damaged hoist or hoist that is NOT working properly.
4. NOT us a hoist with twisted, kinked, damaged, or worn load chain.
5. NOT operate with an lever extension (cheater bar).
6. NOT attempt to “free chain” the hoist
7. NOT use the hoist to lift, support or transport people.
8. NOT lift loads over people and make sure all personnel remain clear of the
supported load.
9. NOT attempt to lengthen the load chain or repair damaged load chain.
10. Protect the hoist’s load chain from any damaging contaminates.
11. NOT use load chain as a sling or wrap load chain around load.
12. NOT apply the load to the tip of the hook or to the hook latch.
13. NOT apply load unless load chain is properly seated in the chain sprockets.
14. NOT operate beyond the limits of the load chain travel.
15. NOT leave load supported by the hoist unattended unless specific
precautions have been taken.
16. NOT operate the hoist unless load attachments are seated properly.
17. NOT operate a hoist unless all persons are and remain clear of the supported
load.
18. REPORT malfunctions or unusual performance of hoist and do not re-use
until checked by qualified persons.
19. BE familiar with operation controls, procedures, and warnings.
20. MAINTAIN a firm footing or be otherwise secured when operation the hoist.
21. CHECK brake function by tensioning the hoist prior to each lift.
22. USE hook latches.
Morgan Aero 1450 80
th Street
SW Everett, WA. 98203 – USA PH. (425) 438-9600 FAX. (425) 438-1907
16 of 24
MA8120-2
“Aero-Weigh” Digital Display & Load Cell, User Manual & Parts List
Rev. G 06/08/2012
23. MAKE sure the hook latches are closed and not supporting any parts of the
load.
24. MAKE sure the load is free to move and will clear all obstructions.
25. AVOID swinging the load. KEEP a firm grip on the lever until operation stroke
is completed and the lever is at rest.
26. INSPECT the hoist regularly, replace damaged or worn parts, and keep
appropriate records of maintenance.
27. USE only recommended parts when repairing the unit.
28. LUBRICATE load chain per maintenance manual
29. NOT permit more than one operator to pull on lever at the same time. More
than one operator is likely to cause hoist overload.
30. NOT allow attention to be diverted from proper operation of the hoist.
31. NOT adjust or repair the hoist unless qualified to perform such adjustments
or repairs.
Morgan Aero 1450 80
th Street
SW Everett, WA. 98203 – USA PH. (425) 438-9600 FAX. (425) 438-1907
17 of 24
MA8120-2
“Aero-Weigh” Digital Display & Load Cell, User Manual & Parts List
Rev. G 06/08/2012
Troubleshooting Guide:
The following list the faults and fault messages which may occur and how to
solve them.
1) The display is blank after initial setup and power up: Press the “OFF’
button and then press the ‘ON’ button for 2 seconds. (see the start
instructions at the beginning of this document). If the display is still blank
the battery charge may be too low for it to operate – (go to the battery
charge section of this document).
2) “OVRLD” – the load cell reader is receiving an input voltage out of its
expected range. (This may occur when the load cell is started and it has a
previous signal input stored): Press the ‘ENTER /ZERO’ button to clear the
memory. The display should now read “0”.
3) “-------“–the load cell reader battery may not charged, or the cable from
the load cell reader to the load cell pin may not be connected or may be
shorted. Check the cable connections for proper pin alignment and
attachment to the couplings, check the cables for damage, check the load
cell reader battery charge level (go to the battery charge section of this
document). If none of these solutions works return the entire load cell
reader system directly to Morgan Aero Products.
Morgan Aero 1450 80
th Street
SW Everett, WA. 98203 – USA PH. (425) 438-9600 FAX. (425) 438-1907
18 of 24
MA8120-2
“Aero-Weigh” Digital Display & Load Cell, User Manual & Parts List
Rev. G 06/08/2012
Appendix A: CALIBRATION
Calibration of the “Aero-Weigh” is a simple menu driven operation. The load cell
and the display should always be used as a matched set. When either
component is replaced they must be re-calibrated as a set. Calibration should
only be carried out by a qualified technician.
CALIBRATION SET-UP
Initial set-up of the load cell is critical in performing accurate and repeatable
calibrations. During normal operation of the load cell system the load cell is used
in either the machined fixture end of the boot-strap arm or with a 8.5T shackle
and centering spool. When used with the boot-strap arm the load cell is held in
the same position every time it is used and the load is always centered under the
load cell. It will also be noted that when properly installed on the boot-strap arm
the flat on the plug end of the load cell is retained in the up position. This
insures that the load applied will always be in the same place on the load cell.
This placement insures accuracy and repeatability.
When ordered with the 8.5T shackle a centering spool and small keeper are
supplied so that when used the load cell load is again centered in the same
location. (see below)
Morgan Aero 1450 80
th Street
SW Everett, WA. 98203 – USA PH. (425) 438-9600 FAX. (425) 438-1907
19 of 24
MA8120-2
“Aero-Weigh” Digital Display & Load Cell, User Manual & Parts List
Rev. G 06/08/2012
Morgan Aero 1450 80
th Street
SW Everett, WA. 98203 – USA PH. (425) 438-9600 FAX. (425) 438-1907
20 of 24
MA8120-2
“Aero-Weigh” Digital Display & Load Cell, User Manual & Parts List
Rev. G 06/08/2012
In order to ensure that your load cell and display always display an accurate
reading when used it is important to make sure it is always calibrated and used
with the load cell in the same position and the load bearing on the center portion
of the load cell. When used on the bootstrap tool or with the optional shackle
and spool the proper configuration for use and calibration is maintained. If
calibration is performed without the use of the optional shackle and spool always
maintain the load cell as shown in picture ‘C’ below.
Also ensure that the flat on the load cell connector end is on top and at a right
angle to the load being applied.
FAILURE TO CONFIGURE THE LOAD CELL OR THE DISPLAY DURING
CALIBRATION OR USE WILL RESULT IN INACCURATE READINGS THAT
CAN CAUSE SEVERE PERSONNEL INJURY, DEATH OR DAMAGE TO
EQUIPMENT.
The “Aero-Weigh” and the supplied load cell are a matched set and the “AeroWeigh MUST be calibrated to the load cell that it will be used with. Load cells
and displays MUST NOT BE SWITCHED WITHOUT RE-CALIBRATION prior
to use.
When equipment is received it has been calibrated as a set. The display has an
identification tag marked with its serial number and the serial number of the load
cell it has been calibrated with. (See Fig. 1)
Morgan Aero 1450 80
th Street
SW Everett, WA. 98203 – USA PH. (425) 438-9600 FAX. (425) 438-1907
21 of 24
MA8120-2
“Aero-Weigh” Digital Display & Load Cell, User Manual & Parts List
Rev. G 06/08/2012
To properly identify the load cell the serial number of each load cell is located as
seen in Fig. 2
The load cell also contains capacity, part number and other information as seen
in Fig. 3.
Morgan Aero 1450 80
th Street
SW Everett, WA. 98203 – USA PH. (425) 438-9600 FAX. (425) 438-1907
22 of 24
MA8120-2
“Aero-Weigh” Digital Display & Load Cell, User Manual & Parts List
Rev. G 06/08/2012
Morgan Aero 1450 80
th Street
SW Everett, WA. 98203 – USA PH. (425) 438-9600 FAX. (425) 438-1907
23 of 24
MA8120-2
“Aero-Weigh” Digital Display & Load Cell, User Manual & Parts List
Rev. G 06/08/2012
Ensure that the battery has been completely charged.
DO NOT PRESS THE “ON” BUTTON UNTIL BOTH THE “AERO-WEIGH”
AND THE LOAD CELL HAVE BEEN CONNECTED TOGETHER OR THE
DISPLAY MAY BE DAMAGED
1) Connect the load cell to the Unit with the cable connector.
2) While holding down the “MENU” button, turn the unit on by pressing the
“ON” button. After the display comes on release the “ON” button, count to
three and release the “UP ARROW / MENU” button. You should see “SET
UP” displayed, if not repeat this step.
WHEN “SETUP” IS DISPLAYED DO NOT PRESS THE ENTER BUTTON
UNLESS YOU HAVE CONFIRMED WITH SUPERVISORY PERSONEL A
SYSTEM CHANGE IS NECESSARY. DOING SO COULD CAUSE FACTORY
SETTINGS TO BE CHANGED AND RESULT IN INCORRECT READINGS OR
OPERATOR CONFUSION THAT COULD RESULT IN INJURY TO
PERSONNEL OR DAMAGE TO EQUIPMENT!
3) When “SET UP” is displayed press the up arrow button and “DO CALIB”
will be displayed, press the ‘ENTER / ZERO’ button and “APPLY WEIGHT”
will be displayed. The unit is now ready to calibrate.
4) Slowly apply the known test load.
5) Press the “ENTER/ZERO” button and the display will show a weight
reading. This reading may or may not be the actual applied weight. To
calibrate the unit to the actual applied load use the “UP ARROW / RESET”
button and “DOWN ARROW / MENU” button to adjust the displayed
reading to the actual weight of the test load.
6) When the display matches the known weight of the test load, press the
“ENTER / ZERO” button and remove the weight. The unit is now
calibrated to within 1.5% FS. To check the accuracy, apply varying known
weights and compare to the displayed reading, if necessary repeat the
calibration procedure.
Morgan Aero 1450 80
th Street
SW Everett, WA. 98203 – USA PH. (425) 438-9600 FAX. (425) 438-1907
24 of 24