1
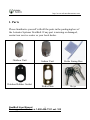
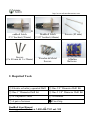
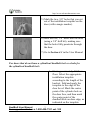
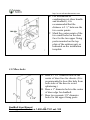
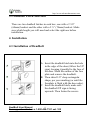
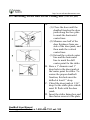
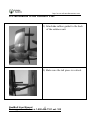
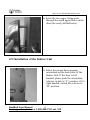
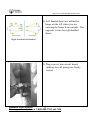
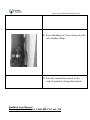
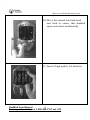
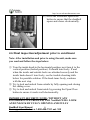
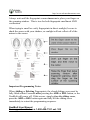
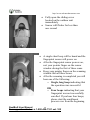
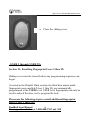
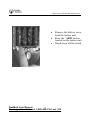
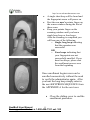
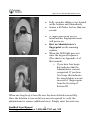
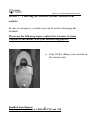
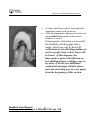
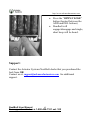
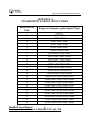
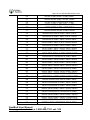
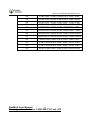
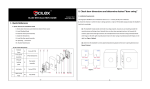
http://www.advancedactuators.com PREFACE Thank you for purchasing the Actuator Systems NextBolt Secure-Mount or High Security Series fingerprint deadbolt. Please read the documentation carefully before installation & use. The manual details all installation procedures and operation steps. Manufacturer and/or Distributors of the Actuator Systems NextBolt will not be responsible for any damages caused by incorrect installation or mishandling of the lock. Any such damages will void manufacturer’s warranty. 1 NextBolt User Manual For support contact us a 1-800-408-7101 ext. 102 http://www.advancedactuators.com Table of Contents Preface………………………………………………………………1 Installation Manual 1. Parts ........................................................................................ 3 2. Required Tools........................................................................ 4 3. Pre-installation ........................................................................ 5 3.1 Mark and bore holes on the door .................................. 5 3.2 Deadbolt Latch Selection .............................................. 9 4. Installation .............................................................................. 9 4.1 Installation of Deadbolt ................................................ 9 4.2 Installing Strike and Strike Lining Box (on the door jamb) ................................................................................. 10 4.3 Sizing Tail Piece (to the right length) ......................... 11 4.4 Installation of the Outdoor Unit .................................. 13 4.5 Installation of the Indoor Unit .................................... 15 5. Trouble Shooting .................................................................. 22 Operation Manual ..................................................................... 24 Section I - Enrolling Administrators: ............................... 28 Section II - Enrolling Fingerprint Users 2 thru 99: ........... 30 Section III – Deleting Individual Fingerprint Users: ........ 34 Section IV – Deleting ALL Fingerprint Users: ................ 36 Section V – Unlocking the Actuator Systems NextBolt from outside: ..................................................................... 38 Section VI – Locking the Actuator Systems NextBolt from Outside: ............................................................................. 40 Section VII – Locking and Unlocking the Actuator Systems Nextbolt from Inside: ......................................... 41 APPENDIX A …………………………………………..43 USER ENROLLMENT TABLE: ..................................... 46 Special THANKS from Actuator Systems……………....51 2 NextBolt User Manual For support contact us a 1-800-408-7101 ext. 102 http://www.advancedactuators.com 1. Parts Please familiarize yourself with all the parts in the packaging box of the Actuator Systems NextBolt. If any part is missing or damaged, contact our service center or your local dealer. Outdoor Unit Outdoor Rubber Gasket Indoor Unit Strike Lining Box Strike Plate Keys 3 NextBolt User Manual For support contact us a 1-800-408-7101 ext. 102 http://www.advancedactuators.com D eadbolt Latch 2 ¾‖ backset (70mm) Screws (2 x 40 mm & 1 x 29mm) Deadbolt Latch 2 3/8‖ backset (60mm) Wooden & Metal Screws Screws (82 mm) Alkaline Batteries 2. Required Tools ① Electric or battery operated Drill ② One 3/8‖ Diameter Drill Bit ③ One 1‖ Diameter Drill bit ④ One 2 1/8‖ Diameter Drill Bit ⑤ A Carpenter Chisel ⑥ A Hammer ⑦ A pair of scissors ⑧ Vise-Grip 4 NextBolt User Manual For support contact us a 1-800-408-7101 ext. 102 http://www.advancedactuators.com ⑨ Philips & flat head screw drivers ⑩ Metal Cutters or Hacksaw 11) Marker 3. Pre-installation 3.1 Mark and bore holes on the door 3.11 Mark holes on door For doors with existing deadbolt lock with 2 1/8” diameter hole: 1) Remove existing cylindrical deadbolt . 5 NextBolt User Manual For support contact us a 1-800-408-7101 ext. 102 http://www.advancedactuators.com 2) Please be sure to use the installation template when installing the Actuator Systems NextBolt on a door with an existing deadbolt. 3) Cut out the two, 3/8‖ holes on the Installation Template that correspond to your existing backset (2 3/8‖ or 2 ¾‖). 4) Rest the installation template on the front of the door, on top of the existing 2 1/8‖ hole, making sure that it is aligned properly for the door’s existing 2 3/8‖ or 2 ¾‖ backset. 6 NextBolt User Manual For support contact us a 1-800-408-7101 ext. 102 http://www.advancedactuators.com 5) Mark the two, 3/8‖ holes that you cut out of the installation template on the door (with a magic marker). 6) Bore the two, 3/8‖ holes into the door (using a 3/8‖ drill bit), making sure that the holes fully penetrate through the door. 7) Go to Section 4.3 in the User Manual For doors that do not have a cylindrical deadbolt lock or a hole for the cylindrical deadbolt lock: A. Start approximately 46‖ from floor. Select the appropriate installation template according to the length of the backset. Fold and apply the template to the edge of the door bevel. Mark the center point of the cylinder hole on the door face, and then mark the center point of the deadbolt hole on door edge, as indicated on the template. 7 NextBolt User Manual For support contact us a 1-800-408-7101 ext. 102 http://www.advancedactuators.com B. For installation of combination set (door handle and deadbolt), it is recommended that the distance is 5 ½‖ between the two center points. C. Mark the center points of the two small holes on the door face for the two upper fixing posts mounted on the top plate of the outdoor unit, as indicated on the installation template. 3.12 Bore holes A. Bore a 2 1/8‖ diameter hole in the center of door face for chassis. (It is recommended to bore this hole from both sides of the door to avoid splintering.) B. Bore a 1‖ diameter hole in the center of door edge for deadbolt. C. Bore two separate 3/8‖ diameter holes for the upper fixing posts. 8 NextBolt User Manual For support contact us a 1-800-408-7101 ext. 102 http://www.advancedactuators.com 3.2 Deadbolt Latch Selection There are two deadbolt latches in each box, one with a 2 3/8‖ (60mm) backset and the other with a 2 ¾‖ (70mm) backset. Make sure which length you will need and select the right one before installation. 4. Installation 4.1 Installation of Deadbolt A. Insert the deadbolt latch into the hole in the edge of the door (follow the UP sign), keeping it parallel to the face of the door. Mark the outline of the face plate and remove the deadbolt. B. Then chisel 1/8‖ deep rectangular shape, per your marking (or until the faceplate is flush with the door edge). C. Insert the deadbolt latch; make sure the deadbolt UP sign is facing upwards. Then fasten the screws. 9 NextBolt User Manual For support contact us a 1-800-408-7101 ext. 102 http://www.advancedactuators.com 4.2 Installing Strike and Strike Lining Box (on the door jamb) A. (1) Close the door until the deadbolt touches the door jamb along the face plate to mark the horizontal center lines. (2) Measure one half of the door thickness from one side of the door jamb, and then mark the vertical center lines. (3) Extend the vertical center line and the horizontal line to mark the drill center point for the strike. B. Bore a 1‖ diameter and 1‖ deep hole in the door jamb at the center point for strike. To ensure the proper deadbolt function, this hole must be drilled at least 1‖ deep. C. Chisel the door jamb at 1/16‖ deep for the strike plate which must fit flush with the door jamb. D. Insert the strike lining box and then fasten screws to the plate. 10 NextBolt User Manual For support contact us a 1-800-408-7101 ext. 102 http://www.advancedactuators.com 4.3 Sizing Tail Piece (to the right length) The Actuator Systems NextBolt is designed to fit door thicknesses of 1 3/8‖ to 2‖. Four pre-sized tailpieces are included with the Actuator Systems NextBolt for 1 3/8‖, 1 ½‖, 1 ¾‖ and 2‖ thick doors. Your door thickness and length of the tailpiece being used must match exactly. EX: If your door is 1 ¾‖ thick, then you must use the 1 ¾‖ long tailpiece. The Actuator Systems NextBolt comes with the 1 ¾‖ tailpiece preinstalled. If your door is not 1 ¾‖ thick, but the thickness matches one of the other pre-cut tailpieces included with the lock, then you must swap out the tailpiece. For video directions on how to swap the tailpiece, go to the Actuator Systems knowledgebase page at www.advancedactuators.com and click on the Support Material section on the bottom of the page for links to the instructional videos. 11 NextBolt User Manual For support contact us a 1-800-408-7101 ext. 102 http://www.advancedactuators.com IF YOUR DOOR THICKNESS DOES NOT EXACTLY MATCH ANY OF THE PRE-CUT TAILPIECES LENGTHS, THEN YOU MUST TRIM THE PRE-INSTALLED TAIL PIECE TO MATCH YOUR EXACT DOOR THICKNESS. If you need to trim the tailpiece, be sure to measure the exact thickness of your door, mark the tailpiece (with a marker) where it needs to be cut and trim the tail piece accordingly per the exact thickness of your door, with a hacksaw or metal cutters. Notes: The motor could be dislodged if the tailpiece is not cut properly and is too long, due to excessive pressure. Warranty will be voided if this occurs. 12 NextBolt User Manual For support contact us a 1-800-408-7101 ext. 102 http://www.advancedactuators.com 4.4 Installation of the Outdoor Unit 1) Attach the rubber gasket to the back of the outdoor unit. 2) Make sure the tail piece is vertical. 13 NextBolt User Manual For support contact us a 1-800-408-7101 ext. 102 http://www.advancedactuators.com 3) Make sure the deadbolt is engaged. 4) Insert tail piece through the cross slot of the latch. 5) Insert the connector and wire through the cylinder hole below the deadbolt latch. 14 NextBolt User Manual For support contact us a 1-800-408-7101 ext. 102 http://www.advancedactuators.com 6) Insert the two upper fixing posts through the small upper holes on the door (the newly drilled holes). 4.5 Installation of the Indoor Unit 1) Select the proper door opening orientation on the back plate of the Indoor Unit. If the door is left handed, please push the orientation selector switch to ―L‖ position; if it’s right handed, switch the selector to ―R‖ position. 15 NextBolt User Manual For support contact us a 1-800-408-7101 ext. 102 http://www.advancedactuators.com 2) Left handed doors are defined as hinge on the left when you are entering the home from outside. The opposite is true for right handed doors. Right Handed/Left Handed 3) Plug wire set into circuit board, making sure all prongs are firmly seated. 16 NextBolt User Manual For support contact us a 1-800-408-7101 ext. 102 http://www.advancedactuators.com 4) Press sheathing of wire casing into the wire holder clamp. 5) Turn the manual turn knob to the vertical position, facing downward. 17 NextBolt User Manual For support contact us a 1-800-408-7101 ext. 102 http://www.advancedactuators.com 6) Insert the tail piece into the vertical retaining slot of the indoor unit. 7) Gently finish joining the outdoor and indoor units together, ensuring all fixing posts are aligned properly. 18 NextBolt User Manual For support contact us a 1-800-408-7101 ext. 102 http://www.advancedactuators.com 8) Fasten the two shorter screws through the upper fixing post holes on the upper section of the inside unit. 9) Fasten the two long screws through the bottom fixing post holes on the inside unit. 19 NextBolt User Manual For support contact us a 1-800-408-7101 ext. 102 http://www.advancedactuators.com 10) Move the manual turn knob back and forth to ensure that deadbolt opens and closes mechanically. 11) Insert 4 high-quality AA batteries 20 NextBolt User Manual For support contact us a 1-800-408-7101 ext. 102 http://www.advancedactuators.com 12) Press the electronic open/close button to ensure that the deadbolt opens and closes electronically. 4.6 Final inspection/adjustment prior to enrollment Note: After installation and prior to using the unit, make sure you read and follow the steps below: ① Turn the inside knob to the horizontal position; next turn it to the vertical position (locked position). It should turn freely. If and when the inside and outside locks are attached securely and the inside knob doesn’t turn freely, see the trouble shooting table below for possible solution. If the knob turns freely, continue with the next step. ② Try to lock and unlock from outside by fully opening and closing the sliding cover. ③ Try to lock and unlock from inside by pressing the Open/Close button to ensure it works well electronically. IMPORTANT SECURITY NOTE: WITHOUT ANY FINGERPRINTS ENROLLED, THE NextBolt WILL LOCK AND UNLOCK BY FULLY OPENING AND FULLY 21 NextBolt User Manual For support contact us a 1-800-408-7101 ext. 102 http://www.advancedactuators.com CLOSING THE SLIDING COVER. 5. Trouble Shooting PROBLEMS Indoor turn knob does not turn or turns very sluggishly POSSIBLE REASONS 1. Incorrect installation 2. Incorrect tailpiece length SOLUTIONS 1. Make sure the tail piece was inserted vertically through the cross slot of the deadbolt and slot of the indoor unit while the turn knob was vertical (facing down). 2. Measure the door thickness and swap or trim the tail piece per section 4.3 of the installation manual 22 NextBolt User Manual For support contact us a 1-800-408-7101 ext. 102 http://www.advancedactuators.com Indoor turn knob turns but nothing happens. 1. The tail piece 1. Remove and reinstall the did not go outdoor unit. Then insert the through the cross tail piece through the cross slot of the slot of the deadbolt and slot deadbolt; of the indoor unit while the turn knob is in vertical position (facing down). 2. Tail piece was trimmed too short and does not penetrate the slot of the indoor unit; The sliding cover is fully lifted to power on without any fingerprint enrolled inside, the deadbolt does not disengage or four alert beeps are heard. 1. Right & left hand door configurations is set incorrectly; 2. The tail piece was not set properly 2. Contact the Actuator Systems NextBolt dealer that you purchased to lock from OR Contact us at: support@advancedactuators. com 1. Correctly configure the unit for left or right hand door swing per section 4.5. 2. Uninstall the outdoor unit and keep the UP sign side of the tail piece up and insert the tail vertically through the cross slot of the deadbolt while the turn knob is in vertical position. 23 NextBolt User Manual For support contact us a 1-800-408-7101 ext. 102 http://www.advancedactuators.com When the sliding 1. Improper cover is fully lifted positioning of and immediately the strike and put down to engage strike lining box. the deadbolt, but It may be the deadbolt does deflecting the not fully engage, or deadbolt. four alert beeps are heard. When the sliding 1. Batteries not cover is lifted up inserted during daily use, correctly; nothing happens (fingerprint scanner does not blink) 2. Wires not connected properly Six beeps are heard Low Voltage when any function is performed. 1. Check the position of the strike and the strike lining box. 1. Remove & reinsert the batteries following ―+‖ and ―—― signs in the battery house. 2. Check the connections and make sure wires are fully plugged in. Change the batteries Operation Manual Operation Manual Helpful Hints Please be sure to physically leave your door open until you have successfully enrolled the first user (ADMINISTRATOR) into the Actuator Systems NextBolt and have successfully verified the new user’s fingerprint to unlock the door. 24 NextBolt User Manual For support contact us a 1-800-408-7101 ext. 102 http://www.advancedactuators.com With no fingerprints enrolled in the Actuator Systems NextBolt, the deadbolt will engage/disengage when the sliding cover is fully opened and immediately closed. Definitions of Indication Beeps: Single, Short Beep – Indicates that any operations sequence has begun OR that the door has been successfully locked or unlocked OR that the sliding cover has been left open for more than ten seconds. Single, Long Beep – Indicates that programming operation was successful Short, Double Beep – Indicates that individual fingerprint user deletion sequence has begun. Long Double Beep – Indicates that Delete All programming was successful Four Beeps – Indicates unsuccessful enrollment/unsuccessful verification attempt OR Actuator Systems NextBolt was improperly installed (see Installation Guide). Five Beeps - Indicates the selected user was unsuccessfully deleted. Six, Short Beeps – Low battery alert, change batteries Common definitions of terms used when using the Actuator Systems NextBolt: Fingerprint Enrollment: Process of adding fingerprints to the Actuator Systems NextBolt. Enrolled Fingerprints: Fingerprints that have been successfully added into the Actuator Systems NextBolt. 25 NextBolt User Manual For support contact us a 1-800-408-7101 ext. 102 http://www.advancedactuators.com Verifying Fingerprints: Process of authentication by scanning enrolled fingerprints to: A) Unlock the door B) Authenticate Administrators enrolled fingerprints to program the Actuator Systems NextBolt. Before enrolling and verifying fingerprints, make sure to read the following helpful hints for Fingerprint Enrollment and Verification: Generally, the center of the vortex (swirl) of the fingerprint pattern is the key data point; ideally, it is placed in the center of the small glass window in a consistent way. Your finger should be flat, motionless and held with light pressure in the same way each time. See the picture below for some guiding drawings. Light pressure when placing the finger on the scanner gives the best image, but the finger must not move during scanning. Moist fingers provide better images than dry ones. If on cold, dry days you have difficulty, for example, try moistening your finger with your breath or a little lotion. Very dry, dirty or scarred fingers are obviously not recommended, since they will obscure the fingerprint. The pointer finger is, by far, the best fingerprint to enroll. The thumb is the second best digit. If the pointer finger is difficult to enroll or verify, try enrolling the same NON ADMIN fingerprint 2 or 3 times at slightly different angles. EX: Enroll same pointer finger as users 3, 4 and 5. In the event you still have trouble enrolling fingerprints we have included 2 fingerprint pads in your box. Moisten your fingers with one of these pads prior to enrollment. These dramatically increase the quality of the enrollment. Once enrolled these pads may be discarded. 26 NextBolt User Manual For support contact us a 1-800-408-7101 ext. 102 http://www.advancedactuators.com Always wait until the fingerprint scanner turns on to place your finger on the scanning window. This is true for both fingerprint enrollment AND verification. When trying to enroll or verify fingerprints in direct sunlight, be sure to shade the sensor with your shadow, so sunlight will not reflect off of the mirror in the sensor. Important Programming Notes: When Adding or Deleting Fingerprints, the closed sliding cover must be fully lifted within 8 seconds after pressing the ADD or DEL button, or the NextBolt will power off. If this occurs, simply close the sliding cover, press the ADD or DEL button again and fully lift the sliding cover immediately to restart the programming sequence. 27 NextBolt User Manual For support contact us a 1-800-408-7101 ext. 102 http://www.advancedactuators.com The first two fingerprint users enrolled will automatically be programmed as ADMINISTRATORS (Users 1 and 2). ADMINISTRATORS can apply all programming functions as well as verify their fingerprints to unlock the door. The 3rd thru 99th fingerprint users enrolled (Users 3 thru 99) are automatically programmed at the USER level. USER level fingerprints can only be used to unlock the door, not to program the lock. Section I - Enrolling Administrators (First Fingerprint User): Sliding cover must be closed before any programming sequence can begin. As noted in the Helpful Hints section, the first two users that enroll their fingerprints into the Actuator Systems NextBolt will automatically be programmed as ADMINISTRATORS (Users 1 and 2). ADMINISTRATORS can apply all programming functions as well as verify their fingerprints to unlock the door. Please use the following steps to enroll the first fingerprint user (ADMINISTRATOR1/USER 1): Remove the battery cover from the indoor unit Press the ―ADD‖ button located on the indoor unit Single beep will be heard 28 NextBolt User Manual For support contact us a 1-800-408-7101 ext. 102 http://www.advancedactuators.com Fully open the sliding cover located on the outdoor unit immediately Sensor will flicker for less than one second A single short beep will be heard and the fingerprint sensor will power on After the fingerprint sensor powers on , rest your pointer finger on the sensor window during the first of three scans Keep your pointer finger on the scanning window thru all three scans. After the scanning is completed you will hear one of the following: o Single, long beep indicating that the operation was successful OR o Four beeps indicating that your fingerprint was not successfully enrolled. If you hear four beeps, please start the enrollment process over from the beginning 29 NextBolt User Manual For support contact us a 1-800-408-7101 ext. 102 http://www.advancedactuators.com Close the sliding cover (USER 2 through USER 99): Section II - Enrolling Fingerprint Users 2 thru 99: Sliding cover must be closed before any programming sequence can begin. As noted in the Helpful Hints section, the third thru ninety-ninth fingerprint users enrolled (Users 3 thru 99) are automatically programmed at the USER level. USER level fingerprints can only be used to unlock the door, not to program the lock. Please use the following steps to enroll additional fingerprint users (Users 3 thru 99): 30 NextBolt User Manual For support contact us a 1-800-408-7101 ext. 102 http://www.advancedactuators.com Remove the battery cover from the indoor unit Press the ―ADD‖ button located on the indoor unit Single beep will be heard 31 NextBolt User Manual For support contact us a 1-800-408-7101 ext. 102 http://www.advancedactuators.com Fully open the sliding cover located on the outdoor unit immediately Sensor will flicker for less than one second A single short beep will be heard and the fingerprint sensor will power on After the fingerprint sensor powers on, rest an ADMINISTRATOR’S finger on the sensor window to verify that they are an Administrator When the first Administrator’s fingerprint is successfully verified, the sensor will briefly turn off (for less than one second) Immediately remove the ADMINSTRATOR’S finger and enter the KEPRESS SEQUENCE for the user number you wish to enroll described in APPENDIX A 32 NextBolt User Manual For support contact us a 1-800-408-7101 ext. 102 http://www.advancedactuators.com A single short beep will be heard and the fingerprint sensor will power on Rest the new user’s pointer finger on the sensor window during the first of three scans Keep your pointer finger on the scanning window until you hear a single long beep or four beeps. After the scanning is completed you will hear one of the following: o Single, long beep indicating that the operation was successful OR o Four beeps indicating that your fingerprint was not successfully enrolled. If you hear four beeps, please start the enrollment process over from the beginning Once enrollment begins users can be enrolled consecutively without the need to verify the administrator again. After you hear the long beep simply enter in the next KEYPRESS SEQUENCE from the APPENDIX A for the next user. Close the sliding cover to end the enrollment procedure. 33 NextBolt User Manual For support contact us a 1-800-408-7101 ext. 102 http://www.advancedactuators.com Section III – Deleting Individual Fingerprint Users: Sliding cover must be closed before any programming sequence can begin. The Individual Fingerprint User Deletion programming function deletes the individual user you select from your enrolled users. Please use the following steps to delete individual fingerprint users: With the battery cover removed, press the ―DEL‖ button located on the indoor unit Short, Double Beep will be heard 34 NextBolt User Manual For support contact us a 1-800-408-7101 ext. 102 http://www.advancedactuators.com Fully open the sliding cover located on the outdoor unit immediately Sensor will flicker for less than one second A single short beep will be heard and the fingerprint sensor will power on Rest an Administrator’s fingerprint on the scanning window When the LED light goes out enter the keypress sequence. (The chart is in Appendix A of this manual). o If you hear four beeps this indicates that the Administrator was not recognized. If you hear five beeps this indicates the user deletion was not successful. Begin again from the first step of Section III. When one long beep is hear the user has been deleted successfully. Once the deletion is successful you are not required to verify the administrator to remove additional users. Simply enter the next user 35 NextBolt User Manual For support contact us a 1-800-408-7101 ext. 102 http://www.advancedactuators.com id sequence and wait for the long beep for each user you wish to remove. Close the sliding cover to end the deletion procedure. Close the sliding cover Repeat steps from the beginning of Section III to delete the next most recently enrolled fingerprint user. Section IV – Deleting ALL Fingerprint Users: Sliding cover must be closed before any programming sequence can begin. Deleting ALL enrolled fingerprint users will reset the lock and all users (including Administrators fingerprints) will be deleted. With no fingerprints enrolled in the Actuator Systems NextBolt, the deadbolt will engage/disengage when the sliding cover is fully opened and immediately closed. 36 NextBolt User Manual For support contact us a 1-800-408-7101 ext. 102 http://www.advancedactuators.com Please use the following steps to delete ALL fingerprint users: 1. Press and hold the DEL button. 2. While holding down the DEL button add the other two buttons (ADD & OPEN/CLOSE). Now all three buttons on the lock will be held down. 3. When one long beep is heard, pull the outside cover up and place the Admin finger on the sensor for verification when the sensor light turns on. 4. Once one long beep is heard, the lock is reset successfully. Close the sliding cover IMPORTANT SECURITY NOTE: WITHOUT ANY FINGERPRINTS ENROLLED, THE NEXTBOLT WILL LOCK AND UNLOCK BY FULLY OPENING AND FULLY CLOSING THE SLIDING COVER. 37 NextBolt User Manual For support contact us a 1-800-408-7101 ext. 102 http://www.advancedactuators.com Section V – Unlocking the Actuator Systems NextBolt from outside: In case of emergency, override keys can be used to disengage the deadbolt. Please use the following steps to unlock the Actuator Systems NextBolt from outside, with your enrolled fingerprint: Fully lift the sliding cover located on the outdoor unit. 38 NextBolt User Manual For support contact us a 1-800-408-7101 ext. 102 http://www.advancedactuators.com A single short beep will be heard and the fingerprint sensor will power on After the fingerprint sensor powers on, rest any enrolled fingerprint on the sensor window to verify. If fingerprint verification is successful, the deadbolt will disengage and a single, short beep will be heard; If verification of enrolled fingerprint was not successful, then 4 short beeps will be heard. If this happens, the fingerprint scanner will still turn on two additional times enabling users to try more. If all the two additional verification attempts still fail, please start the unlocking process over again, from the beginning of this section. 39 NextBolt User Manual For support contact us a 1-800-408-7101 ext. 102 http://www.advancedactuators.com Close the sliding cover Section VI – Locking the Actuator Systems NextBolt from Outside: In case of emergency, override keys can be used to engage the deadbolt. Please use the following steps to lock the Actuator Systems NextBolt from outside (when leaving): 40 NextBolt User Manual For support contact us a 1-800-408-7101 ext. 102 http://www.advancedactuators.com Make sure your door is closed Open and immediately close the sliding cover Deadbolt will engage and a single, short beep will be heard Section VII – Locking and Unlocking the Actuator Systems NextBolt from Inside: In case of emergency, manual turn knob can be used to disengage the deadbolt. Please use the following steps to lock and unlock the Actuator Systems NextBolt from inside: 41 NextBolt User Manual For support contact us a 1-800-408-7101 ext. 102 http://www.advancedactuators.com Press the ‖OPEN/CLOSE‖ button (located between the ADD and DEL buttons) Deadbolt will engage/disengage and single, short beep will be heard. Support: Contact the Actuator Systems NextBolt dealer that you purchased the lock from OR Contact us at: [email protected] for additional support. 42 NextBolt User Manual For support contact us a 1-800-408-7101 ext. 102 http://www.advancedactuators.com APPENDIX A FINGERPRINT ENROLLMENT CODES Real User ID Code 1 2 3 4 5 6 7 8 9 10 11 12 13 14 15 16 17 18 19 20 21 22 23 24 25 Keypress Sequence (plus Open/Close) ADD ADD/DEL ADD/ADD ADD/DEL/DEL ADD/DEL/ADD ADD/ADD/DEL ADD/ADD/ADD ADD/DEL/DEL/DEL ADD/DEL/DEL/ADD ADD/DEL/ADD/DEL ADD/DEL/ADD/ADD ADD/ADD/DEL/DEL ADD/ADD/DEL/ADD ADD/ADD/ADD/DEL ADD/ADD/ADD/ADD ADD/DEL/DEL/DEL/DEL ADD/DEL/DEL/DEL/ADD ADD/DEL/DEL/ADD/DEL ADD/DEL/DEL/ADD/ADD ADD/DEL/ADD/DEL/DEL ADD/DEL/ADD/DEL/ADD ADD/DEL/ADD/ADD/DEL ADD/DEL/ADD/ADD/ADD ADD/ADD/DEL/DEL/DEL ADD/ADD/DEL/DEL/ADD 43 NextBolt User Manual For support contact us a 1-800-408-7101 ext. 102 http://www.advancedactuators.com 26 27 28 29 30 31 32 33 34 35 36 37 38 39 40 41 42 43 44 45 46 47 48 49 50 51 52 53 54 55 56 ADD/ADD/DEL/ADD/DEL ADD/ADD/DEL/ADD/ADD ADD/ADD/ADD/DEL/DEL ADD/ADD/ADD/DEL/ADD ADD/ADD/ADD/ADD/DEL ADD/ADD/ADD/ADD/ADD ADD/DEL/DEL/DEL/DEL/DEL ADD/DEL/DEL/DEL/DEL/ADD ADD/DEL/DEL/DEL/ADD/DEL ADD/DEL/DEL/DEL/ADD/ADD ADD/DEL/DEL/ADD/DEL/DEL ADD/DEL/DEL/ADD/DEL/ADD ADD/DEL/DEL/ADD/ADD/DEL ADD/DEL/DEL/ADD/ADD/ADD ADD/DEL/ADD/DEL/DEL/DEL ADD/DEL/ADD/DEL/DEL/ADD ADD/DEL/ADD/DEL/ADD/DEL ADD/DEL/ADD/DEL/ADD/ADD ADD/DEL/ADD/ADD/DEL/DEL ADD/DEL/ADD/ADD/DEL/ADD ADD/DEL/ADD/ADD/ADD/DEL ADD/DEL/ADD/ADD/ADD/ADD ADD/ADD/DEL/DEL/DEL/DEL ADD/ADD/DEL/DEL/DEL/ADD ADD/ADD/DEL/DEL/ADD/DEL ADD/ADD/DEL/DEL/ADD/ADD ADD/ADD/DEL/ADD/DEL/DEL ADD/ADD/DEL/ADD/DEL/ADD ADD/ADD/DEL/ADD/ADD/DEL ADD/ADD/DEL/ADD/ADD/ADD ADD/ADD/ADD/DEL/DEL/DEL 44 NextBolt User Manual For support contact us a 1-800-408-7101 ext. 102 http://www.advancedactuators.com 57 58 59 60 61 62 63 64 65 66 67 68 69 70 71 72 73 74 75 76 77 78 79 80 81 82 83 84 85 86 87 ADD/ADD/ADD/DEL/DEL/ADD ADD/ADD/ADD/DEL/ADD/DEL ADD/ADD/ADD/DEL/ADD/ADD ADD/ADD/ADD/ADD/DEL/DEL ADD/ADD/ADD/ADD/DEL/ADD ADD/ADD/ADD/ADD/ADD/DEL ADD/ADD/ADD/ADD/ADD/ADD ADD/DEL/DEL/DEL/DEL/DEL/DEL ADD/DEL/DEL/DEL/DEL/DEL/ADD ADD/DEL/DEL/DEL/DEL/ADD/DEL ADD/DEL/DEL/DEL/DEL/ADD/ADD ADD/DEL/DEL/DEL/ADD/DEL/DEL ADD/DEL/DEL/DEL/ADD/DEL/ADD ADD/DEL/DEL/DEL/ADD/ADD/DEL ADD/DEL/DEL/DEL/ADD/ADD/ADD ADD/DEL/DEL/ADD/DEL/DEL/DEL ADD/DEL/DEL/ADD/DEL/DEL/ADD ADD/DEL/DEL/ADD/DEL/ADD/DEL ADD/DEL/DEL/ADD/DEL/ADD/ADD ADD/DEL/DEL/ADD/ADD/DEL/DEL ADD/DEL/DEL/ADD/ADD/DEL/ADD ADD/DEL/DEL/ADD/ADD/ADD/DEL ADD/DEL/DEL/ADD/ADD/ADD/ADD ADD/DEL/ADD/DEL/DEL/DEL/DEL ADD/DEL/ADD/DEL/DEL/DEL/ADD ADD/DEL/ADD/DEL/DEL/ADD/DEL ADD/DEL/ADD/DEL/DEL/ADD/ADD ADD/DEL/ADD/DEL/ADD/DEL/DEL ADD/DEL/ADD/DEL/ADD/DEL/ADD ADD/DEL/ADD/DEL/ADD/ADD/DEL ADD/DEL/ADD/DEL/ADD/ADD/ADD 45 NextBolt User Manual For support contact us a 1-800-408-7101 ext. 102 http://www.advancedactuators.com 88 89 90 91 92 93 94 95 96 97 98 99 ADD/DEL/ADD/ADD/DEL/DEL/DEL ADD/DEL/ADD/ADD/DEL/DEL/ADD ADD/DEL/ADD/ADD/DEL/ADD/DEL ADD/DEL/ADD/ADD/DEL/ADD/ADD ADD/DEL/ADD/ADD/ADD/DEL/DEL ADD/DEL/ADD/ADD/ADD/DEL/ADD ADD/DEL/ADD/ADD/ADD/ADD/DEL ADD/DEL/ADD/ADD/ADD/ADD/ADD ADD/ADD/DEL/DEL/DEL/DEL/DEL ADD/ADD/DEL/DEL/DEL/DEL/ADD ADD/ADD/DEL/DEL/DEL/ADD/DEL ADD/ADD/DEL/DEL/DEL/ADD/ADD 46 NextBolt User Manual For support contact us a 1-800-408-7101 ext. 102 http://www.advancedactuators.com USER ENROLLMENT TABLE Number Name Finger Used (L/R) 1 2 3 4 5 6 7 8 9 10 11 12 13 14 15 16 17 18 19 20 21 22 23 24 25 26 27 28 47 NextBolt User Manual For support contact us a 1-800-408-7101 ext. 102 Date http://www.advancedactuators.com 29 30 31 32 33 34 35 36 37 38 39 40 41 42 43 44 45 46 47 48 49 50 51 52 53 54 55 56 57 58 59 48 NextBolt User Manual For support contact us a 1-800-408-7101 ext. 102 http://www.advancedactuators.com 60 61 62 63 64 65 66 67 68 69 70 71 72 73 74 75 76 77 78 79 80 81 82 83 84 85 86 87 88 89 90 49 NextBolt User Manual For support contact us a 1-800-408-7101 ext. 102 http://www.advancedactuators.com 91 92 93 94 95 96 97 98 99 50 NextBolt User Manual For support contact us a 1-800-408-7101 ext. 102 http://www.advancedactuators.com We would like to personally thank you for your purchase of our exciting NextBolt NX Series biometric deadbolt lock from Actuator Systems. We hope you enjoy using it as much as we enjoy developing this technology for you. For more helpful information about your NextBolt please visit www.advancedactuators.com/support.php or our knowledgebase at http://www.advancedactuators.com/kb/ For all Tech Support Questions: Call: 407-567-7130 Ext 102 or Email: [email protected] To reach the main office: 407-567-7130 Frequently Asked Questions (FAQ) Here are a few answers to common installation questions. (These account for 90% of the inquiries we receive to our technical support department). 1) When you mate the front and back of the lock together insure the bolt is in the *locked* (out) position and the knob is pointing directly down. This will cause the notch the tailpiece fits into to be in a vertical position. 2) Insure the wire that runs between the two lock pieces does not interfere with the rotation of the tailpiece. 3) Issues with fingerprint recognition are due to a poor enrollment 95% of the time. High quality enrollments are the key to fast and reliable operation of your new lock. Ensure when you place your finger on the pad for enrollment that as much of your finger as possible is in contact with the sensor. Do not move your finger while it is being scanned – wait until you hear the long beep. Keep even pressure applied to the center of the fingerprint pad. You can enroll the same finger more than one time. It also can help enrollment if the finger you use is not overly dry. a. We have included in your pack 2 disposable fingerprint enhancement pads.DO NOT discard these! Even if you enroll perfectly they could be useful later. These pads are only necessary in the event you had trouble enrolling. To use just wipe your finger with one of the pads 5 seconds before enrollment. These pads considerably enhance the quality of the ridges of the fingerprint. Thanks again from your friends at Actuator Systems! 51 NextBolt User Manual For support contact us a 1-800-408-7101 ext. 102