1
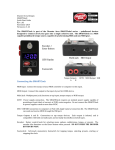
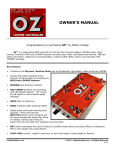
Disaster Area Designs SMARTSwitch 2 Quick Start Guide Rev 1.00 October 2014 Firmware v1.00 SMARTSwitch 2 QUICK START The SMARTSwitch 2 is part of the Disaster Area SMARTPedal series – pedalboard devices designed to connect all of your gear into a single cohesive unit. The SMARTSwitch 2 is a MIDI capable remote footswitch, capable of controlling amps, effects, and other devices. Connecting the SMARTSwitch 2 MIDI Input: Connect the output of your MIDI controller or computer to this input. MIDI Output: Connect this output to the input of your first MIDI device. DC9V: Power supply connection. The SMARTSwitch 2 requires an isolated power supply capable of providing at least 48mA of current, at 9VDC center negative. Do not connect the SMARTClock to power supplies rated at more than 9VDC. USB: USB MIDI connection to computer or iPad with Apple Camera Connection Kit. The SMARTSwitch 2 can send and receive MIDI through the USB port. Outputs A and B: Connections to amps, effects devices, etc. Each output is isolated, and is compatible with normally open, normally closed, or momentary control types. Output A works as a TRS switching output if Output B is not connected. In this mode, Switch A controls the TIP of Output A, and Switch B controls the RING. Footswitches: Soft-‐touch momentary footswitches for engaging each switch output. Configuring the SMARTSwitch 2 The SMARTSwitch 2 responds to incoming MIDI program change (PC) or continuous controller (CC) messages on one of 16 MIDI channels. By default the SMARTSwitch 2 will respond on MIDI channel 1. To change this, perform the following procedure: 1. Power the SMARTSwitch 2 off by unplugging the power supply. 2. Connect a MIDI controller to the SMARTSwitch 2 MIDI input. 3. Power the SMARTSwitch 2 on while holding the Switch A button down. The LEDs on the SMARTSwitch 2 should blink as the controller enters MIDI setup mode. 4. While the LEDs are blinking, send MIDI CC 99 whose value corresponds to the desired MIDI channel. Example: to set the SMARTSwitch 2 to MIDI channel 10, send CC 99, 10 while the SMARTSwitch 2 is in MIDI setup mode. If a Disaster Area controller is used as the master MIDI device, it will send out the correct message at each boot. In this case, simply power on the SMARTSwitch 2 in MIDI setup mode, then power on the DMC controller. The SMARTSwitch 2 will auto-‐ configure itself. Connecting and Controlling Your Gear: Connect a shielded ¼” cable to the desired output. If your equipment has a stereo / TRS input for switching, you may connect Output A to this input using a stereo cable. Power the SMARTSwitch 2 on. After the initial self-‐test, the SMARTSwitch 2 footswitches should be directly controlling your amp or effects. If the LED on the SMARTSwitch 2 and the function on the device are not in sync, the SMARTSwitch 2 Setup should be performed. Relay Output Setup The SMARTSwitch 2 has a built-‐in Setup mode that allows the user to determine the control type. To enter Setup mode, hold Switch A down until the LEDs blink. Tap Switch A and B to cycle through the setup options, then hold Switch A to exit setup. Please consult the documentation for your amplifier, effects, etc. to determine what type of switching is required. Normally Open – LED ON. In Normally Open, the switch is closed when the LED is ON. Most channel switching is controlled using this mode, including most Fender amplifier tremolo. Normally Closed – LED OFF. In Normally Closed, the switch is open when the LED is ON. Fender amplifier reverb is usually controlled using this mode. Momentary – LED BLINKING. In Momentary mode, the output is closed for a brief time when switching occurs. Momentary control is used for the Bogner dual pedals, TC Electronic Stereo Chorus + Flanger, and certain amplifier circuits. MIDI Presets and Control To control the outputs using a MIDI controller, send MIDI CC 60 (Output A) or MIDI CC 61 (Output B.) Sending a value from 0-‐63 will set the output to “off,” and sending a value from 64-‐127 will set the output to “on.” Please note that the “off” and “on” states are based on the relay output setup as described above. “On” corresponds to the state the output is in when its LED is ON, and “Off” is the state the output is in when its LED is OFF. To save the status of the outputs to a MIDI preset, perform the following procedure: 1. Set the outputs to the desired state with the footswitches. 2. Hold Switch B to enter Save mode. 3. Send a MIDI program change message from your master controller 4. The SMARTSwitch 2 will save the current output state to the program sent. To exit Save mode without changing the current preset, tap Switch A. If Switch B is held while in Save mode, SMARTSwitch 2 will be set to “don’t care” for that program. In “don’t care,” the outputs will not be changed when this preset is loaded. This is useful if you wish to have some presets that do not change your amp settings. Factory Reset To reset the SMARTSwitch 2, hold both buttons at startup. WARNING! This will erase all saved programs and force all settings back to factory defaults. The controller will also enter “bootloader” mode for 30 seconds. To exit bootloader mode, power the controller off and on again or wait for the time to elapse.