1
Sybase Control Center for Sybase Unwired
Platform
Sybase Unwired Platform 2.2
SP04
DOCUMENT ID: DC01092-01-0224-01
LAST REVISED: May 2013
Copyright © 2013 by Sybase, Inc. All rights reserved.
This publication pertains to Sybase software and to any subsequent release until otherwise indicated in new editions or
technical notes. Information in this document is subject to change without notice. The software described herein is furnished
under a license agreement, and it may be used or copied only in accordance with the terms of that agreement.
Upgrades are provided only at regularly scheduled software release dates. No part of this publication may be reproduced,
transmitted, or translated in any form or by any means, electronic, mechanical, manual, optical, or otherwise, without the prior
written permission of Sybase, Inc.
Sybase trademarks can be viewed at the Sybase trademarks page at http://www.sybase.com/detail?id=1011207. Sybase and
the marks listed are trademarks of Sybase, Inc. ® indicates registration in the United States of America.
SAP and other SAP products and services mentioned herein as well as their respective logos are trademarks or registered
trademarks of SAP AG in Germany and in several other countries all over the world.
Java and all Java-based marks are trademarks or registered trademarks of Oracle and/or its affiliates in the U.S. and other
countries.
Unicode and the Unicode Logo are registered trademarks of Unicode, Inc.
All other company and product names mentioned may be trademarks of the respective companies with which they are
associated.
Use, duplication, or disclosure by the government is subject to the restrictions set forth in subparagraph (c)(1)(ii) of DFARS
52.227-7013 for the DOD and as set forth in FAR 52.227-19(a)-(d) for civilian agencies.
Sybase, Inc., One Sybase Drive, Dublin, CA 94568.
Contents
Get Started .............................................................................1
About Sybase Control Center for Unwired Platform .......1
Documentation Roadmap for Unwired Platform
...........................................................................1
Unwired Platform Administration by Node .............2
Cluster Administration ............................................3
Server Administration ............................................5
Application and User Management Overview ........5
Domain Management ............................................7
MBO Package Management Overview ..................8
Hybrid App Package Management Overview ......10
Security Administration Overview ........................10
System Monitoring Overview ...............................11
Starting and Stopping Sybase Control Center in
Unwired Platform ......................................................12
Cleaning Up the Flash Player Cache ............................13
Copying and Pasting Properties ...................................13
Getting Started with Production Clusters .....................14
Getting Started After Installing .............................14
Configuring Memory Usage .................................16
Configuring the Automatic Logout Timer .............18
Manually Opening the Unwired Platform
Console ...........................................................19
Adding or Updating Unwired Server Registration
Properties ........................................................20
Understanding the Sybase Control Center Interface ....21
User Interface Overview ......................................21
Perspectives ........................................................23
Views ...................................................................25
Repository ...........................................................27
Sybase Control Center Console ..........................32
Sybase Control Center for Sybase Unwired Platform
iii
Contents
Sybase Control Center Security ..........................36
Platform Administration Roles and Tasks .....................36
SUP Platform Administrator .................................36
Platform Administration Tasks .............................37
SUP Domain Administrator ..................................38
Domain Administration Tasks ..............................38
SUP Helpdesk .....................................................39
Help Desk Operator Tasks ...................................39
Administer ............................................................................41
Clusters .........................................................................41
Cluster-Affecting Configuration Changes .............41
Cluster Properties ................................................41
Configuring Asynchronous Operation Replay
Queue Count ...................................................62
Viewing Cluster Information .................................62
Checking System Licensing Information ..............63
Checking Cluster Status ......................................64
Sharing Cluster Information With SAP Servers ...64
Relay Server .................................................................69
Configuring Unwired Server to use Relay Server
.........................................................................69
Managing Configured Relay Servers ...................77
Relay Server Tab Reference ................................80
Unwired Server .............................................................81
Server List ............................................................82
Configuring Unwired Server General Properties
.........................................................................84
Configuring Unwired Server to Securely
Communicate With an HTTP Proxy .................85
Relay Server Outbound Enabler .........................86
Server Log ...........................................................95
Domains ........................................................................99
Creating and Enabling a New Domain ...............100
Deleting a Domain .............................................101
Registering a Domain Administrator User .........102
iv
Sybase Unwired Platform
Contents
Assigning Domain Administrators to a Domain . 103
Viewing Applications for a Domain ....................104
Viewing Application Connections for a Domain . 104
Scheduling Accumulated Data Cleanup for
Domains ........................................................106
Domain Logs ......................................................110
Checking Client Application Logs ......................155
Connections .......................................................156
Configuring Domain Security .............................179
Security Configurations ...............................................183
Creating a Security Configuration ......................185
Assigning a Security Configuration to a Domain
.......................................................................231
Viewing Security Configuration Usage ..............231
Anonymous Access Security Configuration .......232
SiteMinder Authentication with Sybase Unwired
Platform .........................................................232
Applications ................................................................238
Activating and Maintaining Applications ............239
Defining Applications .........................................239
Maintaining Activated Applications ....................242
Transporting Applications Between
Environments Using Export and Import ........256
Application Connections ....................................258
Application Connection Templates .....................266
Application Connection Properties ....................269
Deploy .................................................................................279
MBO Packages ...........................................................279
Deploying MBO Packages .................................279
MBO Package Management ..............................288
MBO Subscription Management ........................297
Reviewing MBO History .....................................303
Reviewing Operation History .............................303
DOE-C Packages ........................................................304
Deploying and Configuring DOE-C Packages . . .304
Sybase Control Center for Sybase Unwired Platform
v
Contents
Viewing and Changing Package Connection
Properties ......................................................304
Setting the Bulk Load Timeout Property ............305
Checking and Resolving DOE-C User Failures . 306
Package Subscription Properties .......................306
Hybrid App Packages .................................................307
Deploying Hybrid App Packages .......................307
Enabling and Configuring the Notification
Mailbox ..........................................................310
Configuring a Hybrid App Package ....................311
Monitor ................................................................................321
Monitoring Usage .......................................................321
System Monitoring Overview ......................................322
Monitoring Configuration .............................................324
Configuring Monitoring Performance Properties
.......................................................................324
Monitoring Profiles ......................................................326
Creating and Enabling a Monitoring Profile .......326
Monitoring Data ..........................................................328
Reviewing System Monitoring Data ...................328
Purging Monitoring Data ....................................329
Exporting Monitoring Data .................................329
Searching Monitoring Data ................................330
Viewing Package-Level Cache Statistics ...........331
Monitoring Data Categories ...............................331
Troubleshoot Sybase Control Center ..............................353
Using Sybase Control Center to Troubleshoot Unwired
Platform ..................................................................353
Collecting Administration Performance Data for
Troubleshooting ......................................................354
Sybase Control Center Management Tier Issues .......355
Launching Sybase Control Center Results in
Rounded Rectangle Box or Empty Console
Screen ...........................................................356
vi
Sybase Unwired Platform
Contents
Sybase Control Center Console Continually
Refreshes ......................................................357
Sybase Control Center Windows Service Fails
to Start ...........................................................357
Sybase Control Center Windows Service
Deleted .......................................................... 359
Sybase Control Center Fails to Start ................. 359
Second Sybase Control Center Fails to Start .... 361
Login Invalid in Sybase Control Center ..............362
Login Fails in Sybase Control Center ................ 363
Login to Sybase Control Center Forces Ending
Existing Session ............................................ 364
Administrator Account is Locked ........................365
Browser Refresh (F5) Causes Logout ............... 366
Stale Version of Sybase Control Center After
Upgrade .........................................................366
Sybase Control Center Reports Certificate
Problem ......................................................... 368
Previous Administrator Credentials Used .......... 369
Security Error Triggered When Connecting to
Sybase Control Center from Remote Browser
....................................................................... 370
Administrator Login Passes When Provider Is
Not Available ..................................................370
Host Name of Registered Resource Changed
But Is Not Updated ........................................ 371
Management Issues with Clustered Data Tiers
....................................................................... 372
Poor Sybase Control Center Performance after
Upgrade .........................................................373
Sybase Control Center Communication with
Unwired Server Fails ..................................... 374
Platform Component Monitoring Issues ......................375
Monitoring Data Does Not Appear in History Tab
....................................................................... 376
Sybase Control Center for Sybase Unwired Platform
vii
Contents
Domain Log Data Does Not Appear in History
Tab .................................................................376
Previously Existing Monitoring Data No Longer
Appears .........................................................377
Previously Existing Domain Log Data No Longer
Appears .........................................................378
Server Tier Administration Issues ...............................378
Server List Not Retrieved ...................................379
Unwired Server Fails to Start .............................381
Error in Listing Application Connections and
ADMIN_WEBSERVICE_INVOCATION_ERR
OR in gateway.log ..........................................381
Starting or Restarting a Remote Server from
Sybase Control Center Fails ..........................382
Port Conflict Issues ............................................384
Unexpected Listener Startup or Connection
Errors .............................................................385
Refreshing Server Configuration Displays Only
Partial Updates ..............................................385
Users Connect with Old Credentials ..................387
AuthorizationException Displays Instead of
Status ............................................................388
Increasing Messaging Queue Counts Degrades
Performance ..................................................388
Saving Server Configuration Fails Due to
Certificate Validation Error .............................389
Unknown Server Error Message ........................389
Package Deployment and Management Issues .........390
Exporting or Deploying Large Packages Fails ...390
Invalid DOE-C User Error for an SAP Server
Connection ....................................................391
Troubleshoot CTS Imports .................................392
Application and Application User Management Issues
................................................................................395
Wrong Application for Code Error ......................395
viii
Sybase Unwired Platform
Contents
Index
User Name of Registered Application
Connection Not Displayed .............................396
Internal Server Error When Clicking Applications
.......................................................................396
................................................................................399
Sybase Control Center for Sybase Unwired Platform
ix
Contents
x
Sybase Unwired Platform
Get Started
Get Started
Set up Sybase® Control Center.
About Sybase Control Center for Unwired Platform
Sybase Control Center provides a single comprehensive Web administration console to
configure and manage Sybase products and their components.
Sybase Control Center combines a modular architecture, a rich administrative console,
agents, common services, and tools for managing and controlling Sybase products. Unwired
Platform is one of many Sybase products that use Sybase Control Center as it's management
and administrative tool.
As part of an Unwired Platform installation, Sybase Control Center can be used in three ways:
•
•
•
In a personal development environment, developers may act as administrators to set up a
personal testing environment. Development administrators use Sybase Control Center to
deploy and configure packages, register messaging devices, and so on. No other additional
configuration or administration may be required.
In a distributed or shared development environment, administrators use Sybase Control
Center to set up an Unwired Server, manage packages, manage devices, configure Hybrid
App packages, as well as review server and domain logs, and monitoring-related data.
In a production environment, administrators use Sybase Control Center on a regular basis
to perform the same tasks described for a shared development environment. They also
configure the operation of Unwired Servers, and administer day-to-day activities of the
production environment. Administrators must also routinely monitor the overall health
and performance of the system, which may include clusters and domains.
Documentation Roadmap for Unwired Platform
Sybase® Unwired Platform documents are available for administrative and mobile
development user roles. Some administrative documents are also used in the development and
test environment; some documents are used by all users.
See Documentation Roadmap in Fundamentals for document descriptions by user role.
Check the Sybase Product Documentation Web site regularly for updates: http://
sybooks.sybase.com/sybooks/sybooks.xhtml?
id=1289&c=firsttab&a=0&p=categories , then navigate to the most current
version.
Sybase Control Center for Sybase Unwired Platform
1
Get Started
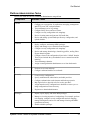
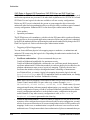
Unwired Platform Administration by Node
The left navigation pane in the Sybase Control Center console displays a tree of administrable
features in the form of nodes, some of which can be expanded to reveal a more granular view of
the cluster environment. These nodes let you manage and configure the main components of
Unwired Platform.
Clicking nodes allows you to administer the following features through Sybase Control
Center. However, be aware of the following dependencies:
•
•
2
There are three administration roles. Users with the platform administration role have
access to all nodes. Users with the domain administrator role see only the "Domains"
nodes for their assigned domains. Users with the help desk role has read only access to
system configuration values.
You must have the correct Unwired Platform version and license for these nodes to be
functional when they are visible.
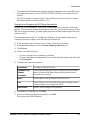
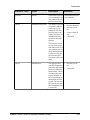
Node
Purpose
Cluster
View general cluster and server node properties and access the server list
for the cluster. Additionally perform configuration for Relay Server,
System Landscape Directory (SLD) server, and SAP Licence Audit.
Domains
Add, delete, enable, and disable domains. Expand this node to manage the
security, package, role mappings, cache group, synchronization group,
subscription, and connection configurations for each domain. You can
also expand the Applications subnode to see the applications and application connections managed from the domain.
Servers
Configure Java Virtual Machine properties for each server.
Applications
Add, view, delete, and edit applications, application users, application
connections, and application connection template operations as part of
application activation.
Security
Add, view, edit, and delete domain administrators. Add or delete a security configuration. Each security configuration contains one or more
security providers for authentication, authorization, attribution and auditing. Once configured, security configurations can be assigned to domains and then mapped to one or more packages, depending on the requirements for each.
Hybrid App
Deploy and manage Hybrid App packages and configure the notification
mailbox. Deployed Hybrid App packages are listed below this node. Use
the individual Hybrid App nodes to manage Hybrid App package properties, matching rules, context variables, error logs, application connections, and, optionally, queue items.
Sybase Unwired Platform
Get Started
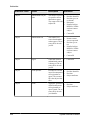
Node
Purpose
Monitoring
Create and manage settings for monitoring security, replication synchronization, messaging synchronization, device notification, data change
notification, queue, package, user, and cache activities.
Cluster Administration
The goal of cluster administration is to ensure that clusters and servers work smoothly, and
scale over time. By default, the Unwired Platform is installed as a one-node cluster. The onenode cluster is supported in development or test environments. Production deployments of
Unwired Platform are likely to require multiple nodes. Cluster administration is mostly a
nonroutine administration task.
See Designing the Landscape in Landscape Design and Integration.
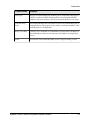
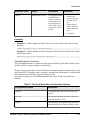
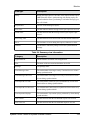
Table 1. Cluster administration tasks
Task
Frequency
Accomplished by
Installing the cluster
One-time installation per cluster
Unwired Platform installer
Setting up Relay Servers
One-time initial installation and con- Manual installation; manual setfiguration; occasionally adding serv- up using configuration files.
ers to the cluster
Suspending and resuming
server nodes
On demand, as required
Sybase Control Center
Setting cluster properties,
including cache database
settings, monitoring database setup, and so on
Once, or as cluster changes require
Manual configuration using
files and .BAT scripts.
Sybase Control Center for Sybase Unwired Platform
3
Get Started
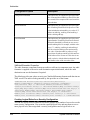
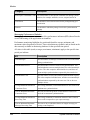
Task
Frequency
Configuring the cluster to:
Post installation configuration with
infrequent tuning as required
•
•
•
•
•
•
•
•
•
•
Set the configuration
cache properties
Set the solution manager URL
Set the replication
ports and properties
Set the messaging synchronization ports
Set the management
ports for communication requests from
Sybase Control Center
Configure the client
dispatcher
Set how applications
handle DCN requests
sent though an HTTP
GET operation
Create security profiles for secure communication
Set up secure synchronization
Tune server performance
Setting cluster log file settings for Unwired Server
system components
Accomplished by
Once, unless log data requirements
change
Administering the runtime Routine to ensure that the database Established processes and comdatabases
server is monitored and backed up, mand line utilities. Consult with
that there is sufficient space for Un- your database administrator.
wired Platform metadata and cached
data tables, and that performance is
within acceptable limits (performance tuning)
Reviewing licensing infor- Occasional, or as device user regismation, including total li- tration and deregistration occurs
censed devices and currently used licenses count
4
Sybase Control Center.
Sybase Unwired Platform
Get Started
Server Administration
The goal of server administration is to ensure that Unwired Server is running correctly and that
it is configured correctly for the environment in which it is installed (development or
production). Server administration is mostly a one-time or infrequent administration task.
There are two types of server nodes that can be installed:
•
•
Application Server node – (mandatory) runs all services.
Scale Out node – (optional) specifically designed to allow the stateless request/response
HTTP and synchronous message services to be horizontally scaled.
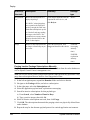
Table 2. Server administration tasks
Task
Frequency
Accomplished by
Installing the server
One-time installation per server
Unwired Platform installer.
Tuning the server performance.
Post installation with Sybase Control Center.
infrequent tuning as
required
Manage the outbound enabler configuration for Relay Server.
Post installation
•
•
•
•
Sybase Control Center
Configure Relay Server properties
Manage certificates
View logs
Configure proxy servers for outbound
enabler
Application and User Management Overview
The goal of application management is to register an application to Unwired Server as an
entity, create an application template that specifies application connection details for a user,
and activate application connections either manually or automatically.
Developers must invoke registration (manual or automatic) for native applications. For
development details, see the Developer Guide for your application API and device platform
type. For application, connection, registration details, see Administer > Applications in
Sybase Control Center for Sybase Unwired Platform.
Sybase Control Center for Sybase Unwired Platform
5
Get Started
Table 3. Application and user management tasks
Task
Frequency
Accomplish by using
Create new applications to register applica- As required
tion entities with Unwired Server. A default
application template is created automatically. Modify and delete applications as part of
application life cycle.
Sybase Control Center for Unwired Platform with Applications node, and Applications
tab.
Create or modify application connection
templates to specify details for native, Hybrid App, and proxy application connections.
As required
Sybase Control Center for Unwired Platform, with Application node, and Application Connection Templates tab.
Create one or more push configurations for
applications.
As required
Sybase Control Center for Unwired Platform, with Application node, and Properties button.
For applications that need to be registered
As required
manually, register an application connection
to associate an application connection with a
user. This is not necessary for applications
that are registered automatically.
Sybase Control Center for Unwired Platform, with Application node, and Application Connections tab.
View activated users, once they have logged As required
in with the activation code. Users must either
supply the activation code manually, or the
device client supplies the activation code
automatically as coded.
Sybase Control Center for Unwired Platform with the Application node, and Application
Users tab.
Create a new activation code for a user
whose code has expired.
As required
Sybase Control Center for Unwired Platform, with Application node, and Application Connections tab.
Review registered application connections As required
and users, delete application connections to
free licenses, delete application connections
to remove users from the system.
Sybase Control Center for Unwired Platform with the Applications node.
Change logical roles or modify role mapAs required
pings for a security configuration to prevent
users from accessing the application.
Sybase Control Center for Unwired Platform with the Security node
Manage subscriptions
Sybase Control Center for Unwired Platform with the Packages node.
As required
Information and guidelines:
•
6
Application templates hold default connection properties that can be assigned to an
application during the connection registration process. However, these templates are
Sybase Unwired Platform
Get Started
configured differently depending on what type of connection registration you enable for
applications. See the recommendations documented in Creating Application Connection
Templates in the Mobile Application Life Cycle guide.
When a client application connects to Unwired Server its application ID is used to look up
a matching template. If that template allows automatic registration (the Automatic
Registration Enabled property is set to true), then the security configuration in the template
is used to authenticate the user and establish an identity against which the connection is
registered. If the template also specifies a logical role, then user is authorized using the
mapped physical role(s) of the logical role in the security configuration. When there are
templates with different logical roles for the same application id and security
configuration, the priority of the template determines the order of evaluation of the
associated logical roles.
Note: If no templates are detected, the registration request fails. If multiple templates are
detected, the client application registers using the template with the highest priority. If
there is more than one template with the highest priority, the application registers using
one of the templates with the highest priority, selected at random. For details on how user
names and security configuration names are processed when an email address is used, see
Considerations for Using E-mail Addresses as User Names in the Security guide.
See also
• Applications on page 238
Domain Management
The goal of domain management is to create and manage domains for one specific tenant. Use
multiple domains for multiple tenants sharing the same Unwired Server cluster.
Multiple domains in a cluster allow tenants' administrators (that is, domain administrators) to
each manage their own application components. Domain administration for the platform
administrator is typically an infrequent administration task that occurs each time a new
domain needs to be added to support a change in the tenancy strategy used or need to make
changes to an existing domain.
Domains give you the means to logically partitioning environments, thereby providing
increased flexibility and granularity of control over domain-specific applications.
Administration of multiple customer domains takes place within the same cluster.
•
•
An platform administrator adds and configures domains, creates security configurations
for customer applications, and assigns those security configurations to the domain so they
can be mapped to packages in the domain.
One or more domain administrators then perform domain-level actions within their
assigned domains.
In a development environment, domains allow developers from different teams to share a
single cluster without disrupting application deployment. Administrators can facilitate this
by:
Sybase Control Center for Sybase Unwired Platform
7
Get Started
1. Creating a domain for each developer or developer group.
2. Granting domain administration privileges to those users so they can perform deployment
tasks within their assigned domains.
Table 4. Domain management tasks
Task
Frequency
Administrator
Create domains
Once for each customer
Unwired Platform administrator
Create and assign security
Infrequent, as required
configurations, and map roles
at package or domain levels
Unwired Platform administrator
Assign and unassign domain
administrators
Infrequent, as required
Unwired Platform administrator
Configure and review domain logs
Routine
Unwired Platform administrator and domain administrator
Deploy MBO and DOE-C
packages
Routine
Unwired Platform administrator and domain administrator
Manage server connections
and templates
Infrequent, as required
Unwired Platform administrator and domain administrator
Manage subscriptions and
scheduled tasks
As required
Unwired Platform administrator and domain administrator
Review client log and MBO/
operation error history
As required
Unwired Platform administrator and domain administrator
MBO Package Management Overview
The goal of mobile business object (MBO) package management is to make MBOs available
to device users. MBO package management typically requires a one-time deployment and
configuration, except for ongoing subscription management for messaging and Data
Orchestration Engine connector (DOE-C) packages.
Packages contain MBOs that are deployed to Unwired Server to facilitate access to back-end
data and transactions from mobile devices. Package types include UNIFIED packages, and
SAP® DOE-C packages.
A package, along with its current settings for cache groups, role mappings, synchronization
groups, connections, and security configuration, can be exported to an archive and imported
8
Sybase Unwired Platform
Get Started
back into Sybase Control Center for backup or to facilitate a transition from a test environment
to a production environment.
Table 5. MBO package management tasks
Task
Package
type
Frequency Accomplish by using
Deploy packages to a development or production Unwired
Server
UNIFIED
Once, unless Sybase Control Center for Una new version wired Platform with the domainbecomes
level Packages node
available
Control user access by assign- UNIFIED
ing security configurations for
each package, and mapping
roles if fine-grained authorization is enforced through logical
roles
Once, unless Sybase Control Center for Unsecurity rewired Platform with the domainquirements of level Packages node
the package
change
Set up the package cache inter- UNIFIED
val and cache refresh schedule
(for getting data updated on the
Unwired Server from the data
source)
Once, unless Sybase Control Center for Undata refreshes wired Platform with the domainneed to be
level Packages node
tuned
Manage subscriptions (UNIVaries
FIED, and DOE-C), synchronization groups (UNIFIED), and
device notifications (UNIFIED) to customize how updated data in the cache is delivered to the device user
Periodic, as
required
Sybase Control Center for Unwired Platform with the domainlevel Packages node
Export or import an MBO
package
UNIFIED
On-demand,
as required
Sybase Control Center for Unwired Platform with the domainlevel Packages node
Review current/historical/performance metrics
All
Routine
Sybase Control Center for Unwired Platform with the Monitor
node (available only to administrators)
Periodic, as
required
Sybase Control Center for Unwired Platform with the domainlevel Packages node. However,
asynchronous operation replays
must first be enabled at the cluster
level. See Viewing Asynchronous
Operation Replays .
View asynchronous operation Replication,
replays for the selected package UNIFIED
Sybase Control Center for Sybase Unwired Platform
9
Get Started
Hybrid App Package Management Overview
The goal of Hybrid App package management is to make Hybrid Apps available from the
Unwired Server to device users. Hybrid App package management typically requires a onetime deployment and configuration, except for ongoing package maintenance.
The Hybrid App application is a simple business process application that delivers
functionality, such as sending requests and approvals through an e-mail application, to mobile
device clients on supported device platforms, including Windows Mobile, iOS.
Table 6. Hybrid App package management
Task
Frequency
Accomplish by using
Deploy Hybrid App packages
Once, unless a new version becomes Sybase Control Center for Unavailable
wired Platform with the Hybrid
App node
Assign or unassign a Hybrid App to an application
connection template
When a new Hybrid App package is Sybase Control Center for Undeployed
wired Platform with the Hybrid
App node
Hybrid App configuration Once
that includes e-mail matching rules and context variables
Sybase Control Center for Unwired Platform with the Hybrid
App node
Device registration and
Routine when new users or new deuser assignments to Hybrid vices are added
App packages
Sybase Control Center for Unwired Platform with the Hybrid
Apps><Hybrid AppName>
node
Monitor users and errors
Sybase Control Center for Unwired Platform with the Monitor
node
Routine
Security Administration Overview
Perform security administration tasks to establish rules for the protection of enterprise and
administrative data and transactions.
Unwired Server coordinates data between enterprise information server (EIS) data sources
and device clients, meaning that transferred information is often proprietary, confidential, or
private. Therefore, the data and communication streams that carry information from Unwired
Server to other components in the Unwired Platform must be protected.
Unwired Platform has several security layers that protect data and transactions.
Administrators manage system and application authentication and authorization security
configurations at the cluster level, and perform role mapping at the domain and package levels.
By default, the 'admin' security configuration is used to authenticate and authorize all
10
Sybase Unwired Platform
Get Started
administrative users, including domain administrators. All domain administrator logins must
be valid in the security repository configured for the 'admin' security configuration.
Platform administrators register domain administrators at the cluster level, and then assign
them to a domain from the domain-level Security Configurations tab. Security configurations
are assigned when domains are created, or subsequently, from the Domains node. Packages
must also be mapped to a security configuration at deployment; role mapping can be
configured at a later time.
Roles are used for MBOs and operations during development to indicate authorization
requirements. These roles are enforced by Unwired Server. At deployment or after
deployment, these logical roles can be mapped to physical roles to restrict which users have
access to MBOs and operations. Roles assigned at the MBO level are separate from operationlevel roles. However, package-level role mapping overrides domain-level role mapping. If the
same package is deployed to multiple domains and associated with the same security
configuration, then the domain-level role mapping is shared.
System Monitoring Overview
(Not applicable to Online Data Proxy) The goal of monitoring is to provide a record of
activities and performance statistics for various elements of the application. Monitoring is an
ongoing administration task.
Use monitoring information to identify errors in the system and resolve them appropriately.
This data can also be shared by platform and domain administrators by exporting and saving
the data to a .CSV or .XML file.
The platform administrator uses Sybase Control Center to monitor various aspects of Unwired
Platform. Monitoring information includes current activity, historical activity, and general
performance during a specified time period. You can monitor these components:
•
•
•
•
•
•
•
•
•
Security log
Replication synchronization
Messaging synchronization
System messaging queue status
Data change notifications
Device notifications (replication)
Package statistics (replication and messaging)
User-related activity
Cache activity
To enable monitoring, platform administrators must set up a monitoring database, configure a
monitoring data source or create a new one, and set up monitoring database flush and purge
options. By default the installer created a monitoring database, however you can use another
one if you choose.
To control monitoring, platform administrators create monitoring profiles and configurations,
which define the targets (domains and packages) to monitor for a configured length of time. A
Sybase Control Center for Sybase Unwired Platform
11
Get Started
default monitoring profile is created for you by the installer. Monitoring data can be deleted by
the platform administrator as needed.
Table 7. System monitoring tasks
Task
Frequency
Create and enable monitor- One-time initial configuration with
ing profiles
infrequent tuning as required
Accomplished by
Sybase Control Center for Unwired Platform with the Monitoring node
Enable domain logging
One-time setup with infrequent con- Sybase Control Center for Unfiguration changes, usually as issues wired Platform with the Doarise
mains > <DomainName> >
Log node.
Review current/historical/
performance metrics
Routine
Sybase Control Center for Unwired Platform with the Monitoring node
Identify performance issues
Active
Sybase Control Center for Unwired Platform with the Monitoring node
Monitor application and
user activity to check for
irregularities
Active
Sybase Control Center for Unwired Platform with the Monitoring node
Troubleshoot irregularities Infrequent
Reviewing various platform
logs
Purge or export data
Sybase Control Center for Unwired Platform with the Monitoring node
On demand
Starting and Stopping Sybase Control Center in Unwired
Platform
Sybase Unified Agent is used to start and stop Sybase Control Center.
There are two ways to start and stop the Sybase Control Center in an Unwired Platform
environment.
•
•
•
12
By default, SybaseControlCenterX.X is installed to run as a Windows service, and is set by
the installer to start automatically.
You can also use a command-line script as required.
Start or stop from the Windows Control Panel; change automatic start and restart:
a) Open the Windows Control Panel.
Sybase Unwired Platform
Get Started
•
•
b) Select Administrative Tools > Services.
c) Locate SybaseControlCenterX.X. If the service is running, the status column displays
“Started.”
d) To start or stop the service, right-click the service and choose Start or Stop.
e) Double-click the service.
f) To set the service to automatically start when the system starts, change the Startup
type to Automatic.
g) To restart the service in case of failover, choose the Recovery tab and change the First,
Second, and Subsequent failures to Restart Service.
Click Apply to save the modifications before closing the dialog.
Manually starting Sybase Control Center by command-line script:
a) Enter the start command:
<UnwiredPlatform_InstallDir>\SCC-X_X\bin\scc.bat
Manually stopping Sybase Control Center by command-line script:
a) Enter the stop command:
<UnwiredPlatform_InstallDir>\SCC-X_X\bin\scc.bat -stop
Note: You can use scc.bat -stop only to stop an SCC that was manually started with
"scc.bat"; it cannot stop the SCC windows service.
Cleaning Up the Flash Player Cache
Sybase recommends you clean up the Flash Player cache, after upgrading to the latest version
of Sybase Control Center. This is needed if you have used a previous version of Sybase
Unwired Platform on the same machine. This cleanup is only required once.
1. Navigate to C:\Documents and Settings\username\Application Data
\Macromedia\Flash Player\#SharedObjects .
2. Delete all files under this folder.
Note: Alternatively, go to the following link from a browser: http://www.macromedia.com/
support/documentation/en/flashplayer/help/settings_manager07.html. Use the Website
Storage settings panel to change storage capacity, or delete Websites to clean up the cache.
Copying and Pasting Properties
Values displayed in property tables in Sybase Control Center can be copied and pasted.
Tables that support copying and pasting include monitoring properties, device properties, user
properties, registration templates, domain log properties, and sever log properties.
Sybase Control Center for Sybase Unwired Platform
13
Get Started
1. To copy a value, right click the cell, then select Copy from the context menu.
2. To paste what you have copied, go to the property table you require, click the cell in
question, then select Paste from the context menu. You cannot paste in a table cell that is
read only, by you can copy a value from a table cell and paste it elsewhere (for example,
copy text input for a search).
Getting Started with Production Clusters
Get started using Sybase Control Center in production clusters of Unwired Platform. Follow
steps to configure and prepare Sybase Control Center for Unwired Platform use.
1. Getting Started After Installing
Perform postinstallation testing and configuration.
2. Configuring Memory Usage
(Optional) Determine whether you need to configure how much memory Sybase Control
Center uses, and if so which configuration method to use.
3. Configuring the Automatic Logout Timer
(Optional) Set Sybase Control Center to end login sessions when users are inactive for too
long.
4. Manually Opening the Unwired Platform Console
If the Unwired Platform administration console does not appear automatically, you may
need to manually open it in Sybase Control Center (SCC). Once open, you can then use the
Unwired Platform administration console to manage the Unwired Server enabled mobile
environment.
5. Adding or Updating Unwired Server Registration Properties
By default a Sybase Control Center detects and registers clusters and Unwired Server
nodes as managed resources of Sybase Control Center automatically: the resource entry
named 'localhost' is created for the local server upon installation. However, you may need
to manually register other new clusters or nodes or modify existing entries under specific
conditions.
Getting Started After Installing
Perform postinstallation testing and configuration.
Prerequisites
Start Sybase Control Center.
Task
1. Install Adobe Flash Player 10.1 or later in the Web browser you will use to connect to
Sybase Control Center.
14
Sybase Unwired Platform
Get Started
Flash Player is a free plug-in. You can download the latest version from http://
get.adobe.com/flashplayer/.
If Flash Player is already installed but you are not sure which version you have, go to the
Adobe test site at http://adobe.com/shockwave/welcome. Click the link that says Test
your Adobe Flash Player installation. The version information box on the next page that
appears displays your Flash Player version.
2. To connect to Sybase Control Center, direct your browser to:
https://<scc_server_hostname>:8283/scc
Note: If you changed the default HTTPS port during installation, use the new port number
instead of 8283.
3. If you see an error about the security certificate, add Sybase Control Center to your
browser’s trusted sites zone (Internet Explorer) or add a security exception (Firefox).
4. Log in. Use the login account (supAdmin) and password that you set up during installation.
This account can be used for both SCC login, and SUP login.
5. Learn about Sybase Control Center. To open the help system, click ? in the upper-right
corner of the screen, or select Help > Online Documentation.
See also
• Configuring Memory Usage on page 16
Setting Up Browser Certificates for Sybase Control Center Connections
To avoid security exceptions when launching Sybase Control Center, set up security
certificates correctly.
This task is required when:
•
•
•
The browser session starts from a host computer that is remote from the Sybase Control
Center installation.
The browser session starts on the same computer as Sybase Control Center and reports a
Certificate Error. The installer automatically sets up a local security certificate, but the
certificate installed for https in the web container keystore is a self-signed root certificate,
which is not recognized b the client browser.
The host computer does not have Visual Studio Certificate Manager SDK installed.
Alternatively, follow browser-specific instructions to accept the certificate into the Windows
certificate store.
1. Change the default shortcut to use the full host name of the computer on which Sybase
Control Center has been installed.
The host name is required because the default self-signed generated certificate the installer
issues cannot be assigned to “localhost.”
For example, change the shortcut URL to something similar to:
Sybase Control Center for Sybase Unwired Platform
15
Get Started
"%ProgramFiles%\Internet Explorer\iexplore.exe" https://
SCChost.mydomain.com:8283/scc
2. Add the certificate to the Windows certificates store.
a) Extract the self-signed certificate:
<UnwiredPlatform_InstallDir>\JDKX.X.X_XX\bin\keytool.exe exportcert -alias jetty
-keystore <UnwiredPlatform_InstallDir>\SCC-X_X\services
\EmbeddedWebContainer\container\Jetty-X.X.XX\keystore -file
cert.crt
b) Click Start > Run, type mmc, and then click OK to import the cert.crt file into the
host computer’s Windows store with the Windows Certificate Manager. The default
password for both the keystore and the alias is "changeit".
Logging Into Sybase Control Center with an Installer-Defined Password
The person acting as platform administrator logs in to Sybase Control Center for the first time
after installation.
During installation, the person installing Unwired Platform defines a password for the
supAdmin user. This password is used to configure the Preconfigured login module that
performs the administrator authentication.
Note: This installer-defined password is not intended to be a permanent administrator
credential. You must replace this module with a production-grade authentication module,
typically LDAP.
1. Launch Sybase Control Center.
2. Enter supAdmin for the user name and type the <supAdminPwd> for the password.
Note that the user name is case sensitive.
3. Click Login.
Logging out of Sybase Control Center
Log out of a cluster when you finish your administration session.
In order to protect system security, Sybase recommends that you log out of Sybase Control
Center when you are not using the console.
Choose one of these methods:
•
•
Click the Logout link at the top right corner of the console.
From the Sybase Control Center menu, select Application > Logout.
Configuring Memory Usage
(Optional) Determine whether you need to configure how much memory Sybase Control
Center uses, and if so which configuration method to use.
It is not usually necessary to configure memory usage for Sybase Control Center. This table
lists memory options you can set and circumstances under which you should consider
changing them.
16
Sybase Unwired Platform
Get Started
Modify this value
When
Guidelines
Maximum memory
•
On machines with less than 4GB of
memory, set maximum memory to
256MB or more.
•
•
jvmopt=-Xmx – if
you are running SCC as
•
a Windows service
SCC_MEM_MAX – if
you are starting SCC
from the command line
•
•
•
Permanent memory
•
jvmopt=XX:MaxPermSize – if you are run-
You need to prevent Sybase Control Center from using more than a
given amount of memory
SCC fails to start and may display
an error: Could not cre-
Default value: none. (On machines
with 4GB or more of memory, maxiate the Java Virtual mum memory is set dynamically and
is effectively limited only by the
machine.
amount of system memory available.)
An OutOfMemory error says
SCC is out of heap space
A warning message about system
memory appears during the start
process
The machine where SCC is installed has less than 4GB of memory.
(Starting SCC on a machine with
less than 4GB of memory triggers
the startup warning message
about system memory.)
An OutOfMemory error says SCC is
out of permanent generation space
ning SCC as a Windows service
•
Increase by 32MB increments. If you
reach a value equal to twice the default and still see the OutOfMemory
error, contact Sybase technical support.
Default value: 128MB
SCC_MEM_PERM –
if you are starting SCC
from the command line
You can change memory options in two ways:
•
•
For Sybase Control Center started from the command line – execute commands to set one
or more environment variables before executing the scc command to start Sybase Control
Center. When you use this method, your changes to the memory options last only as long as
the current login session. This method is useful for testing new option values.
For the Sybase Control Center service – modify a file used by the SCC service. When you
use this method, your changes to the memory options persist—Sybase Control Center uses
them every time it starts as a service.
See also
• Getting Started After Installing on page 14
Sybase Control Center for Sybase Unwired Platform
17
Get Started
•
Configuring the Automatic Logout Timer on page 18
Changing a Memory Option on the Command Line
Before you start Sybase Control Center from the command line, you can issue a command to
change the value of a memory option temporarily.
Changes made using this method last only as long as the current login session. This method is
useful for testing new option values.
1. If Sybase Control Center is running, shut it down.
2. Set the environment variable. Specify a size in megabytes but do not indicate the units in
the command.
> set SCC_MEM_MAX=512
3. Use the scc command to start Sybase Control Center.
Changing a Memory Option for an SCC Windows Service
Add a jvmopt command to the scc.properties file to change a memory option (-Xmx or
-XX:MaxPermSize) for a Sybase Control Center Windows service.
When you use this method to set memory options, your changes are permanent—Sybase
Control Center uses them every time it starts as a service.
1. If Sybase Control Center is running, shut it down.
2. Open the SCC properties file:
<SCC-install-directory>\SCC-3_2\bin\scc.properties
3. Add (or modify, if it already exists) a jvmopt line specifying the memory size in Java
format. Use m for megabytes or g for gigabytes.
For example:
jvmopt=-Xmx512m
4. Save the file and start the Sybase Control Center Windows service.
Configuring the Automatic Logout Timer
(Optional) Set Sybase Control Center to end login sessions when users are inactive for too
long.
Prerequisites
Launch Sybase Control Center and log in using an account with administrative privileges.
(The login account or its group must have sccAdminRole.)
Task
1. From the application’s menu bar, select Application > Administration.
2. Select General Settings.
18
Sybase Unwired Platform
Get Started
3. Click the Auto-Logout tab.
4. Enter the number of minutes after which an idle user will be automatically logged out.
Enter 0 or leave the box empty to disable automatic logout.
5. Click OK (to apply the change and close the properties dialog) or Apply (to apply the
change and leave the dialog open).
See also
• Configuring Memory Usage on page 16
Manually Opening the Unwired Platform Console
If the Unwired Platform administration console does not appear automatically, you may need
to manually open it in Sybase Control Center (SCC). Once open, you can then use the Unwired
Platform administration console to manage the Unwired Server enabled mobile environment.
Prerequisites
Before managing a cluster, ensure that the login has SCC administration privileges.
Task
1. In the SCC menu, select View > Open > Resource Explorer.
2. From the list of resources, select the cluster you want to manage.
3. From the Resource Explorer menu bar, click Resources > Add Resources to
Perspective.
The Unwired Server is added to the Perspective Resources window.
4. In the Perspective Resources window, mouse over the cluster you want to manage, click
the down arrow, and select Authenticate.
5. To authenticate against the cluster, select one of these:
•
•
Use my current SCC login – SCC uses the administrator's initial SCC login
credentials to establish a connection to the Unwired Platform cluster. Use this option if
you have already mapped the SCC administrator role to the SUP administrator role.
Specify different credentials – enter a new user name and password specifically for
logging in to this cluster. Use this option if SCC and Unwired Platform use different
authentication repositories. Using different credentials in this step is unnecessary if
SCC and Unwired Platform use the same security provider.
6. Click OK.
7. Mouse over the cluster you want to open, click the down arrow, and select Manage.
If you are successfully authenticated, the Unwired Platform console appears. If authentication
fails, see Sybase Control Center Issues in the Troubleshooting guide.
Sybase Control Center for Sybase Unwired Platform
19
Get Started
Adding or Updating Unwired Server Registration Properties
By default a Sybase Control Center detects and registers clusters and Unwired Server nodes as
managed resources of Sybase Control Center automatically: the resource entry named
'localhost' is created for the local server upon installation. However, you may need to manually
register other new clusters or nodes or modify existing entries under specific conditions.
For information on these conditions, see When Manual Managed Resource Property Changes
Are Needed.
1. Choose your action:
•
To register a new resource, on the Sybase Control Center menu, select Resource >
Register.
• To update the resource properties, on the Sybase Control Center menu, select View >
Select > Perspective Resources view. Then in the Name column, click EntryName >
Properties.
2. Configure any of these properties, depending on you initial action:
•
•
•
the resource name and type
a description
host name and port of the server
The host name and port must match those configured for the Unwired Server
management port.
3. If you changed hostname, reauthenticate the server:
a) Click EntryName > Clear Authentication to remove currently validated credentials
to the previous host values.
b) Click EntryName > Authenticate to reauthenticate with the current host values.
4. Once authenticated, you can now manage it from Sybase Control Center: click
EntryName > Manage to launch the Unwired Platform management console.
See also
• Configuring Management Port Properties on page 42
• Sybase Control Center Communication with Unwired Server Fails on page 374
When Manual Managed Resource Property Changes Are Needed
Understand the conditions under which managed resource properties need to be manually
edited or added
These are the conditions under which you must manually create a new registration entry:
•
•
20
If a cluster or node is not located within your network.
If it is not automatically detected and registered in the Sybase Control Center Resource
Explorer
Sybase Unwired Platform
Get Started
These are the conditions under which you must manually update an existing registration entry:
•
If you modify the Unwired Server configuration to change the management port, you need
to update these resource properties to match those values.
Note: When modifying the hostname of the resource, you need to reauthenticate the
resource.
Understanding the Sybase Control Center Interface
Manipulate Sybase Control Center interface elements to set up the console according to your
requirements and preference.
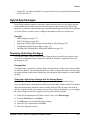
User Interface Overview
This illustration labels important elements of the Sybase Control Center user interface so you
can identify them when they appear in other help topics.
Figure 1: Sybase Control Center User Interface
See also
• Perspectives on page 23
• Views on page 25
• Repository on page 27
• Sybase Control Center Console on page 32
• Sybase Control Center Security on page 36
Sybase Control Center for Sybase Unwired Platform
21
Get Started
Toolbar Icons
Describes the icons in the Sybase Control Center toolbar for launching and managing views.
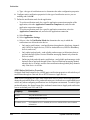
Table 8. Toolbar icons
Icon
Name
Description
Show/Hide Perspective Resources
View
Displays or minimizes the Perspective Resources view, which lists registered resources in this
perspective.
Launch Resource Explorer
Opens the resource explorer, which lists reachable resources (both registered and unregistered).
Launch Heat Chart
Opens the perspective heat chart, which gives a
status overview of the registered resources in
this perspective.
Close All Open Views
Closes all open and minimized views.
Minimize All Views
Minimizes all open views.
Restore All Minimized Views
Returns all minimized views to their original
size.
Cascade All Open Views
Arranges open views to overlap each other.
Tile All Open Views Vertically
Arranges open views in a vertical manner.
Tile All Open Views Horizontally
Arranges open views in a horizontal manner.
Sybase Control Center Functionality Not Applicable to Unwired Platform
Sybase Control Center is a standard management framework used by multiple products,
including Sybase Unwired Platform. Certain standard functions that appear in the user
interface cannot be used to administer Unwired Platform.
The following Sybase Control Center features can be disregarded in the context of Sybase
Unwired Platform:
•
•
•
22
Alerts
Schedules
Heat charts
Sybase Unwired Platform
Get Started
• Historical performance monitoring
• Logging
These features either do not apply to Sybase Unwired Platform or are redundant due to custom
functionality implemented in place of standard functions. The inapplicable Sybase Control
Center functionality cannot be removed, as it may be required by other Sybase product servers
also using Sybase Control Center.
Accessibility Features
This document is available in an HTML version that is specialized for accessibility. You can
navigate the HTML with an adaptive technology such as a screen reader, or view it with a
screen enlarger.
The Sybase CEP Option R4 documentation complies with U.S. government Section 508
Accessibility requirements. Documents that comply with Section 508 generally also meet
non-U.S. accessibility guidelines, such as the World Wide Web Consortium (W3C) guidelines
for Web sites.
For information about accessibility support in the Sybase IQ plug-in for Sybase Central™, see
“Using accessibility features” in Chapter 1, “Introducing Sybase IQ” in Introduction to
Sybase IQ. The online help for Sybase IQ, which you can navigate using a screen reader, also
describes accessibility features, including Sybase Central keyboard shortcuts.
Note: You might need to configure your accessibility tool for optimal use. Some screen
readers pronounce text based on its case; for example, they pronounce ALL UPPERCASE
TEXT as initials, and MixedCase Text as words. You might find it helpful to configure your
tool to announce syntax conventions. Consult the documentation for your tool.
For information about how Sybase supports accessibility, see Sybase Accessibility at
http://www.sybase.com/accessibility. The Sybase Accessibility site includes
links to information on Section 508 and W3C standards.
Sybase Control Center Accessibility Information
Sybase Control Center uses the Adobe Flex application.
For the most current information about Adobe Flex keyboard shortcuts, see http://
livedocs.adobe.com/flex/3/html/help.html?content=accessible_5.html.
Note: To use Sybase Control Center with JAWS for Windows screen reading software
effectively, download and install the appropriate Adobe scripts. See www.adobe.com.
Perspectives
A perspective is a named container for a set of one or more managed resources. You can
customize perspectives to provide the information you need about your environment.
As the main workspaces in the Sybase Control Center window, perspectives let you organize
managed resources. You might assign resources to perspectives based on where the resources
are located (continents, states, or time zones, for example), what they are used for, which
Sybase Control Center for Sybase Unwired Platform
23
Get Started
group owns them, or which administrator manages them. Perspectives appear as tabs in the
main window.
Every perspective includes a Perspective Resources view, which lists the resources in that
perspective and provides high-level status and descriptive information. Use the View menu to
switch from detail view to icon view and back.
You can open additional views as needed to manage the perspective’s resources. The views in
a perspective display information only about resources in that perspective.
One resource can appear in many perspectives.
See also
• User Interface Overview on page 21
• Views on page 25
• Repository on page 27
• Sybase Control Center Console on page 32
• Sybase Control Center Security on page 36
Creating a Perspective
Create a perspective in which you can add and manage resources.
1. From the application menu bar, select Perspective > Create.
2. Enter a name for your perspective. The name can contain up to 255 characters.
3. Click OK.
See also
• Removing a Perspective on page 24
• Renaming a Perspective on page 25
Removing a Perspective
Delete a perspective window.
1. Select the perspective tab you want to delete.
2. In the main menu bar, select Perspective > Delete.
The selected perspective disappears. If there are other perspectives, Sybase Control Center
displays one.
See also
• Creating a Perspective on page 24
• Renaming a Perspective on page 25
24
Sybase Unwired Platform
Get Started
Renaming a Perspective
Change the name of your perspective.
1. Select the perspective tab you want to rename.
2. From the main menu bar, select Perspective > Rename..
3. Enter the new name for your perspective.
4. Click OK.
See also
• Creating a Perspective on page 24
• Removing a Perspective on page 24
Views
Use views to manage one or more resources within a perspective.
In Sybase Control Center, views are the windows you use to monitor and manage a
perspective’s resources. You can re-arrange, tile, cascade, minimize, maximize, and generally
control the display of the views in your perspective.
Each perspective includes these views:
•
•
Perspective Resources
Administration Console
Note: SCC views are not related to database views; they serve a completely different purpose.
See also
• User Interface Overview on page 21
• Perspectives on page 23
• Repository on page 27
• Sybase Control Center Console on page 32
• Sybase Control Center Security on page 36
Managing a View
Open, close, minimize, maximize, or restore a view in the current perspective.
You can:
Sybase Control Center for Sybase Unwired Platform
25
Get Started
Task
Action
Open a view
Do one of the following:
•
In the Perspective Resources view, select a resource, click the dropdown arrow to the right of the resource name, and select the view to
open.
•
In the application menu bar, select View > Open and choose a view.
Close a view
Select the view to close. In the application menu bar, select View > Close.
You can also click the X in the view’s upper right corner.
Maximize a view
Click the box in the view’s upper right corner. The view enlarges to fill the
entire perspective window. Click the box again to return the view to its
former size.
Minimize a view
Click the _ in the view’s upper right corner. The view shrinks to a small
tab at the bottom of the perspective window.
Minimize all views
In the application menu bar, select View > Minimize All Views.
Restore a view
Click the box on the minimized tab to maximize the view. Click the box
again to return the view to its former (smaller) size so you can see other
views at the same time.
Bring a view to the front
In the application menu bar, select View > Select and choose the view you
want from the submenu.
See also
• Arranging View Layout in a Perspective on page 26
Arranging View Layout in a Perspective
Use the view layout options to manage your perspective space.
Click one of these icons in the Sybase Control Center toolbar:
Icon Action
Close All Open Views
Minimize All Open Views
Restore All Minimized Views
Cascade All Open Views
26
Sybase Unwired Platform
Get Started
Icon Action
Tile All Open Views Vertically
Tile All Open Views Horizontally
In a cascade, views overlap; in tiling arrangements, they do not.
Alternatively, you can arrange view layouts from the Sybase Control Center menu bar. From
the menu bar, select Perspective > Arrange and select your view layout.
See also
• Managing a View on page 25
Repository
The Sybase Control Center embedded repository stores information related to managed
resources, as well as user preference data, operational data, and statistics.
You can back up the repository database on demand, schedule automatic backups, restore the
repository from backups, and configure repository purging options. Full and incremental
backups are available. A full backup copies the entire repository. An incremental backup
copies the transaction log, capturing any changes since the last full or incremental backup.
By default, Sybase Control Center saves backups as follows:
•
•
Each full backup is stored in its own subdirectory in <SCC-install-directory>/
backup.
Each incremental backup is stored in a file in <SCC-install-directory>/
backup/incremental.
Sybase recommends that you periodically move backup files to a secondary storage location
to prevent the installation directory from becoming too large.
See also
• User Interface Overview on page 21
• Perspectives on page 23
• Views on page 25
• Sybase Control Center Console on page 32
• Sybase Control Center Security on page 36
Sybase Control Center for Sybase Unwired Platform
27
Get Started
Scheduling Backups of the Repository
Configure full and incremental backups of the repository to occur automatically.
Prerequisites
Determine your backup strategy, including when to perform full backups and incremental
backups. For example, you might schedule incremental backups every day and a full backup
every Saturday.
You must have administrative privileges (sccAdminRole) to perform this task.
Task
A full backup copies the entire repository. An incremental backup copies the transaction log,
capturing any changes since the last full or incremental backup.
1. From the main menu, select Application > Administration.
2. In the left pane, select Repository.
3. Click the Full Backup tab.
4. (Optional) To change the directory in which backups will be stored, click Browse and
navigate to the desired directory.
5. Select Schedule a Regular Backup.
6. Specify the day you want scheduled backups to begin. Enter a Start date or click the
calendar and select a date.
7. (Optional) Use the Time and AM/PM controls to specify the time at which backups occur.
8. Specify how often backups occur by setting the Repeat interval and selecting hours, days,
or weeks.
9. (Optional) To purge the repository after each backup, select Run a repository purge after
the backup completes.
10. If you include purging in the backup schedule, go to the Size Management tab and
unselect Automatically purge the repository periodically to disable automatic purging.
11. Click Apply to save the schedule.
12. Click the Incremental Backup tab and repeat the steps above to schedule incremental
backups to occur between full backups.
Next
Set purging options on the Size Management tab.
See also
• Modifying the Backup Schedule on page 29
• Forcing an Immediate Backup on page 29
• Restoring the Repository from Backups on page 30
28
Sybase Unwired Platform
Get Started
•
Configuring Repository Purging on page 31
Modifying the Backup Schedule
Suspend or resume repository backups or change the backup schedule.
Prerequisites
You must have administrative privileges (sccAdminRole) to perform this task.
Task
1. From the main menu, select Application > Administration.
2. In the left pane, select Repository.
3. Choose the type of backup to modify:
•
•
Click the Full Backup tab, or
Click the Incremental Backup tab.
4. (Optional) To suspend or resume the backup schedule, select or unselect Schedule a
Regular Backup.
When you unselect (uncheck) this option, the scheduling area is grayed out and scheduled
backups no longer occur. However, the schedule is preserved and you can reinstate it at any
time.
5. To change the backup schedule, edit the Start date, Time, Repeat interval, or units. You
can also select or unselect Run a repository purge after the backup completes.
6. Click Apply to save the schedule.
See also
• Scheduling Backups of the Repository on page 28
• Forcing an Immediate Backup on page 29
• Restoring the Repository from Backups on page 30
• Configuring Repository Purging on page 31
Forcing an Immediate Backup
Perform an unscheduled full or incremental backup of the repository.
Prerequisites
You must have administrative privileges (sccAdminRole) to perform this task.
Task
1. From the main menu, select Application > Administration.
2. In the left pane, select Repository.
Sybase Control Center for Sybase Unwired Platform
29
Get Started
3. Choose the type of backup to run:
•
•
Click the Full Backup tab, or
Click the Incremental Backup tab.
4. Click Back up Now.
Sybase Control Center saves the backup to the directory shown in the Location field.
See also
• Scheduling Backups of the Repository on page 28
• Modifying the Backup Schedule on page 29
• Restoring the Repository from Backups on page 30
• Configuring Repository Purging on page 31
Restoring the Repository from Backups
Load backup files into the repository database to revert undesirable changes or to recover from
a catastrophic failure.
If you configured Sybase Control Center to store backups somewhere other than the default
location, change the source directory in the copy commands in this procedure.
1. Shut down Sybase Control Center.
2. Copy the most recent full backup from <SCC-install-directory>/backup/
<generated_directory_name> to <SCC-install-directory>/
services/Repository. For example:
copy C:\sybase\SCC-3_2\backup\repository.
270110161105\scc_repository.db
C:\sybase\SCC-3_2\services\Repository
3. If you have no incremental backups to load,
a) Also copy the log file from <SCC-install-directory>/backup/
<generated_directory_name> to <SCC-install-directory>/
services/Repository. For example:
copy C:\sybase\SCC-3_2\backup\repository.
270110161105\scc_repository.log
C:\sybase\SCC-3_2\services\Repository
b) Skip to step 5 on page 31.
4. Start the repository database using the -ad option, which directs it to load transaction logs
(incremental backups) from the incremental directory. (The database loads full
backups automatically.) For example:
cd <SCC-install-directory>\services\Repository
..\..\bin\sa\bin_<platform>\dbsrv11.exe scc_repository -ad
<SCC-install-directory>\backup\incremental
30
Sybase Unwired Platform
Get Started
The repository database loads the full backup and any subsequent incremental backups
present in the incremental directory. Incremental backups are loaded in date order.
After loading and saving, the database shuts down.
5. Start Sybase Control Center.
If you loaded incremental backups, SCC starts normally (that is, no further recovery
occurs). If you copied a full backup to the Repository directory, the database recovers
the repository from the full backup.
Example: Loading incremental backups into the repository database
These commands start SQL Anywhere® on a 32-bit Windows machine:
% cd C:\sybase\SCC-3_2\services\Repository
% ..\..\bin\sa\bin_windows32\dbsrv11.exe scc_repository -ad
C:\sybase\SCC-3_2\backup\incremental
See also
• Scheduling Backups of the Repository on page 28
• Modifying the Backup Schedule on page 29
• Forcing an Immediate Backup on page 29
• Configuring Repository Purging on page 31
Configuring Repository Purging
Change repository purging options.
Prerequisites
You must have administrative privileges (sccAdminRole) to perform this task.
Task
As you decide how to purge your repository, consider that:
•
•
•
•
Purging keeps the repository from absorbing too much disk space.
By default, purging is enabled. It occurs once a day and purges data older than one day.
Statistics and alert history can help you detect trends in server performance and user
behavior. The Sybase Control Center statistics chart can graph performance data over a
period of a year or more if the data is available. If you have enough disk space, consider
saving data for a longer period of time or disabling the purging of statistics or alert history.
Changing the purge frequency and other options might affect Sybase Control Center
performance.
Note: If you configure purging as part of a scheduled backup of the repository, disable
automatic purging on the Size Management tab.
Sybase Control Center for Sybase Unwired Platform
31
Get Started
1. From the main menu bar, select Application > Administration.
2. Select Repository.
3. Click the Size Management tab.
4. To turn automatic purging on or off, click Automatically purge the repository
periodically.
Turn this option off if purging is configured as part of your scheduled full or incremental
backups.
5. Click purge options to turn them on or off:
• Purge statistics
• Purge alert history
6. In Purge data older than, enter the number of days after which to purge repository data.
7. Click Apply, then OK.
See also
• Scheduling Backups of the Repository on page 28
• Modifying the Backup Schedule on page 29
• Forcing an Immediate Backup on page 29
• Restoring the Repository from Backups on page 30
Sybase Control Center Console
The console is a command-line interface for displaying details about the status of the Sybase
Control Center server and its subsystems.
When you use the scc command to start Sybase Control Center, it displays start-up messages
and then displays the console prompt.
Note: The console prompt does not appear if you start Sybase Control Center as a service, if
you direct the output of scc to a file, or if you start Sybase Control Center in the background.
See also
• User Interface Overview on page 21
• Perspectives on page 23
• Views on page 25
• Repository on page 27
• Sybase Control Center Security on page 36
Console Commands
Use the Sybase Control Center console to get status information on Sybase Control Center and
its ports, plug-ins, and services.
32
Sybase Unwired Platform
Get Started
help Command
Display syntax information for one or more Sybase Control Center console commands.
Syntax
help [command_name]
Parameters
•
command_name – optional. status, info, or shutdown. If you omit command_name, help
returns information on all the console commands.
Examples
•
Example 1 – returns information on the status command:
help status
Permissions
help permission defaults to all users. No permission is required to use it.
See also
• info Command on page 33
• shutdown command on page 34
• status Command on page 35
info Command
Display information about specified parts of the Sybase Control Center server.
If you enter info with no parameters, it returns information for every parameter.
Syntax
info [-a | --sys]
[-D | --sysprop [system-property]]
[-e | --env [environment-variable]]
[-h | --help]
[-m | --mem]
[-p | --ports]
[-s | --services]
Parameters
•
-a | --sys – optional. List all the services known to Sybase Control Center, indicate whether
each service is enabled, and list other services on which each service depends.
Sybase Control Center for Sybase Unwired Platform
33
Get Started
•
•
•
•
•
•
-D | --sysprop [system-property] – optional. Display information about the specified Java
system property. Omit the system-property argument to return a list of all Java system
properties and their values.
-e | --env [environment-variable] – optional. List all the environment variables in the
Sybase Control Center Java VM process environment. Omit the environment-variable
argument to return a list of environment variables and their values.
-h | --help – optional. Display information about the info command.
-m | --mem – optional. Display information about the server’s memory resources.
-p | --ports – optional. List all the ports on which the Sybase Control Center agent and its
services listen, indicate whether each port is in use, and show the service running on each
port.
-s | --services – optional. List all Sybase Control Center services, indicate whether each
service is enabled, and list other services on which each service depends.
Examples
•
Example 1 – displays information about ports on this Sybase Control Center server:
info -p
Permissions
info permission defaults to all users. No permission is required to use it.
See also
• help Command on page 33
• shutdown command on page 34
• status Command on page 35
shutdown command
Stop the Sybase Control Center server if it is running.
Syntax
shutdown
Examples
•
Example 1 – shuts down Sybase Control Center:
shutdown
Permissions
shutdown permission defaults to all users. No permission is required to use it.
34
Sybase Unwired Platform
Get Started
See also
• help Command on page 33
• info Command on page 33
• status Command on page 35
status Command
Display the status of the SCC agent, plug-in, or service components of Sybase Control Center.
Syntax
status [-a | --agent]
[-h | --help]
[-p | --plugin [plugin-name]]
[-s | --service [service-name]]
Parameters
•
•
•
•
-a | --agent – display the status of the Sybase Control Center agent component.
-h | --help – display information about the info command.
-p | --plugin [plugin-name] – display the status of the specified Sybase Control Center
plug-in (for example, ASEMap, the Adaptive Server® management module). Omit the
plugin-name argument to return a list of plug-ins.
-s | --service [service-name] – display the status of the specified Sybase Control Center
service (for example, the Alert service or the Messaging service). Omit the service-name
argument to return a list of services.
Examples
•
Example 1 – displays status information on the Repository service:
status --service Repository
Permissions
status permission defaults to all users. No permission is required to use it.
See also
• help Command on page 33
• info Command on page 33
• shutdown command on page 34
Sybase Control Center for Sybase Unwired Platform
35
Get Started
Sybase Control Center Security
User access to Sybase Control Center is controlled by configuring a security provider.
Security providers are configured with the Unwired Platform management console.
By default, Sybase Control Center delegates user access control to providers configured for
Unwired Server. Consequently, the login and group management features for Sybase Control
Center (that is, those available when you click Application > Administration > Security
from the Sybase Control Center menu) do not apply to the Unwired Platform use case. See
Securing Platform Administration in the Security guide.
See also
• User Interface Overview on page 21
• Perspectives on page 23
• Views on page 25
• Repository on page 27
• Sybase Control Center Console on page 32
Platform Administration Roles and Tasks
By default, there are three logical administration roles for Unwired Platform, each with a
specific set of tasks to perform.
To enable role-based access to the Sybase Control Center interface, configure mapping of the
logical roles to roles that exist in the security repository used for administrative authentication
and authorization. For details, see the Security guide.
SUP Platform Administrator
Platform administrators interact with Unwired Platform to perform high-level, cluster-wide
management.
A platform administrator can perform all administrative operations in the Unwired Platform
administration console, including domain administration for all domains.
Note: The terms "Unwired Platform (platform) administrator" is used in all documentation to
refer to the user with "SUP Administrator" role.
36
Sybase Unwired Platform
Get Started
Platform Administration Tasks
Review the tasks an Unwired Platform administrator can perform.
Component
Available Tasks
Cluster
•
•
•
•
•
•
Domains
•
•
•
•
Configure server properties for replication, messaging, management
and HTTP ports, SSL, and performance.
View and manage server log settings.
Configure Relay Server and server farms.
Configure security configuration role mappings.
Review licensing status and generate SAP audit data.
Review and manage system landscape directory configuration, and
upload schedule.
•
•
Deploy, configure, and manage MBO packages.
Deploy and manage server connections and templates.
Configure security configuration role mappings.
Review and manage domain logs, domain log profiles, and log filters.
Export domain log data.
Configure cluster-wide configuration objects in the "default" domain.
These objecst include the system database server connections and domain log.
View and manage domains.
Assign or unassign domain administrators to or from the domain.
Server
•
•
Perform server starts and stops.
Configure outbound enablers on each node.
Security
•
•
•
•
•
Create security configurations.
Specify authentication, authorization, and audit providers.
Configure authentication cache timeout and lockout properties.
Map logical roles to physical roles for security providers.
Assign named security configurations to domains or remove pre existing configurations where necessary.
Register new domain administrators.
•
•
Packages
•
•
•
Import, export, deploy, and delete MBO packages.
Manage or view the properties of each package. For example, perform
role mapping, configure security configuration and role mapping,
manage subscriptions, and review and manage client log and MBO/
operation error history.
Enable or disable packages.
Sybase Control Center for Sybase Unwired Platform
37
Get Started
Component
Available Tasks
Hybrid Apps
•
•
•
•
Applications
Import and export applications.
Monitoring
•
•
Deploy and configure Hybrid Apps.
Assign and unassign Hybrid Apps to users.
Review queue status and errors.
Import and export Hybrid Apps.
Configure monitoring settings and review monitoring data.
Review captured monitoring data and KPIs .
SUP Domain Administrator
Domain administrators interact with Unwired Platform to manage packages, server
connections, security configurations, and role mappings in specific domains. A domain is a
logical partition used to isolate and manage runtime artifacts for a particular tenant.
The domain administrator can administer only the domain to which he or she is assigned. The
domain administrator is granted access on a per-domain basis by the platform administrator.
The logical role for the domain administrator is "SUP Domain Administrator." The term
"domain administrator" is used in all documentation to refer to the user with the "SUP Domain
Administrator" role.
Domain Administration Tasks
Review the tasks a domain administrator can perform.
Component
Available Tasks
Domain
•
•
•
•
•
•
•
Log
38
•
•
Manage the domain.
Enable or disable managed domain.
Deploy, configure, and manage MBO packages.
Deploy and manage server connections and templates.
Configure security configuration role mapping.
Review and manage domain logs, domain log profiles, and log filters.
Export domain log data.
Configure cluster-wide configuration objects in the "default" domain.
These objects include the system database server connections and domain log.
Review and manage domain logs, domain log profiles, and log filters.
Export domain log data.
Sybase Unwired Platform
Get Started
Component
Available Tasks
Packages
•
•
•
Import, export, deploy, and delete MBO packages.
Manage or view the properties of each package, for example perform
role mapping, configure security configuration and role mapping, manage subscriptions, review and manage client log and MBO/operation
error history.
Enable or disable packages.
Connections
•
•
Create and configure server connections.
Manage connection templates.
Security
•
Map logical roles to physical roles for domain security providers.
Applications
•
•
Review applications that are defined for the domain.
Review application connections that access the domain.
SUP Helpdesk
Help desk operators interact with Unwired Platform to review system information to
determine the root cause of reported problems. Help desk operators only need to view
information, not change it.
Help desk operators have read-only access to all administration information in the Unwired
Platform administration console. They cannot perform any modification operations on
administration console tabs, and cannot save changes made in dialogs or wizards.
The logical role for the help desk operator is "SUP Helpdesk." The term "help desk operator"
is used in all documentation to refer to the user with the "SUP Helpdesk" role.
Help Desk Operator Tasks
Review the tasks a help desk operator can perform.
Component
Available Tasks
Cluster
•
•
•
•
•
Review properties for for replication, messaging, management and
HTTP ports, SSL, and performance.
Review server logs.
Review Relay Server and server farms.
Review licensing status and generate SAP audit data.
Review system landscape directory configuration and schedule.
Sybase Control Center for Sybase Unwired Platform
39
Get Started
Component
Available Tasks
Domain
•
•
•
•
•
Review existing domains.
Review MBO packages and their configuration.
Review server connections and templates properties.
Review security configurations and role mapping.
Review domain logs, domain log profiles, and log filters. Export domain
log data .
Server
•
Review outbound enablers on each node.
Applications
•
Review applications, application push configurations, application users
and connections, and application connection templates.
Security
•
Review security configurations, their authentication, authorization, attribution, and audit provider properties, and their logical role mappings.
Review authentication cache timeout and lockout properties.
Review security configurations assigned to.
Review currently registered domain.
•
•
•
40
Hybrid Apps
•
Review currently deployed Hybrid Apps, their configuration settings,
assigned application connections, application connection templates,
queue status, and errors.
Monitoring
•
•
Review monitoring settings and monitoring data.
Review captured monitoring data and KPIs.
Sybase Unwired Platform
Administer
Administer
Use Sybase Control Center for Unwired Platform to administer and configure components of
a cluster registered as a managed resource. When you configure cluster components you are
setting up the elements required to mobilize your data. Once configured you perform ongoing
administration tasks to maintain the environment.
Clusters
As an organization grows, Unwired Platform administrators need to create a scalable IT
infrastructure using clusters. Clustering creates redundant Unwired Platform components on
your network to provide a highly scalable and available system architecture.
Organizations can seamlessly achieve high availability and scalability by adding more or
redundant instances of core components. Redundant instances of critical components provide
transparent failover.
In a production environment, the Unwired Platform deployment typically uses at least one
relay server. The connections to relay servers can be configured within a cluster instance from
Sybase Control Center.
Cluster-Affecting Configuration Changes
Before you configure Unwired Servers in a cluster, ensure you understand how changes are
synchronized to cluster members.
When you make a cluster-affecting change on the primary Unwired Server, those changes are
synchronized to all secondary servers in the cluster. This ensures that servers are configured
the same way and behave consistently within the cluster.
Cluster-affecting changes include:
•
•
•
cluster configuration
monitoring setup
security configuration
Cluster Properties
Cluster properties let administrators manage server configuration settings for all nodes in the
cluster to ensure smooth data exchange between the server and client.
Note: .
Cluster property changes that do not require a server restart will be automatically
synchronized to all nodes in the cluster. A message is displayed for any changes that require a
server restart. Servers that require a restart are also flagged in the Server List.
Sybase Control Center for Sybase Unwired Platform
41
Administer
See also
• Server List on page 82
• Unwired Server on page 81
• Server Log on page 95
Configuring Management Port Properties
Management ports in Unwired Server process incoming administration connection requests
from Sybase Control Center. Management ports use IIOPS by default, though IIOP can be
configured as well.
Note: If you are using Sybase Control Center in a development/test environment, you must
also configure the Sybase Unwired WorkSpace on all development computers accessing the
development Unwired Server to also save the required certificates to the java keystore.
SybaseMutual authentication for the IIOPS management port is not supported.
1. In the left navigation pane, select Configuration.
2. In the right administration pane, click the General tab.
3. From the menu bar, select Components.
4. Select Management, then click Properties.
5. To configure the IIOP management port, enter the port number (default is 2000).
6. To configure the IIOPS secure management port:
• Enter the port number (default is 2001).
• Select the security profile used for the secure port.
See also
• Replication on page 42
• Messaging on page 46
• Configuring a Client Dispatcher on page 47
• Upgrade: Configuring Data Change Notification Components on page 47
• Configuring Cluster Performance Properties on page 48
• Configuring SSL Properties on page 49
• Configuring Web Container Properties on page 54
• Configuring the Configuration Cache on page 56
• Configuring SAP Solution Manager URL on page 57
• Configuring Server Log Settings on page 57
• Adding or Updating Unwired Server Registration Properties on page 20
• Sybase Control Center Communication with Unwired Server Fails on page 374
Replication
Replication synchronization involves synchronization between Unwired Server and a
replication-based mobile device application. Synchronization keeps multiple variations of the
42
Sybase Unwired Platform
Administer
data set used by a device application in coherence with one another by reconciling differences
in each. Reconciling differences before writing updates back to the enterprise information
server (EIS) maintains data integrity.
For replication synchronization, configure the corresponding port to receive incoming
synchronization requests from devices, as well as set up configuration to enable push
notification messages to the device when data changes in CDB. In a typical environment,
client applications running on devices will connect to the synchronization port via Relay
Server and Relay Server Outbound Enabler (RSOE). In those cases, the HTTP port will be
used.
See also
• Configuring Management Port Properties on page 42
• Messaging on page 46
• Configuring a Client Dispatcher on page 47
• Upgrade: Configuring Data Change Notification Components on page 47
• Configuring Cluster Performance Properties on page 48
• Configuring SSL Properties on page 49
• Configuring Web Container Properties on page 54
• Configuring the Configuration Cache on page 56
• Configuring SAP Solution Manager URL on page 57
• Configuring Server Log Settings on page 57
Configuring a Replication Listener
(Not applicable to Online Data Proxy)Configure the port to receive synchronization requests
from client devices.
Prerequisites
A secure synchronization stream uses SSL or TLS encryption. Both TLS and SSL require
production-ready certificates to replace the default ones installed with Unwired Server.
Ensure that you possess digital certificates verified and signed by third-party trusted
authorities. See Encrypting Synchronization for Replication Payloads in Security.
Task
1. In the left navigation pane, select Configuration .
2. In the right administration pane, click the General tab.
3. From the menu bar, select Components.
4. Select Replication and click Properties.
5. Select the protocol and port you require:
Sybase Control Center for Sybase Unwired Platform
43
Administer
•
If you do not require SSL encryption, choose Port. Sybase Unwired Platform
recommends this option if you do not require a secure communication stream for
synchronization. By default, the port for HTTP is 2480.
• To encrypt the HTTP stream with SSL, choose Secure port. By default, the port for
HTTPS is 2481. The "Secure Sync Port" properties can be used to review and set the
server identity and public certificate for the secure synchronization port. See below.
6. (Optional) Configure additional properties for E2EE with TLS, HTTPS with SSL, and
synchronization server startup options:
Note: Leave E2E Encryption values blank to disable end-to-end encryption.
•
•
•
•
•
•
•
•
•
E2E Encryption Certificate – specify the file containing the private key that acts as the
identity file for Unwired Server.
E2E Encryption Certificate Password – set the password to unlock the encryption
certificate.
E2E Encryption Public Key – specify the file containing the public key for Unwired
Server.
E2E Encryption Type – specify the asymmetric cipher used for key exchange for endto-end encryption. You can only use RSA encryption.
Secure Sync Port Certificate – identifies the location of the security certificate used to
encrypt and decrypt data transferred using SSL.
Secure Sync Port Certificate Password – is used to decrypt the private certificate listed
in certificate file. You specify this password when you create the server certificate for
SSL.
Secure Sync Port Public Certificate – specify the file containing the SSL public key
that acts as the identity file for synchronization port.
Trusted Relay Server Certificate – if Relay Server trusted certificate is configured for
HTTPS connections encrypted with SSL, identifies the public security certificate
location.
User Options – sets the command line options for starting the synchronization server.
These options are appended the next time the synchronization server starts. These are
the available user options:
Option
Description
@ [variable | fil- Applies listener options from the specified environment variable or text file.
ePath]
44
-a <value>
Specifies a single library option for a listening library.
-d <filePath>
Specifies a listening library.
-e <deviceName>
Specifies the device name.
-f <string>
Specifies extra information about the device.
Sybase Unwired Platform
Administer
Option
Description
-gi <seconds>
Specifies the IP tracker polling interval.
-i <seconds>
Specifies the polling interval for SMTP connections.
-l <"keyword=value;...">
Defines and creates a message handler.
-m
Turns on message logging.
-ni
Disables IP tracking.
-ns
Disables SMS listening.
-nu
Disables UDP listening.
-o <filePath>
Logs output to a file.
Note: Ensure that you enter the absolute file path for this
property.
-os <bytes>
Specifies the maximum size of the log file.
-p
Allows the device to shut down automatically when idle.
-pc [+ | -]
Enables or disables persistent connections.
-r <filePath>
Identifies a remote database involved in the responding action of a message filter.
-sv <scriptVersion>
Specifies a script version used for authentication.
-zf
(Recommended in development environments) Causes the
Unwired Server replication service to check for script
changes at the beginning of each synchronization. Unless this
option is used, the service assumes that no script changes
have been made, no checks for script changes are performed,
once the service starts. For production environments, this
option is not recommended due to its negative impact on
synchronization performance.
-t [+ | -] <name>
Registers or unregisters the remote ID for a remote database.
-u <userName>
Specifies a synchronization server user name.
-v [0 | 1 | 2 | 3] Specifies the verbosity level for the messaging log.
-y <newPassword>
Specifies a new synchronization server password.
Sybase Control Center for Sybase Unwired Platform
45
Administer
Do not use the User Options property in Sybase Control Center to pass in these options:
-c, -lsc, -q, -w, -x, -zs.
For more information on synchronization server command line options, see MobiLink
Listener options for Windows devices (http://infocenter.sybase.com/help/topic/
com.sybase.help.sqlanywhere.12.0.1/mlsisync/ms-listener-s-3217696.html) in the
SQL Anywhere® 12.0.1 online help.
7. Click OK.
Messaging
Messaging is a synchronization method used to maintain data integrity on device client
applications. It uses a JMS service to upload and download data changes to and from the
Unwired Server cache database. Messaging-based synchronization ports implement a
strongly encrypted HTTP-based protocol using a proprietary method.
Configure messaging in the Messaging tab of the Server Configuration node for the particular
server you are administering.
See also
• Configuring Management Port Properties on page 42
• Replication on page 42
• Configuring a Client Dispatcher on page 47
• Upgrade: Configuring Data Change Notification Components on page 47
• Configuring Cluster Performance Properties on page 48
• Configuring SSL Properties on page 49
• Configuring Web Container Properties on page 54
• Configuring the Configuration Cache on page 56
• Configuring SAP Solution Manager URL on page 57
• Configuring Server Log Settings on page 57
Configuring Messaging Properties
Configure a port to receive service requests from devices.
1. In the left navigation pane, select Configuration.
2. In the right administration pane, click the General tab.
3. From the menu bar, select Components.
4. Select Messaging, then click Properties.
5. Enter the synchronization port number. The default is 5001.
6. (Optional) Configure the BES response portioning value.
There are limits on the amount of data that can be downloaded through an HTTP
connection using the BlackBerry MDS. The BES response portioning limit determines the
amount of HTTP traffic the BES MDS server accepts from Unwired Server. For
46
Sybase Unwired Platform
Administer
BlackBerry MDS, this limit is set in BlackBerry Manager using the Maximum KB/
Connection setting.
7. Click OK.
Configuring a Client Dispatcher
Configure the dispatcher for Sybase Unwired Platform client traffic.
1. In the left navigation pane, select Configuration.
2. In the right administration pane, click the General tab.
3. From the menu bar, select Components.
4. Select Client Dispatcher and click Properties.
5. Configure the thread count for the messaging client dispatcher.
6. Configure the maximum number of messaging client dispatcher connections allowed per
host configuration.
7. Click OK.
See also
• Configuring Management Port Properties on page 42
• Replication on page 42
• Messaging on page 46
• Upgrade: Configuring Data Change Notification Components on page 47
• Configuring Cluster Performance Properties on page 48
• Configuring SSL Properties on page 49
• Configuring Web Container Properties on page 54
• Configuring the Configuration Cache on page 56
• Configuring SAP Solution Manager URL on page 57
• Configuring Server Log Settings on page 57
Upgrade: Configuring Data Change Notification Components
Configure the behavior of Data Change Notification (DCN) components in the cluster. You
can configure DCN to accept HTTP GET and POST requests to support applications
developed with versions previous to Unwired Platform 2.2. By default, the current version of
Unwired Server only accepts HTTP POST requests for DCN.
1. In the left navigation pane, select Configuration.
2. In the right administration pane, click the General tab.
3. From the menu bar, select Components.
4. If you want Unwired Server to be backward compatible with DCN code written previous to
version 2.2., select Data Change Notification and click Properties.
5. Select the Enable HTTP GET method text box.
Sybase Control Center for Sybase Unwired Platform
47
Administer
By setting this property, developers do not need to update the code of existing applications.
See also
• Configuring Management Port Properties on page 42
• Replication on page 42
• Messaging on page 46
• Configuring a Client Dispatcher on page 47
• Configuring Cluster Performance Properties on page 48
• Configuring SSL Properties on page 49
• Configuring Web Container Properties on page 54
• Configuring the Configuration Cache on page 56
• Configuring SAP Solution Manager URL on page 57
• Configuring Server Log Settings on page 57
Configuring Cluster Performance Properties
To optimize Unwired Server performance across the cluster, configure the thread count and
pool size, web service connection counts and timeout, inbound and outbound messaging
queue counts, and proxy connection pool and synchronization cache size.
1. In the left navigation pane, select Configuration.
2. In the right administration pane, click the General tab.
3. From the menu bar, select Performance.
4. Configure these properties, as required:
•
•
•
•
•
•
48
Inbound messaging queue count – number of message queues used for incoming
messages from the messaging-based synchronization application to the server. Sybase
recommends you choose a value that represents at least 10% of active devices.
Maximum count of total webservice connections – maximum number of web service
connections allowed overall.
Maximum count of webservice connections per host – maximum number of web
service connections allowed per host configuration.
Maximum number of in memory messages – maximum allowable number of in
memory messages.
Maximum proxy connection pool size – maximum size for the replication protocol
server memory cache.
Outbound messaging queue count – number of message queues used for outbound
messages from the server to the messaging-based synchronization application. Sybase
recommends a value that represents at least 50% of active devices. However, if you are
running 32-bit operating system, do not exceed a value of 100% of active devices.
Sybase Unwired Platform
Administer
•
•
•
•
Subscribe bulk load thread pool size – maximum number of threads allocated to initial
bulk load subscription operations. The default value is 5 Setting the thread pool size too
high can impact performance.
Synchronization cache size – maximum size for the replication protocol server
memory cache.
Thread count – MobiLink thread count. This value should be lower than the thread
count for the SQL Anywhere database.
Webservice connection timeout – length of time, in seconds, until a web service
connection is established. A value of 0 (zero) means no timeout.
5. Click Save.
See also
• Configuring Management Port Properties on page 42
• Replication on page 42
• Messaging on page 46
• Configuring a Client Dispatcher on page 47
• Upgrade: Configuring Data Change Notification Components on page 47
• Configuring SSL Properties on page 49
• Configuring Web Container Properties on page 54
• Configuring the Configuration Cache on page 56
• Configuring SAP Solution Manager URL on page 57
• Configuring Server Log Settings on page 57
Configuring SSL Properties
Configure SSL certificates and security profiles to facilitate Secure Sockets Layer (SSL)
encryption for communication ports in Unwired Server.
Prerequisites
Ensure you have set up the server environment before you configure a security profile as part
of the server configuration. For more information, see Encrypting Synchronization with SSL
for Replication in the Security guide.
Task
1. Defining Certificates for SSL Encryption
Specify keystore and truststore certificates to be used for SSL encryption of Unwired
Server communication ports. All security profiles use the same keystore and truststore.
2. Creating an SSL Security Profile in Sybase Control Center
Security profiles define the security characteristics of a client/server session. Assign a
security profile to a listener, which is configured as a port that accepts client connection
requests of various protocols. Unwired Server uses multiple listeners. Clients that support
Sybase Control Center for Sybase Unwired Platform
49
Administer
the same characteristics can communicate to Unwired Server via the same port defined in
the listener.
3. Enabling OCSP
(Optional) Enable OCSP (Online Certificate Status Protocol) to determine the status of a
certificate used to authenticate a subject: current, expired, or unknown. OCSP
configuration is enabled as part of cluster level SSL configuration. OCSP checking must
be enabled if you are using the CertificateAuthenticationLoginModule and have set
Enable revocation checking to true.
See also
• Configuring Management Port Properties on page 42
• Replication on page 42
• Messaging on page 46
• Configuring a Client Dispatcher on page 47
• Upgrade: Configuring Data Change Notification Components on page 47
• Configuring Cluster Performance Properties on page 48
• Configuring Web Container Properties on page 54
• Configuring the Configuration Cache on page 56
• Configuring SAP Solution Manager URL on page 57
• Configuring Server Log Settings on page 57
Defining Certificates for SSL Encryption
Specify keystore and truststore certificates to be used for SSL encryption of Unwired Server
communication ports. All security profiles use the same keystore and truststore.
1. In the left navigation pane, select Configuration
2. In the right administration pane, select the General tab.
3. From the menu bar, select SSL Configuration.
4. To configure SSL encryption for all security profiles, complete these fields:
• Keystore Location – the relative path name indicating the location where the keys and
certificates are stored. Certificates used for administration and data change notification
ports are stored in the keystore. The path should be relative to <Unwired
Platform_InstallDir>\UnwiredPlatform\Servers
\UnwiredServer.
• Keystore Password – the password that secures the key store.
• Truststore Location – therelative path name for the public key certificate storage file.
The Certificate Authority (CA) certificates used to sign certificates store their public
keys in the truststore. The path should be relative to <Unwired
Platform_InstallDir>\UnwiredPlatform\Servers
\UnwiredServer.
50
Sybase Unwired Platform
Administer
•
Truststore Password – the password that secures the truststore.
Note: If at any point you have changed the password for the keystore and truststore with
keytool, then you must remember to update the password here as well. The password must
be used with all aliases as well. To update the alias, use a command similar to this one:
keytool -keypasswd -alias sample1 -keypass changeit -new
changeit2 -keystore keystore.jks
keytool -keypasswd -alias sample2 -keypass changeit -new
changeit2 -keystore keystore.jks
5. Click Save.
Next
Create an SSL security profile that uses the selected certificates.
Creating an SSL Security Profile in Sybase Control Center
Security profiles define the security characteristics of a client/server session. Assign a security
profile to a listener, which is configured as a port that accepts client connection requests of
various protocols. Unwired Server uses multiple listeners. Clients that support the same
characteristics can communicate to Unwired Server via the same port defined in the listener.
Note: A security profile can be used by one or more servers in a cluster, but cannot used by
multiple clusters.
1. In the left navigation pane, select Configuration
2. In the right administration pane, select the General tab.
3. From the menu bar, select SSL Configuration.
4. In the Configure security profile table:
a) Enter a name for the security profile.
b) Enter a certificate alias. This is the alias of a key entry in the keystore. Make sure the
key password of this key entry is the same as the keystore password.
c) Select an authentication level:
If the security profile authenticates only the server, then only the server must provide a
certificate to be accepted or rejected by the client. If the security profile authenticates
both the client and the server, then the client is also required to authenticate using a
certificate; both the client and server will provide a digital certificate to be accepted or
rejected by the other.
Sybase Control Center for Sybase Unwired Platform
51
Administer
Profile
Authenticates
Cipher suite(s)
intl
server
•
•
intl_mutual
client/server
•
•
RSA_EXPORT_WITH_RC4_40_MD5
RSA_EXPORT_WITH_DES40_CBC_S
HA
simple
server
RSA_WITH_NULL_MD5
RSA_WITH_NULL_SHA
simple_mutual
client/server
RSA_WITH_NULL_MD5
RSA_WITH_NULL_SHA
strong
server
•
•
•
strong_mutual
client/server
For example, this is
the required option
for mutual authentication of Unwired
Platform and Gateway.
domestic
server
•
•
•
•
•
•
•
•
•
•
•
52
SA_EXPORT_WITH_RC4_40_MD5
RSA_EXPORT_WITH_DES40_CBC_S
HA
RSA_WITH_3DES_EDE_CBC
_SHA
RSA_WITH_RC4_128_MD5
RSA_WITH_RC4_128_SHA
RSA_WITH_3DES_EDE_CBC
_SHA
RSA_WITH_RC4_128_MD5
RSA_WITH_RC4_128_SHA
RSA_WITH_3DES_EDE_CBC
_SHA
RSA_WITH_RC4_128_MD5
RSA_WITH_RC4_128_SHA
RSA_WITH_DES_CBC_SHA
RSA_EXPORT_WITH_RC4_40_MD5
RSA_EXPORT_WITH_DES40_CBC_S
HA
TLS_RSA_WITH_NULL_MD
5
TLS_RSA_WITH_NULL_SHA
Sybase Unwired Platform
Administer
Profile
Authenticates
Cipher suite(s)
domestic_mutual
client/server
•
•
•
•
•
•
•
•
RSA_WITH_3DES_EDE_CBC
_SHA
RSA_WITH_RC4_128_MD5
RSA_WITH_RC4_128_SHA
RSA_WITH_DES_CBC_SHA
RSA_EXPORT_WITH_RC4_40_MD5
RSA_EXPORT_WITH_DES40_CBC_S
HA
RSA_WITH_NULL_MD5
RSA_WITH_NULL_SHA
5. Click Save.
6. From the Components menu, assign the security profile to the desired management or
communication ports.
Enabling OCSP
(Optional) Enable OCSP (Online Certificate Status Protocol) to determine the status of a
certificate used to authenticate a subject: current, expired, or unknown. OCSP configuration is
enabled as part of cluster level SSL configuration. OCSP checking must be enabled if you are
using the CertificateAuthenticationLoginModule and have set Enable revocation checking to
true.
Enable OCSP for a cluster when configuring SSL.
1. In the left navigation pane, select Configuration.
2. In the right administration pane, select the General tab.
3. From the menu bar, select SSL Configuration.
4. To enable OCSP when doing certificate revocation checking, check Enable OCSP.
5. Configure the responder properties (location and certificate information):
Responder Property
Details
URL
A URL to responder, including its port.
For example, https://ocsp.example.net:80.
Sybase Control Center for Sybase Unwired Platform
53
Administer
Responder Property
Details
Certificate subject name
The subject name of the responder's certificate.
By default, the certificate of the OCSP responder is that of the issuer of the certificate
being validated.
Its value is a string distinguished name (defined
in RFC 2253), which identifies a certificate in
the set of certificates supplied during cert path
validation.
If the subject name alone is not sufficient to
uniquely identify the certificate, the subject
value and serial number properties must be used
instead.
When the certificate subject name is set, the
certificate issuer name and certificate serial
number are ignored.
For example, CN=MyEnterprise,
O=XYZCorp.
Certificate issuer name
The issuer name of the responder certificate.
For example, CN=OCSP Responder,
O=XYZCorp.
Certificate serial number
The serial number of the responder certificate.
Configuring Web Container Properties
Configure and tune HTTP ports and some general properties.
1. In the left navigation pane, select Configuration.
2. In the right administration pane, click the Web Container tab.
3. Configure the following web server properties, as required:
•
•
Max form content size – amount of data that can post back from a browser or other
client to the server. The default is 10000000 (10MB), with a maximum of 100000000
(100MB).
Perform server side compression – enables HTTP compression in a production
environment when client demand becomes high and affects server performance for
ODP applications.
Note: If you enable server compression, notify developers that client behavior must
accommodate compression: namely, the client needs to use the Encoding parameter for
HTTP headers and set the value to GZIP Information is available on the Internet if
54
Sybase Unwired Platform
Administer
more information is required. See ODPRequest class in Developer Guide: OData
SDK.
4. To create a new HTTP/HTTPS port, click New.
5. Configure the port properties, as required:
•
•
•
•
•
•
•
•
•
•
•
•
•
•
•
•
Port – port number where the server listens for requests.
Enabled – whether the port is enabled.
Protocol – communication protocol. When Protocol is set to https, the Security
Profile drop down is displayed to allow selection of a security profile.
Maximum threads – maximum number of active threads that the server allows for this
listener. This value must be less than or equal to the allowed number of connections.
Maximum idle time – the length of time, in seconds, that a socket is idle before it
disconnects.
So linger time(s) – the length of time, in seconds, that a socket lingers before it
disconnects to enable a graceful shutdown.
Acceptors number – number of acceptor threads to be run.
Acceptor priority – priority of the acceptor threads relative to the other threads. The
priority is adjusted by the value you enter here (the default 0) to either favor the
acceptance of new threads and newly active connections, or to favor the handling of
already dispatched connections.
Response buffer size (k) – size of the content buffer for sending responses. These
buffers are used only for active connections that are sending responses with bodies that
do not fit within the header buffer.
Request buffer size (k) – size of the content buffer for receiving requests. These buffers
are used only for active connections that have requests with bodies that do not fit within
the header buffer.
Header buffer size (k) – size of the buffer to be used for request and response headers.
An idle connection has a maximum of one buffer of this size allocated.
Listen backlog – maximum backlog for incoming connections.
Statistics on – enables statistics collection on connections.
Low resources connections – number of connections, which if exceeded, places this
connector in a low resources state. This is not an exact measure, as the connection
count is averaged over the select sets. When in a low resources state, different idle
timeouts can apply on connections as specified in the low resources maximum idle
time property.
Low resources maximum idle time(s) – period, in milliseconds, that a connection is
allowed to be idle when there are more connections than the number set for the low
resources connections property. This allows the server to rapidly close idle
connections to gracefully handle high load situations.
Include server info in session – includes the server's IP address and port in the HTTP
session ID. This is required when using the Web redirectors for load balancing to
ensure sticky sessions.
Sybase Control Center for Sybase Unwired Platform
55
Administer
6. Click OK.
7. Click Save.
See also
• Configuring Management Port Properties on page 42
• Replication on page 42
• Messaging on page 46
• Configuring a Client Dispatcher on page 47
• Upgrade: Configuring Data Change Notification Components on page 47
• Configuring Cluster Performance Properties on page 48
• Configuring SSL Properties on page 49
• Configuring the Configuration Cache on page 56
• Configuring SAP Solution Manager URL on page 57
• Configuring Server Log Settings on page 57
Configuring the Configuration Cache
Use the configuration cache to configure the distributed memory used by all cluster nodes.
1. In the left navigation pane, select Configuration.
2. In the right administration pane, click the Configuration Cache tab.
3. Configure these properties, as required:
•
•
•
•
•
•
Auto increase port number – set to true to increment the cache port number.
Core pool size – core number of threads for the executor service.
Encrypt configuration cache network – set to true to encrypt data at the transport layer.
Keep alive time(s) – length of time, in seconds, that threads can remain idle before
being terminated.
Maximum pool size – maximum allowed number of threads for the executor service.
Port – port number for the configuration cache.
4. Click Save.
See also
• Configuring Management Port Properties on page 42
• Replication on page 42
• Messaging on page 46
• Configuring a Client Dispatcher on page 47
• Upgrade: Configuring Data Change Notification Components on page 47
• Configuring Cluster Performance Properties on page 48
• Configuring SSL Properties on page 49
• Configuring Web Container Properties on page 54
56
Sybase Unwired Platform
Administer
•
•
Configuring SAP Solution Manager URL on page 57
Configuring Server Log Settings on page 57
Configuring SAP Solution Manager URL
The Admistrator can define and maintain a URL definition associated with an SAP Solution
Manager instance for each application in the landscape. This endpoint is used to upload the
business transaction XML generated by the client device platforms in an end-to-end trace
session.
1. In the left navigation pane, select Configuration.
2. In the right administration pane, click the General tab.
3. From the menu bar, select Components.
4. Select Solution Manager and click Properties.
5. In the Solution Manager Component Property dialog, enter the URL associated with the
appropriate SAP Solution manager.
See also
• Configuring Management Port Properties on page 42
• Replication on page 42
• Messaging on page 46
• Configuring a Client Dispatcher on page 47
• Upgrade: Configuring Data Change Notification Components on page 47
• Configuring Cluster Performance Properties on page 48
• Configuring SSL Properties on page 49
• Configuring Web Container Properties on page 54
• Configuring the Configuration Cache on page 56
• Configuring Server Log Settings on page 57
Configuring Server Log Settings
Server logs collect data that enables you to monitor system health. Configure the server log
settings to specify the amount of detail that is written to the log.
See also
• Configuring Management Port Properties on page 42
• Replication on page 42
• Messaging on page 46
• Configuring a Client Dispatcher on page 47
• Upgrade: Configuring Data Change Notification Components on page 47
• Configuring Cluster Performance Properties on page 48
• Configuring SSL Properties on page 49
Sybase Control Center for Sybase Unwired Platform
57
Administer
•
•
•
Configuring Web Container Properties on page 54
Configuring the Configuration Cache on page 56
Configuring SAP Solution Manager URL on page 57
Configuring Unwired Server Log Settings
Unwired Server logs collect data on Unwired Server health and performance by component.
Configure Unwired Server log properties to specify the amount of detail that is written to the
log, as well as the duration of the server log life cycle.
Additionally, you should always use Sybase Control Center to configure server logs. If you
manually edit the configuration file, especially on secondary servers in a cluster, the servers
may not restart correctly once shut down.
1. In the Sybase Control Center left navigation pane, click Configuration.
2. In the right administration pane, click the Log Setting tab and select Unwired Server..
3. The option "Start a new server log on server restart" is set by default. When selected, this
option means a new version of the log file is created after server restart, and the old one is
archived.
4. Set the MMS server log size and backup behavior that jointly determine the server log life
cycle.
a) Set the Maximum file size, in kilobytes, megabytes, or gigabytes, to specify the
maximum size that a file can reach before a new one is created. The default is 10MB.
Alternatively, select No limit to log all events in the same file, with no maximum size.
b) Set the Maximum backup index to determine how many log files are backed up
before the oldest file is deleted. The index number you choose must be a positive
integer between 1 and 65535. The default is 10 files.
Alternatively, select No limit to retain all log files.
5. Set the HTTP log settings.
a) Select Enable HTTP request log to generate an HTTP request log in the logs
subdirectory. The generated log file name is server-name-http.log.
b)
c)
d)
e)
Note: HTTP logging is off by default. Enabling HTTP logging can cause a
performance impact and possible logging of sensitive data.
Set the Maximum file size of the log file.
If you want to back up the log file when it reaches the limit, select Perform rotation.
The backup file is saved as server-name-http.log.backup-number.
If you want to continue to use the current log file when the server restarts, select
Reuse.If you do not select this option, when the server restarts the current log file is
copied to the .\old subdirectory and a new log file is created.
If you want to archive the log file select Archive, then specify the Archive file name. If
you want to compress the archive log file select Compress.
6. For each component, choose a log level:
58
Sybase Unwired Platform
Administer
Component
Default Log Level
MMS
Info
PROXY
Info
Cluster
Info
MSG
Info
Security
Info
PUSH
Info
Mobilink
Info
DataServices
Info
Other
Warn
DOEC
Info
Log level Messages logged
All
Complete system information
Trace
Finer-grained informational events than debug
Debug
Very fine-grained system information, warnings, and all errors
Info
General system information, warnings, and all errors
Warn
Warnings and all errors
Error
Errors only
Console
Messages that appear in the administration console only (when Unwired
Server is running in non-service mode)
Off
Do not record any messages
7. Click Save.
Log messages are recorded as specified by the settings you choose. The log file is located
in: <UnwiredPlatform_InstallDir>\UnwiredPlatform\Servers
\UnwiredServer\logs\<hostname>-server.log.
Log life cycle default example
If you keep the default maximum file size and default index, an Unwired Server writes to the
log file until 10MB of data has been recorded. As soon as the file exceeds this value, a new
version of the log file is created (for example, the first one is <hostname>-server.log.
1). The contents of the original log are backed up into this new file. When the <hostname>server.log file again reaches its limit:
Sybase Control Center for Sybase Unwired Platform
59
Administer
1. The contents of <hostname>-server.log.1 are copied to <hostname>server.log.2.
2. The contents of <hostname>-server.log are copied to <hostname>server.log.1.
3. A new copy of <hostname>-server.log is created.
This rollover pattern continues until the backup index value is reached, with the oldest log
being deleted. If the backup index is 10, then <hostname>-server.log.10 is the file
removed, and all other logs roll up to create room for the new file.
Configuring Messaging Server Log Settings
Messaging Server logs create trace configurations for messaging modules, and retrieve trace
data for all or specific messages. Configure trace configuration properties for modules to
specify the amount of detail that is written to the log. You can configure trace settings for the
primary server cluster in Sybase Control Center for each module. The settings are available to
cluster servers through the shared data folder.
Note: The default settings may only need to change in case of technical support situations
where, for diagnostic reasons, a request is made to configure the specific module(s) settings,
and provide the request log. In all other cases, the administrator or developer should not need
to change the settings.
Additionally, you should always use Sybase Control Center to configure server logs. If you
manually edit the configuration file, especially on secondary servers in a cluster, the servers
may not restart correctly once shut down.
1. In the Sybase Control Center left navigation pane, click Configuration.
2. In the right administration pane, click the Log Setting tab and select Messaging
Server.
3. Select Default, or one or more of the messaging service modules. Click Show All to show
all modules.
60
Module
Description
Default
Represents the default configuration. The default values are used if optional fields are left
blank in a module trace configuration. Required.
Device Management
Miscellaneous functions related to device registration, event notification, and device administration. Enable tracing for problems in these
areas.
Sybase Unwired Platform
Administer
Module
Description
JMSBridge
This module handles communications from the
Unwired Server to the messaging server. Enable tracing to view the detailed messaging exchange.
MO
This module handles the delivery of messages
between the client and server, including synchronous function calls from client to server.
Enable tracing for MO errors and message delivery issues.
SUPBridge
This module handles communications from the
messaging server to the Unwired Server. Enable tracing to view the detailed messaging exchange.
TM
This module handles the wire protocol, including encryption, compression, and authentication, between the messaging server and clients.
All communication between the client and the
messaging server passes through TM. Enable
tracing for authentication issues, TM errors,
and general connectivity issues.
WorkflowClient
The WorkflowClient module.
4. Click Properties.
a) Enter trace configuration properties. If you selected multiple modules, a string of
asterisks is used to indicate settings differ for the selected modules. You can select the
option to view or change the property value for any module.
Property
Description
Module
Display only. Default, module name, or list of
module names selected.
Description
(Optional) Custom description of the server
module.
Level
Trace level for the module - DISABLED,
ERROR, WARN, INFO, DEBUG, DEFAULT. If the default trace level is specified
for the module, the module uses the trace
level defined for Default. Required.
Max trace file size
(Optional) Maximum trace file size in MB. If
the trace file size grows larger than the specified value, the trace file data is backed up
automatically.
Sybase Control Center for Sybase Unwired Platform
61
Administer
Property
Description
User name
(Optional) Only data for the specified user
name is traced.
Application Connection ID
(Optional) Only data for the specified Application ID is traced.
b) Click OK.
Log files for each module are stored in folders of the same name located in:
<UnwiredPlatform_InstallDir>\UnwiredPlatform\Servers
\UnwiredServer\logs.
Configuring Asynchronous Operation Replay Queue Count
Configure properties of a cluster to control whether asynchronous operation replays are
enabled for all cluster packages.
1. In Sybase Control Center navigation pane, click the name of the cluster.
2. In the administration view, click General.
3. Configure the queue limit for asynchronous operation replays in Asynchronous
operation replay queue count. The minimum acceptable queue count is 1 and the default
is 5.
See also
• Viewing Asynchronous Operation Replays on page 296
Viewing Cluster Information
View cluster information to determine the name and size of the cluster.
1. In Sybase Control Center navigation pane, click the name of the cluster.
2. Review information for general properties:
•
•
•
•
•
The name of the cluster. By default the cluster name is mysupcluster.
The number of servers that are members of the cluster.
The name of servers that have outbound enablers configured.
The cluster sync data shared path, if enabled.
The asynchronous operation replay queue count. See Configuring Asynchronous
Operation Replay Queue Count.
See also
• Viewing Asynchronous Operation Replays on page 296
62
Sybase Unwired Platform
Administer
Checking System Licensing Information
Review licensing information to monitor available and used device licenses, license expiry
dates, and other license details. This information allows administrators to manage license use
and determine whether old or unused device licenses should be transferred to new devices.
1. In the left navigation pane, select the top-level tree node.
2. In the right administration pane, select the General tab, and click Licensing.
3. Review the following licensing information:
•
•
•
•
•
•
•
•
Server license type – the type of license currently used by Unwired Platform. For more
information on license types, see Sybase Unwired Platform Licenses in System
Administration.
Production edition – the edition of the software you have installed.
Server license expiry date – the date and time at which the server license expires. When
a server license expires, Unwired Server generates a license expired error and Unwired
Server is stopped.
Overdraft mode – allows you to generate additional licenses in excess of the quantity of
licenses you actually purchased. This enables you to exceed your purchased quantity
of licenses in a peak usage period without impacting your operation. This mode is
either enabled or disabled, as specified by the terms of the agreement presented when
you obtain such a license.
Total device license count – the total number of device licenses available with your
license. This count limits how many devices can connect to your servers. See Sybase
Unwired Platform Licenses topics in System Administration for licensing
information.
Used device license count – the total number of unique devices associated with the
users currently registered with the server. If all of your available device licenses are in
use, you can either upgrade your license or manually delete unused devices to make
room for new users:
• For workflow and Online Data Proxy client devices, delete the Application
Connections that are no longer in use.
• For native replication-based applications, delete Package Users on the respective
Package.
• For native messaging-based applications, delete the Application Connections
associated with the clients not in use.
See System Administration for licensing information.
Device license expiry date – the date and time at which the device license expires.
When a device license expires, Unwired Server generates a license expired error and
connection requests from registered devices are unsuccessful.
Used mobile user license count – the number of mobile user licenses currently in use. A
mobile user is a distinct user identity—username and associated security configuration
Sybase Control Center for Sybase Unwired Platform
63
Administer
•
—that is registered in the server. As such, the used mobile user license count represents
the total distinct user identities registered on the server. One mobile user may access:
• Multiple applications and different versions of the same application.
• The same or different versions of an application from multiple devices.
Used application user license count – the number of all registered application users of
all applications. This value represents the cumulative total of the distinct user identities
registered for each application. The same user identity using:
• Multiple versions of the same application counts as one application user.
• Two different applications count as two application users.
4. Click Close.
Note: Unwired Platform licensing is configured during installation. However, if necessary,
license details can be changed at a later time. See Manually Updating and Upgrading License
Files in System Administration.
Checking Cluster Status
Verify that a cluster is running.
In the left navigation pane, check the status (in brackets) beside the cluster name.
Sharing Cluster Information With SAP Servers
If your Unwired Platform deployment is part of a larger SAP® landscape, review the SLD
servers with which cluster information can be shared.
To share cluster information requires one of these SAP servers. Depending on the server type,
you must either register the server, or export information to it.
SLD Server Registration
System Landscape Directory (SLD) is a central repository of system landscape information
used to manage the software lifecycle.
SLD describes the systems and software components that are currently installed. SLD data
suppliers register the systems on the SLD server, and keep the information up-to-date. Sybase
Unwired Platform is a third-party system that must be registered with SLD.
To prepare the SLD server environment for Unwired Platform, ensure the following prerequisites:
•
•
•
64
The installed version of SLD is for SAP NetWeaver 7.0 (2004s) SPS07 or higher.
The SLD server is running.
The SLD is configured to receive data. For more information, see the Post-Installation
Guide and the User Manual for your SAP NetWeaver version on SDN: http://
www.sdn.sap.com/irj/sdn/nw-sld.
Sybase Unwired Platform
Administer
•
•
You contact the SLD administrator and determine the connection values to the SLD server,
including its host name, protocol (HTTP or HTTPS), HTTP(S) port and the SLD user
account.
The SLD to which you register Sybase Unwired Platform must be the latest Common
Information Model version (currently 1.6.30).
Registering or Reregistering SLD Server Destinations
Registering an SLD destination identifies the connection properties needed to deliver the
payload. You can register multiple destinations as required by your SAP environment. If your
SLD server properties change, you must update properties as required and reregister the server
with new values.
For information about SLD, see Configuring, Working with and Administering System
Landscape Directory on http://www.sdn.sap.com/irj/sdn/nw-sld.
1. In the navigation pane of Sybase Control Center, select the cluster name.
2. In the administration pane, click the System Landscape Directory tab.
3. Click Servers.
4. Choose one of the following:
•
•
If you are creating a new destination, click New.
If you are updating an existing destination, select the destination name in the table, and
click Properties.
Configure
the connection properties:
5.
User Name
User name for the SLD server.
Password and
Repeat
Password
The user account password used to authenticate the user name
entered. Password and Repeat Password must match for the
password to be accepted.
Host
The host name or the IP address of the SLD server.
Port
The HTTP(S) port on which the SLD server is running. Enter a
valid port number in the range of 0-65535.
Use secure
Select if you are using HTTPS protocol.
6. To validate the configuration, click Ping.
7. To accept validated configuration properties, click OK.
This registers the SLD destination.
Sybase Control Center for Sybase Unwired Platform
65
Administer
Deleting a Registered SLD Server Destination
Delete an SLD server to unregister it from Unwired Platform. Deleting an SLD server removes
it from Sybase Control Center and you can no longer use it as a payload destination.
1. In the navigation pane of Sybase Control Center, click the cluster name.
2. In the administration pane, click the System Landscape Directory tab.
3. Click Servers.
4. Select one or more servers then click Delete.
5. In the confirmation dialog, click Yes.
Uploading Payloads with Sybase Control Center
Use Sybase Control Center to register the SLD server, and then either upload generated
payloads on-demand or with a configured (and enabled) schedule.
1. Manually Uploading or Exporting Payloads On-Demand
Run an SLD payload generation task manually to generate and upload a payload on
demand. Alternatively, export the payload to an XML file to archive SLD payload contents
or to troubleshoot the cluster.
2. Configuring and Enabling Scheduled Payload Generation and Uploads
Configure a schedule to automatically generate a new payload that uploads to an SLD
server once cluster information is aggregated from all cluster members. For information
on how cluster information is aggregated and held, see SLD and Unwired Platform
Architecture in System Administration.
Manually Uploading or Exporting Payloads On-Demand
Run an SLD payload generation task manually to generate and upload a payload on demand.
Alternatively, export the payload to an XML file to archive SLD payload contents or to
troubleshoot the cluster.
1. In the navigation pane of Sybase Control Center, select the name of the cluster for which
you want to immediately upload an SLD payload.
2. In the administration pane, click the System Landscape Directory tab.
3. From the menu bar of the System Landscape Directory page, click Schedule.
4. Click Run Now.
The payload generation process begins.
5. Upon completion, review the contents of the payload and choose an action:
•
•
66
To export and save the contents to a file as XML, click Save to File and choose your file
output name and location.
To upload the contents, select the target SLD servers and click Finish.
Sybase Unwired Platform
Administer
Configuring and Enabling Scheduled Payload Generation and Uploads
Configure a schedule to automatically generate a new payload that uploads to an SLD server
once cluster information is aggregated from all cluster members. For information on how
cluster information is aggregated and held, see SLD and Unwired Platform Architecture in
System Administration.
1. In the navigation pane of Sybase Control Center, select the name of the cluster for which
you want to schedule an SLD payload upload.
2. From the menu bar of the System Landscape Directory page, click Schedule.
3. To edit an existing schedule for a selected SLD server, click Edit.
a) Configure the schedule:
• Schedule repeat – select how often the schedule should run. Options are monthly,
weekly, daily, hourly, and custom.
• If you select monthly or weekly, specify:
• Start date – select the date and time the automated upload should begin.
Use the calendar picker and 24-hour time selector.
• End date – select the date and time the automated upload should end.
• If you select daily or hourly, specify:
• Start date – select the date and time the automated upload should begin.
Use the calendar picker and 24-hour time selector.
• End date – select the date and time the automated upload should end.
• Days of the week – select each day the automated upload schedule should
run.
• Select custom, to specify the interval granularity in seconds, minutes, or hours,
as well as other date and time parameters.
b) Click OK.
4. To enable the schedule, click Enable.
Disabling a Schedule
You can disable a schedule that is currently enabled. Disabling a schedule prevents the
payload generation process from running so that no new data is aggregated in the cluster
database, nor can any current data be uploaded.
1. In the navigation pane of Sybase Control Center, click the cluster name.
2. From the menu bar of the System Landscape Directory page, click Schedule.
3. Click Disable.
Audit Measurement for SAP License Audit
For SAP built applications, administrators can generate an XML file that contains usage audit
data that is then sent manually to SAP License Audit. The generated XML file is compatible
with the License Audit infrastructure. The audit data in the file includes counts of application
Sybase Control Center for Sybase Unwired Platform
67
Administer
users for the entire cluster as well as for each SAP built application that is deployed to the
Sybase Unwired Platform cluster.
Use Sybase Control Center for Unwired Platform to generate an audit measurement XML file
for export to SAP License Audit. See Sharing Application Data with SAP License Audit,
Generating the SAP Audit Measurement File, and Uploading the SAP Audit Measurement
File. Also see SAP License Audit in Developer Guide: Unwired Server Runtime >
Management API.
Sharing Application Data with SAP License Audit
Generate an audit measurement file that includes usage data for Sybase Unwired Platform and
usage data for SAP applications deployed to the server.
Generate an audit measurement file that includes license data related to application usage.
1. Generating the SAP Audit Measurement File
Use Sybase Control Center to generate an audit measurement file.
2. Uploading the SAP Audit Measurement File
Upload the audit measurement file to SAP License Audit by sending the file to SAP.
Generating the SAP Audit Measurement File
Use Sybase Control Center to generate an audit measurement file.
Using Sybase Control Center, generate a audit measurement file that can be sent to SAP for
uploading to SAP License Audit.
1. In Sybase Control Center, select the Unwired Platform cluster and click the General tab.
2. Click SAP Auditing Export.
3. In the Export SAP Auditing Measurement window, enter the user name and click Next.
4. After Sybase Control Center generates the file, click Finish.
5. Select a save location for the file and click Save.
Note: For information on uploading the audit measurement file to SAP License Audit, see
supporting SAP documentation at https://websmp108.sap-ag.de/licenseauditing. Also see
Uploading the SAP Audit Measurement File.
Uploading the SAP Audit Measurement File
Upload the audit measurement file to SAP License Audit by sending the file to SAP.
To upload the file to SAP License Audit, send the audit measurement file to SAP using the
email address included in the measurement request from SAP. Included in this SAP-provided
email is a link to the documentation for the SAP measurement process. See supporting SAP
documentation at https://websmp108.sap-ag.de/licenseauditing .
68
Sybase Unwired Platform
Administer
Relay Server
Relay Server acts as a reverse proxy for client devices communicating with the Unwired
Server cluster, and it provides load balancing for the Unwired Server cluster.
Relay Servers are deployed on the DMZ subnet. With a corresponding Outbound Enabler
(RSOE), Relay Server enables communication from the Unwired Server cluster to client
devices, via the Internet, without opening an inbound port on the internal firewall.
Each Unwired Server instance is supported by one or more RSOEs. Each RSOE opens
outbound connections to the Relay Server, to handle both inbound and outbound
communication channels, on behalf of the Unwired Server. Connections between the RSOE
and Relay Server use HTTPS protocol.
Relay Server also provides load balancing for the Unwired Server cluster by forwarding
requests from client devices to Unwired Servers in the cluster, by round-robin distribution.
However, in most production deployment environments, multiple Relay Servers are used with
a third-party load balancer, which provides complete load balancing and failover capability. In
this case, Relay Servers are deployed as a farm, and you need to perform additional steps at the
end of the file generation task.
You must configure Unwired Server to use Relay Server, using these high-level steps::
1. Use Sybase Control Center to configure an Unwired Server cluster with Relay Server
farms, nodes and their tokens, as needed, and with Relay Server connection information.
2. Generate the Relay Server configuration file from Sybase Control Center, and use it to
update the Relay Server configuration (manually transfer the generated file to the Relay
Server node and use rshost.exe utility to update the configuration). Refer to Adding Relay
Servers or Reverse Proxies in the Landscape Design and Integration guide, or visit http://
infocenter.sybase.com/help/index.jsp?topic=/com.sybase.help.sqlanywhere.12.0.1/
relayserver/relayserver12.html for Relay Server installation and configuration
information.
3. Set up Outbound Enablers on each Unwired Server node.
Configuring Unwired Server to use Relay Server
Choose a method for configuring Unwired Server to use Relay Server, then generate a Relay
Server configuration file. Copy the file to the Relay Server host, and distribute the same
configuration file to multiple Relay Server nodes.
This task applies only to a Relay Server installed on the LAN. It does not apply to the Sybase
Hosted Relay Service.
Note: If you are creating a custom Relay Server configuration, go to Creating a Custom Relay
Server Configuration on page 71.
Sybase Control Center for Sybase Unwired Platform
69
Administer
If you are using a quick configuration, continue with Creating a Quick Configuration on page
70.
1. Configuring Relay Server Properties
There are two methods of configuring Relay Server properties.
2. Generating the Relay Server Outbound Enabler Configuration File
To quickly and easily replicate a common outbound enabler (RSOE) configuration to
multiple hosts, generate an RSOE configuration file.
3. Generating and Modifying the Relay Server Configuration File
Generate all or part of a Relay Server configuration file. Then transfer the generated file to
all Relay Server hosts.
4. Setting Up RSOE
Set up one or more RSOEs for each Unwired Server identified in a Relay Server
configuration. The configured values are saved in the cluster database.
Configuring Relay Server Properties
There are two methods of configuring Relay Server properties.
Choose from one of these methods. Once completed, transfer the resulting configuration file
to all hosts upon which Relay Server has been installed. For installation details, see Installing a
Relay Server in Landscape Design and Integration.
See also
• Generating the Relay Server Outbound Enabler Configuration File on page 74
Creating a Quick Configuration
Create a Relay Server configuration primarily with system defaults, and create Outbound
Enabler (OE) processes for each Unwired Server.
1. In the navigation pane, click the Unwired Server cluster name.
2. In the administration pane, click the Relay Servers tab.
3. Click Quick Configure.
4. Specify these property values:
Values vary for load balanced environments. If you do not configure load balancer values,
Outbound Enablers bypass the load balancer and high availability is compromised if a
direct Relay Server connection fails.
•
•
70
Host – for Relay Server farms that use a load balancer, the host name or IP address of
the load balancer. Otherwise, the host name or IP address of a single Relay Server.
Http port – for Relay Server farms that use a load balancer, the port of the load
balancer. Otherwise, the Relay Server HTTP port.
Sybase Unwired Platform
Administer
•
•
•
•
Https port – for Relay Server farms that use a load balancer, the port of the load
balancer. Otherwise, the Relay Server HTTPS port.
URL suffix – the URL suffix used by the Outbound Enabler to connect to a Relay
Server. The value you set depends on whether Relay Server is installed on IIS or
Apache hosts. For IIS, use /ias_relay_server/server/
rs_server.dll . For Apache use/srv/iarelayserver/.
Replication or Messaging or Web Service (for scale-out nodes) farm token – the
security token used by the Outbound Enabler to authenticate its connection with the
Relay Server. Assign a token string (up to 2048 characters); one token can be shared by
all farm types. The replication and messaging farm token values can be the same.
(Optional) Description – a user-definable description of the Relay Server.
5. (Optional) Select Advanced settings and specify these property values:
•
Http user name – user name for OE authentication on the Web server (Relay Server
host).
• Http password – password for OE authentication on the Web server.
6. (Optional) Configure connection values to required Internet proxy servers:
•
•
•
•
Proxy server host – host name of the Internet proxy server.
Proxy server port – connection port on the Internet proxy server.
Http proxy user – user name for OE authentication on the Internet proxy server.
Http proxy password – password for OE authentication on the Internet proxy server.
7. Click OK to generate a Relay Server configuration file, and the OE processes for each
Unwired Server.
Properties in the [backend_farm] and [backend_server] sections are populated
automatically, based on the Unwired Server cluster name and host name.
Multiples of Outbound Enabler instances (three for each protocol configured) are
automatically created for each Unwired Server host, but they are not started.
Next
Review the values in the Relay Server configuration file, and edit if necessary.
Continue with Generating and Modifying Relay Server Configuration File on page 75.
Creating a Custom Relay Server Configuration
Create a Relay Server configuration by specifying all configuration property values.
1. Launching the Relay Server Configuration Wizard
Launch the Relay Server Configuration wizard to create a configuration file with
customized property values.
2. Setting Relay Server General Properties
Sybase Control Center for Sybase Unwired Platform
71
Administer
Set basic connection properties for the Relay Server.
3. Defining Server Farms and Cluster Nodes
Set connection properties for the Unwired Server cluster and its constituent nodes.
4. Reviewing Configured Relay Server Properties
Confirm the Relay Server property values before you generate the configuration file.
Launching the Relay Server Configuration Wizard
Launch the Relay Server Configuration wizard to create a configuration file with customized
property values.
1. In the navigation pane, click the Unwired Server cluster name.
2. In the administration pane, click the Relay Servers tab.
3. Click New.
Setting Relay Server General Properties
Set basic connection properties for the Relay Server.
Prerequisites
Launch the Relay Server configuration wizard.
Task
1. Specify property values.
Values vary for load balanced environments. If you do not configure load balancer values,
Outbound Enablers bypass the load balancer and high availability is compromised if a
direct Relay Server connection fails.
• Host – for Relay Server farms that use a load balancer, the host name or IP address of
the load balancer. Otherwise, the host name or IP address of a single Relay Server.
• Http port – for Relay Server farms that use a load balancer, the port of the load
balancer. Otherwise, the Relay Server HTTP port.
• Https port – for Relay Server farms that use a load balancer, the port of the load
balancer. Otherwise, the Relay Server HTTPS port.
For IIS, the value identifies the relative path for rs_client.dll. If your IIS
directory structure is different, modify this value accordingly.
•
72
Note: If Relay Server uses HTTPS and certificates, clients other than those using
replication-based synchronization may not be able to connect: messaging applications
support only HTTP, and Hybrid Workflow Container applications for iOS support
HTTPS, but not certificates.
URL suffix – the URL suffix used by the Outbound Enabler to connect to a Relay
Server. The value you set depends on whether Relay Server is installed on IIS or
Sybase Unwired Platform
Administer
Apache hosts. For IIS, use /ias_relay_server/server/
rs_server.dll . For Apache use/srv/iarelayserver/.
For IIS, the value identifies the relative path for rs_client.dll. If your IIS
directory structure is different, modify this value accordingly.
Note: For IIS, the value identifies the relative path for rs_client.dll. If your IIS
directory structure is different, modify this value accordingly.
Note: The value used in the client application connection for the URL suffix must
match what the administrator configures in the URL suffix. Otherwise, the connection
fails. Use the Diagnostic Tool command line utility to test these values. See Diagnostic
Tool Command Line Utility (diagtool.exe) Reference in System Administration.
• (Optional) Description – a user-definable description of the Relay Server.
2. Add or remove HTTP credentials as required:
a) Select Configure relay server HTTP credentials.
b) To add new credentials, specify these property values and click +:
•
User name – user name for RSOE authentication on the Web server (Relay Server
host).
• Password – password for RSOE authentication on the Web server.
c) To remove credentials from the list, select the corresponding user name, then click
X.
3. Click Next.
Defining Server Farms and Cluster Nodes
Set connection properties for the Unwired Server cluster and its constituent nodes.
1. Define the Unwired Server cluster.
a) Specify these property values:
• Farm ID – a string that identifies the Unwired Server cluster for which the Relay
Server manages requests. This property is case-sensitive, and must match the value
in the Outbound Enabler configuration.
• Type – the type of request managed by the Relay Server: Replication, Messaging
or Webservice protocol. When configuring Relay Server Outbound Enabler
properties for a scale-out node, you can select only the Webservice farm type.
• (Optional) Description – user-defined description for the Unwired Server cluster.
b) Click +.
c) Repeat steps 1 and 2 to add multiple Unwired Server clusters.
d) To delete a configured Unwired Server cluster, select it in the list, then click the X
button.
2. Identify each Unwired Server instance in the cluster.
a) Select an existing Unwired Server cluster.
Sybase Control Center for Sybase Unwired Platform
73
Administer
b) Specify these property values:
• Node ID – a string that identifies the Unwired Server in the cluster. This property is
case-sensitive, and it must match the value in the RSOE configuration.
• Token – the security token used by the Outbound Enabler to authenticate its
connection with the Relay Server. Assign a token string (up to 2048 characters);
one token can be shared by all farm types.
c) Click +.
d) Repeat steps 1 and 2 to add Unwired Server cluster nodes.
e) To delete a configured Unwired Server node, select it in the list and click X.
3. Click Next to review your settings, or click Finish to exit the wizard.
Note: After you exit the wizard, generate the Relay Server configuration file, and copy it to
each Relay Server instance to update configuration for multiple Relay Servers.
Reviewing Configured Relay Server Properties
Confirm the Relay Server property values before you generate the configuration file.
1. Review property values to ensure that:
•
•
No errors exist.
All Unwired Server clusters are defined, and assigned the correct type.
2. Click Finish.
The Relay Server is registered with Sybase Control Center, and it can be managed from the
Relay Servers tab for the Unwired Server cluster.
Generating the Relay Server Outbound Enabler Configuration File
To quickly and easily replicate a common outbound enabler (RSOE) configuration to multiple
hosts, generate an RSOE configuration file.
Administrators can use Sybase Control Center to configure an initial RSOE for development.
Once a configuration proves valid and stable, the administrator can generate the RSOE
configuration file, then use regRelayServer.bat to apply it to Unwired Server hosts.
1. In the navigation pane, click the Unwired Server cluster name.
2. In the administration pane, click the Relay Servers tab.
3. Click Generate.
4. Choose Outbound enabler configuration XML file, then click Next.
5. Click Finish.
6. Select an output target for the file.
See also
• Configuring Relay Server Properties on page 70
74
Sybase Unwired Platform
Administer
Generating and Modifying the Relay Server Configuration File
Generate all or part of a Relay Server configuration file. Then transfer the generated file to all
Relay Server hosts.
Generating a configuration file extracts the property values stored in the cluster database
during the configuration process, and writes them to a file. You may still need to edit this file.
1. In the navigation pane, click the Unwired Server cluster name.
2. In the administration pane, click the Relay Servers tab.
3. Click Generate.
4. Choose Relay server configuration file.
5. Select the parts of the file to generate:
•
•
•
The entire Relay Server configuration
A server node definition
A farm definition
6. Click Next, then click Finish.
7. Select an output target for the file.
8. Manually edit the file if necessary, and save the changes.
For details on other manual edits that you can perform, see the Relay Server
documentation at http://infocenter.sybase.com/help/index.jsp?topic=/
com.sybase.help.sqlanywhere.12.0.1/relayserver/relayserver12.html.
9. To configure a Relay Server farm, apply the same changes to the configurations of
remaining farm members. The configuration among all members must be identical.
Setting Up RSOE
Set up one or more RSOEs for each Unwired Server identified in a Relay Server configuration.
The configured values are saved in the cluster database.
Configuring RSOE General Properties
Set general RSOE configuration properties to define the context in which the RSOE process
operates.
1. In the navigation pane, click Servers > <ServerNode> > Server Configuration.
2. In the administration pane, select the Outbound Enabler tab, then click New.
3. Specify these property values:
• Farm type – select the type of request managed by the Relay Server: Replication,
Messaging or Webservice protocol. When configuring Relay Server Outbound
Enabler properties for a scale-out node, you can select only the Webservice farm type.
• Unwired Sever port – select the port on which RSOE manages requests.
Sybase Control Center for Sybase Unwired Platform
75
Administer
•
•
•
•
Relay Server host – for Relay Server farms that use a load balancer, the host name or
IP address of the load balancer. Otherwise, the host name or IP address of a single
Relay Server.
Relay Server port – for Relay Server farms that use a load balancer, the port of the load
balancer. Otherwise, the Relay Server HTTP or HTTPS port.
Unwired Server farm – select the string that identifies the Unwired Server cluster, for
which the Relay Server manages requests. This property is case-sensitive, and it must
match the value in the Relay Server configuration.
Server node ID – select the string that identifies the Unwired Server in the cluster. This
property is case-sensitive, and must match the value in the Relay Server configuration.
4. Click Next.
Configuring RSOE Connection Settings
Set connection configuration properties for an RSOE. These properties define the RSOE
connection to the Relay Server.
1. Specify these property values:
• Http user name – select the user name for RSOE authentication on the Web server
(Relay Server host).
• Http password – enter the password for RSOE authentication on the Web server.
2. If RSOE connections to the Relay Server must pass through an Internet proxy server,
specify these property values:
•
•
•
Proxy server – select the Internet proxy server.
Http proxy user – select the user name for RSOE authentication on the proxy server.
Http proxy password – type the password for RSOE authentication on the proxy
server.
3. Specify these property values:
• Certificate file – select this option and choose the .CRT file used to authenticate the
RSOE to Relay Server. You can choose this file only if you have already loaded it into
the Unwired Server certificate store and your Relay Server Port selection is HTTPS:
443 in General Properties.
Configuring RSOE Start Options
Configure start options for RSOE.
1. Enable an option:
a) Select the box that corresponds to each name.
b) Set a value. If you click a box and do not enter a value, the default is used.
2. Click OK.
3. Ensure the process starts by viewing the Status column of the Outbound Enablers tab.
76
Sybase Unwired Platform
Administer
Managing Configured Relay Servers
Relay Servers configured with Sybase Control Center are registered in the Unwired Server
cluster database. Administrators can view or edit configuration properties, and delete Relay
Servers in Sybase Control Center when they are displayed in the Relay Server tab.
Viewing or Editing Relay Server Properties
View or edit configuration properties for a selected Relay Server.
1. Relaunching the Relay Server Configuration Wizard
Relaunch the Relay Server Configuration wizard to create a new Relay Server
configuration file, with customized property values.
2. Setting Relay Server General Properties
Set basic connection properties for the Relay Server.
3. Defining Server Farms and Cluster Nodes
Set connection properties for the Unwired Server cluster and its constituent nodes.
4. Reviewing Configured Relay Server Properties
Confirm the Relay Server property values before you generate the configuration file.
See also
• Deleting a Relay Server Configuration on page 80
• Refreshing the Relay Server List on page 80
Relaunching the Relay Server Configuration Wizard
Relaunch the Relay Server Configuration wizard to create a new Relay Server configuration
file, with customized property values.
1. In the navigation pane, click the Unwired Server cluster name.
2. In the administration pane, click the Relay Server tab.
3. Select a Relay Server.
4. Click Properties.
Setting Relay Server General Properties
Set basic connection properties for the Relay Server.
Prerequisites
Launch the Relay Server configuration wizard.
Sybase Control Center for Sybase Unwired Platform
77
Administer
Task
1. Specify property values.
Values vary for load balanced environments. If you do not configure load balancer values,
Outbound Enablers bypass the load balancer and high availability is compromised if a
direct Relay Server connection fails.
• Host – for Relay Server farms that use a load balancer, the host name or IP address of
the load balancer. Otherwise, the host name or IP address of a single Relay Server.
• Http port – for Relay Server farms that use a load balancer, the port of the load
balancer. Otherwise, the Relay Server HTTP port.
• Https port – for Relay Server farms that use a load balancer, the port of the load
balancer. Otherwise, the Relay Server HTTPS port.
For IIS, the value identifies the relative path for rs_client.dll. If your IIS
directory structure is different, modify this value accordingly.
•
Note: If Relay Server uses HTTPS and certificates, clients other than those using
replication-based synchronization may not be able to connect: messaging applications
support only HTTP, and Hybrid Workflow Container applications for iOS support
HTTPS, but not certificates.
URL suffix – the URL suffix used by the Outbound Enabler to connect to a Relay
Server. The value you set depends on whether Relay Server is installed on IIS or
Apache hosts. For IIS, use /ias_relay_server/server/
rs_server.dll . For Apache use/srv/iarelayserver/.
For IIS, the value identifies the relative path for rs_client.dll. If your IIS
directory structure is different, modify this value accordingly.
Note: For IIS, the value identifies the relative path for rs_client.dll. If your IIS
directory structure is different, modify this value accordingly.
Note: The value used in the client application connection for the URL suffix must
match what the administrator configures in the URL suffix. Otherwise, the connection
fails. Use the Diagnostic Tool command line utility to test these values. See Diagnostic
Tool Command Line Utility (diagtool.exe) Reference in System Administration.
• (Optional) Description – a user-definable description of the Relay Server.
2. Add or remove HTTP credentials as required:
a) Select Configure relay server HTTP credentials.
b) To add new credentials, specify these property values and click +:
•
User name – user name for RSOE authentication on the Web server (Relay Server
host).
• Password – password for RSOE authentication on the Web server.
c) To remove credentials from the list, select the corresponding user name, then click
X.
78
Sybase Unwired Platform
Administer
3. Click Next.
Defining Server Farms and Cluster Nodes
Set connection properties for the Unwired Server cluster and its constituent nodes.
1. Define the Unwired Server cluster.
a) Specify these property values:
• Farm ID – a string that identifies the Unwired Server cluster for which the Relay
Server manages requests. This property is case-sensitive, and must match the value
in the Outbound Enabler configuration.
• Type – the type of request managed by the Relay Server: Replication, Messaging
or Webservice protocol. When configuring Relay Server Outbound Enabler
properties for a scale-out node, you can select only the Webservice farm type.
• (Optional) Description – user-defined description for the Unwired Server cluster.
b) Click +.
c) Repeat steps 1 and 2 to add multiple Unwired Server clusters.
d) To delete a configured Unwired Server cluster, select it in the list, then click the X
button.
2. Identify each Unwired Server instance in the cluster.
a) Select an existing Unwired Server cluster.
b) Specify these property values:
• Node ID – a string that identifies the Unwired Server in the cluster. This property is
case-sensitive, and it must match the value in the RSOE configuration.
• Token – the security token used by the Outbound Enabler to authenticate its
connection with the Relay Server. Assign a token string (up to 2048 characters);
one token can be shared by all farm types.
c) Click +.
d) Repeat steps 1 and 2 to add Unwired Server cluster nodes.
e) To delete a configured Unwired Server node, select it in the list and click X.
3. Click Next to review your settings, or click Finish to exit the wizard.
Note: After you exit the wizard, generate the Relay Server configuration file, and copy it to
each Relay Server instance to update configuration for multiple Relay Servers.
Reviewing Configured Relay Server Properties
Confirm the Relay Server property values before you generate the configuration file.
1. Review property values to ensure that:
•
•
No errors exist.
All Unwired Server clusters are defined, and assigned the correct type.
Sybase Control Center for Sybase Unwired Platform
79
Administer
2. Click Finish.
The Relay Server is registered with Sybase Control Center, and it can be managed from the
Relay Servers tab for the Unwired Server cluster.
Deleting a Relay Server Configuration
Delete a Relay Server configuration to remove all defined Unwired Server clusters, server
nodes, and RSOEs that connect to the Relay Server.
1. In the navigation pane, click the Unwired Server cluster name.
2. In the administration pane, click the Relay Server tab.
3. Select a Relay Server.
4. Click Delete.
See also
• Viewing or Editing Relay Server Properties on page 77
• Refreshing the Relay Server List on page 80
Refreshing the Relay Server List
Refresh the Relay Server list to display current information about deployed and configured
Relay Servers.
1. In the navigation pane, click the Unwired Server cluster name.
2. In the administration pane, click the Relay Server tab.
3. Select a Relay Server.
4. Click Refresh.
See also
• Viewing or Editing Relay Server Properties on page 77
• Deleting a Relay Server Configuration on page 80
Relay Server Tab Reference
Configuration property values that appear in the Relay Server tab for an Unwired Platform
cluster.
80
Column
Description
Host
for Relay Server farms that use a load balancer, the host name or
IP address of the load balancer. Otherwise, the host name or IP
address of a single Relay Server.
Sybase Unwired Platform
Administer
Column
Description
Http port
for Relay Server farms that use a load balancer, the port of the
load balancer. Otherwise, the Relay Server HTTP port.
Https port
for Relay Server farms that use a load balancer, the port of the
load balancer. Otherwise, the Relay Server HTTPS port.
URL suffix
the URL suffix used by the Outbound Enabler to connect to a
Relay Server. The value you set depends on whether Relay Server
is installed on IIS or Apache hosts. For IIS, use /ias_relay_server/server/rs_server.dll . For
Apache use/srv/iarelayserver/.
Unwired Server
The Unwired Platform runtime server is called Unwired Server. Unwired Server is an instance
of Unwired Server installed as the application server to manage resource intensive traffic/
communication/transactions, such as PUSH payload and synchronization, between the scaleout nodes and the data server cluster. Unwired Server can be installed as a cluster. In a
production environment, the Unwired Server must be installed on a 64-bit host.
There are two types of server nodes that can be installed:
•
•
Application Server node – (mandatory) runs all services.
Scale Out node – (optional) specifically designed to allow the stateless request/response
HTTP and synchronous message services to be horizontally scaled.
Unwired Server features include:
•
•
•
Data services – supports connections to back-end data resources using these standard
technologies: enterprise databases with JDBC™ connections and Web Services (SOAPstyle and REST-style) . Also supports connections to enterprise applications such as
SAP®.
Data virtualization – introduces a layer called a mobile business object (MBO) between
your enterprise databases or applications, and the remote database on the device client.
Utilizes a cache database (CDB) to optimize device client access and minimize back-end
resource utilization.
Device connection services – (does not apply to Scale Out nodes) supports connections
from various different platforms and operating systems with different communication
styles.
• Replication-based synchronization – A synchronization method where cached data is
downloaded to and uploaded from client database to server via replication. Typically,
mobile replication-based synchronization is used in occasionally connected scenarios.
Sybase Control Center for Sybase Unwired Platform
81
Administer
•
Messaging-based synchronization – In flight messages are queued in a messaging
cache. Synchronization occurs as messages are delivered to the device. Typically,
mobile messaging-based synchronization is used in always available and occasionally
disconnected scenarios.
See also
• Server List on page 82
• Cluster Properties on page 41
• Server Log on page 95
Server List
Depending on the license you purchase and the type of environment you install, you may
deploy multiple Unwired Servers in a cluster.
There are two types of server nodes that can be installed:
•
•
Application Server node – (mandatory) runs all services.
Scale Out node – (optional) specifically designed to allow the stateless request/response
HTTP and synchronous message services to be horizontally scaled.
If you have installed multiple servers as part of a clustered architecture, you must register these
servers first. Only servers that are installed on the same host as Sybase Control Center are
registered automatically. Once registered, remote servers also appear in the server list.
Servers are listed according to their cluster role (that is, primary or secondary servers). Sybase
Control Center automatically identifies the primary server and lists it first, followed by
secondary servers.
The Server Type column indicates whether the server is an Application Server node or a Scale
Out node.
The Need Restart column indicates if a server restart is required due to configuration
changes,
See also
• Unwired Server on page 81
• Cluster Properties on page 41
• Server Log on page 95
Stopping and Starting a Server
Stop and start a server to perform maintenance or to apply changes to server settings. You can
perform this action as a two-step process (stop and start) or as a single restart process.
You can stop and start a server from Sybase Control Center for servers that are installed on the
same host as Sybase Control Center, as well as servers that are installed on different hosts.
82
Sybase Unwired Platform
Administer
Note: If someone manually shuts the server down, this action triggers multiple errors in
Sybase Control Center for Unwired Server until the console determines that the server is no
longer available. This takes approximately 30 seconds to detect. When this occurs you might
see multiple Runtime API throws exception errors logged. Wait for the server to
come online and log into the server again to resume your administration work.
Note: Sybase Control Center requires at least one Application Server node running to work
properly. If all Application Server nodes are stopped, the Sybase Control Center console tree
will be collapsed automatically and the following error message will display: The cluster
is unavailable because of no running primary server found.
Note: You cannot start a Scale-out node from Sybase Control Center. If you stop a Scale-out
node, you must start it manually.
1. In the Sybase Control Center navigation pane, click Servers to display the servers list.
2. Select a server in this list.
3. Choose an appropriate process:
•
•
To stop the server, click Stop. You can then perform the administration actions you
require that might require the server to be started. To then restart the server, click
Start.
Note: If you have selected a Scale-out node server type, the Start button is disabled.
If you perform an administration action that requires a restart to take effect, click
Restart. This shuts the server down and restarts it in a single process.
As the server stops and starts, progress messages display in the Server Console pane.
Suspending and Resuming a Server
Suspend and resume a server to temporarily disallow clients to access the specific server for
routine maintenance. While the server is suspended, it remains running and available for all
administrative actions.
Prerequisites
Configure the Relay Server Outbound Enabler (RSOE) for Unwired Server in order to enable
the suspend and resume server functions.
Task
1. In the Sybase Control Center navigation pane, click Servers to display the servers list.
2. Select one or more servers in this list.
3. Choose an appropriate process:
Sybase Control Center for Sybase Unwired Platform
83
Administer
•
•
To suspend the server, click Suspend. Wait for about 1 minute, and click Refresh. The
Suspend button is now disabled. You can perform the administration actions you
require.
To resume the server, click Resume.
As the server suspends and resumes, progress messages display in the Server Console pane.
Pinging a Server
Ping a server to test the availability of backend server connectivity and verify the server state
(for example, started or stopped). By default ping uses whichever Internet Inter-ORB Protocol
call you configured (IIOPS by default) to test if a server's connection is available.
1. In the left navigation pane, expand the Servers folder and select a server.
2. Select the General tab.
3. Click Ping.
The result displays in the console area.
Checking Unwired Server Status
Verify whether a server is running, stopped, or suspended.
1. In the left navigation pane, select Servers.
2. In the right administration pane, select the General tab.
3. In the Status column, check the server status corresponding to the server you are
administering: running or stopped.
4. Use the controls in the administration console to start, stop, or restart the server, as
required.
Configuring Unwired Server General Properties
To optimize Unwired Server performance, configure the thread stack size, maximum and
minimum heap sizes, and user options such as enabling trace upload to SAP® Solution
Manager or setting the cache disk size.
1. In the left navigation pane, expand the Servers folder and select a server.
2. Select Server Configuration.
3. In the right administration pane, select the General tab.
4. Configure these replication payload properties, as required:
•
•
84
Host Name – the name of the machine where Unwired Server is running (read only).
Maximum Heap Size – the maximum size of the JVM memory allocation pool. Use K
to indicate kilobytes, M to indicate megabytes, or G to indicate gigabytes. For
Sybase Unwired Platform
Administer
•
•
•
production recommendations on this value, see Unwired Server Replication Tuning
Reference in System Administration.
Minimum Heap Size – the minimum size of the JVM memory allocation pool, in
megabytes. For production recommendations on this value, see Unwired Server
Replication Tuning Reference in System Administration.
Thread Stack Size – the JVM -Xss option.
User Options (in Show optional properties) – other JVM options. .
For example, you can enable JVM garbage collection logging by setting -XX:
+PrintGCDetails. Or you can set the permanent space which is allocated outside
of the Java heap with the DJC_JVM_MAXPERM environment variable (in SUP_HOME
\Servers\UnwiredServer\bin\usersetenv.bat); the maximum perm
size must be followed by K, M, or G, for example, -XX:MaxPermSize=512M. Note
that DJC_JVM_MAXPERM is not visible to Sybase Control Center.
If you are in an SAP environment and want to define the Solution Manager URL into
which trace files can be uploaded, use this user option: Dcom.sap.solutionmanager.url=<SolutionManager_URL>
To update the disk cache size, use the -ds user option. The disk cache size must be
followed by k, m, or g, for example, -ds 10G.
5. Click Save.
Configuring Unwired Server to Securely Communicate With an HTTP
Proxy
If you want Unwired Server connect to an HTTP Proxy, you can set connection properties for
it when you optimize Unwired Server performance.
1. In the left navigation pane, expand the Servers folder and select a server.
2. Select Server Configuration.
3. In the right administration pane, select the General tab.
4. In the User Options row, enter command-line options to control the startup behavior.
Enter options as a series of Java system property and value pairs, using this syntax:
-DpropertyName=value
Supported properties include:
• -dhttp.proxyHost – for the the host name of the proxy server.
• -dhttp.proxyPort – for the port number. The default value is 80.
• -dhttps.protocol – for the SSL protocol used by the proxy server. Use this to control
which protocols are accepted. For example, if your server is using SSLv2 and you
require a stronger level of SSL encryption, you may configure this value as:
-Dhttps.protocols=SSLv3,TLS,TLSv1
•
-dhttp.nonProxyHosts – for the list of hosts that should be reached directly,
thereby bypassing the proxy. Separate multiple entries with |.
Sybase Control Center for Sybase Unwired Platform
85
Administer
The patterns may start or end with a * for wildcards. A host name that matches the
wildcard pattern can bypass the proxy. For example, to use command-line options to
configure a proxy and other non-proxy hosts (including those on local computers):
-Dhttp.proxyHost=proxy.myDomain.com –Dhttp.proxyPort=8080 –
Dhttp.nonProxyHosts=*.myOtherDomain1.com|localhost|
*.myOtherDomain2.corp
5. Click Save.
Relay Server Outbound Enabler
The Outbound Enabler (RSOE) runs as an Unwired Server process and manages
communication between the Unwired Server and a Relay Server.
Each RSOE maintains connections to each Relay Server in a Relay Server farm. The RSOE
passes client requests to the Unwired Server on its Replication or Messaging port. Unwired
Server sends its response to the RSOE, which forwards it to the Relay Server, to be passed to
the client.
As an Unwired Server process, the RSOE always starts when Unwired Server starts. Unwired
Server monitors the process to ensure it is available. If an RSOE fails for any reason, Unwired
Server restarts it automatically.
Note: Sybase recommends three RSOE processes each, for both Replication and Messaging
ports.
Loading and Unloading HTTPS Certificates for RSOE
Load HTTPS certificates for the RSOE to add it to the Unwired Server node .
Note: You must use only RSA certificates.
If the Web server (Relay Server host) already uses a certificate signed by a CA for HTTPS
connections, you do not need to perform this task.
1. In the navigation pane, click Servers > ServerNode > Server Configuration.
2. In the administration pane, select the Outbound Enabler tab, then click Certificate
Files.
3. Choose the action you want to perform:
•
•
•
To add a new certificate, click +. Browse and select the .CRT file to upload, then click
Open.
To replace a certificate in the store, select Replace the certificate file. Verify the
certificate file name, then click +.
To delete a certificate from the store, select the filename and click X.
4. When certificate management tasks are complete, click OK.
86
Sybase Unwired Platform
Administer
Setting Up RSOE
Set up one or more RSOEs for each Unwired Server identified in a Relay Server configuration.
The configured values are saved in the cluster database.
1. Configuring RSOE General Properties
Set general RSOE configuration properties to define the context in which the RSOE
process operates.
2. Configuring RSOE Connection Settings
Set connection configuration properties for an RSOE. These properties define the RSOE
connection to the Relay Server.
3. Configuring RSOE Start Options
Configure start options for RSOE.
Configuring RSOE General Properties
Set general RSOE configuration properties to define the context in which the RSOE process
operates.
1. In the navigation pane, click Servers > <ServerNode> > Server Configuration.
2. In the administration pane, select the Outbound Enabler tab, then click New.
3. Specify these property values:
• Farm type – select the type of request managed by the Relay Server: Replication,
Messaging or Webservice protocol. When configuring Relay Server Outbound
Enabler properties for a scale-out node, you can select only the Webservice farm type.
• Unwired Sever port – select the port on which RSOE manages requests.
• Relay Server host – for Relay Server farms that use a load balancer, the host name or
IP address of the load balancer. Otherwise, the host name or IP address of a single
Relay Server.
• Relay Server port – for Relay Server farms that use a load balancer, the port of the load
balancer. Otherwise, the Relay Server HTTP or HTTPS port.
• Unwired Server farm – select the string that identifies the Unwired Server cluster, for
which the Relay Server manages requests. This property is case-sensitive, and it must
match the value in the Relay Server configuration.
• Server node ID – select the string that identifies the Unwired Server in the cluster. This
property is case-sensitive, and must match the value in the Relay Server configuration.
4. Click Next.
Configuring RSOE Connection Settings
Set connection configuration properties for an RSOE. These properties define the RSOE
connection to the Relay Server.
Sybase Control Center for Sybase Unwired Platform
87
Administer
1. Specify these property values:
• Http user name – select the user name for RSOE authentication on the Web server
(Relay Server host).
• Http password – enter the password for RSOE authentication on the Web server.
2. If RSOE connections to the Relay Server must pass through an Internet proxy server,
specify these property values:
•
•
•
Proxy server – select the Internet proxy server.
Http proxy user – select the user name for RSOE authentication on the proxy server.
Http proxy password – type the password for RSOE authentication on the proxy
server.
3. Specify these property values:
• Certificate file – select this option and choose the .CRT file used to authenticate the
RSOE to Relay Server. You can choose this file only if you have already loaded it into
the Unwired Server certificate store and your Relay Server Port selection is HTTPS:
443 in General Properties.
See also
• Updating Common Properties for Multiple RSOEs Concurrently on page 90
• Outbound Enabler Start Options Reference on page 89
Configuring RSOE Start Options
Configure start options for RSOE.
1. Enable an option:
a) Select the box that corresponds to each name.
b) Set a value. If you click a box and do not enter a value, the default is used.
2. Click OK.
3. Ensure the process starts by viewing the Status column of the Outbound Enablers tab.
88
Sybase Unwired Platform
Administer
Outbound Enabler Start Options Reference
Review available Outbound Enabler start options, which affect Outbound Enabler logging.
Each Outbound Enabler has its own log file that you can retrieve in Sybase Control Center.
Option
Default
Description
Verbosity level
0
Sets log file verbosity values:
•
•
•
•
0 – log errors only. Use this
logging level for deployment.
1 – session-level logging.
This is a higher level view of
a session.
2 – request-level logging.
Provides a more detailed
view of HTTP requests
within a session.
3 - 5 – detailed logging.
Used primarily by Technical Support.
Reconnect delay
5
Delay before retry after connection fails.
Maximum output file size
10KB
Maximum log file size.
Truncate log file
None
Delete the log file at RSOE
startup.
Advanced
None
User-defined value for start parameters. See Outbound Enabler in SQL Anywhere 12.0.1 at
http://infocenter.sybase.com/
help/index.jsp?topic=/com.sybase.help.sqlanywhere.12.0.1/
relayserver/ml-relayservers-6039420.html.
See also
• Updating Common Properties for Multiple RSOEs Concurrently on page 90
• Configuring RSOE Connection Settings on page 87
Sybase Control Center for Sybase Unwired Platform
89
Administer
Generating the Relay Server Outbound Enabler Configuration File
To quickly and easily replicate a common outbound enabler (RSOE) configuration to multiple
hosts, generate an RSOE configuration file.
Administrators can use Sybase Control Center to configure an initial RSOE for development.
Once a configuration proves valid and stable, the administrator can generate the RSOE
configuration file, then use regRelayServer.bat to apply it to Unwired Server hosts.
1. In the navigation pane, click the Unwired Server cluster name.
2. In the administration pane, click the Relay Servers tab.
3. Click Generate.
4. Choose Outbound enabler configuration XML file, then click Next.
5. Click Finish.
6. Select an output target for the file.
Managing Configured RSOEs
Manage RSOE instances you have configured.
Retrieving RSOE Logs
You can retrieve one RSOE log at a time, from the Unwired Server host, and copy it to another
location. You cannot retrieve an empty RSOE log file.
1. In the navigation pane, click Servers > <ServerNode> > Server Configuration.
2. In the administration pane, select the Outbound Enabler tab, and select the RSOE instance.
3. Click Retrieve Log, then Next, then Finish to save the log and choose the target location
for the file.
See also
• Updating Common Properties for Multiple RSOEs Concurrently on page 90
• Deleting RSOE Configurations on page 91
• Refreshing the RSOE List on page 91
• Configuring Proxy Server Settings for an Outbound Enabler on page 92
Updating Common Properties for Multiple RSOEs Concurrently
To avoid setting common RSOE properties repeatedly, configure common properties
simultaneously for selected RSOEs already deployed. This streamlines the number of times
they would otherwise need to be set.
1. In the navigation pane, click Servers > <ServerNode> > Server Configuration.
2. In the administration pane, select the Outbound Enabler tab.
90
Sybase Unwired Platform
Administer
3. Select two or more RSOE instances in the list of configured RSOEs, then click
Properties.
4. Modify common settings for multiple RSOEs, including:
•
•
Startup options. See Outbound Enabler Start Options Reference.
Proxy settings. See step 2 in Configuring RSOE Connection Settings.
See also
• Retrieving RSOE Logs on page 90
• Deleting RSOE Configurations on page 91
• Refreshing the RSOE List on page 91
• Configuring Proxy Server Settings for an Outbound Enabler on page 92
• Configuring RSOE Connection Settings on page 87
• Outbound Enabler Start Options Reference on page 89
Deleting RSOE Configurations
Delete an RSOE configuration to remove the configuration properties from the cluster
database.
1. In the navigation pane, click Servers > <ServerNode> > Server Configuration.
2. In the administration pane, select the Outbound Enabler tab, and select the RSOE
instances.
3. Stop the RSOE instances and click Delete.
4. Click OK.
See also
• Retrieving RSOE Logs on page 90
• Updating Common Properties for Multiple RSOEs Concurrently on page 90
• Refreshing the RSOE List on page 91
• Configuring Proxy Server Settings for an Outbound Enabler on page 92
Refreshing the RSOE List
Refresh the RSOE list to display current information about deployed and configured RSOE
instances.
1. In the navigation pane, click Servers > <ServerNode> > Server Configuration.
2. In the administration pane, select the Outbound Enabler tab, and click Refresh.
See also
• Retrieving RSOE Logs on page 90
• Updating Common Properties for Multiple RSOEs Concurrently on page 90
• Deleting RSOE Configurations on page 91
Sybase Control Center for Sybase Unwired Platform
91
Administer
Configuring Proxy Server Settings for an Outbound Enabler on page 92
•
Configuring Proxy Server Settings for an Outbound Enabler
(Applies only to Online Data Proxy) Configure an Outbound Enabler to work with an Internet
proxy server, when connections to the Relay Server must pass through a proxy server.
1. In the navigation pane, click Servers><ServerNode> > Server Configuration.
2. In the administration pane, select the Outbound Enabler tab.
3. Click Proxy .
4. Define a list of required proxy servers:
a) To add a new server connection, type Host and Port values, then click +.
b) To remove an existing connection, select the server, then click X.
c) To edit an existing connection, click an appropriate cell and re-enter or modify the
current value.
5. Define a proxy user for a selected server:
a) Select a server from the list.
b) To add a new user, enter a User name and password then click +.
c) To remove an existing user, select the name, then click X.
d) To edit an existing user, click an appropriate cell and re-enter or modify the current
value.
6. Click OK.
See also
• Retrieving RSOE Logs on page 90
• Updating Common Properties for Multiple RSOEs Concurrently on page 90
• Deleting RSOE Configurations on page 91
• Refreshing the RSOE List on page 91
Outbound Enabler Tab Reference
Understand the columns of data displayed in the Outbound Enabler tab for an Unwired Server
node.
Column Name
Displays
Server Node ID
the string that identifies the Unwired Server in the cluster. This property is
case-sensitive, and must match the value in the Relay Server configuration.
Unwired Server Port the port on which Outbound Enabler manages requests.
92
Sybase Unwired Platform
Administer
Column Name
Displays
Farm Type
the type of request managed by the Relay Server: Replication, Messaging or
Webservice protocol. When configuring Relay Server Outbound Enabler
properties for a scale-out node, you can select only the Webservice farm type.
Unwired Server
Farm
the string that identifies the Unwired Server cluster, for which the Relay Server
manages requests. This property is case-sensitive, and it must match the value
in the Relay Server configuration.
Relay Server Host
for Relay Server farms that use a load balancer, the host name or IP address of
the load balancer. Otherwise, the host name or IP address of a single Relay
Server.
Status
current state of the Outbound Enabler process: stopped, running, or error.
Sybase Control Center for Sybase Unwired Platform
93
Administer
Column Name
Displays
Status Description
additional details on the state of the Outbound Enabler. If you receive one of
these messages, follow the documented recommendation:
•
Unknown error state – Check the log for additional details.
•
Failed to connect Unwired Server, retrying... – Check the Unwired
Server port managed by the Outbound Enabler.
•
Unauthorized. – Check the security token of Outbound Enabler.
•
Unrecognized farm or server node ID. – The string that identifies the
Unwired Server cluster or server node in the Outbound Enabler configuration does not match the Relay Server configuration.
•
Please check the relay server host and port or Failed to create I/O
stream to the relay server – If you use HTTPS port, check to see if the
certificate file is valid.
•
Relay server service unavailable. – Check if the Relay Server is properly
configured, or if any internal errors are logged.
•
Relay server not found. – Either the Relay Server is not yet deployed, or
the URL suffix is wrong.
•
Bad request. – Check the syntax of the URL suffix.
•
Error writing HTTP headers – Check if the trusted certificate is valid,
and verify the URL suffix syntax. Something may be misformatted.
Note:
Sometimes when the Status column shows "Running" the Status Description
shows:
Relay Server outbound enabler is running. Please
check the log file to confirm the status.
In these cases, the console may detect that an RSOE is running, even though
the RSOE is actually in an error state.
•
•
Certificate File
94
The RSOE log level is set too high (4 or 5). Sybase Control Center cannot
detect the status from scanning the RSOE log.
The RSOE enters an unrecognized error condition. For example, when
RSOE connects to Relay Server through an Internet proxy server, if the
proxy server shuts down, the RSOE is effectively in an error state. The
RSOE may continue to retry the connection indefinitely, and produce no
log message recognized as an error.
the certificate file uploaded to the Unwired Server certificate store.
Sybase Unwired Platform
Administer
Column Name
Displays
Log File
the name and location of the Outbound Enabler log file. The syntax of this
filename is <nodeName>.RSOE<n>.log. <n> is the primary key of
the Outbound Enabler database record in the cluster database used by Unwired
Platform.
Server Log
Server logs enable you to monitor system health at a high level, or focus in on specific issues
by setting up filtering criteria using Sybase Control Center.
These server logs are available:
•
•
Unwired Server logs – collect data on Unwired Server health and performance by
component, and retrieve data for all or specific searches. You can save and archive system
logs.
Messaging Server logs – retrieve trace data for all or specific messages. Export data for
archive or further analysis.
See also
• Server List on page 82
• Unwired Server on page 81
• Cluster Properties on page 41
Unwired Server Runtime Logging
Unwired Server logs collect runtime information from various embedded runtime
components.
You can change default log levels for different components as required from Sybase Control
Center.
You can view logs from:
•
•
Sybase Control Center – click Servers > primaryServer > Log in the left pane.
The first 150 entries initially appear in the console area, so you may need to incrementally
retrieve more of the log as required, by scrolling down through the log events.
Text editor – browse to and open one or more of the
<UnwiredPlatform_InstallDir>\UnwiredPlatform\Servers
\UnwiredServer\logs\<hostname>-server.log files. These files may be
indexed, depending on how you configure the life cycle for the server's log file.
See also
• Messaging Server Runtime Logging on page 97
Sybase Control Center for Sybase Unwired Platform
95
Administer
Viewing the Unwired Server Log
In text or grid view, use the vertical scroll bar to retrieve additional segments of the log file in
150-line increments. In grid view, up to 10 pages of the server log data is loaded in one request.
You can navigate to any page by using the First, Prev, Next, and Go to controls. Use View
Details open the actual log file and find the corresponding line.
Note: Last is disabled -- use Next to advance to the final page in the list.
There are also two search options you can use:
•
•
Basic search – search by keyword, log level, first/last X number of lines in the log file.
Advanced search – search by specific subcomponents, log level, exception, time range,
and so on.
You can include backup logs in your search or retrieval. The option is not selected by default.
Searching Unwired Server Log Data
Filter server log data according to the criteria you specify.
1. In the Sybase Control Center left navigation pane, click Servers > primaryServer > Log,
and in the right pane click Unwired Server.
2. Select Show filter criteria to display the search pane.
3. Select Include backup logs to display backup logs.
4. Select Text view or Grid view to specify how to display the logs.
5. Select Basic search to filter your search according to the specific string you enter in the
search field. (Optional) You may also specify:
•
•
Show – specify first lines, last lines, or a keyword. If you are searching by first or last
lines, you can enter any value up to a maximum of 1000 lines in the log. However,
Sybase recommends that you provide a more manageable value to avoid severe
performance degradation associated with this upper limit.
Log level – search only messages logged by the particular log level you select.
6. Select Advanced search to enter more specific search criteria, including:
•
•
•
•
•
96
Component – identify which component the log data belongs to: MMS, Proxy, MSG,
Security, MobiLink™, DataServices, Other or DOEC.
Note: Set the log level for each component in the Setting tab. See Configuring
Unwired Server Log Settings.
Log level – search only messages logged by the particular log level you select.
Thread ID – specify the ID name of the thread that logs the message you are searching.
Logger name – indicate the class name and instance of the logged component.
Keyword – indicate a value, file name, or other keyword by which to filter your search.
Sybase Unwired Platform
Administer
•
Time period – specify a start date, start time, end date, and end time.
7. Click Retrieve.
8. To begin a new query, click Reset in the search panel and enter new search criteria.
Retrieving the Unwired Server Log
Update the information in the log console window.
1. In the Sybase Control Center left navigation pane, click Servers > primaryServer > Log,
and in the right pane click Unwired Server.
2. To display the latest log data collected in the log file if time has elapsed since you last
opened the log, click Retrieve.
3. (Optional) Select a row to view a single record in the detail pane. Additional columns may
be available.
Deleting the Unwired Server Log
Clear old or unrequired server log data from the log file.
1. In the Sybase Control Center left navigation pane, click Servers > primaryServer > Log,
and in the right pane click Unwired Server.
2. To delete all data from the log file and all backup log files, click Delete, then OK.
Messaging Server Runtime Logging
(Does not apply to Scale Out server nodes) Messaging Server logs collect data that enables
you to trace message handling from the cluster database to the device user, based on various
trace settings.
See also
• Unwired Server Runtime Logging on page 95
Viewing the Messaging Server Log
You can view results for one or more modules, or the Default. You can navigate to any page by
using the First, Prev, Next, Last, and Go to controls.
Searching Messaging Server Log Data
Filter server log data according to the criteria you specify.
1. In the Sybase Control Center left navigation pane, click Servers > primaryServer > Log,
and in the right pane click Messaging Server.
2. Click Show filter, and then select the search criteria:
•
Max level – search only messages logged by the particular log level you select. All
messages up to that level are retrieved.
Sybase Control Center for Sybase Unwired Platform
97
Administer
•
•
•
•
•
•
Thread ID – specify the ID name of the thread that logs the message you are searching.
Contains – enter a search string.
Users – select one or more users.
Application connections – select one or more application connections.
Modules – select one or more modules.
Time period – specify a start date, start time, end date, and end time.
3. Click Retrieve.
4. To begin a new query, click Reset.
Retrieving the Messaging Server Log
Update the information in the log console window.
1. In the Sybase Control Center left navigation pane, click Servers > primaryServer > Log,
and in the right pane click Messaging Server.
2. To display the latest log data collected in the log file if time has elapsed since you last
opened the log, click Retrieve.
3. (Optional) Select a row to view a single record in the detail pane. Additional columns may
be available.
Exporting Messaging Server Log
Export retrieved trace information for archive or further analysis.
1. In the Sybase Control Center left navigation pane, click Servers > primaryServer > Log,
and in the right pane click Messaging Server.
2. To display the latest log data collected in the log file if time has elapsed since you last
opened the log, click Retrieve.
3. Click Export to launch the Export Trace Log Wizard.
Trace Log
The trace logs capture messaging server data for cluster level database to mobile device user
activities. Using the trace logs you can trace obtain detailed information using a variety of
search criteria.
•
•
•
•
•
•
98
Time – the date and time when the current trace entry was logged on Unwired Server. The
returned date and time is the Unwired Server time without time zone information.
Module – the module to which the current trace entry belongs.
Description – detailed trace information.
Level – the trace level of the current trace entry. The possible trace level values (from high
to low) are: ERROR, WARN, INFO, and DEBUG.
User – the user name of the current trace entry.
Application Connection ID – the application connection ID of the current trace entry.
Sybase Unwired Platform
Administer
•
•
Thread ID – the thread ID when the trace entry was logged.
Node – the server that created the trace entry.
Domains
Domains provide a logical partitioning of a hosting organization's environment that achieves
increased flexibility and granularity of control in multitenant environments. By default, the
installer creates a single domain named "default."
Administrators use different domains within the same Unwired Platform installation.
Domains enable the management of application metadata within a partition, including server
connections, packages, role mappings, domain logs, and security, so that changes are visible
only in the specific domain.
Considerations when implementing domains in a multitenant environment include:
•
•
•
•
Create and manage domains using Sybase Control Center from the Unwired Platform
administration perspective of Sybase Control Center.
You can support multiple customers inside the same Unwired Platform cluster.
You can configure security specifically for individual domains by creating one or more
security configurations in the cluster, and then assigning those security configurations to a
domain. You can then map the security configurations to one or more packages. A user
accessing the package from a device application is authenticated and authorized by the
security provider associated with the package.
Customers may require their own administrative view on their portion of the Unwired
Platform-enabled mobility system. By granting domain administration access to your
customers, you can allow customers to customize their deployed applications packages
and perform self-administration tasks as needed.
The "default" domain
The "default" domain is a special domain where critical runtime configuration artifacts exist.
These artifacts include:
•
•
•
An "admin" security configuration – this security configuration is mapped to the "default"
domain and is used to authenticate and authorize administrative users. For this reason,
administrators are not allowed to unassign the "admin" security configuration from the
"default" domain.
Cache database (CDB) data source connections – for the "default" CDB data source, users
can configure the Pool Size property in the "default" domain according to their
requirements. This setting allows the maximum number of open connections to the SQL
Anywhere database server hosting the CDB.
Monitor database data source connections – the customer can modify the existing
monitoring data source properties according to their configuration requirements, or create
a new monitoring datasource in the "default" domain.
Sybase Control Center for Sybase Unwired Platform
99
Administer
•
Domain log database data source connections – the customer can modify the existing
domain log data source properties according to their configuration requirement, or create a
new domain log data source in the "default" domain. By default, the name of domain log
data source is "domainlogdb".
Since these critical runtime-related artifacts are located in the "default" domain,
administrators are not allowed to delete this domain. Sybase recommends creating new
domains to facilitate tenants according to their application requirements.
Creating and Enabling a New Domain
Create and configure multiple domains within a single Unwired Platform installation. A
domain must be enabled for application users to access the packages deployed in the domain.
Enabling a domain also triggers synchronization of the domain changes to the secondary
nodes in the cluster. Application users who attempt to access a disabled domain receive an
error message.
Prerequisites
Create a security configuration for the domain and register the domain administrator.
Task
1. In the left navigation pane, select the Domains folder.
2. In the right administration pane, select the General tab, and click New.
3. In the Create Domain dialog, enter a name for the domain and click Next.
4. Select a security configuration for the domain by checking an option from the list of
available configurations. You must select at least one security configuration. The security
configurations you select are then available for use in validating users accessing the
packages. If you select multiple security configurations, the first one you select becomes
the default security configuration for the domain.
5. Click Next.
6. Optional. Select one or more domain administrators for the domain.
7. Click Finish.
The new domain appears in the General tab.
8. Click the box adjacent to the domain name, click Enable, then click Yes to confirm.
See also
• Deleting a Domain on page 101
• Registering a Domain Administrator User on page 102
• Assigning Domain Administrators to a Domain on page 103
• Viewing Applications for a Domain on page 104
• Viewing Application Connections for a Domain on page 104
• Scheduling Accumulated Data Cleanup for Domains on page 106
100
Sybase Unwired Platform
Administer
•
•
•
•
Domain Logs on page 110
Checking Client Application Logs on page 155
Connections on page 156
Configuring Domain Security on page 179
Deleting a Domain
Remove a domain and its contents from the cluster when you no longer require the partition.
When a domain is deleted, all referenced artifacts, such as domain administrators and security
configurations, are retained. However, all contained artifacts, including packages,
subscription templates, device subscriptions, MBO and operation historical data, packagelevel role mapping, cache group settings, server connections, and domain-level role mappings
for security configurations independent of any other domain, are also deleted.
To preserve a deployed package before deleting a domain, export the package to an archive
file.
Note: You cannot delete the "default" domain since it contains critical runtime-related
artifacts.
1. In the left navigation pane, select Domains.
2. In the right administration pane, click the General tab and select the domain you want to
delete.
3. Click Delete.
4. In the confirmation dialog, click Yes.
See also
• Creating and Enabling a New Domain on page 100
• Registering a Domain Administrator User on page 102
• Assigning Domain Administrators to a Domain on page 103
• Viewing Applications for a Domain on page 104
• Viewing Application Connections for a Domain on page 104
• Scheduling Accumulated Data Cleanup for Domains on page 106
• Domain Logs on page 110
• Checking Client Application Logs on page 155
• Connections on page 156
• Configuring Domain Security on page 179
Sybase Control Center for Sybase Unwired Platform
101
Administer
Registering a Domain Administrator User
A platform administrator can add domain administrators, so these users can administer
domains to which they are assigned. This process registers an administrator with the cluster, so
the user can be assigned as an administrator for a domain.
Prerequisites
Create the user entry and map the physical role to the SUP Domain Administrator logical role
in the security provider repository used to authenticate administrators in Sybase Control
Center (SCC).
Task
1. In the left navigation pane, click the Security node.
2. In the right administration pane, click the Domain Administrators tab and click New.
3. To configure user properties for the administrator, enter:
• Login name – the user name assigned to the administrator. For example, if you are
using LDAP to authenticate administrators, the UID is typically used as the login
name.
•
•
•
Note: The login name can't be longer than 36 characters.
(Optional) Company name – the name of the organization the administrator belongs
to. Sybase recommends you supply this information if you are setting up Unwired
Platform in a hosted environment and using domains to distinguish between different
hosted solutions for different organizations.
(Optional) First name – the administrator's first name. The first name must match the
one assigned to the login name in the security repository.
(Optional) Last name – the administrator's last name. The last name must match the
one assigned to the login name in the security repository.
4. Click OK to register the administrator.
The domain administrator can now log in with his or her user login credentials (user name
and password).
Next
Assign the domain administrator role to this user.
See also
• Creating and Enabling a New Domain on page 100
• Deleting a Domain on page 101
• Assigning Domain Administrators to a Domain on page 103
• Viewing Applications for a Domain on page 104
• Viewing Application Connections for a Domain on page 104
102
Sybase Unwired Platform
Administer
•
•
•
•
•
Scheduling Accumulated Data Cleanup for Domains on page 106
Domain Logs on page 110
Checking Client Application Logs on page 155
Connections on page 156
Configuring Domain Security on page 179
Assigning Domain Administrators to a Domain
Assign domain administration privileges to a domain administrator. You must be a platform
administrator to assign and unassign domain administrators.
Prerequisites
Ensure the user is already registered as a domain administrator in the Domain Administrators
tab.
Task
1. In the left navigation pane, expand the Domains folder, and select the domain for which to
assign domain administration privileges.
2. Select the domain-level Security folder.
3. In the right administration pane, select the Domain Administrators tab, and click
Assign.
4. Select one or more administrator users to assign to the domain by checking the box
adjacent to the user name.
5. Click OK.
A message appears above the right administration pane menu indicating the success or
failure of the assignment. If successful, the new domain administrator appears in the list of
users.
See also
• Creating and Enabling a New Domain on page 100
• Deleting a Domain on page 101
• Registering a Domain Administrator User on page 102
• Viewing Applications for a Domain on page 104
• Viewing Application Connections for a Domain on page 104
• Scheduling Accumulated Data Cleanup for Domains on page 106
• Domain Logs on page 110
• Checking Client Application Logs on page 155
• Connections on page 156
• Configuring Domain Security on page 179
Sybase Control Center for Sybase Unwired Platform
103
Administer
Viewing Applications for a Domain
View applications registered for a specific domain.
1. In the left navigation pane, expand the Domains folder, and select a domain.
2. Within the domain, select Applications.
3. In the right pane, select the domain-level Applications tab.
4. Click Refresh to view a list of Applications IDs, and their display names and
descriptions.
5. Alternatively, search for one or more application IDs.
a) Provide the search criteria for Application ID by adding a search string.
b) Click Go.
All the applications that match the search criteria provided for the selected domain are
populated in the table.
See also
• Creating and Enabling a New Domain on page 100
• Deleting a Domain on page 101
• Registering a Domain Administrator User on page 102
• Assigning Domain Administrators to a Domain on page 103
• Viewing Application Connections for a Domain on page 104
• Scheduling Accumulated Data Cleanup for Domains on page 106
• Domain Logs on page 110
• Checking Client Application Logs on page 155
• Connections on page 156
• Configuring Domain Security on page 179
Viewing Application Connections for a Domain
View application connection information for a specific domain. Optionally select the relevant
columns of information to display.
Note: The association of application connections to a domain is based on the "domain" setting
value in the application connections. Therefore, when registering application connections, the
application template must be registered either using a template, where the domain value is
appropriately configured, or in the registration wizard of the Sybase Control Center user
interface.
1. In the left navigation pane, expand the Domains folder, and select a domain.
2. Within the domain, select Applications.
3. In the right pane, select the domain-level Application Connections tab.
104
Sybase Unwired Platform
Administer
4. Click Refresh to view a list of Users.
5. Alternatively, search for one or more users.
a) Provide the search criteria for Users by adding a search string.
b) Click Go.
All the users that match the search criteria provided for the selected domain are
populated in the table.
6. (Optional) Select the columns to display (all columns, or specific columns) from the dropdown list.
See also
• Creating and Enabling a New Domain on page 100
• Deleting a Domain on page 101
• Registering a Domain Administrator User on page 102
• Assigning Domain Administrators to a Domain on page 103
• Viewing Applications for a Domain on page 104
• Scheduling Accumulated Data Cleanup for Domains on page 106
• Domain Logs on page 110
• Checking Client Application Logs on page 155
• Connections on page 156
• Configuring Domain Security on page 179
Managing Connection Pools for Unwired Server Connections
Connection pools are used by Unwired Server to improve performance between the server and
internal databases, which include cache database, cluster database, domainlog database,
messaging database, monitor database and sampledb. These values are synchronized among
all servers in the cluster when the primary server values change.
Configure the maximum pool size to determine the how large of a pool is used for these JDBC
database connections.
1. In the left navigation pane, expand the Domains folder, and select the domain for which
you want to modify the connection.
2. Select Connections.
3. In the right administration pane:
•
•
To edit the properties of a connection pool, click the Connections tab.
To edit the properties of a connection pool template, click the Templates tab.
4. Select a connection pool or template from the list.
5. Select JDBC as the Connection pool type, and click Properties.
6. Change the Max Pool Size value (and any other values you choose). The default value is
150, and 0 indicates no limit. The Max Pool Size value should not be a negative value.
Sybase Control Center for Sybase Unwired Platform
105
Administer
See Creating Connections and Connection Templates in Sybase Control Center for Sybase
Unwired Platform and JDBC Properties.
7. Click Save to save the changes.
Scheduling Accumulated Data Cleanup for Domains
Periodically clean up accumulated data maintenance items in cache that are no longer needed,
by creating a data purge schedule. The schedule should be set to perform the clean up
processes run when system usage is low.
However, you can also manually purge accumulated data items at any time; however note that
for domain logs, if the number of domain log data is very large (one with hundreds of
thousands of entries for example) then Unwired Server must purge domain log data
asynchronously.
Note: You can use the Administration API to automate clean up at the package level.
1. In the Sybase Control Center left navigation pane, expand the Domains tab and select a
domain.
2. In the right pane, select the Scheduled Task tab.
3. Under Task, select one of the options you want to schedule, and then select Properties to
set up its automatic schedule:
Option
Description
Subscription Cleanup
Removes subscriptions that are not active for the 'number
of inactive days' in the schedule task configuration. Note,
subscription is considered active as follows:
• Replication – last synchronization request timestamp.
• Messaging – last synchronization message timestamp.
Note: If a casual user accesses the system infrequently,
for example three to four times a year, the user falls outside the specified time frame and is removed from Sybase
Unwired Platform. The user will then have to reinstall
Sybase Unwired Platform and initiate a sync to re-activate
subscription.
Error History Cleanup
Removes historical data on MBO data refresh and operation replay failures, which result from system or application failures. System failures may include network
problems, credential issues, and back-end system failure.
Application failures may include invalid values, and nonunique data.
Note: Only error messages are removed.
106
Sybase Unwired Platform
Administer
Option
Description
Client Log Cleanup
Removes client log records that have already been
synchronized to the device, or are no longer associated
with active users.
Synchronization Cache Cleanup
This cleanup task removes:
• Logically deleted rows in the cache that are older than
the oldest synchronization time on record in the system. Synchronization activity for all clients establish
the oldest synchronization time.
• Unused or stale partitions.
• Expired DCN entries identified by the exp property in
the DCN message.
4. Select Enable. Schedules run until you disable them, or they expire.
See also
• Creating and Enabling a New Domain on page 100
• Deleting a Domain on page 101
• Registering a Domain Administrator User on page 102
• Assigning Domain Administrators to a Domain on page 103
• Viewing Applications for a Domain on page 104
• Viewing Application Connections for a Domain on page 104
• Domain Logs on page 110
• Checking Client Application Logs on page 155
• Connections on page 156
• Configuring Domain Security on page 179
Scheduling Cleanup Options
The Sybase Unwired Platform administrator or Sybase Unwired Platform domain
administrator schedules domain-level data maintenance cleanup.
Set up an automatic schedule for database cleanup:
1. In the left pane, select the cluster, then the domain.
2. In the right pane, select the Scheduled Tasks tab.
3. Select one of the cleanup options:
Sybase Control Center for Sybase Unwired Platform
107
Administer
Option
Description
Subscription Cleanup
Removes subscriptions that are not active for the 'number
of inactive days' in the schedule task configuration. Note,
subscription is considered active as follows:
• Replication – last synchronization request timestamp.
• Messaging – last synchronization message timestamp.
Note: If a casual user accesses the system infrequently,
for example three to four times a year, the user falls outside the specified time frame and is removed from Sybase
Unwired Platform. The user will then have to reinstall
Sybase Unwired Platform and initiate a sync to re-activate
subscription.
Error History Cleanup
Removes historical data on MBO data refresh and operation replay failures, which result from system or application failures. System failures may include network
problems, credential issues, and back-end system failure.
Application failures may include invalid values, and nonunique data.
Note: Only error messages are removed.
Client Log Cleanup
Removes client log records that have already been
synchronized to the device, or are no longer associated
with active users.
Synchronization Cache Cleanup
This cleanup task removes:
• Logically deleted rows in the cache that are older than
the oldest synchronization time on record in the system. Synchronization activity for all clients establish
the oldest synchronization time.
• Unused or stale partitions.
• Expired DCN entries identified by the exp property in
the DCN message.
4. Click Properties, then in the Task Properties dialog, select the Schedule tab.
5. Configure the required schedule:
• Schedule repeat – select how often the schedule should run. Options are monthly,
weekly, daily, hourly, and custom.
• If you select monthly or weekly, specify:
• Start date – select the date and time the automated upload should begin. Use
the calendar picker and 24-hour time selector.
• End date – select the date and time the automated upload should end.
• If you select daily or hourly, specify:
108
Sybase Unwired Platform
Administer
•
•
Start date – select the date and time the automated upload should begin. Use
the calendar picker and 24-hour time selector.
• End date – select the date and time the automated upload should end.
• Days of the week – select each day the automated upload schedule should run.
Select custom, to specify the interval granularity in seconds, minutes, or hours, as
well as other date and time parameters.
6. In the Task Properties dialog, select the Options tab, set the number of inactive days for
which to purge.
Note: This step is unnecessary for Synchronization Cache Cleanup.
7. Click OK to save the schedule properties and purge options.
Note: If a casual user accesses the system infrequently, for example three to four times a
year, the user falls outside the purging time frame and is removed from Sybase Unwired
Platform. The user will then have to reinstall Sybase Unwired Platform and initiate a sync.
Enabling Domain Cleanup
The SUP Administrator or SUP Domain Administrator must enable the schedule as a separate
task.
You can set up the schedule, and enable it at a later time. Once enabled, the cleanup runs
automatically until is changed, disabled, or expires. You can check the current enabled or
disabled status on the Scheduled Tasks tab.
1. In the left pane, select the cluster, then the domain.
2. In the right pane, select the Scheduled Task tab.
3. Select one of the cleanup options, and verify the value in the Status column is set to
disabled.
4. On the Scheduled Task tab, click Enable.
5. Click OK to confirm. The value in the Status column changes to enabled. The cleanup
schedule runs automatically for the selected option.
Disabling Domain Cleanup
The SUP Administrator or SUP Domain Administrator can disable, or reenable, a scheduled
cleanup option at any time.
If you disable the cleanup option while it is running, the current process continues. Future
action is disabled, unless you reenable the option.
1. In the left pane, select the cluster, then the domain.
2. In the right pane, select the Scheduled Task tab.
3. Select one of the cleanup options, and verify the value in the Status column is set to
enabled.
Sybase Control Center for Sybase Unwired Platform
109
Administer
4. On the Schedule tab, click Disable.
5. Click OK to confirm. The value in the Status column changes to disabled.
Running Manual Purge by Domain
At any time the SUP Administrator or SUP Domain Administrator can manually run cleanup
options. The processes run asynchronously on Unwired Server using the current settings.
As much as reasonable, use manual purge when system load is light.
1. In the left pane, select the cluster, then the domain.
2. In the right pane, select the Scheduled Tasks tab.
3. Select one of the cleanup options.
4. Click Run Now, then optionally specify the number of days for which to preserve data.
Artifacts that fall outside of the time period are purged.
5. Click OK to confirm. The request is sent immediately, and the task runs asynchronously
on Unwired Server.
Domain Logs
The domain log enables an administrator to monitor application activities throughout the
system. Detailed views of application activities are available by subsystem. The administrator
can review activities in a specific subsystem log view, view correlated data in multiple
subsystems, or view a unified log across all subsystems. The administrator must enable
logging, and then use log filters to view data of interest.
By default, only error messages are recorded in each domain's log. To enable domain logging,
you must create a log profile. See Creating and Enabling Domain Logging in Sybase Control
Center for Sybase Unwired Platform.
See also
• Creating and Enabling a New Domain on page 100
• Deleting a Domain on page 101
• Registering a Domain Administrator User on page 102
• Assigning Domain Administrators to a Domain on page 103
• Viewing Applications for a Domain on page 104
• Viewing Application Connections for a Domain on page 104
• Scheduling Accumulated Data Cleanup for Domains on page 106
• Checking Client Application Logs on page 155
• Connections on page 156
• Configuring Domain Security on page 179
110
Sybase Unwired Platform
Administer
Enabling Application Logging
Enable domain-level logging to help you trace and monitor application activities, and review
the resulting logs for troubleshooting.
1. Creating and Enabling Domain Logging
Create logging profile definitions and enable the log profile.
Creating and Enabling Domain Logging
Create logging profile definitions and enable the log profile.
1. In the left navigation pane of Sybase Control Center, select Domains.
2. Under the domain node, select Log.
3. In the right administration pane, select the Settings tab.
4. Click New.
5. In the Profile Definition dialog, enter a Name and Description for the log profile.
6. Add the necessary profile definitions.
7. Select Enable after creation.
8. Click OK.
Note: To ensure the domain logs are populated immediately after enabling the log profile,
do the following:
a. Under the Settings tab, click Configuration.
b. Check Enable flush threshold.
1. Creating the Profile Definition
Create profile definitions belonging to multiple categories.
2. Enabling the Created Profile
Enable the profile you have created to monitor the log profile definitions.
3. Enabling and Configuring Domain Logging
Configure auto purge, flush threshold, and flush batch size settings to determine how long
domain log data is retained, how frequently it is written to database from server nodes, and
set a domain log database connection to configure where domain log data is stored.
Creating the Profile Definition
Create profile definitions belonging to multiple categories.
You can add profile definitions by selecting applications, security configurations, users,
connections, applications connections or payloads of your choice.
See also
• Enabling the Created Profile on page 117
Sybase Control Center for Sybase Unwired Platform
111
Administer
Adding or Removing Applications to the Profile
Add applications to the log profile that are currently deployed in the selected domain.
Note: If a logging profile includes both package related and payloads criteria, you may
experience a serious performance impact. Make sure you include additional criteria such as
users or application connections.
1. In the Profile Definition dialog, select Package related.
2. Select Applications, then click the button to add application to the profile.
The Applications dialog is displayed with the list of applications currently deployed in this
domain.
3. To search for the application you want to add to the profile, select the search criteria from
the Search drop-down list and enter a value for this criteria.
4. Click Go.
5. You can do any of the following:
• To add an application to a new or existing profile, select the check-box adjacent to the
application entry in the list.
• To remove an application from the profile, uncheck the check-box adjacent to the
application entry in the list.
6. Click OK.
See also
• Adding or Removing Packages to the Profile on page 112
• Adding or Removing MBOs to the Profile on page 113
• Adding or Removing Operations to the Profile on page 114
• Adding or Removing Security Configurations or Users to the Profile on page 114
• Adding or Removing Package Users to the Profile on page 115
• Adding or Removing Connections to the Profile on page 115
• Adding or Removing Application Connections to the Profile on page 116
• Adding or Removing Payloads to the Profile on page 116
Adding or Removing Packages to the Profile
Add one or more packages to the profile.
Note: If a logging profile includes both package related and payloads criteria, you may
experience a serious performance impact. Make sure you include additional criteria such as
users or application connections.
1. In the Profile Definition dialog, select Package related.
2. Select Packages, then click the button to add packages to the profile.
112
Sybase Unwired Platform
Administer
3. Select one or more packages to include.
4. Click OK.
Note: To remove a selection, click View selection, select the item, then click Remove.
See also
• Adding or Removing Applications to the Profile on page 112
• Adding or Removing MBOs to the Profile on page 113
• Adding or Removing Operations to the Profile on page 114
• Adding or Removing Security Configurations or Users to the Profile on page 114
• Adding or Removing Package Users to the Profile on page 115
• Adding or Removing Connections to the Profile on page 115
• Adding or Removing Application Connections to the Profile on page 116
• Adding or Removing Payloads to the Profile on page 116
Adding or Removing MBOs to the Profile
Add MBOs from one or more packages to the profile.
Note: If a logging profile includes both package related and payloads criteria, you may
experience a serious performance impact. Make sure you include additional criteria such as
users or application connections.
1. In the Profile Definition dialog, select Package related.
2. Select MBOs, then click the button to add MBOs to the profile.
3. Navigate to a package in the left pane.
4. Select the MBO in the right pane.
5. Identify another MBO, or click OK.
Note: To remove a selection, click View selection, select the item, then click Remove.
See also
• Adding or Removing Applications to the Profile on page 112
• Adding or Removing Packages to the Profile on page 112
• Adding or Removing Operations to the Profile on page 114
• Adding or Removing Security Configurations or Users to the Profile on page 114
• Adding or Removing Package Users to the Profile on page 115
• Adding or Removing Connections to the Profile on page 115
• Adding or Removing Application Connections to the Profile on page 116
• Adding or Removing Payloads to the Profile on page 116
Sybase Control Center for Sybase Unwired Platform
113
Administer
Adding or Removing Operations to the Profile
Add operations to the log profile for MBOs that are currently deployed in the selected domain.
You can select operations for one or more MBOs.
Note: If a logging profile includes both package related and payloads criteria, you may
experience a serious performance impact. Make sure you include additional criteria such as
users or application connections.
1. In the Profile Definition dialog, select Package related.
2. Select Operations, then click the button to add operations to the profile.
3. Navigate to a package in the left pane, and select an MBO.
4. Identify the create, delete, or update operations to include for the MBO in the right pane.
5. Select another MBO and its operations, or click OK.
Note: To remove a selection, click View selection, select the item, then click Remove.
See also
• Adding or Removing Applications to the Profile on page 112
• Adding or Removing Packages to the Profile on page 112
• Adding or Removing MBOs to the Profile on page 113
• Adding or Removing Security Configurations or Users to the Profile on page 114
• Adding or Removing Package Users to the Profile on page 115
• Adding or Removing Connections to the Profile on page 115
• Adding or Removing Application Connections to the Profile on page 116
• Adding or Removing Payloads to the Profile on page 116
Adding or Removing Security Configurations or Users to the Profile
Add one or more domain security configurations to the profile.
1. In the Profile Definition dialog, select Security related.
2. Select Security configuration, then click the button to add packages to the profile.
3. Select one or more security configuration to include.
4. Click OK.
Note: To remove a selection, click View selection, select the item, then click Remove.
See also
• Adding or Removing Applications to the Profile on page 112
• Adding or Removing Packages to the Profile on page 112
• Adding or Removing MBOs to the Profile on page 113
114
Sybase Unwired Platform
Administer
•
•
•
•
•
Adding or Removing Operations to the Profile on page 114
Adding or Removing Package Users to the Profile on page 115
Adding or Removing Connections to the Profile on page 115
Adding or Removing Application Connections to the Profile on page 116
Adding or Removing Payloads to the Profile on page 116
Adding or Removing Package Users to the Profile
Add one or more domain package users to the profile to include security configurations.
1. In the Profile Definition dialog, select Security related.
2. Select Users, then click the button to add packages to the profile.
3. Select one or more user name to include.
4. Click OK.
Note: To remove a selection, click View selection, select the item, then click Remove.
See also
• Adding or Removing Applications to the Profile on page 112
• Adding or Removing Packages to the Profile on page 112
• Adding or Removing MBOs to the Profile on page 113
• Adding or Removing Operations to the Profile on page 114
• Adding or Removing Security Configurations or Users to the Profile on page 114
• Adding or Removing Connections to the Profile on page 115
• Adding or Removing Application Connections to the Profile on page 116
• Adding or Removing Payloads to the Profile on page 116
Adding or Removing Connections to the Profile
Add connections of a particular connection type to the profile.
1. In the Profile Definition dialog, select Connections.
2. Click the button to add connections to the profile.
The Connections dialog is displayed with the list of applications currently deployed in this
domain.
3. You can do any of the following:
• To add a connection to a new or existing profile, select a Connection Type entry in the
list and select the connection names.
• To remove an application from the profile, select the View selection check-box. Select
the connection type and click Remove.
4. Click OK.
Sybase Control Center for Sybase Unwired Platform
115
Administer
See also
• Adding or Removing Applications to the Profile on page 112
• Adding or Removing Packages to the Profile on page 112
• Adding or Removing MBOs to the Profile on page 113
• Adding or Removing Operations to the Profile on page 114
• Adding or Removing Security Configurations or Users to the Profile on page 114
• Adding or Removing Package Users to the Profile on page 115
• Adding or Removing Application Connections to the Profile on page 116
• Adding or Removing Payloads to the Profile on page 116
Adding or Removing Application Connections to the Profile
Add application connections to the profile. This enables you to list current application
connections to Unwired Server.
1. In Profile Definition, select Application connections.
2. Click the button to add application connections to the profile.
3. In Application Connections, select Application Connections, and the data columns to
include
4. Click OK.
See also
• Adding or Removing Applications to the Profile on page 112
• Adding or Removing Packages to the Profile on page 112
• Adding or Removing MBOs to the Profile on page 113
• Adding or Removing Operations to the Profile on page 114
• Adding or Removing Security Configurations or Users to the Profile on page 114
• Adding or Removing Package Users to the Profile on page 115
• Adding or Removing Connections to the Profile on page 115
• Adding or Removing Payloads to the Profile on page 116
Adding or Removing Payloads to the Profile
Add a subsystem to the profile for payload logging. This enables you to identify one or more
specific subsystems where payload data will also be included with the logged activity. If
specified, payload is enabled for the selected subsystems.
The payload corresponds to the information of one request serviced by the Unwired Server.
Example: For an administrator to keep track of granular details such as request headers sent to
Gateway through the proxy server, payload is enabled for a profile.
Note: If a logging profile includes both package related and payloads criteria, you may
experience a serious performance impact. Make sure you include additional criteria such as
users or application connections.
116
Sybase Unwired Platform
Administer
1. In the Profile Definition dialog, select Payloads.
2. Click the button to add payloads to the profile.
The Payloads dialog is displayed.
3. You can do any of the following:
•
•
Select the check-box adjacent to the subsystem you want to add to the profile.
Uncheck the check-box that you want to remove from the profile.
4. Click OK.
See also
• Adding or Removing Applications to the Profile on page 112
• Adding or Removing Packages to the Profile on page 112
• Adding or Removing MBOs to the Profile on page 113
• Adding or Removing Operations to the Profile on page 114
• Adding or Removing Security Configurations or Users to the Profile on page 114
• Adding or Removing Package Users to the Profile on page 115
• Adding or Removing Connections to the Profile on page 115
• Adding or Removing Application Connections to the Profile on page 116
Enabling the Created Profile
Enable the profile you have created to monitor the log profile definitions.
1. In the Profile Definition dialog, select Enable after creation to enable the logging profile
once you have created it.
2. Click OK.
You can alternatively enable the log profile by doing the following:
a. In the Settings tab, select the log profile you have created.
b. Click Enable.
c. Click OK on the confirmation dialog.
See also
• Creating the Profile Definition on page 111
Enabling and Configuring Domain Logging
Configure auto purge, flush threshold, and flush batch size settings to determine how long
domain log data is retained, how frequently it is written to database from server nodes, and set
a domain log database connection to configure where domain log data is stored.
If you do not configure the auto-purge schedule, you can purge data manually with the Purge
button. If you are manually purging logs with hundreds of thousands of entries, note that
Unwired Server removes these entries asynchronously to avoid negatively impacting runtime
Sybase Control Center for Sybase Unwired Platform
117
Administer
performance. For smaller logs, the purge action tends to be more instantaneous. To avoid large
logs, use the auto purge schedule.
1. In the left navigation pane of Sybase Control Center, select Domains.
2. Under the domain node, select Log.
3. In the right administration pane, select the Settings tab. These settings are used for all
domains.
4. Click Configuration.
5. Configure auto purge settings.
Auto purge clears obsolete data from the database once it reaches the specified threshold.
a) Select Enable auto purge configuration to activate auto purge functionality.
b) Enter the length of time (in days) to retain monitoring data before it is purged.
6. Configure flush threshold settings:
The flush threshold indicates how often data is flushed from memory to the database. This
allows you to specify the size of the data saved in memory before it is cleared. Alternately,
if you do not enable a flush threshold, data is immediately written to the domain log
database as it is captured.
a) Select Enable flush threshold configuration to activate flush threshold functionality.
Note: Enabling flush configuration is a good practice for performance considerations.
Be aware there may be a consequent delay in viewing data, until data is stored in the
database.
b) Select one of:
• Number of rows – domain log data that surpasses the specified number of rows is
flushed from memory. Enter the desired number of rows adjacent to Rows.
Disabled by default.
• Time interval – domain log data older than the specified time interval is flushed
from memory. Enter the desired duration adjacent to Minutes. The default is 5.
• Either rows or time interval – domain log data is flushed from memory according
to whichever value is reached first: either the specified number of rows or the
specified time interval. Enter the desired rows and duration adjacent to Rows and
Minutes, respectively.
7. If you enabled a flush threshold, enter a Flush batch row size by specifying the size of
each batch of data sent to the domain log database. The row size must be a positive integer.
The batch size divides flushed data into smaller segments, rather than saving all data
together according to the flush threshold parameters. For example, if you set the flush
threshold to 100 rows and the flush batch row size to 50, once 100 rows are collected in the
console, the save process executes twice; data is flushed into the database in two batches of
50 rows. If the flush threshold is not enabled, the flush batch row size is implicitly 1.
118
Sybase Unwired Platform
Administer
Note: By default, the domain log database flushes data every 5 minutes. Alternatively, you
can flush data immediately by removing or decreasing the default values, but doing so
impacts performance.
8. Optional. To change the data source, select an available database from the Domain log
database endpoint drop down list.
Available databases are those with a JDBC server connection type (SQL Anywhere)
created in the default domain. To create a new database, a platform administrator must set
up a database by running the appropriate configuration scripts and creating a server
connection for the database in the default domain. The database server connection then
appears as an option in the Domain Log Database Endpoint drop down list.
9. Optional. Change the maximum length of the payload data logged in the payload
column(s) of each sub-system. Large payload content is truncated to the length specified
as that value. The default max size is 12K (in bytes) which is configured in the 'default'
domain and applicable for all domains. Increasing the domain payload size should be
tested to identify proper configuration for the server's JVM memory settings.
10. Click OK.
Reviewing Domain Log Data
An administrator reviews logged data by creating log filters. The filters enable you to retrieve
data logged for a specific thread, application, user, connection, among other options.
You can retrieve log data without using any filters, however, when there is large number of
activities being logged, it may be advisable to filter the results to a more manageable size by
specifying search conditions in the log filter (user, application, or thread-id).
You can combine multiple log filters that are common with sub-system specific filters when
viewing in a sub-system view, and combine multiple sub-system filters in the ALL tab to
retrieve the data of interest.
Supported Log Subsystems
Log subsystems provide categories that enable you to filter and correlate application data at a
more granular level. Understanding these subsystems enables you to formulate more specific
filters for tracking application activities throughout the system.
Subsystem
Description
All
Provides a unified view of all subsystems, enabling you to look for activities,
trends, and symptoms across multiple subsystems.
Synchronization
Provides a view of synchronization activities. Within this subsystem, additional categories include data synchronization, operation replay, subscription,
result checker, cache refresh, and data services (DS) interface.
Device Notification Provides a view of device notification activities.
Sybase Control Center for Sybase Unwired Platform
119
Administer
Subsystem
Description
DCN
Provides a view of data change notification (DCN) activities. Within this
subsystem, additional categories include general DCN, and Hybrid App DCN.
Security
Provides a view of security-related activities.
Error
Provides a view of errors.
Connection
Provides a view of connection activities. Within this subsystem, additional
categories include DOE, JDBC, RES, SAP®, and SOAP connections.
Push
Provides a few of push notification activities.
Proxy
Provides a view of Online Data Proxy connection-related activities.
Server
Provides a view of server-related activities.
Dispatcher
Provides a view of dispatcher activities. Within this subsystem, categories
include Messaging and Service.
Application
Provides a view of application activities. Within this subsystem, categories
include Registration and Setting.
.
See also
• Setting Up a Pool of Log Filters on page 121
• Retrieving Unified View Logs on page 123
• Retrieving Synchronization Logs on page 124
• Retrieving Device Notification Logs on page 125
• Retrieving Data Change Notification Logs on page 126
• Retrieving Security Logs on page 127
• Retrieving Error Logs on page 128
• Retrieving Connection Logs on page 129
• Retrieving Push Logs on page 130
• Retrieving Proxy Logs on page 131
• Retrieving Server Logs on page 132
• Retrieving Dispatcher Logs on page 132
• Retrieving Application Logs on page 134
• Correlating Log Data Across Subsystems on page 135
• Exporting Log Data on page 136
120
Sybase Unwired Platform
Administer
Setting Up a Pool of Log Filters
Set up a pool of log filters to filter out unwanted application activities, and provide a view of
specific activities. Use Sybase Control Center to create and manage your filters.
See also
• Supported Log Subsystems on page 119
• Retrieving Unified View Logs on page 123
• Retrieving Synchronization Logs on page 124
• Retrieving Device Notification Logs on page 125
• Retrieving Data Change Notification Logs on page 126
• Retrieving Security Logs on page 127
• Retrieving Error Logs on page 128
• Retrieving Connection Logs on page 129
• Retrieving Push Logs on page 130
• Retrieving Proxy Logs on page 131
• Retrieving Server Logs on page 132
• Retrieving Dispatcher Logs on page 132
• Retrieving Application Logs on page 134
• Correlating Log Data Across Subsystems on page 135
• Exporting Log Data on page 136
Reusable Log Filters
Create reusable log filters that you can use as a base. One strategy is to create a base log filter
for each of the supported log subsystems, and for significant categories within subsystems.
Another strategy is to create common log filters (useful across subsystems) on specific
criteria, such as thread ID, user, package, and so forth.
You can modify these base log filters as needed for more specific searches, or clone the log
filter and modify it for a specific search.
See also
• Creating Log Filters on page 121
• Deleting Filters on page 122
• Updating Filters on page 122
Creating Log Filters
Filter the log data by creating filters across subsystems that define the appropriate search
criteria.
1. In the left navigation pane of the Sybase Control Center, select theDomains node.
Sybase Control Center for Sybase Unwired Platform
121
Administer
2. Select the domain node and select the Log node.
3. In the right administration pane, select the General tab.
4. Select + to add a filter definition to a subsystem.
5. In the Filter Definition dialog, enter the Name and Description of the filter.
6. Select the Sub System.
7. Select the filter criteria and assign values to the criteria selected. You can use the logical
operations to compose the criteria.
Note: You use the 'AND' logical operator to highlight filter relations belonging to the same
subsystem. Filter definitions among multiple subsystems use the 'OR' logical operator.
8. Click OK.
See also
• Reusable Log Filters on page 121
• Deleting Filters on page 122
• Updating Filters on page 122
Deleting Filters
Delete the filters created for sub systems
1. In the left navigation pane of the Sybase Control Center, select theDomains node.
2. Select the domain node and select the Log node.
3. In the right administration pane, select the General tab.
4. Select the filter from the list.
5. Click Delete.
See also
• Reusable Log Filters on page 121
• Creating Log Filters on page 121
• Updating Filters on page 122
Updating Filters
Update filters as needed to fine tune log file filtering.
1. In the left navigation pane of the Sybase Control Center, select theDomains node.
2. Select the domain node and select the Log node.
3. In the right administration pane, select the General tab.
4. Select the filter from the list.
5. Click the properties icon to review or modify the filter.
122
Sybase Unwired Platform
Administer
Note: Alternatively, click the clone icon to clone the filter, then proceed to modify it.
6. In Filter Definition, modify the description, and set up the filter criteria.
7. Click OK.
See also
• Reusable Log Filters on page 121
• Creating Log Filters on page 121
• Deleting Filters on page 122
Retrieving Unified View Logs
Retrieves logging data across the domain to provide a unified view.
1. Display the General tab for Domain Logs.
In the navigation pane, click Domain > <domainName> > Log, then select General from
the administration pane.
2. Select the All tab.
3. To filter the display, select Show filter and either:
•
•
Use an existing filter by checking the box adjacent to the filter name.
Create a new filter by clicking + and choosing a starting date and time, and ending date
and time.
To customize the display, select the view type (grid or text), or click >> to show only
selected columns. To export the filtered results, click Export and select an appropriate
output destination.
4. Click Retrieve to retrieve the logs.
The table is populated with the list of logs.
See also
• Supported Log Subsystems on page 119
• Setting Up a Pool of Log Filters on page 121
• Retrieving Synchronization Logs on page 124
• Retrieving Device Notification Logs on page 125
• Retrieving Data Change Notification Logs on page 126
• Retrieving Security Logs on page 127
• Retrieving Error Logs on page 128
• Retrieving Connection Logs on page 129
• Retrieving Push Logs on page 130
• Retrieving Proxy Logs on page 131
• Retrieving Server Logs on page 132
• Retrieving Dispatcher Logs on page 132
Sybase Control Center for Sybase Unwired Platform
123
Administer
•
•
•
Retrieving Application Logs on page 134
Correlating Log Data Across Subsystems on page 135
Exporting Log Data on page 136
Retrieving Synchronization Logs
Retrieves logging data related to different aspects of data synchronization, including data,
subscriptions, operations, result checker, cache refresh and the data service and Unwired
Server interface. Using data in these logs and the correlation tool, you can follow the data path
between the enterprise information system (EIS), Unwired Server, cache database, and user
application connection.
1. Display the General tab for Domain Logs.
In the navigation pane, click Domain > <domainName> > Log, then select General from
the administration pane.
2. Select the Synchronization tab.
3. Select a synchronization subsystem:
• Data Sync – view data synchronization details.
• Operation Replay – view MBO operational replay details.
• Subscription – view subscription details.
• Result Checker – view result checker details.
• Cache Refresh – view cache database interaction details.
• DS Interface – view requests entering data services that result in interaction with cache
database and EIS.
4. To filter the display, select Show filter and either:
•
•
Use an existing filter by checking the box adjacent to the filter name.
Create a new filter by clicking + and choosing a starting date and time, and ending date
and time.
To customize the display, select the view type (grid or text), or click >> to show only
selected columns. To export the filtered results, click Export and select an appropriate
output destination.
5. (Optional) Select the columns to display from the drop down list, such as Application ID,
Application Connection Id, and User.
6. Click Retrieve to retrieve the logs.
7. (Optional) Select a specific row to view additional columns in the detail area.
See also
• Supported Log Subsystems on page 119
• Setting Up a Pool of Log Filters on page 121
• Retrieving Unified View Logs on page 123
• Retrieving Device Notification Logs on page 125
124
Sybase Unwired Platform
Administer
•
•
•
•
•
•
•
•
•
•
•
Retrieving Data Change Notification Logs on page 126
Retrieving Security Logs on page 127
Retrieving Error Logs on page 128
Retrieving Connection Logs on page 129
Retrieving Push Logs on page 130
Retrieving Proxy Logs on page 131
Retrieving Server Logs on page 132
Retrieving Dispatcher Logs on page 132
Retrieving Application Logs on page 134
Correlating Log Data Across Subsystems on page 135
Exporting Log Data on page 136
Retrieving Device Notification Logs
Retrieves logging data for server-initiated synchronization notifications between Unwired
Server and devices.
1. Display the General tab for Domain Logs.
In the navigation pane, click Domain > <domainName> > Log, then select General from
the administration pane.
2. Select the Device Notification tab.
3. To filter the display, select Show filter and either:
•
•
Use an existing filter by checking the box adjacent to the filter name.
Create a new filter by clicking + and choosing a starting date and time, and ending date
and time.
To customize the display, select the view type (grid or text), or click >> to show only
selected columns. To export the filtered results, click Export and select an appropriate
output destination.
4. (Optional) Select the columns to display from the drop down list, such as Application ID,
Application Connection Id, and User.
5. Click Retrieve to retrieve the log data.
6. (Optional) Select a specific row to view additional columns in the detail area.
See also
• Supported Log Subsystems on page 119
• Setting Up a Pool of Log Filters on page 121
• Retrieving Unified View Logs on page 123
• Retrieving Synchronization Logs on page 124
• Retrieving Data Change Notification Logs on page 126
• Retrieving Security Logs on page 127
Sybase Control Center for Sybase Unwired Platform
125
Administer
•
•
•
•
•
•
•
•
•
Retrieving Error Logs on page 128
Retrieving Connection Logs on page 129
Retrieving Push Logs on page 130
Retrieving Proxy Logs on page 131
Retrieving Server Logs on page 132
Retrieving Dispatcher Logs on page 132
Retrieving Application Logs on page 134
Correlating Log Data Across Subsystems on page 135
Exporting Log Data on page 136
Retrieving Data Change Notification Logs
Retrieves logging data for data change notifications (DCN) between an enterprise information
system (EIS) and an MBO package, for general and Hybrid App DCN.
1. Display the General tab for Domain Logs.
In the navigation pane, click Domain > <domainName> > Log, then select General from
the administration pane.
2. Select the DCN tab.
3. Select the DCN type:
• General DCN
• Hybrid App DCN
4. To filter the display, select Show filter and either:
•
•
Use an existing filter by checking the box adjacent to the filter name.
Create a new filter by clicking + and choosing a starting date and time, and ending date
and time.
To customize the display, select the view type (grid or text), or click >> to show only
selected columns. To export the filtered results, click Export and select an appropriate
output destination.
5. (Optional) Select the columns to display from the drop down list, such as Application ID,
Application Connection Id, and User.
6. Click Retrieve to retrieve the logs.
7. (Optional) Select a specific row to view additional columns in the detail area.
See also
• Supported Log Subsystems on page 119
• Setting Up a Pool of Log Filters on page 121
• Retrieving Unified View Logs on page 123
• Retrieving Synchronization Logs on page 124
• Retrieving Device Notification Logs on page 125
126
Sybase Unwired Platform
Administer
•
•
•
•
•
•
•
•
•
•
Retrieving Security Logs on page 127
Retrieving Error Logs on page 128
Retrieving Connection Logs on page 129
Retrieving Push Logs on page 130
Retrieving Proxy Logs on page 131
Retrieving Server Logs on page 132
Retrieving Dispatcher Logs on page 132
Retrieving Application Logs on page 134
Correlating Log Data Across Subsystems on page 135
Exporting Log Data on page 136
Retrieving Security Logs
Retrieves security details for specific applications.
1. Display the General tab for Domain Logs.
In the navigation pane, click Domain > <domainName> > Log, then select General from
the administration pane.
2. Select the Security tab.
3. To filter the display, select Show filter and either:
•
•
Use an existing filter by checking the box adjacent to the filter name.
Create a new filter by clicking + and choosing a starting date and time, and ending date
and time.
To customize the display, select the view type (grid or text), or click >> to show only
selected columns. To export the filtered results, click Export and select an appropriate
output destination.
4. (Optional) Select the columns to display from the drop down list, such as Application ID,
Application Connection Id, and User.
5. Click Retrieve to retrieve the logs.
See also
• Supported Log Subsystems on page 119
• Setting Up a Pool of Log Filters on page 121
• Retrieving Unified View Logs on page 123
• Retrieving Synchronization Logs on page 124
• Retrieving Device Notification Logs on page 125
• Retrieving Data Change Notification Logs on page 126
• Retrieving Error Logs on page 128
• Retrieving Connection Logs on page 129
• Retrieving Push Logs on page 130
Sybase Control Center for Sybase Unwired Platform
127
Administer
•
•
•
•
•
•
Retrieving Proxy Logs on page 131
Retrieving Server Logs on page 132
Retrieving Dispatcher Logs on page 132
Retrieving Application Logs on page 134
Correlating Log Data Across Subsystems on page 135
Exporting Log Data on page 136
Retrieving Error Logs
Retrieves logging data for domain errors. Note that error logging is always on, and any error
that occurs for any application activity is logged.
1. Display the General tab for Domain Logs.
In the navigation pane, click Domain > <domainName> > Log, then select General from
the administration pane.
2. Select the Error tab.
3. To filter the display, select Show filter and either:
•
•
Use an existing filter by checking the box adjacent to the filter name.
Create a new filter by clicking + and choosing a starting date and time, and ending date
and time.
To customize the display, select the view type (grid or text), or click >> to show only
selected columns. To export the filtered results, click Export and select an appropriate
output destination.
4. (Optional) Select the columns to display from the drop down list, such as Application ID,
Application Connection Id, and User.
5. Click Retrieve to retrieve the logs.
See also
• Supported Log Subsystems on page 119
• Setting Up a Pool of Log Filters on page 121
• Retrieving Unified View Logs on page 123
• Retrieving Synchronization Logs on page 124
• Retrieving Device Notification Logs on page 125
• Retrieving Data Change Notification Logs on page 126
• Retrieving Security Logs on page 127
• Retrieving Connection Logs on page 129
• Retrieving Push Logs on page 130
• Retrieving Proxy Logs on page 131
• Retrieving Server Logs on page 132
• Retrieving Dispatcher Logs on page 132
128
Sybase Unwired Platform
Administer
•
•
•
Retrieving Application Logs on page 134
Correlating Log Data Across Subsystems on page 135
Exporting Log Data on page 136
Retrieving Connection Logs
Retrieves logging data for domain connections for specific connection types to backend data
sources, including DOE, JDBC, REST, SAP, and SOAP if enabled.
1. Display the General tab for Domain Logs.
In the navigation pane, click Domain > <domainName> > Log, then select General from
the administration pane.
2. Select the Connection tab.
3. Select a connection type, such as DOE, JDBC, REST, SAP, or SOAP.
4. To filter the display, select Show filter and either:
•
•
Use an existing filter by checking the box adjacent to the filter name.
Create a new filter by clicking + and choosing a starting date and time, and ending date
and time.
To customize the display, select the view type (grid or text), or click >> to show only
selected columns. To export the filtered results, click Export and select an appropriate
output destination.
5. (Optional) Select the columns to display from the drop down list, such as Application ID,
Application Connection Id, and User.
6. Click Retrieve to retrieve the data.
7. (Optional) Select a specific row to view additional columns in the detail area.
See also
• Supported Log Subsystems on page 119
• Setting Up a Pool of Log Filters on page 121
• Retrieving Unified View Logs on page 123
• Retrieving Synchronization Logs on page 124
• Retrieving Device Notification Logs on page 125
• Retrieving Data Change Notification Logs on page 126
• Retrieving Security Logs on page 127
• Retrieving Error Logs on page 128
• Retrieving Push Logs on page 130
• Retrieving Proxy Logs on page 131
• Retrieving Server Logs on page 132
• Retrieving Dispatcher Logs on page 132
• Retrieving Application Logs on page 134
Sybase Control Center for Sybase Unwired Platform
129
Administer
•
•
Correlating Log Data Across Subsystems on page 135
Exporting Log Data on page 136
Retrieving Push Logs
Retrieves the log data for all push notifications.
Once you have traced a connection under the Applications node, you can retrieve the logs
under the Domains node.
1. Display the General tab for Domain Logs.
In the navigation pane, click Domain > <domainName> > Log, then select General from
the administration pane.
2. Select Push.
3. To filter the display, select Show filter and either:
•
•
Use an existing filter by checking the box adjacent to the filter name.
Create a new filter by clicking + and choosing a starting date and time, and ending date
and time.
To customize the display, select the view type (grid or text), or click >> to show only
selected columns. To export the filtered results, click Export and select an appropriate
output destination.
4. (Optional) Select the columns to display from the drop down list, such as Application ID,
Application Connection Id, and User.
5. Click Retrieve to retrieve the data.
6. (Optional) Select a specific row to view additional columns in the detail area.
See also
• Supported Log Subsystems on page 119
• Setting Up a Pool of Log Filters on page 121
• Retrieving Unified View Logs on page 123
• Retrieving Synchronization Logs on page 124
• Retrieving Device Notification Logs on page 125
• Retrieving Data Change Notification Logs on page 126
• Retrieving Security Logs on page 127
• Retrieving Error Logs on page 128
• Retrieving Connection Logs on page 129
• Retrieving Proxy Logs on page 131
• Retrieving Server Logs on page 132
• Retrieving Dispatcher Logs on page 132
• Retrieving Application Logs on page 134
• Correlating Log Data Across Subsystems on page 135
130
Sybase Unwired Platform
Administer
•
Exporting Log Data on page 136
Retrieving Proxy Logs
Retrieves the log data for all requests and responses made from the Proxy server.
Once you have traced a connection under the Applications node, you can retrieve the logs
under the Domains node.
1. Display the General tab for Domain Logs.
In the navigation pane, click Domain > <domainName> > Log, then select General from
the administration pane.
2. Select the Proxy.
3. To filter the display, select Show filter and either:
•
•
Use an existing filter by checking the box adjacent to the filter name.
Create a new filter by clicking + and choosing a starting date and time, and ending date
and time.
To customize the display, select the view type (grid or text), or click >> to show only
selected columns. To export the filtered results, click Export and select an appropriate
output destination.
4. (Optional) Select the columns to display from the drop down list, such as Application ID,
Application Connection Id, and User.
5. Click Retrieve to retrieve the log data.
6. (Optional) Select a specific row to view additional columns in the detail area.
See also
• Supported Log Subsystems on page 119
• Setting Up a Pool of Log Filters on page 121
• Retrieving Unified View Logs on page 123
• Retrieving Synchronization Logs on page 124
• Retrieving Device Notification Logs on page 125
• Retrieving Data Change Notification Logs on page 126
• Retrieving Security Logs on page 127
• Retrieving Error Logs on page 128
• Retrieving Connection Logs on page 129
• Retrieving Push Logs on page 130
• Retrieving Server Logs on page 132
• Retrieving Dispatcher Logs on page 132
• Retrieving Application Logs on page 134
• Correlating Log Data Across Subsystems on page 135
• Exporting Log Data on page 136
Sybase Control Center for Sybase Unwired Platform
131
Administer
Retrieving Server Logs
Retrieves logging data for domain servers.
1.
2. Display the General tab for Domain Logs.
In the navigation pane, click Domain > <domainName> > Log, then select General from
the administration pane.
3. Select the Server tab.
4. To filter the display, select Show filter and either:
•
•
Use an existing filter by checking the box adjacent to the filter name.
Create a new filter by clicking + and choosing a starting date and time, and ending date
and time.
To customize the display, select the view type (grid or text), or click >> to show only
selected columns. To export the filtered results, click Export and select an appropriate
output destination.
5. (Optional) Select the columns to display from the drop down list, such as Application ID,
Application Connection Id, and User.
6. Click Retrieve to retrieve the logs.
See also
• Supported Log Subsystems on page 119
• Setting Up a Pool of Log Filters on page 121
• Retrieving Unified View Logs on page 123
• Retrieving Synchronization Logs on page 124
• Retrieving Device Notification Logs on page 125
• Retrieving Data Change Notification Logs on page 126
• Retrieving Security Logs on page 127
• Retrieving Error Logs on page 128
• Retrieving Connection Logs on page 129
• Retrieving Push Logs on page 130
• Retrieving Proxy Logs on page 131
• Retrieving Dispatcher Logs on page 132
• Retrieving Application Logs on page 134
• Correlating Log Data Across Subsystems on page 135
• Exporting Log Data on page 136
Retrieving Dispatcher Logs
Retrieves logging data related to different aspects of the dispatcher, including messaging and
service data. Using data in these logs and the correlation tool, you can follow the data path
132
Sybase Unwired Platform
Administer
between the enterprise information system (EIS), Unwired Server, cache database, and user
application connection.
1. Display the General tab for Domain Logs.
In the navigation pane, click Domain > <domainName> > Log, then select General from
the administration pane.
2. Select the Dispatcher tab.
3. Select a dispatcher subsystem: Messaging or Service.
4. To filter the display, select Show filter and either:
•
•
Use an existing filter by checking the box adjacent to the filter name.
Create a new filter by clicking + and choosing a starting date and time, and ending date
and time.
To customize the display, select the view type (grid or text), or click >> to show only
selected columns. To export the filtered results, click Export and select an appropriate
output destination.
5. (Optional) Select the columns to display from the drop down list, such as Application ID,
Application Connection Id, and User.
6. Click Retrieve to retrieve the logs.
7. (Optional) Select a specific row to view additional columns in the detail area.
See also
• Supported Log Subsystems on page 119
• Setting Up a Pool of Log Filters on page 121
• Retrieving Unified View Logs on page 123
• Retrieving Synchronization Logs on page 124
• Retrieving Device Notification Logs on page 125
• Retrieving Data Change Notification Logs on page 126
• Retrieving Security Logs on page 127
• Retrieving Error Logs on page 128
• Retrieving Connection Logs on page 129
• Retrieving Push Logs on page 130
• Retrieving Proxy Logs on page 131
• Retrieving Server Logs on page 132
• Retrieving Application Logs on page 134
• Correlating Log Data Across Subsystems on page 135
• Exporting Log Data on page 136
Sybase Control Center for Sybase Unwired Platform
133
Administer
Retrieving Application Logs
Retrieves application logging data, including registration and setting information. Using data
in these logs and the correlation tool, you can follow the data path between the enterprise
information system (EIS), Unwired Server, cache database, and user application connection.
1. Display the General tab for Domain Logs.
In the navigation pane, click Domain > <domainName> > Log, then select General from
the administration pane.
2. Select the Application tab.
3. Select a application subsystem: Registration or Setting.
4. To filter the display, select Show filter and either:
•
•
Use an existing filter by checking the box adjacent to the filter name.
Create a new filter by clicking + and choosing a starting date and time, and ending date
and time.
To customize the display, select the view type (grid or text), or click >> to show only
selected columns. To export the filtered results, click Export and select an appropriate
output destination.
5. (Optional) Select the columns to display from the drop down list, such as Application ID,
Application Connection Id, and User.
6. Click Retrieve to retrieve the logs.
7. (Optional) Select a specific row to view additional columns in the detail area.
See also
• Supported Log Subsystems on page 119
• Setting Up a Pool of Log Filters on page 121
• Retrieving Unified View Logs on page 123
• Retrieving Synchronization Logs on page 124
• Retrieving Device Notification Logs on page 125
• Retrieving Data Change Notification Logs on page 126
• Retrieving Security Logs on page 127
• Retrieving Error Logs on page 128
• Retrieving Connection Logs on page 129
• Retrieving Push Logs on page 130
• Retrieving Proxy Logs on page 131
• Retrieving Server Logs on page 132
• Retrieving Dispatcher Logs on page 132
• Correlating Log Data Across Subsystems on page 135
• Exporting Log Data on page 136
134
Sybase Unwired Platform
Administer
Correlating Log Data Across Subsystems
Correlation mode enables you to retrieve domain log data in multiple subsystems, using the
same search condition. The same condition is combined by common type filters and time
range. This provides a tool for correlating activity across subsystems, useful for analyzing and
troubleshooting.
For example, you could create a common filter for Application ID (such as Application ID =
appid); select the ProxyRequestResponse tab and enter the filter information; retrieve the
data; then select Correlated mode, and switch to another tab such as ProxyPush.
1. In the left navigation pane of Sybase Control Center, select Domain.
2. Under the domain node, select Log.
3. In the right administration pane, select the General tab.
4. Select the subsystem tab, such as Synchronization.
5. To select or set up a special filter, select Show filter.
6. To filter based on the date and time, enter a Start date, End date, Start time, End
time.
7. (Optional) Select the columns to display from the drop down list, such as Application ID,
Application Connection Id, User, and Thread.
8. Click Retrieve to retrieve the logs.
The table is populated with log data.
9. Select Correlated mode and select the common type of log filters to use.
10. Switch to another subsystem tabs. The data is refreshed using the same criteria from the
common type of log filters and time range specified.
11. Use the data to trace application activity across subsystems.
See also
• Supported Log Subsystems on page 119
• Setting Up a Pool of Log Filters on page 121
• Retrieving Unified View Logs on page 123
• Retrieving Synchronization Logs on page 124
• Retrieving Device Notification Logs on page 125
• Retrieving Data Change Notification Logs on page 126
• Retrieving Security Logs on page 127
• Retrieving Error Logs on page 128
• Retrieving Connection Logs on page 129
• Retrieving Push Logs on page 130
• Retrieving Proxy Logs on page 131
• Retrieving Server Logs on page 132
• Retrieving Dispatcher Logs on page 132
Sybase Control Center for Sybase Unwired Platform
135
Administer
•
•
Retrieving Application Logs on page 134
Exporting Log Data on page 136
Exporting Log Data
Export data to a file for archive, or to analyze and troubleshoot problems.
Note:
•
•
Depending on the amount of data being exported, the log export can take a long time.
Sybase recommends using log filters and time ranges to filter out and export specific log
entries of interest.
You can also use the management API if there is a need to export domain log contents if the
data set is large, or to refrain from blocking the user interface.
1. In the left navigation pane of Sybase Control Center, select Domain.
2. Under the domain node, select Log.
3. In the right administration pane, select the General tab.
4. Select the subsystem tab, such as Synchronization.
5. To select or set up a special filter, select Show filter.
6. To filter based on the date and time, enter a Start date, End date, Start time, End
time.
7. Click Retrieve to retrieve the logs.
The table is populated with log data.
8. Click Export and specify the file name and location.
See also
• Supported Log Subsystems on page 119
• Setting Up a Pool of Log Filters on page 121
• Retrieving Unified View Logs on page 123
• Retrieving Synchronization Logs on page 124
• Retrieving Device Notification Logs on page 125
• Retrieving Data Change Notification Logs on page 126
• Retrieving Security Logs on page 127
• Retrieving Error Logs on page 128
• Retrieving Connection Logs on page 129
• Retrieving Push Logs on page 130
• Retrieving Proxy Logs on page 131
• Retrieving Server Logs on page 132
• Retrieving Dispatcher Logs on page 132
• Retrieving Application Logs on page 134
• Correlating Log Data Across Subsystems on page 135
136
Sybase Unwired Platform
Administer
Purging Domain Logs
A manual purge request is submitted to the primary server. It is a background task is initiated to
perform batched clean-up of the data from the domain log database.
Note: Do not stop the primary server while the purge task is executing. Otherwise, you will
need to submit the manual purge request again.
1. In the left navigation pane of Sybase Control Center, select Domains.
2. Under the domain node, select Log.
3. In the right administration pane, select the Settings tab.
4. Click Purge.
5. Enter the date and time within which you want the data to be purged.
6. Click OK.
The purge completion time is dependent on the amount of the log data being purged.
Therefore, domain log data may still be seen during this time.
Domain Log Categories
Domain log data provides detailed statistics for all aspects of device, user, application,
domain, and data synchronization related activities.
Synchronization Log
Synchronization logs include data related to different aspects of data synchronization,
including data, subscriptions, operations, result checker, cache refresh and the data service
and Unwired Server interface. Using data in these logs and the correlation tool, you can follow
the data path between the enterprise information system (EIS), Unwired Server, cache
database, and user application connection.
To find out about
See
Data synchronization transactions
Data Sync statistics
Data services requests made to the Enterprise in- DS Interface statistics
formation system (EIS)
Cache database (CDB) activities
Cache refresh statistics
EIS error codes or failures resulting from Mobile Result Checker statistics (coding required)
Business Object operations against the EIS datasource
Moving MBO operations from a mobile device to Operation replay statistics
the CDB
Sybase Control Center for Sybase Unwired Platform
137
Administer
To find out about
See
Moving data between a mobile device and the
CDB
Subscription statistics
Data Sync
Synchronization logs include data related to different aspects of data synchronization,
including data and Unwired Server interface.
Data Sync – basic statistics for individual data synchronizations:
•
•
•
•
•
•
•
•
•
•
•
•
•
Time – the time and date stamp for the log entry.
Application ID – the unique identifier assigned to the registered application. Values may
include a number, blank, or HWC, depending on the client type.
Application Connection ID – the unique identifier for a user application connection.
User – the name of the user associated with the application ID.
Stage – the current stage of processing - START or FINISH.
Package – the name of the package to which the subscription belongs.
MBO – the mobile business object used.
Sync Group – the synchronization group associated with the request.
Thread ID – the identifier for the thread used to process the request.
Node ID – the server node on which the request is received.
Error – the error message if any.
Transaction ID – a unique ID that represents a transaction (one cycle of request-response)
performed by the client or application.
Root Context ID – a unique ID that represents a client/server session. A session can be
thought of as a block that includes multiple requests from the client to the server.
Note: Additional detail columns:
•
Payload
Operation Replay
Synchronization logs include data related to different aspects of data synchronization,
including operations and Unwired Server interface.
Operation Replay – statistics for moving MBO operations (typically create, update, and
delete) from the device cache to the cache database cache on Unwired Server:
•
•
•
•
138
Time – the time and date stamp for the log entry.
Application ID – the unique identifier assigned to the registered application. Values may
include a number, blank, or HWC, depending on the client type.
Application Connection ID – the unique identifier for a user application connection.
User – the name of the user associated with the application ID.
Sybase Unwired Platform
Administer
•
•
•
•
•
•
•
•
•
Stage – the current stage of processing - START or FINISH.
Package – the name of the package to which the subscription belongs.
MBO – the mobile business object used.
Operation – the MBO operation.
Thread ID – the identifier for the thread used to process the request.
Node ID – the server node on which the request is received.
Error – the error message if any.
Transaction ID – a unique ID that represents a transaction (one cycle of request-response)
performed by the client or application.
Root Context ID – a unique ID that represents a client/server session. A session can be
thought of as a block that includes multiple requests from the client to the server.
Note: Additional detail columns:
•
Payload
Subscription
Synchronization logs include data related to different aspects of data synchronization,
including subscriptions and Unwired Server interface.
Subscription – statistics for transferring data between mobile devices and the cache database
on Unwired Server:
•
•
•
•
•
•
•
•
•
•
•
•
•
•
Time – the time and date stamp for the log entry.
Application ID – the unique identifier assigned to the registered application. Values may
include a number, blank, or HWC, depending on the client type.
Application Connection ID – the unique identifier for a user application connection.
User – the name of the user associated with the application ID.
Stage – the current stage of processing - START or FINISH.
Package – the name of the package to which the subscription belongs.
Subscription Type – the type of subscription used, including SUBSCRIBE,
UNSUBSCRIBE, RECOVER, SUSPEND, and RESUME.
Subscription ID – the identifier associated with the subscription.
Sync Group – the synchronization group associated with the request.
Thread ID – the identifier for the thread used to process the request.
Node ID – the server node on which the request is received.
Error – the error message if any.
Transaction ID – a unique ID that represents a transaction (one cycle of request-response)
performed by the client or application.
Root Context ID – a unique ID that represents a client/server session. A session can be
thought of as a block that includes multiple requests from the client to the server.
Note: Additional detail columns:
Sybase Control Center for Sybase Unwired Platform
139
Administer
•
Payload
Result Checker
Synchronization logs include data related to different aspects of data synchronization,
including result checker and Unwired Server interface.
Result Checker – EIS error codes or failures resulting from Mobile Business Object
operations against the EIS datasource (requires coding):
•
•
•
•
•
•
•
•
•
•
•
•
Time – the time and date stamp for the log entry.
Application ID – the unique identifier assigned to the registered application. Values may
include a number, blank, or HWC, depending on the client type.
Application Connection ID – the unique identifier for a user application connection.
User – the name of the user associated with the application ID.
Stage – the current stage of processing - START or FINISH.
Package – the name of the package to which the subscription belongs.
Class – the class used for the result checker.
Thread ID – the identifier for the thread used to process the request.
Node ID – the server node on which the request is received.
Error – the error message if any.
Transaction ID – a unique ID that represents a transaction (one cycle of request-response)
performed by the client or application.
Root Context ID – a unique ID that represents a client/server session. A session can be
thought of as a block that includes multiple requests from the client to the server.
Note: Additional detail columns:
•
None
Cache Refresh
Synchronization logs include data related to different aspects of data synchronization,
including cache refresh and Unwired Server interface.
Cache Refresh – statistics for cache database activities:
•
•
•
•
•
•
•
140
Time – the time and date stamp for the log entry.
Application ID – the unique identifier assigned to the registered application. Values may
include a number, blank, or HWC, depending on the client type.
Application Connection ID – the unique identifier for a user application connection.
User – the name of the user associated with the application ID.
Stage – the current stage of processing - START or FINISH.
Package – the name of the package to which the subscription belongs.
MBO – the mobile business object used.
Sybase Unwired Platform
Administer
•
•
•
•
•
•
•
•
•
•
•
Cache Group – the cache group name.
CacheRow Count – the number of cached rows.
EIS Row Count – the number of rows retrieved from the enterprise information system
(EIS).
Insert Count – the number of rows inserted in the cache.
Update Count – the number of rows updated in the cache.
Delete Count – the number of rows deleted from the cache.
Thread ID – the identifier for the thread used to process the request.
Node ID – the server node on which the request is received.
Error – the error message if any.
Transaction ID – a unique ID that represents a transaction (one cycle of request-response)
performed by the client or application.
Root Context ID – a unique ID that represents a client/server session. A session can be
thought of as a block that includes multiple requests from the client to the server.
Note: Additional detail columns:
•
•
•
•
•
Refresh Type
Virtual Table Name
Partition Key
Pre Update Cache Image (payload)
Post Update Cache Image (payload)
DS Interface
Synchronization logs include data related to different aspects of data synchronization,
including data service and Unwired Server interface.
DS Interface – statistics for data services requests made to the Enterprise information system
(EIS):
•
•
•
•
•
•
•
•
•
•
•
Time – the time and date stamp for the log entry.
Application ID – the unique identifier assigned to the registered application. Values may
include a number, blank, or HWC, depending on the client type.
Application Connection ID – the unique identifier for a user application connection.
User – the name of the user associated with the application ID.
Stage – the current stage of processing - START or FINISH.
Package – the name of the package to which the subscription belongs.
MBO – the mobile business object used.
Operation – the MBO operation.
Thread ID – the identifier for the thread used to process the request.
Node ID – the server node on which the request is received.
Error – the error message if any.
Sybase Control Center for Sybase Unwired Platform
141
Administer
•
•
Transaction ID – a unique ID that represents a transaction (one cycle of request-response)
performed by the client or application.
Root Context ID – a unique ID that represents a client/server session. A session can be
thought of as a block that includes multiple requests from the client to the server.
Note: Additional detail columns:
•
•
•
•
Operation Type
Virtual Table Name
Input Attributes (payload)
Input Parameters (payload)
Device Notification Log
Device notification logs include logging data for server-initiated synchronization
notifications between Unwired Server and devices.
•
•
•
•
•
•
•
•
•
•
•
•
Time – the time and date stamp for the log entry.
Application ID – the unique identifier assigned to the registered application. Values may
include a number, blank, or HWC, depending on the client type.
Application Connection ID – the unique identifier for a user application connection.
User – the name of the user associated with the application ID.
Package – the name of the package to which the subscription belongs.
MBO – the mobile business object used.
Sync Group – the synchronization group associated with the request.
Thread ID – the identifier for the thread used to process the request.
Node ID – the server node on which the request is received.
Error – the error message if any.
Transaction ID – a unique ID that represents a transaction (one cycle of request-response)
performed by the client or application.
Root Context ID – a unique ID that represents a client/server session. A session can be
thought of as a block that includes multiple requests from the client to the server.
Note: Additional detail columns:
•
Payload
Data Change Notification Log
Data Change Notification (DCN) logs include logging data for data change notifications
between an enterprise information system (EIS) and an MBO package, for general and Hybrid
App DCN.
142
Sybase Unwired Platform
Administer
General Data Change Notification
Provides logging data for general data change notifications between an enterprise information
system (EIS) and an MBO package.
•
•
•
•
•
•
•
•
•
•
Time – the time and date stamp for the log entry.
User – the name of the user associated with the application ID.
Stage – the current stage of processing - START or FINISH.
Package – the name of the package to which the subscription belongs.
MBO – the mobile business object used.
Thread ID – the identifier for the thread used to process the request.
Node ID – the server node on which the request is received.
Error – the error message if any.
Transaction ID – a unique ID that represents a transaction (one cycle of request-response)
performed by the client or application.
Root Context ID – a unique ID that represents a client/server session. A session can be
thought of as a block that includes multiple requests from the client to the server.
Note: Additional detail columns:
•
Payload
Hybrid App Data Change Notification
Provides logging data for Hybrid App data change notifications between an enterprise
information system (EIS) and an MBO package.
•
•
•
•
•
•
•
•
•
•
•
•
•
•
Time – the time and date stamp for the log entry.
Hybrid App ID – the unique identifier associated with a Hybrid App.
Application Connection ID – the unique identifier for a user application connection.
User – the name of the user associated with the application ID.
Package – the name of the package to which the subscription belongs.
Thread ID – the identifier for the thread used to process the request.
Node ID – the server node on which the request is received.
Operation – the MBO operation.
Subject – the Hybrid App DCN request subject line.
From – the "From" value for the Hybrid App DCN request.
To – the "To" value for the Hybrid App DCN request.
Body – the message body for the Hybrid App DCN request.
Error – the error message if any.
Transaction ID – a unique ID that represents a transaction (one cycle of request-response)
performed by the client or application.
Sybase Control Center for Sybase Unwired Platform
143
Administer
•
Root Context ID – a unique ID that represents a client/server session. A session can be
thought of as a block that includes multiple requests from the client to the server.
Note: Additional detail columns:
•
Payload
Security Log
Security logs provide security details for individual applications, application connections, and
users. Logs capture authentication failures and errors, and provide supporting information
that identifies request-response messaging, package and MBO details, security configuration,
and the thread and node that attempted to process an authentication request.
•
•
•
•
•
•
•
•
•
•
•
•
•
•
•
•
Time – the time and date stamp for the log entry.
Application ID – the unique identifier assigned to the registered application. Values may
include a number, blank, or HWC, depending on the client type.
Application Connection ID – the unique identifier for a user application connection.
User – the name of the user associated with the application ID.
Correlation ID – the unique ID associated with every request-response message pair.
Package – the name of the package to which the subscription belongs.
MBO – the mobile business object used.
Security Configuration – the associated security configuration.
Method – the MBO operation used.
Thread ID – the identifier for the thread used to process the request.
Node ID – the server node on which the request is received.
Outcome – the authentication outcome for the security check.
Reason – the reason for authentication failure.
Error – the error message if any.
Transaction ID – a unique ID that represents a transaction (one cycle of request-response)
performed by the client or application.
Root Context ID – a unique ID that represents a client/server session. A session can be
thought of as a block that includes multiple requests from the client to the server.
Error Log
Errors log data includes domain-level errors.
•
•
•
•
•
144
Time – the time and date stamp for the log entry.
Application ID – the unique identifier assigned to the registered application. Values may
include a number, blank, or HWC, depending on the client type.
Application Connection ID – the unique identifier for a user application connection.
User – the name of the user associated with the application ID.
Correlation ID – the unique ID associated with every request-response message pair.
Sybase Unwired Platform
Administer
•
•
•
•
•
•
•
•
Package – the name of the package to which the subscription belongs.
MBO – the mobile business object used.
Operation – the MBO operation.
Thread ID – the identifier for the thread used to process the request.
Node ID – the server node on which the request is received.
Error – the error message if any.
Transaction ID – a unique ID that represents a transaction (one cycle of request-response)
performed by the client or application.
Root Context ID – a unique ID that represents a client/server session. A session can be
thought of as a block that includes multiple requests from the client to the server.
Connection Log
Connections log data includes domain connections for specific connection types to backend
data sources, including DOE, JDBC, REST, SAP, and SOAP, if enabled. Check the detail pane
for additional columns that may be available. Enable Payload to see payload data that may be
available.
DOE Connection
Connections log data includes domain connections for DOE connection types, if enabled.
Check the detail pane for additional columns that may be available. Enable Payload to see
payload data that may be available.
•
•
•
•
•
•
•
•
•
•
•
•
•
Time – the time and date stamp for the log entry.
Application ID – the unique identifier assigned to the registered application. Values may
include a number, blank, or HWC, depending on the client type.
Application Connection ID – the unique identifier for a user application connection.
User – the subscription user for the package.
Event Type – the DOE-C event type, such as Acknowledged, Duplicate Ignored, Exclude,
No Response (from client or server), Packet Dropped, Registration Response, Resend
(from client), Status Request (from client or server), DOE-C Subscription, and DOE-C
Data Import.
Package – the name of the package to which the subscription belongs.
MBO – the mobile business object used.
Operation – the MBO operation.
Connection – the managed connection used. Its value is DOE for DOE-C logs.
Client ID – the identifier for the DOE-C client.
Physical ID – the DOE-C generated physical identifier registered with DOE at
subscription.
Subscription ID – the DOE-C generated subscription identifier registered with DOE at
subscription.
Logical Device ID – the DOE-C logical device identifier, generated by DOE and provided
to DOE-C upon successful subscription.
Sybase Control Center for Sybase Unwired Platform
145
Administer
•
•
•
•
Message Direction – the DOE-C message direction, either client to Unwired Server, or
Unwired Server to client.
Thread ID – the identifier for the thread used to process the request.
Node ID – the server node on which the request is received.
Error – the error message if any.
Note: Payload and detail columns:
•
•
•
•
•
•
•
•
•
•
•
•
•
•
•
•
•
146
Device ID – the core and administrative (MMS) device ID.
Domain – the core and administrative (MMS) domain name.
JSON Message Content – the messaging synchronization JSON message (payload). This
is the SUP-specific representation of the incoming DOE XML message in JSON format.
DOE-C receives XML the payload from DOE in response, which is then parsed and
converted to a JSON string and sent to the client.
XML Message Content – the DOE SOAP messages (payload). This represents either an
XML request in a format for sending to DOE by DOE-C, or an XML payload response
received from DOE as applicable.
Endpoint Name – the core and administrative (MMS) endpoint name.
DOE server message ID – the SAP DOE reliable messaging server message ID.
DOE client message ID – the SAP DOE reliable messaging client message ID.
DOE-C server message ID – the DOE-C client-side SAP DOE reliable messaging server
message ID.
DOE-C client message ID – the DOE-C client-side SAP DOE reliable messaging client
message ID.
DOE-C method name – the DOE-C method being executed.
DOE-C action name – the DOE SOAP action.
Push to – the messaging asynchronous response queue.
Address – the remote URL of the DOE server for this subscription (for example,
http://saphost:50015/sap/bc/DOE_ESDMA_SOAP?sap-client=600).
Log – the DOE-C subscription-specific log level.
Extract Window – the DOE extract window for a subscription. This value determines the
maximum number of unacknowledged "in-flight" messages allowed by the DOE reliable
messaging protocol.
PBI – the messaging synchronization "piggy backed import" setting for the subscription.
Boolean property – indicates whether replay after-images can be piggy-backed onto
replayResult and replayFailed messages (default is false).
Sybase Unwired Platform
Administer
JDBC Connection
Connections log data includes domain connections for JDBC connection types to backend
data sources, if enabled. Check the detail pane for additional columns that may be available.
Enable Payload to see payload data that may be available.
•
•
•
•
•
•
•
•
•
•
•
•
•
•
Time – the time and date stamp for the log entry.
Application ID – the unique identifier assigned to the registered application. Values may
include a number, blank, or HWC, depending on the client type.
Application Connection ID – the unique identifier for a user application connection.
User – the name of the user associated with the application ID.
Stage – the current stage of processing - START or FINISH.
Package – the name of the package to which the subscription belongs.
MBO – the mobile business object used.
Operation – the MBO operation.
Connection – the managed connection used.
Thread ID – the identifier for the thread used to process the request.
Node ID – the server node on which the request is received.
Error – the error message if any.
Transaction ID – a unique ID that represents a transaction (one cycle of request-response)
performed by the client or application.
Root Context ID – a unique ID that represents a client/server session. A session can be
thought of as a block that includes multiple requests from the client to the server.
Note: Payload and detail columns:
•
•
•
•
•
•
•
•
•
•
Input Parameters – the parameters used in a JDBC endpoint operation (payload). This will
vary by operation.
Query – the SQL statement used in a JDBC endpoint operation (payload). This will vary by
operation.
Device ID – the core and administrative (MMS) device ID.
Domain – the core and administrative (MMS) domain name.
Endpoint Name – the core and administrative (MMS) endpoint name.
Database Product Name – the remote database product name, such as "SQL Anywhere".
Database Product Version – the remote database version, such as "11.0.1.2044".
Driver Name – the database driver used, such as: "jConnect™ for JDBC™".
Driver Version – the database driver version, such as "jConnect™ for JDBC™/7.07
GA(Build 26666)/P/EBF19485/JDK 1.6.0/jdbcmain/Wed Aug 31 03:14:04 PDT 2011".
Database User Name – the database user account.
Sybase Control Center for Sybase Unwired Platform
147
Administer
REST Connection
Connections log data includes domain connections for REST connection types to backend
data sources, if enabled. Check the detail pane for additional columns that may be available.
Enable Payload to see payload data that may be available.
•
•
•
•
•
•
•
•
•
•
•
•
•
•
•
•
•
Time – the time and date stamp for the log entry.
Application ID – the unique identifier assigned to the registered application. Values may
include a number, blank, or HWC, depending on the client type.
Application Connection ID – the unique identifier for a user application connection.
User – the name of the user associated with the application ID.
Stage – the current stage of processing - START or FINISH.
Package – the name of the package to which the subscription belongs.
MBO – the mobile business object used.
Operation – the MBO operation.
Connection – the managed connection used.
URL – the URL associated with the managed connection.
Action – the GET, POST, PUT, or DELETE action.
Response Status – the response status code for the invocation.
Thread ID – the identifier for the thread used to process the request.
Node ID – the server node on which the request is received.
Error – the error message if any.
Transaction ID – a unique ID that represents a transaction (one cycle of request-response)
performed by the client or application.
Root Context ID – a unique ID that represents a client/server session. A session can be
thought of as a block that includes multiple requests from the client to the server.
Note: Payload and detail columns:
•
•
•
•
•
Response – the message returned by the EIS system in response to a request (payload).
Device ID – the core and administrative (MMS) device ID.
Domain – the core and administrative (MMS) domain name.
Endpoint Name – the core and administrative (MMS) endpoint name.
HTTP Header Parameters – "Accept-Encoding: gzip, Accept-Encoding: compress".
SAP Connection
Connections log data includes domain connections for SAP connection types to backend data
sources, if enabled. Check the detail pane for additional columns that may be available. Enable
Payload to see payload data that may be available.
•
148
Time – the time and date stamp for the log entry.
Sybase Unwired Platform
Administer
•
•
•
•
•
•
•
•
•
•
•
•
•
•
•
Application ID – the unique identifier assigned to the registered application. Values may
include a number, blank, or HWC, depending on the client type.
Application Connection ID – the unique identifier for a user application connection.
User – the name of the user associated with the application ID.
Stage – the current stage of processing - START or FINISH.
Package – the name of the package to which the subscription belongs.
MBO – the mobile business object used.
Operation – the MBO operation.
BAPI – the SAP BAPI used as the data source.
Connection – the managed connection used.
Properties – the list of name:value pairs.
Thread ID – the identifier for the thread used to process the request.
Node ID – the server node on which the request is received.
Error – the error message if any.
Transaction ID – a unique ID that represents a transaction (one cycle of request-response)
performed by the client or application.
Root Context ID – a unique ID that represents a client/server session. A session can be
thought of as a block that includes multiple requests from the client to the server.
Note: Payload and detail columns:
•
•
•
•
•
•
Parameters – input that was supplied to the operation; this will vary per request and
operation (payload).
Device ID – the core and administrative (MMS) device ID.
Domain – the core and administrative (MMS) domain name.
Endpoint Name – the core and administrative (MMS) endpoint name.
SAP Host – the remote system hostname (if available).
SAP User – the SAP user for the operation.
SOAP Connection
Connections log data includes domain connections for SOAP connection types to backend
data sources, if enabled. Check the detail pane for additional columns that may be available.
Enable Payload to see payload data that may be available.
•
•
•
•
•
•
Time – the time and date stamp for the log entry.
Application ID – the unique identifier assigned to the registered application. Values may
include a number, blank, or HWC, depending on the client type.
Application Connection ID – the unique identifier for a user application connection.
User – the name of the user associated with the application ID.
Stage – the current stage of processing - START or FINISH.
Package – the name of the package to which the subscription belongs.
Sybase Control Center for Sybase Unwired Platform
149
Administer
•
•
•
•
•
•
•
•
•
•
MBO – the mobile business object used.
Operation – the MBO operation.
Connection – the managed connection used.
Service Address – the service address URL.
Action – the SOAP action.
Thread ID – the identifier for the thread used to process the request.
Node ID – the server node on which the request is received.
Error – the error message if any.
Transaction ID – a unique ID that represents a transaction (one cycle of request-response)
performed by the client or application.
Root Context ID – a unique ID that represents a client/server session. A session can be
thought of as a block that includes multiple requests from the client to the server.
Note: Payload and detail columns:
•
•
•
•
•
•
•
Request (payload) – SOAP messages sent to the remote SOAP service.
Response (payload) – SOAP messages received from the remote SOAP service.
Device ID – the core and administrative (MMS) device ID.
Domain – the core and administrative (MMS) domain name.
Endpoint Name – the core and administrative (MMS) endpoint name.
Connection Timeout – the response timeout window, in milliseconds.
Authentication Type – the authentication type, either "None", "Basic", "SSO2", or
"X509".
Push Log
Push logs include log data for all push notifications.
•
•
•
•
•
•
•
•
•
•
•
•
150
Time – the time and date stamp for the log entry.
Application ID – the unique identifier assigned to the registered application. Values may
include a number, blank, or HWC, depending on the client type.
Application Connection ID – the unique identifier for a user application connection.
User – the name of the user associated with the application ID.
Source - the source of the log if its from the server or client.
Correlation ID - the unique id associated with every request-response message pair.
URN - not relevant.
Log Level - not relevant.
Thread ID – the identifier for the thread used to process the request.
Node ID – the server node on which the request is received.
Error – the error message if any.
Transaction ID – a unique ID that represents a transaction (one cycle of request-response)
performed by the client or application.
Sybase Unwired Platform
Administer
•
•
•
•
•
Root Context ID – a unique ID that represents a client/server session. A session can be
thought of as a block that includes multiple requests from the client to the server.
Device Type – device type from which the push message originated.
Notification Type – type of notification. For example Native.
Received Time – a time stamp indicating when the message was received by the server.
Processing Started Time – a time stamp indicating when the server started processing the
message.
Proxy Log
Proxy logs all data made to and from the Proxy server.
•
•
•
•
•
•
•
•
•
•
•
•
•
•
•
Time – the time and date stamp for the log entry.
Application ID – the unique identifier assigned to the registered application. Values may
include a number, blank, or HWC, depending on the client type.
Application Connection ID – the unique identifier for a user application connection.
User – the name of the user associated with the application ID.
Source - the source of the log if its from the server or client.
Correlation ID - the unique id associated with every request-response message pair.
Request Type - the request type of the message.
Request URL - the Gateway URL.
HTTP Endpoint - the Gateway URL.
Response Code – the response status code for the invocation.
Log Level - not relevant.
Thread ID – the identifier for the thread used to process the request.
Node ID – the server node on which the request is received.
Transaction ID – a unique ID that represents a transaction (one cycle of request-response)
performed by the client or application.
Root Context ID – a unique ID that represents a client/server session. A session can be
thought of as a block that includes multiple requests from the client to the server.
Note: Additional detail columns:
•
•
•
•
Post Data
Request Header Fields
Response Body
Response Header Fields
Server Log
Server logs include logging data for Unwired Server.
•
Time – the time and date stamp for the log entry.
Sybase Control Center for Sybase Unwired Platform
151
Administer
•
•
•
•
•
•
•
•
•
•
•
•
Application ID – the unique identifier assigned to the registered application. Values may
include a number, blank, or HWC, depending on the client type.
Application Connection ID – the unique identifier for a user application connection.
User – the name of the user associated with the application ID.
Package – the name of the package to which the subscription belongs.
Correlation ID – the unique id associated with the correlated data. see Correlating Log
Data Across Subsystems for details. For example, root context id and Transaction id
appear in every trace entry, and contain the values used to correlate trace entries from
different subsystems (buckets).
Log Level – indicates the log level, if any, set on the client that controls what and how much
should be logged.
Thread ID – the identifier for the thread used to process the request.
Node ID – the server node on which the request is received.
Bucket – the subsystem from which the logging data originates. For example Security or
Data Services (DS).
Category – the category or type of information under which the data is logged.
Transaction ID – a unique ID that represents a transaction (one cycle of request-response)
performed by the client or application.
Root Context ID – a unique ID that represents a client/server session. A session can be
thought of as a block that includes multiple requests from the client to the server.
Dispatcher Log
Dispatcher log data includes various dispatcher specific messages, including Messaging and
Service.
Messaging Log
Messaging log data includes data for all message-based application data routed by the
dispatcher.
•
•
•
•
•
•
•
•
•
•
152
Time – the time and date stamp for the log entry.
Application ID – the unique identifier assigned to the registered application. Values may
include a number, blank, or HWC, depending on the client type.
Application Connection ID – the unique identifier for a user application connection.
User – the name of the user associated with the application ID.
Source - the source of the log if its from the server or client.
Request URL - the Gateway URL.
Response Code – the response status code for the invocation.
Log Level – indicates the log level, if any, set on the client that controls what and how much
should be logged.
Thread ID – the identifier for the thread used to process the request.
Node ID – the server node on which the request is received.
Sybase Unwired Platform
Administer
•
•
•
•
Transaction ID – a unique ID that represents a transaction (one cycle of request-response)
performed by the client or application.
Root Context ID – a unique ID that represents a client/server session. A session can be
thought of as a block that includes multiple requests from the client to the server.
Request Header Fields - the HTTP request header field contained in the application. For
example, used by REST API-based application to create an application connection.
Response Header Fields - the HTTP response header field communicated to the device
from the server.
Service Log
Service log data includes application service data routed by the dispatcher.
•
•
•
•
•
•
•
•
•
•
•
•
•
Time – the time and date stamp for the log entry.
Application ID – the unique identifier assigned to the registered application. Values may
include a number, blank, or HWC, depending on the client type.
Application Connection ID – the unique identifier for a user application connection.
User – the name of the user associated with the application ID.
Source - the source of the log if its from the server or client.
Response Code – the response status code for the invocation.
Log Level – indicates the log level, if any, set on the client that controls what and how much
should be logged.
Thread ID – the identifier for the thread used to process the request.
Node ID – the server node on which the request is received.
Transaction ID – a unique ID that represents a transaction (one cycle of request-response)
performed by the client or application.
Root Context ID – a unique ID that represents a client/server session. A session can be
thought of as a block that includes multiple requests from the client to the server.
Request Header Fields - the HTTP request header field contained in the application. For
example, used by REST API-based application to create an application connection.
Response Header Fields - the HTTP response header field communicated to the device
from the server.
Application Log
Application log data includes application specific messages, including Registration and
Setting.
Registration Log
Registration log data includes registration-related application data. The registration log
applies only to applications registered through the HTTP channel.
•
Time – the time and date stamp for the log entry.
Sybase Control Center for Sybase Unwired Platform
153
Administer
•
•
•
•
•
•
•
•
•
•
•
•
Application ID – the unique identifier assigned to the registered application. Values may
include a number, blank, or HWC, depending on the client type.
Application Connection ID – the unique identifier for a user application connection.
User – the name of the user associated with the application ID.
Source - the source of the log if its from the server or client.
Log Level – indicates the log level, if any, set on the client that controls what and how much
should be logged.
Thread ID – the identifier for the thread used to process the request.
Node ID – the server node on which the request is received.
Transaction ID – a unique ID that represents a transaction (one cycle of request-response)
performed by the client or application.
Root Context ID – a unique ID that represents a client/server session. A session can be
thought of as a block that includes multiple requests from the client to the server.
Auto Registraton - the automatic connection registration setting of the application, as
determined by the autoreghint provisioning property.
Security Configuration - the security configuration assigned to the application.
Template - the application template used by the application.
Setting Log
Setting log data includes application settings information.
•
•
•
•
•
•
•
•
•
•
•
•
•
154
Time – the time and date stamp for the log entry.
Application ID – the unique identifier assigned to the registered application. Values may
include a number, blank, or HWC, depending on the client type.
Application Connection ID – the unique identifier for a user application connection.
User – the name of the user associated with the application ID.
Source - the source of the log if its from the server or client.
Log Level – indicates the log level, if any, set on the client that controls what and how much
should be logged.
Thread ID – the identifier for the thread used to process the request.
Node ID – the server node on which the request is received.
Transaction ID – a unique ID that represents a transaction (one cycle of request-response)
performed by the client or application.
Root Context ID – a unique ID that represents a client/server session. A session can be
thought of as a block that includes multiple requests from the client to the server.
Operation – the MBO operation.
Request Body - the application's HTTP request body field.
Response Body - the server's HTTP response body field.
Sybase Unwired Platform
Administer
Checking Client Application Logs
Review data about client application operations for all devices subscribed to a package in
order to track errors and identify performance issues.
1. In the left navigation pane, expand the Packages folder and select the package you want to
manage.
2. In the right administration pane, select the Client Log tab.
3. Review this information to monitor client application activity:
•
•
•
•
•
•
•
•
User – the name of the user that activates the device. The user under the domain logs
should be in the format "username@securityConfiguration"..
Application Connection ID – the unique identifier for a user application connection.
MBO – the mobile business object that the client is synchronizing with.
Operation – the operation that the client is performing.
Code – the result of server-side operations; either 200 (successful) or 500 (failed).
Level – the log level for the application; either FATAL, ERROR, WARN, INFO,
DEBUG, or TRACE.
Timestamp – the date and time at which the operation took place.
Message – the log message associated with the operation.
4. Select a row from the table and click Details to see a detailed view of data for the selected
client log event.
5. Click Close to return to the Client Log summary view.
See also
• Creating and Enabling a New Domain on page 100
• Deleting a Domain on page 101
• Registering a Domain Administrator User on page 102
• Assigning Domain Administrators to a Domain on page 103
• Viewing Applications for a Domain on page 104
• Viewing Application Connections for a Domain on page 104
• Scheduling Accumulated Data Cleanup for Domains on page 106
• Domain Logs on page 110
• Connections on page 156
• Configuring Domain Security on page 179
Cleaning the Client Log
Clears client application log data from the SCC administration page.
1. In the left navigation pane, expand the Packages folder and select the package you want to
manage.
Sybase Control Center for Sybase Unwired Platform
155
Administer
2. In the right administration pane, select the Client Log tab.
3. Click Clean.
4. Enter a time frame to indicate which client log data you want to erase, and click OK.
The data is removed from the Client Log tab.
Connections
Connections allow Unwired Server to communicate with data sources. To facilitate the
connection process, define a set of properties for each data source. Establish connections and
connection pools for each domain.
A connection is required to send queries to mobile business objects, and to receive answers.
The format in which data is communicated depends on the type of data source; for example,
database data sources use a result set, while Web services data sources provide XML files, and
SAP data sources use tables.
Establish connections by supplying an underlying driver and a connection string. Together,
the driver and string allow you to address the data source, and provide you a mechanism by
which to set the appropriate user authentication credentials and connection properties that
describe the connection instance. Once a connection is establish, Unwired Server can open
and close it as required.
Connection Pools
Unwired Server maintains database connections in a connection pool, which is a cache
database connections for the cache database or any other database data source.
A connection can be reused when the database receives future requests for data, thereby
improving Unwired Server performance. If all the connections are being used, and the
maxPoolSize value you configured for a connection pool has been reached, a new connection
is added to the pool. For Unwired Server, connection pools are based on an existing template
created for a specific data source type.
See also
• Creating and Enabling a New Domain on page 100
• Deleting a Domain on page 101
• Registering a Domain Administrator User on page 102
• Assigning Domain Administrators to a Domain on page 103
• Viewing Applications for a Domain on page 104
• Viewing Application Connections for a Domain on page 104
• Scheduling Accumulated Data Cleanup for Domains on page 106
• Domain Logs on page 110
• Checking Client Application Logs on page 155
• Configuring Domain Security on page 179
156
Sybase Unwired Platform
Administer
Connection Templates
A connection template is a model or pattern used to standardize connection properties and
values for a specific connection pool type so that they can be reused. A template allows you to
quickly create actual connections.
Often, setting up a connection for various enterprise data sources requires each administrator
to be aware of the mandatory property names and values for connecting to data sources. Once
you create a template and add appropriate property names and corresponding values (for
example user, password, database name, server name, and so on), you can use the template to
instantiate actual connection pools with predefined property name and value pairs.
See also
• EIS Data Source Connection Properties Reference on page 159
• Creating Connections and Connection Templates on page 157
Creating Connections and Connection Templates
Create a new connection or connection template that defines the properties needed to connect
to a new data source.
1. In the left navigation pane, expand the Domains folder, and select the domain for which
you want to create a new connection.
2. Select Connections.
3. In the right administration pane:
•
•
To create a new connection – select the Connections tab, and click New.
To create a new connection template – select the Templates tab, and click New.
4. Enter a unique Connection pool name or template name.
5. Select the Connection pool type or template type:
•
•
•
•
JDBC – choose this for most database connections.
Proxy - choose this if you are connecting to a proxy endpoint; for example, an Online
Data Proxy data source or other proxy endpoint.
WEBSERVICE – choose this if you are connecting to a Web Services (SOAP or
REST) data source.
SAP – choose this if you are connecting to an SAP (JCO) data source.
6. Select the appropriate template for the data source target from the Use template menu. By
default, several templates are installed with Unwired Platform; however, a production
version of Unwired Server may have a different default template list.
7. Template default properties appear, along with any predefined values. You can customize
the template, if required, by performing one of:
Sybase Control Center for Sybase Unwired Platform
157
Administer
•
•
Editing existing property values – click the corresponding cell and change the value
that appears.
Adding new properties – click the <ADD NEW PROPERTY> cell in the Property
column and select the required property name. You can then set values for any new
properties.
Note: In a remote server environment, if you edit the sampledb Server Name property, you
must specify the remote IP number or server name. Using the value "localhost" causes
cluster synchronization to fail.
8. Test the values you have configured by clicking Test Connection. If the test fails, either
values you have configured are incorrect, or the data source target is unavailable. Evaluate
both possibilities and try again. Only the SAP and JDBC connection pool types can test the
connection. The Proxy and WEBSERVICE pool types cannot test the connection.
9. Click OK to register the connection pool.
The name appears in the available connection pools table on the Connections tab.
Administrators can now use the connection pool to deploy packages.
See also
• Application Connections on page 258
• Connection Templates on page 157
• EIS Data Source Connection Properties Reference on page 159
Editing Connection Pools and Templates
Edit the properties and values assigned to connection pools and templates.
1. In the left navigation pane, expand the Domains folder, and select the domain for which
you want to create a new connection.
2. Select Connections.
3. In the right administration pane:
•
•
To edit the properties of a connection pool, click theConnections tab.
To edit the properties of a connection pool template, click theTemplates tab.
4. Select a connection pool or template from the list.
5. Click Properties.
a) Edit the property and value.
a) Click Save to save the changes.
Testing a Connection
Test connection properties of a data source to validate the connection values.
1. In the left navigation pane, click the Connections icon.
158
Sybase Unwired Platform
Administer
2. Select the Connection Pool Name you want to validate.
3. Click Properties.
4. Click Test Connection.
If the connection test is not successful, see Connection Test Errors in theTroubleshooting
guide.
Deleting a Connection Pool and Template
Delete a connection pool or template.
1. In the left navigation pane, expand the Domains folder, and select the domain for which
you want to create a new connection.
2. Select Connections.
3. In the right administration pane:
•
•
To delete a connection pool, click theConnections tab.
To delete a connection pool template, click theTemplates tab.
4. Select the connection pool or template you want to delete.
5. Click Delete.
EIS Data Source Connection Properties Reference
Name and configure connection properties when you create connection pools in Sybase
Control Center to enterprise information systems (EIS) .
See also
• Application Connections on page 258
• Connection Templates on page 157
• Creating Connections and Connection Templates on page 157
JDBC Properties
Configure Java Database Connectivity (JDBC) connection properties.
This list of properties can be used by all datasource types. Sybase does not document native
properties used only by a single driver. However, you can also use native driver properties,
naming them using this syntax:
<driver_type>:<NativeConnPropName>=<SupportedValue>
Note: If Unwired Server is connecting to a database with a JDBC driver, ensure you have
copied required JAR files to correct locations. See Installation Guide for Runtime.
Sybase Control Center for Sybase Unwired Platform
159
Administer
Name
Description
After Insert
Changes the value to into if a da- into
tabase requires insert into
rather than the abbreviated into.
Batch Delimiter
Sets a delimiter, for example, a sem- <delimiter>
icolon, that can be used to separate
multiple SQL statements within a
statement batch.
Blob Updater
Specifies the name of a class that can
be used to update database BLOB
(long binary) objects when the
BLOB size is greater than psMaximumBlobLength.
<class name>
Specifies the name of a class that can
be used to update database CLOB
(long string) objects when the
CLOB size is greater than psMaximumClobLength.
<class name>
Specifies how to represent a repertoire of characters by setting the value of CS_SYB_CHARSET for this
datasource. Used when the data in
the datasource is localized. If you do
not specify the correct code set,
characters may be rendered incorrectly.
[server]
Clob Updater
Code Set
160
Supported values
The class must implement the
com.sybase.djc.sql.BlobUpdater interface.
The class must implement the
com.sybase.djc.sql.ClobUpdater interface.
If the value is server, the value of the
current application server’s defaultCodeSet property is used.
Sybase Unwired Platform
Administer
Name
Description
Supported values
Commit Protocol
Specifies how Unwired Server handles connections for a datasource at
commit time, specifically when a
single transaction requires data from
multiple endpoints.
[optimistic| pessimistic | XA_2PC]
Choose only one of these protocols:
•
If you use XA, the recovery log is
stored in the tx_manager datasource, and its commit protocol
must be optimistic. If tx_manager is
aliased to another datasource (that
is, one that is defined with the aliasFor property), the commit protocol
for that datasource must be optimistic. A last-resource optimization ensures full conformance with the XA •
specification. The commit protocol
for all other datasources should be
XA_2PC. Alternately, a transaction
that accesses multiple datasources
for which the commit protocols are
optimistic is permitted.
•
Sybase Control Center for Sybase Unwired Platform
Optimistic – enables connections to
be committed without regard for
other connections enlisted in the
transaction, assuming that the transaction is not marked for rollback and
will successfully commit on all resources. Note: if a transaction accesses multiple data sources with
commit protocol of "optimistic",
atomicity is not guaranteed.
Pessimistic – specifies that you do
not expect any multi-resource transactions. An exception will be thrown
(and transaction rolled back) if any
attempt is made to use more than one
"pessimistic" data source in the
same transaction.
XA_2PC – specifies use of the XA
two phase commit protocol. If you
are using two phase commit, then
the recovery log is stored in the
"tx_manager" data source, and that
data source (or the one it is aliased
to) must have the commit protocol of
"optimistic" or "pessimistic". All
other data sources for which atomicity must be ensured should have
the "XA_2PC" commit protocol.
161
Administer
Name
Description
Supported values
Datasource Class
Sets the class that implements the
JDBC datasource.
<com.mydatasource.jdbc.Driver>
Use this property (along with the
driverClass property) only if you do
not have a predefined database-type
entry in Unwired Server for the kind
of SQL database you are connecting
to. For example, you must use this
property for MySQL database connections.
You can implement a datasource
class to work with a distributed
transaction environment. Because
Unwired Server supports distributed
transactions, some datasources may
require that a datasource class be
implemented for Unwired Server to
interact with it.
For two-phase transactions, use the
xaDataSourceClass connection
property instead.
Database Command Echo
162
Echoes a database command to both [true|false]
the console window and the server
Set a value of 1 to echo the database
log file.
commands like databaseStartUse this property to immediately see Command, and databaseStopand record the status or outcome of Command.
database commands.
Otherwise, do not set this property, or
When you enable this property, Un- use a value of 0 to disable the echo.
wired Server echoes every SQL
query to ml.log, which may help
you debug your application.
Sybase Unwired Platform
Administer
Name
Description
Supported values
Database Create Command
Specifies the operating system command used to create the database for
this datasource. If this command is
defined and the file referenced by $
{databaseFile} does not exist, the
command is run to create the database when an application component attempts to obtain the first connection from the connection pool for
this datasource.
<command>
Indicates the database file to load
when connecting to a datasource.
<string>
Database File
Example: <UnwiredPlat-
form_InstallDir>\Servers\SQLAnywhere11\BIN32\dbinit -q
${databaseFile}
Supply a complete path and file name.
Use this property when the path to The database file you specify must be on
the database file differs from the one the same host as the server.
normally used by the database server.
If the database you want to connect
to is already running, use the databaseName connection parameter.
Sybase Control Center for Sybase Unwired Platform
163
Administer
Name
Description
Supported values
Database Name
Identifies a loaded database with
which to establish a connection,
when connecting to a datasource.
[DBN|default]
If you set this property to default, the
name is obtained from the DBN option
Set a database name, so you can re- set by the database administrator.
fer to the database by name in other
If no value is used, the database name is
property definitions for a datainherited from the database type.
source.
If the database to connect to is not
already running, use the databaseFile connection parameter so the database can be started.
Note: For Unwired Server, you typically do not need to use this property. Usually, when you start a database on a server, the database is assigned a name. The mechanism by
which this occurs varies. An administrator can use the DBN option to
set a unique name, or the server may
use the base of the file name with the
extension and path removed.
Database Start Command
Database Stop Command
164
Specifies the operating system command used to start the database for
this datasource. If this command is
defined and the database is not running, the command is run to start the
database when the datasource is activated.
Specifies the operating system command used to stop the database for
this datasource. If this property is
defined and the database is running,
this command executes during shutdown.
<command>
Example: <UnwiredPlat-
form_InstallDir>\Servers\SQLAnywhere11\BIN32\dbsrvXX.e
xe
<command>
For a SQL Anywhere® database, where
the user name and password are the defaults (dba and sql), enter:
<UnwiredPlatform_InstallDir>\Servers\SQLAnywhere11\BIN32\dbsrvXX.e
xe
Sybase Unwired Platform
Administer
Name
Description
Supported values
Database Type
Specifies the database type.
<database type>
Database URL
Sets the JDBC URL for connecting
to the database if the datasource requires an Internet connection.
<JDBCurl>
Typically, the server attempts to
construct the database URL from
the various connection properties
you specify (for example, portNumber, databaseName). However, because some drivers require a special
or unique URL syntax, this property
allows you to override the server defaults and instead provide explicit
values for this URL.
Driver Class
Sets the name of the class that implements the JDBC driver.
The database URL is JDBC driver vendor-specific. For details, refer to the
driver vendor's JDBC documentation.
<Class.forName("foo.bar.Driver")>
Use this property (along with the
Replace <Class.forName("foo.bar.DrivdataSourceClass property) only if
er")> with the name of your driver.
you do not have a predefined database-type entry in Unwired Server
for the kind of SQL database you are
connecting to. For example,
MySQL database connections require you to use this connection
property.
To create a connection to a database
system, you must use the compatible
JDBC driver classes. Sybase does
not provide these classes; you must
obtain them from the database manufacturer.
Driver Debug
Enables debugging for the driver.
[true|false]
Set to true to enable debugging, or false
to disable.
Driver Debug Settings
Configures debug settings for the
driver debugger.
Sybase Control Center for Sybase Unwired Platform
[default|<setting>]
The default is STATIC:ALL.
165
Administer
Name
Description
Supported values
Initial Pool Size
Sets the initial number of connections in the pool for a datasource.
<int>
In general, holding a connection
causes a less dramatic performance
impact than creating a new connection. Keep your pool size large
enough for the number of concurrent
requests you have; ideally, your connection pool size should ensure that
you never run out of available connections.
Replace <int> with an integer to preallocate and open the specified number of
connections at start-up. The default is 0.
Sybase suggests that you start with 0,
and create additional connections as
necessary. The value you choose allows
you to create additional connections before client synchronization requires the
server to create them.
The initialPoolSize value is applied
to the next time you start Unwired
Server.
Is Download Zipped
Specifies whether the driver file
[True|False]
downloaded from jdbcDriverDownThe default is false. The file is copied,
loadURL is in .ZIP format.
but not zipped to <UnwiredPlatThis property is ignored if the value form-install>\lib\jdbc.
of jdbcDriverDownloadURL conSet isDownloadZipped to true to save
nection is an empty string.
the file to <UnwiredPlatforminstall>\lib\jdbc and unzip
the archived copy.
JDBC Driver Download
URL
Specifies the URL from which you
can download a database driver.
166
<URL>
Replace <URL> with the URL from
Use this property with isDownload- which the driver can be downloaded.
Zipped to put the driver in an archive
file before the download starts.
Sybase Unwired Platform
Administer
Name
Description
Language
For those interfaces that support lo- <language>
calization, this property specifies
Replace <language> with the language
the language to use when connectbeing used.
ing to your target database. When
you specify a value for this property,
Unwired Server:
•
•
•
Supported values
Allocates a CS_LOCALE structure for this connection
Sets the CS_SYB_LANG value
to the language you specify
Sets the Microsoft SQL Server
CS_LOC_PROP connection
property with the new locale information
Unwired Server can access Unicode
data in an Adaptive Server® 12.5 or
later, or in Unicode columns in
Adaptive Server 12.5 or later. Unwired Server automatically converts
between double-byte character set
(DBCS) data and Unicode, provided
that the Language and CodeSet parameters are set with DBCS values.
Max Idle Time
Specifies the number of seconds an
idle connection remains in the pool
before it is dropped.
Sybase Control Center for Sybase Unwired Platform
<int>
If the value is 0, idle connections remain
in the pool until the server shuts down.
The default is 60.
167
Administer
Name
Description
Supported values
Max Pool Size
Sets the maximum number of con- <int>
nections allocated to the pool for this
A value of 0 sets no limit to the maxidatasource.
mum connection pool size. The default
Increase the maxPoolSize property is 10.
value when you have a large user
base. To determine whether a value
is high enough, look for ResourceMonitorTimeoutException exceptions in <hostname>-server.log. Continue increasing the
value, until this exception no longer
occurs.
To further reduce the likelihood of
deadlocks, configure a higher value
for maxWaitTime.
To control the range of the pool size,
use this property with minPoolSize.
Max Wait Time
Sets the maximum number of sec- <int>
onds to wait for a connection before
The default is 60.
the request is cancelled.
Max Statements
Specifies the maximum number of <int>
JDBC prepared statements that can
A value of 0 (default) sets no limit to the
be cached for each connection by the
maximum statements.
JDBC driver. The value of this property is specific to each JDBC driver.
Min Pool Size
Sets the minimum number of con- <int>
nections allocated to the pool for this
A value of 0 (default) sets no limit to the
datasource.
minimum connection pool size.
168
Sybase Unwired Platform
Administer
Name
Description
Supported values
Network Protocol
Sets the protocol used for network The network protocol is JDBC driver
communication with the datasource. vendor-specific. There are no predefined
values.
Use this property (along with the
driverClass, and dataSourceClass
See the driver vendor's JDBC documenproperties) only if you do not have a tation.
predefined database-type entry in
Unwired Server for the kind of SQL
database you are connecting to. For
example, you may be required to use
this property for MySQL database
connections.
Password
Specifies the password for connect- [default|<password>]
ing to the database.
Ping and Set Session Auth Runs the ping and session-authori- [True|False]
zation commands in a single comSet to true to enable, or false to disable.
mand batch; may improve performance. You can only enable the Ping
and Set Session Auth property if you
have enabled the Set Session Auth
property so database work runs under the effective user ID of the client.
Ping Connections
Ping SQL
Port Number
Pings connections before attempting to reuse them from the connection pool.
[True|False]
Specify the SQL statement to use
when testing the database connection with ping.
[default|<statement>]
Sets the server port number where
the database server listens for connection requests.
[default|<port>]
Set to true to enable ping connections, or
false to disable.
Replace <statement> with the SQL
statement identifier. The default is "select 1".
Replace <port> with the TCP/IP port
number to use (that is, 1 – 65535).
If you set the value as default, the default
protocol of the datasource is used.
Sybase Control Center for Sybase Unwired Platform
169
Administer
Name
Description
Supported values
PS Maximum Blob
Length
Indicates the maximum number of
bytes allowed when updating a
BLOB datatype using PreparedStatement.setBytes.
[default|<int>]
PS Maximum Clob
Length
Indicates the maximum number of [default|<int>]
characters allowed when updating a
Replace <int> with the number of bytes
CLOB datatype using Preparedallowed during an update. The default is
Statement.setString.
16384.
Role Name
Sets the database role that the user
must have to log in to the database.
Replace <int> with the number of bytes
allowed during an update. The default is
16384.
[default|<name>]
If you set this value to default, the default database role name of the datasource is used.
Server Name
Defines the host where the database <name>
server is running.
Replace <name> with an appropriate
name for the server.
Service Name
Defines the service name for the da- <name>
tasource.
Replace <name> with an appropriate
For SQL Anywhere servers, use this name for the service.
property to specify the database you
are attaching to.
Set Session Auth
Establishes an effective database
identity that matches the current
mobile application user.
If you use this property, you must
also use setSessionAuthSystemID
to set the session ID.
[true|false]
Choose a value of 1 to use an ANSI SQL
set session authorization command at
the start of each database transaction.
Set to 0 to use session-based authorizations.
Alternately you can pingAndSetSessionAuth if you are using this
property with pingConnection. The
pingAndSetSessionAuth property
runs the ping and session-authorization commands in a single command
batch, which may improve performance.
170
Sybase Unwired Platform
Administer
Name
Description
Supported values
Set Session Auth System
ID
If Set Session Authorization is ena- <database identity>
bled, specifies the database identity
Replace <database identity> with the
to use when the application server
database identifier.
accesses the database from a transaction that runs with "system" identity.
Start Wait
Sets the wait time (in seconds) before a connection problem is reported. If the start command completes
successfully within this time period,
no exceptions are reported in the
server log.
<int>
Replace <int> with the number of seconds Unwired Server waits before reporting an error.
startWait time is used only with the
databaseStartCommand property.
Truncate Nanoseconds
Sets a divisor/multiplier that is used [default|<int>]
to round the nanoseconds value in a
The default is 10 000 000.
java.sql.Timestamp to a granularity
that the DBMS supports.
Use Quoted Identifiers
Specifies whether or not SQL identifiers are quoted.
[True|False]
Set to true to enable use of quoted identifiers, or false to disable.
User
Identifies the user who is connecting [default|<user name>]
to the database.
Replace <user name> with the database
user name.
XA Datasource Class
Specifies the class name or library
name used to support two-phase
commit transactions, and the name
of the XA resource library.
<class name>
Replace <class name> with the class or
library name.
•
•
Sybase Control Center for Sybase Unwired Platform
SQL Anywhere database:
com.sybase.jdbc3.jdbc.SybXADataSource
Oracle database: oracle.jdbc.xa.client.OracleXADataSource
171
Administer
See also
• SAP Java Connector Properties on page 172
• SAP DOE-C Properties on page 173
• Web Services Properties on page 176
• Proxy Properties on page 178
SAP Java Connector Properties
Configure SAP Java Connector (JCo) connection properties.
For a comprehensive list of SAP JCo properties you can use to create an instance of a client
connection to a remote SAP system, see http://help.sap.com/javadocs/NW04/current/jc/com/
sap/mw/jco/JCO.html#createClient(java.util.Properties).
This list of properties can be used by all datasource types. Sybase does not document all native
endpoint properties. However, you can add native endpoint properties, naming them using this
syntax:
<NativeConnPropName>=<SupportedValue>
Table 9. General connection parameters
Name
Description
Enable ABAP Debugging Enables or disables ABAP debugging. If enabled, the connection is
opened in debug mode and the invoked function module can be stepped through in the debugger.
Supported values
Not supported.
Do not set this parameter or leave it set
to 0.
For debugging, an SAP graphical user
interface (SAPGUI) must be installed
on the same machine the client program is running on. This can be either
a normal Windows SAPGUI or a Java
GUI on Linux/UNIX systems.
Remote GUI
172
Specifies whether a remote SAP
Not supported.
graphical user interface (SAPGUI)
Do not set this parameter or leave it set
should be attached to the connection.
to 0.
Some older BAPIs need an SAPGUI
because they try to send screen output
to the client while executing.
Sybase Unwired Platform
Administer
Name
Description
Supported values
Get SSO Ticket
Generates an SSO2 ticket for the user Not accessible by the customer.
after login to allow single sign-on. If
Do not set this parameter or leave it set
RfcOpenConnection() succeeds, you
to 0.
can retrieve the ticket with RfcGetPartnerSSOTicket() and use it for additional logins to systems supporting
the same user base.
Use X509
Unwired Platform sets this property If an EIS RFC operation is flagged for
when a client uses an X509 certificate SSO (user name and password personas the login credential.
alization keys selected in the authentication parameters) then Sybase Unwired Platform automatically sets the
appropriate properties to use X.509,
SSO2, or user name and password SSO
credentials.
The corresponding properties should
not be set by the administrator on the
SAP endpoint.
Additional GUI Data
Provides additional data for graphical Not supported.
user interface (GUI) to specify the
SAProuter connection data for the
SAPGUI when it is used with RFC.
GUI Redirect Host
Identifies which host to redirect the
remote graphical user interface to.
GUI Redirect Service
Identifies which service to redirect
Not supported.
the remote graphical user interface to.
Remote GUI Start Program
Indicates the program ID of the server Not supported.
that starts the remote graphical user
interface.
Not supported.
See also
• JDBC Properties on page 159
• SAP DOE-C Properties on page 173
• Web Services Properties on page 176
• Proxy Properties on page 178
SAP DOE-C Properties
Configure Sybase SAP® Data Orchestration Engine Connector (DOE-C) properties. This
type of connection is available in the list of connection templates only when you deploy a
Sybase Control Center for Sybase Unwired Platform
173
Administer
Sybase SAP® Data Orchestration Engine Connector package. No template exists for these
types of connections.
Note: If you change the username or password property of a DOE-C connection, you must
reopen the same dialog and click Test Connection after saving. Otherwise the error state
of this DOE-C package is not set properly, and an error message is displayed. This will not
work if you click Test Connection before saving the properties.
Name
Description
Supported values
Username
Specifies the SAP user account ID. The Valid SAP login name for the DOE
SAP user account is used during inter- host system.
action between the connected SAP system and client for certain administrative activities, such as sending acknowledgment messages during dayto-day operations or "unsubscribe"
messages if a subscription for this connection is removed.
This account is not used for messages
containing business data; those types
of messages are always sent within the
context of a session authenticated with
credentials provided by the mobile client.
The technical user name and password
or certificateAlias must be set to perform actions on subscriptions. The certificateAlias is mutually exclusive with
and overrides the technical user name
and password fields if set. The technical user name and password fields can
be empty, but only if certificateAlias is set.
174
Password
Specifies the password for the SAP
user account.
Valid password.
DOE SOAP
Timeout
Specifies a timeout window during
which unresponsive DOE requests are
aborted.
Positive value (in seconds).
The default is 420 (7 minutes).
Sybase Unwired Platform
Administer
Name
Description
Supported values
DOE Extract
Window
Specifies the number of messages allowed in the DOE extract window.
Positive value (in messages).
The minimum value is 10. The maximum value is 2000. The default is 50.
When the number of messages in the
DOE extract window reaches 50% of
this value, DOE-C sends a StatusReqFromClient message, to advise the SAP DOE system of the client's messaging status and acknowledge the server's state.
Packet Drop Size
Specifies the size, in bytes, of the larg- Positive value (in bytes).
est JavaScript Object Notation (JSON)
The default is 1048576 bytes (1MB).
message that the DOE connector proDo not set lower than 4096 bytes; there
cesses on behalf of a JSON client.
is no maximum limitation.
The packet drop threshold size should
be carefully chosen, so that it is larger
than the largest message sent from the
DOE to the client, but smaller than the
maximum message size which may be
processed by the client.
Service Address
Specifies the DOE URL.
Valid DOE URL.
If you are using DOE-C with SSL:
Listener URL
Specifies the DOE-C server listener
URL.
Sybase Control Center for Sybase Unwired Platform
•
Modify the port from the standard
http://host:8000 to
https://host:8001/.
•
Add the certificate being used as
the technical user and DOE-C endpoint security profile certificate to
the SAP DOE system's SSL Server
certificate list by using the
STRUST transaction. See your
SAP documentation for details.
Valid DOE-C listener URL, for example http://<sup_hostname>:8000/doe/publish.
175
Administer
Name
Description
Supported values
SAP Technical
User Certificate
Alias
Sets the alias for the Unwired Platform Valid certificate alias.
keystore entry that contains the X.509
certificate for Unwired Server's SSL
peer identity.
If you do not set a value, mutual authentication for SSL is not used when
connecting to the Web service.
If you are using DOE-C with SSO use
the "SAP Technical User Certificate
Alias" only for configurations which
require the technical user to identify
itself using an X.509 certificate; it
specifies the Certificate Alias to be
used as the technical user. This overrides the "Username" and "Password"
settings normally used.
Login Required
Indicates whether authentication credentials are required to login. The default value is true.
A read-only property with a value of
true.
For upgraded packages, "login-required=false" gets converted to "loginrequired=true" and a No-Auth security
configuration "DOECNoAuth" is assigned to the upgraded package.
See also
• JDBC Properties on page 159
• SAP Java Connector Properties on page 172
• Web Services Properties on page 176
• Proxy Properties on page 178
Web Services Properties
Configure connection properties for the Simple Object Access Protocol (SOAP) and
Representational State Transfer (REST) architectures.
176
Name
Description
Supported Values
Password
Specifies the password for HTTP basic Password
authentication, if applicable.
Sybase Unwired Platform
Administer
Name
Description
Supported Values
Address
Specifies a different URL than the port HTTP URL address of the Web service
address indicated in the WSDL document at design time.
User
Specifies the user name for HTTP basic authentication, if applicable.
Certificate Alias
Sets the alias for the Unwired Platform Use the alias of a certificate stored in
keystore entry that contains the X.509 the Unwired Server certificate keycertificate for Unwired Server's SSL
store.
peer identity.
User name
If you do not set a value, mutual authentication for SSL is not used when
connecting to the Web service.
authenticationPreemptive
When credentials are available and this False (default)
property is set to the default of false,
True
this property allows Unwired Server to
send the authentication credentials only in response to the receipt of a server
message in which the HTTP status is
401 (UNAUTHORIZED) and the
WWW-Authenticate header is set. In
this case, the message exchange pattern is: request, UNAUTHORIZED response, request with credentials, service response.
When set to true and basic credentials
are available, this property allows Unwired Server to send the authentication
credentials in the original SOAP or
REST HTTP request message. The
message exchange pattern is: request
with credentials, a service response.
Socket Timeout
The socket timeout value controls the
maximum time in milliseconds after a
web service operation (REST or
SOAP) is allowed to wait for a response from the remote system; if the
EIS system doesn't respond in that
time, the operation fails and the SUP
thread is unblocked.
Sybase Control Center for Sybase Unwired Platform
Time in milliseconds (default: 6000).
Range of [0 – 2147483647], where 0 is
interpreted as infinity.
177
Administer
See also
• JDBC Properties on page 159
• SAP Java Connector Properties on page 172
• SAP DOE-C Properties on page 173
• Proxy Properties on page 178
Proxy Properties
(Applies only to OData SDK Application and REST API applications). Proxy properties
identify the application endpoint and the pool size for connections to a Proxy server.
178
Name
Description
Supported Values
User
Corresponds to the username of the
backend system.
Certificate Alias
Sets the alias for the Unwired Platform Use the alias of a certificate stored in
keystore entry that contains the X.509 the Unwired Server certificate keycertificate for Unwired Server's SSL
store.
peer identity.
Address
Corresponds to the application endMust be a valid application endpoint.
point provided when registering an application.
Pool Size
Determines the maximum number of
connections allocated to the pool for
this datasource.
Password
Corresponds to the password of the
backend system.
Allow Anonymous Access
While using REST services, you can
The default value is False.
enable/disable anonymous user access
To enable anonymous user access, set
the value to True.
Enable URLRewrite
This is a custom property which is used To enable URL rewrite, set the value to
to enable/disable URL Rewrite while True.
using REST services.
To disable URL rewrite, set the value to
False.
The default value set for the pool size is
25.
Sybase Unwired Platform
Administer
Name
Description
Supported Values
Enable HttpProxy
This is a custom property which is used The default value is set to False.
to connect to an EIS using Http proxy.
If you set this property to True, you
must configure an HTTP proxy host
and port on the server. For more information, see Configuring Unwired
Server to Securely Communicate With
an HTTP Proxy in the Sybase Control
Center online help..
Note:
•
•
•
In Sybase Control Center, when the application endpoint for a registered application is
modified under the Applications node, you must manually update the Address in the
proxy properties of the connection pool. There is a default refresh time of 100000ms after
which the updated connection settings get reflected at runtime.
In Sybase Control Center, in addition to the application endpoint, you must register any
URL that is required by an application for a proxy service to enable communication with
Unwired Server.
The application end point should be white-listed only once as a proxy connection. The
proxy connection name should be same as the application ID, if an application is registered
to be used for referencing the EIS service end point.
See also
• JDBC Properties on page 159
• SAP Java Connector Properties on page 172
• SAP DOE-C Properties on page 173
• Web Services Properties on page 176
Configuring Domain Security
Configure security for an individual domain to meet the customer's security requirements.
Prerequisites
Before mapping and assigning administrator roles, ensure that you have set the Unwired
Platform administration and user roles and passwords required for Sybase Control Center
administrator login. See Enabling Authentication and RBAC for Administrator Logins in
Security.
Task
Perform steps to appropriately configure domain security settings.
Sybase Control Center for Sybase Unwired Platform
179
Administer
1. Choosing a Security Configuration
Select a security configuration that provides authentication and optionally authorization,
attribution, or auditing services. You can assign as many security configurations as needed
to a domain.
2. Assigning Domain Administrators to a Domain
Assign domain administration privileges to a domain administrator. You must be a
platform administrator to assign and unassign domain administrators.
3. Mapping Roles for a Domain
Map logical roles to physical roles for a domain by setting the mapping state. Domain
administrators map roles for the domains they control. Role mappings performed at the
domain level are automatically applied to all domains that share the same security
configuration. Domain-level role mapping overrides mapping set at the cluster level by the
platform administrator.
See also
• Creating and Enabling a New Domain on page 100
• Deleting a Domain on page 101
• Registering a Domain Administrator User on page 102
• Assigning Domain Administrators to a Domain on page 103
• Viewing Applications for a Domain on page 104
• Viewing Application Connections for a Domain on page 104
• Scheduling Accumulated Data Cleanup for Domains on page 106
• Domain Logs on page 110
• Checking Client Application Logs on page 155
• Connections on page 156
Choosing a Security Configuration
Select a security configuration that provides authentication and optionally authorization,
attribution, or auditing services. You can assign as many security configurations as needed to a
domain.
Only super administrators have privileges to create security configurations. Domain
administrators can view a security configuration only after a super administrator has assigned
it to the domain.
1. In the left navigation pane, navigate to Cluster > Domains > <DomainName> >
Security.
2. In the right administration pane, select the General tab and click Assign.
The Assign Security Configurations dialog appears.
3. Select one or more security configurations to assign to the domain by checking the box
adjacent to the configuration name.
180
Sybase Unwired Platform
Administer
4. Click OK.
A message appears above the right administration pane menu indicating the success or
failure of the assignment. If successful, the new security configuration appears in the list of
security configurations.
5. To set the default security configuration for the domain, check the box adjacent to the
configuration name and click Set Default.
6. To remove a security configuration, check the box adjacent to the configuration name and
click Unassign.
You cannot remove a security configuration if:
• it is mapped to one or more MBO packages
• it is the default security configuration for the domain.
Assigning Domain Administrators to a Domain
Assign domain administration privileges to a domain administrator. You must be a platform
administrator to assign and unassign domain administrators.
Prerequisites
Ensure the user is already registered as a domain administrator in the Domain Administrators
tab.
Task
1. In the left navigation pane, expand the Domains folder, and select the domain for which to
assign domain administration privileges.
2. Select the domain-level Security folder.
3. In the right administration pane, select the Domain Administrators tab, and click
Assign.
4. Select one or more administrator users to assign to the domain by checking the box
adjacent to the user name.
5. Click OK.
A message appears above the right administration pane menu indicating the success or
failure of the assignment. If successful, the new domain administrator appears in the list of
users.
Mapping Roles for a Domain
Map logical roles to physical roles for a domain by setting the mapping state. Domain
administrators map roles for the domains they control. Role mappings performed at the
domain level are automatically applied to all domains that share the same security
configuration. Domain-level role mapping overrides mapping set at the cluster level by the
platform administrator.
Sybase Control Center for Sybase Unwired Platform
181
Administer
Prerequisites
Unwired Platform cannot query all enterprise security servers directly; to perform
authentication successfully know the physical roles that are required.
Task
1. In the left navigation pane of Sybase Control Center, expand Domains > Domain name. >
Security and select the security configuration to map roles for.
2. In the right administration pane, click the Role Mappings tab.
3. Select a logical role and select one of the following in the adjacent list:
State
Description
AUTO
To map the logical role to a physical role of the same name.
NONE To disable the logical role, which means that the logical role is not authorized.
MAP
To manually map the logical role when the physical and logical role names do not match.
See Mapping a Physical Role Manually.
Mapping a Physical Role Manually
Use the Role Mappings dialog to manually map required physical roles for a logical role when
physical and logical role names do not match. If names do not match, the AUTO mapping state
does not work.
Prerequisites
Unwired Platform cannot query all supported enterprise security servers directly; for
successful authentication, you must know the physical roles your back-end systems require.
Task
You can map a logical role to one or more physical roles. You can also map multiple logical
roles to the same physical role. If a role does not exist, you can also add or delete names as
needed.
1. Review the list of existing physical role names that you can map to the logical role you
have selected. If the list retrieved is too long to locate the name quickly, either:
•
•
Click the banner of Available Roles list to sort names alphanumerically.
Start typing characters in the box, then click the Search button to filter the available
list.
2. If a role that you require still does not appear, enter the Role name and click the + button.
The role name appears in the Available roles list with an asterisk (*). This asterisk
indicates that an available role was added by an administrator, not a developer.
182
Sybase Unwired Platform
Administer
3. To remove a role you no longer require from the Available roles list, select the name and
click the x button adjacent to the Role name field.
The role is removed and can no longer be mapped to a logical role.
4. To map a logical role that appears in the text area of the Role Mappings dialog to a physical
role:
a) Select one or more Available roles.
b) Click Add.
5. To unmap a role:
a) Select one or more Mapped roles.
b) Click Remove.
The roles are returned to the Available roles list.
6. Click OK to save these changes.
Once a logical role has been manually mapped, the mapping state changes to MAPPED. The
roles you have mapped appear in the active Physical Roles cell for either a package-specific or
server-wide role mappings table.
Mapping State Reference
The mapping state determines the authorization behavior for a logical name instance.
State
Description
AUTO
Map the logical role to a physical role of the same name. The logical
role and the physical role must match, otherwise, authorization fails.
NONE
Disable the logical role, which means that the logical role is not authorized. This mapping state prohibits anyone from accessing the
resource (MBO or Operation). Carefully consider potential consequences before using this option.
MAPPED
A state that is applied after you have actively mapped the logical role
to one or more physical roles. Click the cell adjacent to the logical role
name and scroll to the bottom of the list to see the list of mapped
physical roles.
Security Configurations
Sybase Unwired Platform does not provide proprietary security systems for storing and
maintaining users and access control rules, but delegates these functions to the enterprise’s
existing security solutions.
A security configuration determines the scope of user identity, performs authentication and
authorization checks, and can be assigned multiple levels (domain or package). Applications
inherit a security configuration when the administrator assigns the application to a domain via
a connection template.
Sybase Control Center for Sybase Unwired Platform
183
Administer
Users can be authenticated differently, depending on which security configuration is used. For
example, a user identified as "John" may be authenticated different ways, depending on the
named security configuration protecting the resource he is accessing: it could be an MBO
package, a DCN request, use of Sybase Control Center .
The anonymous security configuration provides unauthenticated user access, and are targeted
to applications that do not require tight security.
Security configurations aggregate various security mechanisms for protecting Unwired
Platform resources under a specific name, which administrators can then assign. Each security
configuration consists of:
•
•
A set of configured security providers. Security provider plug-ins for many common
security solutions are included with the Sybase Unwired Platform.
Role mappings (which are set at the domain and package level) that map logical roles to
back end physical roles.
A user entry must be stored in the security repository used by the configured security provider
to access any resources (that is, either a Sybase Control Center administration feature or an
application package that accesses data sets from a back-end data source). When a user
attempts to access a particular resource, Unwired Server tries to authenticate and authorize the
user, by checking the security repository for:
•
•
Security access policies on the requested resource
Role memberships
1. Creating a Security Configuration
Create and name a set of security providers and physical security roles to protect Sybase
Unwired Platform resources.
2. Assigning a Security Configuration to a Domain
Assign security configurations to one or more domains. This allows the supAdmin to offer
a security repository for application user authentication and authorization, as well as to
share security providers across domains in case one tenant uses mutiple domains.
3. Viewing Security Configuration Usage
You can view the security configurations and logical roles used to access applications.
This enables you to assess the impact of changing a security configuration or logical role.
4. Anonymous Access Security Configuration
Allow unauthenticated users access to application data, for example, applications that
allow users to browse a read-only product catalog without logging in by assigning the
anonymous security configuration to the application.
5. SiteMinder Authentication with Sybase Unwired Platform
Configure your SiteMinder environment for authentication in Sybase Unwired Platform.
See also
• Configuring Domain Security on page 179
184
Sybase Unwired Platform
Administer
•
•
Creating Logical Roles for a Security Configuration on page 226
Mapping a Physical Role Manually on page 228
Creating a Security Configuration
Create and name a set of security providers and physical security roles to protect Sybase
Unwired Platform resources.
Only platform administrators can create security configurations. Domain administrators can
only view after the platform administrator creates and assigns them to a domain.
1. In the left navigation pane of Sybase Control Center, select Security.
2. In the right administration pane, click New.
3. Enter a name for the security configuration and click OK.
4. In the left navigation pane, under Security, select the new security configuration.
5. In the right administration pane, select the Settings tab, and set values for these properties
as required:
• Authentication cache timeout – determines how long authentication results should
be cached before a user is required to reauthenticate. For details, see Authentication
Cache Timeouts in Security. Set the cache timeout value in seconds. The default is
3600. To force re-authentication, change this value to 0.
• Maximum allowed authentication failure – determines the maximum number of
login attempts after which the user is locked.
• Authentication lock duration – determines how long the user is locked after the
maximum login attempts is reached.
6. Click Save.
7. Select the tab corresponding to the type of security provider you want to configure:
Authentication, Authorization, Attribution or Audit.
8. To edit the properties of a preexisting security provider in the configuration:
a) Select the provider, and click Properties.
b) Configure the properties associated with the provider by setting values according to
your security requirements. Add properties as required. For more information about
configuring security provider properties, see the individual reference topics for each
provider.
c) Click Save.
9. To add a new security provider to the configuration:
a) Click New.
b) Select the provider you want to add.
c) Configure the properties associated with the provider by setting values according to
your security requirements. Add properties as required. For more information about
configuring security provider properties, see the individual reference topics for each
provider.
Sybase Control Center for Sybase Unwired Platform
185
Administer
d) Click OK.
The configuration is saved locally, but not yet committed to the server.
Note: When you create a new security configuration, Sybase Unwired Platform sets the
NoSecurity provider by default. Sybase recommends that after you add, configure, and
validate your providers, you remove the NoSecurity provider. For more information on the
NoSecurity provider, see NoSecurity Configuration Properties.
10. To remove the NoSecurity provider:
a) In the left navigation pane, select Security.
b) In the right administration pane, within the Authenticationtab, select
NoSecLoginModule and click Delete.
c) In the right administration pane, within the Authorization tab, select
NoSecAuthorizer and click Delete.
d) In the right administration pane, within the Attribution tab, select NoSecAttributer
and click Delete.
e) In the General tab, click Apply then click Save.
11. To map roles for the security configuration, select the Role Mappings tab. Create logical
roles and map them to physical roles in the security provider.
12. Select the General tab, and click Validate to confirm that Unwired Server accepts the new
security configuration.
A message indicating the success of the validation appears above the menu bar.
13. Click Apply to save changes to the security configuration, and apply them across Unwired
Server.
A message indicating the success of the application appears above the menu bar.
See also
• Assigning a Security Configuration to a Domain on page 231
Security Providers
Configure one or more security providers as part of a named security configuration. There are
different types of providers you can use, and these can be ordered and flagged according to the
requirements of your production environment.
Configure security providers for Unwired Server by logging in to the server in Sybase Control
Center and clicking Security > Configuration.
For third-party providers or providers you have created with the CSI SDK, save related JAR
files or DLLs in the <UnwiredPlatform_InstallDir>\UnwiredPlatform
\Servers\UnwiredServer\lib\ext folder.
•
186
Authentication modules – verify the identity of a user accessing a network with the mobile
application, typically via a login form or some other login or validation mechanism.
Authentication in Unwired Server is distinct from authorization. You must have at least
Sybase Unwired Platform
Administer
•
•
•
one authentication module configured in a production deployment of Unwired Server. You
can stack multiple providers so users are authenticated in a particular sequence.
Authorization modules – check the access privileges for an authenticated identity. Sybase
recommends that you have at least one authorization module configured in a production
deployment of Unwired Server.
Attribution modules – when a user is authenticated, a custom attribution provider can add
more information about the authenticated user. Attribution modules are only available if
you have created a custom provider with the CSI SDK and saved to the correct folder.
Auditing modules – report all audit events to allow you to evaluate the security system
implementation for Unwired Server. Auditing provides you a record of all the security
decisions that have been made. Each successful authentication creates a session key that
shows up in subsequent security checks for that user. Unsuccessful authentications are also
logged. Each authorization records what roles were checked, or what resource was
accessed. Audit filters determine what events get recorded, the audit format determines
what the audit records look like, and the audit destination specifies where audit records are
sent. Use the audit trail to identify who did what and when, with respect to objects secured
by your providers. Auditing modules are optional.
In most cases, each security module requires a unique set of configuration properties.
However, there are some cases when modules require a common set of properties, and these
properties are configured once for each module on a tab created for that purpose.
You can configure different security providers for administrator authenticaton and device user
authentication. For more information on configuring security providers depending on the type
of user, see either Enabling Authentication and RBAC for User Logins or Enabling
Authentication and RBAC for Administrator Logins in the Security guide.
Stacking Providers and Combining Authentication Results
Optionally, implement multiple login modules to provide a security solution that meets
complex security requirements. Sybase recommends provider stacking as a means of eliciting
more precise results, especially for production environment that require different
authentications schemes for administrators, DCN, SSO, and so on.
Stacking is implemented with a controlFlag attribute that controls overall behavior when you
enable multiple providers. Set the controlFlag on a specific provider to refine how results are
processed.
For example, say your administrative users (supAdmin in a default installation) are not also
users in an EIS system like SAP. However, if they are authenticated with just the default
security configuration, they cannot also authenticate to the HttpAuthenticationLoginModule
used for SSO2Token retrieval. In this case, you would stack a second login modules with a
controlFlag=sufficient login module for your administrative users.
Or, in a custom security configuration (recommended), you may also find that you are using a
technical user for DCN who is also not an SAP user. This technical user does not need SSO
because they will not need to access data. However, the technical user still needs to be
Sybase Control Center for Sybase Unwired Platform
187
Administer
authenticated by Unwired Server. In this case, you can also stack another login module so this
DCN user can login.
1. Use Sybase Control Center to create a security configuration and add multiple providers as
required for authentication.
2. Order multiple providers by selecting a login module and using the up or down arrows at to
place the provider correctly in the list.
The order of the list determines the order in which authentication results are evaluated.
3. For each provider:
a) Select the provider name.
b) Click Properties.
c) Configure the controlFlag property with one of the available values: required,
requisite, sufficient, optional.
See controlFlag Attribute Values for descriptions of each available value.
d) Configure any other common security properties as required.
4. Click Save.
5. Select the General tab, and click Apply.
For example, say you have sorted these login modules in this order and used these controlFlag
values:
•
•
•
•
LDAP (required)
NT Login (sufficient)
SSO Token (requisite)
Certificate (optional)
The results are processed as indicated in this table:
188
Provider
Authentication Status
LDAP
pass
pass
pass
pass
fail
fail
fail
fail
NT Log- pass
in
fail
fail
fail
pass
fail
fail
fail
SSO Token
*
pass
pass
fail
*
pass
pass
fail
Certificate
*
pass
fail
*
*
pass
fail
*
Overall
result
pass
pass
pass
fail
fail
fail
fail
fail
Sybase Unwired Platform
Administer
Stacking LoginModules in SSO Configurations
(Not applicable to Online Data Proxy) Use LoginModule stacking to enable role-based
authorization for MBOs and data change notifications (DCNs).
controlFlag Attribute Values
(Not applicable to Online Data Proxy) The Sybase implementation uses the same control flag
(controlFlag) attribute values and definitions as those defined in the JAAS specification.
If you stack multiple providers, you must set the control flag attribute for each enabled
provider.
Control Flag Value
Description
Required
The LoginModule is required. Authentication proceeds down the LoginModule list.
Requisite
The LoginModule is required. Subsequent behavior depends on the
authentication result:
•
•
Sufficient
The LoginModule is not required. Subsequent behavior depends on the
authentication result:
•
•
Optional (default)
If authentication succeeds, authentication continues down the
LoginModule list.
If authentication fails, control returns immediately to the application (authentication does not proceed down the LoginModule list).
If authentication succeeds, control returns immediately to the application (authentication does not proceed down the LoginModule
list).
If authentication fails, authentication continues down the LoginModule list.
The LoginModule is not required. Regardless of success or failure,
authentication proceeds down the LoginModule list.
Example
Providers are listed in this order and with these controlFlag:
1. CertificateAuthenticationLoginModule (sufficient)
2. LDAP (optional)
3. NativeOS (sufficient)
A client doing certificate authentication (for example, X.509 SSO to SAP) can authenticate
immediately. Subsequent modules are not called, because they are not required. If there are
regular user name and password credentials, they go to LDAP, which may authenticate them,
Sybase Control Center for Sybase Unwired Platform
189
Administer
and set them up with roles from the LDAP groups they belong to. Then NativeOS is invoked,
and if that succeeds, Sybase Unwired Platform picks up roles based on the Windows groups
they are in.
LDAP Stacking and Configuration Sharing
LDAP login and attribution modules can sometimes share a common configuration.
LDAPAttributer can share the configuration properties from the configured LDAP login
modules only if no configuration properties are explicitly configured for LDAPAttributer.
If stacking these modules, be aware that authorizers do not inherit configuration properties
from the login modules you configure. Configurations must be explicit. In the case where both
LDAPLoginModule and LDAPAuthorizer are separately configured:
•
•
Matching configuration – LDAPAuthorizer simply skips the role retrieval.
Differing configuration – LDAPAuthorizer proceeds with the role retrieval from the
configured backend, and performs the authorization checks using the complete list of roles
(from both the login module and itself).
Only one attributer instance needs to be configured even when multiple login module
instances are present in the security configuration. The LDAPAttributer attributes an
authenticated subject using the LDAP configuration that was used to authenticate the subject.
However, the list of available roles is computed by the LDAPAttributer by iterating through all
available LDAP configurations.
Regarding LDAPAttributer stacking and configuration:
•
•
•
LDAPAttributer has maximum functionality when combined with the LDAP
authentication provider; the LDAPAttributer can be configured completely standalone or
with alternate authentication providers.
If you do not configure an LDAPLoginModule, you must define the configure all
properties in the attributer.
If explicit configuration properties are specified for the attributer, then the properties from
the login module are not used for attributer functionality, including retrieving attributes for
authenticated subjects, listing roles, and more. Sybase recommends you share
configuration rather than try to maintain separate ones.
Configuring an LDAP Provider to use SSL
If your LDAP server uses a secure connection, and its SSL certificate is signed by a
nonstandard certificate authority, for example it is self-signed, use the keytool utility
(keytool.exe) to import the certificate into the truststore.
1. Run the following console command: keytool.exe -import -keystore
SUP_HOME\Servers\UnwiredServer\Repository\Security
\truststore.jks -file <LDAP server cert file path> -alias
ldapcert -storepass changeit.
190
Sybase Unwired Platform
Administer
2. Restart Sybase Unwired Platform services.
3. Log in to Sybase Control Centerfor Sybase Unwired Platform.
4. In the navigation pane of Sybase Control Center, expand the Security folder and select the
desired security configuration in which to add the LDAP provider.
5. In the administration pane, click the Authentication tab.
6. Add an LDAPLoginModule, configuring the ProviderURL, Security Protocol,
ServerType, Bind DN, Bind Password, Search Base, and other properties determined by
you and the LDAP administrator. Choose one of the two methods below to secure a
connection to the LDAP server:
a) Use ldaps:// instead of ldap:// in the ProviderURL.
b) Use ssl in the Security Protocol.
7. In the General tab, select Validate then Apply.
8. Click OK.
Reordering Configured Providers
List stacked security providers for a security configuration to identify them as primary or
auxiliary providers. Providers are used in the order configured.
1. In the left navigation pane, expand the Security folder.
2. Select the security configuration you want to administer.
3. In the right administration pane, select the tab corresponding to the type of security
provider you want to configure: Authentication, Authorization, Attribution, or Audit.
4. Select a provider from the list, then use the up and down arrows to the right of the table to
achieve the desired placement.
5. Click Save.
6. Select the General tab, and click Apply.
A notification message appears if a server restart is required for changes to take effect.
Security Provider Configuration Properties
Security providers implement different properties, depending on the type of provider you are
configuring.
Platform administrators can configure application security properties in the Sybase Control
Center. These properties are then transcribed to an XML file in the
<UnwiredPlatform_InstallDir>\Servers\UnwiredServer
\Repository\CSI\ directory. A new section is created for each provider you add.
LDAP Configuration Properties
Use these properties to configure the LDAP provider used to authenticate Sybase Control
Center administration logins or to configure the LDAP provider used to authenticate device
application logins. If you are configuring an LDAP provider for device application logins in
Sybase Control Center, then Unwired Platform administrators use Sybase Control Center
Sybase Control Center for Sybase Unwired Platform
191
Administer
these properties are saved to the SUP_HOME\Servers\UnwiredServer
\Repository\CSI\<security configuration name file.
The Java LDAP provider consists of three provider modules.
•
•
•
The LDAPLoginModule provides authentication services. Through appropriate
configuration, you can enable certificate authentication in LDAPLoginModule.
(Optional) LDAPAuthorizer or RoleCheckAuthorizer provide authorization service in
conjunction with LDAPLoginModule. LDAPLoginModule works with either authorizer.
The RoleCheckAuthorizer is part of every security configuration but does not appear in
Sybase Control Center.
Use LDAPAuthorizer only when LDAPLoginModule is not used to perform authentication,
but roles are still required to perform authorization checks against the LDAP data store. If
you use LDAPAuthorizer, always explicitly configure properties; for it cannot share the
configuration options specified for the LDAPLoginModule.
(Optional) LDAPAttributer is used to retrieve the list of roles from the LDAP repository.
These roles are displayed in the role mapping screen in Sybase Control Center. The LDAP
attributer is capable of sharing the configuration properties from the LDAPLoginModules.
If no configuration properties are explicitly specified, then the attributer iterates through
the configured LDAPLoginModules and retrieves the roles from all the LDAP repositories
configured for the different LDAPLoginModules.
Use this table to help you configure properties for one or more of the supported LDAP
providers. When configuring modules or general server properties in Sybase Control Center,
note that properties and values can vary, depending on which module or server type you
configure.
Note: The following characters have special meaning when they appear in a name in LDAP: ,
(comma), = (equals), + (plus), < (less than), > (greater than), # (number or hash sign), ;
(semicolon), \ (backslash), / (forward slash), LF (line feed), CR (carriage return), " (double
quotation mark), ' (single quotation mark), * (asterisk), ? (question mark), & (ampersand), and
a space at the beginning or end of a string. LDAP providers do not handle these special
characters in any of the names or DNs, in any of the configuration properties. Additionally,
some of the properties, as identified below, cannot use these special characters in common
names.
192
Sybase Unwired Platform
Administer
Property
Default Value
Description
ServerType
None
Optional. The type of LDAP server you are connecting to:
•
•
sunone5 -- SunOne 5.x OR iPlanet 5.x
msad2k -- Microsoft Active Directory,
Windows 2000
•
•
nsds4 -- Netscape Directory Server 4.x
openldap -- OpenLDAP Directory Server
2.x
The value you choose establishes default values
for these other authentication properties:
•
•
•
•
•
•
ProviderURL
ldap://localhost:389
RoleFilter
UserRoleMembership
RoleMemberAttributes
AuthenticationFilter
DigestMD5Authentication
UseUserAccountControl
The URL used to connect to the LDAP server.
Without this URL configured, Unwired Server
cannot contact your server. Use the default value
if the server is:
•
•
Located on the same machine as your product
that is enabled with the common security infrastructure.
Configured to use the default port (389).
Otherwise, use this syntax for setting the value:
ldap://<hostname>:<port>
Sybase Control Center for Sybase Unwired Platform
193
Administer
Property
Default Value
Description
DefaultSearchBase
None
The LDAP search base that is used if no other
search base is specified for authentication, roles,
attribution and self registration:
1. dc=<domainname>,dc=<tld>
For example, a machine in sybase.com domain would have a search base of dc=sybase,dc=com.
2. o=<company name>,c=<coun-
try code>
For example, this might be o=Sybase,c=us for
a machine within the Sybase organization.
Note: When you configure this property in the
"admin" security configuration used to authenticate the administrator in Sybase Control Center,
the property value should not contain any special
characters, as listed above, in any of the common
names or distinguished names.
SecurityProtocol
None
The protocol to be used when connecting to the
LDAP server. The specified value overrides the
environment property java.naming.security.protocol.
To use an encrypted protocol, use SSL instead of
ldaps in the URL.
AuthenticationMethod
Simple
The authentication method to use for all authentication requests into LDAP. Legal values are
generally the same as those of the java.naming.security.authentication JNDI property. Choose one
of:
•
•
194
simple — For clear-text password authentication.
DIGEST-MD5 — For more secure hashed
password authentication. This method requires that the server use plain text password
storage and only works with JRE 1.4 or later.
Sybase Unwired Platform
Administer
Property
Default Value
Description
AuthenticationFilter
For most LDAP servers:
The filter to use when looking up the user.
(&
When performing a user name based lookup, this
(uid={uid})(ob- filter is used to determine the LDAP entry that
jectclass=permatches the supplied user name.
son))
or
The string "{uid}" in the filter is replaced with the
supplied user name.
For Active Directory email lookups: (&
Note: When you use this property to authenticate
a user in Sybase Control Center:
(userPrincipal•
Name={uid})
(objectclass=user))
•
[ActiveDirectory]
The property value should not contain any
special characters, as listed above, in any of
the common names or distinguished names.
Do not use Chinese or Japanese characters in
user names or passwords of this property.
For Active Directory
Windows user name
lookups: (&
(sAMAccountName={uid})(objectclass=user))
AuthenticationScope
onelevel
The authentication search scope. The supported
values for this are:
•
•
onelevel
subtree
If you do not specify a value or if you specify an
invalid value, the default value is used.
AuthenticationSearchBase
None
The search base used to authenticate users. If this
property is not configured, the value for DefaultSearchBase is used.
Note: When you configure this property in the
"admin" security configuration used to authenticate the administrator in Sybase Control Center,
the property value should not contain any special
characters, as listed above, in any of the common
names or distinguished names.
Sybase Control Center for Sybase Unwired Platform
195
Administer
Property
Default Value
Description
BindDN
None
The user DN to bind against when building the
initial LDAP connection.
In many cases, this user may need read permissions on all user records. If you do not set a value,
anonymous binding is used. Anonymous binding
works on most servers without additional configuration.
BindPassword
None
The password for BindDN, which is used to authenticate any user. BindDN and BindPassword
separate the LDAP connection into units.
The AuthenticationMethod property determines
the bind method used for this initial connection.
Sybase recommends that you encrypt passwords,
and provides a password encryption utility. If you
encrypt BindPassword, include encrypted=true in the line that sets the option. For
example:
<options name="BindPassword" encrypted="true" value="1snjikfwregfqr43hu5io..."/>
If you do not encrypt BindPassword, the option
might look like this:
<options name="BindPassword"
value="s3cr3T"/>
196
Sybase Unwired Platform
Administer
Property
Default Value
Description
RoleSearchBase
None
The search base used to retrieve lists of roles. If
this property is not configured, the value for DefaultSearchBase is used.
Note: Setting the RoleSearchBase to the root in
Active Directory (for example "DC=example,DC=com") results in a PartialResultsException error when validating the configuration or
authenticating a user. To confirm, verify that example.com:389 is reachable. The DNS lookup
may successfully resolve example.com to an IP
address but port 389 may not be open with an
Active Directory server listening on that port. In
this case, adding an entry to the systemroot
\system32\drivers\etc\hosts
(typically, C:\WINDOWS\system32\drivers\etc\hosts) file on
the machine where Sybase Unwired Platform is
installed resolves any communication error.
Note: When you configure this property in the
"admin" security configuration used to authenticate the administrator in Sybase Control Center,
the property value should not contain any special
characters, as listed above, in any of the common
names or distinguished names.
Sybase Control Center for Sybase Unwired Platform
197
Administer
Property
Default Value
Description
RoleFilter
For SunONE/iPlanet:
The role search filter. This filter should, when
combined with the role search base and role
scope, return a complete list of roles within the
LDAP server. There are several default values,
depending on the chosen server type. If the server
type is not chosen and this property is not initialized, no roles are available.
(&(objectclass=ldapsubentry) (objectclass=nsroledefinition))
For Netscape Directory
Server: (|(object-
Note: When you use this property to authenticate
a user in Sybase Control Center:
class=groupofnames) (object- •
class=groupofuniquenames))
For ActiveDirectory: (|
•
(objectclass=groupofnames) (objectclass=group))
RoleMemberAttributes
For Netscape Directory
Server and OpenLDAP
Server: member,uniquemember
The property value should not contain any
special characters, as listed above, in any of
the common names or distinguished names.
Do not use Chinese or Japanese characters in
user names or passwords of this property.
A comma-separated list of role attributes from
which LDAP derives the DNs of users who have
this role.
These values are cross-referenced with the active
user to determine the user's role list. One example
of the use of this property is when using LDAP
groups as placeholders for roles. This property
has a default value only when the Netscape server
type is chosen.
RoleNameAttribute
cn
The attribute of the role entry used as the role
name in Unwired Platform. This is the role name
displayed in the role list or granted to the authenticated user.
RoleScope
onelevel
The role search scope. Supported values include:
•
•
onelevel
subtree
If you do not specify a value or if you specify an
invalid value, the default value is used.
198
Sybase Unwired Platform
Administer
Property
Default Value
Description
SkipRoleLookup
false
Set this property to true to grant the roles looked
up using the attributes specified by the property
UserRoleMembershipAttributes without crossreferencing them with the roles looked up using
the RoleSearchBase and RoleFilter.
LDAP configuration validation succeeds even
when an error is encountered when listing all the
available roles. The error is logged to the server
log during validation but not reported in Sybase
Control Center, allowing the configuration to be
saved. This has an impact when listing the physical roles for role mapping as well as in Sybase
Control Center. To successfully authenticate the
user, set the SkipRoleLookup property to true.
UserRoleMembershipAttri- For iPlanet/SunONE:
butes
nsRoleDN
For Active Directory:
memberOf
For all others: none
Defines a user attribute that contains the DNs of
all of the roles a user is a member of.
These comma-delimited values are cross-referenced with the roles retrieved in the role search
base and search filter to generate a list of user's
roles.
If SkipRoleSearch property is set to true, these
comma-delimited values are not cross-referenced
with the roles retrieved in the role search base and
role search filter. See Skipping LDAP Role Lookups (SkipRoleLookup).
Note: If you use nested groups with Active Directory, you must set this property to tokenGroups. See LDAP Nested Groups and Roles
in LDAP.
UserFreeformRoleMembershipAttributes
None
The freeform role membership attribute list.
Users who have attributes in this comma-delimited list are automatically granted access to roles
whose names are equal to the attribute value. For
example, if the value of this property is department and user's LDAP record has the following
values for the department attribute, { sales, consulting }, then the user will be granted roles whose
names are sales and consulting.
Sybase Control Center for Sybase Unwired Platform
199
Administer
Property
Default Value
Description
Referral
ignore
The behavior when a referral is encountered. Valid values are dictated by LdapContext, for example, follow, ignore, throw.
DigestMD5AuthenticationFormat
DN
The DIGEST-MD5 bind authentication identity
format.
UseUserAccountControlAttribute
For Active Directory:
true
When this property is set to true, the UserAccountControl attribute is used to detect if a user
account is disabled, if the account has expired, if
the password associated with the account has expired, and so on. Active Directory uses this attribute to store this information.
controlFlag
optional
When you configure multiple authentication providers, use controlFlag for each provider to control how the authentication providers are used in
the login sequence.
For OpenLDAP: User
name
controlFlag is a generic login module option rather than an LDAP configuration property.
For more information, see controlFlag Attribute
Values.
EnableLDAPConnectionTrace
False
Enables LDAP connection tracing. The output is
logged to a file in the temp directory. The location of the file is logged to the server log.
ConnectTimeout
0
Specifies the timeout, in milliseconds, when connecting to the LDAP server. The property value
sets the JNDI com.sun.jndi.ldap.connect.timeout
property, when attempting to establish a connection to a configured LDAP server. If the LDAP
provider cannot establish a connection within the
configured interval, it aborts the connection attempt. An integer less than or equal to zero results
in the use of the network protocol's timeout value.
200
Sybase Unwired Platform
Administer
Property
Default Value
Description
ReadTimeout
0
Controls the length of time, in milliseconds, the
client waits for the server to respond to a read
attempt after the initial connection to the server
has been established. The property values sets the
JNDI com.sun.jndi.ldap.read.timeout property,
when attempting to establish a connection to a
configured LDAP server. If the LDAP provider
does not receive an LDAP response within the
configured interval, it aborts the read attempt. The
read timeout applies to the LDAP response from
the server after the initial connection is established with the server. An integer less than or equal to
zero indicates no read timeout is specified.
LDAPPoolMaxActive
8
Caps the number of concurrent LDAP connections to the LDAP server. A non-positive value
indicates no limit. If this option is set for multiple
LDAP providers, the value set by the first LDAP
provider loaded takes precedence over all the
others. When LDAPPoolMaxActive is reached,
any further attempts by the LDAP provider
classes to borrow LDAP connections from the
pool are blocked indefinitely until a new or idle
object becomes available in the pool.
Connection pooling improves the LDAP provider's performance and resource utilization by managing the number of TCP connections established
with configured LDAP servers. A separate pool is
associated with different Sybase Unwired Platform security configurations, ensuring that the
LDAP connections in the connection pool for a
particular security configuration are isolated from
any changes occurring outside this security configuration. A separate pool also ties the connection pool life cycle to that of the security configuration.
NTProxy Configuration Properties
(Not applicable to Online Data Proxy) Configure these properties to allow the operating
system's security mechanisms to validate user credentials using NTProxy (Windows Native
Sybase Control Center for Sybase Unwired Platform
201
Administer
OS). Access these properties from the Authentication tab of the Security node in Sybase
Control Center.
Table 10. Authentication properties
202
Properties
Default Value
Description
Extract Domain From Username
true
If set to true, the user name can
contain the domain in the form
of <username>@<domain>. If
set to false, the default domain
(described below) is always
used, and the supplied user
name is sent to through SSPI
untouched.
Default Domain
The domain for the host computer of the Java Virtual Machine.
Specifies the default host name,
if not overridden by the a specific user name domain.
Default Authentication Server
The authentication server for
the host computer of the Java
Virtual Machine.
The default authentication server from which group memberships are extracted. This can be
automatically determined from
the local machine environment,
but this property to bypass the
detection step.
useFirstPass
false
If set to true, the login module
attempts to retrieve only the user
name and password from the
shared context. It never calls the
callback handler.
tryFirstPass
false
If set to true, the login module
first attempts to retrieve the user
name and password from the
shared context before attempting the callback handler.
clearPass
false
If set to true, the login module
clears the user name and password in the shared context when
calling either commit or abort.
storePass
false
If set to true, the login module
stores the user name and password in the shared context after
successfully authenticating.
Sybase Unwired Platform
Administer
NoSecurity Configuration Properties
A NoSecurity provider offers pass-through security for Unwired Server, and should be
typically be reserved for devlopment or testing. Sybase strongly encourages you to avoid
using this provider in production environments — either for administration or device user
authentication.
•
•
•
The NoSecLoginModule class provides open authentication services
The NoSecAuthorizer class provides authorization services
The NoSecAttributer provides attribution services
You need to configure only the authentication properties for the NoSecurity provider.
Table 11. Authentication Properties
Property
Default Value
Description
useUsernameAsIdentity
true
If this option is set to true, the user name
supplied in the callback is set as the
name of the principal added to the subject.
identity
nosec_identity
The value of this configuration option is
used as the identity of the user if either of
these conditions is met:
•
•
No credentials were supplied.
The useUsernameAsIdentity option
is set to false.
useFirstPass
false
If set to true, the login module attempts
to retrieve only the user name and password from the shared context. It never
calls the callback handler.
tryFirstPass
false
If set to true, the login module first attempts to retrieve the user name and
password from the shared context before attempting the callback handler.
clearPass
false
If set to true, the login module clears the
user name and password in the shared
context when calling either commit or
abort.
Sybase Control Center for Sybase Unwired Platform
203
Administer
Property
Default Value
Description
storePass
false
If set to true, the login module stores the
user name and password in the shared
context after successfully authenticating.
Note: When you create a new security configuration, Sybase Unwired Platform sets the
NoSecurity provider by default. Sybase recommends that after you add, configure, and
validate your providers, you remove the NoSecurity provider. For more information, see
Creating a Security Configuration.
Certificate Authentication Properties
Add and configure authentication provider properties for
CertificateAuthenticationLoginModule, or accept the default settings.
Note: This provider cannot be used for administrative security (in the "admin" security
configuration).
Table 12. CertificateAuthenticationLoginModule properties
Property
Description
Implementation class
The fully qualified class that implements the login module.
com.sybase.security.core.CertificateAuthenticationLoginModule is the default class.
204
Provider type
LoginModule is the only supported value.
Control flag
Determines how success or failure of this module affects the overall
authentication decision. optional is the default value.
Clear password
(Optional) If true, the login module clears the user name and password from the shared context. The default is false.
Store password
(Optional) If true, the login module stores the user name and password in the shared context. The default is false.
Try first password
(Optional) If true, the login module attempts to retrieve user name
and password information from the shared context, before using the
callback handler. The default is false.
Use first password
(Optional) If true, the login module attempts to retrieve the user
name and password only from the shared context. The default is
false.
Sybase Unwired Platform
Administer
Property
Description
Enable revocation checking
(Optional) Enables online certificate status protocol (OCSP) certificate checking for user authentication. If you enable this option, you
muse enable OCSP in Unwired Server. This provider uses the values
defined as part of the SSL security profile. Revoked certificates
result in authentication failure when both of these conditions are
met:
•
•
revocation checking is enabled
OCSP properties are configured correctly
Regex for username certificate (Optional) By default, this value matches that of the certificates
match
common name (CN) property used to identify the user.
If a mobile application user supplies a user name that does not match
this value, authentication fails.
Trusted certificate store
(Optional) The file containing the trusted CA certificates (import the
issuer certificate into this certificate store). Use this property and
Store Password property to keep the module out of the system trust store. The default Unwired Server system trust store is
SUP_HOME\Servers\UnwiredServer\Repository\Securitytruststore\truststore.jks. If
you do not specify a store location::
•
Unwired Server checks to see if a store used by the JVM (that is,
the one defined by the javax.net.ssl.trustStoreType system property.
•
If the system property is not defined, then this value is used: $
•
{java.home}/lib/security/jssecacerts
If that location also doesn't exist, then this value is used: $
{java.home}/lib/security/cacerts
Note: This property is required only if Validate certificate path is set
to true.
Sybase Control Center for Sybase Unwired Platform
205
Administer
Property
Description
Trusted certificate store password
(Optional) The password required to access the trusted certificate
store. For example, import the issuer of the certificate you are trying
to authenticate into the shared JDK cacerts file and specify the
password using this property.
Note: This property is required only if Validate certificate path is set
to true. However, you do not need to configure this value if the
default is used.
The default value is the value of the jav-
ax.net.ssl.trustStorePassword property.
Trusted certificate store provider
(Optional) The keystore provider. For example, "SunJCE."
Note: This property is required only if Validate certificate path is set
to true. However, you do not need to configure this value if the
default is used.
The default value is the value of the jav-
ax.net.ssl.trustStoreProvider property. If it is
not defined, then the most preferred provider from the list of registered providers that supports the specified certificate store type is
used.
Trusted certificate store type
(Optional) The type of certificate store. For example, "JKS."
Note: This property is required only if Validate certificate path is set
to true. However, you do not need to configure this value if the
default is used.
The default value is the value of the javax.net.ssl.trustStore property. If this value is not defined, then default value is the keystore type as specified in the Java
security properties file, or the string "jks" (Java keystore) if no such
property exists.
206
Sybase Unwired Platform
Administer
Property
Description
Validate certificate path
If true (the default), performs certificate chain validation of the
certificate being authenticated, starting with the certificate being
validated. Verifies that the issuer of that certificate is valid and is
issued by a trusted certificate authority (CA), if not, it looks up the
issuer of that certificate in turn and verifies it is valid and is issued by
a trusted CA. In other words, it builds up the path to a CA that is in the
trusted certificate store. If the trusted store does not contain any of
the issuers in the certificate chain, then path validation fails. For
information about adding a certificate to the truststore, see Using
Keytool to Generate Self-Signed Certificates and Keys in Security.
Certificate Validation Properties
Add and configure provider properties for CertificateValidationLoginModule, or accept the
default settings. CertificateValidationLoginModule can be used in conjunction with other
login modules that support certificate authentication (for example, LDAPLoginModule) by
configuring CertificateValidationLoginModule before the login modules that support
certificate authentication.
You can only use this provider to validate client certificates when an HTTPS listeners is
configured to use mutual authentication.
Table 13. CertificateValidationLoginModule properties
Property
Description
Implementation class
The fully qualified class that implements the login module.
com.sybase.security.core.CertificateValidationLoginModule is the default class.
crl.[index].uri
Specifies the universal resource identifier for the certificate revocation list (CRL). Multiple CRLs can be configured using different
values for the index. The CRLs are processed in index order. For
example:
crl.1.uri=http://crl.verisign.com/ThawtePersonalFreemailIssuingCA.crl
crl.2.uri=http://crl-server/
Provider type
LoginModule is the only supported value.
Sybase Control Center for Sybase Unwired Platform
207
Administer
Property
Description
Validated certificate is identity (Optional) Determines if the certificate should be set the authenticated subject as the user ID. If the CertificateValidationLoginModule is used in conjunction with other login modules that establish
user identity based on the validated certificate, set this value to
false. If you are implementing this provider with a DCN security
configuration, and it's also not used with SSO, then set this property
to true.False is the default value.
Enable revocation checking
(Optional) Enables online certificate status protocol (OCSP) certificate checking for user authentication. If you enable this option, you
muse enable OCSP in Unwired Server. This provider uses the values
defined as part of the SSL security profile. Revoked certificates
result in authentication failure when both of these conditions are
met:
•
•
Trusted certificate store
revocation checking is enabled
OCSP properties are configured correctly
(Optional) The file containing the trusted CA certificates (import the
issuer certificate into this certificate store). Use this property and
Store Password property to keep the module out of the system trust store. The default Unwired Server system trust store is
SUP_HOME\Servers\UnwiredServer\Repository\Securitytruststore\truststore.jks. If
you do not specify a store location::
•
Unwired Server checks to see if a store used by the JVM (that is,
the one defined by the javax.net.ssl.trustStoreType system property.
•
If the system property is not defined, then this value is used: $
•
{java.home}/lib/security/jssecacerts
If that location also doesn't exist, then this value is used: $
{java.home}/lib/security/cacerts
Note: This property is required only if Validate certificate path is set
to true.
208
Sybase Unwired Platform
Administer
Property
Description
Trusted certificate store password
(Optional) The password required to access the trusted certificate
store. For example, import the issuer of the certificate you are trying
to authenticate into the shared JDK cacerts file and specify the
password using this property.
Note: This property is required only if Validate certificate path is set
to true. However, you do not need to configure this value if the
default is used.
The default value is the value of the jav-
ax.net.ssl.trustStorePassword property.
Trusted certificate store provider
(Optional) The keystore provider. For example, "SunJCE."
Note: This property is required only if Validate certificate path is set
to true. However, you do not need to configure this value if the
default is used.
The default value is the value of the jav-
ax.net.ssl.trustStoreProvider property. If it is
not defined, then the most preferred provider from the list of registered providers that supports the specified certificate store type is
used.
Trusted certificate store type
(Optional) The type of certificate store. For example, "JKS."
Note: This property is required only if Validate certificate path is set
to true. However, you do not need to configure this value if the
default is used.
The default value is the value of the javax.net.ssl.trustStore property. If this value is not defined, then default value is the keystore type as specified in the Java
security properties file, or the string "jks" (Java keystore) if no such
property exists.
Sybase Control Center for Sybase Unwired Platform
209
Administer
Property
Description
Validate certificate path
If true (the default), performs certificate chain validation of the
certificate being authenticated, starting with the certificate being
validated. Verifies that the issuer of that certificate is valid and is
issued by a trusted certificate authority (CA), if not, it looks up the
issuer of that certificate in turn and verifies it is valid and is issued by
a trusted CA. In other words, it builds up the path to a CA that is in the
trusted certificate store. If the trusted store does not contain any of
the issuers in the certificate chain, then path validation fails. For
information about adding a certificate to the truststore, see Using
Keytool to Generate Self-Signed Certificates and Keys in Security.
HTTP Basic Authentication Properties
The HttpAuthenticationLoginModule provider authenticates the user with given credentials
(user name and password) against the secured Web server using a GET against a URL that
requires basic authentication, and can be configured to retrieve a cookie with the configured
name and add it to the JAAS subject to facilitate single sign-on (SSO).
Configure this provider to authenticate the user by:
•
•
•
Using only the specified user name and password.
Using only the specified client value or values.
Attempting token authentication. If that fails, revert to basic authentication using the
supplied user name and password. You may find this helpful when using the same security
configuration for authenticating users with a token, such as device users hitting the
network edge, and when DCN requests from within a firewall present a user name and
password but no token.
Note: The HttpAuthenticationLoginModule allows token validation by connecting to an
HTTP server capable of validating the token specified in the HTTP header and cookie set in
the session.
Table 14. HttpAuthenticationLoginModule Configuration Options
210
Configuration Option
Default Value
Description
URL
None
The HTTP or HTTPS URL that
authenticates the user. For SSO,
this is the server URL from
which Unwired Server acquires
the SSO cookie/token.
Sybase Unwired Platform
Administer
Configuration Option
Default Value
Description
Disable certificate validation
False
(Optional) The default is false.
If set to true, this property disables certificate validation when
establishing an HTTPS connection to the SWS using the configured URL. Set to true only for
configuration debugging.
SSO cookie name
None
(Optional) Name of the cookie
set in the session between the
LoginModule and the secured
Web server, and holds the SSO
token for single sign-on. The
provider looks for this cookie in
the connection to the secured
Web server. If the cookie is
found, it is added to the authenticated subject as a named credential.
The authentication provider ignores the status code when an
SSO cookie is found in the session; authentication succeeds
regardless of the return status
code.
Roles HTTP header
None
(Optional) The name of an
HTTP header that the server
may return. The header value
contains a comma-separated list
of roles to be granted.
Successful connection status
code
200
HTTP status code interpreted as
successful when connection is
established to the secured Web
server.
Sybase Control Center for Sybase Unwired Platform
211
Administer
Configuration Option
Default Value
Description
HTTP connection timeout inter- 60 seconds
val
The value, in seconds, after
which an HTTP connection request to the Web-based authentication service times out. If the
HTTP connection made in this
module (for either user authentication or configuration validation) does not have a timeout set,
and attempts to connect to a
Web-based authentication service that is unresponsive, the connection also becomes unresponsive, which could potentially
cause Unwired Server to become unresponsive. Setting the
timeout interval ensures that authentication failure is reported
without waiting indefinitely for
the server to respond.
SendClientHttpValuesAs
Comma-separated list of strings
that indicate how to send ClientHttpValuesToSend to the
HTTP server. For example:
None
SendClientHttpValuesAs=header:header_name,
cookie: cookie_name
This property does not apply if
the user is to be authenticated
using only the supplied user
name and password .
212
Sybase Unwired Platform
Administer
Configuration Option
Default Value
Description
ClientHttpValuesToSend
None
A comma-separated list of client HTTP values to be sent to
the HTTP server. For example:
ClientHttpValuesToSend=client_personalization_key,
client_cookie_name
Set this property if you are using
token authentication.
Setting this property triggers token authentication. Only token
authentication is attempted, unless TryBasicAuthIfTokenAuthFails is configured to true
in conjunction with ClientHttpValuesToSend.
This property does not apply if
the user is to be authenticated
using only the supplied user
name and password .
Sybase Control Center for Sybase Unwired Platform
213
Administer
Configuration Option
Default Value
Description
SendPasswordAsCookie
None
Deprecated. Use only for backward compatibility. New configurations should configure token authentication using SendClientHttpValuesAs and ClientHttpValuesToSend.
Sends the password to the URL
as a cookie with this name. If not
specified, the password is not
sent in a cookie. This property is
normally used when there is a
cookie-based SSO mechanism
in use (for example, SiteMinder), and the client has put an
SSO token into the password.
The token can be propagated
from the personalization keys
and HTTP header and cookies
to the secured Web server without impacting the password
field.
TryBasicAuthIfTokenAuthFails
False
Specifies whether the provider
should attempt basic authentication using the specified user
name and password credentials
if token authentication is configured and fails. This property
is applicable only if token authentication is enabled.
This property does not apply if
the user is to be authenticated
using only the supplied user
name and password .
214
Sybase Unwired Platform
Administer
Configuration Option
Default Value
Description
UsernameHttpHeader
None
HTTP response header name
returned by the HTTP server
with the user name retrieved
from the token. Upon successful
authentication, the retrieved
user name is added as a SecNamePrincipal.
This property does not apply if
the user is to be authenticated
using only the supplied user
name and password .
regexForUsernameMatch
None
Regular expression used for
matching the supplied user
name with the user name returned by the HTTP server in
the UsernameHttpHeader. The
string "{username}" in the regex is replaced with the specified user name before using it. If
specified, it matches the user
name retrieved from the UsernameHttpHeader to the user
name specified in the callback
handler. If the user names do not
match, authentication fails. If
the user names match, both the
specified user name and the retrieved user name are added as
SecNamePrincipals to the authenticated subject.
This property does not apply if
the user is to be authenticated
using only the supplied user
name and password .
Sybase Control Center for Sybase Unwired Platform
215
Administer
Configuration Option
Default Value
Description
TokenExpirationTimeHttpHeader
None
HTTP response header name
that is returned by the HTTP
server with the validity period of
the token in milliseconds since
the start of January 1, 1970. If
the header is returned in the
HTTP response from the secured Web server, the token is
cached for the duration it remains valid unless TokenExpirationInterval is also configured.
If this response header is not returned with the token, it might
result in unintended use of the
token attached to the authenticated context even after it has
expired.
This property does not apply if
the user is to be authenticated
using only the supplied user
name and password .
216
Sybase Unwired Platform
Administer
Configuration Option
Default Value
Description
TokenExpirationInterval
0
Specifies the interval, in milliseconds to be deducted from the
actual expiration time returned
in TokenExpirationTimeHttpHeader. This ensures that the
token credential retrieved from
the authenticated session remains valid until it is passed to
the SWS for single sign-on to
access MBOs.
Note: This property does not
apply if the user should be authenticated using only the supplied user name and password.
Note: If the configured TokenExpirationInterval value exceeds the amount of time the token is valid, authentication by
the HttpAuthenticationLoginModule fails even if the token is
validated successfully by the secured Web server.
CredentialName
None
Sybase Control Center for Sybase Unwired Platform
Name to set in the authentication credential that contains the
token returned in SSOCookieName. If this property is not
configured, the SSOCookieName is set as the name of the
token credential.
217
Administer
SAP SSO Token Authentication Properties
The SAPSSOTokenLoginModule has been deprecated, Use the
HttpAuthenticationLoginModule when SAP SSO2 token authentication is required. This
authentication module will be removed in a future release.
Table 15. SAPSSOTokenLoginModule properties
Property
Description
Implementation class
(Required) – the fully qualified class that implements the
login module. com.sybase.security.sap.SAPSSOTokenLoginModule is the default class.
Provider type
(Required and read-only) – LoginModule is the only
supported value.
Control flag
(Required) – optional is the default value. Determines
how success or failure of this module affects the overall authentication decision.
SAP server URL
(Required) – the SAP server URL that provides the SSO2
token. This may or may not be the same server that authenticates the user. If providing and authenticating servers are
different, you must import the SAP Token provider server
certificate or one of its CA signers into the Unwired Server
truststore in addition to that of the authenticating server to
enable HTTPS communication. In environments where the
servers are different, the basic flow is:
1. Unwired Server passes credentials over HTTPS to the
token granting service.
2. An SSO2Token cookie is returned to Unwired Server.
3. The SSO2Token flows to the authenticating server, which
could be an SAP EIS or a server that hosts a Web service
bound to SAP function modules.
Note: The SAP Server URL must be configured to require
BASIC authentication, not just FORM based authentication.
Clear password
218
(Optional) – if set to True, the login module clears the
username and password in the shared context.
Sybase Unwired Platform
Administer
Property
Description
Disable server certificate validation
(Optional) – the default is False. If set to True, disables
certificate validation when establishing an HTTPS connection to the SAP server using the configured URL. Set to
True only for configuration debugging.
SAP server certificate
(Optional) – name of the file containing the SAP certificate's
public key in .pse format. This is required only when token
caching is enabled by setting a SAP SSO token persistence
data store value.
SAP server certificate password
(Optional) – password used to access the SAP server certificate.
SAP SSO token persistence data store (Optional) – JNDI name used to look-up the data source to
persist the retrieved SSO2 tokens.
Set to "jdbc/default" to store tokens in the Unwired Server
CDB. If unconfigured, some caching is still done based on the
"Authentication cache timeout interval" property associated
with the security configuration setting.
If you use the default setting, you do not need to set SAP SSO
token persistence data store, SAP server certificate, SAP
server certificate password, or Token expiration interval
properties.
To enable token caching through the SAPSSOTokenLoginModule:
1. Set the SAP SSO token persistence data store value to
"jdbc/default."
2. Download and install the SAP SSO2 token files. See
Installing the SAP Cryptographic Libraries in the Security guide.
3. Specify the correct value for the SAP server certificate,
SAP server certificate, SAP server certificate password
and Token expiration interval properties.
Store password
(Optional) – if set to true, the login module stores the username/password in the shared context after successfully authenticating the user.
Sybase Control Center for Sybase Unwired Platform
219
Administer
Property
Description
Token expiration interval
(Optional) – this property is ignored when the SAP SSO
token persistence data store property is not configured. It
specifies the token validity period, after which time a new
token is retrieved from the SAP EIS. The default value is 120
seconds.
Keep in mind that:
•
The "Token expiration interval" cannot exceed the "Token validity period", which is the amount of time defined
in the back-end SAP server for which the token is valid.
•
The "Authentication cache timeout" property must be
less than the "Token expiration interval" property value.
Try first password
(Optional) – if set to True, the login module attempts to
retrieve the username/password from the shared context, before calling the callback handler.
Use first password
(Optional) – if set to True, the login module attempts to
retrieve the username/password only from the shared context,
and never calls the callback handler.
HTTP connection timeout interval
The value, in seconds, after which an HTTP(s) connection
request to the EIS times out. If the HTTP connection made in
this module (for either user authentication or configuration
validation) does not have a time out set, and attempts to connect to an EIS that is unresponsive, the connection hangs,
which could potentially cause Unwired Server to hang. Setting the timeout interval ensures authentication failure is reported without waiting for ever for the server to respond.
Preconfigured User Authentication Properties
The PreConfiguredUserLoginModule authenticates the Unwired Platform Administrator
user whose credentials are specified during installations.
This login module is recommended only to give the Platform administrator access to Sybase
Control Center so it can be configured for production use. Administrators are expected to
replace this login module immediately upon logging in for the first time.For details on how to
setup administrator authentication in a production deployment, see Enabling Authentication
and RBAC for Administrator Logins in the Security guide.
The PreConfiguredUserLoginModule:
220
Sybase Unwired Platform
Administer
•
Provides role based authorization by configuring the provider
com.sybase.security.core.RoleCheckAuthorizer in conjunction with this authentication
provider.
Authenticates the user by comparing the specified username/password against the
configured user. Upon successful authentication, the configured roles are added as
Principals to the Subject.
•
Table 16. PreConfiguredUserLoginModule properties
Property
Description
User name
A valid user name. Do not use any of these restricted special
characters: , = : ' " * ? &.
Password
The encoded password hash value.
Roles
Comma separated list of roles granted to the authenticated
user for role-based authorization. Platform roles include
"SUP Administrator", "SUP Domain Administrator", and
"SUP Helpdesk".
Roles are mandatory for "admin" security configuration. For
example, if you define "SUP Administrator" to this property,
the login id in the created login module has Platform administrator privileges.
The "SUP Helpdesk" role has the fewest privileges. If multiple roles are defined for this property, a role with more
privileges ("SUP Administrator" or "SUP Domain Administrator") is used for authorizing users.
Note: If you use other values, ensure you map Unwired Platform roles to the one you define here.
Audit Provider Properties
The security configuration for Sybase Unwired Platform includes an audit provider with three
components: audit filter, audit formatter, and audit destination.
An auditor consists of one destination, one filter, and one formatter.
•
•
The supported value for destination is
com.sybase.security.core.FileAuditDestination. Optionally, you can
develop a custom provider and configure it as the audit destination, formatter, and filter.
See CSI Audit Generation and Configuration.
The only supported value for the filter is
com.sybase.security.core.DefaultAuditFilter.
Sybase Control Center for Sybase Unwired Platform
221
Administer
•
The only supported value for the formatter is
com.sybase.security.core.XmlAuditFormatter.
For information on developing a custom provider and configuring it as the audit destination,
formatter, and filter, see Security API in Developer Guide: Unwired Server Runtime.
For detailed information on the audit packages, see Security Configuration in Developer
Guide: Unwired Server Runtime > Management API.
DefaultAuditFilter Properties
The audit filter component configures the resource classes for which the audit records should
be routed to the associated destination.
Filter resource classes require a specific syntax. The audit token identifies the source for core
audit requests of operations, such as auditing the results for authorization and authentication
decisions, in addition to placing information such as active provider information into the audit
trail. The audit records have their resource class prefixed by the prefix core. The CSI core is
able to audit multiple items.
DefaultAuditFilter Configuration Properties
The property name default value description is:
(1)caseSensitiveFiltering false set to true to use case sensitivity
when matching resource classes and actions
(2)filter
default
value="(ResourceClass=core.subject,Action=authorization.role)
(ResourceClass=core.subject,Action=authorization.resource)
(ResourceClass=core.subject,Action=authentication)
(ResourceClass=core.subject,Action=logout)
(ResourceClass=core.profile)
(ResourceClass=providers.*)(ResourceClass=clients.*)"
description = the filter string that determines whether an audit
record should be written out to the audit destination.
Syntax
Filter resource classes consist of one or more filter expressions that are delimited by
parenthesis ( () ). Square brackets ([]) denote optional values. The syntax is:
[key1=value [,key2=value...]].
The allowed keys are: ResourceClass, Action, or Decision.
This table describes core auditable items:
222
Sybase Unwired Platform
Administer
Resource Class
Action
Description
Attributes
provider
activate
Called when a provid- Generated unique proer is activated by CSI. vider identifier.
The resource ID is the
provider class name.
subject
authentication.provider
The result of a provider's specific authentication request. Depending on the other
providers active, the
actual CSI request for
authentication may
not reflect this same
decision.
•
•
•
•
Provider identifier
Decision (yes or
no)
Failure reason (if
any)
Context ID
This resource class is
not a provider-generated audit record. CSI
core generates this audit record automatically after receiving the
provider's decision.
The resource ID is not
used.
subject
authentication
The aggregate deci•
sion after considering
each of the appropriate
•
provider's authentication decisions. This record shares the same
request identifier as
the corresponding authentication provider
records. The resource
ID is the subject identifier if authentication
is successful.
Sybase Control Center for Sybase Unwired Platform
Decision (yes or
no)
Context ID
223
Administer
Resource Class
Action
Description
Attributes
subject
authorization.role.provider
The result of a provid- •
er's specific role au•
thorization request.
The resource ID is the
•
subject ID.
•
•
subject
224
authorization.role
The result of a re•
source-based authori•
zation request. The re•
source ID is the subject ID.
•
Provider identifier
Decision (yes, no
or abstain)
Role name
Supplied subject
identifier, if different from context
subject
Context ID
•
Resource name
Access requested
Decision (yes or
no)
Supplied subject
identifier, if different from context
subject
Context ID
subject
logout
Generated when an
authenticated context
is destroyed. The resource ID is the subject ID.
•
Context ID
subject
create.provider
Provider-level record
issued for anonymous
self-registration requests. The resource
ID is the subject identifier.
•
•
•
Provider identifier
Decision
Subject attributes
subject
create
Aggregate, generated
when an anonymous
self-registration request is made. The resource ID is the subject identifier.
•
•
Decision
Subject attributes
Sybase Unwired Platform
Administer
Resource Class
Action
Description
Attributes
subject
authorization.resource
The aggregate authorization decision,
which is made after
considering each of
the appropriate provider's result. The resource ID is the subject ID.
•
•
•
•
•
Resource ID
Access requested
Decision (yes or
no)
Subject ID supplied, if different
from context subject
Context ID
Examples
•
Example 1 – enables auditing of all the CSI core resource classes that involve a deny
decision:
(ResourceClass=core.*,Decision=Deny)
•
Example 2 – enables auditing for all core resource classes where the action is the subject
modification action:
Resource=core.*,Action=subject.modify.*)
FileAuditDestination Properties
The FileAuditDestination is a simple file-based provider that logs the audit records to a file
which is rolled over upon reaching a specified size.
This provider can safely share access to a file between multiple instances as long as they are all
in the same VM. To integrate with a customer's existing audit infrastructure, a custom audit
destination provider can be developed and deployed. See
com.sybase.security.core.FileAuditDestination in Developer Guide: Unwired Server
Runtime.
Table 17. File Audit Destination Configuration Options
Configuration Option
Description
auditFile
The absolute path of the file to write the audit
records.
encoding
The character encoding used when writing the
audit data (default=UTF-8).
logSize
This option may be supplied to specify the maximum audit log file size before a rollover occurs.
Sybase Control Center for Sybase Unwired Platform
225
Administer
Configuration Option
Description
compressionThreshold
This option may be supplied to specify the number of uncompressed audit log rollover files that
are created, before compression is used to archive
the audit data.
deleteThreshold
This option may be supplied to specify the number of audit log files that will be preserved. This
value includes the main audit log, so a value of "3"
allows an audit.log, audit.log.0 and audit.log.1
before deleting old logs.
errorThreshold
This option may be supplied to specify the maximum number of audit log files that are allowed.
When this threshold is reached, an error occurs
and all auditing fails. For example, with this value
set to "3", audit.log, audit.log.0 and audit.log.1
will be created according to the maximum log
size value. If another audit log rollover is triggered, then all audit operations will fail until one
of the rollover files is removed. This value is mutually exclusive with the deletion threshold, and
the smallest value of the two takes effect.
XMLAuditFormatter Properties
The audit formatter component formats an audit record from its component parts. An audit
formatter is supplied to the active audit destination upon initialization, where the audit
destination can use the formatter if required.
The default provider com.sybase.security.core.XmlAuditFormatter formats audit data into an
XML record. The audit records generated by this provider are of the format
<AuditRecord Action="[action]" Decision="[decision]"
When="[timestamp]"> <Resource Class="[resource classname]"
ID="[resource id]" /> <Attribute Name="[attribute1 name]"
Value="[attribute1 value]" /> <Attribute Name="[Map attribute name]"
Key="[Map Key1 name]" Value="[Map value associated with the key1]" />
<Attribute Name="[Map attribute name]" Key="[Map Key2 name]"
Value="[Map value associated with the key2]" /> <Attribute
Name="[List attribute name]" Value="[List value1]" /> <Attribute
Name="[List attribute name]" Value="[List value2]" /> </AuditRecord>
Creating Logical Roles for a Security Configuration
You can use logical roles to control access and/or group a large number of users who use the
same security configuration. You create the required logical roles and map them to one or
more physical role, then assign both a security configuration and a logical role to an
226
Sybase Unwired Platform
Administer
application (through the application connection template). Users must have one of the
physical roles that the logical role is mapped to in order to access the application..
1. In the left navigation pane of Sybase Control Center, select Security > Security
configuration name.
2. In the right administration pane, click the Role Mappings tab.
3. Click New.
4. Enter a name for the logical role you wish to create.
5. Select one of the following options:
State
Description
AUTO
To map the logical role to a physical role of the same name.
NONE To disable the logical role, which means that the logical role is not authorized.
MAP
To manually map the logical role when the physical and logical role names do not match.
See Mapping a Physical Role Manually.
6. Click OK.
See also
• Mapping a Physical Role Manually on page 228
• Security Configurations on page 183
Mapping Roles for a Security Configuration
Map logical roles to physical roles for a security configuration by setting the mapping state.
Role mappings performed at the security configuration level are applied to all domains that are
assigned the security configuration.
Prerequisites
Unwired Platform cannot query all enterprise security servers directly; to perform
authentication successfully, know the physical roles that are required.
Task
1. In the left navigation pane of Sybase Control Center, select Security > Security
configuration name .
2. In the right administration pane, click the Role Mappings tab.
3. Select a logical role and select one of the following in the adjacent list:
Sybase Control Center for Sybase Unwired Platform
227
Administer
State
Description
AUTO
To map the logical role to a physical role of the same name.
NONE To disable the logical role, which means that the logical role is not authorized.
MAP
To manually map the logical role when the physical and logical role names do not match.
See Mapping a Physical Role Manually.
Mapping a Physical Role Manually
Use the Role Mappings dialog to manually map required physical roles for a logical role when
physical and logical role names do not match. If names do not match, the AUTO mapping state
does not work.
Prerequisites
Unwired Platform cannot query all supported enterprise security servers directly; for
successful authentication, you must know the physical roles your back-end systems require.
Task
You can map a logical role to one or more physical roles. You can also map multiple logical
roles to the same physical role. If a role does not exist, you can also add or delete names as
needed.
1. Review the list of existing physical role names that you can map to the logical role you
have selected. If the list retrieved is too long to locate the name quickly, either:
•
•
Click the banner of Available Roles list to sort names alphanumerically.
Start typing characters in the box, then click the Search button to filter the available
list.
2. If a role that you require still does not appear, enter the Role name and click the + button.
The role name appears in the Available roles list with an asterisk (*). This asterisk
indicates that an available role was added by an administrator, not a developer.
3. To remove a role you no longer require from the Available roles list, select the name and
click the x button adjacent to the Role name field.
The role is removed and can no longer be mapped to a logical role.
4. To map a logical role that appears in the text area of the Role Mappings dialog to a physical
role:
a) Select one or more Available roles.
b) Click Add.
5. To unmap a role:
a) Select one or more Mapped roles.
b) Click Remove.
The roles are returned to the Available roles list.
228
Sybase Unwired Platform
Administer
6. Click OK to save these changes.
Once a logical role has been manually mapped, the mapping state changes to MAPPED. The
roles you have mapped appear in the active Physical Roles cell for either a package-specific or
server-wide role mappings table.
Mapping State Reference
The mapping state determines the authorization behavior for a logical name instance.
State
Description
AUTO
Map the logical role to a physical role of the same name. The logical
role and the physical role must match, otherwise, authorization fails.
NONE
Disable the logical role, which means that the logical role is not authorized. This mapping state prohibits anyone from accessing the
resource (MBO or Operation). Carefully consider potential consequences before using this option.
MAPPED
A state that is applied after you have actively mapped the logical role
to one or more physical roles. Click the cell adjacent to the logical role
name and scroll to the bottom of the list to see the list of mapped
physical roles.
Mapping Logical Roles to a Technical User in a Repository
Mapping the SUP Push User or SUP DCN User logical role binds it to another physical user
identity rather than a role.
1. In the navigation pane of Sybase Control Center, select the security configuration that is
assigned to the Push or DCN domain.
2. Locate the logical role.
3. Select Map Role.
4. In the Role Mapping dialog, enter the technical role name in the Role name box.
user:supuser, where supuser is the technical user in the repository.
5. Click Add (+).
6. Select the newly added technical role.
Technical role can be based on basic authorization or certificate (client).
7. Click Add.
If you are using ActiveDirectory, and are using an e-mail address for the technical user
names, the definition appears as
username@myaddress@DomainSecurityConfigName.
The logical role now shows the mapping state changes to MAPPED. In the Physical Roles
drop-down, verify that the new technical role is added.
Sybase Control Center for Sybase Unwired Platform
229
Administer
SUP Roles to Support EIS Operations: SUP DCN User and SUP Push User
SUP DCN User SUP Push User roles are the mechanisms by which illicit EIS DCN or push
notification operations are prevented. Like other built-in platform roles, SUP DCN User and
SUP Push User are logical roles that are available to all new security configurations.
Before any DCN event is submitted, the person or group mapped to this role must be
authorized (after first being authenticated) by a security provider you define as part of a named
security configuration. Submitted DCN events that require authorization include:
•
•
Cache updates
Operation performance
The SUP Push user role is mandatory; with this role the EIS cannot deliver push notifications
to Unwired Server for a registered application connection. Before any push event is submitted
by the EIS, the authenticated user performing the push must be authorized by being in the SUP
Push User logical role. Push events that require authorization include:
•
Triggering a Hybrid App package
You can choose different physical role mapping targets to authorize, or authenticate and
authorize EIS events using the logical roles. Depending the authorization method used, the
implementation varies:
•
Certificate authorization – Sybase recommends that you use
CertificateValidationLoginModule for maximum security.
CertificateValidationLoginModule validates the user certificate passed during mutual
certificate authentication. Unlike other methods, it confers no physical roles; therefore, the
platform administrator must create a logical role mapping. Typically, the user has a
certificate that includes a Subject distinguished name containing a common name
(cn=TechnicalUser), so creates a logical role mapping between the logical role and
user:TechnicalUser in the CN. To implement certificate authorization, see Setting
Up Authorization with Certificate Validation in Security.
Note: While explicitly mapping a certificate user name for SUP Push User role in \Sybase
Control Center, ensure there is a space after every comma. Example: user:
CN:PushTest, OU=SSL Server, O=SAP-AG, C=DE” . Further more, if you are
using push notification with strong mutual authentication, you can only use the “Admin”
security configuration. Ensure you add a CertificateValidationLoginModule to the Admin
security configuration and and us it as the default security configuration in the pushenabled domain. If any other security configuration is used, a user not in
Required role error is generated in the client log.
•
230
Technical user authorization – if the role cannot be mapped to a real user in the security
repository of the configured security provider used by the security configuration, you may
need to create a new technical user or use an existing technical user for EIS operation role
mappings. In this case, no authentication is required as the user is not a real user in the
traditional sense. To implement technical user authorization, Sybase recommends that you
Sybase Unwired Platform
Administer
•
create a security configuration that includes an LDAP provider. To implement technical
user authentication, see Setting Up Authorization with a Technical User Role Stored in a
Repository in Security.
Real user authorization – (Applies only to DCN) if the role must be mapped to a real user,
you can authenticate and authorize the user mapped to the SUP DCN User role. You can
also use PreconfiguredUserLogin module to perform HTTP Basic authentication, where
the module extracts the user information from the request parameter in a URL. To
implement real user authentication, see Setting Up Authorization with
PreConfiguredUserLogin Values in Security
Once you have multiple providers configured, especially when implementing authorization
with single sign-on, you can stack them so they are processed in correct order. See Stacking
Providers to Authenticate using SSO Before Authorizing in Security.
Assigning a Security Configuration to a Domain
Assign security configurations to one or more domains. This allows the supAdmin to offer a
security repository for application user authentication and authorization, as well as to share
security providers across domains in case one tenant uses mutiple domains.
Prerequisites
A supAdmin must already have created one or more security configurations in the Security
node of Sybase Control Center.
Task
1. In the left navigation pane, navigate to ClusterName > Domains > DomainName >
Security
2. In the right administration pane, select the Security Configurations tab and click
Assign.
3. From the list of available security configurations, select the appropriate configuration for
domain security, and click OK.
If successful, an Assigned successfully message appears, and the newly added security
configuration is listed in the domain-level Security node.
See also
• Creating a Security Configuration on page 185
Viewing Security Configuration Usage
You can view the security configurations and logical roles used to access applications. This
enables you to assess the impact of changing a security configuration or logical role.
Sybase Control Center for Sybase Unwired Platform
231
Administer
1. In the left navigation pane of Sybase Control Center select Security > Security
configuration name.
2. In the right administration pane, click the Role Mappings tab.
•
•
To view the applications that the security configuration provides access to, click Usage
and review the information on the Domains and Packages and Application
Connection Templates tabs.
To view the applications that a specific role in a security configuration provides access
to, select a roles, click Usage, and review the information on the Application
Connection Templates tab.
Note: The Domains and Packages tab lists all MBO packages that the security
configuration provides access to, no matter what logical role is selected.
Anonymous Access Security Configuration
Allow unauthenticated users access to application data, for example, applications that allow
users to browse a read-only product catalog without logging in by assigning the anonymous
security configuration to the application.
The anonymous security configuration:
•
•
•
Is a preconfigured user name/password login module that accepts the user name
"anonymous" and the password "anonymous". User name is not case sensitive, but
password is.
Cannot be modified.
Can be enabled when manually creating an application with anonymous access or when
setting anonymous access for an existing application by creating an application
connection template for it that uses the anonymous security configuration.
SiteMinder Authentication with Sybase Unwired Platform
Configure your SiteMinder environment for authentication in Sybase Unwired Platform.
CA SiteMinder enables policy-based authentication and single sign-on with Sybase Unwired
Platform. You can configure SiteMinder and Sybase Unwired Platform integration in a
number of ways, depending on your environment. For detailed examples focusing on
SiteMinder-specific configurations for Sybase Unwired Platform, see How-To: Set up SUP
with SiteMinder at http://scn.sap.com/docs/DOC-29574.
SiteMinder Client Authentication
SiteMinder provides various client authentication options for Sybase Unwired Platform,
including single sign-on (SSO), tokens, and Network Edge.
SiteMinder client authentication includes:
•
232
Network Edge – when a reverse proxy or Relay Server in the DMZ is protected by
SiteMinder, the Sybase Unwired Platform client is challenged for basic authentication
credentials. If the credentials are valid, an SMSESSION cookie is issued and the client is
Sybase Unwired Platform
Administer
•
•
•
allowed through to the Sybase Unwired Platform server. The client begins a session (RBS,
MBS, or OData) by sending an HTTP(S) request to the reverse proxy. The reverse proxy
detects the unauthenticated request, and challenges using basic authentication. After the
401 challenge, the client may already have network credentials configured, or executes a
callback to prompt for credentials.
Non-Network Edge – the Network Edge (reverse proxy or Relay Server) is not protected.
The client’s request is allowed to flow to Sybase Unwired Platform, where a LoginModule
presents the basic credentials to a SiteMinder-protected Web server on behalf of the client.
Sybase Unwired Platform server retains the SMSESSION cookie and credentials for the
client.
External tokens – the Sybase Unwired Platform client application obtains an
SMSESSION cookie external to the Sybase Unwired Platform libraries using custom
application processing. This SMSESSION token passes into the Sybase Unwired Platform
libraries as a cookie. Sybase Unwired Platform libraries add the cookie to subsequent
HTTP requests to Sybase Unwired Platform server. The cookie may or may not be checked
at the Network Edge.
SAP SSO2 integration – the Sybase Unwired Platform user is initially authenticated by
SiteMinder, resulting in an SMSESSION for the user. This SMSESSION is forwarded
along with the SAP user ID to a SiteMinder SAP agent running inside of NetWeaver as a
LoginModule. The SMSESSION is revalidated, and the TokenIssuingLoginModule is
allowed to issue an SSO2 ticket for the specified SAP user ID. This ticket returns to Sybase
Unwired Platform as an MYSAPSSO2 cookie. Sybase Unwired Platform now has both an
SMSESSION and an SSO2 ticket to use for SSO purposes with various EIS depending on
which SSO mechanism the EIS requires.
Note: In any of these authentication patterns, you can add the SMSESSION token as a
credential to the authenticated Sybase Unwired Platform subject for use in single sign-on to
SiteMinder-protected systems.
Single Sign-on to a SiteMinder-protected EIS
SiteMinder single sign-on (SSO) provides integration between a SiteMinder-protected EIS
and Sybase Unwired Platform.
Table 18. SiteMinder Single Sign-on Integration
Accessed Service
Details
SiteMinder-protected Web service
When an EIS Web service is protected by SiteMinder, Sybase Unwired Platform sends the current Sybase Unwired Platform user’s SMSESSION cookie when executing the Web service.
For more information on sending the SMSESSION cookie to the SiteMinder-protected Web
service, see Single Sign-on Using NamedCredential in the Security guide.
Sybase Control Center for Sybase Unwired Platform
233
Administer
Accessed Service
Details
SSO2-protected JCo RFC or SAP Web service
The SAP server is configured to use SSO2 tickets
for single sign-on. Sybase Unwired Platform
sends the user’s current MYSAPSSO2 ticket
along with the request. SAP validates that the
SSO2 ticket is valid and was issued by a trusted
peer, and executes the request as that user.
Note: You must have a SiteMinder agent for SAP
installed in a NetWeaver server. Sybase Unwired
Platform sends the SMSESSION cookie to NetWeaver, the SAP SiteMinder agent validates the
cookie, and then the TokenIssuingLoginModule
generates an SSO2 ticket and returns it to Sybase
Unwired Platform as a MYSAPSSO2 cookie.
Web service hosted on NetWeaver requiring both Sybase Unwired Platform sends both SSO creSSO2 and SMSESSION
dentials when executing the Web service call.
Authentication Cache Timeout and Token Authentication
To reduce the load, Sybase Unwired Platform uses an authentication cache to reduce the load it
places on your back-end identity management and security systems. Depending on your
security configuration, you can adjust the authentication cache timeout to avoid authentication
failures and errors.
By default, the authentication cache holds a user’s subject, principals, and credentials used for
single sign-on to an EIS for 3600 seconds (one hour). If the user name and password contained
inside subsequent Sybase Unwired Platform requests are unchanged, the request is considered
authenticated and uses the cached security information for access control and single sign-on to
EIS operations.
Note: When using token-based authentication, clients should use a hash code of the token as
the password, so Sybase Unwired Platform proceeds through the login modules and replaces
the cached token credential. This prevents using an expired token in single sign-on to an EIS.
If you cache an SMSESSION for a user and the token expires before the cache entry, you get
authentication failures during the single sign-on EIS operations. This leads to either
synchronization errors or operation replay errors.
Configure the authentication cache to avoid errors and failures. If needed, you can disable the
authentication cache entirely by setting the cache timeout to 0. Every Sybase Unwired
Platform request is reauthenticated. For non-Network Edge basic authentication, you can set
the cache interval to slightly less than the Idle Timeout for your SiteMinder session policy.
For Network Edge authentication, you must set the authentication cache timeout to 0. If the
URL configured to validate the SMSESSION token also returns an HTTP header with the
234
Sybase Unwired Platform
Administer
expiration time for the token expressed in milliseconds since the epoch (1/1/1970), the
HttpAuthenticationLoginModule can use that value to adjust the authentication cache
expiration for this subject’s entry so it expires at an appropriate time. Use the
TokenExpirationTimeHttpHeader to specify the name of the header containing this expiration
value. Additionally, you can use TokenExpirationInterval property to reduce time from the
expiration so it does not expire while Sybase Unwired Platform is processing a request.
For detailed examples, including how to configure the timeout in the SiteMinder Admin, see
How-To: Set up SUP with SiteMinder at http://scn.sap.com/docs/DOC-29574.
SiteMinder Web Agent Configuration for Sybase® Unwired Platform
When integrating with Sybase Unwired Platform, SiteMinder uses default settings for the
Web agent to stop cross-site scripting cross-site scripting (XSS) attacks. The SiteMinder
default settings do not allow use of special characters and can lead to integration issues with
Sybase Unwired Platform.
By default, the Web agent does not allow certain characters, often seen in XSS attacks, to be
including in the URLs it processes. The Web agent allows only legal characters, according to
the defined HTTP standard.
Native HTTP OData applications, typically use, and sometimes require, URLs that contain
characters within a left and right parenthesis ( ) and within single quotes ' '. The left and right
parenthesis and single-quotes characters are prohibited.
The SiteMinder administrator must modify the Web agent configuration in the policy server to
either disable XSS filtering entirely or change the default forbidden characters.
Security Configuration to a SiteMinder-protected EIS
With Sybase Unwired Platform, SiteMinder authentication is used in Network Edge and nonNetwork Edge configurations to authenticate the client of a Web service, SAP JCo, or
NetWeaver service.
In your security configuration that integrates with SiteMinder applications, you need a
ClientValuePropagatingLoginModule so you can save your SMSESSION cookie as a
credential for EIS single sign-on. if the SiteMinder agent adds an sm_user header to client
requests, use that header in the ClientValuePropagatingLoginModule to set a user Principal. If
the SiteMinder agent does not add an sm_user header, then disable impersonization checking.
You should also have an HttpAuthenticationLoginModule configured for a SiteMinderprotected URL where Sybase Unwired Platform can verify the validity of the user's
SMSESSION cookie.
For a detailed example focusing on SiteMinder specific configurations for Sybase Unwired
Platform, see How-To: Set up SUP with SiteMinder at http://scn.sap.com/docs/DOC-29574.
Sybase Control Center for Sybase Unwired Platform
235
Administer
Configuring Security for SiteMinder Token and Basic Authentication
Use Sybase Control Center to create a security configuration for your single sign-on (SSO)
applications.
1. In Sybase Control Center, navigate to the Unwired Platform Cluster pane and select
Security.
2. In the General tab, click New and name your security configuration.
3. Open the Security folder and select your configuration. In the Authentication tab, click
Add to add a LoginModule.
4. Choose the ClientValuePropagatingLoginModule and add these properties:
• Implementation Class –
com.sybase.security.core.ClientValuePropagatingLoginModule
• ClientHttpValuesAsPrincipals – sm_user
• ClientHttpValuesAsNamedCredentials – smsession:SMSESSION2
• Control Flag: optional
Note: ClientHttpValuesAsNamedCredentials ensures that if the client application picked
up an SMSESSION cookie either using Network Edge authentication or an external token,
it is saved as a credential named SMSESSION2 on the subject so it can be used for SSO to a
SiteMinder-protected EIS. Therefore, the credential.a.name property is SESSION2. Also,
ClientHttpValuesAsPrincipals uses the sm_user HTTP header if the client has used
Network Edge authentication and enables you to perform impersonation checking.
5. Click OK.
6. In the Authentication tab, select the default NoSecLoginModule and click Delete.
LoginModule allows logins without credentials, and you must remove it for security
integrity.
7. In the Authentication tab, click New to add a provider.
8. Select and configure the HttpAuthenticationLoginModule:
a) Select com.sybase.security.http.HttpAuthenticationLoginModule and click Yes in
the Duplicate Authentication Provider warning.
b) Configure the module's properties so the SiteMinder-protected URL has the same
policy server that issued the SMSESSION cookie to the client.
• ClientValuesToSend = SMSESSION
• SendClientValuesAs = cookie:SMSESSION
This causes Sybase Unwired Platform to forward the cookie to the specified
SiteMinder-protected URL. If the HTTP status response code is 200, then the
SMSESSION cookie is valid and the user is considered authenticated.
9. In the Authorization tab, select the NoSecAuthorizer provider type and click Delete.
10. In the Settings tab, adjust the properties as follows:
236
Sybase Unwired Platform
Administer
•
•
•
Authentication cache timeout(seconds) – 0
Maximum number of failed authentications – 5
Authentication lock duration(in seconds) – 600
11. Click Apply.
12. In the General tab, click Validate to check your configuration.
13. With successful validation, click Apply to save all changes.
For detailed examples focusing on SiteMinder specific configurations for Sybase Unwired
Platform, see How-To: Set up SUP with SiteMinder at http://scn.sap.com/docs/DOC-29574.
Configuring Network Edge Authentication with a SiteMinder-Protected Web Service
Configure the SMSESSION cookie for Network Edge authentication to a SiteMinder Web
service.
Network Edge authentication for SiteMinder requires the Web service endpoint to be changed
in Sybase Control Center to use the SMSESSION cookie for single sign-on. By default, the
application connection template is configured with the server name set to your SiteMinderprotected server.
1. In the left navigation pane, select Cluster, then expand Domains, and select the domain
for which you want to create a new connection.
2. Select Connections.
3. In the right administration pane, select the Connections tab.
4. Select the EIS connection pool that is a Web service connection for the SiteMinderprotected service, and click Properties.
5. In the Edit Connection Pool pane, configure these properties:
Property
Value
credential.a.mapping
Cookie:SMSESSION
credential.a.name
SMSESSION
6. Click Save.
For detailed examples focusing on SiteMinder specific configurations for Sybase Unwired
Platform, see How-To: Set up SUP with SiteMinder at http://scn.sap.com/docs/DOC-29574.
Configuring Non-Network Edge Authentication with a SiteMinder-Protected Web
Service
Configure the SMSESSION cookie and application connection template for non-Network
Edge authentication to a SiteMinder-protected Web service.
Similar to Network Edge authentication for SiteMinder, non-Network Edge authentication
requires the Web service endpoint to be changed in Sybase Control Center to use the
SMSESSION cookie for single sign-on. However, for non-Network Edge authentication, by
Sybase Control Center for Sybase Unwired Platform
237
Administer
default the application connection template is configured with the server name set to the
Sybase Unwired Platform server or a reverse proxy, depending on your configuration.
1. In the left navigation pane, select Cluster, then expand Domains, and select the domain
for which you want to create a new connection.
2. Select Connections.
3. In the right administration pane, select the Connections tab.
4. Select the EIS connection pool that is a Web service connection pointing to the
SiteMinder-protected service, and click Properties.
5. In the Edit Connection Pool pane, configure these properties:
Property
Value
credential.a.mapping
Cookie:SMSESSION
credential.a.name
SMSESSION
6. Click Save.
For detailed examples focusing on SiteMinder specific configurations for Sybase Unwired
Platform, see How-To: Set up SUP with SiteMinder at http://scn.sap.com/docs/DOC-29574.
Applications
An application consists of two parts: the software user interface that consumes enterprise data
from one or more data sources, and the definition created in Sybase Control Center that allows
the mobile application to be recognized by the runtime. The application definition on the
server establishes the relationship among packages used in the application, the domain that the
application is deployed to, the activation code for the application, and other application
specific settings.
A native application is the single client binary provisioned then installed to the device. It is
associated with one or more MBO packages. The native Hybrid App is a collection of Hybrid
App packages and typically constitutes one application. A non-native application uses no
packages and therefor requires no package association.
While developers create the client application using either a native development tool for
Unwired Platform or a third-party tool for non-native application types, applications must be
defined, then managed and monitored by administrators in Sybase Control Center.
See also
• Application and User Management Overview on page 5
• Considerations for Application Connection Registration on page 262
• Application ID and Template Guidelines on page 241
238
Sybase Unwired Platform
Administer
Activating and Maintaining Applications
The activation stage defines all activities that relate to the startup of and formal entry of an
application and a known or anonymous user into the Unwired Platform runtime. It ties all
entities together by associating a user with the application and its resources (connections,
customizations, and packages).
The activation of applications is essential to their functionality. It is critical that you
understand this activation process. Sybase encourages you to read Understanding the
Activation Process in Mobile Application Life Cycle Once you understand what activation is
and how it works, follow the administrator workflow in Enabling Application Activation with
Sybase Control Center of this same document.
Defining Applications
Applications are recognized by Unwired Server by the properties that define them.
Administrators define applications with a unique application ID and other key application
properties, such as domain, packages, security configuration, and connection templates.
An application cannot register a connection unless a definition has been created for it. If your
development team has not yet set these application properties, administrators must do so
before the application connection can be registered.
1. Launching the Application Creation Wizard
Use the Application Creation wizard to register an application.
2. Setting General Application Properties
Provide general application properties such as the application ID, description, security
configuration and domain details while registering the application.
See also
• Application Connection Properties on page 269
Launching the Application Creation Wizard
Use the Application Creation wizard to register an application.
1. In the left navigation pane of Sybase Control Center, click the Applications node and
select the Applications tab in the right administration pane.
2. To register an application, click New.
The Application Creation wizard is displayed.
Sybase Control Center for Sybase Unwired Platform
239
Administer
Setting General Application Properties
Provide general application properties such as the application ID, description, security
configuration and domain details while registering the application.
1. In the Application Creation Wizard, enter a unique Application ID.
Note:
• Sybase recommends that application IDs contain a minimum of two dots ("."). For
example, the following ID is valid: com.sybase.mobile.app1.
• Application IDs cannot start with a dot ("."). For example, the following ID is
invalid: .com.sybase.mobile.app1.
• Application IDs cannot have two consecutive dots ("."). For example, the following ID
is invalid: com..sybase.mobile.app1.
2. Enter a Display name and Description for the application.
3. Select the appropriate security configuration from the Security Configuration dropdown list.
For applications that do not require authentication, select the anonymous security
configuration or the Anonymous access checkbox.
4. Select the appropriate domain from the Domain drop-down list.
5. (Optional) Assign one or more packages as desired.
Note: When an application ID is intended for use by Online Data Proxy, packages do not
need to be assigned. .
6. (Optional) Modify application connection template settings.
a) Select Configure additional settings, and click Next.
b) To reuse the configuration of an existing template, select a Base template from the
drop-down list.
c) Configure the application connection template properties as required.
Note: ODP applications require a proxy type connection endpoint. When modifying
application connection template settings for an ODP application, you can
automatically create the proxy connection endpoint by entering an OData URL as the
Application Endpoint value in the connection template Proxy properties. This creates a
proxy connection endpoint with the same name as the Application ID. If the ODP
application uses an anonymous security configuration, the newly created connection
endpoint will have the Allow Anonymous Access property set to True and the Address
(URL) property set to the Application ID. If you want to create the proxy connection
endpoint manually, leave the Application Endpoint property empty. You manually
create the proxy connection endpoint through the Sybase Control Center Domains
node.
7. Click Finish to register the application with the configured settings.
240
Sybase Unwired Platform
Administer
See also
• Application ID and Template Guidelines on page 241
• Application Connection Properties on page 269
Application ID and Template Guidelines
Choose an appropriate application ID while registering application connection for use by
native MBO, Hybrid App, or Online Data Proxy clients. Using an incorrect application ID
results in failure when the client tries to activate itself.
Application Type
Guidelines
Hybrid App
•
•
•
Native MBO application
•
•
Online Data Proxy
2.0.1 or earlier – leave the application ID empty.
2.1 or later – use preexisting HWC template, or, if
you are using your own template, make sure that
HWC is set as the application ID in the template.
iOS sample container 2.1 or later – use the template
you have created. The application ID used by the iOS
sample container should match the application ID
specified in registration.
Previous to 2.1.2 – leave the application ID empty.
This applies to native messaging-based application
clients.
2.1.2 or later – (recommended) use the application
connection template that is automatically created for
the application. Otherwise, ensure you register the
application connection with the correct template by
verifying that application ID matches, and that the
correct security configuration and domain are selected. Also, if using replication, set other template
properties (such as synchronization-related properties in Connection category) as required. For Android
native MBO applications, this recommendation applies starting with version 2.1.1.
Register the application connection using the template
created for the application. Existing templates can be
found in the Applications > Application Connection
Template tab.
See also
• Setting General Application Properties on page 240
• Registering or Reregistering Application Connections on page 258
Sybase Control Center for Sybase Unwired Platform
241
Administer
•
Considerations for Application Connection Registration on page 262
Maintaining Activated Applications
Activated applications can be managed and have usage monitored.
Viewing Assigned Connections
View the properties of the connections assigned to an application.
1. In the right administration pane, select the Applications tab.
2. Select the application from the list.
3. Click Application Connections.
4. Click Refresh to refresh the list that displays the application connections.
5. To filter the list, click Show filter and add filters.
6. To define a filter.
a) Select the type of information you want to filter on.
b) Enter the filter criteria.
c) Click +.
a) Repeat for additional filters, as required.
b) When you have defined all your filters, click Refresh.
Different types of filters are combined using a logical AND. If the same type of filter is
added multiple times with different criteria, the filters are combined using a logical OR
If you defined the following filters:
• Security Configuration = Security1
• User = User1
• User = User2
The filtered list would return results that matched both Security1 and either User1 or
User2.
See also
• Viewing Assigned Application Users on page 243
• Viewing Correlated Application Details on page 243
• Refreshing the Application View on page 244
• Deleting Applications on page 244
• Modifying Application Properties on page 245
• Searching for Applications on page 253
• Monitoring Users of Applications on page 254
242
Sybase Unwired Platform
Administer
Viewing Assigned Application Users
View the list of the users assigned to an application
1. In the right administration pane, select the Applications tab.
2. Select the application from the list.
3. Click Application Users.
4. Click Refresh to refresh the list that displays the
5. To define a filter.
a) Select the type of information you want to filter on.
b) Enter the filter criteria.
c) Click +.
a) Repeat for additional filters, as required.
b) When you have defined all your filters, click Refresh.
Different types of filters are combined using a logical AND. If the same type of filter is
added multiple times with different criteria, the filters are combined using a logical OR
If you defined the following filters:
• Security Configuration = Security1
• User = User1
• User = User2
The filtered list would return results that matched both Security1 and either User1 or
User2.
See also
• Viewing Assigned Connections on page 242
• Viewing Correlated Application Details on page 243
• Refreshing the Application View on page 244
• Deleting Applications on page 244
• Modifying Application Properties on page 245
• Searching for Applications on page 253
• Monitoring Users of Applications on page 254
Viewing Correlated Application Details
Select one or more applications, then view correlated application details in several categories,
including packages, application users, and application connections.
1. In the left navigation pane, click the Applications node.
2. In the right administration pane, click the Application tab.
You can view the list of registered applications.
Sybase Control Center for Sybase Unwired Platform
243
Administer
3. Select one or more applications from the list.
4. Select on of the buttons to view related packages, application users, or application
connections.
• Packages – view correlated domains and packages.
• Application Users – view correlated applications.
• Application Connections – view correlated applications.
5. In Review Assignment, check the information.
6. Click OK.
See also
• Viewing Assigned Connections on page 242
• Viewing Assigned Application Users on page 243
• Refreshing the Application View on page 244
• Deleting Applications on page 244
• Modifying Application Properties on page 245
• Searching for Applications on page 253
• Monitoring Users of Applications on page 254
Refreshing the Application View
Refresh the list of all available applications registered through the Sybase Control Center.
1. In the right administration pane, select the Applications tab.
2. To view the list of registered applications, click Refresh.
See also
• Viewing Assigned Connections on page 242
• Viewing Assigned Application Users on page 243
• Viewing Correlated Application Details on page 243
• Deleting Applications on page 244
• Modifying Application Properties on page 245
• Searching for Applications on page 253
• Monitoring Users of Applications on page 254
Deleting Applications
Delete an application to remove all the registered users, connections, and subscriptions
associated with those connections. Delete an application to remove all associated runtime
artifacts on the server. Deleting applictions removes application definitions, application users
and connections associated with the application, and package-level subscriptions of the
application connections. Delete applications with care to avoid adversely impacting users.
244
Sybase Unwired Platform
Administer
1. In the left navigation pane of Sybase Control Center, click the Applications node and
select the Applications tab in the right administration pane.
2. Select the application and click Delete.
See also
• Viewing Assigned Connections on page 242
• Viewing Assigned Application Users on page 243
• Viewing Correlated Application Details on page 243
• Refreshing the Application View on page 244
• Modifying Application Properties on page 245
• Searching for Applications on page 253
• Monitoring Users of Applications on page 254
Modifying Application Properties
Associate the application with one or more domains and packages. (Optional for OData SDK
Android and iOS clients) Associate the application with one or more customization resource
bundles.
1. In the left navigation pane of Sybase Control Center, click the Applications node, and, in
the right administration pane, select the Applications tab.
2. Select an application, and click Properties.
3. Click the Domains and Packages tab.
a) Select the domains to associate with the application.
To see more domains, click +. In Available Domains, select one or more domains from
the list.
a) Select the packages to associate with the application.
To see more packages, click +. In Available Packages, select one or more packages
from the list.
4. (Optional: For OData applications) Click the Customization Resource Bundles tab.
a) Select the customization resource bundles to associate with the application.
To see more customization resource bundles, click +. In Select File to Upload, select a
JAR file.
5. Click the Push Configurations tab.
Select the native notifications to associate with the application.
6. Click the Application Connection Templates tab.
If there is more than one application connection template associated with the application,
you can re-order the connection templates using the arrow buttons. The first application
connection template in the list will be the first one used to authorize application access. If
Sybase Control Center for Sybase Unwired Platform
245
Administer
authorization fails, the next application connection template in the list will be used, and so
on.
7. Click OK.
See also
• Viewing Assigned Connections on page 242
• Viewing Assigned Application Users on page 243
• Viewing Correlated Application Details on page 243
• Refreshing the Application View on page 244
• Deleting Applications on page 244
• Searching for Applications on page 253
• Monitoring Users of Applications on page 254
Application Customization Resource Bundles
(Applies only to Object API SDK clients and OData SDK (Android and iOS) clients) For
supported application types, customization resource bundles enable you to associate deployed
client applications with different versions of customization resources.
A customization resource bundle is a JAR file that includes a manifest file of name and version
properties. The customization resource bundle does not contain any information that binds or
helps bind to applications; it can be uploaded or exported during the definition of an
application with Sybase Control Center. A deployed customization resource bundle is readonly.
Implementing a customization resource bundle requires the coordination of various roles:
1. (Application developer) Invokes the SDK API that downloads the customization resource
bundle. Use the onCustomizationBundleDownloadComplete (in the
Application Callback API) and
BeginDownloadCustomizationBundle (in the SUPApplication class) methods
to pair the application with the device, and reach the client application. See Developer
Guide: OData SDK or any of the Object API Developer Guides.
For example, for an application called Sybase.Mobile.Application, you might
implement the customization resource bundle invocation as follows:
/// <summary>
/// start downloading default resource bundle associated with the
application.The resource bundle would be saved into
writer stream provided by user.
///an application only bundle an resource
///</summary>
///&! lt;param name="writer">a writer stream provided by user
///</param> public void
BeginDownloadCustomizationBundle(System.IO.Stream writer) { }
/// <summary>
/// start downloading resource bundle named customizationBundleID.
The resource bundle would be saved into writer stream
provided by user.
246
Sybase Unwired Platform
Administer
///</summary>
///<param name="customizationBundleID">the resource bundle name
///</param>
///<param name="writer">a writer stream provided by user
///</param> public void BeginDownloadCustomizationBundle
(string customizationBundleID, System.IO.Stream writer) { }
Sybase.Mobile.IApplicationCallback
/// <summary>
/// Invoked when download resource bundle complete.
/// </summary>
/// <param name="customizationBundleID">! the resource bundle
name. if null, application default resource bundle is downloaded
/// </param> void OnCustomizationBundleDownloadComplete(string
customizationBundleID, int errorCode, string errorMessage);
2. (Developer) Generates the JAR with the MANIFEST.MF, which includes these required
properties:
• Customization-Resource-Bundle-Name
• Customization-Resource-Bundle-Version
3. (Administrator) Uses Sybase Control Center to upload the customization resource bundle
to Unwired Server then assign it to an application connection.
4. Once the application activation process completes, the application is directed to the
appropriate version of the resource bundle.
Application Customization Resource Bundle Recommendations
There are a variety of recommendations for working with customization resource bundles.
•
•
•
You can use customization resource bundles only for Object API SDK clients and OData
SDK (Android and iOS) clients.
The expected format of the customization resource bundle is a JAR archive that contains
MANIFEST.MF.
• The manifest file must include these properties:
• Customization-Resource-Bundle-Name
• Customization-Resource-Bundle-Version
• Property values cannot include a colon (":").
• File size should not exceed 5MB. File size is not enforced, but the larger the file, the
slower the performance, and can be subject to device platform hardware capabilities.
See Managing Application Customization Resource Bundles in Developer Guide:
Unwired Server Runtime for information about the administration API that allows
programmatic access to this functionality.
You can assign the same customization resource bundle to different application
connections, and it is treated independently for each application that is paired with the
connection template that identifies the bundle and version. The primary key is: application
ID, customization resource bundle name, and version.
Sybase Control Center for Sybase Unwired Platform
247
Administer
•
•
•
•
Each customization resource bundle:
• Belongs to one and only one application. If you delete an application, all associated
customization resource bundles are deleted as well. This implies that the actual binary
is stored twice when assigned to two application IDs.
• Is applicable only to:
• The application to which it belongs.
• The application connections that have the same application ID.
• The application connection templates that have the same application ID.
• Takes effect only when it is assigned to one or more application connections.
• Is by default, not assigned to either application connections or application connection
templates.
• Must be assigned explicitly by configuring an application connection or application
connection template to use a customization resource bundle.
Note: The application connection assignment configuration overrides that of the
application connection template.
• Can be exported to the same JAR file being uploaded to Unwired Server, meaning the
format does not change.
Can upload more than one customization resource bundles, as long as the name and
version combination is unique.
Can assign only one primary customization resource bundle in an application definition.
However, any uploaded customization resource bundle is accessible to any application
connection.
You can delete a customization resource bundle only if it is not assigned to any application
connection and application connection template with the same application.
Uploading Application Customization Resource Bundles
Before you can assign application customization resource bundles, you must upload them to
Unwired Server with Sybase Control Center.
Only platform administrators can upload bundles to Unwired Server.
1. In the left navigation pane, click the cluster-level Applications node, and, in the right
administration pane, select the Applications tab.
2. Select one application, and click Properties. In the dialog, select the Customization
Resource Bundles tab.
3. (Optional) Click Refresh to update the list of deployed customization resource bundles for
this application.
4. (Optional) Add another customization resource bundle to the list.
a) Click Add.
248
Sybase Unwired Platform
Administer
b) In the file dialog, navigate to and select the customization resource bundle JAR file, and
click OK. The name and version of the newly deployed customization resource bundle
is added to the list.
c) (Optional) In the Confirm dialog, select one or more check boxes to assign the newly
uploaded bundle to application connections or application connection templates with
the same application ID. If no check boxes are selected, there is no automatic
assignment.
Note: You can make these assignments at a later time.
5. (Optional) Add another customization resource bundle to the application.
6. Click OK.
Assigning an Application Customization Resource Bundle to a Connection and
Template
Assign a customization resource bundle to an individual application connection and
application connection template.
1. In the left navigation pane, click the cluster-level Applications node, and, in the right
administration pane, select the Applications tab.
2. Select the Application Connections or Application Connection Templates tab.
3. Select an application connection (user) or application connection template, depending on
the tab selected, and click Properties.
4. Select Application Settings.
5. Select a value from Customization Resource Bundles. These are customization resource
bundles that are deployed to the selected application identifier. To unselect a customization
resource bundle, select an empty item.
6. Click OK.
Assigning an Application Customization Resource Bundle to All Connections
Associated with an Application
Assign a customization resource bundle to all application connections and application
connection templates associated with a specific application identifier.
1. In the left navigation pane, click the cluster-level Applications node, and, in the right
administration pane, select the Applications tab.
2. Select one application, and click Properties. In the dialog, select the Customization
Resource Bundles tab.
3. (Optional) Click Refresh to update the list of deployed customization resource bundles for
this application.
4. Select one customization resource bundle to enable the Assign and Unassignbuttons.
5. Click Assign to launch the dialog. The list of assignable application connections and
application connection templates appears in the respective tabs.
Sybase Control Center for Sybase Unwired Platform
249
Administer
Click OK to confirm the assignment for the customization resource bundle, then Yes.
Unassigning Application Customization Resource Bundles
Unassign a customization resource bundle from an application.
1. In the left navigation pane, click the cluster-level Applications node, and, in the right
administration pane, select the Applications tab.
2. Select one application, and click Properties. In the dialog, select the Customization
Resource Bundles tab.
3. (Optional) Click Refresh to update the list of deployed customization resource bundles for
this application.
4. Click Unassign to launch the dialog. The list of unassignable application connections and
application connection templates appears in the respective tabs.
Click Yes to confirm the unassignment for the customization resource bundle.
Managing Deployed Application Customization Resource Bundles
Use Sybase Control Center to view deployed customization resource bundles, and to export
and delete customization resource bundles.
Viewing Deployed Application Customization Resource Bundles
View the customization resource bundles deployed to an application.
1. In the left navigation pane, click the cluster-level Applications node, and, in the right
administration pane, select the Applications tab.
2. Select one application, and click Properties. In the dialog, select the Customization
Resource Bundles tab.
3. You can view the list of deployed customization resource bundles (if any) for the selected
application.
4. (Optional) Click Refresh to update the list.
Exporting Application Customization Resource Bundles
Export a customization resource bundle from an application.
1. In the left navigation pane, click the cluster-level Applications node, and, in the right
administration pane, select the Applications tab.
2. Select one application, and click Properties. In the dialog, select the Customization
Resource Bundles tab.
3. (Optional) Click Refresh to update the list of deployed customization resource bundles for
this application.
4. Select a single customization resource bundle in the list and click Export.
5. Click Next, and then Finish.
250
Sybase Unwired Platform
Administer
6. In the file dialog, enter a file location and click OK to create a customization resource
bundle JAR file.
7. (Optional) Export another customization resource bundle JAR file for the application.
Deleting an Application Customization Resource Bundle
Delete a customization resource bundle from an application. You cannot delete a
customization resource bundle if it is assigned to an application connection or application
connection template; you must unassign it first.
Note: You may have multiple versions of an application in use at once, so it is acceptable to
have multiple customization resource bundle versions in the repository. However it is good
practice to delete customization resource bundles once you know they are not used.
1. In the left navigation pane, click the cluster-level Applications node, and, in the right
administration pane, select the Applications tab.
2. Select one application, and click Properties. In the dialog, select the Customization
Resource Bundles tab.
3. (Optional) Click Refresh to update the list of deployed customization resource bundles for
this application.
4. Select a single customization resource bundle in the list and click Delete.
5. Click Yes to confirm deletion.
6. If the customization resource bundle JAR file is not assigned, it is deleted from the file
repository. Otherwise, you must unassign the customization resource bundle first.
Configuring Native Notifications
Configure a new or edit an existing native notification properties for an application based on
application ID and domain.
1. In the left navigation pane, select Applications.
2. In the right pane, select the Applications tab.
3. Select the application ID for which you are configuring native notification and select
Properties.
4. Select the Push Configurations tab and click Add.
5. Configure the native configuration settings:
a) Name - name of the configuration.
b) Domain - the domain to which the configuration applies. A domain can have only one
configuration for Apple (APNS) or Google (GCM) type notifications, but can have
multiple Blackberry (BES) type configurations. .
Note: You must specify a domain when configuring push notifications for a Hybrid
Web Container application.
Sybase Control Center for Sybase Unwired Platform
251
Administer
c) Type - the type of notification service determines the other configuration properties.
6. Configure native notification properties for the type of notification service you are
enabling and click OK.
7. Define the notification mode for the application.
•
•
To set the notification mode for a specific application connection template of the
application, select the Application Connection Templates tab, and select the
application connection template.
To set the notification mode for a specific application connection, select the
Application Connections tab, and select the application connection.
a) Select Properties.
b) Select Application Settings.
c) Select a value for Notification Mode that determines the way in which the
notifications are delivered to the device:
• Only native notifications - send notifications through native third party channels
only (APNS for Apple devices, GCM for Android devices, BES for BlackBerry
devices, and so on).
• Only online/payload push - send reliable push messages (with business data as
payload) through Sybase Unwired Platform messaging channel only when the
device is online.
• Online/payload push with native notification - send reliable push messages (with
business data as payload) through Sybase Unwired Platform messaging channel
when the device is online, and use native notification through third party channels
only if the device is off-line.
APNS Native Notification Properties
Set Apple Push Notification Service (APNS) native notification properties to allow delivery of
notifications through an Unwired Server HTTP listener to Apple devices.
Note: When configuring the Apple Push Notification Service native notification properties,
change the push notification server, push notification port, feedback server, and feedback port
values only when configuring notifications in a development environment. To enable Apple
push notifications, the firewall must allow outbound connections to Apple push notification
servers on default ports 2195 and 2196.
252
Property
Description
Server
The push notification server.
Port
Push notification server port.
Feedback server
If a feedback service is enabled, the server to which APNS routes feedback
information.
Sybase Unwired Platform
Administer
Property
Description
Feedback port
The feedback service port.
Certificate (encoded)
The security certificate used for authentication.
Certificate password
The security certificate password.
BES Native Notification Properties
Set BlackBerry Enterprise Server (BES) native notification properties to allow delivery of
notifications through an Unwired Server HTTP listener to BlackBerry devices.
These properties are used to authenticate your Sybase Unwired Platform to BES Push Service
for addressing push request messages to the push-enabled application.
Property
Description
Server URL
Address in the form http://<DNS or IP address>:<portNumber>/pap to push
notifications to the device.
User
(Optional) User accessing the URL.
Password/Confirmed Password
(Optional) User password used to connect to the URL.
GCM Native Notification Properties
Set Google Cloud Messaging (GCM) native notification properties to allow delivery of
notifications through an Unwired Server HTTP listener to Android devices.
Property
Description
URL
The URL of the push notification server. This field is read-only, and the default
value is https://android.googleapis.com/gcm/send.
API key
An API key that is saved on Unwired Server that grants Sybase Unwired Platform authorized access to Google services.
Searching for Applications
Search for registered applications from the default view, or perform an advanced search. The
advanced search enables you to search through applications, users, application connections,
packages, and subscriptions, filtering out results at each level until you obtain very specific
results.
See also
• Viewing Assigned Connections on page 242
Sybase Control Center for Sybase Unwired Platform
253
Administer
•
•
•
•
•
•
Viewing Assigned Application Users on page 243
Viewing Correlated Application Details on page 243
Refreshing the Application View on page 244
Deleting Applications on page 244
Modifying Application Properties on page 245
Monitoring Users of Applications on page 254
Searching from the Default View
Search for applications that are registered in the Sybase Control Center.
1. In the right administrations pane, select the Applications node.
2. To set the search criteria, select the criteria from the Search drop-down list.
3. Add a search string.
4. Click Go.
All the applications that match the search criteria provided are populated in the table.
See also
• Performing an Advanced Search on page 254
Performing an Advanced Search
search through applications, users, application connections, packages, and subscriptions,
filtering out results at each level until you obtain very specific results.
1. In the right administrations pane, select the Applications node.
2. Select Advanced Search.
3. In Advanced Search, enter an application ID, then click Go, or click Go to display a list of
applications.
4. Select an application, and click Search.
The Users, Application Connections, Packages, and Subscriptions tabs remain.
5. Select one of the remaining tabs, select the search criteria, and click Search.
6. Continue this process until you have the information you seek. Each time you search in a
one of the categories, the tab is removed. In this way you refine your search.
See also
• Searching from the Default View on page 254
Monitoring Users of Applications
Track and modify application usage by user, and maintain application users as required.
254
Sybase Unwired Platform
Administer
See also
• Viewing Assigned Connections on page 242
• Viewing Assigned Application Users on page 243
• Viewing Correlated Application Details on page 243
• Refreshing the Application View on page 244
• Deleting Applications on page 244
• Modifying Application Properties on page 245
• Searching for Applications on page 253
Deleting Application Users
Delete a user to remove the entry as well as personalization data from the cache database.
1. In the left navigation pane of Sybase Control Center, click the Applications node and
select the Application Users tab in the right administration pane.
2. Select the user and click Delete.
The user entry and data are removed.
Checking Application User Assignments
Check which applications are used by registered users.
1. In the left navigation pane of Sybase Control Center, click the Applications node and
select the Application Users tab in the right administration pane.
2. Select an application user and click Applications.
All applications used by the user are listed in the dialog.
Searching for Application Users
Search for application users according to the criteria you specify.
1. In the right administration pane, select the Applications Users node.
2. Choose the criteria from the Search drop-down list for which you want to search for the
required user.
3. Click Go.
The user information is populated according to the criteria you have specified.
Refreshing the Application Users View
Refresh the application user list to display current information about registered users.
1. In the right administration pane, select theApplications node, then the Application Users
tab.
Sybase Control Center for Sybase Unwired Platform
255
Administer
2. Click Refresh to view the current information of all users.
Transporting Applications Between Environments Using Export and
Import
You can transport applications between different server environments by exporting them from
one server before importing them into another one. This sequence of events is typically
performed by administrators when transporting applications from a development local server
environment to a test network environment, or from a test or pilot environment to a production
cluster environment.
Exporting Applications
Export applications to create a deployment archive that can be used to transport applications
between Unwired Servers.
Prerequisites
Before beginning, review import requirements and best practices.
Task
1. In the left navigation pane of Sybase Control Center, select Applications.
2. In the right navigation pane, click the Applications tab.
3. Select the box adjacent to the application and click Export.
4. Click Next.
5. Click Finish.
6. Select the file system target for the exported contents and click Save.
Note: Ensure that you do not hide the file type extension when you name the export
archive; otherwise, the *.zip extension becomes invisible, which adversely affects the
outcome of the export process.
A status message indicates the success or failure of the export transaction. If the
transaction succeeds, a ZIP file is created in the location you specified. You can then
import this file on another Unwired Server.
Next
Deliver the file to the appropriate person, or deploy or transport the exported application to the
appropriate server.
Importing Applications
Import applicatiions after they have been exported from another Unwired Server.
Prerequisites
Review import requirements and best practices before beginning.
256
Sybase Unwired Platform
Administer
Task
Note: Only platform administrators can import applications at the cluster level.
1. In the left navigation pane of Sybase Control Center, select Applications .
2. In the right administration pane, click the Applications tab and click Import..
3. Click Browse to navigate to the file.
4. Click Import.
5. After the import is complete, check the import details and click OK.
Next
If the application connection template does not exist on the target server, it is imported. You
may need to change the connection and proxy settings to match the target server configuration.
If the application connection template aready exists on the target server, connection and proxy
settings are not imported; the target server template settings are used for connection and proxy
settings.
Import Requirements and Best Practices
Import is typically used to move a package or application from a development environment to
a test environment, and after testing to a production environment.
MBO Package Imports
•
•
Domain requirements – all server connections and security configurations referenced by
the MBO package must exist in the target domain.
Versioning recommendations – if a developer has updated the package version number:
1. (Required) Verify that this new package version is added to the application.
2. (Recommended) Whenever possible, use the update instead of import. Otherwise,
delete the existing package first, to remove all runtime data for the package including
cached data, registered subscriptions, subscription templates, client log, MBO and
operation histories, and registered package users. Delete these items only after serious
consideration.
Application Imports
Make sure the target system has resources that match those referenced in the export archive
file:
•
•
Domains, security configurations, logical roles assigned to application connection
templates, proxy endpoint connections (used by ODP applications)
If MBO packages are included, the domains, security configurations and connections
referenced by the MBO package archives
Sybase Control Center for Sybase Unwired Platform
257
Administer
Hybrid App Imports
If MBO packages are referenced in the export archive file, make sure that the MBO packages
have already been deployed to the target system.
Note: If the Hybrid App has matching rules, all matching rule search expressions are imported
as regular expression types. Other expresssion types such as Begins with or Equals are
imported as Regular expression.
Application Connections
Application connections define the manner in which the application connects to Unwired
Server and interacts with the runtime services the application requires. Connections are
defined by the properties that are configured for it, frequently saved as a reusable template.
The connection registration process is either manual or automatic. Without successful
registration, a connection is not activated, and an application cannot consume the data, the
customizations, or the packages it requires.
Sybase recommends that you use templates to store and reuse connections. At minimum, you
should create one template per security configuration.
See also
• EIS Data Source Connection Properties Reference on page 159
• Creating Connections and Connection Templates on page 157
Registering or Reregistering Application Connections
Registering an application connection groups the user, device, and application to create a
unique connection in Sybase Control Center, so the registered connection activity can be
monitored. Use Sybase Control Center to manually register an application connection. You
can also reregister an application connection when the association between the user, device
and application breaks or requires a different pairing.
For more information on registering and reregistering application connections, see How
Connections Are Registered in Mobile Application Life Cycle.
1. In the left navigation pane, click the Applications node.
2. In the right administration pane, click the Application Connections tab.
3. Choose an action:
•
•
258
Click Register to register a new application connection. Using the Activation Code,
this application is then paired with a user and a device.
Click Reregister to associate the application with a new device and user pairing. For
example, reregister the application connection if someone loses their device. By
reregistering the application connection, the user then receives the same applications
and workflows as the previous device.
Sybase Unwired Platform
Administer
Note: If the client application does not support reregistration, you cannot reregister the
application connection. To determine if the client application supports reregistration,
review the Capabilities properties for the application connection. If the Application
Supports Client Callable Components property has a value of False, reregistration
is not supported.
4. In the Register Application Connection or the Reregister Application Connection dialog.
a) For new device registration only, type the name of the user that will activate and
register the device. For reregistrations or clones, the same name is used and cannot be
changed.
b) (Not applicable to reregistration.) Select the name of the template for initial application
connection registration. The template you use supplies initial values in the subsequent
fields.
• Default – a default template that you can use as is, or customize.
• HWC – a default template for Hybrid Web Container. Use as is, or customize. If you
use the HWC template, Application ID must be set to HWC.
• Custom - customized templates are listed.
Note: You cannot change the application connection template for an application
connection after registration.
5. Change the default field values for the template you have chosen.
If you are using Relay Server, ensure the correct values are used.
• Application ID- the application ID registered for the application. The value differs
according to application client type - native application, Hybrid App, or Online Data
Proxy client. See Application ID Overview for guidelines.
•
•
•
•
•
Note: If the template you have chosen supplies the Application ID, then this field is
read-only.
Security Configuration- select the security configuration relevant for the application
connection.
Logical Role- (not applicable to reregistration) select the logical role that users must
belong to in order to access the application.
Domain- select the domain for which you want to register the application connection
with. A domain is not required for registering application connections for Hybrid Web
Container applications.
Note: This value is sent to and used by the device application, and is automatically
derived from the application ID you select. Therefore, you must set this value correctly
when using a domain with an application ID.
Activation code length - the number of characters in the activation code. If you are
reregistering or cloning a device, this value cannot be changed.
Activation expiration- the number of hours the activation code is valid.
Sybase Control Center for Sybase Unwired Platform
259
Administer
6. (Optional) Select the check box adjacent to Specify activation code to enter the code sent
to the user in the activation e-mail. This value can contain letter A - Z (uppercase or
lowercase), numbers 0 - 9, or a combination of both. Acceptable range: 1 to 10 characters.
7. Click OK
The application is registered or reregistered. SAP applications that have connections
registered with Unwired Server, can also have licenses counted by SAP License Audit service.
For a list of SAP applications for which licenses are counted, see SAP Applications Tracked
with SAP License Audit in System Administration..
See also
• Application ID and Template Guidelines on page 241
• Considerations for Application Connection Registration on page 262
• Application Connection Properties on page 269
Assigning and Unassigning Hybrid Apps to Application Connections
Assign Hybrid App packages to application connections to make them available to device
users.
1. In the left navigation pane of Sybase Control Center, click Applications.
2. In the right administration pane, click the Application Connections tab.
3. Select the application connection to assign a Hybrid App package to.
4. Click Hybrid Apps.
5. Select the Hybrid App package or packages that you want to assign to the application
connection.
6. Click Assign.
Note: If the client application does not support Hybrid Apps , you cannot assign a Hybrid
App to the application connection. To determine if the client application supports Hybrid
Apps, review the Capabilities properties for the application connection. If the
Application Supports Hybrid App property has a value of False , Hybrid Apps are not
supported.
7. To set a Hybrid App package as the default application for the application connection,
select the package and click Set default.
Set a Hybrid App package as the default to run that application on the device as a singlepurpose application. Single-purpose applications launch automatically when the user
opens the Hybrid Web Container. You can only select one default per application
connection.
8. To unassign a Hybrid App package, select the package and click Unassign.
260
Sybase Unwired Platform
Administer
Note: If you unassign the Hybrid App package that is set as the default for the application
connection, you may want to select a new default package.
9. Click OK.
Maintaining Registered Connections
Connections that are registered can be maintained and managed. Perform any connection
maintenance tasks as needed.
Searching for Application Connections
Set search criteria to filter connections viewed in the Application Connections tab
1. In the right navigation pane, click the Applications node.
2. In the right administration pane, click the Application Connections tab.
3. To set the search criteria, configure these search elements:
• Choose the connection information column name you want to enter a search value for.
• Type or choose the value for the column name you selected.
4. To search based on multiple filter criteria, select Multi filters and add filters.
5. To define a filter:
a) Select the type of information you want to filter on
b) Enter the filter criteria.
c) Click +.
d) Repeat for additional filters, as required.
You can define only one filter criteria for each type of information. The filters are
combined using a logical AND.
6. To define a filter.
a) Select the type of information you want to filter on.
b) Enter the filter criteria.
c) Click +.
a) Repeat for additional filters, as required.
b) When you have defined all your filters, click Refresh.
Different types of filters are combined using a logical AND. If the same type of filter is
added multiple times with different criteria, the filters are combined using a logical OR
If you defined the following filters:
• Security Configuration = Security1
• User = User1
• User = User2
The filtered list would return results that matched both Security1 and either User1 or
User2.
Sybase Control Center for Sybase Unwired Platform
261
Administer
Considerations for Application Connection Registration
An application connection can be registered automatically, manually or anonymously.
Information and guidelines:
•
•
Application templates hold default connection properties that can be assigned to an
application during the connection registration process. However, these templates are
configured differently depending on what type of connection registration you enable for
applications. See the recommendations documented in Creating Application Connection
Templates in the Mobile Application Life Cycle guide.
When a client application connects to Unwired Server its application ID is used to look up
a matching template. If that template allows automatic registration (the Automatic
Registration Enabled property is set to true), then the security configuration in the template
is used to authenticate the user and establish an identity against which the connection is
registered. If the template also specifies a logical role, then user is authorized using the
mapped physical role(s) of the logical role in the security configuration. When there are
templates with different logical roles for the same application id and security
configuration, the priority of the template determines the order of evaluation of the
associated logical roles.
Note: If no templates are detected, the registration request fails. If multiple templates are
detected, the client application registers using the template with the highest priority. If
there is more than one template with the highest priority, the application registers using
one of the templates with the highest priority, selected at random. For details on how user
names and security configuration names are processed when an email address is used, see
Considerations for Using E-mail Addresses as User Names in the Security guide.
Supported device client activation options:
Device Client
Type
Automatic Registration
Manual Registra- Anonymous
tion
Registration
Workflow
X
X
Native
X
X
Online Data Proxy
X
X
X
X
See also
• Registering or Reregistering Application Connections on page 258
Deleting Application Connections
Delete an application connection to remove a user assignment to an application connection.
1. In the left navigation pane of Sybase Control Center, click the Applications node and
select the Application Connections tab in the right administration pane.
262
Sybase Unwired Platform
Administer
2. Select the application connection and click Delete.
Editing the Application Connection Properties
Modify or update the properties of an application connections
1. In the left navigation pane, click the Applications node.
2. In the right administration pane, click the Applicaton Connections tab.
3. Select an application connection from the list.
4. Click Properties.
a) In the Application Connection Properties dialog, select the category from the left pane.
b) Update or modify the property and its value.
Note:
• You cannot update or modify the Capabilities properties. These properties are set
by the client application.
• If the client application does not support a password policy, you cannot update or
modify the Password Policy properties. To determine if the client application
supports a password policy, review the Application Supports Password Policy
property under Capabilities. A value of False means a password policy is not
supported.
c) Click OK.
Note: When the application end-point for a registered application is modified under
the Proxy property, you have to manually update the Address in the proxy properties
of the connection pool.
Cloning Application Connections
Create a duplicate copy of an application connection configuration settings. This allows you to
retain user information and pair it with a different device in the event that a user gets a new or
alternate device.
1. In the left navigation pane, click the Applications node.
2. In the right administration pane, click the Application Connections tab.
3. Check the box adjacent to the connection you want to clone and click Clone.
Note: If the client application does not support cloning, you cannot clone the application
connection. To determine if the client application supports cloning, review the
Capabilities properties for the application connection. If the Application Supports
Client Callable Components property has a value of False, cloning is not supported.
4. Edit the configuration settings associated with the application connection.
• Application ID- the application ID registered for the application.
Sybase Control Center for Sybase Unwired Platform
263
Administer
•
•
•
Security Configuration- select the security configuration relevant for the application
connection.
Domain- select the domain for which you want to register the application connection
with.
Activation expiration- the number of hours the activation code is valid.
5. (Optional) Select the check box adjacent to Specify activation code to enter the code sent
to the user in the activation e-mail. This value can contain letter A - Z (uppercase or
lowercase), numbers 0 - 9, or a combination of both. Acceptable range: 1 to 10 characters.
6. Click OK
Viewing Package Users for Application Connections
View users of packages associated with a registered application connection.Users can only be
viewed following connection registration. Connection registration creates a pairing between
the user, the application ID, and the connection.
1. In the left navigation pane, click the Applications node.
2. In the right administration pane, click the Application Connections tab.
3. Check the box adjacent to the connection you want to review package users for and click
Package Users.
Note: If the client application does not support package users, you cannot review package
users for the application connection. To determine if the client application supports
package users, review the Capabilities properties for the application connection. If the
Application Supports Client Callable Components property has a value of False ,
package users are not supported.
4. View package user information. Select and delete users if required.
5. Click OK.
Locking and Unlocking Application Connections
Lock or unlock connections to control which users are allowed to synchronize data. Locking
an application connection is an effective way to disable a specific user without making
changes to the security profile configuration to which he or she belongs. Locking an
application connection blocks delivery of generated data notifications to the replication-based
synchronization clients.
1. In the left navigation pane, select the Applications node.
2. In the right administration pane, select the Application Connections tab.
3. Select the application connection you want to manage, and:
• If the connection is currently unlocked and you want to disable synchronization, click
Lock.
264
Sybase Unwired Platform
Administer
•
If the connection is currently locked and you want to enable synchronization, click
Unlock.
4. In the confirmation dialog, click OK.
Tracing Application Connections
Send a request to Unwired Server to retrieve log files for an application connection.
1. In the left navigation pane, select the Applications node.
2. In the right administration pane, click Application Connections tab.
3. Select an application connection, and click Get Trace.
Note: If the client application does not support tracing, you cannot trace the application
connection. To determine if the client application supports tracing, review the
Capabilities properties for the application connection. If the Application Supports
Client Callable Components property has a value of False, tracing is not supported.
The application connection status must be "online" to retrieve the logs.
4. Click OK.
5. When the application connection is online, check the application connection log. The
default location for single node and cluster installations is
<UnwiredPlatform_InstallDir>\UnwiredPlatform\Servers
\UnwiredServer\logs\ClientTrace .
Viewing Default Hybrid Apps
Set a Hybrid App package as the default application for an application connection to run on the
device as a single-purpose application. A single-purpose application launches automatically
when the user opens the Hybrid Web Container and is the only Hybrid App available on the
device.
1. In the left navigation pane of Sybase Control Center, click Applications.
2. In the right administration pane, click the Application Connections tab.
3. Select the application connection you want to view the default Hybrid App for.
4. Click Hybrid Apps.
The Hybrid Apps assigned to the connection are listed. The default application is
identified with a check mark in the Default column.
5. To change the default, select the current default Hybrid App and click Unset default, then
select the new default Hybrid App and click Set default.
You can only select one default per application connection.
6. Click OK.
Sybase Control Center for Sybase Unwired Platform
265
Administer
Setting Anonymous Access for Applications
To provide anonymous access to a manually created or existing application, select the
anonymous security configuration and the Anonymous access checkbox.
1. To set anonymous access for an existing application, select the application and create an
application connection template with the Anonymous security configuration.
2. For either new or existing ODP applications, you must also manually create a connection
for the application where the:
• connection pool name is the application ID
• connection pool type is Proxy
• Allow Anonymous Access property = true
Application Connection Templates
An application connection template is a model or pattern used to standardize properties and
values for application connections. When application share many of the same connection
properties and values save them to a connection template. The application connection
template assigned during application connection registration sets the default connection with
common properties and values. You can then override the default template properties and
specific values.
You can also assign Hybrid App packages to an application connection template. When you
assign Hybrid App packages to an application connection template, all application
connections that use the template are automatically assigned the Hybrid App packages.
Commonly used application properties include: application ID, security configuration, and
logical role (used for automatic application connection registration for role based access), and
domain. Together, the application ID, security configuration, and logical role form a unique
key. An application may have multiple templates that use the same security configuration but
different logical roles. During the course of automatic registration and application activation,
the Template Priority property of in template's Application Settings defines the order in
which the logical roles are evaluated for user authorization.
Use the built-in templates or create new ones as dictated by your deployment environment.
You can also use these built-in templates to customize templates beyond those created from
development property values:
•
•
•
266
Default – Registers application connections without an application ID. Use this option for
backward compatibility scenarios, or with previous versions of client runtime for native
messaging clients.
HWC – Registers application connections for Hybrid Web Container clients only.
$diagtool – Registers application connections to verify a valid end-to-end configuration.
Sybase Unwired Platform
Administer
Creating Application Connection Templates
Create application connection templates by setting appropriate properties and values.
1. In the left navigation pane, click the Applications node.
2. In the right administration pane, click the Application Connection Templates tab.
3. Click New.
4. Enter the Template name and Description for the application connection template.
5. Select the Base template from the drop-down list.
6. You can configure any of the following profiles. See Application Connection Properties:
• Apple Push Notifications
• Application Settings
• BlackBerry Push Notifications
• Android Push Notifications
• Connection
• Custom Settings
• Device Advanced
• Device Info
• Password Policy
• Proxy
• Security Settings
• User Registration
7. Click OK.
See also
• Application Connection Properties on page 269
• Application Settings on page 271
Assigning and Unassigning Hybrid Apps to Application Connection Templates
When you assign Hybrid App packages to an application connection template, all registered
application connections are automatically assigned Hybrid App packages.
You can also assign Hybrid App packages directly to an application connection. The set of
packages assigned to an application connection will be a combination of packages assigned
indirectly through the application connection template and directly through the application
connection..
1. In the left navigation pane, select Applications .
2. In the right navigation pane, click the Application Connection Templates tab.
All the application connection templates are listed.
Sybase Control Center for Sybase Unwired Platform
267
Administer
3. Select a template and click Hybrid Apps.
Note: The selected template must have an application ID.
4. Select one or more Hybrid App packages that you want to assign to the template.
5. To set a Hybrid App package as the default for the application connection template, select
the Hybrid App package and click Set default.
Set a Hybrid App package as the default to if you want it to launch automatically when the
user opens the Hybrid Web Container. This will be the only Hybrid App available on the
device. You can only select one default per application connection template.
Note: If the same application connection has a default Hybrid App package assigned to it
directly (not through the application connection template), the direct assignment default
takes precedence.
6. To unassign a Hybrid App, select the Hybrid App and click Unassign.
Note: If you unassign the default Hybrid App, you may want to select a new default Hybrid
App.
Changing Properties of Application Connection Template
Change existing propert values used in application connection templates.
Note: Changes made to application connection template properties are applied to all
application connections that use that template, except where the properties have been
overridden for a specific application connection.
1. In the left navigation pane, click the Applications node.
2. In the right administration pane, click the Application Connection Templates tab.
3. Select the application connection template from the list and click Properties.
4. In the Template dialog, select the category you want to edit and modify the property and
value.
Note: Some properties are read-only and cannot be changed by the administrator. Some
read-only properties are set by the application developer or the device. Other read-only
properties are set by the administrator but cannot be changed after the template has been
used to register an application connection.
5. Click OK.
Deleting an Application Connection Template
When an application connection template is no longer needed, delete the template.
Understand the risks and outcomes of this action before proceeding:
268
Sybase Unwired Platform
Administer
•
•
If an application was defined using a template targeted for deletion, then deleting a
template prevents future connections from registering. Therefore, before you delete a
template, always ensure it is not used in any existing application definition.
If the application connection template is used by a registered application connection, you
cannot delete the template.
1. In the left navigation pane, click the Applications node.
2. In the right administration pane, click the Application Connection Templates tab.
3. Select the application connection template from the list and click Delete.
4. Click OK on the confirmation dialog.
Application Connection Properties
Application connection properties are used to define the values used for an registered
application connection. You can create a set of single-use properties or save a base set of
defaults for an application connection templates if you have a set of values used by many
applications.
See also
• Setting General Application Properties on page 240
• Registering or Reregistering Application Connections on page 258
• Application Settings on page 271
• Creating Application Connection Templates on page 267
• Defining Applications on page 239
Native Notification Properties
The Unwired Server HTTP listener provides a notification interface through which delivery of
both native notifications and payload push notifications is configured for a connection.
Configure each set of properties accordingly.
Use native notifications to allow third-party applications or an EIS to deliver notifications/
payload directly through the Unwired Platform HTTP notification channel to the device. For
example, BlackBerry (BES), Apple (APNS), or Android (GCM). Do not confuse native
notifications with Unwired Server initiated push notifications.
Sybase Control Center for Sybase Unwired Platform
269
Administer
Android Push Notification Properties
Android push notification properties allow Android users to install messaging client software
on their devices.
Property
Description
Enabled
Enables Google Cloud Messaging (GCM) push notifications to the device if the
device is offline. This feature sends a push notification over an IP connection
only long enough to complete the Send/Receive data exchange. Android Push
notifications overcome issues with always-on connectivity and battery life consumption over wireless networks. Acceptable values: true (enabled) and false
(disabled). If this setting is false, all other related settings are ignored.
Registration ID
The registration ID that the device acquires from Google during GCM registration.
Sender ID
GCM sender ID used by Unwired Server to send notifications. Used by the client
to register for GCM.
Apple Push Notification Properties
Apple push notification properties allow iOS users to install client software on their devices.
•
•
•
•
APNS Device Token – the Apple push notification service token. An application must
register with Apple push notification service for the iOS to receive remote notifications
sent by the application’s provider. After the device is registered for push properly, this
should contain a valid device token. See the iOS developer documentation.
Alert Message – the message that appears on the client device when alerts are enabled.
Default: New items available.
Delivery Threshold – the frequency, in minutes, with which groupware notifications are
sent to the device. Valid values: 0 – 65535. Default: 1.
Sounds – indicates if a sound is a made when a notification is received. The sound files
must reside in the main bundle of the client application. Because custom alert sounds are
played by the iOS system-sound facility, they must be in one of the supported audio data
formats. See the iOS developer documentation.
Acceptable values: true and false.
•
Default: true
Badges – the badge of the application icon.
Acceptable values: true and false
•
•
Default: true
Alerts – the iOS standard alert. Acceptable values: true and false. Default: true.
Enabled – indicates if push notification using APNs is enabled or not.
Acceptable values: true and false.
270
Sybase Unwired Platform
Administer
Default: true
See also
• Configuring Messaging Subscription Settings on page 299
BlackBerry Push Notification Properties
BlackBerry push notification properties enable the server to send notifications to BlackBerry
devices using Blackberry Enterprise Server (BES).
Property
Description
Enabled
Enables notifications to the device if the device is offline. This feature sends a
push notification over an IP connection only long enough to complete the Send/
Receive data exchange. BlackBerry Push notifications overcome issues with
always-on connectivity and battery life consumption over wireless networks.
Acceptable values: true (enabled) and false (disabled). If this setting is false, all
other related settings are ignored. Default: true
Delivery threshold The minimum amount of time the server waits to perform a push notification to
the device since the previous push notification (in minutes). This controls the
maximum number of push notifications sent in a given time period. For example,
if three push notifications arrive 10 seconds apart, the server does not send three
different push notifications to the device. Instead they are sent as a batch with no
more than one push notification per X minutes (where X is the delivery threshold). Acceptable values: 0 – 65535. Default: 1
BES Push Listener Port
The listener port for BES notifications. The port is discovered and set by the
client, and is read-only on the server.
Device PIN
Every Blackberry device has a unique permanent PIN. During initial connection
and settings exchange, the device sends this information to the server. Unwired
Server uses this PIN to address the device when sending notifications, by sending
messages through the BES/MDS using an address such as: Device="Device
PIN" + Port="Push Listener port". Default: 0
BES Notification
Name
The BES server to which this device's notifications are sent. In cases where there
are multiple BES servers in an organization, define all BES servers.
Application Settings
Application settings display details that identify the Application Identifier, Domain, Security
Configuration, and Customization Resource of an application connection template
•
•
Automatic Registration Enabled – set to True to automatically register the application
using a connection template. Be sure you understand the security ramifications of setting
this value to true. See Registering Applications, Devices, and Users in the Security guide.
Application Identifier – the application identifier registered on SCC.
Sybase Control Center for Sybase Unwired Platform
271
Administer
•
Customization Resource Bundles – the application configuration (customization
resource bundles) associated with the application. Values include:
•
•
•
•
A single name, such as Appmc:1.2.1, indicates a single customization resource
bundle.
Blank means no customization resource bundles are assigned.
Note: Application configuration is only used for OData SDK clients (Android and iOS),
and is not used for Hybrid Web Container connections.
Domain – the domain selected for the connection template.
The domain is not required when automatic registration is enabled.
Notification Mode – the notification mode through which native notifications and
payload push notifications to registered devices are delivered:
•
•
•
Only native notifications – allows third party applications or EIS to deliver native
notifications directly through the HTTP notification channel: BlackBerry (BES),
Apple (APNS), or Android (GCM) to the device.
Only online/payload push – allows third party applications or EIS to deliver data
payload push notifications to an online device.
Online/payload push with native notifications – allows both payload and native
notifications to be delivered to the device.
Note: Apple and Google do not recommend payload delivery over their systems:
•
•
•
Data may not be delivered.
Data is delivered out of sequence.
If enabled, the actual payloads must be small.
For example, GCM makes no guarantees about delivery or order of messages. While
you might use this feature to inform an instant messaging application that the user has
new messages, you probably would not use it to pass actual messages.
RIM supports guaranteed delivery, including callbacks to notify Unwired Server that the
message was delivered or when it failed. However, this is a different message format. RIM
messaging has many limitations including packet size, number of packets for a single user
that BES keeps, number of packets BES keeps for all users, and so on. Therefore, BES
should also only be used to send the notification, but not to send payloads.
Refer to the appropriate platform documentation (APNS, BES, or GCM) for additional
information.
•
Security Configuration – the security configuration defined for the connection template.
The security configuration of the application connection template is used to authenticate
users when automatic registration is enabled. The user name for authentication can be
included in the security configuration, for example, supAdmin@admin. If a security
configuration is provided, the server looks for the application connection template
according to both the appId and security configuration. If a security configuration is not
272
Sybase Unwired Platform
Administer
•
•
provided, the server looks for the unique application connection template according to the
appId. If there are multiple templates with different security configurations for the same
appId, the server reports an exception, as it does not know which template should be used
to authenticate the user.
Logical Role – the logical role that users must belong to in order to access the application.
Template Priority – the priority in which the application connection template will be used
by the application, if the application has more than one application connection template
associated with it.
See also
• Application Connection Properties on page 269
• Creating Application Connection Templates on page 267
Connection Properties
Connection properties define the connection information for a client application so it can
locate the appropriate Unwired Server synchronization service.
Typically, production client applications connect to the synchronization server via Relay
Server or some other third-party intermediary reverse proxy server. In those cases, the settings
for the synchronization host, port, and protocol need to use Relay Server property values. For
more information on how these properties are used in a synchronization environment, see
Replication in System Administration.
•
•
•
•
•
•
•
•
Activation Code – (not applicable to replication clients) the original code sent to the user
in the activation e-mail. Can contain only letters A – Z (uppercase or lowercase), numbers
0 – 9, or a combination of both. Acceptable range: 1 to 10 characters.
Farm ID – a string associated with the Relay Server farm ID. Can contain only letters A –
Z (uppercase or lowercase), numbers 0 – 9, or a combination of both. Default: 0.
Server Name – the DNS name or IP address of the Unwired Server, such as
"myserver.mycompany.com". If using Relay Server, the server name is the IP address or
fully qualified name of the Relay Server host.
Server Port – the port used for messaging connections between the device and Unwired
Server. If using Relay Server, this is the Relay Server port. Default: 5001.
Synchronization Server Host – the server host name used for synchronization.
Synchronization Server Port – the port used for synchronization.
Synchronization Server Protocol – the synchronization protocol - HTTP or HTTPS.
Synchronization Server Stream Parameters – the synchronization server stream
parameters that are used to explicitly set client-specific values. After the client application
successfully registers with the Unwired Server, it receives the trusted certificate
configured in the Server configuration (either the Secure Sync Port Public Certificate or
Trusted Relay Server Certificate). If you are using Relay Server, ensure the Trusted Relay
Server Certificate property is configured to point to a file that has the server's public
certificate.
You can configure these parameters as one or morename=value entries.
Sybase Control Center for Sybase Unwired Platform
273
Administer
•
•
•
•
•
trusted_certificates – the file containing trusted root certificate file.
certificate_name – the name of the certificate, which is used to verify certificate.
certificate_unit – the unit, which is used to verify certificate.
certificate_company – the name of the company issuing the certificate, which is used
to verify certificate.
For more information about certificates, see Security.
Synchronization Server URL Suffix – the server URL suffix. For Relay Server, suffixes
vary depending on the Web Server used. For example, /cli/iarelayserver/
FarmName for Apache, or ias_relay_server/client/rs_client.dll/
FarmName for IIS.
See also
• Configuring Messaging Subscription Settings on page 299
Custom Settings
Define one of four available custom strings that are retained during reregistration and cloning.
Change the property name and value according to the custom setting you require. The custom
settings can be of variable length, with no practical limit imposed on the values. You can use
these properties to either manually control or automate how Hybrid App-related messages are
processed:
•
•
Manual control – an administrator can store an employee title in one of the custom fields.
This allows employees of a specific title to respond to a particular message.
Automated – a developer stores the primary key of a back-end database using a custom
setting. This key allows the database to process messages based on messaging device ID.
See also
• Configuring Messaging Subscription Settings on page 299
Device Advanced Properties
Advanced properties set specific behavior for messaging devices.
•
Relay Server URL Prefix – the URL prefix to be used when the device client is
connecting through Relay Server. The prefix you set depends on whether Relay Server is
installed on IIS or Apache. For IIS, this path is relative. Acceptable values include:
•
•
For IIS – use/ias_relay_server/client/rs_client.dll.
For Apache – use /cli/iasrelayserver.
Note: The value used in the client application connection for the URL suffix must match
what the administrator configures in the URL suffix. Otherwise, the connection fails. Use
274
Sybase Unwired Platform
Administer
•
•
•
•
•
the Diagnostic Tool command line utility to test these values. See Diagnostic Tool
Command Line Utility (diagtool.exe) Reference in System Administration.
Allow Roaming – the device is allowed to connect to server while roaming. Acceptable
values: true and false. Default: true.
Debug Trace Size – the size of the trace log on the device (in KB). Acceptable values: 50 to
10,000. Default: 50.
Debug Trace Level – the amount of detail to record to the device log. Acceptable values: 1
to 5, where 5 has the most level of detail and 1 the least. Default: 1.
• 1: Basic information, including errors
• 2: Some additional details beyond basic
• 3: Medium amount of information logged
• 4: Maximum tracing of debugging and timing information
• 5: Maximum tracing of debugging and timing information (currently same as level 4)
Device Log Items – the number of items persisted in the device status log. Acceptable
values: 5 to 100. Default: 50.
Keep Alive (sec) – the Keep Alive frequency used to maintain the wireless connection, in
seconds. Acceptable values: 30 to 1800. Default: 240.
See also
• Configuring Messaging Subscription Settings on page 299
Device Info Properties
Information properties display details that identify the mobile device, including International
Mobile Subscriber identity (IMSI), phone number, device subtype, and device model.
•
•
•
•
IMSI – the International Mobile Subscriber identity, which is a unique number associated
with all Global System for Mobile communication (GSM) and Universal Mobile
Telecommunications System (UMTS) network mobile phone users. To locate the IMSI,
check the value on the SIM inside the phone.
Phone Number – the phone number associated with the registered mobile device.
Device Subtype – the device subtype of the messaging device. For example, if the device
model is a BlackBerry, the subtype is the form factor (for example, BlackBerry Bold).
Model – the manufacturer of the registered mobile device.
See also
• Configuring Messaging Subscription Settings on page 299
Password Policy Properties
Create a password policy for device application logins. Only passwords that meet the criteria
of the policy can be used to access the sensitive artifacts secured inside a device's data vault.
You can create a password policy as part of an application connection template. Ensure your
developers add enforcement code to the application's data vault.
Sybase Control Center for Sybase Unwired Platform
275
Administer
•
•
•
•
•
•
•
•
Enabled – Set this value to True to enable a password policy for device applications. By
default, this property is set to True.
Default Password Allowed – Set this value to True to allow default passwords. If a
default password is allowed in the policy, developers can create the vault using with a
default password, by specifying null for both the salt and password arguments. By default,
this value is set to False
Expiration Days – Sets the number of days the existing password can be used before it
must be changed by the user. By default, this value is set to 0, or to never expire.
Has Digits | Lower | Special | Upper – Determines what combination of characters must
be used to create a password stringency requirements. The more complex the password,
the more secure it is deemed to be. Set the value to True to enable one of these password
stringency options. By default they are set to false.
Lock Timeout – Determines how long a successfully unlocked data vault will remain
open. When the timeout expires, the vault is locked, and the user must re-enter the vault
password to resume using the application. Use this property in conjunction with the Retry
Limit.
Minimum Length – Sets how long the password chosen by the user must be. By default,
this value is set to 8.
Minimum Unique Characters – Determines how many unique characters must be used
in the password. By default this property is set to 0. For example, if set that the password
has a minimum length of 8 characters, and the number of unique characters is also 8, then
no duplicate characters can be used. In this instance a password of Sm00the! would fail,
because two zeros were used. However, Smo0the! would pass because the duplication
has been removed.
Retry Limit – Sets the number of times an incorrect password can be retried before the
data vault is deleted. A deleted vault means that the database encryption key is lost, and all
data in the application is rendered irretrievable. As a result the application becomes
unusable. By default this value is set to 20.
Proxy Properties
(Applies only to Online Data Proxy) Proxy properties display details that identify the
application and push endpoints.
•
•
Application Endpoint – the URL pointing to the EIS.
Push Endpoint – the Sybase Unwired Platform URL used by EIS to forward
notifications.
Note: The application end point should be whitelisted only once as a proxy connection. The
proxy connection name should be same as the application ID, if an application is registered to
be used for referencing the EIS service end point.
276
Sybase Unwired Platform
Administer
Security Settings
Security settings display the device security configuration.
•
•
•
E2E Encryption Enabled – indicate whether end-to-end encryption is enabled or not: true
indicates encryption is enabled; false indicates encryption is disabled.
E2E Encryption Type – use RSA as the asymmetric cipher used for key exchange for endto-end encryption.
TLS Type – use RSA as the TLS type for device to Unwired Server communication.
Note: These settings are visible, but not in use by client (replication native application) at this
time.
User Registration
User registration specifies details of the activation code that is sent to a user to manually
activate an application on the device.
•
•
Activation Code Expiration (Hours) – indicates how long an activation code is valid. The
default is 72 hours.
Activation Code Length – indicates the length of the activation code, as in number of
alphanumeric characters. The default is 3.
Sybase Control Center for Sybase Unwired Platform
277
Administer
278
Sybase Unwired Platform
Deploy
Deploy
Deployment is a routine administration task that manages the life cycle of a mobile business
object (MBO) package on the Unwired Server. Deployment makes a package available to the
runtime environment, so that it can be administered or accessed by client devices. Deployment
is similar to, but not the same as, exporting and importing packages between multiple cluster
environments.
Unwired Platform supports the development and subsequent deployment of:
•
•
Package archives
Hybrid App archives
Depending on the package type, the deployment steps can vary.
MBO Packages
MBO packages are collections of MBOs that are related by application use and authorship and
grouped according to maintenance or distribution. Packages are initially created by
developers, but are deployed and maintained on a production Unwired Server by
administrators.
Administrators cannot change the name of a package if one has been defined by the
development team. You can, however, create new package versions when you make an
upwardly incompatible change to an existing application. In this case, leave both versions of
the package running until every one of the remote client applications has been upgraded to the
latest version; only then should you delete the old package version.
Although each mobile business object (MBO) type has unique properties and data sources,
MBOs within a package used by an application may be of different types.
Note: You must deploy a package before you can configure or manage it. Package
administration tasks vary, depending on the type of package you deploy.
See also
• DOE-C Packages on page 304
• Hybrid App Packages on page 307
Deploying MBO Packages
Deploying is the process whereby whole or part of a mobile package is loaded onto an
Unwired Server as one or more deployment units. Unwired Server can then make these units
accessible to users via a client application that is installed on a mobile device. There a different
methods you can use to deploy an MBO package to Unwired Server.
Sybase Control Center for Sybase Unwired Platform
279
Deploy
Prerequisites
If your developers have created a custom filter for the mobile business object you are
deploying, you must copy class files to the primary server before you deploy the package that
uses those filters. If you copy the filters to a slave server by mistake, they are deleted when you
deploy the package to the primary server.
To locate the name of the master, look at the server list in Sybase Control Center. If a particular
server is the master server of a cluster, it will be labeled as "primary" in the left navigation
pane.
Task
Because the deployment unit file contains package name and other information, you do not
need to select a package from the list of available packages; Unwired Server creates the
package automatically according to what has been defined in the deployment file.
1. Deploying with the Deploy Wizard
Use the Deploy wizard when packages have already been created for a known domain in a
particular development or runtime environment, or when you want Unwired Server to
create a package for you from a deployment unit file for that known domain.
2. Transporting Packages Between Environments with Export and Import
If you are trying to transfer deployment packages among disparate server environments,
you can export packages from one server environment before importing them into another
one. This sequence of events is typically performed by administrators when transporting
packages from a development local server environment to a test network environment, or
from a test or pilot environment to production cluster environment.
Deploying with the Deploy Wizard
Use the Deploy wizard when packages have already been created for a known domain in a
particular development or runtime environment, or when you want Unwired Server to create a
package for you from a deployment unit file for that known domain.
Prerequisites
Note: If the connection properties of an MBO or operation use credentials that have been
customized manually by a developer, the back-end data sources connection properties of these
MBOs and operations cannot be updated by an administrator when using the Deploy Wizard.
Instead, the adminstrator can update these properties after the MBO or operation is deployed
to an Unwired Server. When the server connection is created on Unwired Server, the
administrator can then change connection properties in Sybase Control Center by clicking on
the Connections node in the left navigation pane.
280
Sybase Unwired Platform
Deploy
Task
1. In the left navigation pane, expand the Domains folder.
2. Choose a domain name, then select Packages.
3. In the right administration pane, click the General tab.
4. Click Deploy.
Follow the instructions in the wizard to configure a package so it can be deployed.
See also
• Transporting Packages Between Environments with Export and Import on page 286
Configuring Deployment Properties
Set the properties for packages being deployed on Unwired Server.
A deployment file and an optional deployment descriptor file are created by developers in
Unwired Workspace. These files are typically delivered for deployment to a production
version of the Unwired Server by an administrator.
Note: If the package is deployed to the primary server, it is cluster-level operation.
1. When the Deploy wizard loads, click Next.
2. Review the Deployment File name, or click Browse to navigate to the appropriate file.
You can select either a single deployment unit (.XML) or an archive file (.JAR).
The name of the Package Name appears. If this package does not already exist, the wizard
displays a message that indicates the new package will be created. The name cannot
exceed 64 characters or include any periods (".").
3. Select a Deployment Mode.
The deployment moe determines how the deployment process handles the objects in a
deployment unit and package. The value you choose depends on whether or not a package
of the same name exists on Unwired Server. Allowed values are:
UPDATE – updates the target package with updated objects. After deployment, objects
in the server's package with the same name as those being deployed are updated. By
default, deploymentMode is UPDATE.
• NOCLOBBER – deploys the package only if there are no objects in the target server's
package that have the same name as any of those objects being deployed.
• REPLACE – replaces any of the target objects with those in the package. After
deployment, the servers package contains only those objects being deployed.
• VERIFY – do not deploy package. Only return errors, if any. Used to determine the
results of the <codeph>UPDATE</codeph> deploy mode.
If the deployment mode is specified both in the descriptor file and the Deploy wizard, the
Deploy wizard deploymentMode option overrides the deployment mode specified in the
descriptor file.
•
Sybase Control Center for Sybase Unwired Platform
281
Deploy
4. If you did not choose a deployment archive as your deployment file, you can browse and
select an optional deployment Descriptor File.
5. Click Next.
6. Select a Domain to deploy the package to.
7. Select a Security Configuration for the package.
8. Click Next.
The Configure Role Mapping page appears.
Deployment Archives
An archive is produced after a developer creates a package profile and executes a build on a
package. This archive can only be created in the Eclipse edition of Unwired WorkSpace.
In Unwired WorkSpace, a developer executes a build process so that it creates a .jar archive
file, which contains both a deployment unit and a corresponding descriptor file. A deployment
archive can be delivered to an administrator for deployment to a production version of the
Unwired Server.
Deployment Descriptors
A deployment descriptor is an XML file that captures changes to the deployment unit during
deployment. Those changes are then used when a package is redeployed.
A deployment descriptor is not required to deploy the deployment unit.
A deployment descriptor is created either after a developer creates a package profile and
executes a build on a package, or when the developer deploys a package to a development
edition server from Unwired WorkSpace. The file contains this information:
•
•
•
•
•
The deployment mode
The target package that descriptor applies to
The endpoint information that overrides specific endpoints defined for MBOs or
operations in the deployment unit
The domain and named security that the package applied to
Role mappings
This information is specific to each deployment unit; therefore, you cannot apply a descriptor
from another package to a deployment unit.
Mapping Roles for a Package
Unwired Platform uses a role mapper to map logical and physical roles during an access
control check. This allows developers to create applications that incorporate a logical access
control policy. When the application is deployed, a security administrator can work with the
developer to understand what the logical roles in the application were intended to do and map
these logical roles to physical roles that exist in the real security system. Role mappings
performed at the package level override the mappings set at the global level. Package-level
role mappings apply to all packages that use the same security configuration, even if the
282
Sybase Unwired Platform
Deploy
package is deployed in multiple domains. You can set the mapping state either when managing
roles, or after package deployment.
Prerequisites
Unwired Platform cannot query all enterprise security servers directly; to perform
authentication successfully, know the physical roles that are required.
Task
1. For package-specific role mapping, select and deploy an available package. Follow the
wizard prompts until you reach the Configure Role Mapping page for the target package.
2. Select a logical role and select one of the following in the adjacent list:
State
Description
AUTO
To map the logical role to a physical role of the same name.
NONE To disable the logical role, which means that the logical role is not authorized.
MAP
To manually map the logical role when the physical and logical role names do not match.
See Mapping a Physical Role Manually.
3. Click Next.
The Server Connection page appears.
Deployment-time role mapping is done at the package level. Once the package is deployed,
you can change the role mapping by going to the Role Mapping tab for the desired package.
Mapping a Physical Role Manually
Use the Role Mappings dialog to manually map required physical roles for a logical role when
physical and logical role names do not match. If names do not match, the AUTO mapping state
does not work.
Prerequisites
Unwired Platform cannot query all supported enterprise security servers directly; for
successful authentication, you must know the physical roles your back-end systems require.
Task
You can map a logical role to one or more physical roles. You can also map multiple logical
roles to the same physical role. If a role does not exist, you can also add or delete names as
needed.
1. Review the list of existing physical role names that you can map to the logical role you
have selected. If the list retrieved is too long to locate the name quickly, either:
Sybase Control Center for Sybase Unwired Platform
283
Deploy
•
•
Click the banner of Available Roles list to sort names alphanumerically.
Start typing characters in the box, then click the Search button to filter the available
list.
2. If a role that you require still does not appear, enter the Role name and click the + button.
The role name appears in the Available roles list with an asterisk (*). This asterisk
indicates that an available role was added by an administrator, not a developer.
3. To remove a role you no longer require from the Available roles list, select the name and
click the x button adjacent to the Role name field.
The role is removed and can no longer be mapped to a logical role.
4. To map a logical role that appears in the text area of the Role Mappings dialog to a physical
role:
a) Select one or more Available roles.
b) Click Add.
5. To unmap a role:
a) Select one or more Mapped roles.
b) Click Remove.
The roles are returned to the Available roles list.
6. Click OK to save these changes.
Once a logical role has been manually mapped, the mapping state changes to MAPPED. The
roles you have mapped appear in the active Physical Roles cell for either a package-specific or
server-wide role mappings table.
Mapping State Reference
The mapping state determines the authorization behavior for a logical name instance.
284
State
Description
AUTO
Map the logical role to a physical role of the same name. The logical
role and the physical role must match, otherwise, authorization fails.
NONE
Disable the logical role, which means that the logical role is not authorized. This mapping state prohibits anyone from accessing the
resource (MBO or Operation). Carefully consider potential consequences before using this option.
MAPPED
A state that is applied after you have actively mapped the logical role
to one or more physical roles. Click the cell adjacent to the logical role
name and scroll to the bottom of the list to see the list of mapped
physical roles.
Sybase Unwired Platform
Deploy
Updating Server Connection Properties
Configure the production version of server connection properties. Typically, the endpoint and
role mapping a developer would use are not the same for a production system. Administrators
must reset these properties accordingly.
This step allows you to change connection profiles used for development (design time) to an
appropriate server-side connection. For example, your development environment might
permit access to certain systems that the Unwired Server prohibits.
Note: If the connection properties of an MBO or operation use credentials that have been
customized manually by a developer, the back-end data sources connection properties of these
MBOs and operations cannot be updated by an administrator when using the Deploy Wizard.
1. Review the connection properties.
2. Depending on how the properties are configured, choose an appropriate option:
•
•
If the properties are configured by the developer as a set of connection properties, you
can edit properties as needed. To edit a property, click a field in the Value column and
change the value as required.
If the properties are configured as an endpoint, choose an existing server connection to
use. You cannot alter any of these properties.
3. If you want the changes to apply to operations only, click the corresponding check box at
the bottom of the table.
4. Click Next.
The connection properties are updated. The changes you make are displayed in the Summary
page in the Endpoint Updates section.
Reviewing the Deployment Summary
Review the properties you have supplied before deploying the package to Unwired Server.
This allows you to change errors before making the deployment units available via the
package created for that purpose.
1. Review all three sections of the deployment summary. If anything is incorrect, click Back
and correct errors.
2. To create a deployment descriptor:
a) Click Create deployment descriptor.
b) Browse to the location you want to save the file and change the default name if
required.
c) Click OK.
You can use the deployment descriptor to redeploy the deployment unit without having to
repeat these steps in the deployment wizard.
3. Click Finish to deploy the file and create the package on Unwired Server.
Sybase Control Center for Sybase Unwired Platform
285
Deploy
Deploying to the server may take some time to complete. However, a status message
appears above the General tab indicating the success or failure of the attempt.
Transporting Packages Between Environments with Export and Import
If you are trying to transfer deployment packages among disparate server environments, you
can export packages from one server environment before importing them into another one.
This sequence of events is typically performed by administrators when transporting packages
from a development local server environment to a test network environment, or from a test or
pilot environment to production cluster environment.
See also
• Deploying with the Deploy Wizard on page 280
Exporting MBO Packages
Export an MBO package to bundle one or more MBOs and package options to create a new
instance of a deployment archive. Use the deployment archive to transport the package
between Unwired Servers.
Prerequisites
Before beginning, review import requirements and best practices.
Task
1. In the left navigation pane of Sybase Control Center, expand Domains > Domain name >
Packages.
2. In the right administration pane, select the box adjacent to the name of the package and
click Export.
3. Click Next.
4. Click Finish.
5. Select the file system target for the exported contents and click Save.
Note: Ensure that you do not hide the file type extension when you name the export
archive; otherwise, the *.zip extension becomes invisible, which adversely affects the
outcome of the export process.
A status message indicates the success or failure of the export transaction. If the
transaction succeeds, a ZIP file is created in the location you specified. You can then
import this file on another Unwired Server.
Next
Deliver the file to the appropriate person, or deploy or transport the exported package to the
appropriate server.
286
Sybase Unwired Platform
Deploy
See also
• Importing MBO Packages on page 287
• Import Requirements and Best Practices on page 287
Importing MBO Packages
Import MBO packages after they have been exported from another Unwired Server.
Prerequisites
Review import requirements and best practices before beginning.
Task
1. In the left navigation pane of Sybase Control Center, expand Domains > Domain name >
Packages .
2. In the right administration pane, click Import
3. Click Browse to navigate to the file.
4. Click Import.
5. After the import is complete, check the import details and click OK.
See also
• Exporting MBO Packages on page 286
• Import Requirements and Best Practices on page 287
Import Requirements and Best Practices
Import is typically used to move a package or application from a development environment to
a test environment, and after testing to a production environment.
MBO Package Imports
•
•
Domain requirements – all server connections and security configurations referenced by
the MBO package must exist in the target domain.
Versioning recommendations – if a developer has updated the package version number:
1. (Required) Verify that this new package version is added to the application.
2. (Recommended) Whenever possible, use the update instead of import. Otherwise,
delete the existing package first, to remove all runtime data for the package including
cached data, registered subscriptions, subscription templates, client log, MBO and
operation histories, and registered package users. Delete these items only after serious
consideration.
Application Imports
Make sure the target system has resources that match those referenced in the export archive
file:
Sybase Control Center for Sybase Unwired Platform
287
Deploy
•
•
Domains, security configurations, logical roles assigned to application connection
templates, proxy endpoint connections (used by ODP applications)
If MBO packages are included, the domains, security configurations and connections
referenced by the MBO package archives
Hybrid App Imports
If MBO packages are referenced in the export archive file, make sure that the MBO packages
have already been deployed to the target system.
Note: If the Hybrid App has matching rules, all matching rule search expressions are imported
as regular expression types. Other expresssion types such as Begins with or Equals are
imported as Regular expression.
See also
• Exporting MBO Packages on page 286
• Importing MBO Packages on page 287
MBO Package Management
There are common package management activities used by all package types: replication,
messaging, unified, DOE-C, or ODATA.
These activities include:
See also
• DOE-C Packages on page 304
Deleting a Package
Delete a package when you want to permanently remove all elements deployed on an Unwired
Server. If you do not want to permanently prohibit access by removing these files, consider
disabling the package instead.
Deleting a package removes all runtime data for the package including cached data, registered
subscriptions, subscription templates, client log, MBO/Operation history, and registered
package users. All clients must re-sync as a result. Therefore, deletion action should be taken
after careful consideration.
1. In the left pane, click the Unwired Server you are currently logged in to.
This expands the list of Unwired Platform components you can manage, provided that you
have the correct permissions to do so.
2. Click Domains > DomainName > Packages.
3. To delete a package from the this list, select one or more packages and click Delete.
A confirm dialog box appears.
4. Click OK to confirm the deletion.
288
Sybase Unwired Platform
Deploy
The package is removed from Unwired Server.
Enabling and Disabling a Package
Enable or disable a package to allow or prohibit device access to the package. Disabled
packages are still available to Sybase Control Center for Unwired Server. By default, all
packages are enabled.
When you disable a package, the server unloads all of its elements from memory. Disabling a
package prevents the Unwired Server from loading that package at start-up.
Note: You cannot disable a SAP Data Orchestration Engine Connector (DOE-C) package.
1. In the left navigation pane, click Packages.
2. In the right administration pane, select the General tab.
3. Select the box adjacent to the package you want to enable or disable.
You can select more than one package to apply the same change to multiple components.
4. Depending on the current status of the package, perform one of:
•
•
Enable – if the package listed shows a status of disabled, click Enable.
Disable – if the package listed shows a status of enabled, click Disable. The package
remains disabled until you or another administrator enables it; restarting Unwired
Server does not enable the package.
Configuring Synchronization Groups
Configure a synchronization group when a collection of MBOs must be synchronized at the
same time.
The synchronization group defines both the logical unit of synchronization, and generation
frequency for data notifications. The latter influences the synchronization frequency for
replication synchronization applications, which usually need to perform a synchronization
event to download the changes associated with the data notification event.
The synchronization group properties jointly determine the frequency with which data
changes are detected, and notifications are generated. The actual data notification delivery to
the application is determined by this equation:
delivery of data notification = cache schedule repeat value or data
change notification arrival time + synchronization group change
detection interval value + device's subscription push interval
setting
There may be an additional 10 second delay, because the internal thread for performing the
change detection runs every 10 seconds.
1. In the left navigation pane, expand the Packages folder and select the package containing
the sync group you want to configure.
2. Select the desired sync group and click Properties.
Sybase Control Center for Sybase Unwired Platform
289
Deploy
3. Select a change detection interval. This value determines how frequently Unwired Server
looks for changes to MBOs, and generates push notifications. The default is 1 hour.
If you set the Change detection interval to 0, the change detection task is disabled and the
SUP server does not push changed messages or data to the client device.
4. Click OK.
Configuring a Cache Group
Select and configure a cache group. The cache is part of the Unwired Server cache database
(CDB) that is used to store data that is uploaded and downloaded from EIS servers and mobile
clients during synchronization.
Cache group configuration differs depending on whether the cache group is defined as "on
demand" or "scheduled" during development.
MBO Data in the CDB
A data cache is a copy of MBO data that is stored in a specific area of the cache database
(CDB). It is used as the data repository for replication and messaging MBOs that are deployed
to Unwired Server. "CDB" and "cache" and "MBO data" can sometimes used interchangeably,
even though the CDB includes runtime data as well.
When cache data is updated (either with an on-demand or scheduled cache refresh), the remote
client database eventually retrieves the updated data from the server's copy of MBO data in the
CDB by synchronization.
By giving applications a normalized and uniform view of corporate data, organizations can:
•
•
•
Lower the barrier to data behind corporate firewalls
Support development of mobile applications that interact with multiple enterprise backends
Reduce back-end load caused by device client requests
Configuring On Demand Cache Group Properties
Specify the duration of cache data validity by configuring Unwired Server updates to mobile
business object (MBO) data for an on demand cache group.
Prerequisites
You can configure on demand updates for a cache only if the developer enables the cache
group as "on demand" during development. Otherwise, the Cache tab is not configurable in the
Cache Group Properties dialog.
Task
1. In the left navigation pane, expand the Packages folder, and select the package for which
you want to configure cache settings.
2. In the right administration pane, click the Cache Group tab.
290
Sybase Unwired Platform
Deploy
3. Select the cache group you want to configure and click Properties.
4. In the Cache Properties dialog, enter an expiry for the Cache Interval in seconds,
minutes, or hours.
The cache interval determines how frequently Unwired Server updates the cache database
with changes to enterprise data. See On Demand Cache Refreshes in the list of links below.
5. Click OK.
On Demand Cache Refreshes
Cache groups designated as "on demand" during development use cache intervals to balance
how frequently the object updates enterprise data with the amount of network traffic required
to maintain that data.
Unwired Server keeps a local copy of enterprise data in the cache database (CDB), and uses an
intricate mechanism to manage updates between the CDB and the EIS servers. When data is
updated, the remote client database eventually gets updated data from this local copy in the
CDB. The caching mechanism allows MBOs to retrieve updated data even if back-end servers
fail.
You must choose an appropriate cache interval for your system, since this value determines
how frequently the CDB is udpated with data from the EIS. The cache interval must be
configured according to business needs. A higher value for the cache may retain stale data,
however, a lower value increases the backend EIS load and may impede the client application's
performance, because Unwired Server queries the back-end information servers more
frequently to look for changes and possibly update the CDB copy.
Frequent queries typically put a higher load on the servers, as well as use more network
bandwidth on the server side. While the cache interval does not affect the bandwidth required
between the synchronization server and device client applications, nor the performance
characteristics of the client applications, the interval you choose can delay synchronization if
Unwired Server must first update many records in the CDB.
For example, if the cache interval is 0, each time a client application synchronizes, there is a
pause while the Unwired Server rereads data from the EIS and updates the CDB. If, however,
the cache interval is greater than 0, then the wait time depends on how long ago the data was
refreshed. If the synchronization falls within a recent cache update, synchronization is almost
immediate.
Configuring Scheduled Cache Group Properties
Specify the duration of cache data validity by configuring Unwired Server updates to mobile
business object (MBO) data for a scheduled cache group.
Prerequisites
You can configure a schedule refresh for a cache only if the developer enables the cache group
as "scheduled" during development. Otherwise, the Schedule tab is not configurable in the
Cache Group Properties dialog.
Sybase Control Center for Sybase Unwired Platform
291
Deploy
Task
1. In the left navigation pane, expand the contents of the Packages folder and select the
package for which you want to display properties.
2. In the right administration pane, click the Cache Group tab.
3. Select the cache group you want to configure and click Properties.
4. In the Schedule tab of the Cache Properties dialog, set the frequency of the refresh by
selecting an appropriate Schedule Repeat: hourly, daily or custom.
This property determines what other schedule properties you must configure. Each option
is documented in a seperate topic which further discusses the details for each frequency
type. For more details, see the corresponding topic.
Scheduling an Hourly or Daily Refresh
Scheduling an hourly or daily cache refresh means that information is fetched from the
enterprise information server (EIS) and populated into the cache on either of these hourly or
daily frequencies according to the schedule and range of time you configure.
The Schedule tab in the Cache Property dialog displays options appropriate for configuring
this type of schedule.
1. Select either Hourly or Daily as the Schedule Repeat criteria.
2. (Optional) If you want to set a range to control which days the schedule refresh runs,
configure a start date and time, an end date and time, or day of week (if applicable).
•
•
•
Select Start Date to set a date for which the first execution of the scheduled refresh is
performed. To be more specific, you can also select Start Time to specify a start time.
If you do not set a start date and time, then, by default, the date and time that Unwired
Server starts is used.
Select End Date to set a date that ends the repeating refresh transactions for a package.
To be more specific, you can also select End Time to specify an end time. An end date
and time are exclusive. This means that a refresh transaction runs up to, but does not
include, the end time.
If you do not set an end date and time, then, by default, the date and time that Unwired
Server stops is used.
Select Specify Week Days to select the days of the week that the refresh transaction
runs. This means that for the days you select, the refresh runs every week on the day or
days you specify. A weekday is inclusive. This means that any day you choose is
included in the frequency. All others are excluded.
For example, if a schedule has a start time of 13:00 and an end time of 16:00 and repeats
every hour, the refresh task would execute between 13:00 and 16:00 as determined for a
custom schedule (based on the interval expiry). For an hourly or daily schedule, the refresh
is triggered in that time range on an hourly or daily basis.
292
Sybase Unwired Platform
Deploy
When the schedule expires, the automatic refresh you configured terminates, unless the
end user initiates a refresh.
3. Click Save.
See also
• Scheduling a Custom Refresh on page 293
• Scheduled Cache Refreshes on page 294
Scheduling a Custom Refresh
Scheduling a custom cache refresh is the most flexible of all cache refresh schedules. This
means that information is fetched from the enterprise information system (EIS) according to
the schedule repeat interval you specify.
The Schedule tab in the Cache Property window displays options appropriate for configuring
this type of schedule.
1. Select Custom as the schedule repeat criteria.
2. Specify a repeat Interval, in minutes or seconds, to determine how often the cache refresh
occurs.
This interval determines how frequently Unwired Server updates the cache database with
changes to enterprise data. The default is 0 seconds, which means the mobile business
object retrieves the data from the enterprise information server (EIS) on every playback
request. If you choose something other than 0 seconds, the data is held by the cache for the
duration of the specified interval.
3. (Optional) To set a range to control which days the schedule refresh runs, configure a start
date and time, end date and time, or day of week (if applicable).
•
•
•
Select Start Date to set a date for which the first execution of the scheduled refresh is
performed. To be more specific, you can also select Start Time to specify a start time.
In this case, the refresh cannot begin until a given time on a given day has been reached.
A start date and time are inclusive.
If you do not set a start date and time, then, by default, the date and time that Unwired
Server starts is used.
Select End Date to set a date that ends the repeating refresh transactions for a package.
To be more specific, you can also select End Time to specify an end time. An end date
and time are exclusive. This means that a refresh transaction runs up to, but does not
include, the end time. For example, if a schedule has a start time of 13:00 and an end
time of 16:00 and repeats every hour, it runs at 13:00, 14:00, and 15:00, but not at
16:00.
If you do not set an end date and time, then, by default, the date and time that Unwired
Server stops is used.
Select Specify Week Days to select the days of the week that the refresh transaction
runs. This means that for the days you select, the refresh runs every week on the day or
Sybase Control Center for Sybase Unwired Platform
293
Deploy
days you specify. A weekday is inclusive. This means that any day you choose is
included in the frequency. All others are excluded.
When the schedule expires, the automatic refresh you configured terminates, unless the
end user initiates a refresh.
4. Click Save.
See also
• Scheduling an Hourly or Daily Refresh on page 292
• Scheduled Cache Refreshes on page 294
Scheduled Cache Refreshes
A schedule-driven cache refresh is a background task that runs between a configured start and
endpoint at scheduled intervals during normal server operation.
A schedule-driven cache refresh defines a contract between Unwired Server and back-end
information servers. Normally, data is retrieved from a server (for example, a database, and an
SAP repository, or a Web service) when a device user synchronizes. If the administrator wants
the data to be preloaded, he or she configures the Unwired Server repeat interval to expedite
data updates on the device.
Two properties configure the cache refresh schedule, which is used with a subscription to
synchronize data for mobile business objects (MBOs).
•
•
Schedule repeat – determines the time frame when data is refreshed. If you set up a
schedule to repeatedly refresh data, information is always refreshed. Set the schedule to
meet business application requirements for data consistency.
As an administrator, you may also use a schedule repeat to look for data changes and alert
subscribed clients to synchronize when there are changes. Keep in mind, however, that the
actual detection of changes and sending of data (for messaging payloads) or notifications
(for replication payloads) depends on the:
• Change detection interval property of the synchronization group for the package.
• Notification threshold property of subscriptions for replication payloads.
• Push related device settings for messaging payloads.
Repeat interval – determines how often Unwired Server updates the cache with changes to
backend data.
See also
• Scheduling an Hourly or Daily Refresh on page 292
• Scheduling a Custom Refresh on page 293
294
Sybase Unwired Platform
Deploy
Online Refresh Policy
MBOs that use an Online refresh policy indicates that the MBOs are to be used only in Hybrid
App applications where access to real-time enterprise information system (EIS) data is
required (cache validity is zero).
Data is valid in the Unwired Server cache only until delivery and immediately invalid. You
cannot modify the cache or schedule of the Online policy. Expired data is purged from the
cache based on a schedule at the domain level.
DCN Refresh Policy
The cache refresh and schedule options are disabled for DCN (data change notification)
policy, since data never expires and is not refreshed based on client demand or a schedule.
Cache data does not expire until a cache invalidate operation is invoked or a data change
notification request is received from the enterprise information system (EIS).
Purging a Cache Group
Physically delete data that has been logically deleted from the cache. Cached data is marked as
logically deleted when certain activities occur in the client application or back end.
1. In the left navigation pane of Sybase Control Center, expand the Packages folder and
select the package to configure.
2. In the right administration pane, select the Cache Group tab.
3. Click OK.
Purging the Synchronization Cache Manually
You can manually purge the synchronization at the package level. Mobile business objects
(MBOs) contained in a cache group using the online policy are deleted.
1. In the left navigation pane, expand the Domains folder and select a domain.
2. Navigate to the Packages folder, and select a package.
3. In the right pane, select the Cache Group tab.
4. On the Cache Group tab, click Purge.
5. Click OK to purge immediately based on your selections.
Assigning Package-Level Security
Assign security configurations at the package level to override those set at the domain-level.
1. Selecting a Security Configuration for a Package
Designate a security configuration for a package in Sybase Control Center. This is a
required step during package deployment, but you can later change the security
configuration.
Sybase Control Center for Sybase Unwired Platform
295
Deploy
Selecting a Security Configuration for a Package
Designate a security configuration for a package in Sybase Control Center. This is a required
step during package deployment, but you can later change the security configuration.
The administrator must create a security configuration in the cluster and assign it to the
domain where the package is deployed before the deployer can assign the security
configuration to the package.
1. In the left navigation pane, expand the Packages folder, and select the package to
configure.
2. In the right administration pane, click the Settings tab.
3. Select a security configuration.
The security profiles that appear in this list have been created by a platform administrator
and assigned to the domain.
4. Click Save.
Viewing Asynchronous Operation Replays
View pending asynchronous operation replays for unified or replication packages already
deployed to Unwired Server.
Prerequisites
Asynchronous operation replays are only available if the feature has been enabled as part of
the cluster properties. See Configuring Asynchronous Operation Replay Queue Count.
Task
1. In the left navigation pane, expand the Packages folder and select the deployed package.
2. In the right administration view, click the Asynchronous Operation Replay tab.
3. Review the requests displayed in the table for this package.
The number of replays are ordered in sequence along with:
• The user name that performed the operation.
• The name of the operation.
• The name of the MBO.
4. If the list is long, you can search for a particular entry:
a) Select the field you want to search for: user, operation, or MBO name.
b) Type the text string in the adjacent field.
This file allows the use of wildcards (that is, *). For example, if you selected a user
name search, and you want to return replays for all users that start with A, you type A*
as the search string.
296
Sybase Unwired Platform
Deploy
See also
• Configuring Asynchronous Operation Replay Queue Count on page 62
• Viewing Cluster Information on page 62
Viewing and Changing Package Connection Properties
View and edit connection properties for deployed MBO and DOE-C packages.
1. In the left navigation pane, expand the Packages folder, select the package whose
connection properties you want to view or change, and select the mobile business object.
2. In the right navigation pane, click the Connection tab.
3. If you wish to change any of the settings:
a. In the left navigation pane, click the Connections icon.
b. Select the checkbox for the Connection Pool Name that matches the name of the
package whose connection properties you were just viewing.
c. Click Properties.
d. Make desired changes and click Save.
Note: For DOE-C connections, you must save the connection properties first, then test
connection. For other connection types, you can test connection without saving.
e. Click Test Connection.
If the connection test is not successful, see Connection Test Errors in the
Troubleshooting guide
MBO Subscription Management
Manage subscriptions for MBO packages.
Subscription management activities include:
Configuring Package Subscriptions
Configure subscriptions and subscription templates to allow the device user to be notified
when information is available, depending on the subscription properties configured for a
package. Subscription templates allow you to configure predefined properties for a
synchronization group. A client's first synchronization for a specified synchronization group
results in subscription creation using both the template and client-specified properties.
Creating Replication Subscription Templates
Create a subscription template to specify synchronization targets and behavior for subscribed
users. A template is useful to create a set of predefined values that are used frequently.
Sybase Control Center for Sybase Unwired Platform
297
Deploy
Otherwise, a subscription is still automatically created for each client upon explicit indication
of interest for a device notification.
This is an optional step; it is only required if an administrator wants to establish preset
subscription properties. The subscription properties can be modified from device application,
but only if the Admin lock property is disabled.
1. In the left navigation pane, expand the Packages folder and select the replication based
sync package you want to configure.
2. In the right administration pane, click the Subscriptions > Replication tab.
3. From the menu bar, select Templates.
4. Click New.
5. In the New Template dialog, select settings for these options:
• Synchronization Group – the group of MBOs that a client receives data change
notifications for when data changes occur.
• Notification Threshold – the length of time that must pass since a client's last
synchronization before another notification is sent.
• Admin Lock – (enable or disable) prevents device users from modifying the push
synchronization state or sync interval value configured in the subscription. If the admin
lock is disabled, the device client user can change these properties, and these changes
take effect the next time the client user synchronizes the package to which the
subscription applies.
• Push – (enable or disable) if enabled, automatic server-initiated notifications are
pushed to users when changes occur in the cache. If disabled, device users perform
client-initiated synchronizations when they receive an outbound notification.
Note: If you intend to use push synchronization with BlackBerry devices, enable push
synchronization in the BlackBerry server. See the BlackBerry server documentation for
details.
6. Click OK.
The new subscription template appears in the list of templates.
Notifications are delivered to BlackBerry device clients using push-based notification settings
and to Windows Mobile device clients using pull-based notification settings. The "poll every"
setting determines the notification delivery behavior. See in Sybase Control Center online
help.
Configuring Replication Subscription Properties
View and configure subscription properties for replication device users subscribed to
deployed synchronization packages.
1. In the left navigation pane, expand the Packages folder and select the replication-based
synchronization package you want to configure.
298
Sybase Unwired Platform
Deploy
2. In the right navigation pane, click the Subscriptions > Replication tab.
3. From the menu bar, select Devices.
4. Check the box adjacent to a device user and click Properties to view these subscription
properties:
•
•
•
•
•
•
•
•
•
Application Connection ID – the unique identifier for a user application connection.
User – the name of the user associated with the application ID.
Package Name – the name of the package to which the subscription belongs.
Sync Counts – the total number of synchronizations for the subscription since the
synchronization history was last cleared.
Notification Threshold – the length of time that must pass since a client's last
synchronization before another notification is sent.
Last Sync Time – the date and time that the last synchronization for the subscription
occurred.
Synchronization Group – the group of MBOs that a client receives data change
notifications for when data changes occur.
Admin Lock – (enable or disable) prevents device users from modifying the push
synchronization state or sync interval value configured in the subscription. If the admin
lock is disabled, the device client user can change these properties, and these changes
take effect the next time the client user synchronizes the package to which the
subscription applies.
Push – (enable or disable) if enabled, automatic server-initiated notifications are
pushed to users when changes occur in the cache. If disabled, device users perform
client-initiated synchronizations when they receive an outbound notification.
5. Check the box adjacent to Clear sync history in order to erase stored synchronization
details for the subscription.
6. If you made changes to subsciption properties, click Save. Otherwise, click Cancel to
return to the Subscriptions tab.
Configuring Messaging Subscription Settings
View and edit user properties for messaging packages that allow you to manage messaging
between Unwired Server and application users.
1. In the left navigation pane, expand the Packages folder, and select the package you want to
configure.
2. In the right navigation pane, click Subscriptions > Messaging .
3. Check the box adjacent to an application connection and click Device Settings.
4. Configure these property categories, as required:
• Connection
• Custom Settings
• Device Advanced
Sybase Control Center for Sybase Unwired Platform
299
Deploy
•
•
•
•
•
•
Device Info
User Registration
Apple Push Notifications (iPhone only)
BlackBerry Push Notifications
Proxy' 'Security Settings
Application Setting
See also
• Connection Properties on page 273
• Custom Settings on page 274
• Device Advanced Properties on page 274
• Device Info Properties on page 275
• Apple Push Notification Properties on page 270
Managing Subscriptions
Manage subscriptions to control the messages that application connections receive.
Subscription management tasks include pinging, unsubscribing, recovering, suspending,
resuming, resynchronizing, and logging subscriptions. Subscription tasks vary by the package
type.
These subscription management tasks apply only to the package types specified in the table
below. Perform each task in the Subscriptions tab of the deployed package you are managing.
Table 19. Subscription management tasks
Subscription task
Description
Summary
Package
type
Ping
Ensure that push information a
user provides for a device is
configured correctly.
Select the box adjacent to the device ID, and click Ping.
UNIFIED
(replication
subscriptions)
If the ping is successful, notifications and subsequent data
synchronizations occur as defined by each subscription. If
the ping fails, open the log and
check for an incorrect host
name or port number.
300
Sybase Unwired Platform
Deploy
Subscription task
Description
Subscribe|Un- Add or remove a subscription
subscribe
from Unwired Server.
Summary
Package
type
Select the box adjacent to the device ID, and click Unsubscribe
for UNIFIED packages, messaging packages, and DOE-C packages.
All
For Windows Mobile, the device
application must include the DatabaseClass.CleanAllData();
method for data to be unsubscribed correctly. If this method is not
used, Unsubscribe and Subscribe could work unpredictably.
Recover
Reestablish a relationship beCheck the box adjacent to the subtween the device and Unwired scription ID of the device, and
Server. Perform recovery under click Recover.
severe circumstances when a
device is unable to successfully
synchronize data.
UNIFIED
(messaging
subscriptions)
During subscription recovery,
Unwired Server purges all enterprise data on the device. It
retains the device ID and subscription information so that all
data can then be resynchronized
and loaded onto the device.
Suspend/resume
Control the deactivation and re- Select the box adjacent to the sub- UNIFIED
activation of package subscrip- scription ID of the device, and
(messaging
tions:
click either Suspend or Resume. subscriptions)
• Suspend – temporarily
DOE-C
block data synchronization
for a device subscribed to a
particular package.
• Resume – reactivate a package subscription after it has
been suspended.
Sybase Control Center for Sybase Unwired Platform
301
Deploy
Subscription task
Description
Summary
Resynchronize
Reactivate subscriptions to a
deployed package.
Check the box adjacent to the sub- DOE-C
scription ID of the device, and
click ReSync.
If a DOE-C subscription does
not respond to the SAP DOE
quickly enough, the DOE may
mark that subscription's queues
as "blocked" and stop sending
messages to the DOE-C. Resynchronize to resume communication from the DOE to the
DOE-C subscription.
Purge
Package
type
Removes subscriptions that are Select the subscription, click
UNIFIED
no longer referenced by any ac- Purge, and then select the criteria. (messaging
tive users.
subscriptions)
UNIFIED
(replication
subscriptions)
Purging Inactive Package Subscriptions Manually
Purge subscriptions for that have been inactive and remove them from the cache database as
well as Sybase Control Center's management view.
Note: Devices for which you have purged subscriptions cannot perform any operations. Only
purge those subscriptions that are inactive for a long period of time.
1. In the left navigation pane, expand the Domains folder and select a domain.
2. Navigate to the Packages folder, and select a subscription.
3. In the right pane, select the Subscriptions tab.
4. Select the application payload used: replication or messaging.
5. Search for inactive subscriptions for that payload type:
a) From Search, select Number of Inactive Days.
b) Type a positive integer, then click Go.
6. Select all inactive subscriptions retrieved, then click Purge.
7. Click OK. The subscriptions that match the purging criteria are physically deleted from
cache database.
8. Repeat the step for the alternate payload protocol in a mixed application environment.
302
Sybase Unwired Platform
Deploy
Reviewing MBO History
View or clear the error history of a mobile business object (MBO).
1. In the left navigation pane, expand the Packages folder and select the package that
contains the MBO you want to view.
2. Select the MBO.
3. In the right administration pane, click the History tab.
4. To view MBO data from a specific time period, select a Start date and End date and click
Go.
5. Review the following data for the MBO:
• Data refresh time – the time of this data refresh's failure.
• Failed data refresh counts – the number of failed data refreshes that occurred during the
specified time period.
• Last successful data refresh – the date and time of the most recent successful data
refresh of this MBO before this refresh failure.
6. To clean MBO history data, click Clean.
Data is removed from the cache database.
Reviewing Operation History
View the error history of a mobile business object (MBO) create, delete, or update operation.
1. In the left navigation pane, expand the Packages folder and select the package that
contains the MBO operation you want to view.
2. Expand the desired MBO and select the operation for which you want to view the error
history: create, delete, or update.
3. In the right administration pane, click the History tab.
4. To view operation data from a specific time period, select a Start date and End date and
click Go.
5. Review the following data for the operation:
• Operation replay time – time of this operation replay's failure.
• Number of failed operation replays– the number of failed operation replays that
occurred during the specified time period.
• Last successful operation replay – the date and time of the most recent successful
replay of this operation before this operation replay failure.
6. Click Clean to remove operation history data.
The lines are removed from the cache database.
Sybase Control Center for Sybase Unwired Platform
303
Deploy
DOE-C Packages
Sybase Hybrid App for SAP Business Suite and Sybase Mobile Sales for SAP CRM work
with Unwired Platform to make parts of SAP Workflow available on your mobile device using
SAP Data Orchestration Engine connector (DOE-C) packages.
DOE-C packages implement the messaging payload protocol, so package management that
relate to messaging packages also apply to DOE-C packages. The activities listed here only
apply to DOE-C.
See also
• MBO Packages on page 279
• Hybrid App Packages on page 307
• MBO Package Management on page 288
Deploying and Configuring DOE-C Packages
Unlike Hybrid App or MBO packages that use Sybase Control Center to deploy packages to
Unwired Server, you must deploy the DOE-C package to specific domain using the DOE-C
command line utility (CLU). Once deployed, the DOE-C package is visible and manageable
from Sybase Control Center.
1. Start the command line utility console. See Starting the Command Line Utility Console in
System Administration.
2. Deploy the DOE-C package. During deployment, you can set the domain and security
configuration using the setPackageSecurityConfiguration command with -d and -sc
options. After deployment, you can set the security configuration using the
setPackageSecurityConfiguration command, or perform this task later from Sybase
Control Center.
See SAP DOE Connector Command Line Utility in the System Administration guide.
Next
Verify or set the security configuration for the domain or package.
Viewing and Changing Package Connection Properties
View and edit connection properties for deployed MBO and DOE-C packages.
1. In the left navigation pane, expand the Packages folder, select the package whose
connection properties you want to view or change, and select the mobile business object.
2. In the right navigation pane, click the Connection tab.
3. If you wish to change any of the settings:
304
Sybase Unwired Platform
Deploy
a. In the left navigation pane, click the Connections icon.
b. Select the checkbox for the Connection Pool Name that matches the name of the
package whose connection properties you were just viewing.
c. Click Properties.
d. Make desired changes and click Save.
Note: For DOE-C connections, you must save the connection properties first, then test
connection. For other connection types, you can test connection without saving.
e. Click Test Connection.
If the connection test is not successful, see Connection Test Errors in the
Troubleshooting guide
Setting the Bulk Load Timeout Property
The Subscribe bulk load timeout property is a package level property targeted to BlackBerry
clients for initial server-side subscription operations.
Server-side subscription improves performance and is enabled on the client if the device has a
secure digital (SD) memory card enabled. The timeout allows you to set an initial subscription
push timeout period. If the timeout period is reached, Unwired Server sends the database file
to the device, whether the initial subscribe is complete or not. The timeout window signals that
the device has received sufficient import messages to send the server-built database to the
client.
Note: This option is only available for Sybase SAP Data Orchestration Engine Connector
(DOE-C) packages.
1. In the left navigation pane of Sybase Control Center, expand the Packages folder and select
the package to configure.
2. In the right administration pane, select the Settings tab.
3. Set the timeout value. The default value is 3600 seconds.
In addition to the timeout value, you can define the Subscribe Bulk Load Thread Pool
Size – the maximum number of threads allocated to initial server-side subscription
operations. The default value is 5. Setting the thread pool size too high can impact
performance. This is a server-side setting that can be set:
a) In the left navigation pane, select Configuration.
b) In the right administration pane, select the General tab.
c) From the menu bar, select Performance .
d) Restart Unwired Server if you change the Subscribe Bulk Load Thread Pool Size
value for it to take effect.
Sybase Control Center for Sybase Unwired Platform
305
Deploy
Checking and Resolving DOE-C User Failures
If the General tab of a DOE-C package displays an invalid user account error for the Error
State property, you must resolve the issue by reconfiguring the username and password in the
Connection Pool configured for the SAP package connection.
1. In the default domain, expand the Packages folder and click the DOE-C package name.
2. Check the Error State property in the General tab.
3. Validate the username and password configured, by clicking the Connection tab.
4. Correct the user credentials used by editing the corresponding connection pool properties:
a) In the navigation pane, click Connections.
b) In the administration pane, click the Connections tab.
c) Select the connection for the DOE-C package, then click Properties.
d) Set the username and password so that it matches the user account credentials.
Note: If you change the username or password property of a DOE-C connection, you
must reopen the same dialog and click Test Connection after saving. Otherwise
the error state of this DOE-C package cannot be cleaned up. If you do not click Test
Connection, the username or password is correct, but the error state of the DOE-C
package cannot be cleaned up.
Package Subscription Properties
Review information on SAP Data Orchestration Engine connector (DOE-C) package
subscriptions in order to manage the synchronization data that device users receive.
Package subscription properties include:
•
•
•
•
•
•
•
Application Connection ID – the unique identifier for a user application connection.
User – the name of the user associated with the application ID.
Last Server Response Time – the date and time that the last outbound response was sent
from Unwired Server to the client.
Client ID – the device application ID, which identifies the package database for the
application.
Application Name – the name of the device application used by the subscription.
Status – the current status of a device. The possible values are: Running, Suspended,
Pending Activation, Online, Offline, and Expired.
Packet Dropped – the current packet dropped state of a device. The values are true or
false.
Select Advanced to view these properties:
•
306
Subscription ID – the unique identifier of the subscription.
Sybase Unwired Platform
Deploy
•
Logical ID – the unique identifier of a registered device that is generated and maintained
by Unwired Server.
Hybrid App Packages
Hybrid App packages support occasionally connected users and solve the replication and
synchronization issues such users present with respect to data concurrency. Hybrid App
packages are similar to other package types in that an administrator must deploy the package
to Unwired Server so that it can be configured and made available to client devices.
See also
• MBO Packages on page 279
• DOE-C Packages on page 304
• Deploying a Hybrid App Package with the Deploy Wizard on page 307
• Configuring a Hybrid App Package on page 311
• Enabling and Configuring the Notification Mailbox on page 310
Deploying Hybrid App Packages
Use Sybase Control Center to deploy Hybrid App packages created by developers, and to
perform the configuration tasks required to make them available to application users on
messaging devices.
Prerequisites
If a Hybrid App is needed for a domain, then a developer must configure the context variable
for a known domain. The administrator then only needs to change the context variable if the
developer defined variable in the Hybrid App is not using the same domain as a named MBO
package.
Deploying a Hybrid App Package with the Deploy Wizard
Use the Deploy wizard to make Hybrid App packages available on Unwired Server.
If you are deploying to a target domain, replicate the value in the context variable. The domain
deployment target must match the context variable defined. If the developer has used an
incorrect context variable (for example, one used for testing environments), you can change
the value assigned to one that is appropriate for production deployments.
1. In the left navigation pane of Sybase Control Center, click Hybrid Apps.
2. From the General tab, click Deploy.
3. Click Browse to locate the Hybrid App package.
4. Select the file to upload and click Open.
5. Select the deployment mode:
Sybase Control Center for Sybase Unwired Platform
307
Deploy
•
New – deploys an Unwired Server package and its files for the first time.
If the uploaded file does not contain an Unwired Server, or an Unwired Server with the
same name and version is already deployed to Unwired Server, you see an error
message.
• Update – installs a new Unwired Server package with the original package name and
assigns a new, higher version number than the existing installed Unwired Server
package. Sybase recommends that you use this deployment mode for major new
changes to the Unwired Server package.
During the update operation, Unwired Server:
• Acquires a list of assigned application connections from the original package.
• Installs and assigns the package a new version number.
• Prompts the administrator to specify application connection assignments from the
acquired list of assigned application connections.
• Preserves existing notifications.
• Preserves the previous Unwired Server package version.
• Replace – replaces an existing Unwired Server package with a new package, but
maintains the same name and version. Sybase recommends that you use the replace
deployment mode for minor changes and updates to the Unwired Server package, or
during initial development.
During the replace operation, Unwired Server:
• Acquires a list of assigned application connections for each user of the original
package.
• Uninstalls the original package.
• Installs the new package with the same name and version.
• Assigns the original application connections list to the new package, thus
preserving any application connection assignments associated with the original
package.
The package is added to the list of deployed packages, which are sorted by Display Name.
Next
Configure the deployed package if you want it to have a different set of properties in a
production environment.
See also
• Configuring a Hybrid App Package on page 311
• Hybrid App Packages on page 307
Transporting Packages Between Environments with Export and Import
If you are trying to transfer deployment packages among disparate server environments, you
can export packages from one server environment before importing them into another one.
This sequence of events is typically performed by administrators when transporting packages
308
Sybase Unwired Platform
Deploy
from a development local server environment to a test network environment, or from a test or
pilot environment to production cluster environment.
Exporting Hybrid Apps
Export Hybrid Apps to create a deployment archive that can be used to transport Hybrid Apps
between Unwired Servers.
1. In the left navigation pane of Sybase Control Center, select Hybrid Apps.
2. In the right navigation pane, click the General tab.
3. Select the box adjacent to the Hybrid App and click Export.
4. Click Next.
5. Click Finish.
6. Select the file system target for the exported contents and click Save.
Note: Ensure that you do not hide the file type extension when you name the export
archive; otherwise, the *.zip extension becomes invisible, which adversely affects the
outcome of the export process.
A status message indicates the success or failure of the export transaction. If the
transaction succeeds, a ZIP file is created in the location you specified. You can then
import this file on another Unwired Server.
Next
Deliver the file to the appropriate person, or deploy or transport the exported Hybrid App to the
appropriate server.
See also
• Importing Hybrid Apps on page 309
• Import Requirements and Best Practices on page 310
Importing Hybrid Apps
Import Hybrid Apps after they have been exported from another Unwired Server.
1. In the left navigation pane of Sybase Control Center, click Hybrid Apps.
2. In the right administration pane, click the General tab.
3. Click Browse to navigate to the file.
4. Click Import.
5. After the import is complete, check the import details and click OK.
See also
• Exporting Hybrid Apps on page 309
• Import Requirements and Best Practices on page 310
Sybase Control Center for Sybase Unwired Platform
309
Deploy
Import Requirements and Best Practices
Import is typically used to move a package or application from a development environment to
a test environment, and after testing to a production environment.
MBO Package Imports
•
•
Domain requirements – all server connections and security configurations referenced by
the MBO package must exist in the target domain.
Versioning recommendations – if a developer has updated the package version number:
1. (Required) Verify that this new package version is added to the application.
2. (Recommended) Whenever possible, use the update instead of import. Otherwise,
delete the existing package first, to remove all runtime data for the package including
cached data, registered subscriptions, subscription templates, client log, MBO and
operation histories, and registered package users. Delete these items only after serious
consideration.
Application Imports
Make sure the target system has resources that match those referenced in the export archive
file:
•
•
Domains, security configurations, logical roles assigned to application connection
templates, proxy endpoint connections (used by ODP applications)
If MBO packages are included, the domains, security configurations and connections
referenced by the MBO package archives
Hybrid App Imports
If MBO packages are referenced in the export archive file, make sure that the MBO packages
have already been deployed to the target system.
Note: If the Hybrid App has matching rules, all matching rule search expressions are imported
as regular expression types. Other expresssion types such as Begins with or Equals are
imported as Regular expression.
See also
• Exporting Hybrid Apps on page 309
• Importing Hybrid Apps on page 309
Enabling and Configuring the Notification Mailbox
Configure the notification mailbox settings that allow Unwired Server to transform e-mail
messages into Hybrid App.
The notification mailbox configuration uses a listener to scan all incoming e-mail messages
delivered to the particular inbox specified during configuration. When the listener identifies
310
Sybase Unwired Platform
Deploy
an e-mail message that matches the rules specified by the administrator, it sends the message
as a Hybrid App to the device that matches the rule.
Note: Saving changes to the notification mailbox configuration deletes all e-mail messages
from the account. Before proceeding with configuration changes, consult your e-mail
administrator if you want to back up the existing messages in the configured account.
1. In the left navigation pane, click Hybrid Apps.
2. In the right administration pane, click Notification Mailbox.
3. Select Enable.
4. Configure these properties:
•
•
•
•
•
•
Protocol – choose between POP3 or IMAP, depending on the e-mail server used.
Use SSL – encrypt the connection between Unwired Server and the e-mail server in
your environment.
Server and Port – configure these connection properties so Unwired Server can
connect to the e-mail server in your environment. The defaults are localhost and port
110 (unencrypted) or 995 (encrypted).
User name and Password – configure these login properties so Unwired Server can
log in with a valid e-mail user identity.
Truncation limit – specify the maximum number of characters taken from the body
text of the original e-mail message, and downloaded to the client during
synchronization. If the body exceeds this number of characters, the listener truncates
the body text to the number of specified characters before distributing it. The default is
5000 characters.
Poll seconds – the number of seconds the listener sleeps between polls. During each
poll, the listener checks the master inbox for new e-mail messages to process. The
default is 60 seconds.
5. If you have added at least one distribution rule, you can click Test to test your
configuration. If the test is successful, click Save.
See also
• Hybrid App Packages on page 307
Configuring a Hybrid App Package
Configure Hybrid App properties for you production environment.
Prerequisites
You must deploy a package before you can configure properties for it.
1. Configuring General Hybrid App Properties
Sybase Control Center for Sybase Unwired Platform
311
Deploy
Configure general properties for a Hybrid App, including display name and icon. Alter
these settings to change development environment values to production environment
equivalents.
2. Configuring Matching Rules
Define the parameters and matching rules that determine whether an e-mail message is a
regular e-mail, or a Hybrid App e-mail at runtime.
3. Configuring Context Variables for Hybrid App Packages
The administrator can change some of the values of a selected variable, should the designtime value need to change for a production environment.
4. Assigning and Unassigning a Hybrid App to an Application Connection
Assign a Hybrid App package to an application connection to make it available to a device
user. Unassign the Hybrid App package when it is no longer required.
See also
• Deploying a Hybrid App Package with the Deploy Wizard on page 307
• Hybrid App Packages on page 307
Configuring General Hybrid App Properties
Configure general properties for a Hybrid App, including display name and icon. Alter these
settings to change development environment values to production environment equivalents.
1. In the left navigation pane, click Hybrid Apps and select the Hybrid App for which to
configure the properties.
2. In the right administration tab, click General.
Only an administrator can change the general properties. All others are configured by the
Hybrid App developer and cannot be modified.
•
•
Display name – sets the name that appears for the Hybrid App package.
Display icon – select from the list of built-in icons. Any custom icons contained in the
Hybrid App package can be viewed but not selected.
Note: The Hybrid App package may contain custom icons to accommodate the
different image resolutions required by different devices. The use of custom icons is
determined by individual devices. The built-in icon is only used if the device cannot
display any of the custom icons; for example, if the device does not support the icon
image type.
3. Click Lock/Unlock to lock or unlock a Hybrid App.
You cannot modify or deploy a locked Hybrid App.
4. Click Save.
312
Sybase Unwired Platform
Deploy
Configuring Matching Rules
Define the parameters and matching rules that determine whether an e-mail message is a
regular e-mail, or a Hybrid App e-mail at runtime.
Prerequisites
The developer must have created an object query and added an E-mail Subscription starting
point when the Hybrid App was designed.
Task
When a multiplexer, which a user configures for a Notification mailbox, retrieves e-mails
from the e-mail server, the "Matching rules" are used to determine if an e-mail is a regular email or a Hybrid App e-mail. If the "matching rules" match, then the e-mail is processed as a
Hybrid App e-mail. The e-mail is processed for "Extraction rules" (this processing is not
visible in SCC) to extract values from the e-mail. This determines further processing, such as
calling MBO object queries, and so forth. Then, a Hybrid App message is constructed with the
necessary data of the object query result, and sent to device(s) according to the "Distribution
rules" (which determine the devices to which the message should be sent).
You can configure a matching rule at one of two levels:
•
•
At the inbox level to route e-mails for all Hybrid Apps
At the package level to route e-mails only for a specific Hybrid App
1. In the left navigation pane, click Hybrid AppsHybrid AppName.
2. In the right administration pane, click the Matching Rules tab.
3. Configure matching rules by either:
•
•
Clicking Add to create a new rule, or,
Selecting an existing rule name and clicking Properties.
4. In the Matching Rules dialog:
a) Select the field in the e-mail from which the parameter value is extracted. For example,
if you choose From, the parameter value is extracted from the line of the e-mail
message that indicates the name of the sender of the message.
You can also select one of the custom parameter values. When registering Hybrid App
devices, an administrator can choose one of four device settings. The customer then
populates the settings with whatever values they like. Custom parameters can also be
set programmatically through Web services.
Note: If you are editing properties of a rule created by a developer, you cannot modify
the matching rules.
b) Choose the type of search expression:
•
Equals – the field must exactly match the text in the label.
Sybase Control Center for Sybase Unwired Platform
313
Deploy
•
•
•
•
Begins with – the field must begin with the text in the label.
Ends with – the field must end with the text in the label.
Contains – the text in the label must exist somewhere in the field.
Regular expression – search for text that matches the pattern defined by the regular
expression. You can create an expression with Boolean operators, groups, or
wildcards like "?" or "*". Unwired Platform uses the Boost regular expression
engine. See the Boost documentation on regular expression syntax at http://
www.boost.org/doc/libs/1_40_0/libs/regex/doc/html/boost_regex/syntax.html.
c) Configure the text to search against, or define a regular expression in the Value field.
Next
Test all new and changed rules to ensure they work as designed.
See also
• Configuring Context Variables for Hybrid App Packages on page 314
Testing Configured Matching Rules
Test a new or modified matching rule to ensure it is configured correctly.
1. In the Matching Rules tab for a selected Hybrid App package, click Test.
2. Populate the fields to create a sample e-mail message against which the rule configuration
is tested. Review the results:
•
•
•
If a pattern for a corresponding field in the rule matches, the word Pass appears
adjacent to the field.
If a pattern for a corresponding field in the rule does not match, the word Fail appears
adjacent to the field.
Otherwise, No Rule appears, indicating that no rule was created for this
corresponding e-mail field.
Configuring Context Variables for Hybrid App Packages
The administrator can change some of the values of a selected variable, should the design-time
value need to change for a production environment.
Which values are configurable depends on whether the developer hard-coded a set of user
credentials or used a certificate.
1. In the left navigation pane, click Hybrid Apps<Hybrid App_Package>:<Hybrid
App_Version>.
2. In the right administration pane, click the Context Variables tab.
3. Select the context variable to configure, then click Modify.
314
Sybase Unwired Platform
Deploy
Context Variable
Description
SupUser
The valid Hybrid App application user ID that
Unwired Server uses to authenticate the user.
Depending on the security configuration, Unwired Server may pass that authentication to
an EIS.
SupUnrecoverableErrorRetryTimeout
After sending a JSON request to Unwired
Server, if you receive an EIS code that indicates an unrecoverable error in the response
log, the Hybrid App client throws an exception. A retry attempt is made after a retry time
interval, which is set to three days by default.
Select this property to change the retry time
interval.
SupThrowCredentialRequeston401Error
The default is true, which means that an error
code 401 throws a CredentialRequestException, which sends a credential request notification to the user's inbox.
If this property is set to false, error code 401 is
treated as a normal recoverable exception.
SupRecoverableErrorRetryTimeout
After sending a JSON request to Unwired
Server, if you receive an EIS code that indicates a recoverable error in the response log,
the Hybrid App client throws an exception. A
retry attempt is made after a retry time interval, which is set to 15 minutes by default.
Select this property to change the retry time
interval.
SupPassword
The valid Hybrid App application user password that Unwired Server uses to authenticate
the user. Depending on the security configuration, Unwired Server may pass that authentication to an EIS. An administrator must
change development/test values to those required for a production environment.
SupPackages
The name and version of the MBO packages
that are used in the Hybrid App. This cannot
be changed.
Sybase Control Center for Sybase Unwired Platform
315
Deploy
Context Variable
Description
SupMaximumMessageLength
Use this property to increase the allowed
maximum Hybrid App message size. Limitations vary depending on device platform:
• For BlackBerry 5, the limit is 512KB.
• For Windows Mobile the limit is 500KB.
• For BlackBerry 6 and Android, the limit
depends on the memory condition of the
device. Large message may result in an
out of memory error.
4. In the Context Variable dialog, change the value of the named variable and click OK.
See also
• Configuring Matching Rules on page 313
• Assigning and Unassigning a Hybrid App to an Application Connection on page 317
Changing Hard Coded User Credentials
The administrator can change hard coded user credentials assigned at design time if the design
time value needs to change for a production environment.
1. In the left navigation pane, click Hybrid Apps<Hybrid App_Package>:<Hybrid
App_Version>.
2. In the right administration pane, click the Context Variables tab.
3. Select one or both of the variables: SupUser or SupPassword, and click Modify.
4. Type the new value and click OK.
Adding a Certificate File to the Hybrid App Package
The administrator can change the credential certificate assigned at design time.
Note: Sybase recommends that you use Internet Explorer to perform this procedure.
1. In the left navigation pane, click Hybrid Apps<Hybrid App_Package>:<Hybrid
App_Version>.
2. In the right administration pane, click the Context Variables tab.
3. Select SupPassword and click Modify.
4. Select Use certificate-base credentials and click Browse to find and upload a certificate
file.
5. Set the value for Certificate password and click OK.
On the Context Variables page, the read-only values of SupUser, SupCertificateSubject,
SupCertificateNotBefore, SupCertificateNotAfter, and SupCertificateIssuer change to
reflect values of the new certificate and password you set.
316
Sybase Unwired Platform
Deploy
Configuring Client Variables for Hybrid Apps
Client variables are defined for Hybrid Apps by Hybrid App developers. Administrators can
modify client variable values or add new client variables for the production environment.
1. In the left navigation pane, click Hybrid Apps and select the Hybrid App to configure the
properties for.
2. In the right administration tab, click Client Variables.
3. Select the client variable that you want to configure and click Modify.
4. Enter the production value for the client variable.
If you want to push the modified value to deployed clients, click Send notification to
deployed client.
Click OK.
To add a new client variable, click New and enter the name and value. If you want to push
the new property to deployed clients, click Send notification to deployed client and click
OK.
To delete a client variable, select it and click Delete. If you want to push the deletion to
deployed clients, click Send notification to deployed client and click Yes .
Assigning and Unassigning a Hybrid App to Application Connection
Templates
When you assign a Hybrid Apppackage to an application connection template, all application
connections that use that template are automatically assigned the Hybrid App package.
1. In the left navigation pane, expand Hybrid Apps and select a Hybrid App.
2. Click the Application Connection Templates. tab.
All application connection templates that the Hybrid App package is assigned to are listed.
3. Click Assign.
All available application connection templates are listed.
4. Select one or more application connection templates and click OK.
Note: The selected templates must have an application ID.
5. To unassign a Hybrid App from an application connection template, select the template in
the Application Connection Templates tab and click Unassign.
Assigning and Unassigning a Hybrid App to an Application Connection
Assign a Hybrid App package to an application connection to make it available to a device
user. Unassign the Hybrid App package when it is no longer required.
You can also assign Hybrid App packages indirectly through the application connection
template. The set of packages assigned to an application connection will be a combination of
packages assigned indirectly through the application connection template and directly
through the application connection.
Sybase Control Center for Sybase Unwired Platform
317
Deploy
1. In the left navigation pane of Sybase Control Center, click Hybrid Apps and select the
Hybrid App to assign.
2. In the right administration pane, click the Application Connections tab.
3. Select the application connection to assign a Hybrid App package to.
4. Click Assign.
5. List the activation users to assign the Hybrid App package to.
By default, there are no users listed. Search for users by selecting the user property you
want to search on, then selecting the string to match against. Click Go to display the users.
6. Select the user or users from the list that you want to assign the Hybrid App package to.
7. Click OK.
8. To set the Hybrid App package as the default application for an application connection,
select the connection and click default.
Set a Hybrid App package as the default to run that application on the device as a singlepurpose application. Single-purpose applications launch automatically when the user
opens the Hybrid Web Container. This will be the only Hybrid App available on the device.
You can select only one default per application connection.
9. To unassign a Hybrid App package, select the application connection and click
Unassign.
Note: If you unassign the Hybrid App package that is set as the default, you may want to
select a new default package.
10. Click OK.
See also
• Configuring Context Variables for Hybrid App Packages on page 314
Setting and Unsetting a Default Hybrid App
Set a Hybrid App package as the default application for an application connection to run it on
the device as a single-purpose application. A single-purpose application launches
automatically when the user opens the Hybrid Web Container and is the only Hybrid App
available on the device.
1. In the left navigation pane of Sybase Control Center, click Applications.
2. In the right administration pane, click the Application Connections tab.
3. Select the application connection to set the default for.
4. Click Hybrid Apps.
5. Select the Hybrid App package to set as the default and click Set default.
You can select only one default per application connection.
318
Sybase Unwired Platform
Deploy
To remove a Hybrid App package as the default, select the package and click Unset
default.
6. Click OK.
Checking Hybrid App Users and Queues
Check Hybrid App application users and review pending activities for a Hybrid App
application.
1. In the left navigation pane, expand the Hybrid Apps folder and select the Hybrid App you
want to administer.
2. To check Hybrid App users:
a) In the right administration pane, select the Application Connections tab.
b) Review data about Hybrid App device users:
• User – the name of the user that activates the device. The user under the domain logs
should be in the format "username@securityConfiguration"..
• Application Connection ID – the unique identifier for a user application
connection.
• Errors – the total number of errors on the device.
• Transform Items – the total number of items in the transform queue. The transform
queue contains items that Unwired Server has transformed from e-mail messages
into Hybrid App messages to be sent to clients.
• Response Items – the total number of items in the response queue. The response
queue contains Hybrid App messages that are sent from the device to Unwired
Server.
• Transform Queue Status – the current status of the transform queue: active,
awaiting credentials, or awaiting retry.
• Response Queue Status – the current status of the response queue: active, awaiting
credentials, or awaiting retry.
3. To view pending activities for a Hybrid App:
a) Select the Queue Items tab.
b) Review data about pending Hybrid App activities:
• User – the name of the user that activates the device. The user under the domain logs
should be in the format "username@securityConfiguration"..
• Queue Type – the type of Hybrid App queue: response or transform.
• Application Connection ID – the unique identifier for a user application
connection.
• Logical ID – the unique identifier for a registered mobile device that is generated
and maintained by Unwired Server.
• Queue ID – the unique identifier of the queued item.
Sybase Control Center for Sybase Unwired Platform
319
Deploy
•
•
•
State – the status of the Hybrid App queue: active, awaiting credentials, or awaiting
retry.
Creation Date – the date the queue item was created.
Retry Date – the date that the processing of the queue item is scheduled to be retried
(if applicable).
4. To manage the Hybrid App queue in the event of non-recoverable errors:
a) Select the Queue Items tab.
b) Identify a Hybrid App queue item that requires you to unblock it or delete it.
Errors affecting Hybrid App queue items are either recoverable (where a retry is
applicable) or unrecoverable/unknown (where no automatic retry occurs, or there is
very long retry interval).
To recover from a long retry interval, an administrator can unblock a queue currently in
retry state, so the next work schedule can pick up the blocked item immediately, instead
of waiting for the retry timeout.
c) Select one of more of the queue items from the same queue type (the queue type for all
the selected items must be either Transform or Retry).
d) Select one of the following actions:
• Delete – deletes the selected Hybrid App queue item(s).
• Unblock – unblocks the selected Hybrid App queue item(s) that are currently in a
retry state.
e) Click OK to confirm the action.
320
Sybase Unwired Platform
Monitor
Monitor
Monitor availability status, view system and performance statistics, and review system data
that allow administrators to diagnose the health and security of the runtime.
Monitored operations include security, replication-based synchronization, messaging-based
synchronization, messaging queue, data change notification, device notification, package,
user, and cache activity. These aspects of monitoring are important to ensuring that the
required data is collected.
The critical aspects of monitoring include:
1. Setting up a monitoring configuration. A monitoring configuration sets the server
behavior for writing data to database, automatic purge, and data source where the
monitoring data is stored.
A default configuration is created for you, however you will likely want to customize this
configuration for your environment. By default, monitoring data is flushed every 5
minutes. In development and debugging scenarios, you may need to set the flush behavior
to be immediate. Set the Number of rows and Batch size properties to a low number. You
can also disable flush, which results in immediately persisting changes to monitoring
database. If you are setting up immediate persistence in a production environment, you
may experience degraded performance. Use persistence with caution.
2. Creating a monitoring profile. A monitoring profile defines one or more domains and
packages that need to be monitored.
You can either use the default profile to capture monitoring data for all packages in all
domains or create specific profiles as required. Otherwise, disable the default profile or
modify it as needed.
3. Reviewing the captured data. An administrator can review monitoring data (current,
historical, and performance statistics) from Sybase Control Center.
Use the monitoring tabs to filter the data by domain, package, and time range. You can also
export the data into a CSV or XML file and then use any available reporting or spreadsheet
tool to analyze the data.
Monitoring Usage
Monitoring information reflects current and historical activity, and general performance
during a specified time period.
Monitoring allows administrators to identify key areas of weakness or periods of high activity
in the particular area they are monitoring. Access to this data helps administrators make
decisions about how to better configure the application environment to achieve a higher level
of performance.
Sybase Control Center for Sybase Unwired Platform
321
Monitor
The historical data is preserved in the monitor database. Performance data (KPIs for
Replication, Messaging, Package Statistics, User Statistics, and Cache Statistics) for the
specified time period is calculated upon request using the historical data available for that
period. If monitoring data is purged for that time period, the performance data calculations
will not factor in that data. It is recommended to purge monitoring data after putting in place
mechanisms to export the required historical and/or performance data as needed. By default,
monitoring data is automatically purged after seven days.
Also note that the processing times are calculated based on the time the request (or message)
arrives on the server, and the time it took to process the request (or message) on the server. The
client-side time (request origin time, and time taken to deliver to the server) are not factored
into that data.
See also
• System Monitoring Overview on page 322
• Monitoring Configuration on page 324
• Monitoring Profiles on page 326
• Monitoring Data on page 328
System Monitoring Overview
(Not applicable to Online Data Proxy) The goal of monitoring is to provide a record of
activities and performance statistics for various elements of the application. Monitoring is an
ongoing administration task.
Use monitoring information to identify errors in the system and resolve them appropriately.
This data can also be shared by platform and domain administrators by exporting and saving
the data to a .CSV or .XML file.
The platform administrator uses Sybase Control Center to monitor various aspects of Unwired
Platform. Monitoring information includes current activity, historical activity, and general
performance during a specified time period. You can monitor these components:
•
•
•
•
•
•
•
•
•
Security log
Replication synchronization
Messaging synchronization
System messaging queue status
Data change notifications
Device notifications (replication)
Package statistics (replication and messaging)
User-related activity
Cache activity
To enable monitoring, platform administrators must set up a monitoring database, configure a
monitoring data source or create a new one, and set up monitoring database flush and purge
322
Sybase Unwired Platform
Monitor
options. By default the installer created a monitoring database, however you can use another
one if you choose.
To control monitoring, platform administrators create monitoring profiles and configurations,
which define the targets (domains and packages) to monitor for a configured length of time. A
default monitoring profile is created for you by the installer. Monitoring data can be deleted by
the platform administrator as needed.
Table 20. System monitoring tasks
Task
Frequency
Create and enable monitor- One-time initial configuration with
ing profiles
infrequent tuning as required
Accomplished by
Sybase Control Center for Unwired Platform with the Monitoring node
Enable domain logging
One-time setup with infrequent con- Sybase Control Center for Unfiguration changes, usually as issues wired Platform with the Doarise
mains > <DomainName> >
Log node.
Review current/historical/
performance metrics
Routine
Sybase Control Center for Unwired Platform with the Monitoring node
Identify performance issues
Active
Sybase Control Center for Unwired Platform with the Monitoring node
Monitor application and
user activity to check for
irregularities
Active
Sybase Control Center for Unwired Platform with the Monitoring node
Troubleshoot irregularities Infrequent
Reviewing various platform
logs
Purge or export data
Sybase Control Center for Unwired Platform with the Monitoring node
On demand
See also
• Monitoring Usage on page 321
• Monitoring Configuration on page 324
• Monitoring Profiles on page 326
• Monitoring Data on page 328
Sybase Control Center for Sybase Unwired Platform
323
Monitor
Monitoring Configuration
The monitoring configuration identifies the monitoring database endpoint and determines
how long data is stored in the database.
The configurable monitoring properties are:
•
•
•
•
Auto-purge – configures an automatic purge of the monitoring database to occur on a
regular basis.
Flush threshold – determines how often monitoring data is flushed from the server
memory for storage in the monitoring database.
Flush batch size – divides flushed data into smaller segments, rather than saving all data
together according to the flush threshold parameters.
Monitor database endpoint – sets the database to be used for storage of monitoring data.
See also
• Monitoring Usage on page 321
• System Monitoring Overview on page 322
• Monitoring Profiles on page 326
• Monitoring Data on page 328
Configuring Monitoring Performance Properties
Configure auto-purge, flush threshold, and flush batch size settings to determine how long
monitoring data is retained, and set a monitoring database to configure where data is stored.
Prerequisites
Depending on the expected level of monitoring activity, ensure that the monitoring database is
adequately prepared to store monitoring data.
Task
1. In the left navigation pane of Sybase Control Center, select Monitoring.
2. In the right administration pane, select the General tab.
3. Click Configuration.
4. Configure auto purge settings.
Auto purge clears obsolete data from the monitoring database once it reaches the specified
threshold.
a) Select Enable auto purge configuration to activate auto purge functionality.
b) Enter the length of time (in days) to retain monitoring data before it is purged.
324
Sybase Unwired Platform
Monitor
5. Configure flush threshold settings.
The flush threshold indicates how often data is flushed from memory to the database. This
allows you to specify the size of the data saved in memory before it is cleared. Alternately,
if you do not enable a flush threshold, data is automatically written to the monitoring
database as it is captured.
a) Select Enable flush threshold configuration to activate flush threshold functionality.
b) Select one of:
• Number of rows – monitoring data that surpasses the specified number of rows is
flushed from memory. Enter the desired number of rows adjacent to Rows. The
default is 100.
• Time interval – monitoring data older than the specified time interval is flushed
from memory. Enter the desired duration adjacent to Minutes. The default is 5.
• Either rows or time interval – monitoring data is flushed from memory according
to whichever value is reached first: either the specified number of rows or the
specified time interval. Enter the desired rows and duration adjacent to Rows and
Minutes, respectively.
6. If you enabled a flush threshold, enter a Flush batch row size by specifying the size of
each batch of data sent to the monitoring database. The row size must be a positive integer.
The batch size divides flushed data into smaller segments, rather than saving all data
together according to the flush threshold parameters. For example, if you set the flush
threshold to 100 rows and the flush batch row size to 50, once 100 rows are collected in the
monitoring console, the save process executes twice; data is flushed into the database in
two batches of 50 rows. If the flush threshold is not enabled, the flush batch row size is
implicitly 1.
Note: By default, the monitoring database flushes data every 5 minutes. Alternatively, you
can flush data immediately by removing or decreasing the default values, but doing so
impacts performance and prevents you from using captured data.
7. Optional. To change the data source, select an available database from the Monitor
database endpoint drop down list.
Available databases are those with a JDBC server connection type created in the "default"
domain. To create a new monitor database, a platform administrator must set up a database
by running the appropriate configuration scripts and creating a server connection for the
database in the default domain. The database server connection then appears as an option
in the Monitor Database Endpoint drop down list.
8. Click OK.
Sybase Control Center for Sybase Unwired Platform
325
Monitor
Monitoring Profiles
Monitoring profiles specify a monitoring schedule for a particular group of packages. These
profiles let administrators collect granular data on which to base domain maintenance and
configuration decisions.
A default monitoring profile is automatically created in disabled state on Unwired Server.
Administrators can enable or remove the default profile, and enable one or more new
monitoring profiles as required.
The same monitoring schedule can be applied to packages across different domains; similarly,
you can select individual packages for a monitoring profile.
See also
• Monitoring Usage on page 321
• System Monitoring Overview on page 322
• Monitoring Configuration on page 324
• Monitoring Data on page 328
Creating and Enabling a Monitoring Profile
Specify a monitoring schedule for a group of packages.
Prerequisites
Depending on the expected level of monitoring activity, ensure that the monitoring database is
adequately prepared to store monitoring data.
Task
1. In the left navigation pane, select Monitoring.
2. In the right administration pane, select the General tab.
3. Click New to create a monitoring profile.
4. Enter a name for the new profile.
5. Select the Domains and Packages tab and choose packages to be monitored according to
these options:
•
•
•
326
Monitor all domains and packages – select All Domains and Packages.
Monitor all packages from one or more domains – select a domain, then click Select
All Packages. Perform this step for each domain you want to monitor.
Monitor specific packages from one or more domains – select a domain, then select the
particular packages you want to monitor from that domain. Perform this step for each
domain you want to monitor.
Sybase Unwired Platform
Monitor
6. Select View my selections to view the packages you selected for the monitoring profile.
Unselect this option to return to the package selection table.
7. Select Enable after creation to enable monitoring for the selected packages immediately
after you create the profile. By default, this option is selected. Unselect this option to
enable the monitoring profile later.
8. On the Schedule tab, select a schedule to specify when monitoring takes place:
•
•
•
Always On – this schedule requires no settings. Package activity is continually
monitored.
Run Once – specify a length of time during which monitoring occurs, in either minutes
or hours. Package activity is monitored for the duration specified for one time only.
Custom – specify start and end dates, start and end times, and days of the week.
Package activity is monitored according to the time frame specified. See Setting a
Custom Monitoring Schedule.
9. Click OK.
A status message appears in the administration pane indicating the success or failure of
profile creation. If successful, the profile appears in the monitoring profiles table.
10. To enable a profile that you did not enable during creation, select the monitoring profile
and click Enable.
Setting a Custom Monitoring Schedule
Customize the monitoring schedule for packages within a monitoring profile. Setting a
custom schedule is the most flexible option; monitoring information is provided according to
the time frame you specify.
Prerequisites
Begin creating a monitoring profile in the New Monitor Profile dialog.
Task
1. In the New Monitor Profile dialog, select the Schedule tab.
2. Select Custom as the monitoring schedule criteria.
3. To set a range to control which days the custom schedule runs, configure a start date and
time, end date and time, or day of week (if applicable).
•
•
•
Select Start Date to set a date for when monitoring of package activity begins. To be
more specific, you can also enter a Start Time. In this case, monitoring cannot begin
until a given time on a given day has been reached.
Select End Date to set a date that ends the monitoring of package activity. To be more
specific, you can also enter an End Time.
Select the days of the week that package monitoring runs. This means that for the days
you select, the schedule runs every week on the day or days you specify.
Sybase Control Center for Sybase Unwired Platform
327
Monitor
If you do not indicate a time frame, Unwired Server uses the default custom schedule,
which is equivalent to Always On monitoring.
4. Click OK.
Monitoring Data
Monitoring data is aggregated in the Monitoring node of Unwired Server and organized by
activity, including security, replication-based synchronization, messaging-based
synchronization, messaging queue, data change notifications, device notifications, packages,
users, and cache. The data for each activity is further broken down into current, historical, and
performance-related information. View data for each monitored activity to track the
performance and health of the system.
You can selectively view data accrued during a specific time period to see a snapshot of system
performance during specific periods. The export function allows you to save data to a file
outside of Sybase Control Center for reference or logging purposes.
See also
• Monitoring Usage on page 321
• System Monitoring Overview on page 322
• Monitoring Configuration on page 324
• Monitoring Profiles on page 326
Reviewing System Monitoring Data
Review data for monitored activities. The monitoring data is retrieved according to the
specified time range. Key Performance Indicators (KPIs) are also calculated for the specified
time range.
1. In the left navigation pane, select Monitoring.
2. In the right administration pane, select one of the following tabs according to the type of
monitoring data you want to view:
•
•
•
•
•
•
•
•
•
328
Security Log
Replication
Messaging
Queue
Data Change Notifications
Device Notifications
Package Statistics
User Statistics
Cache Statistics
Sybase Unwired Platform
Monitor
See also
• Purging Monitoring Data on page 329
• Exporting Monitoring Data on page 329
• Searching Monitoring Data on page 330
• Monitoring Data Categories on page 331
Purging Monitoring Data
Clear old data from the monitoring database.
Using the Purge function in Sybase Control Center allows you to perform an ad hoc purge of
monitoring data.
1. In the left navigation pane, select Monitoring.
2. In the right administration pane, select the General tab.
3. Click Purge.
4. Indicate the time period for which you want to delete data by specifying a Start Date,
Start Time, End Date, and End Time.
All monitoring data collected from the start time and date to the end time and date is
deleted from the database. If you do not specify a start date, all data acquired prior to the
end date and time is purged. Similarly, if you do not specify an end date, all data collected
from the start date until the present time is purged. To save the data to file before purging it,
see Exporting Monitoring Data.
5. Click OK.
A status message appears in the right administration pane indicating that the data purge was
successfully completed.
See also
• Reviewing System Monitoring Data on page 328
• Exporting Monitoring Data on page 329
• Searching Monitoring Data on page 330
• Monitoring Data Categories on page 331
Exporting Monitoring Data
Save a segment of monitoring data to a location outside of the monitoring database. Export
data to back up information, particularly before purging it from the database, or to perform
closer analysis of the data in a spreadsheet application.
This option is especially useful when you need to share monitoring data with other
administrators and tenants. Since this task can be time-consuming, depending upon the size of
the data being exported, Sybase recommends that you export the data in segments or perform
the export at a time when Sybase Control Center is not in use.
Sybase Control Center for Sybase Unwired Platform
329
Monitor
Note: The time taken to export the requested data is dependent on the time range specified, and
the amount of data in the monitoring database. If the export is taking too long, or the user
interface is blocked for too long, another option is to export the monitoring data using the
management APIs provided for exporting monitoring data. Please see Developer Guide:
Unwired Server Runtime > Unwired Server Management API for further details.
1. In the left navigation pane, select Monitoring.
2. In the right administration pane, select the tab corresponding to the monitoring data you
want to view.
3. Perform a search using the appropriate criteria to obtain the desired monitoring data.
4. Click Export.
5. Select a file type for the exported data (CSV or XML), and click Next.
6. Click Finish.
7. In the file browser dialog, select a save location and enter a unique file name.
8. Click OK.
All monitoring data retrieved by the search is saved to the file you specify in step 7.
See also
• Reviewing System Monitoring Data on page 328
• Purging Monitoring Data on page 329
• Searching Monitoring Data on page 330
• Monitoring Data Categories on page 331
Searching Monitoring Data
Filter monitoring data according to a specified date and time range.
Filter options vary depending upon the type of monitoring data you search.
1. In the left navigation pane, select Monitoring.
2. In the right administration pane, select the tab corresponding to the monitoring data you
want to view.
3. In the Search pane, indicate the time period for which you want to view data by specifying
a date range to search within (that is, Start Date, Start Time, End Date, and End Time) .
Note: You do not need to specify a time period if you are performing a search on Current
date.
4. Filter the system components to include in the search.
a) Select Show filter.
b) Specify the components to include in your search.
If a domain or package does not appear in the search list (for example, if it has been
deleted), enter the name and click Add.
330
Sybase Unwired Platform
Monitor
5. From the Sort By drop-down list, select a category by which to sort search results.
Note: This field is disabled for some categories.
6. To view the domains and packages you included in the search, select View my
selections.
7. Click Retrieve.
Monitoring data for the time period specified appears in the administration console.
See also
• Reviewing System Monitoring Data on page 328
• Purging Monitoring Data on page 329
• Exporting Monitoring Data on page 329
• Monitoring Data Categories on page 331
Viewing Package-Level Cache Statistics
Use the package tree to view cache statistics at the package, cache group, or mobile business
object (MBO) level.
The package tree allows for a granular view of data in all cache statistic categories except for
domain-level data. Domain-level data instead uses the Filter by Domain search functionality.
1. In the left navigation pane, select Monitoring.
2. In the right administration pane, select Cache Statistics.
3. From the cache feature drop-down list, select one of the following, depending on the type
of data and level of granularity you require:
•
•
•
•
Domain level
Package level
Package level cache group
Package level MBO
4. Select Show Package Tree.
The tree view appears on the left side of the right administration pane.
5. In the tree view, click the package, cache group, or MBO for which you want to view
monitoring data.
The monitoring data displays in the monitoring console. You can further filter data by
specifying a time period in the search panel (for package-level cache performance and
package-level MBO status only).
Monitoring Data Categories
Monitoring data is organized according to object type, allowing administrators to perform
focused data analysis on specific activities and Unwired Platform components. Current,
Sybase Control Center for Sybase Unwired Platform
331
Monitor
historical, and performance-based statistics facilitate user support, troubleshooting, and
performance tracking for individual application environments.
The replication and messaging categories are the primary sources of data relating to
application environment performance. The remaining tabs present detailed monitoring data
that focuses on various aspects of replication-based applications, messaging-based
applications, or both.
See also
• Reviewing System Monitoring Data on page 328
• Purging Monitoring Data on page 329
• Exporting Monitoring Data on page 329
• Searching Monitoring Data on page 330
Security Log Statistics
The security log reflects the authentication history of users either across the cluster, or filtered
according to domain, during a specified time period. These statistics allow you to diagnose
and troubleshoot connection or authentication problems on a per-user basis. Security log
monitoring is always enabled.
User security data falls into these categories:
Category
Description
User
The user name
Security Configuration
The security configuration to which the device user belongs
Time
The time at which the authentication request took place
Result
The outcome of the authentication request: success or failure
Application Connection ID
The application connection ID associated with the user
Package
The package the user was attempting to access
Domain
The domain the user was attempting to access
See also
• Replication Statistics on page 333
• Messaging Statistics on page 337
• Messaging Queue Statistics on page 341
• Data Change Notification Statistics on page 342
• Device Notification Statistics on page 344
• Package Statistics on page 346
• User Statistics on page 348
332
Sybase Unwired Platform
Monitor
Cache Statistics on page 350
•
Replication Statistics
Replication statistics reflect replication synchronization activity for monitored packages.
Current statistics monitor the progress of real-time synchronizations, while historical
statistics present data from completed synchronizations on a per-package basis. Performance
monitoring uses key performance indicators to produce data about synchronization efficiency.
Through statistics that report on the duration and scope of synchronizations, as well as any
errors experienced during synchronization, replication monitoring allows you to identify the
rate at which synchronizations happen during specified time periods, which users synchronize
data, and which mobile business objects are affected.
See also
• Security Log Statistics on page 332
• Messaging Statistics on page 337
• Messaging Queue Statistics on page 341
• Data Change Notification Statistics on page 342
• Device Notification Statistics on page 344
• Package Statistics on page 346
• User Statistics on page 348
• Cache Statistics on page 350
Current Replication Statistics
Current statistics for replication synchronization provide real-time information about inprogress synchronizations.
Unwired Server monitors replication requests using these statistical categories:
Category
Description
Application ID
The ID associated with the application.
Package
The package name.
Phase
The current synchronization activity: upload or download. During
the upload phase, a client initiates operation replays to execute
mobile business object (MBO) operations on the back-end system.
During the download phase, a client synchronizes with Unwired
Server to receive the latest changes to an MBO from the back-end
system.
Entity
During the download phase, the name of the MBO with which the
client is synchronizing. During the upload phase, the name of the
operation that the client is performing.
Sybase Control Center for Sybase Unwired Platform
333
Monitor
Category
Description
Synchronization Start Time
The date and time that the synchronization request was initiated.
Domain
The domain to which the package involved in synchronization
belongs.
Application Connection ID
The ID number of the connection participating in the synchronization.
User
The name of the user associated with the device ID.
Replication History Statistics
Historical data for replication-based synchronization consists of past synchronization details
for monitored packages.
The summary view provides general information, whereas the detail view presents a more
specific view of all request events during each synchronization; each row of data corresponds
to a synchronization request from the client in the time frame you define:
•
•
Click either Details to see more granular information on each synchronization request, or
select the Detail option to see all synchronization request details. Detail view allows you to
look at the individual messages that make up the summary view.
Select Summary to see aggregated details by domain, package, and user about past
synchronization events for the defined time frame.
Table 21. Detail view information
334
Synchronization element
Description
Application ID
The ID number associated with an application.
Package
The package name.
Application Connection ID
The ID number of the connection used in a synchronization request.
User
The user associated with the device ID.
Phase
The sync activity that occurred during this part of synchronization:
upload or download. During the upload phase, a client initiates
operation replays to change an MBO. During the download phase,
a client synchronizes with Unwired Server to receive the latest
changes to an MBO.
Entity
During download, the name of the MBO that the client is synchronizing with. During upload, the operation that the client is performing: create, update, or delete.
Sybase Unwired Platform
Monitor
Synchronization element
Description
Total Rows Sent
The total number of rows sent during package synchronization.
This data type is not supported at the MBO level.
Bytes Transferred
The amount of data transferred during the synchronization request.
Start Time
The date and time that the synchronization request was initiated.
Finish Time
The date and time that this part of synchronization completed.
Error
The incidence of errors during this request: true or false.
Domain
The domain to which the package involved in synchronization
belongs.
Table 22. Summary view information
Category
Description
Application ID
The ID number associated with an application.
User
The name of the user associated with the device ID.
Package
The package name.
Total Rows Sent
The total number of rows sent during package synchronization.
Total Operation Replays
The total number of operation replays performed by clients during
synchronization.
Total Bytes Sent
The total amount of data (in bytes) downloaded by clients from
Unwired Server during synchronization.
Total Bytes Received
The total amount of data (in bytes) uploaded to Unwired Server by
clients during synchronization.
Start Time
The date and time that the synchronization request was initiated.
Total Synchronization Time
The amount of time taken to complete the synchronization.
Total Errors
The total number of errors that occurred for the package during
synchronization.
Domain
The domain to which the package involved in synchronization
belongs.
Sybase Control Center for Sybase Unwired Platform
335
Monitor
Replication Performance Statistics
Replication performance statistics consist of key performance indicators (KPIs) that reflect
the overall functioning of the application environment.
Performance monitoring highlights key totals and identifies average, minimum, and
maximum values for primary activities. These calculations are dynamic, and are based on the
data currently available in monitoring database for the specified time period.
All values in this table (totals, averages, maximums, minimums) apply to the specific time
period you indicate:
336
KPI
Description
Total Distinct Package Synchronization
The total number of packages subject to synchronization.
Total Distinct Users
The total number of users who initiated synchronization requests.
This value comprises only individual users, and does not count
multiple synchronizations requested by the same user.
Average/Minimum/Maximum
Sync Time
The average, minimum, or maximum amount of time Unwired
Server took to finish a complete synchronization.
Time at Minimum/Maximum
Sync Time
The time of day at which the shortest or longest synchronization
completed.
Package with Minimum/Maximum Synchronization Time
The name of the package and associated MBO with the shortest or
longest synchronization time.
Average/Minimum/Maximum
MBO Rows Per Synchronization
The average, minimum, or maximum number of MBO rows of data
that are downloaded when synchronization completes.
Average/Minimum/Maximum
Operation Replays per Sync
(records received)
The average, least, or greatest number of operation replays per
synchronization received by Unwired Server from a client.
Total Bytes Sent
The total number of bytes downloaded by clients from Unwired
Server.
Total Bytes Received
The total number of bytes uploaded from clients to Unwired Server.
Total Operation Replays
The total number of operation replays performed on the EIS.
Total Errors
The total number of errors that took place across all synchronizations.
Average/Minimum/Maximum
Concurrent Users
The average, least, or greatest number of users involved in concurrent synchronizations.
Sybase Unwired Platform
Monitor
KPI
Description
Time at Minimum/Maximum
Concurrent Users
The time at which the least or greatest number of users were involved in concurrent synchronizations.
Messaging Statistics
Messaging statistics report on messaging synchronization activity for monitored packages.
•
•
•
Current monitoring data tracks the progress of messages from device users presently
performing operation replays or synchronizing MBOs.
Historical data reveals statistics indicating the efficiency of completed transactions.
Performance monitoring provides an overall view of messaging payload activity intended
to highlight areas of strength and weakness in the application environment.
Messaging historical data captures messages such as login, subscribe, import, suspend,
resume and so on. The Import type message is a data payload message from server to client
(outbound messages), while rest of the messages (login, subscribe, replay, suspend, resume)
are sent from the client to server (inbound messages).
See also
• Security Log Statistics on page 332
• Replication Statistics on page 333
• Messaging Queue Statistics on page 341
• Data Change Notification Statistics on page 342
• Device Notification Statistics on page 344
• Package Statistics on page 346
• User Statistics on page 348
• Cache Statistics on page 350
Current Messaging Statistics
Current statistics for messaging synchronization provide real-time information about inprogress synchronizations. Because messaging synchronizations progress rapidly, there is
typically little pending messaging data available at any given time.
Unwired Server monitors messagin requests using these categories:
Category
Description
Application ID
The ID associated with the application.
Package
The package name.
Message Type
The type of message sent by the client to Unwired Server, indicating the current sync activity; for example, import, replay, subscribe, suspend, resume, and so on.
Sybase Control Center for Sybase Unwired Platform
337
Monitor
Category
Description
Entity
During the import process, the name of the mobile business object
(MBO) with which the client is synchronizing. During replay, the
operation that the client is performing. For all other message types,
the cell is blank.
Start Time
The date and time that the initial message requesting synchronization was sent by the client.
Domain
The domain to which the package involved in synchronization
belongs.
Application Connection ID
The ID number of the application participating in the synchronization.
User
The name of the user associated with the device ID.
Messaging History Statistics
Historical data for messaging synchronization consists of past synchronization details for
monitored packages.
The summary view provides general information, whereas the detail view presents a more
specific view of all request events during each synchronization; each row of data corresponds
to a synchronization request from the client in the time frame you define:
•
•
Click either Details to see more granular information on each synchronization request, or
select the Detail option to see all synchronization request details. Detail view allows you to
look at the individual messages that make up the summary view.
Select Summary to see aggregated details by domain, package, and user about past
synchronization events for the defined time frame.
Table 23. Detail view information
338
Data type
Description
Application ID
The ID number associated with an application.
Package
The package name.
Application Connection ID
The ID number of the connection that participated in the synchronization request.
User
The name of the user associated with the device ID.
Message Type
The type of message sent by the client to Unwired Server, indicating the sync activity; for example, import, replay, subscribe, suspend, resume, and so on.
Sybase Unwired Platform
Monitor
Data type
Description
Entity
During the import process, the name of the mobile business object
(MBO) that the client is synchronizing with. During replay, the
operation that the client is performing. For all other message types,
the cell is blank.
Payload Size
The size of the message (in bytes).
Start Time
The date and time that the message for this sync request is received.
Finish Time
The date and time that the message for this sync request is processed.
Processing Time
The total amount of time between the start time and the finish time.
Error
The incidence of errors during this request; either true or false.
Domain
The domain to which the package involved in synchronization
belongs.
Table 24. Summary view information
Category
Description
Application ID
The ID number associated with an application.
User
The name of the user associated with the device ID
Package
The package name
Total Messages Sent
The total number of messages sent by Unwired Server to clients
during synchronization
Total Messages Received
The total number of messages received by Unwired Server from
clients during synchronization
Total Payload Size Sent
The total amount of data (in bytes) downloaded by clients from
Unwired Server during synchronization
Total Payload Size Received
The total amount of data (in bytes) uploaded to Unwired Server by
clients during synchronization
Total Operation Replays
The total number of operation replays performed by clients during
synchronization
Last Time In
The date and time that the last inbound request was received
Last Time Out
The date and time that the last outbound response was sent
Sybase Control Center for Sybase Unwired Platform
339
Monitor
Category
Description
Subscription Commands Count The total number of subscription commands sent during synchronization; for example, subscribe, recover, suspend, and so on
Total Errors
The number of errors that occurred for the package during synchronization
Domain
The domain to which the package involved in synchronization
belongs
Messaging Performance Statistics
Messaging performance statistics consist of key performance indicators (KPIs) that reflect the
overall functioning of the application environment.
Performance monitoring highlights key totals and identifies average, minimum, and
maximum values for primary activities. These calculations are dynamic, and are based on the
data currently available in monitoring database for the specified time period.
All values in this table (totals, averages, maximums, minimums) apply to the specific time
period you indicate:
340
KPI
Description
Total Messages
The total number of messages sent between the server and clients
during synchronization.
Total Distinct Devices
The total number of devices involved in synchronization. This
total includes the same user multiple times if he or she has multiple
devices. The value comprises individual devices, and does not
count multiple synchronizations requested by the same device.
Total Distinct Users
The total number of users who initiated synchronization requests.
This value comprises individual users, and does not count multiple
synchronizations requested by the same user if he or she uses
multiple devices.
Average/Minimum/Maximum
Concurrent Users
The average, minimum, or maximum number of users involved in
simultaneous synchronizations.
Time at Minimum/Maximum
Concurrent Users
The time at which the greatest or least number of users were
involved in concurrent synchronizations.
Average/Minimum/Maximum
Processing Time
The average, minimum, or maximum amount of time Unwired
Server took to respond to a sync request message.
Time at Minimum/Maximum
Message Processing Time
The time of day at which the shortest or longest message processing event completed.
Sybase Unwired Platform
Monitor
KPI
Description
MBO for Maximum/Minimum
Message Processing Time
The name of the package and associated mobile business object
(MBO) with the shortest or longest message processing time.
Average/Minimum/Maximum
Message Size
The average, smallest, or largest message sent during synchronization.
Total Inbound Messages
The total number of messages sent from clients to Unwired Server.
Total Outbound Messages
The total number of messages sent from Unwired Server to clients.
Total Operation Replays
The total number of operation replays performed by clients on
MBOs.
Total Errors
The total number of errors that took place across all synchronizations.
Average/Minimum/Maximum
Concurrent Users
The average, least, or greatest number of users involved in concurrent synchronizations.
Note: Reporting of KPIs related to concurrent users is based on a background task that takes a
periodic snapshot of the messaging activities. Depending on the nature and length of the
processing of a request, the background snapshot may not always see all the requests.
Messaging Queue Statistics
Messaging queue statistics reflect the status of various messaging queues. The data does not
reveal any application-specific information, but provides a historical view of messaging
activities that communicates the efficiency of messaging-based synchronization, as well as
the demands of device client users on the system.
Based on this data, administrators can calculate the appropriate inbound and outbound
message queue counts for the system (configurable in the Server Configuration node of
Sybase Control Center).
See also
• Security Log Statistics on page 332
• Replication Statistics on page 333
• Messaging Statistics on page 337
• Data Change Notification Statistics on page 342
• Device Notification Statistics on page 344
• Package Statistics on page 346
• User Statistics on page 348
• Cache Statistics on page 350
Sybase Control Center for Sybase Unwired Platform
341
Monitor
Messaging Queue Status
Messaging queue status data provides historical information about the processing of
messaging-based synchronization requests by Unwired Server. The data indicates areas of
high load and times of greatest activity. This data can help administrators decide how to handle
queue congestion and other performance issues.
These key indicators monitor messaging queue status:
Statistic
Description
Name
The name of the messaging queue.
Current Queued Items
The total number of pending messages waiting to be processed by
Unwired Server.
Average/Minimum/Maximum
Queue Depth
The average, minimum, or maximum number of queued messages.
For minimum and maximum queue depth, this value is calculated
from the last server restart.
Time at Minimum/Maximum
Queue Depth
The time and date at which the queue reached its minimum or
maximum depth.
Type
The direction of message flow: inbound or outbound.
Total Messages
The total number of messages in the queue at one point since the
last server reboot.
Bytes Received
The total number of bytes processed by the queue since the last
server reboot.
Last Activity Time
The time at which the most recent message was added to the queue
since the last server reboot.
Data Change Notification Statistics
Data change notification (DCN) statistics monitor notifications that are received by Unwired
Server from the enterprise information server. Specifically, DCN monitoring reports which
packages and sync groups are affected by notifications, and how quickly these are processed
by the server.
Monitoring DCN statistics allows you to troubleshoot and diagnose performance issues if, for
example, the cache is not being updated quickly enough. These statistics help to identify
which packages took longest to process data changes, as well as times of peak performance or
strain on the system.
See also
• Security Log Statistics on page 332
• Replication Statistics on page 333
342
Sybase Unwired Platform
Monitor
Messaging Statistics on page 337
Messaging Queue Statistics on page 341
Device Notification Statistics on page 344
Package Statistics on page 346
User Statistics on page 348
Cache Statistics on page 350
•
•
•
•
•
•
Data Change Notification History Statistics
Historical information for data change notifications (DCNs) consists of past notification
details for monitored packages. Detailed data provides specific information on past
notification activity for packages, and identifies which server data was affected.
Details about past notification events are organized into these categories:
Category
Description
Domain
The domain to which the package affected by the DCN belongs.
Package
The name of the package containing data changes.
MBO
The name of the MBO to which the notification applied.
Notification Time
The date and time that Unwired Server received the DCN.
Processing Time
The time that Unwired Server used to process the DCN.
Data Change Notification Performance Statistics
Data change notification (DCN) performance statistics consist of key performance indicators
that reflect the efficiency of notification processing by Unwired Server.
Performance monitoring highlights key totals and identifies average, minimum, and
maximum values for primary activities. These calculations are dynamic, and are based on the
data currently available in monitoring database for the specified time period.
All values in this table (totals, averages, maximums, minimums) apply to the specific time
period you indicate:
Key performance indica- Description
tor
Total Notifications
The total number of notifications sent by the enterprise information
system to Unwired Server.
Average/Minimum/Maximum
Processing Time
The average, minimum, or maximum amount of time Unwired
Server took to process a DCN.
Time at Minimum/Maximum
Message Processing Time
The time of day at which the shortest or longest DCN processing
event completed.
Sybase Control Center for Sybase Unwired Platform
343
Monitor
Key performance indica- Description
tor
Time of Last Notification Received
The time at which the most recent DCN was received by Unwired
Server.
MBO with Minimum/Maximum Notification Processing
Time
The name of the package and associated mobile business object
(MBO) with the shortest or longest notification processing time.
Device Notification Statistics
Device notification statistics provide data about the occurrence and frequency of notifications
sent from Unwired Server to replication synchronization devices.
Historical device notification monitoring reports on the packages, synchronization groups,
and devices affected by replication payload synchronization requests in a given time frame.
Performance-related device notification data provides a general indication of the efficiency of
notification processing and the total demand of synchronization requests on the system.
See also
• Security Log Statistics on page 332
• Replication Statistics on page 333
• Messaging Statistics on page 337
• Messaging Queue Statistics on page 341
• Data Change Notification Statistics on page 342
• Package Statistics on page 346
• User Statistics on page 348
• Cache Statistics on page 350
Device Notification History Statistics
Historical information for device notifications provides specific information on past device
notifications, indicating which packages, synchronization groups, and devices were involved
in synchronization requests.
Details about past device notification events fall into these categories:
344
Category
Description
Application ID
The ID associated with the application.
Domain
The domain to which the package affected by the device notification belongs.
Package
The name of the package containing data changes.
Sybase Unwired Platform
Monitor
Category
Description
Synchronization group
The synchronization group that the package belongs to.
Application Connection ID
The ID number of the connection participating in the synchronization request.
Generation time
The date and time that Unwired Server generated the device notification.
User
The name of the user associated with the device ID.
Device Notification Performance Statistics
Device notification performance statistics provide a general indication of the efficiency of
notification processing and the total demand of synchronization requests on the system.
Performance monitoring highlights key totals and identifies average, minimum, and
maximum values for primary activities. These calculations are dynamic, and are based on the
data currently available in monitoring database for the specified time period.
All values in this table (totals, averages, maximums, minimums) apply to the specific time
period you indicate:
KPI
Description
Synchronization Group for
Maximum Notifications
The synchronization group for which the maximum number of
notifications were sent.
Package for Maximum Notifications
The package for which the greatest number of device notifications
were sent.
Total Notifications
The total number of device notifications sent from Unwired Server
to devices.
Total Distinct Users
The total number of users that received device notifications. This
value comprises only individual users, and does not count multiple
synchronizations requested by the same user.
Total Distinct Devices
The total number of devices that received device notifications. This
is distinct from Total Distinct Users, because a single user name
can be associated with multiple devices.
Enabled Subscriptions
The total number of replication subscriptions for which notifications are generated.
Time at Last Notification
The time at which the last device notification was sent by Unwired
Server.
Sybase Control Center for Sybase Unwired Platform
345
Monitor
KPI
Description
Outstanding Subscriptions
The total number of replication subscriptions, both enabled and
disabled.
Package Statistics
Package statistics reflect response times for replication-based and messaging-based
synchronization packages.
This type of monitoring uses key performance indicators to provide data on the efficiency of
response by Unwired Server to synchronization requests. These calculations are dynamic, and
are based on the data currently available in monitoring database for the specified time period.
See also
• Security Log Statistics on page 332
• Replication Statistics on page 333
• Messaging Statistics on page 337
• Messaging Queue Statistics on page 341
• Data Change Notification Statistics on page 342
• Device Notification Statistics on page 344
• User Statistics on page 348
• Cache Statistics on page 350
Replication Package Statistics
Replication package statistics consist of key performance indicators (KPIs) that reflect the
overall function of the application environment at the cluster or domain level. The statistics
highlight key totals and identify average, minimum, and maximum values for primary
activities.
These key indicators monitor replication packages:
Note: These KPIs are not applicable at the MBO level.
•
•
•
346
Total Bytes Received
Total Bytes Sent
Total Operation Replays
Sybase Unwired Platform
Monitor
KPI
Description
Total Devices
The total number of devices involved in synchronization.
This total includes the same user multiple times if he or she
has multiple devices. The value comprises individual devices, and does not count multiple synchronizations requested
by the same device.
Total Rows Sent
The total number of rows sent during package synchronization.
Total Rows Received
The total number of rows received during package synchronization.
Total Errors
The total number of errors that took place across all synchronizations.
Total Bytes Received
The total number of bytes uploaded from clients to Unwired
Server.
Total Bytes Sent
The total number of bytes downloaded by clients from Unwired Server.
Average/Minimum/Maximum Synchronization Time
The average, minimum, or maximum amount of time Unwired Server took to finish a complete synchronization.
Time at Minimum/Maximum Synchronization Time
The time at which the shortest or longest synchronization
completed.
Total Synchronization Requests
The total number of sync requests initiated by a client.
Total Operation Replays
The total number of operation replays performed by clients
on MBOs.
Messaging Package Statistics
Messaging package statistics consist of key performance indicators (KPIs) that reflect the
overall function of the application environment at the cluster or domain level. The statistics
highlight key totals and identify average, minimum, and maximum values for primary
activities.
Note: These KPIs are not applicable at the MBO level:
•
•
Total Subscription Commands
Total Devices
These key indicators monitor messaging packages:
Sybase Control Center for Sybase Unwired Platform
347
Monitor
KPI
Description
Total Subscription Commands
The total number of subscription commands sent from clients to the
server.
Total Devices
The total number of devices involved in synchronization. This total
includes the same user multiple times if he or she has multiple
devices. The value comprises individual devices, and does not
count multiple synchronizations requested by the same device.
Average/Minimum/Maximum
Message Processing Time
The average, minimum, or maximum amount of time Unwired
Server took to respond to a synchronization request message.
Time at Minimum/Maximum
Processing Time
The time at which the shortest or longest response time completed.
Total Inbound Messages
The total number of messages sent from clients to Unwired Server.
Total Outbound Messages
The total number of messages sent from Unwired Server to clients.
Total Operation Replays
The total number of operation replays performed by clients on
mobile business objects (MBOs).
Total Errors
The total number of errors that took place across all synchronizations.
Total Data Push
The total amount of data transmitted from the server to clients.
User Statistics
User statistics consist of key performance indicators that reflect the overall activity of
application users.
User statistics can be filtered to include users who belong to a particular security
configuration. This type of monitoring highlights key totals and identifies average, minimum,
and maximum values for primary user activities. These calculations are dynamic, and are
based on the data currently available in monitoring database for the specified time period.
Note: These statistics are not supported for Sybase Mobile CRM and Sybase Hybrid App for
SAP application users.
See also
• Security Log Statistics on page 332
• Replication Statistics on page 333
• Messaging Statistics on page 337
• Messaging Queue Statistics on page 341
• Data Change Notification Statistics on page 342
• Device Notification Statistics on page 344
• Package Statistics on page 346
348
Sybase Unwired Platform
Monitor
Cache Statistics on page 350
•
Replication User Statistics
Replication user statistics reflect the synchronization activity of a group of replication-based
synchronization users belonging to a specified security configuration. These statistics include
general activity-related information on a per-user basis.
These key indicators monitor replication users:
KPI
Description
Total Synchronization Requests The total number of sync requests initiated by a client.
Total Rows Received
The total number of rows received during package synchronization.
Total Rows Sent
The total number of rows sent during package synchronization.
Total Bytes Received
The total number of bytes uploaded from clients to Unwired Server.
Total Bytes Sent
The total number of bytes downloaded by clients from Unwired
Server.
Average/Minimum/Maximum
Synchronization Time
The average, minimum, or maximum amount of time Unwired
Server took to complete a synchronization request.
Time at Maximum/Minimum
Synchronization Time
The time at which the fastest or slowest synchronization is completed.
Total Operation Replays
The total number of operation replays performed by user of mobile
business objects (MBOs).
Total Errors
The total number of errors that took place across all synchronizations.
Total Devices
The total number of devices involved in synchronization. This total
includes the same user multiple times if he or she has multiple
devices. The value comprises individual devices, and does not
count multiple synchronizations requested by the same device.
Messaging User Statistics
Messaging user statistics reflect the synchronization activity of a group of messaging-based
synchronization users belonging to a specified security configuration. These statistics include
general activity-related information on a per-user basis.
These key indicators monitor messaging users:
Sybase Control Center for Sybase Unwired Platform
349
Monitor
KPI
Description
Total Devices
The total number of devices involved in synchronization. This total
includes the same user multiple times if he or she has multiple
devices. The value comprises individual devices, and does not
count multiple synchronizations requested by the same device.
Average/Minimum/Maximum
Message Processing Time
The average, minimum, or maximum amount of time Unwired
Server took to respond to a sync request message.
Time at Minimum/Maximum
Message Processing Time
The time of day at which the shortest or longest message processing event completed.
Total Inbound Messages
The total number of messages sent from clients to Unwired Server.
Total Outbound Messages
The total number of messages sent from Unwired Server to clients.
Total Operation Replays
The total number of operation replays performed by clients on
mobile business objects (MBOs).
Total Errors
The total number of errors that took place across all synchronizations.
Total Subscription Commands
The total number of subscription commands sent from clients to the
server.
Total Data Push
The total number of import data messages.
Cache Statistics
Cache statistics provide a granular view of cache activity eithr at the domain or package level,
particularly in the areas of cache performance, mobile business object (MBO) status, and
cache group status.
Cache statistics report on performance at the domain, package, MBO, and cache group levels
to allow administrators to obtain different information according to the level of specificity
required. These calculations are dynamic, and are based on the data currently available in
monitoring database for the specified time period.
Note: These statistics are not supported for Sybase Mobile CRM and Sybase Hybrid App for
SAP application users.
See also
• Security Log Statistics on page 332
• Replication Statistics on page 333
• Messaging Statistics on page 337
• Messaging Queue Statistics on page 341
• Data Change Notification Statistics on page 342
• Device Notification Statistics on page 344
350
Sybase Unwired Platform
Monitor
Package Statistics on page 346
User Statistics on page 348
•
•
Cache Performance Statistics
Cache performance statistics report on key totals and identify average, minimum, and
maximum values for primary cache activities. View cache performance data at the domain or
package level.
Select either Domain level or Package level to view the following key performance
indicators:
Key performance indicator
Description
Domain
The domain to which the package affected by the cache activity belongs.
Package
The name of the package associated with this cache activity.
Minimum/Maximum Cache The minimum or maximum number cache misses and the MBO name
Misses
for which it was generated.
Minimum/Maximum Cache The minimum or maximum number of scheduled cache queries for all
Hits
of the MBOs in the package in the specified date range.
Minimum/Maximum/Average % Cache Hits
The minimum or maximum percentage of scheduled cache queries for
the supplied date range and the MBO name for which it was generated.
Minimum/Maximum Average Wait Time
The minimum or maximum average wait time for a scheduled cache
query and the MBO name for which it was generated.
Minumum/Maximum Aver- (Package-level only)The minimum or maximum average refresh time
age Refresh Time
for an on-demand or scheduled refresh.
MBO Statistics
Mobile business object (MBO) status monitoring reports on cache activity at the MBO level,
and thus, reflects activity for single mobile business objects.
Select Package level MBO to view the following key performance indicators:
Key performance indi- Description
cator
Cache Group
The name of the group of MBOs associated with this cache activity.
MBO
The name of the single mobile business object associated with this
cache activity.
Number of Rows
The number of rows affected by the cache refresh.
Sybase Control Center for Sybase Unwired Platform
351
Monitor
Key performance indi- Description
cator
Cache Hits
The number of scheduled cache queries that occurred in the supplied
date range.
Cache Misses
The number of on-demand cache or cache partition refreshes that
occurred in the supplied date range.
Access Count
The number of cache queries that occurred in the supplied date range.
Minimum/Maximum/Average Wait Time
The minimum, maximum, or average duration of cache queries in the
supplied date range. This time does not include the time required to
refresh the cache in a cache “miss” scenario. Instead Minimum/
Maximum/Average Full Refresh Time exposes this data.
Minimum/Maximum/Average Full Refresh Time
The minimum, maximum, or average duration of on-demand and
scheduled full refresh activities in the supplied date range.
Cache Group Status Statistics
Cache group status statistics provide monitoring data about cache activity at the cache group
level. The data reflects activity for all mobile business objects (MBOs) belonging to a cache
group.
Select Package level cache group to view the following key performance indicators (KPIs):
KPI
Description
Package
The name of the package to which the associated cache group belongs
Cache Group
The name of the group of MBOs associated with the cache activity
Number of Rows
The number of rows in the cache table of the MBO
Last Full Refresh Time
The last time the cache or cache partition was fully refreshed
Last Update Time
The last time a row in the cache was updated for any reason (row-level
refresh, full refresh, partitioned refresh, or data change notification)
Last Invalidate Time
The last time the cache was invalidated
Cache Coherency Window
The data validity time period for the cache group, in seconds. Can
span any value in this range:
•
•
352
0 shows that data is always retrieved on-demand for each client.
2049840000 shows that the cache never expires. This occurs
when you set the on-demand cache group to NEVER expire or
scheduled cache group to NEVER repeat.
Sybase Unwired Platform
Troubleshoot Sybase Control Center
Troubleshoot Sybase Control Center
Troubleshoot issues that arise in Sybase Control Center.
Using Sybase Control Center to Troubleshoot Unwired
Platform
Problem: Unwired Platform is not functioning properly or exhibits abnormal behaviour.
Consult these Sybase Control Center sources to find useful information to help you
troubleshoot Unwired Platform issues:
1. Review the server log – view server errors, warnings, and general information to identify
problems. Access the Server node in the left navigation tree of Sybase Control Center to
view server log data.
2. Review domain logs – if domain logging is enabled, view domain logs in each Domains >
<DomainName> > Log node of Sybase Control Center. Aggregated log data in the console
makes domain information readily accessible and actionable.
3. Review monitoring data – access the Monitoring node in the left navigation tree of Sybase
Control Center to view monitoring data on the following components of Unwired
Platform: replication synchronization, messaging synchronization, messaging queue, data
change notifications, device notifications, packages, users, and cache. See System
Monitoring Overview in System Administration.
4. Review Application Connection status – access the Applications node in the left
navigation pane of Sybase Control Center to view application connection information in
the right pane.
Note: You can also view domain-level Application Connection status – navigate to the
domain then select Applications in the left navigation pane, and view application
connection information in the right pane.
5. Review package client logs – access the Client Log tab of the Packages > <PackageName>
node in Sybase Control Center to view data about client application operations for all
devices subscribed to a package. This information allows you to track errors and identify
performance issues.
6. Review MBO and operation history – access the History tab for both the MBO and
operation nodes of a package in Sybase Control Center to review error history during
synchronizations and operation replays.
See also
• Collecting Administration Performance Data for Troubleshooting on page 354
Sybase Control Center for Sybase Unwired Platform
353
Troubleshoot Sybase Control Center
•
•
•
•
•
Sybase Control Center Management Tier Issues on page 355
Platform Component Monitoring Issues on page 375
Server Tier Administration Issues on page 378
Package Deployment and Management Issues on page 390
Application and Application User Management Issues on page 395
Collecting Administration Performance Data for
Troubleshooting
Problem: You need to collect performance data to troubleshoot performance issues in Sybase
Control Center for Unwired Platform administrative options.
Solution: Set up the SCC_HOME\log\executionTime.log, which provides
information on the length of time taken to complete operations in Sybase Control Center.
Sybase Product Support and Engineering teams can use this information to diagnose the
source of your performance issues. To set up this log file:
1. Open SCC_HOME\plugins\com.sybase.supadminplugin\agentplugin.xml.
2. Add the following line to the file under the <properties> element:
<set-property property="log_MO_method_execution_time"
value="enable_log_mo_method_execution_time" />
3. Open SCC_HOME\conf\log4j.properties.
4. If you are experiencing log truncation issues, edit the following lines to change the default
values for maximum file size (default: 25MB) and maximum backup index (default: 20
files) to the values shown in this example:
## file appender (size-based rolling)
log4j.appender.executionTime=org.apache.log4j.RollingFileAppender
log4j.appender.executionTime.File=${com.sybase.ua.home}/log/
executionTime.log
log4j.appender.executionTime.layout=org.apache.log4j.PatternLayou
t
log4j.appender.executionTime.layout.ConversionPattern=%d [%-5p]
[%t] %c.%M(%L) - %m%n
log4j.appender.executionTime.MaxFileSize=50MB
log4j.appender.executionTime.MaxBackupIndex=20
## log MO method execution time
log4j.logger.com.sybase.uep.sysadmin.management.aop=INFO,executio
nTime
5. Restart Sybase Control Center.
The executionTime.log file now appears in the SCC_HOME\log folder.
Use this log file to diagnose and analyze performance problems. For more information on
configuring the agent-plugin.xml configuration file, search for Agent Plugin
Properties Reference in the System Administration guide.
354
Sybase Unwired Platform
Troubleshoot Sybase Control Center
You can also use the Adobe Flex log to track performance in Sybase Control Center. To access
Flex-side logging, highlight the resource in the Perspective Resources view and select View
Log to show the user interface time for each activity. Alternately:
1. Modify the SCC_HOME\plugins\com.sybase.supadminplugin\agentplugin.xml file as indicated in step 2, above.
2. Restart Sybase Control Center.
3. Log in and perform your regular administrative tasks.
4. View the execution time indicators for these operations in the cookie file
supatcookie.sol. The location of this file varies depending on your operating
system:
Operating System
Location
Windows XP
C:\Documents and Settings\<username>
\Application Data\Macromedia\Flash
Player\#SharedObjects
Windows Vista
C:\Users\<username>\AppData\Roaming
\Macromedia\Flash Player\#SharedObjects
Macintosh OS X
/Users/<username>/Library/Preferences/Macromedia/Flash Player/#SharedObjects
Linux
/home/<username>/.macromedia/
Flash_Player/#SharedObjects
5. Analyze the log using your preferred method of data analysis.
See also
• Using Sybase Control Center to Troubleshoot Unwired Platform on page 353
• Sybase Control Center Management Tier Issues on page 355
• Platform Component Monitoring Issues on page 375
• Server Tier Administration Issues on page 378
• Package Deployment and Management Issues on page 390
• Application and Application User Management Issues on page 395
Sybase Control Center Management Tier Issues
Review this list of documented general issues for Sybase Control Center and its server
management-related services.
Sybase Control Center for Sybase Unwired Platform
355
Troubleshoot Sybase Control Center
See also
• Using Sybase Control Center to Troubleshoot Unwired Platform on page 353
• Collecting Administration Performance Data for Troubleshooting on page 354
• Platform Component Monitoring Issues on page 375
• Server Tier Administration Issues on page 378
• Package Deployment and Management Issues on page 390
• Application and Application User Management Issues on page 395
Launching Sybase Control Center Results in Rounded Rectangle Box
or Empty Console Screen
Problem: When you launch Sybase Control Center, a rounded rectangular box appears instead
of the administration console, or the console displays a gray or empty screen.
Explanation: The Adobe Flash Player version is older than the minimum version supported by
Sybase Control Center.
Solution: Upgrade your Flash Player version to the latest version. For more information on
software prerequisites, see Supported Hardware and Software.
See also
• Sybase Control Center Console Continually Refreshes on page 357
• Sybase Control Center Windows Service Fails to Start on page 357
• Sybase Control Center Windows Service Deleted on page 359
• Sybase Control Center Fails to Start on page 359
• Second Sybase Control Center Fails to Start on page 361
• Login Invalid in Sybase Control Center on page 362
• Login Fails in Sybase Control Center on page 363
• Login to Sybase Control Center Forces Ending Existing Session on page 364
• Administrator Account is Locked on page 365
• Browser Refresh (F5) Causes Logout on page 366
• Stale Version of Sybase Control Center After Upgrade on page 366
• Sybase Control Center Reports Certificate Problem on page 368
• Previous Administrator Credentials Used on page 369
• Security Error Triggered When Connecting to Sybase Control Center from Remote
Browser on page 370
• Administrator Login Passes When Provider Is Not Available on page 370
• Host Name of Registered Resource Changed But Is Not Updated on page 371
• Management Issues with Clustered Data Tiers on page 372
• Poor Sybase Control Center Performance after Upgrade on page 373
• Sybase Control Center Communication with Unwired Server Fails on page 374
356
Sybase Unwired Platform
Troubleshoot Sybase Control Center
Sybase Control Center Console Continually Refreshes
Problem: Every 8-10 minutes, the left navigation pane of the Sybase Control Center console
collapses and expands.
Explanation: This occurs when using Firefox or Chrome browers.
Solution: Use Internet Explorer as your browser.
See also
• Launching Sybase Control Center Results in Rounded Rectangle Box or Empty Console
Screen on page 356
• Sybase Control Center Windows Service Fails to Start on page 357
• Sybase Control Center Windows Service Deleted on page 359
• Sybase Control Center Fails to Start on page 359
• Second Sybase Control Center Fails to Start on page 361
• Login Invalid in Sybase Control Center on page 362
• Login Fails in Sybase Control Center on page 363
• Login to Sybase Control Center Forces Ending Existing Session on page 364
• Administrator Account is Locked on page 365
• Browser Refresh (F5) Causes Logout on page 366
• Stale Version of Sybase Control Center After Upgrade on page 366
• Sybase Control Center Reports Certificate Problem on page 368
• Previous Administrator Credentials Used on page 369
• Security Error Triggered When Connecting to Sybase Control Center from Remote
Browser on page 370
• Administrator Login Passes When Provider Is Not Available on page 370
• Host Name of Registered Resource Changed But Is Not Updated on page 371
• Management Issues with Clustered Data Tiers on page 372
• Poor Sybase Control Center Performance after Upgrade on page 373
• Sybase Control Center Communication with Unwired Server Fails on page 374
Sybase Control Center Windows Service Fails to Start
Problem: When starting the Sybase Control Center X.Xservice, it takes a long time before
failing, and the service manager displays a message that the service startup has timed out.
The SCC_HOME\log\agent.log shows the failure message.
Explanation: This problem usually occurs when the Sybase Control Center repository
database log file is out of sync with the repository database. A related symptom is the message
SQL Login Failure in the Sybase Control Center repository log file.
Solution 1: Review SCC_HOME\services\Repository\scc_repository.log
log for any issues with the database transaction log file during startup. If the transaction log
Sybase Control Center for Sybase Unwired Platform
357
Troubleshoot Sybase Control Center
could not be processed, the database cannot start, and consequently nor can the Sybase
Control Center service. Resolve this error by:
1. Creating a backup of SCC_HOME\services\Repository
\scc_repository.log.
2. Deleting the SCC_HOME\services\Repository\scc_repository.log file
and restarting the Sybase Control Center service.
Solution 2: Review SCC_HOME\services\Repository\scc_repository.log
log for any failures in database transaction and/or recovery. Resolve this error by temporarily
configuring the repository database (-f) to start without a transaction log:
1. Log out of Sybase Control Center and then shutdown Sybase Control Center service.
2. Open command prompt window, and run the following command:
SCC_HOME\services\SccSADataserver\sa
\bin_windows32\dbsrv11.exe -n scc_repository -o C:\Sybase
\SCC-3_2\services\Repository\scc_repository.slg -f -m -qi qw -sb 0 -gn 100 -gm 500 -zl -zp -x TCPIP{port=3638} C:
\Sybase\SCC-3_2\services\Repository\scc_repository.db
3. Delete the SCC_HOME\services\Repository\scc_repository.log file
using Windows Explorer.
4. Restart the Sybase Control Center service.
See also
• Launching Sybase Control Center Results in Rounded Rectangle Box or Empty Console
Screen on page 356
• Sybase Control Center Console Continually Refreshes on page 357
• Sybase Control Center Windows Service Deleted on page 359
• Sybase Control Center Fails to Start on page 359
• Second Sybase Control Center Fails to Start on page 361
• Login Invalid in Sybase Control Center on page 362
• Login Fails in Sybase Control Center on page 363
• Login to Sybase Control Center Forces Ending Existing Session on page 364
• Administrator Account is Locked on page 365
• Browser Refresh (F5) Causes Logout on page 366
• Stale Version of Sybase Control Center After Upgrade on page 366
• Sybase Control Center Reports Certificate Problem on page 368
• Previous Administrator Credentials Used on page 369
• Security Error Triggered When Connecting to Sybase Control Center from Remote
Browser on page 370
• Administrator Login Passes When Provider Is Not Available on page 370
• Host Name of Registered Resource Changed But Is Not Updated on page 371
358
Sybase Unwired Platform
Troubleshoot Sybase Control Center
•
•
•
Management Issues with Clustered Data Tiers on page 372
Poor Sybase Control Center Performance after Upgrade on page 373
Sybase Control Center Communication with Unwired Server Fails on page 374
Sybase Control Center Windows Service Deleted
Problem: the Sybase Control Center X.X windows service was inadvertently deleted, so
Sybase Control Center is unavailable.
Solution: Re-create the Windows service with the following command:
SCC_HOME\utility\ntautostart\release\sccservice.exe -install
See also
• Launching Sybase Control Center Results in Rounded Rectangle Box or Empty Console
Screen on page 356
• Sybase Control Center Console Continually Refreshes on page 357
• Sybase Control Center Windows Service Fails to Start on page 357
• Sybase Control Center Fails to Start on page 359
• Second Sybase Control Center Fails to Start on page 361
• Login Invalid in Sybase Control Center on page 362
• Login Fails in Sybase Control Center on page 363
• Login to Sybase Control Center Forces Ending Existing Session on page 364
• Administrator Account is Locked on page 365
• Browser Refresh (F5) Causes Logout on page 366
• Stale Version of Sybase Control Center After Upgrade on page 366
• Sybase Control Center Reports Certificate Problem on page 368
• Previous Administrator Credentials Used on page 369
• Security Error Triggered When Connecting to Sybase Control Center from Remote
Browser on page 370
• Administrator Login Passes When Provider Is Not Available on page 370
• Host Name of Registered Resource Changed But Is Not Updated on page 371
• Management Issues with Clustered Data Tiers on page 372
• Poor Sybase Control Center Performance after Upgrade on page 373
• Sybase Control Center Communication with Unwired Server Fails on page 374
Sybase Control Center Fails to Start
Problem: The Sybase Control Center server does not start.
This problem occurs when the host name cannot be resolved or the IP address of the machine
has changed since the product installation. This troubleshooting topic applies only when
either of these scenarios is true.
Sybase Control Center for Sybase Unwired Platform
359
Troubleshoot Sybase Control Center
Solution 1: Change the host name to its IP address in the Sybase Control Center serviceconfig.xml file:
1. From the command line, verify the host name by running nslookup<hostname >.
2. If the DNS server cannot resolve the host name, edit the collocated SCC_HOME
\services\RMI\service-config.xml file:
a. Log out of Sybase Control Center.
b. Stop the Sybase Control Center X.X service.
c. Open SCC_HOME\services\RMI\service-config.xml.
d. Locate this line: <set-property property="address"
value="<hostname>" />.
If the line does not exist, add it under the <properties></properties>
element in the file.
e. Change the value from the host name to the IP address of the host computer. If the IP
address is already used, ensure it is valid (especially if the IP address has recently been
changed).
f. Restart the Sybase Control Center X.X service.
g. Log in to Sybase Control Center and proceed with your administrative tasks.
See also
• Launching Sybase Control Center Results in Rounded Rectangle Box or Empty Console
Screen on page 356
• Sybase Control Center Console Continually Refreshes on page 357
• Sybase Control Center Windows Service Fails to Start on page 357
• Sybase Control Center Windows Service Deleted on page 359
• Second Sybase Control Center Fails to Start on page 361
• Login Invalid in Sybase Control Center on page 362
• Login Fails in Sybase Control Center on page 363
• Login to Sybase Control Center Forces Ending Existing Session on page 364
• Administrator Account is Locked on page 365
• Browser Refresh (F5) Causes Logout on page 366
• Stale Version of Sybase Control Center After Upgrade on page 366
• Sybase Control Center Reports Certificate Problem on page 368
• Previous Administrator Credentials Used on page 369
• Security Error Triggered When Connecting to Sybase Control Center from Remote
Browser on page 370
• Administrator Login Passes When Provider Is Not Available on page 370
• Host Name of Registered Resource Changed But Is Not Updated on page 371
• Management Issues with Clustered Data Tiers on page 372
• Poor Sybase Control Center Performance after Upgrade on page 373
360
Sybase Unwired Platform
Troubleshoot Sybase Control Center
•
Sybase Control Center Communication with Unwired Server Fails on page 374
Second Sybase Control Center Fails to Start
Problem: Cannot start a second co-existing Sybase Control Center in a deployment
environment.
Explanation: When multiple versions of Sybase Control Center co-exist on a single machine,
if the older version is already using the default port number, the new version of Sybase Control
Center uses another port number, such as 8285. If the configuration files have not been
updated, this may cause port conflicts.
Solution: Check the port numbers, and check the configuration files to make sure the
configuration is correct. See the topic Port Number Reference in the System Administration
guide. If the configuration is correct, you may need to start the second version of Sybase
Control Center manually.
See also
• Launching Sybase Control Center Results in Rounded Rectangle Box or Empty Console
Screen on page 356
• Sybase Control Center Console Continually Refreshes on page 357
• Sybase Control Center Windows Service Fails to Start on page 357
• Sybase Control Center Windows Service Deleted on page 359
• Sybase Control Center Fails to Start on page 359
• Login Invalid in Sybase Control Center on page 362
• Login Fails in Sybase Control Center on page 363
• Login to Sybase Control Center Forces Ending Existing Session on page 364
• Administrator Account is Locked on page 365
• Browser Refresh (F5) Causes Logout on page 366
• Stale Version of Sybase Control Center After Upgrade on page 366
• Sybase Control Center Reports Certificate Problem on page 368
• Previous Administrator Credentials Used on page 369
• Security Error Triggered When Connecting to Sybase Control Center from Remote
Browser on page 370
• Administrator Login Passes When Provider Is Not Available on page 370
• Host Name of Registered Resource Changed But Is Not Updated on page 371
• Management Issues with Clustered Data Tiers on page 372
• Poor Sybase Control Center Performance after Upgrade on page 373
• Sybase Control Center Communication with Unwired Server Fails on page 374
Sybase Control Center for Sybase Unwired Platform
361
Troubleshoot Sybase Control Center
Login Invalid in Sybase Control Center
Problem: Logging in to Sybase Control Center generates an Invalid Login message.
Solution:
•
•
•
•
Verify Sybase Control Center session validity – ensure that the current Sybase Control
Center session is active. If the session is frozen or expired, refresh the page or close the
browser and try again.
Verify server-side configuration by trying to connect to Unwired Server from Sybase
Unwired WorkSpace (requires creating Unwired Server Connection Profile with proper
user name and password among other things).
Check SCC_HOME\log\agent.log to see if the authentication failed. If so, check the
security configuration. By default, Sybase Control Center shares the same configuration
as the one used on the local Unwired Server. Ensure that the correct login and password is
provided (one that has administrative privilege). See Enabling Authentication and RBAC
for Administration Logins in the Security guide.
If all services are running, check the SCC_HOME\log\agent.log for an error
message containing text similar to the following:
Failed to authenticate user 'supAdmin' (Failed to connect
to service:jmx:rmi:///jndi/rmi://eas3w03.sybase.com:9999/
agent, probably because the agent is protected and requires
credentials.Security Service Error. Agent service
exception.)
• Ensure that the Sybase Control Center authentication provider configuration is correct,
and points to the correct server. See Enabling Authentication and RBAC for
Administration Logins in the Security guide.
See also
• Launching Sybase Control Center Results in Rounded Rectangle Box or Empty Console
Screen on page 356
• Sybase Control Center Console Continually Refreshes on page 357
• Sybase Control Center Windows Service Fails to Start on page 357
• Sybase Control Center Windows Service Deleted on page 359
• Sybase Control Center Fails to Start on page 359
• Second Sybase Control Center Fails to Start on page 361
• Login Fails in Sybase Control Center on page 363
• Login to Sybase Control Center Forces Ending Existing Session on page 364
• Administrator Account is Locked on page 365
• Browser Refresh (F5) Causes Logout on page 366
• Stale Version of Sybase Control Center After Upgrade on page 366
• Sybase Control Center Reports Certificate Problem on page 368
362
Sybase Unwired Platform
Troubleshoot Sybase Control Center
Previous Administrator Credentials Used on page 369
Security Error Triggered When Connecting to Sybase Control Center from Remote
Browser on page 370
• Administrator Login Passes When Provider Is Not Available on page 370
• Host Name of Registered Resource Changed But Is Not Updated on page 371
• Management Issues with Clustered Data Tiers on page 372
• Poor Sybase Control Center Performance after Upgrade on page 373
• Sybase Control Center Communication with Unwired Server Fails on page 374
•
•
Login Fails in Sybase Control Center
Problem: Removed the PreconfiguredUser login module from the "admin" security
configuration. Now, logins to Sybase Control Center fail.
Solution: Verify server-side configuration by trying to connect to Unwired Server from
Sybase Unwired WorkSpace (requires creating Unwired Server Connection Profile with
proper username and password among other things). If that works but the Sybase Control
Center login still fails, check for error messages ins inagent.log can offer further clues on
the
See also
• Launching Sybase Control Center Results in Rounded Rectangle Box or Empty Console
Screen on page 356
• Sybase Control Center Console Continually Refreshes on page 357
• Sybase Control Center Windows Service Fails to Start on page 357
• Sybase Control Center Windows Service Deleted on page 359
• Sybase Control Center Fails to Start on page 359
• Second Sybase Control Center Fails to Start on page 361
• Login Invalid in Sybase Control Center on page 362
• Login to Sybase Control Center Forces Ending Existing Session on page 364
• Administrator Account is Locked on page 365
• Browser Refresh (F5) Causes Logout on page 366
• Stale Version of Sybase Control Center After Upgrade on page 366
• Sybase Control Center Reports Certificate Problem on page 368
• Previous Administrator Credentials Used on page 369
• Security Error Triggered When Connecting to Sybase Control Center from Remote
Browser on page 370
• Administrator Login Passes When Provider Is Not Available on page 370
• Host Name of Registered Resource Changed But Is Not Updated on page 371
• Management Issues with Clustered Data Tiers on page 372
• Poor Sybase Control Center Performance after Upgrade on page 373
• Sybase Control Center Communication with Unwired Server Fails on page 374
Sybase Control Center for Sybase Unwired Platform
363
Troubleshoot Sybase Control Center
Login to Sybase Control Center Forces Ending Existing Session
Problem: If you login to Sybase Control Center when there already is a session running using
the same login, you are forced to end the pre-existing session before proceeding.
Explanation: Sybase Control Center allows only one session at a time for each administrative
user.
Sybase Control Center remembers the UI layout of each user’s screen so that the next time you
login your screen layout is the same as you last left it. If Sybase Control Center allowed
multiple concurrent sessions from the same user, the screen layout information could become
corrupted.
Solution:
•
•
Recommended: Configure the "admin" security configuration to integrate with your
company identity management systems so that Sybase Unwired Platform administrators
can login to Sybase Control Center using their own accounts.
Development Environment Only: For a development environment, you can add
PreconfiguredUserLoginModules for each of the administrators to the "admin" security
configuration. Make sure to set the "SUP Adminstrator" or "SUP Domain Administrator"
role in each PreConfiguredUserLoginModule.
Note: It is never recommended to use the PreconfiguredUserLoginModule in a production
installation of Sybase Unwired Platform.
See also
• Launching Sybase Control Center Results in Rounded Rectangle Box or Empty Console
Screen on page 356
• Sybase Control Center Console Continually Refreshes on page 357
• Sybase Control Center Windows Service Fails to Start on page 357
• Sybase Control Center Windows Service Deleted on page 359
• Sybase Control Center Fails to Start on page 359
• Second Sybase Control Center Fails to Start on page 361
• Login Invalid in Sybase Control Center on page 362
• Login Fails in Sybase Control Center on page 363
• Administrator Account is Locked on page 365
• Browser Refresh (F5) Causes Logout on page 366
• Stale Version of Sybase Control Center After Upgrade on page 366
• Sybase Control Center Reports Certificate Problem on page 368
• Previous Administrator Credentials Used on page 369
• Security Error Triggered When Connecting to Sybase Control Center from Remote
Browser on page 370
• Administrator Login Passes When Provider Is Not Available on page 370
364
Sybase Unwired Platform
Troubleshoot Sybase Control Center
•
•
•
•
Host Name of Registered Resource Changed But Is Not Updated on page 371
Management Issues with Clustered Data Tiers on page 372
Poor Sybase Control Center Performance after Upgrade on page 373
Sybase Control Center Communication with Unwired Server Fails on page 374
Administrator Account is Locked
Problem: An administrator tried logging into Unwired Server from Sybase Control Center
multiple times. After receiving multiple instances of the message Wrong username and
password errors, the message The account is currently locked.
Please contact your server administrator. is finally displayed.
Explanation: The user has exceeded the threshold for failed login attempts. The platform
administrator sets the properties that control the login failure account lock threshold, and the
timeout period. When a user exceeds the threshold value, the account is locked for the timeout
period.
Solution: A user must wait for the lock timeout value to pass, and then log in again.
For details, see Creating a Security Configuration in Sybase Control Center for Sybase
Unwired Platform online help.
See also
• Launching Sybase Control Center Results in Rounded Rectangle Box or Empty Console
Screen on page 356
• Sybase Control Center Console Continually Refreshes on page 357
• Sybase Control Center Windows Service Fails to Start on page 357
• Sybase Control Center Windows Service Deleted on page 359
• Sybase Control Center Fails to Start on page 359
• Second Sybase Control Center Fails to Start on page 361
• Login Invalid in Sybase Control Center on page 362
• Login Fails in Sybase Control Center on page 363
• Login to Sybase Control Center Forces Ending Existing Session on page 364
• Browser Refresh (F5) Causes Logout on page 366
• Stale Version of Sybase Control Center After Upgrade on page 366
• Sybase Control Center Reports Certificate Problem on page 368
• Previous Administrator Credentials Used on page 369
• Security Error Triggered When Connecting to Sybase Control Center from Remote
Browser on page 370
• Administrator Login Passes When Provider Is Not Available on page 370
• Host Name of Registered Resource Changed But Is Not Updated on page 371
• Management Issues with Clustered Data Tiers on page 372
• Poor Sybase Control Center Performance after Upgrade on page 373
Sybase Control Center for Sybase Unwired Platform
365
Troubleshoot Sybase Control Center
•
Sybase Control Center Communication with Unwired Server Fails on page 374
Browser Refresh (F5) Causes Logout
Problem: Pressing the F5 key to refresh your browser logs you out of Sybase Control Center.
Solution: Do not use F5 when you are logged in to Sybase Control Center. Browser refresh
does not refresh data inside Sybase Control Center, but refreshes the loaded application or
pages in the browser—in this case, the Adobe Flash on which Sybase Control Center is built.
Consequently, pressing F5 logs you out of any servers you are currently logged in to, including
Sybase Control Center.
See also
• Launching Sybase Control Center Results in Rounded Rectangle Box or Empty Console
Screen on page 356
• Sybase Control Center Console Continually Refreshes on page 357
• Sybase Control Center Windows Service Fails to Start on page 357
• Sybase Control Center Windows Service Deleted on page 359
• Sybase Control Center Fails to Start on page 359
• Second Sybase Control Center Fails to Start on page 361
• Login Invalid in Sybase Control Center on page 362
• Login Fails in Sybase Control Center on page 363
• Login to Sybase Control Center Forces Ending Existing Session on page 364
• Administrator Account is Locked on page 365
• Stale Version of Sybase Control Center After Upgrade on page 366
• Sybase Control Center Reports Certificate Problem on page 368
• Previous Administrator Credentials Used on page 369
• Security Error Triggered When Connecting to Sybase Control Center from Remote
Browser on page 370
• Administrator Login Passes When Provider Is Not Available on page 370
• Host Name of Registered Resource Changed But Is Not Updated on page 371
• Management Issues with Clustered Data Tiers on page 372
• Poor Sybase Control Center Performance after Upgrade on page 373
• Sybase Control Center Communication with Unwired Server Fails on page 374
Stale Version of Sybase Control Center After Upgrade
Problem: after upgrading Sybase Unwired Platform and relaunching Sybase Control Center
through a Web browser, a stale version of Sybase Control Center loads in the browser.
Explanation: Adobe® Flash® Player caches the earlier version of Sybase Control Center
locally, preventing you from logging in to the correct version of Sybase Control Center when
accessing the browser.
366
Sybase Unwired Platform
Troubleshoot Sybase Control Center
Solution 1: Clear the Adobe Flash Player cache:
1. In Windows Explorer, navigate to C:\Documents and Settings\<username>
\Application Data\Macromedia\Flash Player\#SharedObjects,
and delete all files in this folder.
As an alternative to manually deleting files, you can also access the Adobe Flash Player
Cache Cleanup URL: http://www.macromedia.com/support/documentation/en/
flashplayer/help/settings_manager07.html
Solution 2: Only perform this solution if Solution 1 does not solve the problem. Clear browser
history:
1. In Microsoft Internet Explorer, select Tools > Internet Options > General > Delete... and
delete all temporary files, history, cookies, saved passwords, and Web form information.
See also
• Launching Sybase Control Center Results in Rounded Rectangle Box or Empty Console
Screen on page 356
• Sybase Control Center Console Continually Refreshes on page 357
• Sybase Control Center Windows Service Fails to Start on page 357
• Sybase Control Center Windows Service Deleted on page 359
• Sybase Control Center Fails to Start on page 359
• Second Sybase Control Center Fails to Start on page 361
• Login Invalid in Sybase Control Center on page 362
• Login Fails in Sybase Control Center on page 363
• Login to Sybase Control Center Forces Ending Existing Session on page 364
• Administrator Account is Locked on page 365
• Browser Refresh (F5) Causes Logout on page 366
• Sybase Control Center Reports Certificate Problem on page 368
• Previous Administrator Credentials Used on page 369
• Security Error Triggered When Connecting to Sybase Control Center from Remote
Browser on page 370
• Administrator Login Passes When Provider Is Not Available on page 370
• Host Name of Registered Resource Changed But Is Not Updated on page 371
• Management Issues with Clustered Data Tiers on page 372
• Poor Sybase Control Center Performance after Upgrade on page 373
• Sybase Control Center Communication with Unwired Server Fails on page 374
Sybase Control Center for Sybase Unwired Platform
367
Troubleshoot Sybase Control Center
Sybase Control Center Reports Certificate Problem
When attempting to bring up Sybase Control Center by clicking the Sybase Control Center
link after installation , this message appears: There is a problem with this
website's security certificate.
Explanation: This can occur when the browser session starts on the same computer as Sybase
Control Center. The installer automatically sets up a local security certificate, but the
certificate installed for HTTPS in the web container keystore is a self-signed root certificate,
which is not recognized b the client browser.
Solution: Follow browser-specific instructions to accept the certificate into the Windows
certificate store. Once the certificate is accepted, you may also need to change the Sybase
Control Center Web URL to include the network domain name <yourco.com> in addition to
the host name. That host name in the Web URL must match with the "Issued To" property of
the certificate.
See also
• Launching Sybase Control Center Results in Rounded Rectangle Box or Empty Console
Screen on page 356
• Sybase Control Center Console Continually Refreshes on page 357
• Sybase Control Center Windows Service Fails to Start on page 357
• Sybase Control Center Windows Service Deleted on page 359
• Sybase Control Center Fails to Start on page 359
• Second Sybase Control Center Fails to Start on page 361
• Login Invalid in Sybase Control Center on page 362
• Login Fails in Sybase Control Center on page 363
• Login to Sybase Control Center Forces Ending Existing Session on page 364
• Administrator Account is Locked on page 365
• Browser Refresh (F5) Causes Logout on page 366
• Stale Version of Sybase Control Center After Upgrade on page 366
• Previous Administrator Credentials Used on page 369
• Security Error Triggered When Connecting to Sybase Control Center from Remote
Browser on page 370
• Administrator Login Passes When Provider Is Not Available on page 370
• Host Name of Registered Resource Changed But Is Not Updated on page 371
• Management Issues with Clustered Data Tiers on page 372
• Poor Sybase Control Center Performance after Upgrade on page 373
• Sybase Control Center Communication with Unwired Server Fails on page 374
368
Sybase Unwired Platform
Troubleshoot Sybase Control Center
Previous Administrator Credentials Used
Problem: You cannot use new credentials to authenticate against a resource in Sybase Control
Center. When an administrator enters credentials with the Remember these credentials for
future sessions option, Sybase Control Center uses those credentials until they are cleared.
Solution: Clear credentials so that Sybase Control Center does not use them for future
sessions:
1. Open the Perspective Resources window.
2. Select the resource you want to log in to.
3. From the menu bar, select Resource > Clear Authentication Parameters and click
OK.
You can now authenticate against the resource using new administrator credentials.
See also
• Launching Sybase Control Center Results in Rounded Rectangle Box or Empty Console
Screen on page 356
• Sybase Control Center Console Continually Refreshes on page 357
• Sybase Control Center Windows Service Fails to Start on page 357
• Sybase Control Center Windows Service Deleted on page 359
• Sybase Control Center Fails to Start on page 359
• Second Sybase Control Center Fails to Start on page 361
• Login Invalid in Sybase Control Center on page 362
• Login Fails in Sybase Control Center on page 363
• Login to Sybase Control Center Forces Ending Existing Session on page 364
• Administrator Account is Locked on page 365
• Browser Refresh (F5) Causes Logout on page 366
• Stale Version of Sybase Control Center After Upgrade on page 366
• Sybase Control Center Reports Certificate Problem on page 368
• Security Error Triggered When Connecting to Sybase Control Center from Remote
Browser on page 370
• Administrator Login Passes When Provider Is Not Available on page 370
• Host Name of Registered Resource Changed But Is Not Updated on page 371
• Management Issues with Clustered Data Tiers on page 372
• Poor Sybase Control Center Performance after Upgrade on page 373
• Sybase Control Center Communication with Unwired Server Fails on page 374
Sybase Control Center for Sybase Unwired Platform
369
Troubleshoot Sybase Control Center
Security Error Triggered When Connecting to Sybase Control Center
from Remote Browser
Problem: Connecting to Sybase Control Center from a browser that is remote triggers a
security exception.
Solution: Ensure you have a security certificate installed in the Windows security store. See
Setting Up Browser Certificates for Sybase Control Center Connections in Sybase Control
Center for Sybase Unwired Platform.
See also
• Launching Sybase Control Center Results in Rounded Rectangle Box or Empty Console
Screen on page 356
• Sybase Control Center Console Continually Refreshes on page 357
• Sybase Control Center Windows Service Fails to Start on page 357
• Sybase Control Center Windows Service Deleted on page 359
• Sybase Control Center Fails to Start on page 359
• Second Sybase Control Center Fails to Start on page 361
• Login Invalid in Sybase Control Center on page 362
• Login Fails in Sybase Control Center on page 363
• Login to Sybase Control Center Forces Ending Existing Session on page 364
• Administrator Account is Locked on page 365
• Browser Refresh (F5) Causes Logout on page 366
• Stale Version of Sybase Control Center After Upgrade on page 366
• Sybase Control Center Reports Certificate Problem on page 368
• Previous Administrator Credentials Used on page 369
• Administrator Login Passes When Provider Is Not Available on page 370
• Host Name of Registered Resource Changed But Is Not Updated on page 371
• Management Issues with Clustered Data Tiers on page 372
• Poor Sybase Control Center Performance after Upgrade on page 373
• Sybase Control Center Communication with Unwired Server Fails on page 374
Administrator Login Passes When Provider Is Not Available
Problem: The configured authentication provider is unavailable but administration credentials
are still accepted.
Explanation: The administrator login credentials may be cached by Unwired Server.
Solution: If this behavior is undesired, reduce the cache timeout value used by the Unwired
Server security domain instance. For details, search for Authentication Cache Timeouts in
Security.
370
Sybase Unwired Platform
Troubleshoot Sybase Control Center
See also
• Launching Sybase Control Center Results in Rounded Rectangle Box or Empty Console
Screen on page 356
• Sybase Control Center Console Continually Refreshes on page 357
• Sybase Control Center Windows Service Fails to Start on page 357
• Sybase Control Center Windows Service Deleted on page 359
• Sybase Control Center Fails to Start on page 359
• Second Sybase Control Center Fails to Start on page 361
• Login Invalid in Sybase Control Center on page 362
• Login Fails in Sybase Control Center on page 363
• Login to Sybase Control Center Forces Ending Existing Session on page 364
• Administrator Account is Locked on page 365
• Browser Refresh (F5) Causes Logout on page 366
• Stale Version of Sybase Control Center After Upgrade on page 366
• Sybase Control Center Reports Certificate Problem on page 368
• Previous Administrator Credentials Used on page 369
• Security Error Triggered When Connecting to Sybase Control Center from Remote
Browser on page 370
• Host Name of Registered Resource Changed But Is Not Updated on page 371
• Management Issues with Clustered Data Tiers on page 372
• Poor Sybase Control Center Performance after Upgrade on page 373
• Sybase Control Center Communication with Unwired Server Fails on page 374
Host Name of Registered Resource Changed But Is Not Updated
Problem: An administrator changes the host name property of a registered resource; but in
Sybase Control Center, the old host name is still used and the management console for
Unwired Platform does not appear.
Description: If you modify the resource properties for an Unwired Server in Sybase Control
Center, the new host name or IP address is not used in establishing a connection to the server.
Solution: After changing the host name property of the resource, in the Perspective Resources
view, right-click the resource and select Authenticate to update resource connection
properties. You can then launch the management console successfully.
See also
• Launching Sybase Control Center Results in Rounded Rectangle Box or Empty Console
Screen on page 356
• Sybase Control Center Console Continually Refreshes on page 357
• Sybase Control Center Windows Service Fails to Start on page 357
• Sybase Control Center Windows Service Deleted on page 359
Sybase Control Center for Sybase Unwired Platform
371
Troubleshoot Sybase Control Center
Sybase Control Center Fails to Start on page 359
Second Sybase Control Center Fails to Start on page 361
Login Invalid in Sybase Control Center on page 362
Login Fails in Sybase Control Center on page 363
Login to Sybase Control Center Forces Ending Existing Session on page 364
Administrator Account is Locked on page 365
Browser Refresh (F5) Causes Logout on page 366
Stale Version of Sybase Control Center After Upgrade on page 366
Sybase Control Center Reports Certificate Problem on page 368
Previous Administrator Credentials Used on page 369
Security Error Triggered When Connecting to Sybase Control Center from Remote
Browser on page 370
• Administrator Login Passes When Provider Is Not Available on page 370
• Management Issues with Clustered Data Tiers on page 372
• Poor Sybase Control Center Performance after Upgrade on page 373
• Sybase Control Center Communication with Unwired Server Fails on page 374
•
•
•
•
•
•
•
•
•
•
•
Management Issues with Clustered Data Tiers
Problem: if you install Unwired Platform and the cache database on Microsoft Cluster, you
will receive errors when trying to manage the cluster in Sybase Control Center. This is because
Microsoft Cluster uses node switches.
Solution: Replace the current entry for the cluster with a new entry that uses the computer
node's hostname or IP address, rather than Unwired Platform cluster's hostname (the default).
See also
• Launching Sybase Control Center Results in Rounded Rectangle Box or Empty Console
Screen on page 356
• Sybase Control Center Console Continually Refreshes on page 357
• Sybase Control Center Windows Service Fails to Start on page 357
• Sybase Control Center Windows Service Deleted on page 359
• Sybase Control Center Fails to Start on page 359
• Second Sybase Control Center Fails to Start on page 361
• Login Invalid in Sybase Control Center on page 362
• Login Fails in Sybase Control Center on page 363
• Login to Sybase Control Center Forces Ending Existing Session on page 364
• Administrator Account is Locked on page 365
• Browser Refresh (F5) Causes Logout on page 366
• Stale Version of Sybase Control Center After Upgrade on page 366
• Sybase Control Center Reports Certificate Problem on page 368
372
Sybase Unwired Platform
Troubleshoot Sybase Control Center
Previous Administrator Credentials Used on page 369
Security Error Triggered When Connecting to Sybase Control Center from Remote
Browser on page 370
• Administrator Login Passes When Provider Is Not Available on page 370
• Host Name of Registered Resource Changed But Is Not Updated on page 371
• Poor Sybase Control Center Performance after Upgrade on page 373
• Sybase Control Center Communication with Unwired Server Fails on page 374
•
•
Poor Sybase Control Center Performance after Upgrade
Problem: After upgrading to the latest version of Sybase Unwired Platform, Sybase Control
Center performance is poor.
Explanation: This may indicate that Flash Player cache from the previous version of Sybase
Control Center is filled and slowing down performance.
1. Navigate to C:\Documents and Settings\username\Application Data
\Macromedia\Flash Player\#SharedObjects .
2. Delete all files under this folder.
Note: Alternatively, go to the following link from a browser: http://www.macromedia.com/
support/documentation/en/flashplayer/help/settings_manager07.html. Use the Website
Storage settings panel to change storage capacity, or delete Websites to clean up the cache.
See also
• Launching Sybase Control Center Results in Rounded Rectangle Box or Empty Console
Screen on page 356
• Sybase Control Center Console Continually Refreshes on page 357
• Sybase Control Center Windows Service Fails to Start on page 357
• Sybase Control Center Windows Service Deleted on page 359
• Sybase Control Center Fails to Start on page 359
• Second Sybase Control Center Fails to Start on page 361
• Login Invalid in Sybase Control Center on page 362
• Login Fails in Sybase Control Center on page 363
• Login to Sybase Control Center Forces Ending Existing Session on page 364
• Administrator Account is Locked on page 365
• Browser Refresh (F5) Causes Logout on page 366
• Stale Version of Sybase Control Center After Upgrade on page 366
• Sybase Control Center Reports Certificate Problem on page 368
• Previous Administrator Credentials Used on page 369
• Security Error Triggered When Connecting to Sybase Control Center from Remote
Browser on page 370
Sybase Control Center for Sybase Unwired Platform
373
Troubleshoot Sybase Control Center
•
•
•
•
Administrator Login Passes When Provider Is Not Available on page 370
Host Name of Registered Resource Changed But Is Not Updated on page 371
Management Issues with Clustered Data Tiers on page 372
Sybase Control Center Communication with Unwired Server Fails on page 374
Sybase Control Center Communication with Unwired Server Fails
Problem: While using Sybase Control Center, a Communication with Unwired
Server failed appears.
Explanation: Sybase Control Center cannot connect to the Unwired Server and displays this
error message. To confirm this issue, open the Sybase Control Center SCC_HOME\log
\gateway.log and look for org.omg.CORBA.COMM_FAILURE,
com.sybase.djc.rmi.iiop.BadMagicException, or
org.omg.CORBA.MARSHAL entries.
Solutions:
1. Ensure the protocol and port used by both the Unwired Server management port and the
Sybase Control Center managed resource registration entry match. For information about
validating and changing these properties, see Adding or Updating Unwired Server
Registration Properties in Sybase Control Center for Sybase Unwired Platform.
2. Validate that the configured port is the Unwired Server management port of 2000 or 2001.
Sybase recommends that you not change these default values. If you have changed them
and the connection fails, update the managed resource connection property to use the
default.
For more information about ports, see Port Number Reference in System Administration.
For more information about validating and changing this port, see Registering a Resource
as an SCC Managed Resource in Sybase Control Center for Sybase Unwired Platform.
3. If the management security profile now uses SSL mutual authentication, validate that you
have installed certificates for mutual authentication into both Sybase Control Center's and
Unwired Server's keystore. If each component does not have the opposite set of
certificates, mutual authentication fails. Either install the missing certificates if mutual
authentication is required, or use the following procedure to recover from this scenario:
a. If Unwired Server also has a standard management (non-secure) port available, you
can connect to that port by updating the Sybase Control Center resource (localhost)
port number property and setting secure to "No". See Adding or Updating Unwired
Server Registration Properties in Sybase Control Center for Sybase Unwired
Platform.
b. If Unwired Server does not have the standard management port enabled, then update
the securityProfile property value in the SUP_HOME\Servers\UnwiredServer
\Repository\Instance\com\sybase\djc\server
\SocketListener\{ServerName}_iiops1.propertiesfile to use the
"default" profile, and restart Unwired Server.
For information about installing certificates, see Changing Installed Certificates Used for
Unwired Server and Sybase Control Center HTTPS Listeners, in the Security guide. For
374
Sybase Unwired Platform
Troubleshoot Sybase Control Center
information about changing the authentication method used by the security profile, see
Creating an SSL Security Profile in Sybase Control Center in Sybase Control Center for
Sybase Unwired Platform online help.
See also
• Launching Sybase Control Center Results in Rounded Rectangle Box or Empty Console
Screen on page 356
• Sybase Control Center Console Continually Refreshes on page 357
• Sybase Control Center Windows Service Fails to Start on page 357
• Sybase Control Center Windows Service Deleted on page 359
• Sybase Control Center Fails to Start on page 359
• Second Sybase Control Center Fails to Start on page 361
• Login Invalid in Sybase Control Center on page 362
• Login Fails in Sybase Control Center on page 363
• Login to Sybase Control Center Forces Ending Existing Session on page 364
• Administrator Account is Locked on page 365
• Browser Refresh (F5) Causes Logout on page 366
• Stale Version of Sybase Control Center After Upgrade on page 366
• Sybase Control Center Reports Certificate Problem on page 368
• Previous Administrator Credentials Used on page 369
• Security Error Triggered When Connecting to Sybase Control Center from Remote
Browser on page 370
• Administrator Login Passes When Provider Is Not Available on page 370
• Host Name of Registered Resource Changed But Is Not Updated on page 371
• Management Issues with Clustered Data Tiers on page 372
• Poor Sybase Control Center Performance after Upgrade on page 373
• Adding or Updating Unwired Server Registration Properties on page 20
• Configuring Management Port Properties on page 42
Platform Component Monitoring Issues
Review this list of documented issues for platform components monitored by Sybase Control
Center.
See also
• Using Sybase Control Center to Troubleshoot Unwired Platform on page 353
• Collecting Administration Performance Data for Troubleshooting on page 354
• Sybase Control Center Management Tier Issues on page 355
• Server Tier Administration Issues on page 378
Sybase Control Center for Sybase Unwired Platform
375
Troubleshoot Sybase Control Center
•
•
Package Deployment and Management Issues on page 390
Application and Application User Management Issues on page 395
Monitoring Data Does Not Appear in History Tab
Problem: Monitoring data does not appear immediately in the History tab.
Explanation: The monitoring data is stored in memory to optimize database access, and
periodically flushed to the monitoring database.
Solution: Try either of these options:
•
•
Wait for the data to be flushed. The default time period is five minutes.
Change the flush interval to a smaller value in Sybase Control Center:
1. In the left navigation pane, select Monitoring.
2. In the right administration pane, select the General tab.
3. Click Configuration.
4. In the flush threshold section, ensure that Enable flush threshold configuration is
selected.
5. Select one of:
• Number of rows – monitoring data that surpasses the specified number of rows is
flushed from the console display. Enter the desired number of rows adjacent to
Rows. The default is 100.
• Time interval – monitoring data older than the specified time interval is flushed
from the console display. Enter the desired duration adjacent to Minutes. The
default is 5.
• Either rows or time interval – monitoring data is flushed from the console display
according to whichever value is reached first: either the specified number of rows
or the specified time interval. Enter the desired rows and duration adjacent to Rows
and Minutes, respectively.
6. Retrieve the results list using the Sybase Control Center monitoring node.
See also
• Domain Log Data Does Not Appear in History Tab on page 376
• Previously Existing Monitoring Data No Longer Appears on page 377
• Previously Existing Domain Log Data No Longer Appears on page 378
Domain Log Data Does Not Appear in History Tab
Problem: Domain log data does not appear immediately in the History tab.
Explanation: The domain log data is stored in memory to optimize database access, and
periodically flushed to the domain log database.
Solution: Try either of these options:
376
Sybase Unwired Platform
Troubleshoot Sybase Control Center
•
•
Wait for the data to be flushed. The default time period is five minutes.
Change the flush interval to a smaller value in Sybase Control Center:
1. In the left navigation pane, expand the Domains folder and select the default domain.
2. Select Log.
3. In the right administration pane, select the Settings tab.
4. Click Configuration.
5. In the flush threshold section, ensure that Enable flush threshold configuration is
selected.
6. Select one of:
• Number of rows – domain log data that surpasses the specified number of rows is
flushed from the console display. Enter the desired number of rows adjacent to
Rows. The default is 100.
• Time interval – domain log data older than the specified time interval is flushed
from the console display. Enter the desired duration adjacent to Minutes. The
default is 5.
• Either rows or time interval – domain log data is flushed from the console display
according to whichever value is reached first: either the specified number of rows
or the specified time interval. Enter the desired rows and duration adjacent to Rows
and Minutes, respectively.
7. Retrieve the results list using the Sybase Control Center domain log node.
See also
• Monitoring Data Does Not Appear in History Tab on page 376
• Previously Existing Monitoring Data No Longer Appears on page 377
• Previously Existing Domain Log Data No Longer Appears on page 378
Previously Existing Monitoring Data No Longer Appears
Problem: Monitoring data that displayed previously no longer appears.
Explanation: By default, monitoring data is preserved in the database for seven days. After
that period, the data is removed.
Solution: Change the auto purge setting value in Sybase Control Center. Auto purge clears
obsolete data from the monitoring database once it reaches the specified threshold.
1.
2.
3.
4.
5.
6.
7.
In the left navigation pane, select Monitoring.
In the right administration pane, select the General tab.
Click Configuration.
In the auto purge section, ensure that Enable auto purge configuration is selected.
Enter the length of time (in days) to retain monitoring data before it is purged.
Restart the server.
Retrieve the results list using the Sybase Control Center monitoring node.
Sybase Control Center for Sybase Unwired Platform
377
Troubleshoot Sybase Control Center
See also
• Monitoring Data Does Not Appear in History Tab on page 376
• Domain Log Data Does Not Appear in History Tab on page 376
• Previously Existing Domain Log Data No Longer Appears on page 378
Previously Existing Domain Log Data No Longer Appears
Problem: Domain log data that displayed previously no longer appears.
Explanation: By default, domain log data is preserved in the database for seven days. After
that period, the data is removed.
Solution: Change the auto purge setting value in Sybase Control Center. Auto purge clears
obsolete data from the domain log database once it reaches the specified threshold.
1.
2.
3.
4.
5.
6.
7.
8.
In the left navigation pane, expand the Domains folder and select the default domain.
Select Log.
In the right administration pane, select the Settings tab.
Click Configuration.
In the auto purge section, ensure that Enable auto purge configuration is selected.
Enter the length of time (in days) to retain domain log data before it is purged.
Restart the server.
Retrieve the results list using the Sybase Control Centerdomain log node.
See also
• Monitoring Data Does Not Appear in History Tab on page 376
• Domain Log Data Does Not Appear in History Tab on page 376
• Previously Existing Monitoring Data No Longer Appears on page 377
Server Tier Administration Issues
Review this list of documented issues for Unwired Server or its internal synchronization
services configured and administered by Sybase Control Center.
See also
• Using Sybase Control Center to Troubleshoot Unwired Platform on page 353
• Collecting Administration Performance Data for Troubleshooting on page 354
• Sybase Control Center Management Tier Issues on page 355
• Platform Component Monitoring Issues on page 375
• Package Deployment and Management Issues on page 390
• Application and Application User Management Issues on page 395
378
Sybase Unwired Platform
Troubleshoot Sybase Control Center
Server List Not Retrieved
Problem: No list of Unwired Server displays in Sybase Control Center. Instead, an Error
Retrieving Server List message appears in the left navigation pane.
Scenario 1: No other error message appears.
If this is the case, one of the following explanations may apply:
•
•
You are attempting to connect to a remote server that is not properly registered in Sybase
Control Center.
Solution: Manually register the remote server. By default, only Unwired Servers installed
to the same host computer are automatically registered with Sybase Control Center. See
Getting Started with Unwired Server Administration in the Sybase Control Center online
help. If you have recently made changes to the environment, for example, by modifying
server resource properties (login, password, host name, IP address, or port number),
ensure that you reauthenticate after making the changes.
Jetty caching in Sybase Control Center prevents the console from displaying the server
tree. This is indicated by 404 errors in both the console URL and SCC_HOME\services
\EmbeddedWebContainer\log\http-service.log (the HTTP access log).
Solution:
1. Close Sybase Control Center.
2. Stop Sybase Control Center X.X Service.
3. Delete the contents of: SCC_HOME\services\EmbeddedWebContainer
\container\Jetty-X.X.XX\work.
4. Restart Sybase Control Center X.X service.
Scenario 2: The right administration pane shows an Authentication has failed
error message.
If this is the case, one of the following explanations may apply:
•
•
You have not performed the "Authenticate" step in Sybase Control Center after registering
the resource or changing their credentials.
Solution: In the Perspective Resources view, right click the server name and select
Authenticate. In the default configuration, if you have used "supAdmin" to log in to
Sybase Control Center, select Use my current SCC login.
The server IP may have changed.
Solution: Update server resource properties, and repeat the "Authenticate" step described
above. See the topic Sybase Control Center Fails to Start.
Scenario 3: The right administration pane shows a Connection unknown. Ensure
Server is running.... message.
If this is the case, one of the following explanations may apply:
Sybase Control Center for Sybase Unwired Platform
379
Troubleshoot Sybase Control Center
•
•
Unwired Server responded with an exception indicating a problem on the server.
Solution: Check SUP_HOME\Servers\UnwiredServer\logs\<hostname>server.log for details.
The Sybase Control Center security provider is down or a system condition prevents
Sybase Control Center from authenticating the user for administration access.
Solution: Ensure that the security provider is running and that its host is reachable from the
Sybase Control Center host.
Scenario 4: In some rare cases, the connection between Sybase Control Center and Unwired
Server cannot be established after trying the previous recommendations.
Solution: You may need to stop and restart the Sybase Control Center X.X windows service.
After stopping the window service, make sure the process uaservices.exe is not running
(or stop it from Windows task manager). Then log in to Sybase Control Center again.
Scenario 5: This may happen if you upgraded Sybase Unwired Platform to a newer version,
and changed the server host name.
Solution: You need to complete some extra steps:
1. Change the listener prefix of httpListeners and iiopListeners for the new hostname in the
new server's properties file:
Repository\Instance\com\sybase\djc\server\ApplicationServer
\default.properties, <new_hostname>.properties
2. In Repository\Instance\com\sybase\djc\server\SocketListner
\*.properties, rename all the
<old_hostname>_<protocol>.properties into
<new_hostname>_<protocol>.properties.
3. Use dbisqlc to update the table: cluster_installation in clusterdb,
update cluster_installation set hostname='<new_hostname>'
where hostname='<old_hostname>'.
See also
• Unwired Server Fails to Start on page 381
• Error in Listing Application Connections and
ADMIN_WEBSERVICE_INVOCATION_ERROR in gateway.log on page 381
• Starting or Restarting a Remote Server from Sybase Control Center Fails on page 382
• Port Conflict Issues on page 384
• Unexpected Listener Startup or Connection Errors on page 385
• Refreshing Server Configuration Displays Only Partial Updates on page 385
• Users Connect with Old Credentials on page 387
• AuthorizationException Displays Instead of Status on page 388
• Increasing Messaging Queue Counts Degrades Performance on page 388
• Saving Server Configuration Fails Due to Certificate Validation Error on page 389
380
Sybase Unwired Platform
Troubleshoot Sybase Control Center
•
Unknown Server Error Message on page 389
Unwired Server Fails to Start
Problem: Starting Unwired Server from Windows services or the desktop shortcut fails.
Solution:
1. Ensure that the server license is valid and has not expired.
2. Open Windows services to check that the services Unwired Server depends on for start-up
are running properly. Identify dependencies by right-clicking the service and selecting
Properties.
3. Check SUP_HOME\Servers\UnwiredServer\log\serverNameserver.log for error messages indicating the nature of Unwired Server start-up issues.
4. Check SUP_HOME\Servers\UnwiredServer\log\bootstrap**.log for
possible license errors.
See also
• Server List Not Retrieved on page 379
• Error in Listing Application Connections and
ADMIN_WEBSERVICE_INVOCATION_ERROR in gateway.log on page 381
• Starting or Restarting a Remote Server from Sybase Control Center Fails on page 382
• Port Conflict Issues on page 384
• Unexpected Listener Startup or Connection Errors on page 385
• Refreshing Server Configuration Displays Only Partial Updates on page 385
• Users Connect with Old Credentials on page 387
• AuthorizationException Displays Instead of Status on page 388
• Increasing Messaging Queue Counts Degrades Performance on page 388
• Saving Server Configuration Fails Due to Certificate Validation Error on page 389
• Unknown Server Error Message on page 389
Error in Listing Application Connections and
ADMIN_WEBSERVICE_INVOCATION_ERROR in gateway.log
Problem: This message may indicate that an Unwired Server administrative component is not
running.
If users report a problem listing application connections in Sybase Control Center, check for
this error message in the Sybase Control Center gateway.log file:
com.sybase.uep.sysadmin.management.mbean.UEPAdminException:
com.sybase.uep.admin.client.AdminException:
ADMIN_WEBSERVICE_INVOCATION_ERROR:java.security.PrivilegedActionExc
eption: com.sun.xml.internal.messaging.saaj.SOAPExceptionImpl:
Message send failed
javax.management.MBeanException:
Sybase Control Center for Sybase Unwired Platform
381
Troubleshoot Sybase Control Center
Explanation: Usually this occurs when there is a conflict on the currently configured port for
the administration web service or a component of Unwired Server service went down for some
reason.
One way to verify availability of the Web service is by accessing the following URL from the
host where Sybase Unwired Platform is installed: http://localhost:5100/MobileOffice/
Admin.asmx.
Note: This link works from the host where Sybase Unwired Platform is installed, using the
correct Messaging port. The default Messaging port is 5100, but this may vary depending on
your configuration.
Solution 1: Check Windows Application Event log for any error reported there. If the service
is configured to run with a domain account and the password has been changed, you will need
to update the password.
Solution 2: Make sure the administration Web service is up and running, and correctly
configured. Review Cannot Access Applications Tab and Web Service Error in
Troubleshooting to reconfigure the port in case of conflict with existing port.
See also
• Server List Not Retrieved on page 379
• Unwired Server Fails to Start on page 381
• Starting or Restarting a Remote Server from Sybase Control Center Fails on page 382
• Port Conflict Issues on page 384
• Unexpected Listener Startup or Connection Errors on page 385
• Refreshing Server Configuration Displays Only Partial Updates on page 385
• Users Connect with Old Credentials on page 387
• AuthorizationException Displays Instead of Status on page 388
• Increasing Messaging Queue Counts Degrades Performance on page 388
• Saving Server Configuration Fails Due to Certificate Validation Error on page 389
• Unknown Server Error Message on page 389
Starting or Restarting a Remote Server from Sybase Control Center
Fails
Problem: After you have registered a remote server in Sybase Control Center, you cannot start
or restart the server.
If the DNS server cannot resolve the host name of the machine on which the remote Unwired
Server is installed, or if the host has no internal DNS server, you cannot start, stop, or restart
that Unwired Server using your local instance of Sybase Control Center. Because this network
communication relies on name resolution, you must ensure that DNS is set up properly to
successfully control a remote Unwired Server.
Before attempting the following solutions, verify that:
382
Sybase Unwired Platform
Troubleshoot Sybase Control Center
1. Sybase Control Center is running on the remote host.
2. A network connection can be established between your Sybase Control Center host and
the Sybase Control Center agent on the remote server's host.
If the DNS server cannot establish a connection, try the following:
Solution 1: Repair the network DNS server setup. If you or your network administrator cannot
modify the DNS, use solution 2.
Solution 2: Change the host name to its IP address in the Sybase Control Center serviceconfig.xml file:
•
•
•
If you cannot resolve the local host name, modify the file on the local instance of Sybase
Control Center.
If you cannot resolve the remote host name, modify the file on the remote instance of
Sybase Control Center.
If you cannot resolve both the remote and local host names, modify both files.
1. From the command line, verify the host name by running nslookup<hostname >.
2. If the DNS server cannot resolve the host name, edit the collocated SCC_HOME
\services\RMI\service-config.xml file:
a. Log out of Sybase Control Center.
b. Stop the Sybase Control Center X.X service.
c. Open SCC_HOME\services\RMI\service-config.xml.
d. Locate this line: <set-property property="address"
value="<hostname>" />.
If the line does not exist, add it under the <properties></properties>
element in the file.
e. Change the value from the host name to the IP address of the host computer. If the IP
address is already used, ensure it is valid (especially if the IP address has recently been
changed).
f. Restart the Sybase Control Center X.X service.
g. Log in to Sybase Control Center and proceed with your administrative tasks.
If the DNS server resolves the host name, but the problem persists, check that both:
•
•
The remote host on which Unwired Platform and Sybase Control Center are installed can
receive UDP multicasts from the local host on which Sybase Control Center is installed,
and
The remote instance of Sybase Control Center uses RMI port 9999.
Solution 3: Make sure the hosts file includes complete entries for each node in the Unwired
Server cluster.
1. On each Unwired Server host, edit the hosts file, located at:
C:\WINDOWS\system32\drivers\etc
Sybase Control Center for Sybase Unwired Platform
383
Troubleshoot Sybase Control Center
2. Add entries to identify the IP address and fully qualified network name of every other node
in the Unwired Server cluster.
See also
• Server List Not Retrieved on page 379
• Unwired Server Fails to Start on page 381
• Error in Listing Application Connections and
ADMIN_WEBSERVICE_INVOCATION_ERROR in gateway.log on page 381
• Port Conflict Issues on page 384
• Unexpected Listener Startup or Connection Errors on page 385
• Refreshing Server Configuration Displays Only Partial Updates on page 385
• Users Connect with Old Credentials on page 387
• AuthorizationException Displays Instead of Status on page 388
• Increasing Messaging Queue Counts Degrades Performance on page 388
• Saving Server Configuration Fails Due to Certificate Validation Error on page 389
• Unknown Server Error Message on page 389
Port Conflict Issues
Problem: You have identified a Sybase Control Center X.X service port conflict.
Solution:
1. Identify the service with the port conflict in SCC_HOME\log\agent.log.
2. Use a text editor to open SCC_HOME\Services\Servicename\serviceconfig.xml.
3. Change the port to an available port number.
4. Save and close the file.
Search for Port Number Reference in System Administration for more information.
See also
• Server List Not Retrieved on page 379
• Unwired Server Fails to Start on page 381
• Error in Listing Application Connections and
ADMIN_WEBSERVICE_INVOCATION_ERROR in gateway.log on page 381
• Starting or Restarting a Remote Server from Sybase Control Center Fails on page 382
• Unexpected Listener Startup or Connection Errors on page 385
• Refreshing Server Configuration Displays Only Partial Updates on page 385
• Users Connect with Old Credentials on page 387
• AuthorizationException Displays Instead of Status on page 388
• Increasing Messaging Queue Counts Degrades Performance on page 388
384
Sybase Unwired Platform
Troubleshoot Sybase Control Center
•
•
Saving Server Configuration Fails Due to Certificate Validation Error on page 389
Unknown Server Error Message on page 389
Unexpected Listener Startup or Connection Errors
Problem: You encounter unexpected listener startup or connection errors for Unwired
Platform components. This is usually seen when Unwired Server is installed on a host in DMZ
(De-Militarized Zone) within the internal and external firewalls.
Solution:
1. Verify that the TCP/IP filtering restriction is not in effect on the host machine.
To do so on Windows XP, navigate to: Control Panel > Network Connections > Local
Area Connection 1 > Properties > General tab > Internet Protocol (TCP/IP) >
Properties > General tab > Advanced > Options tab > TCP/IP filtering > Properties
2. In TCP/IP Filtering, check to make sure the Enable TCP/IP Filtering (All Adopters)
checkbox is not selected. This enables all Sybase Unwired Platform infrastructure ports.
If you do choose to select it, be sure to select Permit All for TCP Ports to enable all Sybase
Unwired Platform infrastructure ports. These ports are documented in the Port Number
Reference in the Installation Guide for Runtime.
3. Click OK to close each window and save your changes.
4. You can change “Local Area Connection 1” to the network connection name being used on
the machine.
5. Make sure users are not using third party port blockers, like McAfee Antivirus.
See also
• Server List Not Retrieved on page 379
• Unwired Server Fails to Start on page 381
• Error in Listing Application Connections and
ADMIN_WEBSERVICE_INVOCATION_ERROR in gateway.log on page 381
• Starting or Restarting a Remote Server from Sybase Control Center Fails on page 382
• Port Conflict Issues on page 384
• Refreshing Server Configuration Displays Only Partial Updates on page 385
• Users Connect with Old Credentials on page 387
• AuthorizationException Displays Instead of Status on page 388
• Increasing Messaging Queue Counts Degrades Performance on page 388
• Saving Server Configuration Fails Due to Certificate Validation Error on page 389
• Unknown Server Error Message on page 389
Refreshing Server Configuration Displays Only Partial Updates
Problem: The Refresh button in the Server Configuration node does not display correct
properties or values, despite changes being made and saved. Updates consequently appear to
Sybase Control Center for Sybase Unwired Platform
385
Troubleshoot Sybase Control Center
have been lost. In some scenarios, when you save the Server Configuration, it fails with the
message Save Failed.
Scenario 1: After restarting Unwired Server, refreshing the server configuration displays the
first saved change, but not subsequent saved updates. The message Save Failed appears in
the administration console after you attempt to save an update.
In this scenario, the second save was likely unsuccessful. The message Save Failed
indicates a conflict with the first set of updates.
Cumulative saved changes are applied successfully upon server restart only if these updates do
not conflict. Attempting to save two conflicting sets of changes fails.
Solution: Inject a server restart in between each saved change to ensure that the required
updates are propagated across the server.
Scenario 2: After restarting Unwired Server, refreshing the server configuration displays the
final saved update, but not previous ones.
The refresh action following saved configuration changes must be used in conjunction with an
Unwired Server restart. Refreshing the server configuration displays the latest successfully
saved configuration information.
If you click Refresh in between two sets of saved changes, only the most recent saved updates
are applied during a server restart, as in the following workflow:
1.
2.
3.
4.
5.
6.
7.
Make the first change.
Save the configuration.
Refresh the configuration.
Make the second change.
Save the configuration.
Restart the server.
Refresh the configuration.
In this sequence, only the second set of changes in step 4 are committed and consequently
displayed as the current set of properties used by Unwired Server.
Solution: If you refresh the configuration after saving updates to it, restart Unwired Server
immediately to apply those changes before making another set of updates. Otherwise, the first
set of configuration changes will be lost. The Refresh button allows you to then validate that
those changes are applied and used by Unwired Server. For details on how to refresh the server
in the correct sequence, see Saving and Refreshing an Unwired Server Configuration in the
Sybase Control Center for Sybase Unwired Platform online help.
See also
• Server List Not Retrieved on page 379
• Unwired Server Fails to Start on page 381
386
Sybase Unwired Platform
Troubleshoot Sybase Control Center
Error in Listing Application Connections and
ADMIN_WEBSERVICE_INVOCATION_ERROR in gateway.log on page 381
• Starting or Restarting a Remote Server from Sybase Control Center Fails on page 382
• Port Conflict Issues on page 384
• Unexpected Listener Startup or Connection Errors on page 385
• Users Connect with Old Credentials on page 387
• AuthorizationException Displays Instead of Status on page 388
• Increasing Messaging Queue Counts Degrades Performance on page 388
• Saving Server Configuration Fails Due to Certificate Validation Error on page 389
• Unknown Server Error Message on page 389
•
Users Connect with Old Credentials
Problem: A user changes password in the backend security system, but can still authenticate
with the previous password when connecting to Unwired Server.
Description: Unwired Server securely caches authenticated login credentials (1 hour by
default), so that subsequent connection requests using the same credentials are not sent to the
underlying security provider until the login cache timeout is reached. However, if the same
user uses changed credentials, the authentication request is sent to the underlying security
provider. The authorization outcome is not cached and always delegated to the security
provider in the security configuration.
Solution: To reduce the cache period, decrease the default authentication cache timeout for a
security configuration using Sybase Control Center (go to the Cluster > Security > <security
configurationname> > Settings tab). Setting the property to 0 results in disabling the
authentication caching (not recommended for performance reasons).
See also
• Server List Not Retrieved on page 379
• Unwired Server Fails to Start on page 381
• Error in Listing Application Connections and
ADMIN_WEBSERVICE_INVOCATION_ERROR in gateway.log on page 381
• Starting or Restarting a Remote Server from Sybase Control Center Fails on page 382
• Port Conflict Issues on page 384
• Unexpected Listener Startup or Connection Errors on page 385
• Refreshing Server Configuration Displays Only Partial Updates on page 385
• AuthorizationException Displays Instead of Status on page 388
• Increasing Messaging Queue Counts Degrades Performance on page 388
• Saving Server Configuration Fails Due to Certificate Validation Error on page 389
• Unknown Server Error Message on page 389
Sybase Control Center for Sybase Unwired Platform
387
Troubleshoot Sybase Control Center
AuthorizationException Displays Instead of Status
The SCC administration console left-pane tree structure is not complete, and an
AuthorizationException is reported..
Explanation: This may happen if the SCC administration console internal network
communications are not working properly.
Solution:
1. Close the Internet Explorer session.
2. Relaunch the SCC administrative console.
3. Log in as usual.
The internal network connection is resumed by restarting, so the tree displays information
and status properly.
See also
• Server List Not Retrieved on page 379
• Unwired Server Fails to Start on page 381
• Error in Listing Application Connections and
ADMIN_WEBSERVICE_INVOCATION_ERROR in gateway.log on page 381
• Starting or Restarting a Remote Server from Sybase Control Center Fails on page 382
• Port Conflict Issues on page 384
• Unexpected Listener Startup or Connection Errors on page 385
• Refreshing Server Configuration Displays Only Partial Updates on page 385
• Users Connect with Old Credentials on page 387
• Increasing Messaging Queue Counts Degrades Performance on page 388
• Saving Server Configuration Fails Due to Certificate Validation Error on page 389
• Unknown Server Error Message on page 389
Increasing Messaging Queue Counts Degrades Performance
Problem: Both inbound and outbound messaging queue counts were increased, however,
performance degraded as a result.
Description: After increasing inbound and outbound message queue count, the default
maxThreads of IIOP socket listener is insufficient.
Solution: Increase the maxThreads of IIOP socket listener by editing the
hostname_iiop1.properties file (located in SUP_HOME\Servers
\UnwiredServer\Repository\Instance\com\sybase\djc\server
\SocketListener\), and restart Unwired Server. The maxThread of IIOP socket
listener must be larger than the sum of all nodes needed IIOP thread counts.
388
Sybase Unwired Platform
Troubleshoot Sybase Control Center
See also
• Server List Not Retrieved on page 379
• Unwired Server Fails to Start on page 381
• Error in Listing Application Connections and
ADMIN_WEBSERVICE_INVOCATION_ERROR in gateway.log on page 381
• Starting or Restarting a Remote Server from Sybase Control Center Fails on page 382
• Port Conflict Issues on page 384
• Unexpected Listener Startup or Connection Errors on page 385
• Refreshing Server Configuration Displays Only Partial Updates on page 385
• Users Connect with Old Credentials on page 387
• AuthorizationException Displays Instead of Status on page 388
• Saving Server Configuration Fails Due to Certificate Validation Error on page 389
• Unknown Server Error Message on page 389
Saving Server Configuration Fails Due to Certificate Validation Error
Problem: Saving the server configuration after property updates yields this error:
"[com.sybase.sup.admin.server.configuration.RuntimeServerConfigurationHandler] Invalid
configuration object for: SyncServerConfiguration. Message : 'certificate validation failed.
Update did not happen.'"
Solution: The message suggests that the server certificate has expired. Update the certificate
file to a non-expired version, and try to save again.
See also
• Server List Not Retrieved on page 379
• Unwired Server Fails to Start on page 381
• Error in Listing Application Connections and
ADMIN_WEBSERVICE_INVOCATION_ERROR in gateway.log on page 381
• Starting or Restarting a Remote Server from Sybase Control Center Fails on page 382
• Port Conflict Issues on page 384
• Unexpected Listener Startup or Connection Errors on page 385
• Refreshing Server Configuration Displays Only Partial Updates on page 385
• Users Connect with Old Credentials on page 387
• AuthorizationException Displays Instead of Status on page 388
• Increasing Messaging Queue Counts Degrades Performance on page 388
• Unknown Server Error Message on page 389
Unknown Server Error Message
Problem: An internal server error occurs.
Solution: Check the logs for more details. Start by looking at the SCC log file SCC_HOME
\log\gateway.log for the error message that occurred when user interface displayed the
Sybase Control Center for Sybase Unwired Platform
389
Troubleshoot Sybase Control Center
message. In most cases, the error is an unexpected failure condition in the server, and further
details can be obtained by reviewing the SUP_HOME\Servers\UnwiredServer
\logs\{ServerName}-server.log. If that does not help, contact your Sybase
Unwired Platform technical support representative.
See also
• Server List Not Retrieved on page 379
• Unwired Server Fails to Start on page 381
• Error in Listing Application Connections and
ADMIN_WEBSERVICE_INVOCATION_ERROR in gateway.log on page 381
• Starting or Restarting a Remote Server from Sybase Control Center Fails on page 382
• Port Conflict Issues on page 384
• Unexpected Listener Startup or Connection Errors on page 385
• Refreshing Server Configuration Displays Only Partial Updates on page 385
• Users Connect with Old Credentials on page 387
• AuthorizationException Displays Instead of Status on page 388
• Increasing Messaging Queue Counts Degrades Performance on page 388
• Saving Server Configuration Fails Due to Certificate Validation Error on page 389
Package Deployment and Management Issues
Review this list of documented issues for packages deployed or managed from Sybase Control
Center.
See also
• Using Sybase Control Center to Troubleshoot Unwired Platform on page 353
• Collecting Administration Performance Data for Troubleshooting on page 354
• Sybase Control Center Management Tier Issues on page 355
• Platform Component Monitoring Issues on page 375
• Server Tier Administration Issues on page 378
• Application and Application User Management Issues on page 395
Exporting or Deploying Large Packages Fails
Problem: You used Sybase Control Center to export or deploy a large package, and it fails.
You can troubleshoot this error by opening the Sybase Control Center SCC_HOME\log
\agent.log file and checking for a message tsimilar to:
exception:java.lang.IllegalStateException: Form too large
390
Sybase Unwired Platform
Troubleshoot Sybase Control Center
Explanation: This message means that the package, not the form, is too large. The Web server
that hosts Sybase Control Center cannot manage the data. A number such as 273310 indicates
the size of the package in kilobytes (that is, 273,310).
1.
2. Use a text editor to open SCC_HOME\services\EmbeddedWebContainer
\service-config.xml.
3. Set the jetty.maxFormContentSize to a value larger than the default. The default
is 10000000. For example:
<set-property property="jetty.maxFormContentSize"
value="2000000" />
4. Save the file.
See also
• Invalid DOE-C User Error for an SAP Server Connection on page 391
• Troubleshoot CTS Imports on page 392
Invalid DOE-C User Error for an SAP Server Connection
Problem: The General tab of a DOE-C package displays an invalid user account error for the
Error State property.
Explanation: SAP servers could not authenticate this user with the Username and Password
configured for this package.
User names and passwords configured for the connection pool cannot be tested before they are
used. Errors are only reported after the connection fails. Errors typically occur during an
administrative operation (such as unsubscribing a subscription), or in response to an
asynchronous message for a subscription from DOE. On a system with existing DOE-C
subscriptions, the initial resynchronization at startup would implicitly test the technical user.
Solution: Check the username and password configured for this user in the Connection Pool
configured for the package. If it is incorrect, edit the properties used.
Note: If you change the username or password property of a DOE-C connection, you must
reopen the same dialog and click Test Connection after saving. Otherwise the error state
of this DOE-C package cannot be cleaned up. If you do not click Test Connection, the
username or password is correct, but the error state of the DOE-C package cannot be cleaned
up.
See also
• Exporting or Deploying Large Packages Fails on page 390
• Troubleshoot CTS Imports on page 392
Sybase Control Center for Sybase Unwired Platform
391
Troubleshoot Sybase Control Center
Troubleshoot CTS Imports
When using a CTS transport request to import a package or application, a return code and
deployment message is recorded in the CTS detail log.
Table 25. Import MBO Package Return Codes
Return Code
Meaning
Possible Causes
0
The import has been
successfully completed.
The MBO package is imported successfully into the target Unwired
Server.
8
Content errors occurred when importing.
•
•
•
•
392
The imported archive is not a
valid MBO package archive.
Create a new transport request
and import it.
The specified import domain
does not exist in the target Unwired Server. Create the required import domain in the
target system or specify a different domain, then retry the
import.
The target Unwired Server does
not have the security configuration used by the package, or
the security configuration is not
assigned to the specified domain. Create the required security configuration in the target system and retry the import.
The target Unwired Server does
not have the server connection
definition that is used by the
MBO package in the specified
domain. Create the required
server connection in the target
system and retry the import.
Sybase Unwired Platform
Troubleshoot Sybase Control Center
Return Code
Meaning
Possible Causes
12
A tool issue occurred •
during the import. Resolve the problem and
•
import the same
transport request
again.
•
The target Unwired Server is
down.
The deployment method properties are not set correctly in the
target system in CTS. For example, the Deploy URI is not
correct.
The provided user name or
password is incorrect, or the
user does not have authorization to perform the import operation.
Table 26. Import Hybrid App Return Codes
Code
Meaning/Action
Possible Causes
0
The import has been successful- The Hybrid App package is imly completed.
ported successfully into the Unwired Server.
8
Content errors occurred when
importing.
12
A tool issue occurred during the •
import. Resolve the problem
and import the same transport
•
request again.
The archive is not a valid Hybrid
App archive. Create a new transport request and import it.
The target Unwired Server
is down.
The provided user name or
password is ncorrect, or the
user does not have authorization to perform the import
operation.
Table 27. Import Application Return Codes
Code
Meaning
0
The import has been
The application is imported sucsuccessfully completed. cessfully into the target Unwired
Server.
Sybase Control Center for Sybase Unwired Platform
Return Error
393
Troubleshoot Sybase Control Center
Code
Meaning
Return Error
8
Content errors occurred •
when importing.
•
•
•
The imported archive is not a
valid application archive. Create a new transport request and
import it.
The specified import domain
does not exist in the target Unwired Server. Create the required import domain in the target system, or specify a different
domain, then retry the import.
The archive does not include the
MBO package archive used by
the application. Create a new
transport request and retry the
import .
The security configuration in
the application connection template does not exist on the target
Unwired Server. Create the required security configuration in
the target system and retry the
import.
12
A tool issue occurred
during the import. Resolve the problem and
import the same transport request again.
The target Unwired Server is down.
13
A tool issue occurred
during the import. Resolve the problem and
import the same transport request again.
The provided user name or password is incorrect, or the user does
not have authorization to perform
the import operation.
Note: If the application archive includes the MBO package archive used by the application,
the codes may indicate the failure conditions listed for MBO packages.
See also
• Exporting or Deploying Large Packages Fails on page 390
• Invalid DOE-C User Error for an SAP Server Connection on page 391
394
Sybase Unwired Platform
Troubleshoot Sybase Control Center
Application and Application User Management Issues
Review this list of documented issues for applications or application users managed by Sybase
Control Center.
See also
• Using Sybase Control Center to Troubleshoot Unwired Platform on page 353
• Collecting Administration Performance Data for Troubleshooting on page 354
• Sybase Control Center Management Tier Issues on page 355
• Platform Component Monitoring Issues on page 375
• Server Tier Administration Issues on page 378
• Package Deployment and Management Issues on page 390
Wrong Application for Code Error
Problem: Application registration using a Windows Mobile emulator appears successful in
Sybase Control Center, but the application log shows a Wrong Application for Code
error when the application attempts to connect to Unwired Server.
This error occurs when you:
•
•
•
Hard reset a Windows Mobile device emulator,
Close an emulator without saving the emulator state, or
Uninstall and reinstall the Unwired Server client software on the device.
Explanation: Because emulators do not generate unique application IDs, the Unwired Server
messaging software on the device creates an application ID during installation and stores it in
the emulator application registry. After registration, this permanent link between the emulator
and the application ID must remain.
Hard resetting the emulator, closing the emulator without saving the emulator state, or
uninstalling and reinstalling the Unwired Server client software purges the device registry and
breaks the link between Unwired Server and the device software. When you attempt to
reconnect, Unwired Server creates a new application ID for the device. Without the original
application ID, the server cannot identify the device emulator, and therefore, cannot establish
a relationship between the application and the activation code.
To avoid this problem so that the emulator and server remain synchronized, always save the
emulator state before you close the emulator, and refrain from hard resetting the emulator, or
uninstalling and reinstalling the client software.
Note: Before saving the state of an emulator, always uncradle the emulator using the Device
Emulation Manager. This allows the device emulator to be cradled when the save image is
loaded and used in the future.
Sybase Control Center for Sybase Unwired Platform
395
Troubleshoot Sybase Control Center
Solution: Reconnect the emulator by either:
1. Deleting the original application from Unwired Server, then reregister the application,
or
2. Reregistering the application
See also
• User Name of Registered Application Connection Not Displayed on page 396
• Internal Server Error When Clicking Applications on page 396
User Name of Registered Application Connection Not Displayed
Problem: The configured user name of a registered application connection is not displayed
when you later review the properties for a device in Sybase Control Center. The Application
Connections tab shows other properties but not the user name.
Explanation: The user name used for a application connection registration is not stored or
handled as an application property.
Solution: To view the user name of the registered application in Sybase Control Center:
1.
2.
3.
4.
In the left navigation pane, click the Applications node.
In the right administration pane, click the Application Users tab.
In the table of registered users, for the user.
You can also select the Application Connections tab, and check the users properties.
See also
• Wrong Application for Code Error on page 395
• Internal Server Error When Clicking Applications on page 396
Internal Server Error When Clicking Applications
Problem : Once logged into Sybase Control Center, the administrator clicks Applications in
the navigation pane, and an Internal server error message is displayed.
After receiving this error, the administrator is further unable to register any applications
because the OK button remains disabled.
Solution:
1. Validate the error:
a. Open SCC_HOME\log\gateway.log.
b. Look for this error: Caused by:
com.sybase.uep.sysadmin.management.exception.ImoWsExcept
ion: An error occurred loading a configuration file:
396
Sybase Unwired Platform
Troubleshoot Sybase Control Center
2.
3.
4.
5.
Attempted to read or write protected memory. This is
often an indication that other memory is corrupt.
Validate that the Sybase Unwired Server service is running and there are no errors being
reported in the Windows Application event log by that service.
Validate that the Messaging Server Administration Web Service is running:
a. Open a Web browser.
b. Open http://localhost:5100/MobileOffice/admin.asmx.
c. Select the GetDeviceList2 method, then click Invoke.
d. Check whether a valid XML response returns.
If anything in steps 1-3 is unexpected, you may have an installation or configuration issue.
Confirm this by:
a. Restarting the Sybase Unwired Server service.
b. Once available, repeat steps 2-3.
• Otherwise, open Sybase Control Center, and click Applications to try registering
an application again.
If you still get the same error and same behavior, contact Sybase Support.
See also
• Wrong Application for Code Error on page 395
• User Name of Registered Application Connection Not Displayed on page 396
Sybase Control Center for Sybase Unwired Platform
397
Troubleshoot Sybase Control Center
398
Sybase Unwired Platform
Index
Index
-Xmx maximum memory option 18
-XX:MaxPermSize permanent memory option 18
A
accessibility 23
administration
core administration nodes 2
administration performance 354
administration perspective
empty Sybase Control Center console screen
356
gray Sybase Control Center console screen
356
rectangular box instead of Sybase Control
Center console 356
administration tasks
domain administrator 38
help desk operator 39
platform administrator 37
administration users
configuring 103, 181
maintaining 103, 181
administrators
domain administrator role 38
help desk role 39
login accepted when authentication provider
unavailable 370
platform administrator role 36
Adobe Flex 23
agent.log file 357
Alert Message property 270
alerts
effects of repository purging on history 31
Alerts property 270
alias, certificate 176
Allow Roaming property 274
Apache
Relay Server configuration 75
APNS Device Token property 270
Apple push notification properties 270
application 240
application connection
activation options 262
application connection template 266–268
application connection templates
administration overview 5
application connections
administration overview 5
assigning Hybrid Apps to 260
reviewing package users for 264
application creation wizard 239
application ID
guidelines 241
application log 153
registration log data 153
setting log data 154
application management issues 395
application settings 271
application user management issues 395
application users 243
applications 238, 239, 253
administration overview 5
Appliction Connection properties 263
audit destination 225
audit filter 222
audit formatter 226
authentication
provider unavailable but administrator can log
in 370
authentication cache timeout 185
authentication failure 144
authorization
DCNs 230
Push notifications 230
AuthorizationException 388
auto purge
monitoring data 324
removing domain log data 378
removing monitor data 377
automated message processing 274
automatic registration 271
B
backups
about 27
changing the schedule 29
forcing 29
restoring from 30
scheduling 28
Sybase Control Center for Sybase Unwired Platform
399
Index
suspending and resuming 29
Badges property 270
C
cache 290
cache database server pool size 105
cache group
configuring 290
purging 295
status statistics 352
cache interval
real time 295
cache monitoring 350
cache performance statistics 351
cache refresh
custom 293
daily 292
hourly 292
never schedule 295
on demand 291
scheduling 291
cache statistics
viewing 331
cache timeout, setting 185
caching of login credentials 387
cannot start Unwired Server 381
CDB 290
certificate alias 176
certificate problems 368
CertificateAuthenticationLoginModule
authentication module
for SAP single sign-on and X.509 204
certificates
for context variables 314
managing for RSOE 86
changing
cache database server pool size for Unwired
Platform 105
cleaning up the Flash Player cache 13, 373
client application logs
checking 155
cleaning 155
Client dispatcher
configuring for HTTP client connections 47
client variables
configuring for Hybrid Apps 317
cluster configuration
configuration cache properties 56
performance properties 48
400
web container properties 54
cluster properties 62
clusters 41
administration overview 3
affected by configuration changes 41
cluster properties 41
status, checking 64
communication ports
security configuration 49
SSL encryption 49, 51
configuration cache properties, configuring 56
configuration changes
effect on clusters 41
configuration files
Relay Server 69
connection errors 385
connection templates, creating 157
Connections 115
connections, creating 157
console
about 32
commands 32
context variables 316
configuring 314
control flag 189
controlFlag 189
correlating log data across subsystems 135
credentials
old, ability to authenticate with 387
CTS+
troubleshooting 392
custom settings for messaging devices 274
customization resource bundle
deleting from applications 251
customization resource bundles
assigning to all existing application
connections 249
assigning to application connections 249
deploying for applications 248
description for applications 246
exporting from applications 250
guidelines and recommendations for
applications 247
managing for applications 250
unassigning from applications 250
viewing for an application 250
Sybase Unwired Platform
Index
D
data cache
cache 290
data change notification monitoring
histories 343
performance statistics 343
data change notification statistics 342
databases
monitoring 324
DCN log data
general DCN 142, 143
Hybrid App DCN 142, 143
Debug Trace Level property 274
Debug Trace Size property 274
degrading performance 388
deleting 268
Delivery Threshold property 270
deploy failure for large packages 390
deploying Hybrid App packages 307
deployment
Hybrid App archives 279
package archives 279
deployment issues for packages 390
device log error 395
Device Log Items property 274
device notification
history statistics 344
performance statistics 345
device notification log data 142
device notification monitoring 344, 345
device notifications
configuring 297
statistics 344
Device Subtype property 275
device user name not displayed 396
device users
assigning Hybrid App packages 317
devices
Apple push notification properties 270
user assignments 255
dispatcher log 152
dispatcher log data 152
service log data 153
DNS server failure 359
documentation roadmap 1
DOE-C
invalid user 306, 391
DOE-C packages 304
domain 104
security configuration, choosing 180
security, assigning security configuration 231
security, configuring 179
domain administrator 38
domain administrators
registering 102
domain log data
DOE connections 145
JDBC connections 147
not displayed 378
REST connections 148
SAP connections 148
SOAP connections 149
domain logs 110
domain role mapping 181
domains 99
administration overview 7
creating 100
deleting 101
enabling 100
E
e-mail
redirecting with matching rules 313
editing an application connection 263
EIS
connection properties 159
Push operations 230
Enable property 270
enabling log profile 117
enterprise information systems
See EIS
environment variables
SCC_MEM_MAX 16, 18
SCC_MEM_PERM 16, 18
error messages
logging levels 58
server logs 95
errors
user account failure 306, 391
errors log data 144
export failure for large packages 390
exporting log data 136
Sybase Control Center for Sybase Unwired Platform
401
Index
F
F5 (browser refresh)
logging out of Sybase Control Center 366
Flash Player 14
cleaning up the cache after upgrade 13, 373
flush batch size for monitoring data 324
flush threshold for monitoring data 324
full backups 28
G
gateway.log file 381
general application properties 240
getting started after installing 14
GZIP 54
H
hard coded credentials 316
heat chart
launch icon 22
help command (console) 33
help desk 39
help system, accessing 15
History tab is blank 376
host name changes not reflected in Sybase Control
Center 371
host name resolution failure 359
HTTP
configuring client dispatcher properties for 47
HTTP compression 54
HTTPS
RSOE certificates 86
Hybrid App 307
setting defaults 318
viewing default 265
Hybrid App packages
assigning device users 317
configuring 311
configuring notification mailbox 310
deploying 307
deploying and managing 307
Hybrid Apps
assigning to application connections 260
checking users and queues 319
configuring client variables 317
configuring display name and icon 312
Hybrid App packages administration 10
402
I
icons
in SCC toolbar 22
IIS
Relay Server configuration 75
IMSI property 275
incremental backups 28
info command (console) 33
invalid login 362
iOS push notification properties 270
J
Java system properties
displaying information about 33
JDBC properties 159
jvmopt memory options for Windows services 16,
18
K
Keep Alive (sec) property 274
keyboard shortcuts for Adobe Flex 23
keytool.exe 190
L
layout for SCC views 26
LDAP
configuration properties 191
processes 362
stacking providers 190
startup 362
LDAP SSL configuration 190
licenses
servers, reviewing 63
listener startup errors 385
log files
agent.log file 357
scc_repository.log 357
server logs 58
log filters 121
log profile 117
log, server
refreshing 97
logging in to Sybase Control Center
clearing authentication parameters 369
Sybase Unwired Platform
Index
logging in to Sybase Control Center - first user 14
logging levels 58
logging out of a server 16
logging out of Sybase Control Center
unintentionally, using F5 browser refresh 366
logical roles
DCNs 230
Push notifications 230
login accounts, default
about 14
login invalid 362
login session timeout
setting 18
login troubleshooting
Sybase Control Center 369
logs
application 134
application logs 134
client application 155
dispatcher 132
dispatcher logs 132
DOE connections 129
domain-level 110
general DCN 126
Hybrid App DCN 126
JDBC connections 129
life cycles 58
outbound enabler 90
REST connections 129
SAP connections 129
server 95
server, configuring 58
SOAP connections 129
synchronization 124
synchronization logs 124
Unwired Server 95
M
management console unavailable 371
management issues for packages 390
managing Hybrid App packages 307
Managing properties 268
manual control of message processing 274
Manual registration 239
mapping roles
domain-level 181
mapping roles for a package 282
matching rules for redirecting e-mail
configuring 313
testing 314
MBO create error history 303
MBO data
See cache
MBO delete error history 303
MBO error history 303
MBO operation error history 303
MBO packages
contents, exporting 286
MBO status statistics 351
MBO update error history 303
memory
configuring 16
displaying information about 33
messaging 46
configuring properties 46
configuring subscriptions 299
messaging device advanced properties 274
messaging device connection properties 273
messaging devices
custom settings 274
information properties 275
messaging history monitoring
detail view 338
summary view 338
messaging monitoring
history 338
performance statistics 340
request statistics 337
messaging packages
statistics 347
messaging queue counts 388
messaging queues
statistics 341
status data 342
messaging statistics 337
messaging synchronization
monitoring 338
messaging users
monitoring 349
Microsoft Cluster issues 372
mobile business objects
cache group status statistics 352
clearing error history 303
reviewing error history 303
mobile devices
properties identifying 275
Model property 275
Sybase Control Center for Sybase Unwired Platform
403
Index
monitoring 328
cache 350
cache group status 352
cache performance 351
data change notification statistics 342
database, configuring 324
device notification history 344
device notification performance 345
device notifications 344
issues for platform components 375
MBO status 351
messaging queue statistics 341
messaging statistics 337
messaging synchronization 338
messaging user statistics 349
replication statistics 333
replication user statistics 349
replication-based synchronization 334
statistic categories 331
user security 332
user statistics 348
monitoring data 328
auto purge 324
exporting 329
flush batch size 324
flush threshold 324
not displayed 377
purging 329
reviewing 328
searching 330
monitoring profiles 326
creating and enabling 326
monitoring schedule
custom 327
monitoring setup
effect on clusters 41
monitoring Unwired Platform 321
overview 11, 322
N
named security configuration
domain, selecting 180
Navigating applications 242
notification mailbox 310
O
onboarding 5
404
operation error history 303
Outbound Enabler 86
configuring 75, 76, 87
deleting configuration 91
downloading log files 90
generate configuration file 74, 90
information in SCC 92
list of 91
loading certificates 86
logging options 89
managing 90
setting up 75, 87
startup options 76, 88, 89
P
package deployment and management issues 390
package role mapping 282
package statistics 346
package subscriptions
configuring 298
managing 300
pinging 300
recovering 300
resuming 300
resynchronizing 300
suspending 300
unsubscribing 300
package users
reviewing for an application connection 264
packages
administration overview 8
cache properties 290
contents, importing 287
enabling and disabling 289, 305
Hybrid App administration overview 10
replication based synchronization 288
security 296
passwords
old, ability to authenticate with 387
payloads 116
performance
Sybase Control Center 13, 373
performance data
administration 354
performance degradation 388
performance properties
configuring for cluster 48
performance properties, configuring for server 84,
85
Sybase Unwired Platform
Index
Perspective Resources view
about 23
show/hide icon 22
perspectives
about 23
creating 24
removing 24
renaming 25
Phone Number property 275
pinging a server 84
platform administrators 36
platform component monitoring issues 375
port conflicts
among multiple Sybase Control Center
versions 361
with Sybase Control Center X.X 384
port numbers 362
ports
displaying information about 33
postinstallation tasks 14
problems starting Sybase Control Center services
357
problems with application and application user
management 395
production edition 63
profile definitions 111
properties
advanced, of messaging devices 274
connection reference 159
custom settings for messaging devices 274
Hybrid Apps 312, 317
information on messaging devices 275
monitoring database 324
package subscriptions, configuring 298
push notification for iOS 270
security provider configuration 191
proxy 131
Proxy 130
proxy log
proxy log data 151
proxy properties 178
purging a cache group 295
purging domain logs 137
Push 130
push log data 150
push notification properties for iOS 270
Q
queue counts 388
queues
Hybrid App, checking 319
messaging, status data 342
R
Refreshing application view 244
registered application 104
reinstalling Sybase Control Center service 359
Relay Server
configuration properties in Relay Server tab
80
custom configuration 77
deleting configuration 80
generate RSOE configuration 74, 90
information in SCC 80
managing 77
outbound enabler 86
properties, viewing or editing 77
Relay Server installation
configuring outbound enabler connection
settings 76, 87
configuring outbound enabler general
properties 75, 87
configuring outbound enabler start options 76,
88
configuring Unwired Server to use Relay
Server 69
custom configuration 71
defining server farms and cluster nodes 73, 79
generating outbound enabler configuration file
74, 90
generating Relay Server configuration file 75
launching Relay Server configuration wizard
72
modifying Relay Server configuration file 75
outbound enabler start options reference 89
quick configuration 70
reviewing configured Relay Server properties
74, 79
setting Relay Server general properties 72, 77
Relay Server Outbound Enabler 75, 86, 87
configuring 75, 76, 87
deleting configuration 91
downloading log files 90
generate configuration file 74, 90
information in SCC 92
list of 91
loading certificates 86
logging options 89
Sybase Control Center for Sybase Unwired Platform
405
Index
managing 90
setting up 75, 87
startup options 76, 88, 89
Relay Server URL Prefix property 274
Relay Servers 69
replication history monitoring
detail view 334
summary view 334
replication monitoring
history 334
performance statistics 336
request statistics 333
replication packages
configuring subscriptions 297
statistics 346
replication statistics 333
replication subscription templates 297
replication synchronization 42
replication users
monitoring 349
replication-based synchronization
monitoring 334
repository 27
backing up 29
changing backup schedule 29
configuring purging 31
restoring from backup 30
scheduling backups 28
Request Response 131
resource explorer
launch icon 22
resources
remote, registering manually 20
restarting a remote server
unsuccessful 382
restarts, configuring in Windows 12
retrieving logs 119
role mapping
domain-level 181
package 282
RSOE 75, 87
rules for redirecting e-mail
configuring 313
testing 314
S
SAP
user account error 306, 391
SAP audit measurement file 67, 68
406
SAP connection properties 173
SAP License Audit 67, 68
SAP single sign-on
deploying packages and bundles 304
SAPSSOTokenLoginModule authentication
properties 218
stacking login modules 189
SAP single sign-on with X.509
CertificateAuthenticationLoginModule
authentication module 204
SAP Sybase SAP® Data Orchestration Engine
Connector connections 173
SAP Sybase SAP® Data Orchestration Engine
Connector properties 173
SAP/R3 properties 172
SAPSSOTokenLoginModule authentication
module
properties 218
SCC console tree is not complete 388
SCC_MEM_MAX 16, 18
SCC_MEM_PERM 16, 18
scc_repository.log file 357
searching 253, 255
Secure Sockets Layer encryption
communication ports 49
secure synchronization port 43
security
administration overview 10
domain, assigning security configuration 231
domain, configuring 179
monitoring 332
security certificates
See SSL certificates
security configuration
choosing 180
effect on clusters 41
packages 296
removing 180
security configuration, creating 185
security configurations
overview 183
security error when connecting to Sybase Control
Center 370
security log data 144
security profile
communication port 49
management port 49
SSL certificates 50
Sybase Unwired Platform
Index
security profiles 51
communication port 51
management port 51
security provider configuration properties 191
security providers, reordering 191
server
status 84
server compression 54
server configuration
effect on clusters 41
system performance properties 84, 85
server licensing 63
server log
deleting 97
searching 96
server log data 151
server tier administration issues 378
servers
log, refreshing 97
logging out of 16
logs, configuring 58
pinging 84
stopping and starting 82
suspending and resuming 83
services
listing 33
services, Windows
configuring SCC memory options for 18
running Sybase Control Center as 12
shutdown command (console) 34
SiteMinder authentication 232
SiteMinder authentication cache timeout 234
SiteMinder security configuration 235
SiteMinder single sign-on 233
SiteMinder SSO 233
SiteMinder Web agent 235
SLD: uploading payloads with SCC 66
SOAP Web Services properties 176
Sounds property 270
SSL
mutual authentication 176
RSOE certificates 86
SSL certificates 15, 50
error when missing 370
setting up 15
SSL encryption
communication ports 49
security profile 51
SSL keystore 50
SSL truststore 50
stacking LDAP modules 190
stacking login modules
for SAP single sign-on 189
start up, automatic, configuring in Windows 12
starting a remote server
unsuccessful 382
starting servers 82
statistics
application connection security 144
for messaging packages 347
for replication packages 346
statistics chart
effects of repository purging on 31
status command (console) 35
stopping a remote server
unsuccessful 382
stopping servers 82
subscription templates
configuring for replication packages 297
creating 297
subscriptions, DOE-C
reviewing 306
SUP DCN User 230
SUP Push User 230
SupCertificateIssuer 316
SupCertificateNotAfter 316
SupCertificateNotBefore 316
SupCertificateSubject 316
SupPassword 316
for context variables 314
SupUser 316
for context variables 314
Sybase Control Center
about 1
accessibility 23
connecting a browser to 14
console commands 32
dependence on Sybase Control Center X.X 12
failure to start 359
functionality not applicable to Unwired
Platform 22
logging out unintentionally with F5 366
management tier issues 355
reinstalling the service 359
second version fails to start 361
security error when connecting 370
service port conflicts 384
setting up SSL certificates 15
Sybase Control Center for Sybase Unwired Platform
407
Index
starting in Windows 12
starting in Windows as a service 12
stopping in Windows 12
Windows service fails to start 357
Sybase Control Center performance 13, 373
Sybase Control Center service 362
sync group
configuring 289
synchronization
configuring general properties 43
synchronization listener properties 43
synchronization log
cache refresh 140
data services interface 141
data sync 138
operation replay 138
result checker 140
subscription 139
synchronization log data
cache refresh 137
data services interface 137
data synchronization 137
operation replay 137
result checker 137
subscription 137
synchronization port 43
synchronization problems 381
system data, reviewing 328
System Landscape Directory (SLD)
registering destinations for 65
system licensing 63
system properties
displaying information about 33
T
TCP/IP filtering causing errors 385
timeout
setting for login sessions 18
toolbar icons 22
troubleshooting
authentication failure 144
Outbound Enabler 90
Relay Server Outbound Enabler 90
Sybase Control Center problems 353
Unwired Server problems 381
Unwired Server startup 381
user account failure 391
troubleshooting Microsoft Cluster 372
troubleshooting performance issues 354
408
troubleshooting Unwired Platform with SCC 353
U
uafshutdown.bat 12
uafstartup.bat 12
Unwired Platform
configuring 41
monitoring 11, 322
Unwired Platform administrators 36
Unwired Platform console
opening 19
Unwired Platform management console unavailable
371
Unwired Server
checking status 84
configuration changes unsuccessful 385
extended session 362
importing package contents 287
list does not appear in Sybase Control Center
379
logging 95
logging out of 16
moving Hybrid App package contents from or
to 286
moving MBO package contents from or to
286
pinging 84
refresh after changing configuration 385
server list 82
services provided by 81
startup failure 381
stopping and starting 82
suspending and resuming 83
Unwired Servers
administration overview 5
user interface, about 21
users 255
able to connect with old password 387
administration overview 5
administration, configuring 103, 181
administration, maintaining 103, 181
deleting 255
devices used by 255
Hybrid App, checking 319
messaging statistics 349
monitoring 348
not displayed for registered devices 396
security statistics 332
Sybase Unwired Platform
Index
closing 25
maximizing 25
minimizing 25
opening 25
restoring 25
V
variables, context
configuring 314
view layouts, SCC
cascade 26
close all 26
horizontal tiling 26
minimize all 26
restore all 26
vertical tiling 26
Viewing applications 242
views
icons for managing 22
views, SCC
about 25
bringing to front of perspective 25
W
web container properties, configuring 54
Windows
starting, stopping Sybase Control Center 12
X
XML audit file 67, 68
Sybase Control Center for Sybase Unwired Platform
409
Index
410
Sybase Unwired Platform