1
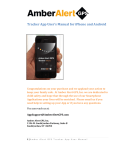
e-doorman– manual
e-doorman
Manual
1
e-doorman– manual
1. Introduction
This manual is divided into two parts. The first part describes how to set up e-doorman on your device. The second part describes user interface
and how to use functions provided by e-doorman application.
I. PART – Sections:
2. Gmail account
3. Connecting device to the internet
4. Installation and setup of application for android device (tablet)
5. Installation and setup of application for mobile phone (remote control)
II. PART – Sections:
6. Entry screen
7. Main screen
8. User settings
9. Application settings
10. Start and stop of surveillance mode
11. Example of system in surveillance mode
12. Instructions
13. Use of mobile phone
2
e-doorman– manual
2. Gmail account
Gmail account will be needed for normal (full) use of application and its features. For this purpose existing
or new Gmail account can be used. To create new Gmail account please follow next steps:
1. Open web browser and for URL address type: mail.google.com,
2. On website »mail.google.com« click on button »Create an account« (top right corner),
3. In form (image on the right) it is necessary to complete following fields: Name, Last name, User
name, Password, Confirm password, Date of birth, Gender, Prove you’re not a robot, and agreeing
with Google Terms of Service and Privacy Policy.
4. By clicking on button »Next step« your Google account will be created.
3
e-doorman– manual
3. Connecting device to the internet
Android device on which e-doorman application will be running needs to be connected to the internet.
You can set up Wi-Fi by following next steps:
1. In device settings find Wi-Fi setting (usually under Wireless & networks tab)
2. Check if Wi-Fi is turned on, if it’s not turn it on
3. Device automatically find nearby networks (networks may be displayed under Wi-Fi settings tab)
4. Click on network that you want to connect to
5. If required enter password for Wi-Fi network
6. Click button “Connect”
4
e-doorman– manual
4. Installation and setup of application for android device (tablet)
E-doorman application can be installed on a tablet by following these bullets:
1. On your tablet open application “Play Store”
2. In title bar press magnifying glass
3. Enter e-doorman in search field and press enter (search)
4. In the resulting list of application choose application “e-doorman beta”
5. On application screen click “Install”
6. New window will be opened, displaying permissions required to run application; if you agree with them press “Accept & download”
7. Application will start downloading and installing
Setting up application for the first time – setup wizard:
1. Start – Under applications (on android device) find icon for e-doorman and click on it
2. Setup wizard – creating first user – After starting application for the first time, field to create first user will be presented. In the field “New
User” enter your user name, in the field password enter desired password (it needs to be at least 5 characters long), in the field “confirm
password” re-enter password. By clicking on button “Enter new user” you will create a new user and enter application.
5
e-doorman– manual
3. Choosing language and setting up Gmail account – In the setup wizard you can choose language of application and Google account. To
choose language click on spinner with current language and choose from the list of languages. To select Gmail account click on “Choose
account”.
4. New window will be opened. If your account is not visible on the list click “Create new Account” and follow wizard to add Gmail account.
Otherwise select your account.
6
e-doorman– manual
5. To select account network connection is required. When account is selected, you may be prompted to allow application e-doorman to use
Google account. Click yes. If account is setup correctly the text on button should change to name of your account.
6. User settings – To use all features of the application some additional information is required in user settings. Here you can add telephone
numbers and e-mail address through which you will receive (status/warning/alarm) messages from application. To add a new telephone
number click on the telephone icon with green plus. In the same way you can add e-mail address by clicking on the e-mail icon with a green
plus.
7
e-doorman– manual
7. Setting up telephone number – In field “Phone number” enter phone number and select which type of messages you want to receive: 1)
“Status” (state of system) 2) “Warnings” (example: Battery is low) 3) “Alarm” (motion was detected).
Commands (from remote control applications) will be received from all numbers regardless of fields selected in user settings.
By clicking on button test, you can test whether SMS part of application is working correctly. If you receive SMS everything is working OK. If
you don’t get it please check: 1) if entered number is correct 2) if SIM card is inserted into device (tablet) 3) if SIM card has enough credit
(money) to send SMS.
8
e-doorman– manual
Warning: If you wish to control system via remote control, the phone number (of remote control) needs to be written under one user.
Warning: In case your tablet doesn’t have GSM module (ability to make phone calls), the field about phone settings won’t be visible in your
application.
8. Setting up e-mail address – In field “E-mail” enter e-mail address on which you want to receive system messages. After this you can
select which type of messages you want to receive: 1) “Status” (system state messages), 2) “Warnings” (example: Battery is low), 3)
“Alarm” (motion was detected).
By clicking on button “Test” you can test if e-mail settings are working correctly. If you receive e-mail message on tested address everything
is working OK. Otherwise please check: 1) if the e-mail address is correct 2) is the device connected to the internet.
9. Finishing wizard – With the next screen setup wizard is done. By clicking on the button “Activate surveillance mode” surveillance mode is
activated. You can also choose between three filters to filter previous events shown: 1) Event filter 2) Users filter 3) Time filter.
9
e-doorman– manual
Setting up application for use (Warning: if you haven’t skipped setup wizard this settings are already correct and you can skip this part of the
manual):
1. Start – Under applications (on an android device) find the icon for e-doorman and click on it.
2. Enter first user – After starting application for the first time, field to create first user will be presented. In the field “New User” enter your
user name, in the field “password” enter desired password (it needs to be at least 5 characters long), in the field confirm password re-enter
password. By clicking on the button “Enter new user” you will create new user and enter the application.
10
e-doorman– manual
3. Adding Gmail account – In application settings you need to setup Gmail account which will be used for sending messages from device. You
can open settings screen by pressing button
in title bar on main scree of application. In section “Other settings” click on button
“Choose account”. If account that you wish to use is already on the list click on
it. Otherwise click on “Create new Google account” and follow wizard to setup
Google account. If the Gmail account is added correctly name of button should
change to name of your account. You can save changes by clicking on button.
When system asks you if you wish to save settings click yes, identify
yourself and click yes again. Changes will be saved after successful
identification.
NOTE: Internet connection is required to setup (add) Gmail account.
NOTE: You may be prompted to allow our application to use your Gmail
account, if so click yes.
4. User settings – To use all features you may need to add telephone number and
e-mail address under user settings. To get to the user settings click on
button on main screen.
5. Setting up individual user – In the list of users click on a user you wish to edit.
The chosen user’s profile will be opened in a new screen (as seen on image on
the right). Warning: If you device (tablet) does not support GSM module
(phone calls) phone settings won’t be visible. You also won’t be able to use
features that require phone.
6. Setting up phone numbers – In the field “Phone number” enter phone number
and select if you wish to receive “Status” messages (system state), “Warning”
messages (example: Battery is low) and “Alarm” messages (example: Motion is
detected). Warning: If you wish to control application with remote control
(application), phone number (of remote control) needs to be entered at least
for one user. Warning: One android device (tablet) can send messages to
multiple phone numbers. To send messages to multiple numbers just add
another phone number.
7. Setting up e-mail – In “e-mail” field please enter e-mail address on which you
wish to receive messages from device. Similarly like in phone numbers you can
11
e-doorman– manual
choose which type of messages to receive. Note: to add e-mail address, device’s e-mail address needs to be set up first. If it isn’t you will be
prompted to set it up before allowed to add a new address.
8. You can save changes by clicking on the yellow arrow in the title bar. When the system asks you if you wish to save settings click “Yes” and
identify yourself. Changes will be saved after identification is successful.
12
e-doorman– manual
5. Installing and setting up the application for mobile phone (remote control)
E-doorman remote control application can be installed on a mobile phone by following these bullets:
1 On your phone open application “Play Store”
2 In the title bar press magnifying glass
3 Enter e-doorman remote control in search field and press enter (search)
4 In the resulting list of application choose application “e-doorman remote control”
5 On application screen click “Install”
6 New window will be opened, displaying permissions required to run application; if you agree with them press “Accept & download”
7 Application will start downloading and installing
Setting up application:
1. Start– Under applications (on phone) find icon for e-doorman remote control and click on it
2. Setting up phone number of tablet device – After starting application you need to enter phone number of tablet on which commands will
be sent and from which system messages will be sent. To do so click on the button in the upper right corner, this will open settings. In
settings you need to enter correct phone number (of tablet). To save phone number you need to click the button on the right side of the
field. After saving is completed application will exit settings and go to main screen. Warning: one mobile phone can control only one tablet
device.
13
e-doorman– manual
6 Entry screen
Image on the right is showing first screen we see after starting the
application for the first time. Here we can create first user. User can identify
him/herself with the username (name) and password. By pressing button:
•
•
Enter new user – new user is created and saved, then setup wizard
starts to help us set other settings;
Cancel – user exits application without creating a new user
14
e-doorman– manual
7 Main screen
Image is showing main screen of application “e-doorman” on a tablet
device.
Main screen is divided into:
1. Title bar with logo and buttons (from left to right):
a. User settings
b. Application settings
c. Help
d. Exit
2. Centre field
a. Big red button to activate surveillance mode
b. Filters for filtering events
3. Lower part that is used to log history of events (start /stop surveillance
mode, alarms, change of user- and application settings etc.). By clicking
on event you can get additional information about it (exact time, images
from alarm…)
4. Bottom line with system buttons, notifications and clock.
After installing application:
•
•
Phone numbers and e-mail addresses need to be added on which device
will send notification (button 1-a).
It is recommended to take a look in application settings and set the
application according to your needs (button 1-b).
15
e-doorman– manual
If we click on the event in the list of Past events from the previous figure, we
can see the gallery of the photos taken by the surveillance camera, shown in
this figure.
Buttons:
-
Cancel delete
Select all
Delete selection
Options:
-
we can check the photos of our interest
the photos can be deleted by pressing delete next to the photo
they can be deleted also by selecting all of them or several of
them.
16
e-doorman– manual
8 User settings
Image below shows sample screen of users list accessible by clicking on user
settings button. By clicking on user we open view that allows us to modify
user’s settings. In title bar there are two buttons: + which allows us to add
new user and arrow which returns us to the main screen.
Image shows settings for user named John. View for creating new user looks
the same but with empty fields. On both screens you can set username and
password, phone numbers and e-mail for receiving different type of system
message. In title bar there are two buttons. Trash bin is used to delete user
and arrow which brings us back to users list.
In the case that user forgets his/her password, he can reset password by
pressing on the button “Reset password”. Note: E-mail or phone number
17
e-doorman– manual
must be set prior to use this feature because new password will be sent to
the chosen e-mail or phone.
9 Application settings
Image below shows screen with application settings. Application settings
are accessible by clicking on settings button on main screen.
By clicking on the “Motion detection settings” we expand the group as seen
in the image below.
By clicking on the group of settings, the group will expand, revealing all the
settings in that group. Example: by clicking on “Surveillance setting” group
expands as seen on the right image. Here it is possible to set exit and entry
delay, warnings about detected motion, time between two alarms,
maximum size of the e-mail attachment and maximum size of the memory
allocated for saving images. Maximal size of the attachment does not
interfere with maximum size allocated for saving images on the SD card. It is
recommended that the maximum size of the attachment is such that it is
within the limits of e-mail clients of all users (example: for Gmail it is 25MB).
By clicking on other settings we can change language of application,
notification settings, which camera to use, etc. Changes are saved by
clicking on the yellow arrow in title bar. Changes will be saved after
successful identification.
18
e-doorman– manual
charges caused by SMS and e-mail messages. After successful identification
count down timer starts counting down the time you have before it reaches
zero to exit the room. After timer finishes counting down, the surveillance
mode is activated.
10 Start and stop of surveillance mode
Image on the right shows count down timer that starts after clicking on red
button “Activate surveillance mode” in the main screen. Surveillance mode
starts after we have successfully identified ourselves (we can change
username of identification by clicking on the name of the current user). By
this activation process, application prevents use of application by
unauthorized person (who is not on the users list) and prevents from
features to be activated (changed) mistakenly. This prevents unwanted
To stop the surveillance mode click on screen (if nothing happens make
sure device didn’t lock screen or batteries are not drained out). On the
screen identification dialog should appear. If the identification process is
successful the surveillance mode will stop and the application will switch to
the main screen.
19
e-doorman– manual
11 Example of the system in surveillance mode
1. After pressing button “Activate surveillance mode” on main screen, surveillance mode activation process starts as described in section 10
2. First step is user identification.
3. Second step is count down timer – user has certain amount of time to leave the room without triggering alarm. Amount of time is set up in settings
under delay time (see section about Settings). After the counting down is completed screen goes black and surveillance mode is activated. While count
down timer is still working, we can see image from camera that will be shrivelled. By clicking on image we can rotate it by 90 degrees.
4. When system detect motion it sends warning to phone numbers and e-mails that have this option enabled in the user settings. If user doesn’t want to
get this message he/she can uncheck “warning” setting in user’s settings.
5. After some time system sends the “Alarm” message to the phone numbers and email addresses that have this option enabled. Time between motion
detected and alarm event is set up in settings under “Entry delay” section. This allows user to identify him before alarm will be triggered. Message sent
on phone will contain “Alarm detected”, message sent through the e-mail will contain photos that were taken during the alarm (number of photos
depends on maximum allocation size set in settings). In time of alarm (when motion is still detected) photos will be periodically saved on device’s SD
card. User can view these photos by going to device’s default gallery, or by clicking on alarm in event history on main screen.
6. Surveillance mode is deactivated when user click on screen and successfully identifies himself, or by sending SMS message to end surveillance mode.
NOTE: In order to get an android device back in the case it was stolen, you can install the android app such as Wheres my Droid, which is able to send an sms
with the current location of the device and to put the volume for calling up, if it was in silent mode.
20
e-doorman– manual
12 Instructions
The main screen has a help button
in the top row that displays
a help screen explaining how to use the application.
21
e-doorman– manual
2. Call tablet (regular phone call) – tablet automatically accepts
13 Use of a mobile phone
phone call. NOTE: tablet requires the GSM module.
Image shows user interface of the remote control application on a
3. Stop surveillance mode – if surveillance mode is running it will
mobile phone.
be stopped, user will get message that surveillance mode has
been changed.
4. Start surveillance mode – if surveillance mode is not running it
will be started, user will get message that surveillance mode has
been changed.
5. Picture via e-mail – request current image (what tablet currently
sees) via e-mail.
In the lower part of the screen there is a list of messages that tablet
sent to phone as a result of commands on the phone (by pressing
different buttons) and are used as a proof whether some action was
successfully accomplished or not. Part of this list represents the
messages about alarms and warnings from the tablet (instead of
them being viewed in the default SMS application on the phone).
Note 1: For the safety reasons, the tablet accepts commands only
from the known phone numbers. Phone number is known if it is
written under any user in user settings.
Note 2: Testing has shown that on some tablets some features
don’t work as intended. For example: On the Freelander tablet
doesn’t automatically pick up a phone call, even if the phone
number is known. We suggest that before first use of application
you first test all the features to make sure that all features work
correctly.
By pressing any button on the main screen an SMS with encoded
message will be sent to the tablet. There are following types of
messages that can be sent:
1. System state – tablet will sent current state of system: a) is it in
surveillance mode, normal node, alarm etc., b) is it connected to
electricity, c) who was the last person to change system state.
22