1
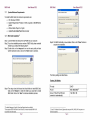
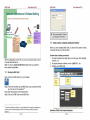
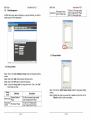
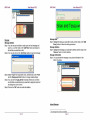
MSO Gold Revision User Manual V2.2 History Rev Date Note Author User Manual 1.0 Oct01,2007 1. Nelson MSO Gold 1.1 > > > > Layout Designer Auto Media Update Daily Schedule Client Billing Log 1.2 Oct12, 2007 Nov 22, 2007 Initial draft 1. Add 2. Add 3. Add export 4. Add 1. RSS preview GPS description Trigger Event USB Nelson sample layout Add Bulletin 1. 2. USER MANUAL Revision 2.2 1.3 Jan 9, 2008 Modify UI Improve playlist saving speed 3. Add "Load 1st day of schedule" button in auto media update 4. Check client level when assigning a client to a group Nelson 1. 1.4 Feb15, 2008 Add network setting via WAN 2. Add input mode support 3. Add RSS & HTML Bulletin limitation Nelson 1. l-TECH CDMPANY! iTech Company LLC Phone:(888)483-2418 email: [email protected] website: www.iTechLCD.com 1.5 Mar 31,2008 1.6 Aug 18, 2008 1.7 Sep 09, 2008 Add Multi-Language support for Message and RSS Nelson Rolf 1. Add video output source description Nelson 1. Add clock daily deviation 2. Add default setting tutorial Nelson Page II MSO Gold 1.8 User Manual V2.2 Dec 30, 2008 1.9 May 6, 2009 2.0 April 6, 2010 2.1 June 4, 2010 2.2 May 18, 2011 MSO Gold User Manual V2.2 Index---1 . Add Transferring limitation 1. 2. Add Event Viewer Add Timetable in UK format 1 . Modify description of MSO Gold with Touch function 1 . Modify the description of 3G Settings 1 . Modify the 3G & GPS settings Bruce Bruce Chapter 1 1.1 1.2 1.3 1.4 1.5 Bruce 1.5.1 1.5.2 1.5.3 1.5.4 1.5.5 1.5.6 Bruce Bruce 1.6 1.7 1.7.1 1.7.2 1.7.3 1.7.4 1.7.5 1.7.6 1.8 1.8.1 1.9 1.10 1.11 1.12 1.13 1.14 Chapter 2 2.1 2.2 2.3 2.4 2.5 Page III MSO Gold Software System Minimum Requirements MSO Gold Installation* Starting the MSO Gold Media Creation, Scheduling, Distribution Workflow Client Management Group Creation Group Deletion Client Addition Client Deletion Refresh Client Configuration Media Management Playback Management Layout Template Playlist Schedule Instant Message HTML Bulletin RSS Feed (Really Simple Syndication) Advanced Control Trigger Event Report Management Save Transfer Event Viewer Configuration User Management Advanced Setting Touch Group Creation (Optional) Landscape Touch/ Portrait Touch (Optional) Touch Playlist (Optional) Define Touch Actions (optional) Troubleshooting Information 2.5.1 CPM setting in MSO Gold Software Page IV 6 7 7 11 12 15 15 16 17 18 18 20 25 29 29 31 38 42 44 47 50 50 61 62 63 64 65 69 70 70 71 72 73 79 80 MSO Gold Appendix A How to Get Codec Information User Manual V2.2 85 Appendix B Video Editing Tutorial 88 Appendix C How to Change Message and RSS Language 97 MSO Gold User Manual V2.2 1 MSO Gold Software ü ü ü ü ü Page V Client/Group Management Media Collection Schedule Setting Play List Edition Program Configuration Page 6 MSO Gold 1.1 User Manual V2.2 MSO Gold User Manual V2.2 System Minimum Requirements To install the MSO Gold, the minimum requirements are: ¨ OS: Windows XP/2000 ¨ System Requirement: Pentium III 1GHz or greater, 128 MB RAM or greater ¨ Window Media Player 9 or higher ¨ Update K-Lite Codec Pack Video decoder 1.2 MSO Gold Installation*1 Step1. Load the MSO Gold Setup from CD-ROM into your computer. Step2. If you have installed previous version of MSO Gold, please uninstall it before you continue the following steps*2. Step3. Double click on the “setup.exe” icon and the setup utility will start with the welcome screen, click on the “Next” button to continue. Step5. The MSO Gold utility is now installed. Click on the “Close” button to complete the installation. The factory settings are listed below. Factory LAN Setting Step4. The setup wizard will choose the default folder to install MSO Gold. Click on the “Browse” to select the folder you would like to install MSO Gold. Click on the “Next” to continue installation process. IP mode DHCP IP port 8001,8002,8003*3 Server IP (the IP that NP Gold connects to automatically) 192.168.0.188 1 The default language is English, French and Spanish are also available. Please remove MSO Gold from Control Panel if you cannot uninstall MSO Gold successfully from Start menu. 2 Page 7 3 If your PC is behind a firewall, please make sure port 8001, 8002, 8003 are open or set firewall exceptions. Page 8 MSO Gold User Manual V2.2 The default IP mode is DHCP and it will switch to “Fixed mode” automatically if there is no any IP assigned to Network Player unit. IP mode Fixed LAN IP 192.168.0.128 LAN Subnet Mask 255.255.255.0 LAN Gateway 192.168.0.1 MSO Gold User Manual V2.2 fBHSBBsmna Factory Wireless LAN Setting WLAN IP 192.168.252.249 WLAN Subnet Mask 255.255.0.0 Network Player Gold connects to the server actively; therefore, you will required to either change the IP that Network Player Gold connects to or configure the IP address of your PC to establish communication channel. We provide a utility to configure client settings in you PC and use USB flash drive to apply those configurations in Network Player unit. Please refer to1.13 Configuration for more details. If you choose to change the IP address of your PC, please make sure your desktop or laptop’s IP address comply the following rules. Path to call Internet Protocol (TCP/IP) Property: Please refer to the following figures for more complex settings via routers. Click on the Start→ Control Panel→ Double-click on the on Network Connections. Right-click on the Local Area Connection then select Properties. On General tab , double click on the Internet Protocol (TCP/IP) Setup client IP Click on the OK to confirm the settings The IP address of your server PC has to be 192.168.0.188 in order to establish connection in the first time. Then you are free to set the server IP address. Page 9 Page 10 MSO Gold User Manual V2.2 MSO Gold User Manual V2.2 Network Architecture & Related Setting Server on LAN with Router’s Virtual Server Function serverPC with MSO software installed Private LAN IP(Fixed)=192.168.10.188 Private IP(DHCP/Fixed): 192.168.0.128 Router A Router B Public WAN: IP(FIXED)=220.128.0.22 Open the virtual server: Forward Port 8001 -> Server’PC’s IP(192.168.10.188):8001 Port 8002 -> Server’PC’s IP(192.168.10.188):8002 Port 8003 -> Server’PC’s IP(192.168.10.188):8003 Private LAN IP(Fixed) =192.168.0.1 Gateway(Very Im Important) =Router A’s LAN IP(Fixed)For example:192.168.0.1 Public WAN: IP(DHCP\Fixed) =220.130.150.216 Server IP(Fixed) =Server PC’s Public IP =220.128.0.22 1.4 Tips: you can press F1 to show user manual in PDF format. Media Creation, Scheduling, Distribution Workflow Before you start operating MSO Gold, you should know general naming convention that we use in this document. After the configuration of server IP, you can use a crossover cable or a hub to connect client and server. Note: You have to restart the MSO Gold software after you modify the server network configuration 1.3 u General rules of naming convention: 1. No space is between any object name, such as group, client, template, schedule…etc. 2. No special character is allowed, such as ~!@#$%^&*()...etc. 3. Working area of MSO Gold. Starting the MSO Gold Step1. Click on the MSO Gold icon on your desktop. Step2. If this is the first time you start MSO Gold, a pop-up window will lead you to set up your own password.*4 Step3. Enter the password in the Password field. Step4. Click on the “OK” button to start MSO Gold. 4 The password should not contain of any special characters. We strongly recommended you to select a password combined uppercase and lowercase letters, numbers, and special characters. Page 11 tjmn la Ifw Haal Workflow of MSO Gold Content Distribution Page 12 MSO Gold User Manual V2.2 There are 5 major sections in MSO Gold: Ø Client Management Ø Media Management Ø Playback Management Ø Advanced Control Ø Report Management MSO Gold remains great flexibility to allow users to work on each task individually and also be able to share resources between different groups. Basically, the schedule management function is a component that combines all tasks and transfers them to selected network players. The workflow of MSO Gold is listed below. MSO Gold User Manual V2.2 Layout of Shopping Center 1 s t Floor 2 n d Floor entry I 1i 2 5 Food MSO Gold Content Distribution Workflow Toys 3 4 stairs stais ; Schedule Transfer Netw r- Player \ In order to apply the illustrate diagram for shopping center, you are required to create Groups under the Event: Entrance, Food, Toys, Women and assign players to each group. You are also required to create different layout template for according to what you will display in Network Player. Depends on display zones of the layout, you can add different media files into the playlist. In the last step, you can define and create a schedule task and include each component and then transfer this schedule task into your players. Example 1 : an illustrate diagram for shopping center Layout of building: • 1st Floor: Entrance, Food & Toys • 2nd Floor: Women’s Fashion, Men's Fashion A customer would like to: • Place a 32” Network Player in the Entrance to welcome customers and inform them about news and events • Play daily and seasonal promotions in the food court • Play cartoon, new games and toys Ad in Toys department • Play individual fashion shows in Men’s and Women’s department, with information about brand and style Page 13 U^ Page 14 MSO Gold 1.5 Client Management User Manual V2.2 MSO Gold WMSS600/650 In MSO Gold, every client must belong to a group; therefore, you need to create a group for client assignment. User Manual V2.2 This Box is HD image quality Video/ Image Network Player With TV/ Video signal input HD Network Player with TV/Video Input Group Group List demo Group Level -I ff IJ Add Remove Cancel 1.5.2 Group Deletion Pres :-l be User Manual [ |HUM Group Group List 1.5.1 Group Creation Stepl. Click on the "Add & Remove Group" button to bring group adding window. Step2. Click on the "Add" button and enter the group name. Step3. Click on the "OK" button to save the new group. Step4. Choose the Group Level from drop-down menu. Click on the "Exit" button when you finish. Group Level Description Definition WMSS300/350 Standard Network Player WMSS500/550 OMD550 HD Network Player Page 15 This Box is standard image quality Video/ Image Network Player This Box is HD image quality Video/ Image Network Player Group Level -I Remove Cancel S t e p l Click on the "Add & Remove Group" button to bring group adding window. Step2. Highlight the group you would like to delete and then click on the "Remove" button to confirm the deletion. Page 16 MSO Gold 1.5.3 User Manual V2.2 Client Addition Step1. Click on the “Add Client” from drop-down menu. Step2. If there are clients already connected to the server, you can highlight one of the Online Clients and choose a group in Destination Group, then click on the “Add Clients” button to bring up “Add a New Client” window. Step3. Enter client name then click on the “OK” button to complete client addition. Step4. If there are no clients connecting to the server, you can highlight the MSO Gold 1.5.4 User Manual V2.2 Client Deletion Step 1 . Highlight the client you would like to delete, and then click on the “Remove Client” button to confirm deletion. 1.5.5 Refresh group you would like to add new client from “Add Offline Client”. Step5. Enter the client name and MAC address and then click on the “OK” Step1. Highlight the client you would like to refresh, and then click on the “Refresh” button to reload the connection information. button to save current settings. Page 17 Page 18 MSO Gold User Manual V2.2 Notice: the following table indicates field introduction of players MSO Gold 1.5.6 User Manual V2.2 Client Configuration In the Client Management section, you are be able to view and change client settings, such as Group, LAN, WLAN, Auto Reboot, Time Zone, and others. Field Introduction Table No. Number of the Player Group Name Name of the Group Mac Mac Address Status The status of player CPM The connection information with CPM Box Device Type The player level of device Panel Size The display's size Resolution The level of information on a display device Last Update Used Disk Space Total Disk Space FW Version The playlist you update last time Group The storage you have used t The total storage in storage device The firmware version of the player 4- 4fc 4- Page 19 You can choose a group from drop-down menu and assign a client into the group, and then click on the “Set” button to save the current settings. You can change the server IP (the IP that client will connect automatically) and click on the “Set” button to save the current settings. You can click on the “Client Reboot” button to reboot the client immediately. You can click on the “Delete All Content” button to send a command to clients and delete all contents in its internal storage. You can click on the “Transferring Log” button to get client playing log report. Page 20 MSO Gold User Manual V2.2 LAN MSO Gold User Manual V2.2 Step1. Tick on the “WLAN On” checkbox and fill in IP, Subnet Mask, Gateway, ESSID and Channel. Step2. Tick on the “WEP”*7 checkbox and fill in keys if your wireless AP has WEP key protect. Step3. Click on the “Set” button to save the settings. u Tips: LAN and WLAN ports can be work simultaneously, however, they should be in different subnet. If LAN and WLAN are in the same subnet, the WLAN's priority is higher then LAN. In this case, LAN will be disabled. Auto Reboot Group | LAM 4- | W L A N ^ A u t o R e b o o T N i m e Zone | Misc | 3G | CPM | You can change client IP Mode according to your network environment*5, click on the “Set” button to save the sett Step1. The network player will do system check when booting up, so you can setup auto reboot timer for client to clean up unnecessary system file based on the daily task. Step2. Tick on the “Auto Reboot Enable” checkbox and choose the next reboot time. Step3. Click on the “Set” button to save the settings. Time Zone Group | LAN | WLAN | Auto Rebo^T Time Zone \hsc | 3G | CPM | Step1. Choose the time zone according to client’s location and click on the “Set” button to save the settings. 5 The default IP mode is DHCP and it will switch to “Fixed Mode” automatically if there is no any IP assigned by DHCP server to Network Player unit. 6 LAN and WLAN ports are be able to work simultaneously, however, they should be in different subnet. If LAN and WLAN are in the same subnet, the WLAN's priority will be higher then LAN. In this case, LAN will be disabled. If you have any question regarding to this issue, please contact your system administrator for further information. Page 21 Miscellaneous 7 The Network Player does not support Ad-hoc mode WLAN. You should always use a WLAN AP connect to the Network Player unit. The WEP key must be 10 or 26 hexadecimal digits. Page 22 MSO Gold User Manual V2.2 MSO Gold User Manual V2.2 3G modem allows to user data services from the mobile company from the mobile providers. When you connect 3G Modem with the Bus Bundle hardware device, MSO Gold 3G (after MSO Gold 2.00A12 CPM version) is enabled as the following picture. Please tick “3G Enable” checkbox to enable the 3G functions. Then you will see the 3G’s signal strength. Step1. Choose Boot Mode from drop-down menu. The default value is INSTALLATION mode, which will display all the client information such as IP, MAC address, subnet mask, server IP, storage, and firmware version in boot-up screen. The NORMAL mode will only show boot-up picture without displaying any sensitive information. Step2. Tick on the “Enable Hot Key of Trigger Event” checkbox to activate Trigger Event function. Step3. Click on the “Disk Repair”*8 button to repair internal storage. Step4. If you ever use the remote control function to adjust the volume of integrated Network Player LCD, volume adjustment via network will be disabled after since. You can click on the “Volume Restore” button to restore the default volume settings (50 out of 100 maximum) and turn the volume control backward. Step5. You are allowed to give each client an ID for identification. The value is limited and has to be 0~254. Baud rate indicates the number of bits per second is transmitted. Normally five values can be chosen: 4800, 9600, 19200, 38400, 57600, and 115200. The default baud rate of Network Player is 38400. Click on the “Set” button to save RS232 settings. Step6. There are two checkboxes for “RSS Always Run” and “Bulletin Always Run”, when you enable both functions, RSS Feed and Static HTML Bulletin run constantly on player side. Even when the Network Connection is interrupted, RSS Feed and HTML Bulletin will keep running which base on latest updated information. 3G Modem Configuration 8 The “Disk Repair” function allows the system to check disk and auto repair broken segments. Page 23 ♦ Tips: APN means “Access Point Name” which is the log name you get from the 3G SIM card’s telecom supplier. When you key in the “APN”, you need to enter the User’s name and password as well. Motion Detect Description: Edit a playlist for motion sensor’s active stage. Command Index: No Need. How to trigger? The play list would be applied when motion sensor detect an object movement. MSO Gold 1.6 Media Management User Manual V2.2 Media Management is a place where you can manage all media files, such as video, picture, and message. Video MSO Gold User Manual V2.2 Step1. Highlight the video you would like to delete, and then click on the “Remove” button to confirm deletion. Video Information Step1. You can preview video or see video information in the bottom of window. Notice: MSO Gold Software support both Landscape and Portrait mode video, if you need to have Portrait Mode Video when you mount the Display vertically, please refer to Appendix B “Video Editing Tutorial” to make the video 90 degree turn as Vertical Portrait mode. Video Addition*9 Step1. Click on the “Add Files” button and browse to the video files you would like to add. Step2. Click on the OK to confirm file addition. u Tips: MSO Gold can only rotate pictures and messages. If you choose portrait mode layout, you might also need to use 3rd party software for video rotation. Please refer to Appendix B Video Editing Tutorial for more details. ♦ Tips: All video file should contain audio track, otherwise MSO Gold will not allow the file addition to the database. Picture10 Picture Addition Step1. Click on the “Add Files” button and browse to the picture files you would like to add. Step2. Click on the OK to confirm file addition. Picture Deletion Step1. Highlight the picture you would like to delete, and then click on the “Remove” button to confirm deletion. Picture Information Step1. You can preview picture or see picture information in the bottom of window. Vide 9 The Landscape Video and Portrait Video areas are only for you to distinguish different mode of videos. Please refer to Appendix B for Portrait Video creation. Page 25 10 MSO Gold blocks 256 color BMP, but allows 24bit BMP files Page 26 MSO Gold User Manual V2.2 Message Message Addition Step1. You can use any text editor to create your own text message and save it as a .txt file. Click on the “Add Files” button and browse to the text file you would like to add. Step2. You can also click on the “Add String” button to type text message. MSO Gold User Manual V2.2 Message Edit*11 Step1. Highlight the string you would like to edit, and then click on the “Edit String” button to follow the editing procedures. Message Deletion Step1. Highlight the message you would like to delete, and then click on the “Remove” button to confirm deletion. Message Information Step1. You can preview the message or see picture information in the bottom of window. Step3. Select “Height” from drop-down menu, and then click on the “Font” and the “Background Color” button to change related settings. Step4. You can tick the “Apply all files” checkbox if there are more then one text files are selected and you would like to apply the same font and background color to them. Step5. Click on the “OK” button to confirm file addition. Instant Message 1 Page 27 Text message from txt file is not editable. Page 28 MSO Gold User Manual V2.2 In the Instant Message Mode, the message can be updated independently without system reboot. However, the message will be run from right hand side to left hand side once only, and then it turns back to the original message. The addition, edit, deletion, and preview of instant message are totally the same as message. Please refer to the Message section above for more details. 1.7 MSO Gold User Manual V2.2 Step7. Use the “…” button to browse the background picture if you would like to setup background for the layout template. Or you can type the path in the column and click on the “Set” button to load the background picture. Step8. Click on the “Save” button to save all settings. Playback Management 1.7.1 Layout Template In MSO Gold, users will be able to create their own layout design for background, video, picture, message, and clock*12. The maximum numbers of display zone are 1 background picture, 1 Video/Picture/Input zone, 2 picture zones, 2 message zones, and 1 clock zone. Layout Template Edit Step1. Highlight the layout template you would like to edit. Step2. Drag each display zone and change the zone size or display layout. You can also click on the on a display zone and use absolute percentage to change the X, Y position, Width and Height of that zone. Step3. Click on the “Save” button to save all settings. Layout Template Creation Step1. Click on the “New Template” button and enter template name to create a new layout template. Step2 .Highlight the template you would like to define its display zones. Step3. Click on the “Load Sample Layout” button and select the layout you like or do step 4~5 to create your own layout template. Step4. Select Screen Mode (Landscape / Portrait). Step5. Enable the checkbox of a display zone that you would like to create. Click on the button of this display zone and use mouse to drag the zone size in the preview window. Step6. Repeat steps 1~5 to create more display zones if you like. 2 The daily clock derivation is 2 seconds per day. Page 29 Page 30 MSO Gold User Manual V2.2 Layout Template Deletion Stepl. Highlight the layout template you would like to delete, and then click on the "Remove Template" button to confirm deletion. MSO Gold User Manual V2.2 Q vkWUcflnput ] Q No. L.IT- Message 1 0 Clock He 'J^O L 633682119M6B750B3..,. l $ l L 633682115782612613..,. BF'^^H 1 j | 1 1.7.2 Playlist M ..: VidBtVPcJtipL* i 1 | | Playlist is a list where you can define media files playback, including video, picture, message, and clock. Playlist Creation Stepl. Click on the "Add" button to add a new playlist. Step2. Enter playlist name then choose layout template and group level from the list. Step3. Click on the "OK" button to finish playlist creation. -J'.-iii H ^ H SlRemove Si>t Cloc* [ ^ H Step5. In each tab of display zone, use the "Add" and "Remove" button to add or delete media files. Video/Picture/Input Zone Stepl. Select media files from Media DB and click on the "Add" button to add it into playlist. [ 3 Video | Q Picture | [ ? ] Input | apple, mpg SkdetonKey_HD.avi MP 7 buttondefin?-2uu7... JEMO '.::CO_02.mpg No, L/P Ffe 0 L S VIDEO PAL apple.mpg Picture Preview {►ra-Gxa Note: For WMSS350 network playe, the single video file cannot exceed 2GB in playlist. Step4. Highlight the layout template you would like to add media files. Depends on the layout you choose, you will see tabs for different display zone. Page 31 ♦ Tips: The high-definition videos can only be congested by Group Level 550 and 650 series of Network Player. The Input signal is only available for Group Level 650 of Network Player; please make sure your network player support this feature. Currently only SVIDEO_PAL, CVBS_PAL, COMPONENT_PAL, and COMPONENT_480p59 are available. Page 32 MSO Gold User Manual V2.2 Stepl. You can use the "UP" and the "DN" button to rearrange the playback order. Step2. Click on the "Exit" button to save the settings. Step3. The default settings of video is full screen, volume level 50, and plays once then goes to the next media file. You can tick the full screen checkbox to remain the original ratio, change volume and repeat time, and then click on the "Set" button to save all settings. User Manual V2.2 MSO Gold 1366x768/60 1600x1200/60 13 1920x1080/60* H WfcoffWinput | g pfctg.811 g Pfcture2 I f | tteaage, | Q V V V V V V V V V V V Video Format 1080p/8mbps 1080p1920x1080/1 Ombps Storage 80xCF 80xCF Play Media Playback While Transferring Play Media Playback While Transferring 1024x768/60 V V V F1 1280x1024/60 V V V F1 1366x768/60 V V V F1 1600x1200/60 V V V F1 1920x1080/60 V V V F1 Outpuf^^ Resolution^^^ Step4. The default playback duration of input signal is 60 seconds then change to the next media file. You can change the playback duration and click on the "Set" button to save settings. V msi^z Multiple Zones WMSS350 Group Type can only play standard definition video clip (res. <= 720x576). WMSS550 and WMSS650 Group Type are capable of playing High Definition video (res. >720x576 ~ 1280x720) in multiple-zone layout. HighDefinition video (res. >1280x720 ~ 1920x1080) can only be played in single zone layout. Single Zone Video Format 480p(720x480)/10mbps 720p(1280x720)/8mbps Storage 80xCF 80xCF Play Output^^^ Resolution ^ ^ ^ Media Playback While Transferring Play Media Playback While Transferring Video Format 480p(720x480)/1 Ombps Storage 80xCF Play Media Playback While Transferring 1024x768/60 V V 1280x1024/60 V V 1366x768/60 V V 1600x1200/60 V V 1920x1080/60 V V Outpuf^^ Resolution^^. Video Format 1024x768/60 V V V V 1280x1024/60 V V V V Page 33 13 720p(1280x720)/8mbps For output resolution 1920x1080, you must use DVI-d cable connecting to monitor. Otherwise distorted picture and green screen might happen. Page 34 MSO Gold User Manual V2.2 Storage MSO Gold User Manual V2.2 80xCF Play Media Playback While Transferring 1024x 768/60 v v 1280x1024/60 v v 1366x768/60 v v 1600x1200/60 F2 F2 1920x1080/60 F2 F2 Output Resolution Failed 1(F1): Video Playback is not smooth Failed 2(F2): If output resolution is higher then this, the noise level may happen in the output image For Single Zone Playback The max. video file resolution that player can ingest is 1920x 1080/10Mbps*14 The max output resolution for player is 1920 x 1080/ 60Hz. For Multiple Zone Playback (with Scrollable message or Picture playback) The max. video file resolution that player can ingest is 1280x 720/8Mbps (720p) The max. output resolution for player is 1366x 768/ 60Hz. *15*16 Picture Zone Step1. Select picture files from Media DB and click on the “Add” button to add it into the playlist. Step2. You can use the “UP” and the “DN” button to rearrange the playback order. Step3. Click on the “Exit” button to save settings. Step4. The default playback duration of picture is 10 seconds and then goes to the next media file. You can change the picture showing time and transition effect, and then click on the “Set” button to save all settings. Message Zone Step1. Select picture files from Media DB and click on the “Add” button to add it into playlist. 4 If file is transferred while media playback, the video playback will not be smooth or loosing frame If output resolution is higher then this, the noise level may happen in the output image. 6 If Hard Disk is used as storage device, the output display resolution may go up to 1920 x 1080/ 60Hz. Page 35 5 Page 36 MSO Gold User Manual V2.2 Step2. You can use the “UP” and the “DN” button to rearrange the playback order. Step3. Click on the “Exit” button to save the settings. Step4. The default value of playback repeating time is set to once only, speed is 8 pixel*17, and scrolling direction from right to left. You can change repeating time, speed, direction, and then click on the “Set” button to save all settings. MSO Gold User Manual V2.2 Playlist Deletion Step1. Highlight the playlist you would like to delete, and then click on the “Remove” button to confirm deletion. 1.7.3 Schedule Schedule is a place where you can define playback schedule for groups and also setup playlist for this schedule. Playlist Edit Step1. Highlight the playlist you would like to edit. Step2. Click on the “Edit” button to make related changes to the playlist. Schedule Creation/Deletion Step1. Click on the “Add/Remove Schedule” button to initiate schedule addition or deletion. Step2. Choose a group which you would like to create schedule from the group list. Click on the “Add” button to create a new group if at the moment the group does not exist. From 1-15, 1 indicates the lowest speed and 15 indicates the fastest speed. Page 37 Page 38 MSO Gold User Manual V2.2 Step3. Click on the “Add” button from schedule window, and then enter schedule name. Click on the “OK” button to complete schedule addition. Step4. Repeat step 3 when you want to add more schedule. Click on the “Exit” button when you are finished. Step5. In the schedule management window, you will see the schedule is created with default timeslot. Step6. Highlight a schedule from the left hand side pane and choose output type*18, resolution, and orientation from the lower pane. Step7. You can check the “Enable media sync for this schedule” checkbox to enable auto media synchronization. If this is enabled, you should also specify media upload time and playlist apply time*19. You can also check the “Enable Time Sync Everyday*20” checkbox to enable auto time sync. 18 If you choose DVI output but still connect S-Video signal to another display, you will see green or blue screen and vice versa. 19 Media Upload Time indicates the time that the network player will download media files and playlist. Playlist Apply Time indicates the time that the network player starts playing. 20 Every time when MSO Gold synchronizes with player, it will send the standard Greenwich Mean Time to player. Then the player will calculate the time according to its time zone. But the player does not know the “daylight saving”. To make the correct player time, you need to adjust the time zone of player. For instance, change to GMT-4 instead of GMT-5. Page 39 MSO Gold User Manual V2.2 Step8. Highlight the timeslot and choose a Playlist Template from the drop down menu. You can select or deselect bars under weekly days to make schedule on or off. Green bar means schedule on and red bar means schedule off. Timeslot Creation Except the default timeslot in a schedule, you can also create other timeslots for special events such as playing only during weekdays from 8AM to 5PM, special sales event for Oct 3 to Oct 5 from 11AM to 9PM. The priority of user-defined timeslot is higher then default timeslot. The schedule of default timeslot will be running if there are no other user-defined timeslots. Step1. Click on the “Add Time Slot” button to initiate timeslot creation. Step2. Select the group and schedule you would like to add timeslot, and then enter timeslot name. Step3. Click on the “OK” button to complete timeslot creation. Page 40 MSO Gold User Manual V2.2 MSO Gold 1.7.4 User Manual V2.2 Instant Message You can edit instant message template in case if any emergency or broadcast that needs to be sent immediately. Note that instant message can be updated independently without system reboot. However, the message will run from right hand side to left hand side once only, and then it turns back to the original message. Instant Message Template Addition Step1. Click on the “Add” button and enter instant message template name, and then click on the “OK” button to complete instant message template creation. Step2. Highlight the instant message template you just created from the instant message template list. Step3. Click on the “Add” button in the bottom of Instant Message window to add text files. Step4. Highlight the timeslot you just created and choose a Playlist Template from the drop-down menu, and then setup the playback date and time*21. You can select or deselect bars under weekly days to make schedule on or off. Green bar means schedule on and red bar means schedule off. u Tips: Depends on the orientation (landscape/portrait) of a schedule, only suitable Playlist will appear in the drop-down menu. Step4. Select text files from Media DB and click on the “Add” button to add it into playlist. You can use the “UP” and the “DN” button to rearrange the playback order. Step5. Click on the “Exit” button to save the settings. Timeslot Deletion Step1. Highlight the timeslot you would like to delete, and then click on the “Remove Timeslot” button to confirm deletion. 1 The time of timeslots can not be overlapped if there are more then one timeslots in a date. Page 41 Page 42 MSO Gold User Manual V2.2 MSO Gold User Manual V2.2 Instant Message Transfer When you are done with the Instant Message Template creation, you can select one template and transfer it to one or more groups. Step1. Highlight the template you would like to transfer and then click on the “Transfer” button to initiate transfer process. Step2. Highlight a group you would like to transfer and click on the “Add” button to add it to destination. Step3. Repeat step 2 if you would like to add more groups. You can highlight a group from destination area and click on the “Remove” button to remove it from destination list. Step4. Click on the “Transfer” button to start instant message transfer. Instant Message Template Deletion Step1. Highlight the template you would like to delete, and then click on the “Remove” button to confirm deletion. Step2. You can highlight instant messages from the Instant Message List and click on the “Remove” button to remove them from the Instant Message List. 1.7.5 HTML Bulletin HTML, an initialism of Hypertext Markup Language, is the predominant markup language for web pages. It provides a means to describe the structure of text-based information in a document. The HTML file can embed links to database and show real-time information such as bus schedule, currency exchange rate, airline schedule, class schedule, and so on. Applications are including bus stations, banks, airports, schools, clinics, and much more. Page 43 Page 44 MSO Gold User Manual V2.2 HTML Bulletin Creation Step1. Select a group under Bulletin icon in the left pane. Step2. Click on the “Add” button to add HTML source. Step3. Enter HTML name and type. You can choose to read from local text file or HTML URL as Bulletin source. Click on the “Enable” checkbox if you would like to activate this source in Bulletin list. Step4. Click on the “OK” button to complete Bulletin source creation. Step5. Repeat step 2~4 if you would like to add more Bulletin source. Step6. Highlight a Bulletin source and click on the “Preview Item” button to preview individual Bulletin source. Page 45 MSO Gold User Manual V2.2 Step7. In the lower pane, you can setup Bulletin refresh period, playlist loop, showing duration, transition effect, capture picture width and height. Step8. When you are done with all settings, click on the Bulletin icon in the left pane. You will have a good overview in the upper pane and you can change Refresh Period and Playlist Loop in the lower pane. You can enable the “Enable Bulletin” checkbox to start real-time Bulletin. Note that the Bulletin will be running continuously until you uncheck the “Enable Bulletin” checkbox or when connection to the server is lost. Page 46 MSO Gold User Manual V2.2 MSO Gold User Manual V2.2 RSS Message Addition Step1. Select a group under RSS icon in the left pane. u Tips: The HTML Bulletin picture will replace the Picture Zone 1, so make sure the group layout you choose contains Picture Zone 1. You also need to drag at least one picture file in playlist in order to show HTML Bulletin picture successfully. Step2. Click on the “Add” button to add RSS source. Step3. Enter RSS name and type. You can choose to read from local text file or RSS URL as RSS source. All RSS sources are enabled by default. Bulletin Source Deletion Step1. Highlight the bulletin source you would like to delete, and then click on the “Remove” button to confirm deletion. Bulletin Source Edit Step1. Highlight the bulletin source you would like to edit. Step2. Click on the “Edit” button to make related changes to the bulletin source. 1.7.6 RSS Feed (Really Simple Syndication) RSS is a family of web feed formats used to publish frequently updated content such as blog entries, news headlines or podcasts. Web browser Internet Explorer (IE) is necessary for the successful use of RSS. Internet Explorer 7 (IE7) supports re-directing URL. If you use web browser version earlier then IE7, the URL must be a real URL without any re-direction. Page 47 Step4. Click on the “OK” button to complete RSS source creation. Step5. Repeat step 2~4 if you would like to add more RSS source. Step6. Highlight a RSS source and click on the “Preview RSS List” button to preview individual RSS source. Page 48 MSO Gold User Manual V2.2 MSO Gold User Manual V2.2 RSS Message Deletion Step1. Highlight the RSS message you would like to delete, and then click on the “Remove” button to confirm deletion. RSS Message Edit Step1. Highlight the RSS message you would like to edit. Step2. Click on the “Edit” button to make related changes to the RSS message. 1.8 Advanced Control Step7. You can click on the “Preview Refresh” button to preview the whole RSS message from the Text Preview window before you send it. Note that disabled RSS source will not appear in the preview window. Step8. When you are done with all RSS source creation, click on the RSS Feed icon in the left pane. In the lower pane, you can setup RSS font, background color, refresh period, and scrolling speed for all RSS source. Enable the “RSS running” checkbox in the lower pane to start RSS message. Note that the RSS message will be running continuously until you uncheck the “RSS running” checkbox or when the connection to server is lost. 1.8.1 Trigger Event In MSO Gold, users can define their own command to trigger a playlist, command interface including RS232, keypad, IR, LAN, motion detect, and GPS. You can click on the “Help” button in each type of trigger event to view detailed description. Note that Advanced Control is not a standard feature in MSO Gold; each feature is only available upon project request. Trigger Event Addition Step1. Click on the “Add” button to create different interface of trigger. u Tips: The RSS message will replace the Message Zone 1, so make sure the group layout you choose contains Message Zone 1. You also need to drag at least one message in playlist in order to show RSS message successfully. Page 49 Page 50 MSO Gold User Manual V2.2 RS232 Description: Edit a RS232 command which can trigger a play list. Command Index: Command Index is used to combine lead string and command string. The lead string is a fixed string “RS232_”; the command string is defined by user. For example, the command string is “INDEX1”. User could send a command which re-pack for “INDEX1” to trigger the play list. MSO Gold User Manual V2.2 Command length 4 Command length in Hex “0000”~”FFFF” Command N A user defined command string Checksum 2 Checksum of command in hex Tailer 1 “00”~”FF” A Constant text ”\n” For Example a command string :TC010006INDEX1A9’\n’ ait the trigger Name |AA Type |R5232 _TJ Command Index |R5232_ W Video/Pic/Input V Picture 1 V Picture 2 V Message 1 V Message 2 Help + |lNDEXl| Define which zone you would like to replace with new playlist if this trigger is received by network player. 1 0K 1 Keypad Description: Indicate keypad to trigger a pre-defined playlist.. Command Index: Command Index is used to combine lead string and command string. The lead string is a fixed string “BTN_”, command string could be selected only “1 ”,”2” Button 1 indicates the Volume Up button in the OSD keypad, Button 2 indicates the Volume Down button in the OSD keypad. For example, the command string is “1” Cancel How to trigger? Send the string command to network player via RS232. The command format is described as below: CP(command package)=header+package type +slaveID+command length+command+checksum+tailer. Bytes =1 +1+2+4+n+2+ 1 Name header Length 1 Package Type 1 Slave ID 2 Hex in “00”~”FF” “00” is reserved “FF” is for broadcast mode Otherwise is a specified ID Page 51 Keypad Command Index ~B BTN_ Zone Activation W Video/Pic/Input Description A constant text “T” “C”:for command package “A” for Ack package al !te£Eer V Picture 1 V Picture 2 V Message 1 I Message 2 Help 'l Define which zone you would like to replace with new playlist if this trigger is received by network player. Note: Button 3 is used for “Next Playlist Trigger”, which indicates the Brightness Increase button in the OSD keypad. Note: Button 4 is used for “Previous Playlist Trigger”, which indicates the Brightness Decrease button in the OSD keypad. Client Configuration: Page 52 MSO Gold User Manual V2.2 After this keypad trigger event is done, user has to enable the hotkey function in Client Management/Device/Group/Client and enable the hotkey of trigger event. Note that when hotkey trigger event is enabled, the original OSD keypad function will be disabled. MSO Gold User Manual V2.2 User can set the custom code and define the next and previous trigger code. Once the user press the next/previous trigger key on the IR remote, network player will play the next/previous trigger play list. Command Index: Command Index is used to combine lead string and command string. The lead string is a fixed string “IR_”, command string is a two digit hex string. For example, the command string is “1A” s Type |lR~ Command Index |^_ ~3 Help [IAT ■Zone Activation How to trigger? Trigger play list: Click on the button1 or button 2 to trigger the playlist Trigger play list: Click on the specified next/previous key on the keypad to trigger next/previous play list. IR Description: Edit an IR code which can trigger a play list. IR Custom code setting: P I - Video/Pic/Input Picture 1 Define which zone you would like to replace with new playlist if this trigger is received by network player. |~~ Picture 2 I - V Message 1 ] Message 2 How to trigger? Trigger play list: Click on the specified key on the IR remote will trigger the play list Trigger play list: Click on the specified next/previous key on the IR remote to trigger next/previous play list. LAN Description: Edit an LAN command which can trigger a play list. Command Index: Command Index is used to combine lead string and command string. The lead string is a fixed string “LAN_”,command string could be a string which string length is limited under 32. For example, the command string is “INDEX1” Page 53 Page 54 MSO Gold User Manual V2.2 U [ a new trigger ~H Type Command Index Help MSO Gold User Manual V2.2 Ul.-.fti.pr Help Type Command Index | GPS - LAN. ■Zone Activation — |~~ Video/Pic/Input |~~ Picture 1 Define which zone you would like to replace with new playlist if this trigger is received by network player. Define which zone you would like to replace with new playlist if this trigger is received by network player. I - Video/Pic/Input r Picture 1 r Picture 2 |~~ Picture 2 V Message 1 |~~ Message 1 I - Message 2 |~~ Message 2 How to trigger? Step1. Click on the “Send LAN Trigger” button to initiate LAN trigger process. Step2. Select groups you would like to send LAN trigger and click on the “Add” button to add those groups into destination list. Step3. Type LAN command in LAN Trigger Command column and click on the “Transfer” button to start transferring. How to trigger? Step1. Connect the GPS module to the player’s Wifi/3G/GPS 3-in-1 Combo antenna. Step2. The player will parse the GPS module’s output and play the specified play list where is according to the coordinate. Step3. After you see the pop-up window of GPS, please click on” Open Map” button. GPS In MSO Gold software, user will be able to define a play list for an area. The GPS module continuously feeding the coordinates to Network Player via Wifi/3G/GPS 3-in-1 Combo antenna, so Network Player can display different play list depends on its geographic position. Description: Edit the coordination of an area to trigger the specified play list Command Index: Command Index is used to combine lead string and command string. The lead string is a fixed string “GPS_” Step4. It will pop-up an embedded Google Map as follow, Step5. Please edit the GPS Trigger zones by clicking two points on the map. Step6. After you finish the setting of GPS Trigger zones, Please click “Save and Exit” Page 55 Page 56 MSO Gold User Manual V2.2 MSO Gold User Manual V2.2 Step8. When you are done with the creation of triggers, you can highlight each trigger and choose media files for this trigger. Step7. After you finish the GPS Editing, it will show coordinate information on pop-up window of GPS. Step9. Highlight a GPS trigger from the trigger management window. Depends on what display zone you have defined for this trigger, you will see different tabs in the lower pane. Step10. Click on the “Add” button to add media files from media database. Click on the “Exit” button to save all settings when you are done. Note that you MUST set player’s RS232 baud rate to be 4800 and reboot the player in order receive coordinates from GPS antenna successfully. Page 57 Page 58 MSO Gold User Manual V2.2 MSO Gold User Manual V2.2 Trigger Event Transfer When you are done with the Trigger Event creation, you can select one or more trigger event and transfer them to one or more groups. Step1. Highlight the trigger event(s) you would like to transfer and then click on the “Transfer” button to initiate transfer process. Step2. Highlight a group you would like to transfer and click on the “Add” button to add it to destination. Step3. Repeat step 2 if you would like to add more groups. You can highlight a group from destination area and click on the “Remove” button to remove it from destination list. Step4. Click on the “Transfer” button to start trigger event transfer. Trigger Event Deletion Step1. Highlight the trigger event you would like to delete, and then click on the “Remove” button to confirm deletion. Step2. You can highlight media file from the Media List and click on the “Remove” button to remove them. Step5. Click on the “Export to USB Drive” button if you would like to transfer Trigger Event via USB drive. Browse to the USB drive path and choose correct layout mode. Click on the “OK” button to finish USB drive exporting process. You should then plug the USB drive to Network Player, reboot the device to start exporting. Unplug the USB drive and reboot the Network Player when the exporting is complete. Trigger Event Edit Step1. Highlight the trigger event you would like to edit. Step2. Click on the “Edit” button to make related changes to the trigger event. Page 59 IR Config. Page 60 MSO Gold User Manual V2.2 Please refer to 1.8.1 Trigger Event for detailed description of IR trigger event. Send LAN Trigger After you transfer LAN trigger to network player, you can use Send LAN Trigger function to send commands through RJ45 cable and trigger related playlist. MSO Gold PlayingLog Contains all detailed playing activities of all players in a group. Step1. Click on the “Send LAN Trigger” button to initiate LAN trigger process. Step2. Select groups you would like to send LAN trigger and click on the “Add” button to add those groups into destination list. Step3. Type LAN command in LAN Trigger Command column and click on the “Transfer” button to start sending command. ClientBasePlayingLog Contains file name and total playback time based on each client. FileBasePlayingLog Contains client name and total playback time based on each file. 1.9 Report Management The Report Management is ideal for retrieving playing logs from clients in a group. MSO Gold generates three files for your convenience to view the client log. Due to the numerous playing activities written to the network player, the network player will only remain playing log for 7 days. Step1. In the Report Management, select the group you would like to get playing log. Step2. Browse to the file saving path and click on the “Get” button to start downloading playing log from client. Playing log of the past 7 days will be generated. ^ ■ t v e r y Sunday ■» H C:\ProgramFiles\M50GoldUadmi ., u User Manual V2.2 Tips: In order to play media file with unacceptable filename by Linux system, MSO Gold creates numeric filename for each file in the media database and creates a mapping table to show original filename in log report. Therefore, if you retrieve log report from the PC other then the original server PC with mapping table, you might not able to see the original media filename in the log report. Get 5et 1 Step3. You can check the “Enable” checkbox to enable auto playing log download routine. You should specify routine download day, time, and file saving path and click on the “Set” button to setup auto download. Step4. The system will create 3 CSV files for your convenience to view the client log. 1.10 Save You should save all changes when you are done with all creation, deletion, modification, and other activities. Due to the numerous activities you might have done, the saving process may take a while (up to 30 seconds). Page 61 Page 62 MSO Gold User Manual V2.2 MSO Gold User Manual V2.2 Step2. Select a group and then select a schedule. Click on the “Add” button to add this schedule into destination list. Step3. Repeat step 2 if you would like to add more schedules. You can highlight a schedule from destination area and click on the “Remove” button to remove it from destination list. Step4. Check the “Clear the client’s storage before transfer” checkbox if you would like to clear out the client’s internal storage. Click on the “Transfer” button to start schedule transfer. Step5. You can click on the “Transfer Log” button to view the transfer history. Step6. If you would like to transfer selected schedules to USB drive, you should choose output type and resolution and then click on the “Export” button to start schedule transfer. You should then plug the USB drive to Network Player, reboot the device to start exporting. Unplug the USB drive and reboot the Network Player when the exporting is complete. 1.11 Transfer 1.12 Event Viewer Event Viewer is a place where you can view all media update time, schedule apply time, playing log download time and status of those activities. Step1. Click on the Event Viewer to view all pre-defined activities. You should transfer schedule to groups in order to apply playlists. Step1. Click on the “Transfer” button to initiate transfer process. Page 63 o Page 64 MSO Gold User Manual V2.2 MSO Gold User Manual V2.2 Update Firmware Ever since a while, we add new features in MSO Gold to meet customer’s requirement. You can fully utilize those features by updating the latest firmware. Note that all media contents will be deleted if update firmware via USB. Choose LAN as the update option if you would like to keep media contents. Check Firmware Version Step2. When media operator is enabling the auto media sync, the player would update the media once a day, if another people is transferring new playlist to the player at the same time. It may cause the transferring conflicts in MSO Gold software before. Now after Enabling the Auto media Sync for Online Players” and “Force to Media Sync whatever, It would updating media sync first, then transferring new playlist to get rid of the transferring conflicts. Depends on the display size and the existent version of firmware in your Network Player Unit, you can choose the most convenient way to upgrade firmware. You will be able to check the firmware version of Network Player in the beginning of system boot up. ■LANliJLEIIaB MAC: 00:00:00:01:01 WLANII 1.13 Configuration Mask: N/AH The Configuration contains functions such as Update Firmware, Update Logo, and USB Configuration Export. F irmware. Version Step1. Click on the “Update Firmware” button from the Configuration window. Page 65 Page 66 MSO Gold User Manual V2.2 Step2. Highlight a group you would like to transfer and click on the “Add” button to add it to destination. Step3. Repeat step 2 if you would like to add more groups. You can highlight a group from destination area and click on the “Remove” button to remove it from destination list. Step4. Browse to the firmware file and click on the “Update” button to start firmware update process. Update Logo User can define his own boot-up logo easily in MSO Gold. Acceptable picture type: jpeg. Resolution is limited no bigger then 720 x 480. Step1. Click on the “Update Logo” button from the Configuration window. Step2. Highlight a group you would like to update logo and click on the “Add” button to add it to destination. Step3. Repeat step 2 if you would like to add more groups. You can highlight a group from destination area and click on the “Remove” button to remove it from destination list. Page 67 MSO Gold User Manual V2.2 Step4. Browse to the logo file and click on the “Update” button to start logo update process. USB Configuration Export (Factory Default Setting) This function is really convenient for you to configure client settings without using a crossover cable or a hub. Configurations you can make with this function including the Server IP that the client should connect to, client LAN settings, client WLAN settings, and client time zone. When you open this Config window, you will see all factory default settings. So you can just export those settings to USB drive, plug the USB drive to network player and reboot to reset factory settings. Step1. Click on the “USB Configuration Export” button from the Configuration window. Step2. Make setting changes. Step3. Browse to the location (USB flash drive) you would like to save the files. Step4. Click on the “Save” button. Step5. Click on the “Exit” button. Step6. Take the USB flash drive and plug it into Network Player unit. Step7. Reboot the Network Player unit to apply settings. Page 68 MSO Gold 1.14 User Management User Manual V2.2 In MSO Gold, the administrator can create user accounts for other users working on the same PC. Each user account will have its own database and settings. Note that only administrator has the privilege to see User Management and create user accounts. Step1. Click on the “Add an User” button and enter username and password for the new user account. Step2. You can highlight a user and click on the “Remove the user” button to delete the user account. Step3. You can highlight a user and click on the “Change Password” button to change the password of a user account. Page 69 MSO Gold 2.1 Touch Group Creation (Optional) User Manual V2.2 Step1. In MSO Gold Software we also support Touch as optional function, Click on the “Add & Remove Group” button to bring group editing window. Step2. Click on the “Add” button and enter group name. Step3. Click on the “OK” button to save the new group. Step4. Select the “Group Level 500 BT” from drop-down menu. Click on the “Exit” button when you finish. Note: In MSO Gold Touch, Only Group level “500BT” is supported Touch function. Be sure to set up the Group under this level. Page 70 MSO Gold User Manual V2.2 2.2 Landscape Touch/ Portrait Touch (Optional) MSO Gold User Manual V2.2 In MSO Gold Software, there are “Landscape Touch” and “Portrait Touch” modes can be selected, you can simply click on the “Add Files” button to select videos you want to add in the play list, and follow by the steps below:. Step1. When you want to add a new touch zone, please select “Landscape Touch” while your player is in landscape mode, or select “Portrait Touch” when your Display is in Vertical portrait mode, then click on the “Add Files” button ^ Step2. Enter the Template name and click on the ”OK” button. Add Zone I J Remove Zone I Edit 2.3 Touch Playlist (Optional) In MSO Gold Touch version, the Touch Playlist is only activated under the playlist level “550 BT” Therefore, please ensure to select the correct level to enable the touch function, and the other settings are as same as the original playlist structure, please refer to chapter 1.7.2 Step3. You will see the Project (Templete) has been created in the left pane, then click on the ”Add Zone” button to add touch zone into the ”Zone defined window”. Page 71 Page 72 MSO Gold User Manual V2.2 MSO Gold User Manual V2.2 of these manufacturers. Please let us know if you are required other resources. Tips: There are no limitations of triggers higher than 550 BT modes and the versions above. Step 1 . Click on the Add Zone button to add a touch zone. You can adjust the size of touch zone and drag it to anywhere upon the background image. Use the Add Zone button to add more touch zones if needed. After selected “550 BT”, you will see the “Touch Icon” when you click on the “add media to the playlist”. Add the touch content you edited into the Playlist, then click on the exit to continue the playlist editing. 2.4 Define Touch Actions (optional) Our Touch screen’s main manufacturers are from ELO Touch and Premier Touch these two suppliers, please make sure to use touch screen from one Page 73 Step 2. Select a project from left pane and it will show up project details, then double click on the touch zone in the right hand side of zone-define window, and it will pop-up another action window, which can be defined as the following four types. None Default value, do nothing Goto New Menu Create a new menu Page 74 MSO Gold User Manual V2.2 Goto Playlist Define a playlist of this zone Goto Menu Jump to an existing menu Existing ² Goto New Menu Step1. Click on the ”Goto New Menu” radio button in the Action Window. Step2. Enter New Menu Name and browse to a background image. Step3. Click on the ”Save” button to save the current settings. MSO Gold User Manual V2.2 ² Choose media files from the database and add them to the playlist in the right hand side. n Normal playlist Choose video and picture files seperately from the database and add them into the playlist. Normal playlist allows video and picture files play accordingly. ² In the bottom right corner, you can setup the picture playback duration and return menu when playback is finished. ² Goto Existing Menu You can use ”Goto Existing Menu” and go back to the previous menu, such as main menu. Step1. Click on the Goto Existing Menu radio button from the Action Window. Step2. Choose an existing menu from the drop-down menu, there is a preview window in the lower part. ² Goto Playlist ² Click on the Goto Playlist radio button from the Action Window. Page 75 Page 76 MSO Gold User Manual V2.2 ² Inactivity In MSO Gold Touch software, we are allowed to create a function which called “Inactivity”. When the existing menu is idled after specific time, the system will return to predefined menu. MSO Gold User Manual V2.2 After you finish the touch zone settings, you can do the playback management to proceed and the settings of playback management please refer to Chapter 1.7. Step1. Enter preferred time period in the Return after field. Step2. Choose “Goto Menu” from the drop-down menu. Page 77 Page 78 MSO Gold 2.5 Troubleshooting Information User Manual V2.2 MSO Gold 2.5.1 CPM setting in MSO Gold Software User Manual V2.2 The self-diagnosis tools for 3G (HUAWEI), GPS, Wi-Fi, CPM which can do the functional testing will describes as following paper. Bus bundle player peripheral testing tool 1. Unzip the file “BusBundle_TestTool.zip” into the root folder of USB memory stick. 2. Plug the USB memory stick into the player and power on. 3. You will see the appearance like below after booting process. This is only a test utility to check the peripheral hardware. It can not modify the settings. So, please use MSO Gold to modify settings. Working mechanism Temperature protection is done in 2 steps, first step is to disable the LCD’s, but it keeps the Player running, if temperature further exceeds the range, CPM box will power off the System. High Temp Player Off High Temp LCD Off Low Temp LCD Off Low Temp Player Off Page 79 . ^ ^ ^ Power Off, CPM MSO Gold Suggested settings User Manual V2.2 MSO Gold User Manual V2.2 Input control with “Ignition/ACC’ Depending on the LCD Specs Max. Values for the Player Battery Protection for deep discharge The CPM will automatically switch on/ off the System, when it meets the following situations. Step1. Battery Voltage lower then Off Voltage level for longer then 1 Minute, the CPM switches off the power Step2. Battery Voltage higher then On Voltage level for longer then 1 Minute, the CPM switches on the power The CPM box can be connected with the Ignition signal of your car through digital in pin header, and it allows to control to enable or disable the LCD’s. For flexible using it is possible to setup delay times for this function, to delay the Enable or /and delay the Disable of the LCD’s. So for example if the Ignition will be turned off at Stops, for less then 10 Minutes, CPM can keep the System running, including the LCD’s. after 10 Minutes, the LCD’s will be powered off, but the Player is still powered on, by setting the Off-delay to 10 min. When the Ignition starts the Engine, the On-delay can be used to delay the powering on of the LCD’s to avoid to heavy load on the battery at the same time. If Disabled, the CPM will ignore the input, and behave, that the LCD’s not will be disabled at any time by the CPM. <Printscreen MSO CPM settings Shutdown Voltage Level> CPM is measuring every 10 seconds the voltage and builds the Average over one minute, this helps to filter short spikes and voltage drops by switching on and off other equipment. In the OFF status, the CPM cannot be waked up with the timer, neither with Master switch nor with Ignition. The status will be shown on CPM with the red Low Battery LED light flashing. This will protect the Battery for deep discharge in any circumstances. Note: Minimum setting for the delay is 5 Sec. Input control with “Master-Switch’ The CPM can be connected with a Master-Switch signal that allows to control the power of the whole system directly. For flexible using it is possible to setup delay times for this function, to delay the Enable or /and delay the Disable of the power. So for example the Master-Switch can be used for the Driver, to power off the whole system immediately, in case there are some troubles, or power it on in the morning. The settings can be adjusted to the age and type and voltage level of the battery. Page 81 Page 82 MSO Gold MSO Gold User Manual V2.2 User Manual V2.2 h 10 V < Voltage < 30 V If Disabled, the CPM box will ignore the input, and keep the power on. - 30 V < Voltage - Ignition Function Table Note: Minimum setting for e elay is 5 ec. Protection Software Control LED Low Batt . LED low temp LED High temp LED Fuse check LED Temp Lost LED Sle epi ng LED DC in LED DC out LC D on LC D off Software Enable All commends to CPM box can be set up in advance from the Software (MSO Gold) side, software triggers the different commends to CPM Box via RS232 port. Ignition key on Ignition key off Software Disable - - CPM Box function table Temperature Sensor Function Table Protection LED Low Batt . Temperature < -20°C LED low tem p LED Hig h tem p LED Fuse check LED Te mp Los t LED Sleepi ng LED DC in LED DC out LC D on LC D off LED Fuse check LED Te mp Los t LED Sleepi ng LED DC in LED DC out LC D on LC D off flas h -20°C < Temperature <10°C 10°C < Temperature <50°C 50°C < Temperature <60°C 60°C < Temperature flas h Battery Function Table Protection Voltage < 10V LED Low Batt LED low tem p LED Hig h tem p - flas Page 83 Page 84 MSO Gold User Manual V2.2 MSO Gold User Manual V2.2 1. We suggest you download and install the “K-Lite code pack 2.50 Full” from http://www.free-codecs.com/download/K_Lite_Codec_Pack.htm to your PC if you would like to see the CODEC information of your media file. 3. After successfully install “K-Lite code pack 2.50 Full” application. Please open the “GSpot Codec Information” application from Starts>Programs->K-Lite Codec Pack->Tools->GSpot Codec Information A Appendix A How to Get Codec Information [£ AVI Fired 4/ 1 Bitrate Csdcuktor 4$ FouaCC Code Chejiger |j£ GraphEdit ''5 GSpot Codec Information 0 t Sherlock d VobSubStrip m XviD StatsReader The GSpot dialog will appear. Open the media file that you want to get codec information from File->Open The “GSpot” application will display the detail information about the media file. You can get the audio and video codec information from “Audio” and “Video” sections. Page 85 Page 86 MSO Gold User Manual V2.2 MSO Gold User Manual V2.2 B Appendix B Video Editing Tutorial Page 87 Page 88 MSO Gold User Manual V2.2 1. Goals and Objectives Video cut by some utilities doesn’t have very good compatibility with Network Player series. In this document, we will introduce the utility that has been tested and works well in Network Player series. The methods of splitter, rotate and encode will be introduced step by step in the following sections. 2. Utility Before we start, please download the convert utilities “VirtualDub-Mpeg2”, “VirtualDub” and necessary codec pack: “K-Lite code pack”. 2.1 What is virtualdub? VirtualDub is a video capture/processing utility for 32-bit Windows platforms (95/98/ME/NT4/2000/XP), licensed under the GNU General Public License (GPL). It lacks the editing power of a general-purpose editor such as Adobe Premiere, but is streamlined for fast linear operations over video. It has batch-processing capabilities for processing large numbers of files and can be extended with third-party video filters. VirtualDub is mainly geared toward processing AVI files, although it can read (not write) MPEG-1 and also handle sets of BMP images(From http://www.virtualdub.org/index) Download utilities VirtualDub http://virtualdub.sourceforge.net/ VirtualDub-Mpeg2: VirtualDub mod with MPEG2 (SVCD, DVD, VOB) import support. http://www.free-codecs.com/download/VirtualDub-MPEG2.htm 2.2 What is K-Lite code pack? K-Lite Codec Pack is a collection of codecs and related tools. Codecs are required to encode and/or decode (play) audio and video. The K-Lite Codec Pack is designed as a user-friendly solution for playing all your movie files. With the K-Lite Codec Pack you should be able to play 99% of all the movies that you download from the interne Download site : http://www.freecodecs.com/download/K Lite Codec Pack.htm MSO Gold User Manual V2.2 degree to right or left, or rotate around by 180 degree. To let the size of video become smaller and keep its quality, the Mpeg4(xvid) will be used. 3.1 Codec Information To understand what the codec the media is, you could use the “Gspot codec information” utility. From “Start->Program->K-Lite codec Pack>Tools->Gspot codec information.” 1. Click on the “File->Open” to open the video file. 2. Then you could get the codec information about the video file. 3.2 Split and Cut Video 1. Execute the VirtualDub or VirtualDub Mpeg2 according to you video type. 2. Then select “File-> Open video file” to open the video file. 3. Drag the slider below the panes to change the current position within the video. 4. Drag the slider to start position, then press the U to mark start. 5. Drag the slider to end position, then press the 3 . Video Editing In this section, the split, rotate, and compression will be introduced. Video splitter can help you split large file into smaller video clips, and you also could get the part you want. The rotate function could let video rotate 90 Page 89 Page 90 to mark end. MSO Gold User Manual V2.2 MSO Gold User Manual V2.2 <Pic 3> <Pic 1> 3.3 Rotate the Video 1. Select “Video->Filters”, and click on the “Add” button on the Filters dialog. 2. In “Add Filter” dialog (Pic2), please select “rotate”. 3. After click on the “OK” in the “Add Filter” dialog, the “Filter: rotate” dialog will appear. (Pic3) 4. According to your need to select the rotate degree. 3.4 Compress Video Video Setting 1. Please select “Video-> Compression”, and then the “Select video compression” dialog will appear (Pic4). 2. 3. 4. <Pic 4> In the list on “Select video compression” dialog, please select “Xvid MPEG-4 Codec”. After click on the Configure button. The “Xvid Configuration” dialog appears (pic5). In the Encoding type, there are three types in the selection. We suggest user select single pass or twopass. <Pic 2> Pass Size Compress time quality Single pass Small Shot General Twopass big long good 5. Page 91 When select Twopass, it needs to compress the video two times; Two pass -1st pass and then Two pass 2nd pass. Page 92 MSO Gold User Manual V2.2 6. Set Profile @ Level to Highdef, and Encoding type: to Twopass – 1st pass. 7. 8. MSO Gold User Manual V2.2 Then please follow the next section to set audio and save the file. When 1st pass procedure has done, please do 2nd pass by setting the Encoding type to 2nd pass, then save to avi again. Pic 5 Audio Setting 1. Please select “ Audio->Full procession mode” (Pic6) 2. Then select “ Audio -> Compression” (Pic7). Options 3. 4. Page 93 Tools Help <Pic6> <Pic7> After that, the “Select audio compression” dialog will appear. We want use mp3 to our audio codec, so please select MPEG Layer-3 in the left list. Page 94 MSO Gold User Manual V2.2 5. In the right list, please select “128 kBit/s, 44,100Hz, Stereo 16KB/s”. 6. Then click on the “OK” to accept the setting and exit the configuration dialog MSO Gold User Manual V2.2 3.5 Create Target File Finally, we are going to create the target file. 1. Please select “File-> Save as AVI…”, and select the path where the destination file will be put. 2. The Virtualdub will start to compress the video file according to above setting. 3. You also could see the Status window when Virtualdub compress the video (Pic9, Pic10).. YirtnalDul) Status - [CharlieChocol... | T ] Main | video | Perf 1 | Log Current video frame: |~ 423/1312 Current audio sample: |~~ Video data: 892213/2413211 5562KB (316KB/s) Audio data: 314KB Projected Pile size: <Pic8> ^X\ 18103K Time elapsed: 0:07 Total time (estimated): | 0:20 Progress: Processing thread priority: |Normal j^J ^ i5now input video; [ 7 Show output video l~~ Show decompressed video <Pic9> <Pic10> Page 95 Page 96 Abort MSO Gold User Manual V2.2 MSO Gold User Manual V2.2 Since Version 1.50 of MSO Gold, it is not only all ANSI based languages, but also UTF-8 and various other formats. C-1 Settings of Windows How to change the support in MSO Gold please follow these steps and set all to the same Language! Example is with Chinese (Taiwan) (UTF-8) Step 1: Open The Control Panel with Startà Settings à Control Panel Step 2: Open Regional and Language Options and select Languages Tab Appendix C How to Change Message and RSS Page 97 Q_ C Page 98 MSO Gold User Manual V2.2 MSO Gold User Manual V2.2 Step 3: Check if your Language is a Complex Script or Right-to-Left Language, like East-Asia, Thai, aso NOTE: Some languages need to be installed by Windows first, YOU WILL NEED THE Windows Installation CD (/I386-folder) Follow the steps of the installer. Page 99 Page 100 MSO Gold User Manual V2.2 MSO Gold User Manual V2.2 Step 5: Add a input Language and select Keyboard you want to use Step 4: Select Details Page 101 Page 102 MSO Gold User Manual V2.2 MSO Gold User Manual V2.2 ?|x Step 6: Choose Default input Language Note: This is the Windows assignment to support all non-Unicode codepages and Languages. After this, the PC has to be rebooted, otherwise the settings will have no effect. Step 8: Reboot the PC, to let the settings be effective Step 7: Select Advanced Tab and choose the Language you want to use for RSS and Message Page 103 Now follow the normal way to create message or RSS by choosing the Input language. Page 104 MSO Gold User Manual V2.2 Note: Make sure your Language also choose the right Font for this Language. All Language settings have to be the same (Example: all Chinese) MSO Gold User Manual V2.2 C-2 Examples of the Windows Language Settings for Chinese (Taiwan): BHBBuma Regional Options | Languages | Advanced | Standards and formats 1 I N ; option affects hoiA some programs formal number;. currencies, dates, and time. Select an Item to match :!f-Fiv:f^er:ce-?, QS click L u s t e r ^ e i.ci cheese your own formats: Samples Number: |123,456739.00 Currency: |NT$123,456739.00 Time: | T ^ F 02:47:13 Short date: J2008M/1 Long date: (2003^4^10 l o help services provide >:ou with local info; nation, such as news and weather, select your present location: Page 105 Page 106 MSO Gold Examples MSO Gold Settings: User Manual V2.2 MSO Gold Photo of RSS in Chinese (UTF-8) RSS Overview Photo of RSS in Arabic (UAE) (UTF-8) Preview RSS List: http://tw.news.yahoo.com/rss/politics Yahoo! ^.JSSW-l&fe S2ftf3TO£?SJI£ft (MM) 2^M^B# mmmmAM ism m\mm mmm^mm (Mm) ii^mWi-^mm S I ^ T (Mm &Mm%- mmik&JKma (Mm ii ] Photo of RSS in Korean(EUR-KR) User Manual V2.2