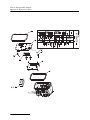
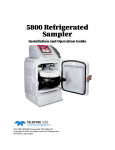
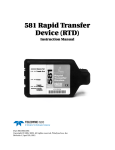
1
Glacier Transportable Sampler Installation and Operation Guide Part #60-2964-025 of Assembly #60-2964-032 Copyright © 2002. All rights reserved, Teledyne Isco Revision V, April 2015 Foreword This instruction manual is designed to help you gain a thorough understanding of the operation of the equipment. Teledyne Isco recommends that you read this manual completely before placing the equipment in service. Although Teledyne Isco designs reliability into all equipment, there is always the possibility of a malfunction. This manual may help in diagnosing and repairing the malfunction. If a problem persists, call or e-mail Teledyne Isco technical support for assistance. Simple difficulties can often be diagnosed over the phone. For faster service, please have your serial number ready. If it is necessary to return the equipment to the factory for service, please follow the shipping instructions provided by technical support, including the use of the Return Merchandise Authorization (RMA) specified. Be sure to include a note describing the malfunction. This will aid in the prompt repair and return of the equipment. Teledyne Isco welcomes suggestions that would improve the information presented in this manual or enhance the operation of the equipment itself. Teledyne Isco is continually improving its products and reserves the right to change product specifications, replacement parts, schematics, and instructions without notice. Contact Information Customer Service Phone: (800) 228-4373 (USA, Canada, Mexico) (402) 464-0231 (Outside North America) Fax: (402) 465-3022 Email: [email protected] Technical Support Phone: Toll Free (866) 298-6174 (Samplers, Flow Meters and Multi-parameter Probes) Toll Free (800) 775-2965 (Syringe Pumps and Liquid Chromatography) Email: [email protected] Return equipment to: 4700 Superior Street, Lincoln, NE 68504-1398 Other Correspondence Mail to: P.O. Box 82531, Lincoln, NE 68501-2531 Email: [email protected] Revised April 2014 Glacier Transportable Sampler Safety Glacier Transportable Sampler Glacier Safety Information The Isco Glacier Transportable Sampler is a “definite purpose” device, intended for use only with compatible Isco equipment. Do not use this product with any other manufacturers’ equipment, or for any other purpose. Use for any purpose not described in this manual could cause personal injury or property damage. Electrical Requirements The Glacier requires 12 VDC at 6 amperes. The DC power input is through the two-pin connector on the side of the refrigerated compartment. The Isco-supplied DC connect cables provide over-current protection through the use of an in-line 8A, 32V fuse. The dual-power configuration of the Glacier may also be powered by an 87 to 264 VAC, 47 to 63 Hz, 2 ampere power source using the attached AC line cord. The AC-powered Glacier is protected by an internal thermal cut-out. Additionally, the controller circuitry is protected by an internal 3.75 ampere PTC (Positive Temperature Coefficient) device. WARNING Electrocution hazard. Never manipulate electrical switches or power connections with wet hands or when your feet are in contact with water. WARNING Dual-power units only: AC electrical power must meet the applicable electrical code requirements for your installation and must be provided with an earth ground connection. If necessary, consult with a certified electrician to ensure that AC power is provided in accordance with the local electrical code. AC Powered Glaciers The AC power cord of this device is quipped with a three-prong grounding plug designed to mate with a grounded power outlet. Grounding minimizes the possibility of electrical shock. It is the user’s responsibility to ensure that the AC power source is properly grounded. If in doubt, have the outlet checked by a qualified electrician. If the available AC power outlet only accepts two prongs, or if it is determined that the outlet is improperly grounded, the outlet must be replaced by a qualified electrician before attempting to power this device. WARNING Never modify the AC power cord or use a three-prong to two-prong adapter. WARNING If this device’s power cord is frayed or otherwise damaged, discontinue its use immediately. The AC power cord is not user-serviceable and must be returned to the factory for repair or replacement. iii Glacier Transportable Sampler Safety General Warnings Before installing, operating, or maintaining this equipment, it is imperative that all hazards and preventive measures are fully understood. While specific hazards may vary according to location and application, take heed in the following general warnings: WARNING Avoid hazardous practices! If you use this instrument in any way not specified in this manual, the protection provided by the instrument may be impaired. Hazard Severity Levels This manual applies Hazard Severity Levels to the safety alerts, These three levels are described in the sample alerts below. CAUTION Cautions identify a potential hazard, which if not avoided, may result in minor or moderate injury. This category can also warn you of unsafe practices, or conditions that may cause property damage. WARNING Warnings identify a potentially hazardous condition, which if not avoided, could result in death or serious injury. DANGER DANGER – limited to the most extreme situations to identify an imminent hazard, which if not avoided, will result in death or serious injury. iv Glacier Transportable Sampler Safety Hazard Symbols The equipment and this manual use symbols to warn of hazards. The symbols are explained below. Hazard Symbols Warnings and Cautions The exclamation point within the triangle is a warning sign alerting you of important instructions in the instrument’s technical reference manual. The lightning flash and arrowhead within the triangle is a warning sign alerting you of “dangerous voltage” inside the product. This symbol warns you that your fingers or hands will sustain serious injury if you place them between the moving parts of the mechanism near this symbol. Symboles de sécurité Ce symbole signale l’existence d’instructions importantes relatives au produit dans ce manuel. Ce symbole signale la présence d’un danger d’électocution. Ce symbole vous avertit que les mains ou les doigts seront blessès sérieusement si vous les mettez entre les éléments en mouvement du mécanisme près de ce symbole. Warnungen und Vorsichtshinweise Das Ausrufezeichen in Dreieck ist ein Warnzeichen, das Sie darauf aufmerksam macht, daß wichtige Anleitungen zu diesem Handbuch gehören. Der gepfeilte Blitz im Dreieck ist ein Warnzeichen, das Sei vor “gefährlichen Spannungen” im Inneren des Produkts warnt. Advertencias y Precauciones Esta señal le advierte sobre la importancia de las instrucciones del manual que acompañan a este producto. Esta señal alerta sobre la presencia de alto voltaje en el interior del producto. v Glacier Transportable Sampler Safety vi Glacier Transportable Sampler Table of Contents Section 1 Introduction 1.1 Overview . . . . . . . . . . . . . . . . . . . . . . . . . . . . . . . . . . . . . . . . . . . . . . . . . . . . . . . . . . 1.1.1 Typical Applications . . . . . . . . . . . . . . . . . . . . . . . . . . . . . . . . . . . . . . . . . . . 1.1.2 Compatible Equipment . . . . . . . . . . . . . . . . . . . . . . . . . . . . . . . . . . . . . . . . . 1.2 Glacier Features . . . . . . . . . . . . . . . . . . . . . . . . . . . . . . . . . . . . . . . . . . . . . . . . . . . . 1.3 Technical Specifications . . . . . . . . . . . . . . . . . . . . . . . . . . . . . . . . . . . . . . . . . . . . . . 1-1 1-2 1-2 1-3 1-5 Section 2 Installation 2.1 Installation Checklist . . . . . . . . . . . . . . . . . . . . . . . . . . . . . . . . . . . . . . . . . . . . . . . . 2-1 2.2 Positioning the Sampler . . . . . . . . . . . . . . . . . . . . . . . . . . . . . . . . . . . . . . . . . . . . . . 2-1 2.3 Replacing the Pump Tube. . . . . . . . . . . . . . . . . . . . . . . . . . . . . . . . . . . . . . . . . . . . . 2-3 2.3.1 Pump Tube Warning . . . . . . . . . . . . . . . . . . . . . . . . . . . . . . . . . . . . . . . . . . . 2-3 2.3.2 Visual Inspection . . . . . . . . . . . . . . . . . . . . . . . . . . . . . . . . . . . . . . . . . . . . . . 2-4 2.4 Install the Bottle . . . . . . . . . . . . . . . . . . . . . . . . . . . . . . . . . . . . . . . . . . . . . . . . . . . . 2-5 2.5 Insert the Temperature Sensor into the Bottle . . . . . . . . . . . . . . . . . . . . . . . . . . . . 2-6 2.6 Route the Discharge Tube. . . . . . . . . . . . . . . . . . . . . . . . . . . . . . . . . . . . . . . . . . . . . 2-7 2.7 Connect a Power Source . . . . . . . . . . . . . . . . . . . . . . . . . . . . . . . . . . . . . . . . . . . . . . 2-8 2.7.1 12 VDC Power Sources . . . . . . . . . . . . . . . . . . . . . . . . . . . . . . . . . . . . . . . . . 2-8 2.7.2 Battery Recommendations . . . . . . . . . . . . . . . . . . . . . . . . . . . . . . . . . . . . . . 2-9 2.8 Connect a Suction Line and Strainer . . . . . . . . . . . . . . . . . . . . . . . . . . . . . . . . . . . . 2-9 2.8.1 Cutting the Suction Line . . . . . . . . . . . . . . . . . . . . . . . . . . . . . . . . . . . . . . . 2-11 2.8.2 Connecting Vinyl Suction Line . . . . . . . . . . . . . . . . . . . . . . . . . . . . . . . . . . 2-11 2.8.3 Connecting PTFE Suction Line . . . . . . . . . . . . . . . . . . . . . . . . . . . . . . . . . . 2-12 2.8.4 Strainers . . . . . . . . . . . . . . . . . . . . . . . . . . . . . . . . . . . . . . . . . . . . . . . . . . . . 2-12 2.8.5 Intake Placement . . . . . . . . . . . . . . . . . . . . . . . . . . . . . . . . . . . . . . . . . . . . . 2-13 2.8.6 Pressurized lines . . . . . . . . . . . . . . . . . . . . . . . . . . . . . . . . . . . . . . . . . . . . . 2-14 2.9 External Connections . . . . . . . . . . . . . . . . . . . . . . . . . . . . . . . . . . . . . . . . . . . . . . . 2-14 2.10 Calibrate the Sample Volumes . . . . . . . . . . . . . . . . . . . . . . . . . . . . . . . . . . . . . . . 2-15 2.10.1 Calibration Step 1 . . . . . . . . . . . . . . . . . . . . . . . . . . . . . . . . . . . . . . . . . . . 2-15 2.10.2 Calibration Step 2 . . . . . . . . . . . . . . . . . . . . . . . . . . . . . . . . . . . . . . . . . . . 2-16 2.10.3 Calibration Step 3 . . . . . . . . . . . . . . . . . . . . . . . . . . . . . . . . . . . . . . . . . . . 2-16 2.10.4 Calibration Step 4 . . . . . . . . . . . . . . . . . . . . . . . . . . . . . . . . . . . . . . . . . . . 2-17 2.10.5 Calibration Step 5 . . . . . . . . . . . . . . . . . . . . . . . . . . . . . . . . . . . . . . . . . . . 2-17 2.10.6 Calibration Step 6 . . . . . . . . . . . . . . . . . . . . . . . . . . . . . . . . . . . . . . . . . . . 2-18 2.11 Start the Program . . . . . . . . . . . . . . . . . . . . . . . . . . . . . . . . . . . . . . . . . . . . . . . . . 2-18 2.12 Secure the Glacier . . . . . . . . . . . . . . . . . . . . . . . . . . . . . . . . . . . . . . . . . . . . . . . . . 2-19 Section 3 Programming 3.1 Programming Overview . . . . . . . . . . . . . . . . . . . . . . . . . . . . . . . . . . . . . . . . . . . . . . 3.2 The Glacier Interface . . . . . . . . . . . . . . . . . . . . . . . . . . . . . . . . . . . . . . . . . . . . . . . . 3.2.1 The Glacier Display . . . . . . . . . . . . . . . . . . . . . . . . . . . . . . . . . . . . . . . . . . . . 3.2.2 The Glacier Keypad . . . . . . . . . . . . . . . . . . . . . . . . . . . . . . . . . . . . . . . . . . . . 3.3 Glacier Operating States . . . . . . . . . . . . . . . . . . . . . . . . . . . . . . . . . . . . . . . . . . . . . 3.3.1 Interactive States . . . . . . . . . . . . . . . . . . . . . . . . . . . . . . . . . . . . . . . . . . . . . 3.3.2 Non-interactive States . . . . . . . . . . . . . . . . . . . . . . . . . . . . . . . . . . . . . . . . . . 3.4 Programming the Glacier . . . . . . . . . . . . . . . . . . . . . . . . . . . . . . . . . . . . . . . . . . . . . 3-1 3-1 3-1 3-1 3-1 3-1 3-2 3-2 vii Glacier Transportable Sampler Table of Contents 3.5 One-button Programming. . . . . . . . . . . . . . . . . . . . . . . . . . . . . . . . . . . . . . . . . . . . . 3-2 3.5.1 Stored Program . . . . . . . . . . . . . . . . . . . . . . . . . . . . . . . . . . . . . . . . . . . . . . . 3-2 3.6 Standard Programming . . . . . . . . . . . . . . . . . . . . . . . . . . . . . . . . . . . . . . . . . . . . . . 3-3 3.6.1 Programming Step 1 – Pacing . . . . . . . . . . . . . . . . . . . . . . . . . . . . . . . . . . . . 3-3 3.6.2 Programming Step 2 – Pacing Interval . . . . . . . . . . . . . . . . . . . . . . . . . . . . 3-4 3.6.3 Programming Step 3 – Bottle Volume . . . . . . . . . . . . . . . . . . . . . . . . . . . . . 3-4 3.6.4 Programming Step 4 – Number of Samples . . . . . . . . . . . . . . . . . . . . . . . . . 3-5 3.6.5 Programming Step 5 – Sample Volume . . . . . . . . . . . . . . . . . . . . . . . . . . . . 3-6 3.6.6 Programming Step 6 – Program Start Time . . . . . . . . . . . . . . . . . . . . . . . . 3-6 3.6.7 Programming Step 7 – Suction Line . . . . . . . . . . . . . . . . . . . . . . . . . . . . . . . 3-7 3.7 Setting the Time and Date . . . . . . . . . . . . . . . . . . . . . . . . . . . . . . . . . . . . . . . . . . . . 3-8 3.8 Glacier Options . . . . . . . . . . . . . . . . . . . . . . . . . . . . . . . . . . . . . . . . . . . . . . . . . . . . . 3-8 3.8.1 Program Lock . . . . . . . . . . . . . . . . . . . . . . . . . . . . . . . . . . . . . . . . . . . . . . . . . 3-9 3.8.2 Storing a Program . . . . . . . . . . . . . . . . . . . . . . . . . . . . . . . . . . . . . . . . . . . . 3-10 3.8.3 Disable Bottle Full Detection . . . . . . . . . . . . . . . . . . . . . . . . . . . . . . . . . . . 3-10 3.8.4 Liquid Detector Disable . . . . . . . . . . . . . . . . . . . . . . . . . . . . . . . . . . . . . . . . 3-10 3.9 Foreign Language Displays . . . . . . . . . . . . . . . . . . . . . . . . . . . . . . . . . . . . . . . . . . 3-11 Section 4 Operating the Sampler 4.1 4.2 4.3 4.4 4.5 Overview . . . . . . . . . . . . . . . . . . . . . . . . . . . . . . . . . . . . . . . . . . . . . . . . . . . . . . . . . . Starting a Program . . . . . . . . . . . . . . . . . . . . . . . . . . . . . . . . . . . . . . . . . . . . . . . . . . Counting Down Delay Times . . . . . . . . . . . . . . . . . . . . . . . . . . . . . . . . . . . . . . . . . . Sampler Inhibit . . . . . . . . . . . . . . . . . . . . . . . . . . . . . . . . . . . . . . . . . . . . . . . . . . . . . Run State Displays . . . . . . . . . . . . . . . . . . . . . . . . . . . . . . . . . . . . . . . . . . . . . . . . . . 4.5.1 Collecting a sample – . . . . . . . . . . . . . . . . . . . . . . . . . . . . . . . . . . . . . . . . . . . 4.5.2 Waiting to sample – . . . . . . . . . . . . . . . . . . . . . . . . . . . . . . . . . . . . . . . . . . . . 4.5.3 Errors – . . . . . . . . . . . . . . . . . . . . . . . . . . . . . . . . . . . . . . . . . . . . . . . . . . . . . 4.6 Sample Collection Cycle . . . . . . . . . . . . . . . . . . . . . . . . . . . . . . . . . . . . . . . . . . . . . . 4.6.1 Pre-purge . . . . . . . . . . . . . . . . . . . . . . . . . . . . . . . . . . . . . . . . . . . . . . . . . . . . 4.6.2 Fill . . . . . . . . . . . . . . . . . . . . . . . . . . . . . . . . . . . . . . . . . . . . . . . . . . . . . . . . . . 4.6.3 Post-purge . . . . . . . . . . . . . . . . . . . . . . . . . . . . . . . . . . . . . . . . . . . . . . . . . . . 4.7 Refrigeration Control . . . . . . . . . . . . . . . . . . . . . . . . . . . . . . . . . . . . . . . . . . . . . . . . 4.8 Pausing or Stopping a Program . . . . . . . . . . . . . . . . . . . . . . . . . . . . . . . . . . . . . . . . 4.9 Program Completion . . . . . . . . . . . . . . . . . . . . . . . . . . . . . . . . . . . . . . . . . . . . . . . . . 4.10 Post-sampling Activities . . . . . . . . . . . . . . . . . . . . . . . . . . . . . . . . . . . . . . . . . . . . . 4.10.1 Recovering the Sampler . . . . . . . . . . . . . . . . . . . . . . . . . . . . . . . . . . . . . . . . 4.10.2 Preparing the Full Sample Bottle . . . . . . . . . . . . . . . . . . . . . . . . . . . . . . . . 4.11 Log . . . . . . . . . . . . . . . . . . . . . . . . . . . . . . . . . . . . . . . . . . . . . . . . . . . . . . . . . . . . . . 4.11.1 Errors . . . . . . . . . . . . . . . . . . . . . . . . . . . . . . . . . . . . . . . . . . . . . . . . . . . . . . 4.11.2 Viewing Log Reports using Isco SAMPLINK software . . . . . . . . . . . . . . . 4.11.3 Viewing Log Reports using a Terminal Program . . . . . . . . . . . . . . . . . . . . 4.12 Grab Samples . . . . . . . . . . . . . . . . . . . . . . . . . . . . . . . . . . . . . . . . . . . . . . . . . . . . . 4-1 4-1 4-1 4-2 4-2 4-2 4-2 4-3 4-3 4-3 4-3 4-3 4-4 4-4 4-4 4-4 4-5 4-5 4-5 4-6 4-7 4-7 4-8 Section 5 Maintenance 5.1 Overview . . . . . . . . . . . . . . . . . . . . . . . . . . . . . . . . . . . . . . . . . . . . . . . . . . . . . . . . . . 5.2 Cleaning. . . . . . . . . . . . . . . . . . . . . . . . . . . . . . . . . . . . . . . . . . . . . . . . . . . . . . . . . . . 5.2.1 Cleaning the Glacier Exterior . . . . . . . . . . . . . . . . . . . . . . . . . . . . . . . . . . . . 5.2.2 Cleaning the Bottles . . . . . . . . . . . . . . . . . . . . . . . . . . . . . . . . . . . . . . . . . . . 5.2.3 Cleaning the Suction Line and Tubing . . . . . . . . . . . . . . . . . . . . . . . . . . . . . 5.2.4 Cleaning the Temperature Sensor . . . . . . . . . . . . . . . . . . . . . . . . . . . . . . . . 5.2.5 Cleaning the Pump Rollers . . . . . . . . . . . . . . . . . . . . . . . . . . . . . . . . . . . . . . 5.2.6 Cleaning the Pump Housing . . . . . . . . . . . . . . . . . . . . . . . . . . . . . . . . . . . . . 5.2.7 Cleaning Wetted Parts . . . . . . . . . . . . . . . . . . . . . . . . . . . . . . . . . . . . . . . . . 5.3 Defrosting the Glacier Refrigerated Compartment. . . . . . . . . . . . . . . . . . . . . . . . . 5.4 Replacing the Pump Tube. . . . . . . . . . . . . . . . . . . . . . . . . . . . . . . . . . . . . . . . . . . . . 5.4.1 Removing the Tube . . . . . . . . . . . . . . . . . . . . . . . . . . . . . . . . . . . . . . . . . . . . viii 5-1 5-1 5-1 5-2 5-2 5-2 5-2 5-2 5-2 5-4 5-4 5-4 Glacier Transportable Sampler Table of Contents 5.4.2 Replacing the Tube . . . . . . . . . . . . . . . . . . . . . . . . . . . . . . . . . . . . . . . . . . . . 5-6 5.4.3 Resetting the Pump Tube Warning . . . . . . . . . . . . . . . . . . . . . . . . . . . . . . . 5-6 5.4.4 Optimizing Pump Performance . . . . . . . . . . . . . . . . . . . . . . . . . . . . . . . . . . . 5-6 5.5 Replacing the Discharge Tube . . . . . . . . . . . . . . . . . . . . . . . . . . . . . . . . . . . . . . . . . 5-7 5.6 Servicing Batteries . . . . . . . . . . . . . . . . . . . . . . . . . . . . . . . . . . . . . . . . . . . . . . . . . . 5-8 5.7 Replacing the Internal Desiccant . . . . . . . . . . . . . . . . . . . . . . . . . . . . . . . . . . . . . . . 5-8 5.7.1 Renewing the Desiccant . . . . . . . . . . . . . . . . . . . . . . . . . . . . . . . . . . . . . . . . 5-9 5.8 Glacier Self-diagnostics. . . . . . . . . . . . . . . . . . . . . . . . . . . . . . . . . . . . . . . . . . . . . . 5-10 5.9 Contacting Teledyne Isco for Assistance . . . . . . . . . . . . . . . . . . . . . . . . . . . . . . . . 5-12 5.9.1 Return Instructions . . . . . . . . . . . . . . . . . . . . . . . . . . . . . . . . . . . . . . . . . . . 5-12 5.10 Replacement Parts . . . . . . . . . . . . . . . . . . . . . . . . . . . . . . . . . . . . . . . . . . . . . . . . 5-13 5.11 Software Updates . . . . . . . . . . . . . . . . . . . . . . . . . . . . . . . . . . . . . . . . . . . . . . . . . 5-13 Appendix A Replacement Parts A.1 Overview . . . . . . . . . . . . . . . . . . . . . . . . . . . . . . . . . . . . . . . . . . . . . . . . . . . . . . . . . . A-1 Appendix B Accessories B.1 Accessories List. . . . . . . . . . . . . . . . . . . . . . . . . . . . . . . . . . . . . . . . . . . . . . . . . . . . . B-1 B.1.1 Bottle Kits . . . . . . . . . . . . . . . . . . . . . . . . . . . . . . . . . . . . . . . . . . . . . . . . . . . B-1 B.1.2 Replacement Bottles . . . . . . . . . . . . . . . . . . . . . . . . . . . . . . . . . . . . . . . . . . . B-1 B.1.3 General Accessories . . . . . . . . . . . . . . . . . . . . . . . . . . . . . . . . . . . . . . . . . . . . B-1 B.1.4 Suction line and strainers . . . . . . . . . . . . . . . . . . . . . . . . . . . . . . . . . . . . . . . B-2 B.1.5 DC Power Connect Cables . . . . . . . . . . . . . . . . . . . . . . . . . . . . . . . . . . . . . . B-2 B.1.6 Connect Cables and Interfaces . . . . . . . . . . . . . . . . . . . . . . . . . . . . . . . . . . . B-3 Appendix C Material Safety Data Sheets C.1 Overview . . . . . . . . . . . . . . . . . . . . . . . . . . . . . . . . . . . . . . . . . . . . . . . . . . . . . . . . . . C-1 Appendix D Battery Selection Guide D.1 Introduction . . . . . . . . . . . . . . . . . . . . . . . . . . . . . . . . . . . . . . . . . . . . . . . . . . . . . . . D-1 D.2 Determining the Power Consumption. . . . . . . . . . . . . . . . . . . . . . . . . . . . . . . . . . . D-1 List of Figures 1-1 1-2 1-3 2-1 2-2 2-3 2-4 2-5 2-6 2-7 2-8 2-9 5-1 5-2 5-3 5-4 5-5 D-1 D-2 Glacier Transportable Samplers . . . . . . . . . . . . . . . . . . . . . . . . . . . . . . . . . . . . . . . 1-1 Glacier Features . . . . . . . . . . . . . . . . . . . . . . . . . . . . . . . . . . . . . . . . . . . . . . . . . . . . 1-3 Glacier Keypad Buttons . . . . . . . . . . . . . . . . . . . . . . . . . . . . . . . . . . . . . . . . . . . . . . 1-4 Pump Housing Cover Removed . . . . . . . . . . . . . . . . . . . . . . . . . . . . . . . . . . . . . . . . 2-4 Placement of Bottle and Retainer (top view) . . . . . . . . . . . . . . . . . . . . . . . . . . . . . 2-6 Temperature Sensor in Bottle . . . . . . . . . . . . . . . . . . . . . . . . . . . . . . . . . . . . . . . . . 2-7 Discharge Tube and Tube Guide . . . . . . . . . . . . . . . . . . . . . . . . . . . . . . . . . . . . . . . 2-7 Attaching the suction line to the pump tubing . . . . . . . . . . . . . . . . . . . . . . . . . . . 2-12 Standard Weighted Polypropylene Strainer . . . . . . . . . . . . . . . . . . . . . . . . . . . . . 2-14 Stainless Steel Strainer . . . . . . . . . . . . . . . . . . . . . . . . . . . . . . . . . . . . . . . . . . . . . 2-14 CPVC Weighted Strainer . . . . . . . . . . . . . . . . . . . . . . . . . . . . . . . . . . . . . . . . . . . . 2-14 Measuring Suction Head Height . . . . . . . . . . . . . . . . . . . . . . . . . . . . . . . . . . . . . . 2-17 Wetted Parts . . . . . . . . . . . . . . . . . . . . . . . . . . . . . . . . . . . . . . . . . . . . . . . . . . . . . . . 5-3 Liquid detector cover removed . . . . . . . . . . . . . . . . . . . . . . . . . . . . . . . . . . . . . . . . . 5-5 Pump housing cover removed . . . . . . . . . . . . . . . . . . . . . . . . . . . . . . . . . . . . . . . . . 5-5 Discharge Tube and Tube Guide . . . . . . . . . . . . . . . . . . . . . . . . . . . . . . . . . . . . . . . 5-7 Internal Desiccant . . . . . . . . . . . . . . . . . . . . . . . . . . . . . . . . . . . . . . . . . . . . . . . . . . 5-9 Amp-hours required to cool 6 liters of sample liquid from 20° C (Ac) . . . . . . . . . . D-3 Amp-hours per day required to maintain sample liquid at 3° C (Am) . . . . . . . . . D-3 ix Glacier Transportable Sampler Table of Contents List of Tables 1-1 Glacier Transportable Sampler Specifications . . . . . . . . . . . . . . . . . . . . . . . . . . . . 1-5 2-1 Standard Bottles for the Glacier Transportable Sampler . . . . . . . . . . . . . . . . . . . 2-5 2-2 Strainer/Suction Line Depths . . . . . . . . . . . . . . . . . . . . . . . . . . . . . . . . . . . . . . . . 2-13 x Glacier Transportable Sampler Section 1 Introduction 1.1 Overview The Glacier is a transportable refrigerated sampler, designed for automated sample collection in remote field situations where conventional, electrically-powered refrigerated samplers cannot be used. Normally, where there is no electrical power available, portable samplers using ice as the means for cooling the sample had to be used. The Glacier’s CFC-free cooling system meets the recommended EPA requirements for sample protection, eliminating the need for ice. Samples collected by the Glacier will be held at 3° C, even in extreme climates. However, some precautions and care must be taken when positioning and locating the Glacier. See section 2.2 before installation. The Glacier is ideally suited for the collection of composite samples for satisfying NPDES permit requirements. It is equally well suited for use in waste water treatment plants where portability or a compact size is needed. Since it can be operated from a 12 volt battery or an internal AC converter, it can be easily moved from one location to another in the plant without worrying whether or not AC power is available. Figure 1-1 Glacier Transportable Samplers 1-1 Glacier Transportable Sampler Section 1 Introduction The Glacier collects liquid samples and places them in a composite sample container. The largest standard sample container will hold 5 gallons (19 liters). A dependable peristaltic pump delivers the liquid to the bottle. Its pump, coupled with the non-contacting liquid detector, gives you accurate, repeatable sample volumes time after time. The liquid detector may also be used to halt the sampling routine when a full bottle is detected. At the heart of the sampler is the controller. It is environmentally sealed (rated NEMA 4X, 6 and IP67) to provide protection from accidental submersion and long term exposure to high humidity and corrosive gases. Its tactile keypad and 2 line by 20 character display simplifies operation. In just seconds, the one-button programming procedure will load the stored program settings and run the sampling routine. 1.1.1 Typical Applications The Glacier is part of Teledyne Isco’s many automated sampling solutions which include the Model 3700 and 6700 Series samplers. This versatile product line meets the demands of: • NPDES permit compliance • Pre-treatment compliance • Stormwater run-off • Combined sewer overflow • Sanitary sewer evaluations • Non-point source sampling • Biomonitoring 1.1.2 Compatible Equipment Compatible Isco devices include: Isco flow measuring instruments: • 4100 Series Flow Loggers • 4200 Series Flow Meters Non-Isco device interfaces: • 4-20 mA Input Interface • Pulse Duration Input Interface Isco parameter measuring devices: • Liquid Level Actuator 1-2 Glacier Transportable Sampler Section 1 Introduction 1.2 Glacier Features Top View 3 2 4 5 6 Front View 1 14 8 9 7 10 Side View 13 11 12 1 Sampler Controller 2 Flow meter connector 3 Bulkhead fitting 4 Discharge Tube 5 Sample Bottle 6 Sample Bottle Retainer 7 Pump Tube 8 Liquid Detector 9 Pump Housing 10 Carrying handle 11 DC Power connector 12 Power mode switch. Always LOW. 13 AC Power Cable (Dual-power Models only) 14 Refrigerated Compartment Figure 1-2 Glacier Features 1-3 Glacier Transportable Sampler Section 1 Introduction 1 5 2 3 4 1 Liquid Crystal Display (LCD) 2 rows by 20 characters 2 Standby Button. When in the Off state the Standby button turns the Glacier on and places it in the Standby state. In any other state, the Standby button will place the sampler in the Off state. 3 KeyPad NUMBER Buttons allow you to enter numerical values when prompted by an interactive screen. The ARROW Button changes the current selection in an interactive screen. Pressing the ARROW button causes a different option to blink. ENTER Button. In an interactive state, the ENTER button accepts the selected (blinking) option. In non-interactive states, pressing the ENTER button will scroll through any additional displays. The STOP Button interrupts the current task and the display reverts to the previous screen or state. If you press the STOP button while a number-entry screen is displayed, the Glacier restores the previous value. Pressing the STOP button during a running program places the Glacier in the Paused state. Pressing the CALIBRATE Button while in the Standby state takes you to the Calibrate Sample Volume sequence of the programming. The GRAB SAMPLE Button allows you to collect a grab sample outside of the programmed number of samples. The PROGRAM Button is used for the Glacier One-button Programming. 4 GO Button. Pressing the GO button places the Glacier in the Run state using the current program. 5 Humidity Indicator. Indicates the internal humidity. To protect the Glacier’s internal components, the desiccant must be replaced when the humidity is completely pink (see section 5.7). Figure 1-3 Glacier Keypad Buttons 1-4 Glacier Transportable Sampler Section 1 Introduction 1.3 Technical Specifications Table 1-1 lists the technical specifications for the Glacier Transportable Sampler. Table 1-1 Glacier Transportable Sampler Specifications Size (H W D) 25 15 24 in. 63 38 60 cm (Does not include optional mobility kit) Weight 60 lb. 28 kg (Includes refrigerator, controller, empty bottle, and bottle retainer. Does not include battery or optional mobility kit) Power The mains line cord is the disconnect device. DC Power Configuration: Dual-power Configuration: 12 VDC, 6 amperes, or 87 to 264 VAC, 47 to 63 Hz, 2 amperes Installation Category II Pollution Degree 4 1 Maximum Altitude 12 VDC, 6 amperes 2000 meters Pump Intake Purge Before and after each sample collection Tubing Life Indicator Provides message to change tubing Intake Suction Line: Length Material Inside Dimension 3 to 99 feet Vinyl or PTFE line 0.375 in. or 0.250 in. Pump Tubing Life 2,000 samples typical Maximum Suction Lift 26 feet Typical Repeatability ± 10 ml Typical Line Velocity: 3 ft (1 m) 10 ft (3.1 m) 15 ft (4.6 m) 2.9 ft/sec 2.5 ft/sec 1.9 ft/sec Liquid Presence Detector Non-wetted, non-conductive sensor for automatic detection of liquid 1 to 30 m 0,952 or 0,635 cm 0,88 m/sec 0,76 m/sec 0,58 m/sec Controller Weight 8 pounds 3.6 kg Dimensions 10 x 12.5 x 10 inches 26 x 32 x 25 cm Operational Temperature 32° to 120° F 0° to 49° C Enclosure Rating NEMA 4x, 6 IP 67 Program Memory Non-volatile ROM Flow Meter Signal Requirements 5 to 15 volt DC pulse or 25 millisecond or longer isolated contact closure Real Time Clock Accuracy 1 minute per month typical Refrigerator Sample maintenance temperature 37.4 ± 1.8° F 3.0 ± 1.0° C Software Sample Frequency Selection 1 minute to 9,999 minutes in 1 minute increments 1 to 9,999 flow pulses 1-5 Glacier Transportable Sampler Section 1 Introduction Table 1-1 Glacier Transportable Sampler Specifications (Continued) Sampling Modes Time or Flow (Flow signal from external source) Programmable Volume 10 to 9,990 ml in 1 ml increments Program Storage One program running, one stored Controller Diagnostics Test for RAM, ROM Pump and Display Note 1: The maximum altitude rating is per European Norm 61010-1, which establishes safety requirements for electrical equipment. The rating pertains to electrical creepage and clearances. The rating is not applicable to pump performance. 1-6 Glacier Transportable Sampler Section 2 Installation 2.1 Installation Checklist 1. Place the Glacier Sampler in position (2.2) 2. Inspect the pump tube (2.3) 3. Install the bottle (2.4) 4. Insert the temperature sensor into the bottle (2.5) 5. Check the discharge tube (2.6) 6. Connect a power source (2.7) 7. Connect a suction line and strainer (2.8) 8. External connections (essential for flow-paced sampling or sampler inhibiting, section 2.9) 9. Calibrate sample volumes (optional, section 2.10) 10. Start the Program (2.11) 11. Secure the Glacier (2.12) 2.2 Positioning the Sampler There are a few considerations when selecting a site for the Glacier sampler. The foremost concern should be personal safety. WARNING The installation and use of this product may subject you to hazardous working conditions that can cause you serious or fatal injuries. Take any necessary precautions before entering the worksite. Install and operate this product in accordance with all applicable safety and health regulations, and local ordinances. WARNING The system is heavy. Use a two-person lift to prevent injury. WARNING If this product is used in a manner not specified in this manual, the protection provided by the equipment may be impaired. WARNING AC Powered Glaciers – Never defeat or modify the mains plug earth ground connection. 2-1 Glacier Transportable Sampler Section 2 Installation The following points should also be considered: • Power–The only means to totally remove power from the Glacier is by disconnecting the mains line cord from the power outlet, or the cable to the battery. Position the battery or connect to the mains outlet in a location where power may be disconnected easily in an emergency. • Level surface–The Glacier should be placed on a level surface to prevent tipping or spills. CAUTION Positions other than the Glacier’s normal upright position will drain the lubricant away from the refrigerator compressor. Operation without adequate lubrication may permanently damage the refrigeration system. If the Glacier is turned over for more than a few seconds, the Glacier’s refrigeration system must not be operated for at least one hour after returning the Glacier to its upright position. • Support–The surface must be able to support the Glacier at full capacity. This weight would include the Glacier, the full sample bottle, and the battery (if used). • Ventilation–The Glacier requires at least 1 foot (0.3 m) of air space around the refrigeration components. The Glacier’s refrigeration system does not have an evaporator fan. Instead, it relies on air circulation to dissipate the heat removed from the refrigerated compartment. Inadequate ventilation will reduce the cooling capacity and significantly increase power consumption. • Environmental–The Glacier is designed for use in harsh environments. However, you should avoid installing the Glacier in locations where its components are subject to chemical attack. Also, prolonged exposure to direct sunlight will eventually damage the exterior. If the Glacier is subject to chemical attack or prolonged UV exposure, consider using a protective enclosure. Keep in mind that positioning the Glacier in direct sunlight will also increase power consumption, a factor worth considering when using battery power. • Avoid submersion–Although the controller will resist damage (rated NEMA 4x, 6), the refrigerator system and bottle compartment cannot prevent the liquid from entering. Liquid entering the refrigerated system will damage the cooling system; liquid entering the bottle compartment will contaminate the collected samples. • Accessibility–The Glacier must be installed in a location where it can be recovered easily without tipping or difficult maneuvering. • Security–The location may need to provide some degree of security to prevent tampering or vandalism. You can read more about securing the sampler in section 2.12. 2-2 Glacier Transportable Sampler Section 2 Installation 2.3 Replacing the Pump Tube If your sampling protocol mandates that you replace the pump tube for each sampling program, refer to the replacement instructions in section 5.4. Otherwise, the pump tube can remain until one of the two following conditions are present: • The sampler controller displays a pump tube warning, or— • A pre-sampling program visual inspection identifies a worn or damaged tube. The pump tube must be replaced when the first of either condition exists. Note The importance of regular tubing replacement cannot be overstated. The key is to replace the tube before failure, not after. When a pump tube ruptures, grit and other abrasive debris can be driven into the pump shaft seal. Over time, this abrasive material will degrade the pump seal, jeopardizing the NEMA 4x 6 rating of the controller. Failure to maintain the pump tube may result in permanent damage to the sampler. Check the condition of the pump tube regularly and if the tube shows signs of fatigue or wear, replace it immediately. A properly maintained sampler will provide years of reliable service that is expected of an Isco Sampler. Section 5.4 of this manual describes the pump tube removal and replacement steps. Afterwards, be sure to reset the pump counter (section 5.4.3). 2.3.1 Pump Tube Warning The Glacier displays a pump tube warning at the recommended replacement interval. The warning display will alternate with the run screens, and is part of the VIEW LOG screens. Regardless of the visual condition of the pump tube, it should be replaced as soon as possible after the warning. The warning appears after the controller reaches the factory set value of 500,000 pump counts. This value will deliver approximately 500 samples of 200 ml each, using a 3/8-inch by 10-foot suction line at a 5-foot suction head. The pump tube replacement interval of 500,000 pump counts should be sufficient for most applications. If you are sampling abrasive liquids or liquids with a high content of suspended solids, you may find that the pump tube requires replacement more frequently. 2-3 Glacier Transportable Sampler Section 2 Installation 2.3.2 Visual Inspection The pump tube must be inspected before running each program. Pump tube failures can prevent the Glacier from collecting the samples—or worse—may even damage the controller. To inspect the pump tube: CAUTION Moving par ts can cause injuries. Remove power before inspecting pump tube. 1. Disconnect the power from the Glacier. 2. Remove the pump housing cover by loosening the four thumbscrews. 3. Visually inspect the pump tube for cracks where it is compressed by the rollers. If the tube is cracked, it must be replaced. Section 5.4 provides detailed instructions on replacing the pump tube and resetting the pump tube counter. 4. Visually inspect the inside of the pump housing. The housing and rollers should be free from debris. 5. Replace the pump housing cover and tighten the thumbscrews. Figure 2-1 Pump Housing Cover Removed 2-4 Glacier Transportable Sampler Section 2 Installation 2.4 Install the Bottle The base section of the Glacier is designed to hold five different types of bottles. These bottle options are shown in Table 2-1. Table 2-1 Standard Bottles for the Glacier Transportable Sampler Illustration Part Number1 Program Volume 68-2960-008 19000 ml 5-gallon (19-liter) lightweight polyethylene bottle with caps. 68-2960-005 9400 ml 2.5-gallon (10-liter) Nalgene polyethylene bottle with caps. 68-2960-006 9400 ml 2.5-gallon (10-liter) Glass bottle with PTFE-lined caps. 68-2960-007 9400 ml 2.5-gallon (10-liter) lightweight polyethylene bottle with caps. 68-2960-009 7000 ml 2-gallon (9-liter) ProPak single-use liner with holder, caps and 100 liners. Description 1. Bottles ordered with this part number include two caps—one with a hole for the discharge tube, the other without the hole to be used when transporting the full bottle— two discharge tubes, and a bottle retainer. 2-5 Glacier Transportable Sampler Section 2 Installation 5-gallon (19-liter) lightweight polyethylene bottle with narrow bottle retainer (69-2963-036) 2.5-gallon (10-liter) round bottles and 2.0-gallon (9-liter) ProPaks with narrow bottle retainer (69-2963-036) 2.5-gallon (10-liter) lightweight polyethylene bottle with wide bottle retainer (69-2963-035) Figure 2-2 Placement of Bottle and Retainer (top view) The bottle fits inside the refrigerated compartment of the Glacier and is secured by the bottle retainer. Refer to Figure 2-2 for the correct placement of the bottle and retainer. Attach the cap with the center hole to the bottle opening. The cap without the hole is for transporting the full bottle. You may store this inside the refrigerated compartment for later use. Note that the program volume listed in Table 2-1 is slightly less than the nominal bottle volume. The smaller program volume prevents the bottle from being over-filled. Refer to Section 3.6.3 for more information on bottle volumes. You may use a non-standard bottle in the Glacier. When entering the non-standard bottle volume, it is advisable to enter a value less than the total volume. Again, this will reduce the possibility of missed samples and spills. 2.5 Insert the Temperature Sensor into the Bottle To reliably cool the samples, the temperature sensor must be inserted into the bottle. The sensor should be routed through the hole in the bottle cap. Note When using the refrigeration control, the end of temperature sensor must be positioned at the bottom of the container. See Figure 2-3. Your sampling protocol may require that the temperature sensor be cleaned before each sampling program. Refer to section 5.2.4 for cleaning instructions. Using a protective sleeve is a practical alternative to cleaning the temperature sensor. PTFE sleeves are available from Teledyne Isco (order part number 60-5314-523). Call the factory for more information. 2-6 Glacier Transportable Sampler Section 2 Installation Cut-away view of 2.5 gallon lightweight polyethylene bottle Figure 2-3 Temperature Sensor in Bottle 2.6 Route the Discharge Tube The discharge tube is located inside the refrigerated compartment. The medical-grade Silastic™ tubing routes the liquid from the bulkhead fitting to the bottle. The 5-gallon and 21/2-gallon lightweight polyethylene bottles use a 51/4-inch long tube. The 21/2-gallon Nalgene and glass bottles, and the ProPaks use an 111/4-inch long tube. The discharge tube should be well fitted over the bulkhead fitting and routed through the hole in the bottle cap. The tube must be free of twists or kinks. Figure 2-4 Discharge Tube and Tube Guide 2-7 Glacier Transportable Sampler Section 2 Installation Note The amount of tubing that should extend into the bottle will depend on the programmed sample volume (see section 3.6.5). For the bottle-full detection to work properly, the volume above the discharge tube end must be greater than the programmed sample volume. Some users, particularly those who must clean or replace the entire liquid path for each sampling program, find it more convenient to eliminate the bulkhead fitting and discharge tube. If you desire to do this, simply unscrew both ends of the bulkhead fitting and remove it. This will allow a continuous piece of pump tubing to be routed through the hole. Tubing can be cut to length from bulk Silastic tubing. See Appendix B. 2.7 Connect a Power Source The Glacier sampler is available with two different power options. The dual-power option allows you to power the refrigerated sampler using AC (87–264 Volt, 47–63 Hz) or DC (12 Volt) power. The DC powered option can only be powered by a 12 VDC source. To connect the dual-power Glacier to AC power, use the attached AC power cord. The dual-power Glacier may be ordered with a power cord for North American outlets, or with a power cord for most European outlets. Users in other regions may need to purchase an appropriate plug adapter for use with the available power outlets. Because the dual-power Glacier includes an internal universal AC power converter, only outlet adapters are required to configure the sampler for the power source. No other hardware or wiring changes are necessary. 2.7.1 12 VDC Power Sources To connect the (DC or dual-power) Glacier to a DC power source, use one of the supplied 12V DC connect cables. Two types are shipped with the Glacier. Connect cable 60-2964-021 is used connect the Glacier to an automotive or deep-cycle marine battery with heavy-duty clips. Connect cable 480-0199-00 is used to connect the Glacier to a cigarette lighter outlet that provides 12V DC power. Both cables provide over-current protection through the use of an in-line fuse: • 60-2964-021 15A Slo-Blo • 480-0199-00 8Z 32V fuse CAUTION Only use Isco battery cables 60-2964-021 or 480-0199-00 to connect the Glacier to a DC power source. The cable length and fusing protect you and the equipment from over-current conditions and the risk of fire. 2-8 Glacier Transportable Sampler Section 2 Installation CAUTION Never use a DC extension cable without first consulting with a Teledyne Isco Service Technician. They will advise you of the proper wire gauge for the length you require. The refrigerator compressor is equipped with a battery controller that will cut out to protect the compressor and the battery when the voltage drops to 10.4–11.3 VDC. The controller will cut in at 11.7–12.5 VDC. CAUTION Never charge the battery while connected to the Glacier. Over-voltages could damage the electronics. Note The refrigerator housing has a High/Low power switch mounted near the DC input power connector. This High/Low switch is unused. The switch must remain in the Low position for normal operation. 2.7.2 Battery Recommendations Before each sampling program, the battery should be exchanged with a fully-charged battery. Power consumption is mostly determined by the ambient temperature. Higher ambient temperatures will in turn create a higher demand for power. A battery selection guide is provided in Appendix D to help you determine the required battery capacity. 2.8 Connect a Suction Line and Strainer The suction line carries the liquid from the sampling point to the Glacier pump tubing. The Glacier is designed to use: • 1/4-inch (6-mm) I.D. Vinyl tubing • 3/8-inch (9-mm) I.D. Vinyl tubing • 3/8-inch (9-mm) I.D. PTFE tubing with a protective polyethylene jacket Note Selecting 1/4-inch (6-mm) suction line disables the Bottle Full detection. Note The vinyl suction line contains a very low ppm (parts per million) level of phenols. If this affects your samples, use the PTFE suction line. The strainer reduces the possibility of debris plugging the suction line. Three types are available: • 3/8-inch standard weighted polypropylene strainer 2-9 Glacier Transportable Sampler Section 2 Installation • CPVC body–strainer for highly-acidic liquids. Fits 3 /8-inch suction lines. • 3/8-inch and 1/4- inch Stainless Steel low flow strainer for routine and priority pollutant sampling. Your application will dictate the best combination of suction line and strainer. 2-10 Glacier Transportable Sampler Section 2 Installation To prepare the suction line and strainer: 1. Cut the suction line to the shortest feasible length (see 2.8.1). 2. Attach a strainer to the suction line. 3. Connect the suction line to the pump tube (2.8.2). Alternative to Strainers 2.8.1 Cutting the Suction Line 4. Route the suction line and place the strainer in the liquid (see 2.8.5). When sampling from high velocity streams with heavy suspended solids, some field investigations suggest that more representative samples are obtained without the strainer. Consider attaching a short piece of thin-walled aluminum or stainless steel tubing to the end of the suction line; anchor the tubing so that the inlet opens upstream. The thin wall will not disturb the flow stream. Under most conditions, the presample purge removes any debris over the tubing entrance. Note that most sample analyses disregard aluminum ions if you decide to use aluminum thin wall tubing. The suction line should be cut to the shortest feasible length. This reduces the possibility of cross-contamination between sample volumes and extends the battery life. The suction line can be easily cut with a knife. When cutting the suction line, keep in mind that the length must be cut to the nearest whole foot or decimeter. The length is measured from end to end, without the strainer or tubing coupler. If you have altered the length, measure the length of the suction line from end to end. This measurement will be used when calibrating the sample volumes (section 2.10). 2.8.2 Connecting Vinyl Suction Line Attach vinyl suction line to the pump tubing with the tube coupling. Two couplings are available, one for each size of vinyl line. Attach the vinyl suction line to the pump tube with the tubing coupler. First, screw the threaded end into the suction line until the flat surface is flush against the suction line (Figure 2-5). Then, push the other end of the coupler into the end of the pump tube until the other flat surface is flush against the tubing. 2-11 Glacier Transportable Sampler Section 2 Installation 1. 2. Figure 2-5 Attaching the suction line to the pump tubing Once the coupler is attached to the pump tube, removal is difficult, and may require cutting the tube. 2.8.3 Connecting PTFE Suction Line To connect the 3/8-inch (9-mm) PTFE suction line to the pump tube: Items required: Suction line with strainer attached 3/4-inch (19-mm) diameter hose clamp (plastic or stainless steel recommended) 1. Place a hose clamp on the upper pump tube. 2. Insert about 1 inch (25 mm) of the PTFE suction line into the upper pump tube. 3. Position the clamp over the joined area and tighten it. 2.8.4 Strainers The 3/8 inch ID vinyl suction lines are shipped from the factory with our standard weighted polypropylene strainer (Figure 2-6) installed on one end of the suction line and a tubing coupling on the other end. Additionally, Teledyne Isco offers two low flow stainless steel strainers (Figure 2-7) for 1/4 inch ID and 3/8 inch ID suction lines. To install the low flow strainer in PTFE suction line, first heat the end of the suction line to make it more pliable, then carefully screw the threaded end of the strainer into the suction line. 2-12 Glacier Transportable Sampler Section 2 Installation For sampling from highly acidic flow streams, a weighted, CPVC plastic-coated strainer is available (Figure 2-8). The use of the strainer is optional. When heavy suspended solids are involved and flow stream velocities are significant, some field investigation results indicate that more representative samples are obtained without the strainer. You can purchase bulk suction line without strainers. Refer to the Accessories List in the back of this manual. The strainer prevents solid particles larger than a specific diameter from entering and clogging the suction line. Teledyne Isco recommends its use for bottom sampling or sampling from streams containing large solids. The 1/4-inch strainers supplied for use with the 1/4 -inch ID suction line have 15/64-inch (0.56 cm) diameter holes. The 3/8-inch strainers supplied for use with the vinyl or PTFE 3/8-inch ID suction line have 23/64-inch (0.9 cm) diameter holes. 2.8.5 Intake Placement The proper placement of the sampler intake assures the collection of representative samples. Place the intake in the main flow, not in an eddy or at the edge of flow. The vertical position of the intake in the flow is important. An intake at the bottom may result in excess heavy solids and no floating materials, while placement at the top may result in the opposite. The suction line tends to float in deep flow streams, dislodging the line and strainer. Table 2-2 shows the maximum depths you can submerge the lines and strainers without risks of flotation. At depths exceeding the safe depths, anchor the line and strainer securely. The suction line should always be cut to the shortest possible length. Route the suction line so that it runs continuously downhill. Loops of coiled suction line or low areas where the liquid can pool will hold residual amounts of liquid that will cross-contaminate sample volumes. A consistent downhill slope will help eliminate air slugs in the line, increasing the sample-to-sample repeatability and accuracy. Note The suction line should maintain a consistent downhill slope to achieve the best sample-to-sample repeatability and accuracy. Table 2-2 Strainer/Suction Line Depths Strainer Standard Weighted Polypropylene Stainless Steel Low Flow CPVC Vinyl Vinyl PTFE (6 mm) 3/8-inch (9 mm) 3/8-inch (9 mm) 1/4-inch — 22 feet (6.7 m) 15 feet (4.5 m) 14 feet (4.3 m) 22 feet (6.7 m) 15 feet (4.5 m) — 4 feet (1.2 m) 4 feet (1.2 m) 2-13 Glacier Transportable Sampler Section 2 Installation Figure 2-6 Standard Weighted Polypropylene Strainer Figure 2-7 Stainless Steel Strainer Figure 2-8 CPVC Weighted Strainer If the strainer is not used, a short piece of thin walled aluminum tubing may be attached to the end of the suction line and the tubing anchored in the flow stream so that the inlet is oriented upstream. The thin wall will provide minimum disturbance of the flow stream and aluminum ions are usually not of concern in analysis. Whether the strainer is used or not, the pre-sample purge cycle should be sufficient to remove any debris which may collect over the strainer or tubing entrance between sampling events. 2.8.6 Pressurized lines 2.9 External Connections 2-14 Teledyne Isco does not recommend sampling from pressurized lines. However, the sampler can obtain samples from pressurized lines, as long as the line pressure does not exceed 15 pounds per square inch. Pressures greater than 15 psi may prevent the sampler from purging the suction line; moreover, extreme pressures can force liquid past the pump, even when the pump is not running. The Glacier can be used with external devices that control the sampler pacing, sampler inhibiting, or both. The sampler pacing input can control the rate of sample collection so that it is proportional to the flow rate of a channel. This input must be used when the Flow Paced program option is selected. The sampler inhibit input can delay the Glacier operation until a monitored parameter meets user-defined conditions. Glacier Transportable Sampler Section 2 Installation These devices connect to the 6-pin Flow Meter Connector located on the side of the Glacier controller. Compatible devices include: • Pacing and Inhibiting devices: · 4100 Series Flow Loggers · 4200 Series Flow Meters · 2100 Series Flow Modules · Signature Flow Meter • Pacing devices (non-Isco device interfaces): · 4-20 mA Input Interface (also used with closed-pipe flow meters) · Pulse Duration Input Interface • Inhibiting devices: · Liquid Level Actuator If you are connecting a device other than those listed above, ensure that the input signals conform to the following: • Flow pacing input signal (pin C) requirements — a 5 to 15 volt DC pulse or isolated contact closure of at least 25 milliseconds in duration. • Sampler inhibit signal (pin F) requirements — a low (grounded) level of at least 5 seconds inhibits the operation. A high (or open) level of at least 5 seconds in duration restores the operation. 2.10 Calibrate the Sample Volumes The Glacier can deliver sample volumes repeatable to ±10 ml. The sampler relies on you to enter correct suction line diameter and length values. The Glacier uses these values to: • Generate internal pump tables to “measure” the liquid volume • Calculate the suction head. By calculating the suction head, the delivered volumes are not affected by varying liquid levels. The Glacier automatically calculates the suction head using input from the Liquid Detector. Incorrect suction line values or disabling the liquid detector may adversely affect the volume accuracy. Therefore, calibrating the sampler can enhance sample volume accuracy. To prepare the Glacier for calibration: 1. Turn the Glacier on. 2. Press the CALIBRATE button and follow the steps: 2.10.1 Calibration Step 1 SUCTION LINE SIZE: 6 mm 9 mm The Glacier advances to the Suction Line Size display after you press the CALIBRATE button. The Suction Line Size is the inside diameter (I.D.) of the suction line tubing. Two sizes of suction line may be used with the Glacier: • 1/4-inch (6-mm) I.D. • 3/8-inch (9-mm) I.D. 2-15 Glacier Transportable Sampler Section 2 Installation To set the suction line size: 1. Determine the size of suction line in use. Compare this to the blinking selection. 2. If the selection is incorrect, press the ARROW button. This will change the blinking selection. 3. Press the ENTER button to accept the selection. The Glacier loads the size into the current program settings and advances to the next step. Note Selecting 1/4-inch (6-mm) suction line disables the Bottle Full detection. 2.10.2 Calibration Step 2 SUCTION LINE LENGTH: 7.6 m (0.9-30.2 m) The Glacier advances to the Suction Line Length display. The Suction Line Length is the measured length of tubing in use. The length is measured from end-to-end, without the strainer or tube coupling. When using English units of measure, the suction line tubing must be cut in whole foot lengths. When using metric units of measure, the tubing must be cut in decimeter lengths. To enter the Suction Line Length: 1. Measure the length of tubing. Cut the tubing if necessary, to the nearest whole foot or decimeter. 2. Enter the tubing length. Press the appropriate NUMBER buttons on the keypad. Note If you enter an incorrect value with the NUMBER buttons, press the STOP button. The Glacier restores the original value and waits for a new value. 3. Press the ENTER button to accept the value. The Glacier loads the length into the current program settings and advances to the next step. 2.10.3 Calibration Step 3 The Glacier advances to the Suction Head display. Note This step only appears when the liquid detector is disabled (see section 3.8.4). SUCTION HEAD: 3.1 m (0-7.6 m) Suction Head is defined as the vertical distance from the surface of the liquid to the inlet of the pump. Since the Glacier will be unable to calculate the suction head as it collects each sample, the Glacier will ask for a manual or “fixed” suction head. The Glacier skips this step when the Liquid Detector is enabled. 2-16 Glacier Transportable Sampler Section 2 Installation To enter the Suction Head: 1. Measure the Suction Head height (Figure 2-9). 2. Enter the height. Press the appropriate NUMBER buttons on the keypad. 3. Press the ENTER button to accept the value. The Glacier loads the fixed Suction Head into the current program settings and advances to the next step. Figure 2-9 Measuring Suction Head Height 2.10.4 Calibration Step 4 CHECK SAMPLE VOLUME? YES NO The Glacier advances to the Check Sample Volume display. Checking the sample volume is recommended if ultimate accuracy is required by your sampling protocol. The default selection is NO. To accept this, press the ENTER button. The Glacier will return to the Standby state. To check sample volumes, select YES by pressing the ARROW button, and then press the ENTER button. The Glacier will continue with the calibration steps. 2.10.5 Calibration Step 5 CALIBRATE VOLUME PRESS WHEN READY! If YES was selected in Calibration Step 4, the sampler waits while you prepare to collect a sample. To prepare for a sample: 1. Pull the lower pump tube end from the bulkhead fitting. 2. Hold the pump tube outlet over a graduated cylinder, such as Teledyne Isco’s 1000-ml plastic graduated cylinder, P/N 299-0020-00. 3. Press the ENTER button and the Glacier will start to collect the sample. 2-17 Glacier Transportable Sampler Section 2 Installation The Glacier displays the screen at left and goes through a complete sample collection cycle. The Glacier deposits the sample in the graduated cylinder. TAKING 200 ml CALIBRATE SAMPLE Note The volume delivered during calibration is the programmed Sample Volume. 2.10.6 Calibration Step 6 The Glacier displays the amount of liquid it has deposited into the graduated cylinder. Measure the volume and compare the numbers. If they match, press ENTER and the Glacier will return to the Standby state. VOLUME DELIVERED 200 ml Note Place the graduated cylinder on a level surface. Read the liquid volume from the bottom of the meniscus, not the top of the curved edges where the liquid wets the sides of the cylinder. If the amounts differ, enter the actual volume delivered. To enter the actual volume: 1. Press the appropriate NUMBER buttons on the keypad. Note If you enter an incorrect value with the number buttons, press the STOP button. The Glacier restores the original value and waits for a new value. 2. Press the Enter button to accept the value. The Glacier updates its internal pump tables. If there is a significant difference between the old and new values, the Glacier displays the screen at left. ___ ml! ARE YOU SURE? YES NO 3. Compare this value with the measured volume. If they match, select YES using the ARROW button and then press ENTER. If they do not match, select NO using the ARROW button and then press ENTER. The Glacier returns to the Volume Delivered screen (step 1, above). When through with Calibration Step 6, the Glacier logs the calibration time in the event log and returns to the Standby state. Be sure to reconnect the pump tube end to the bulkhead fitting. 2.11 Start the Program 1 2-18 2 3 The Glacier has two programs — the current program and the stored program. To run the current program press the GO button. You can also quickly recall the stored program and start it. To do so, press the PROGRAM button twice, followed by the GO button. This action will load the stored program settings as the current settings and run the program. Glacier Transportable Sampler Section 2 Installation Generally when you start a program, the Glacier will attempt to take its first sample at the start time—unless the first sample is delayed or inhibited. See sections 4.3 and 4.4 for more information on delayed or inhibited sampling programs. If the Glacier requires programming before you start the sampling program, refer to Section 3 for instructions. 2.12 Secure the Glacier After starting the program, the protective cover should be replaced over the controller. If the Glacier is in a location where tampering or theft is a possibility, it is advisable to: • Prevent access to the sampling program by using the Program Lock option. See section 3.8.1 for more information on this factory-installed option. • Prevent access to the sampler controller and refrigerated compartment. Use the Glacier Locking Kit, 68-2960-011, to secure the covers. The locking cables thread through the locking loops on the sides of the Glacier, and is secured in the center with a lock. • Secure the Glacier to a immovable, permanent object nearby. A locking cable, such as bicycle locking cables available from most hardware stores, may be threaded through a locking loop or carrying handle to secure your sampler. 2-19 Glacier Transportable Sampler Section 2 Installation 2-20 Glacier Transportable Sampler Section 3 Programming 3.1 Programming Overview This section shows you how to program the Glacier. In this section you will find: • The Glacier Interface—This explains how you operate the Glacier using the keypad and display (3.2). • Operating States—This explains the many states of operation (3.3). • Programming Instructions—This section provides instructions on One-button Programming and Standard Programming (3.4 through 3.6). • Setting the time and date—This section explains how to set the internal clock (3.7). • Sampler Options—This section lists the available software options and how to enable/disable them (3.8). 3.2 The Glacier Interface The Glacier is easily programmed and operated from the controller front panel. The front panel holds the liquid crystal display and the keypad. The front panel also includes an internal case humidity indicator. 3.2.1 The Glacier Display The Control panel holds a 2-column by 20-character liquid crystal display. Through this display, the Glacier reports all of the possible operating states. The display will also show messages as needed. These messages alert you to unusual conditions or the need for servicing. Messages may alternate with the current display, such as “ERRORS HAVE OCCURRED,” or at the end of a sequence of screens, such as “WARNING: CHANGE PUMP TUBE.” 3.2.2 The Glacier Keypad The Glacier accepts input from the 18-button keypad. The operating state will determine which buttons are active. Refer to Section 1 for a description of the keypad buttons. 3.3 Glacier Operating States The Glacier has many states of operation. States of operation can be classified as either “interactive” or “non-interactive.” 3.3.1 Interactive States Standby—The display shows “PROGRAM, VIEW LOG,” and the current time and date. This is an interactive state and the Glacier is waiting for your input. You will see that one of the items is blinking; this is the current selection and will be accepted if the ENTER button is pressed. You can change the selected item by pressing the ARROW button. 3-1 Glacier Transportable Sampler Section 3 Programming P r o g r a m — T h e d i s p l ay s h o w s p r o g ra m m i n g o p t i o n s o r number-entry screens. Again, this is an interactive state through which you can modify the operation of the sampler controller. Paused—Pressing the STOP button while the sampler is running a program places the Glacier in the Paused state. This is an interactive state where you can choose to view the event log, return to the Run state, or halt the sampling routine. Time and Date — the display shows “ENTER TIME AND DATE:” This is an interactive state used to set the correct time and date. 3.3.2 Non-interactive States Off—The display is blank. In this state, a few sampler functions continue to operate, even without its external 12-volt DC power source. An internal battery powers the real-time clock to maintain the correct date and time. When an external 12-volt DC power source is connected, the Glacier will respond only to the ON/OFF button. Run—The display shows information about the program that it is running. This is typically the current activity, such as “TAKING SAMPLE 10 OF 24,” or when the next event is to occur, such as “SAMPLE 8 OF 96 IN MM:SS.” Done—The display shows “PROGRAM DONE.” This state reports that the Glacier has finished running the program. Pressing any button will place the sampler in the Standby state. View Log—The display scrolls through the event log. 3.4 Programming the Glacier There are two ways to program the Glacier: • One-button Programming • Standard Programming One-button Programming quickly loads program settings from a stored program and runs the sampling routine. Standard Programming allows you to step through the current Glacier program settings, making any necessary modifications. 3.5 One-button Programming The One-button Programming feature of the Glacier allows you to load the Stored program settings and run the program in one quick and simple step. Note 1 2 3 3.5.1 Stored Program This sequence of buttons must be completed within 10 seconds. At all times the Glacier holds two programs, the Stored program and the Current program. The Stored and Current program settings may or may not be the same. When you press the GO button, the Glacier runs the Current program settings. The One-button Programming restores the Current program settings to that of the Stored program. The Glacier is shipped from the factory with the following stored program settings: 3-2 Glacier Transportable Sampler Section 3 Programming • Time Paced • 15 Minute Pacing Interval • 9400 ml Bottle Volume - for 2.5 gallon (10 liter) bottles • Take 96 Samples - covers a 24-hour time period • 80 ml Sample Volume • No Delay to First Sample • 3/8-inch by 25-foot suction line Note Re-initializing the Glacier (section 5.8) or updating its software (section 5.11) will restore the factory program settings. 3.6 Standard Programming Standard Programming allows you to step through the current Glacier program settings and make any necessary modifications. To access the Standard Programming, select Program from the Standby screen and press ENTER. The seven-step Standard Programming goes through the following settings: • Pacing—Choose from time or flow paced sampling. Flow paced sampling requires an external flow metering instrument (3.6.1). • Interval—Set the pacing interval in minutes or flow pulses (3.6.2). • Bottle Volume—Enter the capacity of the bottle installed in the Glacier base section (3.6.3). • Number of Samples — Set the number of samples to collect or place the Glacier in the Continuous Sampling mode (3.6.4). • Sample Volume—Enter the desired volume to collect at each sample event (3.6.5). • Delay to First Sample—Without a delay the Glacier will always take the first sample when you press the GO button. This programming step allows you to delay the first sample (3.6.6). • Suction Line—Enter the type of suction line in use. This step also includes the Sample Volume Calibration procedure (3.6.7). 3.6.1 Programming Step 1 – Pacing TIME PACED FLOW PACED The Glacier displays two pacing options—Time Paced and Flow Paced. Select Time to collect samples at uniform time intervals. Select Flow to collect samples based on flow volumes. An input signal from an external instrument is required when you select Flow Paced. The current selection will be blinking. To program the pacing method: 1. Press the ARROW button to select an option. 3-3 Glacier Transportable Sampler Section 3 Programming 2. Press the ENTER button to accept the blinking option. The Glacier loads the option into the current program settings and advances to the next step. 3.6.2 Programming Step 2 – Pacing Interval After selecting the pacing method in Step 1, the program now needs a pacing interval. A pacing interval is a value that the sampler will “count down” from after each sample event. Time paced programs will count down an interval in minutes using its internal clock. Flow paced programs will count down the number of flow pulses it receives from an external device. 15 MINUTES BETWEEN SAMPLES The Pacing Interval display will show “minutes” or “flow pulses” according to the previously selected pacing method. 10 FLOW PULSES BETWEEN SAMPLES You can accept the interval by pressing the ENTER button, or change the setting. To change the setting: 1. Enter the new value using the NUMBER buttons. The Glacier will accept intervals from 1 to 9,999. Note If you enter an incorrect value with the NUMBER buttons, press the STOP button. The Glacier restores the original value and waits for a new value. 2. Press the ENTER button to accept the new value. The Glacier loads the value into the current program settings and advances to the next step. 3.6.3 Programming Step 3 – Bottle Volume BOTTLE VOLUME 9400 ml In this programming step, enter the capacity of the bottle installed in the base section of the sampler. As shown on the display, acceptable values range from 3,500 to 20,000 milliliters. The Glacier typically uses standard bottles provided by Teledyne Isco. When using Teledyne Isco’s standard bottles refer to the chart below for recommended values. You will note that the value is less than the total capacity. This reduces the possibility of missed samples due to a Bottle Full error, or spills when the bottle is full. Bottle Description Enter this value (in milliliters)… 5-gallon (19-liter) lightweight polyethylene 19000 2.5-gallon (10-liter) glass 9400 2.5-gallon (10-liter) Nalgene 9400 2.5-gallon (10-liter) lightweight polyethylene 9400 2-gallon (7.6-liter) ProPak liner 7000 You may use a non-standard bottle in the Glacier. When entering the non-standard bottle volume, it is advisable to enter a value less than the total volume. Again, this will reduce the possibility of missed samples and spills. 3-4 Glacier Transportable Sampler Section 3 Programming To enter the Bottle Volume: 1. Press the appropriate NUMBER buttons on the keypad. The Glacier requires all four numbers. Cumulative Error 2. Press the ENTER button to accept the new value. The Glacier loads the value into the current program settings and advances to the next step. When entering the bottle volume, keep in mind that the actual total volume deposited in the bottle is subject to a cumulative error. Cumulative error is caused by slight variations in the repeated sample volumes and the actual volume delivered compared to the programmed volume. (The sample volume repeatability is ±10 ml.) These variations are repeated as the Glacier collects additional samples, and soon becomes a significant amount of liquid. The example below illustrates this point. If the sampler consistently places 24 sample volumes of 160 ml (150 ml + a 10 ml variation) in a 3800 ml bottle, the total volume deposited would be 3840 ml. This would overfill the bottle by 40 ml. Again, to avoid possible overfilling, enter a bottle volume that is less than the actual bottle capacity. The true bottle size can be entered. However, this increases the likelihood that the cumulative error may cause samples to be missed or spilled. Note Overfilling the bottle or missing samples can affect your sampling results. In some applications, missed or spilled samples may render the bottle contents to be less than a representative composite sample. 3.6.4 Programming Step 4 – Number of Samples TAKE 10 SAMPLES (1-470) Continuous Sampling Mode Enter the number of samples to collect. To enter the number of samples: 1. Press the appropriate NUMBER buttons on the keypad. 2. Press the ENTER button to accept the new value. The Glacier loads the value into the current program settings and advances to the next step. The Glacier can be placed in a Continuous Sampling mode. In this mode, the Glacier collects samples without regard for the total number of samples. In continuous sampling mode, samples are collected until the Liquid Detector senses a full bottle condition. (Sample volumes should be greater than 60 ml for the liquid detector to reliably sense this condition.) The Glacier then halts the sampling routine. To enable the Continuous Sampling mode: 1. At the “TAKE XX SAMPLES” display, press the ZERO button. 2. Press the ENTER button. The Glacier is placed in the Continuous Sampling mode and advances to the next programming step. 3-5 Glacier Transportable Sampler Section 3 Programming 3.6.5 Programming Step 5 – Sample Volume SAMPLE VOLUME 80 ml (10-930) Enter the volume to collect at each sampling event. This value must be within the range shown on the Glacier display. To enter the sample volume: 1. Press the appropriate NUMBER buttons on the keypad. 2. Press the ENTER button to accept the new value. The Glacier loads the value into the current program settings and advances to the next step. Note Sample volumes greater than 60 ml are recommended. This volume is necessary for the bottle full detection to work properly. 3.6.6 Programming Step 6 – Program Start Time NO DELAY TO START SET START TIME The sampling program can be delayed to start at a user-specified time and day. To define the start time: 1. Use the Arrow button to select “NO DELAY TO START” or “SET START TIME,” then press the Enter button . Select “NO DELAY TO START” to take the first sample immediately after the Go button is pressed. If you select this option, programming advances to step #7, Programming Step 7 – Suction Line (section 3.6.7). Select the “SET START TIME” to delay the first sample until a programmed time and date. If you select this option the Glacier advances to the “FIRST SAMPLE AT” display. FIRST SAMPLE AT: 08:00 4/9/15 2. Enter the start hour with the number entry buttons. The hours must be entered in a 24-hour (military time) format. For example, 5:00 p.m. is 17:00 on a 24-hour clock. Press the Enter button to accept the hour setting and advance the cursor to the minutes. Tip – If you enter an incorrect value, press the Stop button . The Glacier will restore the original setting and wait for a new value. 3. Enter the minutes with the number entry buttons. Press the Enter button to accept the minutes setting and advance the cursor to the day setting. 4. Enter the start date with the number entry buttons. Press the Enter button to accept the date and advance the cursor to the month setting. 5. Enter the number of the month (for example, August = 08) with the number entry buttons. Press the Enter button and the Glacier abbreviates the name of the month and advances the cursor to the year setting. 6. Enter the last two digits of the year (for example, 2003 = 03). Press the Enter button to accept the year. 3-6 Glacier Transportable Sampler Section 3 Programming Note If the programmed start time elapses before running the program, the Glacier will take the first sample immediately after the Go button is pressed. If you selected “TIME PACED” in step #1, (section 3.6.1), the Glacier advances to step #7, Programming Step 7 – Suction Line. If you selected “FLOW PACED,” the Glacier advances to the “MAXIMUM RUN TIME” display. MAXIMUM RUN TIME: 168 HOURS Some sampling protocols require a known composite sampling interval, that is, the run time of a sampling program. For time-paced sampling programs, the run time is the number of samples multiplied by the pacing interval. But for flow-paced sampling, the run time may vary widely because of the dependency on flow rates. • If your sampling protocol requires a known run time, enter the number of hours for the MAXIMUM RUN TIME. If the Glacier has not yet completed the sampling program, it will end the sampling program when it reaches the MAXIMUM RUN TIME. • If your sampling protocol does not have this requirement, enter “0” (zero). The Glacier will run until it completes the total number of samples. 3.6.7 Programming Step 7 – Suction Line The display alternates between: SUCTION LINE 9mm BY 7.6 m and PRESS GO TO RUN OR CALIBRATE TO CHANGE This Suction Line display reports the suction line diameter and length. This information must be correct so that the Glacier can deliver sample volumes as programmed. Verify that the diameter and length match the suction line in use. If the suction line settings are correct, calibration is not necessary. To skip the calibration, press: • The Go button to run the program, or, • The Enter button to accept the values and return to the Standby state. If the settings do not match the suction line in use, you must enter new values. Press the Calibrate button and proceed with the Calibration steps. 3-7 Glacier Transportable Sampler Section 3 Programming Note While the two displays alternate, the Glacier is counting down a five-minute time interval. If you do not press a button during this count down, the Glacier times out and automatically runs the current program. Note If your sampling protocol requires the utmost volume accuracy, step through the calibration procedure and check the delivered sample volume. Calibration may improve the Glacier’s volume accuracy. 3.7 Setting the Time and Date Should it become necessary to set the time or date, do the following: 1. From the standby state, press the ARROW button until the time and date is blinking. 2. Press the ENTER button to access time and date entry display. The cursor is waiting for you to enter the current time. 3. Enter the hours with the NUMBER buttons. The hours must be entered in a 24-hour (military time) format. For example, 5:00 p.m. is 17:00 on a 24-hour clock. Press the ENTER button to accept the hour setting and advance the cursor to the minutes. 4. Enter the minutes with the NUMBER buttons. Press the ENTER button to accept the minutes setting and advance the cursor to the day setting. 5. Enter today’s date with the NUMBER buttons. Press the ENTER button to accept the date and advance the cursor to the month setting. 6. Enter the number of the month (for example, August = 08) with the NUMBER buttons. Press the ENTER button and the Glacier abbreviates the month and advances the cursor to the year setting. 7. Enter the last two digits of the year (for example, 2002 = 02). Press the ENTER button to accept the year and return to standby. 3.8 Glacier Options Several software-based options are available for the Glacier. • Program Lock—adds password protection to sampler programming and operation. • Program Storage—store a program for easy recall. • Bottle Full Disable—turn off full bottle detection when using 3/8-inch (9-mm) suction lines. • Liquid Detector Disable—turn off the liquid detector for difficult sampling applications. 3-8 Glacier Transportable Sampler Section 3 Programming • Refrigeration Control—turns the Glacier refrigeration system on or off. • Foreign Languages—The Glacier can be shipped with foreign language displays. 3.8.1 Program Lock The Program Lock adds password protection to the sampler operation. When the Program Lock is enabled, you must enter a password before entering the programming mode and before pausing or halting a running program. The Program Lock is a factory-installed option. This option should be specified at the time of ordering, or you can return the controller to Teledyne Isco to have the option installed. PROGRAM VIEW LOG hh:mm ddmmyy LOCK When the Program Lock function is installed, the LOCK option appears on the Standby display. The lock option on the Standby display allows you to enable or disable the password protection and to change the password. A review of the lock option displays appears below. 1. Press the ARROW button until “LOCK” is blinking. 2. Press the ENTER button to accept the selection. ENTER PASSWORD: XXXXX USE PROGRAM LOCK? YES NO CHANGE PASSWORD: YES NO ENTER NEW PASSWORD: REENTER PASSWORD: 3. If the lock is currently enabled you will be asked to enter the password before modifying any settings. The Glacier is shipped from the factory with a default password of “457.” Press the NUMBER buttons to enter the password and the display returns an asterisk for each button pressed. Press the ENTER button to continue. 4. The next display allows you to enable or disable the password protection. Selecting YES turns the password protection on and advances to step 5. Selecting NO turns the protection off and the Glacier returns to the Standby state. 5. The Glacier queries “CHANGE PASSWORD?”. If you select YES the Glacier advances to the password entry displays in steps 6 and 7. If you select NO, the Glacier retains the existing password and returns to the Standby state. 6. Use the NUMBER buttons to enter the new password. A valid password uses any combination of numbers 0 through 9. The password can use as many as five digits. As you enter the numbers, the Glacier displays asterisks to “hide” the password. Press the ENTER button to accept the password and advance to step 7. 7. The Glacier asks you to confirm the password by re-entering it. Again, use the NUMBER buttons to enter the password and then press the ENTER button to accept it. When you successfully confirm the password, the Glacier returns to the Standby state. If the confirmation is unsuccessful, the Glacier notifies you that the passwords are different and returns you to step 6. While a program is running, it is possible to halt the operation of the pump without the password. Pressing the STOP button will halt the current sample and prompt you to ENTER PASSWORD. Entering the correct password places the Glacier in the Paused 3-9 Glacier Transportable Sampler Section 3 Programming state. If the password is incorrect, or if there is no password entered within 60 seconds, the sampler resumes the count down to the next sample. In any case, the Glacier logs the missed sample as USER STOPPED PUMP. Note Any samples that would have been taken while the sampler is waiting for password entry will be logged as missed due to PROGRAM PAUSED. 3.8.2 Storing a Program Glacier is shipped with default program settings as its stored program. You can overwrite the stored program settings with your own program by using the Program Store function. To store a program: 1. Modify the current program using the standard programming. 2. Press 78673 while in the Standby state. The Glacier displays “PROGRAM STORED” for four seconds. The current program settings are now saved in the Glacier memory as the Stored Program. In the field, recall and run the program with the One-button programming procedure. Note The stored program settings are held in the sampler's memory until the software is updated (section 5.11) or the Glacier is re-initialized (section 5.8). Either of these actions will restore the factory default program settings. 3.8.3 Disable Bottle Full Detection The bottle full detection feature can be disabled. To disable the bottle full detection: 1. Press 3855 while in the Standby state. 2. The Glacier displays “BOTTLE FULL DETECT?” Select NO to disable bottle full detection. Select YES to use bottle full detection. BOTTLE FULL DETECT? YES NO 3. Press the ENTER button to accept the blinking option and the Glacier returns to the Standby state. Note Bottle full detection is always disabled when using 1/4 -inch (6-mm) suction line. 3.8.4 Liquid Detector Disable It is possible to disable the operation of the liquid detector. Typically, there are only two applications where this may be beneficial —collecting samples that include a large amount of foam, or collecting samples from pressurized lines. Keep in mind that disabling the liquid detector will affect the sample collection in several ways. The most significant effect is the sample volume accuracy. Although you can calibrate the sample volumes at a fixed suction head, the Glacier will be 3-10 Glacier Transportable Sampler Section 3 Programming unable to compensate for varying stream levels. Secondly, the Glacier will not be able to detect a full bottle. A disabled liquid detector may increase the risk of overfilling the bottle. Lastly, the Glacier will not be able to detect and log missed samples caused by NO LIQUID or NO MORE LIQUID. To disable the liquid detector: 1. Press 5390 while in the Standby state. USE LIQUID DETECTOR YES NO 2. The Glacier displays “USE LIQUID DETECTOR?”. Select NO to disable the liquid detector. Selecting YES restores the operation. 3. Press the ENTER button to accept the blinking option and the Glacier returns to the Standby state. 3.9 Foreign Language Displays The Glacier is shipped with English language displays unless a different language is specified at the time of ordering. Other available languages are listed below: • English 3645474 • French 373624 • German 437626 • Italian 4825426 • Spanish 7726474 • Japanese 52726 • Swedish 7933474 • Czech 20324 To change the display language, type the numeric code using the keypad, then press ENTER. Other languages may be available. Contact the factory for more information. 3-11 Glacier Transportable Sampler Section 3 Programming 3-12 Glacier Transportable Sampler Section 4 Operating the Sampler 4.1 Overview This section shows you how to run Glacier programs. In this section you will find: • Starting Programs (4.2) • Start time Delays (4.3) • Sampler Inhibiting (4.4) • Run State Displays (4.5) • An explanation of the Sample Collection Cycle (4.6) • An explanation of the refrigeration control (4.7) • Pausing or Stopping a Program (4.8) • Program Completion (4.9) • Post-sampling Activities (4.10) • Viewing the Log (4.11) • Text Reports using Teledyne Isco’s SAMPLINK™ software (4.11.2) • Errors (4.11.1) • Taking Grab Samples (4.12) 4.2 Starting a Program You can easily start the Glacier operation by pressing the GO button. Pressing this button runs the current program. The Glacier operation can also be started with the one-button programming sequence. This action will load the stored program settings as the current settings and run the program. Generally when you start a program, the Glacier will attempt to take its first sample at the start time—unless the first sample is delayed (4.3) or the Glacier is inhibited (4.4). CAUTION Tests indicate that the pump produces sound levels in excess of 85 db at 3 feet (1 meter). Prolonged exposure to this sound level could result in hearing loss and requires the use of protective ear plugs. 4.3 Counting Down Delay Times After pressing the GO button, the Glacier will immediately take a sample regardless of whether it is a time or flow paced program. However, the Delay to First Sample setting can be used to start the sample collection up to 9,999 minutes after you press GO. 4-1 Glacier Transportable Sampler Section 4 Operating the Sampler FIRST SAMPLE IN mmm:ss 4.4 Sampler Inhibit SAMPLER INHIBITED If the Delay to First Sample setting is one or greater, the Glacier must count down from the programmed value before drawing its first sample. During this delay, the First Sample count-down screen is displayed. Before the Glacier takes its first sample, it checks the inhibit line of the Flow Meter connector. If the Glacier detects a logic low (grounded) level, it will suspend the program until the external device returns the line to a logic high (or open) level. While the Glacier is inhibited it will display the screen at left. The inhibit line allows an external device, while monitoring parameters of interest, to control the sampler operation. Compatible Isco devices can be configured to inhibit a sampler until a parameter meets user-defined conditions. For example, a 4200 Flow Meter with a Model 201 pH/Temperature Module can be programmed to suspend sample collection until the stream temperature exceeds 100º F. When the external device releases the inhibit, the Glacier will: • immediately take the first sample • reset the time or flow pacing interval and begin counting down • latch the inhibit signal Latching the inhibit signal means that the Glacier will ignore any later inhibit signals from an external device. Once the Glacier collects its first sample, its operation will continue until the program is done. The Glacier will not “store” samples while it is inhibited. The Glacier takes no action at all when it counts down a complete time or flow-pacing interval. Time or flow pacing intervals that elapse while the Glacier is inhibited are simply ignored. 4.5 Run State Displays 4.5.1 Collecting a sample – TAKING SAMPLE xxx OF yyy The Glacier updates its display while it is running a program so that you can monitor the status. The Run State displays are described in the sections 4.5.1 through 4.5.3. As the Glacier goes through a sample collection cycle it displays the current sample number. If the Glacier is programmed to collect a fixed number of samples it will report which of the total number of samples it is now collecting. If the Glacier is operating in the continuous sampling mode (3.6.4) it will report only the current sample number. 4.5.2 Waiting to sample – The Glacier counts down the pacing interval while it is waiting for the next sample collection cycle. For time paced sample programs, the Glacier will count down the time to next sample. For flow paced sample programs, the Glacier will count down the number of flow pulses to the next sample. 4-2 Glacier Transportable Sampler Section 4 Operating the Sampler If the Glacier is in the Continuous Sampling mode, it only displays the next sample number. 4.5.3 Errors – If the Glacier encounters an error while running a program, the “ERRORS HAVE OCCURRED” display alternates with the pacing interval countdown display. Note You can pause a running program to review the log and determine the cause of the error. See section 4.8. 4.6 Sample Collection Cycle Each time the Glacier collects a sample (programmed or grab) it runs the pump through a complete sampling cycle. The cycle consists of three actions - Pre-purge, Fill, and Post-purge. 4.6.1 Pre-purge As the Glacier waits to collect a sample, some liquid will tend to enter the suction line and debris may collect around the strainer. The pre-purge runs the Glacier pump in reverse to force air down through the suction line and strainer. This action will flush the water from the suction line and clear any debris near the strainer. The duration of the pre-purge is automatically calculated by the Glacier based on the programmed suction line settings. 4.6.2 Fill After a pre-purge, the Glacier pump changes its direction to draw liquid into the suction line. The liquid travels up through the suction line and the pump tube where it then passes through the liquid detector and peristaltic pump. The liquid is transferred to the discharge tube via the bulkhead fitting. The discharge tube deposits the liquid into the bottle. The duration of the fill is controlled by the Glacier using input from the programmed volume and suction line settings, and the liquid detector. The Event Mark pin of the Flow Meter connector goes to a high level (+12 Volts DC) at the beginning of the fill and remains high until the fill is complete. 4.6.3 Post-purge After the fill, the Glacier again reverses the pump direction to force air down through the suction line. This action clears the entire liquid path to prevent cross-contamination. During the post-purge, the Glacier will determine if the bottle is full. Since a short length of discharge tube extends inside the bottle, an over-filled bottle will allow liquid to be drawn back into the discharge tube. If the liquid detector finds that this excess amount of liquid is being returned through the liquid path, the Glacier stops the program and indicates that the bottle is full. The duration of the post-purge is automatically calculated by the Glacier based on the programmed suction line settings. 4-3 Glacier Transportable Sampler Section 4 Operating the Sampler 4.7 Refrigeration Control The refrigeration system will not operate until the completion of the program’s first sample. Even if the first sample results in an error condition, the refrigeration system will be activated. Likewise, the refrigeration system will also be re-activated once power is restored after a power failure. Once activated, the refrigeration control will remain activated until the sampler is shut off, or a new program is run. The refrigeration control will regulate the operation of the cooling system to maintain the sample at a target temperature of 3° C. Note When using the refrigeration control, the temperature sensor should be placed inside the composite bottle, resting at the bottom of the container. 4.8 Pausing or Stopping a Program Press the STOP button to pause a running program. The Glacier will display the paused options screen. The screen displays three options - RESUME, VIEW LOG, and HALT. • Resume—select this option to return to the running program. When the Glacier enters the paused state, it starts a five-minute idle time-out. If you do not press a button within five minutes, the Glacier will automatically resume the running program. • View Log—select this option to scroll through the log. • Halt—select this option to stop the program. Once you stop a program, it cannot be resumed. To run a program the Glacier must be restarted. Use the ARROW button to select an option. When the desired option is blinking, press the ENTER button. Note The Glacier continues to count down the pacing interval while it is paused. Keep in mind that if the count reaches zero the Glacier will not take a sample. It records this as a “MISSED SAMPLE - PROGRAM PAUSED” in the log. 4.9 Program Completion A running program will end in one of three ways: • Program Completed—The Glacier has taken all of the programmed samples. • Program Halted—Stopped by the user. • Bottle Full—The Glacier detected a full bottle and stopped the program. 4.10 Post-sampling Activities Typical post-sampling activities include: • Recovering the sampler (4.10.1) • Preparing the sample bottle to return to the lab (4.10.2) 4-4 Glacier Transportable Sampler Section 4 Operating the Sampler • Viewing the log (4.11) • Preparing the Glacier for reuse (2.1) 4.10.1 Recovering the Sampler When the Glacier completes the program, you may need to move it to a location that allows you easily gain access to its contents. If you must move the sampler keep the following in mind: • A Glacier with a full sample bottle may weigh over 100 pounds (45 kg), excluding the power source. • The Glacier must be kept level to avoid spilling the bottle’s contents. 4.10.2 Preparing the Full Sample Bottle To prepare a full bottle to return to the lab, open the refrigerated compartment and replace the bottle cap with the cap provided for transporting. Then, lift the bottle out of the base. At this point, it is a good idea to label the bottle with the time, date, and site, along with other pertinent information. The bottle may also be returned to the lab in the Glacier. Ideally, the Glacier would be loaded into a vehicle and then connected to 12 VDC power to keep the sample at 3° C. Connect cable 480-0199-00 with the cigarette lighter plug may be used for this purpose. When transporting the bottle inside a powered Glacier, do not replace the bottle cap and leave the temperature sensor at the bottom of the sample container. 4.11 Log The log is a recorded history of the last or currently running program. The Glacier records key program events, such as start and stop times, and exceptional events, such as power failures or missed samples. The log can be viewed by selecting the “VIEW LOG” option at the Standby or Paused state displays. As you begin to view the log, the Glacier reports the following: • The number of samples it has collected • Missed samples. The Glacier skips this display if there are none to report. If there are some, the Glacier will report the number of samples missed and the cause. Possible causes are: · No liquid detected · No more liquid · Power fail · User stopped pump · Paused · Pump jammed · Program halted · Bottle full • Program start time • Current status. One of the following will be reported: · Program completed 4-5 Glacier Transportable Sampler Section 4 Operating the Sampler · Program halted · Bottle full · Program paused (with number of samples remaining) • Power lost. If power was lost while the Glacier was running the program, it reports the times it was lost and restored. This will be reported whether a sample was missed or not. • Last sample volume calibration date • Last programmed date • Clock set at (time and date) • Sampler ID and software revision number • Pump tube warning if the pump counts exceed 500,000. When the Glacier displays this message, replace the pump tube to prevent failures (see 5.4). After you have replaced the pump tube, reset the pump count to zero to clear this message. Note Pressing the GO button clears the log. The only information that the Glacier retains from program to program is the Last Calibration Date, Last Programmed Date, Clock Set, and the Sampler ID and Software Revision. The Glacier also keeps the current pump count value which is used to determine when to display the pump tube warning. Re-initializing the Glacier or updating the software will also clear the log. 4.11.1 Errors The Glacier can detect program errors or conditions that have caused it to miss a sample. If the Glacier encounters an error condition and is still running a program, it alternates the message below with the current display. The Glacier also makes an entry in the Log, which can be viewed later to determine the cause. Possible log entries are: • No liquid detected—The Glacier did not detect any liquid. • No more liquid—The Glacier did detect liquid during the fill cycle, but it stopped detecting liquid before a complete sample volume was collected. • Power fail—Power was lost and caused the Glacier to miss a sample. • User stopped pump—The user pressed the STOP button while the Glacier was collecting a sample. • Paused—The Glacier was in the paused state when a sample was to have been initiated. • Pump jammed—The Glacier pump jammed during a sample collection cycle. • Program halted—Remaining samples were not collected because the program was halted. 4-6 Glacier Transportable Sampler Section 4 Operating the Sampler • Bottle full—Remaining samples were not collected because the Glacier detected a full bottle. 4.11.2 Viewing Log Reports using Isco SAMPLINK software Text reports are available using Teledyne Isco’s SAMPLINK™ software which may be ordered as an accessory. The text reports consist of the VIEW LOG screens, followed by daily summaries of the stored temperature data. Daily summaries include the calendar day’s average temperature, minimum and maximum temperature, hourly averages, and a simple bar graph representing the hourly averages. The Glacier stores up to 10 days of sample temperature data recorded at one-minute intervals. To retrieve the reports from the Glacier: 1. Connect a computer to the Glacier with the connect cable, Isco P/N 60-2954-021. 2. Start SAMPLINK. SAMPLINK is a DOS program, therefore you must run it from a DOS prompt. Depending on which version of Microsoft® Windows® you are running, type either “cmd” or “command,” from the Run dialog (Windows Start>RUN). At the DOS prompt representative of SAMPLINK’s home directory, type “SL”. 3. From the SAMPLINK Screen select the appropriate COM port. SAMPLINK will retrieve the first page of the report. 4. To retrieve additional pages, Type “N” to view the next page, or “C” to retrieve all of the pages continuously. For additional instructions please refer to the SAMPLINK instruction manual. 4.11.3 Viewing Log Reports using a Terminal Program Text reports can also be viewed using a computer terminal communications program such as HyperTerminal which is included with the Microsoft® Windows® operating system. To retrieve the reports from the Glacier: 1. Connect a computer to the Glacier with the connect cable, Isco P/N 60-2954-021. The Glacier must be turned on for the remaining steps. 2. Start the terminal program. Communications should be configured for: · A baud rate up to 19,200 bits per second · Eight data bits · No parity · One stop bit · No hardware flow control. 3. Connect to the Glacier by pressing the “?” key on your computer keyboard. Repeat this at one- or two-second intervals until the Glacier responds with a sampler identification string and a “?” prompt. The Glacier is ready to receive a command. 4. Type a command and press the Enter key on your computer keyboard. 4-7 Glacier Transportable Sampler Section 4 Operating the Sampler Available commands are: · RESULTS - With this input command the Glacier will respond with all of the VIEW LOG screens. · REPORT - With this input command the Glacier will respond with all of the VIEW LOG screens followed by the daily summaries of temperature data. · SUMMARY - The Glacier will return only the daily summaries in the report. Entering these commands will display the requested log report and terminate the communication session. If a second report is needed, re-establish communications by pressing the “?” key again (step 3). One additional command is available: · DATA - The Glacier will report the stored temperature data for the most recent sampling program. The temperature data output format is comma-separated-values, so that you can easily import the data into your spreadsheet or database applications. The Glacier does not terminate the session after the DATA command. When you are done with DATA reports, press the “Q” key on your computer keyboard to terminate the communication session with the Glacier. 4.12 Grab Samples Grab samples let you take a single sample on demand, collecting the sample in an external container. You can collect a grab sample while the Glacier is running a program, paused, or in standby. To collect a grab sample: 1. Press the GRAB SAMPLE button. 2. The Glacier asks how much liquid to collect. Using the NUMBER buttons, enter the desired volume (in ml). Press the ENTER button to continue. 3. The Glacier waits for you to prepare to collect a grab sample. Pull the lower pump tube from the bulkhead fitting. Hold the end of the tube over a container. Press the ENTER button when you are ready. 4. The Glacier goes through a complete sample collection cycle and deposits the requested amount of liquid in the container. 5. Return the pump tube to the bulkhead fitting. If a grab sample is taken while a program is running, it is not counted as part of the number of samples. If you interrupt a running program to collect a grab sample and miss a programmed sample event, it is logged as “PROGRAM PAUSED” error. 4-8 Glacier Transportable Sampler Section 5 Maintenance 5.1 Overview This section contains instructions necessary to perform routine and preventive maintenance on the Glacier and its related components. The topics are outlined below. Routine maintenance - at user determined intervals • Cleaning (5.2) • Defrosting the refrigerator (5.3) • Pump tube replacement (5.4) • Discharge tube replacement (5.5) • Battery and power pack servicing (5.6) Preventive maintenance - as needed • Replacing the internal desiccant (5.7) • Renewing the desiccant (5.7.1) Problem resolution • Troubleshooting and self-diagnostics (5.8) • Contacting Teledyne Isco for assistance (5.9) • Return instructions (5.9.1) • Software Updates (5.11) 5.2 Cleaning 5.2.1 Cleaning the Glacier Exterior This section contains topics that provide instructions for cleaning the Glacier and its components. The Glacier controller, refrigerator exterior, and refrigerated compartment may be cleaned with warm soapy water and a rag. Never use acids or solvents to clean the Glacier. If there is excessive dirt and debris, the Glacier may be hosed off with water. Do not use a pressure washer; this may force water past the protective seals. Water that has collected in the refrigerated compartment can be removed by mopping it up with towels, or by briefly tipping the Glacier over. CAUTION Positions other than the Glacier’s normal upright position will drain the lubricant away from the refrigerator compressor. Operation without adequate lubrication may permanently damage the refrigeration system. If the Glacier is turned over for more than a few seconds, the Glacier’s refrigeration system must not be operated for at least one hour after returning the Glacier to its upright position. 5-1 Glacier Transportable Sampler Section 5 Maintenance 5.2.2 Cleaning the Bottles The Nalgene, polyethylene, and glass bottles have a wide mouth to facilitate cleaning. Wash them with a brush and soapy water, or use a dishwasher. Glass bottles may be autoclaved. The 2 gallon (7.6 liter) ProPak™ system was developed by Teledyne Isco to offer the greatest convenience in preparing sample containers for re-use. Simply remove the used liner and place a new one in the holder. Used ProPak liners can be disposed of or recycled. When necessary, the holder can be washed with warm soapy water or placed in a dishwasher. 5.2.3 Cleaning the Suction Line and Tubing The suction line, pump tube, and discharge tube can be cleaned by placing the end of the suction line in a cleaning solution. Press the Grab Sample button to pump the solution through the delivery system. When the delivery system is clean, repeat the pumping with clean water to rinse the lines. If any of these items are severely contaminated, they should be replaced. The strainer can be cleaned with a brush and soapy water. WARNING The sampler has a safety interlock that prevents the pump from operating when the pump housing band is open. DO NOT tamper with the pump housing and band. The pump is extremely powerful. The pump can injure you severely if the sampler activates the pump while you are working on it. Place the sampler controller in the Standby state before opening the pump housing. 5.2.4 Cleaning the Temperature Sensor The temperature sensor may be cleaned with a mild detergent. Using a disposable protective sleeve is a practical alternative to cleaning the temperature sensor between each sampling program. 5.2.5 Cleaning the Pump Rollers Debris should be removed from the rollers and guides to keep the pump operating efficiently and to extend tubing life. Remove loose debris from the pump rollers and guides with a stiff nylon-bristle brush. If debris has built up and cannot be removed with the brush, scrape the rollers or guides with a plastic or wooden tool to loosen the debris. Do not use a metal tool. This might damage the plastic rollers and guides. 5-2 5.2.6 Cleaning the Pump Housing Remove loose debris from the pump housing with a stiff nylon-bristle brush. If needed, flush debris from the housing with water. Do not forcefully spray with water. This might force water through the seals and bushings and damage internal components. 5.2.7 Cleaning Wetted Parts For general cleaning, you can wash the strainer and sample bottles with a brush and soapy water, then rinse with clean water. You can also autoclave the glass bottles. You can clean the liquid path through the wetted parts (Figure 5-4) by placing the strainer in a cleaning solution and pumping it through the Glacier Transportable Sampler Section 5 Maintenance delivery system. Then place the strainer in clean water and pump it through the delivery system to rinse it. If these items are severely contaminated, replace them. For application-specific requirements, consult with your laboratory to establish cleaning or replacement protocols. Note For critical sampling applications, consider replacing the suction line, pump tube, and discharge tube. Replacement eliminates the possibility of any cross contamination from previous sampling sites. C D E B F G A Figure 5-1 Wetted Parts A. Strainer (316 stainless steel, polypropylene, or CPVC) E. Bulkhead Fitting (316 stainless steel) B. Suction Line (vinyl) F. Discharge Tube (silicone) C. Tubing Coupler (316 stainless steel) G. Bottle (glass, polypropylene, or polyethylene) D. Pump Tube (silicone) 5-3 Glacier Transportable Sampler Section 5 Maintenance 5.3 Defrosting the Glacier Refrigerated Compartment Defrosting the refrigerator compartment may be necessary, depending on the humidity of its operating environment. If ice forms on the walls of the interior compartment, never use sharp objects to remove it. Instead, simply remove power and allow the ice to melt. Mop up the ice-melt with a towel, or drain it by briefly tipping the Glacier over. CAUTION Positions other than the Glacier’s normal upright position will drain the lubricant away from the refrigerator compressor. Operation without adequate lubrication may permanently damage the refrigeration system. If the Glacier is turned over for more than a few seconds, the Glacier’s refrigeration system must not be operated for at least one hour after returning the Glacier to its upright position. 5.4 Replacing the Pump Tube The pump tube is subject to wear during pump operation. It should be replaced when the Glacier displays the pump tube warning at 500,000 pump counts, or when inspection of the tube reveals any cracks along its side. The factory set value of 500,000 pump counts will deliver approximately 500 samples of 200 ml each, using a 3/8-inch by 10-foot suction line at a 5-foot suction head. Note The importance of regular tubing replacement cannot be overstated. The key is to replace the tube before failure, not after. When a pump tube ruptures, grit and other abrasive debris can be driven into the pump shaft seal. Over time, this abrasive material will degrade the pump seal, jeopardizing the NEMA 4x 6 rating of the controller. Failure to maintain the pump tube may result in permanent damage to the sampler. Check the condition of the pump tube regularly and if the tube shows signs of fatigue or wear, replace it immediately. A properly maintained sampler will provide the years of reliable service that is expected of an Isco Sampler. 5.4.1 Removing the Tube WARNING Pump may actuate without warning. To avoid injury, sampler must be off when pump housing cover is removed for inspection or tubing replacement. To remove the pump tube: 1. Disconnect the power from the Glacier. 2. Disconnect the suction line and pull the pump tube from the bulkhead fitting. 5-4 Glacier Transportable Sampler Section 5 Maintenance 3. Loosen the two thumbscrews and remove the liquid detector cover. 4. Loosen the four thumbscrews and remove the pump housing cover. 5. Pull the pump tube out of the pump housing. Rotating the pump rollers will help free the tube. 6. Clean the inside of the pump housing if necessary. Debris can be brushed from the inside of the pump housing, its cover, and rollers. The interior surfaces may be wiped clean with a damp rag. Figure 5-2 Liquid detector cover removed Figure 5-3 Pump housing cover removed Isco replacement pump tubes are marked with two black bands. These bands are used to correctly locate the tubing in the liquid detector and the pump. Position the pump inlet, or short end, in 5-5 Glacier Transportable Sampler Section 5 Maintenance the upper groove of the liquid detector. The band should be placed at the outer edge of the liquid detector. Replacement pump tubes, P/N 60-2964-013, are available from Teledyne Isco. Note If you are cutting replacement tubes from bulk Silastic tubing, cut the length to 30.25 inches (770 mm). Since the bulk tubing will not have bands to mark the correct position, ensure that 18.25 inches (463.55 mm) of tubing is inside the liquid detector and pump, and that the tube is not kinked where it fits over the bulkhead fitting. 5.4.2 Replacing the Tube WARNING Pump may actuate without warning. To avoid injury, sampler must be off when pump housing cover is removed for inspection or tubing replacement. To replace the pump tube: 1. Disconnect the power from the Glacier. 2. Slip the new pump tube under the pump rollers. Rotating the rollers as you do this will help to slide the tube into the pump. 3. Position the pump tube by aligning the bands at the outer edge of the liquid detector. 4. Replace the liquid detector and pump housing covers. The thumbscrews should be fully hand-tightened. 5. Connect the pump outlet end to the bulkhead fitting. Connect the suction line to the pump inlet. 6. Reconnect the power. 5.4.3 Resetting the Pump Tube Warning After changing the pump tube, the pump tube warning should be cleared by resetting the pump counts to zero. To do so: 1. From the main (standby) screen, select VIEW LOG. RESET PUMP COUNTER? YES NO 2. Press the ENTER button until the RESET PUMP COUNTER? screen is displayed. 3. Use the ARROW buttons to select YES, then press the ENTER button. 5.4.4 Optimizing Pump Performance The peristaltic pump and tube will perform the best when you: • Use Isco replacement pump tubes or bulk tubing. • Install the tube properly, aligning the inside edges of the bands with the outside edges of the liquid detector. • Follow the natural curve of the pump tube when fitting the tube inside the pump housing. • Use the shortest possible length of suction line. 5-6 Glacier Transportable Sampler Section 5 Maintenance 5.5 Replacing the Discharge Tube The discharge tube does not “wear out” under normal circumstances. However, some sampling protocols may require new tubing, or that the tubing be cleaned, before running each program. To replace the discharge tube: 1. Remove the discharge tube from the bulkhead fitting. 2. Slide the discharge tube out of the bottle cap. 3. Push the end of the new discharge tube onto the bulkhead fitting. Replacement tubes for the 5-gallon and 21/2-gallon (19- and 10-liter) lightweight polyethylene bottles use a 51/4-inch (135 mm) long tube. Replacement tubes for the 2 1/2-gallon (10-liter) Nalgene and glass bottles, and the ProPaks use an 11 1/4 -inch (285 mm) long tube. 4. Insert the end of the discharge tube into hole in the bottle cap. Note The amount of tubing that should extend into the bottle will depend on the programmed sample volume (see section 3.6.5). For the bottle-full detection to work properly, the volume above the discharge tube end must be greater than the programmed sample volume. Figure 5-4 Discharge Tube and Tube Guide 5-7 Glacier Transportable Sampler Section 5 Maintenance 5.6 Servicing Batteries If you are using a battery to power the Glacier, Teledyne Isco recommends that you install a freshly charged battery before starting each program. CAUTION Never charge the battery while connected to the Glacier. Over-voltages could damage the electronics. CAUTION Only use Isco battery cables 60-2964-021 or 480-0199-00 to connect the Glacier to a DC power source. The cable length and fusing protect you and the equipment from over-current conditions and the risk of fire. Note Battery capacity will degrade after repeated use, eventually requiring replacement. Batteries that are no longer suitable for use should be disposed of according to governing regulations. Check with your battery distributor to see if they will accept the battery as part of its reclamation/recycling program. Keep in mind that a refund may be offered if the old batter y is exchanged for a new one. W h e n p u r cha s i n g a r e p l a c e m e n t b a t t e r y, f i r s t c o n s u l t Appendix D, Battery Selection Guide, to determine the correct capacity. 5.7 Replacing the Internal Desiccant The Glacier uses a bag of desiccant to protect its internal components from moisture damage. When the internal case humidity exceeds 30%, the desiccant should be replaced. The internal case humidity is shown on the indicator visible through the front panel label. The indicator turns pink or white when the humidity level exceeds the printed value. Ideally, all three sections of the indicator should be blue. If the 20 and 30% sections are pink or white, replace the desiccant. 1. Disconnect the power from the Glacier. 2. Remove the 10 screws that attach the Glacier front panel and bezel. 3. Remove the bezel. CAUTION The Glacier controller contains electronic circuitry that can be damaged by static discharge. Open the controller only in a static-free environment. 4. Lift the front panel slowly so that the connecting wires are not pulled excessively (Figure 5-5). 5-8 Glacier Transportable Sampler Section 5 Maintenance 5. While holding the front panel up, open the cardboard box and remove the bag of desiccant. Do no try to remove the cardboard box—it is firmly attached to the side of the case. Attempting to remove the box may damage the box. 6. Insert a new or renewed (section 5.7.1) bag of desiccant. 7. Visually inspect the internal components. Corrosion, residue, or other evidence of moisture damage will indicate a need for cleaning or repair. Contact Teledyne Isco for assistance. 8. Inspect the front panel gasket. It should fit properly in the case and its surface should be clean and smooth. Figure 5-5 Internal Desiccant 9. Replace the front panel using care to ensure that the wiring will be free of the gear train. 10. Replace the bezel and screws. Tighten the 10 screws in an even, cross-torquing pattern. The internal humidity indicator should return to its normal blue color in a few hours. 5.7.1 Renewing the Desiccant CAUTION Desiccant may produce irritating fumes when heated. To reduce the hazard of the fumes: • Use a vented oven in a well-ventilated room • Do not remain in the room while recharging is taking place • Use the recommended temperature. There have been reports of irritating fumes coming from the desiccant during reactivation. While our attempts to duplicate the problem have been unsuccessful, we still urge you to use caution. Mater ial Safety Data Sheets are provided in Appendix C. 5-9 Glacier Transportable Sampler Section 5 Maintenance To renew the desiccant: 1. Remove the bag from the Glacier controller. 2. Place a sheet of brown paper on a flat metal sheet. You can use a brown grocery bag and a typical cookie sheet. 3. Place the bag on the sheet. If you are recharging several bags, do not stack the bags on top of each other or allow them to touch. 4. Place in a vented, circulating forced air, convection oven in a well-ventilated room. Allow two inches of air space between the top of the bag and the next rack. Keep the tray a minimum of 16 inches from the heating element. 5. Heat the bag at a temperature of 240 to 250° F (116 to 121° C) for 12 to 16 hours. 6. At the end of the time period, the bag should be immediately removed and placed in an airtight container for cooling. 7. When the bag has cooled to room temperature, it may be returned to the Glacier controller. The desiccant will be recharged to approximately 80 to 90% of its previous capacity. After repeated renewing, the desiccant bag may require replacement. Note Some bags will have the temperature and time for renewing the desiccant printed on the bag. If they differ, use the temperature and time printed on the bag. 5.8 Glacier Self-diagnostics If you are experiencing problems with the Glacier, contact Teledyne Isco’s Repair Service Department. Simple difficulties can often be diagnosed over the telephone. Before contacting Teledyne Isco however, take a few moments to ensure that several common problems are first eliminated. • Ensure that the power supply is adequate. Low power can cause a variety of problems. Simply replacing the battery with a freshly charged unit can correct many faults. • Ensure that the liquid delivery system is in good condition. The tubing should be free from leaks caused by pinholes or cracks. Ensure that the tubing is not plugged by debris. • Clear debris away from the end of the strainer and ensure that it is submerged deep enough to supply liquid for the entire fill portion of the sampling cycle. If the cause of the problem cannot be determined, the Glacier self-diagnostics routine can be used to test the sampler’s functions. 5-10 Glacier Transportable Sampler Section 5 Maintenance To run the basic level diagnostics: 1. Press 3424 at the Standby display. The Glacier enters the diagnostics mode. 2. The Glacier tests the RAM (Random Access Memory). The Glacier displays the RAM test results for four seconds then advances to the next test. If the Glacier reports “RAM TEST FAILED” contact Teledyne Isco. RAM stores program settings, log data, internal counters, pump tables, etc. 3. The Glacier tests the ROM (Read Only Memory). The Glacier displays the ROM test results for four seconds and then advances to the next test. If the Glacier reports “ROM TEST FAILED” contact Teledyne Isco. ROM stores the embedded software. 4. The Glacier tests the liquid crystal display (LCD). The cursor moves across the LCD turning on every pixel, then turning off every pixel. Next, the Glacier displays characters on the display. Contact Teledyne Isco if the pixels or characters do not appear correctly. 5. The Glacier queries “TEST PUMP?”. Use the ARROW button to choose an option and press the ENTER button to select it. Select “NO” to skip the pump test and advance to the next test. Select “YES” and the Glacier runs the pump in both directions—pumping and purging. At the end of each direction, it displays an On/Off ratio. This ratio should be between 0.50 and 2.00. Contact Teledyne Isco if the ratio is outside of this range. A count near 1.00 is typical. 6. The Glacier queries “TEST LIQUID DETECT?”. Use the ARROW button to choose an option and press the ENTER button to select it. Select “NO” to skip the liquid detect test and advance to the next function (step 9). Select “YES” and the Glacier enters the liquid detector test. 7. (Liquid Detector Test, continued) The Glacier displays “LIQUID DETECT TEST: PRESS WHEN READY.” Ensure that the end of the suction line is in water and there is something to catch the liquid if it is discharged from the pump. Press the ENTER button when you are ready. 8. (Liquid Detector Test, continued) The Glacier pumps liquid and attempts to detect the liquid in the pump tube. It reports “LIQUID DETECT RINSE (#)” as each of the five rinse cycles are accomplished. When the Glacier does not detect liquid it reports the reason and waits for a response. At this point you should: · Verify that liquid was present in the pump tube during the pumping. · Verify that the pump tube is installed correctly. The inside edges of the black bands should be even with the outside edges of the liquid detector. · Ensure that the liquid detector cover is firmly seated over the pump tube and the thumbscrews are tight. 5-11 Glacier Transportable Sampler Section 5 Maintenance After checking the items above, rerun the liquid detect test by pressing any button (except the STOP and ON/OFF) to return to step 6. If the above steps did not remedy the problem, contact Teledyne Isco. If you press the STOP button, the Glacier skips the liquid detector test and advances to step 9. 9. The Glacier queries “RE-INITIALIZE?”. Re-initializing the Glacier resets the stored and current program settings to the factory defaults and clears the log. To skip the reset, select “NO” and the Glacier returns to the Standby state. To reset the program settings, select YES. The Glacier will ask if you are sure. Select YES and the Glacier will load the default settings and turn itself off. 5.9 Contacting Teledyne Isco for Assistance 5.9.1 Return Instructions Contact information can be found in the Foreword of this manual. Should it become necessary to return the Glacier to the factory for repair, please contact Teledyne Isco first and obtain a Return Authorization Number (RAN). This will aid in the prompt repair and return of the sampler. When returning the Glacier, the unit should be cleaned and packed in the original shipping containers. If the original container is not available, prepare the sampler as described below. 1. Assemble all of the components, latching the sections together. 2. Place the sampler in a bag. 3. Select a cardboard box at least 6 inches (150 mm) longer in each dimension. 4. Place the sampler in the box. 5. Fill the box equally with resilient packing material (shredded paper, bubble pack, expanded foam pieces, etc.). 6. Include a note describing the malfunction or reason for return, and reference the RAN. 7. Seal the box and ship to the address listed below. Consulting with Teledyne Isco’s Repair Service Department may determine that only the Glacier controller requires servicing. The controller can be removed and shipped without the refrigerator assembly to save freight charges. To remove the controller and ship it: 1. Remove power from the Glacier. 2. Open the cover to gain access to the controller. 3. Disconnect the suction line from the pump tube. 4. Disconnect the pump tube from the bulkhead fitting. 5. Remove the two screws from the base of the controller. 6. Lift the controller straight up from its mounting surface. 7. Close the controller cover. 5-12 Glacier Transportable Sampler Section 5 Maintenance CAUTION Removing the controller exposes the electrical connector. Do not apply power to the Glacier while the controller is removed. Close the controller cover to protect the exposed connector and to prevent injuries. 8. Place the controller in a bag. 9. Place the controller in a box at least 6 inches (150 mm) longer in each dimension and fill the box equally with resilient packing material. 10. Include a note describing the malfunction or reason for return, and reference the RAN. 11. Seal the box and ship to the address provide by Teledyne Isco’s Repair Service Department. Note Your warranty describes conditions under which Teledyne Isco will pay surface shipping costs. 5.10 Replacement Parts Replacement parts are available from Teledyne Isco. Contact Teledyne Isco’s Customer Service Department for ordering information. A listing of replacement parts is contained in Appendix A of this manual. 5.11 Software Updates Teledyne Isco believes in continually improving its product and at times will release updated versions of software. The Glacier uses flash memory to store its software. With flash technology you can upgrade your sampler’s software without sending it back to the factory or replacing a chip. The software is updated by transferring a binary file (.BIN) from a PC to the Glacier. This requires the new binary file, a PC-to-GLS/Glacier connect cable Isco P/N 60-2954-021), and a program running on your PC. Teledyne Isco has two software programs that may be used to update the instrument software— Update Software (shipped with Flowlink 4 for Windows), and Flash Update. Note When connecting to the Glacier, a baud rate of 19,200 is recommended. 5-13 Glacier Transportable Sampler Section 5 Maintenance 5-14 Glacier Transportable Sampler Appendix A Replacement Parts A.1 Overview Replacement parts are called out in the following illustrations. Refer to the tables to determine the part number for the item. Replacement parts can be purchased by contacting Teledyne Isco’s Customer Service Department. Teledyne Isco Customer Service Department P.O. Box 82531 Lincoln, NE 68501 USA Phone: (800) 228-4373 (402) 464-0231 FAX:(402) 465-3022 E-mail:[email protected] A-1 Glacier Transportable Sampler Appendix A Replacement Parts A-2 Glacier Transportable Sampler Appendix A Replacement Parts Screw, 10-32 x 3/4 Locknut, 10-32 A-3 Glacier Transportable Sampler Appendix A Replacement Parts A-4 Glacier Transportable Sampler Appendix A Replacement Parts A-5 Glacier Transportable Sampler Appendix A Replacement Parts A-6 Glacier Transportable Sampler Appendix A Replacement Parts A-7 Glacier Transportable Sampler Appendix A Replacement Parts A-8 Glacier Transportable Sampler Appendix B Accessories B.1 Accessories List B.1.1 Bottle Kits B.1.2 Replacement Bottles B.1.3 General Accessories Accessories can be purchased by contacting Teledyne Isco’s Customer Service Department. Contact information can be found at the front of this manual. 68-2960-005 2.5-gallon (10-liter) Nalgene round bottle with two caps, two discharge tubes, and bottle retainer. 68-2960-006 2.5-gallon (10-liter) glass round bottle with two PTFE-lined caps, two discharge tubes, and bottle retainer. 68-2960-007 2.5-gallon (10-liter) light weight polyethylene rectangular bottle with two caps, two discharge tubes, and bottle retainer. 68-2960-008 5-gallon (19-liter) light weight polyethylene bottle with two caps, two discharge tubes, and bottle retainer. 60-2960-009 2.0-gallon (9-liter) ProPak single-use liners with holder, caps, 100 liners, two discharge tubes, and bottle retainer. 68-2740-009 2.5-gallon (10-liter) polyethylene round bottle with two caps, qty 1 68-2930-006 2.5-gallon (10-liter) glass round bottle with two PTFE-lined caps, qty 1 68-2960-013 2.5-gallon (10-liter) light weight polyethylene rectangular bottle with two caps, qty 1 68-2960-014 5-gallon (19-liter) light weight polyethylene bottle with two caps, qty 1 60-2953-029 Composite ProPak holder, 2.0-gallon (9-liter), qty 1 60-2953-038 Composite ProPaks, 2.0-gallon (9-liter) bags, qty 100 60-2964-013 Pump tube, Glacier, 30.25 inches long 60-2963-033 Discharge tube, Glacier, 11.25 inches long. For 2.5-gallon Nalgene and glass bottles, and for ProPaks. 60-2963-034 Discharge tube, Glacier, 5.25 inches long. For 5and 2.5-gallon light weight polyethylene bottles. 60-5314-523 PTFE sleeve for Glacier temperature sensor 60-6700-046 Silastic pump tubing, bulk 10' length, for pump and discharge tubes B-1 Glacier Transportable Sampler Appendix B Accessories B.1.4 Suction line and strainers B.1.5 DC Power Connect Cables B-2 60-6700-047 Silastic pump tubing, bulk 50' length, for pump and discharge tubes 299-0020-00 Plastic graduated cylinder, 1000 ml, for sample volume calibration 60-9004-378 /8" ID 10' vinyl suction line with standard weighted polypropylene strainer 60-9004-379 ID 25' vinyl suction line with standard weighted polypropylene strainer 60-1683-146 /8" ID 10' PTFE suction line with protective coating, without strainer 60-2703-114 /8" ID 25' PTFE suction line with protective coating, without strainer 60-9004-367 3/8" 69-2903-139 1 69-2903-138 3 60-3704-066 Weighted strainer only, 3/8", CPVC body 68-1680-055 1 68-1680-056 1 68-1680-057 1/4" 68-1680-058 3 68-1680-059 3 68-3700-006 1/4" 68-3700-007 3 69-4703-154 1 69-4703-106 3 60-2964-021 Connect cable for powering Glacier Transportable Sampler from an external 12V DC source, such as an automotive or deep-cycle marine battery. The six-foot long cable provides over-current protection (fused 8A, 32V) and terminates in heavy-duty battery clips. 480-0199-00 Connect cable for powering Glacier Transportable Sampler from an external 12V DC source. The six-foot long cable provides over-current protection (fused 8A, 32V) and terminates in a cigarette lighter plug. 3 3/8" 3 3 Standard weighted polypropylene strainer /4" Stainless steel low flow strainer only /8" Stainless steel low flow strainer only /4" ID vinyl tubing, bulk 100' /4" ID vinyl tubing, bulk 500' ID vinyl tubing, bulk 1000' /8" ID vinyl tubing, bulk 100' /8" ID vinyl tubing, bulk 500' Vinyl tubing coupler /8" Vinyl tubing coupler /4" Stainless steel suction line coupler /8" Stainless steel suction line coupler Glacier Transportable Sampler Appendix B Accessories B.1.6 Connect Cables and Interfaces 60-1644-000 Model 1640 Liquid Level Actuator 60-3004-107 Connect cable, 25', Isco sampler to Isco flow meter 68-1680-060 Connector only, without cable, for use with non-Isco flow meters having an isolated contact closure proportional to flow 60-1394-077 Same as above, with 22' cable terminating in two wires 60-2004-260 2100 Series Sampler Interface Cable 60-3704-075 4-20 mA Sampler Input Interface (converts analog signal flow meter output as specified by user into pulses acceptable to Isco samplers) 60-2954-021 Software Upgrade Cable, PC-to-GLS/Glacier 60-3774-013 Isco SAMPLINK software. B-3 Glacier Transportable Sampler Appendix B Accessories B-4 Glacier Transportable Sampler Appendix C Material Safety Data Sheets C.1 Overview The following pages provide Material Safety Data Sheets for the internal desiccant used by the Glacier Transportable Sampler. C-1 Glacier Transportable Sampler Appendix C Material Safety Data Sheets Material Safety Data Sheet MSDS Code: J96001 DESICCITE® 25 Revision date: NFPA Classification: Health: Flammability: Instability: Special Hazards: Date Printed: 06/19/06 06/19/06 HMIS Classification: Health: 1* Flammability: 0 Physical Hazard: 0 Personal Protection: E * Indicates possible chronic health effects. 0 0 0 1. CHEMICAL PRODUCT AND COMPANY IDENTIFICATION Common Name: Bentonite, Heat Activated Granules Chemical Name: Montmorillonite Clay CAS No: 1302-78-9 Product Use: Desiccant. Supplier: ENGELHARD CORPORATION 600 E. MCDOWELL ROAD JACKSON, MS 39204 1-800-654-4039 For Chemical Emergency Call CHEMTREC (24 hours): 1-800-424-9300 (US, Canada, Puerto Rico, Virgin Islands) 1-703-527-3887 (Outside Above Area) 2. COMPOSITION / INFORMATION ON INGREDIENTS Ingredient CAS Number Aluminum Silicate 12141-46-7 Silica, Crystalline (Quartz) 14808-60-7 Weight in Percent (%) Notes 97 None. 1-3 None. Other Information: NOTE: Industrial hygiene sampling in our plant, where this product is packaged, resulted in a respirable fraction of crystalline silica quartz of only 0.1-0.115%. 3. HAZARDS IDENTIFICATION Emergency Overview: 1/ 6 C-2 Glacier Transportable Sampler Appendix C Material Safety Data Sheets MSDS code: J96001 Engelhard Material Safety Data Sheet Color: Form: Odor: Flash Point, °C: Revision date: 06/19/06 Off White-gray Granules Odorless Not Applicable Most Important Hazards: Contains SUSPECT CANCER HAZARD. Risk of cancer depends on route, duration and level of exposure. Prolonged or repeated exposure may cause lung damage. Inhalation may result in respiratory irritation. Potential Health Effects: Inhalation: Causes respiratory tract irritation. May cause disabling, progressive pulmonary fibrosis (silicosis) due to crystalline silica. Symptoms include cough, dyspnea, wheezing, and impairment of pulmonary function. Progression of symptoms can continue after dust exposure ceases. Ingestion: No adverse health effects are expected from swallowing. Skin Contact: May cause mechanical injury. Eye Contact: Large amounts of dust may cause mechanical irritation. Carcinogenicity: Ingredient CAS Number Aluminum Silicate 12141-46-7 Silica, Crystalline (Quartz) 14808-60-7 Weight in Percent (%) 97 NTP (Y/N) IARC (See Notes) OSHA (Y/N) ACGIH (See Notes) N N N N 1-3 Y Y1 N A2 Notes: IARC: Y1=Carcinogenic to humans; Y2A=Probably carcinogenic to humans; Y2B=Possibly carcinogenic to humans; N3=Not classifiable as to its carcinogenicity; N=Not studied or probably not carcinogenic. ACGIH: A1=Confirmed human carcinogen; A2=Suspected human carcinogen; A3=Confirmed animal carcinogen; A4=Not classifiable as a human carcinogen; A5=Not suspected as a human carcinogen; N=Not studied. Chronic Health Hazards: Refer to Carcinogenicity and Potential Health Effects. Aggravated Medical Conditions: Pulmonary disorders. 4. FIRST AID MEASURES Inhalation: Move person to fresh air. Aid in breathing, if necessary, and get immediate medical attention. Ingestion: Procedures normally not needed. If large quantities are ingested, seek medical advice. Skin Contact: Flush skin with large amounts of water. If irritation persists, get medical attention. Eye Contact: In case of contact, immediately flush eyes with plenty of water for at least 15 minutes and get medical attention if irritation persists. 5. FIRE FIGHTING MEASURES Flash Point, °C: Not Applicable 2/ 6 C-3 Glacier Transportable Sampler Appendix C Material Safety Data Sheets MSDS code: J96001 Engelhard Material Safety Data Sheet Revision date: 06/19/06 Autoignition Temperature, °C: Lower Explosive Limit, %: Upper Explosive Limit, %: Not Determined Not Determined Not Determined Extinguishing Media: Use extinguishing media appropriate for surrounding fire. Fire Fighting Procedures: Positive pressure, self-contained breathing apparatus. Wear full protective clothing. Unusual Fire and Explosion Hazards: Not a fire or explosion hazard. 6. ACCIDENTAL RELEASE MEASURES Spill Procedures: Contain spillage. Scoop up or vacuum into a container for reclamation or disposal. Avoid dusting. 7. HANDLING AND STORAGE • • • • • • • Keep container closed. Store in a cool, dry location away from incompatible materials. Material may be slippery when wet. Practice good housekeeping. Avoid generating or breathing dust. Avoid contact with eyes. Use only with adequate ventilation. See American Society for Testing and Materials (ASTM) standard practice E1132-99a, "Standard Practice for Health Requirements Relating to Occupational Exposure to Respirable Crystalline Silica." 8. EXPOSURE CONTROLS/PERSONAL PROTECTION Ingredient CAS Number Aluminum Silicate 12141-46-7 Silica, Crystalline (Quartz) 14808-60-7 Weight in Percent (%) 97 1-3 OSHA PEL ACGIH TLV 15 mg/m3 (total dust) 5 mg/m3 (respirable fraction) 30 mg/m3 ÷ (%SiO2 + 2) (Total dust) 250 mppcf ÷ (%SiO2 + 5), or 10 mg/m3 ÷ (%SiO2 + 2) (Respirable dust) 10 mg/m3 (Inhalable particulate) 3 mg/m3 (Respirable particulate) 0.05 mg/m3 (Respirable fraction) Unless otherwise noted, all values are reported as 8-hour Time-Weighted Averages (TWAs) and total dust (particulates only). All ACGIH TLVs refer to the 2005 standards. Unless otherwise noted, all OSHA PELs refer to 29 CFR Part 1910 Air Contaminants: Final Rule, June 30, 1993. Personal Protective Equipment: Safety glasses with side shields. Wear suitable gloves. Respiratory Protection: Use a NIOSH/MSHA approved respirator as necessary to protect from: dust. If respiratory protection is used, follow all requirements for respiratory programs set forth in OSHA regulations (29 CFR 1910.134). 3/ 6 C-4 Glacier Transportable Sampler Appendix C Material Safety Data Sheets MSDS code: J96001 Engelhard Material Safety Data Sheet Ventilation: Revision date: 06/19/06 General ventilation. Local exhaust ventilation is recommended to control exposures to within applicable limits. 9. PHYSICAL AND CHEMICAL PROPERTIES Form: Color: Odor: Granules Off White-gray Odorless Specific Gravity: Solubility (in water): pH: 2.4 Negligible 6-9 (Slurry) 10. STABILITY AND REACTIVITY Stability Data: Stable Conditions/Hazards to Avoid: None anticipated Incompatibility (Materials to Avoid): Strong alkalies. Strong oxidizing agents. Hazardous Decomposition Products: None anticipated Polymerization: None anticipated. Polymerization - Avoid: None anticipated. 11. TOXICOLOGICAL INFORMATION Information on Product: No data available. Information on Components: Ingredient CAS Number Aluminum Silicate 12141-46-7 Silica, Crystalline (Quartz) 14808-60-7 Weight in Acute Toxicity - Acute Toxicity - Acute Toxicity - Acute Toxicity Percent Oral Inhalation Dermal Other (%) 97 Not Available Not Available Not Available Not Available 1-3 Not Available Not Available Not Available Not Available 12. ECOLOGICAL INFORMATION Information on Product: Environmental Fate: Ecotoxicological Information: No data available. No data available. 4/ 6 C-5 Glacier Transportable Sampler Appendix C Material Safety Data Sheets MSDS code: J96001 Engelhard Material Safety Data Sheet Revision date: 06/19/06 13. DISPOSAL CONSIDERATIONS US EPA Waste Number: Not Regulated Disposal of Waste Method: Federal, state and local disposal laws and regulations will determine the proper waste disposal/recycling/reclamation procedure. Disposal requirements are dependent on the hazard classification and will vary by location and the type of disposal selected. All waste materials should be reviewed to determine the applicable hazards (testing may be necessary). 14. TRANSPORT INFORMATION International Transport Regulations: ICAO Class: Not Regulated IMO Class: US Transportation Regulations: DOT Classification: Not Regulated Not Regulated Canadian Transportation of Dangerous Goods (TDG): TDG Classification: Not Regulated 15. REGULATORY INFORMATION International Inventories: United States: Canada: Europe: Japan: Australia: Korea: Philippines: China: US Federal Regulations: Ingredient CAS Number Aluminum Silicate 12141-46-7 Silica, Crystalline (Quartz) 14808-60-7 This product or its ingredients are listed on or compliant with the TSCA Inventory. This product or its ingredients are listed on or compliant with the DSL. This product or its ingredients are listed on or compliant with EINECS. This product or its ingredients are listed on or compliant with MITI. This product or its ingredients are listed on or compliant with AICS. This product or its ingredients are listed on or compliant with the ECL. This product or its ingredients are listed on or compliant with PICCS. This product or its ingredients are listed on or compliant with the IECSC. Weight in Percent (%) Subject to SARA 313 Reporting 97 No 1-3 No SARA 311/ 312 Hazard Categories: Chronic Health Hazard CAA 602 Ozone Depleting Substances (ODS): This product neither contains nor is manufactured with an ozone depleting substance subject to the labeling requirements of the Clean Air Act Amendments 1990 and 40 CFR Part 82. US State Regulations: California Proposition 65 - Carcinogen: WARNING: This product contains chemicals known to the State of California to cause cancer. 5/ 6 C-6 Glacier Transportable Sampler Appendix C Material Safety Data Sheets MSDS code: J96001 Engelhard Material Safety Data Sheet Revision date: 06/19/06 Canadian Regulations: WHMIS Classification: Class D Division 2 Subdivision A This product has been classified in accordance with the hazard criteria of the Controlled Products Regulations and the MSDS contains all the information required by the Controlled Products Regulations . 16. OTHER INFORMATION Revision number: 15 Section(s) Revised in this Version: Section 15: Regulatory Information Prepared By: Engelhard Corporate Environmental Health & Safety Group The information in this Material Safety Data Sheet should be provided to all who will use, handle, store, transport, or otherwise be exposed to this product. This information has been prepared for the guidance of plant engineering, operations, management and for persons working with or handling this product. The information presented in the MSDS is premised upon proper handling and anticipated uses, and is for the material without chemical additions/alterations. We believe this information to be reliable and up-to-date as of the date of publication, but make no warranty that it is. Additionally, if this Material Safety Data Sheet is more than three years old, please contact the supplier at the phone number listed in Section 1 to make certain that this sheet is current. Copyright Engelhard Corporation. License granted to make unlimited copies for internal use only. End of MSDS. 6/ 6 C-7 Glacier Transportable Sampler Appendix C Material Safety Data Sheets C-8 Glacier Transportable Sampler Appendix C Material Safety Data Sheets C-9 Glacier Transportable Sampler Appendix C Material Safety Data Sheets C-10 Glacier Transportable Sampler Appendix C Material Safety Data Sheets C-11 Glacier Transportable Sampler Appendix C Material Safety Data Sheets C-12 Glacier Transportable Sampler Appendix C Material Safety Data Sheets C-13 Glacier Transportable Sampler Appendix C Material Safety Data Sheets C-14 Glacier Transportable Sampler Appendix C Material Safety Data Sheets C-15 Glacier Transportable Sampler Appendix C Material Safety Data Sheets C-16 Glacier Transportable Sampler Appendix C Material Safety Data Sheets C-17 Glacier Transportable Sampler Appendix C Material Safety Data Sheets C-18 Glacier Transportable Sampler Appendix C Material Safety Data Sheets C-19 Glacier Transportable Sampler Appendix C Material Safety Data Sheets C-20 Glacier Transportable Sampler Appendix D Battery Selection Guide D.1 Introduction This section provides information to assist with selecting a power source for 12 VDC battery-powered Glacier Samplers. Teledyne Isco recommends deep-cycle marine batteries, although any 12 VDC power source will work provided that it can meet the current demands of the refrigeration system. D.2 Determining the Power Consumption The Glacier requires continuous 12 VDC power for several purposes: • an idle current while the sampler is inhibited, waiting for the next sample, or after it has finished its sampling program • logging temperature readings at one-minute intervals • operating the pump • cooling the sample container. The first three are negligible when compared to the energy required to cool the liquid as it is collected and to maintain the composite sample at 3° C. The amount of energy required to cool the samples correlates to ambient air temperature. The higher the air temperature, the more the Glacier must operate the refrigeration system. The equation below may be used as a guide for selecting a battery that will meet the requirements of your sampling program. Vc x Ac ( 6 )( Where: ) + Dm x Am = Expected power consumption, Amp-hours Vc = Total sample volume, in liters Ac = Amp-hours to cool sample liquid from 20° C (Fig D-1) Dm= Number of days sample volume must be maintained Am= Amp-hour per day factor for maintenance (Fig D-2) Before using the equation you must know: • the total sample volume that will be collected • the number of days that the Glacier must keep the sample cooled to 3° C • and the average ambient temperature. The first group in the equation calculates the amp-hours required to cool the sample liquid as it is collected. The total sample volume, V c , can be determined by the programmed number of samples multiplied by the sample volume. If the D-1 Glacier Transportable Sampler Appendix D Battery Selection Guide Glacier is programmed for continuous sampling, Vc would be the programmed bottle volume, provided that bottle-full detection is being used. Use Figure D-1 to find A c by determining the amp-hours for the average ambient temperature at your sampling site. Once the sample liquid has been cooled, more energy is required to keep it cool. The second group in the equation may be used to calculate the amp-hours required each day to keep the sample at 3° C. The number of days, Dm, is the days from the first collected sample to when the Glacier is no longer expected to keep the sample cool. Use Figure D-2 to find Am. The following scenario illustrates how to use the equation. Consider a Glacier that is inhibited while waiting for an external device to indicate that a measured condition, such as a rain event, has occurred. The average ambient temperature is 30° C (86° F). When the external device clears the inhibit, the Glacier will collect sample volumes of 250 ml, once an hour, for 24 hours. After running the program, it will take another day to retrieve the Glacier and bring the composite sample to the lab. From this example, we know that Vc is 6 liters, Dm is two days (one to collect the samples, another to retrieve it), and the ambient temperature is 30° C. At this ambient temperature, Figure D-1 tells us Ac is 25, and Figure D-2 tells us Am is 29. The equation would be: Vc x Ac ( ( 6 )( )( 6 x 25 6 ) ) + Dm x Am = Expected power consumption, Amp-hours + 2 x 29 = 83 Amp-hours Using the equation we find operating the sampler under these conditions would need a fully-charged battery with a capacity of at least 83 amp-hours. As previously mentioned, standby current is negligible. In the example above, the Glacier could be waiting several days for the rain event. Because the refrigeration system is not activated until the first sample is taken, the number of days the Glacier is inhibited is generally of no concern. Figure D-1 assumes that the liquid temperature at the sampling point is at room temperature (68 to 77° F or 20 to 25° C). Increase or decrease the expected battery capacity accordingly if the actual liquid temperature falls outside of this temperature range. Other factors, such as high suction head heights (over 3 m or 10 feet) or the amount of direct sunlight will also affect the rated current demand on the battery. D-2 Glacier Transportable Sampler Appendix D Battery Selection Guide Ambient (˚C) 0 10 20 30 40 50 60 50 Sample Cooling Demand Amp-hours 40 30 20 10 0 32 47 62 77 92 107 122 Ambient (˚F) Figure D-1 Amp-hours required to cool 6 liters of sample liquid from 20° C (Ac) Ambient (˚C) 0 10 20 30 40 50 60 Sample Maintenance Demand Amp-hours per Day 50 40 30 20 10 0 32 47 62 77 92 107 122 Ambient (˚F) Figure D-2 Amp-hours per day required to maintain sample liquid at 3° C (Am) D-3 Glacier Transportable Sampler Appendix D Battery Selection Guide D-4 Compliance Statements ℶ❐₼㦘㹡㦘⹂䓸德㒥⏒侯䤓⚜䱿♙⚺摞 Name and amount of Hazardous Substances or Elements in the product ᳝↦᳝ᆇ⠽䋼ܗ㋴ Hazardous Substances or Elements 捷ↅ⚜䱿 䪙 ∲ 䬝 ݁Ӌ䫀 ⒈㘨㣃 Component Name (Pb) (Hg) (Cd) (Cr(VI)) (PBB) ⒈Ѡ㘨㣃 (PBDE) 兎恾㨎 Circuit Boards X O O O O O 㣍䯉 Display X O O O O O 㘴兎 Wiring O O O O X O ␔捷䟄冕 Internal Cables O O O O X O ☚冸㧉 Compressor O O O O X O 公冧᧨公䍼 Insulation O O O O X O 䟄䄟兎 Line Cord O O O O X O 䟄䄟 Power Supply X O O O X O 䦃㿐䟄㧉 DC Motor X O O O X O ⺞枽䥧 Keypad O O O O X O ℶ❐₼㦘㹡㦘⹂䓸德㒥⏒侯䤓⚜䱿♙⚺摞᧶Name and amount of Hazardous Substances or Elements in the product O: 嫷䯉年㦘㹡㦘⹂䓸德⦷年捷ↅ㓏㦘⧖德㧟㠨₼䤓⚺摞⧖⦷ST/ 㪖屓⸩䤓棟摞尐㻑ⅴₚᇭ O: Represent the concentration of the hazardous substance in this component’s any homogeneous pieces is lower than the ST/ standard limitation. X᧶嫷䯉年㦘㹡㦘⹂䓸德咂⺠⦷年捷ↅ䤓㩟⧖德㧟㠨₼䤓⚺摞怔⒉ST/ 㪖屓⸩䤓棟摞尐㻑ᇭ (←₩♾⦷㷳⮓᧨㫈㗽⸭棔㍔⑄⺈ₙ嫷₼㓢“X” 䤓㔏㦾☮⥯扪嫛扪㷴広㢝ᇭ) X: Represent the concentration of the hazardous substance in this component’s at least one homogeneous piece is higher than the ST/ standard limitation. (Manufacturer may give technical reasons to the “X”marks) 䘾≬∎䞷㦮䟀兞洛䫽⸩ᇭ The Environmentally Friendly Use Period (EFUP) was determined through experience. 䞮ℶ㡴㦮嬺冥䪐⦷侊⒦⚆䪐₼ᇭⓜₘ⇜㟿ⷦ䞮ℶ(207 ⅲ嫷 2007 ) ᇭ椞⚝䤓₹ⷦ㹜ⅲ嫷㦗᧶ A 㦗᧨B ℛ㦗᧨䷘䷘ᇭ The date of Manufacture is in code within the serial number. The first three numbers are the year of manufacture (207 is year 2007) followed by a letter for the month. "A" is January, "B" is February and so on. Hazmat Table Avalanche/Glacier 60-2973-065 Rev. DECLARATION OF CONFORMITY Application of Council Directive: Manufacturer's Name: Manufacturer's Address: Description Electrostatic Discharge EN61000-4-3 Radiated RF Immunity EN61000-4-4 Electrical Fast Transient EN61000-4-5 Surge on AC Lines EN61000-4-6 CISPR11/ EN 55011 Level 2 - 4kV contact discharge Level 3 - 8kV air discharge io n EN61000-4-2 Severity Applied D ec la ra t Standard of C on fo rm ity Equipment Type/Environment: Trade Name/Model No: Year of Issue: Standards to which Conformity is Declared: 89/336/EEC The EMC Directive 73/23/EEC The Low Voltage Directive Teledyne Isco, Inc. 4700 Superior, Lincoln, Nebraska 68504 USA Mailing Address: P.O. Box 82531, Lincoln, NE 68501 Laboratory Equipment for Light Industrial/Commercial Environments Glacier 2002 EN 61326-1998 EMC Requirements for Electrical Equipment for Measurement, Control, and Laboratory Use EN 61010-1 Safety Requirements for Electrical Equipment for Measurement, Control, and Laboratory Use EN 60529 : 1992 & NEMA: Degrees of Protection Provided by Enclosure Controller: NEMA 4X Refrigerator: IP-53 Performance Criteria A A A Level 2 2kV on AC lines A 2kV common mode, 1KV differential mode A Conducted RF on I/O lines 150 kHz to 80 MHz, 3V rms, 80% modulated A RF Emissions Group 1, Class A Industrial, Scientific, and Medical Equipment C E 80 MHz to 1000MHz 80% AM at 1kHz Level 1 10V/m We, the undersigned, hereby declare that the design of the equipment specified above conforms to the above Directive(s) and Standards as of July 29, 2002. William Foster USA Representative William Foster Director of Engineering Teledyne Isco, Inc. 4700 Superior Street Lincoln, Nebraska 68504 Phone: (402) 464-0231 Fax: (402) 464-4543 60-2962-006 Rev A Warranty Teledyne Isco One Year Limited Factory Service Warranty* This warranty exclusively covers Teledyne Isco instruments, providing a one-year limited warranty covering parts and labor. Any instrument that fails during the warranty period due to faulty parts or workmanship will be repaired at the factory at no charge to the customer. Teledyne Iscos exclusive liability is limited to repair or replacement of defective instruments. Teledyne Isco is not liable for consequential damages. Teledyne Isco will pay surface transportation charges both ways within the 48 contiguous United States if the instrument proves to be defective within 30 days of shipment. Throughout the remainder of the warranty period, the customer will pay to return the instrument to Teledyne Isco, and Teledyne Isco will pay surface transportation to return the repaired instrument to the customer. Teledyne Isco will not pay air freight or customers packing and crating charges. This warranty does not cover loss, damage, or defects resulting from transportation between the customers facility and the repair facility. The warranty for any instrument is the one in effect on date of shipment. The warranty period begins on the shipping date, unless Teledyne Isco agrees in writing to a different date. Excluded from this warranty are normal wear; expendable items such as pH sensors, charts, ribbon, lamps, tubing, and glassware; fittings and wetted parts of valves; and damage due to corrosion, misuse, accident, or lack of proper maintenance. This warranty does not cover products not sold under the Teledyne Isco trademark or for which any other warranty is specifically stated. No item may be returned for warranty service without a return authorization number issued by Teledyne Isco. This warranty is expressly in lieu of all other warranties and obligations and Teledyne Isco specifically disclaims any warranty of merchantability or fitness for a particular purpose. The warrantor is Teledyne Isco, 4700 Superior, Lincoln, NE 68504, U.S.A. * This warranty applies to the USA and countries where Teledyne Isco does not have an authorized dealer. Customers in countries outside the USA, where Teledyne Isco has an authorized dealer, should contact their Teledyne Isco dealer for warranty service. Before returning any instrument for repair, please call, fax, or e-mail the Teledyne Isco Service Department for instructions. Many problems can often be diagnosed and corrected over the phone, or by e-mail, without returning the instrument to the factory. Instruments needing factory repair should be packed carefully, and shipped to the attention of the service department. Small, non-fragile items can be sent by insured parcel post. PLEASE BE SURE TO ENCLOSE A NOTE EXPLAINING THE PROBLEM. Shipping Address: Mailing Address: Phone: Fax: Email: Teledyne Isco - Attention Repair Service 4700 Superior Street Lincoln, NE 68504 USA Teledyne Isco PO Box 82531 Lincoln, NE 68501 USA Repair service: (800) 775-2965 (lab instruments) (866) 298-6174 (samplers & flow meters) Sales & General Information: (800) 228-4373 (USA & Canada) (402) 465-3001 [email protected] October 11, 2013 P/N 60-1002-040 Rev H