1
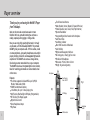
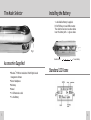
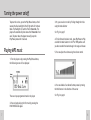
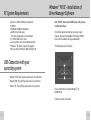
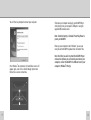
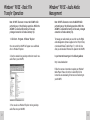
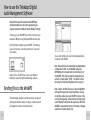
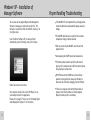
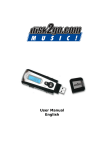
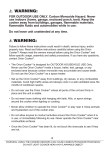
Mobile Pro
Mini MP3 Player
Instruction Manual
Manufactured in more than one country
for a complete guide to mobile connectivity
visit us at
www.teleadapt.com
TeleAdapt Ltd
The Technology Park Colindeep Lane London NW9 6TA UK Tel: +44 (0)20 8233 3000 Fax: +44 (0)20 8233 3132
Email: [email protected]
Offices in the UK, USA & Hong Kong
©2003 The TeleAdapt Group, all rights reserved, TeleAdapt™ and the TeleAdapt Group logo are
trademarks of TeleAdapt Ltd. Patents Pending
All Trademarks Acknowledged
Contents
Player overview
The Mode Selector
Accessories Supplied
Installing the Battery
Standard LCD Icons
Turning the power on/off
Playing MP3 music
Using the Main Options Menu when in Play Mode
Voice Recording Mode
Equalizer Mode
Repeat Mode
The Backlight
Deleting Files
Memory Display
USB Connection to your laptop or PC
PC System Requirements
USB Connection with your operating system
Windows® ’98 SE - Installation of Driver/Manager Software
Windows® ’98 SE - Basic File Transfer Operation
Windows® ’98 SE - Audio Media Management
1
3
5
5
6
6
7
7
9
9
12
13
14
15
16
16
17
17
18
21
22
How to use the Digital Audio Management Software
Sending files to the MiniMP3
Uploading files from your MiniMP3
Deleting files using the Manager software
Formatting the MiniMP3 Player memory
To refresh USB connection
Internal Memory Display
Pre-listening to audio tracks before downloading
Windows® 2000 USB connection & Music Management
Windows® 2000 - Basic File Transfer Operation
Windows® 2000 - Audio Media Management
Windows® 2000 - Installation of Manager Software
Windows® XP USB connection & Music Management
Windows® XP - Basic File Transfer Operation
Windows® XP - Installation of Manager Software
Proper Handling
Troubleshooting
Worldwide Limited Hardware Warranty
Credits
23
23
25
25
26
27
27
27
28
29
30
31
32
34
35
36
36
37
38
2
Player overview
• Track Forward and Reverse
• Mode (Random, Normal, Repeat All, Repeat & Preview)
• 5 Mode Equalizer (Jazz, Classic, Rock, Pop & Normal)
• Dynamic Bass Booster
• Integrated Digital Voice Recorder with Microphone
• Auto Power Down
• Low Battery Indicator
• Direct USB Connection & Download
• Lock/Hold Key
• Digital Audio Management Software
• No moving parts, virtually jog free music
• Provided with Headphones
• Dimensions : 95mm x 30mm x 23mm
• Weight: 34g excluding battery
Thank you for purchasing the MiniMP3 Player
from TeleAdapt.
Music on the move has never been easier or more
flexible! Until now, portable listening has not been a
reality, especially when jogging or riding a bike.
Now you can enjoy high quality digital music in virtually
any situation, with the Teleadapt MiniMP3. The portable
MiniMP3 gives you compact audio – With no cables, cradle
or extra peripherals, just quality headphones and a stylish
player providing a futuristic and manageable Digital Audio
experience! The MiniMP3 also acts as a storage device,
like having an extra removable drive on your computer.
The MiniMP3 also has an integrated digital voice recorder,
ideal for recording quick memos or contact details when
on the move.
Features:
supported includes MPEG Layer 3 (MP3) &
• File formats
Windows® Media Audio (WMA)
• 128MB fixed Multimedia Memory
• 1 AAA Battery for up to 12 hours playing time
• Multi Function Blue Backlight LCD Display (Programmable)
• ID3 TAG Song Title Display support
• Digital Volume Control
• Stereo Headphones Output
• Play/Pause
Microphone
Play/Pause &
Power On/Off
Fig 2
Volume +/–
Fig 1
LCD Display
Hold Button
Headphone
Socket
USB Connector
3
4
Installing the Battery
The Mode Selector
1 x AAA Alkaline Battery is supplied.
Pull off USB cap to reveal USB connector.
Then slide the back cover as shown below.
Insert the battery with +/- signs as shown.
Fig 3
Slide Back Cover
To Insert Battery
Accessories Supplied
• Windows® ’98 Driver Installation CD with Digital Audio
Standard LCD Icons
Management software
• Stereo Headphones
• Neckstrap
• Manual
• 1 x USB extension cable
• 1 x AAA Battery
5
6
Turning the power on/off
To power the unit on, press the Play/Pause button, after 2
seconds the blue backlight LCD will light with LCD in Music
Mode. The Backlight will switch off after 8 seconds. The
player will automatically shut down after 30 seconds if not
used. To power down the player manually, keep the
Play/Pause pressed for 3 seconds.
Playing MP3 music
3. Or, you can select a track by flicking through the titles
using the Mode Selector
See Fig 3 on page 5
4. To fast forward/rewind a track, press Play/Pause to Play
and hold the Mode Selector in the FF or REW position until
you have reached the desired stage in the song and release
5. You can adjust the volume using the volume control
1. Turn the player on by pressing the Play/Pause button,
the following screen will be displayed
6. You can disable all accidental button presses by moving
the Hold button in the direction of the arrow
There are 4 pre-programmed tracks in the player
See Fig 2 on page 4
2. You can begin playing the first track by pressing the
PLAY/PAUSE button again
7
8
Using the Main Options Menu
when in Play Mode
1. While the player is switched on you can access the Main
Options Menu by pushing the Mode Selector in - See Fig 3
on page 4
2. If you have no recorded files then the following will be
displayed
2. You can now move along the menu by moving the
Selector to the right, the following options are available;
REC
Enter the Voice Recording Mode
EQ
Equaliser Mode
Repeat
Repeat Mode
Backlight
Backlight Mode
Del File
Delete Audio File Mode
Memory Info
Memory Information Mode
Return
Return to the Main Menu
Voice Recording Mode
3. To begin your first Voice Recording, press the Mode
Selector again, select the Record Mode and push the Mode
Selector once more
The player will begin to record. You can then position the
microphone accordingly – See Fig 1 on page 4
1. Select the REC Mode as above and push the Mode
Selector in when REC is highlighted
9
10
Equalizer Mode
4. To stop the recording, press the PLAY/PAUSE button.
To create another voice recording repeat steps 3 and 4.
1. When in Play Mode press the Mode Selector and scroll
down one to EQ and press the Mode Selector again
Repeat steps 3 & 4, you will now have two Voice Recordings
Note: While recording, only PLAY/STOP button is
operational
2. You can then scroll through the Equalizer settings and
select from Jazz, Classic, Rock, Pop & Normal by pressing the
Mode Selector again. You will then be returned to Play Mode
5. You can play these recordings by using the Mode Selector
to highlight the item and pressing the PLAY/PAUSE button
6. To delete any voice recordings, press the Mode Selector
and scroll down to Del REC File
7. To exit the Voice Recorder scroll the Mode Selector to
Music Mode and press, you will then return to the main
player mode
11
12
Repeat Mode
1. When in Play Mode press the Mode Selector and scroll
down one to Repeat and press the Mode Selector again.
You can then scroll through the following options
The Backlight
The Backlight has various settings from Off, On for 5
seconds through to 20 seconds, this determines how long
the backlight stays on after the player is turned on.
Push the Mode toggle once and scroll down the Main Menu
to Backlight, push the Mode toggle again to enter the
Backlight Menu. Scroll through the options and push the
Mode toggle in again once you have chosen your setting.
The player will then automatically return to the Music Mode.
Random – Plays all the songs in a Random order then stops
Normal – Plays all the songs in order then stops
Repeat all – Plays all songs in order, then repeats
Repeat one – Repeats the current track
Preview – Previews the first 10 seconds of each track
Return – Returns to Play Mode
13
14
Deleting Files
1. When in Play Mode press the Mode Selector and scroll
down one to Del File and press the Mode Selector again to
enter the Delete File Menu
Note: If a song is playing it will be stopped when the
Delete File option is selected
2. Scroll through the songs until you reach the song you
wish to delete and press the Mode Selector
Memory Display
1. When in Play Mode press the Mode Selector and scroll down
five times to Memory Info and press the Mode Selector again.
This screen shows you the total amount of memory
available in the MiniMP3.
USB Connection to your laptop or PC
The MiniMP3 Player connects directly to your USB port on
your computer, or you can use the supplied USB extension
cable to do this
Press the mode Selector again to delete the song or any
other key to return to the song list. Press the Play/Pause
button to return to the Main Menu
15
Note: Please note the System Requirements BEFORE
connecting the MiniMP3. DO NOT connect more than one
MiniMP3 to your computer at any one time.
16
PC System Requirements
•
•
•
•
•
•
•
•
Pentium II 233Mhz (266Mhz recommended)
USB Port
64MB RAM (128MB recommended)
20MB free hard-disk space
(For music storage more is recommended)
4 x IDE CD-ROM drive or more
Sound Card & Internet Access (Recommended)
Windows® ’98 (Driver required, CD supplied)
Plug and Play for Windows® 2000 & Windows® XP
Windows® ’98 SE - Installation of
Driver/Manager Software
Note: DO NOT connect your MiniMP3 player until you have
installed the software.
Exit all other applications that may be running on your
computer and insert the Installation CD into your CD-ROM
Drive and the installation will begin automatically.
The following screen will be shown;
USB Connection with your
operating system
Windows® ’98 SE – Driver required, please read on for instructions
Windows® 2000 – Plug and Play, please read on for instructions
Windows® XP – Plug and Play, please read on for instructions
Click on Install Drive to install the Windows® ’98
MiniMP3 driver.
Follow the onscreen instructions.
17
18
You will then be prompted to restart your computer.
Shut down your computer and plug in your MiniMP3 Player
either directly into your computer’s USB port or using the
supplied USB extension cable.
Note: Check the battery is installed. Press Play/Pause to
power your MiniMP3.
Power up your computer to start Windows®, you are now
ready to use the MiniMP3 to upload music or transfer files.
Once Windows® has restarted, the Installation screen will
appear again, now click on Install Manager System and
follow the on-screen instructions.
19
Note: Each time you wish to attach the MiniMP3 Player
and use the software you will need to power down your
computer, connect the MiniMP3 via USB and restart your
computer. (Windows® 98 only)
20
Windows® ’98 SE - Basic File
Transfer Operation
Windows® ’98 SE - Audio Media
Management
Note: DO NOT disconnect or move the MiniMP3 while
performing any of the following operations. Whilst the
MiniMP3 is connected the battery will be used,
prolonged connection will reduce battery life.
Note: DO NOT disconnect or move the MiniMP3 while
performing any of the following operations. Whilst the
MiniMP3 is connected the battery will be used, prolonged
connection will reduce battery life.
1. Click Start – Programs – Windows® Explorer
To manage your audio media you can either use the Digital
Audio Management software supplied on the CD (see below)
or download Windows® Media Player 7.1, which will also
allow you to download CD content & upload to the MiniMP3.
Once connected the MiniMP3 will appear as an additional
drive in Windows® Explorer.
2. Use the standard drag and drop method to transfer nonaudio files to your MiniMP3.
In your Internet browser type in the following address:
http://www.download.com
Follow the onscreen instructions to update your Windows®
Media Player. Please refer to the included Help file for
instructions on downloading CD content and transferring to
your MiniMP3.
3. You can also use Windows® Explorer to drag and drop
audio files onto your MiniMP3.
21
22
How to use the TeleAdapt Digital
Audio Management Software
Note: Each time you wish to attach the MiniMP3 Player
and use the software you will need to power down your
computer, connect it via USB and restart. (Windows® 98 only)
Firstly, plug in your MiniMP3 Player either directly into your
computer’s USB port or using the supplied USB extension cable.
Press Play/Pause to power up your MiniMP3. The following
screen will be shown, indicating that the unit is ready for
file transfers.
You can then highlight a file and click the download button
to transfer to the MiniMP3.
Double click on the MP3 Player icon on your Windows®
Desktop to launch the Digital Audio Manager software.
Sending files to the MiniMP3
The main Manager interface is split into two halves, the top half
showing your hard drive contents, clicking on a folder on the left
will display the contents on the right hand side.
23
Note: Non-audio files will automatically be downloaded to
a folder called “edisk” on the MiniMP3. Audio files
(MP3/WMA) will be transferred to the root directory of
the MiniMP3. Voice files recorded will automatically be
stored in a folder named “VOICE”. For details on Voice
Recording see Voice Recording Mode section on page 9.
Note: Caution - DO NOT disconnect or move the MiniMP3
while performing any file transfer operations, this may
corrupt files and/or cause your MiniMP3 to freeze. In the
event of this happening, remove battery and insert again,
restart Windows® and repeat the steps above. Whilst the
MiniMP3 is connected the battery will be used, prolonged
connection will reduce battery life.
24
Uploading files from your MiniMP3
The Manager will allow you to upload non-audio files to
your computer. Highlight the file in the “edisk” directory,
locate the desired directory on your computer in the top
half of the screen and click upload. The MiniMP3 will store
up to 128MB of files.
Deleting files using the Manager
software
Formatting the MiniMP3
Player memory
The MiniMP3 Player can be formatted which returns the unit
to its original setup. This operation can also resolve Audio
file corruption, which can occur if the MiniMP3 is
disconnected while performing an operation.
Click on the Format button in the Manager interface window.
Click on start to begin the formatting.
Once complete, click close.
To delete a file using the Manager software, highlight the file on
the MiniMP3 and click the Delete button.
Note: You cannot delete files from your hard drive using the
Manager software.
Note: caution - do not disconnect or move the MiniMP3
while performing a format operation.
25
26
To refresh USB connection
If the Manager software does not respond to commands,
click the Connect button to refresh the USB connection and
try the operation again.
Internal Memory Display
On the bottom left of the Manager user interface, the memory
utilised by files on the MiniMP3 is shown.
Windows® 2000 USB connection &
Music Management
Note: Please press Play/Pause to power up unit before
connecting to USB port.
Exit all other applications that may be running on your
computer and plug your MiniMP3 Player either directly into
your computer’s USB port or using the supplied USB extension
cable.
After a few seconds the driver will be automatically installed
and your MiniMP3 is ready to use.
Pre-listening to audio tracks before
downloading
Highlight the desired audio file and click on the Play icon button
on the top left of the Manager user interface. The volume bar
can be used to adjust the volume.
27
28
Windows® 2000 - Basic File
Transfer Operation
Windows® 2000 Audio Media
Management
Note: DO NOT disconnect or move the MiniMP3 while
performing any of the following operations. Whilst the
MiniMP3 is connected the battery will be used,
prolonged connection will reduce battery life.
Note: DO NOT disconnect or move the MiniMP3 while
performing any of the following operations. Whilst the
MiniMP3 is connected the battery will be used, prolonged
connection will reduce battery life.
1. Double click My Computer on your Windows® desktop
To manage your audio media you can either use the Digital
Audio Management software supplied on the CD (see below)
or download Windows® Media Player 7.1, which will also
allow you to download CD content & upload to the MiniMP3.
Once connected the MiniMP3 will appear as an additional
removable drive in My Computer.
In your Internet browser type in the following address:
http://www.download.com
You can then copy audio and other files directly onto the
MiniMP3.
Follow the onscreen instructions to update your Windows®
Media Player. Please refer to the included Help file for
instructions on downloading CD content and transferring to
your MiniMP3.
You can also use the supplied Digital Audio Management
software to manage your audio and transfer files. This
software is required to format the MiniMP3, returning it to its
original setup.
29
30
Windows® 2000 - Installation of
Manager Software
You can also use the supplied Digital Audio Management
software to manage your audio and transfer files. This
software is required to format the MiniMP3, returning it to
its original setup.
Insert the Driver/Software CD, the setup will start
automatically and the following screen will be shown;
Windows® XP USB connection &
Music Management
Note: Please press Play/Pause to power up unit before
connecting to USB port.
Exit all other applications that may be running on your
computer and plug your MiniMP3 Player either directly into
your computer’s USB port or using the supplied USB
extension cable.
After a few seconds the following screen will appear
displaying the Media Player/Management software you have
installed, select the software you wish to use with your
MiniMP3 player. The default Player/Manager is Windows®
Media Player and its basic functions are described below.
Follow the onscreen instructions.
Once complete, double click on the MP3 Player icon on
your desktop to launch the application.
Please refer to page 23 “How to use the TeleAdapt Digital
Audio Management Software” for instructions.
31
32
Windows® XP - Basic File Transfer
Operation
The Main Interface screen allows you to Play CDs/Media,
organise any Media you already have in the Media Library,
Copy CDs to Media Libraries and Copy Audio Media onto
your MiniMP3 player. For further Windows® Media Player
functionality please consult your Windows® Media Player
documentation/Help Files.
Note: DO NOT disconnect or move the MiniMP3 while
performing any of the following operations. Whilst the
MiniMP3 is connected the battery will be used, prolonged
connection will reduce battery life.
2. Click Start – My Computer
Once connected the MiniMP3 will appear as an additional
removable drive in My Computer.
You can then copy audio and other files directly onto the
MiniMP3.
33
34
Windows® XP – Installation of
Manager Software
You can also use the supplied Digital Audio Management
software to manage your audio and transfer files. This
software is required to format the MiniMP3, returning it to
its original setup.
Insert the Driver/Software CD, the setup will start
automatically and the following screen will be shown;
Proper Handling Troubleshooting
• If the MiniMP3 will not be operated for a prolonged period,
remove the batteries to avoid possible damage caused by
leakage
• The MiniMP3 should be kept in areas free from extreme
temperature changes, moisture and dust
• Take care not to drop the MiniMP3, avoid contact with
magnetic fields
• Avoid exposing the MiniMP3 to extreme temperatures
• The battery status indicator may flicker while music is
playing, this is normal and due to different levels of power
being required at certain times.
• DO NOT disconnect the MiniMP3 at any time while an
operation is being performed, always use Windows to
disconnect the unit before unplugging from the USB port
Follow the onscreen instructions.
Once complete, double click on the MP3 Player icon on
your desktop to launch the application.
Please refer to page 23 “How to use the TeleAdapt Digital
Audio Management Software” for instructions.
35
• If there is no response when the Play/Pause button is
pressed, check that the battery is installed properly.
Replace the battery with a new battery.
36
Worldwide Limited
Hardware Warranty
TeleAdapt Ltd warrants to the original owner that the hardware product delivered in this
package will be free from defects in material and workmanship for ninety days (90 days)
from the date of purchase only if you register by returning the registration card as
indicated thereon with proof of purchase; or (ii) the registration date if by electronic
means provided such registration occurs within 30 days from purchase. This warranty does
not cover the product if it is damaged in the process of being installed.
TeleAdapt reserves the right to fill your order with a product containing new or
remanufactured components. The above warranty is in lieu of any other warranty,
whether express, Implied or statutory, including, but not limited to, any warranty of
satisfactory quality, fitness for a particular purpose, or any warranty arising out of any
proposal, specification or sample.
This warranty does not cover replacement of products damaged by abuse, accident,
misuse, neglect, alteration, repair, disaster, improper installation or improper testing. If
the product is found to be otherwise defective, TeleAdapt, at its option, will replace or
repair the product at no charge except as set forth below, provided that you deliver the
product along with a return material authorisation (RMA) number either to the company
from whom you purchased it or to TeleAdapt. If you ship the product, you must assume
the risk of damage or loss in transit. You must use the original container (or the
equivalent) and pay the shipping charge. TeleAdapt may replace or repair the product
with either new or remanufactured product or parts, and the returned product becomes
TeleAdapt's property. TeleAdapt warrants the repaired or replaced product to be free
from defects in material and workmanship for a period of ninety (90) days from the
return shipping date.
This warranty gives you specific legal rights and you may have other rights which vary
from country to country. All parts or components contained in this product are covered by
TeleAdapt's limited warranty for this product; the product may contain fully tested,
recycled parts, warranted as if new.
Returning a Defective Product (RMA)
Before returning any product, contact the TeleAdapt Technical Support Team on the
following number; United Kingdom (+44) (0)208 233 3000
NB: No return will be accepted without proof of purchase (Photocopy of
receipt or credit card receipt)
Limitation of liability and remedies TeleAdapt shall have no liability for any
indirect or speculative damages (including, without limiting the foregoing,
consequential, incidental and special damages) arising from the use of or inability
to use this product, whether arising out of contract, negligence, tort, or under
any warranty, irrespective of whether TeleAdapt has advance notice of the
possibility of any such damages, including, but not limited to loss of use, business
interruptions, and loss of profits, notwithstanding the foregoing, TeleAdapt’s total
liability for all claims under this agreement shall not exceed the price paid for
the product. These limitations on potential liabilities were an essential element
in setting the product price. TeleAdapt neither assumes nor authorises anyone to
assume for it any other liabilities.
Some countries do not allow the exclusion or limitation of incidental or
consequential damages, so the above limitations or exclusions may not apply to you.
This Agreement shall be governed by the laws of England and the courts of
England shall have exclusive jurisdiction of any dispute arising hereunder.
Credits
MiniMP3 sample music kindly provided by DJ Tequila from the Shots EP 2003.
1. Djemism - Tequila, Matt & Adam
2. Marimbaba – Tequila & Becky Boo
3. Spoon Dawg – Tequila
4. Solar Breeze – Rude Mercs, Tequila Remix
email: [email protected]
User Manual written by Mark Zvorc, Teleadapt Group Product Manager
Comments and suggestions welcomed;
email: [email protected]
If the Technical Support Team verifies that the product is defective, you will be issued with
an RMA number to place on the outer package of the product. Teleadapt cannot accept
any product without an RMA number on the package.
37
38