1
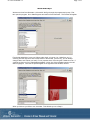
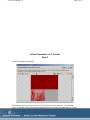
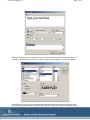
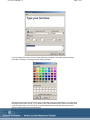
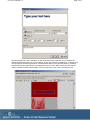
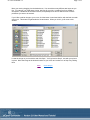
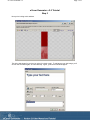
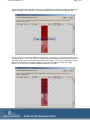
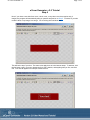
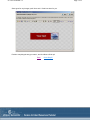
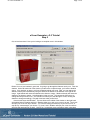
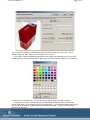
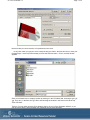
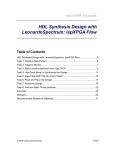
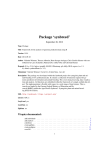
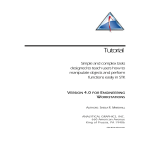
New Page 2
Page 1 of 1
Version 2.0 User Manual and Tutorial
By www.WindowsSoftware.US
Please NOTE IMPORTANT: If Template Images donot apear or all Template
names in list ! you need to (click edit template) above the list and set the folder
path to each image you are going to use inthe template folder ,the template
folder is in the ecover software directory,that was installed,you can also make
your own templates in that template folder ,just follow the layout.
file:///C:/Users/Geno/AppData/Local/Temp/TMP3C43/manualtop.htm
4/17/2015
eCover Generator v 2
Page 1 of 1
Intro and Step 1
Welcome to the eCover Generator v 2.0 tutorial! We'll go through the program step by step. First,
let's open the program. Go to Start/Programs and select eCover Generator. This window will appear:
First, decide what kind of cover you'd like to make--book, cd, report, 2 or 3 sided box, etc., by
choosing from the drop-down menu at the bottom of the window. (Don't worry, you can always
change it later, and I'll show you how!) For our purposes here, I'll be using the 3 sided box cover. If
you'd like to use one of our customizable templates, click on one of the template names on the left
side to highlight it. You'll see the preview appear in the right side of the window, like this:
When you find one you'd like to use, click Next. This will take you on to Step 2.
On to Step 2!
file:///C:/Users/Geno/AppData/Local/Temp/TMP3C43/tutor1.html
4/17/2015
eCover Generator v 2
Page 1 of 5
eCover Generator v 2.0 Tutorial
Step 2
You're now looking at this window:
This shows you the front of your book or box cover. Now it's time to customize. Let's start with
words. To add text, click the Aa symbol located above the cover image, and toward the left. There's
a little picture of mountains to its left, and the outline of an eraser to its right. This is the text button.
When you click on it, you'll see this:
file:///C:/Users/Geno/AppData/Local/Temp/TMP3C43/tutor2.html
4/17/2015
eCover Generator v 2
Page 2 of 5
When you enter your text in the field at the bottom of the window, you'll see it previewed at the top. If
you'd like to change the font, click the Font button at the left of the window. You'll see this window:
Select the font, font style and size using the three fields at the top, then select the effects you'd like, if
any, including any color change, in the lower left hand field. When you've got your selections made,
click OK. This will take you back to the New Text Layer window:
file:///C:/Users/Geno/AppData/Local/Temp/TMP3C43/tutor2.html
4/17/2015
eCover Generator v 2
Page 3 of 5
You may change the color of your text more specifically using the Color button (which is directly
under the Font button). This brings up the following window:
Select the desired color and click OK to return to the New Text Layer window again. You may select
the shadow option here as well. If you check the box marked Shadow at the left of the window (right
under Font and Color), you'll see the X, Y and Intensity fields become active, and you'll see the
resulting shadow appear in the topmost field:
file:///C:/Users/Geno/AppData/Local/Temp/TMP3C43/tutor2.html
4/17/2015
eCover Generator v 2
Page 4 of 5
Play around with the X and Y numbers, as well as the intensity and see how you can position the
shadow and lighten/darken it to your own tastes. Do the same with the Transparency. Perhaps you'd
like an image to show through the text? See what works best for your particular project. Checking
the Bevel box (to the right) will give a 3-D appearance to your text. When you've got it the way you
want it, click OK to return to the program. You'll see the front of your cover, now with your text:
file:///C:/Users/Geno/AppData/Local/Temp/TMP3C43/tutor2.html
4/17/2015
eCover Generator v 2
Page 5 of 5
Move your text by dragging it to the desired area. You can add as many different text layers as you
like. For example, you might have a large, bold font for your title, a medium font for a subtitle or
description, a small font for the author's name, and perhaps some font of different color for those
particulars you want to be noticed!
If you'd like to add an image to your cover, click the button I mentioned before, with the little mountain
scene on it. This button is right beside the Aa text button. When you click it, you'll come to this
window:
Locate the image on your hard drive and click Open. You'll go back to Step 2, now with your picture
in place. Move the image to the desired location on your cover and continue on to Step 3 by clicking
Next.
Back
On to Step 3!
file:///C:/Users/Geno/AppData/Local/Temp/TMP3C43/tutor2.html
4/17/2015
eCover Generator v 2
Page 1 of 3
eCover Generator v 2.0 Tutorial
Step 3
Now you're looking at this window:
This is the side image for your box (or spine for a book cover). To add text to your side image, you'll
click on the Aa button again, as in the last step. Again, you'll see this window appear:
file:///C:/Users/Geno/AppData/Local/Temp/TMP3C43/tutor3.html
4/17/2015
eCover Generator v 2
Page 2 of 3
Type in the desired text, changing the font, color, transparency, etc. as before, adding and adjusting a
shadow if you like. Then click OK. You'll see your text in the field with the side image like this:
Now you need to turn the text to read from top to bottom on the image. You do this by clicking one of
the rotation buttons. If you look at the row of buttons above the checkerboard field, just to the right of
your spine image, you'll see two buttons with pictures of triangles. To turn your text 90 degrees to the
right, choose the button on the right. 90 degrees to the left, click the left of these two triangle
buttons. I'll use the right, or clockwise rotation--the button on the right:
Position your text where you want it and you're all set. If you'd like to add an image, follow the same
file:///C:/Users/Geno/AppData/Local/Temp/TMP3C43/tutor3.html
4/17/2015
eCover Generator v 2
Page 3 of 3
pattern used in the last step. Click the picture button just to the left of the Aa button, locate your
image and click OK. Then position your image where you want it on the side of your box. When your
side image is the way you want it, click Next to move on to Step 4.
Back
On to Step 4!
file:///C:/Users/Geno/AppData/Local/Temp/TMP3C43/tutor3.html
4/17/2015
eCover Generator v 2
Page 1 of 2
eCover Generator v 2.0 Tutorial
Step 4
Now, if you chose a two sided box cover, a book cover, or any other cover that requires only 2
images, the program will automatically take you past this step and on to Step 5. For those of you who
need the third, or top image, here we go. You're looking at this window now:
This will be the top of your box. The same rules apply here as in the last two steps. To add text, click
the Aa button, type in your text, change the font, color, shadow, and anything else you like, and click
OK. Your text will appear in the Step 4 window like this:
file:///C:/Users/Geno/AppData/Local/Temp/TMP3C43/tutor4.html
4/17/2015
eCover Generator v 2
Page 2 of 2
Same goes for any images you'd like to add. I'll add one here for you:
Position everything the way you want it, and click Next to finish up!
Back
On to Step 5!
file:///C:/Users/Geno/AppData/Local/Temp/TMP3C43/tutor4.html
4/17/2015
eCover Generator v 2
Page 1 of 4
eCover Generator v 2.0 Tutorial
Step 5
Ok, we're almost done! Now you're looking at a compiled cover in this window:
Believe it or not, here's where it gets neat! I'm going to go through the features one by one. First, the
shadow. At the left hand side of the window, just above the compiled image, you'll see the shadow
option. If it's checked, as above, you'll see a shadow behind your book. Now, you can change the
attitude, intensity and orientation by using the slides at the bottom of the window, to the right of the
image. Light Attitude will cause the shadow to be shorter or longer. Shadow Intensity will cause the
shadow to be lighter or darker. Light Orientation is the cool one. This causes the light source to
change around your book cover. You choose from where you want the light to come, causing the
shadow to change accordingly. Play with it and see what you like best.
Now let's talk about Axis Rotation. The two slides at the middle of the window on the right hand
side labeled Axis X Rotation and Axis Y Rotation allow you to spin your cover on an axis. The X axis
will spin your cover from top to bottom. You could be looking full at the top of your book or box, or
stop at any "camera angle" you choose. Try it out! Axis Y Rotation will spin your cover from side to
side (like the earth spins on its axis). Just for fun, I turned this cover to a strange angle, using both
the X and Y rotations, to illustrate my point. Note the changes in Light Orientation and Light Attitude
(really long shadow) I threw in there as well:
file:///C:/Users/Geno/AppData/Local/Temp/TMP3C43/tutor5.html
4/17/2015
eCover Generator v 2
Page 2 of 4
You try a bunch of different combinations and see what works best for your own cover. These
different angles can really make your cover stand out in a crowd!
If you'd like to choose a different background color (the white area around your box cover), click
the Background Color button at the right of the window, just above Shadow Intensity. You'll see this:
Choose your color and click OK. You'll see the change appear back at the Step 5 window.
Let's go back to the top of the window now, and just beside the Shadow option, you'll see the
eCover Type option. In my example you see Three Sided Box. If you click the dropdown menu, you'll
see a list of all the different covers that eCover Generator can make. Try them out! My personal
favorite is the CD cover:
file:///C:/Users/Geno/AppData/Local/Temp/TMP3C43/tutor5.html
4/17/2015
eCover Generator v 2
Page 3 of 4
Note here that you control how the cd is positioned in the cover!
In any case, when you get your cover exactly the way you want it, the time has come to save your
finished image. At the top of the window you'll see the Save As button. Click it, and this window
appears:
Save your finished cover to a handy location by naming it in the File Name field, choosing a type (.gif,
.jpg, .bmp, etc.) in the Save As Type field, and choosing the location in the Save In field at the top.
Then click Save.
That's it! You can either click the Close button at the top of your eCover Generator window, or you
can go back to Step 1 and try another one! Whatever you do, have fun with it.
file:///C:/Users/Geno/AppData/Local/Temp/TMP3C43/tutor5.html
4/17/2015
eCover Generator v 2
Page 4 of 4
Enjoy, and Best of Success,
wwwwwwwwwwwwwwwwwwwwwwwxddddddddaaaaaaaaxxxxxxxxxxxxxxxxxxx
Armand
Morin
3333333333333333333dddddddddwwwwwww
xxxxxxxxxxxxxxxxxx
xxxxxxxxx
xxxxxxxxxxxxxxxxxxxxxxxxx
WWW.WindowsSoftware.US Back Home
file:///C:/Users/Geno/AppData/Local/Temp/TMP3C43/tutor5.html
4/17/2015