1
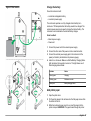
4. Fold up the slack in the paper roll and push it into the paper holder.
5. Lift the free end of the paper and close the printer door.
6. Remove the excess paper.
Note: In the case of paper misalignment, lift the lever on the left side of the
printer to raise the printer carriage. Pull the paper straight and align it. Lower
the carriage before the printer is operated.
Remove the flow sensor blockages
4. Operate the instrument with clean sample fluid. To purge any
trapped air in the clean-out line:
a. Put an absorbent cloth over the wrench and slightly loosen the
clean-out cap while the sample run is in progress. Fluid and air
come out quickly when the cap is loosened.
b. Continue the process until no more air comes from the port.
5. Tighten the clean-out port cap snugly. To avoid damage to the
threads, do not over tighten the cap.
CAUTION
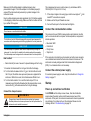
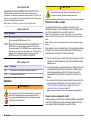
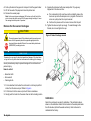
Figure 6 Sensor blockage removal
Chemical exposure hazard. Obey laboratory safety procedures and
wear all of the personal protective equipment appropriate to the
chemicals that are handled. Refer to the current safety data sheets
(MSDS/SDS) for safety protocols.
NOTICE
Excessive force can result in brush and possible cell damage. If the brush does
not go into the cell, pull the brush out and examine the cleaning tip for damage.
Use all precautionary steps to prevent damage to the instrument and
personal injury.
Items to collect:
• Absorbent cloth
• Allen wrench
• Cleaning brush
1. Put an absorbent cloth under the instrument to catch any liquid that
drains from the clean-out port. Refer to Figure 6.
2. Put the brush into the clean-out port until there is resistance.
3. Gently push the brush into the sensor flow cell with a twisting motion.
Calibration
Return the instrument annually for calibration. The calibration date is
shown on the calibration sticker that is located on the serial plate inside
the left side door (behind the waste container). Each instrument is
calibrated at the factory.
18 English