1
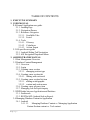
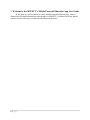
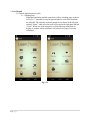
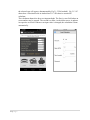
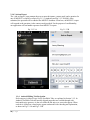
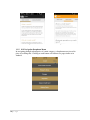
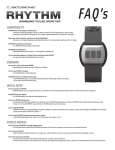
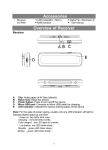
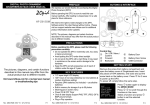
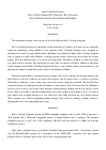
MSUFCU Mobile Financial Education Application User Manual Representatives Sarah Bohan Rachel Ulch Ben Maxim Joe Kaczanowcke Michigan State University Capstone Students Jenny Manning Kyle Ladd Drew Dakin 1|P age TABLE OF CONTENTS 1. EXECUTIVE SUMMARY 2. USER MANUAL 2.1. General Application user guide 2.1.1. Landing Page 2.1.2. Navigation Drawer 2.1.3. Reference Categories 2.1.3.1. Scrollable Tabs 2.1.3.2. Listed 2.1.4. Tools 2.1.4.1. Glossary 2.1.4.2. Calculators 2.1.4.3. Ask an Expert 2.2. OS specific user guide 2.2.1. Android Sliding Tab Navigation 2.2.2. iOS Navigation Dropdown Menu 3. ADMINISTRATOR MANUAL 3.1. Data Management Overview 3.2. Database Content Management 3.2.1. Overview 3.2.2. Login 3.2.3. Creating a new section 3.2.3.1. managing section type 3.2.4. Creating a new section tab 3.2.4.1. linking with section id 3.2.5. Creating a new section list item 3.2.5.1. adding an infographic 3.2.5.2. content and section more 3.2.6. Creating a new glossary item 3.2.7. Managing Ask an Expert inquiry 3.3. PHP Bridge between Application and Database 3.3.1. Framework 3.3.2. RESTful API (Android Ask an Expert) 3.4. Managing Database Content in Application 3.4.1. Android 3.4.1.1.1. Managing Database Content vs. Managing Application Content Section content vs. Tool content 2|P age 1. Welcome to the MSUFCU’s Mobile Financial Education App User Guide In this guide you will learn how to use the Mobile Financial Education App, a native Android and iOS application that provides members of MSUFCU’s Oakland University branch with the resources necessary to make informed financial decisions. 3|P age 2. User Manual 2.1 General Application user guide 2.1.1 Landing Page When the application initially opens there will be a landing page as shown in Fig 2.1.1. Intended for easy navigation links for each of the functions are included. The reference material categories are shown in the left pane entitled “Learn”, while all of the tools are located in the right pane labeled “Tools”. When one of the categories is clicked the page transitions to display its content, while calculators will redirect to a page of relevant calculators. Fig 2.1.1 1.1.1. Navigation Drawer Fig 2.1.1 4|P age The navigation menu slides from the left on any page of the application with a list of the categories and tools available: Shown in Fig 3.1.4A (Android) and Fig 3.1.4B (iOS). With a single gesture, the user can open the glossary to learn the definition of the word, and return to the reading once again. 5|P age 1.1.2. Reference Categories All the reference information in the application is broken into a hierarchy of categories; the top level will be referred to as categories throughout the document. The categories of the application are: Credit, Credit Cards, Budget, Loans, Student Loans, Travel, Fraud, and International Students. Each category contains various subsections of information. Depending on the volume and content of the category, the navigation tool will either be scrollable tabs or a list. 1.1.2.1. Scrollable Tabs Related questions are grouped together on the same tab. In order to keep the information on this page readable, information is kept short and direct. If more information is available, a “more information” button on the subcategory will allow the user to view the information at greater length and detail. This detailed view will occupy its own page. In the Android application, this is represented with tabs which can be seen in Fig 3.1.2.1. In the iOS application, scrollable tabs will instead be contained within a dropdown menu (more on this in 3.3). 6|P age Fig 3.1.2.1 1.1.2.2. List When a category contains only a small volume of information, scrolling tabs or dropdown menus become more cumbersome than convenient. For categories such as “Travel Tips” (Fig. 3.1.2.2), only a list of points is necessary to convey the information effectively. Fig 3.1.2.2 1.1.3. Tools Three main tools included in the application supplement the reference material, allowing the user to gain more personalized advice about their specific queries. The Glossary 7|P age offers direct definition to terms used within the reference materials. Three different sets of financial calculators enable the user to determine numerically the effects of any financial decisions they may be considering. Ask an Expert, the third type of tool, provides users with a form for contacting an expert at MSUFCU directly for any specific questions not covered by the other areas of the application. 1.1.3.1. Glossary Relevant financial terminology is listed in alphabetical order within the glossary. The scrollbar can be used to quickly and effortlessly reach any given letter. Upon selection, the definition appears. Fig 3.1.3.1A shows an example of the Android screen, while Fig 3.1.3.1B shows the iOS. Fig 3.1.3.1A Fig 3.1.3.1B 1.1.3.2. Calculators There are three different types of calculators: Loan, Credit Card, and Savings. The main page for calculators shows each grouped according to type, as shown in Fig 3.1.3.2A. If accessed from the Landing Page shortcut, a page of calculators only of 8|P age the selected type will appear, demonstrated by Fig 3.1.3.2B (Android). Fig 3.1.3.2C shows how a calculator looks in Android and 3.1.3.2D shows a current iOS calculator. The calculators themselves have two input methods. The first is a text field where an exact number may be entered. The second is a slider. As the slider moves, it updates its respective text field. Whenever an input value is changed, the calculation is done automatically. 9|P age 2.1.4.3 Ask an Expert The “Ask an Expert” page prompts the user to enter their name, contact email, and a question for one of MSUFCU’s experts as seen in Fig 3.1.3.3 (Android) and Fig 3.1.3.3B (iOS). Once submitted, the question will be added to the MSUFCU database. From here, an MSUFCU expert will respond to the question via the contact email provided. For the purpose of confidentiality, our application will not handle responses from MSUFCU experts. Fig 3.1.3.3A Fig 3.1.3.3B 1.1.4. Android Sliding Tab Navigation Each category is either of type List or Scrollable Tabs, as explained in Section 3.1.2. In Android, Scrollable Tabs are laterally aligned pages that are scrolled through with horizontal swipe gestures. As the user slides the tab strip over, more tabs appear. When each tab is clicked on, related topics appear underneath with a heading and explanation, as shown in Fig 3.2.1A and Fig 3.2.1B. 10 | P a g e Fig 3.2.2A Fig 3.2.2B 1.1.5. iOS Navigation Dropdown Menu In navigating through subcategories of a main category, a dropdown menu is used in place of scrolling tabs. Clicking on each button will redirect to a page similar as in Android. 11 | P a g e ADMINISTRATOR MANUAL 1. Data Management Overview Data for the application is stored both remotely on a server and in the application itself. This manual discusses how to determine where the data is, where to add new data, and the components that allow the applications to communicate with the database. 2. Database Content Management 1. Overview The database is structured to store data for particular components of the application. The database is divided into 5 separate tables. There is a table for glossary items, questions submitted through the Ask an Expert feature, and 3 tables which describe the different levels of the “learn” category structure. This guide will discuss the components of each table and show how they do or don’t relate with one another. 2. Login The database has relatively low level security and therefore is only password protected. No encryption was necessary for this project. 3. Creating a new section In order to create a new section the admin must navigate to the table entitled “sections”. Once in the table the said user will be presented with the existing sections in the application. In order to create a new section a new heading must be given to the section. This heading will be what displays throughout the application and represents the top level of all the information below it in the hierarchy. Keep note of the section id assigned on creating a new entry. This will be needed for further section creation. One important note to consider. The application will not run if the user does not specify at least one nested tab for the newly created section. 1. Managing section type!! The second critical element is the type. This integer represents which type of section to create. As it is now the number 0 represents “sliding tab” section and 1 represents “listed sections”. 4. Creating a new section tab Important: As previously stated the admin must create at least one section tab for each newly created Section element. A section tab represents the second level of the 3 tier hierarchy in our section data management scheme. The section tab is displayed on “tabbed” sections only, however is still necessary in the case of “listed” sections. Use section tab with heading “Travel Tips” as an example for creating a section listed tab. The tab requires 2 components in order to be created: heading and section ID. The heading is what will appear on the sliding tab in the application. 1. linking with section id 12 | P a g e It is imperative that the field section_id be filled out in order to display the tab in under the correct relevant section. The “section_id” said admin will provide is found under the section table “id” column. Simply copy the section you want to display the tab under into the appropriate spot. 2. Creating a new section list item Section list items represent the third and lowest level of our 3 tier section data hierarchy. The content stored in here is the actual financial relevant information. The section list item table is comprised of 6 columns. The “id” and “heading” columns are the same as section and section tabs. The “section_tab_id” links this entry with an existing tab. The “section_tab_id” you want can be found under the “id” column in the section_tab table. 1. Creating a new infographic This column entry is represented by a data type “string”. The string references an image stored in the application(discussed later) ((((some reference here)))) with the EXACT name. Be sure that the names match exactly or the image will not display. It is not necessary to provide an info graphic for a list item. 2. Content and Section More The content field represents the summarized or shortened version of the content that will be displayed on the section screen beneath the “Tab”. The “more” column displays the full content and is visible once the content portion is clicked on in the application. The new page will also display the infographic if provided. 3. Creating a new glossary item In order to create a new glossary term said admin must navigate to the table called glossary_terms. Creating a new term is fairly simple. The “term” and “definition” columns are self-explanatory. The category column represents the terms position in the glossary. Items will appear in order listed in database under their respective alphabetical code. 4. Managing Ask an Expert Inquiry Per request of MSUFCU the questions are only submitted to the database. The content after this point is managed by existing software in place to reroute the question to an MSUFCU representatives Email. The 3 fields specific to each inquiry will be the “name”, “email”, and “question”. This information is then forwarded on. Once the question is answered the field “answered” should be marked with “1” to represent yes. If the answered field is set to “0” then the question has either not be marked, or not answered. 2. PHP Bridge between Application and Database 1. Framework 13 | P a g e The content is managed by a PHP framework existing on the server. Refer to Fig4.2. Content provided by the server database is cached by the application and updated only when MSUFCU updates information in the database. The mobile applications communicate with a RESTful web service over HTTPS. Responses are received and cached in JSON format. 1.1.6. Server Specifications GNU/Linux, Apache Web Server, MySQL, PHP 1.1.7. Mobile Platforms Supported Android: Gingerbread and above iOS: iOS7 and above Fig 4.2 7. Managing Database Content vs. Managing Application Content Data for the application is stored both remotely and locally as mentioned before. This section discusses the specifics of where that content is within the app. 1. Section Content vs. Tool Content The content provided in the sections is directly linked with the database, however Tools are dependent upon content that is stored locally in the application itself, excepting glossary terms. All text content for the remaining categories is hard coded into the applications and must be modified within the app. 14 | P a g e