1
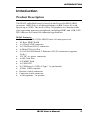
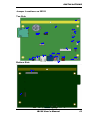
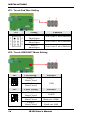
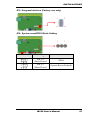
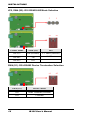
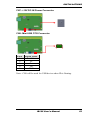
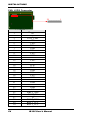
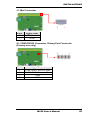
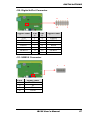
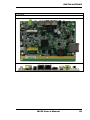
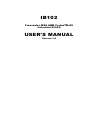
IB102 Freescale i.MX6 ARM CortexTM-A9 Embedded BOARD USER’S MANUAL Version 1.0 This page is intentionally left blank. ii IB102 User’s Manual Table of Contents Introduction ....................................................... 5 Product Description............................................................. 5 Checklist .............................................................................. 7 IB102 Specifications ........................................................... 8 Board Dimensions ............................................................... 9 Installations ..................................................... 11 Setting the Jumpers ........................................................... 12 Connectors on IB102 MRS ............................................... 19 IB102 User’s Manual iii This page is intentionally left blank. iv IB102 User’s Manual INTRODUCTION Introduction Product Description The IB102 embedded board is based on the Freescale iMX6 ARM processor .iMX6 Solo is a high-performance ARM Cortex-A9 with speeds up to 1GHz. The device offers 3D graphics acceleration while also supporting numerous peripherals, including DDR3 and USB OTG PHY that are well suited for industrial applications. IB102 Features: Freescale I.MX6 1GHz ARM Cortex-A9 microprocessor 1G Byte DDR3 RAM 1x 24 bit LVDS connector 1x COM Port (RJ-45) connector 1x Mini-PCIe(x1) Slot 1x 10/100/1000 Based-T Ethernet (RJ-45) connector (supports PoE+) 12V DC-in power connector 1x SD Card Slot 1x EMMC flash 1x USB OTG 2x USB host(1 x USB A-Type, 1 x pin header) 10 Bits GPIO (option) Resistive touch connector Capacitor touch connector 1x microphone / 1x speaker IB102 User’s Manual 5 INTRODUCTION Outlook 6 IB102 User’s Manual INTRODUCTION Checklist Your IB102 package should include the items listed below. The IB102 Embedded board This User’s Manual IB102 User’s Manual 7 INTRODUCTION IB102 Specifications Form Factor CPU System Memory Data Memory Display LAN USB Power Control PoE+ Touch Controller RTC Audio Edge I/O Headers & Expansion Slots Power Board Size Temperature Software Support 8 Specified for MRS-801 Freescale I.MX6 Cortex A9 1Ghz Solo: [PN: C0186S5EVM1010000P as ARM MB1] X32 DDR3 or 1G on board memory, (refer to ARM MB1) SD slot support up to 32GB eMMC 4GB 18/24bit LVDS header x1 4/5-wire resistive touch header x1 10/100/1000 Transformer + RJ45 Athoros 8031 Phy / RGMII interface. 4 port USB Hub 1xUSB 2.0 host @ edge 1xUSB header for Capacitive touch 1xUSB for miniPCIE, (refer to RP100) 1xUSB hear (reserved for other extension test purpose) OTG: 1xOTG@ edge, via USB miniAB type Freescale new F0AEP PMIC - PoE+: TI TPS23754 PoE+ level 25W, 802.3at type1,2 - Power Transformer: 835-01064F, (Eleceltek) - Shielded Power Inductors: LPS4414 4/5-wire design support: PM6000 IC by UART interface. Refer to IB112 1.0 Wolfson audio code 10/100/1000 LAN x1 USB x 1 (USB Host. Vertical A-Type) USB OTG x 1 (mini AB type) COM1 RS-232/485 x 1 by RJ45 connector LEDs light bar x 1 (3xGPIO pin control Red, Blue and Green); SD slot x 1 Reset/ GPI option button ( HW option design by jumper) 2 pin dipswitch x1 for RS232/485 selection 12(+/- 5%)V DC-IN Jack x 1, C1213511IDJD03000P Headers: LVDS Connector x 1 GPIO x 10pin, pitch 2.0 with 3.3V COM2 (RS232) x 1 (pitch 2.0,COM2 also for debug port) Audio pin Header x3 (Mic x1 /Speaker x2) touch connector ( for I2C touch,by 7080K-F12N-04L) Battery: BR2032 with socket RS422 selection jumper. 5 wired resistive touch header x1 for touch FPC. (solder side) Evaluate heat sink with ME Slots: Full Mini PCIe(x1) also with USB signal 12(+/- 5%)V DC-IN or PSE IN 131mm x 160mm 0~60C 1. Android 4.3/ Android 4.0 will depend on 4.3 porting situation. 2. Linux 3.0 kernel IB102 User’s Manual INTRODUCTION Board Dimensions IB102 User’s Manual 9 INTRODUCTION This page is intentionally left blank. 10 IB102 User’s Manual INSTALLATIONS Installations This section provides information on how to use the jumpers and connectors on the IB102 in order to set up a workable system. The topics covered are: Setting the Jumpers .............................................................................. 12 Connectors on IB102 MRS .................................................................. 19 IB102 User’s Manual 11 INSTALLATIONS Setting the Jumpers Jumpers are used on IB102 to select various settings and features according to your needs and applications. Contact your supplier if you have doubts about the best configuration for your needs. The following lists the connectors on IB102 and their respective functions. Jumper Locations on IB102 ................................................................. 13 JP1: Touch Pad Wire Setting ............................................................... 14 JP2: Touch USB/UART Mode Setting ................................................ 14 JP3: Program Interface (Factory use only) ........................................... 15 JP4: System reset/GPIO Mode Setting................................................. 15 JP5, SW4 (S2): RS-232/422/485 Mode Selection ............................... 16 SW4 (S1): RS-422/485 Device Termination Selection ........................ 16 SW1 (S1, S2, S3, S4, S5, S6, S7, S8): System Boot Configuration ..... 17 J2: BL Voltage Setting ......................................................................... 17 J3: BL ADJ Level Setting .................................................................... 18 J4: LVDS Panel Power Selection ......................................................... 18 12 IB102 User’s Manual INSTALLATIONS Jumper Locations on IB102 Top Side Bottom Side IB102 User’s Manual 13 INSTALLATIONS JP1: Touch Pad Wire Setting JP1 2 6 1 5 Setting Pin 1-2 Short/Open Pin 3-4 Short/Open Pin 5-6 Short/Open Function 4 or 8 wire/5 wire (Default) 4 or 8 wire/5 wire (Default) 4 or 8 wire/5 wire (Default) JP2: Touch USB/UART Mode Setting JP2 1 3 5 USB Setting* 2 4 6 JP2 1 3 5 14 2 4 6 2 6 1 5 Function Pin 1-3 Short/Closed Pin 2-4 Short/Closed USB UART Setting Function Pin 3-5 Short/Closed Pin 2-4 Short/Closed Pin 4-6 Short/Closed UART* Baud rate 19200* Baud rate 9600 IB102 User’s Manual INSTALLATIONS JP3: Program Interface (Factory use only) 1 2 11 12 JP4: System reset/GPIO Mode Setting 3 JP4 1 Setting Function Pin 1-2 Short/Closed GPIO Pin 2-3 Short/Closed System Reset (Default) IB102 User’s Manual 15 INSTALLATIONS JP5, SW4 (S2): RS-232/422/485 Mode Selection 3 1 s1 s2 COM1 Mode SW4 (S2) JP5 RS-232 Off (Default) 2-3 Short (Default) RS-485 On 2-3 Short RS-422 Off 1-2 Short SW4 (S1): RS-422/485 Device Termination Selection s1 16 SW4 (S1) Device Mode On None Terminal (Default) Off Terminal IB102 User’s Manual s2 INSTALLATIONS SW1 (S1, S2, S3, S4, S5, S6, S7, S8): System Boot Configuration s1 SW1 s8 Boot Mode (S1, S2, S3, S4, S5, S6, S7, S8) 10100010 SD 01010110 NAND FLASH Note: 1: Switch On 0: Switch Off J2: BL Voltage Setting 3 J2 1 Setting Panel Voltage Pin 1-2 Short/Closed 5V (default) Pin 2-3 Short/Closed 12V IB102 User’s Manual 17 INSTALLATIONS J3: BL ADJ Level Setting 3 J3 1 Setting Panel Voltage Pin 1-2 Short/Closed 5V Pin 2-3 Short/Closed 3.3V (default) J4: LVDS Panel Power Selection 3 J4 18 1 Setting Panel Voltage Pin 1-2 Short/Closed 5V Pin 2-3 Short/Closed 3.3V (default) IB102 User’s Manual INSTALLATIONS Connectors on IB102 MRS CN1: SD Card Connector .................................................................... 20 CN2: Capacitor Touch Pad Connector ................................................ 20 CN3: USB 2.0 Connector .................................................................... 21 CN4: 10/100/1000Mb LAN (PoE+ supported) .................................. 21 CN5: COM1 RJ45 Connector .............................................................. 22 CN7: +12V DC-IN Power Connector .................................................. 23 CN8: Mini USB OTG Connector ........................................................ 23 CN9: LVDS Connector ........................................................................ 24 J1: Mic Connector ............................................................................... 25 J5: COM2 RS232 Connector, Debug Port Connector ......................... 25 (Factory use only) ................................................................................ 25 J7: Resistive Touch Panel Connector .................................................. 26 J8: Mini PCI-E Connector ................................................................... 26 J10: Digital In/Out Connector.............................................................. 27 J11: USB2.0 Connector ....................................................................... 27 J12: Speaker Right-Out Connector ...................................................... 28 J13: Speaker Left-Out Connector ........................................................ 28 SW3: System Reset Button .................................................................. 28 IB102 User’s Manual 19 INSTALLATIONS b b CN1: SD Card Connector CN2: Capacitor Touch Pad Connector 12 1 Pin # 1 2 3 4 5 6 7 8 9 10 11 12 20 Signal Name GND NC NC NC NC GND SDA SCL NC INT 3.3V 3.3V IB102 User’s Manual INSTALLATIONS CN3: USB 2.0 Connector CN4: 10/100/1000Mb LAN (PoE+ supported) This RJ45 LAN connector supports PoE+ function. IB102 User’s Manual 21 INSTALLATIONS CN5: COM1 RJ45 Connector 10 1 Pin # Signal Name 1 COM1 DSR, Data set ready 2 GND 3 GND 4 COM1 RXD, Receive data 5 COM1 TXD, Transmit data 6 COM1 DCD, Data carrier detect 7 COM1 DTR, Data terminal ready 8 COM1 CTS, Clear to send 9 COM1 RTS, Request to send 10 NC COM1 is jumperless for RS-232, RS-422 and RS-485 and configured with SW4 (S2) and JP5 Selection. Pin # Signal Name RS-232 R2-422 RS-485 [ 1 2 3 4 5 6 7 8 9 10 22 DSR Ground Ground RX TX DCD DTR CTS RTS NC NC Ground Ground TX+ RX+ TXRXNC NC NC NC Ground Ground DATA+ NC DATANC NC NC NC IB102 User’s Manual INSTALLATIONS CN7: +12V DC-IN Power Connector CN8: Mini USB OTG Connector 1 Pin # 1 2 3 4 5 5 Signal Name +5V DD+ ID GND Note: CN8 will be used for USB device when ID is floating. IB102 User’s Manual 23 INSTALLATIONS CN9: LVDS Connector 30 Pin # 1 2 3 4 5 6 7 8 9 10 11 12 13 14 15 16 17 18 19 20 21 22 23 24 25 26 27 28 29 30 24 Signal Name NC LCD_VDD LCD_VDD NC TX0TX0+ GND TX1TX1+ GND TX2TX2+ GND CLKCLK+ GND TX3TX3+ GND GND GND GND GND NC BKLT_ADJ BKLT_EN N BKLT_VCC BKLT_VCC BKLT_VCC IB102 User’s Manual 1 INSTALLATIONS J1: Mic Connector 2 Pin # 1 2 1 Signal Name MIC Input GND J5: COM2 RS232 Connector, Debug Port Connector (Factory use only) 4 Pin # 1 2 3 4 1 Signal Name COM2 RXD, Receive Data COM2 TXD, Transmit Data GND NC IB102 User’s Manual 25 INSTALLATIONS J7: Resistive Touch Panel Connector 5 1 Pin # 1 2 3 4 5 Signal Name Touch XP Touch XM Touch SG Touch YP Touch YM J8: Mini PCI-E Connector 26 IB102 User’s Manual INSTALLATIONS J10: Digital In/Out Connector Signal Name 3.3V GPIO1 GPIO3 GPIO7 GPIO9 GPIO10 GPIO12 Pin # 1 3 5 7 9 11 13 Pin # 2 4 6 8 10 12 14 13 1 14 2 Signal Name GPIO2 GPIO5 GPIO8 Reset Watch Dog GPIO11 GND J11: USB2.0 Connector 1 Pin # 1 2 3 4 4 Signal Name +5V DD+ GND IB102 User’s Manual 27 INSTALLATIONS J12: Speaker Right-Out Connector 2 1 Pin # 1 2 Signal Name SPEAKER_RIGHT+ SPEAKER_RIGHT- J13: Speaker Left-Out Connector 1 Pin # 1 2 Signal Name SPEAKER_LEFTSPEAKER_LEFT+ SW3: System Reset Button 28 IB102 User’s Manual 2 INSTALLATIONS OutLook IB102 User’s Manual 29