1
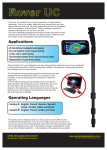
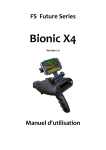
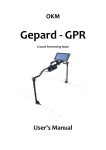
FS Future Serie
Bionic alpha
User's manual
2
Any information contained in these operating instructions may be changed without prior notice. OKM does not make
any warranty for this document. This also applies without limitation to implied assurances of merchantability and
fitness for a specific purpose. OKM does not assume any responsibility for errors in this manual or for any incidental
or consequential damage or loss associated with the delivery, exploitation or usage of this material.
This documentation is available ”as presented“ and without any kind of warranty. In no circumstances OKM takes
responsibility for lost profits, usage or data losts, interruption of business activities or all kind of other indirectly
damages, which developed because of errors in this documentation. This instruction manual and all other stored
media, which are delivered with this package should only be used for this product. Program copies are allowed only
for security- and safety purposes. The resale of these programs, in original or changed form, is absolutely forbidden.
This manual may not be copied, duplicated or translated into another language, neither in part nor completely, over
the copyright matters without the prior written consent of OKM.
Copyright ©2002 – 2009 OKM Ortungstechnik GmbH. All rights reserved.
OKM Ortungstechnik GmbH
www.okmmetaldetectors.com
3
Table of contents
1 Preface ........................................................................................................................................ 4
2 Important notes ......................................................................................................................... 5
2.1 General notes ................................................................................................................................. 5
2.2 Possible health hazards .................................................................................................................. 5
2.3 Surrounding area ........................................................................................................................... 5
2.4 Voltage ........................................................................................................................................... 5
3 Technical specification .............................................................................................................. 6
3.1 Control unit .................................................................................................................................... 6
4 Scope of delivery ........................................................................................................................ 6
5 Assembly ..................................................................................................................................... 7
6 Control elements ........................................................................................................................ 8
6.1 Front view ...................................................................................................................................... 8
6.2 Back view ....................................................................................................................................... 9
7 Operating modes ...................................................................................................................... 10
7.1 Measurement with Bionic System ................................................................................................ 10
7.2 Measurement with Ionic System .................................................................................................. 11
7.3 Measurement with Magnetic System ........................................................................................... 11
8 Charging of internal battery .................................................................................................... 13
8.1 Charger ........................................................................................................................................ 13
8.2 Charging the device ..................................................................................................................... 14
9 Danger of explosion during excavation ................................................................................... 15
10 Maintenance and services ...................................................................................................... 16
Table of figures
Figure
Figure
Figure
Figure
Figure
Figure
Figure
5.1:
5.2:
6.1:
6.2:
7.1:
8.1:
8.2:
Connection of probes................................................................................................................7
Connection of charger and headphones...................................................................................7
Front view................................................................................................................................8
Back view.................................................................................................................................9
General procedure of a measurement....................................................................................11
The charger and its elements.................................................................................................13
Connecting the charger..........................................................................................................14
OKM Ortungstechnik GmbH
www.okmmetaldetectors.com
4
Preface
1 Preface
Dear customer,
in the first instance we want to thank you that you made your decision on a product of OKM
Ortungstechnik GmbH. The present product is based on a measuring method to detect gold objects in
the destination area. The longer the object is buried in the ground the better and deeper it can be
located by the device.
With our team of specialists we guarantee that our products are under recurrent control. Our specialists
try to implement new developments in terms of further quality improvements for you. Of course by
selling our products we cannot guarantee that you really make a find during your research. The
recognition of hidden objects and structures depends on a huge number of factors - like you know.
Determining factors are the dielectric constant of the ground, the grade of mineralization and the
dimensions of an object relating to its depth. Specially in very wet soil, clay and sand with high
conductivity of the ground, recording of the measured results can be falsified strongly.
With this product you purchased a device which stood the tests in regular operation like all other
products of us. If you are interested in where our devices have gone into action please visit our
homepage.
For our company it is necessary that we protect our developments within the framework of existing
legislation to a patent or trademark registration. Therewith we offer you a higher warranty while using
our products.
Please take your time consecutively, read this user‘s manual and familiarize yourself with the utilization
and operation of this Bionic alpha.
OKM Ortungstechnik GmbH
www.okmmetaldetectors.com
Important notes
5
2 Important notes
Please read these operating instructions carefully and closely before using Bionic alpha and its
accessories!These instructions give information on how to use the device and point out potential sources
of danger.
2.1 General notes
Being an electronic device, Bionic alpha has to be treated with the caution and care necessary when
such devices are used. Any failure to observe the safety precautions given or any use for purposes other
than the ones it is conceived for may result in a damage or destruction of the processing unit and
connected components.
The device will get destroyed if it is opened improperly.
2.2 Possible health hazards
If used properly the device normally does not pose any health hazards. According to current scientific
knowledge, the high-frequency signals are not harmful to the human body on account of their low power.
2.3 Surrounding area
Having been transferred from a cold to a warmer place, the device should not be operated immediately
afterwards. Any condensation, which may have formed, might cause the device to get destroyed. Avoid
strong magnetic fields, which may occur in places such as near machines or loudspeakers, and avoid
using a detector within a radius of 50 meters.
2.4 Voltage
The power supply should not be outside the indicated range of values. Use only chargers, batteries and
rechargeable batteries which are included in the scope of delivery.
Never use the 230 Volt mains supply.
OKM Ortungstechnik GmbH
www.okmmetaldetectors.com
6
Technical specification
3 Technical specification
The following technical indications are medial values. During operation small variations are quite
possible.
3.1 Control unit
Dimensions (H x W x D)................................................................................................400 x 130 x 100 mm
Weight.......................................................................................................................................about 1,5 kg
Indication..................................................................................................................................LCD Display
Voltage.................................................................................................................................................9 Volt
Operating time (full charged battery).......................................................................................about 1 hour
Operating temperature..............................................................................................................0 °C – 40 °C
Feedback............................................................................................................................acoustical, visual
Controller............................................................................................................................Motorola 4 MHz
Table 1: Technical specification
4 Scope of delivery
In the following section you can find all standard equipment. The scope of delivery can be different in
some circumstances because of some optional accessories which should not be included in the basic
equipment.
•
1 Control unit
•
1 Probe
•
1 Charger
•
1 Headphones
•
1 Manual
•
1 Carrying case
OKM Ortungstechnik GmbH
www.okmmetaldetectors.com
Assembly
7
5 Assembly
In this section is explained how to assemble the device and how to prepare a measurement.
Figure 5.1: Connection of probes
Figure 5.1 shows how to connect the probe to the control unit. Do it without any unnecessary application
of force!
Figure 5.2: Connection of charger and headphones
In figure 5.2 you can see how the delivered charger has to be connected to the device and how to plug in
the headphones.
OKM Ortungstechnik GmbH
www.okmmetaldetectors.com
8
Control elements
6 Control elements
In this section you will learn more about the fundamental use of all control elements for this measuring
instrument. All connections, inputs and outputs are explained in detail.
6.1 Front view
Figure 6.1 shows the front side of the control unit.
Display
Compass
Operating lamp
Signal lamp
Input for
headphones
OK-key
Power on and
off button
Regulator
Arrow keys
Figure 6.1: Front view
The Compass is not only used for orientation but also to find the direction for the measurement in the
Ionic System.
The Signal lamp shines blue as soon as a target has been located by the device. During this time the
Operating lamp will be deactivated.
On the Display the current operation mode and the measure and calibration values are represented.
In the Input for headphones the delivered headphones can be connected.
With the Regulator the device can be calibrated and so the Bionic alpha can be adjusted optimal to the
current environment conditions.
The Operating lamp indicates if the device is in the state of readiness. If this operating lamp is shining
green the device is ready for operating. If this lamp is not shining after powering on the device you have
OKM Ortungstechnik GmbH
www.okmmetaldetectors.com
Control elements
9
to control if the internal batteries are charged fully.
By using the Arrow keys you can navigate in the menu and select the desired operation mode.
By pressing the OK-key you can confirm your selected operation and start the measurement procedure.
The Power on and off button is used to switch on and off the device.
6.2 Back view
Figure 6.2 shows the back side of the control unit with all connections.
Input for charger
Connection of probe
Figure 6.2: Back view
The Connection of probe is used to connect the delivered probe to the control unit.
The Input for charger is used to connect the delivered charger. This allows you to recharge the internal
batteries of the device.
OKM Ortungstechnik GmbH
www.okmmetaldetectors.com
10
Operating modes
7 Operating modes
In this section you will learn more about operating the device. It is explained step by step how to
proceed for a measurement.
The device provides the following operating modes:
•
Bionic System
Basis for measurement is the natural bio system of the human being and magnetic fields.
•
Ionic System
Measurement of the ionization of buried objects.
•
Magnetic System
Magnetometer measurement to locate ferromagnetic metals
7.1 Measurement with Bionic System
To use the Bionic alpha you have to power on the device with the power on and off button. After
powering on the device the operating lamp will shine green to signal the operation readiness of the
device. In case this operating lamp is not shining than the internal battery is not full charged and has to
be recharged before using the device. To load the device the delivered charger should be used. If the
operating lamp is shining green the device is ready for operation. After powering on the device confirm
the operating mode Bionic System with the OK-key. The operating mode Bionic System is now activated.
Before starting the measurement the device has to be calibrated to the current environment conditions.
The regulator on the device has to be turned to adjust the optimal frequency between 188 and 254. The
current frequency is represented on the display of the device. To adjust the optimal frequency the value
has to be selected in this way that the acoustical signal just disappears. The value should be as high as
possible but the acoustical signal should not go on. The higher the frequency the exacter the device is
adjusted to the environment.
Also it is important that you always keep the contact between your hand and the electrodes on the
retaining handle. This contact should stay during the complete measuring procedure. In case the contact
has been intermitted you should restart the measurement from the beginning and calibrate again. As
soon as the optimal value is adjusted confirm this value by pressing the OK-key.
Now you can start with the measurement. Move the Bionic alpha slowly up and down like it is
represented in figure 7.1. Additionally you can move it also to left and right until you can hear an
acoustical signal from the Bionic alpha. Figure 7.1 represents schematically the principle proceeding.
If the device has recognizing a gold object you will hear an acoustical signal and the signal lamp will
shine in blue color. You should keep this point in your mind.
OKM Ortungstechnik GmbH
www.okmmetaldetectors.com
Operating modes
11
Figure 7.1: General procedure of a measurement
You have now determined a direction where the gold found could be located. But you don‘t know in
which distance the object is situated. Therefore you have to do a cross pin pointing. Walk about 50 meter
to the left or to the right and repeat this procedure. On the place where the 2 directions are crossing
each other the possible target is located. This procedure you can repeat as often as you want. The
principle of pin pointing is represented in figure 7.1.
To finish the measurement you have to switch off the device with the power on and off button.
7.2 Measurement with Ionic System
To operate the Bionic alpha you have to switch on the device with the power on and off button. After
powering on the device the operating lamp will shine green to signal the operation readiness of the
device. In case this operating lamp is not shining than the internal battery is not full charged and should
be reloaded before using the device. To load the device the delivered charger should be used. If the
operating lamp is shining green you can start the measurement.
After powering on the device you can select the operating mode Ionic System with the arrow keys and
confirm this selection by pressing the OK-key.
To do a measurement with Ionic System there is also a calibration necessary. To calibrate the device on
ions the Bionic alpha has to be directed on the searched target. Now the device calibrates itself
automatically on the ion field of this object and memorize this frequency. You confirm this value by
pressing the OK-key.
Now you can start the measurement. The principle procedure of the measurement is similar to operating
mode Bionic System. You should take care always to measure from north to south, which means you
should stay with your back directed to north direction.
To finish the measurement you have to switch off the device with the power on and off button.
7.3 Measurement with Magnetic System
This function is used to locate ferromagnetic metals inside an area.
To enter in the operating mode Magnetic System you have to use the arrow keys until the operating
mode “Mag System” appears on the screen. Confirm your selection by pressing the OK-Key.
OKM Ortungstechnik GmbH
www.okmmetaldetectors.com
12
Operating modes
After that the measurement procedure can be started. The principle procedure of the measurement is
similar to operating mode Ionic System.
To measure in the Magnetic System there is no calibration necessary. In this searching system you don’t
have to measure from north to south direction, you can search for objects in all directions.
Also in this mode you should avoid disturbances from the environment like mobile phones, high voltage
lines or radar systems.
Like in the previous operating modes the device again shows a possible object when lighting up the
signal lamp. Also you will hear an acoustical signal as soon as you pass over the object. The indication
Magfield in the display is not important to the user, it indicates the measured strength of the magnetic
field. The indication Distance shows you the possible distance of a located object in meters.
To finish the measurement you have to switch off the device with the power on and off button.
OKM Ortungstechnik GmbH
www.okmmetaldetectors.com
Charging of internal battery
13
8 Charging of internal battery
In this section you will learn more about how to operate the delivered charger.
To charge the internal battery of Bionic alpha use only the delivered charger!
8.1 Charger
The full automatic charger from figure 8.2 has a refreshing function, so the internal batteries can reach
a much longer durability.
Charger
LED lamps
Charger cable with
connector
Figure 8.1: The charger and its elements
The charger cable and connector should be connected to the appropriate socket of the Bionic alpha.
The LED lamps indicate the current status of recharge. The following situations can exist:
•
“Refreshing”: the LED lamp flashes red/green (refreshing process)
•
“Charging”: the LED lamp shines red (charging process)
•
“Ready”: the LED lamp shines green (battery is charged)
•
“Error”: the LED lamp flashes red (battery defective)
OKM Ortungstechnik GmbH
www.okmmetaldetectors.com
14
Charging of internal battery
8.2 Charging the device
To load the Bionic alpha the delivered charger has to be connected with the control unit in the provided
input, like represented in figure 8.2.
Figure 8.2: Connecting the charger
As soon as the charger is connected to the electric power supply (socket), the LED lamp will indicate the
current charge condition of the internal battery (Green = full charged, Red = empty). After that the
charging-/refreshing process of the internal battery will start.
If required the charger will at first start the refreshing process (LED lamp flashes red/green) and then
switch automatically to the recharging process (LED lamp shines red). After charging the internal
battery it will automatically switch to impulse trickle charge (LED lamp shines green). The charger can
now be disconnected from the Bionic alpha.
In certain circumstances a new switch to the refreshing process may be done automatically during the
recharging process. If the device does not switch to “Ready” (LED lamp shines green) within 24 hours
the internal batteries cannot be regenerated and should be replaced. Therefor it is necessary to send the
device for repair.
OKM Ortungstechnik GmbH
www.okmmetaldetectors.com
Danger of explosion during excavation
15
9 Danger of explosion during excavation
Unfortunately, the last two world wars also made the ground in many places of the world a potentially
explosive scrap heap. A host of those lethal relics are still buried in the ground. Do not start digging and
hacking for an object wildly when you receive a signal of a piece of metal from your device. Firstly, you
might indeed cause irreparable damage to a truly rare find, and secondly, there is a chance that the
object reacts in an insulted way and strikes back.
Note the color of the ground close to the surface. A red or reddish color of the ground is an indicator of
rust traces. As regards the finds themselves, you should definitely pay attention to their shape. Curved
or round objects should be a sign of alarm, especially if buttons, rings or little pegs can be identified or
felt. The same applies to recognizable ammunition or bullets and shells. Leave that stuff where it is, do
not touch anything and, most importantly, do not take any of it home with you. The killing machines of
war made use of diabolical inventions such as rocker fuses, acid fuses and ball fuses. Those components
have been rusting away in the course of time, and the slightest movement may cause parts of them to
break and be triggered. Even seemingly harmless objects such as cartridges or large ammunition are
anything but that.
Explosives may have become crystalline over time, that is, sugar-like crystals have formed. Moving such
an object may cause those crystals to produce friction, leading to an explosion. If you come across such
relics, mark the place and do not fail to report the find to the police. Such objects always pose a danger
to the life of hikers, walkers, farmers or children.
OKM Ortungstechnik GmbH
www.okmmetaldetectors.com
16
Maintenance and services
10 Maintenance and services
In this section you will learn how to maintain your measuring instrument with all included accessories to
keep it in good condition a long time and to get good measuring results.
The following list indicates what you absolutely should avoid:
•
penetrating water
•
strong dirt and dust deposits
•
hard impacts
•
strong magnetic fields
•
high and long lasting heat effect
If you want to clean your device please use a dry rag of soft material. To avoid any damage you should
transport the device and accessories always in the appropriate carrying cases.
Beware that all batteries and accumulators are always charged fully while operating with your system.
You should only load the batteries when they are completely discharged no matter if you are working
with the external power supply or with the internal accumulators. In this way a long durability of the
used batteries is guaranteed.
To load the external and internal batteries you have to use only chargers which are part of our scope of
delivery.
OKM Ortungstechnik GmbH
www.okmmetaldetectors.com