1
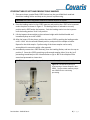
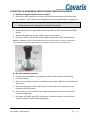
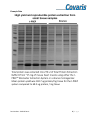
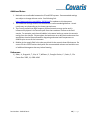
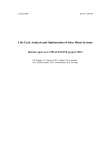
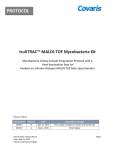
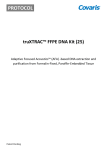
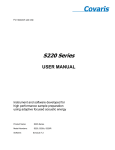
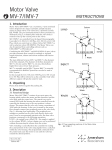
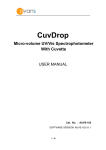
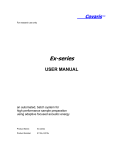
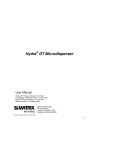
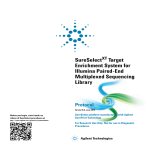
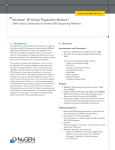
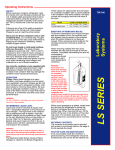
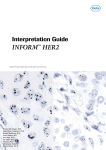
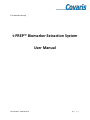
For research use only t-PREP™ Biomarker Extraction System User Manual Part Number: 010164 Rev A 1|Page UNIVERSAL PRECAUTIONS Universal Precautions should be followed on all specimen samples, regardless of whether a sample is known to contain an infectious agent. Laboratories handling specimen samples are advised to comply with applicable parts of the following governmental and clinical standards, or their equivalent in the country of use: Centers for Disease Control (CDC), Universal Precautions for Prevention of Transmission of HIV and Other Bloodborne Infections, published 1987, updated 1996 Clinical and Laboratory Standards Institute (CLSI), GP17-A2 Clinical Laboratory Safety; Approved Guideline Second Edition, published 2004, ISBN 1-56238-530-5 Clinical and Laboratory Standards Institute (CLSI), M29-A3 Protection of Laboratory Workers from Occupationally Acquired Infections; Approved Guideline, Third Edition, published 2005, ISBN 1-56238-5674 Occupational Safety and Health Administration (OSHA), 29 CFR 1910.1030 Bloodborne Pathogens International Standards Organization (ISO) 15190:2003, Medical Laboratories – Requirements for Safety Trademarks Patented or patent pending and registered or registration-pending are trademarks of Covaris. Registered names and trademarks used in this document, even when not specifically marked as such, are not to be considered unprotected by law. Information subject to change without notice For Research Use Only Not for use in diagnostic procedures Publication P/N 010164 Revision A, April 2012 Product covered by Patent No. US6, 719,449, US6, 948, 843, US7, 328,628 and other pending applications Copyright © 2012 Covaris, all rights reserved. Covaris, Inc. 14 Gill St, Unit H Woburn, Massachusetts 01801-1721 USA Part Number: 010164 Rev A Printed in U.S.A. 2|Page INTRODUCTION Tissue Samples used in biomarker discovery and analytical experiments are precious and often small (<10 mg). Small masses present significant technical challenges to achieving controlled and efficient extraction. These challenges are exacerbated by multiple transfer steps with potential for sample loss at each step. The t-PREP™ System is specifically engineered for rapidly processing small tissue samples in the 1-10 mg mass range The t-PREP System integrates the entire sample collection, cryopreservation, storage, cryofracture, and homogenization for the controlled the extraction of biomolecules in a single vessel providing several benefits; increased yield, reduced workflow time, isothermal processing, and no sample loss. The t-PREP workflow utilizes highly controlled Adaptive Focused Acoustics (AFA™) Ultrasonic Technology, allowing isothermal extraction of biomarkers in reagents selected for their compatibility with multiple downstream analyses. The t-PREP also enables rapid tissue stabilization and cryogenic storage before and after the extraction process, which is extremely beneficial for rare and labile protein modifications. For example, the half-life of phosphorylated AKT is about 20 minutes in samples not properly preserved and therefore is not accurately represented in improperly preserved samples (1). Part Number: 010164 Rev A 3|Page MATERIALS AND REAGENTS t-PREP™ Biomarker Extraction Devices (10) (Part Number 520097) REQUIRED, BUT NOT SUPPLIED Covaris S2/S220 high performance, AFA ultrasonicator t-PREP™ S-series Holder (Part Number 500304) t-PREP™ Impactor (Part Number 500305) t-PREP™ Loading Station (Part Number 500312) Dry Ice Distilled or deionized water 0.5 ml microcentrifuge Pipette and tips (to aliquot <300ul) Appropriate Extraction buffer Appropriate inhibitors PREPARATION Turn on the S2/S220, start the SonoLab™ software, and set the Chiller to the appropriate temperature for the extraction buffer (e.g., a protein extraction buffer may require 5°C). Allow the system to degas for at least 30 minutes. Prepare sufficient extraction buffer including inhibitors (e.g., protease and phosphatase inhibitors) for the samples to be processed in an appropriate tube. The recommended volume of extraction buffer is 250 µl for each t-PREP. WORKFLOW SCHEMATIC Part Number: 010164 Rev A 4|Page PROTOCOL SAMPLE LOADING AND THERMAL STABILIZATION 1. Optional: If the mass of the samples to be processed needs to be determined, weigh and record an accurate mass of the empty t-PREP Device(s). 2. Place the desired number of t-PREP Devices, with the cap/piston in position 1 in the black anodized aluminum t-PREP Loading Station, and pre-chill on dry ice for at least 15 minutes. For best results, multiple Loading Stations and t-PREPs can be stored ahead of time at -80C. The Loading Station can accommodate 1, 2, or 3 t-PREP Devices at one time. 3. Turn the clear plastic cap of the t-PREP to Position 1 and remove. Place cap/piston on a clean weighing boat on dry ice. Place tissue sample into the t-PREP chamber in the center of the orange, acoustic window located at the bottom of the t-PREP Device, and replace the cap/piston, turning the cap to position 2. 4. Optional: Take a second mass reading of the t-PREP Device(s) containing tissue samples and record. The difference in the masses is the mass of the tissue sample. NOTE: For very small tissue samples, it may be appropriate to weight the tissue piece on a pre-chilled, pre-weighed, inverted t-PREP cap/piston. 5. For cryostorage the t-PREP can be stored at -80C or below with the cap in Position #2; for immediate cryofracture with the t-PREP Impactor, rotate the cap to Position #3. In Position #3, the cap/piston is able to freely move up and down over the tissue sample. 6. Place samples stored in the t-PREP Devices either (a) at -80C or below for processing at a later date, or (b) on dry ice for immediate processing, as described below. Figure 1. View of the t-PREP™ Device (left) and an exploded view (right) showing its placement in the pre-chilled, metal loading station. The cap/piston is removed in Position #1 for sample loading. Rotating the cap to Position #2 locks the sample for storage (e.g.,-80C). For cryofracturing using the Manual CryoPrep, the cap/piston is rotated to Position #3. Following cryofracture, the handle is rotated to Position #1 for extraction buffer addition and returned to Position #2 for AFA extraction. Part Number: 010164 Rev A 5|Page CRYOFRACTURE OF SOFT AND FIBROUS TISSUE SAMPLES 7. Place up to three, sample filled t-PREP Devices into the pre-chilled black anodized aluminum Loading Station and keep on dry ice until cryofracturing. CAUTION: the t-PREP cap/piston must be in Position #3 prior to impact 8. Place the loading station in the t-PREP Impactor and position the t-PREP to be impacted under the piston as shown in Figure 2. The loading station is indexed to correctly position each t-PREP under the impactor. Push the loading station into the impactor until the loading station ‘clicks’ into position. 9. Lift the impactor brass weight to the maximum height with the black handle and immediately drop on to the t-PREP. 10. After the impact, lift the piston, position the next t-PREP by pushing the loading station until it ‘clicks’ into the second indexed position, and process the sample as before. Repeat for the third sample. Cryofracturing of the three samples can be easily accomplished in succession within a few seconds. 11. Immediately remove the t-PREP Device(s) from the Loading Station, and turn the cap to position 2. Store the t-PREP containing cryofractured samples either (a) on dry ice if proceeding immediately to AFA Ultrasonication or (b) at -80C if the samples will be stored and processed at a later time. CAUTION: for storage following cryofracture, rotate the cap/piston to position #2 Figure 2. The Manual CryoPrep for cryofracturing of frozen samples in the tPREP. The pre-chilled metal tray keeps the t-PREP Device cold during processing. Part Number: 010164 Rev A 6|Page EXTRACTION OF BIOMARKERS FROM CRYOFRACTURED TISSUE SAMPLES A. Addition of extraction buffer to tissue samples 1. Rotate the t-PREP cap/piston to Position #1 to slowly and carefully remove the base. For example, a 1 cm clearance for the pipetting of the extraction buffer is appropriate. NOTE: Some cryofractured tissue may adhere to the bottom of the cap/piston. This tissue will be returned to the homogenate during AFA processing. 2. Slowly pipette 250 µl of appropriate extraction buffer into the chamber of the t-PREP Device. 3. Replace the cap/piston into the t-PREP and turn to Position #2. 4. Place the t-PREP in the S2/S220 t-PREP Holder and proceed to AFA Ultrasonication. Figure 3. t-PREP Device shown in the S2/S220 holder for AFA Ultrasonication. Schematic representation shows focusing of acoustic energy through the AFA window at the bottom of the t-PREP Device. B. AFA Ultrasonication procedure 1. Process sample according to the settings provided in the Summary of Operating Conditions below: 2. After the processing is complete, immediately remove the t-PREP from the Holder and place on ice. 3. Rotate the cap/piston of the t-PREP Device to Position #1, and slowly remove the cap/piston directly upward. 4. At this point, you can tilt the hub at an angle and pipette the lysate to a cold 0.5 ml microcentrifuge tube. 5. Spin down at 10,000 x g at 4C for 10 minutes, to pellet the debris, and transfer the lysate to another 0.5 ml microcentrifuge tube. Part Number: 010164 Rev A 7|Page Operating Conditions for Biomarker Extraction: example proteins Duty Cycle Power level Peak Incident Power Intensity Cycles per Burst Processing Time Temperature (bath) Power mode Degassing mode Volume 10% 70 Watts for (S220) 2 for S2 200 Run an initial time course (e.g., for proteins 2 - 12 minutes) to determine optimal protein extraction time for your sample type. 4C Frequency Sweeping (S2) Continuous 250 µL in the t-PREP™ Maximum weight of tissue 10 mg per t-PREP™ *Water level (RUN) S2/S220 – level 5 *Water level should be ~1mm below the top of the aluminum crimp cap Part Number: 010164 Rev A 8|Page Example Data Part Number: 010164 Rev A 9|Page Additional Notes: 1. Methods are transferable between the S2 and S220 systems. Recommended settings are subject to change without notice. See following link: http://www.covarisinc.com/pdf/pn_010164.pdf for updates to this document. 2. The treatment settings listed in this document are recommended guidelines. Actual results may vary depending on the tissue type and mass. 3. The Covaris process uses high frequency focused acoustic energy and as such is influenced by objects in the acoustic path from the transducer surface to the fluid sample. For example, particles and bubbles in the water bath may scatter the acoustic energy from the sample. Please replace the bath water on a daily basis and ensure that appropriate time has been allowed for degassing and water bath temperature to stabilize prior to use of the instrument. 4. Bubbles in the sample fluid in the tube may diminish the acoustic dose effectiveness. Be sure to fill the t-PREP Devices slowly with the recommended volumes and avoid the use of additional detergents that may induce foaming. References: 1) Baker, A., Dragovich, T., Ihle, N. T., Williams, R., Fenoglio-Preiser, C., Powis, G., Clin. Cancer Res. 2005, 11, 4338–4340. Part Number: 010164 Rev A 10 | P a g e