Transcript
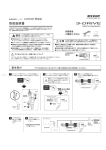
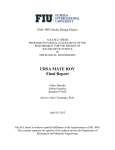
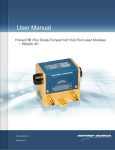
E-DRIVE ADVANCE 2 Contents Instruction Manual harness (the following pictures may be different from reality and they are only for reference) Power cabling method 2 Preparation of installation Shut off the engine at least 10 minutes. Practically follow the above started method to prevent engine check light lighted up. (Pleaser refer to the troubleshooting of engine check light lighted up) E-DRIVE ADVANCE 2 Body Mode shift Please cut both red & white wire of the OBD harness, red wire is for positive current input, white is negative output. 3 Modes: “Nor”: factory default ,”Ec”: Economy , “Po”: Power Turn the battery switch on then start the engine. START Cut off the cable. Control box Extension cables Double sided adhesive tape x 2 ● In transferring the product to others, please always attach with the user’s manual. Electronic throttler connector User’s manual Shut off engine. + Wait for at least 10 min. control box 車輌側 Electronic Throttler red LOCK (OFF) red control box white アクセル部 white OBDII connector Ground Unplug the connector Characteristics When switch is off, the power of 12V still be supplied. Press “Mode” button to shift the mode. Ec Economic fuel consumption mode Setup The circuit board with new design of input and output signal loop can reduce noise. Re-new the internal program corresponding with new vehicle launched after 2010 completely. Basic cabling Connected with power supply Logical operation upgraded for more stable signal output and short the impulse time. The original throttle setting (Nor mode) will be effective automatically when vehicle is in reverse. Three modes: 9 steps Power mode, 7 steps Eco-mode and normal mode. Change mode Setting memorized function: After engine turned off, setting will be memorized automatically, driver doesn’t have to re-set when engine re-started OBDII connector Reverse circuit anytime as your desire. Power cabling method 1 Power cabling method 2 If the OBDII connecter is already occupied by other device, you might need to connect the power supplying with extra wire. Display ADVANCE lectronic Throttle Controller segment Never work in a poor air ventilation space. It may cause carbon monoxide poisoned, explosion and accident. (optional) Electronic throttle connector Shut off the engine at least 10 minutes before install. SET Power Drive Eco Drive For step shift in each mode Normal The maximum % Press the “SET” button to shift the step. press SET The minimum % The percentage of Po mode The minimum % Press the “SET” button to shift the step. press SET Must run the initial setup at first. The maximum % Initial setting Acceleration and fuel consumption of each step Initial setting MODE Re-installation in other vehicle First time installation Body port NORMAL POWER 9 8 7 6 5 4 3 2 1 ▼ ECO 1 2 3 4 5 6 7 High Initial setup is for learning throttle signal. OBDII port Organize the wire after installation. If wire falls scattered while driving may cause danger event. button Initial setup (Throttle opening setup) Port Diagram Don’t scratch the coat of cables. Cable with broken coat might cause flame because of bad connection or short circuit. The throttle opening percentage of Ec mode Throttle opening Notice: please tie up wires, otherwise it might cause danger as wire falling while driving. Please unscrew the negative pole connection of the battery before installation to prevent the part damaged or flame caused by short circuit. button Product shut-down time The monitor will be lighted off after engine turned off 10 seconds to 5 minutes because its power supply is synchronous with ECU. If any throttle opening percentage shown on monitor is normal while the E-drive is shutting off. Connector for specific model Must run the initial setup after first installation, please make sure the engine is off and gear is in “P” or “N” position while running setup. The step shifted under “Ec” and “Po” mode. For mode shift and initial setup Initial setup displayed Important notice ! MODE percentage (15%~100%) control box press Step shift E DRIVE Current mode Body Please read all the instruction to make installation run smoothly Po Power mode plug OBDII directly Electronic ル Throttler The defect or damage is arising from misuse, mishandling, accidental lost, abuse, accident, negligence and damage caused directly or indirectly by Customer, including but not limited to improper testing, installation, alteration or modification of any kind, or spillage of food or liquid, or build up of dirt or dust, or mains supply problem, thunderstorm activities, or infestation by insects or vermin, or exposure to abnormally corrosive conditions, or operation with extreme heat or humidity. MODE The component of E-drive description nor Normal mode Reverse signal wire Never operate while driving. Concentrate your mind while driving will keep you safe. It is to avoid not let the engine check light is on. The E-drive won’t work if no initial setup. Specialized fitting port Acceleration rate low less Fuel consumption NO more setup needed after initial setup. much Professional knowledge is required, please consign Shadow Edrive to technician nearest you for help if any question about installing or wiring. For DC12V vehicle only. Make sure the wire is connected well. If wire welded is necessary, please seal the welded joint with insulating tape and make sure there is no metal core of wire exposed. Do NOT disassemble the product, or modify any of the components as it will void your warranty. Please don’t install this product in humidity environment with high temperature because of failure running. Fragile! Hand with care. Hold the body few seconds after double-side tape pasted and make sure the body is fixed firmly. Installation Instruction Power cabling method 1 Initial setup instruction Turn off the battery switch and plug the OBDII fitting directly. ! Caution pull the wire instead of fitting for release the harness The preparation of initial setup. 1. Must double check all the wire and fitting is connected well. 2. Turn the switch on, shift the gear to “P” or “N” position while the engine is off. OBDII fitting Plug into the OBDII fitting control box Turn the battery switch on. (The engine must ON be off) Reverse lamp MODE Display nor Only under nor mode, the setting is possible. Release the “Mode” button to start the mode shift. MODE Release 3 Reverse control wire control box 6 Keep fully stepping on pedal and press the “Set” button Display SEt SET The figure starts to count back from 7,6,5…1,0 after displaying --- press Please link wire to (+12V) of reverse circuit. Do not step on pedal so the E-drive can learn the throttle opening percentage is 0% 4 Cabling check Press SET key Installation SET Please shift gear in reverse to check if the red dot is on which means the cabling is completed. 5 press Press the “Set” button to confirm the 0% throttle learning. Please verify if any event occurs as below when the E-drive doesn’t work. Symptom No reaction when battery switch is on. Display 100 Keep fully stepping on pedal and hold the button till the code turned into “100”. Release the pedal to finish the setting. Display 100 Engine check light is on Cause OBDII fitting is bad connected. Fitting is bad connected when taking cabling method 2. Display throttle volt (ex. L 1.6) ※ (ex) flashing 8 Display nor Setting completed! Must run the initial setup as above instruction step if re-install the E-drive to other vehicle. If code is turned into in installation step 7 If code is , the procedure will jump to step 3 automatically, please re-set the throttle opening percentage. Please re-run the initial setup if the code shown on monitor. When press the “Mode” button to run the mode or step shift. Display SET The above figures are for example only; various cars may show different voltage. MODE “Err” displayed press “Nor” remained shown during initial setup “Err” shown and the “Nor” mode remained when pressing “Mode” Trouble shooting Please check each fitting is connected well. Unplug the fitting of OBDII before battery switch shut off completely. Please turn engine off, wait for 30 seconds and re-start engine up. No initial setup after installation Re-run the initial setup to reset the throttle opening percentage. Wrong initial setup Re-run the initial setup to reset the throttle opening percentage. ※ Display throttle volt (ex. L 1.6) 0% Troubleshooting (ex) flashing Ground Choose the position where you want to install the E-DRIVE ADVANCE 2. Please confirm that the driver's sight will not be hindered especially when installing multiple sets of products at the same time. Pull the electric wires along the route of shortest distance to the planned installation position of the E-DRIVE ADVANCE 2. press 2 Extend wire ※ (ex) Display throttle volt (ex. H 4.6) 100 % 7 Reverse switch Clean up all grease and dirt found. Code (shown on monitor) flashing Hold “Mode” button till the code becomes “0” It’s optional to equip with the reverse circuit cabling which is for throttle back to factory default while driving in reverse. Double-sided sticker Step Fully stepping on the pedal so the E-drive can learn the throttle opening percentage is 100%. Code (shown on monitor) 1 Backingcircuit circuitcabling Reverse Products assembly diagram Step For your safety, the throttle runs with Power mode is very sensitive, please notice the way to step on pedal if driver changed or driving in reverse. No initial setup after installation Re-run the initial setup again. Please return all the accessory with body and harness for repair. Notes: Reset engine check light IF the engine check light is on because of incorrect installation and instruction, please try the instruction as below: 1.Please turn off engine and wait for few minutes then start engine up, the light will be off. 2.If first solution is failed, please release the negative pole of battery and wait for 10 minutes then connect the pole. 3.If both two methods are failed, please use the OBDII scanner (reader) to diagnosis.