1
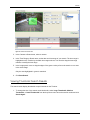
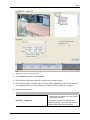
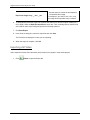
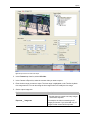
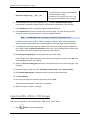
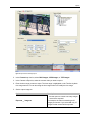
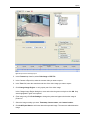
Avigilon Control Center Player User Guide Version 4.10 PDF-PLAYER-D-Rev1 Copyright © 2011 Avigilon. All rights reserved. The information presented is subject to change without notice. No copying, distribution, publication, modification, or incorporation of this document, in whole or part, is permitted without the express written permission of Avigilon. In the event of any permitted copying, distribution, publication, modification, or incorporation of this document, no changes in or deletion of author attribution, trademark legend, or copyright notice shall be made. No part of this document may be reproduced, stored in a retrieval system, published, used for commercial exploitation, or transmitted, in any form by any means, electronic, mechanical, photocopying, recording, or otherwise, without the express written permission of Avigilon. Avigilon Tel +1.604.629.5182 Fax +1.604.629.5183 http://www.avigilon.com Revised 2011-10-18 Table of Contents Introduction .............................................................................................................................. 1 What is the Avigilon Control Center Player .............................................................................................. 1 For More Information ................................................................................................................................ 1 Avigilon University ................................................................................................................................ 1 Support ................................................................................................................................................. 1 Upgrades .............................................................................................................................................. 2 Feedback .............................................................................................................................................. 2 Starting and Shutting Down the Avigilon Control Center Player .......................................... 3 Starting the Player .................................................................................................................................... 3 Shutting down the Player .......................................................................................................................... 3 Views ........................................................................................................................................ 4 What are Views? ....................................................................................................................................... 4 Selecting a Layout for a View ................................................................................................................... 4 Editing a View Layout ............................................................................................................................... 5 Making a View Full Screen ....................................................................................................................... 7 Ending Full Screen ............................................................................................................................... 8 Video ......................................................................................................................................... 9 Watching Recorded Video ........................................................................................................................ 9 Adding and Removing Cameras in a View ........................................................................................... 9 Zooming and Panning a Video ........................................................................................................... 10 Listening to Audio in a View ............................................................................................................... 10 Playing Back Recorded Video ............................................................................................................ 11 iii Avigilon Control Center Player User Guide Reviewing POS Transactions ............................................................................................................. 13 Adjusting Video Display in Image Panels ............................................................................................... 14 Maximizing an Image Panel ............................................................................................................... 14 Displaying Video Overlays ................................................................................................................. 15 Changing the Image Panel Display Quality Settings .......................................................................... 15 Changing the Image Panel Display Adjustments Settings ................................................................. 16 Displaying Analog Video in Deinterlaced Mode ................................................................................. 17 Authenticating Video ............................................................................................................................... 17 Camera Properties .................................................................................................................................. 17 Search ......................................................................................................................................19 Performing an Event Search................................................................................................................... 19 Viewing Event Search Results ........................................................................................................... 21 Performing a Bookmark Search.............................................................................................................. 21 Viewing Bookmark Search Results .................................................................................................... 22 Performing a Pixel Search ...................................................................................................................... 23 Viewing Pixel Search Results ............................................................................................................. 24 Performing a Thumbnail Search ............................................................................................................. 24 Viewing Thumbnail Search Results .................................................................................................... 25 Performing an Alarm Search .................................................................................................................. 26 Viewing Alarm Search Results ........................................................................................................... 27 Performing a POS Transaction Search .................................................................................................. 28 Viewing POS Transaction Search Results ......................................................................................... 29 Performing a License Plate Search ........................................................................................................ 30 Viewing License Plate Search Results ............................................................................................... 31 Export ......................................................................................................................................33 Exporting a Snapshot of an Image ......................................................................................................... 33 Exporting Recorded Video and Images .................................................................................................. 36 Accessing the Export Tab .................................................................................................................. 36 iv Table of Contents Exporting Native Video ....................................................................................................................... 36 Exporting AVI Video ........................................................................................................................... 38 Exporting PNG, JPEG or TIFF Images .............................................................................................. 40 Exporting PDF and Print Images ........................................................................................................ 42 Exporting WAV Audio ......................................................................................................................... 44 v Introduction What is the Avigilon Control Center Player The Avigilon Control Center Player is the video player for Avigilon Native Video Export (AVE) files and Avigilon Backup (AVK) files. The Player displays video in image panels, and allows you to control the playback through the Timeline. The Player is able to authenticate video files against tampering, and can be used to re-export video into other formats. Both AVE and AVK video include event data embedded in the file, so you are also able to search for specific alarms, POS transactions or license plate recognition events linked to the video. A copy of the Player can be downloaded from the Avigilon website, or exported with the AVE file from the Avigilon Control Center Client software (see the Avigilon Control Center Client User Guide for more information). To watch a video overview of the application, see Module 3 - Avigilon Control Center Player in the Avigilon University - End User Stream. For More Information Visit Avigilon at http://www.avigilon.com/ for additional product documentation. Avigilon University The Avigilon University provides free online training videos that demonstrate how to set up and use the Avigilon Surveillance System. Register online at the Avigilon Partner site to begin: http://avigilon.com/partners/ Support For additional support information, visit http://www.avigilon.com/support/. 1 Avigilon Control Center Player User Guide Regular Avigilon Customer Support Center hours of operation are from 6:00 a.m. to 6:00 p.m. Pacific Standard Time (PST) and can be reached by calling the toll-free number: +1.888.281.5182. E-mails can be sent to: [email protected]. For emergency technical support 24 hours a day, 7 days a week, please call the Avigilon Emergency Technical Support Hotline at +1.604.506.3117. Upgrades Software and firmware upgrades will be made available for download as they become available. Check http://www.avigilon.com/support/software for available upgrades. Feedback We value your feedback. Visit our feedback page to comment on our products and services: http://avigilon.com/feedback/ 2 Starting and Shutting Down the Avigilon Control Center Player The Avigilon Control Center Player can be started or shut down at any time. Starting the Player The Player can be opened in any of the following ways: Avigilon Control Center Player shortcut icon on the desktop. Double-click the From the Windows Start menu, select All Programs > Avigilon > Avigilon Control Center Player > Avigilon Control Center Player. When the application first opens, you will be prompted to open an AVE or AVK file. Double-click an Avigilon Native Video Export (AVE) file or Avigilon Backup (AVK) file. The Player opens and displays the video file. Shutting down the Player In the Avigilon Control Center Player software, select File > Exit. 3 Views What are Views? A View is a tab composed of image panels that allows you to organize how video is displayed. For example, you can choose to display video from multiple cameras at the same time by using different layouts. Selecting a Layout for a View You can organize how video is displayed by selecting a View layout. The figure shows the default View layouts. Select View > Layouts > # Division. On the toolbar, select the Change Layout button then select one of the layout options. 4 Views Figure A. Layouts on the toolbar Editing a View Layout If the default View layouts do not fit your surveillance requirements, you can customize a View layout. 1. On the toolbar, select the Change Layout button then select Edit Layouts. 5 Avigilon Control Center Player User Guide Figure A. Layouts on the Toolbar 2. In the Edit Layouts dialog box, select the layout you want to change. 3. Enter the number of Columns and Rows you want in your layout. 4. In the layout diagram, do any of the following to further customize the layout. 6 Views Figure B. Edit Layouts dialog box o To create a larger image panel, select a grey line to delete the border between two image panels. When a line is highlighted in red, the line can be deleted. o To restore an image panel, select a dotted line to divide a large image panel into two. When a dotted line is highlighted in green, the line can be restored. o To restore all default View layouts, click Restore Defaults. All custom layouts in the Layouts list will be replaced. Note: You can only add or subtract lines to create a rectangular shape. 5. Click OK to save your changes. The previous View layout has been replaced with your customized layout. Tip: The keyboard commands used to access View layouts are linked to the layout's position on the View Layouts list. For example, if your custom layout is placed at the top of the Layouts list (layout 1), you can press Alt + 1 to use that layout. Making a View Full Screen You can maximize a View to make full use of a monitor. On the toolbar, click Full Screen. 7 Avigilon Control Center Player User Guide Ending Full Screen Tip: 8 On the toolbar at the top left of the screen, click End Full Screen. The toolbar is hidden when the application is idle. Move your mouse to display the toolbar. Video The Avigilon Control Center Player allows you to watch exported Avigilon Native Video Export (AVE) video and Avigilon Backup (AVK) video in View tabs, similar to the Avigilon Control Center Client software. If the video file contains video from multiple cameras, the video can be displayed in multiple image panels. You can zoom and pan the exported video images, and use the Timeline to control the playback of the recorded video. Watching Recorded Video While reviewing recorded video, you can also choose to watch the same camera video at different zoom depths and control the video playback. Perform any of the following procedures to control the recorded video playback: Adding and Removing Cameras in a View When you first open an AVE or AVK file, all the video stored in the file are displayed in the View by default. So, if the file contains video from 4 cameras, you will automatically see video from all 4 cameras in the View. You can change the video displayed in the View by adding or removing cameras. Adding a Camera to a View Perform one of the following: Drag the camera from the System Explorer to an empty image panel in the View. Double-click a camera in the System Explorer. In the System Explorer, right-click the camera and select Add to View. The camera is added to the next empty image panel in the View layout. Tip: You can drag the same camera to multiple image panels to watch the video at different zoom levels. 9 Avigilon Control Center Player User Guide Removing a Camera From a View Perform one of the following: Right-click the image panel and select Close. Inside the image panel, click Close. Zooming and Panning a Video The zoom and pan tools allow you to focus on specific areas in a video. Using the Zoom Tools The most common way to zoom in and out of the video image is to rotate the scroll wheel on your mouse. The software also includes a set of Zoom tools that can be used with your mouse: 1. Select a Zoom tool: o From the Tools menu, select Zoom In Tool or Zoom Out Tool. o On the toolbar, click Zoom In Tool or Zoom Out Tool. 2. Click the image panel until you reach the desired zoom depth. Using the Pan Tools You can right-click and drag inside an image panel to pan the video image. Or, you can use the Pan tool: 1. Select the Pan tool: o From the Tools menu, select Pan Tool. o On the toolbar, click Pan Tool. 2. Drag the video image in any direction inside the image panel. Listening to Audio in a View If there was an audio device linked to a camera, the Audio bar is displayed when you review the camera's video. To listen to the audio detected by the audio input device, perform any of the following: 10 Video In the lower-right corner of the image panel, click Move the slider to change the volume. to mute or activate the audio. Figure A. Audio bar Playing Back Recorded Video The Timeline displays when video was recorded and lets you play back the recordings. The colored bars on the Timeline show the camera's recording history: A red bar shows the camera recorded an event (for example, a digital input or motion event). A blue bar shows the camera recorded video, but not in response to any event. White areas show that the camera did not record any video. An orange bar is a bookmark in the camera's recording history. Figure A. Playback tools on the Timeline Use any of the following controls to playback the recorded video files: Action To select a Control Procedure • Click the calendar icon and select a date 11 Avigilon Control Center Player User Guide playback time and time. • Or, click on a point in the Timeline. To loop playback Click Loop Playback to repeat the video when the video is played. To start playback Click Play. To stop playback Click Pause. To move forward a frame Click Step Forward. To move back a frame To control the playback direction and speed To jump forward or back on the Timeline To expand the Timeline to a specific moment in time Click Step Backward. Drag the slider to the right to move the video forward. Drag the slider to the left to move the video backward. The farther away the slider is from center the faster the playback speed. On the Timeline, click one of the Go Forward or Go Back buttons to move to different points on the Timeline. • Move the slider on the bottom right to zoom in or out on the Timeline. • Or, you can place your mouse over the Timeline and use the scroll wheel to zoom in or out on the Timeline. To center the Timeline on the time marker Right-click the Timeline, and select Center on Marker. To move through the Timeline quickly with the time marker Drag the time marker through the Timeline. To pan the Timeline 12 • Move the horizontal scroll bar under Video the Timeline. • Or, right-click and drag the Timeline. Reviewing POS Transactions While you monitor recorded video, you can also review the POS transactions that occur in the video. 1. Add a camera that is linked to the POS transaction source to the View, and display the camera's recorded video 2. In the image panel, click View POS Transactions. If there are more than one POS transaction source linked to the camera, you will be prompted to select one. The POS transactions are displayed in the next image panel. Figure A. Recorded POS transactions displayed in an image panel o o o Each transaction is separated by date and time. When you select a transaction, the video moves to that event on the Timeline. Scroll up or down to see other transactions from the POS transaction source. 13 Avigilon Control Center Player User Guide 3. To display cameras that are linked to the POS transaction source, click POS transaction image panel. View Camera in the If multiple cameras are connected to the POS transaction source, you will be prompted to select one. 4. Use the Timeline to review the video in more detail. For more information about Timelines, see Playing Back Recorded Video. If you want to find a specific POS transaction, see Performing a POS Transaction Search. Adjusting Video Display in Image Panels You can adjust the image panel display settings to improve the video display on your monitor. Maximizing an Image Panel You can maximize an image panel to enlarge the video display. Maximizing an Image Panel Perform one of the following: Right-click an image panel and select Maximize. Inside the image panel, click Double-click the image panel. Maximize. Restoring an Image Panel Perform one of the following: 14 Right-click the maximized image panel and select Restore Down. Inside the image panel, click Double-click the image panel. Restore Down. Video Displaying Video Overlays When you monitor video in a View, you can select the type of information that is displayed over the video in each image panel. Select View > Image Overlays, then select one or more of the following: Option Description Camera Name Displays the name given to the camera. Camera Location Displays the location given to the camera. Displays the exposure timestamp for the video. Timestamp Includes the server time zone. Motion Activity Highlights detected motion events in red. Changing the Image Panel Display Quality Settings If you do not have enough processing power, you may not be able to watch video at the full image rate and full quality. You can bias the image panels to display video in high quality and low frame rate, or lower quality and high frame rate. 1. Select Tools > Change Display Quality... to open the Change Display Quality dialog box. 2. In the Change Display Quality dialog box, select one of the following: Figure A. Change Display Quality dialog box o Maximum: displays the full video resolution with the lowest image rate. 15 Avigilon Control Center Player User Guide o High: displays 1/4 of the full video resolution. o Medium: displays 1/16 of the full video resolution. o Low: displays 1/64 of the full video resolution with the highest image rate. 3. Select the Monochrome check box to display the video in black and white. 4. Click OK. Changing the Image Panel Display Adjustments Settings You can change the image panel display settings to bring out video details that are hard to see with the image panel's default settings. 1. Right-click an image panel and select Display Adjustments.... Figure A. Display Adjustments dialog box 2. Move the sliders to adjust the Gamma, Black Level and White Level. The image panel displays a preview of your changes. 3. Click Restore Defaults to clear your changes. 4. Click Close to save your changes. 16 Video Displaying Analog Video in Deinterlaced Mode If there are visible interlacing artifacts in the analog camera video, you can enable the deinterlacing filter to help improve the video image. Select View > Display Deinterlaced Images. Authenticating Video All Avigilon Native Video Export (AVE) and Avigilon Backup (AVK) files contain an encrypted digital signature that is used to confirm that exported images have not been tampered with. To authenticate a video, select Tools > Authenticate Images.... The Authenticate Images dialog box appears and displays the progress as the application checks all the video images for tampering. When the process is complete, the Authenticate Images dialog box displays the number of images that are authentic and the number of images that have been corrupted. Figure A. Authenticate Images dialog box Camera Properties To see detailed information about any camera in the AVE file, you need to access the camera properties. In the System Explorer, right-click a camera and select properties. 17 Avigilon Control Center Player User Guide Figure A. Camera Properties dialog box The Camera Properties dialog box displays the following information about the camera: 18 Camera name Model number Firmware version Location Serial number Resolution MAC Address Search You can search for recorded video by events, thumbnails, pixel area, POS transactions, alarms or license plates. Note: If your video file does not contain any of the following information, that search option will not be displayed. Figure A. Search options Performing an Event Search The Event Search allows you to search for a specific motion events, digital input events and bookmarked video. 19 Avigilon Control Center Player User Guide 1. Click Search to open the Search tab. 2. In the Search tab, select Event Search. The Search:Event tab is displayed. Figure A. Search: Event tab 3. In the Camera to Search area, select all the cameras you want to include in the search. 4. In the Time Range to Search area, set the date and time range of your search. The time range is highlighted on the Timeline by the black time range markers. You can also drag the time range markers to modify the time range. 5. In the Events to Search For area, select the types of events to include in the search. 6. In the Text to Match area, enter text to search for in the titles and descriptions of bookmarks. 7. Click Start Search. 20 Search Viewing Event Search Results 1. In the Search Results area, select a search result. The event is highlighted on the Timeline and the video is displayed in the search image panel. Details about the search result are displayed on the right. Tip: You can change the size of the image panel by moving the edge of the search results. 2. Use the Timeline controls to review the event. See Playing Back Recorded Video for more information. 3. If you want to further refine your search, click Perform a pixel search on this event. You can now search for any pixel movement in the selected result. See Performing a Pixel Search for more information. 4. Click Export this event to export the selected event video. See Exporting Recorded Video and Images for more information. 5. To export all listed results, click Export results to a file and save the file. Performing a Bookmark Search The Bookmark Search allows you to search for a specific bookmark. 1. Click Search to open the Search tab. 2. In the Search tab, select Bookmark Search. The Search:Bookmark tab is displayed. All available bookmarks are listed on the left. 21 Avigilon Control Center Player User Guide Figure A. Search:Bookmark tab 3. In the Search field, enter any text that may appear in the bookmark's title, description, linked camera name or the name of the user who created the bookmark. The search is automatically performed on all the listed bookmarks until only the matches are displayed. Viewing Bookmark Search Results 1. In the Bookmark list, select a bookmark. The bookmark is highlighted on the Timeline and the video is displayed in the image panel. Details about the bookmark are displayed under the image panel. 2. Use the Timeline controls to review the event. See Playing Back Recorded Video for more information. 3. Click Export this bookmark to export the selected bookmark. See Exporting Recorded Video and Images for more information. 4. If you want to further refine your search, click Perform a pixel search on this bookmark. You can now search for any pixel movement in the selected bookmarked video. 22 Search See Performing a Pixel Search for more information. Performing a Pixel Search The Pixel Search allows you to search for tiny pixel change in the recorded video. 1. Click Search to open the Search tab. 2. In the Search tab, select Pixel Search. The Search:Pixel tab displays. Figure A. Search:Pixel tab By default, the entire search image panel is highlighted in green. 3. In the Camera to Search area, select a camera. 4. In the Time Range to Search area, set the date and time range of your search. The time range is highlighted on the Timeline by the black time range markers. You can also drag the time range markers to modify the time range. 5. Define the pixel search area by using the motion detection tools above the image panel. Only areas highlighted in green are searched. 23 Avigilon Control Center Player User Guide 6. In the Pixel Search Options area, drag the Threshold slider to select the amount of motion required to return a search result. A high threshold requires more pixels to change before results are found. 7. Enter a number in the Join results less than field to set the minimum number of seconds between separate search results. You can enter any number between 1-100 seconds. 8. Click Start Search. Viewing Pixel Search Results 1. In the Search Results area, select a search result. The event is highlighted on the Timeline and the video is displayed in the search image panel. Details about the search result are displayed on the right. Tip: You can change the size of the image panel by moving the edge of the search results. 2. Use the Timeline controls to review the event. See Playing Back Recorded Video for more information. 3. Click Export this event to export the selected event video. See Exporting Recorded Video and Images for more information. 4. To export all listed results, click Export results to a file and save the file. Performing a Thumbnail Search The Thumbnail Search is a visual search that displays the search results as a series of thumbnail images. 1. Click Search to open the Search tab. 2. In the Search tab, select Thumbnail Search. The Search:Thumbnails tab displays. 24 Search Figure A. Search:Thumbnails tab 3. In the Camera to Search area, select a camera. 4. In the Time Range to Search area, set the date and time range of your search. The time range is highlighted on the Timeline by the black time range markers. You can also drag the time range markers to modify the time range. 5. In the image panel, move or drag the edges of the green overlay to focus the search on one area in the video image. Only the area highlighted in green is searched. 6. Click Start Search. Viewing Thumbnail Search Results The search results display thumbnails at equal intervals on the Timeline. 1. To change the size of the search result thumbnails, select Large Thumbnails, Medium Thumbnails, or Small Thumbnails from the drop-down menu above the search results and click Search Again. 25 Avigilon Control Center Player User Guide Figure B. Search:Thumbnail results tab 2. Select a thumbnail to highlight the video on the Timeline. 3. Click Step In, or double-click the thumbnail to perform another search around the thumbnail. Click Back to return to the previous results page. 4. Click Open In View to open the recorded video in a new View. 5. Click Change Search to change the search criteria. Performing an Alarm Search Alarm search allows you to search for alarm in the exported video. 1. Click 26 Search to open the Search tab. Search 2. In the Search tab, select Alarm Search. The Search:Alarms tab is displayed. Figure A. Search:Alarms tab 3. In the Alarm to Search list, select all the alarms you would like to include in the alarm search. 4. In the Time Range to Search area, set the date and time range of your search. The time range is highlighted on the Timeline by the black time range markers. You can also drag the time range markers to modify the time range. 5. Click Start Search. Viewing Alarm Search Results 1. In the Search Results area, select a search result. The event is highlighted on the Timeline and the video is displayed in the search image panel. Details about the search result are displayed on the right. 27 Avigilon Control Center Player User Guide Tip: You can change the size of the image panel by moving the edge of the search results. 2. Use the Timeline controls to review the event. See Playing Back Recorded Video for more information. 3. If the event is linked to multiple cameras, select a camera from the Camera drop down list to change the video displayed in the image panel. 4. Click Export this event to export the selected event video. See Exporting Recorded Video and Images for more information. 5. To export all listed results, click Export results to a file and save the file. Performing a POS Transaction Search The POS Transaction Search allows you to search for specific transactions. 1. Click Search to open the Search tab. 2. In the Search tab, select POS Transactions Search. The Search: POS Transactions tab is displayed. 28 Search Figure A. Search:POS Transactions tab 3. In the POS Transaction Sources to Search area, select all the POS transaction sources you would like to include in the search. 4. In the Time Range to Search area, set the date and time range of your search. The time range is highlighted on the Timeline by the black time range markers. You can also drag the time range markers to modify the time range. 5. In the Search Text area, enter any text that will help you filter the search results. For example, you can enter product names or transaction values. Use the Wildcards and Regular Expression search methods to find a range of results. Leave the Text field blank to find all transactions. 6. Click Start Search. Viewing POS Transaction Search Results 1. In the Search Results area, select a search result. The event is highlighted on the Timeline and the video is displayed in the search image panel. Details about the search result are displayed on the right. 29 Avigilon Control Center Player User Guide Tip: You can change the size of the image panel by moving the edge of the search results. 2. Use the Timeline controls to review the event. See Playing Back Recorded Video for more information. 3. If the event is linked to multiple cameras, select a camera from the Camera drop down list to change the video displayed in the image panel. 4. Click Export this event to export the selected event video. See Exporting Recorded Video and Images for more information. 5. To export all listed results, click Export results to a file and save the file. Performing a License Plate Search The License Plate Search allows you to search for license plates that were detected in the exported video. 1. Click Search to open the Search tab. 2. In the Search tab, select License Plate Search. The Search: License Plates tab is displayed. 30 Search Figure A. Search: License Plates tab 3. In the Camera to Search area, select all the cameras you want to include in the search. 4. In the Time Range to Search area, set the date and time range of your search. The time range is highlighted on the Timeline by the black time range markers. You can also drag the time range markers to modify the time range. 5. In the License Plate Search Options area, enter the license plate you want to find and a minimum confidence of a match. 6. Click Start Search. Viewing License Plate Search Results 1. In the Search Results area, select a search result. The event is highlighted on the Timeline and the video is displayed in the search image panel. Details about the search result are displayed on the right. Tip: You can change the size of the image panel by moving the edge of the search results. 31 Avigilon Control Center Player User Guide 2. Use the Timeline controls to review the event. See Playing Back Recorded Video for more information. 3. If the event is linked to multiple cameras, select a camera from the Camera drop down list to change the video displayed in the image panel. 4. Click Export this event to export the selected event video. See Exporting Recorded Video and Images for more information. 5. To export all listed results, click Export results to a file and save the file. 32 Export You can re-export the Avigilon Native Video Export (AVE) and Avigilon Backup (AVK) files into other video and image formats. You can export a single snapshot of the video or export large parts of the video. Exporting a Snapshot of an Image You can export a snapshot of any image panel with video. When you export a snapshot, you are exporting whatever the image panel is currently displaying. 1. To export a snapshot, perform one of the following: o o In the image panel, click the Save Snapshot icon. Right-click the image panel and select Save Snapshot. The snapshot Export tab is displayed, and the image you want to export is displayed. 33 Avigilon Control Center Player User Guide Figure A. Export tab for Snapshot export 2. In the Format drop down list, select an export format. 3. For the selected export format, define your preferences: Format Image options Native Native (AVE) video is exported at full compression and includes data that is linked to the video image. 1. In the Resolution field, select a resolution for the video image. You can manually enter the resolution or click the drop down arrow to select a standard resolution. Note: The Resolution field automatically maintains the image aspect ratio. PNG 2. Click Change Image Region... to only export part of the video image. In the Change Image Region dialog box, move and resize the green overlay then click OK. Only areas highlighted in green are exported. 3. Select the image overlays you want: Timestamp, Camera name, and Camera location. 4. Click Display Adjustments to adjust the Gamma, Black Level and/or 34 Export White Level. 1. In the Compression field, select a compression level. 2. Set the image Resolution. 3. Click Change Image Region to only export a part of the video image. JPEG 4. Select the image overlays you want. 5. Click Display Adjustments to modify the image quality. 1. Set the image Resolution. 2. Click Change Image Region to only export a part of the video image. TIFF 3. Select the image overlays you want. 4. Click Display Adjustments to modify the image quality. 1. Click Change Image Region to only export a part of the video image. 2. Click Printer Settings... to change the selected printer and paper size. 3. Select the image overlays you want. Print 4. Click Add Export Notes... to add notes about the exported image. The notes are printed below the image. 5. Click Display Adjustments to modify the image quality. 1. Click Change Image Region to only export a part of the video image. 2. Select the image overlays you want. PDF 3. Click Add Export Notes... to add notes about the exported image. 4. Click Display Adjustments to modify the image quality. 4. Click Start Export. 5. In the Save As dialog box, name the export file and click Save. The Preview area displays the snapshot you are exporting. 6. When the export is complete, click OK. 35 Avigilon Control Center Player User Guide Exporting Recorded Video and Images You can export the video file into smaller files or into a different format for viewing in other applications. Accessing the Export Tab The Export tab can be accessed in any of the following ways: Export. On the toolbar, click Select File > Export. While performing a search, select a search result and click Export this event. Exporting Native Video You can export the video as Avigilon Native Video Export (AVE) files again. AVE format allows you to export more than one video at a time. 1. Click 36 Export to open the Export tab. Export Figure A. Export tab for recorded video export 2. In the Format drop down list, select Native. 3. In the Camera to Export list, select the camera video you want to export. 4. Enter the time range you want to export. The time range is highlighted on the Timeline by black time range markers. You can also drag the time range markers to modify the time range. 5. Set the export image rate: Option Description Select this option to control how many images per second are exported. Export at __ image rate For example, the video is streaming at 30 images per second. If you select 1/2, only 15 images for that second will be exported. 37 Avigilon Control Center Player User Guide Export one image every __ min __sec Select this option to control the time between each exported video image. For example, if you enter 5 min. 0 sec., only one image will be exported every 5 minutes. 6. To automatically divide the export into separate files that can be stored on optical media (like a CD or DVD), select the Split file into sizes of: check box. Then, manually enter a maximum file size in MB or select a pre-configured option from the drop down list. 7. Click Start Export. 8. In the Save As dialog box, name the export file and click Save. The Preview area displays the video you are exporting. 9. When the export is complete, click OK. Exporting AVI Video Video exported in Audio Video Interleave (AVI) format can be played in most media players. 1. Click 38 Export to open the Export tab. Export Figure A. Export tab for recorded video export 2. In the Format drop down list, select AVI video. 3. In the Camera to Export list, select the camera video you want to export. 4. Enter the time range you want to export. The time range is highlighted on the Timeline by black time range markers. You can also drag the time range markers to modify the time range. 5. Set the export image rate: Option Description Select this option to control how many images per second are exported. Export at __ image rate For example, the video is streaming at 30 images per second. If you select 1/2, only 15 images for that second will be exported. 39 Avigilon Control Center Player User Guide Export one image every __ min __sec Select this option to control the time between each exported video image. For example, if you enter 5 min. 0 sec., only one image will be exported every 5 minutes. 6. In the Encoder field, select the compression used. The VC-1 (Windows Media Video) compression is included by default because it is tailored for high-resolution AVI encoding. 7. In the Quality drop down list, select the exported image quality level. 8. In the Resolution field, select a resolution for the video image. You can manually enter the resolution or click the drop down arrow to select a standard resolution. Note: The Resolution field automatically maintains the image aspect ratio. For high resolution video (11MP or 16MP) the greatest resolution option will be less than the camera's actual resolution because most media players cannot play high resolution AVI files. 9. To automatically divide the export into separate files that can be stored on optical media (like a CD or DVD), select the Split file into sizes of: check box. Then, manually enter a maximum file size in MB or select a pre-configured option from the drop down list. 10. Click Change Image Region... to only export part of the video image. In the Change Image Region dialog box, move and resize the green overlay then click OK. Only areas highlighted in green are exported. 11. Select the Skips recording gaps check box to avoid pauses in the video caused by gaps in the recording. 12. Select the image overlays you want: Timestamp, Camera name, and Camera location. 13. Click Display Adjustments to adjust the gamma, black level and/or white level. 14. Click Start Export. 15. In the Save As dialog box, name the export file and click Save. The Preview area displays the video you are exporting. 16. When the export is complete, click OK. Exporting PNG, JPEG or TIFF Images Video can be exported as a set of still images in PNG, JPEG, or TIFF format. 1. Click 40 Export to open the Export tab. Export Figure A. Export tab for still image export 2. In the Format drop down list, select PNG Images, JPEG Images, or TIFF Images. 3. In the Camera to Export list, select the camera video you want to export. 4. Enter the time range you want to export. The time range is highlighted on the Timeline by black time range markers. You can also drag the time range markers to modify the time range. 5. Set the export image rate: Option Description Select this option to control how many images per second are exported. Export at __ image rate For example, the video is streaming at 30 images per second. If you select 1/2, only 15 images for that second will be exported. 41 Avigilon Control Center Player User Guide Export one image every __ min __sec Select this option to control the time between each exported video image. For example, if you enter 5 min. 0 sec., only one image will be exported every 5 minutes. 6. Select the Export at most __ images check box and enter a number to limit the amount of images that are exported. 7. (JPEG only) In the Quality drop down list, select the exported image quality level. 8. In the Resolution field, select a resolution for the video image. You can manually enter the resolution or click the drop down arrow to select a standard resolution. Note: The Resolution field automatically maintains the image aspect ratio. 9. Click Change Image Region... to only export part of the video image. In the Change Image Region dialog box, move and resize the green overlay then click OK. Only areas highlighted in green are exported. 10. Select the image overlays you want: Timestamp, Camera name, and Camera location. 11. Click Display Adjustments to adjust the gamma, black level and/or white level. 12. Click Start Export. 13. In the Save As dialog box, name the export file and click Save. The Preview area displays the video you are exporting. 14. When the export is complete, click OK. Exporting PDF and Print Images Video can be exported as still images for printing or in PDF format. 1. Click 42 Export to open the Export tab. Export Figure A. Export tab for still image export 2. In the Format drop down list, select Print Image or PDF File. 3. In the Camera to Export list, select the camera video you want to export. 4. In the Time field, enter the exact date and time of the video image you want to export. 5. Click Change Image Region... to only export part of the video image. In the Change Image Region dialog box, move and resize the green overlay then click OK. Only areas highlighted in green are exported. 6. (Print Image only) Click Print Settings to change the printer and paper size that the image is printed on. 7. Select the image overlays you want: Timestamp, Camera name, and Camera location. 8. Click Add Export Notes to add notes about the exported image. The notes are added below the image. 43 Avigilon Control Center Player User Guide 9. Click Display Adjustments to adjust the gamma, black level and/or white level. 10. Click Start Export. 11. In the Save As dialog box, name the export file and click Save. The Preview area displays the video you are exporting. 12. When the export is complete, click OK. Exporting WAV Audio If a video contains audio, the audio is exported with the video. If required, you can choose to only export the audio file. 1. Click 44 Export to open the Export tab. Export Figure A. Export tab for audio export 2. In the Format drop down list, select WAV. 3. In the Camera to Export list, select the camera video you want to export. 4. Enter the time range you want to export. The time range is highlighted on the Timeline by black time range markers. You can also drag the time range markers to modify the time range. 5. Click Start Export. 6. In the Save As dialog box, name the export file and click Save. The Preview area displays the video linked with the audio you are exporting. 7. When the export is complete, click OK. 45